Hot Chocolate Cookies Cozy and Delicious Treats

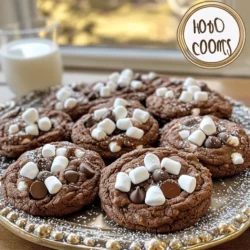
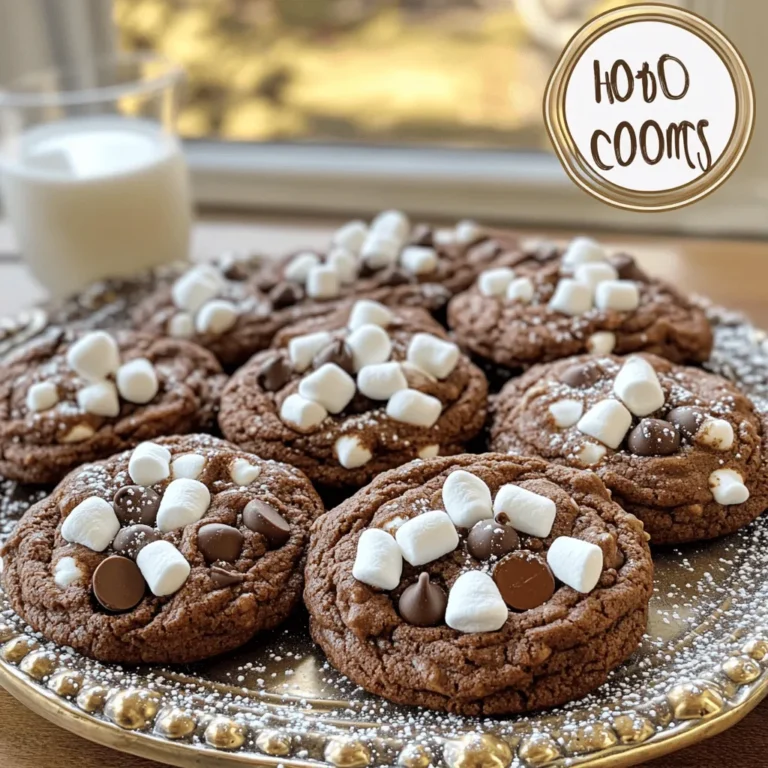
There’s nothing like a warm, gooey hot chocolate cookie to make your day better! In this post, I’ll share my favorite recipe for these cozy treats that melt in your mouth. You’ll learn the essential ingredients, step-by-step instructions, and even some fun variations to try. Whether you’re a newbie baker or a pro, I guarantee these cookies will bring joy to your kitchen. Let’s get baking!

Ingredients

Essential Ingredients for Hot Chocolate Cookies

To make hot chocolate cookies, gather these key ingredients:

– 1 cup unsweetened cocoa powder

– 2 cups all-purpose flour

– 1 teaspoon baking soda

– 1/2 teaspoon salt

– 1 cup unsalted butter, softened

– 1 cup granulated sugar

– 1 cup packed brown sugar

– 2 large eggs, at room temperature

– 2 teaspoons pure vanilla extract

– 1 cup milk chocolate chips

– 1 cup mini marshmallows

Each ingredient plays a vital role. The cocoa powder brings rich chocolate flavor. The butter adds moisture. The sugars provide sweetness and help with texture. Eggs bind everything together.

Baking Supplies Needed

You will need some basic tools to bake these cookies:

– Mixing bowls

– Electric mixer

– Measuring cups and spoons

– Rubber spatula

– Cookie scoop or tablespoon

– Baking sheet

– Parchment paper

– Wire rack

Having these supplies ready makes the baking process smooth and fun.

Optional Add-ins for Extra Flavor

Want to make your cookies even better? Here are some fun add-ins:

– Chopped nuts for crunch

– Different types of chocolate chips, like dark or white

– Peppermint pieces for a festive touch

– A sprinkle of cinnamon for warmth

These add-ins can elevate your hot chocolate cookies, making them truly unique. With the right mix, you can create a delicious twist that fits your taste! For the full recipe, check the details provided earlier.

Step-by-Step Instructions

Preparation Steps for Hot Chocolate Cookies

First, preheat your oven to 350°F (175°C). This step is key for baking. While the oven heats, line a baking sheet with parchment paper. This prevents the cookies from sticking. Next, sift together the unsweetened cocoa powder, all-purpose flour, baking soda, and salt in a medium bowl. Sifting helps mix the dry ingredients well. Set this mix aside for later.

Mixing the Dough

In a large bowl, cream the softened unsalted butter with the granulated and brown sugars. Use an electric mixer for a light, fluffy mix. This usually takes about 2-3 minutes. Add the eggs one at a time, mixing well after each. Pour in the pure vanilla extract and mix until combined.

Now, slowly add the dry mix to the wet mix. Stir gently with a spatula or wooden spoon. Be careful not to overmix, as this can make the cookies tough. Once combined, fold in the milk chocolate chips and mini marshmallows. This adds a sweet surprise in each bite.

Baking Time and Temperature Guidelines

Using a cookie scoop or tablespoon, drop rounded balls of dough onto your prepared baking sheet. Place them about 2 inches apart. This gives them space to spread. Bake the cookies for 10-12 minutes. The edges will set, but the centers should look soft. They will firm up as they cool.

After baking, let the cookies cool on the sheet for about 5 minutes. Then, move them to a wire rack to cool completely. Enjoy the cozy aroma of hot chocolate cookies filling your kitchen! You can find the full recipe above.

Tips & Tricks

How to Achieve the Perfect Cookie Texture

To get the best cookie texture, focus on a few key steps. First, use room temperature ingredients. This helps the butter mix well, giving your cookies a nice rise. Second, don’t overmix the dough. Mix until just combined to keep the cookies soft. Lastly, let the dough rest for about 30 minutes before baking. This helps the flavors meld and improves texture.

Common Mistakes to Avoid

Many home bakers make simple mistakes. One common error is not measuring ingredients correctly. Use a kitchen scale for best results. Another mistake is baking at the wrong temperature. Always preheat your oven to 350°F (175°C). Lastly, avoid overbaking. The cookies should look slightly soft in the center when you take them out. They will firm up as they cool.

Essential Baking Equipment for Success

Having the right tools makes baking easier. Here’s a list of must-haves:

– Mixing bowls

– Measuring cups and spoons

– Electric mixer

– Baking sheets

– Parchment paper

– Cookie scoop or tablespoon

– Wire rack for cooling

These tools will help you create the best hot chocolate cookies. For the full recipe, check back to see how to bring these tips to life!

Variations

Gluten-Free Hot Chocolate Cookie Recipe

To make gluten-free hot chocolate cookies, swap the all-purpose flour for a gluten-free blend. Look for blends that contain xanthan gum, as this helps with texture. You can use the same measurement, two cups, as the gluten-free flour should mimic regular flour. Follow the full recipe steps, and enjoy chewy, rich cookies without gluten.

Vegan Version of Hot Chocolate Cookies

For a vegan twist, replace the eggs with flax eggs. Mix one tablespoon of ground flaxseed with three tablespoons of water. Let it sit for five minutes until it thickens. Use vegan butter in place of unsalted butter. Choose dairy-free chocolate chips and mini marshmallows for a fully plant-based treat. This version still has all the cozy flavors you love.

Seasonal Variations for Different Occasions

You can switch up the flavors to match the seasons. For fall, add a teaspoon of pumpkin spice to the dough. During winter, mix in peppermint extract and crushed candy canes. In summer, try adding orange zest for a citrusy twist. Each change gives a new spin while keeping that classic hot chocolate taste. Enjoy the fun of baking these delightful cookies year-round!

Storage Info

Best Practices for Storing Cookies

To keep your hot chocolate cookies fresh, store them in an airtight container. This method helps maintain their soft texture and rich flavor. Layer parchment paper between cookies to prevent sticking. Keep them at room temperature for the best results. Avoid placing cookies in the fridge, as it can dry them out.

How to Freeze Hot Chocolate Cookies

Freezing cookies is simple. Let the cookies cool completely after baking. Place them in a single layer on a baking sheet. Freeze them for about an hour. Once frozen, transfer them to a freezer-safe bag. They can last up to three months in the freezer. When you’re ready to enjoy, just thaw at room temperature or reheat in the oven.

Shelf Life of Baked Cookies

Baked hot chocolate cookies stay fresh for about one week. If stored properly, they remain soft and tasty. After that, they may lose their charm but still be safe to eat. Keep an eye on any signs of spoilage, like unusual smells or textures. For the best experience, enjoy them while they are fresh! If you want the full recipe, check out the full recipe above.

FAQs

Can I use different types of chocolate chips?

Yes, you can mix and match chocolate chips. Dark chocolate chips add a rich flavor. White chocolate chips give a sweet contrast. Try peanut butter chips for a fun twist. Just make sure to keep the total amount close to one cup. This way, your cookies stay balanced and tasty.

What is the best way to prevent cookies from spreading?

To stop cookies from spreading, chill your dough for 30 minutes. This firms up the butter. You can also use parchment paper on your baking sheet. It helps cookies keep their shape. Another tip is to use a little more flour. Just a few extra tablespoons can work wonders.

How do I know when my cookies are done baking?

Check your cookies after 10 minutes. The edges should be firm, while the centers look soft. They will continue to cook after you take them out. If the edges are slightly cracked, they are perfect. Trust your instincts; if they look good, they probably are. Enjoy your cozy and delicious treats!

You now have all you need to make delicious hot chocolate cookies. We covered the key ingredients, the baking steps, and useful tips. You learned how to achieve the perfect texture and avoid common mistakes. Plus, I shared variations for gluten-free and vegan diets. Remember to store your cookies well for the best taste. Baking can be fun and rewarding. Enjoy baking these treats for yourself or loved ones!

To make hot chocolate cookies, gather these key ingredients: - 1 cup unsweetened cocoa powder - 2 cups all-purpose flour - 1 teaspoon baking soda - 1/2 teaspoon salt - 1 cup unsalted butter, softened - 1 cup granulated sugar - 1 cup packed brown sugar - 2 large eggs, at room temperature - 2 teaspoons pure vanilla extract - 1 cup milk chocolate chips - 1 cup mini marshmallows Each ingredient plays a vital role. The cocoa powder brings rich chocolate flavor. The butter adds moisture. The sugars provide sweetness and help with texture. Eggs bind everything together. You will need some basic tools to bake these cookies: - Mixing bowls - Electric mixer - Measuring cups and spoons - Rubber spatula - Cookie scoop or tablespoon - Baking sheet - Parchment paper - Wire rack Having these supplies ready makes the baking process smooth and fun. Want to make your cookies even better? Here are some fun add-ins: - Chopped nuts for crunch - Different types of chocolate chips, like dark or white - Peppermint pieces for a festive touch - A sprinkle of cinnamon for warmth These add-ins can elevate your hot chocolate cookies, making them truly unique. With the right mix, you can create a delicious twist that fits your taste! For the full recipe, check the details provided earlier. First, preheat your oven to 350°F (175°C). This step is key for baking. While the oven heats, line a baking sheet with parchment paper. This prevents the cookies from sticking. Next, sift together the unsweetened cocoa powder, all-purpose flour, baking soda, and salt in a medium bowl. Sifting helps mix the dry ingredients well. Set this mix aside for later. In a large bowl, cream the softened unsalted butter with the granulated and brown sugars. Use an electric mixer for a light, fluffy mix. This usually takes about 2-3 minutes. Add the eggs one at a time, mixing well after each. Pour in the pure vanilla extract and mix until combined. Now, slowly add the dry mix to the wet mix. Stir gently with a spatula or wooden spoon. Be careful not to overmix, as this can make the cookies tough. Once combined, fold in the milk chocolate chips and mini marshmallows. This adds a sweet surprise in each bite. Using a cookie scoop or tablespoon, drop rounded balls of dough onto your prepared baking sheet. Place them about 2 inches apart. This gives them space to spread. Bake the cookies for 10-12 minutes. The edges will set, but the centers should look soft. They will firm up as they cool. After baking, let the cookies cool on the sheet for about 5 minutes. Then, move them to a wire rack to cool completely. Enjoy the cozy aroma of hot chocolate cookies filling your kitchen! You can find the full recipe above. To get the best cookie texture, focus on a few key steps. First, use room temperature ingredients. This helps the butter mix well, giving your cookies a nice rise. Second, don't overmix the dough. Mix until just combined to keep the cookies soft. Lastly, let the dough rest for about 30 minutes before baking. This helps the flavors meld and improves texture. Many home bakers make simple mistakes. One common error is not measuring ingredients correctly. Use a kitchen scale for best results. Another mistake is baking at the wrong temperature. Always preheat your oven to 350°F (175°C). Lastly, avoid overbaking. The cookies should look slightly soft in the center when you take them out. They will firm up as they cool. Having the right tools makes baking easier. Here’s a list of must-haves: - Mixing bowls - Measuring cups and spoons - Electric mixer - Baking sheets - Parchment paper - Cookie scoop or tablespoon - Wire rack for cooling These tools will help you create the best hot chocolate cookies. For the full recipe, check back to see how to bring these tips to life! {{image_4}} To make gluten-free hot chocolate cookies, swap the all-purpose flour for a gluten-free blend. Look for blends that contain xanthan gum, as this helps with texture. You can use the same measurement, two cups, as the gluten-free flour should mimic regular flour. Follow the full recipe steps, and enjoy chewy, rich cookies without gluten. For a vegan twist, replace the eggs with flax eggs. Mix one tablespoon of ground flaxseed with three tablespoons of water. Let it sit for five minutes until it thickens. Use vegan butter in place of unsalted butter. Choose dairy-free chocolate chips and mini marshmallows for a fully plant-based treat. This version still has all the cozy flavors you love. You can switch up the flavors to match the seasons. For fall, add a teaspoon of pumpkin spice to the dough. During winter, mix in peppermint extract and crushed candy canes. In summer, try adding orange zest for a citrusy twist. Each change gives a new spin while keeping that classic hot chocolate taste. Enjoy the fun of baking these delightful cookies year-round! To keep your hot chocolate cookies fresh, store them in an airtight container. This method helps maintain their soft texture and rich flavor. Layer parchment paper between cookies to prevent sticking. Keep them at room temperature for the best results. Avoid placing cookies in the fridge, as it can dry them out. Freezing cookies is simple. Let the cookies cool completely after baking. Place them in a single layer on a baking sheet. Freeze them for about an hour. Once frozen, transfer them to a freezer-safe bag. They can last up to three months in the freezer. When you're ready to enjoy, just thaw at room temperature or reheat in the oven. Baked hot chocolate cookies stay fresh for about one week. If stored properly, they remain soft and tasty. After that, they may lose their charm but still be safe to eat. Keep an eye on any signs of spoilage, like unusual smells or textures. For the best experience, enjoy them while they are fresh! If you want the full recipe, check out the full recipe above. Yes, you can mix and match chocolate chips. Dark chocolate chips add a rich flavor. White chocolate chips give a sweet contrast. Try peanut butter chips for a fun twist. Just make sure to keep the total amount close to one cup. This way, your cookies stay balanced and tasty. To stop cookies from spreading, chill your dough for 30 minutes. This firms up the butter. You can also use parchment paper on your baking sheet. It helps cookies keep their shape. Another tip is to use a little more flour. Just a few extra tablespoons can work wonders. Check your cookies after 10 minutes. The edges should be firm, while the centers look soft. They will continue to cook after you take them out. If the edges are slightly cracked, they are perfect. Trust your instincts; if they look good, they probably are. Enjoy your cozy and delicious treats! You now have all you need to make delicious hot chocolate cookies. We covered the key ingredients, the baking steps, and useful tips. You learned how to achieve the perfect texture and avoid common mistakes. Plus, I shared variations for gluten-free and vegan diets. Remember to store your cookies well for the best taste. Baking can be fun and rewarding. Enjoy baking these treats for yourself or loved ones!

Hot Chocolate Cookies

Warm up your day with the ultimate comfort treat: hot chocolate cookies! This easy recipe guides you through creating gooey, rich cookies that melt in your mouth. Learn about essential ingredients, handy tips for perfect texture, and creative variations to suit every taste. Whether you're new to baking or a seasoned pro, these cookies will bring joy to your kitchen. Click through to discover the recipe and start baking your cozy deliciousness today!

Ingredients
  

1 cup unsweetened cocoa powder

2 cups all-purpose flour

1 teaspoon baking soda

1/2 teaspoon salt

1 cup unsalted butter, softened at room temperature

1 cup granulated sugar

1 cup packed brown sugar

2 large eggs, at room temperature

2 teaspoons pure vanilla extract

1 cup milk chocolate chips

1 cup mini marshmallows

Instructions
 

Begin by preheating your oven to 350°F (175°C). Prepare a baking sheet by lining it with parchment paper to prevent sticking.

    In a medium-sized mixing bowl, sift together the unsweetened cocoa powder, all-purpose flour, baking soda, and salt. This helps combine the ingredients and aerate the dry mix, setting it aside for later use.

      In a large mixing bowl, use an electric mixer to cream the softened unsalted butter along with the granulated sugar and packed brown sugar. Beat until the mixture is light and fluffy, which usually takes about 2-3 minutes.

        Add the eggs to the butter-sugar mixture one at a time, mixing well after each addition until thoroughly incorporated. Then, pour in the pure vanilla extract and mix until combined.

          Slowly incorporate the dry ingredients into the wet mixture, stirring gently with a spatula or wooden spoon until just combined. Be careful not to overmix, as this can result in tougher cookies.

            Carefully fold in the milk chocolate chips and mini marshmallows, ensuring that they are evenly distributed throughout the cookie dough for a delightful surprise in every bite.

              Using a cookie scoop or a tablespoon, drop rounded balls of dough onto your prepared baking sheet, placing them about 2 inches apart to allow for spreading.

                Bake in the preheated oven for 10-12 minutes. The cookies are done when the edges are set, but the centers should look slightly soft – they will continue to firm up as they cool.

                  Once baked, remove the cookies from the oven and allow them to cool on the baking sheet for about 5 minutes. After that, use a spatula to transfer them to a wire rack to cool completely.

                    Prep Time: 20 minutes | Total Time: 32 minutes | Servings: Approximately 24 cookies

                      - Presentation Tips: For an enticing presentation, arrange the cookies on a decorative platter. Dust them lightly with powdered sugar for a snow-like effect. Pair the cookies with warm milk or a cozy cup of hot chocolate for an unforgettable treat experience!

                        Leave a Comment

                        Recipe Rating