Are you ready to discover a simple and tasty way to make Japanese Katsu bowls? In this guide, I’ll walk you through each step, from choosing the right ingredients to perfecting the frying technique. Whether you’re a beginner or a seasoned cook, you’ll find easy tips to create a delicious meal that’ll impress everyone at your table. Let’s dive in and make some crunchy, flavorful Katsu together!
Ingredients
Main Ingredients for Crunchy Chicken Katsu Bowl
To make a tasty Crunchy Chicken Katsu Bowl, you need the following main ingredients:
– 2 boneless, skinless chicken breasts
– 1 cup panko breadcrumbs
– 1/2 cup all-purpose flour
– 2 large eggs
– 1 tablespoon soy sauce
– 2 cups cooked sushi rice
– 1/4 cup tonkatsu sauce
– 1/4 cup mayonnaise (optional, for drizzling)
– 1 green onion, thinly sliced (for garnish)
– 1 cup finely shredded cabbage
– 1 small carrot, julienned
– Salt and freshly ground pepper to taste
– Oil suitable for frying
These ingredients create the crunchy and savory flavors you love in a katsu bowl.
Optional Ingredients and Customizations
Feel free to get creative with your katsu bowl! Here are some optional ingredients to enhance your dish:
– Sliced avocado for creaminess
– Pickled ginger for a tangy kick
– Sesame seeds for added crunch
– Extra veggies like bell peppers or radishes
– A drizzle of sriracha for heat
These customizations add fun flavors and textures to your bowl.
Tools and Equipment Needed
To prepare your katsu bowl, gather these essential tools:
– Meat mallet or rolling pin
– Three shallow bowls for breading
– Large frying pan or skillet
– Tongs for handling hot chicken
– Paper towels for draining excess oil
– Cooking thermometer for safety
Having the right tools makes cooking easier and more enjoyable.Enjoy making your katsu bowl!
Step-by-Step Instructions
Preparing the Chicken
Start by placing your chicken breasts between two sheets of plastic wrap. Use a meat mallet or rolling pin to gently pound them. Aim for an even thickness of about 1/2 inch. This helps the chicken cook evenly. Season both sides with salt and freshly ground pepper. This adds great flavor.
Setting Up the Breading Station
Next, create your breading station. You need three shallow bowls. In the first bowl, add the all-purpose flour. In the second bowl, beat the eggs and mix in the soy sauce. Pour the panko breadcrumbs into the third bowl. This setup makes the breading process easy and efficient.
Cooking the Chicken Katsu
Now, it’s time to bread the chicken. Take one chicken breast and dip it into the flour. Make sure to coat it well and shake off any extra flour. Then, dip it into the egg wash, letting any excess drip off. Finally, coat it with panko breadcrumbs. Press gently to help them stick. Repeat this for the second chicken breast.
Heat oil in a large frying pan. You want about 1/2 inch deep of oil. Warm it over medium heat. To check if the oil is ready, drop in a small piece of breadcrumb. If it bubbles right away, you’re good to go. Carefully lower the breaded chicken into the hot oil. Fry each side for about 4-5 minutes. Look for a deep golden brown color. Use a meat thermometer to check for doneness; it should read 165°F (75°C).
Assembling the Bowl
Once the chicken is done, remove it with tongs and place it on a paper towel-lined plate. This helps drain excess oil. Let it rest for a few minutes before slicing into strips.
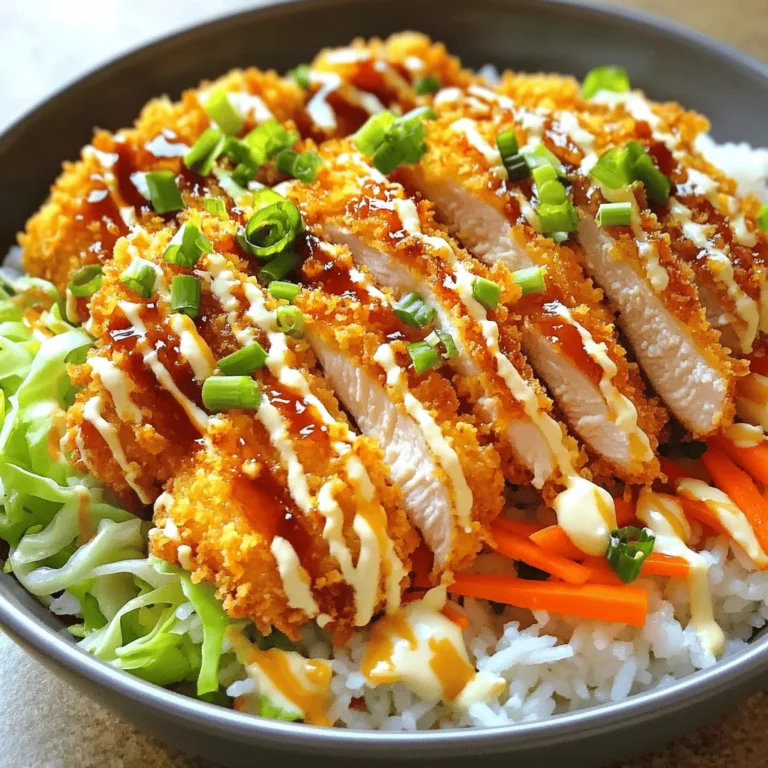
To assemble the bowl, start with a base of cooked sushi rice in each serving bowl. Layer the sliced chicken katsu on top. Add a heap of shredded cabbage and a sprinkle of julienned carrots. Drizzle with tonkatsu sauce and, if you like, a swirl of mayonnaise for extra creaminess. Don’t forget to garnish with sliced green onions to add a fresh touch.
Enjoy your crunchy chicken katsu bowl!
Tips & Tricks
Perfecting the Frying Technique
The right oil temperature is key for great katsu. Heat your oil until it shimmers. A good test is dropping a breadcrumb in the oil. If it bubbles right away, you’re ready to fry. Fry the chicken in batches if your pan is small. This prevents crowding and keeps the heat steady. Flip the chicken gently to avoid splattering. If your katsu browns too fast, lower the heat. Always check that the chicken reaches 165°F in the center. This ensures it’s safe and juicy.
Presentation Tips for an Attractive Bowl
A beautiful bowl makes the meal more fun. Start with a colorful bowl to catch the eye. Layer your ingredients for a nice look. Place the rice at the bottom, then the chicken on top. Add a mound of shredded cabbage and julienned carrots. Drizzle the tonkatsu sauce in a zigzag pattern for flair. Finish with sliced green onions for freshness and a pop of color. A sprinkle of sesame seeds can also add a nice touch.
Flavor Enhancements and Seasoning
To boost flavor, season your flour with salt and pepper. You can add garlic powder or paprika for extra taste. Try marinating the chicken in soy sauce for a few hours. This adds depth to the dish. For a spicy kick, mix some sriracha into your mayo. Don’t forget to taste your sauces. Adjust them to your liking by adding more sweetness or tang. Each tweak makes your katsu bowl unique and tailored to your taste.

Variations
Chicken Katsu vs. Pork Katsu
You can choose between chicken or pork for your katsu bowl. Chicken katsu is light and juicy, while pork katsu is rich and hearty. Both options use the same breading method. Just swap chicken with pork. You will still enjoy that crunchy texture and flavor. The choice depends on your taste and mood.
Vegetarian Alternatives with Tofu
If you prefer a vegetarian option, use tofu. Tofu katsu is tasty and filling. To make it, press the tofu to remove extra water. Slice it into even pieces, like chicken. Coat it with flour, egg wash, and panko just like you would with chicken. Fry it until golden brown, and enjoy a delicious, meat-free meal.
Seasonal Vegetable Additions
Adding seasonal vegetables can boost flavor and nutrition. Consider using carrots, zucchini, or bell peppers. You can sauté or steam them lightly before adding to your bowl. This way, you get a colorful and vibrant dish. Plus, it’s a great way to use up leftovers from your fridge.
Storage Info
How to Store Leftover Katsu
To keep your leftover katsu fresh, let it cool first. Place it in an airtight container. Make sure to separate the chicken from the rice and veggies. This keeps everything crisp. Store the chicken katsu in the fridge for up to three days.
Reheating Instructions
When you are ready to eat, you can reheat the katsu. Preheat your oven to 350°F (175°C). Place the chicken on a baking tray. Heat for about 10 to 15 minutes. This will make the katsu crunchy again. You can also use a microwave, but the texture may not be as good.
Freezing the Dish for Later
If you want to freeze katsu, wrap it well in plastic wrap. Then, place it in a freezer bag. This helps prevent freezer burn. You can freeze it for up to three months. When you want to eat it, thaw it in the fridge overnight before reheating.
FAQs
What is a traditional Japanese Katsu Bowl?
A traditional Japanese Katsu Bowl features crispy fried meat, often chicken or pork. It sits on a bed of sushi rice. The dish also includes fresh veggies like cabbage and carrots. It usually gets a drizzle of tonkatsu sauce. This sauce is savory and slightly sweet. It brings all the flavors together in a tasty way.
How can I make Katsu gluten-free?
To make Katsu gluten-free, swap regular flour for gluten-free flour. Use gluten-free panko breadcrumbs instead of regular ones. These swaps keep the crunch while making it safe for those with gluten allergies. Always check labels to ensure all ingredients are gluten-free.
What sauces pair well with Katsu?
Tonkatsu sauce is the classic choice for Katsu. It adds a rich flavor that complements the dish. You can also try barbecue sauce for a smoky twist. Some people enjoy a drizzle of spicy mayo for a kick. Experiment with different sauces to find your favorite.
Can I prepare this dish in advance?
Yes, you can prepare parts of this dish in advance. You can make the Katsu and store it in the fridge. Just reheat it in the oven to keep it crispy. Cook the rice ahead of time, too. Assemble the bowl right before serving for the best taste.
Where can I find Katsu ingredients?
You can find Katsu ingredients at most grocery stores. Look for panko breadcrumbs in the Asian food aisle. Sushi rice is often in the rice section. If you can’t find something, check local Asian markets. They usually have everything you need for an authentic Katsu Bowl.
I covered how to make a tasty Chicken Katsu Bowl. You learned about ingredients, tools, and cooking steps. I also shared tips to perfect your dish, explore variations, and store leftovers.
In the end, you can create a bowl that suits your taste. Enjoy your cooking adventure, and don’t be afraid to try new things!

