Skip to content
DisclaimerTerms Of UseGDPR PolicyCookie Policy

eataroundit

  • Home
  • Drinks
  • Appetizers
  • Dinner
  • Dessert
  • About
  • Contact
  • Privacy Policy
DisclaimerTerms Of UseGDPR PolicyCookie Policy

Hannah

- 1 cup unsalted butter, softened to room temperature - 1 cup packed brown sugar - 1/2 cup granulated sugar - 2 large eggs, at room temperature - 1 teaspoon pure vanilla extract - 2 cups all-purpose flour - 1/2 teaspoon baking soda - 1/2 teaspoon fine sea salt - 1 cup semi-sweet chocolate chips - 1 cup milk chocolate chips - 1/2 cup white chocolate chips Gathering the right ingredients is key. Each one plays a role in making the cookies rich and tasty. The butter gives a creamy base. The sugars add sweetness and help with texture. Eggs help bind everything together. Flour is the main structure. Baking soda makes them rise, while salt enhances flavor. If you want vegan cookies, swap butter for coconut oil and use flax eggs. For gluten-free cookies, try almond flour or a gluten-free blend. You can also switch the types of chocolate chips. Dark chocolate or even caramel chips can give a fun twist. To make these cookies, you’ll need some tools. Grab mixing bowls for combining ingredients. An electric mixer makes it easy to cream the butter and sugars. Baking sheets lined with parchment paper help with easy cleanup. A cookie scoop or tablespoon is great for portioning the dough evenly. For the complete recipe, check out the Full Recipe for Triple Chocolate Chip Cookies Delight. 1. Preheat the oven to 350°F (175°C). 2. Prepare the baking sheets with parchment paper. 1. In a large bowl, cream the softened butter with brown sugar and granulated sugar. Mix on medium speed until it’s fluffy, about 2-3 minutes. 2. Add the eggs, one at a time. Mix well after each egg. Then stir in the vanilla extract. 3. In another bowl, sift together the flour, baking soda, and salt. Slowly add this dry mix to the wet ingredients. Mix until just combined. Avoid overmixing. 4. Gently fold in the semi-sweet, milk, and white chocolate chips. Make sure they are evenly spread throughout the dough. 1. Use a spoon or cookie scoop to drop rounded tablespoons of dough onto the prepared baking sheet. Leave about 2 inches between each dollop. 2. Bake in the preheated oven for 10-12 minutes. The edges should be golden, while the centers stay soft. 3. Once baked, let the cookies cool on the sheet for about 5 minutes. This helps them firm up. Then, transfer them to a wire rack to cool completely. To make the best triple chocolate chip cookies, focus on texture. Use softened butter. It helps create a creamy mix. This makes your cookies soft and chewy. Remember to measure your flour correctly. Too much flour makes cookies dry. I like to spoon the flour into the measuring cup and level it off. This gives me the right amount. For even baking, place the cookies on the center rack. This allows air to flow around them. Rotate the baking sheet halfway through. This helps them cook evenly. Keep an eye on the edges. They should be golden but not too dark. Resting time is key. After baking, let the cookies sit on the sheet for five minutes. This helps them firm up. Then move them to a wire rack. This cooling step keeps them from becoming hard. You can enhance the flavors of your cookies in fun ways. Try adding nuts like walnuts or pecans. They give a nice crunch and pair well with chocolate. You can also mix in other chocolate types. Dark chocolate adds a rich flavor, while white chocolate brings sweetness. For a twist, add a teaspoon of instant coffee. It deepens the chocolate flavor. You can also use orange zest for a fresh touch. Just a little zest can brighten the cookies. To serve cookies in style, use a decorative platter. Stack the cookies high for a fun look. A light dusting of cocoa powder makes them fancy. For a decadent touch, drizzle melted chocolate over the top. It adds flair and extra flavor. To keep cookies fresh, store them in an airtight container. Layer them between pieces of parchment paper. This keeps them from sticking together. If you want them to last longer, freeze them. Just thaw them at room temperature when you’re ready to enjoy. {{image_4}} You can mix things up with different chocolate types. Using dark chocolate gives a rich taste. It adds depth to each bite. You can also try specialty chocolates. For example, sea salt dark chocolate offers a sweet-salty twist. Another fun option is the white chocolate macadamia version. Swap some chocolate chips with macadamia nuts. This makes the cookie extra crunchy and creamy. The white chocolate’s sweetness pairs well with the nuts. Adding seasonal flavors can make your cookies special. For the holidays, try adding peppermint. You can use peppermint extract or crushed candy canes. This gives a festive, minty flavor that many love. In fall, you might want to incorporate spices. A pinch of cinnamon adds warmth. Nutmeg or ginger can work too, bringing a cozy feel to your cookies. These spices make your cookies perfect for chilly days. You can also transform the cookie recipe into cookie bars. To do this, spread the dough in a baking dish. Make sure to press it evenly. This change makes cutting and serving a breeze. Adjust the baking time to about 20-25 minutes. Keep an eye on it. You want the edges golden, not too dark. Once cooled, cut them into squares for easy serving. For more details, check the Full Recipe. Enjoy experimenting with these variations! Store your cookies at room temperature. This keeps them soft and tasty. Use an airtight container to seal in freshness. You can layer the cookies with parchment paper. This method prevents them from sticking together. Keep the container in a cool place, away from sunlight. Want to keep cookies for later? Freezing is a great option. Place cookies in a single layer on a baking sheet. Freeze them for about an hour. Once firm, transfer them to a freezer bag. Remove as much air as possible before sealing. When ready to enjoy, just thaw them at room temperature. For a warm treat, reheat in the oven for a few minutes. How long do baked cookies last? Typically, they stay fresh for about a week. After that, they may dry out or lose flavor. Keep an eye out for signs they are past their prime. If they smell off or have a change in texture, it's time to toss them. To make the most of your cookie experience, store them right! For the full recipe, check out the details on making these cookies. Look for a few signs of perfectly baked cookies. The edges should be lightly golden brown. The centers will still look soft and slightly puffy. If your cookies crack a little, that’s a good sign. Remember, they will harden as they cool. Keep an eye on them during the last few minutes of baking. Yes, you can make the dough ahead of time. Store the dough in the fridge for up to 3 days. If you need a longer time, freeze the dough. Wrap it in plastic wrap and place it in a freezer bag. It can stay in the freezer for up to 3 months. When ready, just thaw it in the fridge overnight before baking. To soften butter quickly, cut it into small cubes. Place it in a bowl. Let it sit at room temperature for about 10 minutes. You can also use a microwave. Set it to low power and heat for about 5 seconds at a time. Be careful not to melt it; you only want it soft. For the detailed Full Recipe for "Triple Chocolate Chip Cookies Delight," check out the link. This blog post covered a delicious triple chocolate chip cookie recipe. You learned about key ingredients, substitution options, and crucial baking steps. I shared tips for perfect texture and flavor enhancements. You also discovered variations and storage advice to keep your cookies fresh. Enjoy baking these cookies and making them your own. With practice, you will create treats everyone loves. Happy baking!

Triple Chocolate Chip Cookies Irresistible Treat

Get ready to indulge in a cookie lover’s dream! Triple chocolate chip cookies are a rich and delicious treat that

- Whole chicken (4-5 lbs) - Unsalted butter (1/2 cup, softened) - Fresh garlic (5 cloves, finely minced) - Fresh rosemary (2 tablespoons, finely chopped) - Fresh thyme (2 tablespoons, finely chopped) - Fresh parsley (1 tablespoon, finely chopped) - Lemon zest (from 1 lemon) - Lemon (1, cut into quarters) - Onion (1 large, cut into quarters) - Carrots (4 medium, peeled and cut into large chunks) - Potatoes (4 medium, diced) When making Garlic Herb Butter Roasted Chicken, the right ingredients are key. Start with a whole chicken weighing between 4 to 5 pounds. This size ensures it roasts evenly and stays juicy. Next, you'll need half a cup of unsalted butter, softened to room temperature. This butter will carry all those lovely flavors. You’ll also require five cloves of fresh garlic, finely minced. Garlic adds a punch of flavor that complements the chicken beautifully. For herbs, fresh rosemary and thyme are essential. You need two tablespoons of each, finely chopped. They bring a wonderful aroma and taste to the dish. You’ll also want one tablespoon of fresh parsley, finely chopped, and the zest from one lemon. The lemon zest brightens the whole dish. Don’t forget the vegetables! Use one lemon, cut into quarters, and one large onion, also cut into quarters. Carrots and potatoes add heartiness. You need four medium carrots, peeled and cut into large chunks, and four medium potatoes, diced into bite-sized pieces. Together, these ingredients create a flavorful base for your chicken to roast on. Check out the Full Recipe for all the steps to create this delicious dish. 1. First, preheat your oven to 425°F (220°C). This hot temperature helps get a golden skin. 2. Next, make the garlic herb butter. In a bowl, mix: - 1/2 cup unsalted butter, softened - 5 cloves garlic, finely minced - 2 tablespoons fresh rosemary, finely chopped - 2 tablespoons fresh thyme, finely chopped - 1 tablespoon fresh parsley, finely chopped - Zest of 1 lemon - Salt and pepper to taste Use a fork to blend it all until smooth. 1. Rinse the whole chicken under cold water. Pat it dry with paper towels. This step helps the skin crisp up. 2. Now, loosen the skin over the breast and thighs. Gently slide your fingers under the skin, being careful not to tear it. 3. Take half of your garlic herb butter and spread it under the skin on the meat. Use the rest of the butter to coat the outside of the chicken. 4. Season the cavity inside with salt and pepper. Stuff it with quartered lemon and onion for added flavor. 1. Place the chicken breast side up in the center of a large roasting pan. Surround it with: - 4 medium carrots, cut into large chunks - 4 medium potatoes, diced Drizzle some olive oil over the veggies and season them with salt and pepper. 2. Transfer the roasting pan to your preheated oven. Roast for about 1 hour and 15 minutes. Check that the internal temperature reaches 165°F (75°C) in the thickest part of the chicken. The skin should look golden brown. 3. Halfway through, use a spoon to baste the chicken with pan juices. This keeps it moist. 4. Once done, carefully take the chicken out of the oven. Let it rest on a cutting board for 10-15 minutes. This helps keep the juices inside. For the complete cooking guide, check the Full Recipe. Drying the Chicken Thoroughly: Start by giving your chicken a good rinse. Then, dry it well with paper towels. This step is key. If the skin is wet, it won't get crispy. No moisture means crispy skin! Using High Heat during Cooking: Preheat your oven to 425°F (220°C). High heat helps the skin brown nicely. This temperature brings out the best flavor and texture. Your chicken will look golden and delicious when done. Basting the Chicken during Roasting: Halfway through cooking, use a spoon to baste your chicken. Pour some pan juices over it. This keeps the meat moist and adds flavor. It also gives the skin a nice shine. Allowing the Chicken to Rest After Cooking: Once your chicken is done, let it rest for 10-15 minutes. This step helps the juices settle. If you skip this, your chicken may dry out. Resting ensures each bite is juicy and tasty. Carving Techniques for Serving: When it’s time to carve, use a sharp knife. Start by removing the legs and thighs first. Then slice the breast meat. This method makes for a neat presentation. Plus, it helps each piece stay juicy. Enhancing the Dish with Fresh Herbs: Sprinkle fresh herbs like parsley on the carved chicken. This adds color and flavor. You can also add lemon wedges for a bright touch. Fresh herbs make your dish look fancy and inviting. For the complete recipe, check out the [Full Recipe]. {{image_4}} You can change the herbs for different flavors. If you want a fresh taste, try basil or dill. These herbs can add a unique twist. You can also mix different herbs together. This makes your chicken even more exciting. Adding spices can boost the flavor, too. For a kick, use paprika or cayenne pepper. These spices bring warmth to your dish. A little goes a long way, so start small. If you want a different way to cook, try a slow cooker. You can place the chicken in the slow cooker with the garlic herb butter. Cook it on low for 6-8 hours. This method keeps the chicken very tender. Grilling is a fun option for summer. You can marinate the chicken with the garlic herb butter. Grill it over medium heat for about 1.5 hours. This gives it a nice smoky flavor that everyone loves. For sides, you can add roasted vegetables. Carrots, zucchini, or bell peppers pair well with chicken. Simply toss them with olive oil and salt before roasting. Salads are also a great choice. A fresh green salad with lemon vinaigrette complements the meal. You can serve warm bread on the side to soak up the delicious juices. For the full recipe, visit the [Full Recipe] link. How should you store leftover chicken? After enjoying your garlic herb butter roasted chicken, let it cool a bit. Place the chicken in an airtight container. You can also wrap it tightly in plastic wrap. This helps keep it fresh for 3 to 4 days in the fridge. What are the best practices for storing roasted vegetables? Store any leftover vegetables in a separate airtight container. They stay fresh for about 3 to 5 days. Make sure they cool down first before sealing. This keeps them crisp and tasty. Can you freeze cooked chicken and vegetables? Yes! To freeze chicken, cut it into pieces for quicker thawing. Place the pieces in freezer bags. Squeeze out as much air as possible before sealing. You can also freeze the vegetables in freezer-safe bags. What are the thawing instructions for best quality? When you're ready to use frozen chicken, thaw it in the fridge overnight. This keeps the meat juicy. For veggies, you can microwave them for a quick thaw. This helps retain their texture. What are the best containers for storage? Use airtight containers for both chicken and veggies. Glass containers work great, but plastic ones are fine too. Just ensure they seal well to avoid freezer burn. What about labeling and dating for future use? Always label your containers with the date. This helps you keep track of how long food has been stored. Use a permanent marker or labels to write the name of the dish and the date. This way, you can enjoy your garlic herb butter roasted chicken at its best! How long does it take to roast a chicken? It takes about 1 hour and 15 minutes to roast a chicken at 425°F. Timing can vary based on the size of the bird. Always check for doneness to ensure perfect results. What temperature should the chicken internal temperature reach? The chicken should reach an internal temperature of 165°F. This ensures the meat is safe to eat and remains juicy. Can I use frozen chicken for this recipe? I do not recommend using frozen chicken. Thaw the chicken completely before roasting. This helps with even cooking. How do I know when my chicken is done? Use a meat thermometer to check the thickest part of the chicken. If it reads 165°F, it is done. You can also check if the juices run clear when pierced. What should I serve with garlic herb butter roasted chicken? I suggest serving roasted vegetables, mashed potatoes, or a fresh salad. These sides complement the chicken well. Can I use the leftovers in other recipes? Absolutely! Use leftover chicken in soups, salads, or sandwiches. It adds great flavor and saves time in the kitchen. In this post, we explored the key ingredients and steps for roasting a flavorful garlic herb butter chicken. We covered tips for ensuring crispy skin and variations to suit your taste. Remember, your chicken should rest after cooking for the best results. Don't forget that leftovers can be stored and used in many dishes. Enjoy the delicious meal you create, and share it with family and friends for a great experience!

Garlic Herb Butter Roasted Chicken Delight Recipe

Are you ready to impress? This Garlic Herb Butter Roasted Chicken recipe combines rich flavors and simple steps. I’ll show

- 1 lb boneless, skinless chicken breasts - 1/4 cup freshly squeezed lime juice - 1/4 cup fresh cilantro, finely chopped - 2 cloves garlic, finely minced - 1 teaspoon ground cumin - 1 teaspoon chili powder - Salt and black pepper to taste I love using boneless, skinless chicken breasts for this recipe. They cook fast and soak up flavors well. Fresh cilantro and lime juice are key to that zesty taste. The garlic adds a nice kick, while cumin and chili powder give depth. A pinch of salt and black pepper will bring it all together. - 1 cup shredded red cabbage - 1 ripe avocado, thinly sliced - 1/2 cup salsa (your choice of mild or spicy) For toppings, I enjoy using shredded red cabbage. It adds a nice crunch and vibrant color. Sliced avocado brings creaminess that balances the flavors. Salsa is a must; choose your favorite for a spicy or mild touch. - 8 small corn tortillas - Alternative tortilla types (flour, whole wheat) Corn tortillas are my go-to for these tacos. They're soft and have a great taste. If you prefer, you can use flour or whole wheat tortillas. Both options work well and can make your meal even more satisfying. For the full recipe, refer to the earlier section. To start, gather your marinade ingredients. You need fresh lime juice, chopped cilantro, minced garlic, ground cumin, chili powder, and some salt and black pepper. In a medium bowl, mix the lime juice, cilantro, garlic, cumin, and chili powder. Add a pinch of salt and pepper. Stir until combined. This blend gives the chicken a tasty kick. Next, add your chicken breasts to the bowl. Make sure each piece is well coated in the marinade. Cover the bowl with plastic wrap. Place it in the fridge for at least 30 minutes. For best flavor, let it marinate for 2 hours. When you’re ready to cook, preheat your grill or skillet to medium-high heat. Remove the chicken from the marinade, letting any extra drip off. Cook the chicken for about 6-7 minutes on each side. Use a meat thermometer to check the internal temperature. It should reach 165°F (75°C). The chicken should have a nice golden-brown color when done. After cooking, move the chicken to a cutting board. Let it rest for about 5 minutes. This helps keep the juices inside. Then, slice the chicken into thin strips. Now, warm your corn tortillas. You can do this on the grill or in a dry skillet. Heat them for about 30 seconds on each side. They should be soft and slightly charred. To build your tacos, start with a handful of shredded red cabbage on the tortilla. Next, add a portion of the sliced chicken on top. Layer on a few avocado slices. Finish with a drizzle of your favorite salsa. For a fresh touch, sprinkle extra chopped cilantro on top. This adds color and flavor to your tacos. Enjoy your delicious cilantro lime chicken tacos! For the complete recipe, check the Full Recipe section. For the best flavor, marinate the chicken for at least 30 minutes. However, two hours gives you the most taste. You can add more fun flavors to the marinade. Try adding a splash of orange juice for sweetness. A pinch of smoked paprika can give it a nice kick. To avoid dryness, do not overcook the chicken. Check that it reaches 165°F (75°C). Letting the chicken rest helps keep it juicy. For the tortillas, warm them over medium heat. This will give them a nice char and make them soft. These tacos pair well with black beans or corn salad. A light beer or fresh limeade can enhance the meal. To serve, try stacking chicken and toppings high. You can even make a taco bar for fun! Consider using crispy lettuce cups for a fresh twist. For a unique touch, sprinkle some queso fresco on top. Enjoy your cilantro lime chicken tacos! {{image_4}} You can change things up by using different proteins. Shrimp, pork, or tofu work great in these tacos. Each protein needs a bit of attention. For shrimp, cook for about 3-4 minutes until they turn pink. For pork, use thin slices and grill them for about 5-6 minutes per side. Tofu should be pressed and cooked for about 4-5 minutes on each side until golden brown. Want to add a twist? Try adding mango or pineapple for a sweet flavor boost. You can mix diced mango or pineapple into your salsa. It adds a nice contrast to the savory chicken. For spice lovers, add sliced jalapeños or chipotle to the marinade. These peppers give a smoky kick that pairs well with the lime and cilantro. Not in the mood for traditional tacos? Consider taco bowls instead. Use rice as a base and top with chicken, cabbage, and avocado. You can also make lettuce wraps for a low-carb option. Just replace the tortillas with large lettuce leaves. This keeps it fresh and crunchy. For more ideas, check out the Full Recipe for other fun ways to enjoy these flavors! To keep your cooked chicken fresh, place it in an airtight container. This helps lock in moisture and flavor. Store it in the fridge for up to four days. For tacos, wrap each one in foil to keep them crisp. Avoid stacking them to prevent sogginess. When reheating chicken, use a microwave or skillet. For the microwave, heat in short bursts to avoid overcooking. If using a skillet, add a splash of water to steam the chicken. Warm tortillas in a skillet for a few seconds per side. This will keep them soft and ready to fold. You can freeze marinated chicken for later meals. Place it in a freezer bag, removing as much air as possible. This keeps it fresh for up to three months. For prepared tacos, wrap each one in plastic wrap and then foil. This helps maintain taste and texture. Enjoy quick meals on busy days! You can find the full recipe linked earlier for detailed steps. If you dislike cilantro, you have options. Try parsley for a fresh taste. Basil adds a sweet flavor. Mint can bring a unique twist. Each herb gives a different vibe but works well in tacos. Yes, you can prep ahead. Marinate chicken earlier in the day. Cook and slice it when you’re ready. You can also warm tortillas just before serving. Prep toppings like cabbage and avocado in advance. Store them in airtight containers. To keep chicken juicy, don't overcook it. Use a meat thermometer; 165°F is perfect. Let the chicken rest after cooking. This helps the juices redistribute. Marinating adds flavor and moisture too. In this post, we covered how to make delicious cilantro lime chicken tacos. We discussed the main ingredients like chicken, spices, and fresh toppings. I shared step-by-step instructions for marinating and cooking the chicken. We also explored tips for perfecting your tacos with various fillings and storage methods. Remember, cooking is all about experimenting. Feel free to try different proteins and flavors. With these tips, enjoy making tasty tacos that everyone will love!

Cilantro Lime Chicken Tacos Easy and Flavorful Recipe

Are you ready to elevate your taco night? This easy and flavorful recipe for Cilantro Lime Chicken Tacos will impress

To make these delightful cranberry orange scones, you will need: - 2 cups all-purpose flour - 1/2 cup granulated sugar - 1 tablespoon baking powder - 1/2 teaspoon salt - 1/2 cup unsalted butter, cold and cubed - 1/2 cup dried cranberries - Zest of 1 large orange - 1/2 cup heavy cream - 1 large egg - 1 teaspoon vanilla extract - 1/2 cup powdered sugar (for glaze) - 1-2 tablespoons fresh orange juice (for glaze) These ingredients create a perfect balance of sweet and tart. Feel free to customize your scones! You can add: - Chopped nuts, like walnuts or pecans - White or dark chocolate chips - A pinch of cinnamon for warmth - Fresh herbs, like rosemary, for a twist These add-ins can elevate the flavor and texture. To prepare your scones, gather these tools: - Large mixing bowl - Whisk for dry ingredients - Pastry cutter or fingertips for butter - Spatula or wooden spoon for mixing - Sharp knife or bench scraper for cutting the dough - Baking sheet lined with parchment paper - Cooling rack for finished scones Having the right tools makes the process smooth and enjoyable. Start by preheating your oven to 400°F (200°C). This step is crucial for baking. A hot oven ensures the scones rise well and become fluffy. Line a baking sheet with parchment paper. This prevents the scones from sticking. In a large bowl, combine these dry ingredients: - 2 cups all-purpose flour - 1/2 cup granulated sugar - 1 tablespoon baking powder - 1/2 teaspoon salt Whisk them together until they are well mixed. This helps distribute the baking powder for even rising. Add 1/2 cup of cold, cubed butter to the dry mix. You can use a pastry cutter or your fingers. Work the butter in until it looks like coarse crumbs. Some pea-sized bits of butter should remain. These bits make the scones flaky. Now, stir in 1/2 cup of dried cranberries and the zest of 1 large orange. Make sure they are evenly spread in the mixture. The cranberries will give a burst of flavor, and the zest adds freshness. In a different bowl, whisk together these wet ingredients: - 1/2 cup heavy cream - 1 large egg - 1 teaspoon vanilla extract Mix them until smooth. This will create a rich flavor in your scones. Pour the wet mixture into the bowl with the dry ingredients. Gently stir with a spatula until just combined. The dough should be slightly sticky. Avoid overmixing. Turn the dough onto a floured surface. Pat it into a round disk about 1 inch thick. Cut it into 8 wedges. Place the wedges on your prepared baking sheet. Space them about 2 inches apart. Bake in the preheated oven for 15-20 minutes. They should be lightly golden brown. A toothpick inserted into the center should come out clean. While the scones cool, prepare the glaze. Mix 1/2 cup of powdered sugar with enough fresh orange juice. Stir until you have a smooth, pourable glaze. Adjust the juice to get your preferred thickness. Once the scones have cooled slightly, drizzle the glaze over the top. Let it cascade down the sides for a pretty look. This glaze adds sweetness and ties the flavors together. For the full recipe, check the details provided above. To get the best texture in your scones, use cold butter. This keeps the scones flaky. Cut the butter into small cubes and work it quickly into the flour. You want small lumps of butter to stay in the mix. These lumps create air pockets while baking, giving you that lovely rise. Mixing too much can lead to tough scones. When you combine the wet and dry ingredients, use a gentle touch. Stir until everything is just mixed. It’s okay if the dough looks a bit shaggy or uneven. Let it rest for a few minutes; it will come together as it bakes. For the glaze, mix powdered sugar with fresh orange juice until smooth. Adjust the juice to get the thickness you like. Drizzle it over warm scones for a nice melt. If you want, add extra zest to the glaze for more flavor. This adds a beautiful shine and a burst of orange taste. {{image_4}} If you don’t have dried cranberries, you can use other dried fruits. Chopped apricots or raisins work well. You can even try dried cherries for a nice twist. Each fruit brings a different flavor, so feel free to experiment. For a crunch, add nuts like walnuts or pecans. Just chop them up and mix them in with the cranberries. If you prefer something sweet, add chocolate chips. Dark chocolate pairs nicely with the orange flavor. Aim for about half a cup of nuts or chocolate. You can change the flavor of your scones by adding spices. A pinch of cinnamon gives warmth. Nutmeg adds a cozy touch as well. For a zing, try adding a little ginger. Just a dash goes a long way! This is a great way to create your own signature scone. For the full recipe, check back to make your kitchen a happy place! To keep your scones fresh, store them in an airtight container. If you plan to eat them within a few days, they can sit at room temperature. For longer storage, place them in the fridge. This will help maintain their softness and flavor. If you want to save some scones for later, freezing is a great option. Wrap each scone tightly in plastic wrap, then place them in a freezer bag. They will stay fresh for up to three months. When you're ready to enjoy them, simply take out what you need. To bring your scones back to life, preheat your oven to 350°F (175°C). Place the scones on a baking sheet and heat them for about 10 minutes. This will make them warm and soft again. You can also use a microwave for a quick fix, but they may not be as crisp. Enjoy your scones warm, and don’t forget to drizzle on some glaze! Cranberry orange scones stay fresh for about 2-3 days at room temperature. Keep them in an airtight container to maintain their softness. If you want them to last longer, refrigerate them for up to a week. They can also freeze well for up to three months. Yes, you can use fresh cranberries! They add a tart flavor and juicy texture. However, fresh cranberries are more sour than dried ones. You may want to increase the sugar in the recipe to balance the taste. These scones pair wonderfully with a cup of tea or coffee. You can also serve them with clotted cream or butter. A side of fresh fruit, like berries or orange slices, adds color and flavor. Absolutely! You can prepare the dough a day ahead. Wrap it tightly and store it in the fridge. When you’re ready to bake, let it sit for a few minutes before shaping and baking. Yes, you can make gluten-free scones. Use a gluten-free flour blend in place of all-purpose flour. Make sure the blend contains xanthan gum for the best texture. You can find the full recipe for cranberry orange scones in the recipe section above. Enjoy making these delightful treats! You learned about making delicious cranberry orange scones. We covered key ingredients, tools, and step-by-step instructions for baking. Tips helped you avoid common mistakes, while variations offered fun ideas. You also found important storage info and answered FAQs. Now, with this knowledge, you can bake scones that impress. Enjoy the process and make these tasty treats your own. Take your time, have fun, and share with friends! Happy baking!

Cranberry Orange Scones Fresh and Flavorful Recipe

Cranberry Orange Scones are a delicious treat to make for breakfast or tea. In this post, I’ll guide you through

- 8 oz rice noodles - 1 cup shredded carrots - 1 red bell pepper, thinly sliced - 1 cucumber, julienned - 1 cup fresh bean sprouts - 1/2 cup chopped fresh cilantro - 1/4 cup crushed peanuts (for garnish) - 1 lime, juiced - 2 tablespoons soy sauce - 1 tablespoon honey or agave syrup - 1 tablespoon sriracha or hot sauce - 1 teaspoon sesame oil You can swap rice noodles for other types like soba or udon. If you want to mix up the veggies, try adding bell peppers, zucchini, or even snap peas. For sweeteners, maple syrup or brown sugar works well. You can switch sesame oil for olive oil or avocado oil if needed. This flexibility makes the salad fun and unique! You can create flavors that suit your taste. Try using what you have on hand. Each choice can lead to a new favorite version of this dish. You can find the Full Recipe linked for easy access. Enjoy making your own sweet and spicy Thai noodle salad! To cook the rice noodles, follow the package directions. This helps you get an al dente texture. Al dente means the noodles are firm but not hard. It’s key for a great salad. After cooking, drain the noodles in a colander. Rinse them under cold water for a full minute. This stops the cooking and keeps them from getting mushy. Grab a large salad bowl. Add the shredded carrots, sliced red bell pepper, julienned cucumber, fresh bean sprouts, and chopped cilantro. Make sure to mix these fresh veggies well. Use a gentle tossing technique to avoid crushing them. This way, you keep each veggie crisp and bright. In a small bowl, mix the fresh lime juice, soy sauce, honey or agave syrup, sriracha, and sesame oil. Whisk it together until smooth. Taste the dressing; adjust the sweetness or heat. You can add more honey for sweetness or more sriracha for heat. This balance makes the flavor pop. Now, combine the cooled rice noodles with the mixed vegetables in your bowl. Drizzle the dressing over everything. Toss gently to coat all the ingredients evenly. Let the salad rest for about 10 minutes. This gives time for the flavors to meld and become wonderful. Just before serving, toss again to mix any settled bits. Sprinkle chopped peanuts on top for a crunchy finish. To make your Sweet and Spicy Thai Noodle Salad shine, serve it in a large bowl. This way, everyone can see the colorful layers of fresh veggies. You can also divide the salad into smaller plates for individual servings. To top it off, add sprigs of fresh cilantro and a lime wedge. This adds brightness and makes the dish look vibrant. One common mistake is overcooking the noodles. Keep a close eye on them to ensure they stay al dente. This keeps the salad light and prevents mushiness. Another mistake is skipping the resting period. Allowing the salad to sit for about 10 minutes helps the flavors blend together. This little wait makes a big difference in taste. Using fresh herbs like mint or basil can boost the aroma of your salad. They add a layer of freshness that brightens up each bite. You can also try adding spices like chili flakes or crushed garlic for extra zing. This lets you customize the heat level to your liking. Get creative with flavors and enjoy the process! For the complete recipe, check out the Full Recipe link. {{image_4}} You can make this salad even more satisfying by adding protein. Grilled chicken or shrimp works great. They add flavor and texture. Just toss them in with the salad before serving. If you prefer vegetarian options, try adding tofu or edamame. Both provide a nice protein boost without meat. If you need a gluten-free option, you can use gluten-free noodles. Rice noodles are often safe and taste great. Make sure to check the labels on sauces as well. Some soy sauces contain gluten, so you may want to use tamari instead. Adjust the ingredients to keep everything gluten-free. You can change this salad to fit the seasons. In spring, add fresh peas or radishes for a pop of color. In summer, include cherry tomatoes or bell peppers. For fall, roasted squash or sweet potatoes can add warmth. You can also adjust the dressing. In winter, a touch of ginger can add a nice kick. For the Full Recipe, check out the details on how to make this versatile dish. To keep your Sweet and Spicy Thai Noodle Salad fresh, use airtight containers. This keeps the salad crisp and flavorful. Store it in the fridge for up to three days. After that, the veggies may lose their crunch. If you want to eat leftovers, refresh the salad before serving. Add a splash of fresh lime juice to brighten the flavors. Toss it gently to mix. Avoid reheating in the microwave. This can make the noodles mushy. Instead, serve cold or at room temperature for the best taste. Sweet and Spicy Thai Noodle Salad lasts about three to five days in the fridge. Keep it in an airtight container. After a few days, the veggies may lose some crunch, but it still tastes great. Yes, you can make this salad ahead of time. Prepare it a few hours before serving or even a day in advance. Just remember to store it in the fridge. The flavors will blend nicely overnight. Serve this salad chilled. You can plate it in a large bowl for sharing or divide it into individual servings. Garnish with extra peanuts and cilantro for a nice touch. Absolutely! This salad is great for meal prep. You can portion it into containers for easy lunches or dinners. Just keep the dressing separate until you are ready to eat. Yes, you can use other types of noodles. Try soba or udon noodles for a different flavor. Rice noodles are traditional, but feel free to experiment with what you like. For the complete Sweet and Spicy Thai Noodle Salad recipe, visit [Full Recipe]. This blog post shared a simple way to make a tasty Sweet and Spicy Thai Noodle Salad. We covered the key ingredients, cooking steps, and tips for great flavor. Remember, you can swap out ingredients to fit your taste or diet. Avoid common mistakes like overcooking noodles and skipping resting time. This salad is fun to prepare and boasts fresh flavors. With the right storage, you can enjoy it for days. Dive into your kitchen and enjoy making this salad!

Sweet and Spicy Thai Noodle Salad Fresh and Flavorful

Looking for a dish that bursts with flavor? Sweet and Spicy Thai Noodle Salad is your answer! This vibrant salad

This salad shines with fresh produce. Here are the key elements: - 2 cups fresh broccoli florets - 1/4 cup green onions, finely chopped The broccoli brings a nice crunch. The green onions add a mild kick. You need some easy-to-find items for the dressing. Grab these: - 1/2 cup Greek yogurt - 2 tablespoons mayonnaise - 1 tablespoon apple cider vinegar - 1 teaspoon honey or maple syrup - Salt and pepper to taste The Greek yogurt keeps it creamy. The mayo adds richness. The vinegar gives a tangy note. Want to make it extra special? Consider these: - 1 cup sliced almonds, toasted - 1/4 cup dried cranberries The almonds add crunch and flavor. Dried cranberries give a sweet touch. You can mix and match as you like. For the complete steps to make this salad, check out the Full Recipe. To start, bring a pot of water to a boil. Add 2 cups of fresh broccoli florets. Blanch them for about 2-3 minutes. You want them to turn bright green and stay crisp. After blanching, quickly transfer the broccoli to a bowl of ice water. Leave it in the ice bath for about 5 minutes. This step stops the cooking and keeps the color. Once cooled, drain the broccoli and set it aside. In a large mixing bowl, combine 1/2 cup of Greek yogurt with 2 tablespoons of mayonnaise. Add 1 tablespoon of apple cider vinegar and 1 teaspoon of honey or maple syrup. Whisk these ingredients together until smooth. This dressing should be creamy and tangy. Taste it, then add salt and pepper to fit your taste. You can adjust the sweetness or tanginess by adding more honey or vinegar. Now, it's time to mix everything! Gently fold the cooled broccoli into the dressing. Next, add 1 cup of toasted sliced almonds for crunch. If you like, toss in 1/4 cup of dried cranberries for sweetness. Also, add 1/4 cup of finely chopped green onions for some fresh flavor. Make sure all the ingredients are well-coated in the creamy dressing. Cover the bowl and chill in the fridge for at least 30 minutes. This chill time helps the flavors blend. Serve it in a nice bowl, and enjoy a healthy, tasty meal! Check out the Full Recipe for detailed steps. To make a great dressing, use Greek yogurt as the base. Greek yogurt adds creaminess and tang. Mix it with mayonnaise for extra richness. Add apple cider vinegar for some zing. Sweeten it lightly with honey or maple syrup. This balance makes the dressing tasty and bright. Taste as you mix. Adjust salt and pepper to your liking. If you want more flavor, add a dash of lemon juice. Herbs can take your salad to the next level. Fresh herbs like dill or parsley add bright notes. You can also try basil for a sweet touch. Mix in chopped herbs right before serving for the best flavor. Just a handful of herbs can make the salad pop. If you want a bolder taste, sprinkle in some garlic powder or onion powder. Serve your salad in a clear bowl to show off the colors. This salad pairs well with grilled chicken or fish. It also works great as a side for sandwiches. If you want a crunch, add more toasted almonds on top. For a sweet twist, add extra dried cranberries. Chill the salad for at least 30 minutes before serving. This lets the flavors mix well. For the full recipe, check out the details above. {{image_4}} You can boost your salad with proteins. Cooked chicken, turkey, or tofu works well. Adding beans can also make it hearty. A half cup of cooked quinoa adds great texture. Just mix any of these in with the broccoli and almonds. They will make your meal more filling. Switching nuts can change the flavor. Try using walnuts or pecans instead of almonds. Sunflower seeds or pumpkin seeds can add crunch too. Each nut or seed brings its unique taste. Feel free to mix and match for your favorite combo. While the creamy dressing is tasty, you can try new flavors. Use tahini for a nutty twist. A lemon vinaigrette gives a fresh zing. Or, blend avocado for a creamy, plant-based option. Each dressing will give the salad a new vibe. Explore these options to find your favorite. For the full recipe, check out the Creamy Broccoli Almond Salad. Enjoy experimenting with these variations! To keep your Creamy Broccoli Almond Salad fresh, store it in an airtight container. This helps prevent air from making it soggy. If you have leftovers, make sure to cool the salad first. Avoid leaving it out at room temperature for too long. Always refrigerate it within two hours of making it. When stored properly, this salad lasts about 3 to 5 days in the fridge. The broccoli will stay crisp, and the dressing will keep its flavor. However, the longer it sits, the softer the broccoli may become. If you notice any off smells or changes in color, it’s best to toss it. Freezing this salad is not recommended. The texture of the broccoli and dressing will change once thawed. If you want to make it ahead, prepare only the dressing and store it separately. You can freeze the dressing for up to 3 months. When you’re ready to use it, thaw it in the fridge overnight. Then, just mix it with fresh broccoli and almonds! For the full recipe, check out the recipe section above. Yes, you can use frozen broccoli for this salad. It saves time and works well. Just make sure to thaw it completely before using. You may want to blanch it quickly to keep its bright color. This step ensures it still tastes fresh and crunchy. To make this salad vegan, swap Greek yogurt and mayonnaise for plant-based options. Use coconut yogurt or a vegan mayo for the creamy base. For the sweetener, substitute honey with maple syrup. This keeps the taste delicious while staying plant-based. You can add many ingredients to the creamy dressing. Try a squeeze of lemon juice for extra tang. Garlic powder or Dijon mustard can add a nice kick. You can also mix in fresh herbs like dill or parsley for more flavor. - Full Recipe: Creamy Broccoli Almond Salad 🥦🥗 This blog post covered how to make a great Creamy Broccoli Almond Salad. We talked about the fresh ingredients and pantry staples needed. I shared step-by-step instructions to prepare your dish easily. You learned some useful tips to enhance flavor and serve it well. We also discussed variations to customize your salad. Lastly, we covered storage tips to keep it fresh. Enjoy making this salad, and don’t hesitate to try your own twists! Happy cooking!

Creamy Broccoli Almond Salad Healthy and Tasty Meal

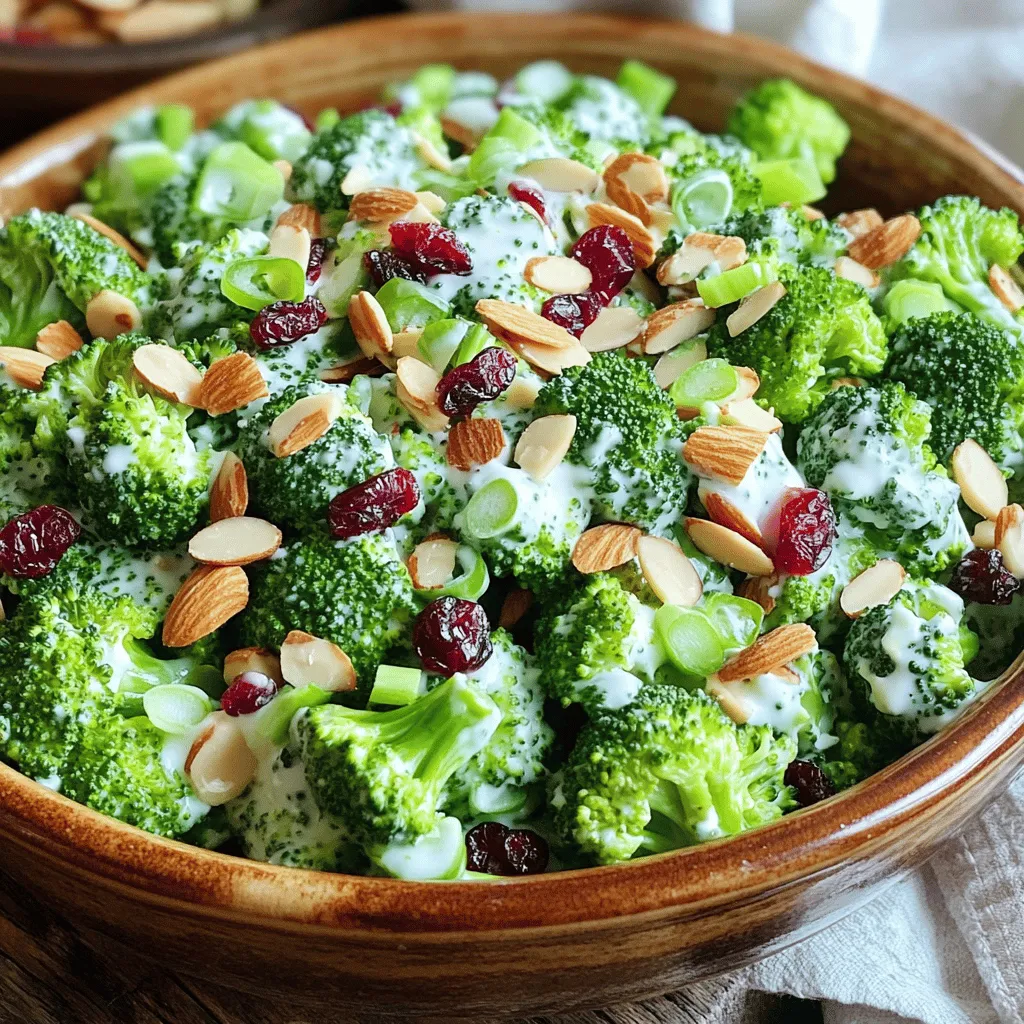
If you’re looking for a healthy yet tasty meal, you’ve found it—Creamy Broccoli Almond Salad! This salad packs flavor while

- 1 lb fresh salmon fillet - 1/4 cup pure maple syrup - 2 tablespoons soy sauce - 1 tablespoon Dijon mustard - 1 teaspoon minced garlic - 1 teaspoon grated fresh ginger - 1 tablespoon sesame oil - Salt and freshly ground black pepper - 2 green onions, thinly sliced - Sesame seeds To create Maple Glazed Salmon Bites, you need a few key items. First, the main star is fresh salmon fillet. I prefer to use one pound, cut into bite-sized cubes. The salmon should be skinless for easy eating. Next, you'll need maple syrup. It adds a sweet touch that balances the savory flavors. I recommend using a quarter cup of pure maple syrup. Then, grab two tablespoons of soy sauce. This ingredient gives depth and umami. For added flavor, include Dijon mustard, minced garlic, and grated fresh ginger. These ingredients combine beautifully with the maple and soy. Use one tablespoon of mustard, one teaspoon of garlic, and one teaspoon of ginger. Finally, don't forget the garnishes! Sesame oil adds richness, while salt and black pepper enhance taste. For a fresh finish, slice two green onions and sprinkle sesame seeds on top. These garnishes make the dish pop visually and taste-wise. Now you have all the ingredients ready! If you want to see how everything comes together, check out the Full Recipe. To make the marinade, combine the following ingredients in a medium bowl: - 1/4 cup pure maple syrup - 2 tablespoons soy sauce - 1 tablespoon Dijon mustard - 1 teaspoon minced garlic - 1 teaspoon grated fresh ginger - 1 tablespoon sesame oil Whisk these ingredients together until the mix is smooth. This blend gives the salmon its sweet and savory flavor. You want it well combined for the best taste. Next, take 1 lb of fresh salmon fillet. Cut it into 1-inch cubes. Season the cubes with salt and pepper. This step is key for enhancing the fish's natural taste. Toss the seasoned salmon in the marinade. Make sure each piece gets coated well. Cover the bowl with plastic wrap, then place it in the fridge. Let it marinate for at least 30 minutes or up to 2 hours. The longer it sits, the more flavor it picks up. Preheat your oven to 400°F (200°C). While the oven warms, prepare a baking sheet. Line it with parchment paper for easy cleanup. After the oven reaches the right temperature, take the salmon from the fridge. Use a slotted spoon to transfer the marinated salmon bites onto the warm baking sheet. Make sure they have space between them. Bake the salmon bites for 10 to 12 minutes. They should become opaque and flake easily with a fork. For extra flavor, brush some leftover marinade over the salmon halfway through baking. When done, take them out and garnish with sliced green onions and sesame seeds. This adds a nice touch for serving. Marinating your salmon bites is key for great flavor. I recommend marinating for at least 30 minutes. If you have time, let them sit for 2 hours. This allows the salmon to soak up the sweet and savory flavors. For perfect caramelization, preheat your oven to 400°F (200°C). Place your lined baking sheet in the oven while it heats. This helps the salmon bites get a nice golden color. Bake them for 10-12 minutes. Watch for when the salmon turns opaque and flakes easily. Garnishing adds visual appeal and flavor. I love using thinly sliced green onions and sesame seeds. They not only look great but also enhance the taste. You can also serve your salmon bites on a platter with lemon wedges. This adds a bright, fresh touch. For a colorful side, pair them with a simple green salad. It makes the dish pop! {{image_4}} For those who enjoy a kick, you can spice things up. To make spicy maple glazed salmon bites, simply add chili flakes or a drizzle of sriracha. You can mix this into the marinade for a balanced heat. This adds a new layer of flavor that pairs well with the sweet maple syrup. Adjust the heat level to your liking. If you love fresh flavors, try an herb-infused version. You can incorporate fresh herbs like thyme, dill, or parsley. Chop them finely and mix them into the marinade. This gives the salmon a bright and fresh taste. It’s a great way to elevate the dish while keeping it simple. You don't have to bake these bites; you can grill or pan-sear them too. For grilling, preheat your grill and place the salmon bites on skewers. Grill them for about 4-5 minutes per side. If you prefer pan-searing, heat oil in a skillet and cook for about 3-4 minutes on each side. Each method gives a unique texture and flavor. Try these variations to keep your meals exciting. You can find the Full Recipe for the basic maple glazed salmon bites if you want to start there. To store leftover maple glazed salmon bites, place them in an airtight container. Make sure the container is sealed well to keep air out. Store it in the fridge for up to 3 days. When you want to enjoy them again, just take them out and reheat. If you want to save the salmon bites for later, freezing works great. First, let them cool completely. Then, place them in a freezer-safe bag or container. Remove as much air as you can. Label the bag with the date. You can freeze them for up to 2 months. When you’re ready to eat, thaw them in the fridge overnight. To reheat the salmon bites, use the oven for the best results. Preheat your oven to 350°F (175°C). Spread the salmon bites on a baking sheet. Heat them for about 10 minutes or until warm. You can also use a microwave, but it may make them a bit soft. If you choose the microwave, heat in short bursts to avoid overcooking. Yes, you can use frozen salmon. Make sure to thaw it first. - Thawing Tips: - Place the salmon in the fridge overnight. - For quicker thawing, seal it in a bag and submerge it in cold water. - Avoid using hot water, as it can cook the fish. Using frozen salmon works well, but fresh salmon tastes best. You can pair these bites with many sides. Here are some tasty options: - Steamed vegetables like broccoli or green beans. - A light salad with mixed greens and vinaigrette. - Quinoa or rice for a filling addition. - Mashed potatoes or sweet potatoes for comfort. These sides balance the sweet and savory flavors of the salmon. Check for doneness using these signs: - The salmon should be opaque and flaky. - It should easily break apart with a fork. - The internal temperature should reach 145°F (63°C). These tips help ensure your salmon bites turn out perfect every time. Enjoy the full recipe for a delicious meal! This blog post covered how to make delicious maple glazed salmon bites. We explored key ingredients like salmon, maple syrup, and soy sauce. The step-by-step instructions guided you from marinating to baking for perfect bites. I shared tips on marination, baking, and garnishing for extra flair. You learned variations to spice things up and storage tips for leftovers. Delicious salmon can be an easy, healthy choice. Enjoy your cooking adventure!

Maple Glazed Salmon Bites Tasty and Simple Recipe

If you’re looking for a quick yet delicious dish, maple glazed salmon bites are perfect for you. This simple recipe

- 2 ahi tuna steaks (approximately 6 oz each) - 1/4 cup black sesame seeds - 1/4 cup white sesame seeds - 2 tablespoons olive oil, plus more for cooking - 1 tablespoon soy sauce - 1 teaspoon freshly grated ginger - 1 teaspoon wasabi paste (optional for an extra kick) - 1 ripe avocado, sliced - 1 small cucumber, thinly sliced - 2 green onions, chopped The main ingredients for this dish are fresh ahi tuna steaks, sesame seeds, and olive oil. Ahi tuna is tasty and packed with protein. The sesame seeds give a crunchy crust that adds flavor and texture. Olive oil helps to cook the tuna and adds a smooth taste. For flavor, I use soy sauce, ginger, and optional wasabi paste. Soy sauce brings a savory depth. Ginger adds warmth, while wasabi gives a spicy kick. You can skip the wasabi if you prefer a milder taste. Finally, I serve the tuna with fresh avocado, cucumber, and green onions. The creamy avocado balances the fish's richness. Cucumber adds a crisp texture, and green onions offer a fresh pop. Together, these ingredients create a colorful and healthy meal. You can find the full recipe to create this delightful dish and impress your family or friends! First, mix the black and white sesame seeds in a shallow dish. This blend gives the tuna a beautiful look and crunch. Next, pat the ahi tuna steaks dry with paper towels. This step helps the seasoning stick. Season both sides with salt and pepper. Make sure to use enough to enhance the flavor. Now, whisk together the olive oil, soy sauce, and freshly grated ginger in a small bowl. If you want some heat, add wasabi paste. This mixture will add great flavor to the tuna. Use a pastry brush to coat each tuna steak evenly. This adds moisture and helps the sesame seeds stick. Heat a non-stick skillet over medium-high heat and add olive oil. Wait until the oil shimmers and is hot. Carefully place the sesame-crusted tuna steaks in the skillet. Sear each side for 1-2 minutes for medium-rare. If you prefer your tuna more cooked, add another minute or two per side. Once cooked, transfer the tuna to a cutting board. Let it rest for about a minute. This resting time keeps the juices inside the fish. After resting, slice the tuna into thin strips, at a slight angle. This creates a nice presentation for your dish. Serve the sliced tuna on a plate with avocado and cucumber slices. Sprinkle with chopped green onions for a fresh touch. Drizzle any remaining soy-ginger mixture over the top. Add lemon wedges on the side for a zesty finish. Enjoy this tasty and healthy delight! You can find the Full Recipe for more details. To get a great crust on your sesame-crusted ahi tuna, follow these simple tips: - Ensuring seeds adhere well: Press the tuna firmly into the sesame seeds. This helps them stick. Make sure the tuna is dry before you season it. A dry surface grabs the seeds better. - Cooking time for desired doneness: Sear the tuna for 1-2 minutes on each side for medium-rare. If you want it more cooked, add another minute per side. When it comes to serving, presentation matters: - Plate presentation tips: Arrange the sliced tuna neatly on the plate. Place the avocado and cucumber around it for color and texture. - Garnishing ideas: Top the tuna with chopped green onions. A drizzle of the soy-ginger mix adds a tasty touch. Pair your dish for a full dining experience: - Best sides to serve: Steamed rice or a fresh salad works well. You could also try a light seaweed salad. - Wine or drink pairings: A crisp white wine, like Sauvignon Blanc, complements the flavors nicely. If you prefer a non-alcoholic drink, try sparkling water with a slice of lemon. Enjoy making this delicious dish! For the complete recipe, check out the Full Recipe. {{image_4}} You can switch up the fish if you want. Instead of ahi tuna, try salmon or swordfish. Both options taste great with sesame seeds. They also have a rich flavor. If you want to use a different oil, go for avocado oil or sesame oil. These oils add their own unique taste to the dish. You can present your sesame crusted ahi tuna in fun ways. For a sushi-style look, slice the tuna into thin pieces. Arrange them on a bamboo mat or a sushi plate. This makes a great starter. You can also serve it in a salad or bowl. Add mixed greens, sliced avocado, and cucumbers for a fresh touch. Drizzle some soy sauce or a ginger vinaigrette over the top. Want some heat? Add chili flakes or sriracha to the soy sauce mix. It brings a spicy kick to your dish. You can also try different sauces like teriyaki or ponzu. These sauces can add a sweet or tangy twist. Experiment with what you love! To keep leftover tuna fresh, place it in an airtight container. This helps prevent odors and keeps the fish moist. Make sure the tuna is at room temperature before sealing the container. The shelf life of cooked tuna in the fridge is about 2 to 3 days. If you won't eat it within this time, consider freezing it. For freezing cooked tuna, wrap each piece tightly in plastic wrap. Then, place the wrapped tuna in a freezer bag or container. This extra layer prevents freezer burn. Cooked tuna can last up to 3 months in the freezer. When you want to eat it, thaw the tuna in the fridge overnight. This helps keep its texture and flavor. The best way to reheat tuna is gently in a skillet over low heat. This method warms the fish evenly without drying it out. You can also use the microwave, but keep it short. Heat in 30-second intervals to avoid overcooking. Overcooked tuna becomes tough and dry, so watch closely. Enjoy your sesame-crusted ahi tuna again with care! To cook tuna just right, aim for medium-rare for the best taste. Sear each side for 1-2 minutes. This gives you a warm, pink center. If you like it well-done, add another minute or two per side. Use a meat thermometer if you want accuracy. The internal temperature should be around 125°F for medium-rare and 145°F for well-done. Remember, tuna cooks quickly, so keep an eye on it! Yes, you can prepare this dish ahead of time. You can coat the tuna with sesame seeds and keep it in the fridge. Just wait to cook it until you’re ready to serve. This way, the tuna stays fresh. If you have leftovers, store them in an airtight container. They will last for about two days in the fridge. When you're ready, just reheat gently to avoid overcooking. Ahi tuna is a great choice for health. It is high in protein, which helps build muscles. Ahi tuna is also low in calories, making it good for weight loss. It has omega-3 fatty acids, which are great for heart health. Plus, it's rich in vitamins and minerals like vitamin B12 and selenium. Eating ahi tuna can help improve brain function and reduce inflammation. You can find the full recipe by following the link I shared earlier. It includes all the details you need. You'll see the list of ingredients and step-by-step instructions to make this delicious meal yourself. Enjoy cooking! In this post, we covered how to create a delicious seared ahi tuna dish. You learned about key ingredients, like sesame seeds and ginger, and how to prepare and cook the tuna to get the perfect crust. I also shared tips for serving and pairing your meal. Remember, confident cooking comes from practice. Try different variations and enjoy experimenting with flavors. Your culinary skills will grow with each attempt. Happy cooking!

Sesame Crusted Ahi Tuna Tasty and Healthy Delight

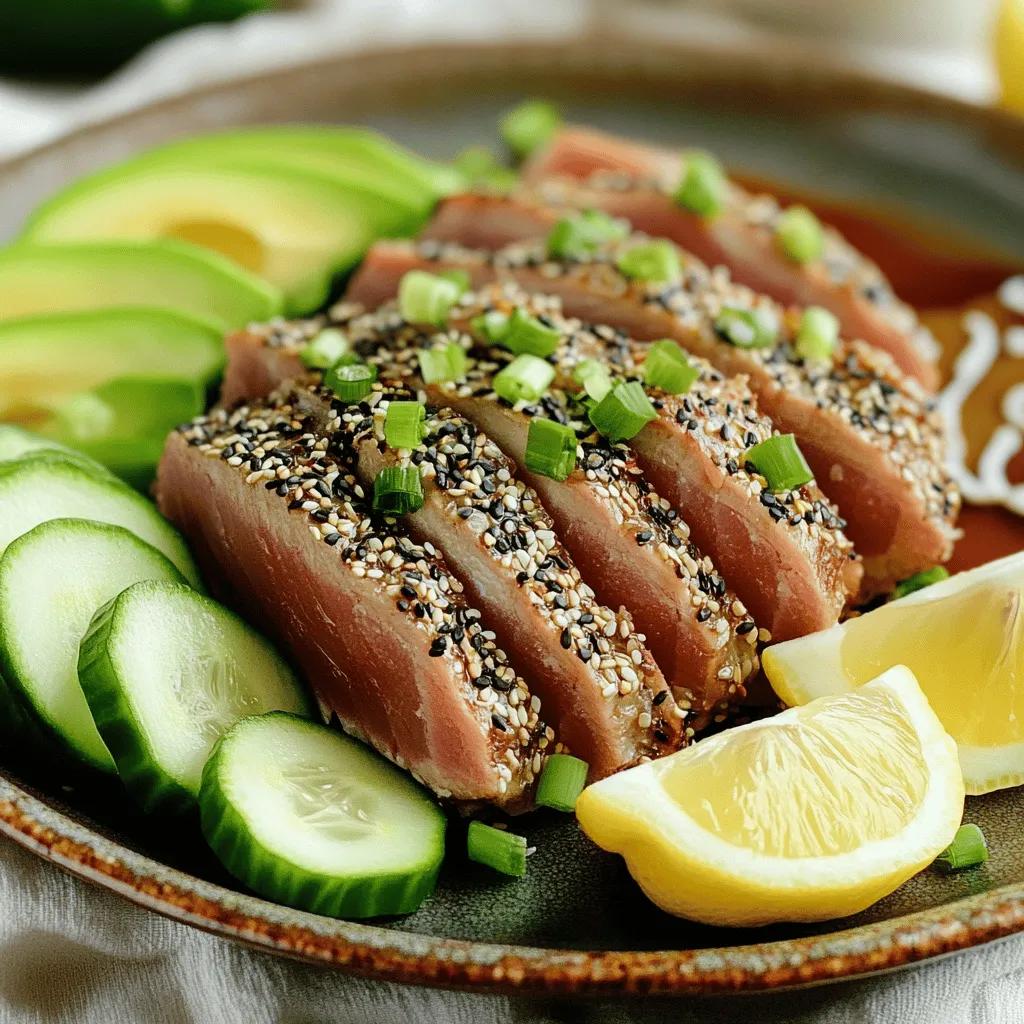
If you crave a dish that’s both tasty and healthy, you’re in for a treat! My sesame crusted ahi tuna

- 2 lbs ripe tomatoes, quartered - 1 medium onion, finely chopped - 4 cloves garlic, peeled - 3 tablespoons extra virgin olive oil - 1 teaspoon balsamic vinegar - 1 teaspoon dried oregano - Salt and freshly cracked black pepper, to taste - 3 cups vegetable broth - 1/2 cup heavy cream (for a velvety texture) - 1 cup fresh basil leaves, roughly chopped (for garnish) This recipe serves 4 to 6 people. Each bowl offers a comforting mix of flavors. Nutritionally, the soup is rich in vitamins and antioxidants from the tomatoes and basil. The olive oil adds healthy fats, while the cream offers a touch of indulgence if you choose to use it. Together, these ingredients create a balanced dish that satisfies the palate and nourishes the body. For the full recipe, refer to the section above. Start by preheating your oven to 400°F (200°C). This heat will help the tomatoes roast perfectly. Next, gather a large mixing bowl. Add 2 lbs of quartered ripe tomatoes, 1 chopped onion, and 4 peeled garlic cloves. Pour in 3 tablespoons of extra virgin olive oil and 1 teaspoon of balsamic vinegar. Sprinkle in 1 teaspoon of dried oregano, salt, and black pepper to taste. Mix everything well so each piece gets coated. Now, spread this mixture onto a baking sheet. Make sure to lay it out in a single layer. This helps the vegetables roast evenly. Place your baking sheet in the preheated oven. Roast the tomatoes for 25 to 30 minutes. You will know they are ready when they turn caramelized and soft. The onion should feel tender, and the garlic should smell fragrant. Once roasted, take the baking sheet out and let it cool for a few minutes. In a large pot, combine the roasted mixture with 3 cups of vegetable broth. Heat this over medium heat until it simmers gently. Let it cook for another 10 minutes to let the flavors blend well. To blend the soup, use an immersion blender for a smooth texture. If you do not have one, carefully transfer the soup in batches to a regular blender, then return it to the pot. Stir in 1 cup of roughly chopped fresh basil and 1/2 cup of heavy cream if you want a creamier soup. Taste it and add more salt or pepper if needed. Heat the soup for about 5 more minutes, but do not let it boil. Ladle the soup into bowls and serve it hot. For a beautiful touch, garnish with more fresh basil, a drizzle of olive oil, and crusty bread for dipping. Enjoy your comforting bowl of roasted tomato basil bliss! For more details, check the Full Recipe. Using fresh herbs makes a big difference. Fresh basil gives your soup a vibrant taste. Dried herbs work too, but fresh adds brightness. When adding herbs, try to use them towards the end of cooking. This keeps their flavor lively. Balancing acidity and sweetness is key for a great soup. Roasted tomatoes can be sweet and tangy. If your soup tastes too tart, add a pinch of sugar. This simple step can elevate your dish. For more depth, try adding a splash of balsamic vinegar. It rounds out the flavors nicely. One common mistake is over-roasting or under-roasting tomatoes. Over-roasting can make them taste bitter. Under-roasting leaves them bland. Aim for a golden, caramelized look that enhances sweetness. Incorrect seasoning adjustments are another pitfall. Always taste as you go. If your soup lacks flavor, don’t be afraid to add more salt. Each ingredient is important, so adjust carefully to bring out the best in your soup. For this recipe, you will need essential cookware. A baking sheet is crucial for roasting tomatoes. A large pot helps combine everything smoothly. An immersion blender makes blending easy and mess-free. If you don’t have one, a standard blender works too. Just be cautious with hot liquids, and blend in batches if needed. These tools will help you create a delicious roasted tomato basil soup that shines. For the full recipe, refer back to the main section. Enjoy the process and the wonderful aroma in your kitchen! {{image_4}} To make this soup vegan, you can substitute heavy cream with plant-based milk. Almond, coconut, or oat milk work well. These milks add creaminess without dairy. You may also add lentils for protein. They cook fast and blend well into the soup. This keeps your meal filling and nutritious. You can spice up your soup by adding paprika or red pepper flakes. They bring warmth and depth to the flavor. Feel free to experiment with different herbs like thyme or parsley. Each herb adds its unique twist. You can find your favorite mix over time. Pair your soup with grilled cheese or a fresh salad. The crunch of grilled cheese complements the soup’s smooth texture. For a fun twist, try creative garnishes. A drizzle of olive oil or a sprinkle of freshly grated cheese adds flair. Whole basil leaves also make a lovely touch. These small details elevate your dish and impress your guests. After you make your roasted tomato basil soup, cool it down first. Pour it into a container that seals well. Glass jars or BPA-free plastic containers work great. Make sure to leave some space at the top. This space helps the soup expand when it freezes. Store it in the fridge for up to five days. You can freeze the soup for later. Pour the cooled soup into freezer-safe containers. Make sure to leave some space for expansion. Seal them tightly to avoid freezer burn. The soup stays good in the freezer for about three months. To thaw, place it in the fridge overnight before reheating. Reheat the soup slowly to keep its yummy taste. Use a pot on low heat, stirring often. If the soup is too thick, add a splash of broth or water. If you want to cook it in the microwave, use a microwave-safe bowl. Heat it in short intervals, stirring in between. Adjust the thickness after reheating by adding more liquid if needed. Enjoy every spoonful of your comforting soup! Roasted Tomato Basil Soup offers many health benefits. First, tomatoes are rich in vitamins C and K. They also contain antioxidants like lycopene, which can fight cancer. Basil adds flavor and has anti-inflammatory properties. The soup is low in calories, making it a great choice for weight management. Olive oil provides healthy fats, which support heart health. You can easily make this soup ahead of time. Roasting the tomatoes and veggies takes about 30 minutes. Once done, blend and store it in the fridge. The soup keeps well for up to three days. You can also freeze it in portions. Just remember to leave space in the container for expansion. Yes, you can use canned tomatoes. Look for high-quality canned tomatoes for the best flavor. Drain them slightly before roasting. This step helps avoid a watery soup. Canned tomatoes can save time and still create a tasty dish. There are many great sides for this soup. Grilled cheese is a classic choice. You can also serve crusty bread for dipping. A fresh salad adds crunch and nutrition. For a twist, pair it with garlic bread or cheese toast to enhance the meal. Roasted Tomato Basil Soup is both simple and delicious. We explored key ingredients like ripe tomatoes, onion, and garlic. You learned how to prepare, roast, and blend for a great flavor. I shared tips to avoid common mistakes and how to store your soup properly. In the end, you can experiment with flavors and serving styles. Every bowl can be your personal creation. Enjoy making this soup and savor each bite!

Roasted Tomato Basil Soup Comforting and Rich Flavor

Are you ready to dive into a bowl of warmth? My Roasted Tomato Basil Soup promises comfort with every spoonful.

- 1 cup fresh strawberries, hulled and halved - 1 ripe banana, peeled and sliced - 1 cup Greek yogurt (plain or vanilla) - 1/2 cup almond milk (or milk of your choice) - 1 tablespoon honey or maple syrup (optional) - 1 tablespoon chia seeds (optional) - Ice cubes (optional) Gathering the right ingredients makes a huge difference. You want fresh strawberries for the best flavor. Choose ripe bananas for natural sweetness. Greek yogurt adds creaminess and protein. Almond milk or another milk keeps the smoothie smooth and drinkable. Honey or maple syrup can sweeten your drink, but they are optional. Chia seeds boost nutrition and add a fun texture. Ice cubes are great if you like a thicker, colder smoothie. With these ingredients, you will enjoy a delightful Strawberry Banana Smoothie. For the full recipe, check the details above. 1. Rinse the fresh strawberries under cool water. 2. Remove the green tops and slice the strawberries in half. 3. In your blender, add the halved strawberries, sliced banana, Greek yogurt, and almond milk. 1. For sweetness, drizzle in honey or maple syrup. 2. If you want more nutrition, add chia seeds. 3. For a thicker smoothie, toss in some ice cubes. 1. Blend on high speed until the mixture is smooth and creamy. 2. Stop to scrape down the sides of the blender. 3. Taste the smoothie. If it needs more sweetness, add more honey or syrup. 4. Blend again briefly to mix. To balance sweetness, I like to use honey or maple syrup. Start with one tablespoon. Blend it in, then taste. Add more if you want it sweeter. If you skip the sweetener, the fruit's natural taste shines through. For thickness, consider adding ice cubes. This gives your smoothie a frosty texture. If you prefer a creamier feel, use less milk. Adjust until you find your perfect blend. For yogurt, Greek yogurt is my top choice. It adds creaminess and protein. Plain yogurt gives a tart taste, while vanilla yogurt is sweeter. Choose what fits your mood! If you don’t have almond milk, no worries. Cow's milk works well too. Soy and oat milk are great alternatives. Use what you enjoy. Presentation matters! Serve the smoothie in chilled glasses. This keeps it cool and refreshing. Garnish with a slice of banana on the rim. Add a whole strawberry beside it for color. You can also sprinkle chia seeds on top. This adds a fun texture and looks appealing. A little extra effort makes your smoothie stand out! {{image_4}} You can change the fruit in your smoothie for fun new flavors. Instead of strawberries and bananas, try blueberries or mangoes. They add sweetness and color. Seasonal fruits work well too. In summer, use peaches or raspberries. In fall, add apples or pears. This way, you get fresh tastes and a burst of nutrition. Want to make your smoothie even better? Add protein powder for a boost. It makes your smoothie filling and great for breakfast. You can also mix in superfoods. Spinach adds vitamins without changing the taste much. Nut butter gives healthy fats and a creamy texture. These add-ins help you feel full and satisfied. If you want a dairy-free smoothie, no problem! Try using plant-based yogurt instead of Greek yogurt. Options like almond or coconut yogurt work well. You can also switch your milk. Use oat milk, soy milk, or any milk you like. These keep your smoothie creamy and delicious. To store leftover smoothie in the refrigerator, use an airtight container. This keeps it fresh. Consume it within 24 hours for the best taste and texture. If you want to save smoothies for later, freezing is a great option. Pour the smoothie into ice cube trays or silicone molds. Once frozen, you can transfer the cubes to a freezer bag. This method saves space and makes it easy to use later. For thawing frozen smoothies, leave them in the fridge overnight. You can also use a microwave on low power for a quick thaw. If you prefer a cold drink, blend the smoothie with a little ice again after thawing. The recommended serving temperature is cold. This enhances the fruity flavors, making your drink refreshing. Enjoy every sip of your strawberry banana bliss! You can use regular yogurt instead of Greek yogurt. It will still taste great. Other options include dairy-free yogurt or silken tofu for a vegan choice. Each option changes the flavor and texture a bit, but they all work well in this smoothie. The smoothie stays fresh for about 1 to 2 days in the fridge. Store it in a sealed container to keep it from spoiling. Before drinking, shake it up or stir well, as it may separate. Yes, you can make this smoothie ahead of time. Just blend and store it in the fridge. It tastes best when fresh, but it is still good after a few hours. If you want to make it even earlier, freeze the ingredients and blend when you are ready. Absolutely! To make a vegan version, simply swap Greek yogurt with a dairy-free yogurt. Use almond milk or any plant-based milk of your choice. You can also skip honey and use maple syrup instead for sweetness. To thicken a smoothie, add ice cubes or use frozen fruit like bananas or strawberries. You can also add chia seeds or oats to help with thickness. These options will give your smoothie a creamy and satisfying texture. In this blog post, I covered how to make a delicious smoothie with fresh ingredients. You learned how to prepare the fruit, blend it, and adjust the flavor. I shared tips for choosing the right yogurt, adding nutrition, and serving your smoothie nicely. For storage, you now know how to keep it fresh. In the end, smoothies are fun and healthy. You can try different fruits and flavors. Enjoy your smoothie journey!

Strawberry Banana Smoothie Quick and Easy Recipe

Looking for a quick and easy recipe that bursts with flavor? The Strawberry Banana Smoothie is your answer! Packed with

Older posts
Newer posts
← Previous Page1 … Page3 Page4 Page5 … Page77 Next →

dsad

© 2025 eataroundit • Built with GeneratePress

Our Policies

  • Copyright Policy
  • Cookie Policy
  • GDPR Policy
  • Privacy Policy
  • Disclaimer
  • Terms Of Use

More Information

  • Home
  • About
  • Contact
  • Appetizers
  • Dessert
  • Dinner
  • Drinks
©2025, eataroundit About Back To Top