Skip to content
DisclaimerTerms Of UseGDPR PolicyCookie Policy

eataroundit

  • Home
  • Drinks
  • Appetizers
  • Dinner
  • Dessert
  • About
  • Contact
  • Privacy Policy
DisclaimerTerms Of UseGDPR PolicyCookie Policy

Hannah

- Fresh Quinoa Selection - 1 cup quinoa, thoroughly rinsed - Seasonal Vegetables - 1 cup cherry tomatoes, halved - 1 medium cucumber, diced - 1 bell pepper, diced (any color of your choice) - 1 ripe avocado, diced - Flavor Enhancers and Herbs - 1/4 cup fresh parsley, finely chopped - 1/4 cup fresh mint, finely chopped - Dressing Components - 3 tablespoons extra virgin olive oil - 2 tablespoons freshly squeezed lemon juice - 1 teaspoon lemon zest - Salt and freshly ground black pepper, to taste I love using quinoa in this salad. Quinoa is a great source of protein. It cooks quickly and tastes wonderful. The mix of fresh veggies adds color and crunch. Cherry tomatoes bring sweetness, while cucumbers offer a refreshing bite. You can choose any bell pepper color. It adds both taste and visual appeal. Don't forget the avocado! It adds creaminess and healthy fats. Fresh herbs like parsley and mint brighten the dish. They add layers of flavor that make every bite exciting. For the dressing, I use simple yet flavorful ingredients. Extra virgin olive oil gives a rich base. Fresh lemon juice and zest add a zesty punch. Salt and pepper help to enhance all the flavors. If you want more tang, squeeze in extra lemon juice. You can find the full recipe [here](#). Gather these ingredients, and you will create a delightful Lemon Herb Quinoa Salad that everyone will love! Rinsing and Preparing Start by rinsing 1 cup of quinoa under cold water. This helps remove any bitter taste. Place the rinsed quinoa in a medium saucepan. Boiling and Simmering Add 2 cups of vegetable broth or water to the saucepan. Set the heat to medium-high and bring it to a boil. Once boiling, lower the heat. Cover the pan with a lid and let it simmer for about 15 minutes. The quinoa will be tender, and the liquid will be absorbed. After cooking, take it off the heat and let it cool for a few minutes. Use a fork to fluff it gently. Chopping Vegetables While the quinoa cools, grab a large mixing bowl. Chop up your fresh vegetables: 1 cup of cherry tomatoes, 1 medium cucumber, 1 bell pepper, and 1 ripe avocado. Toss them gently in the bowl. Mixing Ingredients Once the quinoa has cooled, add it to the bowl with the chopped vegetables. This makes a colorful mix. Whisking the Dressing Ingredients In a small bowl, combine 3 tablespoons of extra virgin olive oil, 2 tablespoons of lemon juice, and 1 teaspoon of lemon zest. Add a pinch of salt and pepper. Whisk it all together until smooth. Combining Dressing with Salad Now, drizzle the dressing over the quinoa and vegetable mix in the large bowl. Add 1/4 cup of chopped parsley and 1/4 cup of chopped mint. Toss everything gently until it’s well mixed. For a complete guide, check out the Full Recipe. Cooking Tips for Fluffy Quinoa To make quinoa fluffy, rinse it well before cooking. Rinsing removes the bitter coating called saponin. Use two cups of broth or water for every cup of quinoa. Bring it to a boil. Then, cover and reduce heat to low. Let it simmer for about 15 minutes. Once done, remove it from heat and fluff it gently with a fork. This method makes the quinoa light and airy. Common Mistakes to Avoid One major mistake is not rinsing the quinoa. This can lead to a bitter taste. Another mistake is using too much water. If you use more water than needed, the quinoa may become mushy. Lastly, don’t skip the cooling step. Letting quinoa cool before mixing keeps the salad fresh and crunchy. Adding Extra Herbs Herbs can elevate your salad. Fresh parsley and mint give a bright flavor. You can also add basil or dill for a different twist. Just chop them finely before mixing them in. This small touch makes a big difference. Incorporating Spices Spices can also enhance the taste. Try adding a pinch of cumin or smoked paprika. These spices add warmth and depth to the salad. If you like a kick, consider crushed red pepper flakes. Just a little can add a nice heat. {{image_4}} You can make Lemon Herb Quinoa Salad heartier by adding protein. Grilled chicken is a great choice. It adds flavor and makes the dish filling. Simply slice the chicken and mix it in after cooking. You can also use tofu for a plant-based option. Grilled or sautéed tofu works well. It soaks up the salad's tasty dressing. Beans or chickpeas are another easy way to add protein. They are rich in fiber and nutrients. Rinse canned beans or cook dried beans. Toss them in after you mix the veggies. This makes the salad even more satisfying and nutritious. You can change the salad by using seasonal ingredients. In summer, add fresh corn or zucchini. Grilled corn adds a sweet crunch. Diced zucchini gives a light, fresh taste. These veggies taste great with the lemon and herbs. In winter, try roasted sweet potatoes or brussels sprouts. Roasting brings out their sweetness. They pair perfectly with the salad's bright flavors. You can also add pomegranate seeds for a pop of color and flavor. This adds a festive touch to your meal. Explore these variations to keep your Lemon Herb Quinoa Salad exciting. Each change brings new flavors and makes the dish fun. For the complete recipe, check the Full Recipe. To keep your lemon herb quinoa salad fresh, store it in the fridge. Use an airtight container. This helps keep the flavors bright. Your salad will last about 3 to 5 days. If you want to freeze it, know that it may change texture. Freeze in a freezer-safe bag. Remove as much air as possible. It can last for up to 3 months. Check for spoilage before eating leftovers. Look for any off smells or slimy textures. If the colors fade or change, toss it out. When reheating, be gentle. Heat it in the microwave for a short time. Stir it well to ensure even warmth. Adding a splash of olive oil or lemon juice can brighten it up again. Enjoy your fresh and flavorful dish! For the full recipe, see above. You can easily make this salad gluten-free by choosing the right quinoa. Quinoa is naturally gluten-free. Just ensure that it is labeled gluten-free. For added flavor, try using vegetable broth instead of water. This will enhance the taste without adding gluten. You can also swap any ingredients that may contain gluten. For example, check your dressing for any hidden gluten sources. Yes, you can prepare this salad ahead of time. It tastes even better after the flavors mix. To prep, cook the quinoa and let it cool. Chop the vegetables and store them separately. Keep the dressing in a jar. When you’re ready to eat, mix everything in one bowl. This keeps the salad fresh and crunchy. Lemon Herb Quinoa Salad pairs well with many sides. Here are a few ideas: - Grilled chicken or tofu for protein - Roasted vegetables for added flavor - Fresh fruit salad for a light touch - A light soup, like tomato or gazpacho For serving, consider a large platter for sharing or individual bowls for guests. Garnish with extra herbs or lemon slices for a pretty touch. You can find the Full Recipe above to guide you through making this delicious dish! This blog post covered how to make a Lemon Herb Quinoa Salad. We explored the key ingredients like fresh quinoa, seasonal vegetables, and flavor enhancers. You learned step-by-step instructions for cooking, preparing, and dressing the salad. Tips helped you avoid common errors and elevate your dish. Variations allow for protein or seasonal twists. Finally, we discussed how to store leftovers to keep your salad fresh. Enjoy making this easy, tasty dish again and again!

Lemon Herb Quinoa Salad Fresh and Flavorful Dish

Looking for a fresh, healthy dish that bursts with flavor? You’re in the right place! This Lemon Herb Quinoa Salad

- Fresh spinach - Strawberries - Kiwi fruit - Feta cheese - Walnuts - Honey - Balsamic vinegar - Olive oil - Salt and pepper When I think of a salad that sings with summer flavors, the Strawberry Kiwi Spinach Salad comes to mind. This dish uses fresh, bright ingredients that make it both tasty and good for you. Each bite bursts with sweet and tangy notes from the strawberries and kiwi. Together with spinach, this salad is a feast for your taste buds. Fresh spinach forms the base. It gives a lovely green color and has a mild flavor. Strawberries add sweetness, while kiwi brings a zingy twist. Feta cheese adds creaminess, making the salad rich and satisfying. I love adding walnuts for a crunchy texture and a nutty flavor. For the dressing, I use honey, balsamic vinegar, and olive oil. This mix ties all the flavors together. A pinch of salt and pepper rounds off the taste. You can find the full recipe [here](Full Recipe). - Calories per serving: Approximately 180 - Key vitamins and minerals: Vitamin C, Vitamin K, and potassium - Health benefits of main ingredients: - Spinach is rich in iron and aids in digestion. - Strawberries are packed with antioxidants for skin health. - Kiwi supports your immune system and improves digestion. - Feta cheese provides protein and calcium for strong bones. - Walnuts contain omega-3 fatty acids that are heart-healthy. This salad is not just a treat for your palate; it also nourishes your body. Enjoying it regularly can boost your health and keep you feeling great! 1. Start with 4 cups of fresh spinach. Rinse the leaves well under cold water. 2. Use a salad spinner or paper towels to dry the spinach. This keeps the salad crisp. 3. Next, take 1 cup of fresh strawberries. Hull them to remove the green tops. 4. Slice the strawberries into thin pieces for easy eating. 5. Now, grab 2 ripe kiwi fruits. Peel them carefully and slice them thinly too. 1. In a large bowl, add the dried spinach as your base. 2. Neatly layer the sliced strawberries and kiwi on top of the spinach. 3. Sprinkle 1/2 cup of crumbled feta cheese over the fruit. This adds creaminess. 4. Finish with 1/4 cup of chopped walnuts for a crunchy texture. 1. In a small mixing bowl, combine 2 tablespoons of honey, 2 tablespoons of balsamic vinegar, and 1 tablespoon of olive oil. 2. Add a pinch of salt and freshly ground black pepper for flavor. 3. Use a whisk to mix the ingredients. Whisk until they blend well and become slightly thick. 1. Drizzle the dressing evenly over the salad. This ensures every bite is flavorful. 2. Use salad tongs to gently toss the salad. Make sure to keep the fruits intact. 3. Serve the salad right away for the best taste. You can chill it for 10-15 minutes if you like. For the complete recipe, check the [Full Recipe]. To keep your salad fresh, store it in an airtight container. This helps to prevent wilting. Always keep the dressing separate until you are ready to serve. If you want to prepare the salad in advance, wash and dry the spinach first. Slice the strawberries and kiwis but store them in the fridge. This way, they stay fresh and bright. This salad pairs well with grilled chicken for a hearty meal. You can also add shrimp or tofu for extra protein. It works great for picnics, potlucks, or casual dinners. Serve it as a starter or a side dish. For creative serving ideas, use a large, colorful platter. This makes the salad look inviting. You can also serve it in individual bowls for a more personal touch. For garnishing, add extra slices of strawberry and kiwi on top. This enhances the colors and makes it even more delightful. {{image_4}} You can easily change up this salad. If you want a different leafy green, try arugula. Arugula adds a peppery bite that pairs well with the sweet fruits. You can also swap nuts. Use pecans or almonds for a new flavor. For cheese, goat cheese or even a vegan option works great too. Let’s talk about dressings. You can make many kinds at home. A simple lemon vinaigrette adds a fresh twist. If you prefer creamy, try a yogurt-based dressing. It makes the salad rich and smooth. Light dressings let the fruit shine. Creamy dressings add depth and richness. You can also mix honey with mustard for a honey-mustard dressing. Want to make your salad heartier? Add grains like quinoa or farro. They give you more texture and keep you full longer. You can also toss in more fruits. Blueberries or raspberries are great choices. They add color and flavor. Feel free to get creative. Adding different fruits makes each bowl unique. If you want the full recipe, check it out [Full Recipe]. - Prep Time: 10 mins - Total Time: 10 mins - Servings: 4 The Strawberry Kiwi Spinach Salad is fresh, bright, and full of flavor. The sweet berries and kiwi contrast nicely with the earthy spinach. This salad is quick to make, perfect for a light meal or a side dish. - Step 1: Prepare a large salad bowl with clean spinach. - Step 2: Arrange sliced strawberries and kiwi on top. - Step 3: Sprinkle crumbled feta cheese and chopped walnuts. - Step 4: Mix honey, balsamic vinegar, olive oil, and seasonings in a bowl. - Step 5: Drizzle the dressing over your salad. - Step 6: Toss gently to coat the greens and fruits. - Step 7: Serve right away or chill for 10-15 minutes. This salad shines with its bright colors and textures. You get the crunch from walnuts and the creaminess of feta. Using fresh, local ingredients adds more flavor. Enjoy this delightful dish with your family or friends! For the full recipe, check out the link provided. If you want a dairy-free option, try using tofu. Crumble firm tofu for a similar texture. You can also use goat cheese or ricotta for a creamier taste. For a sharper flavor, try blue cheese. Each option will change the salad’s taste, so pick what you like best. Yes, you can prepare this salad a few hours in advance. Keep the dressing separate until you are ready to serve. This way, the greens stay crisp, and the fruits remain fresh. If you want to make it the night before, add the dressing just before eating. Absolutely! This salad works well for meal prep. You can divide the salad into containers for the week. Use a small container for the dressing. This keeps everything fresh and ready to grab. Just toss it all together at lunch for a quick, tasty meal. Enjoy this fresh and flavorful dish anytime! For the complete instructions, check the Full Recipe. This blog post guides you through making a fresh Strawberry Kiwi Spinach Salad. We covered key ingredients and their health benefits. I shared step-by-step instructions for perfect prep and assembly. With tips on storage and presentation, you can enjoy this dish anytime. Feel free to swap ingredients or try new dressings. This salad is both tasty and nutritious, making it a great choice for any meal or occasion. Enjoy creating your own version, and remember to have fun with it!

Strawberry Kiwi Spinach Salad Fresh and Flavorful Dish

If you’re looking for a fresh, vibrant dish, the Strawberry Kiwi Spinach Salad is a perfect choice! Packed with colorful

To make roasted cauliflower tacos, you need a few simple items. Here’s what you need: - 1 medium head of cauliflower, cut into bite-sized florets - 2 tablespoons extra virgin olive oil - 8 small corn tortillas - 1 cup red cabbage, finely shredded - 1 ripe avocado, sliced into thin pieces - 1/4 cup fresh cilantro, roughly chopped - Lime wedges, for garnishing These ingredients make the tacos tasty and healthy. The cauliflower gives a nice texture. The tortillas wrap it all together. The spices are crucial for flavor. You will need: - 1 teaspoon smoked paprika - 1 teaspoon ground cumin - 1 teaspoon garlic powder - 1 teaspoon chili powder - Sea salt and freshly cracked black pepper, to taste These spices add warmth and depth. The smoked paprika gives a nice smoky flavor. The cumin enhances the taste, making it rich and savory. Toppings can make your tacos special. You can use: - Shredded red cabbage for crunch - Sliced avocado for creaminess - Fresh cilantro for brightness - Optional: your favorite hot sauce for an extra kick These toppings add color and flavor. The cabbage adds crunch, while the avocado brings creaminess. A squeeze of lime juice brightens everything up. For more details, check out the Full Recipe. Start by preheating your oven to 425°F (220°C). This high heat will make the cauliflower crispy. Line a baking sheet with parchment paper. This helps with easy cleanup later. Now, let’s get the cauliflower ready. Cut one medium head of cauliflower into bite-sized florets. Make sure they are all similar in size for even cooking. In a large bowl, mix the cauliflower florets with two tablespoons of extra virgin olive oil. Add one teaspoon each of smoked paprika, ground cumin, garlic powder, and chili powder. Toss in some sea salt and black pepper to taste. Mix well until all the florets are coated. Spread the cauliflower evenly on the baking sheet. Roast for 25-30 minutes. Stir halfway to get that golden-brown color. While the cauliflower roasts, heat a dry skillet over medium heat. Place your corn tortillas in the skillet, warming them for about 30 seconds on each side. This step makes them soft and easy to fold. Once your cauliflower is roasted and your tortillas are warm, it’s time to assemble your tacos. Just follow the [Full Recipe] for the complete process! To get the best flavor from your cauliflower, follow these simple steps. First, ensure you cut the cauliflower into even florets. This helps them cook at the same rate. Next, always use enough olive oil and spices. This makes each bite tasty. Roast the cauliflower at 425°F (220°C) for 25-30 minutes. Halfway through, stir the florets for even browning. Look for a golden brown color and tender texture. These signs show that your cauliflower is perfectly roasted. When serving your roasted cauliflower tacos, think about balance. Start with a warm tortilla. Add a generous scoop of roasted cauliflower. Then, layer on your favorite toppings. Shredded red cabbage adds crunch. Slices of ripe avocado bring creaminess. Fresh cilantro gives a burst of flavor. For those who like it spicy, drizzle hot sauce on top. Serve with lime wedges for a zesty kick. This combination creates a satisfying meal for everyone. An appealing presentation makes any dish more exciting. Arrange the tacos on a bright platter. This highlights the colorful ingredients. You can garnish with extra cilantro and lime wedges. This adds a fresh touch. For a personal flair, consider adding small bowls of toppings. This way, guests can customize their tacos. A beautiful display not only excites the eyes but also the taste buds! Enjoy your tasty, vibrant meal. For the complete recipe, check the Full Recipe section. {{image_4}} You can change the toppings for your roasted cauliflower tacos. This makes each taco unique. Try adding sliced jalapeños for heat. Fresh salsa can give your tacos a bright flavor. You might want to add crumbled feta cheese for a salty bite. If you love creamy textures, try a drizzle of tahini or ranch dressing. The options are endless, so get creative! While cauliflower shines in these tacos, you can use other veggies too. Roasted sweet potatoes add sweetness and depth. Zucchini or bell peppers can bring a fresh crunch. If you want a meatier option, try mushrooms. They absorb flavors well and add a nice texture. Each veggie swap can change the taco's vibe and taste. These tacos are already vegan and gluten-free with small tweaks. Use gluten-free tortillas to keep them safe for everyone. If you want a creamier texture, try cashew cream instead of sour cream. This keeps it plant-based and yummy. With these options, everyone can enjoy these tasty tacos. For the full recipe, check out the details above! Store your leftover tacos in an airtight container. Place them in the fridge. They stay fresh for up to three days. If you want to keep them longer, consider separating the toppings. This helps maintain their crunch and flavor. To reheat your tacos, use an oven or a skillet. If using an oven, preheat to 350°F (175°C). Wrap the tacos in aluminum foil. Heat for about 10 minutes. If you prefer a skillet, warm it over medium heat. Add the tacos and heat for 3-4 minutes on each side. This keeps them crispy. You can freeze roasted cauliflower for later use. Let it cool completely first. Then, store it in a freezer-safe bag. Remove as much air as possible. Frozen cauliflower can last up to three months. When you’re ready to use it, thaw in the fridge overnight. Reheat as desired, and your meal is ready! For the full recipe, check out Roasted Cauliflower Tacos. You can easily make tacos with leftover roasted cauliflower. Start by warming the tortillas in a skillet. Then, fill each tortilla with the leftover cauliflower. Add your choice of toppings like shredded cabbage, avocado, and cilantro. Squeeze fresh lime juice on top for extra flavor. This method makes for a quick and tasty meal. Yes, you can prepare roasted cauliflower ahead of time. Roast the cauliflower, then let it cool completely. Store it in an airtight container in the fridge. It will stay fresh for about three days. When you’re ready to eat, just reheat the cauliflower in the oven or microwave. This saves you time on busy days. Roasted cauliflower tacos pair well with various side dishes. Here are some ideas: - Black beans seasoned with lime and cilantro - Corn salad with tomatoes and avocado - Simple green salad with a light vinaigrette - Mexican rice flavored with garlic and herbs These sides add color and flavor, making your meal even more satisfying. For the full recipe, check out the detailed instructions above. Roasted cauliflower tacos are tasty and easy to make. We discussed key ingredients, spices, and toppings that enhance flavor. I shared step-by-step instructions to help you roast cauliflower perfectly. We also explored tips for serving and presenting your tacos. You can customize these tacos with many toppings or swap out vegetables. Lastly, I covered how to store leftovers and answered common questions. Enjoy making your tacos and have fun experimenting with your favorite flavors!

Roasted Cauliflower Tacos Flavorful and Satisfying Meal

Are you ready to spice up your taco night? My Roasted Cauliflower Tacos are not just tasty, they’re a fun

- Chicken: 4 boneless, skinless chicken thighs - Marinade Components: 1/4 cup honey, 4 cloves garlic, 2 tablespoons soy sauce - Additional Flavorings: 1 tablespoon olive oil, 1 teaspoon ginger, salt, and pepper - Garnishes: Sesame seeds, green onions - Serving Suggestions: Steamed rice or vegetables To make Simple Honey Garlic Chicken, gather these fresh ingredients. Start with the chicken thighs. They are juicy and cook well with the sweet and savory flavors. You need honey for sweetness and garlic for a strong taste. Soy sauce adds saltiness. Olive oil helps keep the chicken moist. Ginger gives a nice zing. Don’t forget to season with salt and pepper. These are essential! For garnishes, use sesame seeds and green onions to add color and texture. Lastly, serve it with steamed rice or bright veggies for a complete meal. This dish is easy. All these ingredients come together to create a tasty weeknight meal. You can find the Full Recipe in the article for more detailed steps. Enjoy cooking! Start by making the marinade. In a medium bowl, combine honey, minced garlic, soy sauce, olive oil, and grated ginger. Whisk these ingredients together until they blend well. This simple mixture creates a sweet and savory flavor that makes your chicken shine. Next, take the chicken thighs and coat them in the marinade. You can use a large resealable bag or a shallow dish for this part. Make sure each piece is well covered. Seal the bag or cover the dish, then refrigerate it for at least 30 minutes. This step is key for infusing flavor into the chicken. Now it’s time for baking. Preheat your oven to 400°F (200°C). While the oven heats up, you can line a baking sheet with parchment paper. This makes cleanup easier. After marinating, remove the chicken from the bag or dish. Place the chicken thighs on the baking sheet in a single layer. Lightly season the chicken with salt and pepper. Bake for 20 to 25 minutes, until the chicken is cooked through and reaches an internal temperature of 165°F (75°C). While the chicken bakes, take the reserved marinade and pour it into a small saucepan. Heat it over medium heat until it boils. Once boiling, lower the heat and let it simmer. Cook it for about five minutes until the sauce thickens. This sauce will add a delicious finish to your chicken. For the full recipe, visit the Honey Garlic Chicken Delight section. To make your honey garlic chicken stand out, marinate it for at least 30 minutes. However, if you have more time, go for 4 hours. This longer marinating time allows the flavors to soak in. The ideal internal temperature for chicken is 165°F (75°C). Use a meat thermometer to ensure it is safe to eat. One common mistake is skipping the marination process. This step is vital for flavor. Without it, your chicken may taste bland. Another mistake is overbaking the chicken. If you leave it in too long, it can dry out. Keep an eye on it during baking. You can add extra ingredients to boost the flavor. Consider chili flakes for heat or sesame oil for a nutty taste. For sides, serve the chicken with steamed rice or seasonal vegetables. These pair well and make your meal balanced. For the full recipe, check out the complete guide above. {{image_4}} You can easily spice up your honey garlic chicken. To do this, add chili flakes or a few drops of hot sauce to the marinade. This will give the dish a nice kick. I love using about a teaspoon of chili flakes for a good balance. If you like it hotter, feel free to add more! If you plan to serve more people, you can adjust the recipe. Simply multiply the ingredient amounts by the number of servings you need. For example, if you want to serve eight, double the honey, garlic, and chicken. This way, everyone gets to enjoy the sweet and savory flavor. Just make sure to cook the chicken in batches if your oven cannot fit it all at once. You can swap chicken thighs for other proteins. Chicken breasts work well too. They cook faster and are leaner. If you prefer a meat-free option, try tofu. Press and cube the tofu before marinating. This allows the flavors to soak in. Both options will still give you that great honey garlic taste. For the full recipe, check out the link to guide you through the cooking process. To keep your honey garlic chicken fresh, store it in an airtight container. Let it cool down first. Place it in the fridge. It will stay good for up to three days. Be sure to label the container with the date. This way, you know when to eat it. You can freeze honey garlic chicken for later. Wrap each piece tightly in plastic wrap. Then, place them in a freezer bag. Remove as much air as you can. This helps to prevent freezer burn. It can last for up to three months in the freezer. When you’re ready to eat, thaw it in the fridge overnight. To reheat your honey garlic chicken, use a few simple methods. The microwave is quick. Place the chicken on a plate. Cover it with a damp paper towel to keep it moist. Heat in short bursts of 30 seconds. Stir or flip it to heat evenly. You can also use the oven. Preheat it to 350°F (175°C). Place the chicken in a baking dish, cover it with foil, and heat for about 15-20 minutes. This keeps the chicken juicy and tasty. For a crispy finish, uncover it for the last few minutes. For more tips on making this dish, check out the Full Recipe. You can serve honey garlic chicken with many tasty sides. Here are some great options: - Steamed rice - Roasted vegetables - Stir-fried broccoli - Mashed potatoes - Quinoa salad These sides add flavor and help balance the sweetness of the chicken. Enjoy mixing and matching to find your favorite pairings! Yes, you can swap honey for other sweeteners. Some good options include: - Maple syrup - Agave nectar - Brown sugar Each sweetener will change the taste a little. Maple syrup gives a nice flavor, while agave nectar is milder. Use what you have on hand! You can keep honey garlic chicken in the fridge for up to four days. Store it in an airtight container. This keeps the chicken fresh and tasty. Make sure it cools down before you store it! Absolutely! This recipe is perfect for meal prep. You can make a big batch and store it in portions. Just follow these tips: - Marinate chicken on the weekend. - Cook enough for the week. - Store in airtight containers. This way, you will have easy meals ready to go! Yes, grilling is a great option! To grill the chicken, follow these steps: - Preheat your grill to medium-high heat. - Grill chicken for about 6-7 minutes per side. - Check that it reaches 165°F (75°C) inside. Grilling adds a nice smoky flavor. Just be sure to watch it closely so it doesn’t burn! For the full recipe, visit the section above. In this guide, I shared how to make simple honey garlic chicken. We covered the needed ingredients, step-by-step instructions, and tips for a perfect dish. Remember to marinate the chicken for the best taste and avoid overbaking it. You can also try variations like adding spice or using different proteins. Store leftovers properly and enjoy them later. This dish is easy and fun to make, making it a great option for meals. Get ready to impress your friends and family with this tasty recipe!

Simple Honey Garlic Chicken Easy Weeknight Meal

If you’re looking for a quick and tasty dish, try my Simple Honey Garlic Chicken! This easy weeknight meal combines

To make these bars, you need some key ingredients. Here’s what you’ll need: - 1 ½ cups ricotta cheese - 1 cup cream cheese, softened to room temperature - 1 cup granulated sugar - 3 large eggs - Zest of 2 large lemons (about 2 tablespoons) - ⅓ cup freshly squeezed lemon juice - 1 teaspoon pure vanilla extract - ½ cup all-purpose flour - ½ teaspoon baking powder - A pinch of salt - 1 tablespoon butter (for greasing the pan) These ingredients create the creamy, tangy filling. The ricotta adds a smooth texture, while the lemon gives a fresh taste. You can enhance your cheesecake bars with a few extra touches. Here are some optional ingredients to consider: - Fresh berries (like blueberries or raspberries) for topping - A sprinkle of lemon zest on top for added brightness - A dollop of whipped cream for serving - A drizzle of honey for sweetness Adding these ingredients can elevate your dessert, making it even more special. To make your baking easier, you’ll need some basic tools: - A 9x9 inch baking pan - Mixing bowls - Electric mixer or whisk - Rubber spatula - Parchment paper - Wire rack for cooling These tools help you mix, bake, and cool your cheesecake bars with ease. Having everything ready makes the process smooth and fun. For the full recipe, check the details above. First, preheat your oven to 325°F (163°C). Grab a 9x9 inch baking pan. Coat the pan with butter. Line it with parchment paper. Leave some paper hanging over the edges. This helps you lift the cheesecake bars out later. In a large bowl, add 1 ½ cups of ricotta cheese and 1 cup of softened cream cheese. Beat them together with an electric mixer. Mix until it becomes smooth. Then, add in 1 cup of granulated sugar. Keep beating until everything blends well. Next, add 3 large eggs, one at a time. Mix slowly after each egg. Stop mixing when all the eggs are in. Now, add the zest of 2 lemons and ⅓ cup of lemon juice. Include 1 teaspoon of vanilla extract too. Mix until everything is smooth. In a different bowl, whisk together ½ cup of flour, ½ teaspoon of baking powder, and a pinch of salt. Gradually fold this dry mix into the wet mix. Use a spatula and mix just until combined. Don’t overmix; we want the bars to be light! Pour the batter into the prepared pan. Spread it evenly with a spatula. Bake for 35-40 minutes. The edges should be set, but the center will jiggle a bit. The top should look golden. Once done, take it out and let it cool on a wire rack for 1 hour. After that, put it in the fridge for at least 4 hours, or overnight if you can wait. This step makes the flavor even better! When you’re ready, lift the bars out using the parchment paper. Cut them into squares or rectangles. Enjoy your lemon ricotta cheesecake bars! For the full recipe, refer to the previous section. When making lemon ricotta cheesecake bars, it’s easy to make some mistakes. Here are the key points to keep in mind: - Overmixing: Mixing too much can make the bars dense. Mix just until combined. - Not using room temperature cheese: Cold cheese can lead to lumps. Always soften your cream cheese first. - Skipping the chilling step: Don’t rush. Chilling enhances the flavor and sets the texture. To get that creamy, light texture, follow these tips: - Use fresh ricotta: Fresh ricotta will give you a better taste and texture. - Incorporate eggs slowly: Add eggs one at a time. This helps maintain air in the batter. - Bake gently: Keep an eye on the time. The bars should jiggle a bit in the center when done. Serving is just as important as baking. Here’s how to do it right: - Chill before cutting: Always chill the bars for at least 4 hours. This helps with clean cuts. - Use a warm knife: Dip your knife in hot water before cutting. This helps get neat slices. - Garnish for flair: Dust with powdered sugar and add a slice of lemon. This makes the bars look even more inviting. For the full recipe, check out my detailed instructions above. Enjoy your baking adventure! {{image_4}} You can make these lemon ricotta cheesecake bars even more fun! Try adding a berry swirl. Just take some fresh or frozen berries, like strawberries or blueberries. Blend them lightly and swirl them into the batter before baking. You can also add chocolate. Fold in mini chocolate chips for a sweet twist. If you need a gluten-free option, swap the all-purpose flour with almond flour. It keeps the texture light and tasty. You can also use gluten-free baking blends. This way, everyone can enjoy these delicious bars without worry. For a dairy-free version, replace the ricotta and cream cheese with cashew cream. Soak cashews in water for a few hours, then blend them until smooth. Use dairy-free yogurt as a substitute too. This keeps the creaminess while being kind to those avoiding dairy. With these variations, your lemon ricotta cheesecake bars can fit anyone's taste! For the full recipe, make sure to check the detailed steps. Store your leftover cheesecake bars in the fridge. Use an airtight container to keep them fresh. They will stay good for about 5 days. If you plan to keep them longer, consider freezing. To freeze, first let the cheesecake bars cool completely. Then, cut them into squares. Wrap each square in plastic wrap. Place the wrapped bars in a freezer-safe bag or container. They can last up to 3 months in the freezer. To reheat, take a bar out of the fridge or freezer. If frozen, let it thaw in the fridge overnight. For a quick warm-up, use a microwave on low power. Heat for about 10-15 seconds. You want it warm, not hot. Enjoy the fresh taste just like the first bite! Yes, you can use low-fat cheese. It will change the texture a bit. The bars might be less creamy but still taste good. Low-fat cheese can help cut calories. However, I recommend using full-fat cheese for a richer flavor. The bars last about five days in the fridge. Store them in an airtight container. This keeps them fresh and moist. If you notice any changes in smell or texture, it's best to toss them out. You can serve these bars with fresh fruit. Berries like strawberries or blueberries pair well. A dollop of whipped cream adds a nice touch too. Mint leaves can brighten the plate. For something extra, drizzle honey or chocolate sauce on top for a sweet kick. For the full recipe, check out the details above. Lemon ricotta cheesecake bars combine fresh flavors and creamy goodness. We explored all key ingredients, from the main components to tasty extras. Through step-by-step instructions, baking tips, and delicious variations, you can craft the perfect dessert. Remember to store any extras properly to enjoy later. With practice, you'll avoid common mistakes and serve these bars like a pro. Embrace your creativity with flavors and enjoy making this delightful treat!

Lemon Ricotta Cheesecake Bars Delightful and Simple Treat

Looking for a sweet treat that’s both easy and delicious? You’ve come to the right place! My Lemon Ricotta Cheesecake

- 4 plain rice cakes - 1 cup dark chocolate chips - 2 tablespoons coconut oil - 1/4 cup almond butter - 1/4 cup chopped nuts (almonds, walnuts, or pecans) - 1/4 cup dried fruit (cranberries, raisins, or apricots) - Sea salt, for a finishing sprinkle You can swap in different nut butters if you like. Sunflower seed butter works well too. If you want a dairy-free option, use dairy-free chocolate chips. Each serving contains about 200 calories. - Protein: 4g - Fat: 12g - Carbohydrates: 22g These numbers can change based on the nuts and fruits you use. Always check labels for precise values. Dark chocolate offers antioxidants. It may improve heart health and mood. Nuts add protein and healthy fats. Dried fruits provide vitamins and minerals. They also add natural sweetness. This snack combines flavor and nutrition, making it great for any time of day. To start, melt the dark chocolate chips and coconut oil. Use a microwave-safe bowl for this. Heat the mixture in 30-second intervals. Stir after each interval. Keep doing this until the chocolate is smooth and melted. Stirring helps mix the oil and chocolate well. This ensures a nice, silky drizzle. Now, let’s build our rice cakes. Lay the rice cakes flat on a parchment-lined baking sheet. Take about one tablespoon of almond butter. Spread it evenly on each rice cake. This creates a nice base for the chocolate. Next, use a spoon to drizzle the melted chocolate over the almond butter. Get creative! Use a zigzag pattern for a fun look. Once you've drizzled the chocolate, it's time for the toppings. Sprinkle chopped nuts and dried fruit over the chocolate while it’s still warm. This adds a great crunch and flavor. Finally, add a light pinch of sea salt on top. This little touch boosts the sweetness and makes each bite even better. Now, chill the rice cakes in the fridge for 15-20 minutes. This helps the chocolate set and makes them ready to eat. To melt chocolate well, you need to avoid overheating. Use a microwave-safe bowl. Heat the chocolate in short bursts of 30 seconds. Stir it after each burst. This keeps the heat even and helps prevent burning. If you see some lumps, continue stirring. The heat will melt them away. For a silky texture, mix in a little coconut oil. This oil makes the chocolate smooth and shiny. It also helps the chocolate drizzle look great on your rice cakes. Pair your rice cake snacks with a chilled glass of almond milk. The flavors of chocolate and almond butter mix well. You can also serve them with herbal tea. This adds a nice touch of warmth. For presentation, place the snacks on a colorful plate. You can arrange them in a fun pattern. Add a small bowl of almond butter for dipping. This makes it fun and interactive for guests. Store any leftover rice cake snacks in an airtight container. Keep them in the fridge to maintain freshness. This helps the chocolate stay firm and tasty. If you want to keep them longer, freeze the snacks. Wrap each one in plastic wrap. Place them in a freezer-safe container. When you’re ready to eat, let them thaw in the fridge. This keeps them delicious and fresh for later. {{image_4}} You can make your rice cake snacks even better by trying different flavors. Start with nut butters. Almond butter is great, but peanut butter or cashew butter works too. Each nut butter adds its own special taste. You can also mix in toppings. Try coconut flakes for a tropical twist or pumpkin seeds for added crunch. The sky's the limit, so have fun experimenting! If you want a change from dark chocolate, consider white or milk chocolate. Each one gives a new taste. You can also look for sugar-free or dairy-free chocolate. These options let you enjoy your treats while keeping your diet in mind. It’s easy to swap chocolate types. Just melt them like you would with dark chocolate, and you’re good to go! Celebrate the seasons with fun toppings! In winter, add crushed peppermint for a holiday vibe. For fall, try pumpkin spice or cinnamon. You can even add seasonal fruits like fresh berries in summer or apples in autumn. Using fresh fruits not only looks pretty but also gives a burst of flavor. Dress your rice cakes to match the season and enjoy a festive treat! You can find chocolate drizzle rice cake snacks at many stores. Look for brands like Quaker and Nature Valley. They offer tasty options that are easy to grab on the go. Check local grocery stores or big-box retailers for these snacks. You can also buy them online through sites like Amazon or Walmart. Both homemade and store-bought snacks have their benefits. Store-bought snacks are quick and easy. You can grab them on a busy day. However, homemade snacks let you control the quality and flavors. They can be fresher and more fun to make. In terms of cost, homemade snacks may save you money over time. You can make a batch for less than buying individual packs. If you want to make your own snacks, buying quality ingredients is key. Look for dark chocolate chips, almond butter, and rice cakes. You can find these at most grocery stores. For organic options, try local health food stores or specialty shops. Many farmers' markets also sell fresh nuts and dried fruits. This way, you can create a tasty snack with great ingredients. It takes about 10 minutes to prepare the ingredients. You need an extra 15-20 minutes to chill the snacks. So, the total time is around 30 minutes. This quick recipe fits well into a busy schedule. Yes, you can make these snacks ahead of time! Store them in an airtight container in the fridge. They stay fresh for up to three days. Just be sure to let them sit at room temperature for a few minutes before serving. You can mix and match toppings based on your taste. Here are some ideas: - Use peanut butter or sunflower seed butter instead of almond butter. - Try different nuts like pistachios or hazelnuts. - Add coconut flakes for a tropical twist. - Use seeds like chia or pumpkin for crunch. - Drizzle with caramel or honey for extra sweetness. These options let you customize your snacks to fit any diet or craving. This blog post covered how to make Chocolate Drizzle Rice Cake Snacks. We discussed the key ingredients, their health benefits, and how to prepare them step-by-step. You learned tips for melting chocolate, serving ideas, and storage advice. In conclusion, these snacks are simple to make and can fit many tastes. Whether you choose to buy them or make them from scratch, enjoy experimenting with flavors. With a few changes, you can create a treat that’s just right for you.

Chocolate Drizzle Rice Cake Snacks Delightful Treats

Are you ready for a sweet and satisfying snack? Chocolate Drizzle Rice Cake Snacks are here to delight your taste

- 1 pound ground turkey - 1/2 cup whole wheat breadcrumbs - 1/4 cup freshly grated Parmesan cheese - 1/4 cup fresh parsley, finely chopped - 1 clove garlic, minced - 1 teaspoon onion powder - 1 teaspoon Italian seasoning blend - 1 large egg, lightly beaten - 1 teaspoon kosher salt - 1/2 teaspoon freshly ground black pepper - 1/2 cup marinara sauce (for serving) - Fresh basil leaves for garnish Gather these ingredients before you start. Each one plays a key role in making these turkey meatballs tasty and juicy. Using ground turkey keeps them lean, while whole wheat breadcrumbs add a nice texture. Grated Parmesan cheese gives a rich flavor, and fresh parsley brings brightness. Don’t forget the garlic, onion powder, and Italian seasoning. These are the magic touch that makes every bite delicious. The egg helps hold everything together, while salt and pepper add just the right amount of seasoning. Finally, marinara sauce is perfect for dipping, and fresh basil adds a pop of color and flavor. For the full recipe, check the link above. Enjoy the cooking process! Preheat the oven to 400°F (200°C). This step is key for crisp meatballs. In a large bowl, combine the ground turkey with breadcrumbs, cheese, parsley, garlic, egg, onion powder, Italian seasoning, salt, and pepper. Mix until everything is well combined. Avoid overmixing to keep them tender. Take small portions of the mixture and roll them into golf ball-sized meatballs. Each ball should be about 1.5 inches wide. Place the meatballs on a baking sheet lined with parchment paper. Make sure to leave space between each meatball for even cooking. Put the baking sheet in the preheated oven. Bake for 20-25 minutes. The meatballs should turn golden brown. Use a meat thermometer to check that the internal temperature has reached 165°F (74°C). While the meatballs bake, heat your marinara sauce in a small pot over low heat. Stir it gently to keep it from sticking. After baking, let the meatballs rest for about 5 minutes. This helps to lock in all the tasty juices before serving. To make great meatballs, keep them moist. The key is not to overmix the ingredients. When you mix too much, the meatballs can become tough. Just combine everything until it’s mixed well. You want a nice, soft texture that holds together. Spacing your meatballs on the baking sheet is crucial. If they are too close, they won’t cook evenly. Aim for about an inch or so between each meatball. This allows heat to flow around them, giving you a perfect bake every time. These turkey meatballs are super versatile. You can pair them with pasta for a classic dish. They also work great in a sub sandwich, topped with marinara and cheese. Serve them as appetizers with toothpicks for a fun party snack. For more ideas, check the Full Recipe to explore different serving styles. {{image_4}} You can swap ground turkey for ground chicken or beef. Each option gives you a unique taste. Ground chicken is lighter, while beef offers a rich flavor. Try them out for fun twists on this recipe! Want to add heat? Crushed red pepper flakes do the trick. You can also switch up the herbs. Basil, oregano, or thyme can change the flavor. Experiment to find your favorite mix! If you're looking for a gluten-free option, use almond flour instead of breadcrumbs. This swap keeps the meatballs moist while making them healthier. It’s a simple change with a big impact! For the full recipe, check out the main section above! Store any leftovers in an airtight container. They will stay fresh for up to 3 days. This keeps them tasty and safe to eat later. You can freeze the meatballs before baking. Just place them in a freezer bag. They will last for up to 3 months. This makes meal prep easy and quick. To reheat, set your oven to 350°F (175°C). Place the meatballs on a baking sheet. Heat them until warmed through. This keeps them juicy and delicious. For more details, check out the Full Recipe. Yes, you can pre-make and freeze them for later use. This makes meal prep easy. When you're ready to eat, just bake them from frozen. It saves time and still tastes great! Ensure proper binding with breadcrumbs and eggs, and avoid overmixing. Mixing too much can make them tough. Just combine everything until it's blended, then shape them gently. Serve with marinara sauce, over pasta, or in a sandwich for a delicious meal. You can also add a sprinkle of fresh herbs on top for added flavor. For the full recipe, check out the main article! These turkey meatballs combine simple ingredients for a tasty dish. You learned how to prepare them with easy steps. I shared tips for perfect texture and even cooking. You can make variations with different meats or spices. Don't forget about storing leftovers for later meals. Enjoying this recipe will surely please your taste buds. Dive in and create your own delicious turkey meatballs today!

Easy Baked Turkey Meatballs Delicious and Quick Recipe

Looking for a quick and tasty dinner option? These Easy Baked Turkey Meatballs are just the solution! With simple ingredients

- 1 cup quinoa - 1 can black beans (15 oz), drained and rinsed - 1 cup corn kernels, fresh or frozen - 1 red bell pepper, diced into bite-sized pieces - 1 jalapeño pepper, finely diced (seeds removed for a milder flavor) The main ingredients in this dish create a hearty base. Quinoa is full of protein and fiber, making it a great start. Black beans add a rich flavor and more protein. Corn kernels give a nice sweetness and crunch. The bell and jalapeño peppers bring a pop of color and spice. - 1 teaspoon ground cumin - 1 teaspoon smoked paprika - 1 teaspoon chili powder - Salt and pepper to taste The spices and seasonings bring the dish to life. Ground cumin offers a warm, earthy flavor. Smoked paprika gives a hint of smokiness. Chili powder adds heat and depth. Don't forget salt and pepper to enhance all the flavors. - 2 tablespoons olive oil - Juice of 1 fresh lime - 1 ripe avocado, diced - Fresh cilantro leaves for garnish Finally, the additional ingredients complete the bowl. Olive oil helps sauté the veggies for a tender bite. Lime juice brightens the dish with a tangy twist. Avocado adds creaminess, and cilantro brings freshness. For the full recipe, check out the details above! Start by combining the rinsed quinoa and vegetable broth in a medium saucepan. Bring this mixture to a boil over medium-high heat. Once it boils, reduce the heat to low. Cover the pot and let it simmer for about 15 minutes. The quinoa should be light and fluffy when done. All the liquid should be absorbed. After cooking, remove it from the heat and let it rest, covered, for another 5 minutes. This ensures the perfect texture for your dish. While your quinoa cooks, heat olive oil in a large skillet over medium heat. Next, add the diced red bell pepper and jalapeño pepper to the skillet. Sauté these veggies for about 5 minutes. Stir occasionally until they become tender and fragrant. This step brings out their natural sweetness and adds a nice kick. Now it’s time to incorporate the corn and black beans into the skillet. After adding these, sprinkle in the ground cumin, smoked paprika, chili powder, salt, and pepper. Mix everything thoroughly. Cook for another 5 minutes. This allows the flavors to meld together and everything to heat through. Your spicy veggie mixture is almost ready! For the full recipe, check the earlier section. Rinsing quinoa is crucial. It removes the bitter coating called saponin. This step will give your quinoa a clean taste. Always rinse it under cold water before cooking. After cooking, let the quinoa rest. Cover it for 5 minutes once off the heat. This resting time makes it fluffy and light. You can adjust the spice levels to suit your taste. If you like heat, use more jalapeño. For less spice, remove all the seeds. Fresh lime juice adds a bright touch. Squeeze it over the bowl just before serving. This will boost all the flavors and make the dish pop. Layer your ingredients for a beautiful bowl. Start with the fluffy quinoa at the bottom. Then, add the sautéed veggies on top. This creates a nice contrast of colors. Finally, garnish with fresh cilantro leaves. They add a fresh flavor and make it look appealing. Serve with extra lime wedges on the side for added zing. For the full recipe, check the details above. {{image_4}} You can boost your Spicy Southwest Veggie Bowl with protein. Adding grilled chicken makes it heartier. Simply slice cooked chicken breast and place it on top. It adds great flavor and texture. If you prefer a plant-based option, incorporating tofu is a smart choice. Press the tofu to remove moisture, then cube it. Sauté it until golden brown, then add it to the bowl. Both options keep the dish filling and satisfying. For those who want variety, using different beans can change the dish. You might try pinto beans or kidney beans instead of black beans. Each type brings a unique taste and texture. If you want to keep it light, substituting light olive oil is also a good idea. This keeps the dish healthy while adding a nice flavor. You can adapt the spices for a milder taste. If you want less heat, leave out the jalapeño pepper or reduce the chili powder. You can also add sweetness by mixing in some diced mango. For a zesty kick, a sprinkle of lime zest can brighten up the flavors. I always recommend adding fresh herbs like cilantro or parsley for extra brightness. These small changes can make the bowl just right for your taste! Store your Spicy Southwest Veggie Bowl in the fridge for up to four days. Use airtight containers to keep it fresh. Glass or plastic containers with tight lids work best. Make sure to let the bowl cool before sealing it. This helps keep moisture from building up inside. You can freeze the veggie bowl for up to three months. To do this, place the cooled bowl into a freezer-safe container. Make sure to leave some space at the top for expansion. When you are ready to eat, thaw it overnight in the fridge. Reheat in the microwave or on the stove until hot. Watch for signs of spoilage. If the veggies look mushy or have a strange smell, throw them out. Leftovers should be eaten within four days if kept in the fridge. When frozen, they can last longer, but try to eat them within three months for the best taste. Yes, you can prepare this dish in advance. It's great for meal prep. To do this, cook the quinoa and veggies as usual. Let them cool completely before storing. Use airtight containers for the best results. You can keep leftovers in the fridge for up to four days. When you are ready to eat, simply reheat in the microwave. This bowl tastes even better the next day as flavors meld together. Serve with fresh lime juice and avocado for a bright touch. If you want to swap quinoa, there are many options. Brown rice is a great choice. It offers a nutty flavor and chewy texture. You can also use farro or barley for a hearty base. For a gluten-free option, try cauliflower rice. It’s low in carbs and adds a nice crunch. Each of these options will change the taste a bit, but they all work well in the bowl. Experiment to find what you like best. To boost the heat in your veggie bowl, add extra spicy ingredients. You can include more jalapeño peppers, or use a hotter variety like serrano. Another great option is to mix in diced chipotle peppers in adobo sauce. This will give a smoky flavor with heat. You can also sprinkle crushed red pepper flakes on top before serving. Adjust the spice level to fit your taste. Enjoy the kick! This blog post guided you through creating a Spicy Southwest Veggie Bowl. We covered key ingredients, step-by-step cooking instructions, and helpful tips for perfect texture and flavor. You also learned ways to customize the dish to suit your taste and dietary needs. With these techniques, you can make a vibrant meal at home. Experimenting with your bowl can lead to a new favorite. Enjoy the fresh flavors and feel confident trying different variations!

Spicy Southwest Veggie Bowl Flavorful and Healthy Dish

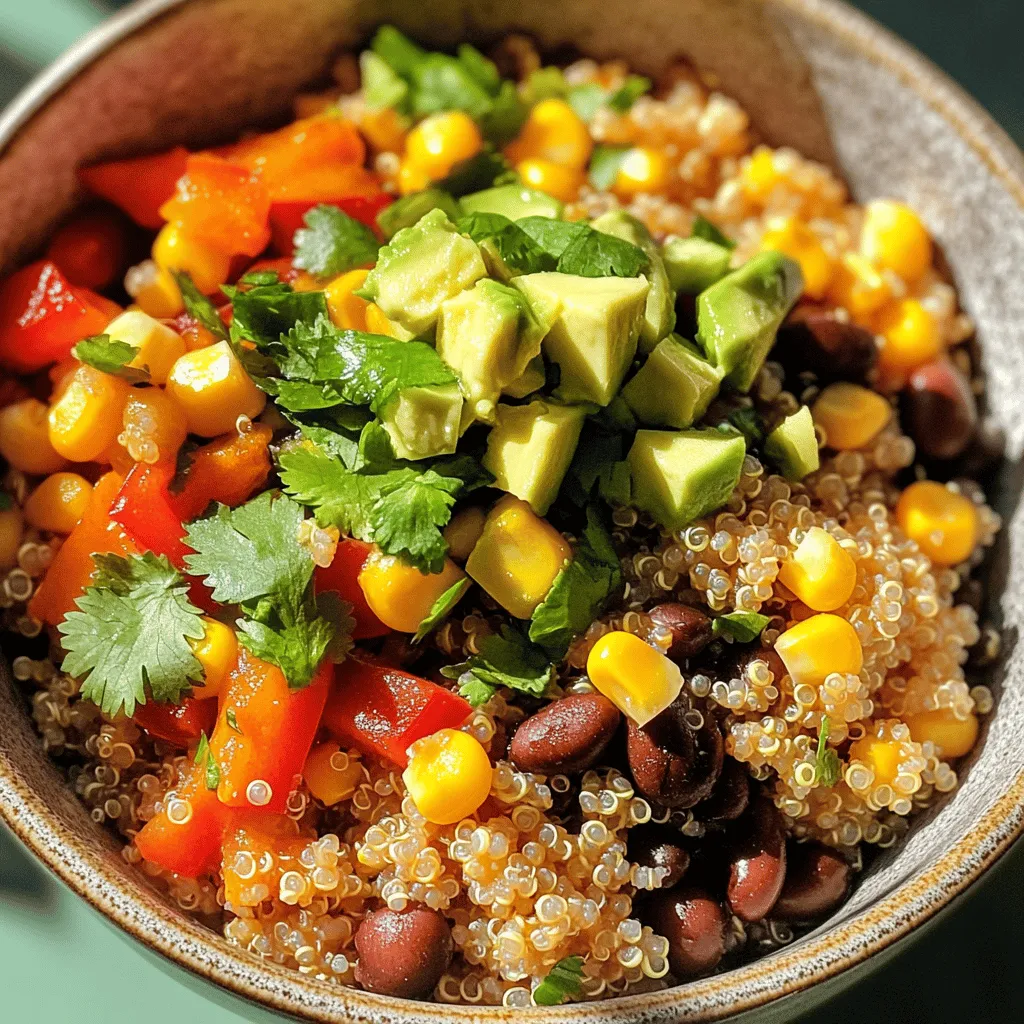
Are you craving a dish that’s both spicy and healthy? The Spicy Southwest Veggie Bowl is the perfect solution! With

- Sturdy French or Italian Bread - Unsalted Butter - Garlic - Dried Parsley Flakes - Italian Seasoning Blend - Shredded Mozzarella Cheese - Grated Parmesan Cheese - Salt and Black Pepper When making cheesy garlic bread, the right ingredients matter. A sturdy loaf holds the toppings well and gives a nice crunch. I suggest using French or Italian bread. Next, you need unsalted butter. Softened butter spreads easily and adds rich flavor. Garlic is key to that classic taste. Use fresh garlic for best results. Dried parsley flakes add a touch of color and flavor. Italian seasoning brings in herbs like oregano and basil for a delightful mix. Cheese is the star of this dish. Shredded mozzarella provides that gooey, melty texture. Grated Parmesan adds a nutty flavor and a nice crust. Don't forget salt and black pepper; they enhance all the flavors. - Alternatives for Butter - Different Cheese Options - Fresh vs. Dried Herbs You can swap out the butter for olive oil if you want a lighter option. It still adds flavor but with a different twist. For cheese, feel free to mix it up! Cheddar or Gouda can bring new tastes. When it comes to herbs, fresh ones can be used instead of dried. Fresh parsley or basil has a vibrant flavor. Just remember to use more fresh herbs than dried, as dried ones are stronger in flavor. For a full guide on making this delicious dish, check out the Full Recipe. - Preheating the Oven Start by preheating your oven to 375°F (190°C). This step is key for getting perfect garlic bread. A hot oven helps the cheese melt and the bread toast nicely. - Slicing the Bread Next, take your loaf of sturdy French or Italian bread. Carefully slice it in half lengthwise. This reveals the soft inside and makes it easier to spread the garlic butter. - Combining Ingredients In a medium bowl, mix 4 tablespoons of softened unsalted butter with 3 finely minced garlic cloves. Add 1 teaspoon of dried parsley flakes and 1 teaspoon of Italian seasoning blend. Don’t forget a pinch of salt and black pepper. Stir everything together with a fork until smooth and creamy. - Achieving the Right Consistency Your garlic butter should be well mixed but not too runny. If it feels too thick, let it sit for a minute. This helps it spread better on the bread. - Spreading the Garlic Butter Now, take your garlic butter mixture and spread it evenly over the cut sides of each bread half. Make sure to cover every bit. This ensures each bite is full of flavor. - Layering the Cheeses After spreading the butter, sprinkle 1 cup of shredded mozzarella cheese over the bread. Then, add 1/2 cup of grated Parmesan cheese on top. This helps create that cheesy, gooey texture we all love. - Baking and Broiling Instructions Place both bread halves cut side up on a baking sheet. Bake them in the preheated oven for about 12-15 minutes. You want the cheese to bubble and turn golden. For a crispy top, broil for an extra 2-3 minutes. Keep a close eye to avoid burning. Once perfect, let them cool for a minute and slice for serving. Enjoy this Easy Cheesy Garlic Bread with your favorite meal or as a snack! For the full recipe, refer back to the ingredients listed earlier. - Importance of Ingredient Quality Good ingredients make great garlic bread. Choose fresh garlic for the best taste. Use a sturdy loaf, like French or Italian bread. This helps hold all the toppings. Quality cheese, like mozzarella and Parmesan, adds rich flavor. - Best Practices for Spreading Spread the garlic butter evenly on the bread. Use a butter knife or spatula. Make sure to get into all the nooks and crannies. This ensures every bite is full of flavor. Don’t skimp on the garlic butter; it’s key to the taste. - Monitoring Baking Time Keep an eye on your garlic bread while it bakes. Ovens can vary, so check it a few minutes early. You want the cheese bubbly and golden, not burnt. If it looks good, it probably is! - Adding Extra Seasonings Get creative with flavors! Add red pepper flakes for heat. Try fresh herbs like basil or thyme for a fresh note. A sprinkle of lemon zest can brighten the taste. Don’t be afraid to experiment! - Tips for a Cheesy Crust For a crunchy cheesy crust, use a mix of cheeses. Blend mozzarella with fontina or cheddar. Add a layer of Parmesan on top for extra crispiness. Broil for a minute or two to get that golden finish. Enjoy the delightful crunch! {{image_4}} You can change the flavor of your cheesy garlic bread by using different cheeses. Mozzarella gives a great melt, but you can try: - Cheddar: This cheese adds a sharp taste. - Gouda: Use this for a creamy and smoky flavor. - Fontina: It melts well and has a rich taste. - Feta: Crumble it on top for a salty kick. Mixing cheeses can create a unique flavor profile. Experiment to find your favorite combo! To make your garlic bread even better, add some flavor boosters. Fresh herbs can brighten the taste. Try these options: - Basil: Adds a sweet, aromatic touch. - Chives: Give a mild onion flavor. - Oregano: It pairs well with Italian dishes. You can also add some veggies for extra flavor. Consider: - Diced tomatoes: They add sweetness and moisture. - Sliced bell peppers: They bring crunch and color. Cheesy garlic bread is perfect for many meals. You can serve it with: - Marinara sauce: A classic dip that pairs well. - Hummus: A healthy option that adds creaminess. - Spinach dip: It makes for a tasty, warm pairing. You can also use cheesy garlic bread in meal themes. Try it with pasta nights or serve it on a pizza night. You can even cut it into strips for a fun appetizer at parties! To keep your cheesy garlic bread fresh, wrap it in foil or plastic wrap. You can also use an airtight container. This method helps keep the bread moist while protecting it from air. Store it in the fridge for up to three days. If you want to keep it longer, freezing is a great option. Just slice the bread first for easy serving later. When it's time to enjoy your leftovers, you can use either the oven or the microwave. The oven gives the best results for reheating. Preheat your oven to 350°F (175°C). Place the bread on a baking sheet and heat for about 10 minutes. This keeps the bread crispy and warm. If you are in a hurry, the microwave works too. Just place the bread on a microwave-safe plate. Heat for about 30 seconds. However, this method may make the bread soft, so use it only if you need to. To maintain that crispy texture, always prefer the oven. It helps the cheese melt perfectly while keeping the outside crunchy. Enjoy your cheesy garlic bread just like it was fresh from the oven! For the complete recipe, check out the Full Recipe section. Homemade garlic bread lasts about 2 to 3 days. Keep it in an airtight container. You can also wrap it in foil or plastic wrap to keep it fresh. After a few days, the bread may get stale but still tastes good. Consider toasting it to bring back some crunch. Yes, you can freeze cheesy garlic bread! Wrap it tightly in foil or plastic wrap. It will stay fresh for up to 3 months in the freezer. When you want to eat it, let it thaw in the fridge overnight. Then, bake it at 375°F (190°C) for 15 to 20 minutes. Cheesy garlic bread pairs well with many dishes. Here are some great ideas: - Pasta with marinara sauce - Soup, like tomato or minestrone - Salad with a light dressing - Grilled meats or veggies - A charcuterie board Yes, you can use whole wheat bread! It adds a nice, nutty flavor. Just make sure the bread is sturdy enough to hold the toppings. Whole wheat bread may change the texture a bit but will still taste delicious. Enjoy your easy cheesy garlic bread with this twist! This blog post covered how to create the best garlic bread. You learned about key ingredients and their substitutions. I shared step-by-step instructions for prep, mixing, and baking. Tips for perfect garlic bread included quality ingredients and monitoring baking time. In the end, garlic bread is simple and fun to make. Customize it with your favorite flavors. With the right techniques, you can impress everyone at the table. Enjoy your garlic bread journey!

Easy Cheesy Garlic Bread Simple and Tasty Recipe

If you love garlic bread, you’re in for a treat! In this post, I’ll show you how to make Easy

Here’s what you need to make crispy air fryer Brussels sprouts. Gather these items: - 1 pound Brussels sprouts, trimmed and halved - 2 tablespoons olive oil - 1 teaspoon garlic powder - 1/2 teaspoon smoked paprika - 1/4 teaspoon freshly ground black pepper - 1/2 teaspoon sea salt - Optional toppings: balsamic glaze and shaved Parmesan cheese These ingredients create a delightful blend of flavors. The Brussels sprouts get crispy and tasty, while the seasonings add depth. You can adjust the spices to match your taste. If you want something extra, drizzle balsamic glaze on top or add some shaved Parmesan cheese. This will make the dish even more special. For the full recipe, check out the complete guide. First, set your air fryer to 375°F (190°C). This usually takes about 5 minutes. Preheating helps the Brussels sprouts cook quickly and get crispy. Next, grab a large bowl. Add 1 pound of halved Brussels sprouts. Pour in 2 tablespoons of olive oil. Then, add 1 teaspoon of garlic powder, 1/2 teaspoon of smoked paprika, 1/4 teaspoon of black pepper, and 1/2 teaspoon of sea salt. Mix well with your hands or a spatula. Each sprout should be coated with oil and spices for the best flavor. Carefully place the seasoned Brussels sprouts in the air fryer basket. Arrange them in a single layer. Do not overcrowd the basket; this helps them stay crispy. If you have too many, fry them in batches. Cook for 15-18 minutes at 375°F. Halfway through, shake the basket to ensure even cooking. When they look golden brown and crispy, they are ready to enjoy! Optionally, drizzle with balsamic glaze and top with shaved Parmesan cheese for extra flavor. For the complete recipe, check out the Full Recipe section. To get crispy Brussels sprouts, follow these tips: - Preheat your air fryer. Set it to 375°F (190°C) for about 5 minutes. - Don’t overcrowd the basket. Lay the sprouts in a single layer. This helps them cook evenly. - Shake the basket halfway. This ensures all sides get that perfect golden brown. Want to boost the taste? Here are some ideas: - Try different seasonings. Add chili powder for heat or lemon zest for freshness. - Top with fresh herbs. Basil or parsley adds a nice touch. - Consider unique toppings. Crumbled feta or toasted nuts can give extra flavor and crunch. Serving matters! Here’s how to make your dish shine: - Use a colorful plate. This makes the Brussels sprouts pop visually. - Garnish with herbs. A sprig of parsley adds a fresh look. - Serve with a drizzle. A small bowl of balsamic glaze next to the sprouts invites guests to add more flavor. For the full recipe, check the section above! Enjoy your crispy Brussels sprouts! {{image_4}} You can change up the flavors with different spices. If you like heat, add cayenne pepper or chili flakes to the mix. For a fresh twist, try using rosemary or thyme. These herbs pair well with Brussels sprouts and add a nice aroma. You can also use lemon zest for a bright flavor. Experiment and see what you enjoy most! If you're out of olive oil, you can use avocado oil or melted coconut oil. Both work well and keep the sprouts crispy. For a dairy-free option, skip the Parmesan cheese or try a vegan cheese. Nutritional yeast can also give a cheesy flavor without the dairy. These substitutes will help you keep the dish delicious and healthy. Don’t worry if you don’t have an air fryer. You can roast Brussels sprouts in the oven. Preheat your oven to 400°F (200°C). Toss the sprouts with oil and seasonings just like before. Spread them out on a baking sheet and roast for 20-25 minutes. Stir them halfway through for even cooking. If you prefer to sauté, heat a pan over medium heat with oil. Add the sprouts and cook for about 10-15 minutes, stirring often. Both methods will give you great results! For more details, check the Full Recipe. To store your leftover crispy Brussels sprouts, let them cool first. Place them in an airtight container. This keeps them fresh for up to three days in the fridge. If you want to avoid sogginess, do not cover them tightly. A loose lid allows some air to flow, keeping them crispy. When you are ready to eat the leftovers, reheat them in the air fryer. Set it to 350°F (175°C) for about five to seven minutes. This method helps restore their crispy texture. You can also use a regular oven. Place them on a baking sheet and heat at the same temperature. Avoid using the microwave, as it may make them soft. You can freeze Brussels sprouts, but it’s best to do it before cooking. Clean and trim them, then blanch in boiling water for three minutes. Cool them in ice water, then drain and dry. Place the sprouts in a freezer bag, removing as much air as possible. They can stay in the freezer for up to six months. When you are ready to cook them, just air fry from frozen. For the full recipe, check the details above. To reduce bitterness, try soaking them in cold water for 30 minutes. This helps draw out some of the bitter flavors. You can also add a pinch of sugar when seasoning. Cooking Brussels sprouts with oil, salt, and spices enhances their flavor. Roasting or air frying can caramelize the natural sugars, making them taste sweeter. Yes, you can use whole Brussels sprouts! However, cooking them whole will take longer. They may not get as crispy as halved ones. If you choose to air fry them whole, cook them for about 20-25 minutes. Check for doneness by piercing them with a fork. Halved Brussels sprouts cook faster and crisp up better. Cooked Brussels sprouts can last for about 3 to 5 days in the fridge. Store them in an airtight container to keep them fresh. Make sure they cool down before you seal them. Reheat them in the air fryer or oven for best results. This way, they stay crispy and tasty. You now have a clear guide for perfect Brussels sprouts in an air fryer. We covered the right ingredients, step-by-step instructions, and tips for the best results. Remember, crispy and tasty sprouts are within your reach. Feel free to mix in your favorite spices or toppings. Enjoy your cooking adventure!

Crispy Air Fryer Brussels Sprouts Easy and Flavorful Dish

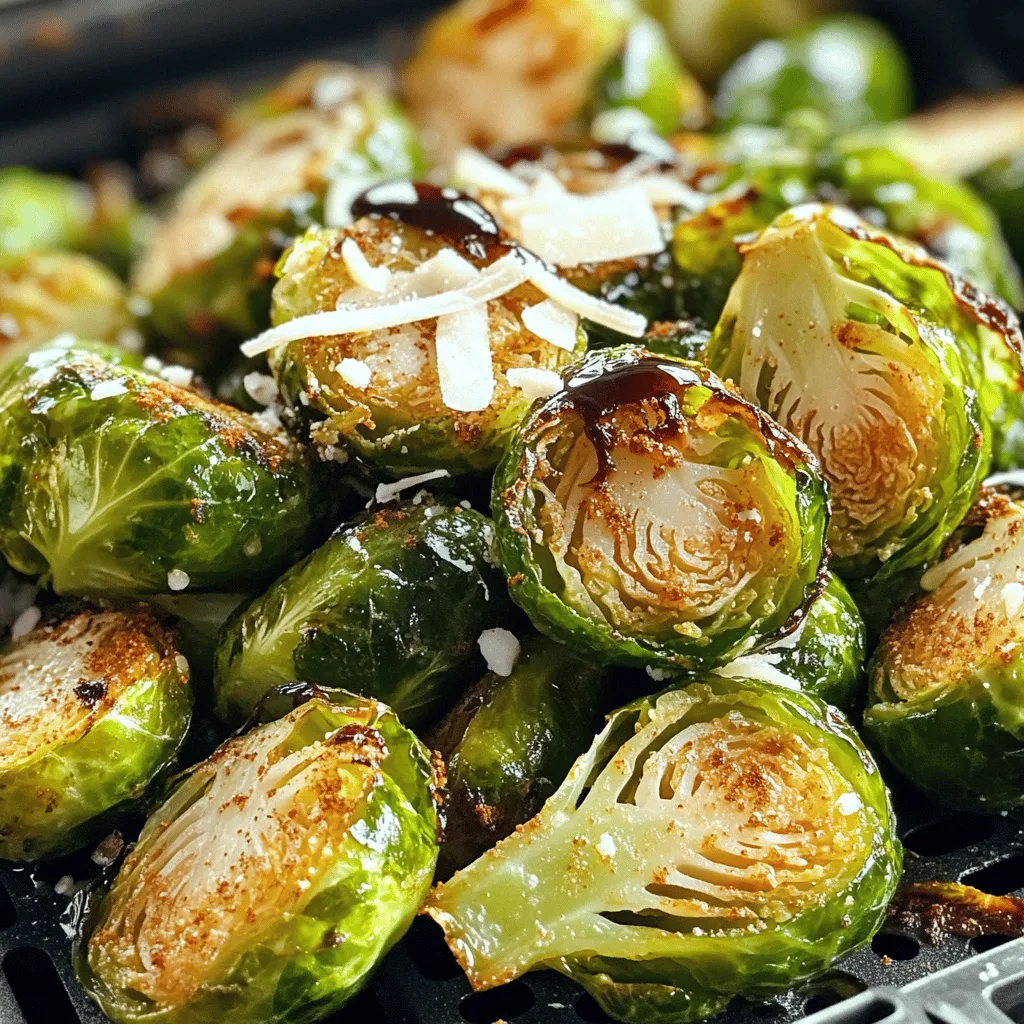
Looking for a quick, flavorful, and healthy side dish? Try my Crispy Air Fryer Brussels Sprouts! With just a few

Older posts
Page1 Page2 … Page55 Next →

dsad

© 2025 eataroundit • Built with GeneratePress

Our Policies

  • Copyright Policy
  • Cookie Policy
  • GDPR Policy
  • Privacy Policy
  • Disclaimer
  • Terms Of Use

More Information

  • Home
  • About
  • Contact
  • Appetizers
  • Dessert
  • Dinner
  • Drinks
©2025, eataroundit About Back To Top