Skip to content
DisclaimerTerms Of UseGDPR PolicyCookie Policy

eataroundit

  • Home
  • Drinks
  • Appetizers
  • Dinner
  • Dessert
  • About
  • Contact
  • Privacy Policy
DisclaimerTerms Of UseGDPR PolicyCookie Policy

Hannah

To make a Peach Melba Smoothie, you need some key ingredients. Here’s a quick look at what you’ll use: - 2 ripe peaches, pitted and finely diced - 1 cup fresh raspberries (frozen works too) - 1 ripe banana, sliced into rounds - 1 cup Greek yogurt for creaminess - 1 cup almond milk (or any milk you like) - 2 tablespoons honey or maple syrup (adjust for sweetness) - 1 teaspoon pure vanilla extract for flavor - Ice cubes (optional for a thicker texture) The peaches bring a sweet and juicy base. Raspberries add a tangy twist, while the banana makes it smooth. Greek yogurt gives it a rich creaminess, and almond milk keeps it light. You can use honey or maple syrup to sweeten it up, and vanilla extract enhances the flavor. If you want a colder drink, toss in some ice cubes. This mix provides a great balance of flavors and textures. Enjoy! For the Full Recipe, check the complete instructions and measurements laid out for you. First, wash your peaches and raspberries. Rinse them well under cold water. This step ensures that your smoothie is clean and fresh. If you choose frozen raspberries, you don’t need to thaw them. They will blend perfectly as they are. Next, slice the banana. Cut it into even rounds. This helps the banana blend smoothly with the other fruits. Aim for pieces about half an inch thick. This size ensures they mix well without any chunks. Now, let's layer the ingredients in the blender. Start with the diced peaches at the bottom. Next, add the raspberries and banana slices. This order helps the blender mix everything evenly. Pour in the Greek yogurt and almond milk on top of the fruit. Add honey or maple syrup and the vanilla extract last. This layering method makes blending easier and gives a creamy texture. Blend the mixture on high speed. Keep blending until it’s smooth and creamy. If you want a thicker smoothie, add ice cubes. Blend again and check the thickness. Add more ice if needed. After blending, taste your smoothie. If it needs more sweetness, add a bit more honey or syrup. Blend again to mix it well. Finally, pour the smoothie into pre-chilled glasses. This keeps the drink cool and refreshing. For a fun touch, garnish with whole raspberries and a peach slice on the rim. A drizzle of honey on top adds shine and sweetness. Enjoy this creamy and refreshing treat! To make a great Peach Melba smoothie, use fresh, ripe fruits. Fresh peaches and raspberries not only taste better but also blend well. If you can’t find ripe peaches, look for ones that are slightly soft to the touch. They should smell sweet and fruity. If you want a thicker smoothie, try adding alternatives like oats or chia seeds. They add texture and nutrition. You can also use frozen fruits, which help create a creamy base without ice. Garnishing your smoothie can make it look even more appealing. Place whole raspberries on top and add a slice of peach on the glass rim. A light drizzle of honey adds shine and sweetness. This simple touch elevates your drink’s appearance. Consider serving your Peach Melba smoothie in clear glasses. This allows the beautiful colors to shine through. For different occasions, like brunch or a picnic, use vibrant straws or fun cups. They make sipping even more enjoyable. If you have leftover smoothie, store it in an airtight container. The fridge keeps it fresh for up to two days. However, smoothies lose their texture over time. To enjoy it later, re-blend the smoothie. This helps mix it up again and restore its creamy texture. If it’s too thick after storage, add a splash of almond milk before blending. This keeps it delicious and refreshing. {{image_4}} You can change up your Peach Melba Smoothie by adding tropical fruits. Try adding mango or pineapple for a fun, new flavor. These fruits bring a sweet and zesty touch. For a complete tropical feel, substitute coconut yogurt for Greek yogurt. This swap adds a creamy texture and a hint of coconut flavor. Want a berry boost? Incorporate mixed berries like blueberries and strawberries. This adds color and a burst of flavor. You might need to adjust the sweetness based on the fruits you choose. Berries can vary in sweetness, so taste as you blend! For an extra nutrition kick, add protein powder or nut butter. This makes your smoothie more filling and great for breakfast. If you add these ingredients, you may need to adjust the liquid amount. More ingredients can thicken the smoothie, so add almond milk slowly until you reach your desired consistency. For the full recipe, check out the detailed section above. Yes, you can use frozen fruits. Frozen peaches and raspberries work great. They add a chill and thick texture. Using frozen fruit also means you can enjoy your smoothie any time of year. Frozen fruits often taste sweet and fresh. They are picked at their peak ripeness and flash-frozen. This helps preserve flavor and nutrients. To make your smoothie vegan-friendly, choose plant-based yogurt. Almond or coconut yogurt works well. For milk, use almond milk, coconut milk, or oat milk. These options keep your smoothie creamy. Instead of honey, use maple syrup or agave nectar for sweetness. This keeps it plant-based while still being delicious. Store your leftover smoothie in the fridge. Use an airtight container to keep it fresh. It usually stays good for 1-2 days. If you want to save it longer, pour it into ice cube trays and freeze. When you’re ready, just blend the frozen cubes into a new smoothie. This keeps the taste and texture just right. This Peach Melba smoothie is a creamy and refreshing treat that is perfect for any time. Here’s how to make it! Ingredients: - 2 ripe peaches, pitted and finely diced - 1 cup fresh raspberries (you can also use frozen) - 1 ripe banana, sliced into rounds - 1 cup Greek yogurt for creaminess - 1 cup almond milk (or your preferred milk variety) - 2 tablespoons honey or maple syrup (feel free to adjust based on your sweetness preference) - 1 teaspoon pure vanilla extract for flavor enhancement - Ice cubes (optional, to achieve a thicker and colder texture) Instructions: 1. Start by washing the peaches and raspberries. If using frozen raspberries, no thawing needed. 2. In your blender, combine the diced peaches, fresh raspberries, and sliced banana. Spread them evenly. 3. Pour in the Greek yogurt and almond milk. Add honey or maple syrup and vanilla extract on top. 4. Blend it all on high speed until smooth and creamy. If you want it thicker, add ice cubes and blend again. 5. Taste your smoothie. Adjust the sweetness by adding more honey or syrup if you like. 6. Pour the smoothie into pre-chilled glasses. This keeps it refreshingly cool. Prep Time: 10 minutes Total Time: 10 minutes Servings: 2 For a beautiful presentation, garnish each glass with whole raspberries and a slice of peach. Drizzle a little honey on top for extra shine and sweetness. Enjoy this vibrant and delicious smoothie! In this blog post, I covered how to make a Peach Melba Smoothie. You learned about the key ingredients like fresh peaches, raspberries, and yogurt options. I detailed step-by-step instructions for preparation and blending. I also shared tips for texture, presentation, and storage. Finally, we explored fun variations, like adding tropical fruits or protein. Now, you have everything to create your own flavorful Peach Melba Smoothie. Enjoy experimenting and make it your own!

Peach Melba Smoothie Creamy and Refreshing Treat

Dive into a bowl of sunshine with my Peach Melba Smoothie! This creamy and refreshing treat combines juicy peaches, tangy

- Dried hibiscus flowers - Fresh raspberries - Honey or agave syrup To make Raspberry Hibiscus Iced Tea, you need a few key ingredients. Dried hibiscus flowers give this drink its beautiful color and tart flavor. You can find these flowers in most grocery stores or online. Fresh raspberries add a sweet touch and a pop of freshness. You can use them whole or mash them slightly for a stronger flavor. Honey or agave syrup sweetens the tea, and you can adjust the amount based on your taste. - Fresh mint leaves - Lemon juice - Ice cubes Adding fresh mint leaves can bring a cool twist to your iced tea. You can crush them slightly to release their flavor. A splash of lemon juice brightens the drink and adds a zesty kick. Ice cubes are essential to keep your tea refreshingly cold. You can even freeze some raspberries to use as ice cubes for an extra touch. For the full recipe, check out the detailed steps to create this summer delight. - Boil water In a medium saucepan, bring 6 cups of water to a rolling boil. Use medium-high heat for this. - Steep hibiscus flowers Once the water boils, remove the saucepan from heat. Add 2 cups of dried hibiscus flowers. Let them steep for 15-20 minutes. The water will turn a deep crimson color. - Strain tea and add sweetness After steeping, strain the hibiscus tea into a large pitcher. Discard the flowers. While the tea is warm, add 1/2 cup of honey or agave syrup. Stir until it dissolves. Taste it and adjust the sweetness if you want. - Combine raspberries and lemon juice Gently fold in 1 cup of fresh raspberries. Then, add 2 tablespoons of freshly squeezed lemon juice. Stir softly to mix without breaking the raspberries too much. - Chill tea before serving Let the tea cool at room temperature for 30 minutes. Then, refrigerate it for 1-2 hours until it's chilled. - Garnish and serve Fill glasses with ice cubes. Pour the chilled raspberry hibiscus tea over the ice. For garnish, add a few extra raspberries and a sprig of fresh mint leaves if you like. For the full recipe, check the details above. Enjoy your refreshing summer drink! Taste your tea after mixing in the honey or agave syrup. Start with half a cup, then add more if needed. Remember, you can always add more sweetness but not take it out. Mix well and taste again. This way, you find the perfect balance for your palate. For the best flavor, steep dried hibiscus flowers in hot water for 15-20 minutes. Use a medium saucepan and bring 6 cups of water to a boil. Remove from heat, then add the flowers. This helps release their bright, tart flavor. Strain the tea using a fine mesh strainer to remove the flowers. You want a smooth drink, not gritty. Serve the tea in clear glasses to show off its rich, crimson color. This makes your drink look as good as it tastes. Consider adding a slice of lemon on the rim for a fresh touch. Garnish with fresh raspberries and mint leaves for a pop of color and flavor. Your friends will love the look and taste! {{image_4}} You can change the taste of your raspberry hibiscus iced tea easily. Adding citrus gives it a bright twist. Try using fresh oranges or limes. Their zesty notes pair well with the sweet raspberries and tart hibiscus. You can slice the fruit and add it directly to your tea for extra flavor. Another fun option is to infuse herbs. Mint and basil bring a refreshing note to the drink. Just add a handful of fresh leaves while the tea cools. This step makes your tea even more vibrant and aromatic. If you want to skip honey, there are other sweetener options. Stevia is a great choice for a low-calorie option. It adds sweetness without extra sugar. You can also try agave syrup, which is more natural. Taste your tea as you add sweeteners. This way, you can adjust to your liking. Remember, everyone has different tastes, so find what works for you. You can make a fun mocktail with this tea. Just add some sparkling water for a fizzy touch. Pour your chilled raspberry hibiscus tea over ice and top with sparkling water. This gives you a refreshing drink for parties. It’s a great way to enjoy summer flavors without alcohol. You can also add garnishes like fresh fruit slices or herb sprigs to make it fancy. Enjoy this vibrant drink at any gathering! To keep your raspberry hibiscus iced tea fresh, store it in a sealed container. A glass pitcher works well. Keep it in the fridge right after it cools down. This way, it stays cold and tasty for longer. Always leave a little space at the top of the container. This helps prevent spills and allows for some expansion. How long can you keep this iced tea in the fridge? You can enjoy it for about 5 to 7 days. After that, the flavors may fade. If you notice any odd smells or changes in color, it’s best to toss it out. Always trust your senses when it comes to checking freshness. Want to save some for later? You can freeze hibiscus tea! Pour the cooled tea into ice cube trays. Once frozen, pop the cubes into a freezer bag. This way, you can add them to drinks or make future batches. Just remember to use them within 3 months for the best flavor. Hibiscus tea is full of antioxidants. These help fight free radicals in your body. Antioxidants can boost your immune system and protect your cells. This tea also supports hydration. Staying hydrated helps your skin look fresh and bright. Plus, hibiscus tea can help lower blood pressure. Some studies show that drinking it regularly may improve heart health. You can use fresh hibiscus flowers, but dried flowers are easier to work with. Dried flowers have a more concentrated flavor. Fresh flowers may not give you the same strong taste. If you use fresh flowers, be sure to adjust the amount. You may need more fresh flowers to match the flavor of dried ones. You can find hibiscus flowers at local grocery stores. Look in the tea aisle or the herbal section. Health food stores often carry them too. If you prefer online shopping, many sites sell dried hibiscus flowers. Just make sure to choose a trusted brand. You want high-quality flowers for the best flavor in your tea. For the full recipe, check out the details above! In this article, we explored how to make delicious hibiscus iced tea. We covered the essential ingredients like dried hibiscus flowers, fresh raspberries, and sweeteners. You learned step-by-step instructions for preparation, mixing, and serving. We discussed tips for adjusting sweetness and enhancing flavors. Finally, we shared storage options and answered common questions. Now you have all the tools to create your own refreshing drink. Enjoy the flavors and health benefits of hibiscus tea!

Raspberry Hibiscus Iced Tea Refreshing Summer Drink

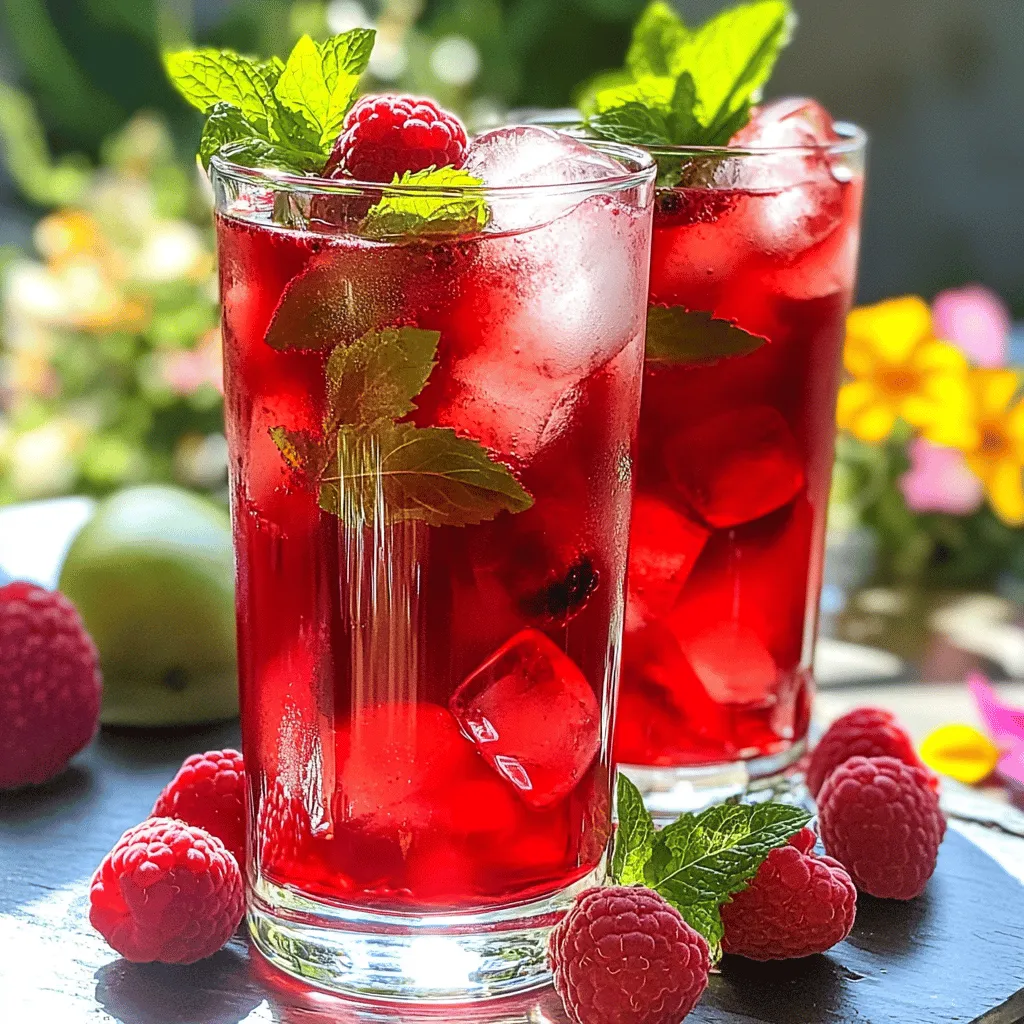
Looking to cool down this summer? Let’s make a delicious Raspberry Hibiscus Iced Tea! This vibrant drink combines the tangy

- Plain rice cakes - Dark chocolate chips (or alternative) - Coconut oil The key to this treat is the balance of flavors. Rice cakes give a crisp base. Dark chocolate chips add depth and richness. Coconut oil helps the chocolate melt smoothly. - Unsweetened shredded coconut - Mixed nuts (finely chopped) - Sea salt Toppings bring texture and flavor. Shredded coconut adds a tropical twist. Chopped nuts give a crunchy contrast. A sprinkle of sea salt enhances the chocolate's sweetness. - Additional flavorings (vanilla extract, etc.) - Colorful sprinkles You can make these treats even more fun. A splash of vanilla makes the chocolate richer. Colorful sprinkles add a festive touch for kids or parties. For the full recipe, check the previous section. To start, I combine dark chocolate chips and coconut oil in a microwave-safe bowl. The coconut oil helps the chocolate melt smoothly. Next, I heat the mixture in the microwave. I do this in 30-second intervals. After each round, I stir well. This keeps the chocolate from burning and helps it become silky smooth. While the chocolate melts, I prepare the rice cakes. I arrange them neatly on a piece of parchment paper. This step is key; it prevents sticking and makes cleanup easy. With the rice cakes set, I can move on to the fun part. Once the chocolate is melted, I grab a spoon. I artistically drizzle the melted chocolate over each rice cake. I like to make a zigzag pattern for a pretty look. If some chocolate drips off, I let it fall back into the bowl. This way, I avoid clumps. Before the chocolate sets, I sprinkle shredded coconut and finely chopped nuts over the top. This adds crunch and flavor. After topping the rice cakes, I let them sit at room temperature for about 10 to 15 minutes. This allows the chocolate to harden. If I want them ready faster, I can put them in the fridge for about 5 minutes. This ensures they set up nicely. For the full recipe, check the details above. To make the best chocolate drizzle, avoid overheating the chocolate. Heat it slowly in the microwave. Use short bursts and stir well. This keeps the chocolate smooth. If it gets too hot, it can seize and become clumpy. For patterns, use a spoon for a zigzag or swirl. You can also use a piping bag for more control. This makes your rice cakes look fancy and fun. You can change the flavor easily. Dark chocolate is rich, while milk chocolate is sweeter. Try white chocolate for a creamy touch. Each type brings its own joy to the treat. Mix in different nuts for crunch. Almonds, walnuts, and hazelnuts are great choices. Add dried fruits like cranberries or apricots for extra flavor. Get creative with toppings to make each bite unique. Make your rice cakes shine at any event. For parties, serve them on a colorful platter. Arrange them in a circle or stack them for height. Add some fresh fruit around the edges for color. For special occasions, use decorative paper or fun plates. You can even package them as gifts. Simply place them in a box with a clear lid. This way, everyone will see your tasty creation. For a full recipe, check out the details above. Enjoy making your chocolate drizzled rice cakes! {{image_4}} You can choose different types of chocolate to drizzle on your rice cakes. Milk chocolate adds a sweet touch. Dark chocolate gives a rich flavor. White chocolate is creamy and sweet. You can also try flavor-infused chocolates like orange or mint for a fun twist. Want to make these rice cakes vegan? Just swap dark chocolate for a dairy-free version. For gluten-free needs, ensure your rice cakes are certified gluten-free. If you follow a keto diet, use sugar-free chocolate chips. These small changes let everyone enjoy this treat. Add extra taste by mixing in spices. A sprinkle of cinnamon or nutmeg can make a big difference. You can also pair your rice cakes with fruits. Bananas and strawberries add freshness and color. This way, you can create a delightful mix of flavors with every bite. Store your chocolate drizzled rice cakes in an airtight container. This keeps them fresh and tasty. You can leave them at room temperature for a few hours, but they last longer in the fridge. If you choose the fridge, let them sit at room temp for a few minutes before eating. You can freeze these treats for later. Wrap each rice cake in plastic wrap, then place them in a freezer bag. This keeps them safe from freezer burn. To thaw, take them out and let them sit at room temp for about 30 minutes. You can also warm them slightly in the microwave for a few seconds. These rice cakes stay fresh for about one week at room temperature. In the fridge, they can last up to two weeks. Check for signs of spoilage. If you see any mold or if they smell off, it's best to toss them. Trust your senses; they won't steer you wrong. If you want to enjoy them longer, freezing is the best option. For the full recipe, refer back to the main section. To keep your chocolate smooth, follow these steps: - Use a dry bowl: Make sure your bowl is completely dry before adding chocolate. - Low heat: Heat chocolate slowly. Use a microwave in 30-second bursts. Stir well after each burst. - Add fat: Mix in a little coconut oil. This helps keep the chocolate silky. - Avoid water: Water can cause chocolate to clump. Keep it away from your melting area. If chocolate seizes, you can fix it with coconut oil or warm cream. Yes, rice cakes come in many flavors. Here are some ideas: - Flavored rice cakes: Try caramel or cheddar rice cakes for a twist. - Shapes: Look for round, square, or even chocolate-coated rice cakes. - Homemade options: You can also make your rice cakes from scratch for a fun project. Each type brings its own taste and texture. You can find pre-made chocolate drizzled rice cakes at: - Major supermarkets: Check the snack aisle for brands like Quaker or Lundberg. - Health food stores: They often carry gourmet options. - Online retailers: Websites like Amazon or Thrive Market offer a variety. Always read labels for any added ingredients or allergens. Rice cakes are light and can be a healthy snack. Here are some benefits: - Low in calories: They are great for weight management. - Gluten-free: Most rice cakes are safe for those with gluten allergies. - Versatile: You can top them with nut butter, yogurt, or fruit for added nutrients. They provide some carbs for energy but are low in fiber. Pair them with healthy toppings for a balanced snack. You learned how to make delicious chocolate-drizzled rice cakes step by step. Remember to melt chocolate slowly and have fun with toppings. Use your favorite flavors and mix-ins for a personal touch. These treats are great for parties or a quick snack. Store them well to keep them fresh. Enjoy making these tasty snacks. They’re easy, fun, and customizable. Now, get creative and share your snacks with friends and family!

Chocolate Drizzled Rice Cakes Simple and Tasty Treat

Looking for a easy and fun treat? Let me introduce you to chocolate drizzled rice cakes! They are simple to

This dish is packed with healthy, tasty foods. Here is what you need: - 1 cup quinoa, thoroughly rinsed - 2 cups vegetable broth (low-sodium recommended) - 1 red bell pepper, diced into small chunks - 1 medium zucchini, sliced into half-moons - 1 cup cherry tomatoes, halved - 1 cup broccoli florets (fresh or frozen) - 2 tablespoons extra-virgin olive oil - 1 teaspoon garlic powder - 1 teaspoon smoked paprika - Sea salt and freshly cracked black pepper to taste - 1 can (15 oz) chickpeas, drained and rinsed under cold water - 1 ripe avocado, sliced - Fresh parsley or cilantro, roughly chopped, for garnish - Lemon wedges, for an extra burst of flavor when serving The quinoa is the base of the bowl. It is full of protein and has a nice texture. The roasted veggies add color and flavor. You can choose any veggies you like, but I love this mix. The olive oil helps the veggies roast well and adds a rich taste. Seasonings like garlic powder and smoked paprika take this dish to the next level. Feel free to top it with sliced avocado and fresh herbs. They add creaminess and brightness. A squeeze of lemon juice at the end boosts the flavors even more. For the complete method, check the Full Recipe. To start, rinse the quinoa. Place it in a fine mesh strainer and run cold water over it. This removes the bitter coating called saponin. Rinse it until the water runs clear. Next, chop your veggies for roasting. Cut the red bell pepper into small chunks. Slice the zucchini into half-moons. Halve the cherry tomatoes and break the broccoli into florets. Now, prepare for baking. Line a large baking sheet with parchment paper. This step helps with cleanup and keeps the veggies from sticking. Set your oven to 400°F (200°C). This temperature helps the veggies roast evenly. Roast them for about 20 to 25 minutes. In a mixing bowl, combine the chopped veggies. Drizzle them with olive oil. Add garlic powder, smoked paprika, sea salt, and black pepper. Toss everything until the veggies are well-coated. For even roasting, stir the vegetables halfway through cooking. This ensures they brown nicely on all sides. In a medium saucepan, bring the vegetable broth to a boil. Once boiling, add the rinsed quinoa. Lower the heat, cover, and let it simmer for 15 minutes. This will make the quinoa fluffy and absorb all the broth. When the quinoa is done, fluff it with a fork. This step adds air and makes it light. Begin by placing a generous scoop of quinoa in each bowl. Then, top it with the roasted vegetables and chickpeas. Make sure to create a colorful mix on each plate. Finish the bowl with slices of ripe avocado. This adds creaminess and flavor. For a pop of color, sprinkle chopped fresh herbs on top. Serve your bowl with lemon wedges for an extra burst of flavor. Follow these steps, and you'll create a beautiful and tasty Roasted Veggie Quinoa Power Bowl. For more details, check the Full Recipe. To get the best roasted veggies, start with fresh produce. Wash and cut your vegetables into even sizes. This helps them cook at the same pace. For softer veggies like zucchini and bell peppers, 20-25 minutes in a hot oven works great. Harder veggies, like carrots or potatoes, may need longer. Check for doneness by poking them with a fork. They should be tender but not mushy. To boost flavor, try adding extra seasonings. Herbs like thyme or rosemary can add depth. You can also use spices like cumin or chili powder for a kick. For oils, avocado or sesame oil can bring a different taste. Dressings like tahini or balsamic vinegar can also add a nice touch. Just drizzle them on top before serving. Quinoa is packed with protein and fiber. It has all nine essential amino acids. This makes it a complete protein source. The veggies add vitamins and minerals. For example, bell peppers are high in vitamin C. Broccoli is great for fiber and antioxidants. Together, they create a filling and nutritious meal. This bowl is not only tasty but also good for your body. {{image_4}} You can change the veggies in your Roasted Veggie Quinoa Power Bowl. This keeps things fun and fresh. Here are some great options: - Carrots - Sweet potatoes - Cauliflower - Asparagus - Eggplant For seasonal veggies, think about what is fresh near you. In the spring, try peas or radishes. In the fall, add Brussels sprouts or butternut squash. Each season brings new flavors to enjoy! If you want more protein, you can add other sources. Here are a few ideas: - Tofu: Press and cube it. Toss it with the veggies. - Tempeh: Slice it and roast it with the vegetables. - Edamame: Toss in shelled edamame for a fun crunch. If you want a legume swap, chickpeas are great, but you can also use: - Black beans - Lentils - Cannellini beans These options add protein and texture to your bowl. You can make your power bowl fit many diets. For gluten-free options, use certified gluten-free quinoa. It is naturally gluten-free and safe for those with gluten sensitivities. If you're vegan, you can easily swap out any non-vegan ingredients. For example: - Use avocado instead of cheese. - Skip honey and use maple syrup in dressings. These changes keep your meal healthy and delicious while meeting your dietary needs. Try the Full Recipe to create your awesome power bowl! To keep your Roasted Veggie Quinoa Power Bowl fresh, store it in the fridge. Use an airtight container. This method helps prevent moisture loss and keeps flavors intact. Your power bowl can last for up to four days in the refrigerator. For freezing, separate the roasted veggies and quinoa. Place each in freezer-safe bags or containers. Make sure to remove as much air as possible. This keeps them fresh for up to three months. When ready to eat, thaw in the fridge overnight. You can reheat your power bowl in both the microwave and oven. For the microwave, place the bowl on a microwave-safe plate. Heat in short bursts, stirring in between. This method warms it up quickly. If you prefer the oven, preheat it to 350°F (175°C). Spread the power bowl on a baking sheet. Heat for about 10-15 minutes. This option helps keep the veggies crisp and flavorful. No matter the method, add a splash of water if it seems dry. This keeps the quinoa moist. Enjoy your meal with all its wonderful flavors intact! You can prep this dish easily. First, cook the quinoa and roast the veggies. Once cool, store them in separate airtight containers. Keep them in the fridge for up to three days. When ready to eat, just reheat the quinoa and veggies in the microwave. You can add fresh avocado and herbs right before serving for a fresh taste. This power bowl pairs well with a few simple side dishes. You can serve it with a crisp green salad or some garlic bread. A light soup, like tomato or vegetable, works too. If you want more protein, try serving it with grilled chicken or fish. Each of these options adds great flavor and texture. Yes, you can swap out quinoa for other grains. Here are some good options: - Brown rice: Chewy and nutty, it adds great texture. - Farro: This ancient grain has a nice bite and earthy flavor. - Barley: It is hearty and full of fiber, making it a healthy choice. - Bulgur: Quick to cook, it offers a light and fluffy base. - Couscous: Fast to prepare, it absorbs flavors well. The average serving has around 450 calories. This can vary based on the toppings you choose. The bowl includes quinoa, veggies, and chickpeas, which provide protein and fiber. Each serving offers a balanced meal that keeps you full and satisfied. The Roasted Veggie Quinoa Power Bowl is easy to make and full of flavor. You learned about essential ingredients, step-by-step cooking, and storage tips. Remember, you can customize the bowl with your favorite veggies and proteins. This dish is not just tasty, but also healthy. It offers great protein and fiber. I hope you try this recipe, share it with friends, and enjoy its benefits in every bite. Happy cooking and enjoy your delicious, colorful bowls!

Roasted Veggie Quinoa Power Bowl Healthy and Satisfying

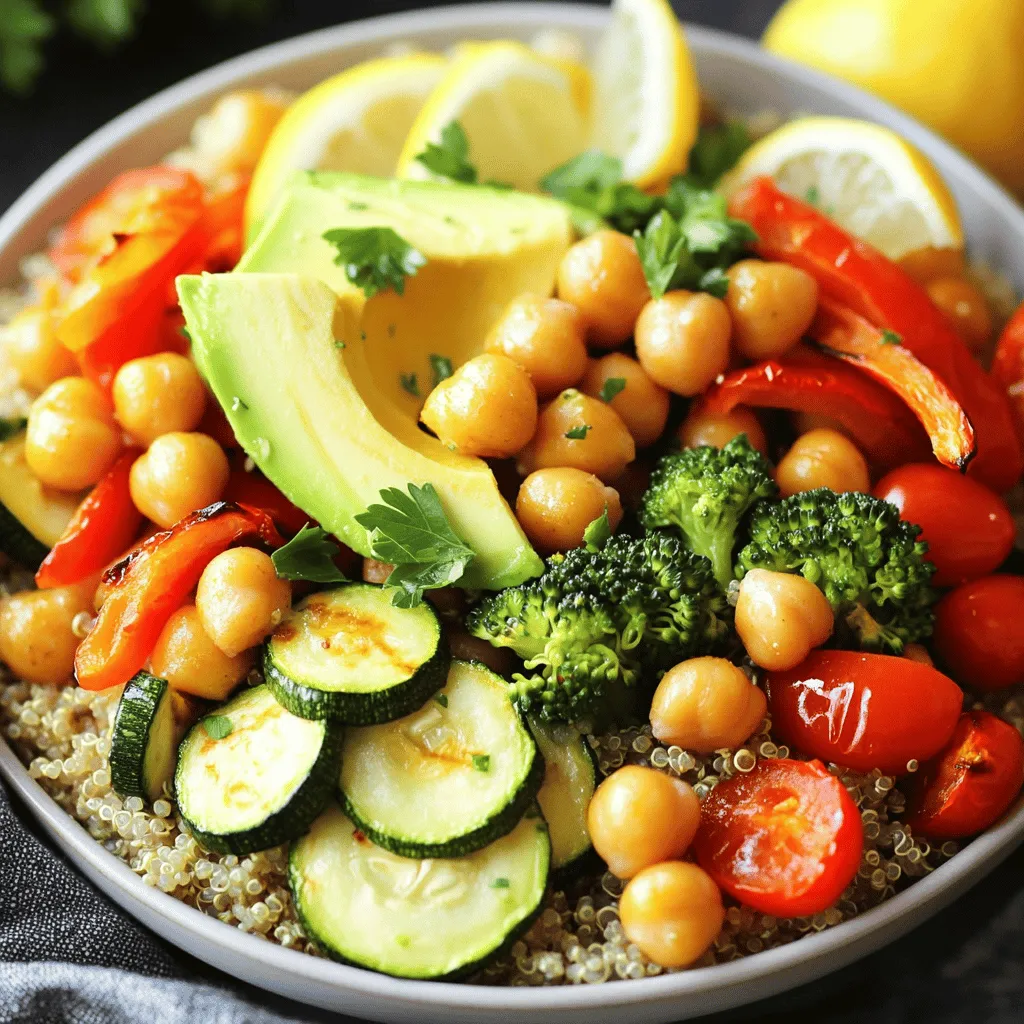
Looking for a healthy meal that packs a punch? The Roasted Veggie Quinoa Power Bowl is just what you need!

To make a great creamy tomato basil soup, you need a few key ingredients. Here’s what you’ll need: - 2 tablespoons olive oil - 1 medium onion, finely chopped - 3 cloves garlic, minced - 2 cans (14 oz each) crushed tomatoes or fresh tomatoes, peeled and chopped - 1 cup vegetable broth or chicken broth - 1 teaspoon sugar - Salt and freshly ground black pepper to taste - 1 cup heavy cream or coconut cream - 1/4 cup fresh basil leaves, chopped These ingredients create a rich and tasty base for your soup. The tomatoes provide a sweet and tangy flavor, while the cream adds richness. Fresh basil gives a fragrant note that brightens up the dish. For an even better taste, you can add a few optional ingredients. Consider these: - 1 teaspoon dried Italian herbs - A pinch of red pepper flakes for heat - Grated parmesan cheese for serving These extras can elevate your soup. Dried herbs add depth, while red pepper flakes give a kick. Parmesan brings a savory umami flavor that pairs well with the creaminess of the soup. If you have dietary needs, you can make simple swaps. Here are some ideas: - Use coconut cream instead of heavy cream for a vegan option. - Replace broth with vegetable broth for a vegetarian version. - If avoiding gluten, check that your broth is gluten-free. These substitutions ensure everyone can enjoy this comforting soup. Feel free to adjust based on what you have at home or your dietary needs. For the full recipe, refer to the section above. To make creamy tomato basil soup, follow these clear steps: 1. Heat olive oil: Start by heating 2 tablespoons of olive oil in a large pot over medium heat. This oil adds flavor and helps cook the veggies. 2. Sauté onion: Add 1 finely chopped onion. Cook it for about 5 minutes. You want it soft and slightly clear. 3. Add garlic: Now, mix in 3 minced garlic cloves. Cook for 1-2 minutes until it smells great. Watch carefully, so it doesn’t burn. 4. Pour in tomatoes: Next, add 2 cans of crushed tomatoes or use fresh, peeled and chopped tomatoes. They bring the soup’s flavor to life. 5. Mix in broth and sugar: Pour in 1 cup of vegetable or chicken broth. Add 1 teaspoon of sugar to balance the acidity. Stir well. 6. Season the soup: Add salt and freshly ground black pepper to taste. These spices make your soup pop. 7. Simmer: Let the soup simmer gently for about 15 minutes. This step helps the flavors blend perfectly. 8. Blend the soup: Use an immersion blender to puree the soup in the pot. If you prefer, carefully transfer it in batches to a conventional blender. Blend until smooth. 9. Add cream: Stir in 1 cup of heavy cream or coconut cream. Let it simmer for another 5 minutes. This step gives your soup a nice, rich texture. 10. Finish with basil: Just before serving, add 1/4 cup of chopped fresh basil. Mix well and taste. Adjust seasoning if needed. Using an immersion blender is easy and fast. You keep the soup in the pot, which saves time. Just blend until smooth. Make sure the blender is fully submerged to avoid splashes. If you use a conventional blender, be careful! Hot soup can splatter. Fill the blender halfway and blend in small batches. Always hold the lid tightly to keep it in place. Serve your creamy tomato basil soup hot. Use nice bowls for a special touch. You can garnish with fresh basil leaves or a drizzle of cream. For added flair, sprinkle some grated parmesan or chili flakes on top. Serve with crusty bread for dipping. It makes the meal feel complete and cozy. Enjoy! For the full recipe, check the provided details. To get that rich, creamy texture in your soup, you need the right ingredients. I always use heavy cream for a lush finish. If you want a dairy-free option, coconut cream works great. Adding the cream at the end makes a big difference. It blends well and keeps that lovely texture. Remember to simmer the soup after adding the cream. This helps meld the flavors without curdling the cream. Seasoning is key to elevate your soup. I add a teaspoon of sugar to balance the acidity from the tomatoes. Fresh basil is a must, but dried Italian herbs can add depth too. You can also sprinkle in some red pepper flakes for a bit of heat. Tasting your soup as you cook is important. Adjust the salt and pepper to your liking. This way, every spoonful bursts with flavor. Even simple recipes can go wrong. Here are some tips to steer clear of common pitfalls: - Not sautéing the onion enough: This step builds the base flavor. Cook until it's soft and translucent. - Skipping the blending step: A smooth soup is key. Don't skip blending for that creamy texture. - Adding cream too early: Always add it at the end to keep it smooth. Following these tips will help you create a delicious Creamy Tomato Basil Soup. For the complete process, check the Full Recipe. {{image_4}} You can easily make this soup vegan. Simply replace the heavy cream with coconut cream. This change creates a rich and creamy texture without using dairy. Coconut cream adds a hint of sweetness that pairs well with the tomatoes. You can also use almond milk if you prefer a lighter option. Want some heat? Add crushed red pepper flakes to the pot when you sauté the onions. Start with a small amount, like half a teaspoon, and adjust to your taste. If you crave more spice, try adding diced jalapeños or a dash of hot sauce. Pairing spicy with the creamy base gives an exciting twist. You can make this soup heartier by adding proteins. Cooked beans, like cannellini or chickpeas, work well. You can also add shredded chicken for a meaty touch. For more veggies, consider adding spinach, zucchini, or carrots. Chop them small and add them early in the cooking process. This way, they will cook through and blend nicely with the soup. Feel free to explore these variations. They make the classic creamy tomato basil soup unique each time. For the full recipe, check out the details above. Store your creamy tomato basil soup in an airtight container. This keeps it fresh and tasty. Let the soup cool completely before sealing the container. Place it in the fridge if you plan to eat it within a few days. For longer storage, use the freezer. The soup lasts about 3 to 4 days in the fridge. If you freeze it, use it within 3 months for the best taste. To reheat your soup, pour it into a pot over medium heat. Stir it often to heat evenly. You can also use the microwave. Place the soup in a microwave-safe bowl. Heat it in short bursts, stirring in between. This helps keep the soup creamy. If it seems too thick, add a splash of broth or water to get the right consistency. When freezing, make sure to use containers that are safe for the freezer. Leave some space at the top, as the soup will expand. To thaw, move the soup from the freezer to the fridge the night before. This way, it will be ready to reheat the next day. If you need it faster, run the sealed container under warm water. Avoid thawing it in the microwave, as this can change the texture. For detailed cooking steps, check the Full Recipe. To store leftover soup, let it cool first. Pour the soup into an airtight container. Seal it well to keep air out. You can keep it in the fridge for up to three days. If you want to store it longer, freeze it. It stays good in the freezer for about three months. Just remember to leave some space in the container. Soup expands when it freezes! Yes, you can use fresh tomatoes instead of canned ones. If you choose fresh, you need about six medium tomatoes. Peel and chop them before adding to the pot. Using fresh tomatoes gives the soup a bright and fresh flavor. Just remember, fresh tomatoes can be a bit more watery. You might need to cook them a little longer to get the right thickness. Making this recipe gluten-free is easy! Just ensure that the broth you use is gluten-free. Most vegetable and chicken broths are safe, but always check the label. Avoid any added ingredients that may contain gluten. The rest of the ingredients, like tomatoes and cream, are naturally gluten-free. Enjoy your creamy tomato basil soup without worry! For the full recipe, check out the details above. In this article, we explored the key ingredients and steps to make creamy tomato basil soup. We discussed essential and optional ingredients, as well as substitutions for dietary needs. I shared practical tips, common mistakes to avoid, and different variations to try. Remember, the right storage and reheating methods help keep your soup tasty. Enjoy experimenting with flavors and making this dish your own! With practice, your soup will impress everyone.

Creamy Tomato Basil Soup Simple and Flavorful Recipe

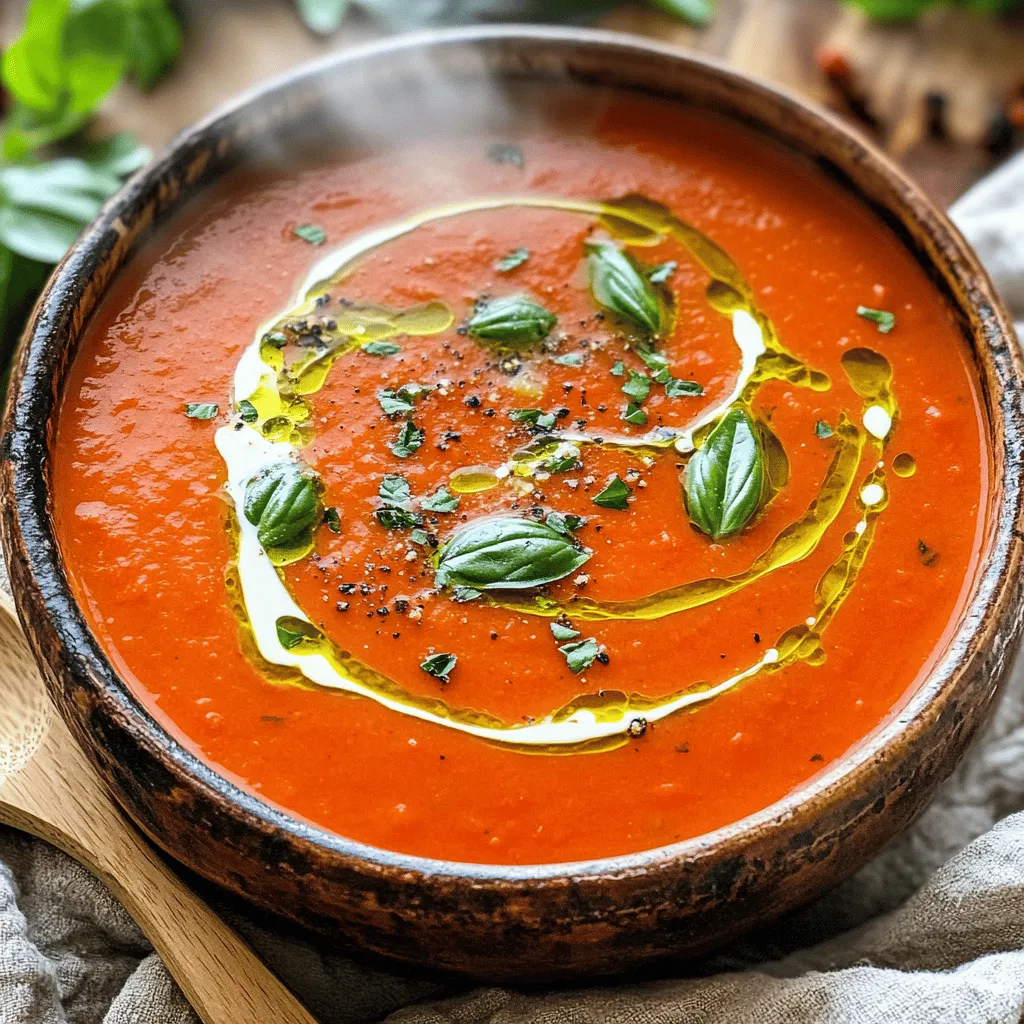
Welcome to the world of Creamy Tomato Basil Soup! This simple and flavorful recipe will warm your soul and tickle

- Chicken breast: 1 lb, diced into 1-inch cubes - Marinade components: - 3 tablespoons high-quality olive oil - 2 tablespoons freshly squeezed lemon juice - 2 cloves garlic, finely minced - 1 teaspoon dried oregano - 1 teaspoon sweet paprika - Seasoning: - Salt and freshly ground black pepper to taste To make great chicken souvlaki, you need fresh ingredients. First, the chicken breast is key. It should be cut into 1-inch cubes. This size helps it cook evenly. Next, the marinade makes the chicken flavorful. Olive oil adds richness. Lemon juice gives it a bright taste. Garlic brings a savory kick. Oregano and paprika add depth to the flavor. Finally, season it with salt and pepper. This simple seasoning enhances all the other tastes. - Pita bread: for serving - Tzatziki sauce: for dipping - Fresh parsley: for garnish While the chicken is the star, accompaniments make the meal better. Warm pita bread is perfect for wrapping the souvlaki. Tzatziki sauce adds a cool, creamy contrast. It is made from yogurt, cucumber, and garlic. Fresh parsley is a nice touch for color and taste. You can sprinkle it on top for a vibrant look. For the full recipe, check the complete list of ingredients above. - In a large mixing bowl, combine: - 3 tablespoons high-quality olive oil - 2 tablespoons freshly squeezed lemon juice - 2 cloves garlic, finely minced - 1 teaspoon dried oregano - 1 teaspoon sweet paprika - Salt and freshly ground black pepper to taste - Whisk until well-blended. The marinade should look smooth and vibrant. This blend gives the chicken its tasty zing. - Take 1 lb of chicken breast, diced into 1-inch cubes. - Coat chicken cubes in the marinade. Make sure each piece is well-covered. - Refrigerate for 30 minutes to 2 hours. The longer it sits, the more flavor it gains. - Preheat the grill or grill pan to medium-high heat. - Thread the marinated chicken onto wooden skewers. Leave a little space between pieces. - Grill for 10-12 minutes. Turn occasionally for even cooking. The chicken should reach 165°F (75°C) inside. Enjoy the process and the lovely smells that fill your kitchen! For the full recipe, check out the details above. Marinating your chicken is key for great flavor. I recommend marinating for at least 30 minutes, but 2 hours is best. This allows the chicken to soak up all the tasty marinade. For grilling, heat your grill to medium-high. This temperature gives you nice grill marks and juicy chicken. Serve your chicken souvlaki with warm pita bread and creamy tzatziki sauce. The cool sauce pairs well with the warm, flavorful chicken. For a beautiful presentation, sprinkle fresh parsley on top. You can also add lemon wedges for a pop of color and extra flavor. Do not overcrowd the grill. If you do, your chicken won’t cook evenly. Give each skewer space. Also, always check the internal temperature. Your chicken should reach 165°F (75°C). This ensures it is safe to eat and juicy. {{image_4}} You can swap chicken for tofu or veggies. Tofu works well when pressed and cubed. Use firm or extra-firm tofu for best results. If you choose veggies, bell peppers, zucchini, and mushrooms are great options. For marinating non-meat options, use the same marinade. Let them soak for at least 30 minutes. This helps enhance their flavor. To boost the taste, try adding different herbs like thyme or rosemary. You can also sprinkle some cumin for warmth. If you want a fresh kick, experiment with citrus fruits. Lime or orange juice can add a nice twist to the marinade. You can even zest the fruits for extra flavor. When serving, you can choose wraps or plates. Wraps are great for a fun, handheld meal. Plates allow for a more elegant presentation. For side dishes, consider serving a Greek salad or roasted veggies. These pair well with chicken souvlaki. You can also add rice or couscous for a heartier meal. For the full recipe, check out the detailed instructions above. To keep your chicken souvlaki fresh, use airtight containers. Glass or plastic containers work well. Make sure they seal tightly. Store leftovers in the fridge. They will stay good for 3 to 4 days. To reheat, use an oven or skillet. This keeps chicken moist. Avoid using a microwave, as it can dry out the meat. Reheat for about 10 minutes at 350°F (175°C). Check to make sure it’s hot all the way through. If you want to freeze, use freezer-safe bags or containers. Squeeze out any air before sealing. Your chicken souvlaki can last up to 3 months in the freezer. To thaw, place it in the fridge overnight. This keeps the texture nice and juicy. To keep your chicken juicy, marinate it well. Use a mix of olive oil, lemon juice, minced garlic, oregano, and paprika. The oil helps lock in moisture. Marinate for at least 30 minutes, but 2 hours gives better flavor. When cooking, don’t overcook the chicken. Aim for an internal temperature of 165°F (75°C). Yes! You can use pork, beef, or shrimp. For pork, use tenderloin and cut it into cubes. For beef, use sirloin or fillets. If you prefer shrimp, choose large, peeled shrimp. Adjust cooking times based on the protein. Shrimp cooks faster, needing only 5-7 minutes on the grill. Chicken souvlaki pairs well with many sides. Here are some popular options: - Greek salad: Fresh tomatoes, cucumbers, and feta cheese. - Rice pilaf: Fluffy rice with herbs and lemon. - Grilled vegetables: Zucchini, bell peppers, and onions add color. - Tzatziki: This creamy dip enhances the flavors. To grill chicken souvlaki, preheat your grill to medium-high heat. Make sure your skewers are soaked in water. This prevents them from burning. Place the skewers on the grill and cook for 10-12 minutes. Turn them often for even cooking. Always check the chicken's internal temperature. Not at all! To make tzatziki, mix plain yogurt with grated cucumber. Add minced garlic, lemon juice, and a bit of salt. Stir well until combined. Let it chill for a bit. This simple sauce is fresh and perfect for dipping. You can even add fresh dill for extra flavor. For the full recipe, check the main section. In summary, making chicken souvlaki is simple with just a few key ingredients and steps. You need chicken breast, a tasty marinade, and a grill. Remember to marinate the chicken for great flavor and avoid overcrowding on the grill. Don’t forget to serve with pita and tzatziki for the best experience. With these tips and variations, you can enjoy a delicious meal that's easy to make, even for beginners. Now, get ready to enjoy your homemade souvlaki. Happy cooking!

Easy Chicken Souvlaki Flavorful and Simple Recipe

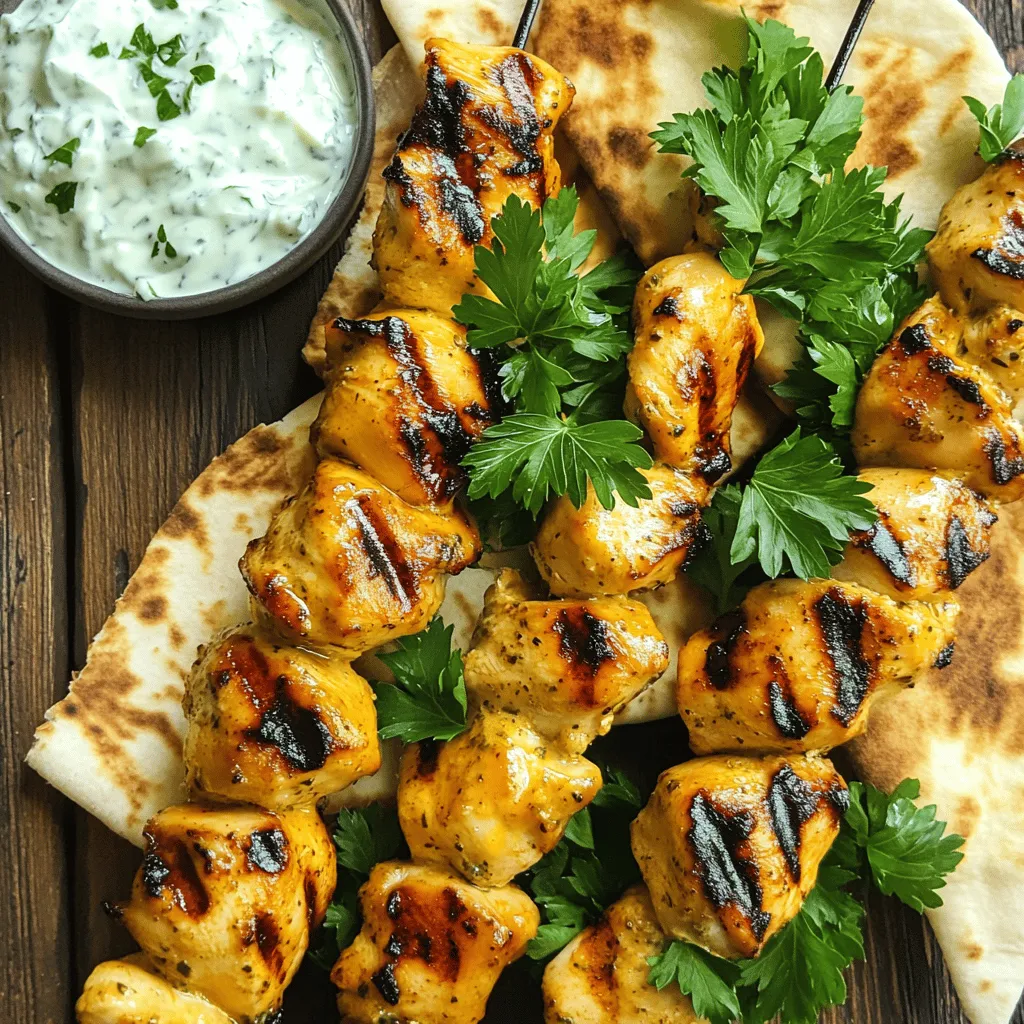
Are you ready to impress your family with a tasty meal that’s easy to make? This Easy Chicken Souvlaki recipe

You need 1 cup of fresh strawberries for this drink. Start by hulling and slicing them. Fresh strawberries are sweet and juicy, making them perfect for lemonade. They are low in calories and packed with vitamins. Strawberries are also high in antioxidants, which help keep you healthy. You will need 1 cup of freshly squeezed lemon juice, which is about 4 to 6 medium lemons. To get the most juice, roll the lemons on the counter before cutting them. Press down while rolling to break down the membranes inside. Lemon juice is rich in vitamin C, which boosts your immune system. It also adds a bright, zesty flavor that balances the sweetness of the strawberries. For this recipe, use 3/4 cup of granulated sugar or adjust to your taste. You can also use alternatives like honey or agave. If you prefer a less sweet drink, start with less sugar and add more as needed. Just remember, the sweetness should enhance the flavors without overpowering them. First, place the sliced strawberries in a blender. Add 1/2 cup of cold water. Blend on high until it becomes smooth. This step brings out the sweet flavor of the strawberries. Next, take a fine-mesh sieve and set it over a large pitcher. Pour the strawberry puree into the sieve. Use a spoon to press down and extract juice. Discard the leftover pulp. This method helps you get a clear and flavorful juice. Now, pour the freshly squeezed lemon juice into the pitcher with strawberry juice. It adds a zesty kick to the mix. Then, add the remaining 3.5 cups of cold water to the pitcher. This helps balance the flavors. Gradually add the granulated sugar. Stir well until the sugar dissolves completely. Taste your drink to see if you want it sweeter. Adjust the sugar to your liking. For the best taste, refrigerate the lemonade for about 30 minutes. Chilling helps the flavors blend nicely. If you are in a hurry, serve it over ice right away. When you're ready to serve, pour the lemonade into glasses filled with ice. Garnish each glass with a slice of lemon and fresh mint leaves. This adds a lovely touch to your drink and makes it look inviting. Enjoy this refreshing summer drink with friends and family! To make your strawberry lemonade even better, you can try adding fresh herbs. Mint or basil works great. Just chop a few leaves and mix them in. This adds a fresh twist to your drink. Balancing sweetness and acidity is key. If your lemonade is too sweet, add more lemon juice. If it’s too tart, stir in more sugar. Taste as you go to find the perfect mix. For a fun look, serve your lemonade in clear glasses. This lets the bright color shine through. Add a slice of lemon on the rim for a pop of color. Fresh mint leaves can be a nice touch too. If you are hosting a party, consider using a large pitcher. You can fill it with lemon slices and strawberries for decoration. This also makes it easy for guests to serve themselves. If you have a busy day, you can save time. Use store-bought lemon juice instead of squeezing fresh lemons. It cuts down on prep time and is still tasty. Another tip is to blend the strawberries in advance. Keep the puree in the fridge. When you’re ready, mix it with the lemon juice and water. This makes your drink quick to prepare when you need it. For the full recipe, check out the detailed instructions above. {{image_4}} You can mix fresh strawberries with other fruits for fun flavors. Peach is sweet and juicy. Raspberry adds a tart kick. Combine all three for a vibrant drink. You can also try herbs for extra flair. Mint gives a refreshing taste, while basil adds a unique twist. Just muddle herbs before mixing them in. If you want different sweeteners, try honey or agave. These natural options can change the taste. Honey gives a floral note, while agave is mild and smooth. If you're watching calories, consider using stevia or monk fruit. Both are low-calorie and do not alter the drink's flavor too much. To make your lemonade fizzy, add sparkling water or soda. This will give a bubbly texture that feels festive. Mix in the sparkling water right before serving for the best fizz. For a fun twist, serve it in tall glasses with ice. Add extra lemon slices and mint leaves on top for a lovely presentation. Check out the Full Recipe for more ideas to enjoy this refreshing drink! Fresh strawberry lemonade lasts in the fridge for about five days. It stays tasty during this time. Look for bright colors and a sweet smell to check for freshness. If you notice any off smells or changes in color, it's time to toss it out. You can freeze strawberry lemonade for later enjoyment. Pour the lemonade into ice cube trays. Once frozen, transfer the cubes to a bag. This helps save space and keeps it fresh. To serve, take out the cubes and let them thaw in the fridge. You can also blend them back into a slushy drink! Use glass or BPA-free plastic containers for storage. These help keep the lemonade fresh. Make sure the containers are airtight to minimize oxidation. This keeps your drink vibrant and flavorful. Always fill the container to the top to reduce air space and prevent spoilage. Yes, you can make strawberry lemonade ahead of time. Here are some best practices: - Prepare the lemonade up to two days in advance. - Store it in a tight container in the fridge. - Keep it away from light and heat to maintain freshness. To maintain freshness, follow these tips: - Add ice just before serving to prevent dilution. - Garnish with lemon slices and mint leaves right before serving. Strawberry lemonade can be a healthy drink. It has several nutritional benefits: - Fresh strawberries provide vitamins and antioxidants. - Lemon juice is high in vitamin C. - The drink has lower calories when made at home. Comparing homemade vs. store-bought options: - Homemade allows you to control sugar levels. - Store-bought may have more added sugars and preservatives. Yes, you can use frozen strawberries in your lemonade. When to opt for frozen: - If fresh strawberries are out of season. - If you want to save time on washing and hulling. The impact on flavor and texture: - Frozen strawberries may be softer when blended. - They can still taste great but may not be as vibrant as fresh ones. For the full recipe, check out the details above. Making fresh strawberry lemonade is easy and fun. We explored key ingredients like strawberries and lemons, and how they boost health. You learned step-by-step methods to create this tasty drink, plus tips for flavoring and serving. Don’t forget the variations like peach or sparkling versions. Proper storage will keep your lemonade fresh longer. Try making this drink your own. With simple changes, you can delight your guests or enjoy it yourself. Enjoy the refreshing taste of summer in a glass!

Fresh Strawberry Lemonade Refreshing Summer Drink

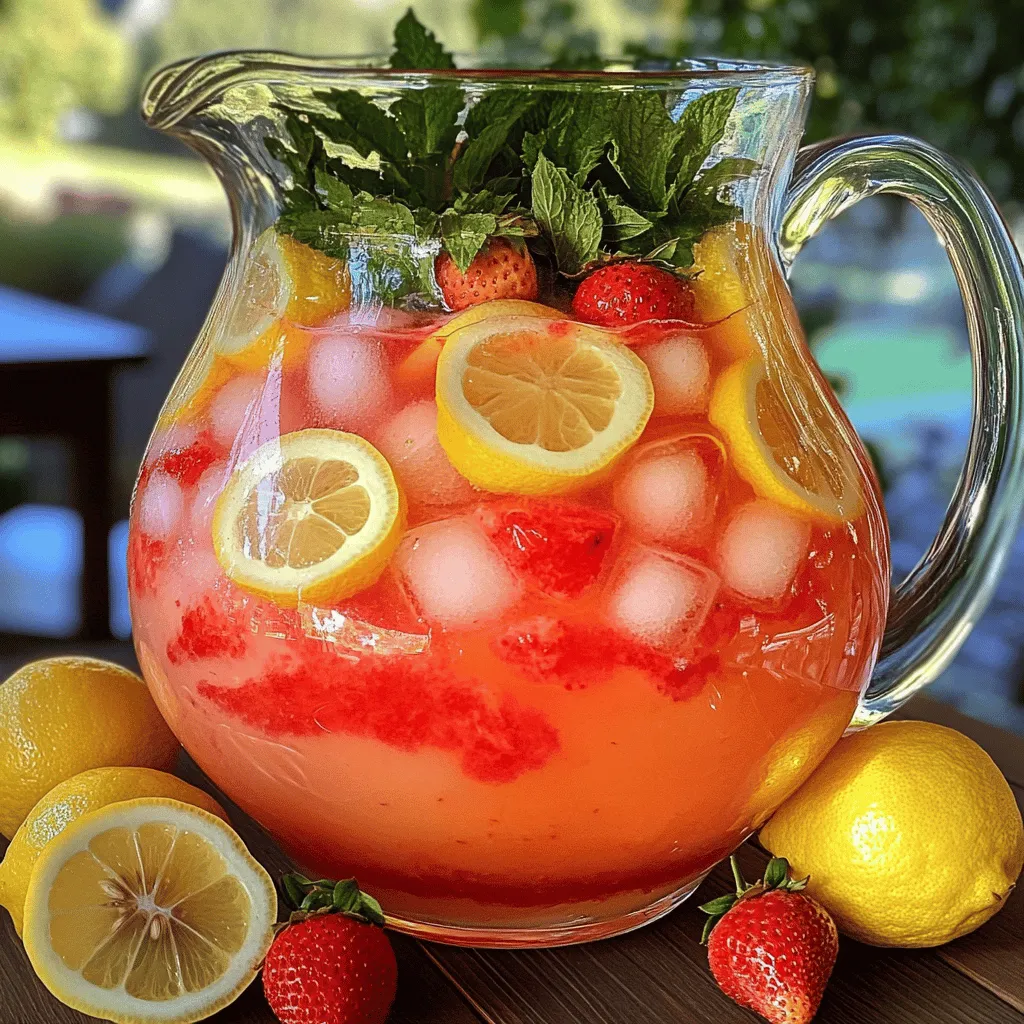
Summer is the perfect time to enjoy a cool and fruity drink. Fresh Strawberry Lemonade is a sweet and tangy

- 4 salmon fillets (6 ounces each) - 1/4 cup pure maple syrup - 2 tablespoons soy sauce (or tamari for gluten-free) - 1 tablespoon Dijon mustard - 1 tablespoon fresh ginger, finely grated - 2 cloves garlic, minced - Salt and freshly ground black pepper, to taste - 3 green onions, finely chopped - A sprinkle of sesame seeds When you gather your ingredients, focus on quality. Fresh salmon makes a big difference. I prefer wild-caught salmon for its rich flavor. The maple syrup should be pure, not imitation. This will give your glaze that sweet depth you crave. Ginger adds a warm touch. Fresh ginger is best. When you grate it, you release its oils, which enhance the dish. Garlic brings a savory note that balances the sweetness. Use fresh garlic for the best flavor. For garnishes, green onions add a fresh crunch. They also bring a pop of color. Sesame seeds add a nice texture and a nutty taste. Together, these ingredients create a beautiful dish both in taste and presentation. You can find the full recipe for more details on preparation. Enjoy this delightful dinner that is sure to impress! 1. In a bowl, combine the following marinade ingredients: - 1/4 cup pure maple syrup - 2 tablespoons soy sauce (or tamari for gluten-free) - 1 tablespoon Dijon mustard - 1 tablespoon fresh ginger, finely grated - 2 cloves garlic, minced Whisk these together until smooth. This glaze adds a sweet and savory touch. 2. Take your salmon fillets and arrange them in a shallow dish. Pour half of the glaze over the fillets. Make sure each piece is well-coated. Cover the dish or seal it in a bag. Refrigerate for 20 to 30 minutes. This helps the salmon soak up the flavors. 1. Preheat your oven to 400°F (200°C). This ensures the salmon cooks evenly. 2. In an oven-safe skillet, heat 1 tablespoon of olive oil over medium-high heat. This will help achieve a nice sear. While the oil heats, season both sides of the salmon with salt and freshly ground black pepper. 1. Once the oil is hot and shimmering, place the salmon fillets skin-side down into the skillet. Sear them for 3 to 4 minutes. You want the skin to become golden brown and crispy. 2. Carefully flip the salmon fillets over. Drizzle the remaining glaze over each fillet. 3. Transfer the skillet to your preheated oven. Bake for 8 to 10 minutes. The salmon is ready when it flakes easily with a fork. 4. After baking, take the skillet out of the oven. Let the salmon rest for a couple of minutes. This keeps it juicy. 5. Just before serving, garnish with finely chopped green onions and a sprinkle of sesame seeds. This adds a nice touch to your dish. For detailed cooking steps and timing, check the Full Recipe. Enjoy your delicious maple glazed salmon! To get the best flavor from your glaze, adjust the sweetness and saltiness to your liking. Taste it as you go. If you want a bolder flavor, marinate the salmon longer. Letting it sit for an hour or more will really enhance the taste. For crispy skin, always start with a hot pan. Sear the salmon skin-side down for about 3-4 minutes. You want to see a golden crust form. To check doneness, use the flakiness test. Gently poke the salmon with a fork; if it flakes easily, it's done. Pair your maple glazed salmon with simple sides. Try sautéed greens or fluffy jasmine rice. For a touch of elegance, serve the salmon on a colorful plate. Drizzle any leftover glaze from the pan over the top for extra flavor. Feel free to add a sprinkle of sesame seeds for a nice finish. Enjoy this delightful dish! Check out the Full Recipe for more details. {{image_4}} You can add a fun twist to your maple glazed salmon by using citrus. Squeeze some lemon or orange juice into the glaze. This adds a bright, fresh taste. You might love how the sweet and tangy flavors mix together! Herbs can also enhance the dish. Try adding fresh dill or cilantro to the glaze. These herbs add a lovely aroma and depth of flavor. I often use dill for a classic touch. Cilantro gives a fresh, vibrant flavor that many enjoy. If you're gluten-free, use tamari instead of soy sauce. Tamari offers a similar flavor without the gluten. You can also skip the soy sauce altogether. Just stick with maple syrup and herbs for a tasty glaze. For low-carb diets, avoid the sugar in soy sauce. You can replace it with coconut aminos. This keeps the dish low in carbs while still being full of flavor. You have three great methods for cooking your salmon: baking, grilling, or pan-searing. Baking is simple and keeps the fish moist. Preheat the oven, and let it cook evenly. Grilling gives your salmon a nice smoky flavor. Just make sure you oil the grill well. This prevents sticking and gives you lovely grill marks. Pan-searing is quick and creates a crispy skin. Heat oil in a skillet and sear the skin-side down. This method locks in juices and adds great texture. Using these different methods can change your meal's taste and texture. Each way brings out the best in maple glazed salmon. For the full recipe, check out the details above! When you finish your meal, store any leftover maple glazed salmon in the fridge. Use an airtight container to keep it fresh. It’s best to eat it within three days. If you want to keep it longer, you can freeze the salmon. Wrap each piece tightly in plastic wrap, then place it in a freezer bag. This method helps prevent freezer burn. To reheat your salmon, use the oven or a skillet. In the oven, preheat to 350°F (175°C). Place the salmon on a baking sheet and cover it with foil. Heat for about 15 minutes. If you use a skillet, heat it over low heat. Add a splash of water and cover the pan to keep it moist. This way, the salmon won't dry out. You can serve reheated salmon on a fresh salad or with rice and veggies for a great meal. Maple glazed salmon lasts about three days in the fridge. In the freezer, it can last up to three months. Always check for any signs of spoilage before you eat it. If it smells off or has an unusual color, it's best to throw it away. Enjoy your delicious meal and store it well for later! For the full recipe, refer to the earlier section. You can tell when salmon is cooked by looking for a few signs. First, the color changes from bright pink to a more opaque shade. Second, when you poke it with a fork, it should easily break apart into flakes. The safe minimum cooking temperature for salmon is 145°F (63°C). Use a food thermometer to check. This ensures your meal is both safe and delicious. Yes! You can use other fish like trout or cod. These fish have a similar texture. If you choose a leaner fish, like cod, reduce the cooking time. Remember to adjust the glaze slightly to fit the new fish. This way, you will still enjoy a tasty meal. The maple glaze is mostly made from natural ingredients. Maple syrup adds sweetness and some minerals. Soy sauce gives flavor but can be high in sodium. Using low-sodium soy sauce makes it healthier. The glaze balances sweet and savory well. This recipe can fit into a healthy diet when enjoyed in moderation. This post gave you all the tools for making great maple-glazed salmon. We covered important ingredients, step-by-step cooking, and helpful tips. You can adjust flavors, choose cooking methods, and even make healthy swaps. Remember to store leftovers properly and know how to reheat them. With these ideas, you will impress with your cooking. Dive into your kitchen and enjoy every bite!

Maple Glazed Salmon Delightful Dinner Recipe

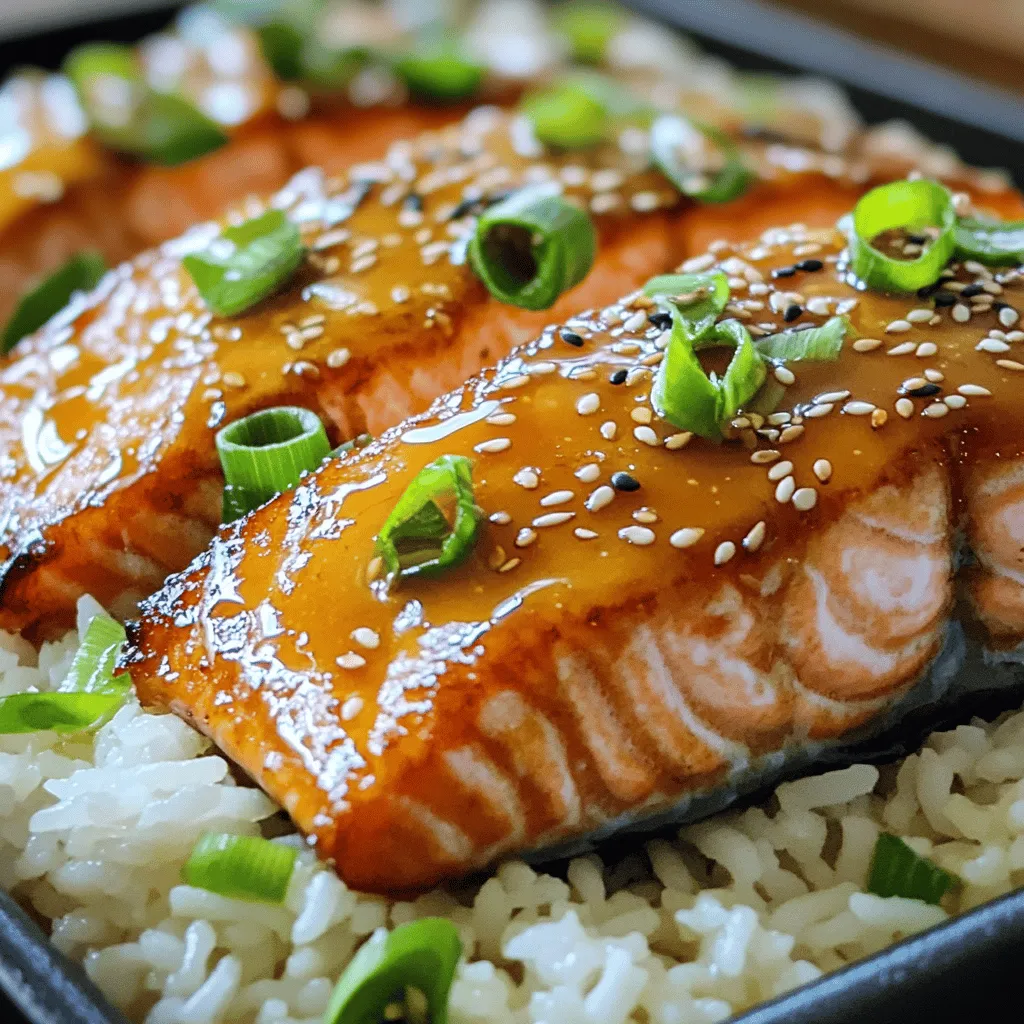
Looking for a dinner that dazzles and satisfies? You’ve hit the jackpot with this Maple Glazed Salmon recipe! With simple,

- 400g firm tofu, pressed and cut into bite-sized cubes - 1 bell pepper (choose red or yellow), sliced thinly - 1 cup snap peas, trimmed - 1 medium carrot, peeled and julienned - 3 green onions, white and green parts separated and chopped - 3 cloves garlic, minced - 1 tablespoon fresh ginger, minced In this dish, firm tofu serves as the main protein. It absorbs flavors well. Fresh vegetables add color and crunch. I love using bell peppers, snap peas, and carrots for a vibrant look. Garlic and ginger bring a warm, aromatic taste. - 3 tablespoons soy sauce - 2 tablespoons honey or agave syrup (to taste) - 1 tablespoon sriracha (adjust based on spice preference) The sauce is the heart of the stir fry. Soy sauce gives it a salty, umami flavor. Honey or agave syrup adds sweetness. Sriracha brings the heat. Adjust the spice level as you like. - Sesame seeds - Additional green onions Garnishes add a fun finish. Sesame seeds bring a nutty crunch. Extra green onions add freshness and color. They make your dish look great and taste even better. For the full recipe, check out the Sweet and Spicy Tofu Stir Fry! First, you need to press the tofu. This helps to remove extra water. Place the tofu between paper towels and press it for about 15 minutes. After that, cut it into bite-sized cubes. Next, toss the tofu cubes in cornstarch. This will make them crispy when cooked. Heat 1 tablespoon of vegetable oil in a skillet over medium-high heat. Once the oil is hot, add the tofu cubes. Sauté them for 8-10 minutes. Turn them occasionally to get an even golden color. When they are crispy, transfer the tofu to a plate lined with paper towels. This will soak up excess oil. In the same skillet, add another tablespoon of vegetable oil. Heat it up, then add minced garlic and ginger. Sauté these for about 30 seconds. They should smell great but not burn. Now, add the sliced bell pepper, snap peas, and julienned carrot. Stir-fry these veggies for about 3-4 minutes. You want them to be tender but still crisp. While the veggies cook, prepare the sauce. In a small bowl, whisk together soy sauce, honey or agave syrup, and sriracha. Make sure it is well mixed. Once the veggies are cooked, pour the sauce over them. Stir well to coat all the vegetables. Now it is time to add the tofu back to the skillet. Gently toss everything together. Let it cook for an additional 2-3 minutes. This helps the tofu soak up some of the sauce flavor. To finish, sprinkle chopped green onion tops and sesame seeds over the stir-fry. This adds color and a nice crunch. Serve your dish hot and enjoy the flavors! For the full recipe, check out the Sweet and Spicy Tofu Stir Fry. Choose between firm and extra-firm tofu. Firm tofu is soft and holds less moisture. Extra-firm tofu is denser and holds its shape better. For stir-frying, I prefer extra-firm tofu. It gives a nice texture and browns well. To press tofu, place it between paper towels or a clean cloth. Add a heavy object on top, like a cast-iron pan. Let it sit for about 15 minutes. This step removes excess moisture and helps the tofu absorb flavors. High heat is key for a great stir-fry. It helps the tofu and veggies cook quickly. Start your skillet or wok on medium-high heat. Wait until it’s hot before adding oil or ingredients. Use quick, even stirring to cook your food. This keeps it from burning and ensures even cooking. Keep your spatula moving to coat everything in sauce. It also adds a nice char to the tofu and veggies. Balancing sweet and spicy is essential in this dish. If you want it sweeter, add more honey or agave syrup. For heat, increase the sriracha. Taste as you go to find your perfect mix. You can also try different sauces for new flavors. Swap soy sauce for teriyaki or hoisin for a unique twist. Explore these options to keep your meals exciting. Check out the Full Recipe for more ideas! {{image_4}} You can change up the vegetables in your stir fry. Choosing seasonal veggies adds fresh flavor and color. Try using bell peppers, carrots, and snap peas for crunch. You can also toss in leafy greens like spinach or bok choy. These greens add nutrients and a nice texture to the dish. If you want to mix things up, try different proteins. Tempeh is a great plant-based option that holds flavors well. If you prefer meat, chicken works nicely too. For seafood lovers, shrimp or beef can add a tasty twist. Just be sure to cook your protein until it’s fully done. For a gluten-free version, you can easily swap out the soy sauce. Tamari is a great choice that tastes similar but is gluten-free. If you need a thickener, use cornstarch or arrowroot instead of regular flour. These options keep your dish safe for those with gluten sensitivities. Feel free to get creative! The Sweet and Spicy Tofu Stir Fry is versatile and can fit your taste. For the full recipe, check out the details above. To store leftovers of your sweet and spicy tofu stir fry, let it cool first. Place it in an airtight container. This keeps the flavors fresh. Use glass or plastic containers that seal tightly. They help avoid spills and keep the dish safe. You can store it in the fridge for up to three days. You can also freeze this stir fry for later. First, let it cool completely. Then, transfer it to a freezer-safe container or bag. Make sure to remove as much air as possible. This helps prevent freezer burn. When you're ready to eat, thaw it overnight in the fridge. To reheat, warm it on the stove over medium heat. Add a splash of water or oil to help it heat evenly. Tofu needs special care for freshness. Keep it in its original packaging until you are ready to use it. If opened, store it in a container with water. Change the water every few days to keep it fresh. Unopened tofu lasts up to a month in the fridge. Once opened, it’s best used within a week. Yes, you can easily make this recipe vegan. Instead of honey, use agave syrup or maple syrup. Both options will add sweetness without using animal products. To amp up the heat, add more sriracha or red pepper flakes. You can also try adding fresh chopped chili peppers. This brings extra flavor and heat to your dish. Serve this dish with steamed rice, fluffy quinoa, or noodles. Each option complements the stir fry and makes for a filling meal. You can even mix and match for variety! This stir fry lasts about 3 to 4 days in the fridge. Store it in an airtight container to keep it fresh. Always check for any signs of spoilage before eating leftovers. Yes, you can prepare parts of this dish ahead of time. Chop the veggies and press the tofu a day before. Just stir-fry everything when you're ready to eat. This makes meal prep quick and easy. For the full recipe, check the main article. This blog post shared a tasty recipe for Sweet and Spicy Tofu Stir Fry. We explored main ingredients like firm tofu, fresh veggies, and a flavorful sauce. You learned step-by-step how to cook each part for the best results. I included tips on selecting tofu and achieving perfect stir fry, plus fun variations. As you try this dish, feel free to adapt it to your taste. Enjoy making a healthy and delicious meal that suits you!

Sweet and Spicy Tofu Stir Fry Flavorful Dinner Idea

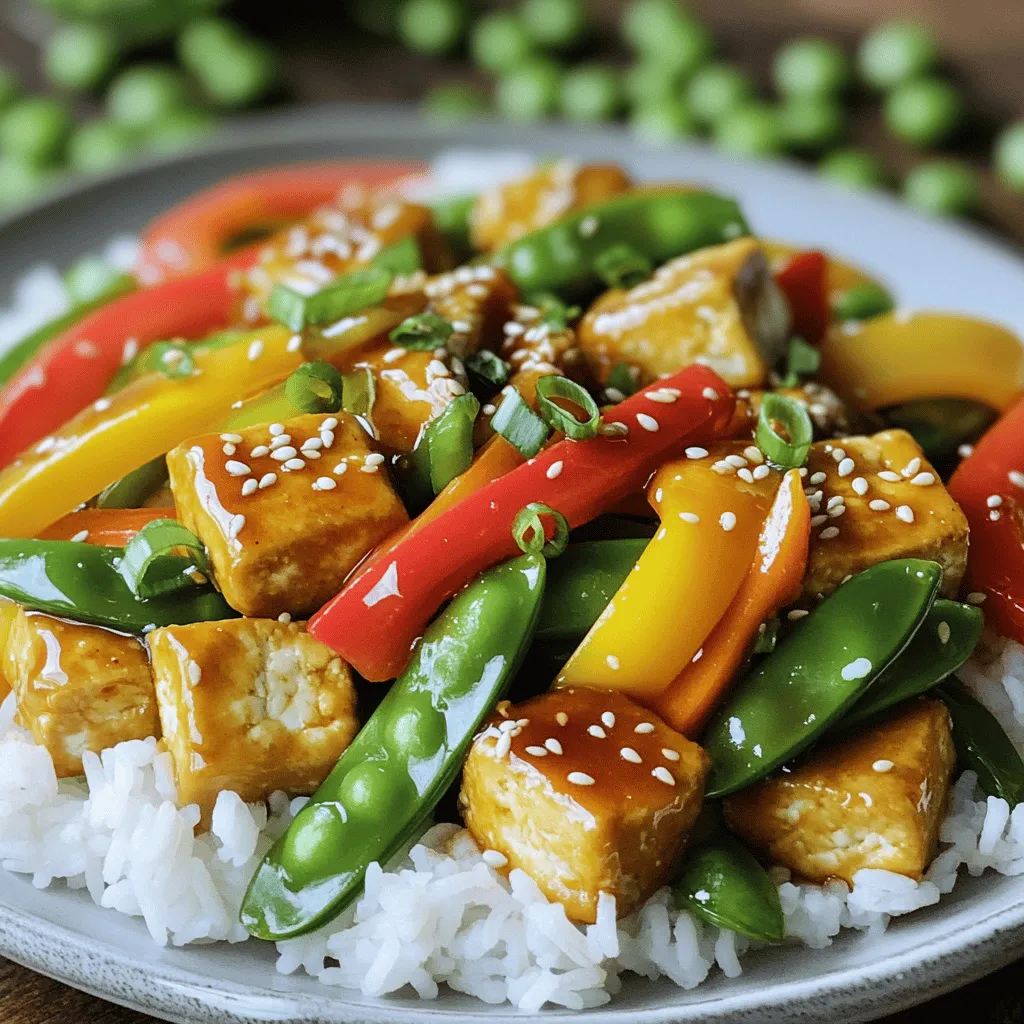
Are you ready to spice up your dinner routine? My Sweet and Spicy Tofu Stir Fry is the perfect mix

- 2 cups penne pasta - 1 lb (450g) cooked chicken, shredded - 1 cup cherry tomatoes, halved - 1 zucchini, diced - 1 bell pepper, diced - 1 cup broccoli florets - 2 cups shredded mozzarella cheese - 1 cup ricotta cheese - 1 cup marinara sauce - 1 teaspoon Italian seasoning - Salt and pepper to taste - 2 tablespoons olive oil - Fresh basil leaves, for garnish The main ingredients make this dish hearty and healthy. The penne pasta serves as a great base. I love using cooked chicken for its flavor and protein. The shredded chicken blends well with the veggies. Cherry tomatoes add a sweet touch, while zucchini and bell pepper bring color and crunch. Broccoli florets add nutrition and texture. Cheeses are key too! The mozzarella creates a gooey topping, and ricotta adds creaminess. Marinara sauce ties it all together with rich flavor. Italian seasoning gives a warm, savory note. Don’t forget salt and pepper for taste. I like to drizzle olive oil to help everything cook evenly. Fresh basil leaves add a nice pop at the end. - Additional vegetables for customization - Different types of cheese for variations - Hot pepper flakes for spice Feel free to get creative! You can add more veggies like carrots or spinach. Try different cheeses, like feta or cheddar. If you like heat, sprinkle in hot pepper flakes. - Calories per serving: Approximately 450 - Macronutrient breakdown: 30g protein, 50g carbs, 15g fats - Health benefits of key ingredients: Chicken is high in protein. Broccoli offers vitamins and fiber. Tomatoes are rich in antioxidants. This meal packs a balanced punch. Enjoy the flavors and health benefits all in one dish! For the full recipe, check out the details above. - Preheat oven to 375°F (190°C). - Cook penne pasta until al dente. Start by preheating your oven. This step keeps the cooking process smooth. While the oven heats, boil water in a pot. Add salt to enhance the pasta's flavor. Cook the penne pasta according to the package instructions. Once it's firm yet tender, drain the pasta and set it aside. - Combine chicken, vegetables, ricotta cheese, and marinara sauce. - Incorporate the penne and seasonings. In a large bowl, mix the shredded chicken with your vegetables. I like to use cherry tomatoes, zucchini, bell pepper, and broccoli. Add the ricotta cheese and marinara sauce to this mix. Stir everything well so each bite bursts with flavor. Now, gently fold in the cooked penne. Don't forget to sprinkle in Italian seasoning, salt, and pepper. This step adds extra flavor to your dish. - Prepare the baking dish with olive oil. - Spread the pasta mixture evenly and top with mozzarella. Grab a 9x13 inch baking dish and drizzle it with olive oil. This prevents sticking and adds a nice flavor. Pour in your pasta mixture, spreading it evenly. Make sure each corner has enough pasta for even cooking. Finally, sprinkle shredded mozzarella cheese over the top. This creates a delicious crust that everyone loves. - Bake for 25-30 minutes until golden brown and bubbling. Place your baking dish in the preheated oven. Set a timer for 25 minutes. Keep an eye on it as it cooks. You want the cheese to melt and turn golden brown. Once it’s bubbling and smells amazing, take it out. Let it cool for a few minutes before you dive in. This is the best part! You can find the full recipe for more details. To achieve perfect al dente pasta, watch the clock. Cook the penne until it has a slight bite. This means it should be firm but not hard. Drain it right away and rinse with cold water. This stops the cooking process and keeps it from getting mushy. Layering your ingredients is key for even cooking. Start with a base of the pasta mixture. Add some of the veggies next, then sprinkle on cheese. Repeat this process until you reach the top. This ensures every bite has a mix of flavors. To elevate taste, add fresh herbs like basil, parsley, or oregano. These add bright notes to your dish. For a hint of warmth, sprinkle some black pepper or red pepper flakes. Experiment with different spices to find your favorite blend. If you want a creamier texture, mix in more ricotta cheese or a splash of cream. This makes each bite rich and velvety. You can also fold in some spinach or kale for added creaminess and color. Pair this pasta bake with a fresh green salad or garlic bread. Both add crunch and flavor to your meal. For a special touch, consider serving with a light vinaigrette dressing. To impress your guests, serve the pasta bake in individual bowls. This makes it fun and personal. Before serving, sprinkle fresh basil on top for an eye-catching finish. This adds color and aroma, making your dish even more inviting. {{image_4}} You can switch up the protein in this dish easily. If you want a lighter option, use turkey instead of chicken. Shrimp also works well and adds a nice touch. For a meatless meal, try plant-based proteins like tofu or tempeh. They soak up flavors and add great texture. If you need a gluten-free dish, use gluten-free pasta. Many brands offer penne made from rice or quinoa. These options provide a similar taste and texture. You can also choose gluten-free marinara sauce and cheese. This way, everyone can enjoy the pasta bake. To change the flavor, think about different cuisines. For an Asian twist, use soy sauce and sesame oil. Add some ginger for an extra kick. If you prefer Mediterranean flavors, toss in olives and feta cheese. These ingredients give the dish a bright and salty taste. You can have fun with flavors and make this meal your own. To keep your Chicken and Veggie Pasta Bake fresh, let it cool first. Place it in a container with a tight lid. Use glass or BPA-free plastic containers for the best results. This helps keep the flavors and texture intact. Store it in the fridge for up to three days. When it's time to enjoy those tasty leftovers, preheat your oven to 350°F (175°C). Place the pasta bake in an oven-safe dish. Cover it with foil to keep it from drying out. Heat for about 20 minutes or until warm throughout. You can also reheat in the microwave for quick meals. Just use a microwave-safe container and heat in short bursts. If you want to freeze your pasta bake, first let it cool completely. Cut it into serving sizes for easier thawing. Wrap each portion tightly in plastic wrap, then place them in a freezer bag. Label the bags with the date. For best taste, use them within three months. To thaw, move a portion to the fridge overnight. Reheat as described above for a warm, hearty meal. To make Chicken and Veggie Pasta Bake, follow these steps: 1. Preheat your oven to 375°F (190°C). 2. Cook 2 cups of penne pasta until al dente. 3. In a bowl, mix together shredded chicken, cherry tomatoes, zucchini, bell pepper, broccoli, ricotta cheese, and marinara sauce. 4. Add the drained pasta to the bowl and mix well. 5. Grease a baking dish with olive oil and spread the mixture in it. 6. Top with shredded mozzarella cheese. 7. Bake for 25-30 minutes until the cheese is golden and bubbly. 8. Let it cool and garnish with fresh basil. This easy recipe is fun and packed with flavor. You can find the Full Recipe for more details. Yes, you can make this dish ahead of time. Prepare the pasta bake up to the baking step. Then, cover it and store it in the fridge for up to 24 hours. When you are ready to eat, simply bake it from the fridge. You might need to add a few extra minutes to the cooking time. If you don’t have ricotta cheese, you can use cottage cheese or cream cheese. Both will give a creamy texture. You can also blend silken tofu for a dairy-free option. Each will work well in this dish and keep it tasty. To add some heat, sprinkle in red pepper flakes or diced jalapeños. You can also use spicy marinara sauce. If you like heat, try adding hot sauce to the mix. Adjust the amount to your taste for the perfect kick. The Chicken and Veggie Pasta Bake lasts about 3-5 days in the fridge. Store it in an airtight container to keep it fresh. If you notice any changes in smell or color, it’s best to toss it. Yes, you can prepare this pasta bake in a slow cooker. First, cook the pasta separately until al dente. Then, mix all the ingredients in the slow cooker. Cook on low for 4-6 hours. Add the cheese on top for the last 30 minutes to melt it nicely. Enjoy this easy method! This blog post covered how to make a tasty Chicken and Veggie Pasta Bake. You learned about the key ingredients, step-by-step instructions, and helpful tips. Remember to customize your dish with your favorite veggies or proteins. This recipe offers great nutrition and flavor. Store leftovers well and they’ll taste good later. You can even try new variations for fun. Enjoy your cooking adventure, and make every bite delicious!

Chicken and Veggie Pasta Bake Easy and Flavorful Meal

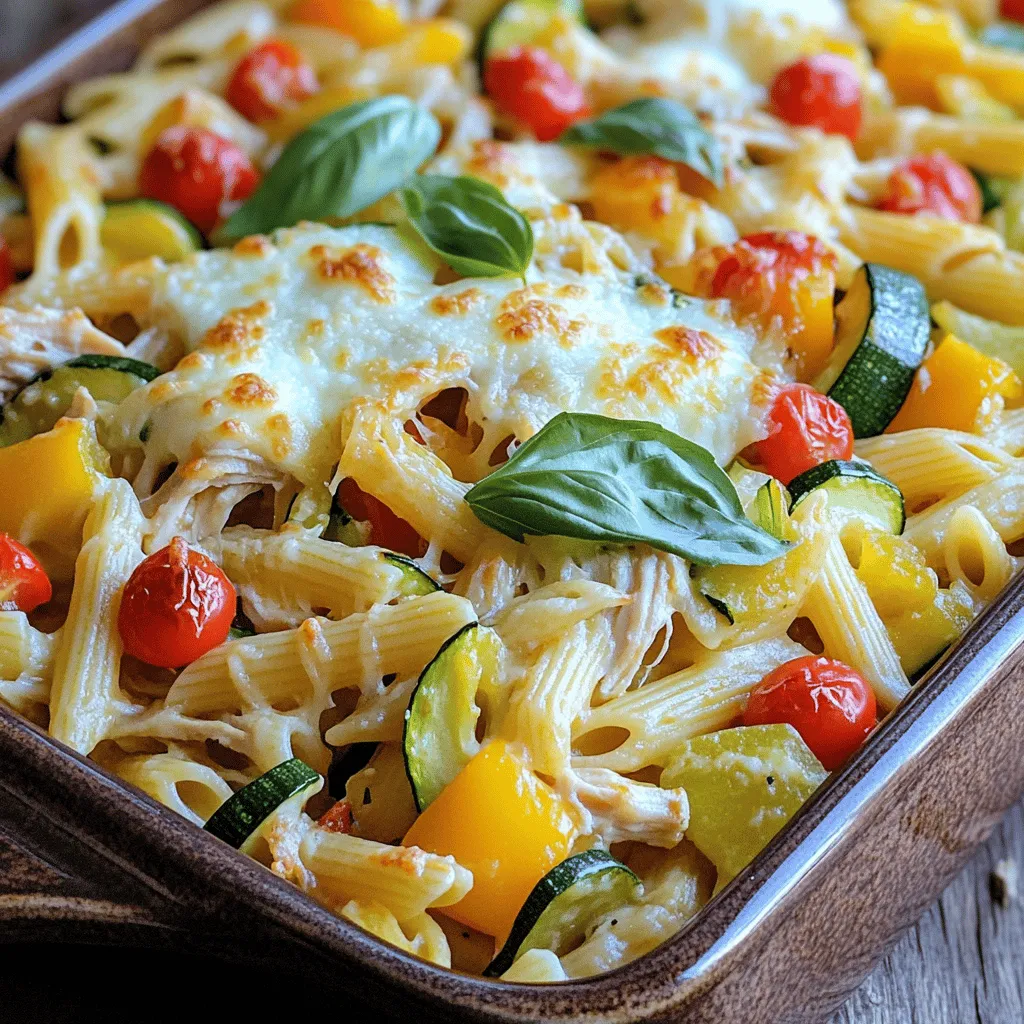
Are you looking for a simple, tasty meal that everyone will love? Look no further! My Chicken and Veggie Pasta

Older posts
Newer posts
← Previous Page1 … Page9 Page10 Page11 … Page59 Next →

dsad

© 2025 eataroundit • Built with GeneratePress

Our Policies

  • Copyright Policy
  • Cookie Policy
  • GDPR Policy
  • Privacy Policy
  • Disclaimer
  • Terms Of Use

More Information

  • Home
  • About
  • Contact
  • Appetizers
  • Dessert
  • Dinner
  • Drinks
©2025, eataroundit About Back To Top