Skip to content
DisclaimerTerms Of UseGDPR PolicyCookie Policy

eataroundit

  • Home
  • Drinks
  • Appetizers
  • Dinner
  • Dessert
  • About
  • Contact
  • Privacy Policy
DisclaimerTerms Of UseGDPR PolicyCookie Policy

Hannah

To make your chicken gyros, gather these main ingredients: - 500g chicken breast, sliced into thin strips - 2 tablespoons extra virgin olive oil - 2 teaspoons dried oregano - 1 teaspoon garlic powder - 1 teaspoon smoked paprika - Salt and freshly ground pepper to taste - 4 soft pita breads These ingredients create a flavorful, juicy chicken that shines in your gyros. The olive oil helps the spices stick to the chicken, while the oregano brings an aromatic touch. Garlic powder adds depth, and smoked paprika gives a nice, warm flavor. For the tzatziki sauce, you will need: - 1 cup creamy Greek yogurt - 1 tablespoon fresh lemon juice - 1 medium cucumber, finely diced - Salt and pepper to taste Tzatziki sauce is cool and refreshing. The Greek yogurt forms the base, while cucumber adds crunch. Lemon juice brightens the flavor, making it a perfect pairing with the gyros. You can add these garnishes and sides: - 1 ripe tomato, diced - 1 small red onion, thinly sliced - Fresh parsley, finely chopped (for garnish) These toppings add color and flavor to your gyros. Diced tomatoes offer sweetness, while red onions provide sharpness. Chopped parsley adds a fresh touch to the final dish. Consider serving with a small side salad for a complete meal. For the full recipe, check out the details above. To start, marinate the chicken. In a bowl, mix the sliced chicken with: - 2 tablespoons extra virgin olive oil - 2 teaspoons dried oregano - 1 teaspoon garlic powder - 1 teaspoon smoked paprika - Salt and freshly ground pepper to taste Toss the chicken until well coated. Cover the bowl with plastic wrap. Let it marinate for at least 30 minutes. If you have time, refrigerate for up to 2 hours. This makes the chicken juicy and full of flavor. Next, cook the chicken. Heat a large skillet over medium-high heat. Once hot, add the marinated chicken strips in a single layer. Cook for about 5-7 minutes. Stir occasionally so it cooks evenly. The chicken should be fully cooked and slightly charred. While the chicken cooks, prepare the tzatziki sauce. In a separate bowl, mix together: - 1 cup creamy Greek yogurt - 1 tablespoon fresh lemon juice - 1 medium cucumber, finely diced - Salt and pepper to taste Stir until everything is well blended. This sauce adds a cool, fresh taste to your gyros. Now, warm the pita breads. Use a dry skillet over medium heat. Warm each pita for about 1-2 minutes on each side. They should feel soft and slightly toasted. This step makes them easy to fold. It’s time to assemble your gyros! Take each warm pita bread and place a good amount of the cooked chicken in the center. Top it with: - Diced ripe tomatoes - Thinly sliced red onions - A generous spoonful of tzatziki sauce This combination creates a delicious burst of flavors in every bite. For a beautiful presentation, arrange the assembled gyros on a bright platter. Add a small bowl of extra tzatziki sauce on the side. Garnish with lemon wedges for a zesty touch. You can also include a small side salad for a complete meal. Enjoy your tasty chicken gyros! To make your chicken gyros really pop, use fresh herbs. Fresh oregano or parsley adds a nice touch. You can also squeeze extra lemon juice on top for brightness. Grill the chicken instead of frying for a smoky taste. Don’t skip the marinating step; it makes a huge difference in flavor. If you want a twist, try using turkey or even tofu instead of chicken. Both options absorb flavors well. For a spicier kick, you can add a pinch of cayenne pepper to the marinade. You can also make gyros with beef or lamb for a heartier meal. Need a fast meal? Serve your gyros with a side of chips or a salad. You can also fill the pita with extra veggies for crunch. If you have leftover chicken, toss it in a wrap with lettuce and the tzatziki sauce. This recipe is easy but still feels special. Check out the Full Recipe for a complete guide! {{image_4}} You can easily switch to a vegetarian or vegan gyros. Use grilled vegetables like zucchini, bell peppers, and mushrooms. For a protein boost, add chickpeas or lentils. These options give you the same great flavor but without meat. You can still use tzatziki sauce, but swap yogurt for a dairy-free version made from cashews or coconut. This way, everyone can enjoy gyros. If you want to try different meats, pork and lamb work great. For pork, use thinly sliced pork loin or shoulder. Marinate it just like chicken. Lamb adds a rich flavor. Use boneless lamb shoulder or leg, cut into strips. Cook them the same way as chicken. Both proteins bring unique tastes to your gyros. Don't limit yourself to just tzatziki. Try hummus or a spicy feta dip as your sauce. These give your gyros a new twist. You can also add toppings like olives, roasted red peppers, or arugula. Each choice will change the taste and make it exciting. Mix and match to find your favorite combination. For the full recipe, check out the linked section. To store leftover chicken gyros, first, let them cool. Place the gyros in an airtight container. You can keep them in the fridge for up to three days. If you want to store them longer, freeze the chicken and tzatziki sauce separately. They can last for about three months in the freezer. To reheat chicken gyros, remove them from the fridge. You can use an oven for best results. Preheat the oven to 350°F (175°C). Wrap the gyros in foil and warm them for about 10-15 minutes. If you’re in a hurry, you can use a microwave. Heat them on medium for 1-2 minutes. Just be careful not to dry them out. Store tzatziki sauce in a separate container. Keep it covered in the fridge. It stays fresh for about four to five days. If you notice extra water, just drain it before using. For a longer shelf life, consider freezing the sauce in ice cube trays. You can pop out a cube when you need a quick sauce! If you want a tasty swap for tzatziki sauce, try a yogurt sauce. Mix Greek yogurt with garlic, lemon juice, and fresh herbs, like dill or mint. You can also use hummus for a creamy texture. Another option is a simple avocado spread for a fresh twist. Yes, you can make Chicken Gyros ahead of time. Cook the chicken and prepare the tzatziki sauce. Store them in separate containers in the fridge. You can also chop your veggies in advance. Just warm the chicken and pita before serving. This makes a quick meal on busy days. You can add many tasty toppings to your gyros. Consider adding sliced bell peppers for crunch. Feta cheese adds a rich flavor. You can also use olives for a briny kick. Roasted red peppers and arugula are great choices too. Mix and match to find your favorites! To check if the chicken is fully cooked, cut into a piece. The inside should be white, not pink. The juices should run clear. You can also use a meat thermometer. The chicken should reach an internal temperature of 165°F (75°C). This keeps your meal safe and tasty. You now have the tools to make easy chicken gyros at home. We covered the key ingredients, including chicken and tzatziki sauce. I shared step-by-step instructions to marinate, cook, and assemble your gyros for a tasty meal. You also learned tips for flavor and serving variations, plus how to store leftovers. Enjoy making these gyros your own. With practice, you'll impress everyone with your skills. Cooking can be fun and rewarding!

Easy Chicken Gyros Flavorful and Simple Recipe

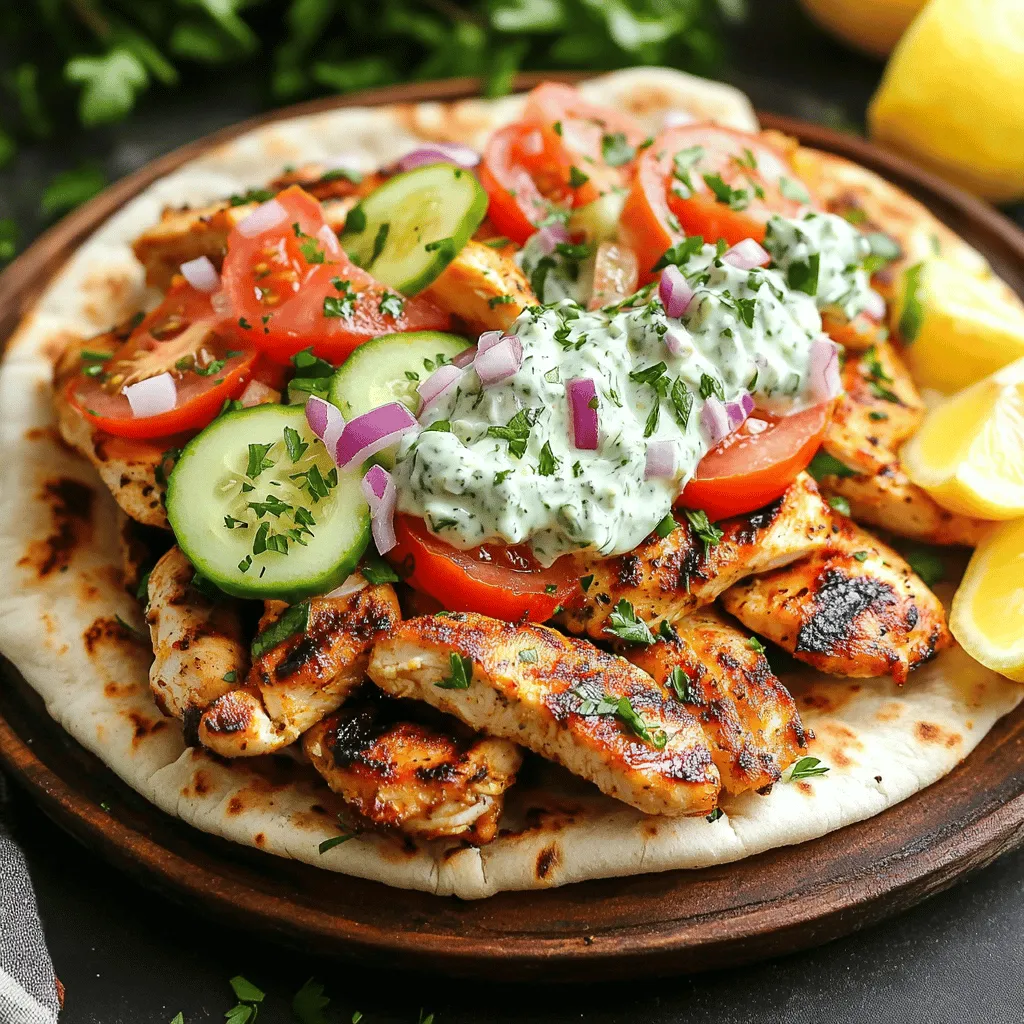
Craving a quick, tasty meal? You’ll love my Easy Chicken Gyros recipe! Packed with flavor and simple to make, this

To make this tasty dish, you need a few key items: - 4 boneless, skinless chicken breasts - 4 cloves of garlic, finely minced - 2 lemons (both zested and juiced) - 3 tablespoons extra virgin olive oil - 1 teaspoon dried thyme - 1 teaspoon dried oregano - Salt and fresh cracked pepper to taste - Fresh parsley, finely chopped (for garnish) These ingredients work together to create a bright and zesty flavor. The lemon and garlic shine in this recipe, giving the chicken a fresh taste. You can elevate your dish with some fun extras. Consider these: - Lemon wedges for serving - A sprinkle of fresh herbs like basil or cilantro - Roasted vegetables or a crisp garden salad - A side of rice or quinoa These garnishes add color and flavor. They also make your meal look beautiful on the plate. If you don't have something on hand, no worries! Here are some swaps: - Use chicken thighs instead of breasts for a juicier option. - Try using lime juice instead of lemon for a twist. - Swap dried thyme and oregano with fresh herbs if you prefer. These substitutions keep the spirit of the dish while allowing for personal touches. You can still enjoy a delicious lemon garlic chicken with what you have! For the complete recipe, check out the Full Recipe. First, preheat your oven to 400°F (200°C). This step ensures a hot oven for baking the chicken. While the oven heats, take your chicken breasts and check for any excess fat. Trim it off for a clean look. Place the chicken in a large resealable bag or a shallow dish. This will help with marinating later. In a small mixing bowl, combine the minced garlic, lemon zest, and lemon juice. Add three tablespoons of extra virgin olive oil. Then, mix in the dried thyme and oregano. Finally, season with salt and freshly cracked pepper. This marinade gives the chicken its strong flavor. Pour the mixture over the chicken, making sure each piece is coated. Seal the bag or cover the dish. Refrigerate for at least 30 minutes, or up to 2 hours for even better flavor. After marinating, take the chicken out of the fridge. Lightly grease a baking dish and place the chicken inside. Spread the pieces apart for even cooking. Bake the chicken for 25 to 30 minutes. Use a meat thermometer to check if it reached 165°F (75°C). The chicken should be fully cooked, with no pink inside. Once done, let it rest for 5 minutes. This helps keep the chicken juicy. Slice the chicken and serve hot, garnished with fresh parsley. Enjoy your Simple Lemon Garlic Chicken! For more details, refer to the Full Recipe. Marinating is key to making your lemon garlic chicken shine. Use a resealable bag or shallow dish to make sure the chicken is fully coated. Seal the bag tightly to keep the flavors in. Aim for at least 30 minutes, but two hours is better. This longer time allows the flavors to soak in deeply. Always refrigerate the chicken while marinating. Remember, the acid from the lemon helps tenderize the meat. To cook chicken perfectly, keep an eye on the internal temperature. Use a meat thermometer to check. It should reach 165°F (75°C) in the thickest part. If you don’t have a thermometer, cut into the chicken. There should be no pink inside. Make sure to space the chicken pieces apart in the baking dish. This allows hot air to circulate and cook them evenly. Rest the chicken for five minutes after baking to keep it juicy. Want to amp up the flavor? Try adding fresh herbs like basil or rosemary. You can also mix in some red pepper flakes for a little heat. For a twist, add a splash of soy sauce or honey. These will give your chicken a unique taste. Experiment with different herbs and spices to find your favorite combination. Just remember to keep the balance so the lemon and garlic still shine through. For the full recipe, check the recipe section above. {{image_4}} You can cook lemon garlic chicken in different ways. Grilling gives a smoky flavor. To grill, heat your grill to medium-high. Place the marinated chicken on the grill. Cook for about 6 to 7 minutes per side. Check the inside to make sure it reaches 165°F. Pan-searing is another great option. Heat a skillet over medium heat. Add a bit of olive oil. Place the chicken in the skillet and cook for 5 to 6 minutes on each side. This method gives a nice golden crust. You can boost the flavor of your lemon garlic chicken. Try adding fresh herbs like rosemary or basil. They pair well with garlic and lemon. You can also use spices like paprika or cumin. These add warmth and depth to the dish. Feel free to mix and match until you find your favorite combo. When serving lemon garlic chicken, think of what goes well. Roasted veggies make a great side. Try carrots, zucchini, or bell peppers. You can also serve it with a fresh salad. For sauces, a light lemon vinaigrette works well. It adds a bit of zing. You can also drizzle a creamy sauce over the chicken for extra flavor. For the full recipe and more ideas, check the Full Recipe. To keep your lemon garlic chicken fresh, place any leftovers in an airtight container. Make sure to cool the chicken to room temperature before sealing it. Store it in the fridge for up to four days. This method helps keep the flavors intact and the chicken moist. When you're ready to enjoy your leftovers, reheat them gently. The best way is to use the oven. Preheat it to 350°F (175°C). Place the chicken in a baking dish and cover it with foil. Heat for about 15 to 20 minutes until warmed through. You can also use the microwave if you're short on time. Just heat in short bursts, checking to avoid drying it out. If you have extra chicken, you can freeze it for later. Wrap each piece tightly in plastic wrap, then place it in a freezer bag. This prevents freezer burn. You can freeze the chicken for up to three months. To use, thaw it in the fridge overnight before reheating. Enjoy your meal anytime with these simple storage methods! Lemon garlic chicken is a simple dish with big flavors. Many people love it for its fresh taste and ease of cooking. You can serve it for family dinners or special occasions. The bright lemon and garlic give the chicken a zesty kick. Plus, it pairs well with many sides, making it a versatile choice. You can marinate chicken for as little as 30 minutes. This lets the flavors soak in. For more flavor, I suggest marinating for up to 2 hours. If you have more time, you can even marinate overnight. Just remember, don’t go over 24 hours. The chicken can become too salty or mushy. Yes, you can use bone-in chicken for this recipe! Bone-in chicken adds great flavor and moisture. Just adjust the cooking time. Bone-in pieces usually take longer to cook through. Aim for an internal temperature of 165°F (75°C) to ensure it’s safe to eat. This will give you juicy, tasty chicken with that lemon garlic flavor. For the full recipe, check the details above. This post covered everything you need for simple lemon garlic chicken. We talked about the main ingredients, step-by-step cooking, and tips for the best results. I also shared variations and storage tips to help you enjoy this dish over time. With the right marinade and cooking method, you can create a tasty meal. Try different herbs and sides to keep it fresh. Enjoy making and sharing this recipe!

Simple Lemon Garlic Chicken Easy and Flavorful Recipe

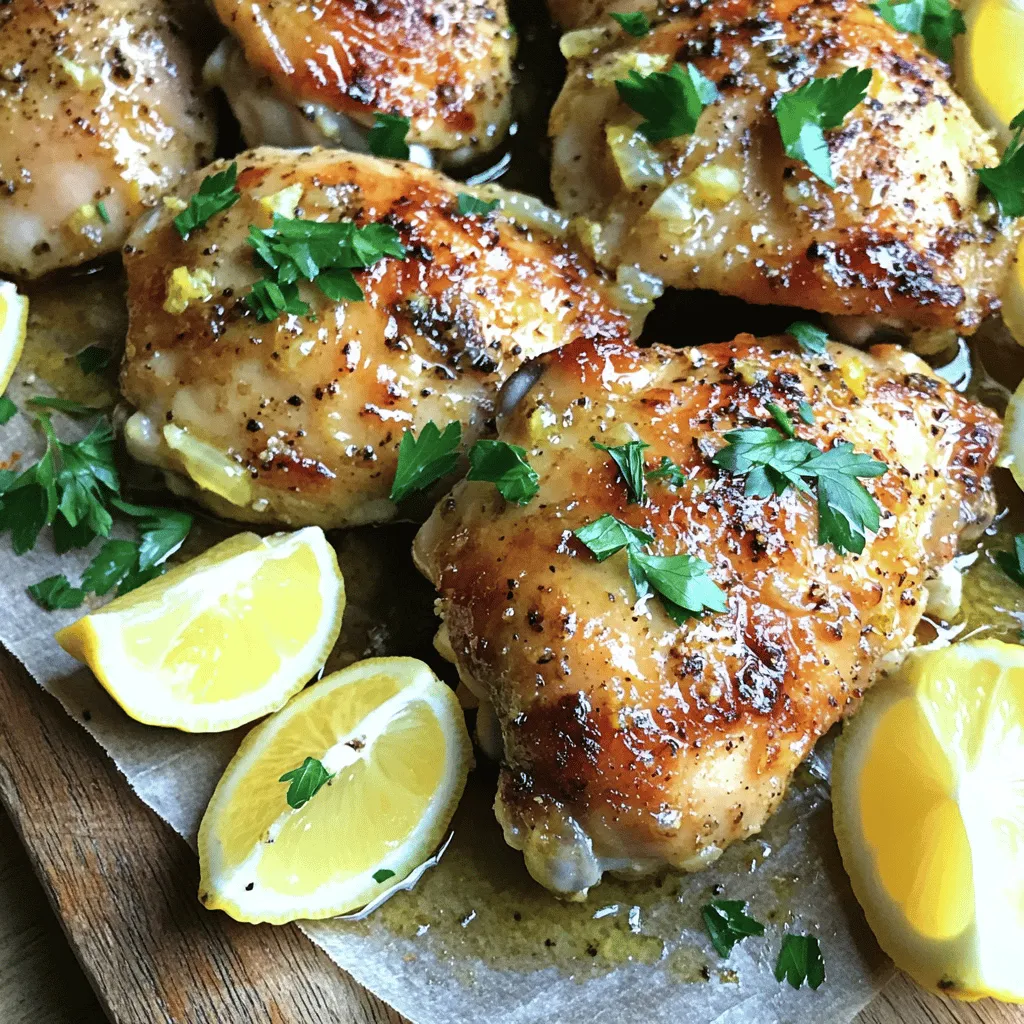
Looking for a quick and tasty meal? You’re in the right place! My Simple Lemon Garlic Chicken recipe brings bright

To make a great French onion soup, you need a few key items: - 4 large yellow onions, thinly sliced - 4 tablespoons unsalted butter - 1 tablespoon olive oil - 1 teaspoon sugar (to enhance caramelization) - 6 cups beef broth (or vegetable broth for a vegetarian option) - 1 teaspoon dried thyme - 2 bay leaves - Salt and pepper to taste - 1 French baguette, sliced into 1-inch pieces - 2 cups shredded Gruyère cheese - Fresh parsley, chopped, for garnish Each ingredient adds a layer of flavor. The onions bring sweetness, while the broth gives depth. Gruyère cheese adds creaminess and richness. You will need some basic tools to make your soup: - A large, heavy-bottomed pot (to caramelize onions evenly) - A wooden spoon (for stirring) - A ladle (for serving) - Oven-safe bowls (for broiling the soup) - A baking sheet (for toasting the baguette) Having the right tools makes the process easier and more fun! If you have dietary needs, you can still enjoy this soup: - Use vegetable broth instead of beef broth for a vegetarian version. - Swap Gruyère cheese for a dairy-free cheese if you are lactose intolerant. - For gluten-free diets, use gluten-free bread instead of a baguette. These swaps keep the rich taste while catering to different diets. Enjoy customizing your bowl! Start with four large yellow onions. Slice them thinly. This helps them cook evenly. Use a sharp knife for better control. Add the sliced onions to a large pot. I prefer a heavy-bottomed pot for even heat. Mix in four tablespoons of unsalted butter and one tablespoon of olive oil. This combination creates a rich base. Now, let’s caramelize those onions. Add one teaspoon of sugar to the pot. This sugar boosts the sweetness. Cook the onions on medium-low heat. Stir them every few minutes. Be patient; this process takes about 25-30 minutes. You want them to turn a deep golden brown. This step develops the soup’s rich flavor. Once the onions are beautifully caramelized, it’s time to make the soup. Pour in six cups of beef broth or vegetable broth for a lighter option. Add one teaspoon of dried thyme and two bay leaves. Season with salt and pepper to taste. Stir well and bring it to a gentle simmer. Let it simmer for an additional 20 minutes. Taste and adjust the seasoning if needed. For the full recipe, check out the Caramelized Onion Bliss Soup. Enjoy! Adding herbs makes your soup shine. I love using dried thyme. It gives a warm, earthy taste. You can also use bay leaves for depth. Don’t forget to season with salt and pepper. Taste as you go! Adjust to your liking. Adding a splash of sherry or white wine can also add a nice touch. Experiment to find your favorite mix! Temperature is key for a good soup. Start with medium-low heat when cooking your onions. This helps them caramelize slowly. If the heat is too high, they may burn. Once you add the broth, bring it to a gentle simmer. Keep it low to let flavors meld without boiling. A slow simmer brings out the best taste! Caramelization is where the magic happens. Start with butter and olive oil in a heavy pot. Add the onions and sugar, then stir well. Cook them for about 25-30 minutes. Patience is important here! Stir occasionally, letting them turn a rich, golden brown. This step builds the soup’s deep flavor. Always remember, the darker your onions, the richer your soup! For a detailed recipe, check out the Full Recipe. {{image_4}} Classic French onion soup has many tasty twists. You can change ingredients to fit your taste. Here are some ideas to make your soup unique. For a vegetarian version, swap beef broth for vegetable broth. This keeps the soup rich and flavorful. Use the same amount of broth. You can also add more herbs, like rosemary or basil. This will enhance the taste without meat. Though Gruyère cheese is classic, feel free to experiment. Try Swiss, mozzarella, or even cheddar. Each cheese adds its own flavor and texture. Mixing cheeses can give a nice touch too. A blend of Gruyère and mozzarella creates a creamy, stretchy finish that is delightful. You can add unique flavors to your soup. Consider adding a splash of sherry or white wine. This adds depth and a hint of sweetness. For a spicy kick, try a pinch of cayenne pepper. You can also stir in sautéed mushrooms or roasted garlic for extra richness. For the full recipe, check out our Caramelized Onion Bliss Soup. Enjoy your cooking! To keep your soup fresh, cool it down first. Once cool, transfer it to an airtight container. Store it in the fridge for up to three days. Make sure to separate the soup from the toppings. This helps keep the bread from getting soggy. When you're ready to enjoy your soup again, pour it into a pot. Heat it over medium heat, stirring often. You can also use a microwave-safe bowl. Cover the bowl with a lid or microwave-safe wrap. Heat for 2-3 minutes. Stir halfway to ensure even warming. You can freeze the soup for later! Use a freezer-safe container. Leave some space at the top for expansion. This soup can last up to three months in the freezer. To serve, thaw it overnight in the fridge. Then, reheat it on the stove or in the microwave. Enjoy your delicious soup anytime! For the full recipe, refer back to the Caramelized Onion Bliss Soup. A good French onion soup has rich, deep flavors. It starts with caramelized onions. These onions should turn a golden brown color. This adds sweetness and depth. Next, quality broth is key. Beef broth gives a robust taste. You can use vegetable broth for a lighter option. Herbs like thyme enhance the flavor. Finally, the melted cheese on top is a must. Gruyère cheese works best for its meltiness. Yes, you can make French onion soup ahead of time. Prepare the soup base and let it cool. Store it in the fridge for up to three days. When ready to eat, reheat it on the stove. Toast the bread and cheese just before serving. This keeps the bread crisp and the cheese gooey. For the best soup, choose yellow onions. They have the right balance of sweetness and flavor. Avoid white onions, as they can be too sharp. Sweet onions are good, but they can be overly sweet. Look for firm onions with a dry skin. Check for any soft spots or blemishes. Fresh onions make a big difference in taste. Classic French onion soup is a mix of simple ingredients and careful steps. You learned about the main ingredients, tools, and easy swaps for your needs. I guided you through preparing and caramelizing onions, then simmering to bring it all together. We covered tips for great flavor and variations to try. Lastly, I shared how to store and reheat your soup. Making this dish can bring comfort and warmth. Enjoy crafting your version of this classic recipe!

Classic French Onion Soup Flavorful and Comforting Dish

Looking for the perfect cozy meal? Classic French onion soup is a warm, comforting dish that delights the senses. Rich,

- 1 package of pre-made pizza dough (store-bought) - 1 cup fresh tomato sauce (either homemade or store-bought for convenience) - 8 ounces fresh mozzarella cheese, sliced into rounds To start with, you need a good base for your pizza. The pre-made pizza dough makes this easy. It helps you skip the hard part of making dough from scratch. This dough gives you a nice, chewy crust. Next, let’s talk about the fresh tomato sauce. You can use homemade or store-bought. Homemade sauce can taste great, but store-bought works well for quick meals. Either way, the sauce should be fresh and flavorful. Now, we need mozzarella cheese. Use fresh mozzarella if you can. It melts nicely and gives that classic pizza taste. Slice it into rounds so it spreads evenly over the sauce. - Fresh basil importance - Olive oil quality - Seasoning tips (sea salt, black pepper, oregano) Fresh basil adds a burst of flavor. It brings that classic Margherita taste. Add it on top of the pizza after baking. This keeps the leaves fresh and vibrant. Using high-quality olive oil is key. Drizzle it on the pizza before baking. It adds richness and depth to every bite. Extra virgin olive oil is a great choice for this. Season your pizza with sea salt and black pepper. These simple spices enhance all the flavors. If you want a bit more flavor, sprinkle some dried oregano. This adds a nice herbal note to the dish. For the complete cooking guide, refer to the Full Recipe. First, preheat your oven to 475°F (245°C). If you have a pizza stone, put it in the oven now. This helps the crust get nice and crispy. Next, take your pre-made pizza dough. Place it on a lightly floured surface. Use a rolling pin to roll it out to about 12 inches wide. You want it to be thin, but not too thin. Dust a bit of cornmeal or flour on your pizza peel or baking tray. This stops the dough from sticking. Now, let’s spread the fresh tomato sauce. Use a spoon to put it evenly on the dough. Leave about a half-inch space around the edges for the crust. Then, layer the sliced mozzarella cheese over the sauce. Make sure to cover all the sauce well. If you want, sprinkle some dried oregano on top for extra taste. Carefully slide the pizza from the peel onto the hot pizza stone. If you're using a baking tray, just place it in the oven. Bake your pizza for 10-12 minutes. Look for a golden brown crust and bubbly cheese as signs that it's ready. When the time is up, use oven mitts to take it out. Let it rest for one minute. Finally, toss the torn basil leaves on top. This adds a fresh taste and looks great. Now, slice up your pizza and enjoy! For a little extra flavor, drizzle some olive oil over each slice. To get the best crust, bake your pizza at a high temperature. I recommend setting your oven to 475°F (245°C). This heat helps create a golden crust. If you use a pizza stone, let it heat up in the oven. This step helps make the base crispy. Using cornmeal on your baking surface is key too. It prevents sticking and adds crunch. Just sprinkle some cornmeal on your pizza peel or baking tray before placing the dough. Fresh ingredients make a big difference in flavor. Use ripe tomatoes for your sauce and fresh mozzarella for that creamy chew. These choices bring the dish to life. After baking, sprinkle fresh basil leaves on top. Adding basil at the end keeps its bright flavor. The heat from the pizza will gently wilt the leaves, making them perfect. One common mistake is having a soggy crust. To avoid this, don’t overload your pizza with sauce or toppings. Leave a little space at the edge for the crust to rise. Also, watch the thickness of your dough. Aim for about 1/4 inch thick. Too thick, and it won’t cook well; too thin, and it may burn. Balancing this is key for a perfect Margherita pizza. For more details, check the Full Recipe for Easy Margherita Pizza. {{image_4}} You can easily change the classic Margherita pizza. Start by adding different toppings. Try slices of pepperoni, mushrooms, or bell peppers. These toppings can bring new flavors to your pizza. You can also add seasonal vegetables. Fresh zucchini, asparagus, or cherry tomatoes work great. This keeps your pizza fresh and exciting all year long. If you need a gluten-free option, use gluten-free dough. Many stores sell this option, and it tastes great too. For those avoiding dairy, vegan cheese is a solid choice. Look for brands that melt well for the best texture. These options let everyone enjoy pizza without worry. Different styles of pizza exist around the world. Neapolitan style is soft and chewy, while Roman style is thin and crispy. You can customize your pizza with local ingredients. Use whatever is fresh in your area. This makes your pizza unique and full of local flavor. The Easy Margherita Pizza recipe allows for all these fun twists! To keep your pizza fresh, store it in the fridge. Place the slices in an airtight container. This method helps keep the pizza from drying out. If you don’t have a container, wrap the slices in plastic wrap or foil. Make sure they are sealed tightly to keep the taste. You can store leftover pizza for up to three days. When it’s time to enjoy your pizza again, you have two main options: the oven or the microwave. The oven is best for a crispy crust. Preheat it to 375°F (190°C). Place the pizza on a baking sheet and heat for about 10 minutes. For the microwave, place a slice on a plate. Add a cup of water next to it. Heat the slice for 30 seconds to 1 minute. This method keeps the cheese from becoming rubbery. If you want to save pizza for later, freezing is a great choice. First, let the pizza cool to room temperature. Then, wrap each slice in plastic wrap. After wrapping, place them in a freezer bag. Be sure to remove as much air as possible. Freeze the pizza for up to two months. To enjoy your frozen pizza, take it out of the freezer and let it thaw in the fridge overnight. When ready to eat, reheat in the oven at 375°F (190°C) for about 10-15 minutes. This keeps the crust nice and crispy. For more details, check the Full Recipe. The best cheese for Margherita pizza is fresh mozzarella. - Bocconcini: These small balls of mozzarella are soft and creamy. - Fior di latte: This cow's milk mozzarella has a mild taste. - Buffalo mozzarella: Made from water buffalo milk, it has rich flavor and creaminess. Fresh mozzarella melts beautifully and gives a lovely texture. Yes, you can make dough from scratch. Here’s a basic recipe. 1. Ingredients: - 2 cups all-purpose flour - 1 packet (2 ¼ teaspoons) active dry yeast - ¾ cup warm water - 1 teaspoon sugar - 1 teaspoon salt - 1 tablespoon olive oil 2. Instructions: - Combine warm water, sugar, and yeast. Let it sit for 5 minutes. - In a bowl, mix flour and salt. Add yeast mixture and olive oil. - Knead until smooth. Let rise for 1 hour. This dough is easy and fun to make. The best toppings for a Margherita pizza are simple and fresh. - Traditional: Fresh mozzarella, basil, and tomato sauce. - Creative: Try adding arugula, prosciutto, or a drizzle of balsamic glaze. The key is to keep it light and fresh. Making a Margherita pizza takes about 30 minutes in total. - Prep time: 10 minutes for dough and toppings. - Cook time: 10-12 minutes in the oven. This quick recipe makes it easy to enjoy pizza any night. Yes, using store-bought tomato sauce is a great choice. - Benefits: - Saves time and effort. - Many options are tasty and high-quality. If you want, try adding herbs to boost the flavor. The ideal oven temperature for pizza is between 475°F and 500°F. - At 475°F, your crust will be crispy and cooked well. - Higher temperatures can create a charred crust, perfect for Neapolitan style. Preheating the oven is key to a great pizza. For a detailed recipe, check the Full Recipe. Making a great Margherita pizza is easy with the right ingredients and steps. You learned about key items like fresh tomato sauce and mozzarella cheese. I shared tips for the best crust and flavor. If you avoid common mistakes, your pizza will shine. Experiment with toppings or dietary needs for a fun twist. Store or freeze leftovers properly to enjoy later. Remember, fresh ingredients make the best pizza. Now it’s your turn to make a delicious Margherita pizza at home!

Easy Margherita Pizza Flavorful and Simple Recipe

Craving a burst of flavor without the fuss? You’re in the right place! This Easy Margherita Pizza recipe proves that

- 1 cup jasmine rice - 1 cup coconut milk - 1 cup water - 1 tablespoon sugar - 1/2 teaspoon salt - 1/4 cup shredded coconut (toasted) - Fresh cilantro leaves - Chopped green onions To make simple coconut rice, you need just a few basic ingredients. Start with jasmine rice, which gives a fluffy texture and a nice scent. Coconut milk adds creaminess and a sweet flavor. Water helps cook the rice perfectly. You can enhance the taste with sugar and salt. Sugar brings out the coconut's natural sweetness, while salt balances the flavors. Toasted shredded coconut adds a nice crunch and extra coconut flavor. For garnishing, I love using fresh cilantro leaves or chopped green onions. They not only add color but also brighten the dish. These simple ingredients come together to create a delightful side dish. For the full recipe, check out Tropical Coconut Rice Delight. - Rinse jasmine rice: Start by rinsing your jasmine rice. Use cold water and rinse until the water runs clear. This step removes extra starch and stops the rice from being sticky. - Combine ingredients: In a medium pot, mix the rinsed jasmine rice with coconut milk, water, sugar, and salt. Stir gently to blend everything well. - Bring to boil: Set the pot over medium-high heat. Watch closely as the mixture heats up to a gentle boil. - Simmer and steam: Once boiling, reduce the heat to low. Cover the pot tightly with a lid to trap steam. Let it simmer for about 15 to 18 minutes. The liquid should absorb fully, and the rice should be tender. - Fluff the rice: After cooking, remove the pot from heat. Keep it covered for 5 more minutes. This allows the rice to steam and fluff up nicely. Use a fork to gently fluff the rice. - Add toasted coconut: Fold in the toasted shredded coconut. This adds a nice crunch and tropical flavor. Serve your coconut rice warm. It’s perfect as a side dish or a base for many meals. If you want to impress, try the [Full Recipe] for tropical coconut rice delight. Rinsing rice is key. Rinse your jasmine rice until the water runs clear. This step removes extra starch. It helps keep the rice fluffy. After rinsing, drain the rice well. Managing cooking temperature is also vital. Start by boiling the rice mixture on medium-high heat. Once it boils, lower the heat right away. Cover the pot tightly to trap steam. This method cooks the rice evenly. Using fresh coconut adds a rich taste. Grate fresh coconut and mix it in while cooking. This step boosts the coconut flavor. You can also add more spices. A pinch of cinnamon or cardamom can make a difference. Try adding a splash of lime juice for brightness. It pairs well with coconut. You’ll find that a little goes a long way. Serve coconut rice in fun ways. Hollow out a pineapple and fill it with rice. This makes a great centerpiece. You can also use coconut shells for a tropical look. For garnishing, add toasted coconut on top. Sprinkle fresh cilantro or green onions for color. These small touches make your dish pop. They also show off your culinary skills. For the full recipe, check out Tropical Coconut Rice Delight. {{image_4}} Adding fruit to coconut rice makes it fun and tasty. You can add pineapple for a sweet touch. Cut fresh pineapple into small pieces and mix them in after cooking. The juicy pineapple adds a tropical flair. You can also incorporate mango. Just like pineapple, cut fresh mango into small chunks. Mix them in gently after you fluff the rice. The mango adds a nice sweetness that balances well with the coconut. Both fruits create a colorful and vibrant dish. You can make coconut rice savory too! Instead of using water, try broth. Chicken or vegetable broth adds rich flavor. Just replace the water with broth in the recipe. This change gives the rice depth and pairs well with many savory meals. Another option is to add spices like turmeric. This spice gives a warm color and a slight earthiness. Stir in a teaspoon of turmeric when you mix the ingredients. It’s an easy way to transform your coconut rice into a more complex side dish. If you want vegan options, you are in luck! The main ingredients are already vegan-friendly. Just check that your sugar is vegan. Some sugars are processed with bone char. For gluten-free folks, coconut rice is a safe choice. All the ingredients are naturally gluten-free. Just ensure your broth is also gluten-free if you choose that option. This way, everyone can enjoy this delightful dish. For the full recipe, check here: [Full Recipe]. After you make coconut rice, let it cool down first. Store leftovers in an airtight container. This keeps the rice fresh and tasty. The rice will stay good for about 3 to 5 days in the fridge. To avoid drying out, always seal the container well. You can freeze coconut rice too! Place it in a freezer-safe bag or container. Make sure to remove as much air as possible. This helps keep the texture nice. Coconut rice can last up to 2 months in the freezer. When you want to use it, let it thaw in the fridge overnight. When reheating, you can choose between a microwave or stovetop. For the microwave, heat it in short bursts. Add a splash of water or coconut milk to keep it moist. If you use the stovetop, warm it gently over low heat. Stir it often, and add liquid as needed. This way, your coconut rice stays soft and fluffy. Enjoy your meal! Coconut rice lasts about 3 to 5 days in the fridge. Store it in an airtight container. This keeps it fresh and helps prevent odors from other foods. When you’re ready to eat, just reheat it until hot. Yes, you can make coconut rice with brown rice. Use 1 cup of brown rice and 1 cup of coconut milk with 1 and 1/4 cups of water. Cook it for a bit longer, about 30 to 40 minutes. Brown rice takes longer to soften, so be patient for that perfect texture. Coconut rice pairs well with many dishes. Try it with grilled chicken or fish. It also goes great with shrimp, curries, or stir-fried veggies. You can even serve it with a fresh salad for a light meal. Coconut rice can be a healthy option. It has healthy fats from coconut milk, which can be good for your heart. Jasmine rice provides quick energy but watch your portion size. It's best enjoyed as part of a balanced meal with plenty of veggies and protein. Coconut rice is simple yet delicious. You learned about the main ingredients, cooking steps, and tips for the best results. Don't forget to try different flavors and variations to make it your own. Storing and reheating correctly keeps it fresh. With these easy steps, you can serve a great side or main dish. Enjoy experimenting with coconut rice in your meals. Your kitchen will smell amazing, and the taste will impress everyone.

Simple Coconut Rice Easy and Flavorful Side Dish

If you’re looking for an easy and tasty side dish, look no further than Simple Coconut Rice! This dish pairs

- 4 cups fresh broccoli florets - 2 cups cooked white rice - 1 cup shredded sharp cheddar cheese - 1 cup cream of mushroom soup - 1/2 cup mayonnaise - 1/2 teaspoon garlic powder - 1/2 teaspoon onion powder - 1/4 teaspoon black pepper - 1 cup crushed Ritz crackers - 2 tablespoons butter for topping A great broccoli cheese casserole starts with fresh ingredients. I love using bright green broccoli florets. They add color and taste to the dish. Cooked white rice makes it hearty and filling. Shredded sharp cheddar cheese brings a rich, creamy flavor that everyone loves. For the creamy base, I use cream of mushroom soup and mayonnaise. These ingredients blend well and keep the casserole moist. I also add garlic powder, onion powder, and black pepper for extra flavor. The crunchy topping is a must. Crushed Ritz crackers give a delightful crunch. Mixing them with melted butter adds richness and taste. This mix makes the casserole even more enjoyable. Together, these ingredients create a dish that’s simple yet satisfying. You can find the full recipe in the section above. 1. Preheat the oven and prepare the baking dish Start by setting your oven to 350°F (175°C). This will warm up while you prep. Grease a 9x13-inch baking dish to keep the casserole from sticking. 2. Blanch the broccoli florets In a big pot, boil salted water. Add 4 cups of fresh broccoli florets. Let them cook for 2-3 minutes. You want them bright green and just tender. Drain the broccoli and set it aside. 1. Combine the rice and cheese mixture In a large bowl, mix 2 cups of cooked white rice, 1 cup of shredded sharp cheddar cheese, 1 cup of cream of mushroom soup, and 1/2 cup of mayonnaise. Add 1/2 teaspoon of garlic powder, 1/2 teaspoon of onion powder, and 1/4 teaspoon of black pepper. Stir until everything blends well. You want a creamy mix. 2. Fold in the blanched broccoli Gently add the blanched broccoli to your rice and cheese mix. Carefully fold it in so that the broccoli spreads evenly. This makes sure every bite has that delicious flavor. 1. Assemble the casserole and add the topping Pour the mixture into your prepared baking dish. Spread it out evenly. In a separate bowl, mix 1 cup of crushed Ritz crackers with 2 tablespoons of melted butter. Coat the crackers well. Sprinkle this mixture over the top of the casserole. 2. Bake until golden brown Place the casserole in the oven. Bake it for 25-30 minutes. Look for bubbly edges and a golden brown top. Once it looks perfect, take it out and let it cool for a few minutes before serving. This step-by-step guide will help you create a warm, cheesy delight that your family will love. For the complete recipe, check out the Full Recipe. To get the best texture for broccoli, blanch the florets first. Boil water in a pot and add the broccoli for just 2-3 minutes. This keeps them tender yet crisp. After blanching, drain them well. This step helps the broccoli stay bright green and not mushy. Mixing ingredients properly is key. When you combine the rice, cheese, and other items, stir until everything is smooth. This ensures each bite is creamy and packed with flavor. Be gentle when folding in the broccoli to keep the florets intact. Want to add more cheese? Try using a mix of cheeses for depth. Mozzarella or gouda can give a richer taste. Just remember, more cheese means more creaminess. You can also enhance flavor with spices. A pinch of paprika or a dash of hot sauce can add a fun kick. Consider adding fresh herbs like thyme or rosemary for a fresh taste. Serve the casserole hot from the baking dish for the best experience. It looks inviting this way. For a pop of color, sprinkle chopped parsley on top. This adds freshness and makes the dish look fancy. Pair the casserole with a side salad for extra crunch and color. This combo makes the meal complete and satisfying. For an added touch, use a nice serving spoon to dish it out. This shows you care about the presentation! Enjoy creating this Classic Broccoli Cheese Casserole with these tips in mind! For the full recipe, check the link earlier in the article. {{image_4}} You can easily switch up the cheese in this dish. Try using mozzarella for a milder taste. Goat cheese adds a tangy twist, while pepper jack gives a spicy kick. Feel free to mix and match to find your favorite! You can also add other veggies. Cauliflower works great with broccoli. Carrots and bell peppers can bring color and crunch. Just make sure to chop them small so they cook well. To make this casserole gluten-free, use gluten-free crackers. Look for brands made with rice or almonds. Swap the cream of mushroom soup for a gluten-free version or a homemade sauce. If you need a dairy-free option, use plant-based cheese. There are many tasty dairy-free cheeses available. You can also use coconut milk instead of cream of mushroom soup for a creamy texture without dairy. Pair this casserole with protein for a complete meal. Grilled chicken or baked fish works well. A side salad can add freshness and balance to your plate. You can turn this dish into a main by adding cooked chicken or ground beef. Mix it right into the casserole before baking. This way, it becomes a hearty meal all on its own! For the Full Recipe, check the dedicated section above. To keep your casserole fresh, use airtight containers. Glass or plastic containers work well. Store the casserole in the fridge. It lasts about 3 to 5 days. Make sure to let it cool down before sealing it. For the best flavor, reheat in the oven. Preheat to 350°F (175°C) and cover the dish with foil. Heat for about 20 minutes. You can also use a microwave, but the oven keeps the topping crisp. If you want to freeze it, place it in a freezer-safe container. It can last up to 3 months in the freezer. Check for any off smell or mold. If it looks dry or has changed color, it's best to throw it out. Always practice safe handling. Use clean utensils and wash your hands before touching the food. That way, you keep your family safe and healthy. The prep time for this dish is 15 minutes. The total cooking time is about 45 minutes. You’ll spend 25 to 30 minutes baking the casserole until it’s golden brown and bubbly. This timing is perfect for a family meal. You can easily fit it into your busy day. Yes, you can make this casserole ahead of time. Prepare the dish up to the point of baking. Cover it tightly and chill it in the fridge. This way, you save time on busy days. When you are ready to bake, just add a few extra minutes to the cooking time. This will ensure it heats through well. Absolutely! To serve more people, simply double the recipe. Use a larger baking dish, like a 12x18-inch pan. You can also cut the recipe in half for smaller gatherings. Adjust the baking time if needed. Always check for that golden crust to know it’s done. In this blog post, we covered how to make a delicious broccoli cheese casserole. We reviewed the main ingredients like fresh broccoli, rice, and cheddar cheese. The step-by-step instructions guide you from preparation to baking. I shared tips for texture, flavor, and presentation. You also learned about ingredient substitutions and storage tips. Enjoy experimenting with variations and serving suggestions. This dish is easy, tasty, and perfect for any meal. Dive in and make it your own!

Classic Broccoli Cheese Casserole Easy Family Delight

Are you ready to create a dish your family will love? This Classic Broccoli Cheese Casserole is the perfect blend

To create delicious Pumpkin Spice Energy Balls, you need a few basic items. Here’s what you will need: - 1 cup rolled oats - 1/2 cup almond butter (or your choice of nut butter) - 1/2 cup canned pumpkin puree These three ingredients form the base of your energy balls. Rolled oats give them structure and fiber. Almond butter adds healthy fats and a creamy texture. Canned pumpkin puree brings in moisture and a rich flavor. Next, we enhance the taste with sweeteners and spices. You'll want: - 1/4 cup honey or maple syrup - 1 teaspoon vanilla extract - 2 teaspoons pumpkin pie spice Honey or maple syrup adds natural sweetness. Vanilla extract gives a warm, inviting flavor. Pumpkin pie spice is the star here, bringing in that classic fall taste with cinnamon, nutmeg, and ginger. For a bit of extra fun, you can add optional ingredients. Consider using: - 1/4 cup mini chocolate chips - 1/4 cup chopped nuts (such as walnuts or pecans) Chocolate chips add a sweet surprise in each bite. Chopped nuts give a nice crunch and more nutrition. These options let you personalize your energy balls to your taste. For the full recipe, check out the [Full Recipe]. Start by grabbing a large mixing bowl. Add 1 cup of rolled oats, 1/2 cup of pumpkin puree, 1/2 cup of almond butter, and 1/4 cup of honey or maple syrup into the bowl. Use a spatula or wooden spoon to mix the ingredients together. Keep stirring until you have a uniform consistency. This step is key for balanced flavor in your energy balls. Next, pour in 1 teaspoon of vanilla extract, 2 teaspoons of pumpkin pie spice, and 1/4 teaspoon of salt. Stir well to blend the flavors throughout the mixture. If you want, you can fold in 1/4 cup of mini chocolate chips and 1/4 cup of chopped nuts. This adds nice texture and flavor. Now, cover the bowl with plastic wrap and chill the mixture in the refrigerator for about 30 minutes. This helps the mixture firm up, making it easier to shape. Once chilled, take a tablespoon or cookie scoop to portion out the mixture. Roll each portion between your palms to form small, bite-sized balls. Place these on a baking sheet lined with parchment paper. Chill again for another 30 minutes. This will help them set completely, so they hold their shape when you grab one as a snack. Mixing your ingredients well is key. It ensures every bite is full of flavor. Start by combining rolled oats, pumpkin puree, almond butter, and sweeteners. Use a spatula to mix until smooth. This helps the flavors meld nicely. Chilling the mixture is also important. It makes the energy balls easier to shape. After mixing, cover the bowl and chill it for 30 minutes. Presentation can make your snack more fun. Serve the energy balls on a colorful plate. You might sprinkle some extra pumpkin pie spice on top. This adds a nice touch. You can also add whole nuts as a garnish. For storage, choose an airtight container. This keeps your energy balls fresh for up to a week. These energy balls pack a healthy punch. They contain rolled oats, which provide fiber. Almond butter offers healthy fats and protein. Pumpkin puree is rich in vitamins. Honey or maple syrup adds natural sweetness without refined sugar. The spices not only taste good but also have health benefits. They can boost your energy and mood. Enjoying these energy balls can be a tasty way to fuel your day. For the full recipe, check out the detailed instructions and measurements. {{image_4}} You can change the nut butter in this recipe. Use peanut butter or sunflower seed butter. Each choice gives a new taste. Adding dried fruits, like raisins or cranberries, boosts nutrition. You may also try seeds like chia or flax for extra crunch. These swaps keep the energy balls exciting and tasty! You can tweak the spice blend based on the season. In winter, try adding a touch of cinnamon or nutmeg. In spring, a hint of ginger can brighten the flavor. You can also use seasonal toppings. Drizzle with dark chocolate or sprinkle with coconut flakes. These options make your energy balls unique for any time of year. To make these energy balls vegan, swap honey for maple syrup. This keeps them sweet and tasty. For gluten-free options, ensure your oats are certified gluten-free. You can also use allergen-free alternatives like pumpkin seed butter. These swaps make the recipe fit various diets while still being delicious. Don’t forget to check the [Full Recipe] for more tips! To keep your Pumpkin Spice Energy Balls fresh, store them in an airtight container. This helps prevent moisture from ruining their texture. I recommend using a glass container with a tight lid. Place them in the refrigerator. This keeps them cool and tasty for a week. You can freeze these energy balls for longer shelf life. To do this, lay them on a baking sheet. Make sure they are not touching. Freeze them for about two hours. Once they are firm, transfer them to a freezer-safe bag. Remove as much air as possible before sealing. When you want to eat them, thaw them in the fridge overnight. This keeps their taste and texture great. In the fridge, these energy balls stay fresh for about one week. If you freeze them, they can last for up to three months. These energy balls are perfect for meal prep. You can grab one as a quick snack or add them to lunch boxes. They are a tasty way to fuel your day! For the full recipe, check back to enjoy this delightful treat. Pumpkin spice energy balls last about one week in the refrigerator. Store them in an airtight container. This way, they stay fresh and tasty for your snacking needs. Yes! You can make these energy balls without nuts. Use seeds like sunflower or pumpkin seeds instead. They add great crunch and nutrition. You can also skip them entirely for a nut-free treat. If you need a nut-free option, try sunflower seed butter. It has a similar texture. You can also use tahini or soy nut butter. These alternatives keep the energy balls creamy and delicious. For a sweeter flavor, try cashew butter. For the full recipe, check out the [Full Recipe]. You’ve learned how to make delicious pumpkin spice energy balls. We covered key ingredients, step-by-step mixing, and shaping techniques. You can enhance flavors and adapt for dietary needs. Remember to store them properly for freshness and enjoy their nutritious benefits. These energy balls are a fun snack for any time. Get creative with flavors and share with friends. Enjoy making them your way!

Pumpkin Spice Energy Balls Simple Healthy Snack

Looking for a quick and tasty snack? Try my Pumpkin Spice Energy Balls! They’re simple, healthy, and packed with flavor.

This Mediterranean Chickpea Salad is a feast for the eyes and taste buds. Here’s what you need to make this fresh and bright dish: - 2 cups canned chickpeas, thoroughly rinsed and drained - 1 cup cherry tomatoes, elegantly halved - 1 cucumber, neatly diced - 1/2 red onion, finely chopped for a mild bite - 1/2 cup Kalamata olives, pitted and halved to bring a briny contrast - 1/4 cup feta cheese, crumbled to add creaminess - 1/4 cup fresh parsley, roughly chopped for a burst of color - 3 tablespoons high-quality olive oil for richness - 2 tablespoons red wine vinegar or fresh lemon juice - 1 teaspoon dried oregano to enhance the herbaceous flavor - Salt and pepper to taste Each ingredient adds its own charm to the salad. The chickpeas are the star, full of protein and fiber. Cherry tomatoes bring sweetness and bright color. Cucumber offers a cool crunch, while red onion adds a nice bite. Kalamata olives give a salty twist, and feta cheese provides creamy goodness. Fresh parsley not only adds color but also freshness. Olive oil and vinegar or lemon juice create a smooth dressing. Dried oregano adds a subtle earthy note. Finally, salt and pepper round out the flavor. You can find the full recipe [here](#). Enjoy crafting this delicious salad! - Combine chickpeas, tomatoes, cucumber, and onion in a mixing bowl. - Fold in Kalamata olives and crumbled feta cheese. - Whisk dressing ingredients in a small bowl. To start, I love using canned chickpeas. They are quick and easy. Rinse them well to remove excess salt. Next, add in bright cherry tomatoes, diced cucumber, and finely chopped red onion. This mix gives the salad a fresh look. Now, gently fold in the Kalamata olives. Their briny taste adds depth. Then, sprinkle crumbled feta cheese on top for a creamy touch. This will make the salad rich and flavorful. In a small bowl, whisk olive oil, red wine vinegar, or lemon juice together. Add dried oregano, salt, and pepper. This dressing brings all the flavors together. - Drizzle dressing over the chickpea mixture. - Gently fold ingredients to coat evenly. - Incorporate fresh parsley and let rest before serving. Once you have your dressing ready, drizzle it over the chickpea mix. Use a gentle folding motion. You want to coat everything evenly without squishing the chickpeas. Now, add the roughly chopped fresh parsley. It adds color and freshness. Let the salad sit for about 10–15 minutes. This allows the flavors to blend beautifully. You can find the full recipe at the top of this section. Enjoy your delicious Mediterranean Chickpea Salad! - Serve your salad in a bright, colorful bowl. This makes it eye-catching. - Garnish with whole olives and fresh parsley. This adds a nice touch. - Add spices like cumin or smoked paprika for extra depth. - Fresh herbs like basil or mint can also brighten the flavor. - Serve the salad chilled or at room temperature for the best taste. When you allow the salad to sit, the flavors blend well. This simple tip makes a big difference. Mixing it up right before serving can also keep it fresh. Enjoy experimenting with these ideas! {{image_4}} You can make this salad dairy-free or vegan easily. Skip the feta cheese and use avocado for creaminess. You can also add more veggies like bell peppers or spinach. If you like, replace chickpeas with black beans or lentils. This adds a new twist to the salad while keeping it healthy. Try different dressings to shake things up. A tahini-based dressing gives a nutty taste. You can also mix balsamic vinegar with olive oil for a sweet twist. If you prefer heat, add a pinch of red pepper flakes. Adjust the flavors to match what you like. This salad is flexible and fun to personalize. Don't forget to check out the Full Recipe for more ideas! To keep your Mediterranean Chickpea Salad fresh, store leftovers in a tight container. This helps keep out air and light, which can spoil the salad. Place the salad in the fridge right after serving. It will stay fresh for about 3 days. The flavors will deepen over time, making it even tastier! You can freeze this salad, but it’s best to leave out the feta and fresh parsley. These ingredients do not freeze well. Pack the salad in a freezer-safe container. When you want to eat it, thaw it in the fridge overnight. Serve it cold or at room temperature. If you want, add fresh toppings right before serving for a bright touch. To make this salad vegan, simply skip the feta cheese. You can add more veggies or use avocado for creaminess. Nutritional yeast can also add a cheesy flavor without dairy. Yes, you can prepare this salad a few hours ahead. Just keep it in the fridge until you are ready to serve. The flavors will blend nicely over time. Chickpeas are high in protein and fiber. They help keep you full and support digestion. They also contain vitamins and minerals like iron and magnesium, which are great for overall health. To keep the salad fresh, store it in an airtight container in the fridge. It can last for 3 to 5 days. If you add dressing, do this right before serving to maintain crispness. For the full recipe, check out Mediterranean Chickpea Delight. This blog post provided a simple and tasty Mediterranean Chickpea Salad recipe. You learned about fresh ingredients, step-by-step instructions, and helpful tips for serving. We discussed variations to fit your preferences and how to store this salad for best freshness. In closing, this salad is quick to make and healthy to eat. Enjoy customizing it to your taste. It’s a delicious way to add more veggies and legumes to your meals.

Savory Mediterranean Chickpea Salad Fresh and Bright

Craving something fresh and bright? This Savory Mediterranean Chickpea Salad is a burst of flavor in every bite! Packed with

- Cauliflower florets - Olive oil - Garlic - Parmesan cheese Garlic Parmesan Roasted Cauliflower is simple yet packed with flavor. The main ingredient is cauliflower. Use fresh cauliflower florets for the best taste. They need to be cut into bite-sized pieces. Next, you will need olive oil. This oil helps to cook and crisp the cauliflower. It also adds a rich flavor. I recommend using extra virgin olive oil for the best results. Garlic is the next key ingredient. Fresh garlic cloves add a nice kick and depth. Be sure to mince them finely so they spread evenly. Finally, Parmesan cheese brings a savory richness. Use freshly grated Parmesan for the best melting and flavor. It creates a golden crust that you will love. - Italian seasoning blend - Salt and black pepper Seasonings are essential to boost flavor. An Italian seasoning blend adds herbs and spices that complement the cauliflower. It includes basil, oregano, and thyme. Salt and black pepper are must-haves in any dish. They enhance all the other flavors. Use them to your taste. - Fresh parsley For a pop of color and freshness, add fresh parsley. It brightens the dish and adds a nice touch. Just chop it finely and sprinkle it on top before serving. For the complete method to make this dish, check the Full Recipe. - Preheat the oven to 425°F (220°C). This prepares it for roasting. - Coat the cauliflower florets in olive oil. This helps them crisp up nicely. - Add minced garlic and Italian seasoning to the bowl. This brings out great flavor. - Toss to ensure even coating. Make sure every piece is covered well. - Spread the florets evenly on a baking sheet. This helps them cook evenly. - Roast initially for 20 minutes. The cauliflower should start to brown. - Sprinkle Parmesan on top and roast again for 10-15 minutes. This melts the cheese into a tasty crust. Enjoy the delightful smell as your Garlic Parmesan Roasted Cauliflower cooks! For the full recipe, refer to the earlier section. To get the best result, spread the cauliflower in a single layer on the baking sheet. This helps each piece roast evenly. If you want softer cauliflower, adjust the roasting time. Cooking it longer makes it tender, while a shorter time keeps it crunchy. Want to add some zing? Try adding lemon zest or a pinch of chili flakes. Both options give a bright kick. You can also switch up the cheese. If you love a sharper taste, try using Pecorino Romano instead of Parmesan. Dipping sauces can elevate your dish. Try ranch or a garlic aioli for a tasty side. You can serve this dish as a side to your main course or as a fun appetizer at parties. It is versatile and sure to please everyone. For the full recipe, check out Garlic Parmesan Roasted Cauliflower. {{image_4}} To make this dish vegan, substitute the Parmesan with nutritional yeast. Nutritional yeast gives a cheesy flavor without using dairy. It is rich in vitamins and adds a nice texture. Use the same amount as the cheese in the recipe. This makes the dish creamy and delicious. You can change the flavors by adding different spices. Try smoked paprika for a warm taste. Cumin also adds a nice earthy flavor. Fresh herbs like thyme or rosemary can brighten the dish. Chop them finely and mix them in with the cauliflower for a fresh twist. For more texture, add other vegetables. Carrots add a sweet crunch, while bell peppers give a nice color. Cut them into bite-sized pieces and mix them with the cauliflower. This not only enhances the taste but also makes your dish more colorful and fun. After enjoying your Garlic Parmesan Roasted Cauliflower, store any leftovers in an airtight container. This keeps the veggies fresh and tasty. Place them in the fridge for up to three days. Make sure the container seals well to lock in flavors. For the best texture, reheat your cauliflower in the oven. Set it to 350°F (175°C) and heat for about 10 minutes. This helps the cheese crisp up again. If you're in a hurry, you can use a microwave. Heat it for about 1-2 minutes, but the texture won’t be as great. If you want to store it for longer, freeze the cauliflower before roasting. This way, you can keep it fresh for about three months. Just remember to thaw it in the fridge before cooking. Thawing helps the cauliflower roast evenly, ensuring that perfect garlic and cheese flavor. For the full recipe, check out the details above! Garlic Parmesan Roasted Cauliflower can last about 3 to 5 days in the fridge. Store it in an airtight container. Make sure it cools before sealing to avoid moisture. This keeps it fresh and tasty. If you notice any off smells or changes in texture, it’s best to toss it. Yes, you can use frozen cauliflower! Just make sure to thaw it completely and pat it dry. This helps avoid excess moisture during roasting. Frozen cauliflower may not get as crispy as fresh, but it still tastes great. Adjust the roasting time slightly since frozen florets can take longer to cook. Garlic Parmesan Roasted Cauliflower pairs well with many main dishes. Try it with grilled chicken or fish for a fresh twist. It also goes great with pasta or quinoa. For a vegetarian option, serve it with a hearty salad or a grain bowl. You can even use it as a fancy side for a holiday meal. Garlic Parmesan Roasted Cauliflower is a simple and tasty dish. We explored the best ingredients, and I shared step-by-step instructions. You learned how to get the perfect roast and spice it up with optional herbs. In the end, this dish is not just a side; it can shine as a main. Use your creativity to change it up! Whether for dinner or a party, enjoy the ease and flavor of this recipe.

Garlic Parmesan Roasted Cauliflower Flavorful Side Dish

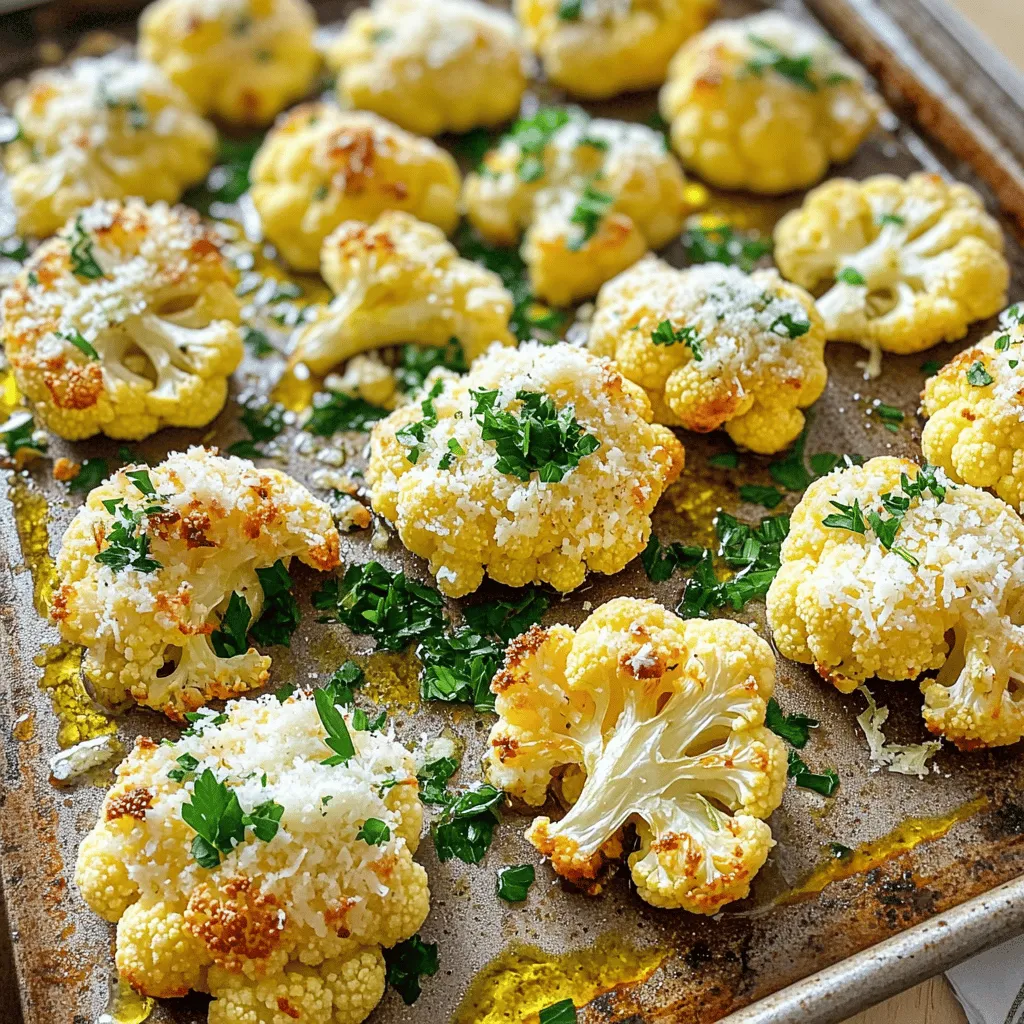
If you’re looking for a side dish that boasts bold flavor and simple prep, Garlic Parmesan Roasted Cauliflower is for

To make Easy Chicken Fettuccine Alfredo, you need a few key ingredients: - 12 oz fettuccine pasta - 2 tablespoons extra-virgin olive oil - 1 lb boneless, skinless chicken breasts, thinly sliced - 2 cloves garlic, finely minced - 1 cup heavy cream - 1 cup freshly grated Parmesan cheese - 1 teaspoon garlic powder - 1 teaspoon Italian seasoning blend - Salt and freshly ground black pepper to taste - Fresh parsley, chopped, for garnish These ingredients come together to create a creamy and satisfying dish. If you can’t find certain ingredients, don’t worry! There are great substitutes. - You can swap fettuccine for any pasta you like, such as penne or spaghetti. - If you don’t have olive oil, use butter or canola oil. - For a lighter option, use chicken thighs instead of breasts. - You can replace heavy cream with half-and-half or a non-dairy cream if needed. - Grated Pecorino Romano cheese works well instead of Parmesan. These swaps can still give you a tasty meal. Choosing fresh ingredients makes a big difference. Here are some tips: - Look for fettuccine that feels firm and has no broken pieces. - Choose chicken breasts that are pink and moist, with no strong odor. - Garlic should be firm and free from sprouting. - For heavy cream, check the expiration date and avoid containers with damage. - When buying cheese, opt for blocks over pre-grated for better flavor. Fresh ingredients boost both taste and nutrition in your dish. Start by boiling water in a large pot. Add salt to the water. This helps flavor the pasta. Once the water boils, add the fettuccine. Cook it for about 8 to 10 minutes until it's al dente. This means it should be firm to the bite. After cooking, drain the pasta but save 1/2 cup of the water. Set the pasta aside for later. While the pasta cooks, grab a large skillet. Heat 2 tablespoons of olive oil over medium heat. Add the thinly sliced chicken breasts to the skillet. Season with salt, pepper, garlic powder, and Italian seasoning. Cook the chicken for about 5 to 7 minutes. Make sure to turn the pieces until they turn golden brown. When done, take the chicken off the heat and place it on a plate. In the same skillet, add the minced garlic. Sauté it for about 1 minute until it smells good. Be careful not to burn the garlic. Next, pour in 1 cup of heavy cream. Bring it to a gentle simmer. Lower the heat and stir in 1 cup of grated Parmesan cheese. Keep stirring until the cheese melts and the sauce thickens a little. Now, add the cooked fettuccine and sautéed chicken back into the skillet. Toss everything together so the pasta and chicken are well-coated with the sauce. If the sauce seems too thick, add a bit of the reserved pasta water. Keep adding until it looks just right. Taste your creamy Alfredo mixture. Adjust the seasoning as needed with more salt and pepper. Once perfect, serve the fettuccine warm. Garnish with chopped parsley for a fresh look. Enjoy your delicious meal. For the full recipe, check the link. To boost the flavor of your chicken fettuccine Alfredo, use fresh herbs. Fresh parsley adds brightness. You can also try adding a squeeze of lemon juice. This adds a nice zing. For a deeper flavor, consider using roasted garlic instead of fresh garlic. It gives a sweet, rich taste. One common mistake is overcooking the pasta. Always cook it until al dente. This keeps it firm and helps it hold the sauce better. Another mistake is not letting the sauce simmer long enough. Letting it simmer helps the cheese melt smoothly and thickens the sauce. Also, avoid rushing the seasoning. Always taste before adding more salt and pepper. For quick meals, use pre-cooked chicken. You can find it in most stores. It cuts down on cooking time. Another tip is to prep your ingredients before you start cooking. Chop your garlic and parsley ahead of time. Lastly, consider using a microwave to quickly heat cream. This helps it blend into the sauce better. For a complete guide, check out the [Full Recipe](#). {{image_4}} You can easily make a vegetarian version of this dish. Swap out the chicken for mushrooms or broccoli. Both add great flavor and texture. Use the same steps in the recipe. Simply sauté the veggies until tender. This keeps the dish creamy and delightful. For a gluten-free meal, choose gluten-free fettuccine pasta. Many brands offer tasty options made from rice or corn. Cook it just like regular pasta. The sauce remains the same. This way, you enjoy the creamy goodness without the gluten. Feel free to get creative by adding more veggies. Spinach, peas, or bell peppers work great. For extra protein, toss in shrimp or scallops. Cook them until just done before mixing with the pasta and sauce. This adds color and nutrition to your dish. To keep your fettuccine Alfredo fresh, place it in an airtight container. Make sure it cools down first before sealing. Store it in the fridge for up to three days. If you notice any signs of spoilage, it's best to toss it out. When you are ready to eat your leftovers, place them in a pan. Add a splash of water or milk to keep it creamy. Heat it over low heat, stirring often. You can also microwave it in short bursts, stirring in between, until it's warm. If you want to freeze the dish, use a freezer-safe container. It can last for up to two months in the freezer. When you want to eat it, let it thaw in the fridge overnight. Reheat it gently as mentioned above. For a detailed guide on making this dish, check out the Full Recipe. Yes, you can use store-bought sauce. It saves time and is still tasty. Just heat it in a skillet before adding the cooked fettuccine and chicken. This way, you get a quick meal on the table. If you want to add a personal touch, mix in some fresh garlic or herbs. If you want a lighter option, try using half-and-half or whole milk. You can also use a mix of milk and butter. For a non-dairy choice, coconut cream or cashew cream works well. Each option changes the flavor slightly, but they still pair well with the dish. Making this dish takes about 30 minutes. You spend about 10 minutes prepping and cooking the pasta and chicken. The rest of the time is for making the sauce and combining everything. It’s fast, easy, and perfect for a weeknight dinner. For the full recipe, check out the section above. It has all the ingredients and steps you need for a delicious meal. Easy Chicken Fettuccine Alfredo is a tasty dish you can cook quickly. We covered key ingredients, simple steps, and great tips. You learned how to choose fresh items and avoid common mistakes. Plus, various options like vegetarian and gluten-free were discussed. In the end, making this meal can be fun and rewarding. Don’t be afraid to try your own twists. Enjoy your cooking!

Easy Chicken Fettuccine Alfredo Creamy Dinner Dish

Craving a creamy, comforting meal? My Easy Chicken Fettuccine Alfredo is the answer! This tasty dish combines tender chicken and

Older posts
Newer posts
← Previous Page1 … Page11 Page12 Page13 … Page60 Next →

dsad

© 2025 eataroundit • Built with GeneratePress

Our Policies

  • Copyright Policy
  • Cookie Policy
  • GDPR Policy
  • Privacy Policy
  • Disclaimer
  • Terms Of Use

More Information

  • Home
  • About
  • Contact
  • Appetizers
  • Dessert
  • Dinner
  • Drinks
©2025, eataroundit About Back To Top