![When making zucchini rice casserole, you need a few simple ingredients. Here’s what you will need: - 2 medium zucchinis, grated - 1 cup long-grain rice, thoroughly rinsed - 2 cups vegetable broth - 1 cup diced tomatoes (canned or fresh) - 1 onion, finely chopped - 2 cloves garlic, minced - 1 cup shredded cheese (cheddar or mozzarella) - 1 teaspoon dried oregano - 1 teaspoon paprika - ½ teaspoon ground black pepper - Salt, to taste - 2 tablespoons olive oil - Handful of fresh basil leaves for garnish These ingredients come together to create a warm, hearty meal. The zucchini adds moisture, while the rice gives it a nice base. The cheese melts beautifully, making each bite creamy and rich. I love using fresh herbs like basil for a pop of flavor. You can find the full recipe to guide you through the cooking process. Enjoy crafting this delightful dish! 1. Preheat your oven to 375°F (190°C). This ensures a hot start for your dish. 2. In a large skillet, add 2 tablespoons of olive oil. Heat it on medium. 3. Add 1 finely chopped onion to the skillet. Sauté for about 5 minutes. The onion should look soft and clear. 4. Next, mix in 2 minced garlic cloves. Cook for 1-2 minutes. Enjoy the lovely aroma! 5. Now, add 2 grated zucchinis to the skillet. Cook for 3-4 minutes. They should become tender but not mushy. 1. In a big bowl, combine 1 cup of rinsed long-grain rice, 2 cups of vegetable broth, and 1 cup of diced tomatoes. 2. Don’t forget to add 1 teaspoon of dried oregano, 1 teaspoon of paprika, salt, and ½ teaspoon of black pepper. 3. Stir everything well until mixed. 4. Carefully fold in the sautéed zucchini mixture. Make sure it’s all combined nicely. 1. Spoon the mixture into a greased casserole dish. Spread it out evenly. 2. Top it off with 1 cup of shredded cheese, covering the entire surface. 3. Cover the dish tightly with aluminum foil. Place it in the oven and bake for 30 minutes. 4. After 30 minutes, remove the foil. Bake for another 10-15 minutes. Look for the cheese to be bubbly and golden. 5. Let the casserole sit for a few minutes before serving. Garnish with fresh basil leaves for a nice touch. This dish is hearty and simple, perfect for a family meal or a gathering. For the complete recipe, you can refer to the [Full Recipe]. To get the right texture in your zucchini rice casserole, it’s key to watch the zucchini. When you sauté it, cook until it’s just tender but still has some crunch. This keeps it from getting mushy in the oven. Also, cover the casserole with foil during the first part of baking. This helps steam the rice and keep it moist. You can easily boost the flavor of your casserole. Try adding herbs like thyme or rosemary for a fresh taste. You can also use spices like cumin or chili powder to give it a kick. For cheese, both cheddar and mozzarella work well, but you can also mix them for more depth. If you want, sprinkle some feta on top for a tangy twist. Pair your zucchini rice casserole with a crisp green salad. A simple mix of lettuce, cucumbers, and a light vinaigrette works great. It adds freshness to the dish. For presentation, serve it in the casserole dish with a sprinkle of fresh basil on top. This not only looks nice but adds a nice aroma too. You can also serve it alongside grilled chicken or fish for a heartier meal. Check out the Full Recipe for more tips! {{image_4}} You can make this zucchini rice casserole your own by swapping some ingredients. - Using brown rice instead of long-grain rice: Brown rice gives a nutty flavor and more fiber. Just remember to add extra broth and cook it longer. - Alternatives for cheese: If you’re not a cheese lover, try nutritional yeast for a cheesy taste without dairy. You can also use vegan cheese for a similar melt. Making a vegan version of zucchini rice casserole is easy. Just follow these steps: - How to make a vegan zucchini rice casserole: Skip the cheese and use plant-based options. Replace the vegetable broth with homemade vegetable stock for depth. - Substituting vegetable broth properly: Always check for low-sodium vegetable broth. This helps control the salt in your dish. You can also use water, but it will lack flavor. You can add local flair to your casserole by changing spices or vegetables. - Spices or ingredient variations popular in different cuisines: Try adding cumin for a Middle Eastern twist, or curry powder for a fun kick. - Incorporating local vegetables or herbs: You can mix in bell peppers, corn, or even spinach. Fresh herbs like cilantro or parsley can brighten the dish. These variations can make your zucchini rice casserole fun and exciting. For the full recipe, check out the details above. To store your zucchini rice casserole properly, let it cool down first. This helps avoid condensation in the container. Place the casserole in an airtight container. You can also use plastic wrap or aluminum foil if needed. For best results, store it in the fridge. Use it within three to four days for the best taste. The best containers for storage are glass or BPA-free plastic. These materials keep the dish fresh and make reheating easy. To reheat leftovers without drying out, add a bit of water or broth. This keeps the dish moist while warming. Cover the casserole with a lid or foil while reheating. For reheating, the oven is the best choice. Set it to 350°F (175°C) and heat for about 20 minutes. If you’re short on time, the microwave works too. Just heat in short bursts, stirring in between. You can freeze zucchini rice casserole effectively for later use. First, let it cool completely. Then, portion it into smaller containers or freezer bags. This makes it easier to thaw only what you need. When freezing, remove as much air as possible. This helps prevent freezer burn. To thaw, place the container in the fridge overnight. You can also use the microwave for quick thawing. After thawing, reheat in the oven or microwave just like before. Enjoy your delicious dish again! For the full recipe, check the earlier sections. You need about 15 minutes to prepare the dish. Cooking takes around 40 minutes. So, the total time is about 55 minutes. Yes, you can! Prepare the casserole and cover it. Store it in the fridge for up to two days. When ready, bake it straight from the fridge. Just add a few extra minutes to the cooking time. This dish pairs well with a crisp green salad. You can also add some bread or roasted veggies. These sides enhance the meal and add freshness. Yes, it can be gluten-free! Use gluten-free rice and check broth labels. This way, you can enjoy the dish without gluten worries. For more details, refer to the Full Recipe. This blog covered a simple way to make zucchini rice casserole. We went through ingredients, step-by-step instructions, and many tips. You learned how to mix and bake the dish, ensuring great flavor and texture. Storage and serving ideas help you enjoy this meal better. You can even adapt the recipe to fit your needs. Enjoy making this healthy dish for yourself or to share!](https://eataroundit.com/wp-content/uploads/2025/06/c397f221-a2fa-49f0-b241-f1a8f6339c32.webp)
Zucchini Rice Casserole Hearty and Simple Dish
Are you looking for a warm, filling dish that’s easy to make? This Zucchini Rice Casserole is the answer! With
Are you looking for a warm, filling dish that’s easy to make? This Zucchini Rice Casserole is the answer! With
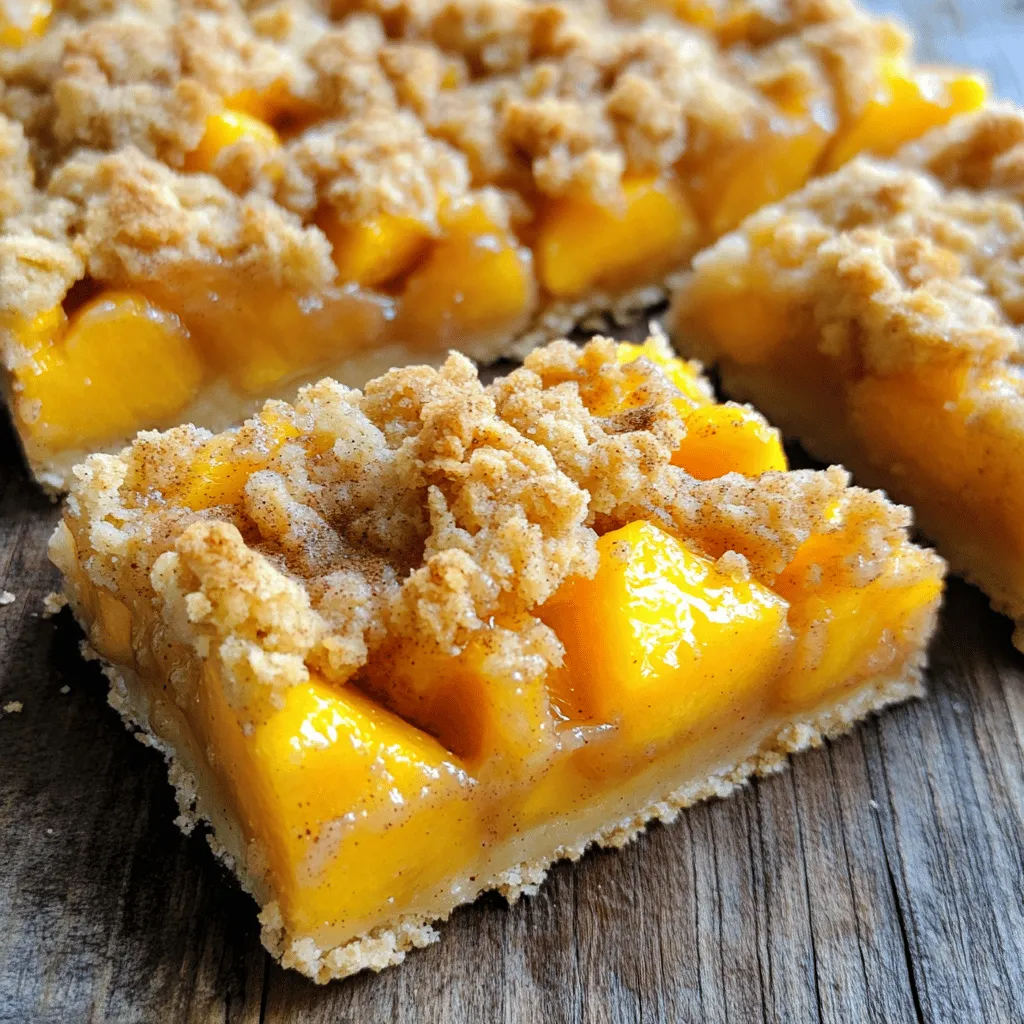
Get ready to bake a treat that’s both tangy and sweet! My Peach Crumble Bars are easy to make and
![To make a tasty Zucchini Banana Bread, gather these ingredients: - 1 cup finely grated zucchini (squeeze out excess moisture) - 2 ripe bananas, mashed until smooth - 1/3 cup melted coconut oil (let cool slightly) - 1/2 cup packed brown sugar (light or dark) - 1/4 cup honey or maple syrup - 2 large eggs (room temperature) - 1 teaspoon vanilla extract (pure) - 1 teaspoon baking soda (fresh) - 1/2 teaspoon baking powder - 1/2 teaspoon salt - 1 teaspoon ground cinnamon - 1 1/2 cups all-purpose flour (spooned and leveled) - 1/2 cup chopped walnuts or pecans (optional) The quality of your ingredients matters. Use fresh zucchini for the best texture. Choose ripe bananas, as they add natural sweetness. Opt for pure vanilla extract, not imitation. Fresh baking soda is key for rising; old baking soda won't work well. For the flour, make sure it is not expired. If using nuts, choose ones that are fresh and crunchy for added flavor. You can swap ingredients if needed. For zucchini, you can use grated carrot for a different taste. Applesauce can replace coconut oil for a lower-fat option. If you're out of brown sugar, granulated sugar works too, but it will be less rich. For a vegan option, use flax eggs instead of regular eggs. Just mix 1 tablespoon of ground flaxseed with 2.5 tablespoons of water for each egg. First, preheat your oven to 350°F (175°C). This step is key for even cooking. While the oven heats, grease a 9x5 inch loaf pan with coconut oil. You can also use parchment paper. This makes it easy to remove the bread later. In a large bowl, combine 1/3 cup melted coconut oil with 1/2 cup brown sugar. Whisk them together until smooth. Then, add 2 ripe bananas, mashed until smooth. Follow this by adding 2 large eggs, 1/4 cup honey or maple syrup, and 1 teaspoon vanilla extract. Mix until everything is well blended and smooth. In another bowl, mix 1 1/2 cups of all-purpose flour, 1 teaspoon baking soda, 1/2 teaspoon baking powder, 1/2 teaspoon salt, and 1 teaspoon ground cinnamon. Use a whisk to blend these dry ingredients well. Next, gently add this dry mix to the wet ingredients. Fold it in carefully with a spatula. Do not overmix; a few lumps are okay. If you want, stir in 1/2 cup of chopped nuts. Pour the batter into your prepared pan. It’s now ready for baking! Check the [Full Recipe] for more details. To keep your batter thick, squeeze out excess moisture from the zucchini. Use a clean kitchen towel to press the grated zucchini. This step helps prevent a soggy loaf. Also, make sure you measure your ingredients correctly. Too much liquid can lead to a runny batter. When you mix your batter, be gentle. Overmixing can make your bread tough. Use a spatula to fold the dry ingredients into the wet ones. Stop mixing as soon as you see no dry flour. A few lumps are okay; they will help keep your bread light and tender. To bake your bread evenly, preheat your oven well. A hot oven helps it rise properly. When you pour your batter into the loaf pan, smooth the top with a spatula. This helps it bake uniformly. Keep an eye on it towards the end of baking. If the top gets too dark, cover it with foil. This way, your Zucchini Banana Bread will come out perfectly golden and delicious. For the full recipe, check out the details above. {{image_4}} You can swap sweeteners easily in this recipe. Try using maple syrup instead of honey. For a lower-calorie option, use a sugar substitute like stevia. Coconut oil adds a nice flavor, but you can also use canola oil or vegetable oil. Each choice will enhance the taste in a unique way. For a fun twist, mix in chocolate chips or nuts. Dark chocolate pairs well with banana and zucchini. You can also add spices like nutmeg or ginger for extra warmth. These small changes can make your bread feel new each time you bake. To make gluten-free zucchini banana bread, simply use a gluten-free flour blend. Check labels to ensure it is certified gluten-free. You may also want to add a bit of xanthan gum for better texture. This way, everyone can enjoy this delicious treat! For a full recipe, check out the Zucchini Banana Bread section. To keep your zucchini banana bread fresh, wrap it tightly in plastic wrap or foil. You can also place it in an airtight container. Store it at room temperature for up to three days. For longer storage, keep it in the fridge, where it will last about a week. This bread stays moist, so it’s great for snacking! If you want to save some for later, freezing is a smart choice. First, slice the bread into pieces. Then, wrap each slice in plastic wrap, followed by aluminum foil. This will prevent freezer burn. You can also store the whole loaf. Place it in a freezer-safe bag or container. The bread will stay good for up to three months in the freezer. Just remember to label it with the date! When you’re ready to enjoy your frozen zucchini banana bread, remove it from the freezer. Let it thaw in the fridge overnight. For a quick reheat, pop it in the microwave for 15-20 seconds. You can also toast slices in a toaster oven for a warm, crispy edge. If you want to enjoy it warm, preheat your oven to 350°F (175°C) and heat the loaf for 10 minutes. This makes it taste just baked! Yes, you can use frozen zucchini. Just remember to thaw it first. Squeeze out any extra water. This step is key to avoid a soggy bread. Frozen zucchini works well and keeps the flavor intact. To check if the bread is done, use a toothpick. Insert it into the center of the loaf. If it comes out clean, your bread is ready. If it has batter on it, bake a bit longer. Keep an eye on it to prevent overbaking. Absolutely! You can turn this recipe into muffins. Just adjust the baking time. Bake muffins for about 20-25 minutes. Check with a toothpick like you would for bread. Muffins are a fun twist on this tasty recipe. For the full recipe, follow the steps outlined above. You learned about key ingredients and how to choose the best ones. I shared tips to avoid a watery batter and ensure even baking. You saw variations, from sweeteners to flavors, making this recipe your own. Storing leftovers helps keep your creation fresh. In short, make this recipe yours and enjoy the process. Happy baking!](https://eataroundit.com/wp-content/uploads/2025/06/f6d3d30b-dfb7-4912-bfeb-c2cca7172bf7.webp)
If you’re looking for a delicious twist on classic banana bread, you’ve found it! My Zucchini Banana Bread is both

Looking for a refreshing drink to cool you down this summer? You’ve found it! My Cucumber Lemonade Spritzer blends crisp
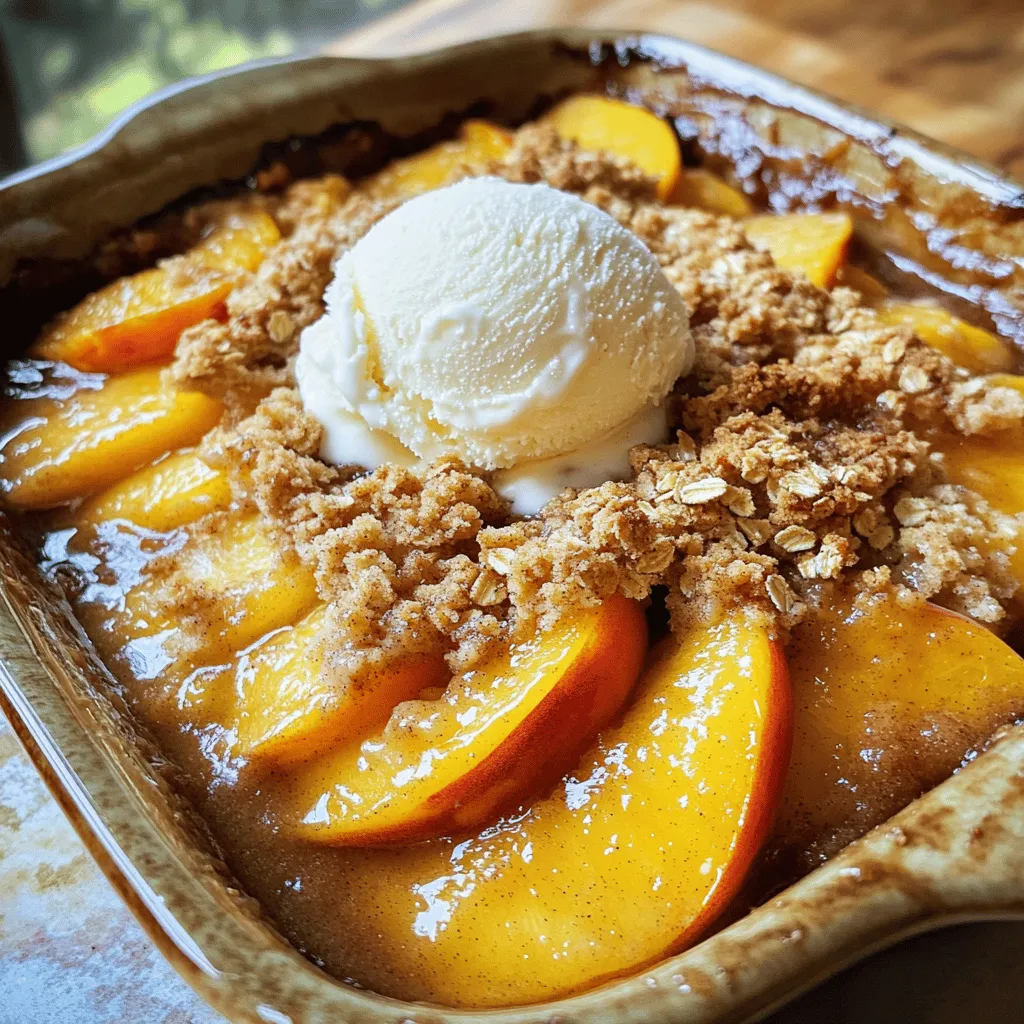
If you’re searching for a simple yet delightful dessert, look no further. This Peach Crisp with Oat Topping recipe is
![To make delicious Zucchini Taco Boats, you need fresh and healthy ingredients. Here’s the complete list of what you’ll need: - 4 medium zucchinis - 1 cup cooked quinoa - 1 can (15 oz) black beans, rinsed and drained - 1 cup corn (fresh or frozen) - 1 cup cherry tomatoes, halved - 1 ripe avocado, diced - 1 teaspoon chili powder - 1 teaspoon ground cumin - 1 teaspoon garlic powder - Salt and freshly cracked pepper to taste - ½ cup shredded cheese (cheddar or Mexican blend) - ¼ cup fresh cilantro, chopped - Lime wedges for serving These ingredients come together to create a tasty and healthy meal. The quinoa adds protein, while the black beans and corn provide fiber. The spices bring warmth and depth to the dish. Using ripe avocados adds creaminess, and the cheese melts to create a wonderful topping. For more detailed steps, check out the Full Recipe. - Preheat your oven to 375°F (190°C). - Take the zucchinis and slice them in half lengthwise. - Scoop out the seeds with a spoon. Make sure you create enough room for the filling. - In a big bowl, combine the cooked quinoa, black beans, corn, halved tomatoes, and diced avocado. - Add chili powder, ground cumin, garlic powder, and some salt and pepper. - Mix everything well until it is evenly combined. This will be the tasty filling. - Fill each zucchini half with the quinoa mixture. Press down lightly to pack it in. - Sprinkle shredded cheese on top of each stuffed zucchini. This will melt into a delicious crust. - Place the baking sheet in the oven and bake for 25-30 minutes. The zucchini should be tender, and the cheese should be melted. - Once done, let the zucchini boats cool for a few minutes. - Before serving, add chopped cilantro for a fresh touch. - Enjoy your Zesty Zucchini Taco Boats with lime wedges on the side for extra flavor. For the complete recipe, check out the [Full Recipe]. To make your zucchini taco boats great, scoop them evenly. This helps avoid sogginess. If you leave too much flesh, the boats can get watery. A good scoop creates a nice space for the filling. Next, spice it up! Use a mix of spices to give your filling more flavor. I like adding chili powder, cumin, and garlic powder. Each spice brings its own taste. Together, they create a bold and tasty dish. Think about sides and dips to serve with your zucchini taco boats. A fresh salad can add crunch. You can also serve salsa for a zesty kick. Guacamole is a great dip, too. It matches well with the creamy avocado in the boats. You could also try serving rice or quinoa on the side. They pair nicely with the flavors in the boats. Want to make your dish lighter? Opt for low-fat cheese. It melts well but has fewer calories. You can also add more veggies to boost nutrition. Chopped bell peppers or spinach can add color and health benefits. If you're feeling adventurous, try adding beans or lentils for extra protein without much fat. These swaps keep your meal healthy and delicious. Remember, these tips can help make your zucchini taco boats even better. You can find the full recipe for Zesty Zucchini Taco Boats to guide your cooking. {{image_4}} You can switch up the filling in many ways. If you want meat, use ground turkey or beef instead of quinoa. This makes the dish heartier and adds rich flavor. You can also swap black beans for lentils or other legumes. Lentils bring a nice texture. Other beans work well too, so feel free to experiment. To kick up the flavor, consider adding jalapeños for a spicy kick. If you like briny tastes, olives are a great choice. They add depth to each bite. A sprinkle of fresh herbs like cilantro can also enhance the overall flavor. Each of these options makes the zucchini taco boats more exciting. To make this dish fully vegan, simply leave out the cheese. You can still enjoy great taste with the other ingredients. Add more veggies or some avocado for creaminess. You might also try vegan cheese if you want that cheesy texture without dairy. This way, everyone can enjoy the deliciousness of zucchini taco boats. For the full recipe, check out the Zesty Zucchini Taco Boats section. To store leftover zucchini taco boats, let them cool first. Place them in an airtight container. This helps keep them fresh. You can store them in the fridge for up to three days. It’s best to keep the filling and zucchini separate if possible. This helps prevent the zucchini from getting too soggy. When it's time to eat your leftovers, you can reheat them easily. The best way is to use the oven. Preheat your oven to 350°F (175°C). Place the zucchini boats on a baking sheet. Heat them for about 10-15 minutes. This method keeps the zucchini firm and the filling warm. You can also use the microwave, but the texture might change. Heat them for one to two minutes, checking to avoid overheating. If you want to save zucchini taco boats for later, freezing is a great option. First, let them cool completely. Wrap each boat in plastic wrap or foil. Place them in a freezer-safe bag or container. They can last for up to three months in the freezer. When you are ready to eat them, thaw them in the fridge overnight. Then, reheat as mentioned above. This keeps the flavor and texture intact. Enjoy the easy meal later! Zucchini Taco Boats last about 3 to 4 days in the fridge. To store them, place the leftovers in an airtight container. This keeps them fresh and tasty. When you want to eat them, just reheat. Be careful not to overcook them. Yes, you can make Zucchini Taco Boats ahead. Prepare the filling and scoop out the zucchinis in advance. Store them separately in the fridge. When you are ready to cook, just fill the zucchinis and bake. This saves time on busy days. Some great side dishes include: - Mexican rice - Fresh salad - Guacamole - Salsa - Corn tortilla chips These sides add extra flavor and texture to your meal. Yes, this recipe is gluten-free. The main ingredients are zucchini, quinoa, and beans. None of these contain gluten. Always check your ingredients to ensure they are certified gluten-free. This way, you can enjoy your meal without worry. For the full recipe, refer to the Zesty Zucchini Taco Boats section. These zucchini taco boats are easy, tasty, and healthy. We covered the ingredients and steps to make them. You can also try different fillings and enhance flavors. Remember to store leftovers properly, so nothing goes to waste. This dish is flexible, fitting many diets. Whether for dinner or meal prep, it’s a winner. Enjoy cooking and exploring new flavors with zucchini taco boats!](https://eataroundit.com/wp-content/uploads/2025/06/7efdc246-f265-49c0-a17d-8c84aaad251f.webp)
Are you ready to try a healthy twist on taco night? These Zucchini Taco Boats are packed with flavor and
![- Cucumber: This cool veggie hydrates you. It has few calories and is full of water. I like using English cucumbers. They are long and have thin skin, making them perfect for smoothies. You can also use standard cucumbers, but peel them for a smoother texture. - Fresh Basil: This herb gives a bright flavor. Basil is rich in antioxidants and vitamins. It adds a unique taste that pairs well with cucumber. Look for vibrant, green leaves. Avoid any that are wilted or brown. - Additional Flavor Enhancers: Lime juice adds a zesty kick. It brightens the smoothie, making it refreshing. Honey or maple syrup can add sweetness, but use it sparingly. You want the fresh flavors to shine through. - Quantities for Each Ingredient: - 1 large cucumber, peeled and roughly chopped - 1 ripe banana, preferably frozen for creaminess - 1 cup fresh basil leaves, densely packed - 1 cup almond milk (or your choice of plant-based milk) - 1 tablespoon honey or maple syrup (optional) - 1 tablespoon freshly squeezed lime juice - 1/2 cup ice cubes - A pinch of sea salt - Recommended Substitutes for Dietary Needs: If you are dairy-free, use almond or oat milk. For a sweeter smoothie, replace honey with agave syrup. If you're allergic to bananas, try using avocado for creaminess instead. For the full recipe, check out the Cucumber Basil Bliss Smoothie. To make the cucumber basil smoothie, start with fresh ingredients. First, take your large cucumber. Peel it and chop it into rough pieces. This makes blending easier. Next, grab fresh basil leaves. Make sure they are clean and dry. You want about one cup of tightly packed leaves for a strong flavor. When adding ingredients to the blender, use this order: cucumber first, then banana. After that, add the basil leaves. Pour in the almond milk, and then add the honey or maple syrup if you like it sweet. Follow with lime juice and a pinch of sea salt. This order helps the blender work better. Now it's time to blend! Set your blender to high speed. Blend the mixture for about 30 to 60 seconds. You want it smooth and creamy. If it seems too thick, add a bit more almond milk. Blend again until it reaches your desired consistency. After blending, it’s time for the ice. Add the ice cubes to the blender. Blend once more until the smoothie is chilled and frothy. Next, taste it. If you want it sweeter, add more honey or maple syrup. Blend again briefly if you add more sweetener. For serving, pour your vibrant smoothie into glasses. To make it look fancy, garnish with a fresh basil leaf and a cucumber slice on the rim. Enjoy this refreshing drink right away to appreciate its fresh flavors. For the complete recipe, check the [Full Recipe]. To make your cucumber basil smoothie even better, try adding other herbs or fruits. Mint adds a cool twist. You can also try a bit of ginger for a spicy kick. If you prefer a sweeter drink, adjust the sweetness. Taste the smoothie first. If it needs more, add honey or maple syrup. Start with a small amount and blend again. You can always add more. For a creamier smoothie, use a ripe banana. A frozen banana works best, making it thick and smooth. If you want a thinner smoothie, add more almond milk. Blend it again until you reach your desired texture. This way, you can make it just how you like it. Be careful not to over-blend or under-blend your smoothie. Over-blending can make it too runny, losing that fresh taste. Under-blending can leave chunks in your drink. Blend until smooth but not too long. Also, always use fresh basil. Stale or wilted basil can ruin the flavor. Fresh herbs give the best taste, making your drink refreshing. {{image_4}} You can easily add fruits to your cucumber basil smoothie. This change gives your drink new flavors and freshness. Try adding: - 1 ripe peach for a sweet twist. - A handful of strawberries for a fruity burst. - Pineapple chunks for a tropical vibe. Seasonal fruits work best. In summer, fresh berries shine. In fall, apples or pears can add a cozy touch. This keeps your smoothie exciting all year. If you want a dairy-free smoothie, you have options. Almond milk is great, but you can try: - Coconut milk for a creamy, tropical flavor. - Oat milk for a smooth texture. - Soy milk for added protein. These plant-based milks blend well and keep your drink delicious and healthy. Want extra nutrition? Add greens! Spinach or kale blends in easily and adds vitamins. Just a handful can make a big difference. You can also mix in protein powder or nuts. This boosts energy and keeps you full longer. It's a simple way to make your smoothie even healthier. To store leftover smoothie, pour it into an airtight container. Glass jars work great for this. Make sure to leave some space at the top, as smoothies can expand a bit when frozen. Seal the container tightly to keep out air and moisture. You can keep your Cucumber Basil Smoothie in the fridge for up to 24 hours. After that, the flavors start to fade. If you see any separation or a change in color, it’s time to toss it. If you smell a sour odor, do not drink it. If you want to keep your smoothie longer, freezing is a smart choice. Pour it into ice cube trays or silicone molds for easy servings. When you want to enjoy it again, just pop a few cubes into a blender and blend until smooth. For the best outcome, thaw them in the fridge overnight or use the microwave for a quick defrost. A Cucumber Basil Smoothie is packed with nutrients. Cucumbers are hydrating and low in calories. They provide vitamins K and C, which help support your immune system. Basil contains antioxidants and may help reduce inflammation. Bananas add potassium and fiber, which can aid digestion. Almond milk is a great dairy-free option that adds creaminess without extra calories. Together, these ingredients make a refreshing drink full of health benefits. Yes, you can prep this smoothie ahead of time. I recommend chopping the cucumber and banana in advance. Store them in airtight containers in the fridge. You can mix the basil, almond milk, and lime juice separately. When you're ready to drink, blend everything together. This method keeps your ingredients fresh and saves time. If you don’t have fresh basil, you can use dried basil. Use about one-third of the amount since dried herbs are stronger. Alternatively, try other fresh herbs like mint or cilantro for a different flavor. Each option will give your smoothie a unique twist. To make your smoothie thicker, add Greek yogurt or avocado. Both options are rich and creamy. You can also use frozen bananas instead of fresh ones. They add thickness and chill your drink. Just blend until you reach your desired consistency. Yes, you can use other vegetable bases in your smoothie. Spinach and kale blend well without changing the taste much. They add extra nutrients and fiber. You can also try zucchini for a mild flavor. Each vegetable will offer its own health benefits while keeping your smoothie delicious. You now have all you need to create a delicious cucumber basil smoothie. We explored the key ingredients, including cucumber and fresh basil, and their benefits. You also learned precise measurements and helpful tips to boost flavor and enhance consistency. Remember to avoid common mistakes like using wilted basil or over-blending. With variations and storage tips, you can easily adjust this smoothie to suit your taste. Keep experimenting, and enjoy your healthy drinks!](https://eataroundit.com/wp-content/uploads/2025/06/b1d8c77d-22d4-4492-bc7a-e87d96fadffd.webp)
Looking for a refreshing drink that won’t ruin your healthy diet? Try my Cucumber Basil Smoothie! This cool blend of
![To make this delightful Peach Upside Down Cake, gather these simple ingredients: - 4 ripe peaches, pitted and thinly sliced - 1/2 cup unsalted butter, softened, divided - 1 cup brown sugar, firmly packed - 1 cup all-purpose flour - 1 teaspoon baking powder - 1/2 teaspoon baking soda - 1/4 teaspoon salt - 1/2 cup granulated sugar - 2 large eggs, at room temperature - 1 teaspoon vanilla extract - 1/2 cup buttermilk, at room temperature - 1 teaspoon ground cinnamon You can swap some ingredients if needed: - Use coconut oil instead of butter for a dairy-free option. - Substitute granulated sugar with coconut sugar for a healthier twist. - To replace buttermilk, mix 1/2 cup milk with 1/2 tablespoon vinegar or lemon juice. - For a gluten-free version, use a gluten-free baking mix instead of all-purpose flour. Choosing ripe peaches is key to a great cake. Here’s how to pick the best ones: - Look for peaches that are slightly soft when gently pressed. - Check for a sweet aroma; this indicates ripeness. - Choose peaches with a vibrant color and smooth skin. - Avoid peaches with bruises or dark spots, as these may be overripe. With these ingredients and tips, you can create a Peach Upside Down Cake that’s both tasty and fun to make. If you want to dive deeper into the cooking process, check out the Full Recipe for a step-by-step guide! First, set your oven to 350°F (175°C). This temperature ensures a nice, even bake. Next, grab a 9-inch round cake pan. Grease it with a bit of butter or cooking spray. This step helps the cake slide out easily after baking. In a medium saucepan, melt 1/4 cup of softened butter over medium heat. When it’s melted, stir in brown sugar. Cook this mixture until it’s fully dissolved and starts to bubble. This should take about 2-3 minutes. Pour this caramel into the bottom of your prepared cake pan. Spread it evenly for a nice base. Now, take your thinly sliced peaches and arrange them over the caramel. You can overlap the slices a bit for a pretty look. Just make sure they cover the caramel well. In a large bowl, mix together your flour, baking powder, baking soda, salt, and ground cinnamon. This is your dry mix. In another bowl, cream the rest of the softened butter with granulated sugar using a hand mixer. Mix until it’s light and fluffy, which takes about 4-5 minutes. Add the eggs one at a time, mixing well after each addition. Then stir in the vanilla extract. Gradually add your dry mix to this butter mixture. Alternate with the buttermilk, starting and ending with the dry ingredients. Mix until it’s just combined. Be careful not to overmix, as this keeps your cake tender. Finally, gently pour the batter over the arranged peaches in the pan. Use a spatula to smooth the top. Now, you’re ready to bake! Follow the [Full Recipe] for the rest of the instructions and enjoy your baking adventure! When baking your Peach Paradise Upside Down Cake, avoid these common errors: - Using unripe peaches: Ripe peaches add natural sweetness. - Overmixing the batter: This can make your cake tough. Mix just until combined. - Skipping the cooling time: Let the cake cool before inverting. This helps it hold its shape. To get a soft and fluffy cake texture, follow these tips: - Room temperature ingredients: Make sure your eggs and buttermilk are at room temperature. This helps them blend well. - Cream butter and sugar well: Spend time mixing until light and fluffy for a good rise. - Measure flour correctly: Use the scoop and level method to avoid dense cake. To enhance your Peach Paradise Upside Down Cake, try these serving ideas: - Pair with whipped cream: The lightness of whipped cream balances the cake's sweetness. - Add vanilla ice cream: Warm cake with cool ice cream is a perfect match. - Garnish with mint: Fresh mint adds color and a hint of freshness. For the complete recipe, check out the Full Recipe. Enjoy your baking adventure! {{image_4}} You can switch up the peaches in this cake. Try using ripe nectarines, juicy plums, or sweet cherries. Each fruit brings its own flavor. Pineapple adds a tropical twist, while apples give a classic touch. Mix and match your favorites for fun! Want to add some extra flavor? Consider mixing in spices like nutmeg or ginger. You can also fold in chopped nuts, like pecans or walnuts, for a crunchy texture. If you enjoy coconut, add shredded coconut to the batter. A splash of almond extract can give your cake a nice twist, too. If you need a gluten-free cake, use a gluten-free flour blend. It works well in this recipe. For a vegan version, swap eggs for flax eggs. Mix one tablespoon of ground flaxseed with three tablespoons of water. Let it sit for a few minutes to thicken. Use a dairy-free butter and plant-based milk for a tasty and inclusive treat. Check the Full Recipe for more details on making these adjustments! To keep your Peach Upside Down Cake fresh, store it in an airtight container. This prevents it from drying out. Place it at room temperature for up to two days. If you need to store it longer, put it in the fridge. It will last for about a week this way. Always cover it well to avoid absorbing other flavors from the fridge. When you want to enjoy your leftover cake, reheating is key. Preheat your oven to 350°F (175°C). Place a slice on a baking sheet. Heat it for about 10 minutes or until warm. This method helps the flavors come back to life. If you prefer, you can also microwave a slice for 20-30 seconds. Just be careful not to overheat it, as this can make it tough. If you want to freeze your cake, follow these steps. First, let the cake cool completely. Then, slice it into pieces. Wrap each slice in plastic wrap, then place them in a freezer bag. Be sure to remove as much air as possible. You can freeze the cake for up to three months. When you're ready to eat it, thaw it in the fridge overnight before reheating. This keeps the cake moist and tasty. Yes, you can use canned peaches. Make sure to drain them well. Canned peaches can save time, but fresh peaches offer better flavor. If you use canned peaches, the cake will still taste good. You can check if the cake is done by using a toothpick. Insert it into the center of the cake. If it comes out clean, the cake is ready. The edges will also pull away from the pan slightly when it is baked well. Serve the cake warm or at room temperature. I love adding whipped cream or vanilla ice cream. A sprinkle of fresh mint leaves makes it look great too. This makes each slice feel special and adds extra flavor. For the full recipe, check out the details above! Peach upside down cake is a delightful treat that blends sweet peaches with rich cake. We discussed the key ingredients and how to pick the best peaches. I shared easy steps to prepare and bake this cake, plus tips to avoid mistakes. You can even explore fun variations and storage tips. In closing, this cake is perfect for any gathering. Enjoy making it your own with fresh fruits or flavors. With a little care, you’ll create a delicious dessert to share.](https://eataroundit.com/wp-content/uploads/2025/06/49a52568-a2d7-4488-9eca-f767153553dd.webp)
If you crave a sweet treat that’s both easy and delicious, peach upside down cake is a winner. This cake

Looking for a simple and tasty meal that the whole family will love? This Easy Chicken Noodle Casserole is your
![- 1 can (15 oz) chickpeas - 1 large roasted red pepper - 2 tablespoons tahini - 2 tablespoons extra virgin olive oil The main ingredients for roasted red pepper hummus are simple and easy to find. You need a can of chickpeas, which gives the dip its creamy base. The roasted red pepper adds a sweet, smoky flavor. Tahini, a sesame paste, adds richness, while extra virgin olive oil provides a smooth texture. - 1 clove garlic - 2 tablespoons fresh lemon juice - 1 teaspoon ground cumin To make your hummus pop, you need flavor enhancers. Garlic gives it a nice kick. Fresh lemon juice adds brightness, balancing the flavors well. Ground cumin adds warmth and depth, making each bite more satisfying. - Salt and freshly ground black pepper - Smoked paprika - Freshly chopped parsley Garnishing elements are key to a beautiful presentation. Salt and freshly ground black pepper will bring out the flavors. Smoked paprika adds a hint of smokiness and a lovely color. Freshly chopped parsley not only looks great but also adds a fresh taste. For the full recipe, check out [Full Recipe]. To roast your own red pepper, you can use a few simple methods. One way is to char it over an open flame. If you don’t have a grill, the oven's broiler works well too. Place the pepper on a baking sheet and keep it close to the heat source. Turn the pepper often. You want the skin to blister and blacken all around. After roasting, place the hot pepper in a bowl. Cover it with a lid or plastic wrap. Let it steam for about 10 minutes. This step helps make peeling easier. Once it cools, remove the skin and discard the seeds. Now, set the roasted pepper aside for later. Next, grab your food processor. This will help you blend all the ingredients smoothly. Start by adding the rinsed chickpeas, roasted red pepper pieces, tahini, olive oil, minced garlic, lemon juice, and ground cumin into the bowl. Blend everything together until you have a smooth and creamy texture. If your hummus is too thick, you can add cold water. Do this one tablespoon at a time until you reach your desired consistency. Once blended, it’s time to adjust the seasoning. Taste your hummus. Add salt and freshly ground black pepper to your liking. Blend briefly to mix in the seasoning well. For a lovely presentation, transfer your hummus into a bowl. Drizzle some extra virgin olive oil on top. Finish by sprinkling smoked paprika and freshly chopped parsley for color and flavor. This roasted red pepper hummus is ready to enjoy! You can find the full recipe for this delicious dip in the article. To make your hummus just right, pay attention to its texture. If your hummus feels too thick, you can easily fix it. Just add cold water! Start with one tablespoon at a time. Blend well after each addition. Keep adding until you reach your preferred creaminess. Cold water helps the hummus stay smooth and fresh. If it’s too thin, blend in more chickpeas or tahini. Want to spice up your hummus? There are many ways to add flavor. Consider adding spices like cayenne pepper for heat or coriander for earthiness. You can also try smoked paprika for a deeper taste. Fresh herbs like cilantro or basil bring a burst of brightness. Just chop them finely and mix them in. These simple additions make your dip even more exciting. Presentation is key for serving. Serve your hummus in a shallow bowl to show off its color. Use a spoon to create a swirl on top before adding olive oil. This adds a nice touch. Surround your hummus with warm pita bread and fresh veggie sticks. Carrots, cucumbers, and bell peppers work well. You can even create a mezze platter with olives and cheeses for a fun spread. For a pop of color, sprinkle fresh parsley on top before serving. For the full recipe and more detailed steps, check out the [Full Recipe]. {{image_4}} You can easily switch things up with roasted red pepper hummus. If you like heat, try a spicy version. Add a pinch of cayenne pepper or a splash of hot sauce to the mix. This will give your hummus a nice kick. Experimenting with herbs and spices is fun too. Fresh basil or dill can change the taste completely. You might also try adding a teaspoon of smoked paprika or a dash of cumin for a warm touch. Not everyone has tahini at home. If you can't find it, try using peanut butter or sunflower seed butter instead. Both options will give your hummus a unique flavor while keeping it creamy. For a vegan option, swap olive oil with avocado oil or a nut oil of your choice. Both will still provide that rich flavor without losing the hummus's essence. Serving your hummus can be just as fun as making it. For parties, pair it with warm pita bread, crunchy veggie sticks, or crackers. You can also serve it as part of a mezze platter with olives and cheese. If you're looking to incorporate it into meals, try using hummus as a spread on sandwiches or wraps. It also works great as a dip for chips or a topping for salads. The options are endless! For the full recipe, check the details above. Homemade hummus lasts in the fridge for about 5 to 7 days. Store it in a clean, airtight container. This keeps the hummus fresh and protects it from strong odors in your fridge. Always let it cool before sealing it. You can freeze hummus to enjoy later. Use a freezer-safe container and leave some space at the top. This allows the hummus to expand. When you're ready to eat it, thaw it in the fridge overnight. The texture may change a bit and become thicker. Just add a splash of cold water and blend to regain creaminess. Leftover hummus can lose some of its charm. To bring it back to life, stir in a bit of olive oil or lemon juice. This adds flavor and moisture. You might also try adding fresh herbs like parsley or a pinch of smoked paprika for a zestier kick. These simple changes make your hummus taste fresh and inviting again. Check the [Full Recipe] for more ideas! You can roast a red pepper in a few ways. The first method is over an open flame, like a gas stove. Hold the pepper with tongs and turn it until the skin chars. The second method is using your oven's broiler. Place the pepper on a baking sheet and broil it, turning it often. Both methods make the skin blister and blacken, flavorful and smoky. After roasting, let it steam in a bowl for about 10 minutes. This helps you peel it easily. Yes, you can! Store-bought roasted red peppers save time. They are already cooked and ready to go. However, they might lack the fresh, smoky flavor of homemade ones. Check the label for added ingredients. Some may have preservatives or oils that affect taste. Overall, they are a good option for quick meals. To make your hummus creamier, blend it longer. Use a food processor for a smooth finish. If it's too thick, add cold water slowly, one tablespoon at a time. You can also use extra olive oil for richness. Adding more tahini can enhance the flavor and texture too. A splash of lemon juice brightens the taste, making it more vibrant. Yes! Roasted red pepper hummus is healthy. Chickpeas provide protein and fiber, promoting good digestion. Olive oil adds heart-healthy fats. Red peppers are high in vitamins A and C, boosting immunity. This dip is low in calories and can fit into many diets. Enjoy it as a snack or part of a meal. You have plenty of great options! Serve it with warm pita bread or veggie sticks like carrots and celery. It pairs well with crackers or flatbreads too. You can also include it in a mezze platter with olives and cheeses. The colorful presentation makes it more inviting and fun to share. Check out the Full Recipe for more serving ideas! This blog post covered all you need for a delicious roasted red pepper hummus. We explored key ingredients like chickpeas, tahini, and roasted red peppers. I shared step-by-step instructions for preparation and blending. You also learned tips for enhancing flavors and achieving the perfect texture. In my final thoughts, homemade hummus offers endless creativity and flavor. Enjoy trying different variations and serving styles. Store it well and savor your delicious results!](https://eataroundit.com/wp-content/uploads/2025/06/4e59e8d8-f42f-45bd-b571-70d55deb2e16.webp)
If you’re looking for a delicious dip that’s easy to make, you’re in the right place. Roasted red pepper hummus
