Skip to content
DisclaimerTerms Of UseGDPR PolicyCookie Policy

eataroundit

  • Home
  • Drinks
  • Appetizers
  • Dinner
  • Dessert
  • About
  • Contact
  • Privacy Policy
DisclaimerTerms Of UseGDPR PolicyCookie Policy

Hannah

- 4 large russet potatoes, cut into wedges - 1/4 cup extra virgin olive oil - 1 tablespoon garlic powder - 1 tablespoon onion powder - 1 teaspoon smoked paprika - 1 teaspoon dried oregano - 1 teaspoon dried thyme - 1/2 teaspoon cayenne pepper (optional) - Salt and freshly ground black pepper to taste - Fresh parsley, chopped, for garnish - 1/4 cup grated Parmesan cheese (optional) To make crispy potato wedges, start with fresh, high-quality russet potatoes. Their starchiness gives a nice texture. The olive oil helps the wedges crisp up in the oven. Use garlic powder and onion powder to add depth. Smoked paprika brings a warm, smoky flavor, while oregano and thyme add herbal notes. If you like heat, cayenne pepper adds a good kick. Salt and pepper are key to enhancing all the flavors. For a lovely finish, sprinkle chopped parsley on top before serving. If you want a cheesy twist, Parmesan cheese melts beautifully over the hot wedges, giving them a rich flavor. This simple list of ingredients will set you on the path to making delicious crispy potato wedges. For the complete cooking method, check the Full Recipe. - Preheat the oven to 425°F (220°C). - Wash and scrub the russet potatoes thoroughly. Start by getting your oven nice and hot. Set it to 425°F (220°C). This heat is key for crispy potato wedges. Next, wash your russet potatoes. Scrub them well to get rid of dirt. You want to keep the skin on for flavor and crunch. After cleaning, cut each potato into wedges. Aim for uniform sizes so they cook evenly. - Combine olive oil with garlic powder, onion powder, smoked paprika, and herbs. - Season the mixture with salt and pepper. Now, let’s make the seasoning mix. In a large bowl, pour in the olive oil. Add garlic powder, onion powder, smoked paprika, dried oregano, and dried thyme. If you like heat, toss in cayenne pepper. Season this mixture with a good pinch of salt and pepper. Stir until it’s well blended. The smell will make your mouth water! - Toss potato wedges in the seasoning mixture. - Bake for 30-35 minutes, flipping halfway through. Next, it’s time to coat the wedges. Add the potato wedges to the seasoning mix. Toss them gently until each wedge is covered in the flavorful oil. Spread them out in a single layer on a baking sheet. This spacing is important for crispiness. Bake for 30-35 minutes. Flip the wedges halfway through to get that golden brown color all around. If you want to learn more, check out the Full Recipe. To get that perfect crunch in your potato wedges, follow these tips: - Make sure the wedges lay flat on the baking sheet. This helps them cook evenly. - Use parchment paper on the baking sheet. It prevents sticking and makes cleanup easy. Preheating your oven is very important. It helps the wedges cook right. I set my oven to 425°F (220°C) for the best results. If you have a convection oven, you might want to lower the temperature to 400°F (200°C). This setting gives a golden crust without burning. Pair your crispy potato wedges with tasty dips. Ranch and garlic aioli are my favorites. For a fun look, serve the wedges on a wooden platter or in a metal basket. This makes them more inviting, especially for guests. {{image_4}} You can easily change the flavor of your crispy potato wedges. Try adding different spices like cumin or chili powder. These spices bring warmth and depth. You can also use fresh herbs like rosemary or basil. Just chop them finely and mix them with the oil. This adds a fresh taste that brightens each bite. For a cheesy twist, you can add Parmesan cheese. Sprinkle it over the wedges during the last five minutes of baking. This makes a tasty, cheesy crust. You can also try other cheeses like cheddar or mozzarella. Each cheese will give your wedges a different flavor. Don’t be shy to experiment! If you want more heat, you can enhance the spiciness level. Add more cayenne pepper to the seasoning mix. You can also try adding chili flakes for an extra kick. For dipping sauces, make your own spicy sauce. Mix mayo with sriracha or hot sauce. This adds a creamy, spicy touch that pairs well with the wedges. To keep crispy potato wedges fresh, store them in an airtight container. Make sure to let them cool before sealing to avoid steam buildup. Use a glass or plastic container that has a tight lid. If you have extra space, place a paper towel in the container. This helps absorb moisture and keeps the wedges crispy. The best way to reheat crispy potato wedges is in the oven. Preheat your oven to 400°F (200°C). Spread the wedges on a baking sheet in a single layer and heat for about 10-15 minutes. If you’re in a rush, you can use a microwave. Just remember, they won’t be as crispy. Heat for 1-2 minutes, but check often to prevent sogginess. You can keep potato wedges in the fridge for 3-5 days. After that, they lose their quality. Look for signs of spoilage, like a bad smell or a slimy texture. If you notice these, it’s best to throw them away. Enjoy your wedges fresh for the best taste! For more details, check the Full Recipe. To make your potato wedges crispy, follow these tips: - Cut Evenly: Cut the potatoes into even-sized wedges. This helps them cook at the same rate. - Soak in Water: Soak the wedges in cold water for 30 minutes. This removes excess starch and helps with crispiness. - Dry Thoroughly: After soaking, dry the wedges well with a towel. Moisture will prevent them from crisping up. - Use Enough Oil: Coat the wedges well with olive oil. This helps them brown nicely. - Single Layer: Spread the wedges out on the baking sheet in a single layer. Crowding them can lead to sogginess. - Flip Halfway: Flip the wedges halfway through cooking. This ensures both sides get crispy. Yes, you can use different types of potatoes! Here are some options: - Sweet Potatoes: They add a sweet taste and are rich in nutrients. They cook similarly to russets. - Yukon Golds: These have a buttery flavor and creamy texture. They crisp up well, too. - Red Potatoes: They are waxy and hold their shape. They can be great for wedges, but may not get as crispy. You can use many spices to flavor your wedges. Here are some ideas: - Classic Mix: Use garlic powder, onion powder, and smoked paprika. This gives a savory taste. - Herbs: Add dried oregano and thyme for an aromatic touch. - Spicy Kick: A pinch of cayenne pepper can add heat. Adjust it to your liking. - Cheesy Flavor: Sprinkle grated Parmesan cheese on top during the last minutes of baking for a cheesy crust. Feel free to experiment with your favorite spices! This blog post covered how to make crispy potato wedges from scratch. I detailed each step, from prepping the potatoes to baking them. You learned about seasoning, tips for crispiness, and variations to try. My final thoughts? These wedges are simple, tasty, and a great side dish. Experiment with flavors and enjoy different dips. Store leftovers properly to keep them fresh. Now, you’re ready to create your perfect potato wedges!

Crispy Potato Wedges Easy and Flavorful Recipe

Looking for a delicious snack or side dish that’s easy to make? You’re in the right place! Today, I’ll share

- 1 large French baguette - 1 cup pitted Kalamata olives, finely chopped - 1 cup green olives, finely chopped - 2 cups shredded mozzarella cheese - 1 cup cream cheese, softened - 2 tablespoons fresh parsley, finely minced - 2 tablespoons fresh basil, finely minced - 1 tablespoon garlic powder - 1 teaspoon onion powder - ½ teaspoon red pepper flakes (optional) - Salt and pepper to taste - 2 tablespoons extra virgin olive oil Gathering the right ingredients is key for this olive cheese bread. You need a fresh baguette as the base. The baguette should be crusty and soft inside. For olives, use both Kalamata and green olives. Their flavors mix well and provide a nice contrast. The cheeses play a big role too. Mozzarella gives you that stretchy, gooey texture. Cream cheese adds smoothness and richness. For a burst of freshness, use minced parsley and basil. Garlic and onion powder enhance the flavor. If you like some heat, add red pepper flakes. Don't forget salt and pepper to taste. Finally, drizzle some extra virgin olive oil. This adds richness and helps the bread crisp up. All these ingredients come together in perfect harmony. If you want to see how to mix and bake these delicious layers, check the Full Recipe for step-by-step guidance! - Preheat the oven to 375°F (190°C). - Slice the French baguette in half lengthwise. - Combine olives, cheeses, herbs, and spices in a bowl. - Mix until well incorporated. - Spread the mixture evenly on the baguette halves. - Drizzle with olive oil and bake for 15-20 minutes. This simple process makes Olive Cheese Bread a fun dish to create. You will love how easy it is to prepare. Follow the full recipe for exact measurements and instructions. Each step adds flavor and fun to your cooking experience. Enjoy the smell of melting cheese as it fills your kitchen! - Use a serrated knife for clean cuts. - Ensure even distribution of the filling. To slice the bread well, a serrated knife works best. This type of knife cuts through the crust without squishing the soft inside. When you slice, be gentle and steady. After baking, each piece should still hold its shape. For the filling, spread it evenly to make sure every bite is tasty. - Adjust red pepper flakes for spice levels. - Experiment with different cheese varieties. To control the heat, you can change the amount of red pepper flakes. If you want a little kick, add more. If not, skip them. You can also switch up the cheese. Try mixing mozzarella with cheddar or feta. Each type of cheese will bring a new flavor. - Serve on a wooden board or decorative platter. - Garnish with parsley and basil sprigs. When it comes to serving, choose a wooden board or a pretty platter. This makes the bread look inviting. For a final touch, add sprigs of parsley or basil. These not only add color but also a fresh aroma. Your Olive Cheese Bread will look as good as it tastes! {{image_4}} You can change the cheese to fit your taste. Swap mozzarella for cheddar for a sharper flavor. Cheddar melts well and gives a nice bite. Feta is another great option. It offers a salty kick and creamy texture. You can also add a layer of goat cheese. Goat cheese adds a tangy flavor that pairs well with olives. Herbs can change the whole vibe of this dish. Use thyme for an earthy taste. Oregano gives a warm, strong flavor that works well with cheese. If you can't find fresh herbs, use dried ones. They are easy to store and still give a good taste. Feel free to get creative with the mix-ins. Sun-dried tomatoes add a sweet and tangy flavor. Roasted garlic gives a rich, mellow taste that enhances the cheese. Diced bell peppers add a nice crunch and a hint of sweetness. Each of these additions makes the dish even more special. Store any leftover Olive Cheese Bread in an airtight container. This helps keep it fresh. You can keep it refrigerated for up to 3 days. If you want to save it for later, wrap it tightly in plastic wrap. This keeps out air and moisture. It’s best used within 1 month for optimal flavor. To reheat your Olive Cheese Bread, I suggest using the oven. This gives the bread a crispy texture. If you prefer a softer option, you can microwave it. Just be careful not to overheat it. Yes, you can prepare the filling and assemble it the night before. Just store it in the fridge. This makes it easy to bake right before your guests arrive. Consider adding jalapeños or other spiced olives. This adds a fun kick. You can also try mixing in some red pepper flakes for extra heat. Yes, all the ingredients are vegetarian. This makes it a great choice for those who avoid meat. The olives and cheese give it lots of flavor and richness. Cut into small pieces for easy sharing at parties. This way, your guests can grab a piece without fuss. Pair it with drinks for a fun snack. Enjoy your Olive Cheese Bread! For the full recipe, check above. This blog post covered how to make Olive Cheese Bread with simple ingredients and steps. We discussed the main components, flavor enhancers, and variations for extra taste. Store leftovers properly for the best flavor later. Remember, you can personalize this dish to fit your taste. Try different cheeses or add herbs for fun twists. Use it as a crowd-pleaser at your next gathering. Enjoy your cooking adventure and share your results!

Olive Cheese Bread Appetizer Flavorful and Simple Dish

Looking for a standout appetizer that’s both tasty and simple? Look no further! My Olive Cheese Bread Appetizer combines rich

- 6 medium russet potatoes, peeled and diced into 1-inch cubes - 1 medium onion, finely chopped - 3 cloves of garlic, minced - 4 cups vegetable broth (low-sodium recommended) - 2 cups shredded sharp cheddar cheese (or a dairy-free alternative) - 1 cup heavy cream or coconut cream (for a dairy-free option) - 1 teaspoon dried thyme - 1 teaspoon smoked paprika - Salt and freshly ground black pepper, to taste - ½ cup green onions, chopped (for garnish) - ¼ cup cooked bacon bits (optional topping for extra flavor) Each ingredient has a specific role. The potatoes give the soup its base and creaminess. The onion adds sweetness, while garlic boosts flavor. Vegetable broth keeps it light and savory. The cheese takes it to a cheesy paradise. Cream adds richness. Thyme and smoked paprika bring warmth and depth. Salt and pepper enhance all the flavors. The green onions and bacon bits add a nice finish. You can swap russet potatoes for Yukon gold for a creamier texture. If you need a dairy-free version, choose a dairy-free cheese and coconut cream. For a boost of flavor, try adding leeks instead of onions. If you want a smoky taste without bacon, use smoked salt. These changes let you personalize the soup while still keeping it comforting and easy. Start by gathering your ingredients. You will need: - 6 medium russet potatoes, peeled and diced into 1-inch cubes - 1 medium onion, finely chopped - 3 cloves of garlic, minced - 4 cups vegetable broth (low-sodium recommended) - 2 cups shredded sharp cheddar cheese (or a dairy-free alternative) - 1 cup heavy cream or coconut cream (for a dairy-free option) - 1 teaspoon dried thyme - 1 teaspoon smoked paprika - Salt and freshly ground black pepper, to taste - ½ cup green onions, chopped (for garnish) - ¼ cup cooked bacon bits (optional topping for additional flavor) Peel and dice your potatoes. Make sure they are even in size for even cooking. Chop the onion finely and mince the garlic. In a slow cooker, combine the diced potatoes, chopped onion, and minced garlic. Pour in the vegetable broth. Make sure the broth covers the vegetables completely. Next, sprinkle in the dried thyme and smoked paprika. Add salt and pepper to taste. Gently stir the mixture to spread the spices evenly. Cover the slow cooker with the lid. Set it to cook on low for 6-7 hours or on high for 3-4 hours. You want the potatoes to be fork-tender. After cooking, take a potato masher and mash the mixture right in the slow cooker. Aim for a creamy texture but keep some chunks for a heartier soup. Gradually stir in the shredded cheddar cheese and heavy cream or coconut cream. Mix until the cheese melts and all is well combined. Taste the soup and adjust the seasoning if needed. If you want it thicker, let it sit on low for 10-15 minutes while stirring occasionally. Serve the soup hot in bowls. Garnish with chopped green onions and optional bacon bits for added crunch. For a richer look, sprinkle more cheddar cheese on top. For the full recipe, check out the detailed instructions above! To boost the flavor of your slow cooker cheesy potato soup, try these tips: - Use fresh herbs. Fresh thyme or parsley adds brightness. - Add a bay leaf while cooking. Remove it before serving for a subtle depth. - Stir in a splash of white wine. It brings a lovely tanginess. - Experiment with spices. A pinch of cayenne pepper can add a nice kick. - Top with crispy bacon bits for extra crunch and flavor. Here are some common pitfalls to watch out for: - Don't skip the garlic. It gives essential flavor. - Avoid over-mashing the potatoes. Some chunks make the soup heartier. - Don’t rush the cooking time. Low and slow is key for the best texture. - Don’t forget to taste! Adjust salt and pepper for your unique preference. - Be careful with the broth. Too much salt can overpower the soup. Serving your slow cooker cheesy potato soup can be fun: - Serve in warm bowls for comfort. - Add a dollop of sour cream for creaminess. - Sprinkle with fresh green onions for color and taste. - Pair with crusty bread or a fresh salad. - For a twist, serve it in a bread bowl for an extra treat. For the full recipe, check out Creamy Cheddar Potato Bliss Soup. Enjoy your cooking adventure! {{image_4}} You can change the cheese to fit your taste. Cheddar is classic, but try gouda for a smoky flair. Monterey Jack adds a nice meltiness, while pepper jack brings some heat. For a rich taste, use gruyere. If you want a dairy-free option, look for vegan cheese that melts well. To make your soup even creamier, consider adding cream cheese. It blends well and adds nice flavor. Another option is sour cream—mix it in at the end for a tangy kick. You can also use a little more heavy cream or coconut cream for that velvety texture. Making this soup gluten-free is easy! Just make sure your broth is gluten-free. For a vegan version, swap the heavy cream for coconut cream and use dairy-free cheese. You can also add more veggies, like carrots or celery, to boost nutrition without losing flavor. Check the [Full Recipe] for more ideas! After you enjoy your soup, store leftovers in a container. Let the soup cool first. Cover it tightly with a lid. You can keep it in the fridge for about three days. Make sure to label the container so you know when you made it. If you want to save some for later, freezing is easy. Pour the cooled soup into freezer-safe bags or containers. Leave some space at the top for expansion. Seal tightly and freeze for up to three months. When you’re ready to eat, thaw it in the fridge overnight. Reheating your soup is simple. You can use the microwave or the stove. If using the microwave, heat in short bursts, stirring often. If using the stove, pour the soup into a pot. Heat on low until warm. Stir well to mix any settled ingredients. Add a splash of broth or cream if it’s too thick. Enjoy your creamy delight again! To make this soup thicker, you can mash more potatoes. Use a masher to mix it well. You can also add a cornstarch slurry. Mix one tablespoon of cornstarch with two tablespoons of cold water. Stir this into the soup and let it cook for a bit longer. Letting it simmer will help it thicken nicely. For a creamier texture, add more heavy cream or cheese. This adds richness and depth to the soup. Yes, you can use other potatoes. Yukon gold potatoes work well for a creamy texture. They have a buttery flavor that enhances the soup. Red potatoes are also a great choice. They hold their shape well and add a nice color. Just remember to peel or not peel based on your taste. Each type of potato gives a different feel to the soup. Experiment and see which you like best! You can keep this soup in the fridge for about three to four days. Make sure to store it in an airtight container. Allow it to cool before sealing it. This keeps the flavors fresh and safe. If you want to keep it longer, freeze it. It can last up to three months in the freezer. Just thaw and reheat when you're ready to enjoy it again. For the full recipe, check the details above. This blog post covered key ingredients, step-by-step instructions, and helpful tips for your soup. You learned how to enhance flavor and avoid common mistakes. Variations offer options for cheese and dietary needs. Proper storage helps keep leftovers fresh. Incorporating these ideas will make your cooking easier and more enjoyable. Enjoy every warm bowl!

Slow Cooker Cheesy Potato Soup Comforting and Easy

Are you ready to dive into a bowl of pure comfort? My Slow Cooker Cheesy Potato Soup is easy to

- 1 cup strawberries, hulled and sliced - 1 cup blueberries - 1 cup raspberries - 1 pound vanilla cake, cubed (store-bought or homemade) - 2 cups vanilla pudding (store-bought or homemade) - 1 cup whipped cream (preferably homemade) - 1 teaspoon vanilla extract - Fresh mint leaves for garnish (optional) - 1 tablespoon powdered sugar (optional, for sweetening whipped cream) The fresh berries are key in this trifle. Strawberries, blueberries, and raspberries add color and flavor. Choose ripe, juicy berries for the best taste. I love to mix them for a vibrant look. The cake gives a soft base. You can use store-bought vanilla cake or make your own. Either way, cubing it makes it easy to layer. The vanilla pudding adds creaminess. You can make it from scratch or buy it. Both options work well. I often make my own for a richer taste. Whipped cream is a must. Homemade tastes best, but store-bought works too. Adding vanilla extract boosts its flavor. If you want it sweeter, mix in powdered sugar. For a nice touch, fresh mint leaves make a great garnish. They add a pop of green and a hint of freshness. Enjoy making this layered dessert! For the complete method, check out the Full Recipe. Start by rinsing your strawberries, blueberries, and raspberries. Use cold water for the best results. Hull the strawberries and slice them into thin pieces. Keep the blueberries and raspberries whole. Set the fruits aside after preparing them. This ensures they stay fresh and juicy for your trifle. If you choose store-bought pudding, just follow the package instructions. For homemade pudding, combine 2 cups of milk, 1/3 cup of sugar, 1/4 cup of cornstarch, and 1 teaspoon of vanilla extract in a saucepan. Whisk until smooth. Cook over medium heat. Stir constantly until it thickens and bubbles. Remove from heat and let it cool. Stir occasionally to avoid a skin forming on top. To get the best whipped cream, use chilled heavy cream. In a mixing bowl, whip 1 cup of cream with a hand mixer or stand mixer. Beat until soft peaks form. If you want, add 1 tablespoon of powdered sugar and 1 teaspoon of vanilla extract for more flavor. Mix until the peaks are firm. This will make your cream light and fluffy. In a large trifle dish or individual cups, start layering your ingredients. First, place a layer of cubed vanilla cake at the bottom. Next, pour a layer of vanilla pudding over the cake. Spread it evenly. Then, add a layer of mixed berries on top. Use strawberries, blueberries, and raspberries. Follow with a generous layer of whipped cream. Repeat this layering until all ingredients are used. Finish with whipped cream and a colorful mix of berries. Cover your assembled trifle with plastic wrap. Refrigerate it for at least 2 hours. Chilling helps the flavors blend and the layers firm up. This step is key for a tasty dessert. The longer you chill, the better it tastes! For more details and a full recipe, check out the [Full Recipe]. To make your trifle shine, think about how you serve it. You can use individual cups or a large trifle dish. Individual cups highlight each layer, making it fun for guests. A trifle dish shows off the colors beautifully and is great for sharing. For garnishing, add fresh mint leaves on top. They bring a nice pop of green. You can also place a few whole berries on top for extra color. This will make your trifle look even more appealing. Want to take your trifle up a notch? Try adding lemon zest to the pudding. This gives a bright twist. You can also swap vanilla pudding for chocolate or lemon pudding. If you love cake, use flavored cake like almond or lemon for more depth. Mix in some coconut flakes or crushed cookies between the layers. These add texture and flavor. Get creative with what you have on hand! Be careful not to over-whip the cream. This makes it grainy. Aim for soft peaks for a smooth finish. Using cake that is too soft can make your trifle soggy. A firmer cake holds its shape better. Always check the chilling times, too. If you don’t chill it long enough, the layers won’t set right. Aim for at least 2 hours before serving for the best taste and texture. For the [Full Recipe], follow these tips, and you'll impress everyone with your Red, White, and Blueberry Trifle! {{image_4}} You can change the fruit in your trifle to suit your taste. Try using peaches or kiwi for a twist. You can even mix in some bananas for extra creaminess. Switching up the cake adds fun too. Instead of vanilla cake, use chocolate or lemon cake. Each cake brings its own flavor and mood to the trifle. If you need gluten-free options, look for gluten-free cake mixes. You can also make a gluten-free vanilla cake from scratch. For dairy-free needs, use almond or coconut milk in the pudding. You can replace whipped cream with coconut whipped cream. Want to cut sugar? Try using a sugar substitute in pudding and whipped cream. You can make this trifle fit any holiday. For spring, add pastel fruits like light green grapes. In the fall, use spiced cake and add pumpkin puree to the pudding. For Christmas, consider using cranberries and a gingerbread cake. Each season gives a chance to create a new spin on this layered delight. You can find the full recipe for Red, White, and Blueberry Trifle [here](#). To store leftover trifle, cover it with plastic wrap. This keeps it fresh. Place it in the fridge. Make sure it is sealed well. This helps prevent drying out. If you use individual cups, cover each cup. This way, they stay tasty. The trifle can last up to three days in the fridge. After that, the fruits may get mushy. The cake might also lose its texture. For best taste, enjoy it within two days. This helps keep each layer fresh and tasty. Freezing the entire trifle is not the best option. The whipped cream and fruits can change in texture. Instead, freeze the cake and pudding separately. You can freeze berries too, but they may get mushy. Thaw the components before assembling. For a fresh taste, assemble the trifle right before serving. This keeps the layers vibrant and delicious. For the full recipe, check out the [Full Recipe]. Yes, you can make this trifle ahead of time. It’s best to prepare it a few hours before serving. This gives the layers time to set and flavors to mix. If you want to make it even earlier, assemble the cake and pudding layers in advance. Keep the whipped cream and berries separate until just before serving. This method keeps the whipped cream fluffy and the berries fresh. I recommend using a light vanilla cake for this trifle. Store-bought cakes work well, but a homemade version is even better. You can also try angel food cake for a fluffy texture. If you want a twist, use pound cake for a denser bite. Just make sure the cake is moist, so it soaks up the pudding nicely. To keep your berries fresh, wash and dry them right before use. Avoid cutting the strawberries too far in advance, as this can lead to mushiness. Layer the berries between the cake and pudding. This will shield them from moisture. If you want to add extra crunch, consider mixing in some granola or nuts in between layers. This trifle recipe blends fresh berries, cake, and creamy layers perfectly. Start by preparing your fruits and pudding, then assemble it with whipped cream. Remember to chill it for the best taste. Use presentation tips to impress your guests. You can adapt flavors and accommodate diets easily. Store leftovers properly to enjoy later. With this guide, you can create a delicious trifle that delights everyone. Enjoy making it, and let your creativity shine!

Red, White and Blueberry Trifle Delicious Layered Dessert

Looking for a fun and easy dessert that celebrates the colors of summer? My Red, White and Blueberry Trifle layers

To make these no-bake cheesecake bites, you will need: - 1 cup graham cracker crumbs - 4 tablespoons unsalted butter, melted - 2 tablespoons granulated sugar - 8 oz cream cheese, softened at room temperature - 1/2 cup powdered sugar - 1 teaspoon pure vanilla extract - 1/2 cup heavy cream, whipped to soft peaks - Fresh berries (strawberries, blueberries, or raspberries) for topping - Optional: melted chocolate for drizzling You can swap ingredients if needed. Here are some ideas: - Use almond flour instead of graham cracker crumbs for a gluten-free crust. - Coconut oil can replace unsalted butter for a dairy-free option. - If you want less sugar, try using a sugar substitute like stevia or monk fruit. - For a vegan version, use a dairy-free cream cheese and whipped coconut cream. Selecting good ingredients makes a big difference in taste. Here are tips: - Choose fresh berries that are bright and firm. Look for ones without bruises. - When picking cream cheese, go for a full-fat option for the best creaminess. - Use real vanilla extract, not imitation, for deeper flavor. - Select high-quality heavy cream for the best texture when whipped. These tips help you create the best no-bake cheesecake bites, ensuring they taste amazing. For the full recipe, check the details above! Start by gathering your ingredients. You will need graham cracker crumbs, melted butter, and sugar. In a mixing bowl, combine the graham cracker crumbs, melted butter, and sugar. Stir until the mixture feels like damp sand. This means all crumbs are coated. Next, press the crumb mix into mini muffin tins or silicone molds. Use the back of a spoon to pack them tight. This makes a strong base for your cheesecake bites. For the filling, you will need softened cream cheese, powdered sugar, vanilla extract, and whipped cream. In a separate bowl, beat the softened cream cheese with an electric mixer. Mix until it is smooth and creamy. Add the powdered sugar and vanilla, blending until fluffy. Now, gently fold in the whipped cream with a spatula. Be careful not to over-mix. You want to keep that light, airy texture. Now for the fun part! Spoon the cheesecake filling over the crusts. Fill each one almost to the top. Cover the muffin tins with plastic wrap and refrigerate for at least 2 hours. This time lets the cheesecake bites set. Once they are firm, pop them out of the molds. Arrange them on a serving platter. For a colorful touch, top each bite with fresh berries. If you want, drizzle some melted chocolate on top. This adds a sweet finish to your bites. For the full recipe, check the details above! Many home cooks rush the mixing. This can lead to lumps in your cheesecake filling. Always beat the cream cheese until it's smooth first. Next, add powdered sugar slowly. If you skip this, the sugar may not mix well. Also, don’t skip chilling! They need time in the fridge to set properly. The key to a smooth texture lies in your cream cheese. Make sure it’s soft. Let it sit at room temperature for about 30 minutes. When mixing, fold in the whipped cream gently. This keeps the mixture light and fluffy. If you over-mix, your bites will lose that creamy feel. Presentation matters, especially for sweet treats. Top your cheesecake bites with fresh berries. They add color and flavor. If you want something extra, drizzle melted chocolate on top. For a fresh look, add a mint sprig. Use a colorful platter to make your bites pop! For a full recipe, visit the [Full Recipe]. {{image_4}} You can change the flavor of your cheesecake bites easily. For chocolate, add cocoa powder to the cream cheese mix. About 1/4 cup will give it a rich taste. For a lemon twist, mix in fresh lemon juice and zest. This brightens up the flavor. You can make these bites vegan and gluten-free, too. For vegan bites, swap cream cheese for cashew cream or a dairy-free cream cheese. Use coconut cream for a rich texture. Choose gluten-free graham crackers or nuts for the crust. This way, everyone can enjoy them! Toppings can change with the seasons. In summer, use fresh berries like strawberries, blueberries, or raspberries. They add a burst of color and flavor. In fall, try sliced apples or pears with a sprinkle of cinnamon. In winter, pomegranate seeds bring a festive touch. These variations make your no-bake cheesecake bites fun and unique. For the full recipe, check out the details above! To keep your no-bake cheesecake bites fresh, store them in an airtight container. This prevents moisture and air from affecting the taste and texture. Layer parchment paper between the bites to avoid sticking. Refrigerating the bites will keep them chilled and creamy. When stored properly, these cheesecake bites last about 5 days in the fridge. After that, they may lose their taste and texture. If you notice any changes in smell or appearance, it’s best to toss them out. You can freeze these bites for later enjoyment. Place them in a single layer on a baking sheet and freeze until solid. Once frozen, transfer them to an airtight container. They can last up to 2 months in the freezer. To enjoy, thaw them in the fridge overnight before serving. This helps retain their creamy goodness. For the full recipe, check out the details above. Yes, you can make No-Bake Cheesecake Bites ahead of time. I love to prepare them the day before a gathering. This gives them enough time to chill and set properly. After they are ready, cover them well with plastic wrap. Store them in the fridge until you are ready to serve. They will stay fresh and delicious for up to three days. To whip cream well, start with cold heavy cream. Pour it into a mixing bowl. Use an electric mixer on medium speed. This will help create soft peaks quickly. Stop mixing once you see soft peaks form. Overwhipping can turn it into butter, which you don't want. Gently fold the whipped cream into your cheesecake mixture. This keeps it light and fluffy. To make your cheesecake bites firmer, try a few simple tips. First, use less whipped cream in the filling. This will reduce the airy texture and make them more dense. Second, chill them longer in the fridge. Letting them sit for four hours or more will help them set better. Lastly, consider adding a bit of gelatin. Just a small amount can help create a firmer texture. This blog post covered how to make delicious no-bake cheesecake bites. We explored the key ingredients and their substitutes. I shared tips for choosing quality items and step-by-step instructions for preparation, filling, and assembly. We also looked at common mistakes and ways to achieve the right texture. Variations include flavors and dietary options. Lastly, I detailed how to store your bites for freshness. Cheesecake bites are fun, easy, and perfect for any occasion. Enjoy making them your own!

No-Bake Cheesecake Bites Simple and Delicious Treat

Craving something sweet but short on time? No-Bake Cheesecake Bites are the perfect treat for you! These simple and tasty

For the best Chili Pineapple Grilled Chicken, you need the following main ingredients: - 4 boneless, skinless chicken breasts - 1 cup fresh pineapple juice - 1/4 cup low-sodium soy sauce - 2 tablespoons honey - 1 tablespoon chili powder - 1 teaspoon garlic powder - 1 teaspoon ground ginger - 1/2 teaspoon crushed red pepper flakes - Salt and pepper to taste - Fresh cilantro, chopped (for garnish) - Lime wedges (for serving) Using fresh pineapple juice is key. It brings a sweet, tangy flavor that jarred juice can't match. Always pick ripe pineapples. They make the dish pop with flavor and freshness. The marinade is where the magic happens. Here’s what you’ll need: - 1 cup fresh pineapple juice - 1/4 cup low-sodium soy sauce - 2 tablespoons honey - 1 tablespoon chili powder - 1 teaspoon garlic powder - 1 teaspoon ground ginger - 1/2 teaspoon crushed red pepper flakes - Salt and pepper to taste You can add optional ingredients to enhance the flavor. For a kick, try adding some lime juice or even a bit of orange juice. Want more depth? Add a teaspoon of sesame oil. Both give a unique twist to your chicken. To make the perfect marinade, mix all the ingredients in a bowl. Whisk well until they blend together. This marinade not only flavors the chicken but also helps keep it juicy when grilled. For the full recipe, check the details above. To make a great marinade for Chili Pineapple Grilled Chicken, start with a medium bowl. Combine these ingredients: - 1 cup fresh pineapple juice - 1/4 cup low-sodium soy sauce - 2 tablespoons honey - 1 tablespoon chili powder - 1 teaspoon garlic powder - 1 teaspoon ground ginger - 1/2 teaspoon crushed red pepper flakes - Salt and pepper to taste Whisk everything together until it blends well. You want a balance of sweet and spicy flavors. If you like more heat, add extra chili powder or red pepper flakes. The pineapple juice gives a nice sweetness and helps tenderize the chicken. Now, let’s marinate the chicken. You can use either a resealable plastic bag or a shallow dish. Place the chicken breasts inside. Pour the marinade over the chicken, making sure each piece is covered well. Seal the bag or cover the dish tightly. Refrigerate this for at least 1 hour. If you have time, marinate it for up to 4 hours. The longer it sits, the more flavor it absorbs. Just remember, don’t marinate it too long, or the chicken may turn mushy. Preheat your grill to medium-high heat, between 375°F and 400°F. This helps achieve the perfect char on your chicken. Take the chicken out of the marinade and let any excess drip off. Place the chicken on the hot grill. Grill it for about 6-7 minutes on each side. You want the internal temperature to reach 165°F. Use a meat thermometer for accuracy. Once cooked, transfer the chicken to a plate and let it rest for 5 minutes. Resting allows the juices to stay inside, making each bite juicy. Enjoy your flavorful and easy Chili Pineapple Grilled Chicken! For the full recipe, check out the details above. For extra flavor, try adding spices like cumin or smoked paprika. You can also mix in fresh herbs like thyme or basil. These can give your chicken a new twist. Pair your Chili Pineapple Grilled Chicken with sides like grilled corn or a fresh cucumber salad. Rice or quinoa also works well. They add good texture and balance to the dish. To get perfect grill marks, preheat your grill well. Aim for a medium-high heat. Place the chicken on the grill and avoid moving it for a few minutes. This helps create those nice lines. Juiciness is key for chicken. Make sure not to overcook it. Use a meat thermometer to check the temperature. Chicken should reach 165°F for safety. Common grilling mistakes include not letting the chicken rest. Resting helps keep it juicy. Also, avoid pressing down on the chicken while it cooks. This pushes out the juices, making it dry. For more tips, check the Full Recipe for a complete guide! {{image_4}} You can easily swap chicken for other meats. Shrimp works great with this marinade. Just adjust the marinating time to 15-30 minutes. Pork also shines here; use pork chops or tenderloin for a juicy bite. If you prefer a vegetarian option, try using tofu or tempeh. Press the tofu first to remove excess water. This helps it soak up the marinade better. Grill until it gets a nice char, about 3-4 minutes on each side. You might want to tweak the sweetness or spice levels. If you like it sweeter, add more honey or use brown sugar. For more heat, increase the chili powder or crushed red pepper flakes. To add different fruit flavors, consider using mango or orange juice instead of pineapple juice. You can even mix fruit juices for a unique twist. This keeps the dish fresh and fun every time you make it. For the full recipe, check out the complete guide above. After you enjoy your chili pineapple grilled chicken, store any leftovers right away. Place the chicken in an airtight container. This keeps it fresh and safe. You can also use plastic wrap or aluminum foil. Make sure to cool it down first. Store the chicken in the fridge. It stays good for up to three days at 40°F or lower. If you want it to last longer, you can freeze it. Just wrap it tightly in foil or freezer bags. Frozen chicken can last up to three months. When it’s time to eat your leftovers, reheating is easy. The best way is to use an oven or a grill. Preheat the oven to 350°F. Place the chicken on a baking sheet and cover it with foil. Heat for about 15-20 minutes or until warm. This keeps the chicken juicy. You can also use a microwave. Heat it in short bursts of 30 seconds, checking often. If you want to save it for later, freezing is a good option. Just make sure to wrap it well. Remember, thaw it in the fridge overnight before reheating. Enjoy your meal! You can tell the chicken is done when it reaches an internal temperature of 165°F. Use a meat thermometer to check this. Look for juices that run clear, and the meat should not be pink. The texture should be firm and not rubbery. Letting the chicken rest after cooking helps the juices stay inside, making it tender. Yes, you can make the marinade a day in advance. Just store it in the fridge in a sealed container. This way, the flavors can blend well. When ready to use, give the marinade a quick stir before adding the chicken. Marinating for at least an hour gives the best taste. Chili pineapple grilled chicken pairs well with many sides, like: - Grilled corn on the cob - Fresh green salad with a light dressing - Cilantro lime rice - Roasted vegetables - Coleslaw for a crunchy contrast These sides balance the chicken's sweet and spicy flavors. Yes, you can grill the chicken indoors using a grill pan or an electric grill. Preheat the pan over medium-high heat before adding the chicken. Cook it about 6-7 minutes on each side, just like on an outdoor grill. You can also use a broiler in your oven if you don’t have a grill pan. This gives a similar charred flavor. For the full recipe, check the details provided earlier in this article. This blog post covered easy steps to make Chili Pineapple Grilled Chicken. We explored key ingredients, how to marinate the chicken, and grilling techniques. You learned about flavor enhancements and variations, which allow you to adapt the recipe to your taste. Finally, we discussed storage tips for leftovers and answered key questions. With this guide, you can enjoy a tasty dish that’s sure to impress. Grab your ingredients and start cooking!

Chili Pineapple Grilled Chicken Flavorful and Easy Meal

Looking for a tasty and easy meal? Try Chili Pineapple Grilled Chicken! This dish brings together sweet and spicy flavors,

Here’s what you need for a rich red velvet cake. - 2 ½ cups all-purpose flour - 1 ½ cups granulated sugar - 1 teaspoon baking soda - 1 teaspoon salt - 1 teaspoon cocoa powder - 1 ½ cups vegetable oil - 1 cup buttermilk, at room temperature - 2 large eggs, at room temperature - 2 tablespoons red food coloring - 1 teaspoon vanilla extract - 1 teaspoon white vinegar - Cream cheese frosting (store-bought or homemade) for frosting Gathering fresh ingredients makes all the difference. Use high-quality cocoa powder for a deeper flavor. Make sure your buttermilk and eggs are at room temperature. This helps the cake rise better and gives it a soft texture. The vibrant red color comes from the food coloring. I prefer gel food coloring for a brighter shade. Each ingredient plays a role. The sugar adds sweetness, while the cocoa powder gives a hint of chocolate. For frosting, I recommend cream cheese. It balances the sweetness of the cake perfectly. You can use store-bought or whip up your own. Either way, it adds a creamy finish. Now you have your list of ingredients. Ready to bake? Check out the Full Recipe for all the steps! - Preheat oven to 350°F (175°C). - Grease and flour two 9-inch round cake pans. Start by preheating your oven. This step is key for even baking. While it warms up, grease and flour your cake pans. This helps the cake come out easily. Use a paper towel to spread the grease. Dust the flour around to coat the sides and bottom well. - Whisk together flour, baking soda, salt, cocoa powder, and granulated sugar. In a large bowl, whisk the dry ingredients together. Add flour, baking soda, salt, cocoa powder, and sugar. Mix until there are no lumps. This step helps your cake rise nicely. It also adds a rich flavor. - Combine oil, buttermilk, eggs, food coloring, vanilla, and vinegar until smooth. In another bowl, combine the wet ingredients. Mix the vegetable oil, buttermilk, eggs, red food coloring, vanilla extract, and vinegar. Whisk until smooth. This mixture adds moisture and color. The vinegar also helps the cake rise. - Gradually fold the wet ingredients into the dry ingredients. Slowly pour the wet mixture into the dry ingredients. Use a spatula to fold them together. Be gentle to avoid overmixing. Stop once there are no dry streaks. This helps keep your cake fluffy. - Distribute batter into pans and bake for 25-30 minutes. Distribute the batter evenly into the prepared pans. Place them in your preheated oven. Bake for 25-30 minutes. Check for doneness with a toothpick. It should come out clean when the cakes are ready. - Cool cakes on wire rack; frost with cream cheese frosting. Once baked, remove the cakes from the oven. Let them cool for about 10 minutes in the pans. Then, turn them out onto a wire rack to cool completely. Frost your cooled cakes with cream cheese frosting. This adds a creamy, tangy flavor that pairs well with the cake. For the full recipe, check the ingredients and instructions above. To get that perfect red hue in your cake, use gel food coloring. Gel color gives a deeper shade than liquid types. This small change can make a big difference. Always make sure your ingredients are at room temperature. It helps the color blend better and gives a smoother batter. When mixing your batter, avoid overmixing. Overmixing can make the cake dense. Mix just until the dry ingredients disappear. After baking, let the cakes cool completely before frosting. This step is key for a light and fluffy texture. For neat frosting layers, use an offset spatula. This tool helps you spread the frosting evenly. If the cake feels too soft, chill it in the fridge before decorating. Chilling makes it easier to handle and gives a neat finish. For more tips and steps, check out the Full Recipe. {{image_4}} You can easily make a vegan red velvet cake. Just swap the eggs for flax eggs. To create a flax egg, mix one tablespoon of ground flaxseed with three tablespoons of water. Let it sit for a few minutes until it thickens. For buttermilk, use plant-based milk mixed with vinegar. Combine one cup of almond milk or soy milk with one tablespoon of vinegar. Let it sit for five minutes. This gives your cake the same moist texture. If you need a gluten-free version, don't worry! Just replace the all-purpose flour with a gluten-free flour blend. Many brands offer blends that work well in cakes. Be sure to check that it contains xanthan gum. This helps to mimic the texture of regular flour. Want to add a twist to your cake? Try adding chocolate chips or chopped pecans to the batter. This adds a lovely crunch. You can also top your cake with chocolate ganache. It gives a rich flavor that pairs well with the cake's sweetness. Alternatively, use a different flavored frosting, like vanilla or raspberry, for a fun change. For the Full Recipe, check the earlier sections of this article. Enjoy creating your own version of this classic cake! Store your red velvet cake in an airtight container. Keep it at room temperature for up to 3 days. This keeps the cake fresh and soft. If you notice it getting dry, you can add a slice of bread to the container. The bread will help keep the cake moist. For longer storage, refrigerate the cake. It stays good for up to a week. If you want to keep it even longer, freeze the slices. Wrap each slice tightly in plastic wrap and place them in a freezer-safe bag. You can freeze them for up to 3 months. Just be sure to label the bags with the date. When you're ready to enjoy your frozen cake, thaw it safely. The best way is to put it in the refrigerator overnight. If you're short on time, you can thaw it at room temperature for a few hours. Once thawed, the cake will taste just as good as when it was fresh. Enjoy your delicious red velvet cake any time! To make your red velvet cake fluffier, keep these tips in mind. First, ensure all your ingredients are at room temperature. Cold ingredients can make the cake dense. Next, be careful not to overmix the batter. Overmixing can lead to a tough texture. Mix just until you see no dry ingredients. This way, your cake will rise light and fluffy. Yes, you can use food coloring alternatives. Beet juice is a great natural option. It gives a nice red hue, but the taste and color may be different from traditional food coloring. You may need to adjust the amount based on how red you want the cake. The classic choice for red velvet cake is cream cheese frosting. Its tangy flavor pairs perfectly with the sweet cake. You can also use buttercream or whipped cream. Both can add a sweet twist and keep the cake light. Red velvet cake has a rich history. It became popular in the Southern United States. The cake's roots trace back to the 1800s, where it was known for its unique color and flavor. It gained fame through various cookbooks and word of mouth. Today, it remains a favorite for many celebrations. If you want to try making this delightful dessert, check out the Full Recipe. You learned how to make a delicious red velvet cake. This recipe uses simple ingredients and clear steps. I shared tips for great texture and vibrant color. You can even explore variations like vegan or gluten-free options. Proper storage ensures your cake stays fresh longer. With practice, you'll create a stunning cake that impresses everyone. Remember, baking is about fun and creativity, so enjoy the process!

Red Velvet Cake Simple and Fluffy Delight

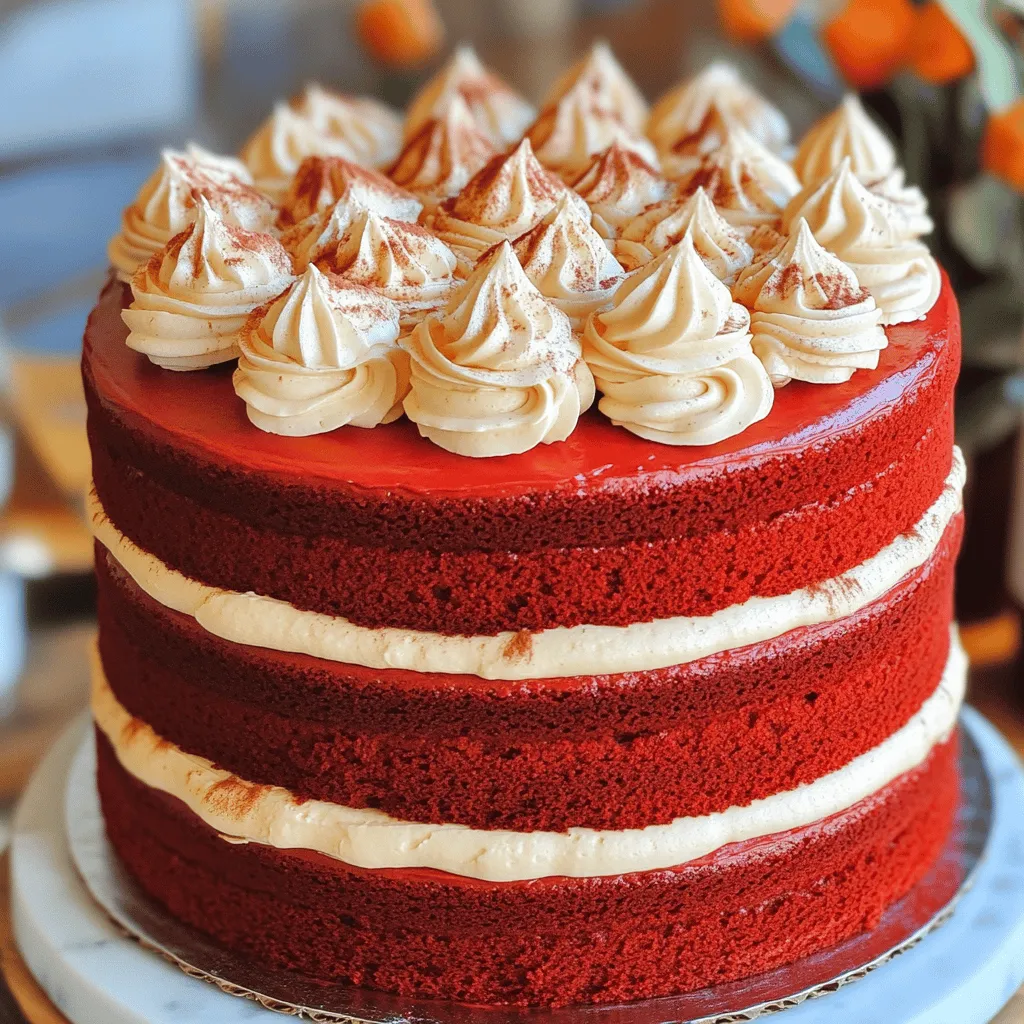
Red velvet cake is the ultimate treat for your next gathering. It’s a rich, fluffy delight that is both beautiful

- Apples required for the filling - 6 medium apples - A mix of Granny Smith for tartness. - Honeycrisp for sweetness. - Peel, core, and slice them thinly. - Spices and seasoning for flavor - 2 tablespoons fresh lemon juice - 3/4 cup granulated sugar - 1 teaspoon ground cinnamon - 1/4 teaspoon ground nutmeg - 1/4 teaspoon salt - 2 tablespoons all-purpose flour (for thickening) - Crust options: store-bought vs. homemade - 1 package (14 oz) refrigerated pie crusts - Store-bought is quick and easy. - Homemade offers a personal touch. - Additional ingredients for egg wash and decoration - 1 egg (for the egg wash) - 1 tablespoon milk (for the egg wash) - Extra sugar for sprinkling on top (optional) Using the right ingredients makes your apple pie shine. The mix of apples gives the pie depth. The spices bring warmth and comfort. Choose a crust that fits your time and skill. Whether you buy it or make it, both can be great. Add the egg wash for a shiny finish. Sprinkle sugar for a sweet crunch on top. This combination creates a classic apple pie that everyone loves! For a complete guide, check the Full Recipe. 1. Preheat your oven to 425°F (220°C). This high heat gives the crust a golden look. 2. Grab 6 medium apples. I like using a mix of Granny Smith and Honeycrisp. 3. Peel, core, and slice the apples thinly. This helps them cook well. 4. In a big bowl, toss the apple slices with 2 tablespoons of fresh lemon juice. This keeps them fresh and bright. 5. In another bowl, mix together 3/4 cup sugar, 1 teaspoon cinnamon, 1/4 teaspoon nutmeg, 1/4 teaspoon salt, and 2 tablespoons flour. Stir well to blend all the flavors. 6. Pour this sugar-spice mix over the apples. Toss gently until all the slices are coated. Let this sit for about 15 minutes. This helps the apples release their juices. 1. Roll out one pie crust on a floured surface. Fit it into a 9-inch pie pan. Leave some crust hanging over the edges. 2. Carefully fill the crust with the apple mix. Make the center a little higher for style. 3. Scatter 2 tablespoons of butter cubes over the apples. This adds a lovely richness. 4. Roll out the second pie crust. Place it over the apple filling and trim excess crust. 5. Fold the top crust under the bottom crust edge. Crimp the edges to seal it tight. 6. Cut a few small vents in the top crust. This lets steam escape while baking. Feel free to make a fun pattern! 1. Bake the pie at 425°F (220°C) for 15 minutes. This starts the cooking process. 2. After that, lower the heat to 350°F (175°C). Bake for another 30-40 minutes. Look for golden crust and bubbling juices. 3. Once done, let the pie cool on a wire rack for at least 2 hours. This cooling time helps the filling set. Make sure to check the Full Recipe for all the details! To make a flaky crust, use cold ingredients. Cold butter and water help create layers. Cut the butter into the flour until it looks like small peas. This technique keeps the crust light and flaky. Avoid overworking the dough. If you mix it too much, your crust can be tough. Instead, mix until just combined. Chill the dough for at least 30 minutes. This step relaxes the gluten and makes it easier to roll out. Common mistakes to avoid include not measuring flour accurately. Too much flour can lead to a dry crust. Also, don’t skip the egg wash. It gives your pie a shiny golden finish. Spice variations can change your pie’s taste. You can add ginger or allspice for a warm twist. Honey or maple syrup can replace sugar for a unique flavor. Try different sweeteners to suit your taste. For presentation, serve slices with ice cream or whipped cream. A sprinkle of cinnamon or lemon zest adds color and flavor. You can also add a few apple slices on top for a fresh look. This little touch can make your pie stand out. For the full recipe, check the detailed instructions to make your classic apple pie perfect! {{image_4}} You can switch up the fruits in your apple pie. Try adding pears or berries. They add a nice twist to the classic flavor. Mixing in different fruits gives you a new taste each time. For those avoiding gluten, you can make a gluten-free crust. Use almond flour or a pre-made gluten-free mix. Many stores sell these options now, making it easy for everyone to enjoy pie. Want to make your pie special? Add caramel or raisins for a richer taste. Caramel gives a sweet and gooey layer, while raisins add a chewy texture. You can mix these in with the apples for a fun surprise. Spices can change the flavor too. Try adding allspice or ginger for a different kick. Each spice brings its own warmth and depth. You can combine spices to create a unique flavor profile that suits your taste. Explore these variations to make your classic apple pie even more delicious. For a full recipe, check out the details above. To keep your apple pie fresh, store it properly. - Refrigeration: Cover the pie with plastic wrap or aluminum foil. This keeps it moist. Store it in the fridge for up to four days. - Freezing: If you need longer storage, wrap the pie tightly in plastic wrap. Then, place it in a freezer-safe bag. This way, it lasts for up to three months. Remember to label the bag with the date. When you’re ready to enjoy your pie again, reheating is key. - Oven method: Preheat your oven to 350°F (175°C). Place a slice of pie on a baking sheet. Cover it loosely with aluminum foil. Heat for about 10-15 minutes, or until warm. - Microwave method: For a quick option, use the microwave. Place a slice on a microwave-safe plate. Heat for 30 seconds to 1 minute. Check the pie to avoid making it soggy. These methods keep the crust crisp and the filling delicious. Enjoy every bite of your classic apple pie! To thicken your filling, use flour or cornstarch. Add about 2 tablespoons of flour when mixing the apples. The flour absorbs the extra juice. Let the mixture sit for 15 minutes before filling the pie. This allows the apples to soften and release juices. For the best flavor, use a mix of tart and sweet apples. I like Granny Smith for tartness and Honeycrisp for sweetness. Other great choices include Fuji and Braeburn. This mix gives your pie a balanced taste. Yes, you can prepare your pie before baking. Assemble the pie, then cover it tightly with plastic wrap. Store it in the fridge for up to 24 hours. You can also freeze it unbaked for up to 3 months. Just bake it straight from the freezer; it may take a bit longer. Peeling apples is not required, but it’s common. Unpeeled apples add texture and nutrients. However, they may alter the pie’s look and feel. If you prefer a smoother filling, stick to peeled apples. It’s all about personal taste! Look for a golden crust and bubbling juices. The apples should be tender when pierced with a fork. If the crust edges brown too quickly, cover them with foil. This will prevent burning while the filling cooks through. Apple pie has deep roots in many cultures. It dates back to the Middle Ages in Europe. The first recorded recipe appeared in England. It became popular in America, symbolizing home and comfort. Today, it’s a favorite dessert worldwide, loved for its warmth and nostalgia. For a delightful twist, try the Full Recipe. This blog gave you all the key steps for making a great apple pie. You learned about the right ingredients and how to prepare them. I shared tips for the perfect crust and ways to improve flavor. You discovered storage methods and reheating tips for leftovers. Remember, a little creativity can make your pie special. Enjoy the process and don’t be afraid to experiment. Making apple pie can bring joy to any gathering. Celebrate this classic dessert with your own twist.

Classic Apple Pie Delicious and Simple Recipe Guide

Picture this: warm, golden slices of classic apple pie fresh from the oven. The sweet aroma fills your kitchen, inviting

- 2 ½ cups all-purpose flour - 1 teaspoon baking powder - ½ teaspoon baking soda - ½ teaspoon salt - 1 cup unsalted butter, softened - 1 ½ cups granulated sugar - 1 large egg - 2 tablespoons fresh lemon zest - 1 tablespoon fresh lemon juice - 1 teaspoon pure vanilla extract - 1 cup powdered sugar - 2 tablespoons fresh lemon juice - Optional: Additional lemon zest for garnish When making glazed lemon sugar cookies, the balance of flavors matters. The dry ingredients create a sturdy base, while the wet ingredients add richness and flavor. The glaze gives that final touch of sweetness and brightness. I use fresh lemon zest to pack in that zesty flavor. It helps the cookies taste bright and fresh. Make sure to measure your ingredients carefully. This will help your cookies come out just right. For the glaze, using powdered sugar allows for a smooth finish. The glaze should be glossy and thick, yet easy to drizzle. If you're feeling fancy, add a sprinkle of lemon zest on top for a pop of color. Remember, the joy of baking is all about experimenting. You can find the full recipe to guide you through this tasty treat. Enjoy the process and the delightful lemony aroma that fills your kitchen! - Preheat the oven to 350°F (175°C). - Line two baking sheets with parchment paper. - In a medium bowl, combine the dry ingredients. - Use a mixer to cream the butter and sugar together. - Add the egg, lemon zest, lemon juice, and vanilla extract. - Scoop the dough and roll it into balls. - Place them on the baking sheets with space in between. - Bake for 10-12 minutes until edges are golden. - Let them cool before glazing. I love this part! You see the cookies puffing up and turning golden. The smell fills your kitchen with lemony goodness. After they cool, you get to drizzle on the glaze made from powdered sugar and fresh lemon juice. It's the best part of making glazed lemon sugar cookies! For the complete recipe, check the Full Recipe section. To get the best texture in your cookies, do not overmix the dough. Overmixing can make cookies tough instead of soft. Mix until just combined. The ideal baking time for soft centers is 10-12 minutes. Watch for the edges to turn lightly golden while the centers look soft. They will firm up as they cool. For a smooth glaze, whisk the powdered sugar with fresh lemon juice until it's glossy. Make sure your cookies are completely cool before glazing. If they are warm, the glaze will melt and not set right. Drizzle the glaze over each cookie with a spoon or a squeeze bottle for more control. For a beautiful display, stack the cookies on a tiered cake stand. You can also arrange them on a decorative plate. Adding a small lemon wedge or a sprig of mint next to each cookie makes the plate look fresh and colorful. A touch of extra lemon zest on top adds a nice finish and boosts the lemon flavor. {{image_4}} You can easily change the flavor of your glazed lemon sugar cookies. Adding almond extract gives them a rich, nutty taste. Use just a teaspoon to start. It offers a lovely twist that pairs well with lemon. Another fun option is to infuse your cookies with lavender. Use culinary lavender buds, about one teaspoon, to bring a floral note. This adds a unique flavor that surprises and delights. If you need gluten-free cookies, you can swap the all-purpose flour. Use gluten-free flour blends that work well in cookie recipes. They can help keep the texture light and tasty. For those following a vegan diet, you can replace the butter and egg. Use a vegan butter or coconut oil for fat. For the egg, a flax egg works great. Mix one tablespoon of ground flaxseed with three tablespoons of water. Let it sit until it thickens, then add it to your dough. Want to mix it up? You can add nuts or chocolate chips to the dough. Chopped walnuts or pecans add crunch. Dark chocolate chips bring a sweet contrast to the tart lemon. Instead of glaze, you can use fruity toppings. Try fresh berries or a fruit compote. These options give your cookies a new look and flavor. For the full recipe, check out the details above. To keep your glazed lemon sugar cookies fresh, store them in an airtight container. This helps lock in moisture and flavor. Place a piece of bread inside the container to help keep the cookies soft. The ideal temperature for storage is at room temperature, away from direct sunlight. You can freeze unbaked cookie dough easily. Scoop the dough into balls and place them on a baking sheet. Freeze them for about one hour, then transfer them to a freezer bag. This way, you can bake fresh cookies anytime! If you prefer to freeze baked cookies, let them cool completely. Wrap them in plastic wrap and place them in a freezer bag. You can enjoy them later, just thaw them at room temperature before serving. These cookies stay fresh for about 5 to 7 days when stored properly. Keep an eye out for signs of staleness. If they become hard or lose flavor, it's time to toss them. Enjoy your cookies while they're at their best! For the full recipe, check out the detailed steps above. To boost the lemon flavor, add more zest and juice. I suggest using 3 tablespoons of zest and 2 tablespoons of juice. The zest gives a strong lemon taste, while the juice adds brightness. You can also try using a mix of fresh and bottled lemon juice for a consistent flavor. Yes, you can prepare the dough in advance. Wrap the dough tightly in plastic wrap and chill it in the fridge for up to three days. This helps the flavors meld. For longer storage, freeze the dough for up to three months. Just let it thaw in the fridge overnight before baking. If lemon isn’t your thing, consider using orange or lime. For the glaze, swap lemon juice with fresh orange juice or lime juice. You can also use flavored extracts, like almond or vanilla, for a tasty twist. This guide shared all you need to make lemon sugar cookies from scratch. We covered ingredients, step-by-step instructions, tips for a perfect bake, and creative variations. You can enjoy soft, tasty cookies that impress. Don't be afraid to try new flavors or share them with friends. With these tips, your cookies will shine every time.

Glazed Lemon Sugar Cookies Perfectly Lemony Treat

If you’re craving a sweet treat with a zesty twist, you’ve come to the right place! My Glazed Lemon Sugar

- 3 medium apples (preferably Granny Smith or Honeycrisp), peeled, cored, and diced - 1/2 cup packed brown sugar - 1 teaspoon ground cinnamon - 1/4 teaspoon ground nutmeg - 1 tablespoon fresh lemon juice - 1 tablespoon cornstarch - 1 1/2 cups cream cheese, softened at room temperature - 1 cup granulated sugar - 1 teaspoon pure vanilla extract - 3 large eggs, room temperature - 1 cup sour cream - 1/4 cup all-purpose flour - 1 1/2 cups graham cracker crumbs - 1/2 cup unsalted butter, melted - 1/4 cup granulated sugar To create the perfect apple pie stuffed cheesecake, gather all your ingredients first. For the apple pie filling, I recommend using Granny Smith or Honeycrisp apples. They bring the best sweet and tart flavor. Make sure to peel, core, and dice the apples. The brown sugar adds sweetness and depth. Ground cinnamon and nutmeg will give that classic apple pie taste. A splash of fresh lemon juice brightens the filling, while cornstarch thickens it, ensuring a great texture. Now, for the cheesecake base, use softened cream cheese for a smooth mix. The granulated sugar adds sweetness, and pure vanilla extract enhances the flavor. Make sure your eggs are at room temperature for even mixing. Sour cream brings richness, while all-purpose flour binds everything together. Finally, for the crust, graham cracker crumbs provide a lovely crunch. Melted unsalted butter helps the crumbs stick together, and a touch of granulated sugar adds sweetness. By preparing these ingredients, you set the stage for a delightful dessert. For the full recipe, check out the details provided above. - Combine diced apples, brown sugar, lemon juice, cinnamon, nutmeg, and cornstarch in a saucepan. - Cook over medium heat until apples are tender and the sauce thickens. - Allow the filling to cool slightly before using. I love making this apple pie filling first. The sweet smell of apples and spices fills the kitchen. You will want to use firm apples like Granny Smith or Honeycrisp. They give the best flavor and texture. As you cook the apples, stir gently. You want them soft but not mushy. This filling adds a burst of flavor to the cheesecake. - Preheat the oven to 325°F (160°C). - Combine graham cracker crumbs, melted butter, and sugar until evenly mixed. - Press the mixture into a springform pan and bake for 10 minutes. The crust is simple but key to a great cheesecake. The graham cracker crumbs create a nice crunch. Be sure to press them down firmly. This helps the crust hold its shape. After baking, let it cool. This will help the cheesecake set better. - Beat softened cream cheese until smooth. - Gradually mix in granulated sugar, vanilla extract, and eggs. - Incorporate sour cream and flour without overmixing. The cheesecake filling is rich and creamy. I like to beat the cream cheese until smooth. This step is vital to avoid lumps. Add the sugar slowly. Each ingredient adds to the creaminess. The sour cream gives a tang that balances the sweetness. - Pour half of the cheesecake batter into the crust. - Add half of the apple pie filling and swirl, then top with the remaining batter and apple filling. When you assemble the cheesecake, it looks beautiful. Pour half of the batter over the crust. Then, add the apple filling. Use a knife to swirl it in gently. This creates a lovely marbled effect. Add the rest of the batter and filling on top. - Bake in the preheated oven for 55-65 minutes until the edges are firm. - Allow to cool in the oven with the door cracked to prevent cracking. Baking the cheesecake is a careful process. You want the edges firm but the center soft. It might jiggle a bit, and that’s okay. After baking, leave the oven door cracked. This helps it cool down slowly and reduces the chance of cracks. - Refrigerate for at least 4 hours or overnight before serving. - Release from the springform pan and slice to serve. Chilling is the best part of making cheesecake. It allows the flavors to blend. I suggest letting it chill overnight for the best taste. When ready to serve, run a knife around the edges. This makes it easy to remove from the pan. For the full recipe, check the details above. Enjoy this delightful and creamy dessert! To get a creamy filling, let your cream cheese soften fully at room temperature. This step is key. If it's too cold, you'll end up with lumps. Also, watch the baking time closely. Your cheesecake should set but still jiggle slightly in the center. This will help keep it creamy. To make your cheesecake shine, serve it with a dollop of whipped cream and a sprinkle of ground cinnamon. This simple touch adds flavor and beauty. You can also garnish each slice with a fresh apple slice. It makes your dish look more inviting and fresh. One common mistake is skipping the chilling time. Always chill your cheesecake for at least 4 hours. This step is vital for the best texture. Another mistake is overmixing after adding eggs and sour cream. This can cause cracks. Mix just until combined for a smooth finish. For the full recipe, check out the details above. {{image_4}} You can give your cheesecake a fun twist. Try adding a swirl of caramel or chocolate to the batter. This simple step adds rich flavor and looks great too. You can also mix in spices like ginger or cloves. These spices bring warmth and a unique taste to your dessert. If you want a gluten-free treat, use gluten-free graham cracker crumbs. This change keeps the crust delicious without gluten. For a vegan option, swap out the cream cheese with a dairy-free alternative. This way, everyone can enjoy this tasty cheesecake. Pair your cheesecake with vanilla ice cream for a classic dessert experience. The ice cream's creaminess contrasts nicely with the cheesecake. You can also serve it warm or at room temperature. Each option offers a different texture and flavor experience. Don't forget to check the Full Recipe for all the details! Keep the cheesecake covered in the refrigerator for up to 5 days. This helps maintain its creamy texture. If you want to save some for later, avoid freezing for best results. However, if needed, it can be frozen for up to 2 months. Just make sure to wrap it tightly. If you freeze the cheesecake, thaw it in the refrigerator overnight. This keeps it safe and tasty. You can serve it cold right from the fridge. If you prefer a softer bite, let it sit at room temperature for about 30 minutes before serving. Enjoy every slice! Yes, it can be prepared a day in advance and chilled overnight for best flavor. This method also helps the flavors meld together nicely. Plus, it saves you time on the day you want to serve it. Granny Smith or Honeycrisp apples are recommended for their balance of sweet and tart flavors. These apples hold their shape well during cooking, giving the filling a great texture. Bake at a lower temperature and allow it to cool gradually in the oven after baking. This slow cooling helps reduce the chance of cracks forming on the surface. You can use a regular cake pan, but be prepared to serve directly from the pan. It may be a bit tricky to remove the cheesecake without a springform pan, so make sure to line the bottom with parchment paper. The recipe yields approximately 12 servings. This makes it perfect for sharing at gatherings or special occasions. If you want smaller pieces, you can cut it into more slices. Enjoy! This blog post shared easy steps for making an Apple Pie Stuffed Cheesecake. You learned about key ingredients, detailed instructions, tips for the best texture, and variations to try. In closing, I encourage you to experiment with this recipe. Enjoy the blend of creamy cheesecake and sweet apple pie. It’s a dessert that brings joy to any gathering. Happy baking!

Apple Pie Stuffed Cheesecake Delightful and Creamy Dessert

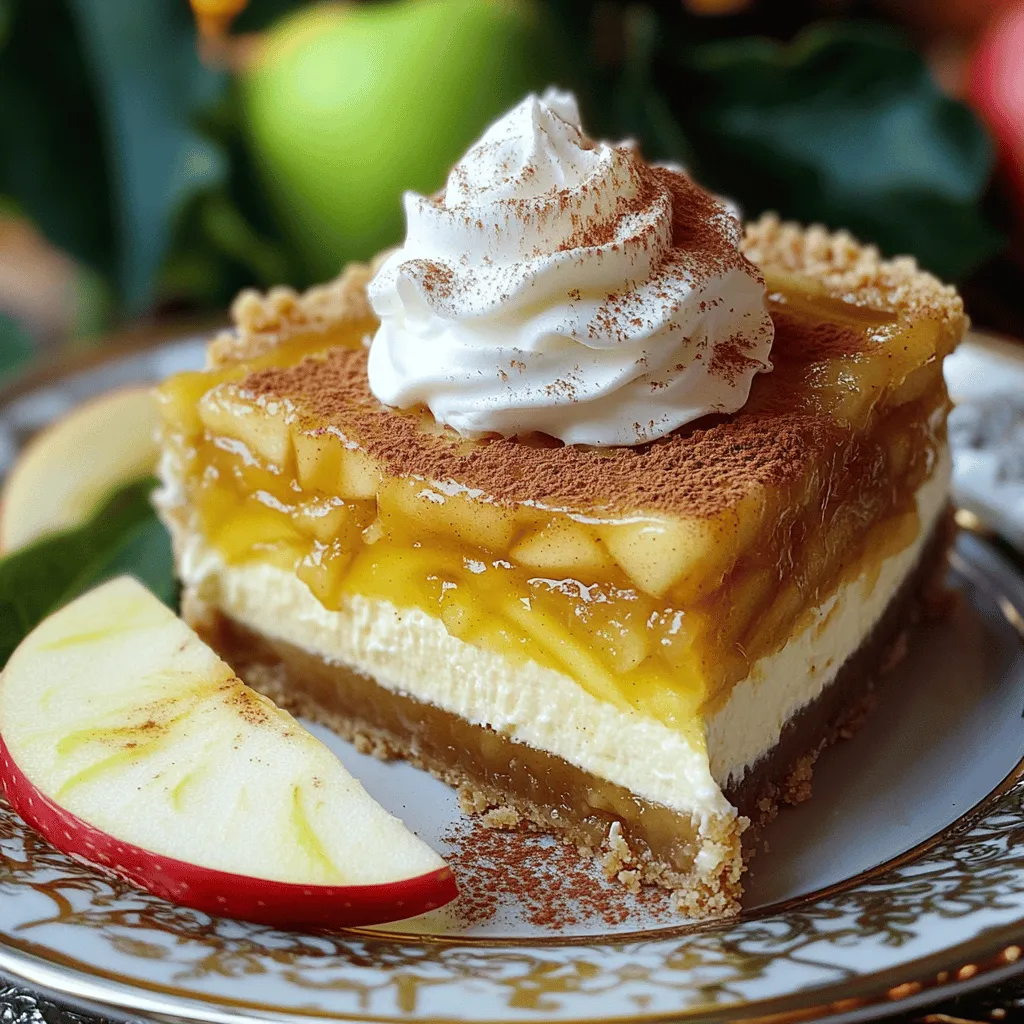
Get ready to indulge in a dessert that combines two classic favorites! My Apple Pie Stuffed Cheesecake blends creamy cheesecake

Older posts
Newer posts
← Previous Page1 … Page51 Page52 Page53 … Page55 Next →

dsad

© 2025 eataroundit • Built with GeneratePress

Our Policies

  • Copyright Policy
  • Cookie Policy
  • GDPR Policy
  • Privacy Policy
  • Disclaimer
  • Terms Of Use

More Information

  • Home
  • About
  • Contact
  • Appetizers
  • Dessert
  • Dinner
  • Drinks
©2025, eataroundit About Back To Top