Skip to content
DisclaimerTerms Of UseGDPR PolicyCookie Policy

eataroundit

  • Home
  • Drinks
  • Appetizers
  • Dinner
  • Dessert
  • About
  • Contact
  • Privacy Policy
DisclaimerTerms Of UseGDPR PolicyCookie Policy

Hannah

- 4 cups all-purpose flour - 1 cup whole milk - 1/2 cup granulated sugar - 1/4 cup unsalted butter (softened) - 2 large eggs - 1 packet instant yeast - 1 teaspoon salt - 1 tablespoon ground cinnamon - 1/2 cup packed brown sugar - 1/4 cup unsalted butter (melted for filling) - 1 cup powdered sugar (for frosting) - 2-3 tablespoons milk (for frosting) - 1 teaspoon vanilla extract (for frosting) To make the best homemade cinnamon rolls, you need these simple ingredients. Start with all-purpose flour for the dough. Whole milk helps the dough stay soft and moist. Granulated sugar adds sweetness, while softened unsalted butter gives richness. Using two large eggs adds structure and helps rise the dough. Instant yeast is key for quick rising. Salt gives flavor, while ground cinnamon brings that classic taste we love. For the filling, packed brown sugar adds depth. Melted butter helps the filling stick and adds flavor. We finish with a frosting made from powdered sugar, a splash of milk, and vanilla extract for sweetness. This list covers everything you need for heavenly homemade cinnamon rolls. With these ingredients, you can create a treat that delights everyone. You can find the full recipe to guide you through each step. - Step 1: Mix warm milk, sugar, and butter in a large bowl. Stir well until the butter melts. - Step 2: Add the eggs and yeast. Mix until everything blends well. - Step 3: Gradually add flour and salt. Stir until a soft dough forms. - Step 4: Knead the dough for 7-10 minutes. The dough should feel smooth and elastic. - Step 5: Place the dough in a greased bowl. Cover it and let it rise until it doubles in size, about one hour. - Step 6: Roll out the dough into a rectangle. Brush it with melted butter, then sprinkle brown sugar and cinnamon evenly. - Step 7: Starting from one edge, roll the dough tightly into a log. Slice it into 1-inch pieces. Let them rise again for 30-45 minutes. - Step 8: Preheat your oven to 350°F (175°C). Bake the rolls for 25-30 minutes until golden brown. For the full recipe, check the ingredients and preparation steps provided earlier. To make great cinnamon rolls, start with warm milk. The milk should be about 110°F. This warmth helps activate the yeast. If the milk is too cold, the yeast may not rise properly. If the dough is too sticky, add a little more flour. You want a soft, slightly tacky dough. Watch the baking time closely. Overbaking can dry out the rolls. They should be golden brown on top. Rotate the baking dish halfway through baking. This ensures even cooking and helps all rolls bake perfectly. To get the right frosting consistency, adjust the milk. Start with two tablespoons and add more if needed. Drizzle the frosting while the rolls are still warm. This allows the frosting to soak in and makes each bite extra delicious. {{image_4}} You can make your cinnamon rolls even better by adding extras. Here are two great ways to do that: - Nuts: Adding chopped pecans or walnuts can give a nice crunch. Just sprinkle them in with the brown sugar and cinnamon. They add a rich, nutty flavor that pairs well with the sweet rolls. - Fruit Filling: Try using fruit, like apples or berries. You can mix them with the filling for a fresh twist. A cream cheese topping also works well, adding a creamy, tangy taste that balances the sweetness. If you need to change the recipe for specific diets, here are some options: - Gluten-Free: You can use gluten-free flour blends instead of all-purpose flour. Just make sure to check that your blend is suitable for baking. - Vegan Substitutions: Replace butter with a plant-based option. Use almond or oat milk instead of regular milk. This way, everyone can enjoy warm, delicious rolls. How you serve these rolls can make them even more delightful. Here are a couple of ideas: - Fresh Fruit: Serve your cinnamon rolls with a side of fresh fruit. Berries, oranges, or even sliced apples can add a refreshing touch. - Coffee or Tea: Pairing your rolls with coffee or tea makes for a cozy brunch. The warmth of the drink complements the sweet rolls perfectly. For the full recipe, check out the detailed instructions. Enjoy experimenting with these variations! To keep your cinnamon rolls fresh, place them in an airtight container. This will help lock in moisture. If you don’t have a container, you can wrap them tightly in plastic wrap. Store them at room temperature for up to three days. For longer storage, keep them in the fridge. Just remember to allow them to cool completely before placing them in the fridge. This will help prevent condensation. To reheat your cinnamon rolls, the oven works best. Preheat it to 350°F (175°C). Place the rolls on a baking sheet and cover with foil. Heat for about 10-15 minutes. This keeps them soft and warm. If you are in a hurry, you can use the microwave. Place a roll on a plate and cover it with a damp paper towel. Heat for about 15-20 seconds. This method is quick but may not keep the texture as good as the oven. You can freeze your cinnamon rolls for later enjoyment! Just make sure they are completely cool before freezing. Wrap each roll in plastic wrap and then place them in a freezer-safe bag. They can stay in the freezer for up to three months. When you are ready to enjoy them, remove the rolls from the freezer. Thaw them in the fridge overnight. To reheat, follow the instructions above to restore their soft, gooey goodness. How long do cinnamon rolls last? Cinnamon rolls can last for about 2 to 3 days at room temperature. Store them in an airtight container to keep them fresh. For longer storage, place them in the fridge for up to a week. Can I make the dough ahead of time? Yes, you can make the dough ahead. After mixing, let it rise once, then punch it down. Wrap it tightly and store it in the fridge for up to 24 hours. When ready, let it come to room temperature before rolling it out. What can I use instead of instant yeast? You can use active dry yeast instead of instant yeast. Just be sure to activate it in warm water for about 5 to 10 minutes before adding it to the dough mixture. Why are my rolls dense? Dense rolls may come from using old yeast or not allowing the dough to rise enough. Make sure your yeast is fresh and give the dough enough time to puff up. How to fix undercooked rolls? If your rolls are undercooked, return them to the oven right away. Bake them at 350°F for an extra 5 to 10 minutes. Check for a golden-brown color and a soft texture. What is the best way to serve cinnamon rolls? Serve cinnamon rolls warm on a plate. Drizzle with frosting for extra sweetness. You can also add nuts or a sprinkle of cinnamon on top for flavor and crunch. Can I use bread flour instead of all-purpose flour? Yes, you can use bread flour. It makes the rolls chewier and adds a nice texture. Just note that you may need to adjust the amount of liquid in the recipe slightly. For the full recipe, you can find all the steps to make heavenly homemade cinnamon rolls. Enjoy your baking! In this blog post, we've explored how to make delicious cinnamon rolls from scratch. We covered the key ingredients, step-by-step instructions, and helpful tips. You can enhance your rolls with fills or toppings and adapt recipes for diet needs. Storing and reheating information ensures your rolls stay tasty. Baking can be fun and rewarding, so don't shy away from experimenting. Enjoy the process, and treat yourself and others to these sweet delights. Happy baking!

Best Homemade Cinnamon Rolls Simple and Delicious Recipe

Are you ready to indulge in the warm, gooey delight of homemade cinnamon rolls? In this simple and delicious recipe,

- 2 cups fresh strawberries, hulled and halved - 1/2 cup granulated sugar - 1 tablespoon freshly squeezed lemon juice Fresh strawberries are the star in this pie. Choose ripe, juicy ones for the best taste. The sugar adds sweetness, while lemon juice brings a nice zing that brightens the flavor. - 1 tablespoon cornstarch - 1/2 teaspoon pure vanilla extract Cornstarch thickens the filling and gives it a nice texture. The vanilla adds a warm, sweet flavor that pairs well with the fruit. Together, they make the filling rich and delicious. - 1 pre-baked pie crust (store-bought or homemade) - 1 tablespoon unsalted butter, cut into small pieces - Optional: Whipped cream for serving A good pie crust is key. You can buy one or make your own if you prefer. The butter adds richness to the filling, and whipped cream on top makes each slice even more special. For the full recipe, check out the Heavenly Strawberry Delight Pie section. - Preheat the oven to 375°F (190°C). - Prepare the strawberries and mixing bowl. Start by preheating your oven. This step is key for a great pie. While the oven warms up, wash and hull the strawberries. Halve them for easy mixing. Grab a medium mixing bowl to combine your ingredients. - Combine strawberries, sugar, lemon juice, cornstarch, and vanilla extract. - Allow ingredients to rest for 10-15 minutes. In your mixing bowl, add the halved strawberries, sugar, lemon juice, cornstarch, and vanilla extract. Stir gently to coat the strawberries. The sugar will help draw out the juices. Let this mixture sit for about 10-15 minutes. This resting time is important. It allows the flavors to blend and the filling to thicken slightly. - Pour mixture into the pre-baked pie crust. - Bake for 25-30 minutes and check for doneness. Next, pour the strawberry mixture into your pre-baked pie crust. Spread it evenly across the crust. Scatter small pieces of butter over the top. This adds flavor as it bakes. Place the pie in the oven and bake for 25-30 minutes. Watch for the filling to bubble and the crust to turn golden. This is your sign that the pie is ready. For the full recipe, check the details above. Enjoy the process, and get ready for a delicious treat! To make the best strawberry pie, you must adjust the sweetness. Ripe strawberries are sweet. If your berries are not ripe, add a bit more sugar. Taste as you go to find the right level. Fresh strawberries give the best flavor. However, frozen strawberries can work too. If you use frozen ones, thaw them first. Drain the excess liquid to avoid a soggy pie. A golden pie crust looks great and tastes even better. To get this color, brush the crust with egg wash before baking. This gives a nice shine and color. Bake your pie until the filling bubbles. Cooling time is very important. Let the pie cool at room temperature. This helps the filling set and flavors blend. If you skip this, the pie may become runny. Garnishing your pie adds a nice touch. A dollop of whipped cream on each slice is perfect. It adds creaminess that pairs well with the sweet strawberries. You can top it with a fresh strawberry or mint leaves for color. Pair your pie with vanilla ice cream or a cup of tea. These choices will enhance your dessert experience. Enjoy the flavors together for a delightful treat. {{image_4}} You can mix strawberries with other fruits for tasty twists. A classic choice is strawberry-rhubarb pie. The tartness of rhubarb pairs well with sweet strawberries. This mix gives you a great balance of flavors. You can also try a mixed berry pie. Combine strawberries with blueberries and raspberries. This combination adds color and depth to your pie. The different berries create a burst of flavor in every bite. If you need a gluten-free option, there are many choices. Look for gluten-free pie crusts made from almond or coconut flour. These crusts can be just as tasty as traditional ones. You can also get creative with cookie crusts. A crust made from crushed graham crackers or Oreos can add a sweet touch. This unique base gives your pie a fun twist. For a fun flavor boost, try adding herbs. Basil and mint can add a fresh taste to your pie. Just chop them finely and mix them into the filling. Spices are another great way to enhance flavor. A pinch of cinnamon or nutmeg can warm up the taste. Experiment a bit and find your favorite blend! For the best strawberry pie, refer to the Full Recipe for a delicious guide. To keep your strawberry pie fresh, store it in the fridge. Place the pie in an airtight container. This helps seal in moisture. If you do not have a container, wrap the pie tightly in plastic wrap. This prevents it from drying out. Your pie can last for about three days in the fridge. You can freeze your pie before or after baking. To freeze before baking, wrap it well in plastic wrap and foil. This helps protect it from freezer burn. When you’re ready to bake, just remove the wrap and bake directly from frozen. If you freeze after baking, let the pie cool first. Wrap it tightly and place it in the freezer. To thaw, move it to the fridge overnight. Serve it at room temperature or warm it up slightly. In the fridge, your pie lasts about three days. Watch for signs of spoilage. If you see any mold, or if the crust feels soggy, it is best to discard it. Freshness is key for enjoying that sweet strawberry flavor. Look for a few signs to know your pie is ready. First, check the filling. It should be bubbly and thick. Second, inspect the crust. It should be a light golden color. You can also poke the filling with a fork. If it feels soft but not runny, it’s done. Yes, you can use frozen strawberries! Just remember to thaw them first. Drain any excess juice. You might need to add a bit more cornstarch to thicken the filling. This will help keep the pie from being too watery. If your filling is too runny, don’t worry! You can fix it. Try adding a bit more cornstarch and heat it on the stove. Let it simmer for a few minutes. Stir until it thickens. Then, pour it back into the pie crust. To find great strawberry pie, check out local bakeries or diners. Ask friends for their favorites. Many places make pies during the strawberry season. Look online for reviews or ratings. This can help you find the best options nearby. You can try many fun variations! Swap in other fruits like rhubarb or blueberries. Mix strawberries with peaches for a tasty twist. You can even add a sprinkle of cinnamon for extra flavor. Don’t be afraid to get creative! For a great presentation, slice the pie into neat pieces. Top each slice with whipped cream. You can also add a fresh strawberry on top for color. Serve with a scoop of vanilla ice cream for a tasty treat. Enjoy! For the full recipe, check out the Heavenly Strawberry Delight Pie. This strawberry pie recipe combines fresh ingredients with simple steps, producing delicious results. You learned how to create a perfect filling and bake a golden crust. Remember, you can adjust sweetness and try different fruits. Store leftovers properly for maximum freshness. Enjoy sharing your pie with loved ones, and don’t hesitate to get creative with new flavors. This is more than just a dessert; it's a sweet memory waiting to be made. Happy baking!

Best Strawberry Pie Savory and Flaky Recipe Guide

Craving a dessert that bursts with flavor? Look no further! This guide shows you how to make the best strawberry

For the crust, you need: - 1 ½ cups graham cracker crumbs - ½ cup unsalted butter, melted - ¼ cup granulated sugar The crust gives the cheesecake bars a nice crunch. Mix the crumbs, melted butter, and sugar well. Press this mixture into your baking dish firmly. For the cheesecake filling, gather these items: - 16 oz cream cheese, softened to room temperature - ½ cup granulated sugar - 2 large eggs, at room temperature - 2 tablespoons all-purpose flour - Zest of 1 lemon (about 1 teaspoon) - ¼ cup freshly squeezed lemon juice - 1 cup fresh raspberries (plus extra for garnish) - 1 teaspoon pure vanilla extract The filling is creamy and tart. Start with the cream cheese and sugar. Mix them until smooth. Then add eggs one at a time, mixing well. Add flour, lemon zest, lemon juice, and vanilla. Fold in the raspberries gently for a fruity burst. For a lovely finish, consider: - Fresh raspberries - Powdered sugar for dusting Garnishes add charm to your cheesecake bars. Fresh raspberries on top create color. A dusting of powdered sugar adds sweetness and flair. You can find the full recipe for these delightful treats in the main article. First, preheat your oven to 350°F (175°C). This helps cook the cheesecake evenly. Next, take an 8x8-inch baking dish. Line it with parchment paper, leaving some paper hanging over the edges. This makes it easy to lift out the bars later. In a medium bowl, gather your crust ingredients. Combine 1 ½ cups of graham cracker crumbs, ½ cup of melted unsalted butter, and ¼ cup of granulated sugar. Use a fork to mix them until it looks like wet sand. Press this mixture firmly into the bottom of your lined baking dish. Bake it for 10 minutes, then let it cool while you make the filling. Now, grab a large mixing bowl. Use an electric mixer to beat 16 oz of softened cream cheese with ½ cup of granulated sugar. Mix until it is smooth and creamy, about 2-3 minutes. Next, add 2 large eggs one at a time, mixing well after each. Then, add 2 tablespoons of all-purpose flour, the zest of 1 lemon, ¼ cup of lemon juice, and 1 teaspoon of vanilla extract. Mix everything until it's well combined. Gently fold in 1 cup of fresh raspberries. Be careful not to break them too much. Pour the cheesecake filling over your baked crust. Spread it evenly with a spatula. Bake for 25-30 minutes, until the edges are set, but the center is still a bit jiggly. After baking, turn off the oven and leave the bars inside for another 10 minutes to cool slightly. Take the dish out, let it cool to room temperature, then cover and chill in the fridge for at least 4 hours, or overnight. This helps the bars set perfectly. For the full recipe, check out the details above. To get a smooth cheesecake filling, start with room-temperature cream cheese. Cold cream cheese can create lumps. Use an electric mixer to beat the cream cheese and sugar until creamy. This usually takes about 2-3 minutes. When adding eggs, mix one at a time. This helps keep the texture smooth. Bake the bars until the edges are set but the center is slightly jiggly. This gives the cheesecake a nice texture when chilled. For clean cuts, use a sharp knife. Dip the knife in hot water before slicing. Wipe the knife with a towel between cuts. This method keeps the edges neat and shows off the layers. Let the cheesecake bars chill fully before slicing. This helps them hold their shape better during cutting. Serve the cheesecake bars on a lovely platter. Garnish each bar with fresh raspberries and a dusting of powdered sugar. For added flair, place a sprig of mint on the side. Arrange extra raspberries around the bars to bring color. This makes each slice look tempting and fresh. For the full recipe, don't forget to check the detailed instructions above. {{image_4}} You can change up the cheesecake filling in many ways. Instead of raspberries and lemon, try using blueberries and lime for a fresh twist. You could also mix strawberries with orange zest. Each berry adds a unique flavor and color. Experiment with your favorite fruits to find a combination you love. Want a lighter treat? You can swap some ingredients. Use low-fat cream cheese instead of regular cream cheese. You can also use honey or maple syrup instead of sugar. For a gluten-free option, replace graham cracker crumbs with almond flour or gluten-free cookies. These swaps keep the taste while cutting calories. If you prefer no-bake desserts, I have a simple method for you. Start by making the crust with crushed graham crackers and melted butter. Press it into a pan like in the original recipe. For the filling, blend cream cheese, sugar, and lemon juice until smooth. Fold in the raspberries, then pour it over the crust. Chill it for at least four hours or until set. This no-bake version is creamy and delicious, perfect for hot days. Try the Full Recipe for both methods. To keep your raspberry lemon cheesecake bars fresh, store them in the fridge. Use an airtight container or cover them tightly with plastic wrap. This helps to prevent them from drying out or absorbing other flavors. Make sure to chill them for at least four hours before serving. This allows the flavors to meld nicely. If you want to save some for later, you can freeze the cheesecake bars. First, let them cool completely. Then, slice them into squares. Wrap each piece in plastic wrap, then place them in a freezer-safe bag. Be sure to remove as much air as possible. To thaw, take out a piece and put it in the fridge overnight. Enjoy them cold or let them sit at room temperature for about 30 minutes. These cheesecake bars can last in the fridge for up to five days. If you freeze them, they can stay good for about three months. Just make sure to label the bags with the date so you remember when you made them. Always check for any signs of spoilage before enjoying your treats again. Yes, you can use frozen raspberries. They work fine in this recipe. However, frozen raspberries may release more juice. This can change the texture of the cheesecake. To avoid too much liquid, thaw and drain the raspberries before adding them. If you want a dairy-free option, try using cashew cream. Blend soaked cashews with a bit of lemon juice and sweetness. Another option is to use Greek yogurt for a lower-fat choice. It adds creaminess and a nice tang. Look for slight jiggle in the center. The edges should be set and firm. The cheesecake will continue to cook after you take it out. Let it cool a bit in the oven. This helps it firm up without cracking. You now have a full guide to make delicious Raspberry Lemon Cheesecake Bars. We covered the ingredients, step-by-step instructions, and various tips to ensure success. Don't forget the garnishes for a lovely finish. Experiment with flavors and healthier swaps to make this recipe your own. Store any leftovers properly to enjoy later. Remember, if you have questions, check the FAQs for answers. With practice, you’ll master this tasty treat! Happy baking!

Raspberry Lemon Cheesecake Bars Delightful Treat

Are you ready to indulge in a sweet treat that bursts with flavor? My Raspberry Lemon Cheesecake Bars are perfect

- 4 ripe bananas - 1 box (12 oz) vanilla wafers The bananas must be ripe. They should have brown spots. This gives a sweet flavor. The vanilla wafers add a crunchy texture. They also soak up the pudding, making it soft. - 2 cups whole milk - 1 cup heavy cream - 1/2 cup granulated sugar - 1/2 cup packed brown sugar Whole milk makes the pudding rich. Heavy cream adds a smooth texture. Granulated sugar provides sweetness. Brown sugar adds a hint of molasses flavor. You can mix these sugars for a deeper taste. - 1/4 cup cornstarch - 1 tablespoon pure vanilla extract - 1/2 teaspoon salt - Whipped cream (for topping) - Additional banana slices and crushed vanilla wafers (for garnish) Cornstarch thickens the pudding. Vanilla extract boosts the flavor. A pinch of salt balances the sweetness. Whipped cream on top makes it pretty. Slices of banana and wafer crumbs give a nice finish. For the full recipe, see the section on Step-by-Step Instructions. 1. Start by mixing the ingredients in a saucepan. In a large saucepan, combine 2 cups of whole milk, 1 cup of heavy cream, 1/2 cup of granulated sugar, 1/2 cup of packed brown sugar, 1/4 cup of cornstarch, and 1/2 teaspoon of salt. 2. Use a whisk to mix well. Make sure there are no lumps in the mixture. 3. Place the saucepan over medium heat. Stir the mixture continuously as it heats up. 4. Cook until the mixture thickens. This should take about 5 to 7 minutes. 5. When it starts to boil, keep stirring for another 1 to 2 minutes. This helps prevent sticking. 6. Once thickened, remove the saucepan from heat. Add 1 tablespoon of pure vanilla extract and stir well. 7. Let the pudding cool for about 10 minutes. 1. In a large serving dish or cups, create the first layer. Place a single layer of vanilla wafers on the bottom. 2. Next, add a layer of sliced bananas. Use 4 ripe bananas, sliced evenly. 3. Pour a generous amount of the warm pudding mixture over the bananas. 4. Repeat this process until all ingredients are used. Make sure the final layer is smooth pudding on top. 1. Cover the dish with plastic wrap. This keeps the pudding fresh while it chills. 2. Refrigerate for at least 4 hours. For the best flavor, chill overnight. 3. This resting time helps the layers meld together. The pudding will set nicely during this time. To avoid lumps in the pudding, whisk your dry ingredients well before adding them to the milk. Mix the sugar, cornstarch, and salt first. This will help blend them smoothly. Stir the mixture continuously while it cooks. This prevents the pudding from sticking to the pan and ensures a creamy texture. For the right consistency, cook the mixture until it thickens but does not boil hard. Gently bubbling means it's ready. Remove it from the heat once it thickens enough to coat the back of a spoon. This step is key to a smooth pudding. For a stunning presentation, use clear glass dishes. This allows everyone to see the beautiful layers of bananas and wafers. Layer the bananas, wafers, and pudding neatly for a colorful look. Top with whipped cream, banana slices, and crushed vanilla wafers for extra flair. You can also serve individual cups for a fun twist. This makes it easy for guests to enjoy their own serving. One big mistake is not allowing enough chilling time. Your banana pudding needs at least four hours in the fridge. For the best flavor, chill it overnight. Another common error is overcooking the pudding mixture. Keep an eye on it while cooking. If it boils too hard, it can get grainy. Stir and watch closely to ensure it stays creamy. Follow these tips to create the best banana pudding. Enjoy your delicious creation! For the full recipe, check out the Banana Bliss Pudding. {{image_4}} To make a vegan banana pudding, we need to swap out dairy products. Use almond milk or coconut milk instead of whole milk. For the heavy cream, try using coconut cream. It adds a rich texture. Next, let’s think about sweeteners. Instead of granulated sugar, use maple syrup or agave syrup. These options add a nice flavor while keeping it plant-based. For a gluten-free version, choose gluten-free vanilla wafers. These are easy to find in stores. They still give that classic crunch we love. You might also want to add thickening agents. Instead of cornstarch, use arrowroot powder or tapioca starch. These work well to keep the pudding smooth and creamy. You can make this banana pudding even more fun by adding flavors. Try mixing in chocolate. Just add some cocoa powder to the pudding mix. It creates a delicious chocolate banana pudding. Peanut butter is another great addition. Swirl it into the pudding for a nutty twist. Also, feel free to change the fruit layers. You can add strawberries, blueberries, or even mango. These fruits pair well with bananas and add a fresh touch. For the full recipe, check out the Banana Bliss Pudding. To keep your banana pudding fresh, use an airtight container. This helps to prevent it from absorbing other flavors in the fridge. Make sure the lid fits snugly. The best temperature for storing banana pudding is in the refrigerator. It should stay cold, ideally below 40°F (4°C). Can you freeze banana pudding? Yes, but it may change in texture. When you freeze it, the bananas can become mushy. To freeze, place the pudding in a freezer-safe container. Leave some space at the top since it will expand. Seal the lid tightly. When you're ready to eat it, thaw it in the fridge overnight. This slow thaw helps maintain the best flavor. How long does banana pudding last? It can stay fresh in the fridge for about 3 to 4 days. Keep track of its freshness by checking the smell and texture. If it smells sour or has a watery layer on top, it may be bad. Always trust your senses. It’s better to be safe than sorry! To ripen bananas quickly, you can use a few simple methods. Place them in a paper bag. This traps the ethylene gas and speeds up ripening. You can also keep them in a warm spot, like on top of the fridge. If you need them fast, you can use the oven. Wrap bananas in foil and bake at 300°F for about 15-20 minutes. Check them often to avoid overcooking. Yes, you can switch out bananas for other fruits! Try adding strawberries, peaches, or blueberries. These fruits can add a fun twist to the classic taste. You can layer them with the pudding just like bananas. Keep in mind that different fruits may change the flavor and texture a bit. Banana pudding should not sit out for more than two hours. After that, bacteria can grow. It is best to keep it in the fridge when not serving. If it has sat out too long, it’s safer to throw it away. Always prioritize food safety to enjoy your dessert without worry. In this blog post, we explored how to make the best banana pudding. We covered key ingredients, like ripe bananas and vanilla wafers, and the right types of dairy and sweeteners. You learned step-by-step instructions to create a rich pudding base, layer it, and chill it. We shared tips to avoid common mistakes and offered fun variations, including vegan and gluten-free options. Banana pudding is simple to make and fun to share. Enjoy your delicious creation!

Best Banana Pudding Delightful and Easy Recipe

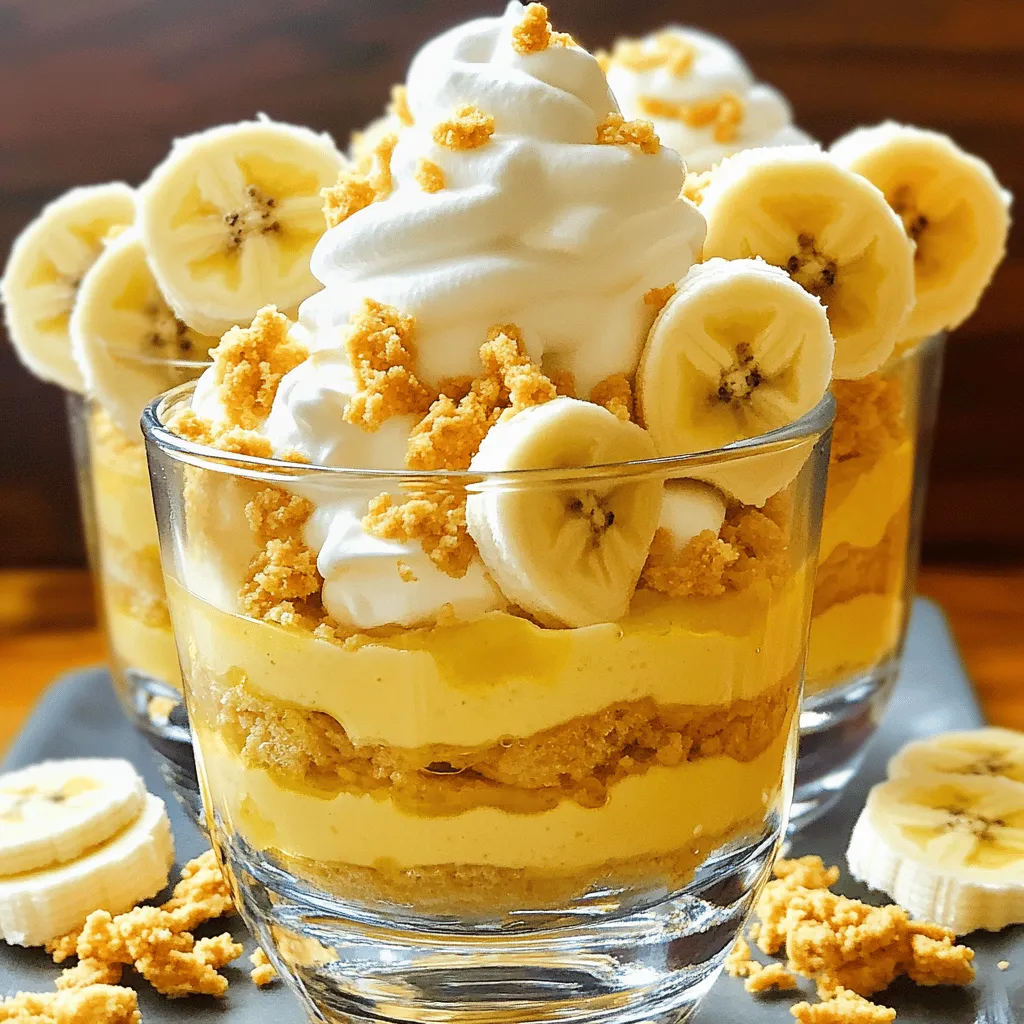
Banana pudding is a classic dessert that brings a smile to everyone’s face. With ripe bananas and creamy goodness, it’s

For the best flavor in your strawberry shortcake, use fresh strawberries. You need: - 2 cups fresh strawberries, hulled and thinly sliced - 1/4 cup granulated sugar The sugar helps the strawberries release their juices. Let them sit for about 20 minutes. This step makes them sweet and juicy. Next, you need the basic baking items. Gather these: - 2 cups all-purpose flour - 1 tablespoon baking powder - 1/2 teaspoon salt - 1/4 cup cold unsalted butter, cut into small cubes These ingredients help form the biscuit base. Make sure your butter is cold for the best texture. Finally, you need a few more items to finish your shortcake. These are: - 1 cup heavy whipping cream (plus extra for serving) - 1 teaspoon pure vanilla extract - 2 tablespoons powdered sugar (for sweetening the whipped cream) Whipping cream adds a rich, creamy layer. The vanilla gives it a lovely flavor. You can find the Full Recipe for precise measurements and steps. First, take 2 cups of fresh strawberries. Remove the green tops and slice them thin. Place them in a bowl, then add 1/4 cup of granulated sugar. Gently mix the strawberries and sugar together. This step helps draw out the juice. Let them sit for 15-20 minutes. You will see the strawberries soften and create a sweet syrup. Next, preheat your oven to 425°F (220°C). In a big bowl, combine 2 cups of all-purpose flour, 1 tablespoon of baking powder, and 1/2 teaspoon of salt. Mix these dry ingredients well. Add 1/4 cup of cold unsalted butter, cut into small cubes. Use your fingers or a pastry cutter to blend until it looks like coarse crumbs. Now, make a well in the center. Pour in 1 cup of heavy whipping cream and 1 teaspoon of pure vanilla extract. Stir gently with a spatula. The dough should be slightly sticky but not too wet. Transfer the dough to a floured surface. Pat it down into a rectangle that is about 1 inch thick. Use a round cutter to cut out biscuits, about 2-3 inches wide. Place them on a baking sheet lined with parchment paper. Gather any leftover dough, re-pat, and cut more biscuits. Bake for 12-15 minutes. The tops should turn golden brown. When done, cool them on a wire rack. While the biscuits cool, make the whipped cream. In a mixing bowl, beat 1 cup of heavy cream with 2 tablespoons of powdered sugar. Use an electric mixer until soft peaks form. This gives you light and fluffy cream. To put it all together, slice each biscuit in half. Spoon the sweet strawberries onto the bottom half. Top with a generous dollop of the whipped cream. Place the biscuit top back on. Serve right away for the best taste and texture. You can find the full recipe in the earlier sections. Choosing ripe strawberries is key. Look for berries that are bright red and firm. Avoid any with white or green spots. Smell the strawberries; they should have a sweet scent. If you can, buy them from a local farmer's market. Fresh berries taste better. For the best whipped cream, start with cold heavy cream. Chill the mixing bowl and beaters for a few minutes. This helps the cream whip faster. Beat until soft peaks form; don’t over-beat or it will turn to butter. Add powdered sugar for sweetness and a touch of vanilla for flavor. One mistake is overmixing the biscuit dough. This makes them tough. Mix just until combined. Another common error is not letting the strawberries sit with sugar. This step makes them juicy and sweet. Finally, serve the shortcakes right after assembling. This keeps them fresh and delicious. For detailed steps, check the [Full Recipe]. {{image_4}} You can easily make a gluten-free version of this dessert. Replace all-purpose flour with a 1-to-1 gluten-free flour blend. Check that the blend has xanthan gum for better texture. You will still get a soft and tasty biscuit that pairs well with strawberries. Strawberries are not the only option. You can swap them for other fruits. Try blueberries, raspberries, or peaches. The process remains the same. Just mix the fruit with sugar and let it sit. Each fruit brings a unique flavor to your shortcake. For a dairy-free treat, use coconut cream instead of heavy cream. You can also use a dairy-free butter or margarine when making the biscuits. Almond, soy, or oat milk work well in place of dairy milk if needed. These swaps keep the taste rich and creamy while being dairy-free. Feel free to experiment with these ideas! You can find the full recipe to guide you through the process. Store leftover strawberry shortcake in an airtight container. Keep it in the fridge for up to two days. This helps keep the biscuits soft and the cream fresh. If you leave it out, the biscuits can dry out quickly. For best flavor, eat it soon after making. You can freeze the biscuits and strawberries separately. Wrap the biscuits tightly in plastic wrap. Place them in a freezer bag. They will stay fresh for up to three months. For the strawberries, store them in a container. They can freeze for about six months. When ready to eat, thaw them in the fridge overnight. To reheat biscuits, place them in a preheated oven at 350°F (175°C). Heat for about 5 to 10 minutes until warm. Avoid using the microwave, as it can make them soggy. For the strawberries, gently warm them in a small pot. Add a splash of water if needed to keep them juicy. Yes, you can use frozen strawberries. Just thaw them first. Drain any excess liquid. This keeps your shortcake from becoming soggy. Frozen strawberries are a great option if fresh ones aren't available. To make fluffier biscuits, use cold butter and cold cream. The cold fat creates steam as it bakes. This steam helps the biscuits rise. Don’t overmix the dough. A light touch keeps them airy. You can use whole milk or coconut cream as a substitute. If using milk, add a bit of butter for richness. This helps mimic the cream's texture. However, the whipped cream won't be as thick. Strawberry shortcake is best eaten fresh. It lasts about one day in the fridge. The biscuits may get soggy from the strawberries. Store components separately to keep them fresh longer. Yes, you can prepare the strawberries and biscuits ahead of time. Store strawberries in the fridge. Keep biscuits in an airtight container. Whip the cream just before serving for the best texture. For the full recipe, check above. You just learned how to make a tasty strawberry shortcake. We covered fresh ingredients, step-by-step baking, and fun tips. Remember to choose ripe strawberries for the best flavor. Don't forget about variations like gluten-free and dairy-free options. Store any leftovers properly to keep them fresh. With this guide, you can bake a delicious treat anytime. Enjoy making your strawberry shortcake and impress your friends and family!

Easy Strawberry Shortcake Delightful and Simple Treat

Are you ready to make a treat that everyone loves? This Easy Strawberry Shortcake is a delightful way to enjoy

To make a tasty chicken spaghetti, you will need: - 12 oz spaghetti - 2 boneless, skinless chicken breasts, diced - 1 cup cherry tomatoes, halved - 1 bell pepper, sliced (any color of your choice) - 1 small zucchini, diced - 4 cloves garlic, minced - 1 teaspoon red pepper flakes (adjust to your desired spice level) - 1 teaspoon Italian seasoning - 1/4 cup fresh basil, chopped (plus additional leaves for garnish) - 1/2 cup grated Parmesan cheese (plus extra for serving) - 2 tablespoons olive oil - Salt and freshly cracked black pepper, to taste These ingredients create a vibrant, flavorful meal. The chicken gives protein, while the veggies add color and crunch. You can customize chicken spaghetti with different add-ins. Here are some ideas: - Use broccoli or spinach for extra greens. - Substitute grilled shrimp for chicken for a seafood twist. - Swap out Parmesan for feta cheese for a tangy flavor. - Add olives or sun-dried tomatoes for a briny kick. Feel free to mix and match based on what you enjoy or have on hand. You will need a few basic tools to whip up this dish: - A large pot for boiling spaghetti - A large skillet for sautéing chicken and veggies - A cutting board for chopping ingredients - A sharp knife for easy slicing - A measuring cup and spoons for accuracy Having the right equipment makes cooking smoother. This setup will help you create a delicious chicken spaghetti in no time. For the full recipe, check the detailed instructions above. Start by boiling a large pot of salted water. Add 12 oz of spaghetti to the pot. Cook it based on the package instructions, usually around 8-10 minutes. You want it al dente, which means it should be firm but not hard. Once done, drain the spaghetti but save 1/2 cup of the pasta water for later. Set the spaghetti aside. Next, heat 2 tablespoons of olive oil in a large skillet over medium heat. Add 2 diced boneless chicken breasts to the skillet. Season the chicken with salt, black pepper, and 1 teaspoon of Italian seasoning. Cook it for 5-7 minutes until no pink remains and the chicken is lightly golden. Once cooked, transfer the chicken to a plate and set it aside. In the same skillet, add more olive oil if needed. Toss in 4 minced garlic cloves, 1 sliced bell pepper, and 1 diced zucchini. Sauté these for about 4-5 minutes. You want the veggies to be soft but still colorful. After that, return the chicken to the skillet. Add 1 cup of halved cherry tomatoes and 1 teaspoon of red pepper flakes. Stir everything well and cook for another 2-3 minutes. Now, add the drained spaghetti to the skillet. Pour in the reserved pasta water and gently toss everything together. Stir in 1/4 cup of chopped basil and half a cup of grated Parmesan cheese. Taste your dish. Adjust the seasoning with more salt and pepper if needed. Serve hot, garnished with extra basil and more Parmesan cheese. Enjoy this easy weeknight meal! You can find the Full Recipe for more details. To cook spaghetti just right, use plenty of water. Bring it to a rolling boil. Add salt to the water; this helps flavor the pasta. Cook according to the package time until it’s al dente. This means it should be firm but not hard. Remember to drain it, but save some pasta water. This water helps bind your dish later. You can change the taste of your chicken spaghetti easily. Add more garlic if you love its flavor. Try different herbs like oregano or thyme for a fresh twist. If you like heat, increase the red pepper flakes. A squeeze of lemon juice at the end adds brightness. Experiment with your favorite spices to make it your own. Meal prep saves time on busy nights. Cook extra chicken and store it for later. Chop veggies ahead of time and keep them in the fridge. You can make the full recipe in about 30 minutes. If you cook pasta in advance, store it in olive oil to prevent sticking. This dish also keeps well, so make a big batch for quick meals. Check out the [Full Recipe] for detailed steps and tips. {{image_4}} You can easily make a vegetarian version of chicken spaghetti. Replace chicken with plant-based protein like tofu or tempeh. Use the same spices for flavor. Add more veggies like mushrooms, carrots, or spinach. These ingredients give texture and taste. You will love how delicious and filling this option is. To make a creamy chicken spaghetti, add a sauce. Mix in heavy cream or cream cheese during cooking. This will create a rich, smooth texture. You can also add a splash of chicken broth for depth. Stir in some grated cheese like mozzarella or cheddar for extra flavor. This variation makes the dish feel more indulgent. If you need a gluten-free option, swap regular spaghetti for gluten-free pasta. Many brands make pasta from rice or quinoa. They cook just like regular spaghetti. Be sure to check the cooking time. Use the same ingredients from the full recipe. You won't miss the gluten, and the meal will still be tasty! Store leftover chicken spaghetti in an airtight container. This keeps it fresh and tasty. Let the dish cool down before sealing the container. Try to eat the leftovers within three days for the best flavor. You can freeze chicken spaghetti for later. First, let it cool completely. Then, transfer it to a freezer-safe container or bag. Make sure to press out as much air as possible before sealing. Label the container with the date. It can stay in the freezer for up to three months. When you're ready to eat the frozen spaghetti, thaw it in the fridge overnight. For reheating, you have a few options. You can use the microwave, a stovetop, or an oven. Microwave on low power, stirring often. On the stovetop, add a splash of water and heat over medium until warm. If using the oven, cover it with foil to keep it moist. Enjoy your chicken spaghetti just like it was fresh from the pot! For the full recipe, check out the Zesty Chicken Spaghetti Delight. Chicken Spaghetti is a tasty dish made with pasta, chicken, and veggies. It combines cooked spaghetti with diced chicken, tomatoes, and peppers. You can mix in spices and herbs for flavor. This dish is quick to make, making it a great choice for busy weeknights. It’s filling and satisfying for the whole family. Yes, you can use different types of pasta. While spaghetti works great, you can try penne, fusilli, or even gluten-free options. Just make sure to cook the pasta according to the package instructions. This way, it will blend well with the chicken and veggies in the dish. To make Chicken Spaghetti spicier, add more red pepper flakes. Start with one teaspoon and adjust to your taste. You can also use hot sauce or diced jalapeños. Adding these will give your dish a nice kick. Just remember to balance the spice with creamy ingredients like cheese or sour cream if you want. For the full recipe, check out the Zesty Chicken Spaghetti Delight! In summary, we covered the key ingredients, step-by-step cooking guide, and tips for chicken spaghetti. You have options to customize flavors and choose variations like vegetarian or creamy versions. Remember, storing and reheating leftovers well keeps your dish tasty. Experiment and find what you love most. Enjoy making chicken spaghetti your way!

Savory Chicken Spaghetti Easy Weeknight Meal

Are you ready for a quick, tasty dinner? This Savory Chicken Spaghetti recipe is just what you need for an

- 2 slices of whole grain or sourdough bread - 3 tablespoons creamy or crunchy peanut butter For a great peanut butter toast, I always choose whole grain or sourdough bread. Whole grain bread has more fiber, making it a healthier choice. Sourdough offers a tangy flavor that pairs well with peanut butter. The type of peanut butter matters too. Creamy peanut butter spreads easily, while crunchy gives a nice texture. You can’t go wrong with either! - 1 medium banana, sliced into thin rounds - 1 tablespoon honey or maple syrup - Fresh berries for garnish, such as blueberries or strawberries - Sliced avocado - Cucumber slices - A pinch of spices like cinnamon or cayenne You can make your toast even better with toppings. Sweet options like banana or honey add flavor. You can layer banana slices on top for a fruity kick. If you prefer savory, try sliced avocado or cucumber. Adding a sprinkle of spices can turn your toast into a flavor explosion! - 1 teaspoon chia seeds - 1 tablespoon dark chocolate chips (optional, for extra indulgence) For extra nutrition, add chia seeds. They boost fiber and are good for digestion. If you want a treat, sprinkle dark chocolate chips on top. They melt slightly and add a sweet touch. These small changes make your peanut butter toast not just tasty, but healthy too! To get the perfect toast, start with good bread. Whole grain or sourdough works best. Use a toaster or a skillet. Toast for around 5 minutes until golden brown. Keep an eye on it; nobody likes burnt toast! If you use a skillet, medium heat is key. Flip the bread halfway for even toasting. For a tasty bite, spread the peanut butter evenly. Use about 1.5 tablespoons on each slice. Start in the middle, then move outwards. This way, you coat the whole slice. A good spread means you taste peanut butter in every bite. Choose creamy or crunchy based on your liking. Now for the fun part! After spreading peanut butter, add banana slices. Arrange them in a nice pattern. Overlap them slightly to look pretty. Next, drizzle honey or maple syrup on top. This adds sweetness and flavor. Use a spoon to create an even drizzle. Finish with chia seeds for crunch and nutrients. If you want more sweetness, sprinkle dark chocolate chips. A pinch of fine sea salt boosts the flavors too. For color, add fresh berries around the toast. This makes your Peanut Butter Bliss Toast look and taste amazing! For the complete recipe, check out the [Full Recipe]. Choosing the right bread is key. I love whole grain for its nutty taste. Sourdough adds a tangy richness that pairs well with peanut butter. Pick what you enjoy! Next, find the best toast-to-peanut butter ratio. I recommend 1.5 tablespoons of peanut butter for each slice. This way, every bite is filled with flavor. You can mix different nut butters for fun. Almond or cashew butter can add a new twist. Try blending them with peanut butter for a tasty surprise. Adding spices can elevate your toast. A sprinkle of cinnamon gives warmth. You can also try a dash of sea salt for a delightful contrast. Pair your toast with drinks or snacks. A glass of milk or a smoothie works well. For a snack, try it with apple slices or yogurt. Peanut butter toast is great anytime. Enjoy it for breakfast, as a snack, or even dessert. You can make it sweet or savory based on your mood. {{image_4}} For a sweet twist, combine peanut butter with banana and a drizzle of chocolate. Slice the banana thinly and layer it on the peanut butter. You can then drizzle melted dark chocolate over the top. This mix gives a rich taste and a fun texture. Another option is to add fresh berries. Blueberries or strawberries work well. Spread peanut butter on toast, then top with your favorite berries. Add a sprinkle of nuts for crunch and flavor. This delicious combo is both tasty and colorful. Want to try something savory? Spread peanut butter on toast and add sliced avocado. The creaminess of the avocado pairs well with the nutty peanut butter. You can also sprinkle a little salt for extra flavor. For a spicy kick, mix peanut butter with some chili flakes or sriracha. Spread this mix on your toast for a bold taste. It adds heat and makes the simple toast feel gourmet. Elevate your toast with gourmet ingredients. Try adding a drizzle of balsamic glaze for a sweet and tangy flavor. Top it with sliced figs or pears for a fancy touch. This makes your toast feel special and unique. You can also create themed variations. For a breakfast twist, add Greek yogurt and honey on top of your peanut butter. This gives you a mix of creaminess and sweetness. Each bite is a delightful experience. For the full recipe, check out the Peanut Butter Bliss Toast. To keep leftover toast fresh, store it in an airtight container. This prevents moisture from making it soggy. If you have extra toast, place it in the fridge if you plan to eat it within a day. For longer storage, freeze it. Wrap it in plastic wrap and then place it in a freezer bag. When you want some, just pop it in the toaster. Reheat for 2-3 minutes for that crispy texture you love. Store peanut butter in a cool, dry place. If you have natural peanut butter, stir it well before use. This keeps the oil mixed in. For store-bought peanut butter, the shelf life is about 6-9 months. Bread lasts about a week at room temperature but can be frozen for up to 3 months. Use fresh toppings like fruits within a few days for the best taste. To make quick meals, prep ingredients ahead of time. Slice bananas and store them in a sealed bag in the fridge. You can also portion peanut butter into small containers. This way, you can make your peanut butter toast fast. Batch prepping toast is easy too. Make several slices, let them cool, and store them in the fridge or freezer. This helps you create several meals with less effort. For more ideas, check out the Full Recipe. The best bread for peanut butter toast varies by taste. Here are some great options: - Whole grain bread is packed with fiber and flavor. - Sourdough offers a tangy taste and a chewy texture. - Gluten-free bread works well for those with dietary needs. - Artisan bread can add a gourmet touch to your toast. Choosing the right bread can enhance your peanut butter experience. Experiment with different types to find your favorite! You can easily boost the health of your peanut butter toast. Here are some simple tips: - Use low-calorie toppings, like fresh fruit or yogurt. - Swap regular peanut butter for natural or no-added-sugar options. - Try whole grain or sprouted bread for extra nutrients. - Add chia seeds or flaxseeds for more fiber and healthy fats. These choices help you enjoy a tasty treat while keeping it nutritious. Yes, peanut butter toast can serve as a meal replacement. To make it balanced: - Pair your toast with a source of protein, like Greek yogurt or a hard-boiled egg. - Add fruits, like banana or berries, for vitamins and fiber. - Consider using whole grain bread for lasting energy. - Monitor portion sizes to ensure you meet your energy needs. With these tips, peanut butter toast can be both delicious and satisfying! In this post, we explored the essentials of making delicious peanut butter toast. You learned about basic ingredients, toppings, and how to customize flavors. I shared step-by-step tips for perfect toasting, spreading, and layering. We also discussed storage methods and meal prep ideas to keep your toast fresh. Peanut butter toast is versatile and easy. Try different toppings and combinations. Get creative and enjoy each bite!

Peanut Butter Toast Simple and Tasty Combinations

Looking for a quick and delicious snack that packs a punch? Today, we’ll explore delightful peanut butter toast combinations that

- 12 oz bowtie pasta - 1 lb ground beef - 1 medium onion, finely chopped - 2 cloves garlic, minced Bowtie pasta gives this dish its fun shape. Ground beef adds rich flavor and protein. Onions and garlic bring a sweet and savory base to the meal. - 1 cup shredded sharp cheddar cheese - 1 cup shredded mozzarella cheese Sharp cheddar cheese offers a strong taste that pairs well with beef. Mozzarella cheese melts beautifully, making the dish creamy and comforting. - 1 cup beef broth - 1 teaspoon Italian seasoning - Salt and black pepper to taste Beef broth adds depth to the sauce. Italian seasoning gives it a warm, herby flavor. Salt and black pepper balance the dish. For the full recipe, check the details provided earlier. First, fill a large pot with water. Add a generous amount of salt. Bring this salted water to a rolling boil. Once boiling, add the bowtie pasta. Cook it according to the package instructions. You want the pasta to be al dente, which usually takes about 8-10 minutes. After cooking, drain the pasta and set it aside. In a large skillet, pour in the olive oil. Heat it over medium heat. Once hot, add the finely chopped onion. Cook until it becomes soft and translucent, which takes about 3-4 minutes. Now, stir in the minced garlic. Cook it for another minute until it smells fragrant. Next, increase the heat to medium-high. Add the ground beef to the skillet. Use a spatula to break the beef into smaller pieces. Cook until it is fully browned, which takes about 5-7 minutes. If you see any excess fat, drain it off. This helps keep the dish light and tasty. Now, it’s time to add flavor. Stir in the drained diced tomatoes and beef broth. Add the Italian seasoning, paprika, salt, and black pepper. Bring this mixture to a gentle simmer. Let it cook for about 5 minutes. This allows all the flavors to meld together beautifully. Add the cooked bowtie pasta to the skillet. Stir well so the pasta gets coated in the sauce. Make sure the beef and sauce mix evenly with the pasta. This step is key to getting every bite delicious. Reduce the heat to low. Now, add half of the shredded cheddar and mozzarella cheeses. Stir continuously until the cheese melts and makes the dish creamy. After that, remove the skillet from heat. Sprinkle the remaining cheese over the top. Cover the skillet for a few minutes to let the cheese melt completely. This process makes the dish rich and satisfying. For the full recipe, check the details above. - To avoid overcooking pasta, watch the clock. Start checking the pasta at 8 minutes. You want it firm, not mushy. Drain it right away to stop cooking. - For browning beef perfectly, heat the skillet well. Add olive oil and then the beef in small batches. This helps it brown nicely. Don’t stir too much; let it sit for a minute to get a good color. - For spice variations, try adding crushed red pepper for heat. You can also use oregano or thyme for added flavor. - To boost nutrition, add chopped spinach or bell peppers. They cook quickly and blend well with the dish. - Serve the pasta in a big, deep bowl. This makes it look inviting. Add a sprinkle of extra cheese on top for that yummy look. - For a fresh touch, garnish with basil leaves. They add great flavor and a pop of color. Pair the dish with crusty bread for a hearty meal. For the full recipe, check out the detailed steps above. {{image_4}} You can switch the ground beef for turkey or chicken. These meats cook quickly and still taste great. They also lower the fat content in your meal. If you want a vegetarian dish, use plant-based protein like lentils or chickpeas. They add texture and flavor while keeping it hearty. Bowtie pasta is fun, but you can try other shapes too. Penne or fusilli work well in this dish. They hold the sauce nicely. If gluten is a concern, look for gluten-free pasta made from rice or chickpeas. These options keep the meal delicious and safe for everyone. Cheese makes this dish creamy and rich. Try different types of cheese for varied flavors. Gouda or fontina can add a smoky twist. Adjust the cheese amount for creaminess. Less cheese makes it lighter, while more cheese creates a rich, gooey texture. You can mix and match to find your favorite taste. You can find the Full Recipe for detailed steps and measurements. Store leftover cheesy beef and bowtie pasta in an airtight container. It keeps well in the fridge for up to three days. When reheating, use a microwave or stovetop. Add a splash of beef broth or water to keep it moist. Heat it until warm, stirring often to avoid hot spots. To freeze leftovers, let the pasta cool completely first. Then, place it in a freezer-safe container. You can also use freezer bags, squeezing out extra air. This dish can last up to three months in the freezer. When ready to eat, thaw it overnight in the fridge. Reheat it in a pan over low heat, adding a bit of broth to keep it creamy. In the fridge, expect cheesy beef and bowtie pasta to stay fresh for about three days. If frozen, it can last up to three months. Watch for signs of spoilage, like off smells or a change in texture. If it looks or smells strange, it’s best to discard it. Enjoy your meal knowing you can store it safely! You can use many types of pasta instead of bowtie. Here are some great options: - Farfalle (the same shape) - Penne - Fusilli - Shells - Spaghetti Each type adds a unique twist. Just cook them according to package instructions. Yes, you can prepare this dish before serving. Here’s how to do it: - Cook the pasta and beef mixture as usual. - Let it cool down. - Store it in the fridge for up to two days. To reheat: - Warm it on the stove over low heat. - Add a splash of beef broth or water to keep it moist. You can easily make it lighter with a few swaps: - Use lean ground beef or turkey. - Add more veggies like spinach or bell peppers. - Choose whole grain or vegetable-based pasta. These changes help cut fat and calories while adding nutrients. To complement this hearty dish, try these sides: - Garlic bread for a crunchy contrast. - A fresh green salad with a light vinaigrette. - Steamed broccoli or green beans for added nutrition. These sides balance the flavors and textures well. Absolutely! Fresh tomatoes work great. Here’s how to use them: - Use about 2 cups of chopped fresh tomatoes. - Blanch them in boiling water for a minute to remove skins. - Drain and add them to the beef mixture. Fresh tomatoes add bright flavor and texture. For the complete recipe, check out the Full Recipe section! This blog post covers all you need to know to make cheesy beef and bowtie pasta. We explored key ingredients like pasta, beef, cheeses, and spices. You learned step-by-step cooking methods, useful tips, and smart variations. With these skills, you can create a tasty meal for any occasion. Cooking doesn't need to be hard; it can be fun. Now, you have the tools to impress family and friends with your delicious dish. Enjoy the process and happy cooking!

Cheesy Beef and Bowtie Pasta Hearty Family Meal

Craving a warm, cheesy dinner that delights the whole family? Look no further! This Cheesy Beef and Bowtie Pasta recipe

- 1 pound ground beef - 1/2 cup breadcrumbs - 1/4 cup grated Parmesan cheese - 1 large egg - 1 teaspoon garlic powder - 1 teaspoon onion powder - Salt and black pepper to taste - 3 cups beef broth - 1 medium onion, sliced into thin rings - 1 cup mushrooms, sliced - 1 tablespoon Worcestershire sauce - 1 tablespoon soy sauce - 2 tablespoons cornstarch mixed with 3 tablespoons cold water - Fresh parsley, roughly chopped Gathering the right ingredients is key to making great Slow Cooker Salisbury Steak Meatballs. Each item adds flavor and texture. Start with ground beef. It forms the base of your meatballs. The breadcrumbs give them a nice bite. The grated Parmesan cheese adds a rich, savory taste. Don’t forget the egg. It helps bind everything together. Garlic powder and onion powder bring in that classic flavor. Season with salt and pepper to taste for balance. Next, you’ll need beef broth, which keeps the meatballs moist. The sliced onion and mushrooms create a tasty layer underneath the meatballs. Worcestershire sauce and soy sauce add depth to the broth. Finally, you’ll use cornstarch mixed with cold water to thicken the sauce later. Fresh parsley is a beautiful garnish that brightens up the dish. This is the full recipe to guide you through the process. - In a large bowl, mix the ground beef, breadcrumbs, Parmesan cheese, egg, garlic powder, onion powder, salt, and black pepper. Use your hands to mix gently. Be careful not to overmix; it can make the meatballs tough. - Shape the mixture into meatballs about the size of golf balls, around 1.5 inches wide. Place them on a baking sheet to keep them ready for the next step. - Start by layering the sliced onions and mushrooms at the bottom of the slow cooker. This will add great flavor to the meatballs. - Next, place the meatballs carefully on top of the onions and mushrooms. Make sure they sit nicely without crowding. - In a separate bowl, whisk together the beef broth, Worcestershire sauce, and soy sauce until smooth. This mix adds depth to the dish. - Pour this mixture over the meatballs in the slow cooker. Ensure the meatballs are mostly submerged in the broth. - Cover the slow cooker. Cook on low for 6 to 8 hours or on high for 3 to 4 hours. The meatballs should be tender and fully cooked. - About 30 minutes before serving, take out 1 cup of broth. Mix it with cornstarch and cold water in a small bowl until smooth. Stir this back into the slow cooker to thicken the sauce. For the full recipe, check out the detailed instructions provided above. To make the best meatballs, avoid overmixing the meat. Gently combine the ground beef, breadcrumbs, and spices until they just blend. Overmixing can make your meatballs tough, which is not what we want. When shaping your meatballs, aim for consistency. Use your hands to form balls about the size of golf balls, roughly 1.5 inches in diameter. This will help them cook evenly and look nice on the plate. To boost the flavor of your meatballs, consider adding herbs or spices. Fresh herbs like parsley or thyme can brighten the dish. Garlic powder and onion powder already add depth, but you can also try a pinch of paprika or Italian seasoning for an extra kick. Adjusting the sauce thickness is key. If you want a thicker sauce, use the cornstarch mixture as directed in the recipe. If you prefer a thinner sauce, skip the cornstarch or add more broth to achieve your desired consistency. These Salisbury steak meatballs shine when paired with creamy mashed potatoes or fluffy egg noodles. The sauce drizzles beautifully over these sides, making each bite a delight. For garnishing, fresh parsley adds color and a burst of flavor. You can also sprinkle some extra grated Parmesan cheese on top for added richness. Enjoy your meal and the smiles it brings! {{image_4}} You can switch up the meat in this recipe. Ground turkey or chicken works well. These meats are leaner, giving a lighter taste. If you want a plant-based option, try using lentils or chickpea-based ground meat. Both choices keep the meal filling and tasty, perfect for any diet. Don't hesitate to play with the sauce! You can use BBQ sauce for a sweet twist. Mushroom sauce adds a rich, earthy flavor. Adjusting seasonings also changes the taste. Try adding thyme or smoked paprika to enhance the dish. Experimenting keeps things fun and fresh. For gluten-free meatballs, use gluten-free breadcrumbs. This small change keeps the dish safe for those with gluten sensitivities. If you want to lower calories, cut back on breadcrumbs. You can also use lean ground beef or turkey. This helps make a lighter meal without losing flavor. For the full recipe, check out the details above. To keep your Slow Cooker Salisbury Steak Meatballs fresh, follow these tips: - Refrigeration: Allow the meatballs to cool down before storing. Place them in an airtight container. They will last in the fridge for up to three days. - Freezing tips: If you want to save them for later, freeze the meatballs in a single layer on a baking sheet. Once frozen, transfer them to a freezer-safe bag. They can stay good for up to three months. When it's time to enjoy your leftovers, you have two great options: - Microwave: Place the meatballs in a microwave-safe dish. Cover with a damp paper towel. Heat for 1-2 minutes on high. Check if they're warm enough; if not, heat in 30-second bursts. - Oven: Preheat your oven to 350°F (175°C). Place the meatballs in an oven-safe dish and cover with foil. Heat for about 20 minutes, or until hot throughout. This method helps keep the texture and flavor intact. For both methods, always check that the meatballs are hot all the way through. Enjoy your hearty comfort meal! These delicious meatballs can last 3 to 4 days in the fridge. Store them in an airtight container. For longer storage, freeze them for up to 3 months. Just let them cool before freezing. When ready to eat, thaw in the fridge overnight. Yes, you can cook this recipe on high. When using the high setting, cook for 3 to 4 hours instead of 6 to 8 hours. The meatballs will still be tender, but cooking on low helps the flavors blend better over time. I love serving these meatballs with creamy mashed potatoes or fluffy egg noodles. You can also add steamed vegetables like green beans or broccoli for a balanced meal. A fresh side salad rounds out the plate nicely. Absolutely! You can use frozen meatballs to save time. Just add them to the slow cooker without thawing. Increase cooking time to about 5 to 6 hours on low or 2 to 3 hours on high. The sauce will still be rich and flavorful. To thicken the sauce, make a slurry. Mix 2 tablespoons of cornstarch with 3 tablespoons of cold water in a small bowl. Stir this mixture into the slow cooker about 30 minutes before serving. This will help the sauce become thicker and more delicious! In this post, I covered how to make Slow Cooker Salisbury Steak Meatballs. We discussed the key ingredients, preparation steps, and cooking tips to ensure delicious results. Remember, mix your meat carefully and experiment with flavors to suit your taste. Try different meats or sauces to keep things exciting. Store leftovers properly for later meals. With these tips, you can make a hearty dish that pleases everyone. Enjoy your cooking adventure!

Slow Cooker Salisbury Steak Meatballs Hearty Comfort Meal

Looking for a hearty, easy meal that satisfies everyone at the table? Slow Cooker Salisbury Steak Meatballs bring classic comfort

- 4 bone-in pork chops (about 1-inch thick) - Salt and freshly ground black pepper, to taste - 1 teaspoon garlic powder - 1 teaspoon smoked paprika - 2 tablespoons extra-virgin olive oil - 1 medium yellow onion, thinly sliced - 2 cloves fresh garlic, minced - 1 cup low-sodium chicken broth - 1 tablespoon Worcestershire sauce - 1 cup heavy whipping cream - 1 tablespoon Dijon mustard - Fresh parsley, finely chopped (for garnish) - Skillet or frying pan - Meat thermometer - Wooden spoon When making smothered pork chops, the right ingredients are key. You want good-quality pork chops. They should be bone-in and about one inch thick. This cut keeps the meat juicy and tender. Don’t skip the spices! Salt and black pepper add a base flavor. Garlic powder and smoked paprika bring depth. Use fresh garlic for a great aroma. Sautéed onions give sweetness to the dish. The heavy whipping cream creates a rich sauce. It combines with chicken broth and Dijon mustard for a creamy delight. Worcestershire sauce adds a savory note. For tools, a heavy skillet works best. It helps sear the pork chops nicely. A meat thermometer ensures the meat is cooked to 145°F (63°C). A wooden spoon is perfect for stirring and scraping the skillet. These ingredients and tools make the magic happen. For the full recipe, check out the detailed steps and instructions. Start by prepping your pork chops. I like to season them well. Use salt, pepper, garlic powder, and smoked paprika. Sprinkle the spices on both sides. Rub them in gently to help the flavors stick. Let the chops sit for about 15 minutes. This step allows the flavors to soak in. It makes a big difference in taste. Now it’s time to cook. Heat a heavy skillet over medium-high heat. Add olive oil when it’s hot. Place the seasoned pork chops in the skillet. Sear each chop for about 4-5 minutes. Look for a nice golden crust. Flip and repeat on the other side. Once done, take them out and set them aside. Use a meat thermometer to check the temperature. It should reach 145°F (63°C) for safe eating. Let’s make that creamy sauce! In the same skillet, add sliced onions. Sauté them until they soften, about 3 minutes. Then, add minced garlic. Cook for another minute until it smells great. Pour in chicken broth and Worcestershire sauce. Stir well and scrape the pan for more flavor. Return the pork chops to the skillet. Cover and let them simmer for 10-15 minutes. Once cooked, take the pork chops out again. Now, stir in heavy cream and Dijon mustard. Cook for 3-5 minutes until it thickens. You can spoon the sauce over the pork chops before serving. Enjoy your delicious smothered pork chops! For the complete cooking details, refer to the Full Recipe. To make your smothered pork chops even better, try these ideas: - Use different spices like cumin or chili powder for a unique taste. - Marinade your pork chops in a mix of soy sauce and garlic for an hour. - Sear the pork chops in hot oil to get a nice brown crust. - Press down gently with a spatula while searing for even cooking. Many home cooks struggle with pork chops. Here are common mistakes and how to avoid them: - Don’t skip resting the pork chops after searing. This keeps them juicy. - Use a meat thermometer to check for doneness. The chops should reach 145°F. - Be careful with the cream sauce. Stir it gently to keep it from curdling. - If the sauce thickens too much, add a splash of broth or water. For more details, check the Full Recipe for all the steps. {{image_4}} You can make smothered pork chops even better by changing a few things. For a lighter meal, use low-fat cream instead of heavy whipping cream. This keeps the creamy texture while cutting down on calories. You can also swap out pork chops for chicken or turkey for a different taste. Adding fun flavors can transform your dish. Toss in some mushrooms for an earthy taste. Bell peppers add a sweet crunch and nice color. You can even try adding a splash of hot sauce if you like things spicy. These small changes can make a big difference in flavor. When it comes to sides, think garlic sautéed green beans. They add a nice crunch and pair well with the creamy sauce. Mashed potatoes are also a great choice. Their fluffy texture soaks up the sauce perfectly, creating a delightful mix of flavors. For a fun garnish, sprinkle fresh parsley on top. This adds a pop of color and freshness. You might also use thinly sliced green onions for a sharp bite. These simple touches can make your plate look even more inviting. After making smothered pork chops, let them cool down. Place the leftovers in a tight container. Always use glass or BPA-free plastic for safe storage. Keep the dish in the fridge. It will stay fresh for about 3 to 4 days. If you want to keep them longer, freeze the pork chops. They can last up to 3 months in the freezer. Just make sure to label your containers with the date. This helps keep track of freshness. When you are ready to eat the leftovers, use gentle heat. The oven works well for reheating. Preheat it to 350°F (175°C). Place the pork chops in a baking dish. Cover them with foil. This helps keep them moist. Heat for about 15 to 20 minutes. If you prefer a quicker method, you can use the microwave. Place the pork chops on a microwave-safe plate. Cover them with a damp paper towel. Heat in short bursts of 1 minute. Check often to avoid dryness. By following these tips, you will enjoy the savory and creamy delight of smothered pork chops even after the first meal. Yes, you can use boneless pork chops. They are lean and cook faster. Bone-in chops offer more flavor and moisture. If you choose boneless, adjust the cooking time. Sear them about 3-4 minutes per side. Use a meat thermometer to check doneness, aiming for 145°F. This ensures a juicy result. Checking the internal temperature is key. Use a meat thermometer. Insert it into the thickest part of the chop. You want it to reach 145°F. This temperature ensures safety and keeps the meat tender. Let the pork rest for a few minutes before serving. This helps the juices redistribute. You can prep parts of this dish ahead. Season the pork chops and refrigerate them overnight. You can also cook the pork and sauce separately. Store them in airtight containers. Reheat gently when ready to serve. This way, the flavors will still shine through. If you want a lighter option, try half-and-half or whole milk. For a dairy-free choice, use coconut milk or almond milk. These alternatives may change the flavor slightly. Adjust the seasoning to maintain taste. Thicken the sauce with a bit of cornstarch if needed. For the complete details on making Smothered Pork Chops in Creamy Garlic Sauce, check the [Full Recipe]. You now have the full guide to making delicious smothered pork chops. We covered all the ingredients, tools, and step-by-step cooking methods. You learned how to enhance flavors and avoid mistakes. Variations and serving suggestions allow for creativity, while storage tips help keep your dish fresh. As you cook, remember that practice builds skills. Enjoy your meal and share it with others. Your smothered pork chops will impress everyone around you. Happy cooking!

Smothered Pork Chops Savory and Creamy Delight

If you crave a dish that oozes comfort and flavor, then Smothered Pork Chops is for you! This recipe combines

Older posts
Newer posts
← Previous Page1 … Page52 Page53 Page54 Page55 Next →

dsad

© 2025 eataroundit • Built with GeneratePress

Our Policies

  • Copyright Policy
  • Cookie Policy
  • GDPR Policy
  • Privacy Policy
  • Disclaimer
  • Terms Of Use

More Information

  • Home
  • About
  • Contact
  • Appetizers
  • Dessert
  • Dinner
  • Drinks
©2025, eataroundit About Back To Top