Skip to content
DisclaimerTerms Of UseGDPR PolicyCookie Policy

eataroundit

  • Home
  • Drinks
  • Appetizers
  • Dinner
  • Dessert
  • About
  • Contact
  • Privacy Policy
DisclaimerTerms Of UseGDPR PolicyCookie Policy

Hannah

The main ingredients for this recipe create a rich and moist banana bread. Here’s what you need: - 3 ripe bananas, mashed until smooth - 1/2 cup tahini, well-stirred - 1/2 cup packed brown sugar - 1/4 cup pure maple syrup - 2 large eggs, at room temperature - 1 teaspoon pure vanilla extract - 1 teaspoon baking soda - 1/2 teaspoon baking powder - 1/4 teaspoon fine sea salt - 1 1/2 cups all-purpose flour - 1/2 cup semi-sweet chocolate chips - 1/4 cup chopped walnuts (optional for added crunch) Each ingredient plays a role. The bananas give moisture and sweetness. Tahini adds a nutty flavor and creaminess. The sugars help the bread rise and brown well. You can swap some ingredients based on what you have. For example: - Use almond butter or peanut butter in place of tahini for a different taste. - If you want a sweeter bread, use honey instead of maple syrup. - For a dairy-free option, replace eggs with a flax egg (1 tablespoon flaxseed meal mixed with 3 tablespoons water). These choices keep your banana bread tasty while using what’s on hand. Feel free to get creative! Adding extra ingredients can make your banana bread even better. Consider: - 1 teaspoon of cinnamon or nutmeg for warmth. - 1/2 cup of shredded coconut for a tropical twist. - 1/4 cup of dried fruit, like raisins or cranberries, for a chewy texture. Try these options to tailor your banana bread to your taste. This recipe is flexible, so enjoy making it your own! For the full recipe, follow the steps and enjoy the process. Start by preheating your oven to 350°F (175°C). Grab a 9x5 inch loaf pan. Grease it lightly or line it with parchment paper. This makes it easy to take out the bread later. In a large bowl, mash 3 ripe bananas until smooth. Add 1/2 cup of tahini to the bowl. Use a fork or potato masher to blend them together. It should be creamy. Next, mix in 1/2 cup of packed brown sugar and 1/4 cup of pure maple syrup. Then, crack in 2 large eggs and pour in 1 teaspoon of vanilla extract. Whisk everything until it looks even. In another bowl, mix 1 1/2 cups of all-purpose flour, 1 teaspoon of baking soda, 1/2 teaspoon of baking powder, and 1/4 teaspoon of fine sea salt. Slowly add this dry mix to the banana-tahini blend. Fold it gently with a spatula. Stop mixing when you don’t see any flour streaks. Overmixing can make the bread tough. Finally, fold in 1/2 cup of semi-sweet chocolate chips and 1/4 cup of chopped walnuts if you want some crunch. Pour the batter into your prepared loaf pan. Smooth the top with a spatula. Place the pan in your preheated oven. Bake for 50-60 minutes. To check if it’s done, poke a toothpick into the center. If it comes out clean or with a few moist crumbs, it’s ready. Once baked, take the loaf out of the oven. Let it cool in the pan for about 10 minutes. After this, move the bread to a wire rack to cool completely. This helps it stay soft. If you want to store it, keep it in an airtight container. It can last for up to a week. You can also freeze it for longer storage. Just slice it first and wrap it well. Enjoy your homemade Chocolate Tahini Banana Bread! If you want the full recipe, check out the full recipe section. To make the best banana bread, start with ripe bananas. They should be mostly brown. This gives a sweet flavor. Mash them well until smooth. Mixing is key. You want a creamy texture for your batter. Measure your ingredients accurately. Too much flour can make your bread dense. Always use a kitchen scale for precise measurements if you can. Tahini adds a nutty taste. It pairs well with bananas and chocolate. Use high-quality tahini for a richer flavor. When you add chocolate chips, mix them in gently. This ensures every slice has that chocolatey goodness. For an extra kick, consider adding a pinch of cinnamon. It enhances the overall taste without overpowering it. One mistake is overmixing the batter. This can lead to tough banana bread. Mix just until you see no dry flour. Another mistake is not greasing the pan well. Use a light layer of oil or line it with parchment paper. This helps your bread come out smoothly. Lastly, don’t skip the cooling time. It helps the flavors settle and makes slicing easier. For the full recipe, check the details above! {{image_4}} You can make this banana bread gluten-free by using a gluten-free flour blend. Look for a blend that includes xanthan gum. Use the same amount as in the recipe. This will help bind the ingredients and keep your bread fluffy. To make this recipe vegan, replace the eggs with flax eggs. Mix 1 tablespoon of ground flaxseed with 2.5 tablespoons of water for each egg. Let this sit for 5 minutes until it thickens. You can also use maple syrup in place of the brown sugar if you prefer a refined sugar-free option. Feel free to get creative with this recipe. You can add different nuts or seeds for a crunch. Dried fruits like cranberries or cherries can give a sweet flavor. For extra chocolatey goodness, try adding more chocolate chips. A dash of cinnamon or a splash of coffee can also enhance the taste. The options are endless! For the full recipe, check out the details above. To keep your chocolate tahini banana bread fresh, let it cool completely first. Once cool, wrap it tightly in plastic wrap or aluminum foil. This helps keep moisture in and prevents it from drying out. You can also place it in an airtight container. Store it at room temperature for easy access. For longer storage, refrigeration works too, but it may change the texture slightly. When stored properly, your chocolate tahini banana bread lasts about 3 to 5 days at room temperature. If you keep it in the fridge, it can last up to a week. Always check for signs of mold or an off smell before eating. If it looks or smells bad, it’s best to throw it away. Freezing is a great option for long-term storage. Slice the banana bread first for easy serving later. Wrap each slice in plastic wrap, then place them in a freezer-safe bag. This prevents freezer burn and keeps your bread fresh for up to 3 months. When you’re ready to enjoy, simply thaw at room temperature or pop it in the microwave for a few seconds. Enjoy your chocolate tahini banana bread straight from the freezer! For the full recipe, check out the section above. Yes, you can use overly brown bananas. They add more sweetness and flavor. Just make sure they are soft. The riper, the better for this recipe. You can mash them easily, which helps blend into the batter. Overripe bananas make the bread moist and fluffy. If you don’t have tahini, you can try almond butter or peanut butter. Both work well and add a nice flavor. You can also use sunflower seed butter for a nut-free option. Keep in mind that this may change the taste a bit. To make your banana bread more chocolatey, add extra chocolate chips. You can increase the amount to 1 cup for a richer flavor. You can also use cocoa powder in the batter. Start with 1/4 cup and adjust to your taste. Yes, you can use whole wheat flour. It adds a nutty flavor and a bit more fiber. The bread may be denser, so consider mixing half all-purpose with half whole wheat. This keeps it light and fluffy while adding nutrition. Check if the banana bread is done by inserting a toothpick into the center. If it comes out clean or with a few moist crumbs, it's ready. If the toothpick has wet batter, bake it a little longer. Absolutely! Chopped walnuts or pecans add great crunch. You can also add pumpkin seeds for a unique twist. Mix them into the batter before baking for extra texture. Yes, this banana bread freezes well. Wrap it tightly in plastic wrap and then in foil. You can freeze it for up to three months. When ready to eat, thaw it in the fridge overnight. Serve your banana bread with a drizzle of tahini on top. A side of fresh fruit like berries also pairs nicely. You can enjoy it with a dollop of yogurt for added creaminess. For the full recipe, check out the detailed instructions above! In this article, we explored how to make chocolate tahini banana bread from scratch. You learned about the key ingredients, helpful tips, and ways to store your bread. I shared variations to fit different diets too. Remember, you can adjust flavors and make it your own. Enjoy this delicious treat anytime! Now, it’s time to bake and savor your creation.

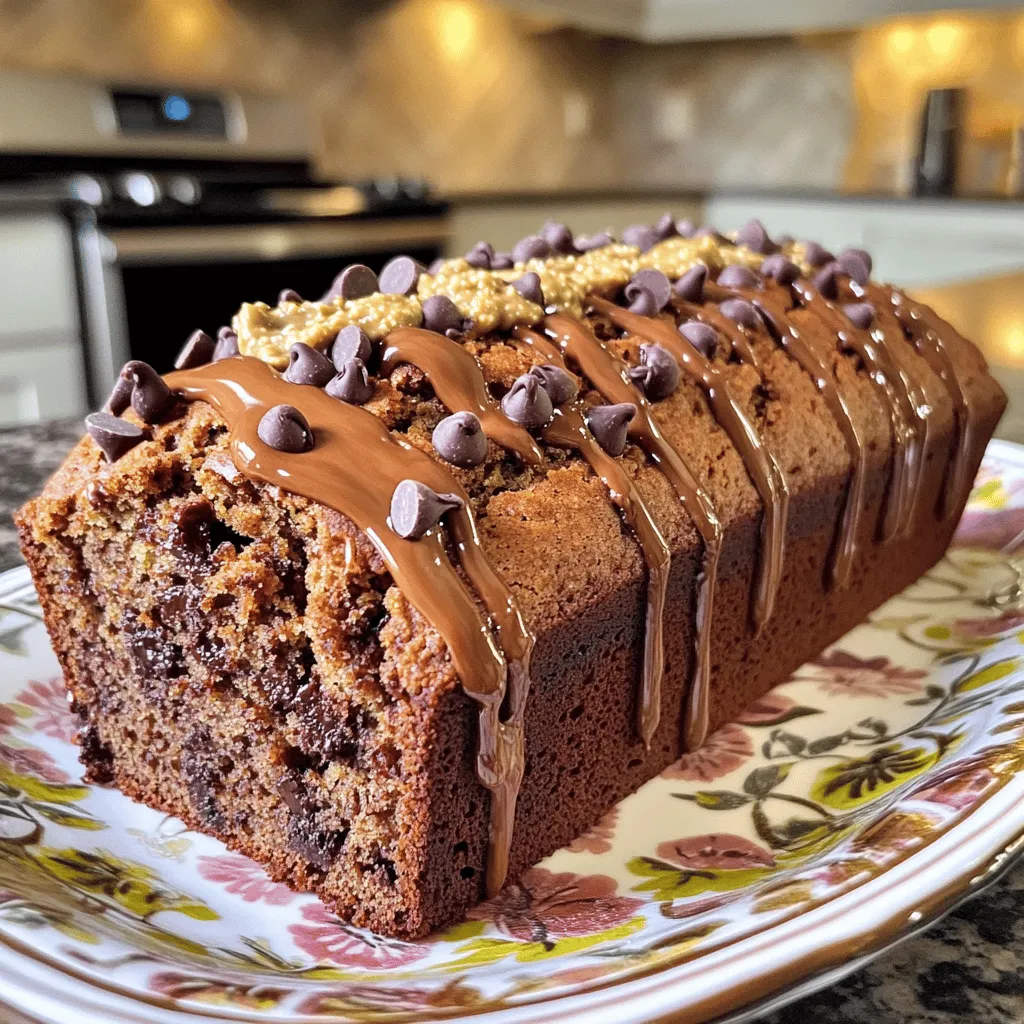
Chocolate Tahini Banana Bread Delightful and Easy Recipe

Are you ready to bake a treat that’s both delicious and unique? This Chocolate Tahini Banana Bread recipe will capture

To make One Pan Lemon Parmesan Orzo, you will need: - 1 cup orzo pasta - 2 cups vegetable broth - 1 medium onion, diced - 2 cloves garlic, minced - 1 cup cherry tomatoes, halved - 1 cup fresh spinach, roughly chopped - 1/2 cup freshly grated Parmesan cheese - 2 tablespoons extra virgin olive oil - Zest and juice of 1 large lemon - Salt and freshly ground black pepper to taste - Fresh basil leaves for garnish These ingredients come together to create a dish full of flavor. Each one plays a role in making the orzo creamy, zesty, and comforting. You can make this recipe your own by swapping some ingredients: - Orzo pasta: Try using farro, quinoa, or even rice if you prefer. - Vegetable broth: Chicken broth works well if you want a richer flavor. - Fresh spinach: Kale or Swiss chard can add a nice twist. - Cherry tomatoes: Diced bell peppers or zucchini can replace tomatoes. - Parmesan cheese: Nutritional yeast gives a cheesy flavor for vegan options. Feel free to customize based on what you have at home. Cooking should be fun and flexible! Using high-quality ingredients makes a big difference. Here are my tips: - Orzo: Look for whole grain orzo for more fiber and nutrients. - Vegetable broth: Choose a low-sodium option to control salt levels. - Fresh produce: Use ripe tomatoes and fresh spinach for the best taste. - Parmesan cheese: Grate fresh cheese instead of using pre-grated. It melts better and has more flavor. Investing in good ingredients elevates your dish. Trust me, it’s worth it! For the full recipe, check the details above. First, grab a large, deep skillet. Heat 2 tablespoons of extra virgin olive oil over medium heat. When the oil shimmers, add 1 medium diced onion. Sauté the onion for 3-4 minutes until it turns soft and clear. Then, add 2 cloves of minced garlic. Cook for 1 more minute until it smells great. Don't let the garlic burn! Next, add 1 cup of orzo pasta to the skillet. Stir it well with the onion and garlic. Toast the orzo for about 2 minutes. This helps it soak up the flavors. After that, pour in 2 cups of vegetable broth. Then, add 1 cup of halved cherry tomatoes, lemon zest, and lemon juice. Bring this to a gentle boil. Stir it now and then to blend all the flavors. Once it boils, lower the heat to a simmer. Cover the skillet and cook for 10-12 minutes. Stir occasionally to keep the orzo from sticking. The pasta should be tender and most of the liquid should be gone. When it’s perfect, fold in 1 cup of roughly chopped spinach and 1/2 cup of grated Parmesan cheese. Stir until the spinach wilts and the cheese melts into a creamy mix. - Use a large skillet for better heat distribution. - Keep an eye on the garlic; it burns fast! - Stir the orzo often while it simmers to prevent sticking. - Taste the dish before serving to adjust salt and pepper. For the best flavor, use fresh ingredients. Fresh lemons and basil really make a difference. If you want a creamier texture, add more cheese. Serve the orzo warm and garnish with fresh basil leaves. A sprinkle of extra Parmesan on top makes it look fancy. Enjoy this dish with a side salad or crusty bread for a complete meal. You can find the Full Recipe for more details. When making One Pan Lemon Parmesan Orzo, watch out for a few common mistakes. First, don’t skip toasting the orzo. This step adds a nice nutty flavor. Also, be careful not to overcook the orzo. It should be al dente, with a slight bite. Stir the mixture regularly to prevent sticking. If you let it sit too long, it may clump together. Lastly, don’t forget to season well. A pinch of salt and fresh pepper can make a big difference! To make your orzo even more delicious, try these tips. Add a splash of white wine after cooking the garlic. This step brightens the dish with acidity. You can also mix in some red pepper flakes for a bit of heat. Fresh herbs can elevate the flavor too. Consider adding parsley or dill along with the basil. Lastly, squeeze in extra lemon juice before serving. This brightens up the dish and gives it a fresh taste. A few handy tools can make this recipe a breeze. A large, deep skillet is key for even cooking. Use a wooden spoon to stir the orzo gently. This helps prevent sticking and makes it easy to mix. A measuring cup for the broth ensures you add just the right amount. Lastly, a zester will help you get that bright lemon zest quickly. With these tools, you'll create a perfect One Pan Lemon Parmesan Orzo every time. For the full recipe, check back to see how all these tips fit into your cooking adventure! {{image_4}} You can easily change this dish by adding protein. Chicken, shrimp, or sausage works well. Cook your protein separately, then mix it in. For chicken, use cooked and diced pieces. For shrimp, add them in the last few minutes to avoid overcooking. Sausage adds a nice, rich flavor. Just slice it and cook it with the onion. If you want a vegetarian dish, skip the meat and add more veggies. Try bell peppers, zucchini, or mushrooms. For a vegan version, leave out the Parmesan cheese. You can use nutritional yeast instead for a cheesy flavor. Adding tofu or chickpeas can give you protein without animal products. You can swap ingredients to enhance flavors. Use chicken broth instead of vegetable broth for a richer taste. Try different cheeses, like feta or goat cheese, for a tangy twist. You can also add spices like red pepper flakes for heat or smoked paprika for depth. Fresh herbs, like thyme or parsley, can brighten the dish even more. For the complete recipe, check out the Full Recipe. To store your One Pan Lemon Parmesan Orzo, let it cool first. Once cool, place it in an airtight container. This keeps the orzo fresh. Store it in the fridge for up to three days. When you’re ready to eat it, check for any signs of spoilage. If it looks good, you can enjoy it again! Freezing is easy and great for meal prep. First, let the orzo cool completely. Next, portion it into freezer-safe bags or containers. Remove as much air as possible. Label each bag with the date. You can freeze it for up to three months. When you’re ready for a quick meal, just thaw it in the fridge overnight. To reheat the orzo, use a skillet for the best flavor. Add a splash of broth or water to keep it moist. Heat over medium-low heat, stirring often. This helps it warm evenly. If you prefer the microwave, place it in a microwave-safe bowl. Cover it with a damp paper towel to keep it from drying out. Heat it in short bursts, stirring in between. Enjoy your flavorful meal again! You can prepare One Pan Lemon Parmesan Orzo ahead of time with ease. Cook the dish and let it cool. Then, store it in an airtight container. Keep it in the fridge for up to three days. When you're ready to eat, reheat it on the stove or in the microwave. Add a splash of broth or water if it seems dry. This will help restore its creamy texture. Yes, you can use another type of pasta. Options like penne or fusilli work well. Keep in mind that cooking times may differ. Check the package instructions for the right time to cook. Adjust the broth accordingly to ensure the pasta absorbs the flavors. One Pan Lemon Parmesan Orzo pairs nicely with many sides. A fresh green salad adds crunch and brightness. Grilled chicken or shrimp makes it a complete meal. Serve with crusty bread to soak up the sauce. You can also add a light soup for a cozy dinner. Enjoy mixing and matching to find your favorite pairings! This post covered how to make One Pan Lemon Parmesan Orzo. We explored the right ingredients and smart swaps. I shared step-by-step cooking tips for tasty results. You learned common mistakes to avoid and ways to boost flavor. We also discussed how to store leftovers properly. Cooking can be simple and fun. With the right ingredients and tips, you can impress anyone. Dive in and enjoy your cooking journey!

One Pan Lemon Parmesan Orzo Flavorful Dinner Recipe

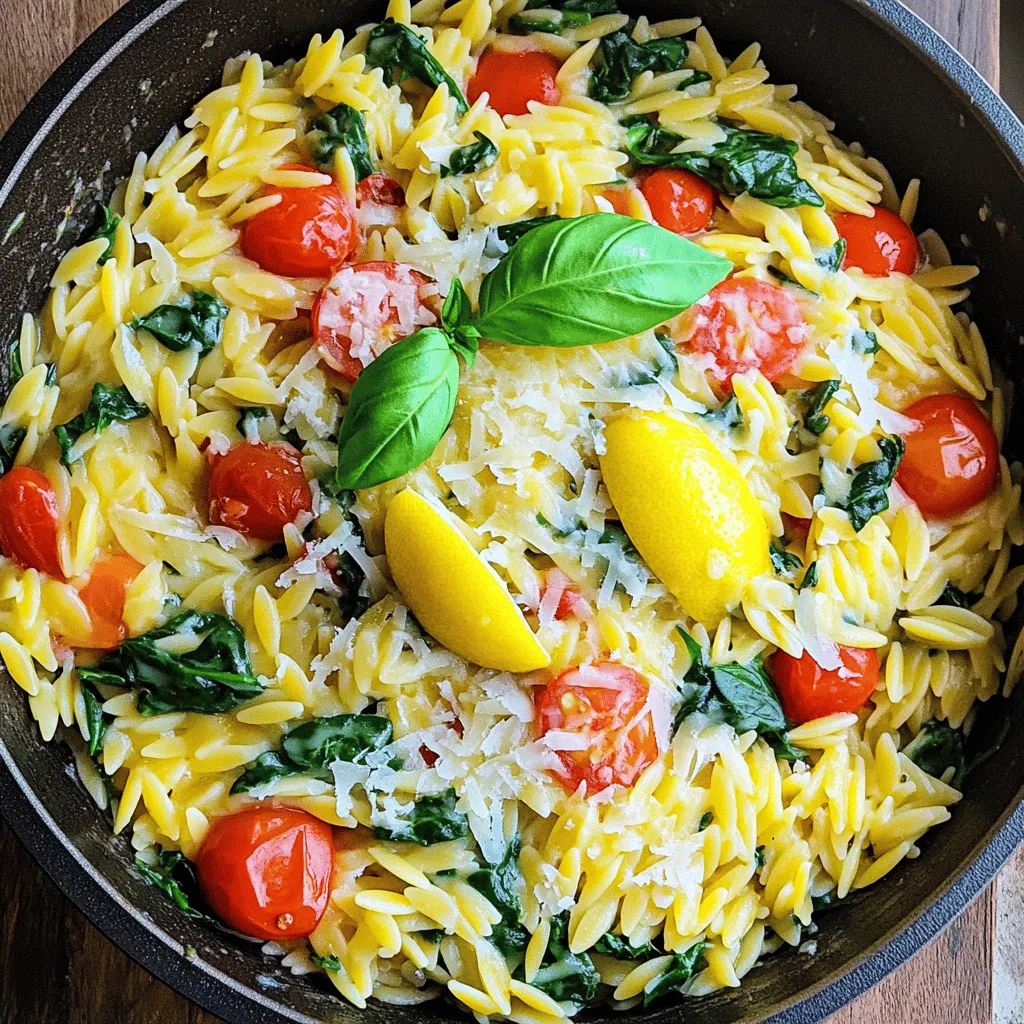
Are you ready for a quick and tasty dinner? One Pan Lemon Parmesan Orzo is the answer! This dish combines

- 1 cup unsalted butter - 1 cup granulated sugar - 1 cup packed brown sugar - 4 large eggs - 1 teaspoon vanilla extract - 1 cup all-purpose flour - 1 cup unsweetened cocoa powder - 1/2 teaspoon salt - 1/2 teaspoon baking powder - 1 cup pretzel pieces (plus extra for topping) - 1 cup salted caramel sauce - Sea salt flakes for garnish For these Salted Caramel Pretzel Brownies, I like to use simple, fresh ingredients. Each one plays a key role in creating the perfect balance of flavors. The unsalted butter gives the brownies a rich taste. The granulated and brown sugars add sweetness and depth. Eggs help bind everything together, making the brownies fudgy. I love using high-quality vanilla extract. It adds warmth to the flavor. The all-purpose flour and cocoa powder create a soft, chocolatey base. The small amounts of salt and baking powder enhance the taste and texture. Pretzels bring a delightful crunch and salty contrast. You can use any pretzel type, but I recommend the classic shape for best results. The salted caramel sauce is the star here, adding a gooey sweetness. You can use store-bought or homemade for this recipe. Finally, sea salt flakes provide a finishing touch. They enhance the flavor and look great on top. - Prep Time: 20 minutes - Cook Time: 25-30 minutes - Total Time: 1 hour - Servings: 12-16 squares This recipe is easy to follow and quick to prepare. In just one hour, you can have 12 to 16 delicious brownie squares. Perfect for sharing with friends or family! Don't forget to check out the Full Recipe for specific instructions. - Preheat your oven to 350°F (175°C). - Prepare a 9x13 inch baking pan with grease and parchment paper. - Melt 1 cup of unsalted butter in a medium saucepan. - Stir in 1 cup of granulated sugar and 1 cup of brown sugar until smooth. - Cool the sugar mixture slightly before adding 4 large eggs. - Incorporate the eggs one at a time, then mix in 1 teaspoon of vanilla extract. - Whisk together 1 cup of all-purpose flour, 1 cup of cocoa powder, 1/2 teaspoon of salt, and 1/2 teaspoon of baking powder. - Gradually stir the dry mixture into the wet ingredients until just combined. - Gently fold in 1 cup of pretzel pieces. - Layer half of the brownie batter in the prepared pan, then drizzle half of the salted caramel sauce over it. - Bake for 25-30 minutes until a toothpick comes out with moist crumbs. - Allow the brownies to cool completely before cutting and garnishing. Following these simple steps will lead you to a sweet treat that’s hard to resist. Enjoy making your salted caramel pretzel brownies! For the full recipe, check the ingredients and instructions above. To get the right texture in your brownies, choose fudgy or cakey. For fudgy brownies, use more fat and less flour. This gives them a rich, moist center. For cakey brownies, add more flour and a little baking powder. This makes them light and fluffy. Do not overmix your batter. Mixing too much adds air, which makes brownies cake-like. Stir until just combined for a dense, fudgy treat. You can add extra chocolate chips or nuts for more flavor. Chocolate chips melt and create gooey pockets. Nuts add crunch and depth. Both choices make your brownies even better. Using homemade salted caramel can elevate your brownies. It is often fresher and has a more robust taste. Store-bought salted caramel is quicker but can be just as good. Choose based on your time and taste. For a great look, serve brownies on a decorative platter. Arrange pretzels around the brownies for fun texture. This adds a rustic touch. Drizzle extra salted caramel over the top. It creates a beautiful shine and enhances flavor. The visual appeal makes them hard to resist. These simple steps will wow your guests! {{image_4}} You can boost these brownies by adding nuts or chocolate. Try using walnuts, pecans, or even hazelnuts for a crunchy bite. Dark, milk, or white chocolate pieces can add a rich twist. Want something different? Experiment with flavored caramel sauces, like vanilla or chocolate. These small changes can create a unique treat each time. For a gluten-free option, swap all-purpose flour with almond or coconut flour. Both work well and taste great. If you're looking for vegan brownies, replace eggs with flaxseed meal or applesauce. Use coconut oil or a vegan butter substitute instead of regular butter. These adjustments keep the spirit of the recipe while catering to dietary needs. Serve these brownies warm with a scoop of vanilla ice cream. The ice cream melts into the warm brownie, creating a delicious blend. Pair these brownies with coffee for a rich dessert experience. They also go well with dessert wines, offering a sweet and salty contrast. Enjoy them in any way you like! For the full recipe, check out the details above. To keep your salted caramel pretzel brownies fresh, pack them well. Use an airtight container. Place parchment paper between layers to prevent sticking. Store in the fridge for up to one week. For longer storage, freeze them. Wrap brownies tightly in plastic wrap, then place them in a freezer bag. They can last up to three months in the freezer. To enjoy your brownies warm, heat them in the oven. Preheat your oven to 350°F. Place brownies on a baking sheet for about 10 minutes. You can also microwave them for about 15-20 seconds. This keeps them soft and gooey. Just be careful not to overheat, or they may become tough. Enjoy the warm, melted caramel and chocolate flavors! Salted caramel brownies stand out due to their rich flavors and textures. The deep chocolate taste combines with sweet and salty caramel. The pretzels add a crunchy bite, creating a fun contrast. This mix of smooth, creamy, and crunchy is what makes each bite exciting. You get sweetness from the caramel, saltiness from the pretzels, and fudgy goodness from the brownies. It’s a delightful treat that satisfies many cravings at once. Yes, you can make these brownies ahead of time. Bake them a day or two early. After cooling, wrap them tightly in plastic wrap. Store them at room temperature for a couple of days. If you want to keep them longer, freeze them. Just slice them first for easy serving later. When you're ready to enjoy, let them thaw at room temperature. This way, they stay fresh and tasty, ready for any occasion. To check if your brownies are done, look for a few key signs. When you insert a toothpick in the center, it should come out with moist crumbs, not wet batter. The edges will pull away slightly from the pan, and the top will look set and shiny. If you see cracks on the surface, that's a good sign too. Remember, overbaking can make them dry, so keep an eye on them as they bake. Absolutely! You can use various pretzel types to mix things up. Try different shapes, like pretzel sticks or rounds. You can also choose pretzels with different flavors, like cheese or chocolate-covered. The key is to keep the amount similar to one cup. This way, you will still get that crunch and salty flavor boost in your brownies. If you don’t have salted caramel sauce, don’t worry! You can make your own easily. Simply melt sugar in a pan until it turns golden. Then add butter and cream, whisking until smooth. For a quick fix, use store-bought caramel sauce and mix in a pinch of sea salt. This will give you that sweet and salty flavor without any hassle. For the full recipe, check out [Full Recipe]. In summary, you now have a clear guide to making salted caramel brownies. We covered ingredients, preparation, baking, and storage. The right methods ensure a rich texture and flavor. You can experiment with variations to make these treats your own. Enjoy serving them warm or with a scoop of ice cream. These brownies are sure to impress your friends and family!

Salted Caramel Pretzel Brownies Irresistible Delight

If you’re looking for a dessert that combines sweet, salty, and crunchy, you’re in for a treat! In this post,

- 1 lb boneless chicken breast, cut into 1-inch cubes - 1 cup fresh pineapple, cut into 1-inch cubes - 1 red bell pepper, cut into 1-inch chunks - 1 green bell pepper, cut into 1-inch chunks - 1 small red onion, cut into 1-inch chunks - 1/4 cup soy sauce - 2 tablespoons honey - 1 tablespoon rice vinegar - 1 tablespoon sesame oil - 1 teaspoon fresh ginger, grated - 2 cloves garlic, minced - Skewers (bamboo or metal) - Salt and pepper to taste The chicken and vegetables bring a colorful mix to your kabobs. The chicken is juicy and tender, while the pineapple adds a sweet twist. Bell peppers and red onion add crunch and color. The teriyaki marinade is key. It gives your kabobs a rich umami flavor. Soy sauce brings saltiness, while honey adds sweetness. Rice vinegar offers a slight tang, and sesame oil gives a nutty aroma. Ginger and garlic add depth to the taste. - Sesame seeds - Fresh cilantro Adding sesame seeds gives a nice crunch and a bit of flair. Fresh cilantro adds a bright touch and a fresh taste. These garnishes take your kabobs from good to great. For the full recipe, check the complete instructions to create these delicious kabobs. Start by making the teriyaki marinade. In a medium bowl, mix these ingredients: - 1/4 cup soy sauce - 2 tablespoons honey - 1 tablespoon rice vinegar - 1 tablespoon sesame oil - 1 teaspoon fresh ginger, grated - 2 cloves garlic, minced - Salt and pepper to taste Whisk everything until it blends well. This marinade gives the chicken a sweet, savory flavor. Now it's time to marinate the chicken. Use about half of your teriyaki marinade. - Place 1 pound of cubed chicken breast in a bowl or bag. - Pour the marinade over the chicken. Make sure it's well coated. Seal the bag or cover the bowl. Refrigerate for at least 30 minutes. If you have time, let it marinate for 1-2 hours for better taste. Next, let's assemble the kabobs. You will need skewers, either bamboo or metal. - If using bamboo, soak them in water for 30 minutes. - Thread the skewer with chicken pieces, alternating with fresh pineapple, red bell pepper, green bell pepper, and red onion. This pattern not only looks good but also enhances the flavor. Now, you can cook the kabobs. You can grill them or bake them. - Preheat your grill to medium-high heat. - Place the kabobs on the grill. Cook them for 10-15 minutes, turning them every few minutes. The chicken should be fully cooked and have nice grill marks. Brush with reserved marinade during cooking for extra flavor. Once done, let the kabobs rest for a few minutes before serving. This helps keep them juicy. For a finishing touch, sprinkle sesame seeds and fresh cilantro on top. For the full recipe, check the section above. Marination Secrets for Enhanced Flavor To get the best flavor, marinate your chicken. Use half the teriyaki marinade before cooking. Let it soak for at least 30 minutes. For more flavor, try to marinate for 1-2 hours. This gives the chicken time to absorb all the tasty ingredients. Skewering Tips for Even Cooking When you skewer the chicken and veggies, keep them balanced. Alternate chicken with pineapple, red pepper, green pepper, and onion. This mix not only makes the kabobs look great but also helps with even cooking. Do not crowd the skewers. Leave space for heat to circulate. Temperature Control and Timing Heat your grill to medium-high before cooking. This is key for nice grill marks and juicy chicken. Cook the kabobs for about 10-15 minutes. Turn them often to avoid burning. Use a meat thermometer to ensure chicken reaches 165°F. Avoiding Common Grilling Mistakes Do not skip soaking bamboo skewers for 30 minutes. This prevents them from catching fire. Also, don’t constantly move the kabobs. Let them grill to get that perfect char. Finally, brush with the reserved marinade while cooking. This adds flavor and moisture. For the full recipe, check out the details above! {{image_4}} You can change things up with different proteins. If you want a vegetarian option, use tofu. Tofu soaks up the teriyaki sauce nicely. If you love seafood, shrimp makes a great swap. It cooks quickly and pairs well with pineapple. You can also switch out the vegetables. Try zucchini, mushrooms, or cherry tomatoes. Seasonal vegetables add fresh flavors. Make your kabobs colorful and fun by mixing various veggies. If you want to try something new, there are good teriyaki sauce substitutes. You could use soy sauce mixed with brown sugar. This gives a sweet and salty taste. Another option is a hoisin sauce. It adds depth to your kabobs. You can also make your own teriyaki sauce. Combine soy sauce, honey, and a bit of garlic. This homemade version can taste fresher than store-bought. Just remember to taste and adjust as you go. Want to explore the full recipe? Check out the full recipe for Tropical Teriyaki Pineapple Chicken Kabobs. To keep your teriyaki pineapple chicken kabobs fresh, follow these tips: - Cool Down: Let the kabobs cool to room temperature first. - Use Airtight Containers: Place them in a clean, airtight container. - Refrigerate: Store in the fridge for up to 3 days. - Keep Sauce Separate: If you have extra teriyaki sauce, store it in another container. To reheat your kabobs while keeping them tasty, try these methods: - Oven Method: Preheat your oven to 350°F (175°C). Place kabobs on a baking sheet and cover with foil. Heat for about 10-15 minutes. - Grill Method: If you want that grilled flavor back, heat your grill to medium. Place kabobs on the grill for 5-7 minutes, turning occasionally. - Microwave Method: For a quick option, cover kabobs with a damp paper towel. Heat on medium for 1-2 minutes, checking often. These methods help retain flavor and juiciness. Enjoy your delicious kabobs again! To keep your chicken juicy, focus on marination and cooking. Here are my tips: - Marinate Well: Use a mix of soy sauce, honey, ginger, and garlic. Let the chicken soak for at least 30 minutes. Longer is better, up to 2 hours. - Don’t Overcook: Cook the kabobs on medium-high heat for about 10-15 minutes. Turn them often for even cooking. - Baste While Grilling: Brush the kabobs with leftover marinade. This keeps them moist and adds flavor. Yes, you can make these kabobs in an oven. Here’s how: 1. Preheat your oven: Set it to 400°F (200°C). 2. Use a baking sheet: Line it with parchment paper or foil for easy cleanup. 3. Arrange kabobs: Place them on the sheet, leaving space between each skewer. 4. Bake: Cook for 15-20 minutes, flipping halfway through. Check that the chicken reaches 165°F (75°C). Pair your kabobs with these tasty side dishes: - Coconut Rice: It complements the tropical flavors well. - Grilled Vegetables: Zucchini, corn, and asparagus work great. - Fresh Salad: A light salad with citrus dressing adds brightness. - Dipping Sauces: Serve extra teriyaki sauce or a spicy mayo for fun. You can find the full recipe in the main article to get started on these delicious kabobs! You learned how to make tasty Teriyaki Pineapple Chicken Kabobs. We covered the main ingredients, including chicken, veggies, and marinade. I shared tips to prepare your marinade and marinate your chicken. You learned how to assemble and cook the kabobs perfectly. Feel free to try variations by swapping proteins or sauces. Don't forget about storing and reheating leftovers to keep them juicy. Enjoy making kabobs that everyone will love!

Teriyaki Pineapple Chicken Kabobs Flavorful Grilling Guide

Get ready to impress your friends with Teriyaki Pineapple Chicken Kabobs! With this flavorful grilling guide, you’ll learn how to

For this dip, you need 1 cup of roasted red peppers. You can use store-bought or make your own. If you opt for homemade, roast fresh red peppers until the skin blisters. This gives them a sweet, smoky flavor. The dip shines with 8 ounces of goat cheese and 2 tablespoons of cream cheese. Make sure both cheeses are softened to room temperature. This helps them blend together easily, creating a smooth texture. You’ll want to add 2 tablespoons of extra virgin olive oil for richness. Include 1 clove of finely minced garlic for a savory note. For a hint of freshness, toss in 1 teaspoon of fresh thyme leaves or ½ teaspoon of dried thyme. If you like a kick, add ¼ teaspoon of red pepper flakes. Lastly, season with salt and black pepper to taste. Top the dip with fresh parsley, finely chopped, for a pop of color. You can find the full recipe [here](#). To start, you need to prepare the roasted red peppers. You can use store-bought or make your own. If you choose jarred roasted red peppers, drain them carefully. Pat them dry with a paper towel to remove excess moisture. If you want to roast fresh peppers, place them on a baking sheet. Roast them in a preheated oven at 375°F (190°C) for about 20 minutes. Look for blistered skin. Once done, let them cool, peel off the skins, and chop them into small pieces. Now, it's time to mix the dip. In a large bowl, combine the chopped roasted red peppers, 8 oz of softened goat cheese, and 2 tablespoons of cream cheese. Add 2 tablespoons of extra virgin olive oil and 1 clove of finely minced garlic. Sprinkle in 1 teaspoon of fresh thyme leaves, or ½ teaspoon if you use dried thyme. For some heat, you can add ¼ teaspoon of red pepper flakes. Season with salt and pepper to taste. Use a fork or spatula to mash and mix until the dip is smooth and creamy. Next, spoon the creamy mix into an oven-safe dish. Spread it out evenly for even cooking. Place the dish in your preheated oven. Bake for about 20 minutes, or until the top is bubbly and lightly golden. After baking, remove the dip from the oven and let it cool for a few minutes. This helps it set. Before serving, sprinkle freshly chopped parsley on top for color. Serve it warm with crispy pita chips, toasted crostini, or fresh veggie sticks for dipping. Enjoy your Roasted Red Pepper Goat Cheese Dip! For the complete recipe, check out the Full Recipe. For a creamier dip, use full-fat cream cheese. It blends well with goat cheese. If you want a lighter dip, use low-fat cream cheese instead. If you prefer a chunkier texture, leave some roasted red pepper pieces. This adds a nice bite. To boost flavor, add herbs like basil or oregano. Fresh herbs make the dip lively. A squeeze of lemon juice brightens the taste too. You can also mix in some smoked paprika for a deeper flavor. Adjust the red pepper flakes for your spice level. Serve this dip warm for the best taste. It pairs well with crispy pita chips, toasted crostini, or colorful veggie sticks. For a fun twist, try it on a sandwich or wrap. You can find the full recipe online for detailed steps. {{image_4}} You can add heat to this dip easily. Mix in more red pepper flakes for a spicy twist. You can also use diced jalapeños for a fresh kick. Both options bring warmth and flavor. Adjust the spice to match your taste. Just remember, a little goes a long way! Herbs can enhance the flavor of your dip. Try adding fresh basil or oregano for a garden taste. You could also mix in some chives for a mild onion flavor. Each herb brings its unique touch. Feel free to experiment with your favorites. Fresh herbs can make a big difference! If you like a creamier dip, add more cream cheese or sour cream. This will make it rich and smooth. You can also blend in some Greek yogurt for a tangy twist. Adjust the consistency to your liking. A creamier dip pairs well with crunchy veggies and chips. For a thicker texture, use less olive oil. You can tweak it to suit your taste! For the full recipe, check out the Roasted Red Pepper & Goat Cheese Delight. After you make the Roasted Red Pepper Goat Cheese Dip, let it cool. Cover it with plastic wrap or a lid. Store it in the fridge for up to five days. This dip tastes great cold or warm. Just remember to check for any signs of spoilage before eating. You can freeze this dip to enjoy later. Place it in an airtight container. It will last up to three months in the freezer. When you are ready to use it, let it thaw in the fridge overnight. To reheat the dip, place it in an oven-safe dish. Preheat the oven to 350°F (175°C). Bake for about 15-20 minutes until hot. You can also microwave it for a quick option. Heat in short bursts, stirring in between, until it is warm throughout. Enjoy it fresh like the day you made it! Yes, you can use fresh red peppers. However, roasting them enhances their flavor. Roasting brings out their sweetness and adds a smoky taste. To roast, place them in the oven until their skin blisters. This process takes about 20 minutes. Once they cool, peel the skins off and chop them. This method will give your dip a richer flavor. The dip lasts about 3 to 5 days in the fridge. Make sure to store it in an airtight container. Keep it cool and covered to maintain its taste and texture. If you notice any changes in smell or color, it’s best to toss it out. Enjoy the dip fresh for the best flavor. You can serve the dip with many tasty options. Here are a few ideas: - Crispy pita chips - Toasted crostini - Fresh veggie sticks like carrots and cucumbers - Crackers or bread slices These choices pair well with the creamy dip. They add texture and a nice crunch. For a fun twist, try mixing in some herbs or spices to your dippers! Check out the Full Recipe for more serving ideas! This blog post covered how to make a tasty Roasted Red Pepper Goat Cheese Dip. We looked at key ingredients, from roasted peppers to special seasonings. I provided step-by-step instructions, tips for better texture and flavor, and served up creative variations. The storage info also helps keep your dip fresh. In conclusion, this dip is fun to make and easy to customize. Enjoy experimenting and sharing this delicious treat with friends!

Roasted Red Pepper Goat Cheese Dip Tasty and Simple

If you’re looking for a dip that’s both tasty and simple, you’ve stumbled upon a winner! My Roasted Red Pepper

- 8 oz cream cheese, softened - 1 cup powdered sugar, sifted - ½ cup sour cream The main ingredients create the base of this dip. The cream cheese gives it a rich, creamy texture. The powdered sugar adds sweetness, while the sour cream gives a slight tang. These three ingredients mix together to form a smooth and delicious dip. - 1 tsp pure vanilla extract - ½ cup mini chocolate chips (plus extra for garnish) - 1 cup whipped topping (like Cool Whip) Now, let's add flavor! The vanilla extract enriches the taste. Mini chocolate chips bring in that classic chocolate flavor we love. The whipped topping makes the dip light and airy. Together, they create a delightful blend that enhances the cheesecake experience. - Graham crackers - Fresh fruit slices (strawberries, apple wedges) - Pretzels Pairing the dip with dippers is key. Graham crackers offer a sweet crunch that contrasts the creamy dip. Fresh fruit slices add freshness and a juicy bite. Pretzels bring a salty crunch that balances the sweetness. You can mix and match these dippers to make every bite fun. Check out the Full Recipe for more details! - Step 1: Beat cream cheese until smooth. Start with 8 oz of softened cream cheese. Use an electric mixer on medium speed. Mix for about 2-3 minutes. You want it creamy and free of lumps. - Step 2: Gradually incorporate powdered sugar. Measure 1 cup of sifted powdered sugar. Add it slowly to the cream cheese. Keep mixing on low speed. This will help prevent a sugary cloud in your kitchen. - Step 3: Mix in vanilla extract and sour cream. Pour in 1 tsp of pure vanilla extract. Then, add ½ cup of sour cream. Blend on low speed. The mixture will become rich and creamy. - Step 4: Fold in mini chocolate chips and whipped topping. Use a spatula to carefully mix in ½ cup of mini chocolate chips. Then, add 1 cup of whipped topping. Gently fold until everything is well combined. - Step 5: Transfer to serving bowl and chill. Spoon the dip into a nice serving bowl. Cover it with plastic wrap. Chill in the fridge for at least 30 minutes. - Step 6: Present with assorted dippers. When ready, serve with dippers like Graham crackers, fresh fruit slices, or pretzels. Arrange them around the dip for a fun look. For the full recipe, you can refer to the earlier section. Enjoy this delicious treat! To make your dip smooth and creamy, start by beating the cream cheese. Use an electric mixer on medium speed. Mix for about 2-3 minutes until it is very smooth. This step is key for the right mouthfeel. If you skip this, your dip may feel lumpy. Chilling the mixture is important. After mixing, cover the dip with plastic wrap. Place it in the fridge for at least 30 minutes. This time allows the flavors to blend well and makes the dip thicker. Choose a colorful or elegant bowl for serving. A bright bowl can make your dip pop. It draws attention and makes it look even tastier. Sprinkle extra mini chocolate chips on top for a sweet touch. This small step makes a big difference. Arrange your dippers in a circle around the dip. Use Graham crackers, fruit slices, or pretzels. A neat presentation invites guests to dig in and enjoy. A pinch of sea salt can enhance the flavors. It adds a nice contrast to the sweetness. Don’t be afraid to experiment with flavored whipped toppings. Try chocolate or vanilla for a fun twist. These small changes can take your dip from good to great. For the full recipe, check out [Full Recipe]. {{image_4}} You can easily switch up the flavors in your chocolate chip cheesecake dip. Here are two fun ideas: - Peanut butter chocolate chip cheesecake dip: Mix in creamy peanut butter for a nutty flavor. Use about ½ cup of peanut butter along with the cream cheese. It adds richness and pairs perfectly with chocolate chips. - Cookie dough chocolate chip cheesecake dip: For those who love cookie dough, add mini chocolate chips and a splash of vanilla. You can also mix in a bit of flour to mimic the cookie dough taste. If you want to make a lighter dip, consider these options: - Low-fat cream cheese and whipped topping options: Swap regular cream cheese for low-fat cream cheese. It cuts calories without losing much flavor. You can also use light whipped topping to reduce fat. - Using Greek yogurt in place of sour cream: Greek yogurt adds creaminess and a little protein. Replace sour cream with an equal amount of Greek yogurt for a healthy twist. Dippers can change your whole experience! Here are some ideas: - Using cookies, caramel or chocolate sauce: Try dippers like chocolate chip cookies or even drizzling caramel sauce on top. They add a sweet touch and make each bite extra special. - Suggesting savory options like pretzel crisps: For a fun twist, serve with pretzel crisps. Their saltiness balances the sweetness of the dip and adds a crunchy texture. For the complete recipe, check out the Full Recipe. To keep your Chocolate Chip Cheesecake Dip fresh, store it in the refrigerator. Use an airtight container to prevent any odors from affecting the dip. This dip stays tasty for about 3 to 5 days. The chocolate chips will stay soft, and the texture will remain creamy if you store it well. If you want to save some for later, you can freeze the cheesecake dip. Place it in a freezer-safe container and seal it tightly. It can last up to three months in the freezer. When you're ready to enjoy it again, thaw it in the fridge overnight. This method helps keep the dip creamy and delicious. Got leftovers? You can use them in fun ways! Spread the dip on toast or mix it into pancakes for a sweet twist. To extend the life of your dippers, store them in separate bags. Keep Graham crackers and fruit slices fresh by wrapping them tightly. This way, you can enjoy your treats for longer! You want to make your dip look great. First, choose a fun bowl. Then, sprinkle extra mini chocolate chips on top. This adds a nice touch. Next, arrange your dippers around the dip. Use Graham crackers, fruit slices, or pretzels. A circle of dippers makes it inviting and easy to reach. Your guests will love the way it looks and tastes. Yes, you can! Prepare the dip a few hours before you need it. Follow the recipe and chill it in the fridge. This helps the flavors blend well. If you make it a day in advance, it will still taste great. Just remember to cover it tightly with plastic wrap to keep it fresh. This dip stays fresh for about 3 days in the fridge. After that, the texture may change, and it might not taste as good. Always check for any signs of spoilage before serving. If it smells off or looks strange, it’s best to throw it out. Enjoy your Chocolate Chip Cheesecake Dip within those 3 days for the best flavor. In this blog post, we explored how to make a delightful Chocolate Chip Cheesecake Dip. You’ve learned about key ingredients, easy preparation steps, and fun dippers. We shared tips for perfect texture and creative variations. Now, you can impress friends at any gathering or snack time. Remember, this dip is versatile, so feel free to experiment. Enjoy creating your version and make every bite count!

Chocolate Chip Cheesecake Dip Delightful Dessert Treat

Are you ready for a dessert that’s both simple and irresistibly tasty? This Chocolate Chip Cheesecake Dip will wow your

- 4 skin-on salmon fillets (approximately 6 ounces each) - 4 tablespoons unsalted butter - 4 cloves garlic, finely minced - 1 tablespoon fresh parsley, finely chopped - 1 tablespoon fresh dill, finely chopped - 1 teaspoon lemon zest (freshly grated) - Salt and freshly ground black pepper to taste - Lemon wedges, for serving - Oven-safe skillet - Small saucepan - Measuring spoons The right ingredients make all the difference in this dish. You'll want fresh salmon that shines when cooked. Skin-on fillets add flavor and keep the fish moist. For the garlic butter mix, unsalted butter gives you control over the salt. Fresh herbs like parsley and dill bring life and a burst of flavor. Don’t forget the lemon zest; it adds a bright touch. For seasoning, salt and pepper are key. They enhance the salmon's natural taste. Lemon wedges are a nice touch for serving. When you squeeze fresh lemon juice on the salmon, it wakes up all the flavors. Gather these items before you start cooking. Having everything ready makes the process smooth and fun. You can find the full recipe detailing how to put this all together. - Preheat the oven to 400°F (200°C). - In a small saucepan, melt 4 tablespoons of unsalted butter over medium heat. - Add 4 cloves of minced garlic. Stir the garlic for about one minute. - Mix in 1 tablespoon of chopped parsley, 1 tablespoon of chopped dill, and 1 teaspoon of lemon zest. - Remove the garlic butter mixture from heat and set it aside. - Season both sides of 4 salmon fillets with salt and pepper. - Heat a drizzle of olive oil in an oven-safe skillet over medium-high heat. - Place the salmon skin-side down in the skillet. Cook for about 4 minutes. - Flip the salmon so the flesh side is facing down. - Pour the garlic herb butter over the salmon. Make sure each piece is covered. - Transfer the skillet to the preheated oven. Bake for 8 to 10 minutes. - The salmon is done when it flakes easily with a fork. - Drizzle any remaining garlic butter from the skillet over the salmon before serving. For the full recipe, check out [Full Recipe]. Enjoy your cooking! To get crispy skin on salmon, start with dry fillets. Pat them with a paper towel. When cooking, heat the oil until it shimmers. Place the salmon skin-side down in the pan. Cook it without moving for about four minutes. This lets the skin crisp up nicely. To keep salmon moist, avoid overcooking. Salmon is done when it flakes easily with a fork. Using a meat thermometer can help. Aim for 125°F (52°C) for medium-rare. Also, pour the garlic butter over the fillets before baking. This keeps the fish juicy and adds flavor. You can boost the flavor with other herbs and spices. Try thyme, oregano, or even a pinch of chili flakes for heat. Lemon zest adds brightness, but lime works great too. Fresh herbs like basil or tarragon can switch things up. For side dishes, consider roasted vegetables or garlic mashed potatoes. A fresh salad with vinaigrette pairs well too. Other options like quinoa or rice provide a healthy base. For a stunning dish, use warm plates. Place the salmon in the center and drizzle with leftover garlic butter. Garnish with fresh herbs and a lemon wedge. This makes the plate pop and looks inviting. Wines that pair well include a crisp Sauvignon Blanc or a light Pinot Noir. These wines enhance the flavors without overpowering the dish. Enjoy your meal with friends or family for a delightful evening. {{image_4}} You can swap salmon for other fish. Try using trout or cod for a change. If you like seafood, shrimp works great too. Each fish gives a different taste and texture. For herbs, you can mix things up! Basil or thyme adds a nice twist. If you want spice, consider adding red pepper flakes. This will give your dish a kick. You can also try parsley with cilantro for a fresh taste. To make this dish dairy-free, use olive oil instead of butter. This keeps the flavor rich and smooth. For gluten-free, this recipe is already safe! Just ensure all your spices are gluten-free. If you want it low-calorie, cut back on the butter. You could use just two tablespoons instead of four. Pair it with lots of veggies for a balanced meal. Grilling is a great option for salmon. Brush the fillets with oil and season them. Grill skin-side down for about six to eight minutes. This gives a smoky flavor and crispy skin. You can also pan-sear the salmon. Heat oil in a skillet, cook skin-side down for four minutes, then flip. This method makes the salmon crispy yet tender. For a slow-cooker option, place the salmon in the cooker with garlic and herbs. Cook on low for two hours. This makes it very tender and full of flavor. You can serve it over rice or with a side salad. For the full recipe, refer to the section above. To store leftovers, place them in an airtight container. This helps keep the salmon fresh. Use glass or plastic containers with tight lids. Try to eat leftovers within two days for the best taste. If you want to save it longer, consider freezing. To reheat salmon, use low heat to avoid drying it out. Preheat your oven to 275°F (135°C). Place the salmon on a baking sheet and cover it with foil. Heat for about 15 minutes. Check it often to make sure it stays moist. You can also use a microwave. Heat it in 30-second bursts, checking in between. This will help keep it tender. To freeze garlic butter herb salmon, let it cool completely. Wrap each fillet in plastic wrap, then in foil. This gives it extra protection from freezer burn. Place the wrapped salmon in a freezer bag. Label the bag with the date. You can freeze it for up to three months. To thaw, move the salmon to the fridge for about eight hours. Once thawed, cook it right away to keep it fresh. You can bake it directly from frozen, but it will take longer to cook. What is the best type of salmon for this recipe? The best type of salmon for this recipe is wild-caught salmon. It has a rich flavor and firm texture. Sockeye and King salmon are great choices. They hold up well to cooking and absorb flavors nicely. Farmed salmon can work too, but it may be less flavorful. Can I substitute fresh herbs with dried herbs? Yes, you can use dried herbs instead of fresh. Use one-third the amount since dried herbs are more potent. For this recipe, if it calls for one tablespoon of fresh parsley, use one teaspoon of dried parsley. The flavor will still be good, but fresh herbs add a bright taste. What to do if the salmon isn't cooking evenly? If your salmon isn’t cooking evenly, check your heat. Adjust the pan on the burner. If one side is cooking faster, rotate the pan halfway through cooking. Use a meat thermometer to check doneness. The center should reach 145°F (63°C). How to know when salmon is fully cooked? You can tell salmon is fully cooked when it flakes easily with a fork. The flesh should be opaque, not translucent. If you have a meat thermometer, check it at the thickest part. It should read 145°F (63°C). How to avoid overcooking salmon. To avoid overcooking salmon, monitor the time closely. Use a timer and check it a few minutes early. Salmon cooks fast, so keep an eye on it. Another tip is to take it out of the oven just before it’s fully done. The residual heat will finish cooking it. Can I use salted butter instead of unsalted? Yes, you can use salted butter, but you may want to adjust the salt in the recipe. Start with less salt in the garlic butter mixture. Taste it before adding more. This way, you keep the flavor balanced. This article covered how to make delicious garlic butter herb salmon. I've shared the main ingredients, cooking steps, and helpful tips. Remember to choose the right salmon and adjust flavors as you like. Feel free to store leftovers properly or try different cooking methods. With these details, you can prepare a tasty meal that impresses everyone. Enjoy making this dish your own!

Garlic Butter Herb Salmon Simple and Tasty Recipe

Are you ready to elevate your dinner game with Garlic Butter Herb Salmon? This simple yet flavorful recipe showcases tender

When making mango coconut popsicles, using fresh, quality ingredients is key. Here’s what you need: - Fresh mangoes - Coconut milk - Sweetener options (honey or maple syrup) - Lime juice - Pure vanilla extract - Salt - Optional garnishes (coconut flakes) 1. Fresh mangoes: You need 2 ripe mangoes. They should be sweet and juicy. Peel and dice them for easy blending. 2. Coconut milk: Use 1 cup of coconut milk. Canned coconut milk gives a richer taste. 3. Sweetener options: You can use 1 tablespoon of honey or maple syrup. This step is optional, depending on how sweet you like your popsicles. 4. Lime juice: Add 1 tablespoon of fresh lime juice. This adds a nice zing and balances the sweetness. 5. Pure vanilla extract: Use 1/4 teaspoon for extra flavor. It makes the popsicles taste even better. 6. Salt: A pinch of salt enhances all the flavors. It’s a small but important step. 7. Optional garnishes: If you want, roll the tops in coconut flakes. This adds texture and a fun look. Gather these ingredients for a delightful treat. This recipe is easy and fun to make. You can find the full recipe for Tropical Bliss Mango Coconut Popsicles to guide you through each step. Preparing these popsicles is a fantastic way to enjoy the sunny flavors of summer! To start, gather your ingredients. You need ripe mangoes, coconut milk, honey or maple syrup, lime juice, vanilla extract, and a pinch of salt. 1. Blending the ingredients: Place the diced mangoes, coconut milk, honey or maple syrup, lime juice, vanilla extract, and salt into a blender. Blend on high speed until smooth and creamy. This step is key for the perfect texture. 2. Tasting and adjusting sweetness: After blending, taste the mixture. If it’s not sweet enough, add more honey or maple syrup. Blend again for a few seconds to mix it well. It’s all about making it just right for your taste. Now, let’s get that mixture into molds! 1. Pouring into molds: Carefully pour the mango-coconut mixture into popsicle molds. Leave a little space at the top to let the popsicles expand as they freeze. 2. Inserting popsicle sticks: Insert popsicle sticks into each mold. Make sure they are centered. You can gently tap the molds on the counter to release any air bubbles. This step helps avoid ice crystals. 3. Freezing time recommendations: Place the molds in the freezer. Let them freeze for at least 4 to 6 hours. You want them to be completely solid and firm before you take them out. Finally, it’s time to enjoy your treats! 1. Running warm water over molds: When you’re ready to eat, run warm water over the outside of the molds for a few seconds. This will help loosen the popsicles. 2. Removing popsicles: Gently pull on the sticks to free the popsicles from the molds. If they stick, give them a little more warm water to help them out. Now, your Mango Coconut Popsicles are ready to delight your taste buds! For the full recipe, check out the Tropical Bliss Mango Coconut Popsicles. To boost the taste of your mango coconut popsicles, consider using fresh coconut milk instead of canned. Fresh coconut milk offers a lighter texture. Canned coconut milk is thicker and creamier. Choose based on your preference. You can also add spices for more flavor. A pinch of cinnamon or a dash of cardamom can add warmth. Lime zest gives a bright, fresh taste. A little goes a long way, so start small! Garnishing your popsicles makes them look fun and appetizing. Try rolling the tops in coconut flakes for texture. You can also add fresh mango slices on the side. Serve the popsicles on a colorful plate or a wooden board. Adding lime wedges beside them makes for a vibrant display. Simple touches make a big difference! If you want vegan popsicles, skip the honey or maple syrup. Use agave syrup or leave it out entirely. The natural sweetness of mangoes is often enough. For those watching sugar, use a low-carb sweetener. Stevia or erythritol can work well. Adjust the amount to taste, just like with honey. This way, everyone can enjoy these tasty treats! For the full recipe, see the sections above. {{image_4}} You can make mango coconut popsicles even more fun by adding other fruits. Pineapple and banana are great choices. They add sweetness and tropical flair. For a berry twist, try mixing in strawberries or blueberries. These fruits bring a burst of color and flavor. You can blend them into the mango mixture or layer them. This lets you enjoy different tastes in each bite. If you want a creamier popsicle, consider using Greek yogurt. It adds a rich texture and protein. You can also try nut milk like almond or cashew. These options can make the popsicles dairy-free. Just swap out the coconut milk for your nut milk of choice. Each variation gives a new twist to the classic flavor. Make your popsicles even more exciting by using different molds. You can find fun shapes like stars or animals. Kids love these playful designs! Layering colors also adds visual appeal. Pour one color, let it freeze a bit, then add another color. This creates a stunning look that makes the popsicles even more tempting. To keep your mango coconut popsicles fresh, wrap them well. Use plastic wrap or aluminum foil. This prevents ice crystals from forming. You can also store them in a freezer-safe bag. Be sure to remove as much air as possible. Store your popsicles at a steady temperature. The ideal freezing temperature is 0°F (-18°C) or lower. Avoid opening the freezer too often. This helps keep the cold air inside. Mango coconut popsicles last up to two months in the freezer. After this time, they may lose flavor. Keep an eye out for signs of freezer burn. This looks like white or icy patches on the popsicles. If you see this, it’s best to throw them away. You can refreeze popsicles if they thaw. However, this might change the texture. They may become icy or grainy. The taste might also suffer a bit. To enjoy the best flavor and texture, eat them fresh when possible. Mango coconut popsicles usually take about 4 to 6 hours to freeze completely. This time ensures that they reach a firm and solid state. For the best results, I recommend leaving them in the freezer overnight. This way, you’ll always have a refreshing treat ready to enjoy. Yes, you can use frozen mango! It’s a great alternative when fresh mangoes aren't available. Just make sure to thaw the frozen mango slightly before blending. This helps create a smoother texture. Frozen mango often has a more intense flavor, which can make your popsicles even tastier. Mango coconut popsicles can be a healthy treat. They are low in fat and provide vitamins from the mangoes. Mangoes are rich in vitamin C and fiber. Coconut milk adds healthy fats that can be good for your heart. If you choose to use a natural sweetener like honey or maple syrup, you can control the sugar content. You can find pre-made mango coconut popsicles at many grocery stores. Look for brands that focus on natural ingredients. Stores like Whole Foods, Trader Joe’s, and local health food shops often carry them. You can also check online retailers for convenient delivery options. For the full recipe, check out the Tropical Bliss Mango Coconut Popsicles recipe! In this blog post, we explored how to make delicious mango coconut popsicles. We covered key ingredients, like fresh mangoes and coconut milk. You learned how to blend, mold, and freeze your popsicles perfectly. We shared tips for enhancing flavor and making variations to suit your taste. Lastly, we discussed storage tips to keep your treats fresh. Now, you can enjoy these fun, refreshing popsicles anytime. Get ready to savor the tropical taste of summer all year round!

Mango Coconut Popsicles Simple and Refreshing Treat

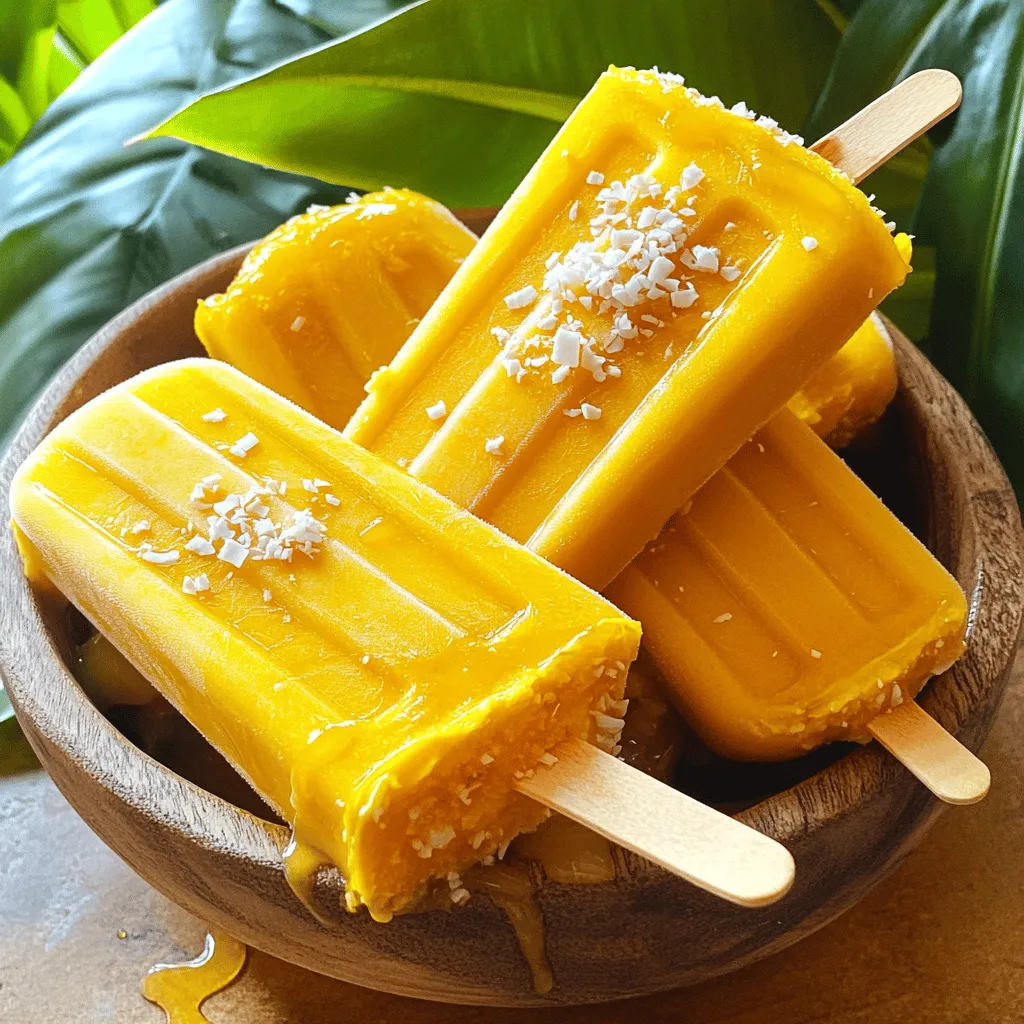
Are you ready to beat the heat with a delicious treat? These Mango Coconut Popsicles are simple to make and

To make a delicious Creamy Sun-Dried Tomato Risotto, gather these key ingredients: - 1 cup Arborio rice - 4 cups vegetable broth (preferably low-sodium) - 1/2 cup sun-dried tomatoes, chopped (oil-packed for extra flavor) - 1 small onion, finely chopped - 2 cloves garlic, minced - 1/2 cup heavy cream - 1 cup freshly grated Parmesan cheese - 2 tablespoons olive oil - Salt and fresh ground black pepper to taste - Fresh basil leaves for garnish These ingredients come together to create a rich and creamy dish. Arborio rice is essential. Its high starch content gives risotto that famous creamy texture. The sun-dried tomatoes add a burst of flavor, while the heavy cream and Parmesan make it rich and indulgent. Using vegetable broth enhances the taste without overpowering the other ingredients. Fresh herbs like basil add a nice touch of color and freshness when serving. For a full recipe, check the detailed instructions on how to prepare this satisfying meal. First, heat the vegetable broth in a medium saucepan. Keep it on low heat. This warm broth helps the rice cook well. You want it warm for the whole cooking time. In a large skillet, add olive oil and warm it over medium heat. Once hot, add the finely chopped onion. Cook it until it turns soft and clear, about 3-4 minutes. Stir it often to avoid browning. Next, add minced garlic and chopped sun-dried tomatoes. Cook for an extra 1-2 minutes until the garlic smells nice, and the tomatoes soften. Now it’s time for the Arborio rice. Add it to the skillet and stir well. Toast the rice for about 2 minutes to bring out its nutty flavor. After that, start adding the warm broth. Do it one ladle at a time. Stir constantly and let each scoop soak in before adding more. This process should take about 18-20 minutes. The rice should be creamy and slightly firm. When the rice is done, take the skillet off the heat. Fold in the heavy cream and freshly grated Parmesan cheese. Stir until it all blends together. Season with salt and fresh ground black pepper to your taste. Let the risotto rest for a minute. This helps it thicken and become even creamier. Serve in warm bowls and garnish with fresh basil leaves. For extra taste, sprinkle more Parmesan on top. For the full recipe, check the earlier sections. To make your risotto creamy, keep the broth warm. Warm broth helps the rice absorb flavors and cook evenly. If the broth is cold, the rice can turn gummy. Stirring is also key for a creamy texture. Stir the rice often as you add broth. This helps release starch, creating that velvety feel. Use high-quality ingredients for the best flavor. Fresh sun-dried tomatoes packed in oil add rich taste. Choose good olive oil and fresh garlic, which boost flavor. You can also add spices like red pepper flakes or Italian herbs. They bring a nice kick and depth to the dish. One common mistake is overcooking or undercooking the rice. Keep an eye on the texture. It should be al dente, soft but with a slight bite. Another mistake is not stirring enough. Stirring helps the rice cook evenly and keeps it from sticking. So, keep stirring for that perfect creamy risotto! For the full recipe, check out the detailed instructions included above. {{image_4}} You can make this risotto even heartier by adding protein. For meat lovers, grilled chicken or sautéed shrimp pair great with the creamy sun-dried tomato flavor. Simply cook the chicken or shrimp separately and mix them in just before serving. If you prefer a vegetarian route, try adding chickpeas or white beans. They bring protein and fiber while keeping the dish plant-based. Just toss them in towards the end of cooking to warm them up. Seasonal vegetables can elevate this dish. Think about adding spinach, peas, or zucchini for a fresh touch. You can sauté these veggies in olive oil before adding them to the risotto. This technique brings out their flavors and keeps them tender. Adding vegetables not only boosts nutrition but also adds colorful appeal to your plate. Just remember to chop them into small pieces for easy mixing. To make your risotto even tastier, consider adding fresh herbs like thyme or parsley. They add brightness and depth to the dish. For a spicy kick, a pinch of red pepper flakes works well too. If you want to switch up the cheese, try feta or goat cheese instead of Parmesan. These alternatives give a unique flavor that complements the sun-dried tomatoes. For a full guide on how to make this delightful dish, check out the Full Recipe. To keep your creamy sun-dried tomato risotto fresh, follow these steps: - Refrigeration: Place leftovers in an airtight container. This keeps it moist and tasty. Store in the fridge for up to three days. - Freezing: To freeze, let the risotto cool completely. Then, put it in freezer-safe bags. Squeeze out air to prevent freezer burn. It can last up to three months in the freezer. When it's time to enjoy your risotto again, you have two main options: - Microwave: Place the risotto in a microwave-safe dish. Cover it with a damp paper towel to keep it moist. Heat in short bursts, stirring in between, until warmed through. - Stovetop: For stovetop reheating, add a splash of broth or water to the risotto in a skillet. Heat over low heat, stirring often. This helps bring back the creaminess. Adding moisture back into the risotto is key. It ensures that your dish remains creamy and delicious, just like when you first made it. If you need more tips, check the Full Recipe for extra guidance on storage and reheating. To make creamy risotto, you need to focus on a few key steps. First, you use Arborio rice, which has a high starch content. This starch is what gives risotto its creamy texture. 1. Warm broth: Always keep your vegetable broth warm. This helps the rice cook evenly. 2. Sauté aromatics: Start by cooking onion and garlic in olive oil. This adds depth to the flavor. 3. Toast rice: Stir in the Arborio rice and toast it for a couple of minutes. This enhances the nutty taste. 4. Add broth gradually: Pour in the warm broth one ladle at a time. Stir often and let the rice absorb the broth fully before adding more. 5. Finish with cream and cheese: When the rice is al dente, fold in heavy cream and Parmesan cheese. This creates a luscious, creamy dish. Yes, you can make risotto ahead of time. However, it’s best to serve it fresh. If you make it early, store it in the fridge for up to two days. When you reheat risotto, it often becomes too thick. To fix this, add a splash of broth or water while warming it. Heat it gently on the stovetop for best results. Creamy sun-dried tomato risotto pairs well with many dishes. Here are some great options: - Grilled chicken: The flavors complement each other well. - Roasted vegetables: Seasonal veggies add color and nutrition. - Fresh salad: A light salad balances the richness of the risotto. - Crusty bread: Perfect for soaking up that creamy goodness. Yes, you can substitute some ingredients in this risotto recipe. Here are a few ideas: - Rice: If you can't find Arborio rice, you can use Carnaroli or Vialone Nano. Both will yield a creamy result. - Broth: For a different taste, try chicken broth instead of vegetable broth. - Cream: You can use half-and-half or full-fat coconut milk for a lighter version. - Cheese: If you want a stronger flavor, swap Parmesan for Pecorino Romano. These substitutions can change the flavor and texture but will still give you a delicious risotto. For the full recipe, check out the main article. This blog post covered how to make a creamy sun-dried tomato risotto. We explored key ingredients, step-by-step instructions, tips for perfect texture, and ways to add protein or veggies. I shared storage tips to keep your risotto fresh and reheating advice to maintain creaminess. In conclusion, making risotto is fun and rewarding. With practice, you can create many delicious versions. Use this guide and enjoy every bite! You have the skills to impress anyone at the dinner table.

Creamy Sun-Dried Tomato Risotto Flavorful and Easy Dish

If you’re craving a comforting dish that’s both creamy and full of flavor, I have just the recipe for you!

Fresh corn and vegetables are the heart of this salad. You will need: - 4 ears of fresh corn, husked - 1 medium red bell pepper, diced - 1 jalapeño, finely chopped (seeds removed for milder flavor) - 1/2 cup red onion, finely chopped - 1/2 cup cherry tomatoes, halved - 1/4 cup fresh cilantro, chopped These components bring bright colors and fresh flavors. Each bite is a burst of summer. The sweet corn pairs well with the crisp bell pepper. The jalapeño adds just the right kick, while the tomatoes keep things juicy. Next, let's talk about the dressing components, which tie everything together. You will need: - Juice of 2 fresh limes - 3 tablespoons extra virgin olive oil - 1 teaspoon chili powder - Salt and freshly ground black pepper, to taste - Crumbled feta cheese (optional, for garnish) The lime juice gives a tart zing. Olive oil adds richness, while chili powder brings warmth. Salt and pepper enhance all the flavors. If you like, sprinkle some feta cheese on top for a creamy finish. For the full recipe, check out the details above. This salad is perfect for picnics or a light meal at home. - Preheat the grill to medium-high heat. - Place the husked corn directly on the grill. - Grill the corn for 10-12 minutes, turning occasionally. Grilling corn adds a smoky flavor that shines in this salad. When the corn is ready, you’ll see beautiful char marks. The corn kernels will be tender and juicy. - Allow the corn to cool for a few minutes. - Slice the kernels off the cobs using a sharp knife. - Add the grilled corn to a large mixing bowl with the vegetables. Mixing the grilled corn with fresh veggies enhances the salad. You’ll add diced red bell pepper, chopped jalapeño, red onion, halved cherry tomatoes, and chopped cilantro. Each bite will be a burst of flavor. - In a small bowl, whisk lime juice, olive oil, chili powder, salt, and pepper. - Drizzle the dressing over the salad and toss to combine. The lime dressing brings everything together. It adds brightness that complements the grilled corn. Taste the salad and adjust the seasoning if needed. You can add more lime or salt for extra zing. For a creamy touch, sprinkle crumbled feta cheese on top. For the full recipe, be sure to check out the [Full Recipe]. Enjoy your fresh and zesty Chili Lime Grilled Corn Salad! - Use fresh corn for the best flavor. Fresh corn gives a sweet and juicy taste. - Turn corn frequently for even charring. This helps cook it evenly and adds great grill marks. - Experiment with other spices or herbs. Consider using smoked paprika for a deeper flavor. - Try adding lime zest for extra citrus flavor. This will boost the freshness of the salad. - Serve chilled or at room temperature. This makes it a perfect dish for summer gatherings. - Garnish with whole cilantro leaves and lime wedges. This adds a lovely pop of color and extra zest. For the complete recipe, check out the [Full Recipe]. {{image_4}} You can boost your salad with protein. For a tasty twist, add grilled chicken or shrimp. These additions make the dish heartier and more filling. If you prefer a vegetarian option, black beans work great. They add protein and fiber without meat. You can mix and match based on your taste. Get creative with your veggies! You can add or substitute avocado for a creamy texture. Avocado pairs well with the lime and chili flavors. You can also use bell peppers in different colors. A mix of red, yellow, and green adds beauty and crunch to your salad. Each color brings its own flavor and nutrients. The dressing can change the whole taste. You might try a cilantro-lime vinaigrette for a fresh take. It adds a zesty kick that brightens the salad. If you want a creamier option, Greek yogurt is a great choice. It gives a rich texture and tangy flavor. Don't hesitate to experiment to find your favorite! For the full recipe, check out the earlier sections. To keep your salad fresh, store it in an airtight container in the fridge. This will lock in the flavors and keep it tasty. You should eat it within 2-3 days for the best taste. You can serve this salad cold or at room temperature. It's best not to reheat it, as it may change the texture. Before serving leftovers, mix it well to combine all flavors again. If you're not serving the salad right away, store each part separately. This way, nothing gets soggy. Make sure to keep the dressing in a different container until you're ready to eat. This keeps everything fresh and crunchy! Yes, it's best if made a few hours before to let flavors meld. The longer it sits, the better the taste. You will enjoy a richer flavor profile. Store it in the fridge until you're ready to serve. Yes, thaw and grill or sauté for best results. Frozen corn can be a great time-saver. Just make sure to remove excess moisture before cooking. This ensures it grills up nicely, adding that delicious charred flavor. Absolutely, it keeps well and is refreshing when served cold. This salad lasts a few days in the fridge. Pack it in individual containers for quick lunches or snacks. Just remember to keep the dressing separate until serving. This blog post covered how to make a fresh corn salad. You learned about the key ingredients, like juicy corn and vibrant veggies. We also discussed how to prepare the corn, mix in vegetables, and whip up a simple dressing. I shared tips to enhance flavors and suggested fun variations, like adding proteins or trying different dressings. By following these steps, you’ll create a refreshing dish perfect for any meal. Enjoy making this salad and feel free to get creative!

Chili Lime Grilled Corn Salad Fresh and Zesty Delight

Looking for a fresh and zesty dish that brightens any meal? My Chili Lime Grilled Corn Salad is bursting with

Older posts
Page1 Page2 … Page76 Next →

dsad

© 2025 eataroundit • Built with GeneratePress

Our Policies

  • Copyright Policy
  • Cookie Policy
  • GDPR Policy
  • Privacy Policy
  • Disclaimer
  • Terms Of Use

More Information

  • Home
  • About
  • Contact
  • Appetizers
  • Dessert
  • Dinner
  • Drinks
©2025, eataroundit About Back To Top