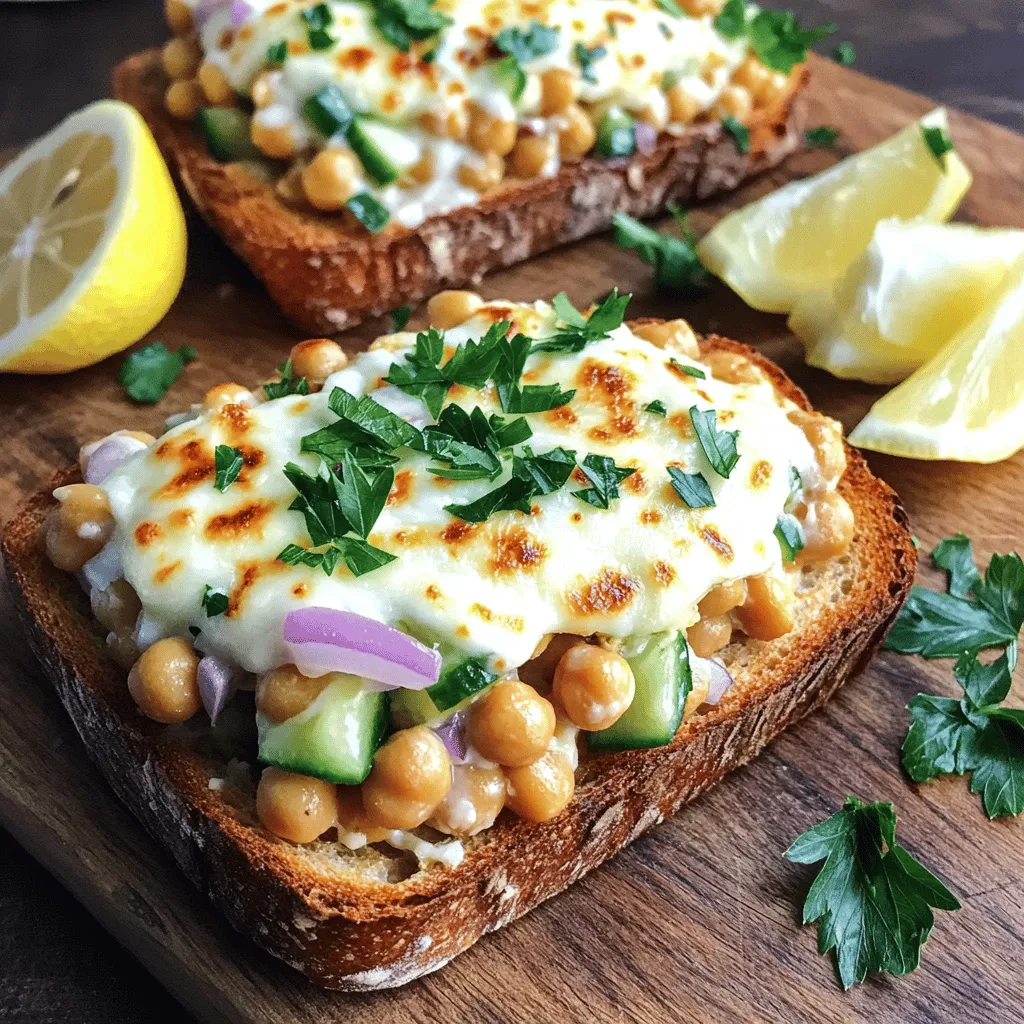
Looking for a tasty meal that’s quick to whip up? Chickpea Salad Melts are the answer! Packed with protein and bursting with flavor, these melts offer a satisfying twist on a classic sandwich. You’ll love how easy they are to make, and I promise your taste buds will thank you. Let’s dive into the simple ingredients and steps to create this delightful dish that’s perfect for any meal!
Ingredients
Main Ingredients
For a tasty Chickpea Salad Melt, you need:
– 1 can (15 oz) chickpeas, drained and rinsed
– 2 tablespoons tahini
– 1 tablespoon fresh lemon juice
– 1 tablespoon extra virgin olive oil
– 1 teaspoon Dijon mustard
– 1 small red onion, finely chopped
– 1/2 cucumber, diced
– 1/4 cup fresh parsley, finely chopped
– Salt and freshly cracked black pepper to taste
– 4 slices whole-grain bread
– 1/2 cup shredded mozzarella cheese (or vegan cheese, as a substitute)
These ingredients blend well for a fresh and creamy taste. The chickpeas give you protein, while tahini adds a rich flavor. The lemon juice brightens it all up. Each bite feels light and crunchy from the cucumber and onion.
Alternative Ingredients
If you want to switch things up, consider these options:
– Vegan cheese options for a dairy-free choice.
– Gluten-free bread options if you avoid gluten.
These swaps keep the recipe friendly for more diets. You still get great flavor and texture.
Suggested Seasonings
To enhance the taste, use:
– Salt
– Black pepper
– Potential herbs and spices like paprika or cumin.
These seasonings add depth to your melts. You can adjust them based on your taste. A little extra seasoning can make a big difference in flavor.Enjoy creating this simple, delicious meal!
Step-by-Step Instructions
Preparation Steps
To start, you need to mash the chickpeas. Open the can and drain them well. Then, rinse the chickpeas under cold water. In a medium bowl, use a fork to mash them. Aim for a chunky texture. You want some pieces to remain whole for a nice bite.
Next, mix the chickpea salad ingredients. Add tahini, lemon juice, olive oil, and Dijon mustard to the mashed chickpeas. Stir well until it becomes creamy. Then, fold in the chopped red onion, diced cucumber, and fresh parsley. Season with salt and pepper. Mix until everything is well combined.
Assembling the Melts
Now, it’s time to spread the chickpea mixture on your bread. Take four slices of whole-grain bread and lay them flat. Spoon the chickpea salad mixture generously onto each slice. Make sure to spread it evenly across the bread.
After that, add the cheese. Sprinkle shredded mozzarella cheese over the chickpea salad on each slice. Make sure the cheese covers the mixture well. This will help create that perfect melty effect.
Baking Instructions
Preheat your oven to 375°F (190°C). This step is key for perfect melts. Place the baking sheet in the oven for about 10-12 minutes. Keep an eye on the melts. You want the cheese to be bubbling and slightly golden.
As the melts bake, monitor the cheese closely. Remove them from the oven once they look perfect. Let them cool for about a minute before serving. This will help you avoid burns when you take a bite.Enjoy your Chickpea Salad Melts!
Tips & Tricks
Best Practices
To make your chickpea salad burst with flavor, focus on fresh ingredients. Use ripe lemons for juice and crisp cucumbers for crunch. The tahini adds a rich, nutty taste, so don’t skip it. When mixing, taste as you go. Adjust the salt and pepper to fit your taste.
To avoid soggy bread, toast it lightly before adding the chickpea salad. This creates a barrier. You can also spread a thin layer of olive oil on the bread. This adds flavor and helps keep it crisp.
Serving Suggestions
Chickpea salad melts pair well with a variety of dips. A simple hummus or a tangy tzatziki can complement the dish. You might also serve it with a fresh side salad or roasted veggies for a complete meal.
When it comes to drinks, a chilled white wine, like Sauvignon Blanc, works great. If you prefer non-alcoholic, an iced herbal tea adds a refreshing touch.
Customization Ideas
Feel free to throw in extra veggies like bell peppers or spinach for added crunch and nutrition. A sprinkle of paprika or cumin can spice things up. If you have leftovers, try them in a wrap or as a topping for crackers. This way, you can enjoy a new meal without wasting food.

Variations
Dietary Modifications
Chickpea Salad Melts are easy to adapt. For a vegan version, simply use vegan cheese. You can also swap regular bread for gluten-free bread. This way, everyone can enjoy these tasty melts.
You can play with cheeses, too. Try goat cheese for a tangy kick or cream cheese for smoothness. Each cheese gives a different flavor twist. Don’t be afraid to mix and match spreads. Hummus adds creaminess, while pesto brings fresh herbs to your dish.
Flavor Enhancements
Want to spice things up? Add jalapeños or hot sauce for a fiery touch. You can also toss in some diced bell peppers for crunch. These spicy additions will wake up your taste buds.
For a Mediterranean flair, include olives, feta cheese, or fresh herbs like basil or oregano. These ingredients bring bold flavors and color to your melts. They create a delightful contrast to the chickpeas and cheese.
Presentation Styles
How you serve these melts can change the whole experience. You can make them open-faced for a casual bite. Just scoop the chickpea mixture onto one slice of bread. This style shows off the colorful ingredients.
For a more traditional look, use two slices of bread. Cut the melts into halves or quarters for easy sharing. If you’re hosting, serve them on a nice platter. Add a garnish of fresh parsley and lemon wedges. This makes your dish pop and adds zest.
Storage Info
Refrigeration Guidelines
To keep your chickpea salad melts fresh, store any leftovers in the fridge. Use an airtight container to prevent moisture loss and keep flavors intact. You can also wrap the melts tightly in plastic wrap. Make sure to eat them within three days for the best taste and texture.
Freezing Instructions
Yes, you can freeze chickpea salad melts! To do this, first let them cool completely. Place them in a freezer-safe container or wrap them in foil. They can stay in the freezer for up to two months. When you want to enjoy them, take them out and let them thaw in the fridge overnight. To reheat, place them in a preheated oven at 375°F (190°C) for about 10–15 minutes. This will ensure they become warm and cheesy again.
Freshness Indicators
Watch for a few signs to know if your chickpea salad melts have spoiled. If you see any mold or an off smell, it’s best to toss them. If the bread feels soggy or the salad looks dry and crumbly, those are also signs to discard them. Always trust your senses when it comes to food safety.
FAQs
How long do Chickpea Salad Melts last in the fridge?
Chickpea Salad Melts stay fresh for about three days in the fridge. Store them in an airtight container. This keeps them tasty and safe to eat. If you notice any changes in smell or texture, it’s best to toss them.
Can I make Chickpea Salad Melts ahead of time?
Yes, you can prepare the chickpea salad mix a day in advance. Just store it in the fridge. When you’re ready to bake, spread it on the bread and add cheese. This saves you time and makes for a quick meal.
What can I serve with Chickpea Salad Melts?
These melts pair well with many sides. Try serving them with a simple green salad. You can also add fresh fruit or crunchy veggies. A bowl of soup makes a cozy choice, too.
Are Chickpea Salad Melts suitable for vegans?
Yes, Chickpea Salad Melts can easily fit a vegan diet. Just use plant-based cheese instead of mozzarella. All other ingredients are already vegan-friendly. Enjoy this tasty meal without worry!
Chickpea Salad Melts are tasty and easy to make. We explored the main ingredients like chickpeas, tahini, and herbs. You learned how to mash chickpeas and create the perfect mix. We covered tips to avoid soggy bread and serve the dish well. Remember, it’s easy to customize with flavors or cheese. Keep storing your leftovers smartly to maintain freshness. Enjoy your cooking adventure with these melts, and feel free to explore different variations!