Skip to content
DisclaimerTerms Of UseGDPR PolicyCookie Policy

eataroundit

  • Home
  • Drinks
  • Appetizers
  • Dinner
  • Dessert
  • About
  • Contact
  • Privacy Policy
DisclaimerTerms Of UseGDPR PolicyCookie Policy

NO-ING-IMG

For this dish, you will need: - 4 bone-in, skin-on chicken thighs These chicken thighs add great flavor and moisture as they cook. The bone keeps the meat juicy, while the skin crisps up nicely. To make the tasty sauce, gather these items: - 1/2 cup honey - 1/4 cup soy sauce - 4 cloves garlic, minced - 1 tablespoon fresh ginger, grated - 1 teaspoon sesame oil - 1/2 teaspoon red pepper flakes (optional for a spicy kick) - Salt and pepper to taste The honey and soy sauce blend gives a sweet and salty taste. The garlic and ginger add a fresh kick. You can add red pepper flakes if you like some heat. For added richness and garnish, consider: - 1 tablespoon cornstarch (for thickening the sauce) - 2 green onions, finely chopped (for garnish) - Sesame seeds (for garnish) Using cornstarch helps thicken the sauce to coat the chicken better. Green onions and sesame seeds add a nice crunch and color. To start, dry the chicken thighs with paper towels. This helps the chicken get a nice sear. Next, season both sides of the chicken with salt and pepper. This adds great flavor to each bite. In a medium bowl, mix together the honey, soy sauce, minced garlic, and grated ginger. Add sesame oil and red pepper flakes if you want some heat. Whisk everything until it blends well. Set this flavorful mixture aside for later. Place the chicken thighs in the slow cooker. Make sure the skin side is facing up. Pour the honey garlic sauce over the chicken, ensuring each piece is well coated. Cover the slow cooker with its lid. Cook on low for 4-6 hours or high for 2-3 hours. The chicken will be tender and cooked through. If you want a thicker sauce, take the chicken out of the slow cooker and set it on a plate. In a small bowl, mix cornstarch with a few tablespoons of water to make a smooth slurry. Stir this into the sauce left in the slow cooker. Cook on high for an extra 10-15 minutes to thicken. Once the sauce is thick, return the chicken to the slow cooker. Make sure it’s well coated in the sauce. Serve the chicken warm on a plate. Garnish with chopped green onions and sesame seeds. For a complete meal, serve it over jasmine rice or with steamed vegetables. Enjoy! When cooking chicken thighs, start with bone-in and skin-on. These cuts keep the meat juicy and tender. Pat the chicken dry before seasoning. This helps the skin crisp up nicely. Always season both sides well with salt and pepper. This step brings out the natural flavors. If you want to sear the thighs first, do it in a hot pan. Searing adds color and depth to the dish. To boost the flavor, use fresh ingredients. Fresh garlic and ginger make a big difference in taste. Add red pepper flakes if you want some heat. They bring a nice kick to the honey garlic sauce. For a more complex flavor, consider adding a splash of rice vinegar. It can brighten the dish and balance the sweetness of honey. If you have time, marinate the chicken in the sauce for a few hours. This extra step allows the flavors to soak in deeper. You can cook honey garlic chicken thighs in several ways. If you don't have a slow cooker, use an oven. Preheat your oven to 375°F. Place the chicken in a baking dish and pour the sauce over it. Bake for 30-40 minutes or until the chicken is fully cooked. Another option is grilling. Marinate the chicken first, then grill over medium heat. This method adds a smoky flavor. Lastly, you can use a stovetop method. Simmer the chicken in a pan with the sauce on medium heat. Cook until tender and the sauce thickens. Each method gives you a tasty dish with unique flavors. {{image_4}} You can add heat to your dish by using red pepper flakes. This gives a spicy kick to the sweet honey garlic sauce. Adjust the amount to your taste. If you like it hotter, use more flakes. For extra flavor, try adding a splash of hot sauce too. It will enhance the dish while keeping the sweet notes. Mixing in vegetables can make this meal even better. You can add carrots, bell peppers, or broccoli. Place the veggies in the slow cooker with the chicken. They soak up the tasty sauce while cooking. This not only makes a complete meal but also adds color and nutrition to your plate. For an Asian twist, consider adding sesame seeds and green onions. These ingredients will give extra flavor and texture. You can also use bok choy or snow peas for a fresh touch. These ingredients add crunch and make the dish more vibrant. They create a fun mix of flavors that will impress everyone at your table. To store leftovers, let the chicken cool down first. Place the chicken thighs in an airtight container. Pour any remaining honey garlic sauce over the chicken. This helps keep the meat moist. Store the container in the fridge for up to three days. Make sure to label the container with the date. When you are ready to enjoy the leftovers, preheat your oven to 350°F (175°C). Place the chicken thighs in a baking dish. Pour some of the sauce over the chicken to keep it juicy. Cover with foil to prevent drying out. Heat for about 20 minutes or until it's hot throughout. You can also reheat in the microwave. Use a microwave-safe dish, and cover with a damp paper towel. Heat in short bursts, checking often. For longer storage, you can freeze the honey garlic chicken thighs. First, let the chicken cool completely. Place the thighs in a freezer bag. Squeeze out as much air as possible before sealing. You can also freeze the sauce separately. Use it within three months for the best flavor. When ready to eat, thaw overnight in the fridge. Reheat as mentioned above for a great meal. Yes, you can use boneless chicken thighs. They will cook faster than bone-in thighs. Adjust the cooking time to about 2-3 hours on high or 4 hours on low. The meat will remain juicy and absorb the honey garlic sauce well. I love serving honey garlic chicken thighs with jasmine rice. The rice soaks up the sauce. Steamed broccoli or carrots add color and nutrients. You can also make a simple salad with fresh greens for a light side. Absolutely! You can prepare the honey garlic sauce a day ahead. Just store it in the fridge. Then, add the chicken and sauce to the slow cooker when you are ready to cook. This saves time and makes dinner easy. To make this dish gluten-free, use tamari instead of soy sauce. Tamari is a gluten-free soy sauce. Check labels on honey and other ingredients to ensure they are gluten-free. This way, everyone can enjoy the meal. The best way to check if the chicken is done is by using a meat thermometer. Insert it into the thickest part of the thigh. The internal temperature should reach 165°F. If you do not have a thermometer, the meat should be fork-tender and easy to pull apart. This blog shared how to make delicious honey garlic chicken thighs. We discussed key ingredients, step-by-step instructions, and helpful tips. I also offered variations to try and storage advice. In conclusion, this recipe is flexible and easy. You can customize it to fit your taste. Enjoy your cooking adventure with these chicken thighs, and have fun experimenting!

Slow Cooker Honey Garlic Chicken Thighs Savory Dish

Looking for a crowd-pleasing dish that’s easy to make? Slow Cooker Honey Garlic Chicken Thighs are just what you need.

- Cauliflower florets - All-purpose flour or gluten-free flour - Buffalo sauce - Shredded cabbage - Diced avocado - Fresh cilantro - Garlic powder - Onion powder - Smoked paprika - Salt and black pepper For this recipe, you’ll need a medium head of cauliflower. Chop it into bite-sized florets. This makes it easy to coat and fry. For the batter, you can use all-purpose flour or gluten-free flour. Mix it with water, garlic powder, onion powder, smoked paprika, and a pinch of salt and pepper. This will create a smooth texture. Buffalo sauce is key for flavor. You can choose store-bought or make your own. The choice is yours! For toppings, I love using shredded cabbage for crunch. Diced avocado adds creaminess. Fresh cilantro gives a pop of flavor. These toppings make the tacos vibrant and tasty. Make sure to have lime wedges on hand. They add a bright, tangy finish to your tacos. Enjoy these delicious bites! First, grab a large bowl. In it, whisk together the flour, water, garlic powder, onion powder, smoked paprika, and a pinch of salt and pepper. Mix until it's smooth. Next, add the cauliflower florets into the bowl. Make sure each piece gets coated well in that tasty batter. Now, let’s get the air fryer ready. Set the temperature to 400°F (200°C). Let it preheat for about 5 minutes. This step is key for making your cauliflower crispy. Once the air fryer is hot, place the battered cauliflower florets in the basket. Try to keep them in a single layer. If you have a lot, cook in batches. Air fry for about 12 to 15 minutes. Shake the basket halfway through to ensure even cooking. You want them to be golden brown and crispy. While the cauliflower cooks, warm your tortillas. Use a dry skillet over medium heat. Heat each tortilla for about 30 seconds on each side. They should be soft and warm. Now, take a tortilla and fill it with the spicy buffalo cauliflower. Top it with shredded cabbage and diced avocado for a nice crunch. Finish with fresh cilantro on top. Serve each taco with lime wedges for that perfect zing! To make your buffalo cauliflower crispy, I use a few simple air frying techniques. First, coat each floret well in the batter. This helps create a crunch. Second, don't overcrowd the air fryer basket. Air needs space to circulate. Cook in batches if needed. Lastly, shake the basket halfway through cooking. This ensures all sides get crispy and golden. When it comes to sauce, you have two choices: store-bought or homemade. Store-bought buffalo sauce is quick and easy. Look for one that fits your taste. Homemade buffalo sauce is fun to make. Combine hot sauce, butter, and a pinch of garlic powder. This gives you control over the flavors and heat level. Both options work well, so choose what you prefer! These tacos shine with a few tasty accompaniments. Shredded cabbage adds a nice crunch. Diced avocado brings creaminess and richness. Fresh cilantro adds a burst of flavor. Serve lime wedges on the side. A squeeze of lime brightens the dish. You can also pair the tacos with a light salad or some fresh fruit for a well-rounded meal. Enjoy your delicious creation! {{image_4}} You can mix things up with different sauces. If you want a milder flavor, try garlic herb sauce. It gives a nice touch without too much heat. Ranch sauce is another great option. It adds creaminess and cools down the spice. You can even make a blend of buffalo sauce with honey for a sweet twist. Experiment with your favorite flavors! Don’t stop at cauliflower! You can add more veggies to your tacos. Try bell peppers for sweetness and color. Zucchini is another great choice, adding moisture and a nice texture. Even diced tomatoes can work well. Just remember to chop them small so they fit nicely in your tacos. Need a vegan or gluten-free option? It’s easy! For a vegan taco, use gluten-free flour. This keeps the taco light and crispy. You can also try chickpea flour for added protein. If you want to make it gluten-free, choose corn tortillas instead of flour. Both options taste amazing! To store leftovers, place the tacos in an airtight container. If you can, keep the cauliflower separate from the tortillas. This helps maintain the crunch. Store them in the fridge for up to three days. Before eating, check for any signs of spoilage. To reheat the tacos, use an air fryer or an oven. This keeps the cauliflower crispy. Preheat your air fryer to 350°F (175°C). Heat the tacos for about 5-7 minutes. If using an oven, wrap them in foil and bake for 10-12 minutes. Avoid using a microwave, as it can make the cauliflower soggy. You can freeze the buffalo cauliflower for later use. Allow it to cool completely before freezing. Place the cauliflower in a freezer-safe bag. Remove as much air as possible. Freeze for up to three months. To thaw, place it in the fridge overnight. Reheat as mentioned above for best results. Yes, you can prepare these tacos ahead of time. Here are some tips for meal prep: - Cook the cauliflower and toss it in buffalo sauce. - Store it in an airtight container. - Keep the tortillas and toppings separate until ready to serve. - Reheat the cauliflower in the air fryer for the best crispiness. These tacos pair well with many side dishes. Here are some suggestions: - Fresh guacamole for a creamy side. - A simple black bean salad for added protein. - Crispy tortilla chips with salsa for a crunchy treat. Making homemade buffalo sauce is easy. Here’s a simple recipe: - Mix ½ cup of hot sauce with ¼ cup of melted butter. - Add 1 teaspoon of garlic powder and 1 tablespoon of vinegar. - Stir until well combined. - Adjust heat by adding more hot sauce if you like it spicier. This blog post shared how to make delicious buffalo cauliflower tacos. We covered key ingredients, seasoning, and step-by-step instructions for the perfect dish. You learned about air frying techniques for crispiness and ways to customize flavors. Don’t forget about storage tips for leftovers. These tacos are an easy, tasty option for any meal. Enjoy experimenting with different toppings and sauces to make them your own. Get ready to impress your family and friends with this fun twist on tacos.

Air Fryer Buffalo Cauliflower Tacos Simple and Tasty

Looking for a quick, tasty meal that will wow your tastebuds? These Air Fryer Buffalo Cauliflower Tacos are exactly what

- 12 oz cheese tortellini (choose fresh or frozen based on your preference) - 2 cups fresh spinach, roughly chopped - 1 cup heavy cream, for luxurious richness - 1 cup vegetable broth, to enhance the flavor - 1 medium lemon, zested and juiced to brighten the dish - 1 cup cherry tomatoes, halved for a pop of sweetness - 2 cups Parmesan cheese, freshly grated for the ultimate creaminess - 2 tablespoons olive oil, for sautéing - 3 cloves garlic, minced for aromatic depth - Salt and freshly ground pepper, to taste - Fresh basil leaves for garnish (optional, but recommended for a burst of freshness) Gathering these ingredients is simple. Start with cheese tortellini, either fresh or frozen. I love using fresh for a soft bite, but frozen works well too. Next, grab fresh spinach. It adds a nice color and nutrition. Heavy cream brings rich flavor, while vegetable broth adds depth. Now, let’s talk about flavor enhancers. The lemon zest and juice brighten this dish. Cherry tomatoes add sweetness and color. For creaminess, use freshly grated Parmesan cheese. Olive oil and garlic create a fragrant base. Don’t forget seasoning! Salt and freshly ground pepper bring everything together. Finally, fresh basil leaves add a lovely touch on top. With these ingredients, you're ready to create a delicious meal. - Sautéing garlic and olive oil: Start by heating 2 tablespoons of olive oil in a large pot over medium heat. Once it's hot, add 3 minced garlic cloves. Sauté for 1-2 minutes until you smell the garlic, but don't let it brown. This step gives your dish a rich flavor base. - Combining vegetable broth and heavy cream: Next, add 1 cup of vegetable broth and 1 cup of heavy cream to the pot. Stir them together until they blend smoothly. This creamy mixture is the heart of your dish, adding richness and depth. - Boiling and simmering instructions: Bring the mixture to a gentle boil. Then, add 12 ounces of cheese tortellini. Reduce the heat to medium-low and let it simmer for about 5-7 minutes. Stir occasionally to prevent sticking. - Assessing tortellini doneness: Check the tortellini after 5 minutes. They should be tender and cooked through. If they need more time, let them simmer a bit longer. Perfectly cooked tortellini are key to a great dish. - Mixing in lemon and spinach: Once the tortellini is cooked, stir in the zest and juice of 1 medium lemon. Then, add 2 cups of roughly chopped spinach. Mix until the spinach wilts, blending its vibrant color and flavor into your dish. - Incorporating Parmesan cheese: Gradually sprinkle in 2 cups of freshly grated Parmesan cheese while stirring continuously. This will melt and create a creamy texture. If the sauce is too thick, add a splash of vegetable broth. - Adding cherry tomatoes and seasoning: Gently fold in 1 cup of halved cherry tomatoes. Season with salt and freshly ground pepper to taste. Heat through for an additional 2 minutes to let the flavors meld. Now, you're ready to enjoy a creamy one-pot lemon spinach tortellini that bursts with flavor! To ensure perfect tortellini texture, cook them until they float. This usually takes about 5-7 minutes. Stir often to prevent sticking. For sauce consistency, add the Parmesan cheese slowly. If it's too thick, pour in a splash of vegetable broth. This helps to keep it creamy and smooth. You can customize the dish with herbs like thyme or oregano. Add a pinch of red pepper flakes for spice. Using fresh ingredients makes a big difference. Fresh spinach and ripe tomatoes bring vibrant flavor. Always zest your lemon before juicing for extra brightness. For garnishing, sprinkle extra Parmesan on top. Add fresh basil leaves for color and flavor. Serve in shallow bowls to show off the creamy sauce. You can also drizzle a bit of olive oil for a nice finish. This makes the dish look appealing and delicious. {{image_4}} You can change up the tortellini type. Try meat, mushroom, or spinach tortellini. Each adds a unique taste. For a dairy-free option, use coconut cream instead of heavy cream. Nutritional yeast can replace Parmesan cheese for a vegan twist. You still get that creamy texture and rich flavor. If you want a low-carb version, swap tortellini for zucchini noodles. They cook fast and soak up flavor well. Gluten-free folks can use gluten-free tortellini. This keeps the dish friendly for all diets. This recipe shines in any season. In spring, add peas or asparagus for a fresh touch. Summer calls for zucchini or bell peppers, adding color and crunch. In fall, consider adding roasted butternut squash for sweetness. Winter can bring in kale; it wilts nicely like spinach. Each season brings new flavors and fun twists! To store leftovers, let the creamy tortellini cool before placing it in an airtight container. This keeps moisture out and helps maintain flavor. The dish lasts up to three days in the fridge. After that, the taste and texture may change. You can freeze creamy tortellini for longer storage. Place it in a freezer-safe container or bag. Make sure to remove as much air as possible. This dish can stay fresh in the freezer for up to three months. When it's time to enjoy, thaw it in the fridge overnight. To reheat, place the tortellini in a pot over low heat. Add a splash of vegetable broth or cream to help loosen the sauce. Stir gently until warm. You can also microwave it in a safe bowl. Heat in short bursts, stirring in between. For the best taste, reheat the creamy tortellini slowly. This keeps it creamy and prevents drying. Serve with a sprinkle of fresh Parmesan and a squeeze of lemon for extra zest. Pair this dish with a light salad or garlic bread for a complete meal. A crisp white wine, like Sauvignon Blanc, can enhance the flavors nicely. Yes, you can use frozen spinach. Here are the pros and cons: Pros: - Frozen spinach is convenient and often pre-washed. - It saves time in meal prep. - It has a long shelf life. Cons: - Frozen spinach may lose some texture. - It can have a slightly different taste. - You need to thaw and drain it before use. Using frozen spinach is fine. Just remember to adjust cooking time. To add heat, consider these options: - Add red pepper flakes while cooking. - Stir in diced jalapeños for a fresh kick. - Use spicy sausage instead of tortellini. - Top with hot sauce before serving. Try one or more of these ideas to suit your taste. Here are some great side dish ideas: - Garlic bread for a classic pairing. - A fresh garden salad to balance the dish. - Roasted vegetables for extra flavor. For beverages, I suggest: - A crisp white wine like Sauvignon Blanc. - Sparkling water with lemon for a light touch. These pairings enhance the meal and make it complete. This blog post shared an easy and tasty creamy lemon spinach tortellini recipe. We covered key ingredients, step-by-step instructions, and helpful tips. You learned about variations and storage methods. Remember, small tweaks can enhance your dish. Experiment with flavors and presentations to make it yours. Enjoy your cooking journey and savor your delicious meal!

Creamy One-Pot Lemon Spinach Tortellini Delight

Looking for a quick and tasty dinner? My Creamy One-Pot Lemon Spinach Tortellini might be just the thing! This dish

- 1 ¼ cups warm water - 1 packet active dry yeast - 2 tablespoons granulated sugar - 3 ¼ cups all-purpose flour - 1 teaspoon salt - ½ cup baking soda - ½ cup unsalted butter - ¾ cup granulated sugar - 2 teaspoons ground cinnamon To make these pretzel bites, you need the right mix of ingredients. First, warm water kicks off the yeast. It must be about 110°F for best results. The yeast helps the dough rise, so it’s key to use one packet of active dry yeast. Next, you add sugar to the warm water. The sugar feeds the yeast, making it active. This mix should sit for about five minutes until you see bubbles. That means the yeast is ready! For the dough, you need flour and salt. The all-purpose flour gives structure, while the salt adds flavor. You’ll mix this into the yeast mixture to form a soft dough. Then, we use baking soda for boiling. This step gives the pretzel bites their classic taste and texture. For the topping, you’ll melt unsalted butter. This will brush over the pretzel bites before baking. The sweet mix of sugar and cinnamon adds a delicious coating. You’ll use three-quarters of a cup of sugar and two teaspoons of cinnamon for this. Gather these ingredients, and you’re ready for fun in the kitchen! - Combine 1 ¼ cups warm water, 1 packet of active dry yeast, and 2 tablespoons of granulated sugar in a bowl. Stir gently until the sugar dissolves. Let it sit for about 5 minutes. You want it to get frothy. This shows the yeast is alive. - Next, add 3 ¼ cups of all-purpose flour and 1 teaspoon of salt to the mixture. Use your hands or a wooden spoon to mix until a soft dough forms. Transfer the dough to a floured surface. Knead the dough for about 5 minutes. You want it smooth and elastic. - Grease a large bowl with oil or butter. Place the kneaded dough inside and cover it with a damp cloth or plastic wrap. Let it rise in a warm spot until it doubles in size, around 1 hour. - While the dough rises, preheat your oven to 450°F (230°C). This step helps the pretzel bites bake evenly. - After the dough has risen, gently punch it down to release air. Divide it into 8 equal pieces. Roll each piece into a long rope, about 12 inches. Cut each rope into bite-sized pieces, around 1-2 inches long. - In a large pot, bring 8 cups of water to a boil. Stir in ½ cup of baking soda. This mixture gives the pretzel bites a nice flavor and chewy texture. Carefully drop the bites into the boiling solution. Let them cook for about 30 seconds. Use a slotted spoon to remove them and let excess water drip off. - Arrange the boiled pretzel bites on a baking sheet lined with parchment paper. Make sure they have space to grow. Brush each bite with ½ cup of melted unsalted butter. This adds flavor and helps them brown. - In a bowl, mix ¾ cup of granulated sugar and 2 teaspoons of ground cinnamon. Sprinkle this sweet mixture generously over the pretzel bites. - Finally, place the baking sheet in the oven. Bake for 10-12 minutes. Look for a golden brown color and a delightful smell. Once done, allow them to cool a bit before serving. To make the best pretzel bites, start with the yeast. After mixing warm water, yeast, and sugar, let it sit. Look for frothiness. This shows your yeast is alive. If you don’t see bubbles, try again. Kneading is key. Once you mix in the flour and salt, use your hands. Knead the dough for about five minutes. It should feel smooth and elastic. If it’s sticky, sprinkle a little more flour. This helps the dough hold its shape. Boiling is crucial for flavor. The baking soda solution creates that classic pretzel taste. Be sure to use enough water. Bring at least eight cups to a boil, then stir in the baking soda. Careful! Don’t overcook your pretzel bites. Boil them for only about 30 seconds. This gives them the right texture. Use a slotted spoon to remove them quickly and let any excess water drip off. When baking, set your oven to 450°F. This high heat helps them brown nicely. Place the baking sheet in the middle of the oven for even cooking. To check for doneness, look for a golden brown color. The bites should smell great too! If they look pale, give them a few more minutes. Enjoy the process and trust your senses. {{image_4}} You can make your pretzel bites even more special. Try adding cheese for a savory twist. Shredded cheddar or mozzarella works great. You can also mix in herbs. Chopped rosemary or thyme adds a fresh taste. For spice lovers, think about infusing your dough with garlic powder or cayenne. These changes make each bite a new surprise. Dipping sauces enhance the experience. Cream cheese icing is a top choice. It’s sweet and creamy, perfect for these bites. You can also try chocolate sauce or caramel. Both add a rich flavor. For a tangy option, consider mustard or a spicy aioli. These choices let you enjoy your pretzel bites in many ways. If you need gluten-free pretzel bites, you can use almond flour or coconut flour. Mix these with a gluten-free baking blend for the best texture. You may need to add xanthan gum to help bind the dough. Keep the rest of the steps the same. This way, you can enjoy pretzel bites that fit your needs. After making your pretzel bites, let them cool completely. This step keeps them soft. Place them in an airtight container. This will keep them fresh for 2-3 days. You can also wrap them in plastic wrap first for extra protection. To reheat pretzel bites, use your oven for the best results. Preheat your oven to 350°F. Place the bites on a baking sheet and heat them for about 5-10 minutes. This warms them nicely. If you use the microwave, heat them for 15-20 seconds. This method is quick but may make them a bit chewy. You can freeze leftover pretzel bites. First, let them cool fully. Then, place them in a single layer on a baking sheet. Once frozen, transfer them to a freezer bag. Make sure to remove as much air as possible. When you want to eat them, thaw them in the fridge overnight. Reheat them in the oven for the best texture. Bakery-style cinnamon sugar pretzel bites stay fresh for about 2 to 3 days. To keep them tasty, store them in an airtight container at room temperature. Avoid keeping them in the fridge, as this can make them tough. If you want to keep them longer, freeze them. They can last up to 3 months in the freezer. Just remember to thaw them at room temperature when you're ready to enjoy them again. Yes, you can use instant yeast instead of active dry yeast. Instant yeast works faster and does not need to be activated in water. Just mix it with the dry ingredients. Your dough may rise a bit quicker, so keep an eye on it. This can save you some time, but the taste and texture will still be great! You can serve pretzel bites with various dips. Cream cheese icing adds a sweet touch. Chocolate sauce is another great option for a dessert twist. For a savory dip, try cheese sauce or mustard. These pairings can enhance your pretzel bites and make them even more enjoyable. Yes, you can prepare pretzel bites in advance. After boiling and before baking, you can freeze them on a baking sheet. Once frozen, store them in a bag. When you want to bake them, just add a few extra minutes to the baking time. This method saves time and ensures you have warm, fresh pretzel bites ready to go! You now know how to make perfect Bakery-Style Cinnamon Sugar Pretzel Bites. We covered essential ingredients, easy steps, and useful tips. Remember to watch your dough and boiling time. Don’t forget about cool toppings and storage options to enjoy later. These bites can be a tasty treat for any occasion. Whether you share them or keep them for yourself, they are sure to please. Enjoy making your pretzel bites with these simple steps and creative ideas.

Bakery-Style Cinnamon Sugar Pretzel Bites Recipe

Craving a sweet and salty treat? Dive into this Bakery-Style Cinnamon Sugar Pretzel Bites recipe! These fluffy bites are perfect

- 1 pound large shrimp, peeled and deveined - 1 red bell pepper, chopped - 1 yellow bell pepper, chopped - 1 medium zucchini, sliced - 1 medium red onion, cut into wedges - 2 cups cherry tomatoes, halved - 4 cloves garlic, minced - 1 teaspoon dried oregano - 1 teaspoon dried thyme - 1 teaspoon smoked paprika - 1/4 teaspoon red pepper flakes (optional) - 3 tablespoons extra virgin olive oil - Juice of 1 fresh lemon - Salt and pepper to taste - 1/4 cup crumbled feta cheese - Fresh parsley, chopped You can add extra red pepper flakes for heat. A splash of balsamic vinegar adds tang. A sprinkle of lemon zest boosts freshness. Try olives for a briny kick. Fresh herbs, like dill or mint, brighten the dish. This recipe serves four and is packed with nutrients. Each serving has about: - Calories: 300 - Protein: 25g - Carbohydrates: 15g - Sugars: 5g - Fat: 15g - Fiber: 3g This dish is low in carbs and high in protein. It's a great option for a healthy meal. It also has good fats from the olive oil and feta cheese. Enjoy the flavors and nutrition in every bite! First, set your oven to 400°F (200°C). This heat is key for cooking the shrimp and veggies just right. While the oven heats, gather your ingredients. You need: - 1 pound large shrimp, peeled and deveined - 1 red bell pepper, chopped - 1 yellow bell pepper, chopped - 1 medium zucchini, sliced - 1 medium red onion, cut into wedges - 2 cups cherry tomatoes, halved - 4 cloves garlic, minced - 1 teaspoon dried oregano - 1 teaspoon dried thyme - 1 teaspoon smoked paprika - 1/4 teaspoon red pepper flakes (optional) - 3 tablespoons extra virgin olive oil - Juice of 1 fresh lemon - Salt and pepper to taste - 1/4 cup crumbled feta cheese - Fresh parsley, chopped Next, grab a large bowl. In this bowl, add the shrimp, bell peppers, zucchini, onion, tomatoes, and garlic. Pour in the olive oil and lemon juice. Then, add the oregano, thyme, smoked paprika, red pepper flakes, salt, and pepper. Use your hands or a spoon to mix well. Make sure all the shrimp and veggies get coated with the seasonings. Now, spread the shrimp and veggie mix evenly on a large sheet pan. Don't crowd the pan; space helps them roast. Place the pan in the oven and bake for 12-15 minutes. The shrimp will turn pink, and the veggies will soften but stay crisp. After baking, take the pan out and sprinkle feta on top. Pop it back in the oven for 3-5 more minutes. This melts the feta slightly and adds great flavor. Finally, add parsley for a fresh touch before serving. To cook shrimp perfectly, you need to watch the time. Shrimp cook fast. Bake them for 12 to 15 minutes. They should turn pink and opaque. Overcooking makes shrimp tough. If you see them curled tightly, they are done. Using fresh herbs brings your dish to life. Try adding fresh parsley or dill. They give bright flavors that wake up the meal. You can also use lemon zest for a zesty kick. Don’t forget the spices! Oregano, thyme, and smoked paprika add depth. Adjust the red pepper flakes for heat. How you serve your meal matters. For a cozy look, serve from the sheet pan. It feels warm and inviting. If you want a fancier touch, use a large platter. Arrange the shrimp and veggies nicely. Drizzle with extra lemon juice for shine. A sprinkle of feta and parsley adds color and flair. {{image_4}} You can easily switch shrimp for other proteins. Chicken breast is a great choice. Cut it into bite-sized pieces so it cooks well. Beef or pork can also work. Just make sure to adjust the cooking time. Fish like salmon or cod can be tasty too. Use skinless fillets for best results. These options keep the meal exciting while adding new flavors. Feel free to mix up the veggies! Broccoli, asparagus, or green beans are fantastic substitutes. You can use carrots for a sweet crunch. Even eggplant or squash will shine in this dish. Use what's fresh and in season. This approach keeps your meal healthy and colorful. The key is to cut veggies into similar sizes for even cooking. You can make this dish vegan by skipping the shrimp and feta. Instead, add chickpeas or tofu for protein. They soak up flavors well and offer a nice texture. Include more veggies like spinach or kale for added nutrients. Use a plant-based feta for that creamy touch. This way, you keep the spirit of Greek flavors while enjoying a vegan meal. After enjoying your meal, let the leftovers cool down. Use an airtight container to keep them fresh. Store the shrimp and veggies together. This helps to keep the flavors intact. You can keep them in the fridge for up to three days. If you want to enjoy them later, freezing is a great option. When you are ready to eat your leftovers, reheating is key. Preheat your oven to 350°F (175°C). Spread the shrimp and veggies on a baking sheet. Heat them for about 10 minutes. This way, they stay juicy and full of flavor. You can also use a microwave. Just heat in short bursts, stirring in between. This helps to warm everything evenly. If you want to save some for later, freezing works well. Place the cooled shrimp and veggies in a freezer-safe container. Leave some space at the top for expansion. You can freeze them for up to three months. When you are ready to eat, thaw in the fridge overnight. Reheat as mentioned above for the best taste. Yes, you can use frozen shrimp. Just thaw them first. Place the shrimp in a bowl of cold water for about 15-20 minutes. Drain and pat them dry before mixing with the veggies. This step keeps the dish tasty and fresh. Many side dishes go well with this meal. Here are a few ideas: - Rice or quinoa for a filling base - Greek salad for a fresh crunch - Pita bread to soak up the flavors - Tzatziki sauce for a cool dip These sides add variety and enhance the meal's taste. To reduce the heat, skip the red pepper flakes. You can also add more veggies, like zucchini or bell peppers, to balance the spice. Serve with a dollop of yogurt or sour cream. This cools the dish down and makes it milder. This post covered how to make a tasty Sheet-Pan Greek Shrimp and Veggies. You learned about key ingredients and optional extras for more flavor. I shared step-by-step instructions to help you bake your dish perfectly. Tips on cooking shrimp and enhancing flavors added depth to your meal. You now know how to store leftovers and even make variations. Enjoy experimenting with new ingredients and flavors. Happy cooking!

Sheet-Pan Greek Shrimp and Veggies Flavorful Feast

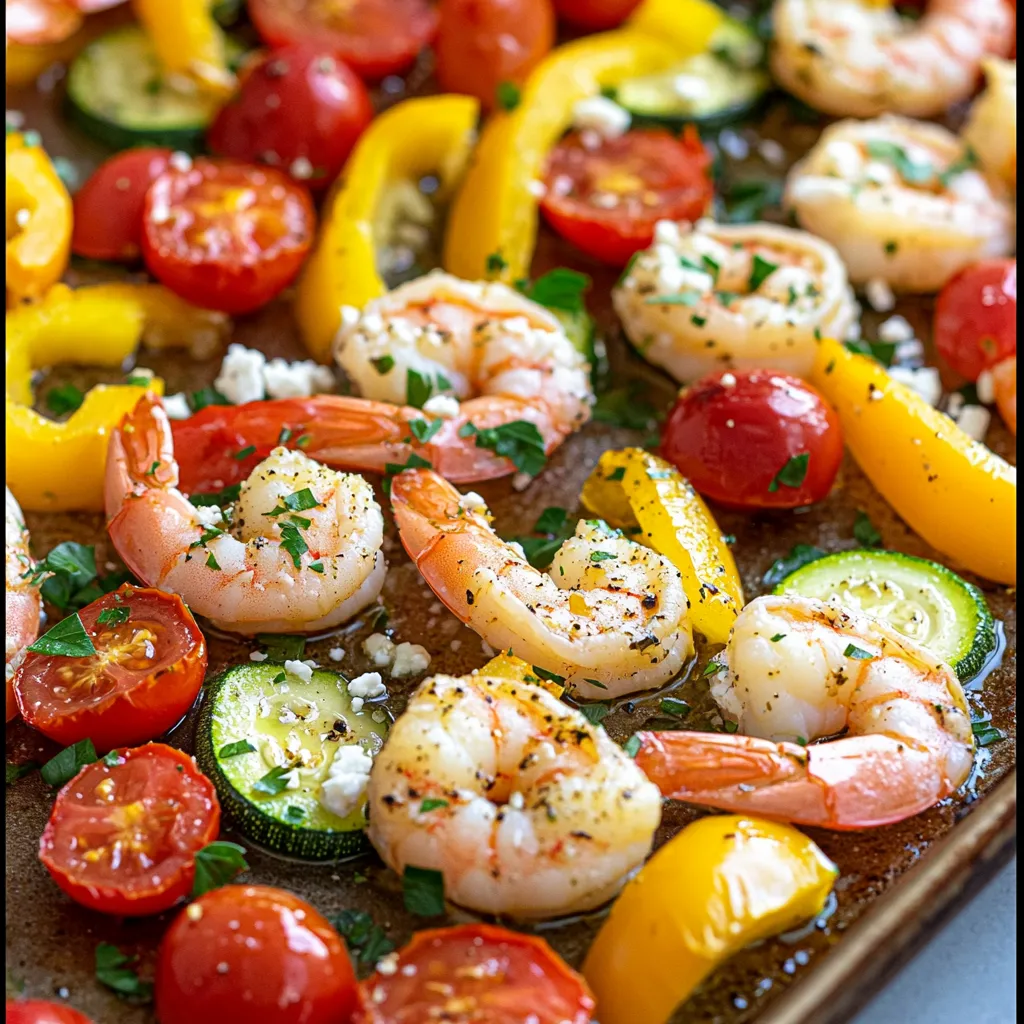
Get ready to bring the flavors of Greece into your kitchen with my Sheet-Pan Greek Shrimp and Veggies! This easy

Here are the simple ingredients you’ll need to make No-Bake Birthday Cake Protein Balls: - 1 cup rolled oats - 1/2 cup vanilla protein powder - 1/4 cup almond flour - 1/4 cup natural almond butter - 1/4 cup honey or maple syrup - 1/2 teaspoon vanilla extract - 1/4 cup colorful rainbow sprinkles - 1 tablespoon coconut oil (optional) - A pinch of salt Each of these ingredients plays a key role. The rolled oats give a great texture and wholesome feel. Vanilla protein powder adds a nice flavor and boosts protein. Almond flour adds a nutty taste and keeps the mix gluten-free. Almond butter gives a creamy richness and helps bind the ingredients. Honey or maple syrup sweetens the mix and helps it stick together. Vanilla extract adds a nice aroma, making your treat even more enjoyable. Rainbow sprinkles bring joy and color, perfect for a birthday vibe. Coconut oil adds richness but is optional if you want a lighter snack. Finally, a pinch of salt balances the sweetness for a well-rounded flavor. Gather these ingredients to create a delightful and nutritious treat that everyone will enjoy! Start by grabbing a large mixing bowl. Place 1 cup of rolled oats into the bowl. Next, add 1/2 cup of vanilla protein powder. Finally, include 1/4 cup of almond flour. Use a spoon or spatula to mix these dry ingredients. Make sure they blend evenly. This step sets the base for your protein balls. Now it's time to add the wet ingredients. Pour in 1/4 cup of natural almond butter. Then, add 1/4 cup of honey or maple syrup. This choice depends on your taste. Next, include 1/2 teaspoon of vanilla extract. If you want a richer flavor, add 1 tablespoon of melted coconut oil. Mix everything well until it becomes a sticky dough. Once the mixture is ready, it's time to shape the balls. Take a small amount of the mixture and roll it between your hands. Aim for about 1 inch in diameter. If the mixture feels too sticky, wet your hands slightly. This helps you shape the balls easily. Place each ball on a baking sheet lined with parchment paper. After shaping all the balls, refrigerate them for about 30 minutes. This will help them firm up nicely. To adjust sweetness, you can change the sweetener. If you like it sweeter, add more honey or maple syrup. Start with a little and taste the mix. You can also reduce the sweetener if you prefer less sugar. Try using a sweet protein powder for a fun twist. Just remember, the key is balance. If your mixture is too sticky, a few tricks can help. First, dampen your hands with water when rolling the balls. This makes it easier to shape them. You could also add more almond flour or oats to the mix. This helps absorb some moisture. Just be careful not to overdo it or change the taste. To keep the protein balls fresh, store them in an airtight container. Place the container in the fridge. The balls can last up to one week this way. You can also freeze them for longer storage. Just remember to separate them with parchment paper. This keeps them from sticking together. Enjoy your tasty snacks whenever you want! {{image_4}} You can easily make these protein balls vegan. Just swap honey for maple syrup. The maple syrup adds a nice sweetness. It also keeps the mix sticky, which helps in shaping the balls. This change makes the recipe plant-based, while still being delicious. Want to add more flavor? Try different mix-ins! You can add chopped nuts or dried fruits. Almonds, walnuts, or cashews work great. Dried cranberries or apricots add a nice chewiness. Just fold them in gently so they mix well without breaking the sprinkles. You can vary the flavor too! For a birthday cake taste, use vanilla extract and rainbow sprinkles. If you prefer chocolate, swap in chocolate protein powder. You can also add cocoa powder for a rich chocolate flavor. Each option will give you a fun twist on the original recipe. Each serving of these no-bake birthday cake protein balls has about 1-2 balls. This means they’re a great snack. Here is what you get per serving: - Calories: 150-200 - Protein: 6-8 grams - Carbohydrates: 20-25 grams - Fat: 6-8 grams These protein balls are packed with good stuff. Here’s how the ingredients help: - Rolled oats provide fiber, which helps digestion. - Vanilla protein powder supports muscle repair and growth. - Almond flour is low in carbs and rich in nutrients. - Almond butter gives healthy fats and keeps you full. - Honey or maple syrup adds natural sweetness and energy. - Rainbow sprinkles add fun and joy without much extra sugar. The caloric info shows how balanced these treats are. They fit well into many diets. Here’s a quick look at the macronutrients: - Calories: About 150-200 per serving. - Protein: 6-8 grams for muscle support. - Carbs: 20-25 grams for energy. - Fats: 6-8 grams for healthy fats. This balance makes them a smart choice for a snack or post-workout treat. Enjoy these delicious bites while knowing they are good for you! Yes, you can freeze these protein balls. Just place them in an airtight container. They will stay fresh for about three months in the freezer. When you want to eat them, pull out the number you need and let them thaw. This makes them a great snack to have ready for any occasion. These protein balls last about one week in the fridge. Store them in an airtight container to keep them fresh. After a week, they may lose some flavor and texture, so enjoy them while they are at their best. They make a perfect snack for busy days or after workouts. If you don’t have almond butter, you can use peanut butter or sun butter. Both options work well and add a nice flavor. If you are nut-free, sun butter is a great choice. Just keep in mind that the taste may vary slightly based on your choice. These no-bake birthday cake protein balls are fun and easy to make. You learned the essential ingredients, how to mix them, and tips to make them even better. The options for flavor and sweetness let you get creative. Each bite offers health benefits while tasting great. Enjoy making this treat for yourself or to share. Try new variations and keep exploring different flavors. You will find joy in both making and eating these protein balls.

No-Bake Birthday Cake Protein Balls Delightful Treat

Are you ready to enjoy a delicious and healthy treat? These No-Bake Birthday Cake Protein Balls are easy to make

- 12 oz cheese-filled tortellini (fresh or frozen) - 2 cups fresh spinach, roughly chopped - 1 cup ricotta cheese - 1 cup heavy cream - 1 cup vegetable broth - 2 cloves garlic, minced - 1 tablespoon extra-virgin olive oil - Salt, black pepper, and red pepper flakes - Fresh basil leaves - 1 cup freshly grated Parmesan cheese This dish is a creamy delight with simple, fresh ingredients. You start with cheese-filled tortellini. You can use either fresh or frozen. I like fresh tortellini for the best taste and texture. Next, add fresh spinach, which adds color and nutrients. Ricotta cheese gives it a rich, creamy base. Heavy cream makes the sauce smooth and velvety. For the broth and seasoning, vegetable broth brings depth to the dish. Garlic adds a wonderful aroma. Extra-virgin olive oil gives a nice touch of flavor. Use salt, black pepper, and red pepper flakes to season to your taste. The red pepper flakes add a little heat, which is optional but fun! Finally, fresh basil leaves and grated Parmesan cheese are the perfect garnishes. They add freshness and a touch of elegance. With these ingredients, you can create a one-pot meal that is both easy and delicious. To start, heat a large pot over medium heat. Add one tablespoon of extra-virgin olive oil. Once the oil is warm, toss in two minced cloves of garlic. Sauté the garlic for about one minute. Stir it often so it does not brown. Next, pour in one cup of vegetable broth. Turn up the heat just a bit and let it simmer gently. Now it’s time to add the star of our dish: the tortellini. You can use either fresh or frozen cheese-filled tortellini, about 12 ounces. Pour it straight into the pot with the broth. Follow the package instructions for cooking time. Fresh tortellini takes about 4-6 minutes. Frozen tortellini needs about 8-10 minutes. Stir occasionally to keep it from sticking together. Once the tortellini is cooked, lower the heat. Gradually add in one cup of heavy cream and one cup of ricotta cheese. Stir well until both are mixed in and the sauce is creamy. Then, slowly sprinkle in one cup of freshly grated Parmesan cheese. Keep stirring until the sauce is velvety and smooth. Now, fold in two cups of roughly chopped fresh spinach. Let it wilt for about two minutes. This adds great color and flavor. Finally, season with salt, black pepper, and red pepper flakes to taste. If you want a little kick, the red pepper flakes are perfect. Let the dish sit for a few minutes to thicken before you serve it. To cook tortellini just right, follow these steps: - Use a large pot for even cooking. - Bring water or broth to a gentle boil before adding tortellini. - Stir occasionally to prevent sticking. For creaminess, adjust the heavy cream and ricotta. Start with 1 cup of each. If you want it creamier, add more heavy cream. If you prefer a lighter dish, reduce the cream. Herbs and spices can elevate your dish. Here are some suggestions: - Add fresh basil for a sweet, herbal note. - Stir in a pinch of oregano for warmth. - Include red pepper flakes for heat, if you like spice. You can also add optional ingredients for extra flavor: - Sun-dried tomatoes bring a tangy bite. - Cooked chicken or shrimp can add protein. - Lemon zest brightens up the creaminess. To serve your creamy tortellini beautifully, consider these tips: - Use deep bowls to show off the vibrant colors. - Layer the tortellini gently for an inviting look. For garnishing ideas that impress: - Top each serving with fresh basil leaves. - Sprinkle extra Parmesan for a nice finish. - Drizzle olive oil for a glossy touch. {{image_4}} You can easily swap out the spinach for other greens. Try kale, arugula, or even Swiss chard. These options bring their own flavors and nutrients. They also work well with the creamy sauce. If you want a different taste, use cottage cheese instead of ricotta. It still gives a creamy texture but with a lighter flavor. You can also experiment with goat cheese for a tangy kick. To make this dish vegan-friendly, replace the ricotta with cashew cream or tofu. Both options give a creamy feel without dairy. Use coconut milk instead of heavy cream for richness. Check your vegetable broth to ensure it’s also vegan. For gluten-free adaptations, use gluten-free tortellini. They are widely available now and taste great. Check the labels to ensure they are truly gluten-free. Want to add protein? Chicken or shrimp can elevate this meal. Just cook them in the pot before adding the broth. Make sure to cut the meat into small pieces for even cooking. Incorporating seasonal vegetables can also enhance the dish. Think zucchini, bell peppers, or cherry tomatoes. These veggies not only add flavor but also color to your plate. To keep your One-Pot Creamy Spinach Ricotta Tortellini fresh, let it cool down first. Once cool, place it in an airtight container. This way, it stays tasty and safe. In the fridge, it lasts about 3 to 4 days. Always check for any signs of spoilage before eating. If it smells off or looks different, it's best to toss it. For long-term storage, you can freeze this dish. Divide it into portions and place them in freezer-safe containers. Make sure to leave some space at the top for expansion. It can stay good in the freezer for up to 3 months. When you're ready to eat, thaw it overnight in the fridge. Reheat it gently on the stove over low heat. Add a splash of cream or broth for the best texture. Stir often to avoid sticking. Enjoy your creamy tortellini even weeks later! Cooking time depends on whether you use fresh or frozen tortellini. Fresh tortellini cooks in about 4 to 6 minutes. Frozen tortellini takes a bit longer, around 8 to 10 minutes. Always check the package for specific times. Yes, you can use other pasta types! Bowties, penne, or even shells work well. Just adjust the cooking time based on the pasta shape. Make sure to choose pasta that can hold the creamy sauce. To add some heat, sprinkle in red pepper flakes while cooking. You can also add diced jalapeños or a splash of hot sauce. Start with a little and taste as you go. Adjust to your heat level. This creamy tortellini pairs well with a simple salad, garlic bread, or steamed veggies. You can also serve it with roasted asparagus or a light tomato sauce on the side for extra flavor. Enjoy! This dish combines cheese-filled tortellini, fresh spinach, and creamy sauce for a delicious meal. By following the easy steps, you create a comforting pasta dish that's sure to impress. Use my tips to enhance the flavors and try some variations to suit your taste. Don't forget to store leftovers properly for later enjoyment. Enjoy cooking this delightful recipe, and remember, there’s always room to make it your own! Your dining experience can be both fun and satisfying.

One-Pot Creamy Spinach Ricotta Tortellini Delight

Looking for a quick, delicious meal? Look no further! This One-Pot Creamy Spinach Ricotta Tortellini Delight combines rich, cheesy flavors

To make Slow Cooker Lemon Garlic Orzo Soup, gather these key items: - 1 cup orzo pasta - 1 tablespoon extra virgin olive oil - 1 medium onion, finely diced - 3 cloves of garlic, minced - 3 medium carrots, peeled and diced - 2 celery stalks, chopped - 6 cups vegetable broth - 1 large lemon (zested and juiced) - 1 teaspoon dried thyme - 1 teaspoon dried oregano - 1 bay leaf - Sea salt and freshly cracked black pepper to taste - 2 cups fresh spinach or kale, roughly chopped - Fresh parsley, finely chopped (for garnish) These ingredients create a rich and hearty soup. The orzo adds a nice texture, while lemon brightens the dish. You can enhance the soup with extras. Here are some ideas: - Protein: Add shredded chicken or cooked beans for a heartier meal. - Vegetables: Toss in zucchini, peas, or bell peppers for more color and nutrition. - Greens: Substitute arugula or chard for a different leafy taste. Feel free to mix and match based on your taste and what you have on hand. The right seasonings bring this soup to life. Use these for the best flavor: - Fresh herbs: Add basil or dill for a fresh twist. - Spices: A pinch of red pepper flakes adds heat. - Citrus: A splash of lime juice can also brighten the flavors. These seasonings can make your soup unique. Adjust them based on your mood and cravings. Start by heating the olive oil in a skillet over medium heat. When the oil is hot, add the finely diced onion. Sauté the onion for about 3 to 4 minutes. You want it soft and clear. Next, add the minced garlic to the skillet. Cook for 1 to 2 minutes until it smells good but not burnt. Then, transfer this mix to your slow cooker. In the slow cooker, add the diced carrots and chopped celery. Pour in the vegetable broth, then add the lemon zest and lemon juice. Sprinkle in the dried thyme and oregano. Toss in the bay leaf, and add salt and pepper. Mix it all up well. Cover the slow cooker with its lid. Set it to low for 6 to 8 hours or high for 3 to 4 hours. This slow cooking brings out the flavors. When the time is up, take out the bay leaf. Stir in the orzo pasta and the chopped spinach or kale. Let it cook for another 30 minutes on high. This time allows the orzo to get soft and soak in the flavor. Before you serve, taste the soup. Adjust the salt and pepper if needed. Serve the soup hot, and add fresh parsley on top for a nice look and taste. To boost the flavor of your soup, use fresh herbs. Fresh parsley adds brightness. Fresh spinach or kale brings earthiness. Sauté your onion and garlic before adding them to the slow cooker. This step adds depth and warmth to the soup. Use homemade vegetable broth for richer taste. If you use store-bought, look for low-sodium options. Fresh lemon juice and zest brighten each bite. Adding more lemon juice at the end can really lift the flavors. One common mistake is adding orzo too early. If you add it too soon, it may become mushy. Make sure to add it during the last 30 minutes of cooking. Another mistake is not tasting before serving. Always check the seasoning. You may need more salt or pepper to balance the flavors. Be careful with the garlic; burnt garlic can taste bitter, ruining your soup. For a complete meal, serve the soup with crusty bread. The bread is perfect for dipping. You can also pair it with a fresh salad. A simple green salad with lemon vinaigrette works well. If you want more protein, add cooked chicken or chickpeas. Top each bowl with extra lemon zest and parsley for color. This adds a nice touch and makes the soup look appealing. {{image_4}} If you have food allergies or preferences, you can swap ingredients easily. For a gluten-free option, use gluten-free orzo or rice. If you're vegan, replace the vegetable broth with a homemade stock using water and veggies. You can skip the cheese garnish or use a dairy-free version if desired. The broth you choose can change the soup's taste. Vegetable broth is great, but chicken broth adds depth. You can also try mushroom broth for a richer flavor. Each option brings a unique taste to your soup, so feel free to experiment. Boost the soup's nutrition with simple add-ins. Try adding beans like cannellini or chickpeas for protein. You can also mix in diced zucchini or bell peppers for added veggies. A handful of frozen peas can add sweetness and color. Each option makes the soup heartier and more filling. After you enjoy your soup, let it cool. Pour any leftovers into a clean, airtight container. Store the soup in the fridge for up to three days. Make sure to keep it covered. This helps keep the soup fresh and tasty. If you want to save the soup for later, freezing is a great option. Allow the soup to cool completely before freezing. Use freezer-safe containers or bags. Leave some space at the top, as the soup will expand when frozen. You can keep it in the freezer for up to three months. When you're ready to eat your frozen soup, move it to the fridge to thaw overnight. If you are short on time, you can reheat it straight from the freezer. Use a pot on low heat or the microwave. Stir often to heat it evenly. Add a splash of broth or water if it seems too thick. Enjoy it warm and comforting! Yes, you can make this soup on the stove. Start by sautéing the onion and garlic in a pot. Then, add the other veggies and broth. Bring it to a boil. Add the orzo last and cook until it's tender. This method takes about 30 minutes. For a pressure cooker, set it to high for 10 minutes. For an instant pot, use the soup setting for about 15 minutes. If using a regular pot, simmer on low for about 30 minutes. Always check the orzo for doneness. You can use any small pasta. Try ditalini or rice for a gluten-free option. Quinoa is another great choice. Just adjust cooking times based on the pasta or grain you pick. This blog covered the key steps to make a great soup from ingredients to serving. We discussed main ingredients, optional add-ins, and seasonings that amp up flavor. I shared easy cooking steps and tips to avoid mistakes. You can explore variations to fit your diet and learn how to store leftovers properly. Remember, soup can be adjusted to your taste and needs. Enjoy making your perfect bowl of soup!

Slow Cooker Lemon Garlic Orzo Soup Comfort Food Guide

Looking for a warm, comforting meal that’s easy to make? My Slow Cooker Lemon Garlic Orzo Soup is the answer!

- 1 cup fresh strawberries, hulled and finely chopped - 1 cup graham cracker crumbs - 1 cup cream cheese, softened to room temperature - 1 cup powdered sugar - 1 teaspoon pure vanilla extract - 1 cup semi-sweet chocolate chips - 1 tablespoon coconut oil (optional, for a smoother chocolate coating) - Flaky sea salt, for garnish Fresh strawberries are key here. They add a bright flavor and natural sweetness. Make sure to hull them well. This means removing the green tops. Finely chop the strawberries so they blend well with the other ingredients. Graham cracker crumbs give a nice crunch. They also help bind the mixture. Use plain or cinnamon-flavored crumbs for a twist. Cream cheese softens the texture. It adds a rich and creamy feel. Always let it sit out for about 30 minutes to soften before mixing. Powdered sugar sweetens the truffles. It also helps thicken the mixture. Use pure vanilla extract for the best taste. It enhances the sweet notes of the strawberries. Semi-sweet chocolate chips are perfect for coating. They melt well and have a rich taste. If you want a smoother finish, add coconut oil when melting the chocolate. This helps the chocolate coat the truffles evenly. Flaky sea salt adds a touch of contrast. It makes the sweet truffles even better. If you can’t find fresh strawberries, use frozen ones. Just make sure to thaw and drain them well. For a nutty flavor, substitute graham cracker crumbs with crushed nuts or cookie crumbs. If you need a dairy-free option, try vegan cream cheese. It works well and keeps the texture. You can also use agave or maple syrup in place of powdered sugar. Adjust the amount to get the right sweetness. For the chocolate coating, use dark chocolate or white chocolate if you prefer. Each option gives a different taste. You can also try flavored chocolate for something unique, like orange or mint. To make the strawberry mixture, start with fresh strawberries. You need one cup, hulled and chopped finely. In a medium bowl, combine the strawberries with graham cracker crumbs, soft cream cheese, powdered sugar, and vanilla extract. Use a spatula or a hand mixer to blend them well. Aim for a thick dough that holds together nicely. If you like it smoother, a hand mixer really helps. This mixture forms the heart of your truffles. Now it’s time to roll the truffles. With clean hands, scoop out small portions of the strawberry mixture, about one inch in diameter. Roll them gently into balls. Place each ball on a baking sheet lined with parchment paper. Make sure to leave space between each truffle. This way, they won’t stick together. Once all are rolled, put the sheet in the freezer for about 30 minutes. This helps the truffles firm up and makes coating them easier. While the truffles chill, prepare the chocolate coating. In a microwave-safe bowl, combine one cup of semi-sweet chocolate chips and one tablespoon of coconut oil if you want a smooth finish. Heat this mixture in the microwave. Do it in 30-second intervals, stirring well after each. Keep going until the chocolate is fully melted and smooth. After the truffles are firm, take them out of the freezer. Dip each truffle into the melted chocolate, ensuring they are fully coated. Use a fork to lift them out. Tap the fork against the bowl's edge to remove extra chocolate. Place them back on the parchment-lined baking sheet. While the chocolate is still wet, sprinkle a tiny pinch of flaky sea salt on top of each truffle. This adds a nice touch of flavor. Finally, put the baking sheet in the fridge. Let the truffles chill until the chocolate sets, which takes about 15 to 20 minutes. Enjoy your sweet creation! To get the right texture for your truffles, mix well. The cream cheese should blend with the strawberries and graham crackers. Aim for a thick dough that holds shape. If it seems too crumbly, add a bit more cream cheese. If it feels too wet, add extra graham cracker crumbs. This balance is key for a perfect bite. When melting chocolate, use a microwave-safe bowl. Heat in short bursts. Start with 30 seconds, then stir. Repeat until melted. Stirring helps keep the chocolate smooth. If you choose to add coconut oil, it makes the chocolate coating silky. This step ensures your truffles have a nice, shiny finish. To make your truffles special, think about add-ins. A pinch of cinnamon or a dash of sea salt can boost the flavor. You can also mix in a few mini chocolate chips for texture. Consider adding a splash of almond extract for a unique twist. These little changes can take your truffles to the next level. {{image_4}} You can mix up the flavors in your truffles. Try using raspberries or blueberries instead of strawberries. You can also add a splash of orange juice for a fruity twist. If you love nuts, consider adding finely chopped almonds or walnuts to the strawberry mixture. Coconut flakes can give a tropical taste too. Play around with spices like cinnamon or nutmeg for warmth. Each option adds a unique touch to your truffles. To make these truffles vegan or dairy-free, swap the cream cheese for a vegan cream cheese. You can also use coconut cream as a rich alternative. For the chocolate, choose dark chocolate that is dairy-free. Always check the labels to ensure no milk products are included. This way, you can enjoy these lovely treats while sticking to your dietary needs. You can change the chocolate type for your coating. Milk chocolate offers a sweeter taste. Dark chocolate gives a rich and bold flavor. White chocolate provides a creamy contrast to the fruity filling. If you want a unique twist, try using flavored chocolates, like mint or orange. Just remember to melt the chocolate carefully to keep its smooth texture. Each chocolate type changes the overall flavor, making your truffles special. To keep your no-bake chocolate covered strawberry truffles fresh, store them in an airtight container. This will prevent them from drying out or absorbing any unwanted smells. Line the bottom of the container with parchment paper to help with sticking. Keep the container in the fridge for the best taste. You can freeze these truffles if you want to save some for later. Place the truffles on a baking sheet and freeze them for about an hour. Once they are firm, transfer them to a freezer-safe bag or container. Make sure to label the bag with the date. You can enjoy them later by letting them sit at room temperature for about 15 minutes before serving. These truffles can last up to one week in the fridge. If you freeze them, they can last up to three months. After that, they may lose their flavor and texture. Always check for any signs of spoilage, like off smells or changes in texture, before enjoying your treats. Yes, you can use frozen strawberries. Just remember to thaw them first. Drain any excess liquid before chopping. This keeps your truffles from getting too soggy. Fresh strawberries give better taste, but frozen works in a pinch. If you want to skip the cream cheese, use Greek yogurt instead. It adds the same creaminess. You can also try using nut butter for a unique taste. Both options will keep your truffles rich and smooth. I prefer semi-sweet chocolate for a balanced flavor. It pairs well with the sweetness of strawberries. Dark chocolate is great if you want a richer taste. Milk chocolate adds sweetness but may overwhelm the berry flavor. Choose what you love! This blog post covered everything you need for perfect strawberry truffles. We discussed key ingredients, cooking notes, and tasty alternatives. I outlined step-by-step instructions to make your truffles easy to follow. You found tips for texture, chocolate melting, and flavor boosts. We explored fun variations, storage tips, and answered common questions. Now you have the tools to create delightful strawberry truffles. Enjoy making them your way!

No-Bake Chocolate Covered Strawberry Truffles Delight

If you love the taste of chocolate and strawberries, you’ll adore these No-Bake Chocolate Covered Strawberry Truffles! They are quick

- 2 ripe green plantains - 1 tablespoon of olive oil or coconut oil - Sea salt and optional seasonings (smoked paprika, garlic powder) What are the nutritional benefits of plantains? Plantains are rich in fiber, vitamins, and minerals. They offer good amounts of vitamin A, vitamin C, and potassium. One medium plantain has about 200 calories, making it a filling option. Why is air frying better than traditional frying? Air frying uses less oil than deep frying. This means fewer calories and less fat. Air-fried plantain chips have a crunch without the guilt. They also retain more nutrients than those fried in oil. Plus, they are easier to clean up! Peeling the plantains To peel the plantains, cut off both ends. Use a sharp knife to make a shallow cut along the skin. Gently lift the skin off to expose the bright green flesh inside. This process is simple and helps you get ready for slicing. Slicing for optimal crispiness Next, slice the plantains. Use a sharp knife or a mandoline slicer. Aim for thin slices, about 1/8 inch thick. Slicing at a slight angle can help them crisp up nicely. The thinner the slices, the crispier the chips will be. Coating with oil and seasonings Place the sliced plantains in a large bowl. Drizzle one tablespoon of olive oil or coconut oil over them. Toss the slices gently to coat them evenly. This step is key for achieving that perfect crispiness. Preheating the air fryer While you prepare the plantains, preheat your air fryer. Set it to 350°F (175°C). Preheating is important. It ensures that your chips cook evenly and get that delightful crunch you want. Cooking time and temperature settings Once your air fryer is hot, add the seasoned plantain slices. Arrange them in a single layer in the basket. Avoid overcrowding; this can lead to softer chips. Air fry for 12 to 15 minutes for the best result. Ensuring even cooking and browning Halfway through cooking, shake the basket gently. This helps the chips brown evenly. Keep an eye on them towards the end. Look for a beautiful golden color. The chips should be crisp and ready to enjoy! To make crispy plantain chips, cut them thin. Aim for slices about 1/8 inch thick. Thinner slices cook faster and yield crunchier chips. Use a sharp knife or a mandoline slicer for even cuts. This tool helps you get uniform thickness, which is key for even cooking. Next, coat the slices evenly with oil. Place your plantain slices in a bowl and drizzle olive oil or coconut oil over them. Toss until every slice is covered. This step ensures all chips get nice and crispy. One common mistake is overcrowding the air fryer. If you pile the chips too high, they will steam instead of crisp. Always place them in a single, even layer. You can cook in batches if needed. Another mistake is not watching the cooking time. Each air fryer can cook differently. Check the chips around 12 minutes. They should look golden and crisp. Keep an eye on them to avoid burning. For serving, think about dips. Guacamole or fresh salsa pairs well with plantain chips. These dips add flavor and a fun touch. You can also present the chips in a basket lined with parchment paper. This makes them look appealing and ready to share. For a creative twist, arrange the chips in a fan shape on a plate. Add a small bowl of dip in the center. This adds flair to your snack and makes it more inviting. {{image_4}} You can play with different spices to make your plantain chips unique. Here are some ideas: - Cayenne Pepper: Adds heat for spice lovers. - Cumin: Gives a warm, earthy taste. - Chili Powder: Offers a smoky flavor. - Cinnamon: For a sweet twist, try a pinch of cinnamon. Using alternative oils can also change the flavor. While olive oil is great, coconut oil brings a tropical vibe. You can even try avocado oil for a richer taste. You can mix in other veggies for added flavor and crunch. Try thinly sliced carrots or zucchini. They add color and texture. For a sweet version, use ripe plantains instead of green ones. Just slice them thin, coat with cinnamon, and air fry for a tasty treat. Adding a sprinkle of shredded coconut or a drizzle of honey can make a sweet snack. You can even blend spices for a unique flavor. Get creative, and have fun with your plantain chips! To keep your crispy air fryer plantain chips fresh, store them in a cool, dry place. Use an airtight container. This helps maintain their crunch. If you have a lot of chips, use a resealable plastic bag. Just make sure to press out the air before sealing. To reheat plantain chips and keep them crispy, use your air fryer. Set it to 350°F (175°C) and warm the chips for about 3-5 minutes. This method keeps them crunchy and tasty. You can also use an oven. Preheat it to the same temperature and place the chips on a baking sheet. Heat for the same time. Avoid using a microwave, as it makes chips soggy. Enjoy your flavorful snack! You know air fryer plantain chips are done when they turn golden brown. The chips should be crispy to the bite. I recommend checking them after 12 minutes. Shake the basket halfway through. This helps them cook evenly. If they still seem soft, give them a few more minutes. Keep a close eye on them near the end. You can use yellow plantains, but the chips will taste sweeter. Yellow plantains are softer and may not get as crispy. Green plantains are firmer and ideal for a crunchy texture. If you like sweet snacks, feel free to try yellow ones! Yes, air fried plantain chips are healthier than deep-fried ones. Air frying uses less oil, cutting down calories and fat. You only need a tablespoon of oil for this recipe. Deep frying can soak up much more oil. Plus, air frying keeps more nutrients in the plantains. - Additional common questions about the recipe and air frying: - You can store leftover plantain chips in an airtight container for up to three days. - To reheat them, use the air fryer for a few minutes to regain crispiness. - Experiment with spices like chili powder or cumin for different flavors. - Pair the chips with guacamole or salsa for a tasty snack! You can easily make crispy air fryer plantain chips with just a few ingredients. You learned about the health benefits of plantains, how to prepare, cook, and store them. Following the tips helped you avoid common mistakes and achieve the best results. Remember, you can also experiment with different flavors and serving ideas. Enjoy your crunchy snack, knowing it's a healthier option than traditional chips. Happy cooking!

Crispy Air Fryer Plantain Chips Simple and Tasty Snack

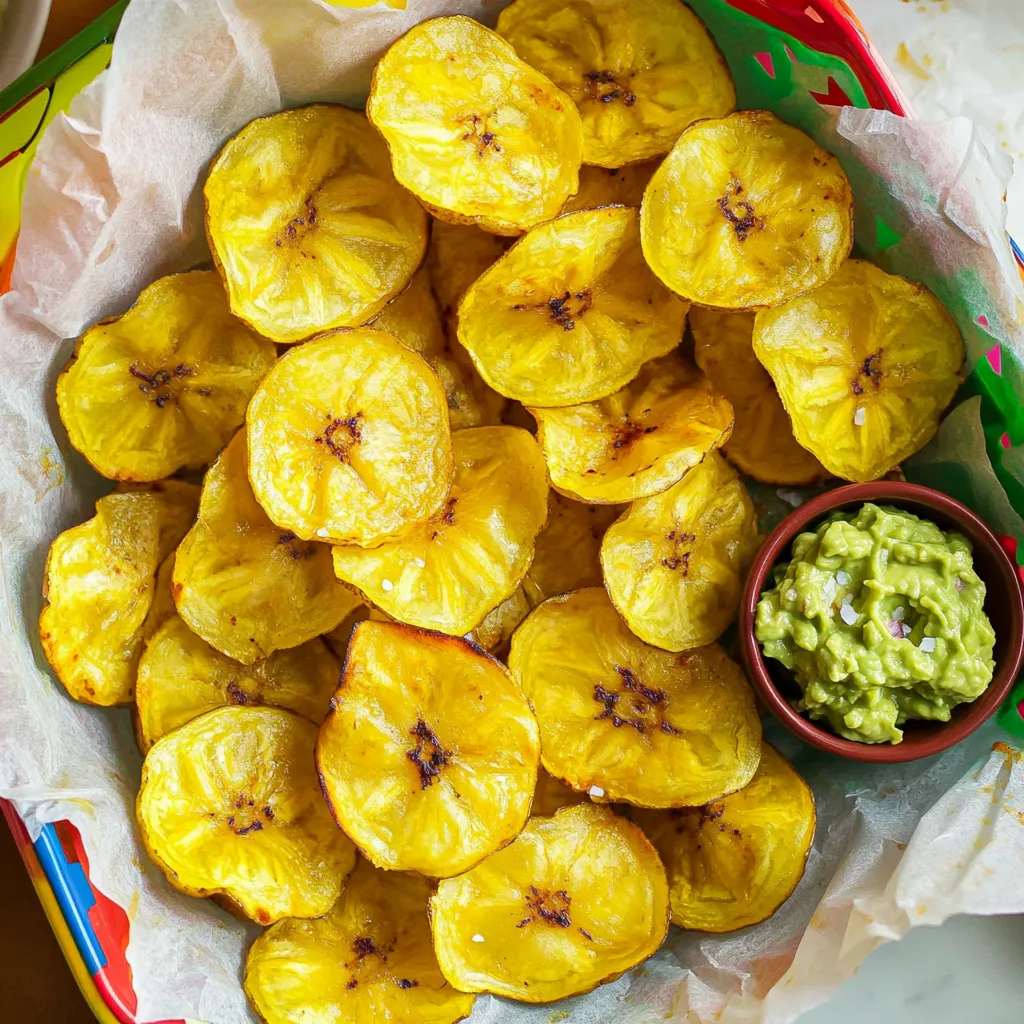
Looking for a crunchy snack that’s both tasty and healthy? I’ve got the perfect solution: crispy air fryer plantain chips!

Older posts
Newer posts
← Previous Page1 … Page12 Page13 Page14 … Page83 Next →

dsad

© 2026 eataroundit • Built with GeneratePress

Our Policies

  • Copyright Policy
  • Cookie Policy
  • GDPR Policy
  • Privacy Policy
  • Disclaimer
  • Terms Of Use

More Information

  • Home
  • About
  • Contact
  • Appetizers
  • Dessert
  • Dinner
  • Drinks
©2026, eataroundit About Back To Top