Skip to content
DisclaimerTerms Of UseGDPR PolicyCookie Policy

eataroundit

  • Home
  • Drinks
  • Appetizers
  • Dinner
  • Dessert
  • About
  • Contact
  • Privacy Policy
DisclaimerTerms Of UseGDPR PolicyCookie Policy

NO-ING-IMG

- 6 large egg whites - 1/2 cup low-fat cottage cheese - 1/4 cup shredded cheese - 1/4 cup diced bell peppers (red and green) - 1/4 cup fresh spinach - Seasoning options (garlic powder, onion powder, salt, pepper) - Cooking spray or silicone muffin molds - Equipment needed (muffin tin, mixing bowl) The main ingredients create a fluffy and tasty bite. The egg whites give this dish its lightness. Cottage cheese adds creaminess and protein. Shredded cheese enhances the flavor, making these bites irresistible. For extra nutrition and color, I love adding bell peppers and spinach. They bring a pop of freshness. You can use any color of bell pepper you prefer. The seasoning options like garlic and onion powder bring out the taste. Just a pinch of salt and pepper can make a big difference. You need some baking essentials to make this recipe easy. Cooking spray helps the bites release from the molds. Silicone muffin molds make things simple too. Just place them on a baking sheet for easy handling. These ingredients combine to create a healthy snack or breakfast. You can easily customize based on your taste. Enjoy the fun of making your own version at home! First, you need to preheat your oven to 350°F (175°C). This step is key for even baking. Next, grab a large mixing bowl. In it, mix 6 large egg whites and 1/2 cup low-fat cottage cheese. Whisk them well until smooth. Now, it’s time to add flavor. Toss in 1/4 cup shredded cheese, 1/4 cup diced bell peppers, and 1/4 cup fresh spinach. Don’t forget the seasonings! Sprinkle in 1/4 teaspoon garlic powder, 1/4 teaspoon onion powder, and season with salt and black pepper. Stir everything together until well combined. Now, let’s prepare to bake. Lightly grease a muffin tin or use silicone muffin molds. This will help the bites come out easily. Carefully pour the egg mixture into the molds. Fill each one about three-quarters full. This will allow room for the bites to puff up while baking. Place the tin in the oven and bake for 20 to 25 minutes. Keep an eye on them. They should be set and start pulling away from the edges. Once they're done, take the muffin tin out of the oven. Let the bites cool for about 5 minutes. This cooling time helps them come out without breaking. For a great look, arrange the egg bites on a colorful platter. You can add a sprig of parsley or basil on top for a fresh touch. Serve warm or with a side of salsa for a tasty kick. Enjoy your homemade egg white bites! How do I whisk egg whites effectively? To whisk egg whites well, start with a clean bowl. Any grease can ruin the fluffiness. Use a hand whisk or electric mixer on high speed. Whisk until soft peaks form. This means the egg whites should hold a shape but still be shiny. Why is mixing ingredients thoroughly important? Mixing is key to even flavor. If you don’t mix well, some bites might taste plain. Stir until you can’t see any white from the egg whites or cottage cheese. This step ensures every bite is creamy and flavorful. What additional spices or herbs complement the recipe? You can add spices like paprika or chili powder for a kick. Fresh herbs like chives or basil add a nice touch too. These will make your bites even more tasty and colorful. What are good substitutions for cheese and vegetables? You can use goat cheese or feta if you want a different taste. For veggies, try mushrooms or zucchini. These add unique flavors and keep the dish fresh and exciting. What are the best ways to serve, including garnishing and side options? Serve the bites warm on a colorful platter. Garnish with a sprig of fresh parsley or basil. This adds a nice color and freshness to your dish. What are some pairing suggestions for a complete meal? You can pair these bites with a side of fresh salsa or avocado. A light salad can also make a great side. This adds more nutrition and makes your meal feel complete. {{image_4}} You can change the cheese to suit your taste. Goat cheese adds a tangy flavor. Feta cheese also works well for a salty kick. If you want a dairy-free option, use vegan cheese. It melts nicely and keeps the bites creamy. Just pick a type you enjoy. Feel free to mix in different vegetables. Mushrooms add a nice earthiness. Zucchini gives a fresh taste. You can even use seasonal veggies like asparagus in spring or roasted squash in fall. These swaps keep your bites exciting and packed with nutrients. If you want more protein, add cooked meats like ham or turkey. Plant-based proteins like black beans or lentils are great too. If you add these extras, you may need to bake a bit longer. Keep an eye on the bites to ensure they cook evenly. To store your egg white bites, let them cool first. Then place them in an airtight container. They stay fresh for about 4 days in the fridge. Keep them away from strong-smelling foods to avoid absorbing odors. You can freeze egg white bites for later. Wrap each bite in plastic wrap. Then, place them in a freezer-safe bag. They last up to 2 months. When you're ready to eat, thaw them in the fridge overnight. This helps keep their texture. For reheating, the microwave is fast and easy. Heat each bite for 30 seconds. Check if it's warm enough, then add more time if needed. You can also use the oven. Preheat it to 350°F (175°C) and heat for about 10 minutes. This keeps the bites fluffy and delicious. Yes, you can use whole eggs. Whole eggs give a richer taste. The bites will also have a creamier texture. Egg whites are lighter and fluffier. Whole eggs add more fat and calories. Try both to see which you like best. To make it dairy-free, swap cottage cheese for silken tofu. Use dairy-free cheese blends instead of regular cheese. Nutritional yeast adds a cheesy flavor without dairy. These swaps keep the bites creamy and tasty. Pair your egg bites with fresh fruit, like berries or melon. A green salad also adds fiber and vitamins. Whole grain toast or avocado slices can provide healthy fats. These sides make your meal more balanced and filling. Look for a firm texture. The bites should pull away from the mold edges. A toothpick should come out clean when inserted in the center. If they jiggle too much, give them more time in the oven. Yes, these egg bites are great for meal prep. You can bake them and store in the fridge. They last for about a week in an airtight container. Just reheat them in the microwave or oven before serving. This makes busy mornings easier! You now have all the tools to make delicious copycat Starbucks egg white bites. From choosing fresh ingredients to storing leftovers, every step matters. Remember, you can mix and match flavors to suit your taste. Don't hesitate to get creative with veggies and cheeses. Enjoy these bites as a tasty meal or snack. You’ll appreciate how easy they are to make and how good they taste. Happy cooking!

Copycat Starbucks Egg White Bites Simple and Tasty

Craving a healthy and tasty breakfast? You’re in the right place! My Copycat Starbucks Egg White Bites recipe is simple

- 1 lb large shrimp, peeled and deveined - 2 tablespoons extra virgin olive oil - 1 tablespoon freshly squeezed lime juice - 1 teaspoon chili powder - 1/2 teaspoon ground cumin - Salt and freshly ground black pepper to taste The shrimp is the star of this dish. Choose large, fresh shrimp for the best flavor. The marinade will add a kick with lime juice and spices. - 1 ripe mango, diced into small cubes - 1 small red onion, finely chopped - 1 red bell pepper, diced - 1 fresh jalapeño, deseeded and minced - Fresh cilantro leaves, for garnish - Lime wedges, for serving The mango offers sweetness that balances the heat from the jalapeño. Pair this with fresh onion and bell pepper. - 8 small corn tortillas Corn tortillas are ideal for these tacos. They hold up well and add great flavor. Warm them up for the best texture. This combination of ingredients makes the tacos colorful and full of flavor. Each bite will be a mix of sweet, spicy, and savory. To make the shrimp tender and tasty, start with the marinade. In a bowl, mix the shrimp with olive oil, lime juice, chili powder, cumin, salt, and pepper. Toss the shrimp well. This step helps the shrimp soak up all the flavors. Let it sit for 15 minutes. This short wait makes a big difference in taste. - Tips for Tender, Flavorful Shrimp - Use fresh shrimp for the best taste. - Do not marinate for too long; 15 minutes is perfect. - Adjust the spice by adding more or less chili powder. Next, let’s make the mango salsa. In another bowl, combine diced mango, red onion, red bell pepper, and minced jalapeño. Drizzle the rest of the olive oil over the mix. Sprinkle with salt and stir gently. This salsa adds a fresh and bright flavor to the tacos. - Allowing Flavors to Meld - Let the salsa sit for a bit. This waiting time blends the flavors. - Fresh salsa tastes better after resting for 10-15 minutes. Now it's time to cook the shrimp. Heat a skillet over medium-high heat. Once hot, add the marinated shrimp. Cook for 2-3 minutes on each side. The shrimp should turn pink and opaque. This means they are done! - Optimal Cooking Techniques for Shrimp - Spread shrimp in a single layer to cook evenly. - Avoid overcrowding the pan. To warm the corn tortillas, you can use two methods. Place them in a dry skillet on low heat, flipping often. Or, microwave them wrapped in a damp paper towel until soft. Now, let’s build the tacos! Take a warm tortilla and place a few shrimp in the center. Top it with a generous scoop of mango salsa. - Layering Ingredients for Optimal Flavor - Start with shrimp, then add salsa. - This layering ensures every bite bursts with flavor. For garnish, sprinkle fresh cilantro on top. It adds color and a nice touch of flavor. - Garnishing Suggestions - Serve with lime wedges for extra zest. - Consider adding avocado slices for creaminess. Adjusting Spice Levels You can change the heat in your tacos. If you like it mild, skip the jalapeño. For more heat, add extra minced jalapeño or even a splash of hot sauce. Always taste as you go to find what you love. Additional Flavor Boosts For a richer flavor, add garlic to the shrimp marinade. You can also mix in a splash of orange juice with the lime juice. This adds a sweet twist. Fresh herbs like mint or basil can brighten up your mango salsa too. Best Cookware for Shrimp Tacos A non-stick skillet works best for cooking shrimp. It helps prevent sticking and makes cleanup easier. A good quality knife is key for chopping veggies quickly. Useful Kitchen Tools for Preparation You need a medium bowl for mixing the shrimp and marinade. Use a separate bowl for the mango salsa. A cutting board is essential for safe chopping. A spatula is great for flipping the shrimp in the skillet, making sure they cook evenly. {{image_4}} You can switch out shrimp for other seafood. Fish like tilapia or cod works well. Scallops are also a great choice. Just remember to adjust cooking times. Fish cooks faster than shrimp, so keep an eye on it. For scallops, sear them until golden brown. This brings out their sweet flavor. If you need gluten-free options, use corn tortillas. They are safe for gluten-free diets. For a vegan twist, replace shrimp with marinated tofu or jackfruit. Tofu absorbs flavors well, so marinate it just like you do with shrimp. Jackfruit has a meaty texture that many enjoy. Both options still pair nicely with the mango salsa. While mango salsa is delicious, you can try other salsas. Pineapple salsa adds a sweet and tangy kick. You can mix diced pineapple, red onion, and lime juice. Another option is peach salsa. Use ripe peaches, jalapeños, and cilantro for a fresh taste. Each variation brings its own twist to the tacos. To keep your spicy mango shrimp tacos fresh, follow these tips: - Refrigeration Guidelines: Store leftover tacos in an airtight container. Keep them in the fridge for up to two days. This helps preserve flavor and texture. For best results, separate the shrimp and salsa from the tortillas. This prevents the tortillas from getting soggy. - Freezing for Long-Term Storage: If you want to save some tacos for later, freeze the shrimp and salsa. Place them in freezer bags, squeezing out the air before sealing. You can freeze them for up to three months. Just remember to thaw them in the fridge overnight before reheating. When it’s time to enjoy your leftovers, here’s how to reheat them: - Maintaining Flavor and Texture: For shrimp, heat them in a skillet over medium heat. Add a splash of olive oil to keep them moist. Cook until warmed through, about 2-3 minutes. For tortillas, warm them in a dry skillet or microwave. This keeps them soft and easy to fold. Avoid overcooking the shrimp to keep them tender. By following these storage and reheating tips, you can enjoy your spicy mango shrimp tacos again without losing their delicious flavors! You can use chicken or firm tofu instead of shrimp. Chicken should be cut into small pieces. For tofu, use extra-firm and press it to remove water. Both options will work well with the same marinade. Yes, you can make the mango salsa a few hours before. This helps the flavors mix well. Just keep it in the fridge until you are ready to serve. Stir it gently before adding it to your tacos. The spice level depends on the jalapeño you use. If you want less heat, remove the seeds. For more spice, keep some seeds in or add extra chili powder. You can always adjust to match your taste. Great sides include black beans, corn salad, or avocado slices. You can also serve tortilla chips with salsa. These sides add color and flavor to your meal. Enjoy with a refreshing drink like limeade! This blog post covered how to make Spicy Mango Shrimp Tacos from start to finish. We explored the main ingredients, preparation steps, and cooking tips to enhance flavors. You can customize these tacos with alternative seafood or dietary options. Remember to store any leftovers properly to keep them fresh. Enjoy creating this dish and impress your friends at your next meal. Cooking can be fun, and these tacos are sure to delight!

Spicy Mango Shrimp Tacos Flavorful and Easy Recipe

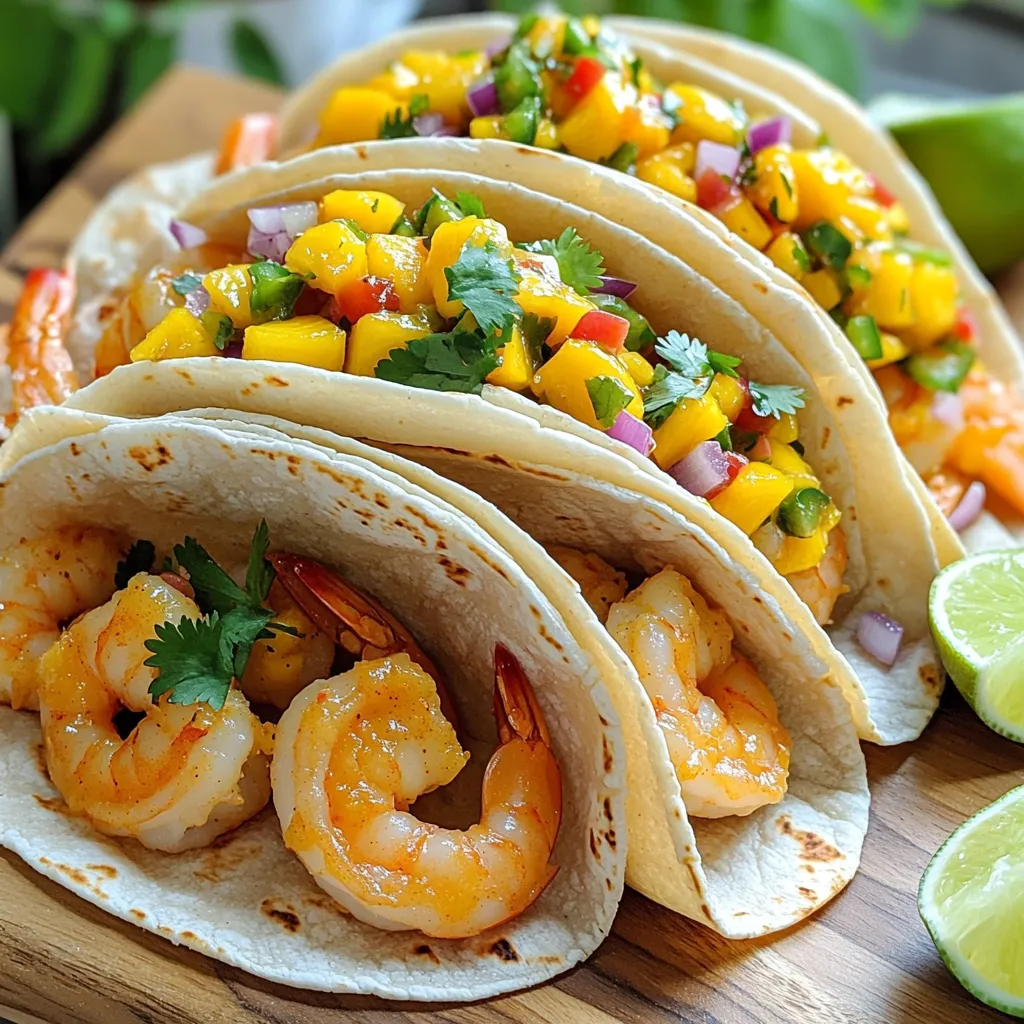
If you’re craving a dish that’s both zesty and simple, you’ll love these Spicy Mango Shrimp Tacos! This easy recipe

To make a great pumpkin spice hot chocolate mix, you need a few key items. Here’s what I recommend: - 1 cup unsweetened cocoa powder - 2 cups powdered sugar - 1 cup powdered milk - 1 tablespoon pumpkin pie spice - 1 teaspoon ground cinnamon These ingredients come together to create a rich and creamy base that gives your drink a lovely fall flavor. Each item plays a role in building that warm, cozy taste. You can add more depth to your mix with some optional ingredients. Here’s what you might consider: - 1 teaspoon vanilla extract Adding vanilla gives your hot chocolate a sweet aroma and extra flavor. This step is not required, but it can make a big difference in taste. When it's time to serve your pumpkin spice hot chocolate, toppings can elevate the experience. Here are my favorites: - Mini marshmallows - Dark chocolate shavings - Pumpkin seeds These toppings not only look great but also add texture and flavor. Marshmallows melt into the drink, while dark chocolate and pumpkin seeds add a nice crunch. Enjoy customizing your drink! To start, gather your ingredients. You will need: - 1 cup unsweetened cocoa powder - 2 cups powdered sugar - 1 cup powdered milk - 1 tablespoon pumpkin pie spice - 1 teaspoon ground cinnamon In a large mixing bowl, add all these dry ingredients. Use a whisk to mix them well. This step is key. It helps blend the flavors together. Make sure there are no lumps. You want a smooth, even mix. Next, consider adding vanilla extract. You will need 1 teaspoon if you choose to add it. Stir the vanilla into the dry mix. This adds a nice depth of flavor. If you prefer a classic taste, you can skip this step. Either way, your hot chocolate will still be delicious. After mixing, it’s time to store your creation. Transfer the mix into an airtight container. A jar works well for this. Seal it tightly to keep air out. Store it in a cool, dry place. This helps the mix stay fresh for up to three months. When you’re ready for a warm cup, grab your favorite mug. Measure out 1/4 cup of the hot chocolate mix. Next, heat 1 cup of milk in a small saucepan. Keep the heat medium and stir often. Heat until it's hot but not boiling. Now, pour the hot milk into your mug over the mix. Stir well with a spoon. Make sure everything dissolves into a creamy drink. To finish, top with mini marshmallows and sprinkle dark chocolate shavings or pumpkin seeds on top. Enjoy every sip of this cozy fall treat! To make the best pumpkin spice hot chocolate, start with fresh ingredients. Use unsweetened cocoa powder for rich flavor. Combine it with powdered sugar and powdered milk for smoothness. Don't forget the pumpkin pie spice and ground cinnamon; they bring warmth to each sip. Whisk everything well to blend the flavors evenly. You can easily adjust the sweetness and spice in your mix. If you like it sweeter, add more powdered sugar. For a spicier kick, increase the pumpkin pie spice. Taste as you go! This way, you can create a blend that fits your taste perfectly. Serve your pumpkin spice hot chocolate in a warm mug. Add mini marshmallows for a fluffy topping. For a special touch, sprinkle dark chocolate shavings or pumpkin seeds on top. This adds texture and flavor. You can enjoy this drink with friends or make it for a cozy night in. {{image_4}} You can easily make this mix vegan. Simply swap the powdered milk for a plant-based milk powder. Almond, soy, or coconut powders work great. When you prepare your drink, use almond milk or coconut milk instead of dairy milk. This gives you a creamy, vegan treat. You can change the flavor based on the season. In winter, add a dash of peppermint extract for a minty twist. In spring, mix in some fresh orange zest for a bright taste. In summer, serve it cold over ice for a refreshing drink. Each season brings fun ways to enjoy your hot chocolate. Make your hot chocolate unique with fun add-ins. Try adding a spoonful of peanut butter for a nutty taste. You can even mix in a pinch of cayenne for a spicy kick. For a dessert-like experience, throw in some crushed cookies or candy canes on top. Each idea adds flavor and fun to your drink. To keep your pumpkin spice hot chocolate mix fresh, store it in an airtight container. Use a jar or a sealed bag to prevent moisture. Keep it in a cool, dry place, away from heat and light. This helps maintain the flavor and quality of the mix. Your hot chocolate mix lasts up to three months when stored properly. After this time, check for any changes. If you see clumps or an off smell, it’s best to throw it away. Freshness is key for that rich, cozy taste. If your mix is older but you want to use it, you can try reviving it. Simply whisk the mix to break up any clumps. You can also add a little bit of fresh cocoa powder or sugar. This can help bring back some of the flavor. Always taste before serving to ensure it still has that delightful pumpkin spice kick! Pumpkin spice hot chocolate mix is a blend of cocoa, sugar, and spices. It brings together the cozy taste of pumpkin pie with rich chocolate. This mix is perfect for chilly days when you want a sweet treat. You can easily make it at home with just a few ingredients. Yes, you can use water instead of milk. However, using milk makes the drink creamier and richer. Water will give you a lighter drink, but it may lose some flavor. If you want a warm drink, stick with milk or a milk alternative. To adjust the recipe, simply divide the amounts by the number of servings you want. For example, if you want to make half the recipe, use 1/2 cup cocoa powder and 1 cup powdered sugar. This way, you keep the taste while making less mix. The ingredients in this mix have some benefits. Unsweetened cocoa is high in antioxidants. It can help improve heart health. Pumpkin pie spice includes cinnamon, which may help with blood sugar. Powdered milk adds calcium for strong bones. Enjoying this mix in moderation can be a tasty treat. You can find pre-made pumpkin spice hot chocolate mix in many grocery stores. Look in the hot drink aisle or seasonal sections. Online retailers also sell it. Check the ingredients to find one that suits your taste and dietary needs. You now have all you need to make a tasty Pumpkin Spice Hot Chocolate Mix. We covered the best ingredients, step-by-step instructions, and helpful tips. You learned about storage details and fun variations. This drink is perfect for cozy nights and chilly days. Don't hesitate to experiment with flavors and toppings. Enjoy your delicious hot chocolate, and share it with friends and family. It’s a simple way to spread joy and warmth. Happy sipping!

Pumpkin Spice Hot Chocolate Mix Simple and Savory Treat

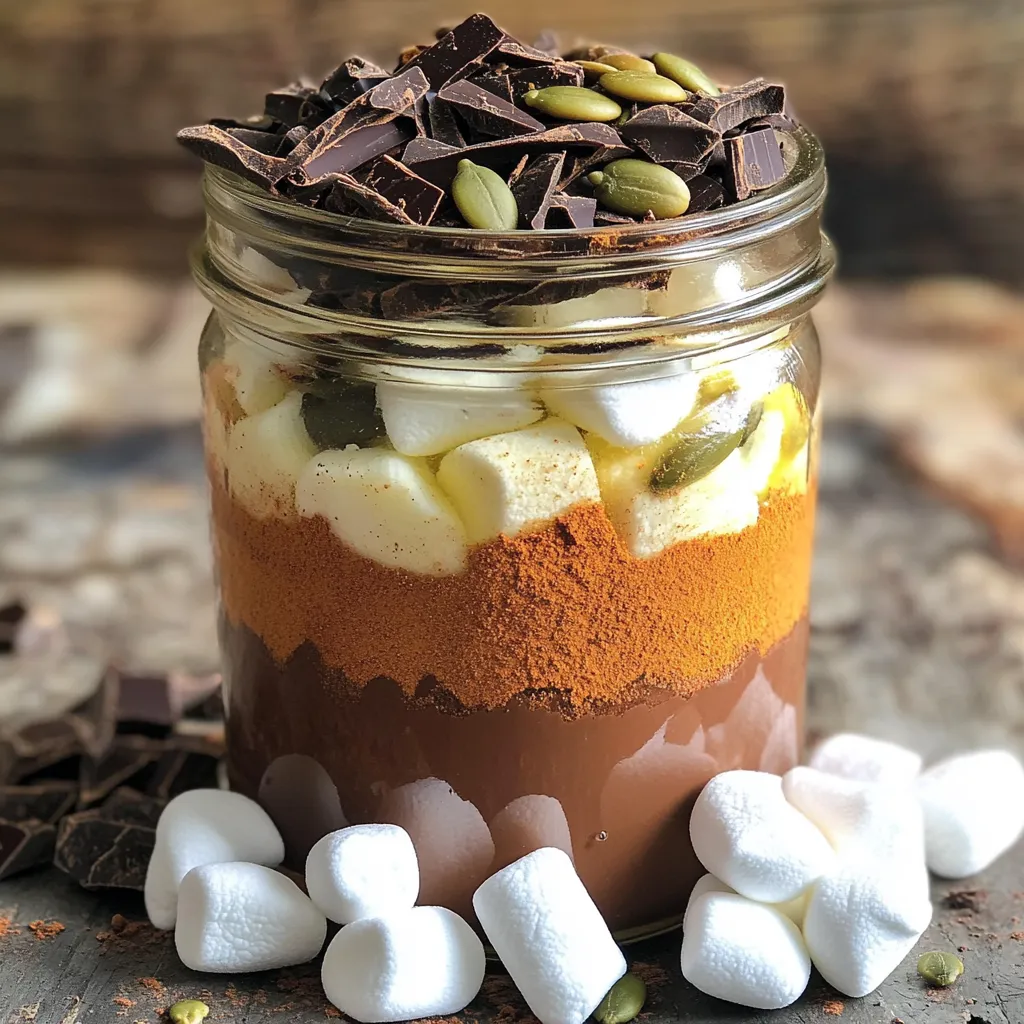
Get ready to warm your soul with a cup of Pumpkin Spice Hot Chocolate Mix! This simple and savory treat

To make One-Pot Creamy Garlic Parmesan Quinoa, gather the following ingredients: - 1 cup quinoa, rinsed thoroughly - 2 tablespoons extra-virgin olive oil - 4 cloves garlic, finely minced - 1 small onion, diced - 4 cups vegetable broth (homemade or low-sodium) - 1 cup heavy cream (or coconut cream for a dairy-free option) - 1 cup finely grated Parmesan cheese (or nutritional yeast for a vegan alternative) - 1 cup fresh spinach leaves, roughly chopped - Salt and freshly ground black pepper, to taste - Fresh parsley, chopped, for garnish These ingredients work together to create a rich and creamy dish. Quinoa serves as a great base. It is packed with protein and fiber. The garlic and onion add a strong flavor. They work well with the creamy texture from the heavy cream and cheese. You can also use coconut cream for a lighter, dairy-free option. This recipe is versatile. You can switch out the cheese for nutritional yeast if you prefer a vegan dish. Don't forget the fresh spinach! It adds color and nutrients. The parsley on top gives a nice touch to the presentation. With these ingredients, you will create a meal that is both tasty and fulfilling. 1. Heating oil and sautéing garlic and onion Start by heating two tablespoons of extra-virgin olive oil in a large pot over medium heat. When the oil shimmers, add four cloves of finely minced garlic and one small diced onion. Sauté for about three to four minutes. You want the onion to turn translucent and the garlic to smell amazing. 2. Toasting quinoa with aromatics Next, add one cup of rinsed quinoa to the pot. Stir it well to mix with the garlic and onion. Toast the quinoa for about one minute. This step brings out its nutty flavor, making the dish even better. 3. Adding broth and cooking quinoa Carefully pour in four cups of vegetable broth. Stir everything together. Then, raise the heat to bring it to a boil. Once boiling, reduce the heat to a gentle simmer and cover the pot. Cook for about 15 minutes, or until the quinoa is fluffy and has absorbed most of the liquid. 1. Incorporating cream, cheese, and spinach After the quinoa cooks, it’s time to add in one cup of heavy cream, one cup of grated Parmesan cheese, and one cup of roughly chopped fresh spinach. Stir well until the spinach wilts and the cheese melts, creating a rich and creamy sauce. 2. Adjusting seasoning to taste Season your dish with salt and freshly ground black pepper to taste. Cook for an additional two to three minutes. This ensures everything is warm and well combined. 3. Allowing dish to rest before serving Remove the pot from heat and let it sit covered for a couple of minutes. This helps the dish thicken slightly, making it even creamier. Serve warm, topped with chopped fresh parsley for a bright finish. How to properly rinse quinoa: Start with a fine mesh strainer. Rinse quinoa under cold water for about 2 minutes. This removes the bitter coating called saponin. Make sure to shake the strainer well to remove excess water. Best ways to enhance flavor without extra ingredients: Use vegetable broth instead of water. This adds depth without adding calories. Toast the quinoa in olive oil with garlic and onion. This step builds a strong flavor base. A sprinkle of salt while cooking can also boost taste. Recommendations for refrigerating leftovers: Store leftovers in an airtight container. It keeps the dish fresh for up to 4 days. Make sure the dish cools to room temperature before sealing. This prevents moisture build-up, which can spoil your meal. Reheating tips for maintaining creaminess: Reheat on the stove over low heat. Add a splash of water or broth to restore creaminess. Stir often to prevent sticking. You can also use a microwave, but cover the dish to keep moisture in. {{image_4}} For those looking to switch things up, this dish can easily fit your needs. You can make it dairy-free by using coconut cream instead of heavy cream. Coconut cream gives it a nice creaminess without the dairy. For a cheesy flavor without the cheese, replace Parmesan with nutritional yeast. It adds a nutty taste that complements the dish well. If you follow a vegetarian or vegan diet, the modifications are simple. Just use vegetable broth, coconut cream, and nutritional yeast, and you’re good to go. This way, everyone can enjoy a bowl of this creamy goodness! Want to take your One-Pot Creamy Garlic Parmesan Quinoa to the next level? Add your favorite herbs and spices! Fresh basil or thyme can add a burst of flavor. A pinch of red pepper flakes can give it a little kick too. You can also use seasonal vegetables for a fresh twist. In spring, add asparagus or peas. In fall, try roasted pumpkin or butternut squash. These veggies don't just add color; they also boost the nutrition in your meal. Feel free to experiment and find your favorite combinations! Each serving of One-Pot Creamy Garlic Parmesan Quinoa contains about 500 calories. This dish is rich in flavor and nutrients. - Carbohydrates: Approximately 60 grams - Fat: About 25 grams - Protein: Roughly 15 grams Quinoa is a whole grain, so it provides a good source of carbs. The olive oil and cream add healthy fats. The parmesan cheese boosts the protein content, making this meal both filling and nourishing. Quinoa is a superfood. It is high in protein and fiber. This grain helps keep you full longer. Spinach is packed with vitamins A and C. It also contains iron, which is great for your blood. Using olive oil gives you heart-healthy fats. These fats help with nutrient absorption. Heavy cream adds richness and flavor. If you use coconut cream, you still get a creamy texture with added health benefits. Incorporating these ingredients makes your meal not only tasty but also nutritious. Enjoy the flavors while fueling your body with good food! Can I use a different grain instead of quinoa? Yes, you can use other grains. Try rice, farro, or barley. Each grain has its own cooking time. Adjust the liquid and time based on the grain you choose. Quinoa cooks fast and has a nice nutty taste. Other grains will change the dish’s texture and flavor. How do I make this dish gluten-free? This dish is already gluten-free when you use vegetable broth. Always check labels on broth and cheese for hidden gluten. If you want a vegan version, use coconut cream and nutritional yeast instead of heavy cream and Parmesan. How long will leftovers last in the fridge? Leftovers can last up to four days in the fridge. Store in an airtight container to keep it fresh. When you're ready to eat, reheat on the stove or in the microwave. Stir well to make sure it warms evenly. Can I freeze this dish? Yes, you can freeze it! Place servings in a freezer-safe container. It will stay good for up to three months. To thaw, move it to the fridge overnight. Reheat slowly on the stove, adding a splash of broth or cream to restore creaminess. This blog post covered a delicious quinoa dish that is simple to prepare. We walked through the key ingredients, including quinoa and spinach, and discussed easy steps to cook it. I shared useful tips for flavor and storage. You can also modify the recipe for different diets or add seasonal flavors. In the end, this dish is nutritious and satisfying. Enjoy making it your own!

One-Pot Creamy Garlic Parmesan Quinoa Delight

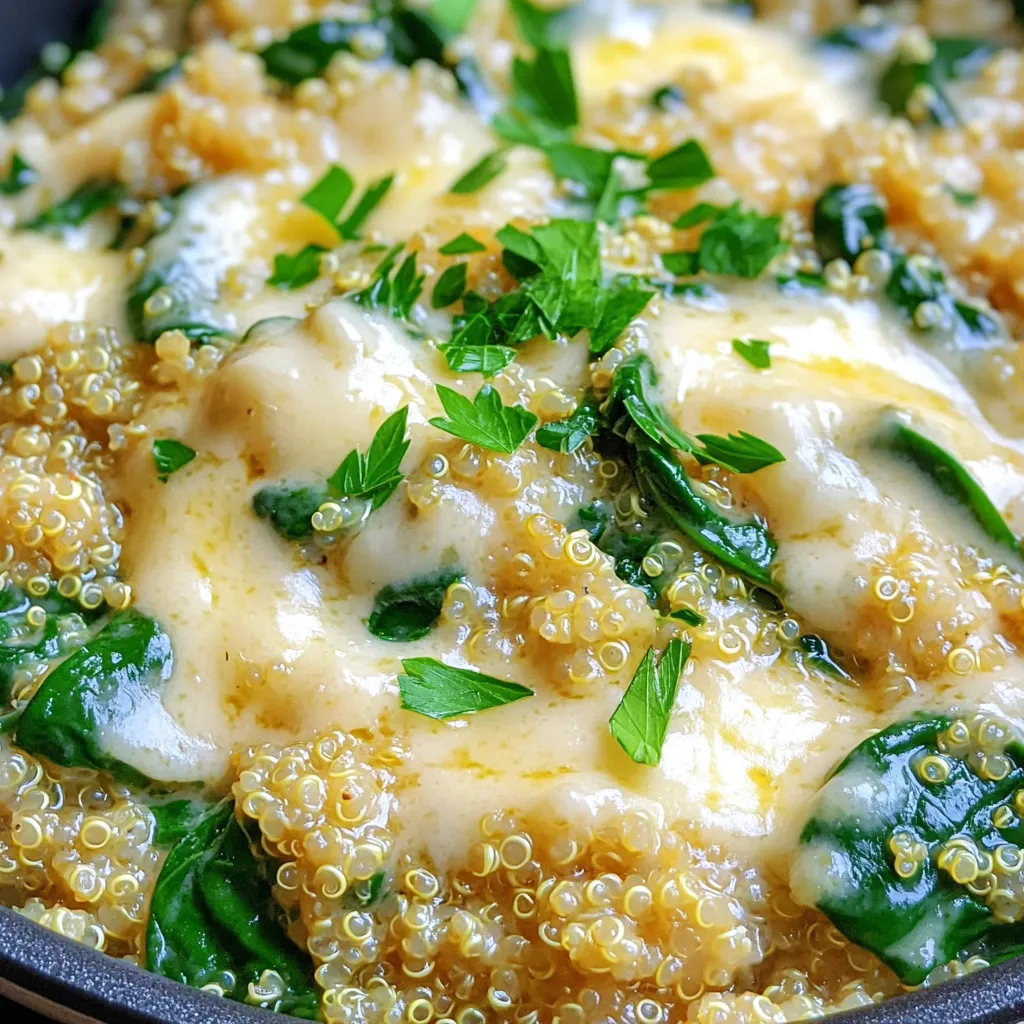
Welcome to a culinary game-changer: One-Pot Creamy Garlic Parmesan Quinoa Delight! This creamy dish combines rich flavors and is easy

To make this tasty dish, gather these key ingredients: - 500g chicken breast, thinly sliced - 1 tablespoon olive oil - 4 garlic cloves, minced - 1 red chili, sliced (adjust to heat preference) - 1 bell pepper (red or green), sliced into strips - 1 cup snap peas, trimmed - 3 tablespoons low-sodium soy sauce - 1 teaspoon sesame oil - 1 tablespoon honey - Salt and pepper to taste - Cooked rice or noodles (for serving) These ingredients combine to create a stir fry that is quick and full of flavor. You can enhance your dish with some fun extras: - Sesame seeds for crunch - Sliced green onions for freshness - Chopped cilantro for a burst of flavor - Lime wedges for a zesty touch These garnishes add color and flavor, making your meal even more inviting. Serve your stir fry with these sides for a complete meal: - Steamed jasmine rice for a classic touch - Noodles for a heartier option - A fresh salad to balance the meal These side dishes work well and complement the stir fry's bold flavors. Enjoy your cooking! - Start with 500g of chicken breast. Thinly slice it. - Mince 4 garlic cloves. - Slice 1 red chili. Adjust it for your heat level. - Slice 1 bell pepper into strips. Use red or green. - Trim 1 cup of snap peas. 1. Heat 1 tablespoon of olive oil in a large frying pan or wok over medium-high heat. 2. When the oil is hot, add the minced garlic and sliced chili. Stir-fry for about 30 seconds. The garlic should turn lightly golden. 3. Raise the heat to high and add the thinly sliced chicken. Stir-fry for 4-5 minutes. The chicken should be browned and no longer pink. 4. Add the sliced bell pepper and snap peas to the pan. Stir-fry for 2-3 minutes. The veggies should be bright and slightly tender but still crisp. 5. In a small bowl, mix 3 tablespoons of low-sodium soy sauce, 1 teaspoon of sesame oil, and 1 tablespoon of honey. Whisk until blended. 6. Pour the sauce over the chicken and veggies. Stir well to coat them evenly. 7. Cook for an additional 1-2 minutes. This lets the sauce thicken a bit. Add salt and pepper to taste. 8. Remove from heat and serve it hot over cooked rice or noodles. - Prepare all your ingredients before you start cooking. This saves time. - Keep the heat high while cooking. This helps to keep the chicken juicy. - Stir often to prevent burning and to cook everything evenly. - For a colorful plate, arrange the stir fry in deep bowls. Garnish with sesame seeds and sliced green onions. Enjoy your meal! To balance flavors in Garlic Chili Chicken Stir Fry, use the right amount of each ingredient. The garlic gives a strong aroma. The red chili adds heat, so adjust it to your taste. Use low-sodium soy sauce to keep it savory without being too salty. Honey adds a nice sweetness. Mix these well for a tasty dish. You want each bite to have a hint of sweetness, saltiness, and heat. One common mistake is overcooking the chicken. Cook it until it's just done. If you leave it too long, it can become dry. Also, don’t neglect the vegetables. Stir-fry them until they are bright and crisp. If you cook them too much, they lose their crunch. Lastly, make sure your oil is hot before adding ingredients. This step helps to sear the chicken and keep it juicy. For this stir fry, a large frying pan or wok works best. A wok allows for even cooking and space for all the ingredients. Make sure to have a good spatula. It helps to stir everything well without breaking the chicken. A sharp knife makes slicing the chicken and veggies easy. Finally, have a mixing bowl ready for combining sauces. This way, you can pour the sauce evenly over the stir fry. {{image_4}} You can change the heat of your garlic chili chicken stir fry. If you like it spicy, add more sliced red chili. For a milder dish, use less chili or remove the seeds. You can also add a dash of chili flakes for extra kick. If you want a sweet note, mix in some sweet chili sauce. This lets you control the spice to match your taste. Chicken breast is great, but you can swap it out for other proteins. Try thin slices of beef, pork, or shrimp. These proteins will cook quickly and absorb the flavors well. For a healthier option, use turkey breast. You can also use tofu for a meatless choice. Just be sure to press the tofu to remove excess water before cooking. To make this dish vegetarian or vegan, replace the chicken with tofu or tempeh. Use low-sodium vegetable broth instead of soy sauce for a lighter flavor. Add more colorful veggies like carrots or broccoli for nutrients. You can also add cashews or peanuts for crunch. This keeps the dish filling while being plant-based. To store leftover Garlic Chili Chicken Stir Fry, place it in an airtight container. Make sure it cools down first. You can keep it in the fridge for up to three days. If you want to keep it longer, consider freezing it. Just remember to label your container with the date. When you are ready to eat your leftovers, reheating is easy. You can use a microwave or a pan. For the microwave, heat it for two to three minutes. Stir halfway through to ensure even heating. If using a pan, heat on medium heat until warm, stirring often. This keeps the chicken and veggies nice and juicy. If you plan to freeze the stir fry, let it cool completely first. Then, transfer it to a freezer-safe bag or container. Remove as much air as possible to prevent freezer burn. You can freeze it for up to three months. When you're ready to eat, thaw it overnight in the fridge before reheating. Yes, you can prepare this stir fry ahead of time. Cook the chicken and veggies, then store them in the fridge. Keep the sauce separate until you reheat the meal. This keeps the dish fresh and tasty. When you are ready to eat, heat it up and add the sauce. It will taste just as good! You can use several options in place of chicken. Tofu is a great choice for a vegetarian meal. Shrimp or beef also work well if you want a different protein. Just make sure to adjust the cooking time. Cook shrimp for about 3-4 minutes, and beef needs around 5-7 minutes, depending on thickness. To change the spice level, you can adjust the amount of chili. If you want it milder, use less chili or remove the seeds. For more heat, add extra chili or try a pinch of red pepper flakes. You can also add hot sauce to the stir fry at the end for an extra kick. This blog covered how to make Garlic Chili Chicken Stir Fry from start to finish. We explored key ingredients, step-by-step cooking, and tips for success. I shared ways to tweak flavors, avoid common errors, and offered side ideas. In the end, stir fry is versatile and easy to love. With these tips, you can create a dish that suits your taste perfectly. Enjoy your cooking journey and savor every bite!

Garlic Chili Chicken Stir Fry 15 Minutes Delight

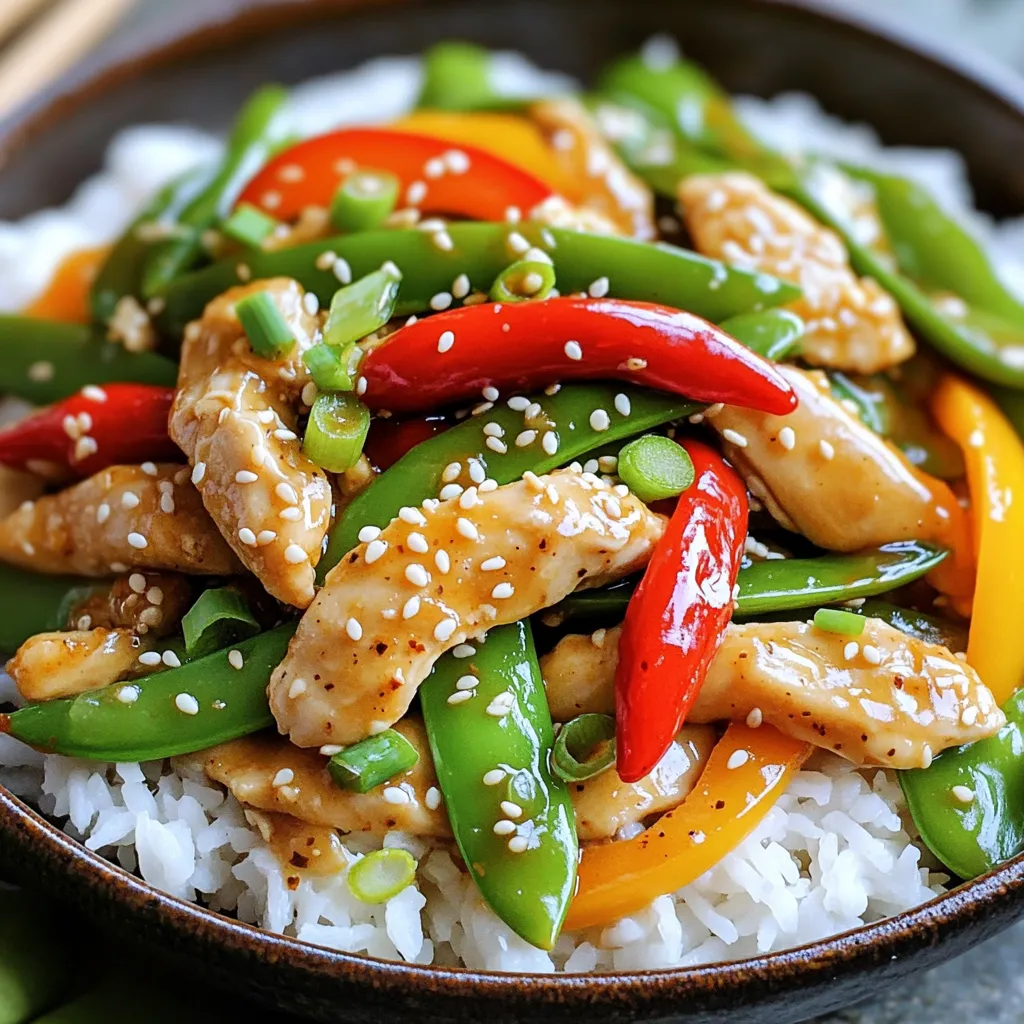
Craving a quick and tasty meal? Look no further! I’m excited to share my Garlic Chili Chicken Stir Fry that

- 1 ½ cups all-purpose flour - 1 teaspoon baking powder - 1 teaspoon baking soda - 1 teaspoon ground cinnamon - 1 teaspoon ground nutmeg - ½ teaspoon ground ginger - ¼ teaspoon ground cloves - ½ teaspoon salt - ½ cup unsalted butter, softened - 1 cup granulated sugar - 2 large eggs - ½ cup canned pumpkin puree - ½ cup brewed espresso, cooled - 1 teaspoon vanilla extract - ½ cup buttermilk - 8 oz cream cheese, softened - ¼ cup unsalted butter, softened - 1 ½ cups powdered sugar - 1 teaspoon vanilla extract - 1-2 tablespoons brewed espresso (optional) - Ground cinnamon and nutmeg for garnish When making pumpkin spice latte cupcakes, gather all your ingredients first. This step keeps your cooking smooth and stress-free. For dry ingredients, start with flour. It forms the base of your cupcakes. Baking powder and baking soda help them rise. The spices add flavor. Cinnamon warms the cupcakes. Nutmeg and ginger bring out the pumpkin taste. Cloves add depth. Lastly, salt balances the sweetness. Next, for wet ingredients, use softened butter. Cream it with sugar until light. Add eggs one by one for best mixing. Pumpkin puree gives moisture and flavor. Brewed espresso adds a coffee kick. Don’t forget vanilla extract for sweetness. Buttermilk adds richness and helps keep the cupcakes soft. Finally, let’s talk about the cream cheese frosting. Start with softened cream cheese and butter. Beat until smooth. Gradually mix in powdered sugar. This keeps the frosting fluffy. Add vanilla for flavor and optional espresso for a coffee boost. Top with a sprinkle of cinnamon and nutmeg for a festive touch. These carefully chosen ingredients create a cupcake that is not just tasty but also a delightful treat for fall. First, preheat your oven to 350°F (175°C). This step helps the cupcakes bake evenly. Next, grab a 12-cup muffin tin and line it with cupcake liners. This keeps the cupcakes from sticking and makes cleanup easy. In a medium bowl, combine the dry ingredients. You’ll need 1 ½ cups of all-purpose flour, 1 teaspoon each of baking powder, baking soda, ground cinnamon, ground nutmeg, and ground ginger. Then, add ½ teaspoon of ground cloves and ½ teaspoon of salt. Use a whisk to mix everything well, ensuring the spices blend nicely. Set this bowl aside. Take a large mixing bowl and add ½ cup of softened unsalted butter. Next, add 1 cup of granulated sugar. Use an electric mixer to cream them together for about 2-3 minutes. The mixture should look light and fluffy. Now, add 2 large eggs, one at a time. Beat well after each egg to mix it in fully. Stir in ½ cup of canned pumpkin puree, ½ cup of cooled brewed espresso, and 1 teaspoon of vanilla extract. Mix until everything combines smoothly. Now, it’s time to mix the dry and wet ingredients. Slowly add the dry mix to the wet mix. Alternate this with ½ cup of buttermilk. Start with the dry, then add some buttermilk, and repeat. Be careful not to overmix; stop when you no longer see any dry flour. Spoon the batter into the lined cupcake tins. Fill each liner about 2/3 full. This allows space for the cupcakes to rise while baking. Place the tin in your preheated oven and bake for 18-20 minutes. To check if they are done, insert a toothpick into the center of a cupcake. If it comes out clean, they are ready. After baking, let the cupcakes cool in the tin for 5 minutes. Then, move them to a wire rack to cool completely. While they cool, prepare the cream cheese frosting. In a separate bowl, beat together 8 oz of softened cream cheese and ¼ cup of softened butter until smooth. Gradually add 1 ½ cups of powdered sugar, mixing well. Finally, add 1 teaspoon of vanilla extract and 1-2 tablespoons of brewed espresso if you want a stronger coffee flavor. Once the cupcakes are cool, frost them generously with the cream cheese frosting. Use a spatula or piping bag for a nice look. For extra flair, sprinkle a little ground cinnamon and nutmeg on top. Enjoy these delightful treats! To make sure your cupcakes turn out just right, avoid overmixing. When you mix the wet and dry ingredients, do it gently. Mix until you see no flour streaks. This helps keep your cupcakes light and fluffy. To check if your cupcakes are done, use a toothpick. Insert it into the center of a cupcake. If it comes out clean, they are ready. If not, bake for a few more minutes. When frosting your cupcakes, you can use either a spatula or a piping bag. A spatula gives a nice rustic look. A piping bag, however, allows for fun designs. Choose whichever you prefer! For the right frosting consistency, it should be smooth and creamy. If it's too thick, add a little milk. If it's too thin, add more powdered sugar. Present your cupcakes beautifully for fall gatherings. Use a decorative plate to make them stand out. Add cinnamon sticks or whole nutmeg for a festive touch. This makes your treats look inviting and delicious! {{image_4}} You can change the flavor of your cupcakes easily. Want more spice? Add an extra half teaspoon of cinnamon or nutmeg. A pinch of cardamom gives a nice twist too. You can also mix in some chocolate chips for a sweet surprise. For frostings, try a maple cream cheese frosting. It pairs great with pumpkin spice. You can also make a simple chocolate ganache. Just melt chocolate with heavy cream for a rich topping. If you need gluten-free cupcakes, swap the all-purpose flour for a gluten-free blend. Make sure it has a binding agent like xanthan gum. This keeps the cupcakes nice and fluffy. For dairy-free options, use coconut milk instead of buttermilk. You can also replace the cream cheese with a vegan alternative. Look for a plant-based cream cheese at your store. Cupcake toppers add fun and flair. Try adding whipped cream on top for a light touch. You can also use chocolate shavings or caramel drizzle for an extra treat. For a fall theme, use candied pecans or pumpkin seeds. They add crunch and a beautiful look. Finally, a sprinkle of edible glitter can create a festive feel. Store your cupcakes at room temperature in an airtight container. This keeps them soft and fresh. If the weather is warm, consider refrigerating them. Just make sure to cover them well to avoid drying out. Cupcakes stay good for about three days this way. You can freeze both the cupcakes and the frosting. First, let the cupcakes cool completely. Wrap each cupcake tightly in plastic wrap. Place them in a freezer-safe bag. They can last up to three months in the freezer. For the frosting, store it in a sealed container in the freezer. Thaw both in the fridge before serving. For the best taste and texture, eat the cupcakes within three days. They taste great fresh, but can stay good for up to a week. Just keep them stored properly. If they seem dry, add a bit of frosting to help moisten them. Pumpkin spice latte cupcakes stay fresh for about 3 days at room temperature. For longer freshness, store them in the fridge for up to a week. Just make sure to keep them in an airtight container. This helps maintain their soft texture and rich flavor. Yes, you can use fresh pumpkin. Just cook and puree the pumpkin until smooth. It should have the same consistency as canned pumpkin. Fresh pumpkin gives a slightly different taste, but it’s delicious! Just remember to drain any excess moisture to keep the cupcakes from getting soggy. If you don’t have buttermilk, you can mix ½ cup of milk with 1 tablespoon of vinegar or lemon juice. Let it sit for about 5 minutes. This mixture will mimic buttermilk's tangy flavor. You can also use yogurt or sour cream, thinned with a bit of milk. To reduce sweetness, cut back on the sugar by ¼ cup. You can also add a pinch of salt to balance the flavors. Consider using dark chocolate in the frosting for a richer taste without adding more sugar. Another option is to use less frosting on each cupcake. Yes, you can bake these cupcakes in advance. They freeze well too! Just let them cool completely, wrap them tightly in plastic wrap, and place them in a freezer bag. When you’re ready, thaw them in the fridge overnight and frost them when you're ready to serve. In this blog post, we explored how to make delicious pumpkin spice latte cupcakes. We covered the key ingredients, from dry to wet, ensuring a rich flavor. The step-by-step instructions helped you create perfect cupcakes with cream cheese frosting. I shared tips for baking success, variations to try, and storage details for freshness. Remember, baking can be fun and easy. Enjoy these cupcakes at your next gathering or keep them for a cozy treat. Happy baking!

Pumpkin Spice Latte Cupcakes Irresistible Fall Treat

Craving an autumn treat that combines two favorites: pumpkin spice and coffee? You’re in luck! These Pumpkin Spice Latte Cupcakes

- 1 lb Italian sausage - 4 medium-sized potatoes - 1 large onion - 2 carrots - 2 celery stalks - 4 cloves garlic - 4 cups chicken broth - 1 cup heavy cream or coconut milk - Dried thyme and smoked paprika - Salt and pepper - Fresh parsley for garnish - Additional seasoning suggestions The main ingredients in this soup bring warmth and heartiness. The Italian sausage adds rich flavor. Potatoes give it a nice texture. Use medium-sized potatoes, peeled and diced into cubes. Chop up the onion finely for a sweet taste. Dice the carrots and chop the celery into small rings. This adds color and crunch. You also need garlic, which boosts flavor. I love using four cloves, minced finely. The chicken broth gives the soup its base. I suggest using low-sodium broth for better control over salt. For creaminess, add one cup of heavy cream or coconut milk. This makes it rich without overpowering the flavors. Finally, season with dried thyme and smoked paprika. They add depth to the soup. Don’t forget salt and pepper to taste. Adjust these to fit your preference. For garnish, fresh parsley adds a lovely touch. It brightens the dish visually and flavor-wise. You can also try other seasonings like red pepper flakes for a kick. To brown the Italian sausage, heat a skillet over medium heat. Add the sausage, breaking it apart with a spatula. Cook until it is browned and crumbly. This should take about 5 to 7 minutes. If there is excess fat, drain it. Then, transfer the sausage to the slow cooker. Next, we need to prepare the vegetables. Dice the potatoes into small cubes. Chop the onion, carrots, and celery into small pieces. In the slow cooker, add the diced potatoes, chopped onion, diced carrots, and chopped celery on top of the browned sausage. Stir gently to combine the ingredients well. Now, let’s layer the flavors in the soup. Sprinkle the minced garlic over the vegetables and sausage. Pour in the low-sodium chicken broth. Add the dried thyme and smoked paprika. Season with salt and pepper to taste. Mix well to ensure all ingredients are evenly distributed. Cover the slow cooker with the lid. Set it to cook on low for 6 to 8 hours or on high for 3 to 4 hours. The soup is ready when the vegetables are tender and the flavors meld beautifully. You will know it's done when you can easily pierce the potatoes with a fork. About 30 minutes before serving, gently stir in the heavy cream or coconut milk. This will enhance the soup's creaminess. Taste and adjust the seasoning with extra salt or pepper if necessary. Once the cooking time is complete, ladle the hearty soup into bowls. If you want, garnish each bowl with fresh chopped parsley. This adds color and a fresh taste. Pair your soup with crusty bread or a simple salad for a complete meal. To boost the taste of your Rustic Sausage Potato Soup, consider adding fresh herbs like thyme or rosemary. They add a lovely aroma. You can also sprinkle in a bit of smoked paprika for a warm, smoky flavor. If you want more depth, try a splash of vinegar or lemon juice. This adds brightness and cuts through the creaminess. For sweetness, a touch of honey or brown sugar can balance the savory notes. Slow cookers can vary a lot in heat. If yours cooks hot, check the soup at 3 hours on high or 5 hours on low. You want the potatoes and carrots soft but not mushy. A fork should easily pierce them. If you have a new slow cooker, check for doneness early to avoid overcooking. To make this soup a complete meal, serve it with crusty bread or a fresh salad. A slice of sourdough is perfect for dipping. If you want to add protein, toss in some cooked beans or shredded chicken. Quinoa or rice can also make it heartier. These additions will keep everyone satisfied! {{image_4}} If you need a dairy-free option, use coconut milk instead of heavy cream. This change adds a subtle sweetness and keeps the soup rich. For those needing gluten-free adjustments, ensure your chicken broth is gluten-free. You can also check the sausage label to confirm there are no gluten ingredients. You can jazz up the soup by adding other vegetables. Kale and sweet potatoes work well. They add color and nutrients. You can also try different types of sausage. Spicy sausage will give the soup a kick, while turkey sausage keeps it lighter. You can serve this soup in two ways. For a chunky stew, keep the potatoes and veggies larger. If you want a smooth soup, blend it after cooking. Garnishing can also be fun. Try adding a dollop of sour cream or a sprinkle of cheese. Fresh herbs like parsley or chives can brighten the dish. To store leftover soup, let it cool first. Use a clean container with a tight lid. This keeps your soup fresh and safe to eat. In the fridge, it lasts up to 3-4 days. Always label your container with the date you made it. This way, you know how long it has been there. If you want to save some soup for later, freezing works great. Use freezer-safe bags or containers. Leave space at the top because soup expands when frozen. Your soup will be good for up to 3 months. When you are ready to eat it, thaw it overnight in the fridge. To reheat, pour the soup into a pot and warm it on low heat. Stir often to avoid burning. To make cooking easier, prepare your ingredients in advance. Chop the vegetables the night before and put them in the fridge. You can also brown the sausage ahead of time. This will save you time on busy days. When you are ready to cook, just add everything to the slow cooker. This makes the process fast and simple! Yes, you can use frozen vegetables in this soup. They save time and still taste great. Just make sure to add them at the same time as the other veggies. This way, they cook evenly and blend well with the flavors. Absolutely! To make this soup on the stovetop, brown the sausage in a large pot first. Then, add the diced potatoes, onion, carrots, and celery. Stir in the garlic, broth, thyme, and paprika. Bring it all to a boil, then reduce the heat to low. Let it simmer for about 30-40 minutes, or until the veggies are tender. Finally, stir in the cream and adjust the seasoning. To adjust the recipe, simply halve the ingredients. For example, use ½ lb of sausage and 2 potatoes. This will help you make a smaller batch. You can also scale it down by using a smaller slow cooker if you have one. This soup goes well with many types of bread. I recommend using crusty bread, like a baguette or sourdough. These breads soak up the soup nicely. You can also try garlic bread or warm dinner rolls for a tasty side. Yes, this soup freezes well. To freeze, let it cool completely. Then, transfer it to airtight containers. It can last up to three months in the freezer. When you're ready to eat, thaw it overnight in the fridge and reheat on the stove. Stir in a bit more cream if needed for added richness. This blog post has shown you how to make a hearty Italian sausage soup. We explored the key ingredients, step-by-step cooking instructions, and tips to enhance flavor. Remember to adjust the recipe to fit your needs, whether you prefer chunky or smooth textures. Don’t forget to experiment with different vegetables or seasonings. With these techniques, you can enjoy a delicious meal that warms your soul. Now it's time to grab your slow cooker and enjoy!

Rustic Sausage Potato Soup Slow Cooker Delight

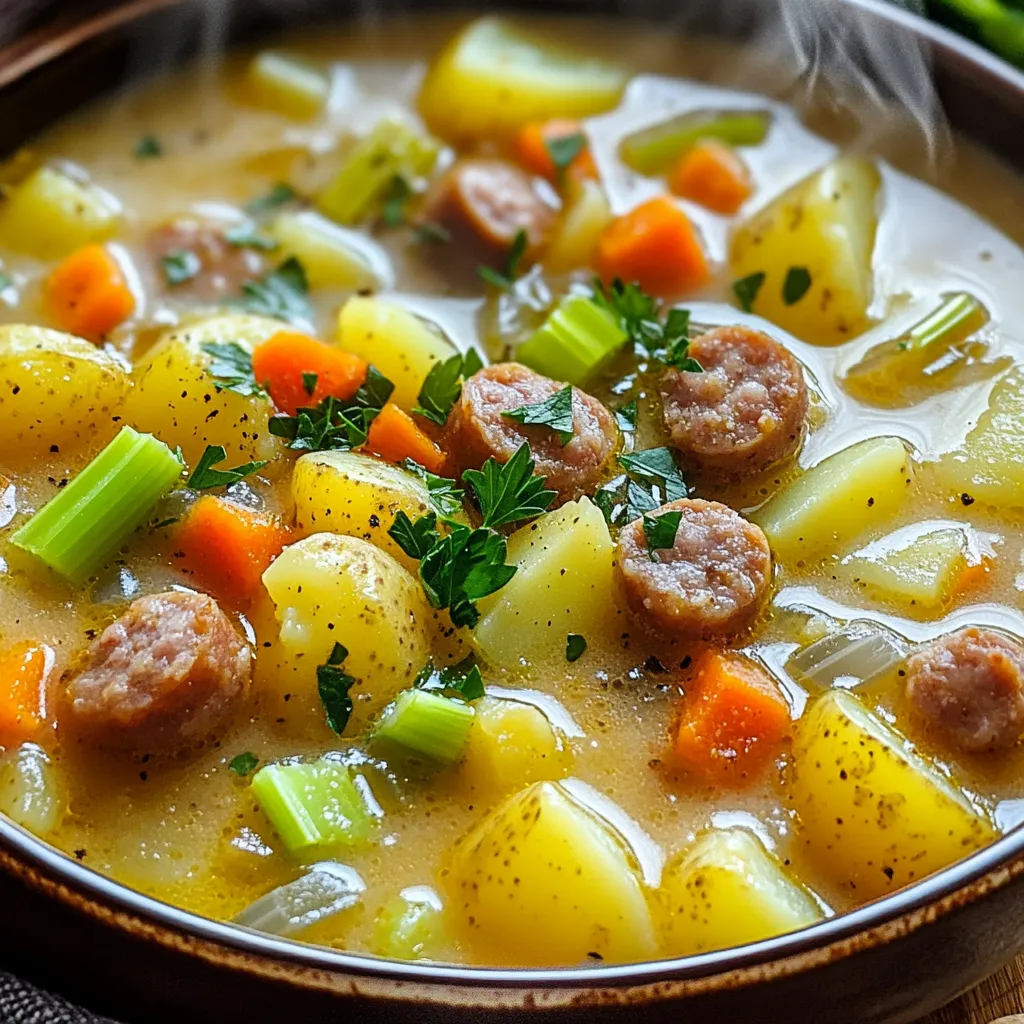
If you’re craving a warm, hearty meal, look no further! My Rustic Sausage Potato Soup made in a slow cooker

To make this creamy tomato spinach pasta, you need the following: - 12 oz (340g) of your preferred pasta - 2 tablespoons of high-quality olive oil - 3 cloves of garlic, finely minced - 1 (14.5 oz) can of diced tomatoes - 4 cups of fresh spinach, washed and chopped - 1 cup of heavy cream - 1 teaspoon of Italian seasoning blend - ½ teaspoon of red pepper flakes (optional) - Salt and black pepper to taste - ½ cup of freshly grated Parmesan cheese - Fresh basil leaves for garnish I recommend using penne or fusilli pasta for this dish. They hold the sauce well, making each bite delightful. You could also try rotini or farfalle if you want a fun twist. Just ensure the pasta cooks evenly and absorbs the flavors. Don’t worry if you don’t have everything on hand. Here are some easy swaps: - Pasta: Use gluten-free pasta if needed. - Cream: Swap heavy cream for coconut cream for a dairy-free option. - Parmesan Cheese: Nutritional yeast serves as a great vegan substitute. - Spinach: Kale or Swiss chard can work in place of spinach. These changes still keep the creamy tomato spinach pasta tasty and satisfying! First, heat 2 tablespoons of olive oil in a large pot. I like to use medium heat for this step. Next, add 3 cloves of finely minced garlic. Sauté the garlic for about 1 minute. You want it to become fragrant and lightly golden. Then, pour in one can of diced tomatoes with their juices. Stir in 1 teaspoon of Italian seasoning and ½ teaspoon of red pepper flakes if you like spice. Let this mixture simmer for about 5 minutes. This allows the flavors to blend nicely. Add 12 ounces of your favorite pasta to the pot. I often use penne or fusilli, but you can choose what you like. Pour in 4 cups of water and stir everything well. Bring the mixture to a rapid boil. Once boiling, reduce the heat and cover the pot. Cook the pasta according to the package instructions, usually about 8 to 10 minutes. Stir occasionally to keep it from sticking. Aim for an al dente texture for the best bite. When the pasta is ready, add 4 cups of washed and roughly chopped spinach. Then mix in 1 cup of heavy cream or coconut cream if you prefer a dairy-free option. Cook this on low heat for about 2 to 3 minutes. You want the spinach to wilt and the sauce to become rich and creamy. Finally, remove the pot from heat and stir in ½ cup of freshly grated Parmesan cheese. Taste the sauce and adjust the seasoning with salt and black pepper as needed. Serve it hot, topped with fresh basil leaves for a lovely touch. To get the best creamy sauce, start with high-quality heavy cream. If you want a dairy-free option, coconut cream works great. Add it at the end for a rich flavor. Always stir in the cheese while the sauce is still warm. This helps it melt smoothly. If the sauce seems thick, add a splash of pasta water to loosen it. Taste and adjust the seasoning. A pinch of salt or a dash of pepper can make a big difference. To keep your creamy tomato spinach pasta fresh, let it cool first. Then place it in an airtight container. It can last in the fridge for up to three days. If you want to keep it longer, consider freezing it. Just remember that the texture might change a bit after thawing. When you reheat, do it slowly. Use low heat on the stove or in the microwave. Add a bit of water or cream to help bring back the creaminess. Serve your creamy pasta hot in big bowls. Top it with fresh basil leaves for a burst of flavor. A sprinkle of extra Parmesan cheese can enhance the taste too. Pair it with a light salad or garlic bread for a full meal. This dish also goes well with a glass of white wine. Experiment with different sides to find what you like best! {{image_4}} You can easily make this dish vegetarian or vegan. For a vegetarian option, just stick to the recipe. Use heavy cream and Parmesan cheese as listed. If you want a vegan version, swap the heavy cream for coconut cream. It gives the same creamy texture but without dairy. Instead of Parmesan, use nutritional yeast for a cheesy flavor. This way, everyone can enjoy the creamy tomato spinach pasta. If you like spice, add more red pepper flakes to the dish. Start with the suggested ½ teaspoon, then taste it. If you want more heat, add a little more. For less spice, skip the red pepper flakes altogether. Your pasta will still taste great without them. Adjusting spice levels makes this dish fit your taste perfectly. You can turn this pasta into a protein-packed meal. Add cooked chicken, shrimp, or tofu for more protein. If you choose to add chicken, make sure it's cooked before mixing it in. For shrimp, add it in the last few minutes of cooking so they don’t overcook. If you prefer tofu, use firm tofu and sauté it until golden before adding it. These options make your creamy tomato spinach pasta even more filling and satisfying. To keep your creamy tomato spinach pasta fresh, let it cool first. Then, place it in an airtight container. Store it in the fridge for up to three days. If you want to enjoy it later, be sure to label the container with the date. You can freeze this pasta dish, too! First, let it cool completely. Then, transfer it to a freezer-safe container or bag. This way, it lasts for up to three months in the freezer. When you want to eat it, just thaw it in the fridge overnight. To reheat, you can use the stovetop or microwave. If using the stovetop, place the pasta in a pan over low heat. Add a splash of water or cream to keep it moist. Stir occasionally until warm. If using the microwave, heat in short bursts, stirring in between. Enjoy your creamy pasta again! Yes, you can use gluten-free pasta. Many brands offer great options. Look for penne or fusilli shapes. Cook time may change, so check the package. Gluten-free pasta should still blend well with the creamy sauce. To make this dish dairy-free, simply swap heavy cream for coconut cream. It gives a rich taste without dairy. Use nutritional yeast instead of Parmesan for a cheesy flavor. Fresh basil remains to add freshness. You can use nutritional yeast as a vegan option. It adds a savory flavor. If you prefer a non-vegan choice, try pecorino or Grana Padano. Both will bring a wonderful taste to your creamy dish. This blog post covered all you need for a tasty dish. We explored the key ingredients, step-by-step instructions, and helpful tips to make it perfect. You learned about variations, storage methods, and answered common questions about substitutions. With this guide, you can create a delicious meal your family will love. Enjoy getting creative in the kitchen, and don't hesitate to experiment with your favorite flavors! Happy cooking!

Creamy Tomato Spinach Pasta One Pot Delight

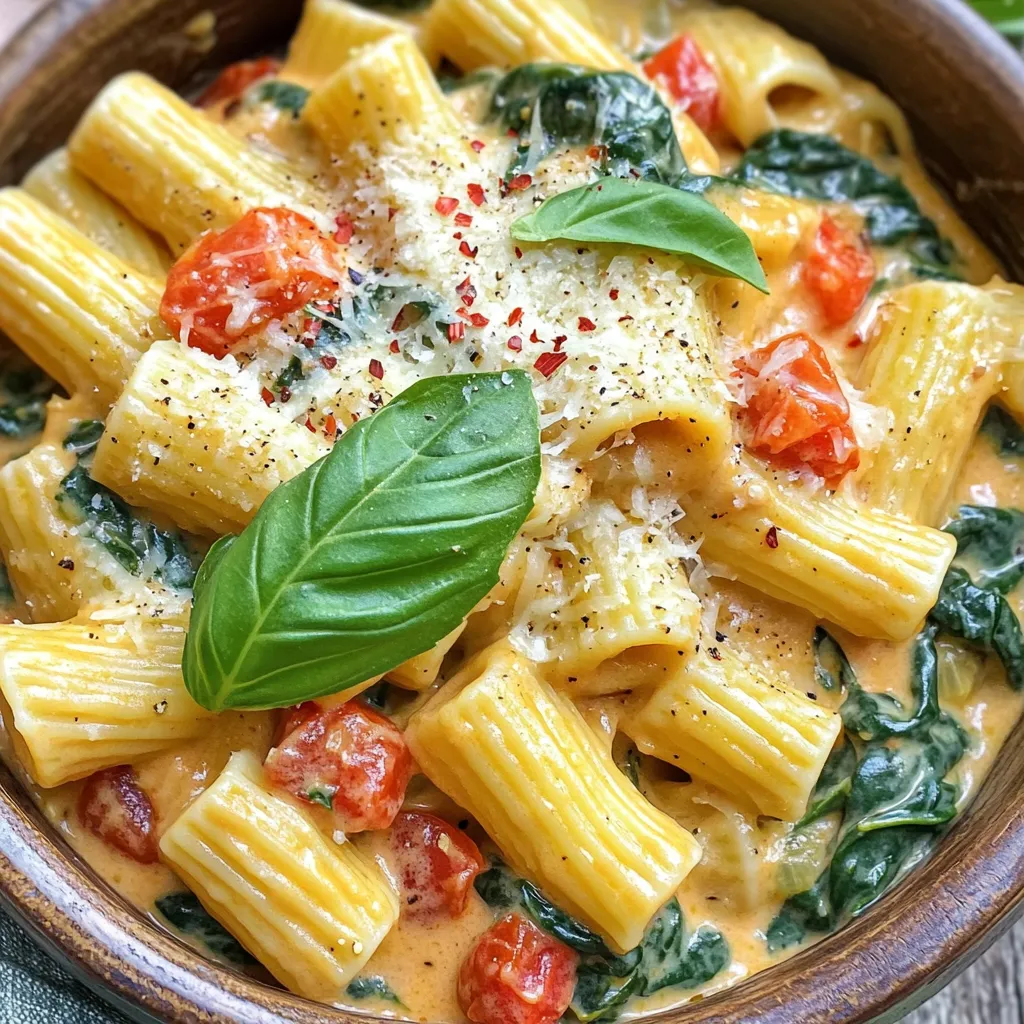
Welcome to your new favorite meal: Creamy Tomato Spinach Pasta One Pot Delight! If you crave a simple, tasty dish

- 2 cups all-purpose flour - 1/2 cup granulated sugar - 1 tablespoon baking powder - 1 teaspoon ground cinnamon - 1/2 teaspoon ground nutmeg - 1/4 teaspoon ground ginger - 1/2 teaspoon salt - 1/2 cup unsalted butter, chilled and cubed - 1/2 cup pumpkin puree - 1/4 cup cream cheese, softened - 1/4 cup heavy cream - 1 large egg - 1 teaspoon vanilla extract - 1/2 cup chopped walnuts or pecans (optional) - Egg wash: 1 egg beaten with 1 tablespoon milk When making pumpkin cream cheese scones, each ingredient plays a key role. The flour helps create the base. Sugar adds sweetness, while baking powder gives the scones a lift. Spices like cinnamon and nutmeg bring warmth and flavor. The butter, when cold, helps create a flakier texture. Pumpkin puree adds moisture and a subtle sweetness. Cream cheese contributes to a rich flavor, making every bite creamy. For the wet ingredients, heavy cream adds richness and helps bind the dough. The egg improves texture and adds color. The vanilla extract enhances all the flavors. If you choose to add walnuts or pecans, they give a nice crunch. Finally, the egg wash ensures a golden, shiny finish. Sprinkling raw sugar on top adds a sweet crunch. This combination of flavors and textures makes these scones a true delight. - Preheat oven to 400°F (200°C). - Line baking sheet with parchment paper. Start by preheating your oven. This step is key for getting those perfect scones. Lining the baking sheet helps keep the scones from sticking. - Whisk together flour, sugar, baking powder, and spices. In a large bowl, mix the flour, sugar, baking powder, cinnamon, nutmeg, and salt. Whisking helps to blend all the dry ingredients evenly. This step sets the base for your scones. - Add butter to dry mix and work until coarse crumbs form. Cut the chilled butter into small cubes. Add these cubes to the dry mix. Use your fingers or a pastry cutter to work the butter into the flour. Stop when the mix looks like coarse crumbs, with some small butter pieces still showing. This gives your scones a flaky texture. - Combine pumpkin puree, cream cheese, heavy cream, egg, and vanilla extract. In a separate bowl, mix the pumpkin puree, cream cheese, heavy cream, egg, and vanilla extract. Stir until smooth. This creamy mix adds moisture and flavor to your scones. - Fold wet ingredients into dry, avoiding overmixing. Slowly pour the wet mixture into the dry ingredients. Use a spatula or wooden spoon to fold them together gently. Be careful not to overmix; this keeps your scones tender and light. If you like, add chopped nuts for extra crunch. - Knead and shape the dough into the desired form and cut. Turn the dough out onto a floured surface. Knead it gently just a few times until it forms a ball. Then, press it into a rectangle about 1 inch thick. Cut it into triangles or squares based on your preference. - Transfer to baking sheet, brush with egg wash, sprinkle with sugar. - Bake for 15-20 minutes until golden. Place your cut scones on the prepared baking sheet. Brush the tops with the egg wash, and sprinkle raw sugar on top. Bake in your preheated oven for about 15-20 minutes. Look for a golden brown color and a clean toothpick when testing for doneness. Enjoy the warm, sweet aroma as they bake! To get perfect scones, use cold butter. Cold butter helps make the scones flaky. When the butter is cold, it creates little pockets of air as it melts. This gives the scones their light texture. Be careful not to overmix the dough. Overmixing leads to tough scones. Mix just until the ingredients combine. A few lumps are fine. This keeps your scones tender and soft. Brushing your scones with an egg wash makes them shine. The wash adds a nice golden color. It also helps the sugar stick. For extra crunch, use raw sugar on top. This gives a sweet crunch with every bite. Serve your pumpkin cream cheese scones warm. They taste best fresh from the oven. You can enjoy them with butter or cream cheese. Pair them with a hot drink like tea or coffee. They also go well with apple cider. The warm flavors blend nicely, making for a cozy treat. {{image_4}} You can add more fun to your scones with spices. Try adding a pinch of allspice or a splash of maple extract. These will brighten the flavor. You can also toss in chocolate chips or dried cranberries for a sweet twist. They pair well with pumpkin and cream cheese. If you need a gluten-free option, use a gluten-free flour blend. It works well in most scone recipes. For dairy-free scones, swap cream cheese with a vegan cream cheese. Coconut cream can replace heavy cream, adding a nice flavor. Cutting scones into different shapes makes them fun. Use cookie cutters for stars, hearts, or even fun shapes like pumpkins. For a quick snack, try mini scones. They bake faster and are easy to share. Store your leftover scones in an airtight container. This keeps them fresh. If you leave them out, they may dry out. For best results, keep them at room temperature for up to two days. If you want to keep them longer, refrigeration can help but may change their texture. You can freeze both uncooked and baked scones. For uncooked scones, shape them and place them on a baking sheet. Freeze them for about an hour, then transfer to a zip-top bag. For baked scones, let them cool completely before wrapping them tightly. They can last in the freezer for up to three months. When you're ready to eat, thaw overnight in the fridge or at room temperature. To reheat scones, use an oven for the best results. Preheat your oven to 350°F (175°C). Place the scones on a baking sheet for about 10-15 minutes. This keeps them warm and flaky. You can also microwave them for 10-15 seconds, but the oven is better for keeping their texture. Enjoy your scones fresh and warm! You can tell if your scones are done by checking a few signs. First, look for a golden-brown color on top. Use a toothpick to poke the center. If it comes out clean, your scones are ready. The sides should feel firm, not soft or doughy. Lastly, you will smell a warm, inviting scent that fills your kitchen. Yes, you can prepare these scones ahead of time. Make the dough and shape it into triangles or squares. Wrap the cut scones in plastic wrap. You can store them in the fridge for up to 24 hours. When you are ready, bake them straight from the fridge. Just add a few extra minutes to the bake time. Pumpkin cream cheese scones pair well with many treats. Serve them with a smear of butter or cream cheese. They also go great with honey or maple syrup. A warm drink like coffee, tea, or cider complements them perfectly. You can even add a sprinkle of cinnamon or nutmeg on top for extra flavor. Absolutely! You can use pumpkin spice instead of the individual spices. Just replace the spices with about 2 teaspoons of pumpkin spice for a warm flavor. This makes it easy and quick. Pumpkin spice blends already contain cinnamon, nutmeg, and ginger. You get great taste with less measuring. If your scones turn out dry, there are ways to fix them. First, add a little butter or cream on top before serving. This adds moisture and flavor. You can also warm them in the oven for a few minutes with a damp paper towel over them. This helps soften them. Lastly, make sure to measure your ingredients correctly next time. Too much flour can lead to dryness. This blog post covered all you need for perfect pumpkin cream cheese scones. We discussed ingredients, mixing methods, and baking steps. I shared tips to enhance your scone-making skills. Remember, cold butter creates flakiness, and avoid overmixing for a tender result. Try different flavors or shapes for fun! With proper storage, enjoy them fresh later. Now, get baking and savor the delicious outcome!

Pumpkin Cream Cheese Scones Bakery Style Delight

Get ready to indulge in the cozy flavors of fall with my Pumpkin Cream Cheese Scones Bakery Style Delight! These

To make Air Fryer Cajun Potato Wedges, you need: - 4 medium russet potatoes, scrubbed and cut into wedges - 3 tablespoons extra virgin olive oil - 2 tablespoons Cajun seasoning - 1 teaspoon garlic powder - 1 teaspoon onion powder - 1 teaspoon smoked paprika - ½ teaspoon sea salt - ½ teaspoon black pepper - Fresh parsley, chopped (for garnish) You will need a few kitchen tools: - Air fryer - Mixing bowl - Knife - Cutting board - Tongs - Serving platter Each ingredient has its benefits: - Russet potatoes are high in fiber and potassium. They help with digestion and heart health. - Extra virgin olive oil is rich in healthy fats and antioxidants. It supports heart health and may reduce inflammation. - Cajun seasoning packs spices like paprika and garlic. These add flavor and may boost metabolism. - Garlic powder has anti-inflammatory properties. It can help boost your immune system. - Onion powder offers antioxidants and may help lower blood sugar levels. - Smoked paprika adds a smoky flavor. It is rich in vitamins A and E. - Sea salt is necessary for taste but should be used in moderation. - Black pepper may aid digestion and enhance nutrient absorption. - Fresh parsley is full of vitamins and adds freshness to your dish. Each ingredient contributes to a tasty and healthy meal. Enjoy the flavors while nourishing your body! First, set your air fryer to 400°F (200°C). Let it heat for about 5 minutes. This step is key for crispy potato wedges. A hot fryer means better crunch! Now, take 4 medium russet potatoes. Scrub them clean and cut them into wedges. In a large bowl, add the wedges. Pour 3 tablespoons of extra virgin olive oil over them. Mix well, so all wedges get coated. This helps them crisp up nicely. Next, add 2 tablespoons of Cajun seasoning, 1 teaspoon of garlic powder, 1 teaspoon of onion powder, 1 teaspoon of smoked paprika, ½ teaspoon of sea salt, and ½ teaspoon of freshly cracked black pepper. Toss everything again. Make sure the spices cover every wedge. This gives them great flavor! Carefully place the seasoned potato wedges in the air fryer basket. Make sure they are in a single layer. If you have too many, cook them in batches. Overcrowding can lead to uneven cooking. Air fry the wedges for 15 to 20 minutes. Shake the basket halfway through. This helps them cook evenly and get that golden color. When they're done, they should look crispy and delicious! Use tongs to remove the wedges from the fryer. Place them on a serving platter. You can garnish with finely chopped fresh parsley for a pop of color. Enjoy these tasty treats with your favorite dipping sauce! To get the best crispiness, start with dry potatoes. Scrub them well and pat them dry. Cut the potatoes into even wedges. This helps them cook at the same rate. Toss the wedges in olive oil, making sure they are coated evenly. The oil helps them crisp up nicely. Shake the basket halfway through cooking. This allows hot air to reach all the sides. If you want extra crunch, you can add a little cornstarch before the oil. It makes a big difference! Cajun seasoning can be spicy. If you like it mild, use less. Start with one tablespoon of Cajun seasoning. Taste the wedges after cooking. You can always add more spice later. If you want heat, consider adding cayenne pepper. A pinch goes a long way. Balance the flavors by adding garlic and onion powder. These spices boost the overall taste without making it too hot. One common mistake is overcrowding the air fryer. If you add too many wedges, they won’t crisp up. Always arrange them in a single layer. If you have extra, cook them in batches. Another mistake is not preheating the air fryer. Preheating helps the wedges cook evenly. Lastly, don’t skip the toss after adding spices. This step ensures every wedge gets coated and flavorful. {{image_4}} You can change up the flavor of your Cajun potato wedges easily. Try using taco seasoning for a fun twist. Italian herbs can add a fresh taste. You can also mix in some chili powder for extra heat. If you like something sweet, add a pinch of cinnamon. Each option offers a unique flavor profile. Experimenting can keep your meals exciting. While russet potatoes work great, don’t be afraid to try other types. Sweet potatoes add a nice sweetness and color. Yukon gold potatoes offer a buttery flavor, making them a good choice too. Red potatoes hold their shape well and are fun to use. Choose the type you enjoy most for different tastes and textures. These crispy wedges shine when served with sauces. A zesty ranch dressing pairs perfectly with their spice. You can also try a smoky chipotle mayo for added depth. For a lighter choice, serve them with a fresh yogurt dip. Pairing with a crisp salad makes a complete meal. They also work well as a side for grilled meats or fish. Enjoy your wedges in many tasty ways! To store leftover Cajun potato wedges, place them in an airtight container. Make sure they cool down first. This keeps them from getting soggy. Store them in the fridge for up to three days. For best taste and texture, eat them within two days. When you want to reheat your potato wedges, the air fryer is your best friend. Preheat it to 350°F (175°C). Place the wedges in the basket. Heat them for about 5 to 7 minutes. This method keeps them crispy and tasty. You can also use an oven for reheating. Set it to 350°F (175°C) and bake for about 10 minutes. If you want to freeze the wedges, first let them cool completely. Then, place them in a single layer on a baking sheet. Freeze them for a few hours until firm. After that, transfer them to a freezer bag. They can last up to three months in the freezer. When you’re ready to eat, reheat them directly from frozen. Adjust the cooking time to ensure they are hot and crispy. Yes, you can use other oils. Avocado oil or canola oil works well too. Each oil has a different taste and smoke point. Extra virgin olive oil adds a nice flavor, but feel free to experiment. Just make sure it can handle high heat. You will know the wedges are done when they are golden and crispy. Use a fork to check their texture. If they feel tender inside and crispy outside, they are ready. Cooking time may vary based on your air fryer. Always shake the basket halfway through for even cooking. These potato wedges pair well with many dips. Ranch dressing or smoky chipotle mayo are great choices. You can also serve them with a fresh salad or grilled veggies for balance. Enjoying them as a snack or side dish makes them versatile and fun! You learned about the ingredients for Air Fryer Cajun potato wedges and their health benefits. I shared step-by-step instructions for perfect cooking and tips for crispiness. Don't forget to try different seasoning ideas and choose your favorite potato type. Proper storage keeps leftovers fresh and tasty. Remember, these wedges are great with many meals. By following this guide, you can make tasty wedges that everyone will love. Enjoy experimenting in the kitchen!

Air Fryer Cajun Potato Wedges Crispy and Flavorful

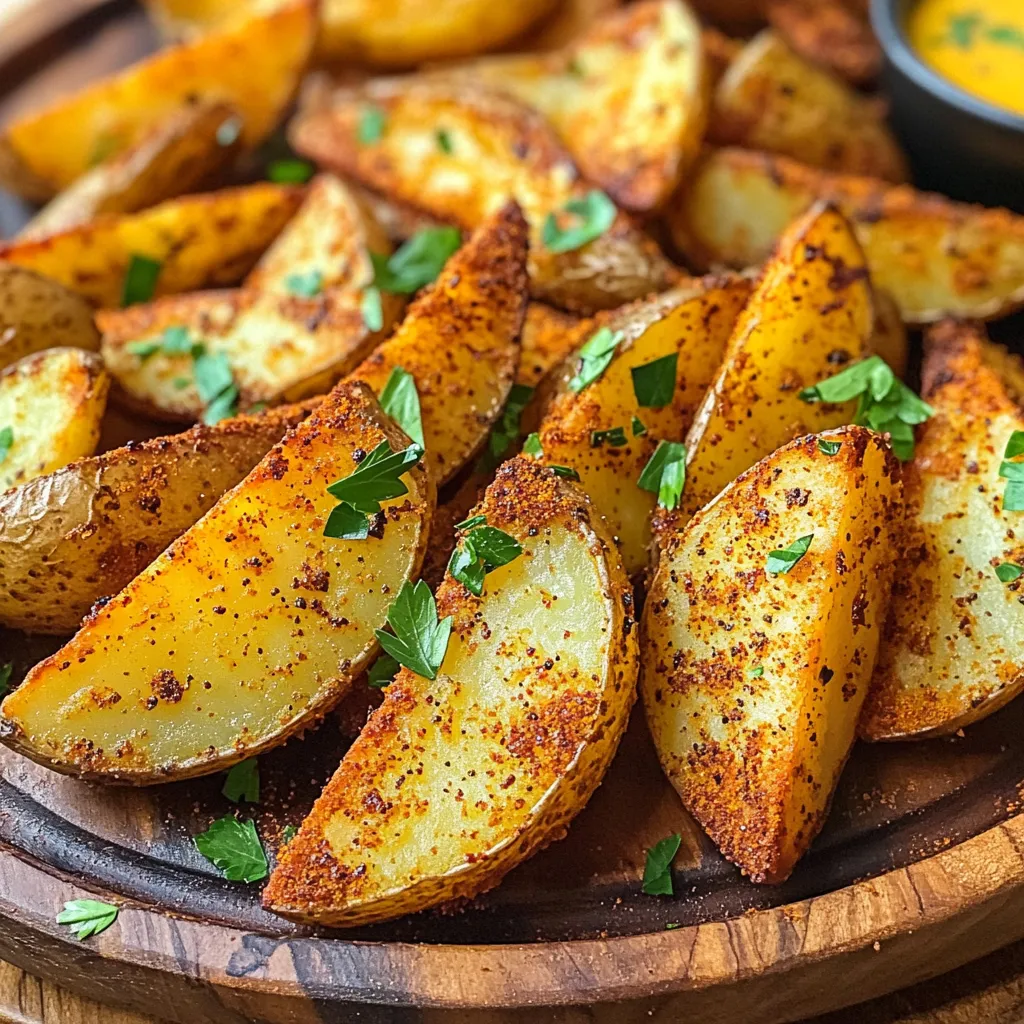
Are you ready to make the most crispy and flavorful potato wedges you’ve ever tasted? In this post, I’ll guide

Older posts
Newer posts
← Previous Page1 … Page13 Page14 Page15 … Page83 Next →

dsad

© 2026 eataroundit • Built with GeneratePress

Our Policies

  • Copyright Policy
  • Cookie Policy
  • GDPR Policy
  • Privacy Policy
  • Disclaimer
  • Terms Of Use

More Information

  • Home
  • About
  • Contact
  • Appetizers
  • Dessert
  • Dinner
  • Drinks
©2026, eataroundit About Back To Top