Skip to content
DisclaimerTerms Of UseGDPR PolicyCookie Policy

eataroundit

  • Home
  • Drinks
  • Appetizers
  • Dinner
  • Dessert
  • About
  • Contact
  • Privacy Policy
DisclaimerTerms Of UseGDPR PolicyCookie Policy

NO-ING-IMG

- 1 sheet of puff pastry (thawed) - 2 medium apples (preferably Granny Smith or Honeycrisp), peeled, cored, and diced - 1/4 cup packed brown sugar - 1 teaspoon ground cinnamon - 1 tablespoon fresh lemon juice - 1/2 cup caramel sauce (store-bought or homemade) - 1/4 cup chopped pecans or walnuts for topping - 1/2 cup powdered sugar (for icing) - 1 tablespoon milk (for icing) - Baking sheet - Parchment paper - Mixing bowls - Rolling pin Gather these ingredients to make your Caramel Apple Danish Braid. The puff pastry is key for that flaky texture. I love using Granny Smith or Honeycrisp apples. They add a nice tartness that pairs well with sweet caramel. Brown sugar and cinnamon create warmth in every bite. A splash of lemon juice brightens the apple flavor, making this treat even better. If you want to go the extra mile, caramel sauce adds a sweet drizzle. Nuts like pecans or walnuts give a great crunch. For the icing, powdered sugar and milk make a simple glaze that ties everything together. Don't forget your baking sheet and parchment paper for easy clean-up! - Preheat the oven: Set your oven to 400°F (200°C). This helps your Danish cook evenly. Line a baking sheet with parchment paper. This step makes for easy cleanup later. - Prepare apple mixture: In a bowl, mix the diced apples with 1/4 cup of brown sugar, 1 teaspoon of ground cinnamon, and 1 tablespoon of fresh lemon juice. Stir well. Let this sit for about 10 minutes. This softens the apples and enhances their flavor. - Roll out the puff pastry: On a lightly floured surface, roll out your thawed puff pastry. This smooths out any creases and makes it easier to work with. Carefully move the pastry to the baking sheet. - Create slits for the braid: Use a sharp knife to cut slits along both sides of the pastry. Make the cuts about 1 inch apart. Leave a 4-inch wide center section for the filling. Be careful not to cut all the way through. - Fill with apple mixture and caramel: Spoon the apple mixture into the center of your pastry. Drizzle some caramel sauce over the apples. This adds a sweet touch. - Folding the braid: Start folding the slits over the apple filling. Alternate sides as you fold. Pinch the ends to seal the braid and keep the filling inside. - Egg wash application: Brush the top of your braid with a beaten egg. This gives it a shiny, golden finish when baked. - Baking time and temperature: Place the baking sheet in the preheated oven. Bake for 25-30 minutes. Look for a puffed and golden-brown pastry. Enjoy the lovely smell in your kitchen! - How to handle puff pastry Keep puff pastry cold. Warm pastry can become sticky. Use a light touch when rolling it out. This keeps layers intact. - Preventing sogginess To avoid sogginess, use parchment paper. It helps with air flow. Bake the Danish braid until golden brown. This ensures a crisp pastry. - Recommended apple varieties Choose Granny Smith or Honeycrisp apples. They add a nice balance of sweet and tart. These apples hold their shape well during baking. - Caramel sauce options You can use store-bought caramel sauce. Homemade caramel sauce is a great option too. Both will give you that rich, sweet flavor. - Serving warm Serve the Danish braid warm. This enhances the aroma and taste. Warm pastry melts the caramel, making it a treat. - Garnishing ideas Drizzle extra caramel sauce on top. A sprinkle of powdered sugar adds a nice touch. For crunch, add chopped pecans or walnuts. {{image_4}} You can easily change the flavor of your caramel apple Danish braid. Adding nuts gives it a nice crunch. Chopped pecans or walnuts work best. They add a rich taste that complements the apples. You can sprinkle them on top before baking. This adds texture and flavor in each bite. You can also incorporate spices for more depth. Try adding nutmeg or ginger for warmth. These spices pair well with apples and caramel. Just a pinch can elevate your braid to a new level. Feel free to experiment with flavors that you love. If you want a twist, try a cream cheese filling. Mix cream cheese with a bit of sugar and vanilla. This creates a rich, sweet base for the apples. Spread it on the puff pastry before adding the apple mixture. It adds a creamy layer that balances the tartness of the apples. You can also use berries instead of apples. Fresh blueberries or raspberries make great options. They give a fruity burst that is both sweet and tangy. Just make sure to adjust the sugar based on the berries' sweetness. This makes your Danish braid fun and versatile. If you need a gluten-free option, look for gluten-free puff pastry. Many brands offer this now, making it easy to enjoy your favorite treats. Just follow the same steps in the recipe. The taste will still be delightful. For sweeteners, you can use alternatives like honey or agave. These options work well to keep the sweetness without refined sugar. Just adjust the amount based on your preference. This way, you can enjoy your treat guilt-free! To keep your Caramel Apple Danish Braid fresh, wrap it tightly in plastic wrap. You can also place it in an airtight container. This method prevents the braid from drying out. For best results, store it in the fridge. The Danish braid can last for up to three days when stored this way. If you want to enjoy your Danish braid warm, reheating is easy. - Oven reheating: Preheat your oven to 350°F (175°C). Place the braid on a baking sheet and cover it loosely with foil. Heat for about 10-15 minutes. This keeps the pastry crisp. - Microwave reheating: For a quick option, place a slice in the microwave. Heat on medium for about 20-30 seconds. This method may make the pastry soft, so enjoy it fresh when possible. Can I use frozen apples? Yes, you can use frozen apples. Just thaw them first. Drain excess liquid to avoid sogginess. How do I make homemade caramel sauce? To make homemade caramel sauce, melt 1 cup sugar in a pan over medium heat. Stir until it melts and turns golden brown. Remove from heat and add 1/2 cup heavy cream slowly. Stir until smooth. Let it cool before using. Can this be made ahead of time? Yes, you can prepare the braid ahead of time. Assemble it and keep it covered in the fridge. Bake it fresh before serving for best results. What’s the best way to freeze the Danish braid? To freeze the Danish braid, wrap it tightly in plastic wrap and then in aluminum foil. Freeze it before baking. When ready to bake, thaw it in the fridge overnight and then bake as directed. How do I achieve a shiny finish on the pastry? For a shiny finish, brush the top with a beaten egg before baking. This gives the pastry a beautiful golden color. Making a delicious apple Danish braid is simple and fun. We covered key ingredients like puff pastry, apples, and cinnamon. I shared detailed steps for prepping, assembling, and baking your treat. You learned helpful tips for perfecting the pastry and creative variations to try. Storing and reheating your leftovers is also easy. Now, with this guide, you can create a tasty dessert that impresses everyone. Enjoy your baking adventure and make it your own!

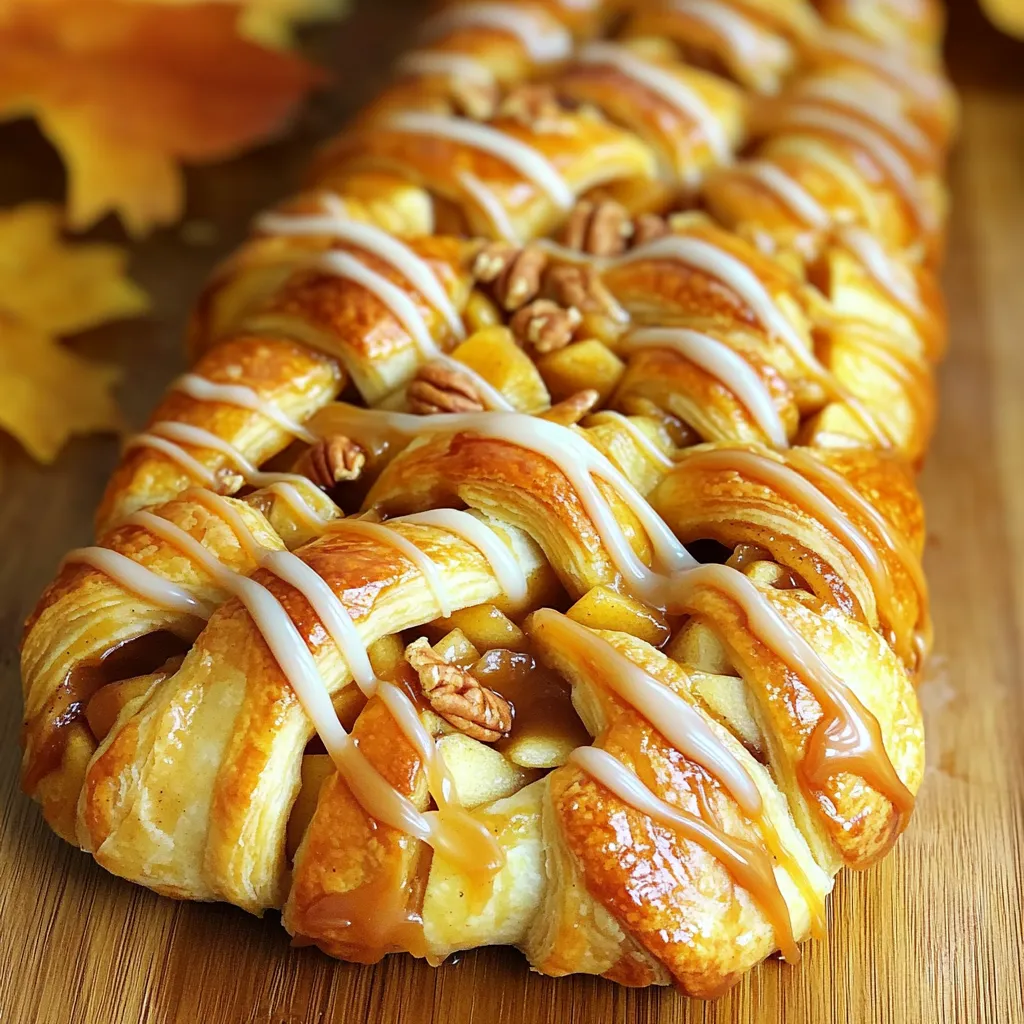
Savory Caramel Apple Danish Braid Simple and Sweet Treat

If you’re craving a dessert that’s both sweet and simple, look no further! This Savory Caramel Apple Danish Braid combines

- 1 cup apple cider - 1/2 cup unsalted butter, melted - 1 cup packed brown sugar - 1 large egg, at room temperature - 1 teaspoon pure vanilla extract - 1 1/2 cups all-purpose flour - 1 teaspoon baking powder - 1 teaspoon baking soda - 1 teaspoon ground cinnamon - 1/4 teaspoon ground nutmeg - 1/2 teaspoon salt - 1 medium Granny Smith apple, peeled and finely diced - 1/2 cup caramel sauce (store-bought or homemade, for drizzling) For this recipe, using precise measurements is key. I like to use a kitchen scale for accuracy. When you melt the butter, make sure it is not too hot when added to other ingredients. Room temperature eggs mix better and create a smoother batter. Use fresh apple cider, as it enhances the flavor. Granny Smith apples add a nice tartness that works well with sweet caramel. You can try different types of apples, like Honeycrisp or Fuji, for a sweeter taste. If you're aiming for a lighter version, substitute some butter with unsweetened applesauce. For a gluten-free option, use a gluten-free flour blend. You can also add nuts, like chopped pecans, for extra crunch and flavor. Experimenting with spices, such as ginger or allspice, can create a unique twist on these muffins. First, set your oven to 350°F (175°C). This heat helps the muffins rise well. While the oven warms up, grease a muffin tin. You can use cooking spray or muffin liners. This step ensures easy removal of muffins later. Next, take one cup of apple cider and pour it into a small saucepan. Heat it over medium-high heat until it boils. Once boiling, lower the heat to medium-low. Let it simmer for about 10-15 minutes. The cider will reduce to about half a cup. This process concentrates the flavor. After reducing, let it cool slightly before using. In a large bowl, combine half a cup of melted unsalted butter and one cup of packed brown sugar. Stir until they blend well. Then, add one large egg and one teaspoon of pure vanilla extract. Mix until the mixture is smooth and creamy. After that, pour in the reduced apple cider. Whisk gently to combine everything. In another bowl, whisk together one and a half cups of all-purpose flour, one teaspoon of baking powder, one teaspoon of baking soda, one teaspoon of ground cinnamon, one-fourth teaspoon of ground nutmeg, and half a teaspoon of salt. This mix adds flavor and helps the muffins rise. Now, slowly add the dry mix to the wet mix. Stir gently until just combined. It's okay if there are a few lumps. Next, fold in one finely diced Granny Smith apple. This adds texture and a pop of flavor. Scoop the batter into the muffin tin, filling each cup about two-thirds full. This amount allows the muffins to rise nicely. Place the tin in the oven and bake for 18-20 minutes. Check for doneness by inserting a toothpick in the center of a muffin. If it comes out clean, your muffins are ready! Once baked, take the muffins out of the oven. Let them cool in the tin for about five minutes. After that, transfer them to a wire rack to cool completely. While they are still warm, generously drizzle caramel sauce over the tops. This adds a sweet finish that makes these muffins a real treat! To make your muffins light and fluffy, start with room temperature ingredients. This helps the batter mix well. Mix the wet and dry ingredients gently. Overmixing can lead to dense muffins. When adding the dry mix, stir just until combined. A few lumps are fine. Accurate measurements are key to great muffins. Use a kitchen scale for precision. If using cups, spoon flour into the measuring cup and level it off with a knife. Don’t scoop directly from the bag; this packs the flour. For brown sugar, pack it tightly into the cup. Having the right tools makes baking easier. Use a good quality muffin tin to ensure even baking. Silicone liners work great for easy muffin removal. A whisk and a spatula are essential for mixing. A kitchen scale helps with accurate measurements. Don’t forget an oven thermometer to check your oven’s temperature! {{image_4}} You can swap out the Granny Smith apple for other fruits. Pears work nicely and add sweetness. You could also use diced peaches or even berries for a twist. Just keep the fruit juicy but not too watery. This change can give your muffins new flavors and textures. You can experiment with what you like best. To make these muffins gluten-free, use a gluten-free flour blend. Many blends work well, but look for one that has xanthan gum. This helps with the structure. You may need to adjust the liquid slightly. Start with the same amount of apple cider and see if the batter feels right. Adding spices can enhance the flavor of your muffins. Try adding cloves or ginger for a warm taste. You can also mix in nuts like walnuts or pecans. Chop them finely and fold them into the batter. This adds crunch and depth to the muffin. Just be careful not to overmix when you add them in! To keep your caramel apple cider donut muffins fresh, place them in an airtight container. You can store them at room temperature for up to three days. If you live in a humid area, it’s best to refrigerate them. This will help prevent them from getting too moist or stale. If you want to save some muffins for later, freezing is a great option. First, let the muffins cool completely. Then, wrap each muffin in plastic wrap. After wrapping, place them in a freezer bag or airtight container. They can stay frozen for up to three months. When you're ready to enjoy them, simply thaw at room temperature. Reheating your muffins can bring back their warm, soft texture. For best results, use the oven. Preheat it to 350°F (175°C). Place the muffins on a baking sheet and heat for about 5 to 8 minutes. You can also use the microwave. Heat each muffin for about 15 to 20 seconds. Just be careful not to overheat, as this can make them tough. Yes, you can use store-bought caramel sauce for these muffins. It saves time and tastes great. Just drizzle it on top while the muffins are warm. If you want a homemade touch, you can make your own caramel sauce. These muffins stay fresh for about three days at room temperature. Store them in an airtight container to keep them moist. If you want them to last longer, try freezing them. Yes, you can make these muffins in advance. They freeze well, so bake them ahead of time. Let them cool completely, then store them in a freezer bag. Just reheat them when you’re ready to enjoy. Granny Smith apples work best for this recipe. They add a nice tart flavor that balances the sweetness. You can also try Honeycrisp or Fuji apples for a sweeter taste. This blog post covered how to make delicious caramel apple cider muffins. We went over the key ingredients, step-by-step baking instructions, and storage tips. You learned how to make muffins fluffy and tried fun variations. Remember, use fresh apples and measure carefully for the best results. Experiment with spices or nuts to make it unique. Enjoy your tasty muffins!

Caramel Apple Cider Donut Muffins Flavorful Delight

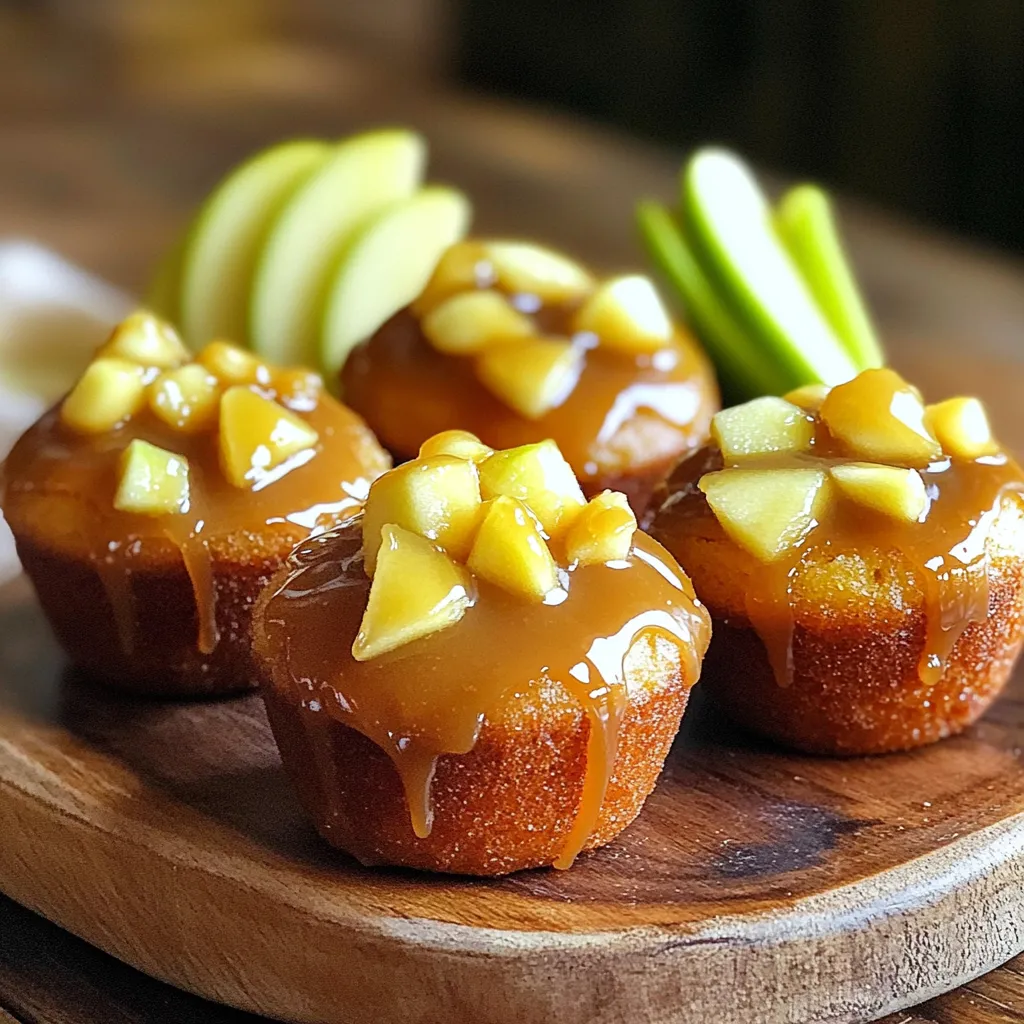
If you love the sweet taste of fall, you’ll adore these Caramel Apple Cider Donut Muffins! This recipe blends the

- 8 ounces of pasta (penne or fusilli options) - 2 cups of fresh broccoli florets - 2 tablespoons of olive oil - 1 small onion, finely diced - 3 cloves of garlic, minced - 1 cup of milk (dairy or plant-based alternative) - 3 cups of vegetable broth - 2 cups of shredded sharp cheddar cheese - Mustard powder, salt, pepper, and optional red pepper flakes When I make this One-Pot Creamy Broccoli Cheddar Pasta, I start with the main ingredients. I choose either penne or fusilli pasta. Both shapes hold the sauce well. The fresh broccoli florets add great color and a nice crunch. The olive oil gives everything a rich flavor. Next, I focus on the aromatics. A small onion, finely diced, brings sweetness. I add minced garlic for depth. Together, they form a lovely base. Then, I pour in one cup of milk. You can use dairy or a plant-based option—both work well. The flavor enhancers are key to this dish. I use three cups of vegetable broth. It adds a savory depth to the sauce. The shredded sharp cheddar cheese is the star. It melts beautifully and gives that creamy texture. I also add mustard powder, salt, and pepper for balance. If I want some heat, I sprinkle in red pepper flakes. This simple combination of ingredients makes a comforting and tasty meal. Each item plays a role in creating a dish that is both satisfying and full of flavor. First, heat 2 tablespoons of olive oil in a large pot over medium heat. Once hot, add 1 small, finely diced onion. Cook the onion until it turns translucent, about 3-4 minutes. This step builds a flavor base for our dish. Next, stir in 3 cloves of minced garlic. Cook for another minute, stirring often. The garlic should be fragrant, but not browned. Now, add 8 ounces of pasta, like penne or fusilli, along with 3 cups of vegetable broth. Bring this mixture to a gentle boil. Once boiling, lower the heat to a simmer. Cover the pot and cook for 7-8 minutes. Stir occasionally to keep the pasta from sticking. The pasta should be nearly al dente when you finish. It’s time to add 2 cups of fresh broccoli florets to the pot. Stir them in well and cook for 3-5 minutes. This will make the broccoli bright green and tender. Now, lower the heat further and pour in 1 cup of milk. Stir well to combine. Gradually add 2 cups of shredded sharp cheddar cheese, mixing continuously until it melts. This gives the pasta a creamy texture. Finally, season with mustard powder, salt, pepper, and optional red pepper flakes. Stir until everything is well coated in that luscious cheese sauce. - Stir the pasta often to stop it from sticking together. - Check the pasta and broccoli for doneness. They should be cooked but not mushy. To ensure perfect pasta, keep an eye on the time. Use a timer when cooking. Stirring helps the pasta cook evenly. It also keeps the broccoli bright and fresh. - Taste the dish to adjust the salt and pepper. - Add more red pepper flakes for extra heat. If you want more creaminess, add a bit more cheese or milk. For a tangy kick, a dash of lemon juice can work wonders. Adjust the mustard powder to fit your taste. - Serve the pasta in warm bowls for a cozy feel. - Top with extra cheese and fresh parsley for color. A sprinkle of extra cheddar makes the dish look inviting. It also adds a burst of flavor. Fresh parsley not only adds color but also freshness. Consider using a fun spoon or fork for serving to make it even more enjoyable! {{image_4}} You can use many pasta types for this dish. Penne and fusilli work great, but don't stop there! Try gluten-free pasta if you need it. Whole grain pasta adds fiber too. You can even experiment with shapes like shells or bowties for fun. Each shape holds sauce differently, giving you a unique taste. If you want a twist, try different cheeses! Gruyère or mozzarella can add a nice touch. For a sharper flavor, use aged cheddar. If you're on a plant-based diet, vegan cheese works well too! Look for brands that melt nicely and have a similar taste. Nutritional yeast is another great option for a cheesy flavor without dairy. Want to make this dish heartier? Add proteins like chicken or tofu! Cook diced chicken in the pot first, then follow the steps. For tofu, use firm tofu and sauté it until golden before adding. Adjust cooking times to ensure proteins are fully cooked. Chicken takes about 10 minutes, while tofu needs about 5 minutes. Enjoy a filling meal! To store leftovers, place the pasta in an airtight container. This helps keep it fresh. I recommend using it within 3 to 4 days for the best flavor. Always let it cool before sealing. When reheating, keep the creaminess intact. The stove-top method works best. Just add a splash of milk while heating. Stir often to avoid sticking. If using a microwave, heat in short bursts, stirring in between. Yes, you can freeze this dish! First, let it cool completely. Then, transfer it to a freezer-safe container. To defrost, place it in the fridge overnight. Reheat gently on the stove with a bit of milk to restore creaminess. Yes, you can use frozen broccoli in this dish. Frozen broccoli is often blanched before freezing, which helps keep its color and nutrients. It cooks faster than fresh broccoli. When using frozen broccoli, add it directly to the pot with the pasta and broth. Make sure to stir it in well and check for doneness. The texture may be softer than fresh, but it will still taste great! To make this dish dairy-free, swap out the milk and cheese. Use a plant-based milk like almond or oat milk. For cheese, try a vegan cheese that melts well, like cashew cheese or a store-bought alternative. You can also add nutritional yeast for a cheesy flavor. Adjust the amounts to get the taste and creaminess you like. You can add many other veggies to this pasta! Carrots, peas, or bell peppers work well. Simply chop them into bite-sized pieces and add them when you add the broccoli. Spinach or kale can be stirred in during the last minute of cooking. These additions will enhance the flavor and boost the nutrients in your dish! This recipe combines simple ingredients, step-by-step instructions, and helpful tips for a delicious dish. You can customize it by changing pastas, cheeses, or adding protein. Store your leftovers well for future meals, and don't hesitate to experiment with flavors. The options are endless. Enjoy making this dish your own and delight in every bite.

One-Pot Creamy Broccoli Cheddar Pasta Delight

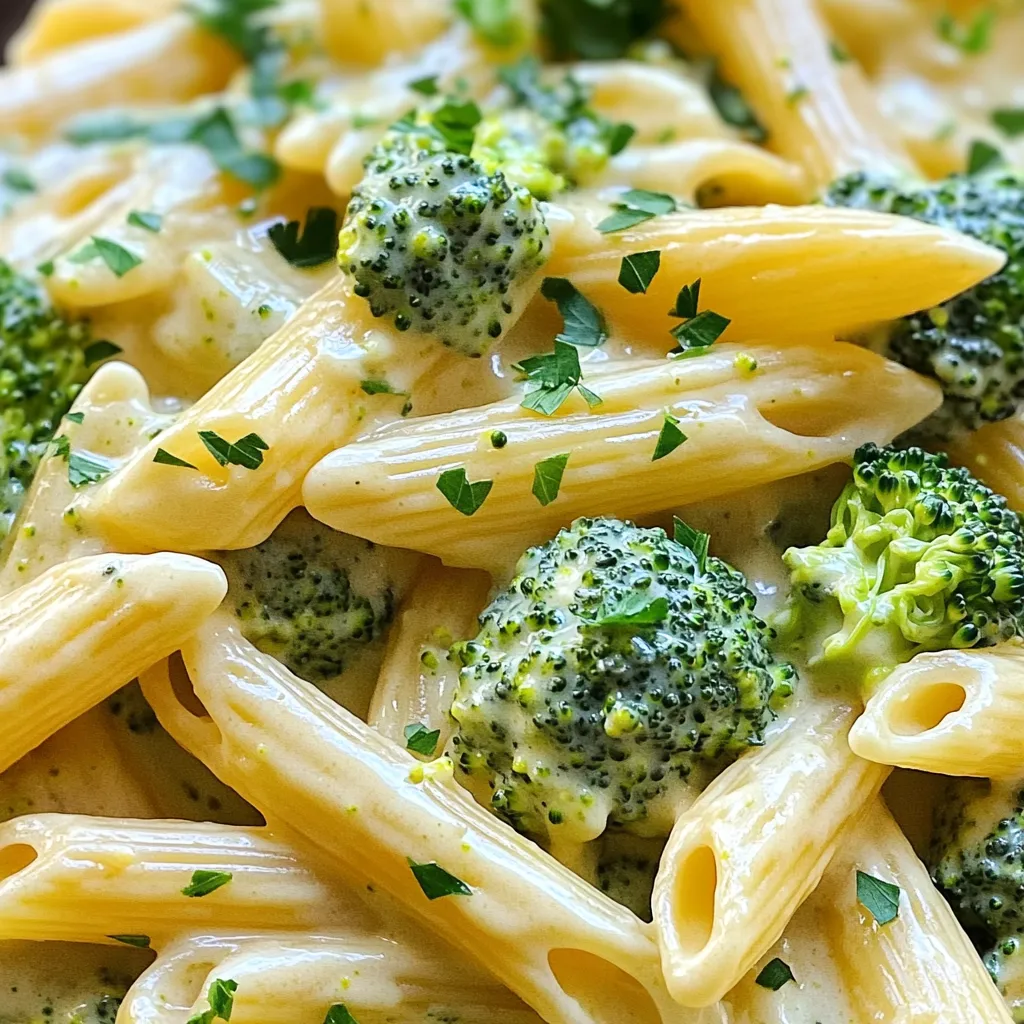
If you crave a cozy, delicious meal that’s a breeze to whip up, you’re in luck! My One-Pot Creamy Broccoli

- 1 pound flank steak, cut into thin strips - 2 tablespoons unsalted butter - 1 tablespoon olive oil - 1 red bell pepper, sliced into strips - 1 yellow bell pepper, sliced into strips - 1 medium onion, sliced into thin rings - 4 cloves garlic, minced - 1 tablespoon chili powder - 1 teaspoon ground cumin - 1 teaspoon smoked paprika - Salt and freshly cracked pepper, to taste These ingredients create a tasty base for your fajitas. The flank steak gives a rich flavor and a nice chew. The bell peppers and onion add sweetness and crunch. Garlic brings a warm, savory touch, while spices enhance the overall taste. - Fresh cilantro - Lime wedges - Tortillas (flour or corn) These toppings add fresh flavor and texture to your meal. Cilantro gives a bright finish, while lime adds a zesty kick. Tortillas are essential for wrapping your delicious filling. - Sheet pan - Mixing bowl - Small saucepan Using a sheet pan allows for even cooking. A mixing bowl helps you combine all the ingredients well. A small saucepan is perfect for melting the garlic butter that adds richness to the dish. - Preheat the oven to 400°F (200°C). This helps the fajitas cook evenly. - In a large bowl, mix together the flank steak, red and yellow bell peppers, onion, and minced garlic. - Add chili powder, ground cumin, smoked paprika, salt, and pepper to the bowl. - Drizzle olive oil over the mixture and toss it well. Make sure everything is coated with the spices. - Transfer the mixed steak and vegetables to a large sheet pan. Spread them out evenly. - In a small saucepan, melt the unsalted butter over medium heat. Once melted, reduce the heat. - Drizzle the garlic butter over the steak and veggies. This adds rich flavor to each bite. - Place the sheet pan in the oven and roast for 20 to 25 minutes. Stir halfway through. This helps with even cooking. - When done, remove the pan from the oven and let it rest for a few minutes. - Warm your tortillas while the fajitas rest. Serve the steak mixture in the tortillas. - Garnish with fresh cilantro and add lime wedges for extra zest. Enjoy your tasty meal! To cook steak just right, timing is key. For medium-rare, aim for about 20 minutes in the oven. This gives you a juicy and tender bite. For medium, cook a few minutes more, up to 25 minutes. Always let your steak rest for 5 minutes after it comes out. This helps the juices settle, making it more flavorful. You want your veggies to be tender but still crisp. To do this, cut them into uniform pieces. This helps them cook evenly. Roast bell peppers and onions together for a sweet and smoky taste. You can also try adding zucchini or mushrooms for extra fun. Want to kick up the taste? Consider adding more spices. A dash of cayenne pepper can give your fajitas a nice kick. You can also marinate the steak ahead of time for deeper flavor. A simple mix of lime juice and garlic works wonders. {{image_4}} You can switch up the protein in this dish. Chicken is a great choice. Just slice it into strips like the steak. Shrimp also works well. Cook shrimp for less time, as they cook fast. For a vegetarian option, try plant-based proteins. Tofu or tempeh are both tasty choices. Just make sure to marinate them for flavor. Want to spice things up? Add jalapeños for a kick. You can slice them thin and mix them in with the other veggies. If you want a global flair, try different seasoning blends. Use taco seasoning for a classic taste. Or go for a Cuban twist with adobo spices. Each option brings a new taste to your fajitas. Fajitas are fun to serve in creative ways. You can make fajita bowls by layering everything over rice. This adds a filling base. Another idea is to use them for nachos. Spread tortilla chips on a plate and top with the fajita mixture. Add cheese and bake until melted. Your family will love these fun twists! To keep your sheet-pan garlic butter steak fajitas fresh, store them in an airtight container. Let them cool to room temperature before sealing. This helps prevent moisture buildup. You can keep them in the fridge for up to three days. If you want to enjoy them later, make sure to label your container with the date. When you're ready to eat your leftovers, the best method is to use the oven. Preheat your oven to 350°F (175°C). Place the fajitas on a baking sheet and cover them with aluminum foil. This keeps them from drying out. Heat for about 10 to 15 minutes, or until warmed through. You can also use a microwave, but the oven keeps the steak and veggies better. Freezing your fajitas is a great option for longer storage. First, let them cool completely. Then, place the fajitas in a freezer-safe bag or container. Squeeze out as much air as possible to prevent freezer burn. You can freeze them for up to three months. When you're ready to eat, thaw them in the fridge overnight before reheating. The best cut of steak for fajitas is flank steak. It is thin and flavorful. Other good choices are skirt steak and sirloin. Flank steak cooks quickly and stays juicy. Skirt steak has a rich taste and works well too. Sirloin is lean and tender. Choose any of these cuts for tasty fajitas. Yes, you can make steak fajitas ahead of time. To prep, cook the steak and veggies as normal. Let them cool and store in an airtight container. You can keep them in the fridge for up to three days. When ready to serve, simply reheat in a pan on low heat. This keeps the flavors fresh and delicious. To check if steak is done, use a meat thermometer. For medium-rare, the internal temperature should be 135°F (57°C). For medium, aim for 145°F (63°C). For medium-well, go for 150°F (66°C). Always let steak rest for a few minutes after cooking. This helps the juices stay in the meat. You learned about making delicious steak fajitas using simple steps and fresh ingredients. We covered key ingredients, cooking tips, and how to store leftovers. Remember, you can customize fajitas with different proteins and spices. This dish is not just a meal; it's an experience. Enjoy your cooking journey and the tasty results. With practice, you’ll master fajitas that impress everyone. Happy cooking!

Sheet-Pan Garlic Butter Steak Fajitas Flavorful Dinner

Ready to impress at dinner? My Sheet-Pan Garlic Butter Steak Fajitas deliver bold flavors with minimal effort. Imagine perfectly seared

- 2 lbs chicken breasts - 1 cup salsa verde - 1 cup low-sodium chicken broth - 1 tablespoon ground cumin - 1 teaspoon garlic powder - 1 teaspoon onion powder - 1 teaspoon smoked paprika - Salt and freshly ground black pepper to taste - 1 cup fresh cilantro, finely chopped - 1 avocado, sliced into wedges - 1 cup crumbled queso fresco or feta cheese - 8 corn tortillas - Lime wedges For these savory slow cooker salsa verde chicken tacos, I focus on quality ingredients. Starting with fresh chicken breasts is key. They soak up all the flavors from the salsa verde and spices. I love using low-sodium chicken broth. It adds moisture without too much salt. The salsa verde not only gives great taste but also a vibrant color to the dish. When it comes to spices, I use cumin, garlic powder, onion powder, and smoked paprika. These spices bring warmth and depth. Fresh cilantro and creamy avocado add freshness and creaminess, making every bite enjoyable. Don't forget the queso fresco! It adds a nice crumbly texture that pairs well with the soft tortillas. I always serve lime wedges on the side. A squeeze of lime juice brightens up the flavors. With these ingredients, you’ll create a meal that’s both tasty and satisfying. Start by placing the chicken breasts in the slow cooker. Season them well with salt, black pepper, ground cumin, garlic powder, onion powder, and smoked paprika. Each spice adds its own unique flavor. Next, pour the salsa verde and low-sodium chicken broth over the seasoned chicken. Make sure the chicken is fully coated in the liquid. This will help keep it moist while cooking. Cover the slow cooker with its lid. Set it to cook on low for 6 to 8 hours or on high for 4 hours. The chicken is ready when it is tender enough to shred with a fork. After cooking, use two forks to shred the chicken right in the slow cooker. Stir the shredded chicken into the salsa verde sauce. This helps blend the flavors perfectly. To prepare the corn tortillas, warm them in a skillet over medium heat. Cook each tortilla for about 30 seconds on each side. This makes them pliable and fragrant. Now, it's time to assemble the tacos! Take a tortilla and add a generous portion of the shredded salsa verde chicken in the center. Top each taco with freshly chopped cilantro, a few slices of creamy avocado, and a crumble of queso fresco. Serve immediately with lime wedges on the side for a zesty touch. To make your salsa verde chicken even tastier, consider adding more spices. Ground coriander or chili powder can add depth. A pinch of cayenne will give it a nice kick. Marinating the chicken in salsa verde for a few hours boosts flavors. This way, each bite bursts with zest. You can cook your chicken on low or high. Cooking on low takes 6 to 8 hours, while high cooks it in 4 hours. Both methods yield tender chicken. To check doneness, use a fork. If the chicken shreds easily, it’s ready to go. Serving your tacos on a rustic wooden platter looks great. You can arrange the tacos neatly. Add lime wedges in a small bowl for easy access. A sprinkle of fresh cilantro on top brings color. This makes your dish inviting and fun to eat! {{image_4}} You can switch up the protein in this recipe. Beef or pork makes great options. Take a beef chuck roast or pork shoulder, and follow the same steps. Cook these on low for 8 hours. They will turn out tender and juicy. If you prefer a vegetarian dish, try using plant-based protein. Options like jackfruit or tofu can work well. Season them like the chicken and let them soak up the salsa verde flavors. There are many types of salsa to try. You can go for a smoky chipotle salsa for a kick. A mango salsa can add a sweet touch. If you want to make your own salsa verde, it’s easy! Blend 2 cups of tomatillos, 1 jalapeño, and a handful of cilantro. Add salt and lime juice to taste. This gives you a fresh and vibrant salsa that enhances the dish. Taco toppings can make your meal even better. Try adding jalapeños for some heat. Sour cream can offer a cool contrast. Pair your tacos with different cheeses too. Queso fresco is great, but shredded cheddar or pepper jack can work nicely. Don't forget fresh cilantro and avocado slices! Each topping adds a fun twist to the flavor and texture. To store leftover chicken tacos, place them in an airtight container. Make sure the tacos are cool before sealing. They will stay fresh in the fridge for up to three days. After that, the taste may fade, and the texture can change. For longer storage, freeze cooked chicken and tortillas separately. Wrap the chicken tightly in plastic wrap and then foil. Place the tortillas in a freezer bag. They will keep for up to three months. When ready to enjoy, thaw the chicken in the fridge overnight. Reheat the chicken in a skillet or microwave until hot. Warm the tortillas in a dry skillet for a few seconds before serving. To enjoy leftover tacos, simply reassemble them. Add fresh toppings like cilantro and avocado for a tasty boost. You can also use chicken in salads, burritos, or quesadillas. Mix it into soups for a flavorful twist. Cooking salsa verde chicken takes about 6 to 8 hours on low and 4 hours on high. The chicken is done when it shreds easily with a fork. This gentle cooking breaks down the meat, making it tender and full of flavor. You can use frozen chicken breasts. Just remember that cooking time will be longer. If you cook on low, it may take 8 to 10 hours. On high, aim for 5 to 6 hours. Always check that the chicken reaches 165°F for safety. Tacos pair great with a variety of sides. Here are some ideas: - Mexican rice - Refried beans - Fresh corn salad - Chips with guacamole These sides add color and flavor, making your meal even better. Yes, you can easily add heat! Here are some tips: - Use spicy salsa verde instead of mild. - Add sliced jalapeños to the slow cooker. - Sprinkle crushed red pepper flakes on top of the tacos. Adjust the spice level to fit your taste. Enjoy the kick! We explored a tasty and easy salsa verde chicken taco recipe. You learned about the main ingredients, including chicken, salsa verde, and broth. I shared step-by-step instructions for cooking and assembling your tacos. We discussed tips for enhancing flavors and alternative serving ideas. Don’t forget storage tips to keep your leftovers fresh! This dish is versatile and fun to make. You can adjust it to fit your tastes and impress your family and friends. Enjoy creating this delicious meal!

Savory Slow Cooker Salsa Verde Chicken Tacos Recipe

Are you ready for a taco night that’s both easy and delicious? My Savory Slow Cooker Salsa Verde Chicken Tacos

- 1/2 cup chia seeds - 2 cups almond milk (or your preferred milk) - 1/4 cup pure maple syrup - 1 teaspoon pure vanilla extract - A pinch of sea salt Chia seeds are tiny powerhouses. They swell up and create a thick pudding. They also pack a punch of fiber, protein, and omega-3 fatty acids. Almond milk is a great base for this pudding. It adds creaminess and flavor without dairy. You can use any milk you love, like oat or coconut milk. Maple syrup gives this pudding its sweet touch. Make sure to choose pure maple syrup for the best taste. The vanilla extract adds warmth and depth. Finally, a pinch of sea salt enhances all the flavors. - Fresh berries (strawberries, blueberries, raspberries) - Shredded coconut - Chopped nuts Toppings make this pudding even more fun. Fresh berries bring color and brightness. Strawberries, blueberries, and raspberries are all great choices. Shredded coconut adds a nice chew and sweetness. Chopped nuts give a crunchy texture. You can mix and match toppings to find your favorite combo. - Combining Chia Seeds and Milk Start by grabbing a medium mixing bowl. Pour in 1/2 cup of chia seeds. Then, add 2 cups of almond milk, or any milk you prefer. Whisk the mixture well. It’s important to break up any clumps. You want the chia seeds evenly mixed into the milk. - Adding Sweeteners and Salt Next, add 1/4 cup of pure maple syrup to the bowl. This gives the pudding a sweet flavor. Then, pour in 1 teaspoon of pure vanilla extract. Don’t forget to add a pinch of sea salt. Stir everything together until it’s smooth and well combined. - Covering and Refrigerating Now, cover the bowl tightly with plastic wrap or a lid. This keeps the mixture fresh. Place it in the refrigerator. - Recommended Cooling Time Let the mixture chill for at least 4 hours. For the best texture, leave it overnight. The chia seeds will soak up the liquid and create a creamy pudding-like consistency. - Stirring Before Serving When you’re ready to serve, take the pudding out of the fridge. Give it a gentle stir. This helps mix any seeds that settled at the bottom. - Presentation Tips Scoop the pudding into individual bowls or jars. For a pretty look, layer the pudding with fresh berries. Use strawberries, blueberries, or raspberries. You can also sprinkle some shredded coconut or chopped nuts on top for extra flavor and crunch. Importance of Whisking Whisking is key to a smooth pudding. When you mix the chia seeds with almond milk, whisk well. This helps break up clumps and spreads the seeds evenly. A good mix ensures the pudding has a nice texture. If you skip this step, you may end up with lumps. Adjusting Sweetness Taste is personal, so adjust the sweetness to your liking. If you want it sweeter, add more maple syrup. Start with a little, then mix and taste. You can always add more, but it’s hard to fix if it’s too sweet. Remember, the flavors blend more as it chills. Pairing with Fruits Fresh fruits make this pudding pop! Berries like strawberries, blueberries, or raspberries add color and flavor. Slice the fruit and place it on top just before serving. You can also mix them in for a fruity surprise. Incorporating Other Toppings Get creative with toppings! Shredded coconut can add a nice texture. Chopped nuts bring a crunch that contrasts well with the creamy pudding. Try different combinations to find your favorite mix. Each topping can change the taste and make it even more fun! {{image_4}} You can easily change the flavor of your maple vanilla chia seed pudding. One tasty twist is adding cocoa powder. This gives a rich chocolate flavor. Start with 2 tablespoons of cocoa powder. Mix it in with the chia seeds and milk. This adds a fun surprise to your pudding. You can also try using different sweeteners. If you want less sugar, use stevia or agave syrup. Honey works well too. Each sweetener gives a unique taste. Adjust the amount to fit your taste. This way, you can enjoy your pudding just how you like it. This pudding is great for many diets. If you need dairy-free options, almond milk is perfect. You can also use oat milk or coconut milk. These options keep the pudding creamy and tasty. For nut-free alternatives, try rice milk or soy milk. Both are excellent choices. They keep the pudding smooth without nuts. You can enjoy this treat without any worries. To keep your maple vanilla chia seed pudding fresh, store it in the fridge. Use an airtight container to prevent odors from other foods. Glass jars or plastic containers work well. If you have leftovers, make sure to seal them tight. For the best taste and texture, enjoy your pudding within 4 to 5 days. After this time, the pudding may lose its creamy consistency. Check for signs of spoilage, such as an off smell or a change in texture. If the pudding appears watery or has clumps, it’s best to discard it. Enjoying this treat fresh will ensure you get the most flavor and nutrition from it. Chia seeds are tiny but packed with nutrients. They are high in fiber, which helps digestion. Each serving offers protein and healthy fats, too. Omega-3 fatty acids in chia seeds support heart health. They can keep you feeling full longer, which helps with weight control. Plus, they are rich in antioxidants, fighting free radicals in the body. Eating chia seeds can boost your overall health and energy levels. Yes, you can use any milk you like! Almond milk is my favorite, but oat, soy, or coconut milk work well too. Each type of milk adds its unique flavor. If you prefer dairy, whole or skim milk is also fine. Just make sure to adjust the sweetness if the milk is sweetened. This recipe remains delicious no matter what milk you choose. You can keep the pudding in the fridge for up to five days. It stays fresh and tasty when stored in an airtight container. Just remember to stir it before serving to mix any settled chia seeds. If you notice any odd smells or changes in texture, it’s best to toss it out. Enjoying your pudding within a few days ensures the best taste and quality. Absolutely! This recipe is naturally vegan if you use plant-based milk. The main ingredients, chia seeds, maple syrup, and vanilla extract, are all vegan-friendly. You can top it with fruits, coconut, or nuts for extra flavor and texture. This pudding is a great option for anyone following a vegan diet. It's simple, healthy, and delicious! You can create a delicious chia seed pudding with just a few simple steps. We covered the key ingredients like chia seeds, almond milk, and sweeteners. You learned how to mix, chill, and serve it beautifully. I shared tips for perfecting flavors and ways to store your pudding for later enjoyment. Remember, chia seeds offer many health benefits, and you can easily make this recipe vegan. Enjoy experimenting with different toppings and flavors. Your creative touch makes it special! The fun starts in your kitchen, so dive in and enjoy your pudding!

Maple Vanilla Chia Seed Pudding Simple and Delicious

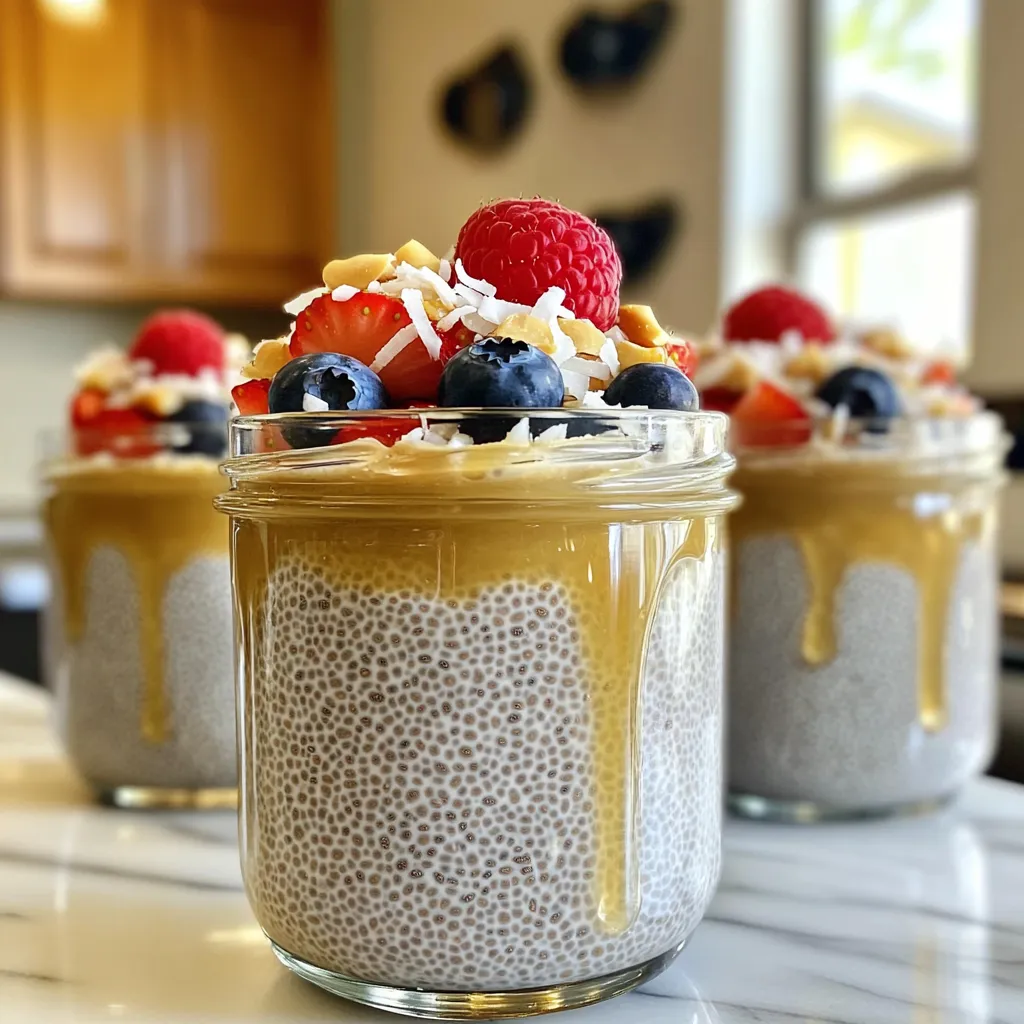
Looking for a quick, tasty, and healthy treat? You’ve found it! Maple Vanilla Chia Seed Pudding is simple to make

- 3 tablespoons unsalted butter - 1 package (10 oz) mini marshmallows - 1 teaspoon pumpkin spice blend - 6 cups Rice Krispies cereal - 1/4 teaspoon sea salt - 1/3 cup crushed graham crackers (optional, for added texture) - 1/4 cup white chocolate chips (optional, for drizzling) Gathering the right ingredients is key for making Brown Butter Pumpkin Spice Rice Krispie Treats. Start with unsalted butter. It helps control the salt in your treats. Next, get a package of mini marshmallows. These melt easily and create a sticky base. The pumpkin spice blend adds that warm, cozy flavor that screams fall. Rice Krispies cereal is a must. It gives the treats their iconic crunch. A touch of sea salt balances the sweetness, making each bite delightful. You can also add crushed graham crackers for some extra texture. Lastly, if you want a sweet drizzle, pick up some white chocolate chips. The combination of these ingredients creates a treat that is not just tasty but also fun to make. Each ingredient plays a role in building flavor and texture. So, make sure to have everything ready before you start cooking. To make brown butter, start with unsalted butter. Place three tablespoons in a large saucepan over medium heat. Stir the butter often as it melts. Watch closely as the color changes. After about five to seven minutes, the butter will turn a golden brown. It will also smell nutty. This is the key to great flavor! Do not walk away. If you burn the butter, your treats will taste bitter. Once your butter is browned, remove the pan from the heat. Quickly add the whole package of mini marshmallows. Also, add one teaspoon of pumpkin spice blend. Stir the mixture well. Keep stirring until the marshmallows melt completely. You want a smooth blend. This may take a few minutes, but it is worth it! Now it’s time to add the Rice Krispies. Pour in six cups of cereal and a pinch of sea salt. If you want extra crunch, sprinkle in a third cup of crushed graham crackers. Gently fold the mixture. Make sure all the Rice Krispies are coated. Once mixed, pour everything into a greased 9x13-inch baking pan. Use a spatula or your hands to press the mixture down firmly. Wet your hands slightly to avoid stickiness. This will help your treats hold their shape. For perfect Rice Krispie Treats, aim for a gooey yet firm mix. The key is the butter and marshmallow ratio. Use just enough marshmallows to coat the Rice Krispies without making them soggy. If you want a fun crunch, add crushed graham crackers. About 1/3 cup gives a nice texture without overpowering the marshmallow flavor. Drizzling white chocolate adds a sweet touch and looks great. Simply melt 1/4 cup of white chocolate chips in the microwave. Use a spoon to drizzle over the treats for a lovely finish. For serving, a tiered dessert stand makes them shine. Wrap each square in parchment paper tied with twine for a rustic charm. To keep your treats from being hard or sticky, don’t overcook the mixture. Remove it from the heat as soon as the marshmallows melt. For browning butter, watch carefully. Cook it until it turns golden brown with a nutty scent, about 5-7 minutes. Stir often to avoid burning. {{image_4}} To make gluten-free Brown Butter Pumpkin Spice Rice Krispie Treats, use gluten-free Rice Krispies. You can also check for gluten-free mini marshmallows. They are often available in stores. For a different crunch, try using gluten-free corn puffs or puffed rice cereal. Both offer a tasty base without gluten. You can change the spices to fit your mood. Try adding cinnamon or nutmeg for a twist. Just a pinch can elevate the flavor. If you love chocolate, mix in some chocolate chips. Dark or milk chocolate works well. You can also fold in dried fruit for a chewy touch. For vegan or dairy-free treats, substitute the unsalted butter with coconut oil. Use vegan marshmallows for a fully plant-based option. They melt just like regular marshmallows. You can also use different marshmallow types, such as flavored ones for a fun twist. Adjusting these elements makes your treats fit many diets. To keep your Brown Butter Pumpkin Spice Rice Krispie Treats fresh, follow these tips: - Use airtight containers. They help keep moisture out and treats soft. - Store at room temperature. This keeps the texture just right. - Avoid the fridge. Cold temperatures can make them hard. - Layer with parchment paper. If stacking, use paper to prevent sticking. If you have leftovers, freezing is a great option. Here’s how: 1. Cut into squares before freezing. This makes it easy to grab a treat later. 2. Wrap each square tightly in plastic wrap or foil. This prevents freezer burn. 3. Place in a freezer-safe bag or container. Label it with the date. To thaw, take the treats out and let them sit at room temperature for a few hours. If they feel hard, pop them in the microwave for a few seconds. This brings back their soft, gooey goodness. Enjoy! Brown Butter Pumpkin Spice Rice Krispie Treats stay fresh for about 3 days at room temperature. Store them in an airtight container. This keeps them soft and chewy. If you want them to last longer, store them in the fridge. They can last up to a week when chilled. Yes, you can use regular butter. Just be mindful of the salt in your recipe. If you use salted butter, skip the sea salt in the mixture. This helps keep the flavor balanced and tasty. For a vegan option, you can use vegan marshmallows. They melt well and taste great. Another choice is to use a mixture of cashew cream and maple syrup. This gives a similar sweet and creamy texture in your treats. Brown Butter Pumpkin Spice Rice Krispie Treats are fun to make, and they can fit many diets. If you need more tips, feel free to ask! You learned how to make Brown Butter Pumpkin Spice Rice Krispie Treats. We covered key ingredients, techniques for browning butter, and tips for a great texture. You now know how to store and freeze your treats, ensuring they stay fresh. Remember, you can customize these treats with different flavors and dietary options. Get creative and enjoy making these tasty snacks for any occasion. Happy cooking!

Brown Butter Pumpkin Spice Rice Krispie Treats Delight

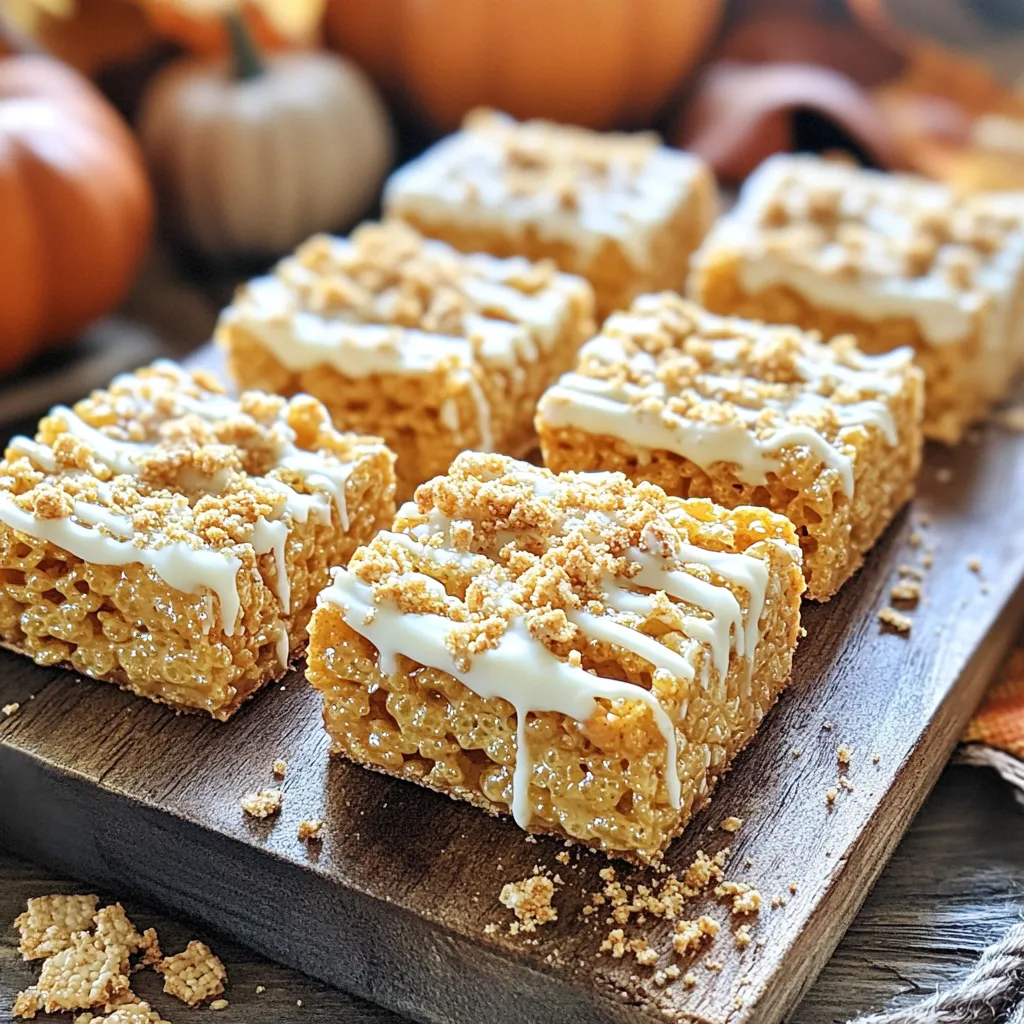
If you’re craving a fun twist on a classic treat, let’s dive into Brown Butter Pumpkin Spice Rice Krispie Treats!

To make crispy halloumi fries, you need a few simple ingredients: - 250g halloumi cheese - ½ cup all-purpose flour - 1 teaspoon garlic powder - 1 teaspoon smoked paprika - ½ teaspoon freshly ground black pepper - 1 large egg, beaten - 1 cup panko breadcrumbs - Olive oil spray These ingredients work together to create a crunchy, tasty treat. The halloumi cheese gives the fries their unique flavor and texture. Panko breadcrumbs add extra crunch, while the spices give them a delicious kick. You can make your halloumi fries even better with a few garnishes: - Fresh parsley, finely chopped (for garnish) - Lemon wedges (for serving) Sprinkling parsley gives your fries a fresh look and taste. The lemon wedges add a zesty touch that brightens the flavor. You can also serve these fries with a tasty sauce, like tzatziki or marinara, for dipping. To make your fries as tasty as possible, use these seasonings: - Garlic powder - Smoked paprika - Freshly ground black pepper These seasonings enhance the halloumi's flavor. Garlic powder gives a savory depth, while smoked paprika adds warmth and a slight smokiness. Black pepper brings a little heat that balances everything perfectly. This combination makes your halloumi fries stand out and keeps you coming back for more. To start, take 250 grams of halloumi cheese. Cut it into thick fry shapes, about half an inch wide. This thickness helps the fries get crispy. Make sure your pieces are even to cook well. Next, set up your dredging stations. You will need three bowls. In the first bowl, mix together half a cup of all-purpose flour, one teaspoon of garlic powder, one teaspoon of smoked paprika, and half a teaspoon of black pepper. Stir them well. In your second bowl, add one large beaten egg. Mix it gently. The last bowl should have one cup of panko breadcrumbs. This will give your fries a great crunch. Now, take a halloumi fry. Dip it first into the flour mix, coating it fully. Shake off any extra flour. Then, dip it into the egg. Let any extra egg drip off. Finally, roll it in the breadcrumbs until it is completely covered. Repeat this for all pieces. Now, preheat your air fryer to 200°C (390°F) for about five minutes. While it heats, lightly spray the air fryer basket with olive oil. This step helps prevent sticking. Arrange the halloumi fries in a single layer in the basket. Make sure they do not touch. Lightly spray the tops with more olive oil. This will help them get that crispy finish. Cook the fries for 10 to 12 minutes. Flip them halfway through cooking. They should turn golden brown and crispy when done. Once cooked, take them out and garnish with finely chopped parsley. Serve them right away with lemon wedges for a zesty touch. To get your halloumi fries really crispy, you need to pay attention to a few key steps. First, cut the halloumi into thick strips, about ½ inch wide. This thickness helps the cheese stay firm while frying. Also, use panko breadcrumbs instead of regular ones. Panko gives a lighter, crunchier texture. Lightly spraying the fries with olive oil before cooking helps them crisp up nicely. Sticking can ruin your fries. To prevent this, start by spraying your air fryer basket with olive oil. This simple step creates a non-stick surface for your halloumi fries. Make sure to arrange the fries in one layer without touching. If they touch, they may stick together. Flipping them halfway through cooking also helps ensure they cook evenly without sticking. Frying halloumi is simple if you follow some best practices. Always dredge the fries in flour, egg, and then panko. This coating provides a strong barrier that keeps the cheese from melting away. Don't overcrowd the basket; it can lead to soggy fries. Instead, cook in batches if needed. Lastly, serve your fries fresh and hot, paired with lemon wedges for a zesty touch. {{image_4}} You can boost the taste of your halloumi fries by adding herbs and spices. Fresh herbs like thyme or rosemary work well. Just chop them finely and mix them into the flour blend. You can also try adding a pinch of cayenne pepper for heat or oregano for a Mediterranean touch. Experimenting with flavors makes each batch unique and fun. If you need a gluten-free option, swap the all-purpose flour with rice flour. You can also use gluten-free breadcrumbs instead of panko. These options will still give you a crispy texture. Just make sure to check labels to ensure they are truly gluten-free. Pair your fries with tasty dips for added flavor. Try tzatziki for a cool creaminess. You can also make a spicy marinara for a zesty kick. Another fun option is a honey mustard mix, which adds a sweet twist. These sauces not only enhance the taste but also make your snack more enjoyable. To keep your halloumi fries fresh, let them cool completely. Place them in an airtight container. This method keeps them safe and tasty for up to two days in the fridge. If you want to make them last a bit longer, wrap them tightly in plastic wrap before putting them in the container. When you are ready to enjoy your leftover fries, the air fryer is your best friend. Preheat your air fryer to 180°C (356°F). Place the fries in a single layer. Heat for about 5 minutes, checking halfway through. This will help them regain their crispiness. Avoid using the microwave, as it makes them soggy. If you want to save some halloumi fries for a later date, freezing is a great option. First, let them cool completely. Then, arrange them in a single layer on a baking sheet. Freeze them for about 1-2 hours. Once they are firm, transfer them to a freezer bag. This will keep them fresh for up to one month. When you are ready to eat, you can cook them directly from frozen. Just add a couple of extra minutes to the cooking time! Cook halloumi fries in your air fryer for 10 to 12 minutes. Flip them halfway through. This helps them cook evenly. You want them golden brown and crispy. Yes, you can try using cheese like mozzarella or cheddar. However, they will not crisp the same way. Halloumi has a unique texture that makes it perfect for frying. Serve halloumi fries hot and crispy. A squeeze of fresh lemon adds zest. You can also pair them with dipping sauces. Tzatziki or spicy marinara works great. For a fun touch, use a trendy paper cone or small basket for serving. You learned how to make crispy halloumi fries using simple steps. We covered key ingredients, cooking tips, and creative variations. You can now enjoy them with tasty dips or fresh herbs. Remember to store any leftovers properly to keep them crisp. Air frying halloumi can be a fun way to snack or impress friends with a unique dish. Try these ideas, and enjoy every bite!

Crispy Air Fryer Halloumi Fries Simple and Tasty Snack

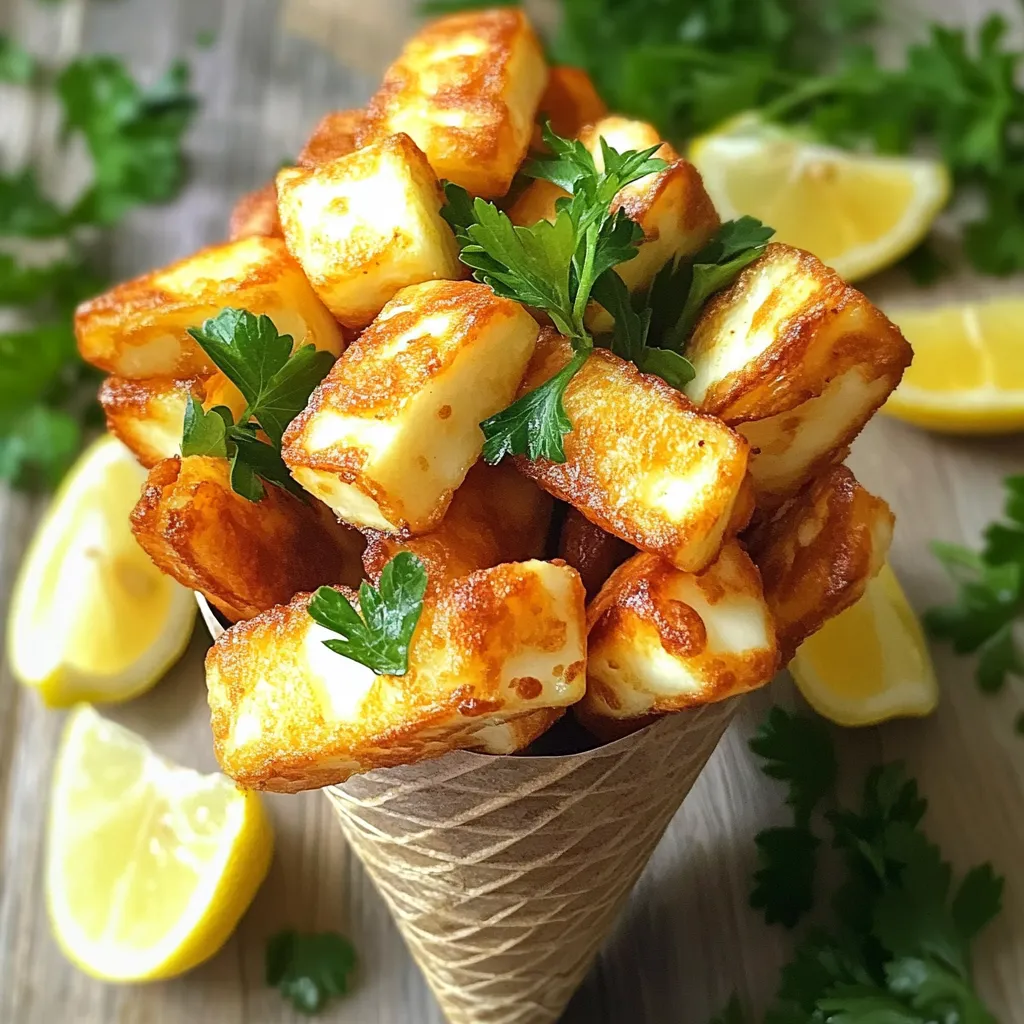
Are you ready to elevate your snacking game? Crispy Air Fryer Halloumi Fries are here to delight your taste buds!

- 1 cup crushed graham crackers - 4 tablespoons unsalted butter, melted - 1 (8 oz) package cream cheese, softened - 1/2 cup powdered sugar - 1 teaspoon vanilla extract - 1 cup whipped cream - 1 cup fresh strawberries, diced - Additional whole strawberries for garnish - Fresh mint leaves for garnish (optional) In this simple dessert, we start with the crust. You need crushed graham crackers and melted butter. This mix gives us a tasty base. Next, the filling is key. We use cream cheese, powdered sugar, and vanilla. These blend into a smooth and sweet mix. Whipped cream adds lightness. It makes the filling fluffy and airy. Fresh strawberries give a pop of color and flavor. Diced strawberries mix right into the layers. You can also add whole strawberries for a nice touch. Mint leaves make a pretty garnish, too. They add a fresh look and taste. Together, these ingredients create a delightful treat. Each cup is a balance of creamy, sweet, and fruity flavors. You’ll love how easy it is to make and enjoy! - In a small bowl, combine 1 cup of crushed graham crackers and 4 tablespoons of melted butter. - Stir until the mixture looks like wet sand. - Take about 2 tablespoons of this mixture and spoon it into each cup. - Press down gently to form an even crust layer at the bottom. - In a medium bowl, beat 1 (8 oz) package of softened cream cheese until it is smooth. - Gradually mix in 1/2 cup of powdered sugar and 1 teaspoon of vanilla extract. - Keep mixing until there are no lumps, and the mixture is creamy. - Carefully fold in 1 cup of whipped cream using a spatula. - Be gentle to keep the mixture light and fluffy. - Use a spoon to layer the cream cheese mixture over the crust in each cup. - Fill each cup halfway with the cream cheese mixture. - Evenly distribute 1 cup of diced strawberries on top of the cream cheese layer. - Spoon the remaining cream cheese mixture over the strawberries, filling the cups nearly to the brim. - Finish with a layer of diced strawberries and garnish each cup with a whole strawberry and a mint leaf if you like. - Cover the cups with plastic wrap and refrigerate for at least 2 hours. To get the best texture, start with softened cream cheese. This step is key. Cold cream cheese can make your filling lumpy. Let it sit at room temperature for about 30 minutes before mixing. When you mix the whipped cream, be gentle. Use a spatula to fold it into the cream cheese. This helps keep the mixture light and airy. If you stir too hard, it can lose that fluffy feel. For a stunning look, serve your cheesecake cups on a decorative tray. This small touch makes a big difference. You can impress your guests with simple, elegant serving. To add some texture, sprinkle crushed graham crackers on top. This extra layer gives a nice crunch. Plus, it adds to the visual appeal of the dessert. With these tips, your no-bake strawberry cheesecake cups will shine! {{image_4}} You can change the fruit in your cheesecake cups. Try using blueberries or raspberries instead of strawberries. Both fruits add a sweet and tart flavor. You can also use seasonal fruits. In summer, peaches or cherries can shine in this dessert. In fall, consider apples or pears for a cozy twist. Each fruit brings its own taste and joy to your cups. You can make this recipe fit your diet. If you need gluten-free options, use gluten-free graham crackers. They work just as well for the crust. If you are dairy-free, look for cream cheese made from nuts or soy. These swaps keep the creamy texture while fitting your needs. Enjoy your dessert without worry! To store leftovers, cover each cup tightly with plastic wrap. This keeps them fresh and prevents any odors from the fridge. I recommend eating them within three days. This keeps the flavors bright and the texture creamy. If you wait too long, they may lose their charm. Yes, you can freeze no-bake strawberry cheesecake cups! To do this, wrap each cup with plastic wrap and then place them in a freezer-safe bag. They will stay good for up to a month. When you are ready to enjoy them, take the cups out and place them in the fridge overnight. This allows them to thaw slowly. After thawing, serve them cold for a refreshing treat! No-bake cheesecake cups stay fresh for about 3 to 5 days in the fridge. To keep them tasty, make sure to cover each cup with plastic wrap. This prevents drying and keeps flavors intact. If you plan to enjoy them later, it’s best to store them in an airtight container. Yes, you can use store-bought whipped cream. It saves time and still gives that light, fluffy texture. Just make sure it is fresh and unsweetened for the best taste. If you prefer, you can still whip heavy cream at home. This way, you control the sweetness and flavor. If you want an alternative to graham crackers, try using crushed cookies like Oreos or digestive biscuits. You can also use crushed nuts mixed with melted butter for a gluten-free option. Each choice adds a unique flavor and texture to your cheesecake cups. You learned how to make delicious no-bake strawberry cheesecake cups. We discussed the key ingredients, easy steps to prepare, and tips for the best texture. You can also explore fun variations and storage options for leftovers. This dessert is simple and can fit any occasion. Enjoy making this treat for friends or family. Your perfect cheesecake cups are just a few steps away!

No-Bake Strawberry Cheesecake Cups Simple Dessert Delight

Looking for an easy dessert that impresses? You’ll love my No-Bake Strawberry Cheesecake Cups! With just a few simple ingredients,

To make Minute Spicy Peanut Noodle Stir-Fry, you will need a few key ingredients. Here’s the list: - 8 oz rice noodles - 2 tablespoons creamy peanut butter - 2 tablespoons soy sauce - 1 tablespoon sriracha - 1 tablespoon sesame oil - 1 cup broccoli florets - 1/2 red bell pepper - 1/2 cup shredded carrots - 2 green onions - 1 tablespoon crushed peanuts - Fresh cilantro leaves - Lime wedges These ingredients work together to create a flavorful and quick meal. The rice noodles serve as a great base. Creamy peanut butter adds a rich taste. Soy sauce gives it a savory touch. If you like spice, sriracha is your friend! Sesame oil adds a lovely aroma. The vegetables not only add color but also crunch. Broccoli, red bell pepper, and carrots bring nutrients and texture to the dish. Green onions and cilantro add freshness. Don’t forget the crushed peanuts on top for a nice crunch! This dish is easy to customize. You can swap out veggies or adjust the spice to fit your taste. Enjoy cooking! - Start by bringing a large pot of water to a boil. - Add 8 oz of rice noodles and cook for 4-5 minutes. - Once cooked, drain the noodles in a colander and rinse with cold water. - In a medium bowl, mix 2 tablespoons of creamy peanut butter, 2 tablespoons of soy sauce, 1 tablespoon of sriracha, and 1 tablespoon of sesame oil. - Whisk until smooth. If the sauce is too thick, add water bit by bit until it’s pourable. - Heat a teaspoon of sesame oil in a large skillet over medium-high heat. - Add 1 cup of broccoli florets, 1/2 sliced red bell pepper, and 1/2 cup of shredded carrots. - Stir-fry for 3-4 minutes until the veggies are tender-crisp and bright. - Now, add the drained rice noodles to the skillet. - Pour the peanut sauce over the noodles and veggies. - Toss everything well using tongs for about 2-3 minutes until heated through. - Remove the skillet from heat and fold in 2 chopped green onions. - Portion the stir-fry onto plates. - Sprinkle with 1 tablespoon of crushed peanuts and fresh cilantro. - Serve with lime wedges on the side for a zesty finish. - To ensure noodles are al dente, follow the package instructions carefully. Cooking time usually takes about 4-5 minutes. - Rinse the noodles under cold water after draining. This stops cooking and helps prevent stickiness. - If you want more heat, add extra sriracha to the sauce. Start with a small amount and taste as you go. - You can swap in other sauces like hoisin or teriyaki for different flavors. Just mix them with peanut butter for a tasty twist. - Try adding snap peas, bell peppers, or bok choy for more color and crunch. - Frozen vegetables work well if you’re short on fresh ones. They cook quickly and still taste great. {{image_4}} You can make Minute Spicy Peanut Noodle Stir-Fry even better with some protein. Grilled chicken is a great choice. It adds nice flavor and texture. Tofu is also a good option for a plant-based meal. It soaks up the sauce well. For seafood lovers, shrimp works wonderfully, too. Beef strips can add heartiness, making it a filling dish. If you need gluten-free options, rice noodles are a great start. They are naturally gluten-free and easy to cook. You can also swap regular soy sauce for gluten-free soy sauce. This keeps the dish tasty without the gluten. Make sure to check labels, as some sauces contain hidden gluten. To keep this dish vegan, check all your ingredients. Use a vegan soy sauce and confirm your peanut butter has no added animal products. You can add more veggies for flavor, like snap peas or mushrooms. For extra crunch, add sesame seeds on top. They give a nice texture and nutty taste. To keep your Minute Spicy Peanut Noodle Stir-Fry fresh, store leftovers in the fridge. Place the stir-fry in an airtight container. This helps to keep it tasty and prevents it from drying out. Make sure to eat it within three days. If you have extra peanuts or cilantro, store them separately. This keeps their crunch and freshness. You can reheat your stir-fry in two ways: the microwave or the stovetop. For the microwave, place your portion in a bowl. Heat it for one to two minutes. Stir halfway to ensure even warming. For the stovetop, add a splash of water to a pan. Heat over medium until warm, stirring gently. This method helps keep the texture nice. If you want to save your dish for later, you can freeze it. Place the cooled stir-fry in a freezer-safe container. It can last up to three months in the freezer. When you're ready to eat, thaw it overnight in the fridge. Reheat it using the stovetop method to keep the noodles from getting mushy. This recipe takes just 15 minutes. You spend 10 minutes prepping and 5 minutes cooking. It's quick and easy, perfect for busy days. Yes, you can make this dish ahead. For meal prep, cook the noodles and veggies. Store them in the fridge. Make the sauce and mix it in when ready to serve. This keeps everything fresh and tasty. If you have nut allergies, try sunflower seed butter or tahini. Both give a creamy texture and nice flavor. They work well in this recipe. Absolutely! This recipe is great for meal prep. Make a larger batch, and store it in containers. You can easily reheat it for lunch or dinner later. This blog post covers a tasty and simple Minute Spicy Peanut Noodle Stir-Fry. You learned about the key ingredients, from rice noodles to fresh veggies. The step-by-step instructions walked you through cooking the noodles, making the sauce, and stir-frying the mix. You can experiment with protein, try different sauces, or choose gluten-free options. For storage, I shared tips on keeping leftovers fresh. With these guidelines, you can enjoy this meal anytime. Dive in and taste the fun of cooking this dish at home.

Minute Spicy Peanut Noodle Stir-Fry Tasty Quick Meal

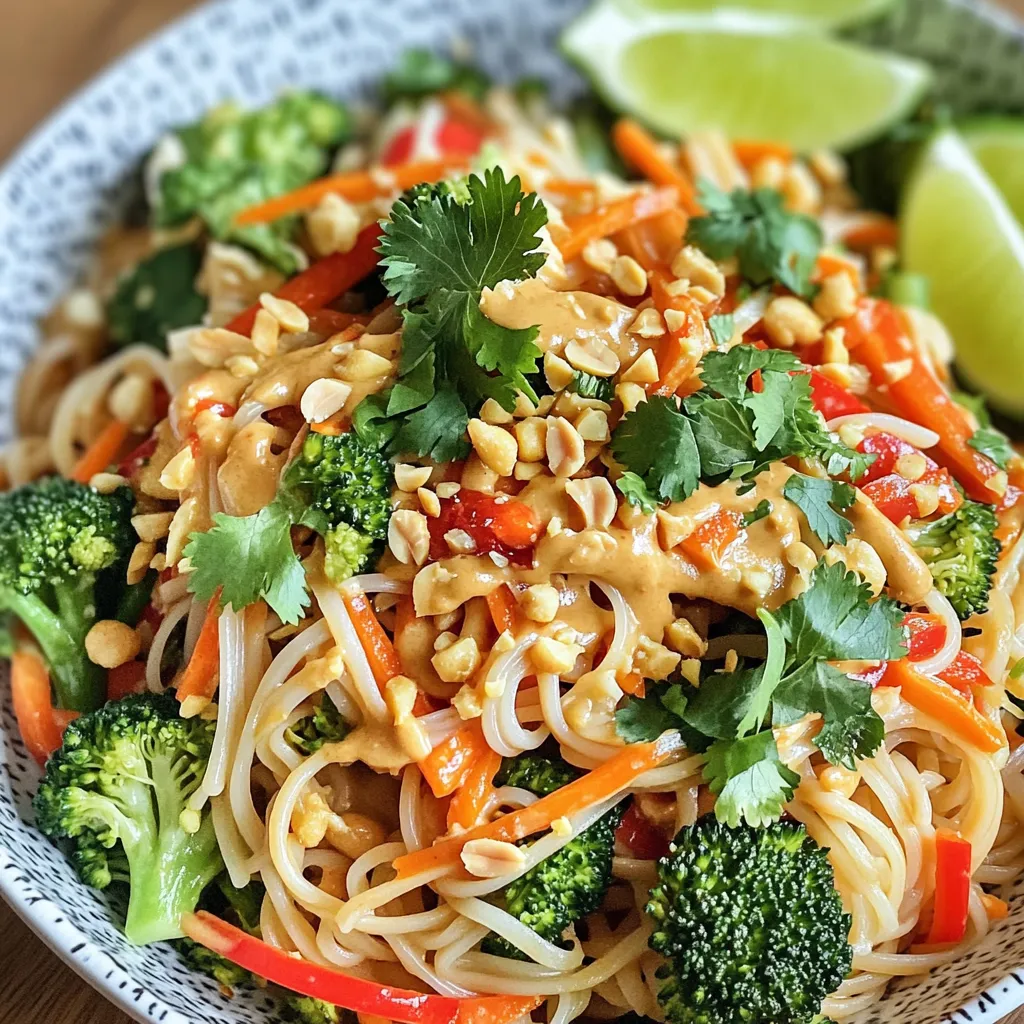
Craving a quick and tasty meal? Try my Minute Spicy Peanut Noodle Stir-Fry! This simple dish packs a flavorful punch

Older posts
Newer posts
← Previous Page1 … Page14 Page15 Page16 … Page83 Next →

dsad

© 2026 eataroundit • Built with GeneratePress

Our Policies

  • Copyright Policy
  • Cookie Policy
  • GDPR Policy
  • Privacy Policy
  • Disclaimer
  • Terms Of Use

More Information

  • Home
  • About
  • Contact
  • Appetizers
  • Dessert
  • Dinner
  • Drinks
©2026, eataroundit About Back To Top