Skip to content
DisclaimerTerms Of UseGDPR PolicyCookie Policy

eataroundit

  • Home
  • Drinks
  • Appetizers
  • Dinner
  • Dessert
  • About
  • Contact
  • Privacy Policy
DisclaimerTerms Of UseGDPR PolicyCookie Policy

NO-ING-IMG

- 1 medium butternut squash, peeled and cut into bite-sized cubes - 4 cups of mixed greens (a blend of arugula, spinach, and kale) - 1/2 cup dried cranberries, plump and sweet - 1/2 cup walnuts, roughly chopped for crunch - 1/4 cup feta cheese, crumbled (optional for creaminess) - 2 tablespoons extra virgin olive oil - 2 tablespoons pure maple syrup - 1 teaspoon ground cinnamon - 2 tablespoons apple cider vinegar for tang - 1 tablespoon Dijon mustard for flavor depth - Sea salt - Freshly cracked black pepper In this Maple Roasted Butternut Squash Salad, I use fresh and vibrant ingredients. The butternut squash brings sweetness and a lovely texture. Mixed greens add color and nutrition. Dried cranberries give a sweet and tart punch. The walnuts add a nice crunch. If you want creaminess, sprinkle in some feta cheese. For the dressing, I combine olive oil, maple syrup, and cinnamon. The apple cider vinegar adds tang, while Dijon mustard deepens the flavor. Season well with salt and freshly cracked black pepper. Each ingredient works together to create a delightful salad that’s both simple and satisfying. - Preheat the oven to 400°F (200°C). This makes sure the squash roasts well. - Peel and cut the butternut squash into bite-sized cubes. Place them in a large bowl. - Add 2 tablespoons of extra virgin olive oil, 2 tablespoons of pure maple syrup, 1 teaspoon of ground cinnamon, sea salt, and black pepper to the bowl. Toss well to coat each piece evenly. - Line a large baking sheet with parchment paper. Spread the seasoned squash in a single layer. - Roast the squash for 25–30 minutes. Stir halfway through to ensure even cooking. Look for a fork-tender texture and a golden color. - While the squash roasts, prepare the dressing. In a small bowl, whisk together 2 tablespoons of apple cider vinegar and 1 tablespoon of Dijon mustard. Add a pinch of salt and a few grinds of black pepper. - In a large serving bowl, combine 4 cups of mixed greens, the warm roasted butternut squash, 1/2 cup of dried cranberries, 1/2 cup of roughly chopped walnuts, and 1/4 cup of crumbled feta cheese if you like. - Drizzle the dressing over the salad and gently toss everything together. Make sure each piece is coated well. - Serve the salad right away while the squash is warm. You can let it cool slightly if you prefer a refreshing dish. To get that perfect caramelization on your butternut squash, follow these tips: - Cut Squash Evenly: Make sure the cubes are about the same size. This helps them cook evenly. - Use Enough Space: Spread the squash in a single layer on the baking sheet. Overcrowding can lead to steaming instead of roasting. - High Heat: Roasting at 400°F (200°C) is key. This temperature helps develop a nice, golden color. For stirring, do this halfway through roasting. This action allows all sides to brown nicely. Just be gentle so you don’t break the squash cubes. The order of layering matters for a great salad. Start with the mixed greens in your bowl. Next, add the warm butternut squash on top. The warmth wilts the greens slightly, which adds a nice texture. After that, sprinkle on the dried cranberries and walnuts. If you choose to use feta, add it last. For presentation, use individual plates. Garnish each plate with extra feta and a few walnuts for a pop of color. A light drizzle of maple syrup can make it look more inviting. This salad is best served warm, right after you mix it. The warm squash and dressing make each bite blissful. However, if you prefer it cool, let it sit for a bit before serving. Pair this salad with roasted chicken or a hearty grain dish. It also goes well with a light soup for a complete meal. Enjoy the flavors and textures together! {{image_4}} You can easily make this salad vegan. Just leave out the feta cheese. The salad still tastes great without it. For gluten-free options, check your Dijon mustard. Most brands are gluten-free but confirm just to be safe. You can swap nuts or seeds based on your taste. Try pecans or pumpkin seeds for a new twist. Adding seasonal vegetables also works well. Roasted Brussels sprouts or beets can add more color and flavor. Spice up the dressing for extra flavor. Add garlic powder or a pinch of cayenne pepper for heat. You can also use fresh herbs like basil or cilantro as a topping. They add freshness and a nice pop of flavor. Store any leftover salad in an airtight container. The mixed greens should go in a separate bag to keep them fresh. Refrigerate the salad right away. This helps keep the flavors and textures nice. Aim to eat leftovers within three days for the best taste. To reheat the butternut squash, use the oven or microwave. If using the oven, preheat it to 350°F (175°C). Place the squash on a baking sheet and warm it for about 10 minutes. This keeps the squash tender and avoids sogginess. In the microwave, heat for one minute at a time. Stir between each minute to keep the texture nice. The fresh salad lasts about three days in the fridge. The roasted squash can stay good for up to five days if stored separately. This way, you can enjoy each part at its best. Yes, you can prepare this salad ahead. First, roast the squash and let it cool. Store it in an airtight container in the fridge. You can mix the dressing in another container. Keep the greens separate until serving. This will keep them fresh and crisp. Combine everything just before serving for the best taste. If you can’t find butternut squash, try these options: - Acorn squash - Sweet potatoes - Pumpkin - Delicata squash These veggies work well and add great flavor to your salad. To check if your squash is done, use a fork. It should easily pierce the cubes. You want them tender but not mushy. For more flavor, you can add extra spices or herbs. This adds depth to your dish and makes it even tastier. Maple roasted butternut squash salad is a tasty and healthy dish you can easily make. We covered the key ingredients, easy steps, and helpful tips for perfecting the dish. You can also explore fun variations and storage methods. I encourage you to try this salad for a delicious meal. Enjoy the mix of flavors, colors, and textures. This dish is sure to impress at gatherings or for a cozy dinner at home. Happy cooking!

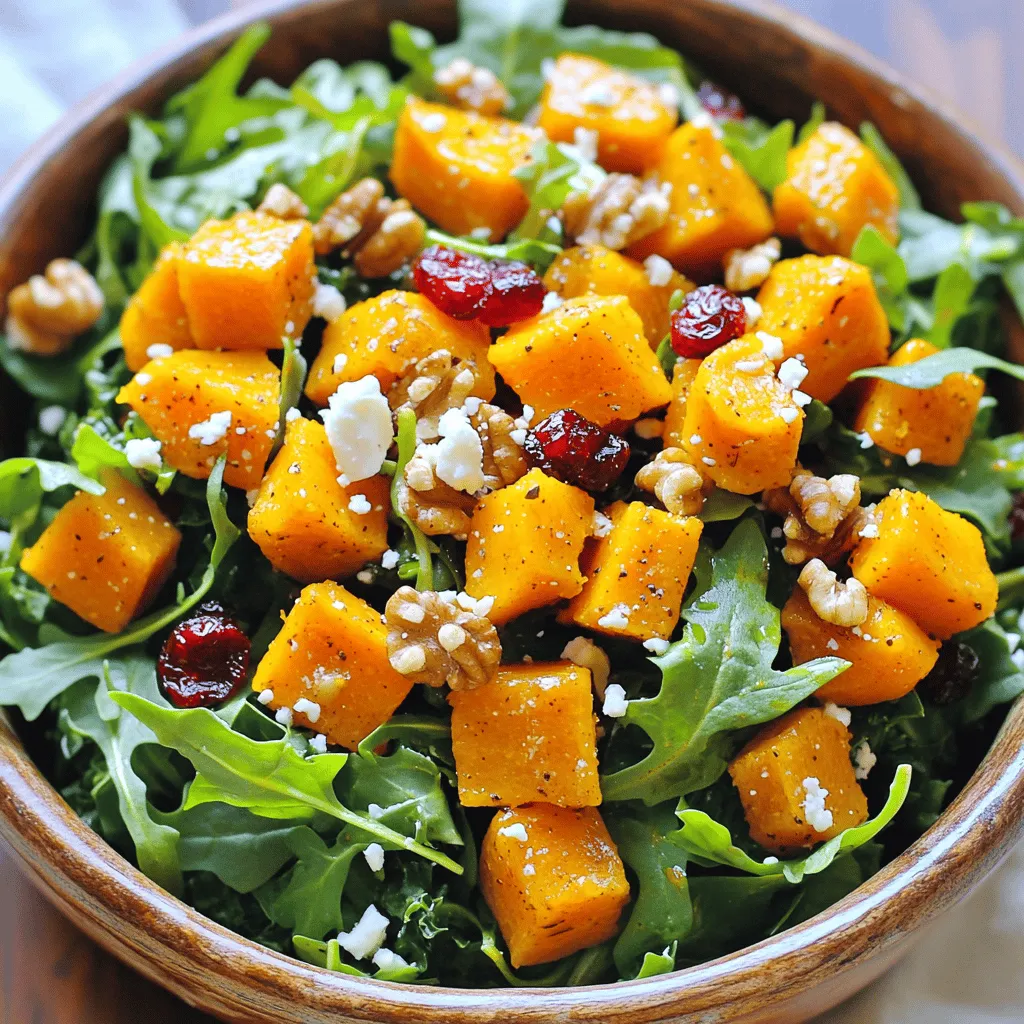
Maple Roasted Butternut Squash Salad Delightful Side

If you’re looking for a side dish that wows, you’ve found it! This Maple Roasted Butternut Squash Salad is vibrant,

- 2 cans chickpeas - 1 large onion - 3 cloves garlic - Carrots - Red bell pepper - Zucchini - Ground spices - Vegetable broth - Raisins or dried apricots The heart of this stew lies in the ingredients. For the main part, you will need two cans of chickpeas. These legumes offer a creamy texture and are high in protein. Use one large onion, finely diced, to bring a sweet base to the dish. Three cloves of garlic, minced, add a punch of flavor. Next, we have the veggies. Slice two medium carrots into rounds for sweetness and color. Add a diced red bell pepper for a bit of crunch. A coarsely chopped zucchini rounds out the mix for a fresh taste. Now, let’s talk seasonings. You’ll want to gather your ground spices. These include cumin, coriander, cinnamon, and paprika. A pinch of cayenne adds heat. Use low-sodium vegetable broth to keep it healthy. Finally, toss in a quarter cup of raisins or chopped dried apricots for a touch of natural sweetness. With these ingredients, you set the stage for a flavorful and satisfying meal. Each element plays a key role, making every bite a delight. Start by heating olive oil in a large skillet over medium heat. Add the diced onion and cook it until it turns soft and clear, about five minutes. Next, add minced garlic, sliced carrots, and diced bell pepper. Cook for another three to four minutes. This step makes the base flavorful and aromatic. Once the vegetables are ready, transfer them to the slow cooker. Add two cans of drained and rinsed chickpeas, chopped zucchini, and one can of undrained diced tomatoes. Pour in one cup of vegetable broth and add a quarter cup of chopped raisins or dried apricots. This mix will give the stew a sweet touch. Cover the slow cooker lid and set it to cook on low for six to eight hours. If you're short on time, set it to high for three to four hours. After cooking, taste the stew and adjust the seasoning. If the stew is too thick, stir in some more broth until it reaches your desired consistency. To make your stew even better, try adjusting the spices. If you like it spicy, add more cayenne. For warmth, increase the cinnamon and cumin. A dash of lemon juice can balance the flavors nicely. This adds brightness and cuts through the richness. Consider using a splash of vinegar too. It works wonders for depth. When serving, dish the stew in deep bowls. This adds an inviting look. You can serve it over fluffy couscous or quinoa. For extra flair, add a lemon wedge on the side. It brightens the plate and flavor. Garnish with fresh cilantro or parsley. A sprinkle of crushed nuts, like almonds, adds crunch and texture. Prep your ingredients ahead of time for a smooth cooking experience. Chop the veggies and store them in the fridge. You can also use frozen vegetables to save time. They work well and can cut prep time in half. Just remember to adjust cooking times slightly. This way, you still enjoy a hearty and flavorful stew. {{image_4}} You can change the protein in this stew to suit your taste. If you want meat, try chicken or lamb. Just add it to the slow cooker with the chickpeas. For a vegan option, use tofu or tempeh. These options add great flavor and texture. The spices really make this stew shine. If you like heat, add more cayenne pepper. Start with a small pinch and taste as you go. You can also try other spices like turmeric or ginger. These spices add warmth and depth to the dish. Serving this stew over grains can enhance your meal. Couscous and quinoa pair well with the stew's flavors. You can also try brown rice or farro for a hearty option. Adding a side salad or crusty bread can round out the meal nicely. Store your leftover Moroccan chickpea stew in an airtight container. Make sure it cools down first. This stew will stay fresh for up to five days in the fridge. If you want to enjoy it later, consider freezing it instead. To freeze the stew, pour it into freezer-safe bags or containers. Leave some space for expansion. Label the bags with the date. You can freeze it for up to three months. When you are ready to eat, move it to the fridge for a night to thaw. When it is time to reheat, use a pot on the stove. This keeps the stew warm and tasty. Stir it often to make sure it heats evenly. You can also use a microwave. Heat it in short bursts, stirring in between. Add a splash of water or broth if it seems too thick. This will help keep the flavors and texture just right. It takes about 6-8 hours on low or 3-4 hours on high. The slow cooker does its magic by slowly blending flavors. Cooking on low gives a rich, deep taste. High heat cooks faster but may not infuse flavors as well. Yes, you can make this stew ahead of time. Cook it completely, then cool and store it in the fridge. It stays fresh for about 3-4 days. You can also freeze it for longer storage. Thaw in the fridge before reheating. Absolutely! You can adjust the heat level easily. Add more cayenne pepper for extra spice. If you prefer less heat, reduce the cayenne. You can also add spicy peppers or hot sauce for a different flavor twist. This blog showed you how to make a delicious Slow Cooker Moroccan Chickpea Stew. We covered key ingredients, like chickpeas, veggies, and spices. You learned step-by-step preparation and cooking methods. I shared tips to enhance flavor and presentation and explored variations to suit different tastes. Finally, you got storage tips to keep your stew fresh and tasty. Now you're ready to enjoy this hearty meal. Happy cooking!

Slow Cooker Moroccan Chickpea Stew Flavorful Delight

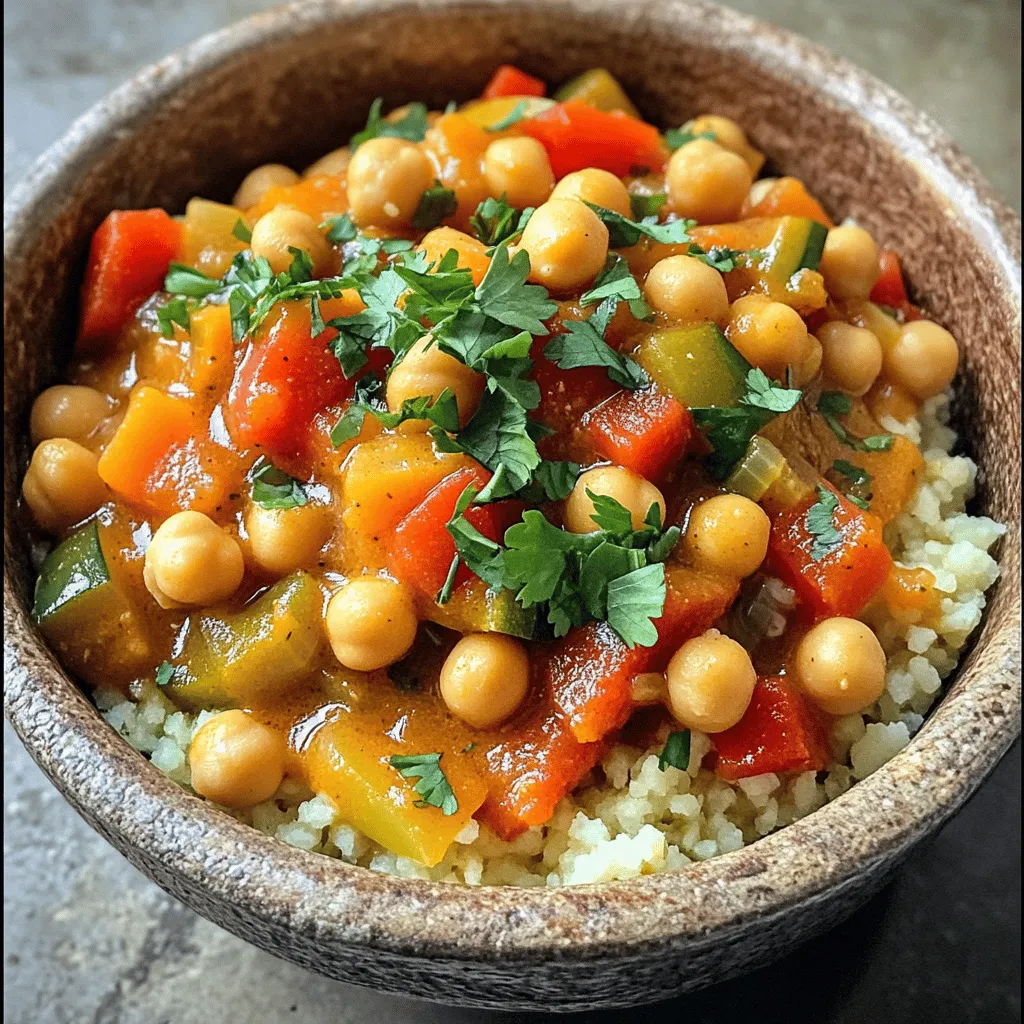
Are you ready to explore a world of flavor? This Slow Cooker Moroccan Chickpea Stew is a delightful mix of

- 1 ripe banana - 1/2 cup rolled oats - 1 cup almond milk - 1 scoop vanilla protein powder - 1 tablespoon almond butter - Optional: honey or maple syrup - Optional: ground cinnamon and ice cubes Gathering the right ingredients is key for a great Protein Banana Oat Smoothie. Start with a ripe banana. The riper, the sweeter! Next, grab rolled oats. They add fiber and make your smoothie filling. Almond milk is a great choice for a creamy base. You can use regular milk if you prefer. Then, include one scoop of vanilla protein powder. This boosts the protein and flavor. Add a tablespoon of almond butter for healthy fats and richness. If you like it sweeter, consider honey or maple syrup. You can also sprinkle in ground cinnamon for warmth. Lastly, ice cubes can make your smoothie cool and refreshing. By using these ingredients, you create a tasty and nutritious drink. Each ingredient plays a role in making your smoothie not just delicious, but also healthy. - Peel and chunk the banana. Peeling is easy; just remove the skin. Cut the banana into small pieces. This helps it blend well. - Add all ingredients to the blender. Put the banana chunks, rolled oats, almond milk, and protein powder in the blender. Also, add almond butter, honey, and cinnamon. - Blend until smooth. Turn on the blender. Blend on high speed for about 30 seconds. Stop when the mixture is creamy and smooth. - Taste and add sweeteners if needed. Take a small sip of your smoothie. If it needs more sweetness, add honey or maple syrup. Blend for just a few seconds more. - Incorporate ice for chill and texture. If you like a cold drink, add ice cubes. Blend again until the ice is crushed. This will give your smoothie a nice chill. When picking a protein powder, go for a quality brand. Whey protein is popular. It blends well and tastes great. If you prefer plant-based options, choose pea protein. Soy protein is also a good choice. Both types work well in smoothies. To make this smoothie more filling, add extras. A tablespoon of chia seeds boosts fiber. You can also mix in spinach for extra vitamins. If you want healthy fats, add a quarter of an avocado. These additions will help keep you full longer. If you have leftover smoothie, store it in the fridge. Use a sealed container to keep it fresh. When you're ready to drink it, re-blend the smoothie for a smooth texture. If it's too thick, add a splash of almond milk to thin it out. {{image_4}} You can use many milk options for this smoothie. Almond milk is my go-to choice. However, you can also try coconut milk or soy milk. Each milk gives a different taste. For nut butter, almond butter works great, but peanut butter is tasty too. Sunflower seed butter is a good nut-free choice. This way, you can enjoy the smoothie, no matter your diet. To jazz up your smoothie, think about adding more fruits. Berries like strawberries or blueberries blend well with bananas. You can also add mango for a tropical twist. If you want spice, sprinkle in some nutmeg or add a dash of vanilla extract. These small changes can make your smoothie even more exciting. Need more protein? You can add seeds like chia or flaxseed. They blend in well and pack a nutritional punch. Greek yogurt is another option for a creamy boost. If you prefer, you can add another scoop of protein powder. These additions make the smoothie filling and keep you energized all day. You can keep your smoothie in the fridge for up to 24 hours. Use an airtight container for best results. This helps maintain freshness and flavor. If you notice separation, just give it a good shake before drinking. To freeze your smoothie, pour it into freezer-safe containers. Leave some space at the top, as liquids expand when frozen. It can last up to three months in the freezer. When you're ready to enjoy it, let it thaw in the fridge overnight. You can also blend in a few ice cubes for a quick chill. This smoothie is quite healthy. It packs a lot of nutrients. The ripe banana gives you potassium, which helps your heart. Rolled oats add fiber, keeping you full longer. Almond milk is low in calories and has healthy fats. Protein powder boosts your muscle health. Almond butter adds more healthy fats and protein. Ground cinnamon can help with blood sugar levels. Together, these ingredients make a balanced meal or snack. Yes, you can skip the protein powder. Try adding Greek yogurt instead. It has a lot of protein and creaminess. Cottage cheese is another great option. Both will make your smoothie thick and smooth. You can also use nut butters like peanut or sunflower butter. These will add protein and flavor too. You can add a few things for more flavor. Try berries like strawberries or blueberries. They add sweetness and color. A splash of vanilla extract can make it taste even better. You can also add a dash of nutmeg for warmth. If you like a bit of zing, try some ginger. All these options keep it healthy without extra sugar. This blog post covered how to make a Protein Banana Oat Smoothie. You learned about the key ingredients, like ripe bananas and almond milk, along with step-by-step instructions. We explored tips for choosing protein powder and storing leftovers. I shared fun variations to suit your taste and even answered common questions about health benefits. Now, you have a simple, tasty way to fuel your day. Enjoy this nutritious drink as part of your routine!

Protein Banana Oat Smoothie for a Healthy Boost

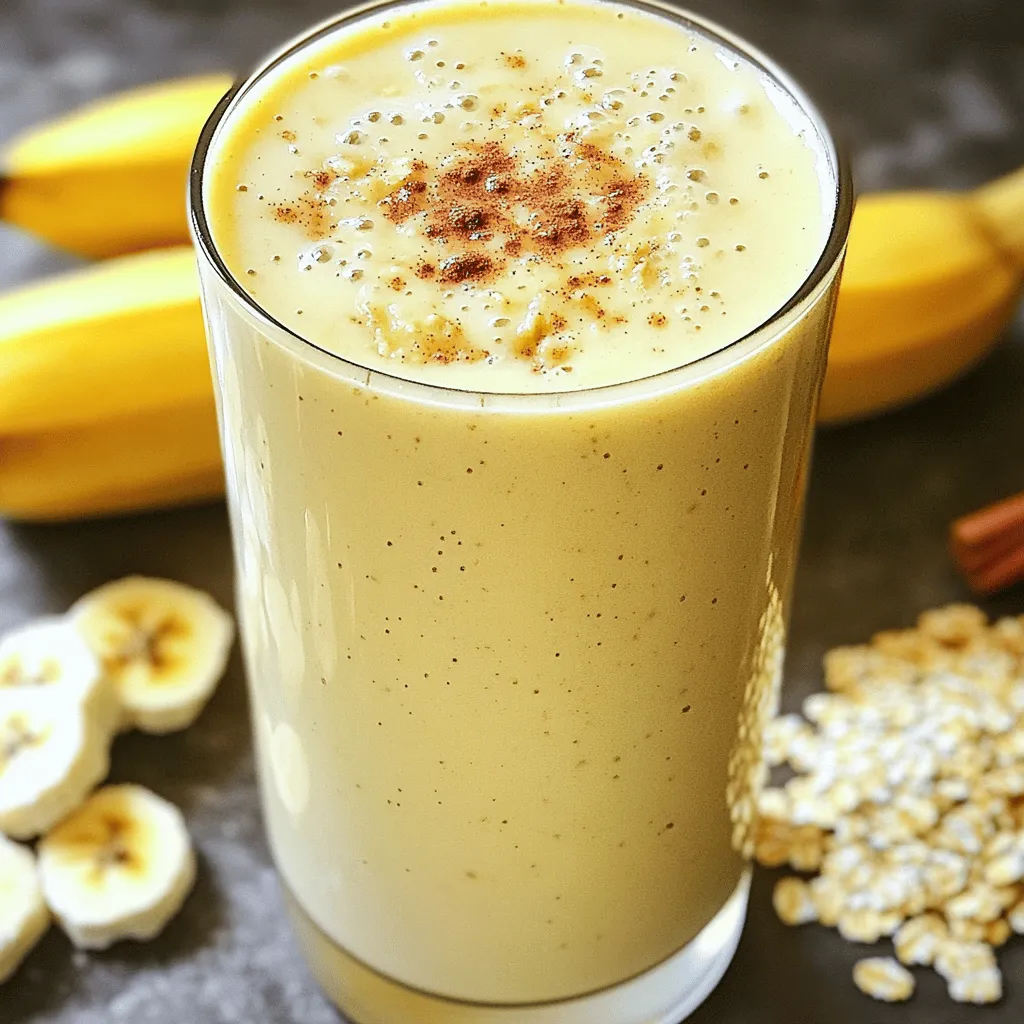
Looking for a quick, healthy boost? You’ve come to the right place! A Protein Banana Oat Smoothie is an easy

To make Baked Feta Pasta with Spinach, you need a few key ingredients that blend well together. Here is what you will need: - 200g pasta (penne or fusilli) - 200g block of feta cheese - 300g cherry tomatoes, halved - 2 cups fresh spinach - 4 cloves garlic, finely minced - 3 tablespoons extra virgin olive oil - 1 teaspoon dried oregano - Salt and freshly cracked black pepper to taste - Fresh basil leaves for garnish - Grated Parmesan cheese (optional, for serving) Each ingredient plays a vital role in creating a rich and creamy dish. The feta cheese melts beautifully, while the cherry tomatoes burst with flavor. The spinach adds a fresh touch, and the garlic gives a nice kick. Don't forget to have a sprinkle of Parmesan on hand for extra taste! First, you need to preheat your oven to 400°F (200°C). This step is key for roasting the tomatoes and melting the feta. Next, take a medium-sized baking dish. Add the halved cherry tomatoes. Drizzle 2 tablespoons of olive oil over them. Sprinkle salt, pepper, and dried oregano. Toss the tomatoes well to coat them in oil and spices. Now, make a small space in the center of your tomatoes. Place the block of feta cheese here. Drizzle the last tablespoon of olive oil over the feta. It adds more flavor. Place the dish in the oven and bake for 25-30 minutes. The tomatoes should burst with juices, and the feta should be soft and golden. While the feta and tomatoes bake, boil salted water in a large pot. Add the pasta and cook according to the package instructions. Aim for al dente texture. Remember to save 1 cup of pasta water before draining. In a large skillet, heat over medium heat. Add the minced garlic and sauté for 1-2 minutes. It should smell good! Then, add the fresh spinach. Cook until it wilts, about 2-3 minutes. Once the feta and tomatoes are done, remove the dish from the oven. Use a fork to mash the feta and mix it with the tomatoes. It should turn creamy. Now, add the drained pasta and wilted spinach to the baking dish. Toss everything together. If it feels too thick, add some reserved pasta water. Taste and adjust salt and pepper. Serve hot, garnished with fresh basil leaves. If you like, sprinkle grated Parmesan cheese on top. Enjoy! Roasting cherry tomatoes brings out their sweet flavor. Use ripe, plump tomatoes for the best taste. Cut them in half and toss with olive oil, salt, and pepper before baking. This helps them caramelize nicely. Bake until they burst. This usually takes about 25 to 30 minutes at 400°F. The juices will mix with the feta, creating a rich sauce. If you want a creamier sauce, save some pasta water. After cooking the pasta, reserve one cup of this starchy water. When mixing the pasta with the feta and tomatoes, add the water a little at a time. This helps you control how creamy the dish becomes. Mix until you reach your preferred texture. To boost the flavor, add more spices. Fresh or dried herbs, like basil or thyme, work well. You can also stir in a squeeze of lemon juice for brightness. For a spicy kick, sprinkle in some red pepper flakes. Don't forget to taste your dish before serving. Adjust the salt and pepper as needed for the best flavor. {{image_4}} You can boost this dish by adding protein. Cooked chicken, shrimp, or sausage work great. Simply add diced protein to the baking dish with the tomatoes. If you like beans, chickpeas add a healthy twist. They blend well with the creamy feta and spinach. While penne and fusilli are tasty, try other pasta shapes. Bowtie, orzo, or even whole wheat pasta are excellent options. Each type changes the dish's texture and look. You can even use gluten-free pasta if needed. Just make sure to follow cooking times on the package. Feel free to mix in more veggies. Zucchini, bell peppers, or even broccoli are delicious. Just chop them up and add them to the baking dish. They will roast nicely with the tomatoes. You can also use frozen spinach if fresh isn’t handy. This dish offers much room for your favorite flavors. After you make this dish, let it cool to room temperature. Place any leftovers in an airtight container. Store in the fridge for up to four days. This helps keep the flavors fresh and the pasta safe to eat. You can freeze this pasta dish too. First, let it cool completely. Then, transfer it to a freezer-safe container. Seal it tightly to avoid freezer burn. It will last for about two months in the freezer. When you're ready to eat, thaw it overnight in the fridge. To reheat, warm it gently in a skillet over low heat. Add a splash of water or olive oil to help loosen the sauce. Stir often to ensure even heating. You can also use the microwave. Heat in short bursts, stirring in between, until hot. Enjoy your meal just like fresh! Yes, you can use goat cheese or ricotta. Goat cheese offers a tangy taste. Ricotta gives a creamier texture. Both options will change the flavor slightly, but they will still be delicious. To make this dish gluten-free, use gluten-free pasta. Many brands offer penne or fusilli made from rice or chickpeas. Always check the label to ensure it fits your needs. If you don't have fresh spinach, try kale or Swiss chard. Both veggies add nice texture and flavor. You can also use frozen spinach; just thaw and drain it before adding. The dish lasts about 3 to 5 days in the fridge. Store it in an airtight container. Reheat it in the oven or microwave before serving. This blog post covered a tasty pasta dish with feta, tomatoes, and spinach. I shared a simple recipe, easy steps, tips for the best flavor, and storage advice. You can also make it your own with protein or veggie swaps. Remember, cooking is fun, so experiment! Enjoy making this dish and sharing it with loved ones. Your meal will be a hit, bringing smiles to the table. Happy cooking!

Baked Feta Pasta with Spinach Delicious Easy Dish

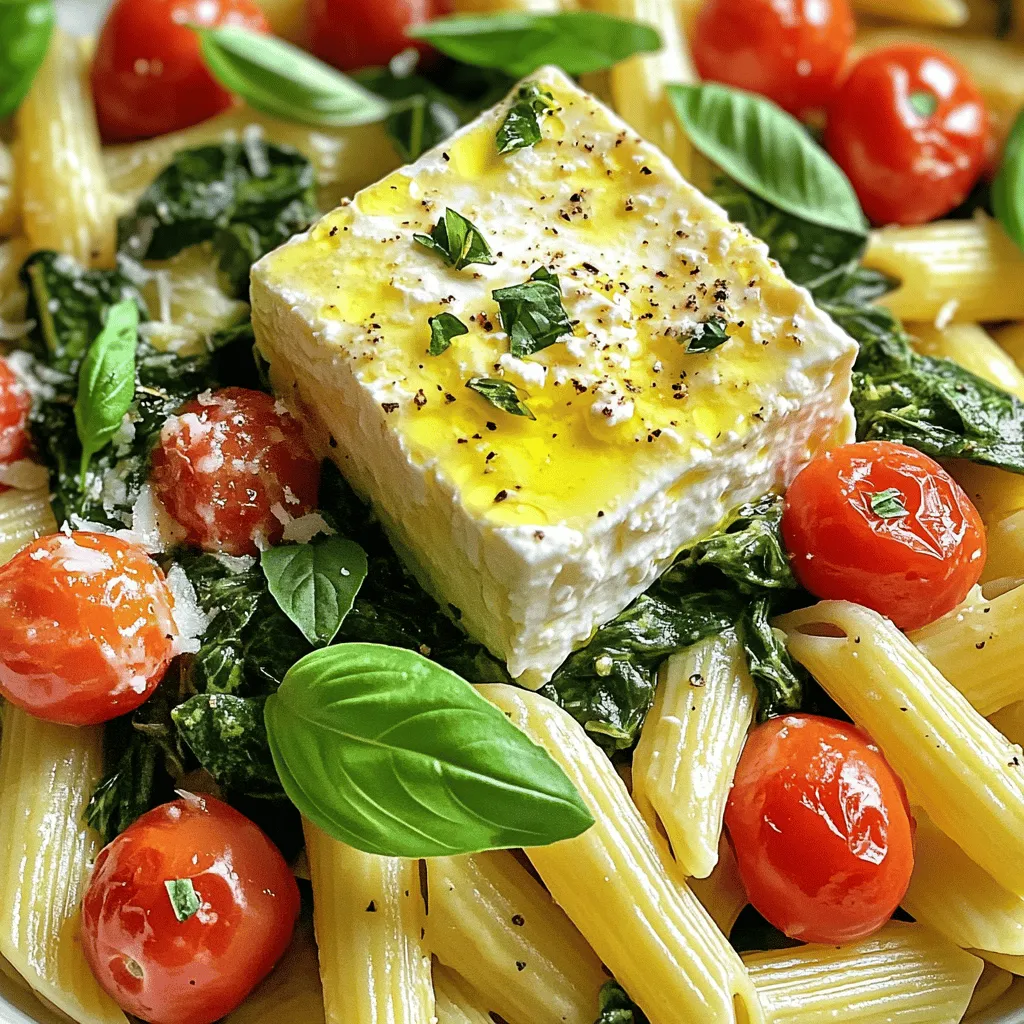
Are you ready to make a dish that’s both simple and delicious? Baked Feta Pasta with Spinach will wow your

- 4 boneless, skinless chicken thighs - 1 tablespoon olive oil - 1 medium onion, diced - 3 cloves garlic, minced - 1 cup long-grain rice (like Basmati) - 2 cups chicken broth - Zest of 1 lemon - 1/4 cup fresh lemon juice - 1 teaspoon dried oregano - Salt and freshly ground black pepper to taste - 1 cup cherry tomatoes, halved - 1/2 cup Kalamata olives, pitted and sliced - Fresh parsley, chopped (for garnish) This dish shines with simple, fresh ingredients. The chicken thighs provide rich flavor. Olive oil adds a smooth, fruity touch. The onion and garlic give depth and aroma. The long-grain rice is key for texture. It absorbs flavors well and stays fluffy. Chicken broth makes the rice savory. Lemon zest and juice bring brightness. Dried oregano adds a hint of earthiness. For garnishes, salt and pepper balance the taste. Cherry tomatoes add sweetness and color. Kalamata olives give a briny kick. Fresh parsley adds a pop of green and freshness. Each ingredient plays a role, making this dish a true delight. Use high-quality items whenever possible. This will enhance the overall taste and experience. To start, you need to sear the chicken thighs in olive oil. Heat 1 tablespoon of olive oil in your pot over medium-high heat. While the oil warms, season the chicken thighs with salt and black pepper. Once the oil is hot, place the chicken in the pot. Cook for about 5 minutes on each side, or until the chicken gets a golden-brown color. This step gives the chicken great flavor. After searing, set the chicken aside on a plate. Next, you will sauté the onions and garlic for depth. In the same pot, add the diced onion. Cook for 3 to 4 minutes until the onion looks soft and turns clear. Then, add the minced garlic. Cook for 1 more minute until you smell the garlic. Make sure not to let it burn, as burnt garlic can taste bitter. Now, it is time to toast the rice for enhanced flavor. Stir in 1 cup of long-grain rice, like Basmati. Cook the rice for about 1 to 2 minutes. This helps bring out the rice's natural flavor. After toasting, carefully pour in 2 cups of chicken broth. Add the zest and juice of 1 lemon, plus 1 teaspoon of dried oregano. Mix everything well, and bring this mixture to a gentle simmer. For the final cooking steps, add the chicken and vegetables back into the pot. Nestle the seared chicken thighs on top of the rice. Sprinkle 1 cup of halved cherry tomatoes and 1/2 cup of sliced Kalamata olives over the chicken. This adds both flavor and color to the dish. Cover the pot and reduce the heat to low. Let it simmer for 20 to 25 minutes. Avoid lifting the lid during this time to allow the rice to cook perfectly. After the cooking time, remove the pot from the heat, but keep it covered for 5 more minutes. This resting time helps the rice finish cooking. After resting, gently fluff the rice with a fork to separate the grains. For the finishing touches, garnish your dish with chopped fresh parsley before serving. This not only looks nice but adds a fresh taste. Enjoy your One Pot Greek Lemon Chicken Rice! To ensure tender chicken, follow these steps: - Sear the chicken: Start with hot oil. This step seals in juices and flavors. - Don’t overcook: Keep an eye on the time. Chicken thighs need about 10 minutes total. For fluffy rice, remember these tips: - Toast the rice: Before adding liquid, cook the rice for 1-2 minutes. This adds a nutty flavor. - Use enough broth: Two cups of broth for one cup of rice works perfectly. To boost the flavor, consider these herbs and spices: - Fresh herbs: Try adding dill or thyme for more depth. - Spice it up: A pinch of red pepper flakes can add a little heat. When it comes to broth, I have some thoughts: - Homemade broth: This adds a fresh, rich taste. - Store-bought broth: Choose low-sodium options to control salt levels. Serve your Greek Lemon Chicken Rice warm. Here are some ideas: - Pair with sides: A simple green salad or roasted vegetables complements the dish well. - Presentation tips: Serve directly from the pot for a rustic feel. Add a lemon wedge for extra zest. Enjoy your meal as you savor the blend of flavors! {{image_4}} You can easily change the protein in this dish. Instead of chicken thighs, try chicken breast for a leaner option. Shrimp is also a great choice. It cooks quickly and adds a nice taste. You can also swap the rice. Quinoa works well for a nutty flavor and is gluten-free. Brown rice is another healthy option, but it may need more cooking time. Adding vegetables can really enhance your dish. Bell peppers bring sweetness, while spinach adds a nice green touch. You can also play with flavors. If you love heat, add some red pepper flakes. For a zestier taste, squeeze in more lemon juice. This gives the dish a bright kick. If you're looking for gluten-free options, just make sure to use certified gluten-free grains. For a vegan version, substitute the chicken with chickpeas or mushrooms. Use vegetable broth instead of chicken broth. These changes still keep the meal full of flavor while meeting different dietary needs. To keep your One Pot Greek Lemon Chicken Rice fresh, store leftovers in an airtight container. Allow the dish to cool down to room temperature before sealing it. This prevents condensation and keeps the rice from becoming soggy. Place the container in the fridge. It should stay good for about three to four days. When you are ready to enjoy your leftovers, use a pot or microwave. If using a pot, add a splash of chicken broth or water. This helps restore moisture. Heat over low heat, stirring often, until warmed through. If using the microwave, cover the dish and heat in short bursts. Stir after each burst to ensure even heating. This keeps the chicken tender and the rice fluffy. To freeze your One Pot Greek Lemon Chicken Rice, start by letting it cool completely. Portion it into freezer-safe bags or containers. Remove as much air as possible before sealing. Label the bags with the date. You can freeze it for up to three months. When ready to eat, thaw it in the fridge overnight before reheating. Enjoy a quick meal later! How can I make One Pot Greek Lemon Chicken Rice more or less tangy? To adjust the tanginess, change the lemon juice amount. More juice will add tang. Less juice will make it milder. You can also use less lemon zest for a subtle flavor. Can I use brown rice instead of white? Yes, you can use brown rice. Just remember to increase the cooking time. Brown rice needs more water and longer to cook fully compared to white rice. What can I substitute for Kalamata olives if I don't have any? If you lack Kalamata olives, use green olives or black olives instead. You can also skip olives if you prefer a dish without them. How long can leftovers be stored in the fridge? You can store leftovers in the fridge for three to four days. Make sure to keep it in an airtight container to maintain freshness. Is it possible to prepare this dish ahead of time? Yes, you can prepare this dish ahead of time. Cook it fully and let it cool. Store it in the fridge until you are ready to reheat it. In this post, I shared a tasty recipe for One Pot Greek Lemon Chicken Rice. You learned about the key ingredients, step-by-step cooking instructions, and helpful tips. I also offered variations, storage info, and answered common questions. This dish is easy and full of bright flavors. You can make it your own by changing ingredients or adding new spices. Enjoy cooking and sharing this meal with friends and family.

One Pot Greek Lemon Chicken Rice Simple Flavor Dish

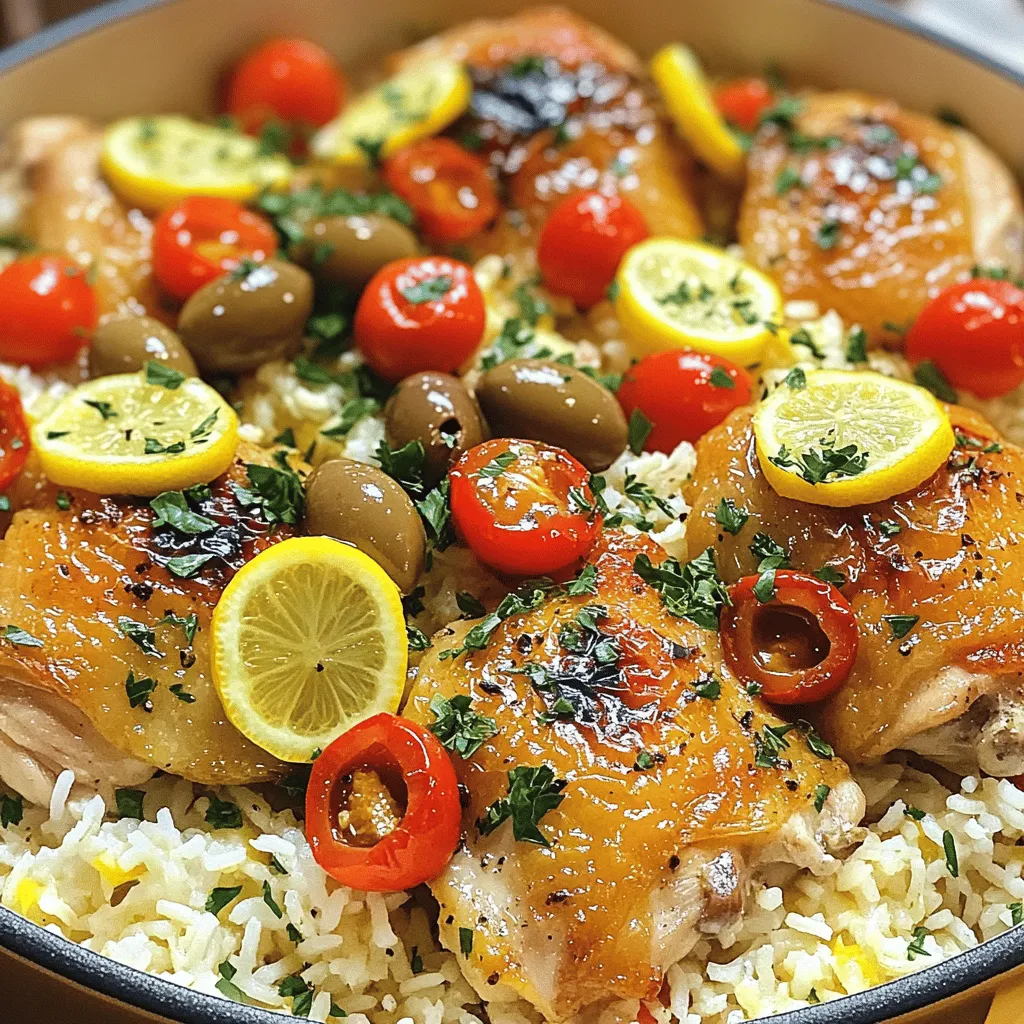
Are you ready to elevate your dinner game? One Pot Greek Lemon Chicken Rice is an easy and delightful dish

- 1 cup quinoa, thoroughly rinsed - 2 cups water or vegetable broth - 1 cup cherry tomatoes, halved - 1 cup cucumber, diced - 1/2 medium red onion, finely chopped - 1 cup corn (fresh or frozen) - 1 ripe avocado, diced - 1/3 cup fresh cilantro, chopped - Juice of 2 fresh limes - 3 tablespoons high-quality olive oil - Salt and freshly ground black pepper - Optional: 1 jalapeño, minced When making cilantro lime quinoa salad, always choose fresh ingredients. Fresh veggies add crunch and flavor. Look for ripe avocados; they should yield slightly when pressed. For tomatoes, pick bright, firm ones. If using corn, fresh is best, but thaw frozen corn well. Choose high-quality olive oil for the dressing. It enhances taste and health benefits. Always use fresh lime juice. Bottled juice lacks the bright flavor of fresh limes. You can swap quinoa for brown rice or couscous for a different base. If you prefer, use bell peppers or radishes instead of cucumbers. Swap cherry tomatoes for diced regular tomatoes if needed. If you don't like cilantro, parsley works well too. For a creamy touch, replace avocado with feta cheese. If you want more protein, add black beans. You can also skip the jalapeño for a milder taste. To start, rinse 1 cup of quinoa under cold water. This removes any bitter taste. In a medium saucepan, add the rinsed quinoa and 2 cups of water or vegetable broth. Place it over medium-high heat. Bring it to a boil. Once it boils, reduce the heat to low. Cover the saucepan and let it simmer for about 15 minutes. The quinoa is done when it’s tender, and all the liquid is absorbed. After that, remove the pot from heat, keeping it covered for 5 more minutes. This step helps it fluff up nicely. Then, fluff the quinoa with a fork and spread it out in a large bowl to cool. While the quinoa cools, grab a large mixing bowl. Add 1 cup of halved cherry tomatoes, 1 cup of diced cucumber, and 1/2 a finely chopped red onion. Next, mix in 1 cup of corn, either fresh or thawed from frozen. Finally, add 1 ripe diced avocado. Make sure all the veggies are well mixed. This will give your salad a colorful and fresh look. Once the quinoa cools, it’s time to combine everything. Carefully add the cooled quinoa to the bowl of veggies. In a small bowl, whisk together the juice of 2 fresh limes, 3 tablespoons of olive oil, salt, and pepper. If you like heat, you can add minced jalapeño here too. Drizzle the dressing over the quinoa and veggies. Toss everything gently so it gets well coated. Taste the salad and adjust seasoning as needed. For best flavor, let it rest for at least 15 minutes before serving. This allows the flavors to meld nicely. Serve it in a beautiful bowl, garnished with fresh cilantro and lime wedges for an inviting look. Enjoy your fresh and flavorful salad! To cook quinoa well, start by rinsing it. Rinsing removes any bitter taste. Use two cups of water or vegetable broth for every cup of quinoa. This adds flavor. Bring the liquid to a boil, then lower the heat. Cover and let it simmer for about 15 minutes. Once cooked, let it sit for five more minutes. This step helps the quinoa fluff up nicely. To boost the taste, add fresh lime juice and high-quality olive oil. These ingredients brighten up the salad. Fresh cilantro adds a burst of flavor. If you like spice, include minced jalapeño. This will give your salad a nice kick. Taste your salad before serving. Adjust the lime juice and salt according to your liking. Serve the quinoa salad in a large bowl. Garnish with fresh cilantro leaves and lime wedges for color. This makes the dish look inviting. Pair it with grilled chicken or fish for protein. The salad also goes well with tacos or burritos. Enjoy it on a hot day as a refreshing meal. {{image_4}} You can make this salad heartier by adding protein. For a plant-based option, black beans or chickpeas work well. Just rinse and drain them before mixing. If you prefer meat, grilled chicken adds a nice flavor. Chop it into bite-sized pieces and fold it in gently. Change up the veggies based on the season. In spring, add snap peas or radishes for crunch. In summer, try bell peppers and zucchini. Fresh herbs like mint or basil can also brighten the dish. Seasonal veggies keep it fresh and exciting. This salad is naturally vegan and gluten-free, which makes it a great choice for many diets. To keep it vegan, ensure your broth is vegetable-based. If you want extra creaminess, consider adding a dollop of vegan yogurt or tahini. These options enhance the flavor without adding gluten. To keep your salad fresh, store it in an airtight container. Make sure the container is clean and dry before use. This keeps moisture out and prevents spoilage. You can also separate the dressing and add it just before serving. This helps the salad stay crisp and vibrant. When stored correctly, cilantro lime quinoa salad lasts about three to five days in the fridge. The flavors will deepen over time, making it even more tasty. However, the avocado may brown, so try to eat it sooner rather than later if you used fresh avocado. This salad is best served cold or at room temperature. If you prefer it warm, you can gently heat the quinoa before mixing it with the other ingredients. Just avoid reheating the whole salad, as this can make the veggies soggy. Always adjust the seasoning after reheating, as flavors can change. Enjoy your delicious salad! You can store this salad in the fridge for up to three days. Make sure to keep it in an airtight container. The flavors will deepen over time, making it even tastier. However, if you include avocado, it may brown after a day. Absolutely! This salad is perfect for meal prep. You can make it a day in advance. Just keep the dressing separate until you're ready to serve. This helps keep the veggies fresh and crisp. If you want to change things up, try these dressings: - Balsamic vinaigrette for a sweet twist. - Honey mustard dressing for a bit of sweetness. - Greek yogurt dressing for creaminess without the oil. Each dressing will add its own unique flavor to the salad. You learned how to make cilantro lime quinoa salad from fresh ingredients. We covered ingredient quality, cooking steps, and fun variations. Remember, using fresh veggies makes a big difference. Try adding different proteins or seasonal twists to keep things exciting. Store leftovers correctly for the best taste. With these tips, you can create a tasty salad every time. Enjoy this healthy dish, and share it with friends. Happy cooking!

Cilantro Lime Quinoa Salad Fresh and Flavorful Recipe

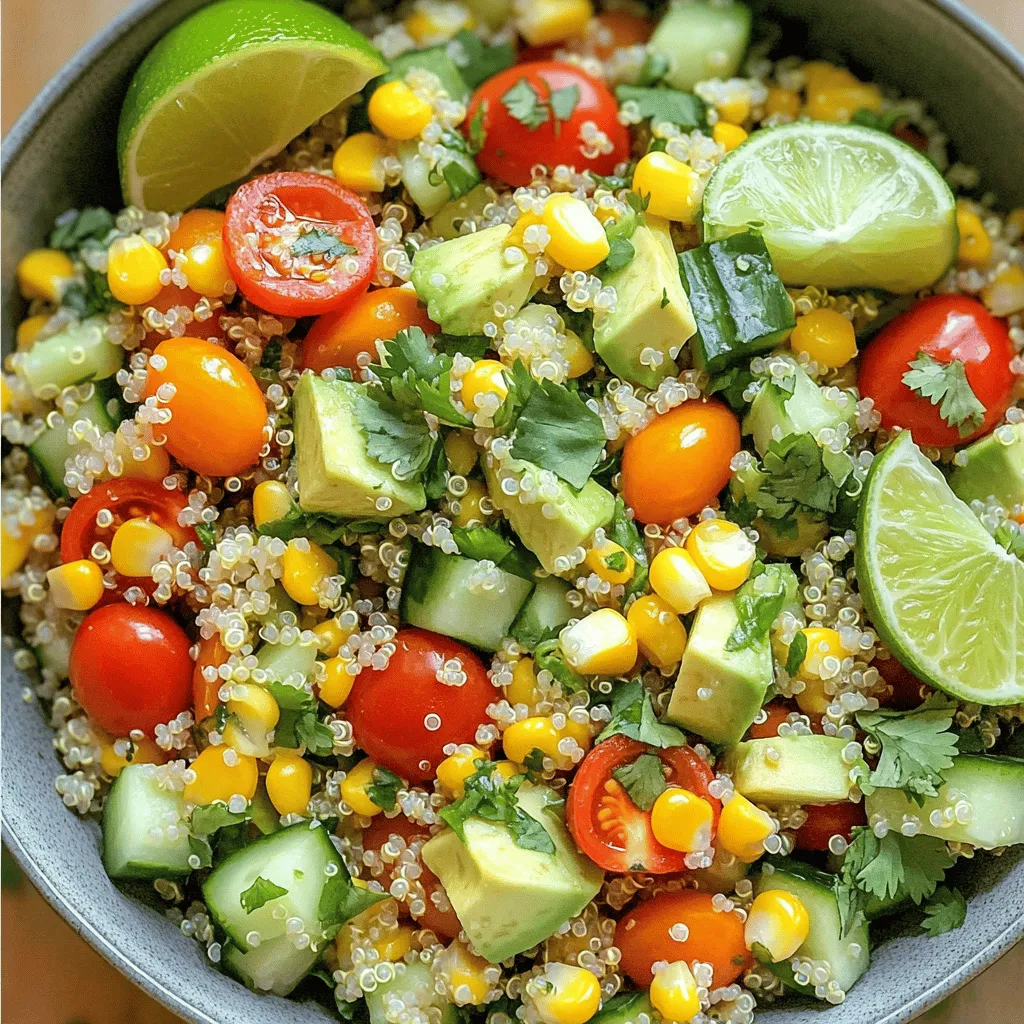
Are you ready for a bright and zesty dish that sings with fresh flavors? This Cilantro Lime Quinoa Salad is

To make Caramelized Banana Oatmeal, gather these simple ingredients: - 1 cup rolled oats - 2 cups almond milk (or your preferred milk) - 1 ripe banana, sliced - 2 tablespoons brown sugar - 1 tablespoon butter (or coconut oil) - 1 teaspoon vanilla extract - 1/2 teaspoon ground cinnamon - A pinch of salt - Chopped walnuts or pecans for topping (optional) - Additional fresh banana slices for garnish (optional) Having these items on hand makes the cooking process easy and fun. You can mix and match some ingredients to suit your taste. For instance, use coconut oil for a vegan option or swap walnuts for pecans. Each choice adds a new layer of flavor. This recipe is not just delicious but also healthy. Bananas provide potassium, while oats offer fiber, making it a great start to your day. I often keep these ingredients stocked in my pantry. That way, I can whip up this delightful breakfast whenever I want. Start by taking a medium-sized saucepan. In it, combine 1 cup of rolled oats, 2 cups of almond milk, and a pinch of salt. Set your stove to medium heat. Stir gently and bring the mixture to a gentle boil. This step is key. You want to watch it closely to prevent sticking. Once it boils, reduce the heat to low. Let the oats simmer for about 5 to 7 minutes. Stir occasionally until the oats become creamy. The cooking time can change based on how thick you like your oatmeal. While the oats are cooking, grab a skillet and heat it over medium heat. Add 1 tablespoon of butter. Once it melts, add the sliced banana and 2 tablespoons of brown sugar. Stir gently to coat the banana slices. Cook for about 3 to 4 minutes. You want them to turn golden brown and soft. This step adds a sweet flavor that makes your oatmeal special. After the oats are cooked to your liking, remove the saucepan from heat. Stir in 1 teaspoon of vanilla extract and 1/2 teaspoon of ground cinnamon. Mix well until it’s fully combined. Now, scoop the oatmeal into two bowls. Top each bowl with the caramelized bananas. Don’t forget to drizzle any leftover caramel sauce from the pan. For added crunch, sprinkle some chopped walnuts or pecans on top. You can also add fresh banana slices for a nice finish. To make your oatmeal creamy, cook it just right. Start with a pinch of salt in the pot. For the best texture, simmer the oats for 5-7 minutes. Stir often while cooking to keep it smooth. You can use almond milk or any milk you like. Almond milk adds a nice nutty flavor. For great caramelized bananas, heat the skillet to medium. Melt butter before adding the bananas. Sprinkle brown sugar on top of the bananas. Stir gently to coat them well. Cook until they turn golden and soft, about 3-4 minutes. If you want to cut down on sugar, try honey or maple syrup instead. They work well and add taste. To make your oatmeal pop, add some fun toppings. Chopped walnuts or pecans add crunch. You can also add more banana slices for freshness. For a twist, try adding a scoop of peanut butter or some berries. These add flavor and health benefits. You could even sprinkle cocoa powder for a chocolate touch. {{image_4}} You can make caramelized banana oatmeal vegan by using coconut oil instead of butter. For milk, swap almond milk for your favorite plant-based option. This keeps the dish creamy while removing any animal products. The sweet taste of coconut oil pairs well with bananas. You can add a pinch of nutmeg for warmth. A splash of almond extract gives a nice touch. Try mixing in other fruits like berries or apples for more flavor. Chopped apples add a nice crunch and pair well with the caramelized bananas. If you need a gluten-free option, use certified gluten-free oats. There are many great oat alternatives like quinoa flakes or rice flakes. Top your oatmeal with gluten-free nuts or seeds. This adds extra crunch and keeps it safe for gluten-sensitive diets. To store leftover caramelized banana oatmeal, cool it to room temperature first. Place it in an airtight container. This keeps the oatmeal fresh and safe. You can store it in the fridge for up to three days. If you want to enjoy it later, use a glass or plastic container. Reheat your oatmeal on the stove for the best texture. Add a splash of almond milk while heating. This helps bring back the creamy feel. Stir it often for even heating. You can also use the microwave. Heat it in 30-second bursts. Stir in between until it’s warm. Yes, you can freeze oatmeal! To freeze it, let the oatmeal cool completely. Then, scoop it into freezer-safe bags or containers. Remove as much air as possible before sealing. This will help prevent freezer burn. It can last up to three months in the freezer. To reheat frozen oatmeal, thaw it overnight in the fridge. Then, warm it on the stove or in the microwave, adding a bit of milk if needed. Enjoy your tasty breakfast anytime! To add more flavor to your oatmeal, try these tips: - Use flavored milk, like vanilla almond milk. - Add spices such as nutmeg or ginger. - Mix in a spoonful of nut butter for richness. - Drizzle honey or pure maple syrup for sweetness. - Toss in fresh fruits like berries or apples for freshness. These small changes can make your oatmeal tasty and fun! Yes, you can use instant oats. They cook faster but have a softer texture. If you choose instant oats, reduce the cooking time. Follow the package instructions for best results. Banana oatmeal is packed with health benefits: - Bananas provide potassium, which supports heart health. - Oats are a great source of fiber, aiding digestion. - This meal keeps you full longer, helping with weight management. - It offers natural sweetness, reducing the need for added sugar. Enjoying banana oatmeal can be a smart choice for your health! To make caramelized banana oatmeal gluten-free, use certified gluten-free oats. Check the packaging to ensure they are safe. You can keep the other ingredients the same. Enjoy a delicious, gluten-free breakfast! Yes, you can prepare oatmeal in advance. Cook the oats and store them in the fridge for up to 3 days. When ready to eat, reheat with a splash of milk. Add caramelized bananas fresh for the best taste! This blog covered all you need to make delicious oatmeal. You learned about the key ingredients, simple steps, and smart tips to enhance your dish. We also shared fun variations to fit your diet. Remember, oatmeal is versatile and can be made to suit your taste. Enjoy experimenting with flavors and toppings. A great bowl of oatmeal waits for you each morning. Simple and tasty, it's a meal you'll love!

Caramelized Banana Oatmeal Delightful Healthy Breakfast

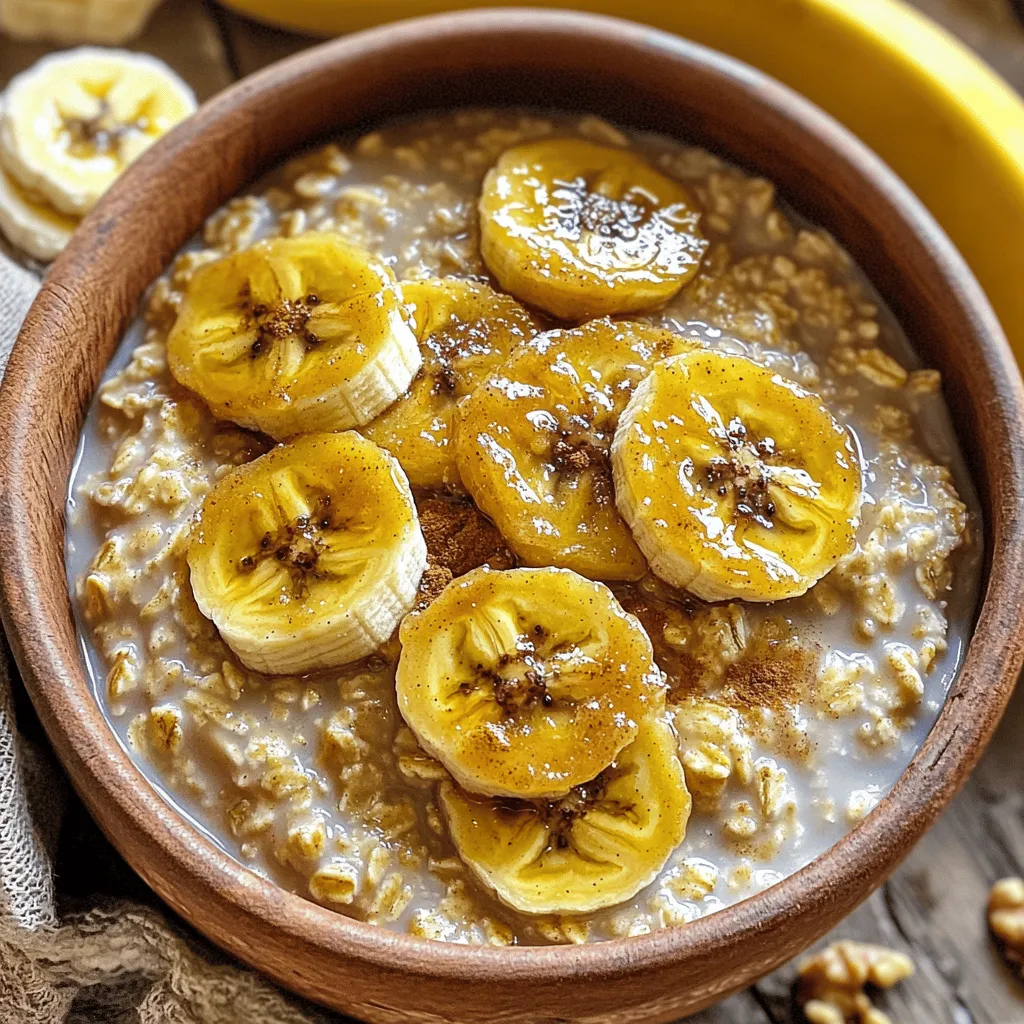
Looking for a quick, tasty, and healthy breakfast? Caramelized Banana Oatmeal will be your new go-to! With sweet bananas and

- 1 cup of cottage cheese - 1 tablespoon of honey or maple syrup - 1/2 cup of mixed berries Cottage cheese is the star here. It has protein and creaminess. You can choose honey or maple syrup to add sweetness. The mixed berries bring color and flavor. I like to use strawberries, blueberries, and raspberries for a mix. - Chia seeds - Nuts (almonds or walnuts) - Granola You can boost nutrition with chia seeds or nuts like almonds or walnuts. Granola adds a nice crunch. Each add-in makes your bowl even better. - Fresh mint leaves Fresh mint leaves give a pop of color. They also add a refreshing hint. This garnish makes your bowl look and taste great. Start by mixing the cottage cheese, sweetener, and vanilla in a bowl. Use one cup of cottage cheese, one tablespoon of honey or maple syrup, and one teaspoon of pure vanilla extract. This blend creates a sweet and creamy base. Next, whip the mixture using a hand mixer or blender. Set it on medium speed for one to two minutes. Your goal is a smooth and creamy texture. The cottage cheese will transform into a delightful whipped spread. Now it’s time to assemble the berry bowl. Choose a serving bowl that shows off the colors well. Spoon the whipped cottage cheese into the bowl. Spread it evenly to form a smooth base layer. Then, arrange your mixed berries on top. Use half a cup of mixed berries like strawberries, blueberries, and raspberries. Make it colorful and fun! This adds freshness and a burst of flavor. Sprinkle a quarter cup of granola over the berries. This adds crunch and texture to each bite. The granola pairs perfectly with the creamy cottage cheese and juicy berries. For extra nutrition, consider adding chia seeds or chopped nuts on top of the granola. Almonds or walnuts work well. They give more flavor and a nice bite. Finally, garnish your bowl with fresh mint leaves. This adds a pop of color and a refreshing touch to your snack. Your whipped cottage cheese berry bowl is now ready to enjoy! To get the best texture, start with cold cottage cheese. This helps it whip up nicely. Use a hand mixer for a smooth finish. Mix on medium speed for 1-2 minutes. Stop when you see a creamy, fluffy consistency. If you want a lighter texture, whip longer. Clear glass bowls are my favorite. They show off the colorful layers. You can also use small jars for a fun look. For garnishing, fresh mint leaves add a pop of color. You can place them on top or beside the bowl. Consider adding extra berries on top for a brighter look. Cottage cheese is low in fat and high in protein. It helps build muscles and keeps you full. Each cup has about 25 grams of protein. Berries are also great. They're rich in vitamins and antioxidants. They add natural sweetness without extra sugar. Nuts like almonds or walnuts provide healthy fats and crunch. They boost heart health and keep you energized. {{image_4}} You can switch up the sweetener in your whipped cottage cheese bowl. If you want a lighter option, try agave syrup or stevia. Both sweeteners add flavor without the extra calories. You can also go sugar-free by using these alternatives. This way, you can enjoy a guilt-free treat that still tastes great. Mixing berries can change the taste of your bowl. Use seasonal berries like strawberries, blueberries, and raspberries for a fresh twist. You can also get creative with exotic fruits. Try mango, kiwi, or even dragon fruit for a fun flavor. Each fruit brings its own taste, making your bowl special. Adding spices to your bowl is a fun way to experiment. A sprinkle of cinnamon or nutmeg can enhance the flavor of the whipped cottage cheese. You can also infuse it with citrus zest. Lemon or orange zest adds a bright kick. These simple additions can turn a basic dish into something exciting and new. To store your whipped cottage cheese berry bowl, use an airtight container. Place it in the fridge for best results. It will stay fresh for up to three days. After that, the texture may change, and it might lose flavor. You don’t need to reheat whipped cottage cheese. It tastes best when cold. If you prefer a warm snack, gently heat the cottage cheese before whipping. Avoid overheating, as it can change the texture. You can use leftover whipped cottage cheese in many ways. Mix it into smoothies for extra creaminess. Spread it on toast for a quick snack. You can also fold it into baked goods like muffins for added moisture. The options are endless! To whip cottage cheese well, start with fresh cheese. Use a medium bowl. Add your cottage cheese, honey or maple syrup, and vanilla extract into the bowl. I like using a hand mixer, but a blender works too. Whip the mixture on medium speed for 1-2 minutes. This helps create a creamy and smooth texture. For best results, let the cottage cheese sit at room temperature for about 10 minutes before whipping. This small step helps it whip better. Yes, you can make this bowl ahead of time! Prepare the whipped cottage cheese and store it in an airtight container. It stays fresh in the fridge for up to two days. Just add the toppings when you're ready to eat. This keeps the granola crunchy and the berries fresh. If you want to prep the berries, wash and slice them ahead of time. Store them separately to avoid sogginess. You can get creative with toppings! Here are some popular ideas: - Sliced bananas for sweetness - Shredded coconut for a tropical vibe - Dark chocolate chips for a treat - Other fruits like peaches or kiwi - Seeds such as sunflower seeds for crunch Feel free to mix and match your favorite toppings. This makes each bowl special! This blog post detailed a simple and tasty whipped cottage cheese berry bowl. You learned about key ingredients like cottage cheese, berries, and sweeteners. I shared tips on mixing, assembling, and garnishing your dish for great texture and looks. We explored alternative options and ways to store your leftovers. Try making this dish your own. Adjust flavors, use different fruits, and enjoy the benefits. This recipe not only tastes good but also supports a healthy diet. Enjoy creating and savoring your berry bowl!

Whipped Cottage Cheese Berry Bowl for Healthy Snacking

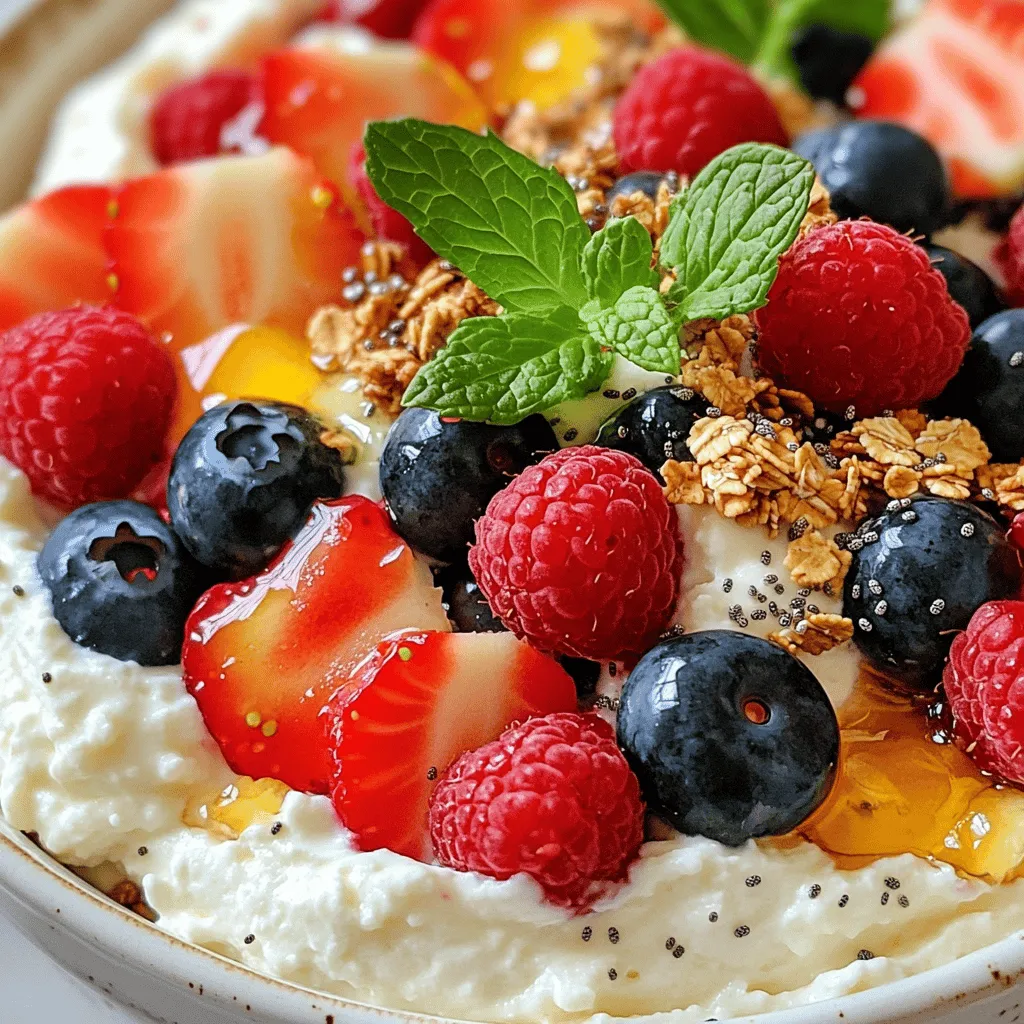
Looking for a tasty and healthy snack? The Whipped Cottage Cheese Berry Bowl is a perfect choice! Packed with nutrients

- 4 large bell peppers - 1 pound boneless, skinless chicken breast - 1 tablespoon olive oil - 1 medium onion - 1 red bell pepper - Spices: chili powder, ground cumin, smoked paprika, salt, and black pepper - 1 cup canned black beans - 1 cup corn - 1 cup shredded cheese - Garnishes: Fresh cilantro, sour cream or Greek yogurt When making Chicken Fajita Stuffed Peppers, the right ingredients make all the difference. I love using large bell peppers because they hold a lot of filling. You can choose any color you like for a vibrant look. For the chicken, I prefer boneless, skinless chicken breast. It cooks fast and stays juicy. A bit of olive oil helps to brown the chicken and adds flavor. Next, I add vegetables. I always include a medium onion for sweetness and a red bell pepper for extra color. Spices are key to a great fajita flavor. I use chili powder, ground cumin, smoked paprika, plus salt and black pepper to create a warm, savory taste. I also mix in canned black beans and corn for added texture and nutrition. Finally, I top it all off with shredded cheese. It melts beautifully and adds creaminess to each bite. For garnishing, fresh cilantro brightens the dish. A dollop of sour cream or Greek yogurt adds a nice cool touch. Together, these ingredients create a delightful, hearty meal. - Preheat the oven to 375°F (190°C). - Cut off the tops of the bell peppers. Remove the seeds and membranes. Set the hollowed peppers aside. - In a large skillet, heat 1 tablespoon of olive oil over medium heat. - Add 1 pound of diced chicken breast. Cook for 5-7 minutes until browned. - Once the chicken is cooked, add 1 medium sliced onion and 1 sliced red bell pepper. Sauté for 3-4 minutes until soft. - Sprinkle in 1 teaspoon of chili powder, 1 teaspoon of ground cumin, 1/2 teaspoon of smoked paprika, and salt and black pepper to taste. Stir well. - Fold in 1 cup of rinsed black beans and 1 cup of corn. Mix until combined. - Use a spoon to fill each bell pepper with the chicken mixture, pressing down lightly. - Arrange the stuffed peppers upright in a baking dish. - Sprinkle 1 cup of shredded cheese on top of each pepper. - Cover the dish with aluminum foil and bake for 25-30 minutes. - Remove the foil and bake for an additional 10 minutes until the cheese is bubbly and golden. Once baked, let the peppers cool for a few minutes before serving. Enjoy the vibrant flavors! - Always cook chicken to an internal temperature of 165°F (75°C). - Use a meat thermometer to check for doneness. - To brown the chicken, heat your pan well before adding it. - Avoid crowding the pan; this helps achieve that perfect sear. - Swap chicken for turkey or even beans for a vegetarian dish. - Add ingredients like black olives or corn for more flavor. - Adjust spices based on your taste; add more chili powder for heat. - For a milder dish, use less chili powder and skip the hot sauce. - Serve with a side of rice or a fresh salad for balance. - Add salsa or guacamole for extra zest. - Present the peppers on a colorful plate for an appealing look. - Top with a sprinkle of cheese or fresh herbs right before serving. {{image_4}} You can choose different colors of bell peppers for your dish. Red, yellow, and green peppers all add their own taste. Each color has a unique flavor. For a twist, try zucchini or poblano peppers. They make great alternatives to bell peppers. Zucchini adds moisture, while poblano peppers bring a mild heat. If you want to switch things up, you can use turkey instead of chicken. Tofu is also a great option for a plant-based meal. You can change the beans too. Instead of black beans, try kidney beans or pinto beans. Adding in extra veggies like spinach or mushrooms can boost flavor and nutrition. To make your meal gluten-free, just ensure all your ingredients are labeled as such. You can also make a vegetarian version by skipping the chicken. For those on a low-carb diet, use cauliflower rice instead of beans. If you need a dairy-free option, skip the cheese or use a dairy-free alternative. These adjustments help you enjoy delicious stuffed peppers no matter your diet. After you enjoy your Chicken Fajita Stuffed Peppers, let them cool. Place them in an airtight container. Store them in the fridge for up to four days. If you want to freeze them, wrap each pepper in plastic wrap. Then, place them in a freezer bag. They can last for about three months in the freezer. To reheat stuffed peppers, avoid drying them out. Use the oven for best results. Preheat your oven to 350°F (175°C). Bake them for about 20 minutes. If using a microwave, heat them on medium for about 3-5 minutes. Check to make sure they are hot all the way through. In the fridge, your stuffed peppers last for about four days. When frozen, they stay good for three months. After thawing, use them within three days. Always check for signs of spoilage before eating. Yes, you can prepare Chicken Fajita Stuffed Peppers ahead. Start by cooking the chicken and veggies. Let them cool, then store in the fridge. You can also hollow the bell peppers in advance. When ready to eat, fill the peppers and bake. This saves time on busy days. Chicken Fajita Stuffed Peppers are quite healthy. They include lean chicken, colorful peppers, and black beans. Each serving provides protein, fiber, and vitamins. The cheese adds some calcium but can be adjusted. You can make it even healthier by using less cheese or adding more veggies. Yes, you can use cooked chicken. This can save time as the chicken only needs to heat through. Just chop the chicken into small pieces. Reduce cooking time for the chicken and adjust seasoning since cooked chicken might already have flavor. Mixing in the spices when you sauté the veggies will help blend the flavors. Chicken Fajita Stuffed Peppers offer a tasty blend of flavors. We covered the main ingredients, like chicken and spices. I shared step-by-step instructions for easy preparation. You can customize the recipe per your taste and dietary needs. Remember to store leftovers properly and reheat them to avoid drying. Overall, this meal is healthy, fun, and perfect for family dinners. Enjoy making and sharing these delicious stuffed peppers!

Savory Chicken Fajita Stuffed Peppers Delight

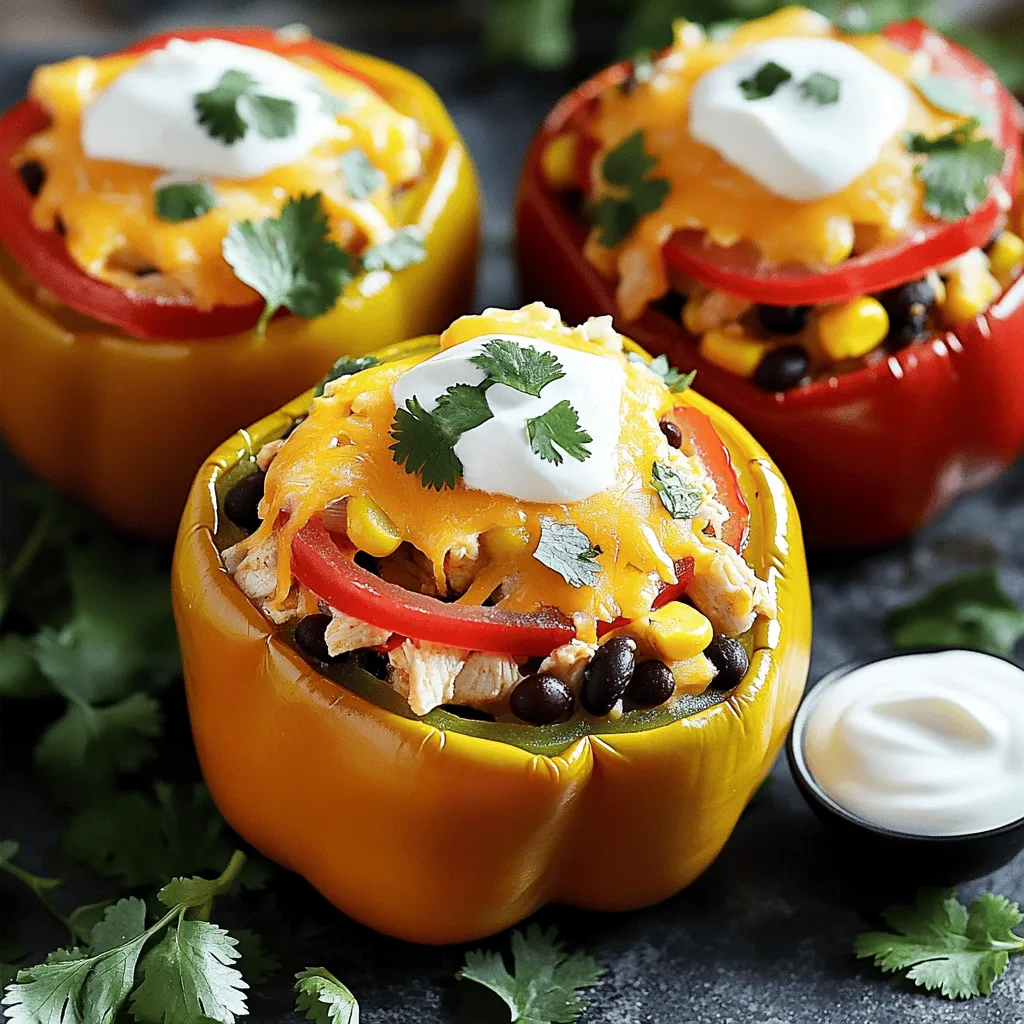
Looking for a tasty, healthy meal that’s easy to make? Try my Chicken Fajita Stuffed Peppers! Bursting with flavor, they

- 1 cup unsalted butter, melted - 1 cup brown sugar, packed tightly - 1/2 cup granulated sugar - 2 large eggs, at room temperature - 2 teaspoons pure vanilla extract - 2 cups all-purpose flour - 1 teaspoon baking powder - 1/2 teaspoon baking soda - 1/4 teaspoon sea salt - 1 cup semi-sweet or dark chocolate chips - 1/2 cup salted caramel sauce (store-bought or homemade) - Sea salt flakes for topping I love using high-quality ingredients for the best flavor. For butter, I recommend Kerrygold for its rich taste. Use Domino for sugars; it always gives a great texture. For chocolate, Ghirardelli or Guittard are my go-to brands. They melt perfectly and add depth. If you want a good caramel sauce, look for Smucker's or make your own for freshness. If you're out of butter, coconut oil works well. For eggs, try unsweetened applesauce or flaxseed meal mixed with water. You can swap all-purpose flour for almond flour for a gluten-free option. If you want less sugar, use coconut sugar instead. Just remember, it might change the flavor a bit. Start by preheating your oven to 350°F (175°C). Grab a 9x13 inch baking pan. Lightly grease it or line it with parchment paper. This will help the blondies come out easily once baked. In a large bowl, combine 1 cup of melted unsalted butter with 1 cup of packed brown sugar and 1/2 cup of granulated sugar. Whisk them together until smooth and creamy. Next, add in 2 large eggs, one at a time. Make sure to whisk well after each one. Lastly, stir in 2 teaspoons of pure vanilla extract. In another bowl, whisk together 2 cups of all-purpose flour, 1 teaspoon of baking powder, 1/2 teaspoon of baking soda, and 1/4 teaspoon of sea salt. This mix adds structure to your blondies. Gradually blend these dry ingredients into the wet mixture. Mix gently until just combined. Avoid overmixing to keep your blondies soft. Now, pour half of the blondie batter into the prepared pan. Use a spatula to spread it evenly. Carefully drizzle 1/2 cup of salted caramel sauce over this layer. Spread it gently, avoiding the blondie batter below. Then, spoon the rest of the batter on top, smoothing it out evenly. Sprinkle sea salt flakes over the top for an extra touch. Bake in the preheated oven for 25 to 30 minutes. To check if they’re done, insert a toothpick in the center. It should come out with a few moist crumbs. Once baked, let the blondies cool in the pan for 20 minutes before cutting them into squares. Enjoy your delightful treat! To get the best blondie texture, mix the batter gently. Overmixing can make them tough. You want a soft, chewy treat with a slight crust. The batter should be thick but smooth. When you add the dry ingredients, fold them in carefully. This keeps the blondies light and tender. Melt your butter slowly, either on the stove or in the microwave. If using the microwave, heat it in short bursts. Stir in between bursts to avoid overheating. You want it just melted, not bubbling or hot. Cool the butter slightly before mixing with sugar. This helps everything blend together nicely. For a perfect salted caramel drizzle, warm your sauce slightly before using it. This makes it easier to spread. Drizzle it over the first layer of batter with a spoon. Be careful not to mix it in too much. You want the caramel to create a sweet layer between the blondies. Finally, sprinkle a few sea salt flakes on top for that extra touch. {{image_4}} You can make these blondies gluten-free. Just swap regular flour for a gluten-free blend. Look for blends that work well in baking. These blends usually have rice flour and starch. The texture stays great, and you still get that chewy bite! Want a vegan version? Use plant-based butter and replace eggs with flaxseed. Mix one tablespoon of flaxseed meal with three tablespoons of water. Let it sit for five minutes. This mix acts like an egg. Use dairy-free chocolate chips and a vegan caramel sauce. You’ll create a tasty treat everyone can enjoy! You can change the flavor of your blondies easily. Here are a few fun ideas: - Nuts: Add chopped walnuts or pecans for crunch. - Different Chips: Try white chocolate or butterscotch chips for a twist. - Spices: Add a pinch of cinnamon or nutmeg for warmth. - Fruit: Mix in dried cherries or cranberries for a fruity touch. These variations keep your blondies exciting and fun for everyone! To keep your blondies fresh, place them in an airtight container. You can stack them with parchment paper between layers. This keeps them from sticking together. Store them at room temperature for up to three days. If you want to keep them longer, refrigeration is a good option. Just note that cold blondies can become a bit dense. If you want to save your blondies for later, freezing works well. First, let them cool completely. Then, wrap each blondie tightly in plastic wrap. Place the wrapped blondies in a freezer-safe bag or container. This way, they stay fresh for up to three months. When you are ready to enjoy them, just thaw them in the fridge overnight. Reheating blondies can bring back their warm, soft texture. To reheat, place them in the microwave for about 10-15 seconds. Check to see if they are warm enough. If you want a crispy top, pop them in the oven at 350°F (175°C) for about 5-10 minutes. Enjoy your blondies warm for the best taste! Yes, you can make these blondies without eggs. Use 1/4 cup of unsweetened applesauce or 1/4 cup of mashed banana for each egg. These options help keep the blondies moist and tasty. You may also consider using 1 tablespoon of ground flaxseed mixed with 3 tablespoons of water as an egg replacement. This adds fiber and binds the ingredients well. To check if the blondies are done, insert a toothpick into the center. If it comes out mostly clean with a few moist crumbs, they are ready. The edges should look golden brown. If they still look wet or sticky, bake a few more minutes. Remember, they will firm up as they cool. These blondies are rich and sweet, making them great with a scoop of vanilla ice cream. You can also serve them warm with extra salted caramel drizzled on top. Pairing them with fresh fruit, like strawberries or raspberries, adds a nice contrast too. For a cozy touch, serve with a cup of coffee or tea. To make homemade salted caramel sauce, follow these steps: 1. In a saucepan, heat 1 cup of granulated sugar over medium heat. Stir constantly until it melts into a golden liquid. 2. Once melted, add 6 tablespoons of unsalted butter and stir until fully combined. 3. Slowly pour in 1/2 cup of heavy cream while stirring. Be careful; it will bubble up. 4. Remove from heat and add 1 teaspoon of sea salt. Mix well. 5. Let it cool before using. Store any leftovers in a jar in the fridge for later use. This blog post covered every step to make salted caramel chocolate chip blondies. You learned about key ingredients, tips for the best texture, and easy variations. I shared how to store and reheat these treats so they stay yummy. In the end, baking is fun and rewarding. With a few simple tricks, you can enjoy delicious blondies anytime. Happy baking!

Salted Caramel Chocolate Chip Blondies Delightful Treat

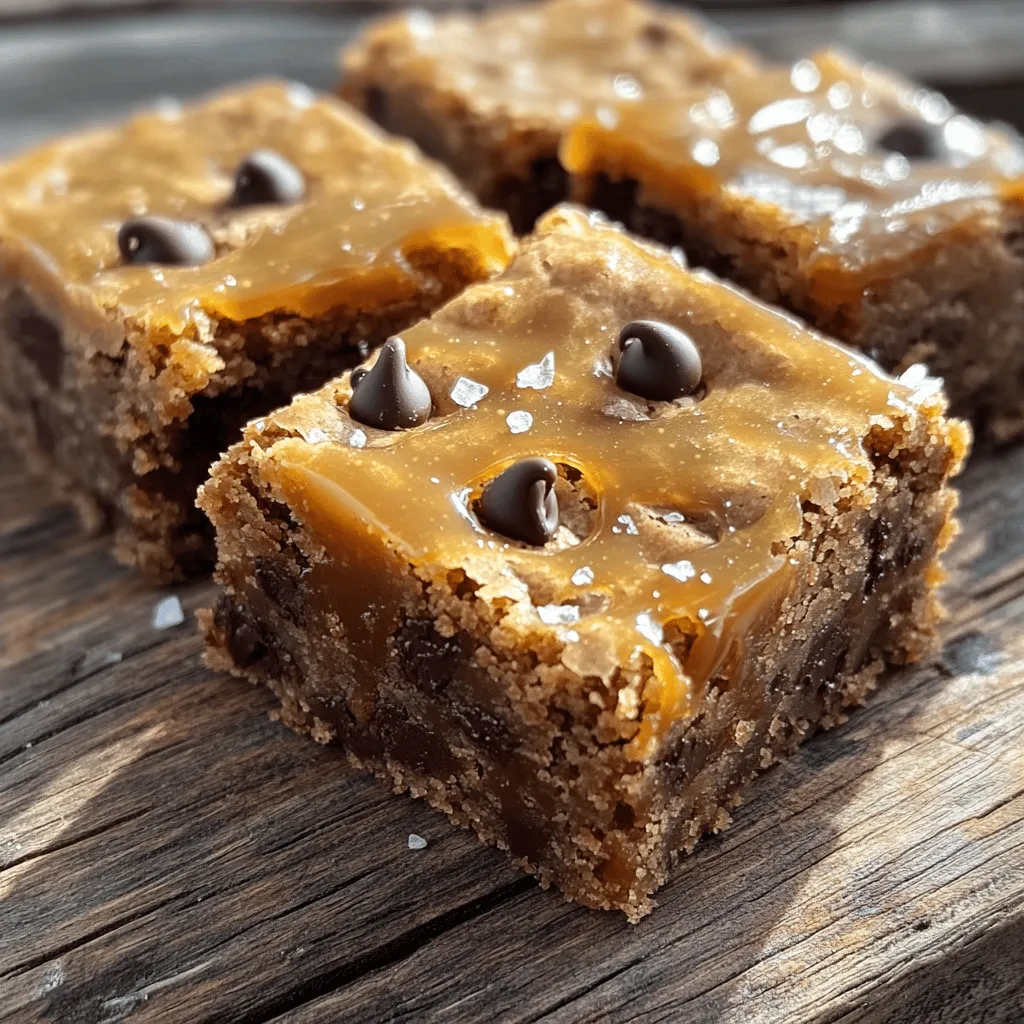
If you’re craving a sweet treat that combines gooey chocolate chips with rich, buttery caramel, you’ve come to the right

Older posts
Newer posts
← Previous Page1 … Page16 Page17 Page18 … Page83 Next →

dsad

© 2026 eataroundit • Built with GeneratePress

Our Policies

  • Copyright Policy
  • Cookie Policy
  • GDPR Policy
  • Privacy Policy
  • Disclaimer
  • Terms Of Use

More Information

  • Home
  • About
  • Contact
  • Appetizers
  • Dessert
  • Dinner
  • Drinks
©2026, eataroundit About Back To Top