Skip to content
DisclaimerTerms Of UseGDPR PolicyCookie Policy

eataroundit

  • Home
  • Drinks
  • Appetizers
  • Dinner
  • Dessert
  • About
  • Contact
  • Privacy Policy
DisclaimerTerms Of UseGDPR PolicyCookie Policy

NO-ING-IMG

- 1 cup creamy almond butter - 1 cup rolled oats - 1/4 cup honey or maple syrup - 1/4 cup unsweetened shredded coconut - 1/4 cup dark chocolate chips - 1/2 teaspoon pure vanilla extract - A pinch of fine sea salt These ingredients come together to make a delicious treat. The creamy almond butter acts as the base. It gives the bites a rich, nutty flavor. Rolled oats add a hearty texture and help hold everything together. Honey or maple syrup sweetens the mixture. Unsweetened coconut adds chewiness, while dark chocolate chips offer a nice touch of sweetness. Vanilla extract adds depth, and sea salt enhances the flavors. You can get creative with your energy bites! Here are some fun additions: - Chia seeds for added nutrition - Nutmeg or cinnamon for warmth - Dried fruit, like cranberries or raisins, for extra sweetness - Nuts like almonds or walnuts for crunch These options let you customize your bites to your taste. Each choice can bring a new twist to the recipe. - Almond butter: Packed with healthy fats and protein, it helps keep you full. - Rolled oats: A great source of fiber, they aid digestion and provide energy. - Honey or maple syrup: Natural sweeteners that offer quick energy boosts. - Unsweetened shredded coconut: Contains healthy fats and can support heart health. - Dark chocolate chips: Rich in antioxidants, they can improve mood. - Vanilla extract: May have calming effects and enhance flavor without extra sugar. - Sea salt: Balances sweetness and can help with hydration after exercise. Each ingredient adds not just flavor, but also benefits for your body. Enjoy these energy bites as a tasty and healthy snack! {{ingredient_image_2}} To start, grab a large mixing bowl. Add 1 cup of creamy almond butter to the bowl. Next, pour in 1 cup of rolled oats. I like to use old-fashioned oats for a nice texture. Now, add 1/4 cup of honey or grade A maple syrup for sweetness. Then, sprinkle in 1/4 cup of unsweetened shredded coconut. This adds a lovely chewiness. Toss in 1/4 cup of dark chocolate chips. You can choose dairy-free chips if needed. Next, add 1/2 teaspoon of pure vanilla extract and a pinch of fine sea salt. Use a sturdy spatula or spoon to mix everything well. You want a sticky dough that holds together. Once your mixture is ready, wash your hands. Scoop out about 1 tablespoon of the mixture. Roll it into a smooth ball. Keep going until you shape all the mixture into bites. You should get around 12 to 15 bites. Place them on a parchment-lined baking sheet. Ensure they have space to breathe. Now it’s time to chill. Put the baking sheet in the fridge for at least 30 minutes. This helps the bites firm up and hold their shape. After they have chilled, transfer the bites to an airtight container. Store them in the fridge. They will stay fresh for up to one week. Enjoy these tasty bites as a quick snack or a boost before your workout! To mix the ingredients, use a large bowl. Start with creamy almond butter as your base. Next, add rolled oats, honey, and shredded coconut. You want this mix to be sticky. Use a sturdy spatula or spoon to stir well. Make sure all ingredients blend together. For rolling, clean your hands first. This keeps the dough from sticking. Take about one tablespoon of mix and roll it into a ball. One common mistake is not measuring ingredients correctly. This can change the texture. Too much almond butter makes the bites too soft. Not enough oats can make them crumbly. Another mistake is skipping the chilling step. Chilling helps them firm up. If you skip it, the bites may fall apart easily. Also, avoid using too many chocolate chips. They can overwhelm the flavor. To boost flavor, try adding spices like cinnamon or nutmeg. These spices add warmth and depth. You can also mix in a bit of peanut butter for a richer taste. If you like crunch, add chopped nuts or seeds. For a tropical twist, use more shredded coconut. To improve texture, consider using old-fashioned oats. They provide a chewier bite. Enjoy experimenting to find your favorite mix! Pro Tips Storage Tips: Keep the energy bites in an airtight container in the refrigerator to maintain freshness for up to a week. Customization Options: Feel free to mix in your favorite nuts or seeds for added crunch and nutrition. Sweetness Adjustment: If you prefer a sweeter taste, increase the honey or maple syrup slightly to suit your palate. Chocolate Choices: Experiment with different types of chocolate chips, such as white chocolate or nut-free options, for a unique flavor twist. {{image_4}} To make these bites vegan, simply swap honey for maple syrup. This keeps them plant-based. Almond butter is already vegan, so you’re good there. You can enjoy these bites without any animal products. If you need gluten-free snacks, choose certified gluten-free oats. Most rolled oats are safe, but always check the label. The other ingredients, like almond butter and chocolate chips, are naturally gluten-free. You can enjoy these bites without worry. Feel free to get creative with add-ins! You can mix in dried fruits like cranberries, raisins, or apricots. Chopped nuts like walnuts or pecans add crunch and flavor. Just remember to adjust the amount of almond butter if you add a lot of extras. To keep your Almond Butter Energy Bites fresh, use an airtight container. Place them in the fridge right after chilling. They will stay good for about one week. Make sure they are not exposed to air. This keeps them moist and tasty. To extend freshness, layer parchment paper between bites in the container. This prevents them from sticking together. Keep the container in the coldest part of your refrigerator. Avoid the door, as it can be warmer from opening and closing. You can freeze these energy bites for up to three months. First, place them in a single layer on a baking sheet. Freeze them for about two hours. Once frozen, transfer them to a zip-top bag. Label the bag with the date. When you want one, just take it out and let it thaw at room temperature. You can use peanut butter or sunflower seed butter. These options work well. They offer similar textures and flavors. If you have nut allergies, sunflower butter is a great choice. This will keep the recipe safe for everyone. When stored in an airtight container, these bites last about one week. Keep them in the fridge for the best taste. You can also freeze them for up to three months. Just thaw them in the fridge before enjoying. Yes, you can skip sweeteners. Use ripe bananas or dates for natural sweetness. These fruits add flavor and moisture. Adjust your ingredients to keep the same texture, and you will still enjoy tasty bites. Absolutely! These energy bites are perfect for meal prep. You can make a large batch and store them. They are quick snacks for busy days or after workouts. Grab a bite, and you’re ready to go! One energy bite has about 100 calories. It contains healthy fats, fiber, and protein. Each bite offers nutrients from almond butter, oats, and dark chocolate. This makes them a wholesome snack choice. Almond Butter Energy Bites are simple to make and great for snacks. We covered key ingredients and health benefits, plus step-by-step instructions. You learned tips to mix and shape them right, and we explored fun flavor variations. Proper storage keeps them fresh for longer. Remember, feel free to swap ingredients to suit your taste. This recipe offers nutrition and energy in a tasty bite. Enjoy making these healthy treats to fuel your day!

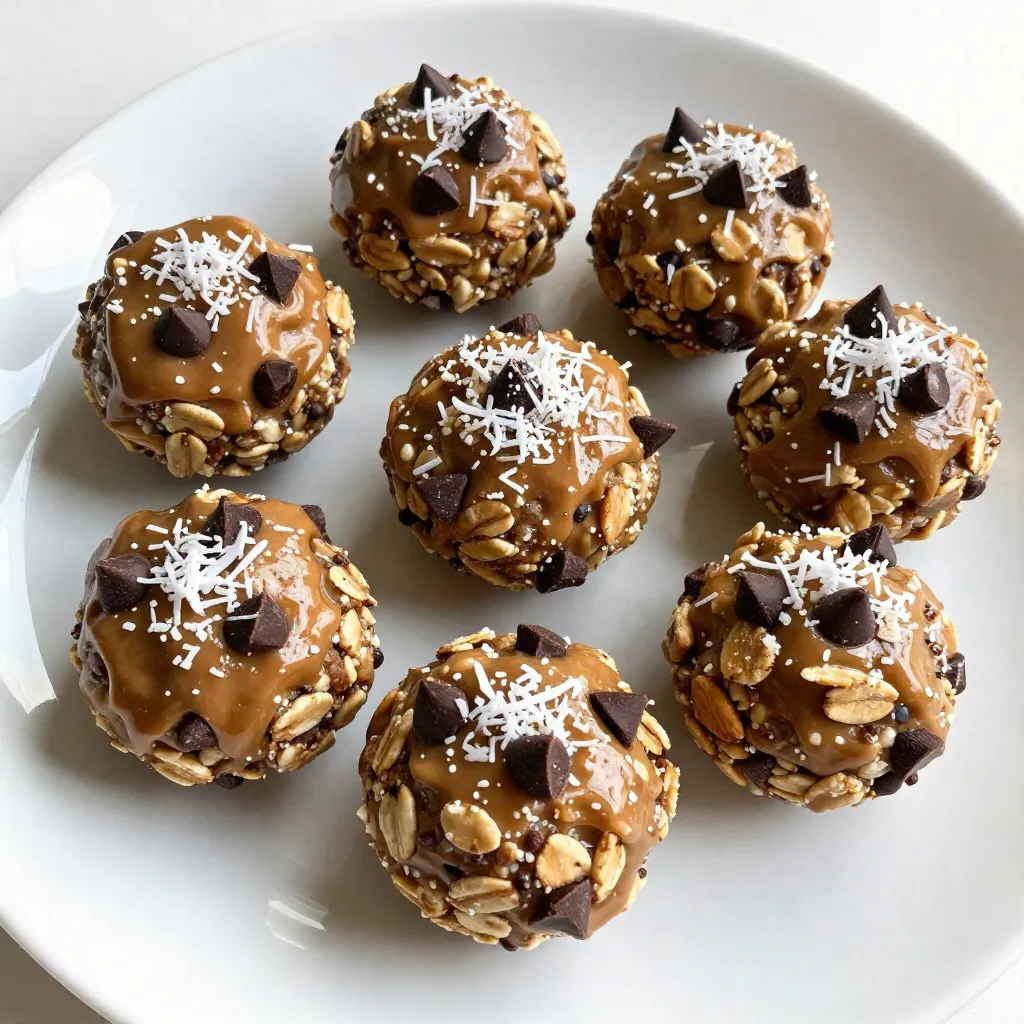
Almond Butter Energy Bites Quick and Easy Recipe

Looking for a quick and tasty snack that fuels your day? Try these Almond Butter Energy Bites! They’re super easy

- 1 cup canned pumpkin puree - 2 cups all-purpose flour - 1/2 cup granulated sugar - 1/2 cup packed brown sugar - 1/2 cup buttermilk - 2 large eggs - 1/4 cup unsalted butter, melted - 1 teaspoon vanilla extract - 1 tablespoon baking powder - 1 teaspoon baking soda - 1 tablespoon pumpkin pie spice - 1 teaspoon ground cinnamon - 1/2 teaspoon salt - 1/2 cup granulated sugar (for coating) - 2 tablespoons ground cinnamon (for coating) For this recipe, accuracy matters. Use a standard measuring cup for liquids and a dry cup for flour. If you don’t have buttermilk, mix one tablespoon of vinegar or lemon juice with a cup of milk. Let it sit for five minutes to thicken. You can swap eggs with a flaxseed meal or applesauce for a vegan option. Canned pumpkin puree is best for this recipe. It gives a rich flavor and moist texture. Avoid pumpkin pie filling; it has added sugars and spices. The spices play a key role here. Pumpkin pie spice brings warmth, while ground cinnamon adds sweetness. For a twist, try adding nutmeg or ginger for more depth. The combination of sugars enhances the donuts' crust, making them irresistible. {{ingredient_image_2}} 1. Preheat the Oven: Set your oven to 350°F (175°C). Grease your donut pan with cooking spray or butter. This step helps the donuts release easily after baking. 2. Mix Wet Ingredients: In a large bowl, add 1 cup of canned pumpkin puree, 1/2 cup of granulated sugar, 1/2 cup of brown sugar, 1/2 cup of buttermilk, 2 large eggs, 1/4 cup of melted unsalted butter, and 1 teaspoon of vanilla extract. Whisk these ingredients until smooth. 3. Combine Dry Ingredients: In another bowl, mix 2 cups of all-purpose flour, 1 tablespoon of baking powder, 1 teaspoon of baking soda, 1 tablespoon of pumpkin pie spice, 1 teaspoon of ground cinnamon, and 1/2 teaspoon of salt. Whisk them well until they are evenly combined. 4. Merge Mixtures: Carefully fold the dry ingredients into the wet mixture. Stir gently until combined. Do not over-mix; the batter should be slightly lumpy for the best texture. 5. Fill the Donut Pan: Use a piping bag or a zip-top bag with a corner snipped off. Fill each cavity of the donut pan about two-thirds full with the batter. This method helps create a perfect donut shape. 6. Bake: Place the donut pan in the preheated oven. Bake for 12-15 minutes, or until a toothpick comes out clean when inserted into the center of a donut. 7. Prepare Coating: While the donuts bake, mix 1/2 cup of granulated sugar and 2 tablespoons of ground cinnamon in a shallow dish. This mixture will coat the warm donuts. 8. Cool the Donuts: After baking, let the donuts cool in the pan for about 5 minutes. Then, transfer them to a wire rack to cool completely. 9. Coat in Cinnamon Sugar: While the donuts are still warm, roll each one in the cinnamon sugar mixture. Make sure each donut is fully coated for extra flavor. 10. Serve: Enjoy the donuts right away for the best taste. You can also store them in an airtight container for up to 3 days for later enjoyment. To get the right texture in your donuts, do not over-mix the batter. When you combine the wet and dry ingredients, stir gently until just blended. You want a slightly lumpy batter. This ensures your donuts stay soft and light. Another tip is to fill the donut pan about two-thirds full. This helps them rise properly without spilling over. One common mistake is using cold ingredients. Make sure your buttermilk and eggs are at room temperature. This helps the batter mix better. Also, avoid opening the oven door too often while baking. Each time you do, heat escapes, which can lead to uneven baking. Lastly, remember to let the donuts cool before coating them in cinnamon sugar. If they are too hot, the sugar will melt. For the best experience, serve these donuts warm. They pair wonderfully with coffee or warm spiced cider. You can also arrange the donuts on a pretty plate and sprinkle some leftover cinnamon sugar on top. This adds a nice touch for guests. Enjoy them fresh, or store them in an airtight container for up to three days. Pro Tips Fresh Pumpkin Puree: For a richer flavor, consider using homemade pumpkin puree instead of canned. Roasting your own pumpkin brings out deeper, sweeter notes. Donut Storage: To keep your donuts fresh, store them in an airtight container at room temperature. Avoid refrigerating as it can dry them out. Flavor Variations: Experiment with adding chocolate chips or nuts to the batter for added texture and flavor. A touch of nutmeg can also enhance the spices! Perfect Baking: Ensure your oven is fully preheated before baking the donuts. This helps them rise properly and achieve a fluffy texture. {{image_4}} You can easily change the flavor of these donuts. Try adding more spices like nutmeg or ginger for warmth. You can also mix in chocolate chips for a sweet twist. If you love nuts, add chopped walnuts or pecans to the batter. For a fun surprise, swirl in some cream cheese or peanut butter before baking. Don’t forget to adjust the sugar if you add sweet ingredients. Want a healthier version? Swap half of the all-purpose flour for whole wheat flour. This gives you more fiber and nutrients. Use honey or maple syrup instead of granulated sugar for a natural sweetener. You can also reduce the sugar in the coating. Try using coconut sugar, which has a lower glycemic index. Another idea is to bake the donuts in mini sizes for smaller servings. If you are vegan, you can replace eggs with flaxseed meal or unsweetened applesauce. Use a plant-based milk instead of buttermilk. For a gluten-free treat, switch the all-purpose flour for a gluten-free blend. Make sure your baking powder is gluten-free too. These changes keep the donuts delicious while catering to different diets. Enjoy experimenting and find what works best for you! To keep your cinnamon sugar pumpkin donuts fresh, place them in an airtight container. This helps keep them soft and moist. You can store them at room temperature for up to three days. If you live in a warm area, consider putting them in the fridge to avoid spoilage. If you want to enjoy these treats later, freezing is a great option. First, let the donuts cool completely on a wire rack. Then, wrap each donut in plastic wrap. Place them in a freezer-safe bag or container. They can stay fresh in the freezer for up to three months. When you crave a donut, just take one out to thaw on the counter for about an hour. To enjoy your donuts warm, you can reheat them easily. Preheat your oven to 350°F (175°C). Place the donuts on a baking sheet and heat for about 5-7 minutes. This will make them soft and delicious again. If you prefer the microwave, heat one donut for about 10-15 seconds. Enjoy your warm treat with that fresh cinnamon-sugar coating! You can tell the donuts are done by checking with a toothpick. Insert the toothpick into the center of a donut. If it comes out clean, the donuts are ready. Look for a golden-brown color on the outside. The tops should spring back when you touch them lightly. Yes, you can use fresh pumpkin. Roast or steam the pumpkin until soft, then mash it. Make sure to drain any excess water. Canned pumpkin is thicker and has a smooth texture. Fresh pumpkin may add a bit more moisture, so adjust your dry ingredients if needed. Cinnamon sugar pumpkin donuts pair well with many drinks. A hot cup of coffee is a classic choice. You can also enjoy them with warm spiced cider. For a sweet touch, try a scoop of vanilla ice cream. These pairings make for a cozy fall treat! You’ve learned about key ingredients for your delicious donuts, along with their measurements. I shared preparation steps and baking tips to guide your cooking. I discussed variations, storage methods, and even answered common questions. Now, you have the tools to create tasty treats at home. Enjoy experimenting with flavors or serving suggestions! Donuts can be fun, easy, and delicious. Happy baking!

Cinnamon Sugar Pumpkin Donuts Irresistible Fall Treat

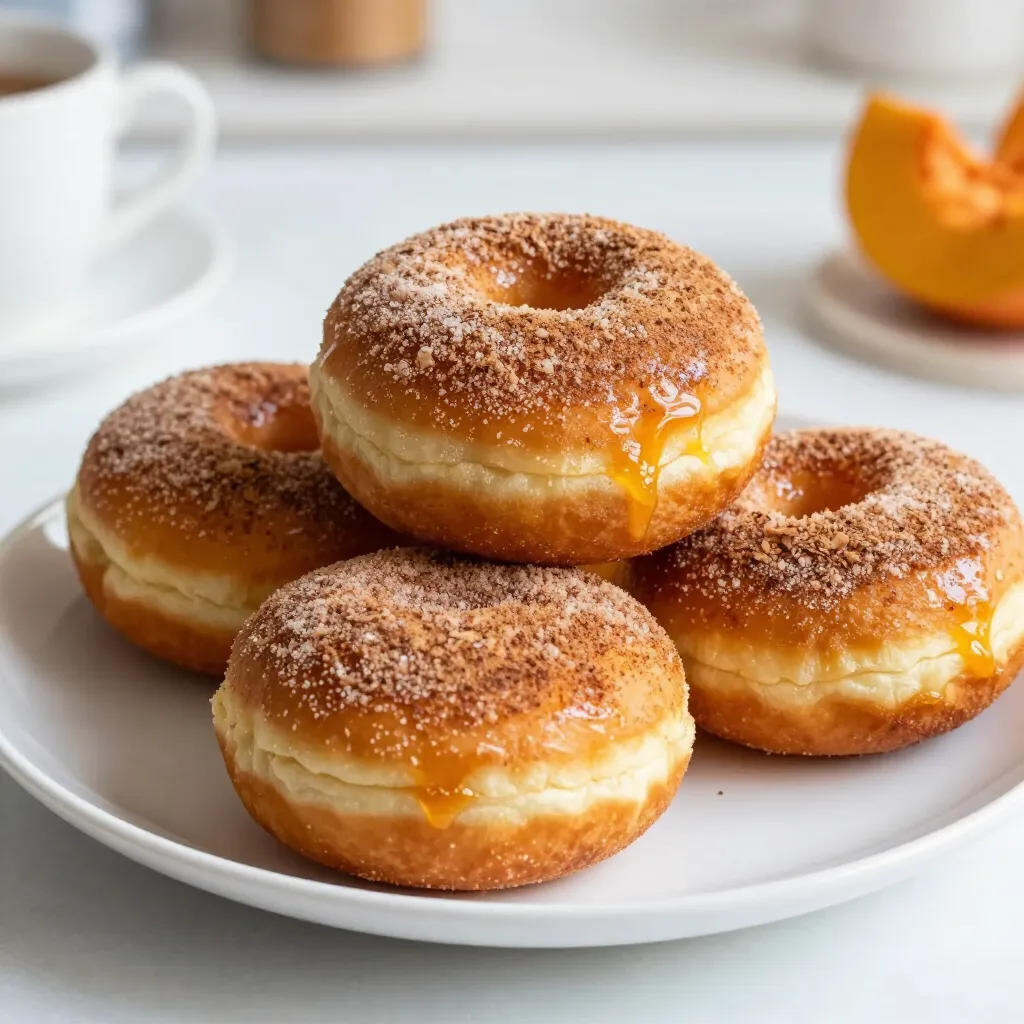
Fall is here, and that means it’s time for sweet treats! Imagine biting into a warm, fluffy Cinnamon Sugar Pumpkin

- 24 Oreo cookies, finely crushed - 1/4 cup unsalted butter, melted - 1 cup creamy peanut butter - 1 cup powdered sugar - 1 cup heavy whipping cream - 8 oz cream cheese, softened at room temperature - 1 teaspoon vanilla extract - 1/2 cup semi-sweet chocolate chips - 1/4 cup chocolate syrup (optional for drizzling) - Extra Oreo crumbs for garnish To make this Chocolate Peanut Butter Oreo Pie, gather your ingredients first. Use 24 Oreo cookies and crush them finely. This will form the pie crust. You will need 1/4 cup of unsalted butter, melted, to mix with the crushed cookies. For the filling, grab 1 cup of creamy peanut butter and 8 ounces of cream cheese. Soften the cream cheese to get smooth mixing. You’ll also need 1 cup of powdered sugar to sweeten the filling. Next, for the whipped topping, use 1 cup of heavy whipping cream. Whip it until stiff peaks form. You will add 1 teaspoon of vanilla extract for flavor. To finish, use 1/2 cup of semi-sweet chocolate chips for melting and drizzling. For a tasty touch, you can drizzle 1/4 cup of chocolate syrup on top if you like. Lastly, keep extra Oreo crumbs for garnish. This adds a nice crunch and looks great! {{ingredient_image_2}} 1. In a medium bowl, mix 24 crushed Oreo cookies with 1/4 cup melted butter. 2. Stir until all crumbs are coated with butter. 3. Press this mixture firmly into a 9-inch pie dish. 4. Make sure to cover the bottom and sides well. 5. Chill the crust in the refrigerator while you make the filling. 1. In a large bowl, beat 1 cup creamy peanut butter and 8 oz softened cream cheese. 2. Use an electric mixer on medium speed until smooth. 3. Gradually add 1 cup powdered sugar while mixing. 4. Keep mixing until there are no lumps and the mixture is creamy. 1. In a separate bowl, whip 1 cup heavy cream on high speed. 2. Keep whipping until stiff peaks form, about 2 to 3 minutes. 3. Gently fold the whipped cream into the peanut butter mixture. 4. Use a spatula and be careful not to deflate the whipped cream. 1. Pour the peanut butter filling into the chilled Oreo crust. 2. Spread it evenly with a spatula. Make sure it reaches the edges. 1. In a microwave-safe bowl, heat 1/2 cup semi-sweet chocolate chips. 2. Do this in 30-second intervals, stirring each time. 3. Once melted and smooth, drizzle the chocolate over the filling. 1. Cover the pie with plastic wrap and chill for at least 4 hours. 2. Just before serving, drizzle 1/4 cup chocolate syrup on top. 3. Sprinkle extra Oreo crumbs for a nice crunch. 4. Slice and serve chilled. Enjoy every bite! To make a firm Oreo crust, press the cookie mixture hard into the dish. This helps it hold its shape. If you want to skip butter, use coconut oil. It gives a nice flavor and works well. Mix the peanut butter and cream cheese slowly at first to avoid lumps. Gradually add the powdered sugar while mixing. This keeps the filling smooth and creamy. For the best texture, make sure the cream cheese is soft. Serve slices on pretty plates for a nice touch. Add a dollop of whipped cream on each slice. This makes it look fancy. Drizzle more chocolate on top and sprinkle extra Oreo crumbs for a fun finish. Pro Tips Use Room Temperature Ingredients: Make sure your cream cheese is softened to room temperature before mixing. This will help achieve a smoother filling without lumps. Quality Chocolate Matters: Using high-quality semi-sweet chocolate chips will enhance the flavor of the pie. Consider using a chocolate brand you love for the best results. Chill Time is Key: Allow the pie to chill for the full 4 hours, or overnight if possible. This will ensure that the filling sets properly and holds its shape when sliced. Decorate with Style: For an elegant touch, use a piping bag to drizzle the chocolate syrup in a decorative pattern on top of the pie before serving. {{image_4}} You can use many Oreo flavors to change this pie's taste. Try mint, peanut butter, or birthday cake Oreos! Each flavor adds a unique twist to the pie. The mint Oreos give a fresh touch, while the peanut butter Oreos boost the peanut flavor. Choose your favorite to make a pie that suits your taste buds. If you want to mix things up, consider using almond or cashew butter instead of peanut butter. Almond butter gives a nutty and slightly sweet flavor. Cashew butter offers a creamy and rich taste. Both options make the pie delightful and keep the texture smooth. Feel free to try these nut butters for a new experience. For a vegan version, swap out the cream cheese and whipping cream. Use coconut cream as a base for the filling. You can also try silken tofu blended to a smooth texture. For sweetening, use powdered sugar or maple syrup. These simple swaps keep the pie creamy and delicious while meeting vegan needs. Enjoy all the flavors without the dairy! Store any leftover pie in the fridge. Cover it tightly with plastic wrap or foil. This keeps the pie fresh and tasty. You can also freeze the pie. Just slice it first, then wrap each piece well. Use freezer-safe bags or containers for best results. The pie stays good in the fridge for about 3 to 4 days. If you freeze it, it can last up to 2 months. Just remember, the sooner you eat it, the better it tastes! To serve leftovers, let the pie sit at room temperature for about 10 minutes. This helps the filling soften a bit. You can also pop it in the microwave for 15 to 20 seconds. Just make sure to check it often to avoid melting the crust. Enjoy your tasty treat! Yes, you can make this pie ahead of time. To prepare in advance, follow these steps: - Make the pie and chill it for at least 4 hours. - Cover it tightly with plastic wrap or foil. - Store it in the fridge for up to 3 days. This way, you save time and still enjoy a delicious treat. If you need to avoid cream cheese, try these options: - Mascarpone cheese for a similar flavor. - Greek yogurt for a lighter option. - Silken tofu for a dairy-free choice. These substitutes keep the pie creamy and tasty. A runny filling can happen if you mix too quickly. To fix it: - Add more powdered sugar to thicken the mix. - Chill the pie longer in the fridge. - Whip more cream and fold it in gently. These steps help achieve a firm, smooth filling. Yes, you can use homemade whipped cream! Here’s how: - Whip heavy cream until stiff peaks form. - Gently fold it into the peanut butter mix. - Avoid over-mixing to keep it fluffy. Homemade whipped cream adds a fresh touch to your pie! This pie combines simple ingredients for a delicious treat. You learn to create a crunchy Oreo crust and a creamy peanut butter filling. With tips for perfecting texture and presentation, you can impress anyone. Explore variations based on your taste or dietary needs. Remember to store leftovers correctly for the best flavor. Enjoy this satisfying dessert and have fun making it. Your kitchen adventures can lead to tasty rewards!

Chocolate Peanut Butter Oreo Pie Delightful Treat

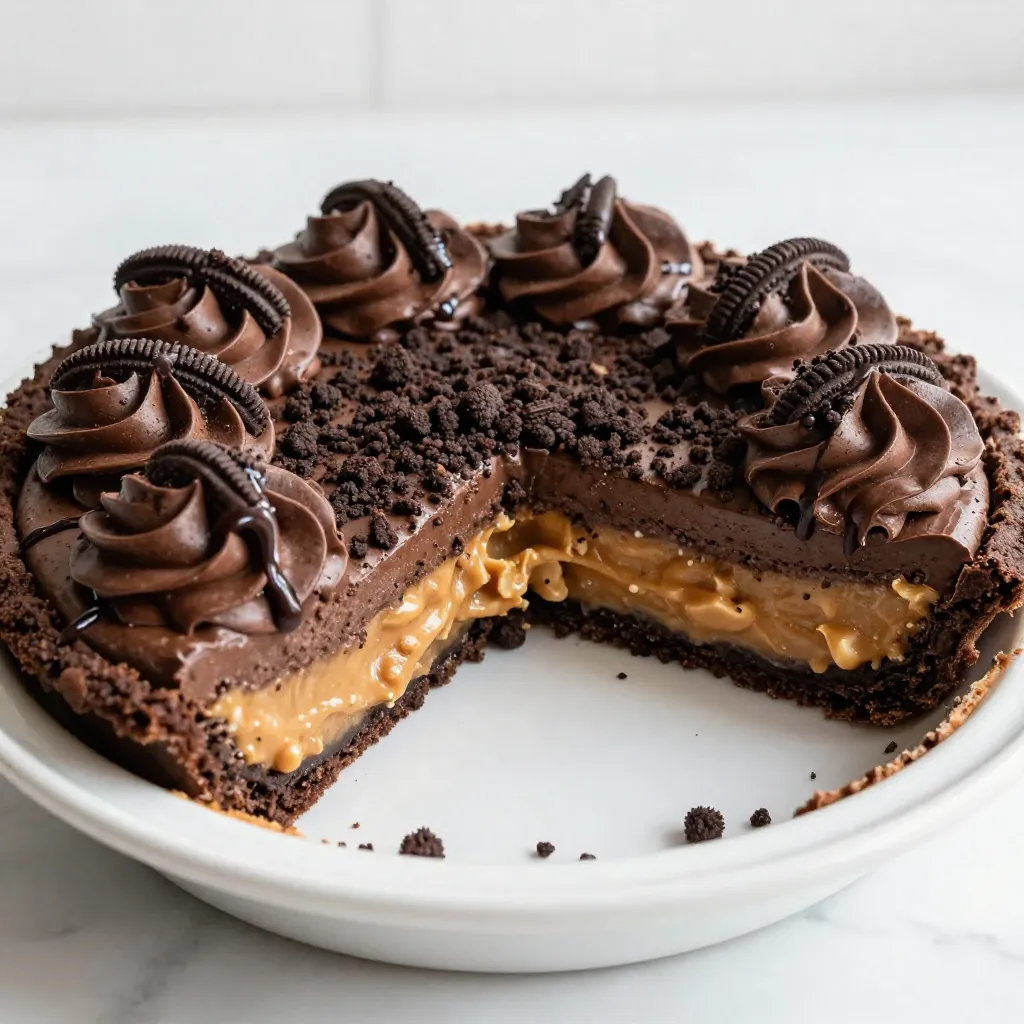
Get ready to indulge in a heavenly dessert: the Chocolate Peanut Butter Oreo Pie! This treat combines creamy peanut butter,

To make the best peanut butter chocolate chip blondies, gather these simple ingredients: - 1 cup creamy peanut butter - 1 cup packed brown sugar - 1/2 cup granulated sugar - 2 large eggs - 1 teaspoon pure vanilla extract - 1/2 teaspoon baking soda - 1/4 teaspoon salt - 1 cup all-purpose flour - 1 cup semi-sweet or dark chocolate chips - Optional: Powdered sugar or melted chocolate for drizzling These ingredients come together to create a rich, chewy treat. The creamy peanut butter gives a smooth texture, while the sugars add sweetness. Eggs bind everything and add moisture. Vanilla extract enhances the flavor. Baking soda helps the blondies rise, making them light and fluffy. The flour forms the base, and chocolate chips add that delightful burst of chocolate in every bite. For a fun twist, you can drizzle melted chocolate or sprinkle powdered sugar on top. This adds an elegant touch and makes your blondies even more special. Enjoy baking this delicious treat! {{ingredient_image_2}} - Preheat oven to 350°F (175°C). - Prepare an 8x8 inch baking pan with parchment paper. Start by heating your oven. This helps the blondies bake evenly. While the oven warms, grab your 8x8 inch pan. Line it with parchment paper. Make sure to leave some overhang. This will help you lift the blondies out later. - Combine peanut butter, brown sugar, and granulated sugar. - Incorporate eggs and vanilla extract. In a large mixing bowl, add 1 cup of creamy peanut butter, 1 cup of brown sugar, and 1/2 cup of granulated sugar. Mix these well until smooth. This is your sweet, creamy base. Next, add 2 large eggs. Mix each egg in one at a time. Lastly, stir in 1 teaspoon of vanilla extract for flavor. - Mix in baking soda, salt, and flour. - Carefully fold in chocolate chips. Now it's time to add the dry ingredients. Sprinkle in 1/2 teaspoon of baking soda and 1/4 teaspoon of salt. Stir until it blends well. Next, sift in 1 cup of all-purpose flour. Be gentle; you don’t want to overmix. Then, fold in 1 cup of chocolate chips. Save a few chips to sprinkle on top. - Pour batter into pan and top with reserved chocolate chips. - Bake for 25-30 minutes and perform the toothpick test. Pour the batter into your prepared pan. Spread it evenly. Top with those reserved chocolate chips for a nice look. Bake in your preheated oven for 25 to 30 minutes. When the time is up, use a toothpick to check. If it comes out with a few moist crumbs, they are done! After baking, let them cool in the pan for about 10 minutes. Use the parchment paper to lift them out. Cool completely on a wire rack before cutting into 16 squares. To get the best texture in your blondies, avoid overmixing the batter. When you add the flour, gently fold it in. Mix just until you no longer see flour streaks. Overmixing can make your blondies tough, which we don’t want. After baking, let the blondies cool in the pan for about 10 minutes. Then, lift them out using the parchment paper. This makes cutting easier. Allow them to cool completely on a wire rack. This step helps them set up nicely and keeps them chewy. You can boost the flavor of your blondies with simple additions. Try adding chopped nuts for crunch or a sprinkle of sea salt on top before baking. Both add great texture and taste. For a fun finish, drizzle melted chocolate over the cooled blondies. You can also dust them with powdered sugar for a sweet touch. These small details make your blondies look and taste even better! Pro Tips Use Room Temperature Ingredients: Ensure your eggs and peanut butter are at room temperature for easier mixing and a smoother batter. Do Not Overmix: When incorporating the flour, mix just until combined. Overmixing can lead to dense blondies. Check for Doneness: Insert a toothpick into the center; it should come out with a few moist crumbs for perfect blondies. Store Properly: Keep leftover blondies in an airtight container at room temperature for up to a week for best freshness. {{image_4}} To make these blondies fit special diets, you can easily adjust some ingredients. - Gluten-free option using almond flour: Swap the all-purpose flour with almond flour. This change keeps your blondies soft and chewy. Almond flour adds a nutty taste, too. - Vegan substitution ideas for eggs and butter: To make these blondies vegan, use flax eggs instead of regular eggs. Mix one tablespoon of ground flaxseed with three tablespoons of water. Let it sit for a few minutes. You can also use coconut oil in place of butter. This keeps the blondies moist and adds a hint of coconut flavor. You can add fun twists to your blondies by mixing in various flavors. - Adding different chips: Instead of chocolate chips, try butterscotch or white chocolate chips. Each choice gives a new taste and makes your blondies unique. - Incorporating additional ingredients: Adding coconut flakes or dried fruits like cranberries can bring more texture and flavor. These extra bits make each bite exciting and delicious. Feel free to experiment with these ideas. Each variation will bring a new twist to your peanut butter chocolate chip blondies! To keep your peanut butter chocolate chip blondies fresh, store them in an airtight container. This method locks in moisture and keeps them tasty. At room temperature, these blondies last about five days. If you want to keep them longer, refrigerate them. In the fridge, they can last up to two weeks. If you want to freeze your blondies, wrap them tightly in plastic wrap. Then, place the wrapped blondies in a freezer bag. They can stay in the freezer for up to three months. When you’re ready to enjoy them, take them out and let them thaw in the fridge overnight. For a quick treat, you can also reheat them in the microwave for about 10-15 seconds. This way, they taste fresh and warm! To check if your blondies are done, use the toothpick test. Insert a toothpick into the center of the blondies. If it comes out with a few moist crumbs, they are ready. If it has wet batter on it, they need more time. The edges should be golden brown, while the center remains soft and chewy. This balance is key for a perfect texture. You can use natural peanut butter, but it changes the blondies. Natural peanut butter has less sugar and oil. This can lead to a drier texture. For a creamier result, stick to creamy peanut butter. It makes the blondies rich and smooth, giving that perfect bite. Yes, you can make these blondies ahead of time! Store them in an airtight container. They stay fresh for about three days at room temperature. For longer storage, freeze them. Wrap each square in plastic wrap, then place them in a freezer bag. When you're ready to enjoy, let them thaw at room temperature. You now have a great recipe for delicious peanut butter blondies. We covered the ingredients, step-by-step baking instructions, and clever tips for success. Remember, you can customize these treats with different flavors and dietary options too. Whether you share them or keep them for yourself, these blondies are sure to please. Use the storage tips to keep them fresh. Enjoy every bite of your sweet creation!

Peanut Butter Chocolate Chip Blondies Rich and Chewy Treat

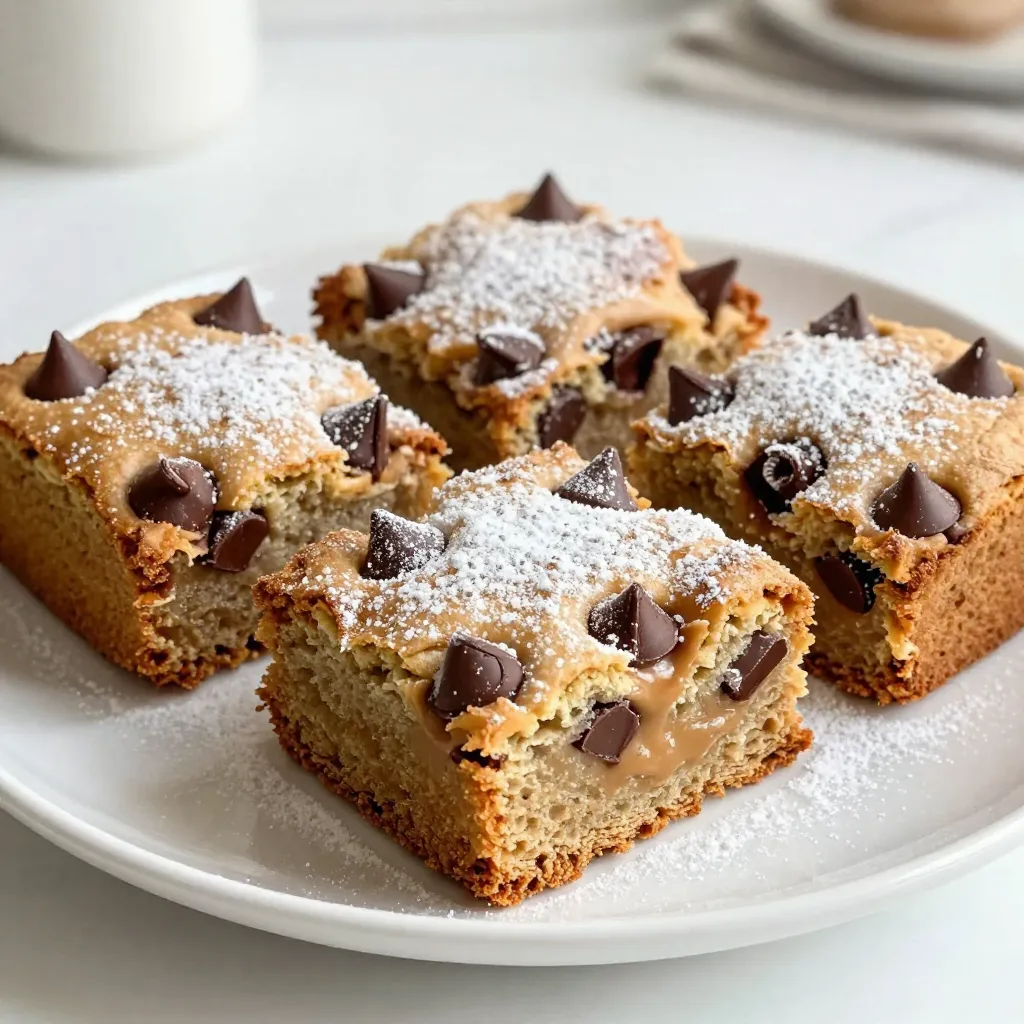
Get ready for a sweet treat with my Peanut Butter Chocolate Chip Blondies! These blondies are rich, chewy, and packed

- 2 cups Greek yogurt (plain or vanilla) - 1 cup mixed berries (strawberries, blueberries, raspberries) - 2 tablespoons honey or maple syrup - 1 teaspoon vanilla extract - 1 cup granola (homemade or store-bought) - Fresh mint leaves (optional) When I make Berry Yogurt Parfait Pops, I focus on fresh, simple ingredients. Greek yogurt is my base. You can choose plain or vanilla yogurt based on your taste. The yogurt gives a creamy texture. Next, I add mixed berries. I like strawberries, blueberries, and raspberries. They are sweet and colorful. Their bright colors make the pops look fun. For sweetness, I use honey or maple syrup. I start with two tablespoons. Adjust the amount to your liking. Remember, the yogurt can be a bit tart, so you may want more sweetness. I also mix in a teaspoon of vanilla extract. This adds a lovely flavor that enhances the yogurt. Granola is another important ingredient. I use one cup, either homemade or store-bought. It adds a nice crunch to the pops. Lastly, I think about presentation. I like to add fresh mint leaves on top. They give a refreshing look and taste. Each ingredient plays a role. They come together to make a tasty and refreshing treat. {{ingredient_image_2}} To start, grab a large mixing bowl. Add 2 cups of Greek yogurt. You can choose plain or vanilla based on your taste. Next, pour in 2 tablespoons of honey or maple syrup. This will sweeten your yogurt. Add 1 teaspoon of vanilla extract for extra flavor. Use a whisk or spatula to mix everything well. Keep stirring until the mixture is smooth and creamy. This step is key to making your pops taste great. Now it’s time to layer your pops. Take your popsicle molds and begin by adding a layer of the yogurt mixture at the bottom. Next, sprinkle in some mixed berries. Use 1 cup of berries, like strawberries, blueberries, and raspberries. Then, add a layer of granola. You can use homemade granola or your favorite store-bought kind. Repeat these steps until each mold is almost full. Leave a small gap at the top to allow for freezing. Once your molds are filled, insert popsicle sticks into the center of each one. To make sure the mixture settles evenly, gently tap the filled molds on the counter. Cover each mold with a lid or a piece of aluminum foil. Place them in the freezer and let them freeze for at least 4 to 6 hours. They should be solidly frozen. When it’s time to enjoy, take the molds out of the freezer. To help release the pops, run warm water over the outside of the molds for a few seconds. Then, gently pull on the popsicle sticks to remove the pops. Serve them right away. For a special touch, add fresh mint leaves on top for color and freshness. Enjoy your tasty treat! To get the best texture for your berry yogurt parfait pops, use full-fat Greek yogurt. It gives a rich and creamy feel. Mix well until there are no lumps. This smoothness helps when you freeze them. You can adjust the sweetness easily. If you like it sweeter, add more honey or maple syrup. Taste the mix before freezing. This way, you can find the perfect balance that suits your taste buds. Making your parfait pops look great is fun! Try displaying them on a colorful platter. You can also use a tall glass for a fancy touch. Adding some extra berries around the pops makes the dish pop visually. Garnishing is key. Fresh mint leaves on top add color and freshness. You could also sprinkle a bit of granola on the top for texture. These little touches make your pops not just tasty, but stunning too! Pro Tips Choose Quality Yogurt: Opt for full-fat Greek yogurt for a creamier texture and richer flavor in your popsicles. Freeze in Layers: Allow each layer to freeze slightly before adding the next to create distinct layers in your pops. Experiment with Sweeteners: Try using agave syrup or coconut sugar for different flavor profiles that suit your taste preferences. Customize Your Toppings: Mix in nuts, seeds, or other fruits to the granola layer for added texture and nutrition. {{image_4}} You can change the yogurt type based on your needs. If you want a dairy-free option, try coconut or almond yogurt. They add a nice creamy texture and taste great. For berries, mix it up! Use blackberries, cranberries, or even chopped peaches. Each fruit gives a unique flavor. You can also add bananas for extra sweetness. Want to spice things up? Add a pinch of cinnamon or nutmeg to your yogurt mix. These spices bring warmth and depth to each bite. You can also switch your sweeteners. Instead of honey or maple syrup, use agave or stevia. This lets you control the sweetness. Each choice changes the taste and makes it exciting! To keep your berry yogurt parfait pops fresh, store them in airtight containers. You can also wrap each pop in plastic wrap before placing them in a freezer bag. This protects them from freezer burn. Make sure to label your containers with the date. This way, you know when you made them. For best results, eat your pops within three months. If you have leftover pops, store them in the same way. Just place them back in the freezer after enjoying a few. They will stay tasty and ready for your next treat. Berry yogurt parfait pops can stay fresh in the freezer for up to three months. After that, the texture and taste may change. Check for ice crystals on the surface. If you see these, it's best to discard them. You should also discard the pops if they have a strange smell or off taste. Always trust your senses when it comes to food safety. Enjoy your pops while they are at their best! Yes, you can use frozen berries. They are often picked at peak ripeness. This means they can taste just as good. Frozen berries also save time and reduce waste. However, they may release more juice when mixed. This can change the look of your pops. If you use frozen berries, let them thaw slightly. Then, drain any extra liquid before adding them to your pops. For dairy-free pops, swap Greek yogurt with coconut yogurt or almond yogurt. These options provide a creamy texture without dairy. Use the same amount as the Greek yogurt in the recipe. Make sure to check for added sugars in these yogurts. You can also use a plant-based sweetener, like agave syrup, if you prefer. This way, you can enjoy your fruity pops without dairy. Berry yogurt parfait pops pair well with fresh fruits like bananas or apples. They also go great with a side of nuts or seeds for crunch. If you want a sweet treat, serve them with chocolate sauce or a scoop of sorbet. For a fun twist, enjoy them alongside a smoothie. These pops are versatile and can fit into many snack times or dessert spreads. This blog post covered all you need for making yogurt parfait pops. We discussed ingredients, step-by-step instructions, and storage tips. I shared ways to customize your pops and make them visually appealing. These tasty treats are easy, fun, and perfect for summer. Try different flavors and ingredients to find your favorite. Your new yogurt parfait pops will impress friends and family. Enjoy creating and serving these delicious snacks!

Berry Yogurt Parfait Pops Tasty and Refreshing Treat

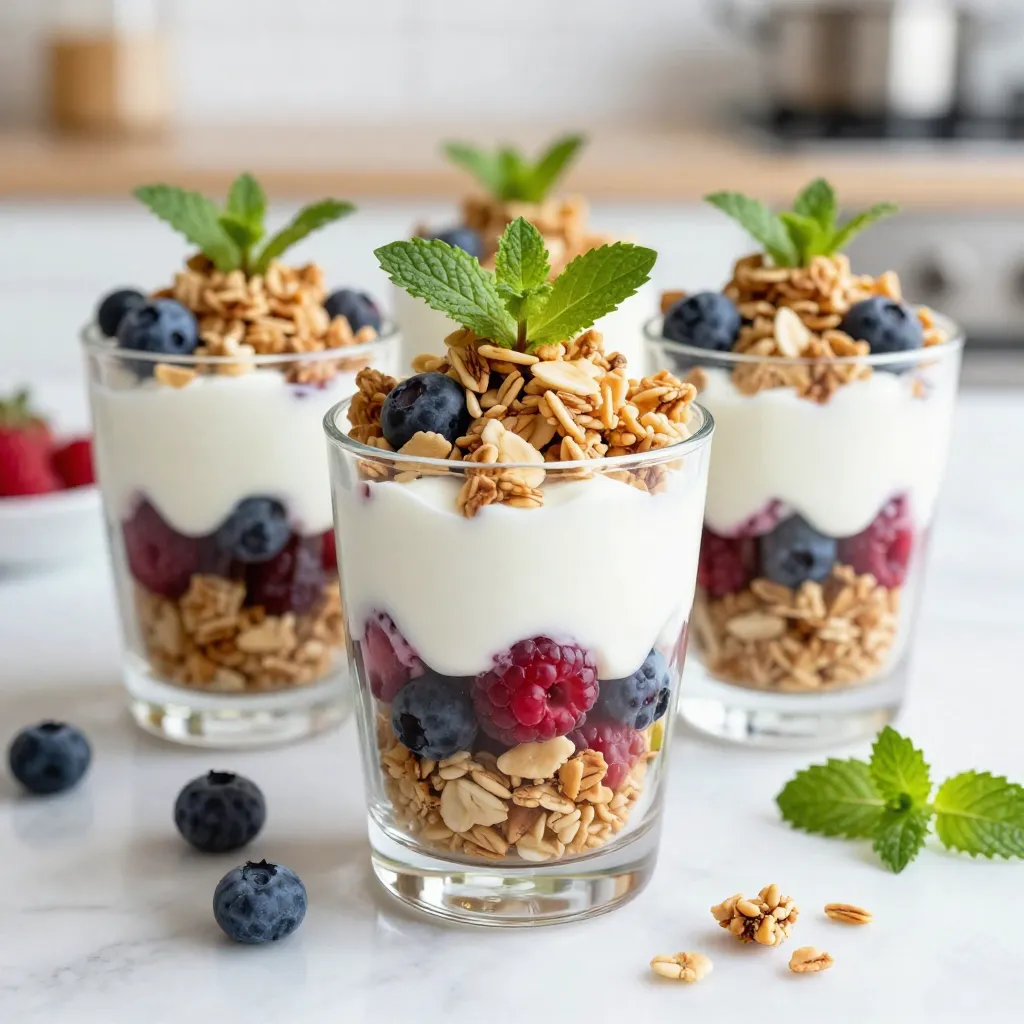
Looking for a tasty and refreshing treat? Let me introduce you to Berry Yogurt Parfait Pops! These colorful pops are

- 1 cup fresh strawberries, hulled and sliced - 1 ripe banana, frozen - ½ cup canned creamy coconut milk - ¼ cup Greek yogurt or dairy-free alternative - 1 tablespoon honey or agave syrup (optional) - ¼ cup granola - 2 tablespoons toasted shredded coconut - Fresh mint leaves for garnish - Extra sliced strawberries for decoration This simple list gives you all you need for a tasty Strawberry Coconut Smoothie Bowl. Fresh strawberries shine here. Their bright color and sweet taste make this bowl special. The ripe banana adds creaminess. I always freeze the banana. It helps blend the smoothie smooth and thick. Coconut milk brings a rich flavor. I prefer canned coconut milk for its creaminess. Greek yogurt adds protein and tang. If you want a dairy-free option, choose a plant-based yogurt. I like to sweeten my bowl with honey or agave syrup. This is totally optional. You can skip it for a more natural taste. Granola adds crunch on top. It makes each bite fun. Toasted shredded coconut is a must. It adds a burst of flavor and texture. I like to add fresh mint leaves at the end. They look nice and taste fresh. Finally, use extra sliced strawberries to make your bowl pretty. This will make it inviting and delicious. {{ingredient_image_2}} - Hull and slice the strawberries. - Ensure the banana is frozen for creaminess. - Combine the strawberries, frozen banana, coconut milk, Greek yogurt, and sweetener. - Blend until smooth, adjusting the consistency if needed. If it's too thick, add more coconut milk. - Transfer the smoothie mixture to a bowl. - Add toppings like granola, shredded coconut, and mint leaves for a fresh look. - Place extra sliced strawberries on top for an inviting finish. This simple process makes a tasty and colorful bowl. Each step builds flavor and texture, making your smoothie bowl a delight! To get the right thickness in your smoothie bowl, you can adjust it with more coconut milk. If you want a creamier texture, use frozen fruits like bananas or strawberries. They help make the blend thick and smooth. This makes your bowl feel rich and satisfying. Using a deep bowl adds a nice touch to your dish. It creates a lovely look that draws people in. Arrange your toppings in a fun way. This can involve layering or creating patterns with granola and fruit. An artful display makes your smoothie bowl more inviting. You can make this bowl your own! If you want to skip dairy, choose a dairy-free yogurt. This keeps it creamy without the milk. Feel free to swap fruits too. Try berries, mango, or even kiwi for a twist. Each fruit brings its own flavor and color to the bowl. Pro Tips Use Frozen Bananas: For the creamiest texture, always use frozen bananas. They help create that smoothie bowl consistency while adding natural sweetness. Toast Your Coconut: Toasting shredded coconut enhances its flavor and adds a delightful crunch. Just a few minutes in a dry skillet will do the trick! Layer Flavors: Feel free to mix in other fruits like mango or pineapple for added flavor complexity. Just blend them in with your base for a tropical twist. Garnish Creatively: Use an assortment of toppings like chia seeds, sliced almonds, or even a drizzle of nut butter to elevate your smoothie bowl both visually and nutritionally. {{image_4}} You can make this smoothie bowl even more fun by adding different fruits. Try using blueberries or raspberries for a burst of flavor and color. These berries blend well and add a nice twist. You can also mix in tropical fruits. Mango or pineapple will give it a bright, sunny taste. This way, you can match the smoothie bowl to your mood or season! Don't forget the toppings! You can use nuts or seeds as a crunchy alternative. Chopped almonds or sunflower seeds can give your bowl a nice bite. Try flavored granolas too. They add sweetness and texture. Choose granolas with coconut or honey for even more flavor! If you want to change the sweetness, you have options. Swap honey for maple syrup for a different taste. You can also try stevia if you're looking for a low-calorie choice. If you like it tart, omit the sweetener altogether. The natural flavor of the strawberries shines through this way! Store any leftover smoothie in an airtight container. It will stay fresh for up to 24 hours in the fridge. This way, you can enjoy it later without losing flavor. You can freeze the blended smoothie for quick breakfast prep later. Pour the smoothie into ice cube trays for easy portioning. This method allows you to grab a few cubes whenever you want a tasty treat. Keep strawberries and bananas in the fridge for best freshness. This helps them stay sweet and firm. Store coconut milk in a cool, dry place. This keeps it from going bad and ensures it stays creamy for your next smoothie bowl. Yes, you can. Just swap the Greek yogurt for a non-dairy option, like almond or coconut yogurt. Use agave syrup instead of honey for sweetness. This keeps the bowl creamy and delicious. You can add protein powder to the blend. This boosts protein without changing the taste much. Alternatively, use more Greek yogurt if you prefer. Both options keep the smoothie bowl tasty and filling. Yes, you can use frozen strawberries. They add a nice chill to the bowl. However, using frozen may change the texture a bit, making it thicker. If you want a lighter texture, add a splash of coconut milk. You can create a delicious smoothie bowl using fresh strawberries, bananas, and coconut milk. Remember to blend your ingredients well for a smooth texture. Top with granola, shredded coconut, and mint for a tasty finish. You can customize the bowl with different fruits and sweeteners. Store any leftovers in the fridge or freeze for later. Enjoy your healthy treat while exploring new flavors and variations! This simple recipe is fun and versatile, making breakfast or snacks enjoyable and easy.

Strawberry Coconut Smoothie Bowl Delightfully Simple

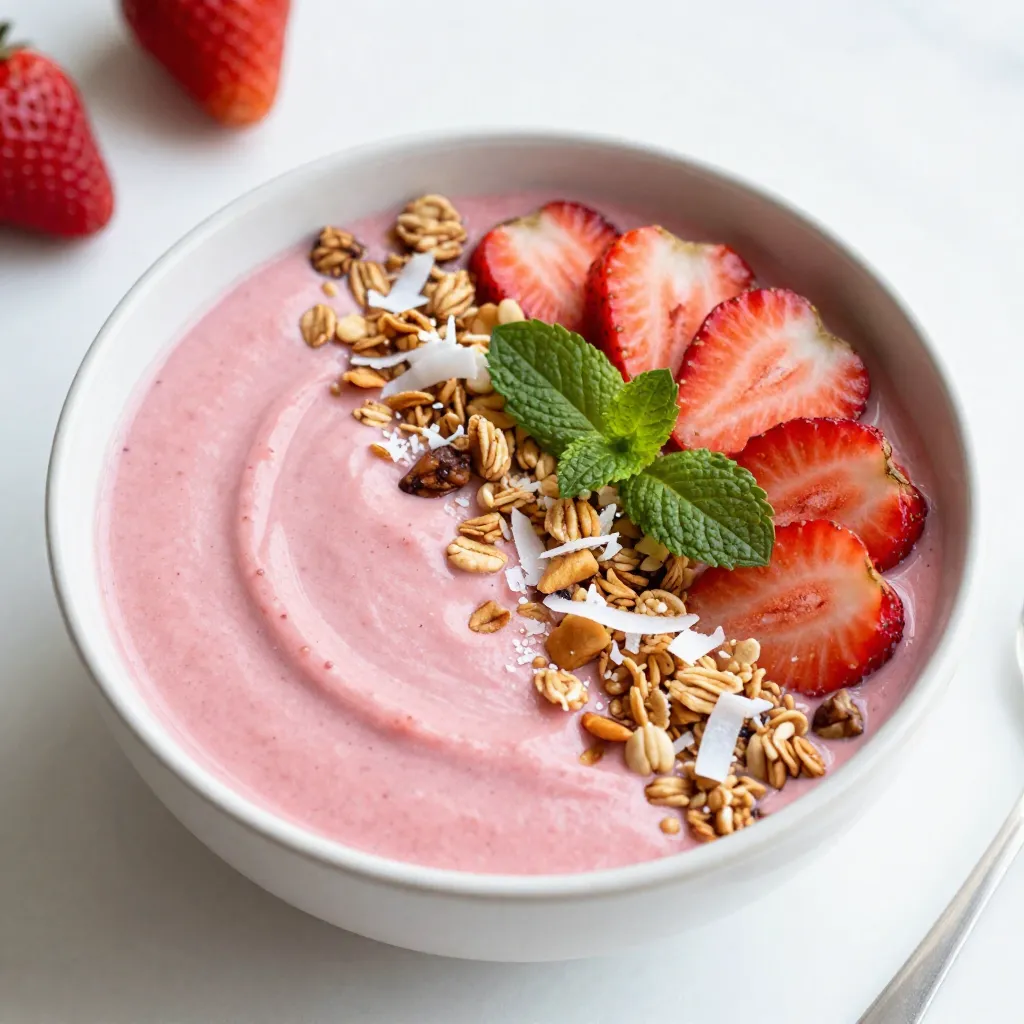
If you crave a delicious and refreshing treat, look no further than this Strawberry Coconut Smoothie Bowl. It’s simple to

To make Chocolate Orange Brownies, you will need: - 1 cup (200g) dark chocolate, finely chopped - ½ cup (115g) unsalted butter, cut into pieces - 1 cup (200g) granulated sugar - 2 large eggs, at room temperature - 1 teaspoon pure vanilla extract - ½ cup (65g) all-purpose flour - ¼ cup (30g) unsweetened cocoa powder - Zest of 1 large orange (about 2 teaspoons) - ½ teaspoon baking powder - ¼ teaspoon fine sea salt - ½ cup (90g) semi-sweet chocolate chips (optional) - Optional: Powdered sugar for light dusting You can swap ingredients if needed: - Use milk chocolate instead of dark chocolate for a sweeter taste. - Coconut oil can replace unsalted butter for a dairy-free option. - For eggs, try flaxseed meal mixed with water for a vegan choice. - Gluten-free flour can work in place of all-purpose flour. To bake these brownies, gather the following tools: - A 9x9 inch (23x23 cm) baking pan - A medium saucepan for melting chocolate - A large mixing bowl for the egg mixture - A whisk for mixing - A spatula for folding ingredients - Measuring cups and spoons for accuracy - A wire rack for cooling the brownies This simple list makes it easy to gather all you need. Now you’re ready to create these rich, chocolatey, and orange-flavored brownies! {{ingredient_image_2}} First, set your oven to 350°F (175°C). This step gets the oven ready for baking. Next, take a 9x9 inch (23x23 cm) baking pan. Grease the bottom and sides with butter. You can also line the pan with parchment paper. This makes it easy to remove the brownies later. In a medium saucepan, put the chopped dark chocolate and pieces of butter. Use low heat to melt them. Stir constantly until everything is smooth. This should take about 5 minutes. Once melted, take it off the heat and let it cool a bit. Grab a large mixing bowl. Add the granulated sugar, room temperature eggs, and pure vanilla extract. Whisk these ingredients together until they blend well. You want it to look slightly frothy. This adds air and makes the brownies light. Now, slowly pour the cooled chocolate and butter mixture into the egg mixture. Whisk it in as you go. Keep mixing until the mixture looks glossy and rich. This step brings all the flavors together. In another bowl, sift together the all-purpose flour, cocoa powder, baking powder, and fine sea salt. Sifting helps remove lumps and makes for a smooth batter. This mix is key for the brownie texture. Take a spatula and gently fold in the orange zest and chocolate chips. Make sure they are evenly mixed throughout the batter. Be careful not to overmix; a few streaks of flour are fine. This adds a delicious orange flavor. Pour the brownie batter into the prepared pan. Use a spatula to smooth the top. Place the pan in the oven and bake for 25-30 minutes. Check if they are done by inserting a toothpick. It should come out with a few moist crumbs. Once baked, let them cool in the pan for 10 minutes. Then, transfer to a wire rack to cool completely before cutting into squares. To get fudgy brownies, first, use high-quality dark chocolate. This adds rich flavor. Melt the chocolate and butter slowly. Stir them constantly over low heat. This helps create a smooth texture. After mixing, let the chocolate cool slightly before adding it to the eggs. This step keeps the eggs from cooking. Baking time matters too; check them early to avoid dryness. Mixing is key, but too much can ruin your brownies. When you add dry ingredients, fold them gently. Use a spatula to combine until just mixed. A few flour streaks are okay. This keeps your brownies soft and moist. Avoid using a whisk at this stage. It can whip air into the batter, which makes them cakey. For serving, cut the brownies into generous squares. A light dusting of powdered sugar adds a sweet touch. Serve them warm with whipped cream or vanilla ice cream. The cold ice cream pairs well with the rich chocolate. You can also add fresh mint as a garnish. It gives a nice pop of color and flavor. Enjoy these brownies as a dessert or a sweet snack! Pro Tips Use Quality Chocolate: For the best flavor, choose high-quality dark chocolate. The richer the chocolate, the better your brownies will taste. Don’t Overmix: When incorporating the dry ingredients, mix just until combined. Overmixing can lead to dense brownies instead of fudgy ones. Let Them Cool: Allow the brownies to cool completely before cutting. This will help them set and make for cleaner slices. Add a Pinch of Sea Salt: A sprinkle of sea salt on top before baking enhances the chocolate flavor and adds a delightful contrast to the sweetness. {{image_4}} You can switch up the flavors in these brownies. Instead of orange, try raspberry or mint. For raspberry, add about half a cup of fresh or frozen raspberries to the batter. This gives a nice tartness. If you like mint, use a few drops of mint extract instead of vanilla. This adds a cool, refreshing taste. Both options make your brownies unique and fun! You can easily adapt these brownies for different diets. To make them gluten-free, use almond flour or a gluten-free flour blend. Make sure the cocoa powder is also gluten-free. For vegan brownies, replace the eggs with flax eggs. Mix one tablespoon of ground flaxseed with three tablespoons of water. Let it sit for five minutes to thicken. Use coconut oil instead of butter for a rich flavor. These swaps keep the brownies delicious while meeting dietary needs. Want to add more texture? Consider stirring in some nuts or seeds. Walnuts or pecans add crunch and flavor. You can also use sunflower seeds or pumpkin seeds for a nut-free option. Chocolate chips are great, but you can try white chocolate or butterscotch chips too. Each add-in changes the taste and makes the brownies even more exciting to eat! To keep your chocolate orange brownies fresh, store them in an airtight container. This helps prevent them from drying out. You can keep them at room temperature for up to four days. If you want to store them longer, consider refrigerating them. Just remember to let them come to room temperature before serving. You can freeze chocolate orange brownies for up to three months. First, cut them into squares. Wrap each piece tightly in plastic wrap. Then, place the wrapped brownies in a freezer-safe bag. Label the bag with the date. When you’re ready to eat them, simply thaw overnight in the fridge. Reheating brownies can bring back their fudgy texture. Preheat your oven to 350°F (175°C). Place the brownies on a baking sheet. Warm them for about 10 minutes. You can also microwave them for 10 to 15 seconds. Just be careful not to heat them too long. They can become dry or tough. Enjoy your warm, gooey brownies! Yes, you can use milk chocolate instead of dark chocolate. However, your brownies will taste sweeter and less rich. Dark chocolate gives a deeper flavor, which balances well with the orange zest. If you prefer a sweeter treat, milk chocolate works nicely. You can use salted butter if you have no unsalted butter. Just reduce the added salt in your recipe. Coconut oil is another option. It adds a subtle flavor and keeps the brownies moist. For a dairy-free option, try a plant-based butter. To check if your brownies are done, insert a toothpick into the center. It should come out with a few moist crumbs, not wet batter. The edges should look set and slightly pull away from the pan. If the toothpick is clean, your brownies may be overbaked. Using orange juice instead of zest will change the texture and flavor. Zest gives a strong orange flavor and some oils for richness. Juice adds moisture but lacks the zest's intensity. If you only have juice, add a little more for flavor, but keep an eye on the batter's consistency. These brownies are easy to make with the right ingredients and steps. Start by understanding your options for substitutes and equipment. Follow the simple instructions for melting, mixing, and baking to achieve the perfect fudgy texture. Remember to avoid overmixing and consider fun variations for extra flavor. Store your treats properly to keep them fresh for longer. I hope these tips help you enjoy delicious brownies any time you want! Now, get ready to impress your friends and family with your baking skills!

Chocolate Orange Brownies Rich and Irresistible Treat

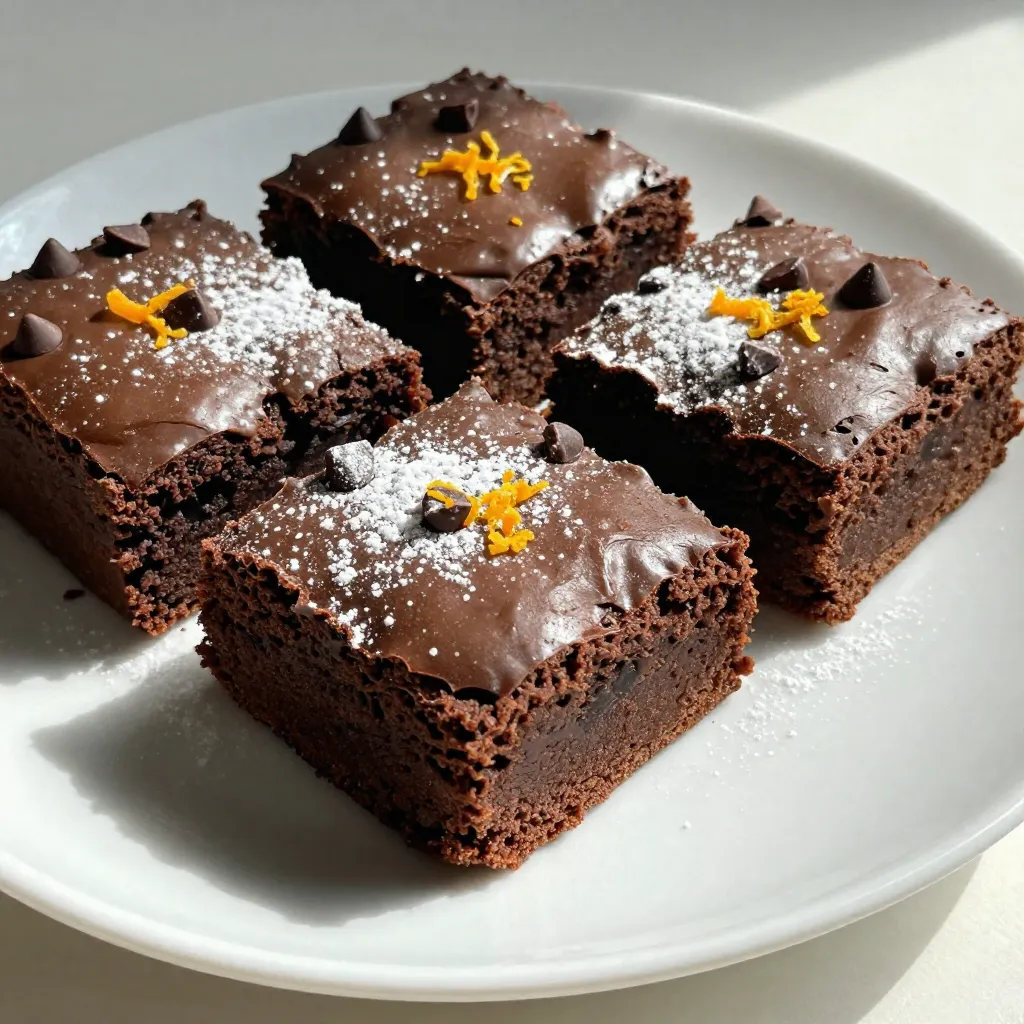
When you crave a rich, sweet treat, these Chocolate Orange Brownies hit the spot! Imagine biting into a fudgy brownie

- Zucchini - Shredded Chicken - Alfredo Sauce - Cheeses (Parmesan and Mozzarella) - Seasonings (Garlic Powder and Italian Seasoning) - Fresh Parsley for Garnish To make Chicken Alfredo Stuffed Zucchini Boats, you need simple ingredients. First, grab 4 medium zucchini. These will be the boats that hold all the tasty filling. Next, you need 2 cups of cooked, shredded chicken. This adds protein and flavor. For that creamy goodness, use 1 cup of Alfredo sauce. You can buy this or make your own. You will also need 1/2 cup of grated Parmesan cheese and 1/2 cup of shredded mozzarella cheese. These cheeses create a rich, cheesy layer that melts perfectly. To season the mix, you’ll need 1/2 teaspoon of garlic powder and 1/2 teaspoon of Italian seasoning. These spices add warmth and depth to your dish. Don't forget to add salt and pepper to taste. Finally, use fresh parsley for garnish. This will brighten up the dish with both color and flavor. When you have everything ready, you can start cooking. Each ingredient plays a key role in making this meal tasty and satisfying. Enjoy the process, and soon you’ll have a delicious dish to share! {{ingredient_image_2}} 1. Preheat your oven to 375°F (190°C). This step is key for even baking. 2. Grab the zucchini and cut each one in half lengthwise. Use a spoon to scoop out the seeds and some flesh. Make sure to leave enough zucchini for the boat shape. Place the zucchini halves cut side up in a baking dish. 1. In a large bowl, mix the shredded chicken and Alfredo sauce. 2. Add garlic powder, Italian seasoning, and half of the grated Parmesan cheese. Season this mixture with salt and pepper. 3. Stir until everything is well coated. 4. Spoon the chicken and sauce mix into each hollowed zucchini boat. Fill them to the brim for a hearty bite. 1. Cover the baking dish with aluminum foil. This keeps the zucchini moist while baking. 2. Place the dish in the oven and bake for 25 minutes. 3. After 25 minutes, remove the foil. This allows the cheese to get nice and brown. 4. Bake for another 10 minutes, or until the cheese is bubbly and golden brown. 5. Once done, take the dish out of the oven. Let the zucchini cool for a few minutes. 6. For a fresh touch, sprinkle chopped parsley on top before serving. - Choosing the right zucchini: Select medium-sized zucchini that are firm and free from spots. They should feel heavy for their size. This ensures they hold up well when stuffed and baked. - Ensuring the filling is seasoned well: Flavor is key. Mix your shredded chicken with Alfredo sauce and spices thoroughly. The garlic powder and Italian seasoning add depth. Taste your filling before stuffing the boats. Adjust salt and pepper to fit your taste. - Presentation tips: Serve the zucchini boats on a large platter. Drizzle some extra Alfredo sauce around the dish. This adds a nice touch and makes it look fancy. - Pairing ideas with side dishes: Pair these boats with a simple salad or garlic bread. A light vinaigrette works well with the creamy dish. You can also serve it with steamed veggies for a colorful plate. Pro Tips Choose Firm Zucchini: Select firm and straight zucchini to ensure they hold their shape during baking, making for better presentation and easier serving. Customize the Filling: Feel free to add vegetables like spinach, bell peppers, or mushrooms to the chicken Alfredo mixture for extra flavor and nutrition. Make Ahead: Prepare the stuffed zucchini boats in advance and store them in the refrigerator. Bake them just before serving for a quick meal option. Experiment with Cheese: Try different cheeses like Gouda or cheddar for a unique twist on the classic flavors in this dish. {{image_4}} You can always mix things up with different proteins and sauces. Instead of chicken, try using turkey or shrimp. Both options add unique flavors and textures. If you want to switch up the sauce, consider using pesto or a rich cheese sauce. These choices can give your dish a fresh twist while keeping it creamy and delicious. If you're watching your carbs, you can make low-carb variations. Simply cut down on the Alfredo sauce or use a lighter version. For those needing gluten-free options, check your sauce label. Many Alfredo sauces are gluten-free. You can also make your own sauce to ensure it meets your dietary needs. With these mods, everyone can enjoy this tasty dish! To store your Chicken Alfredo stuffed zucchini boats, let them cool first. Place leftovers in an airtight container. Store them in the fridge for up to three days. When ready to eat, you can enjoy them cold or reheat them. If you want to keep the flavors fresh, cover the dish tightly with plastic wrap or foil. For long-term storage, freezing is a great option. First, let the stuffed zucchini boats cool completely. Then, wrap each boat in plastic wrap. After that, place them in a freezer-safe bag. They can be frozen for up to three months without losing flavor. To reheat frozen zucchini boats, first, thaw them in the fridge overnight. Preheat your oven to 375°F (190°C). Place the thawed boats on a baking sheet. Bake for about 20 minutes until they are heated through. You can also add a sprinkle of cheese on top before reheating for extra flavor. Can I use raw chicken instead of cooked? No, you should not use raw chicken. Cooked chicken makes this dish safe and tasty. Raw chicken needs more time to cook. Using cooked chicken also saves time. It mixes well with the Alfredo sauce and flavors. How do I know when zucchini boats are done? You can tell when zucchini boats are done by looking at the cheese. It should be bubbly and golden brown. The zucchini should be tender when pierced with a fork. This usually takes about 35 minutes in the oven. Can I make this dish ahead of time? Yes, you can make this dish ahead of time. Prepare the zucchini boats and fill them with the chicken mixture. Cover and store them in the fridge. Bake them when you are ready to eat. This makes it easy for busy days. This blog post shared a simple recipe for chicken Alfredo stuffed zucchini boats. We went over the key ingredients, step-by-step instructions, and helpful tips to make the best dish. You learned about variations and storage options to keep your meal fresh. Remember, this dish is fun and flexible. You can try new ingredients and adjust it to fit your diet. Now, gather your ingredients and enjoy making this delicious, easy meal!

Chicken Alfredo Stuffed Zucchini Boats Flavorful Dish

Looking for a fun, healthy dinner idea? Try Chicken Alfredo Stuffed Zucchini Boats! This dish combines cheesy goodness with fresh

- 4 medium russet potatoes - 1/2 cup unsalted butter, melted - 4 cloves garlic, minced - 2 tablespoons fresh parsley, finely chopped - 1 teaspoon fresh rosemary, finely chopped - 1 teaspoon salt - 1/2 teaspoon black pepper - 1/2 cup grated Parmesan cheese - 1/4 teaspoon red pepper flakes (optional) You can swap unsalted butter for olive oil or coconut oil for a different taste. If you want a non-dairy option, use vegan butter or a nut-based spread. You can mix in other herbs too, like thyme or dill. They add fresh flavors to the dish. Feel free to use garlic powder if you don’t have fresh garlic. It works in a pinch but won't taste quite as fresh. - Preheat the oven: Set your oven to 425°F (220°C). A hot oven helps the potatoes cook well. - Cleaning and drying the potatoes: Rinse 4 medium russet potatoes in cold water. Scrub their skins to remove dirt. Dry them with a clean kitchen towel. - Creating the Hasselback cuts: Use a sharp knife to slice vertical slits into each potato. Space the cuts about 1/4 inch apart. Stop about 1/2 inch from the bottom. To help, place a wooden spoon or chopstick on either side of the potato. This guides your knife and prevents cutting all the way through. - Preparing the garlic butter mixture: In a medium bowl, mix together 1/2 cup melted butter, 4 minced garlic cloves, 2 tablespoons chopped parsley, 1 teaspoon chopped rosemary, 1 teaspoon salt, and 1/2 teaspoon black pepper. You can add 1/4 teaspoon red pepper flakes if you like spice. - Applying the garlic butter to the potatoes: Generously brush the garlic butter mixture over each potato. Make sure it seeps into the slits for the best flavor. Save some garlic butter for later. - Baking process and timings: Place the potatoes on a baking sheet lined with parchment paper. Bake them for 45-55 minutes. They should be tender when pierced with a fork and crispy on the edges. Halfway through, take them out and brush with the reserved garlic butter. - Applying additional garlic butter: After brushing halfway, let the potatoes bake until they are done. - Adding Parmesan cheese: In the last 10 minutes, sprinkle 1/2 cup grated Parmesan cheese over the potatoes. This creates a nice golden crust. - Garnishing before serving: Once you take the potatoes out, let them cool for a few minutes. Add more parsley on top for a fresh look. Enjoy your delicious Garlic Butter Hasselback Potatoes! To master the Hasselback cut, use a sharp knife. This helps create clean slices. Hold the potato firmly to avoid slips. A wooden spoon on each side of the potato works great. It stops your knife from cutting all the way through. Aim for even cuts, spacing them about 1/4 inch apart. This allows the garlic butter to soak in well. For rich flavor, try infusing your garlic butter. Add herbs like thyme or sage for a fresh twist. Red pepper flakes offer heat if you like spice. You can also add lemon zest for a bright taste. Experiment with different combinations to find your favorite mix. Seasonal herbs add depth, so don’t be afraid to try new ones. For a stunning look, serve your Hasselback potatoes on a wooden board. A simple white platter also works well. Garnish with fresh parsley and a sprinkle of extra Parmesan cheese. This adds color and texture, making the dish pop. Slice the potatoes slightly before serving to show off those beautiful layers. A great presentation makes your meal feel special. {{image_4}} You can easily change up the flavors in your Garlic Butter Hasselback Potatoes. Here are some fun ideas: - Cheesy variations: Try different cheeses like cheddar, gouda, or feta. Each cheese adds a unique taste and texture. For a creamy twist, mix cream cheese into the garlic butter. - Spicy versions: Add spices like paprika or cayenne pepper for heat. You can also toss in jalapeños or chili flakes to boost the flavor. Not everyone can enjoy the same foods, so here are some ways to adapt your dish: - Vegan adaptation ideas: Swap the butter for a vegan alternative, like olive oil or coconut oil. Use nutritional yeast instead of Parmesan for a cheesy flavor without dairy. - Gluten-free considerations: This recipe is already gluten-free since it uses potatoes. Just ensure any cheese or extra ingredients are gluten-free as well. Garlic Butter Hasselback Potatoes are great alone, but they shine even more with the right sides. Here are some ideas: - Best accompaniments: Serve them with a fresh salad, grilled veggies, or roasted meat. These pair well with the buttery flavor of the potatoes. - Complete meal suggestions: For a full feast, try them with steak, chicken, or fish. Add a side of garlic bread to round out the meal. To keep your Garlic Butter Hasselback Potatoes fresh, store them in an airtight container in the fridge. This helps lock in flavor and moisture. Let the potatoes cool to room temperature before sealing them. They can stay good for about 3 to 5 days. If you want to freeze them, place them in a freezer-safe bag. Make sure to remove as much air as possible. They can last for up to 2 months in the freezer. When it's time to enjoy your leftovers, the oven is best for reheating. Preheat your oven to 350°F (175°C). Place the potatoes on a baking sheet and cover them with aluminum foil. This keeps them moist. Heat for about 15 to 20 minutes or until warm. You can use a microwave for quick reheating, but it may make the potatoes soft. If you choose the microwave, use a microwave-safe plate and cover them. Heat in short bursts, checking often. Leftover Garlic Butter Hasselback Potatoes can last for 3 to 5 days in the fridge. After that, they may lose their taste and texture. Look for signs of spoilage. If the potatoes smell bad, feel slimy, or have dark spots, it's best to throw them away. Always trust your senses; if in doubt, don't eat them! Hasselback potatoes are a fun way to serve baked potatoes. They originated in Sweden. The name comes from a restaurant called Hasselbacken in Stockholm. This dish features potatoes sliced into thin slits without cutting all the way through. This creates a fan-like shape. The slits allow for more crispy edges and flavor. You can fill the cuts with butter and herbs. This makes them extra tasty. Yes, you can prepare these potatoes ahead of time. Cut the potatoes and add the garlic butter mixture. Wrap each potato in plastic wrap or foil. Store them in the fridge for up to 24 hours. When ready to cook, just take them out and bake. You might need to add a few extra minutes to the baking time. This way, you save time on busy days. To keep your potatoes from browning, use cold water. After cutting them, soak the potatoes in cold water. This stops oxidation. You can also brush them with lemon juice. This adds flavor too. Store them in an airtight container in the fridge. Keeping them cold and sealed helps them stay fresh. Hasselback potatoes are a tasty and fun dish to make. We covered the ingredients and how to prepare them step-by-step. You can swap ingredients for dietary needs or flavor. Tips help you cut perfectly and make your potatoes look great. Store leftovers correctly and enjoy them later. Don’t hesitate to try different variations or pairings to suit your taste. With this guide, you can wow your friends and family with delicious Hasselback potatoes! Enjoy cooking and experimenting in your kitchen!

Garlic Butter Hasselback Potatoes Tasty Side Dish

If you’re looking for a side dish that wows, Garlic Butter Hasselback Potatoes are your answer. These mouthwatering potatoes combine

- 1 lb ground chicken or turkey - 1/2 cup panko breadcrumbs - 1/4 cup green onions, finely chopped - 2 cloves garlic, minced - 1 tablespoon fresh ginger, grated - 1 large egg, beaten - Salt and black pepper, to taste These ingredients form the base of your teriyaki glazed meatballs. The ground chicken or turkey gives a lean and tasty option. Panko breadcrumbs add a nice texture. Green onions, garlic, and ginger bring a burst of flavor. The egg helps bind everything together while adding moisture. - 1/2 cup teriyaki sauce (store-bought or homemade) - 2 tablespoons honey - 1 tablespoon sesame oil The teriyaki glaze is what makes these meatballs shine. Teriyaki sauce adds sweetness and umami. Honey enhances this sweetness and gives a glossy finish. Sesame oil brings a nutty flavor, making the dish even better. - Sesame seeds, for garnish - Additional green onions, for garnish Garnishing with sesame seeds adds a crunchy texture. Extra green onions provide color and fresh flavor. These simple touches elevate the dish and make it look appealing. Each ingredient plays a role in creating a tasty and satisfying meal. - Mixing the ingredients: In a large bowl, mix 1 lb of ground chicken or turkey with 1/2 cup of panko breadcrumbs. Add 1/4 cup of finely chopped green onions, 2 minced garlic cloves, and 1 tablespoon of grated fresh ginger. Next, pour in 1 beaten egg and a pinch of salt and black pepper. Use your hands to blend the mixture until everything is combined well. - Shaping the meatballs: Once mixed, shape the mixture into 1-inch meatballs. Make sure to roll them firmly so they hold together. Lay them out evenly on a baking sheet. Leave space between each meatball to help them cook evenly. - Preheating the oven: Preheat your oven to 400°F (200°C). This step is key for even cooking. - Arranging on the baking sheet: Line your baking sheet with parchment paper. This will prevent sticking and make cleanup easier. Place the meatballs on the sheet, ensuring they are not touching. - Cooking the glaze: While the meatballs bake for 20 minutes, prepare the glaze. In a small saucepan, mix 1/2 cup of teriyaki sauce, 2 tablespoons of honey, and 1 tablespoon of sesame oil. Heat over medium heat and whisk until it simmers. Cook for about 5 minutes until it thickens slightly. - Coating the meatballs: After the meatballs are cooked, take them out of the oven. Carefully toss them in the teriyaki glaze. Make sure each meatball is well-coated to get that sweet and savory flavor. - Setting the glaze: Return the glazed meatballs to the baking sheet and bake for another 5 minutes. This will help the glaze set nicely on the meatballs. - Garnishing the meatballs: Once done, remove the meatballs from the oven. Let them cool for a minute. Finally, sprinkle sesame seeds and extra green onions on top for a burst of color. Serve them up and enjoy! - Ensuring even cooking Bake your meatballs at 400°F (200°C) for the best results. This high heat ensures they cook through and get a nice brown color. Use a meat thermometer if you're unsure. The meatballs should reach 165°F (74°C) to be safe to eat. - The importance of spacing Make sure to leave space between each meatball on the baking sheet. This allows hot air to circulate and cook them evenly. If they touch, they may steam instead of roast, affecting their texture. - Using fresh herbs Fresh herbs like cilantro or basil can brighten your meatballs. Try adding chopped herbs to the meat mixture for extra flavor. A little goes a long way! - Adjusting sweetness If you like a sweeter glaze, add more honey to your teriyaki mix. If you prefer it less sweet, reduce the honey. Taste the glaze as you cook to find your perfect balance. - Serving ideas Serve your teriyaki glazed meatballs on a rustic wooden platter. This adds a cozy touch. You can also use a bowl lined with fresh lettuce leaves to make it look fresh and vibrant. - Creative garnishing options Garnish with sesame seeds and extra green onions for color and crunch. A drizzle of additional teriyaki sauce can also enhance the look and flavor. Make it pop with these simple touches! {{image_4}} You can make teriyaki glazed meatballs with different proteins. Ground chicken is a popular choice, but you can also use turkey. Both options are lean and tasty. If you want a richer flavor, consider using beef or pork. They add a nice depth to the dish and work well with the sweet teriyaki glaze. For those who need gluten-free options, you can easily adapt the recipe. Use gluten-free breadcrumbs instead of regular ones. There are many brands available that taste great. You can also find gluten-free teriyaki sauce at the store. This keeps the flavors intact while making it safe for gluten-free diets. Want to spice things up? Try adding your favorite spices to the meatball mixture. A bit of chili powder or smoked paprika can add warmth. You can also incorporate vegetables like finely chopped bell peppers or grated carrots. These not only enhance the flavor but also add nutrition and color to your meatballs. To store your teriyaki glazed meatballs, place them in an airtight container. This keeps them fresh and safe. In the fridge, they last about 3 to 4 days. Make sure they cool down first before sealing. This helps avoid excess moisture, which can make them soggy. You can freeze cooked meatballs for later use. Let them cool completely, then place them in a freezer-safe bag. Remove as much air as possible before sealing. They can last up to 3 months in the freezer. When you're ready to eat them, take them out and thaw them in the fridge overnight. To reheat, you can bake them in the oven. Set the oven to 350°F (175°C) and warm them for about 15 minutes. This keeps them juicy and flavorful. The best way to reheat teriyaki glazed meatballs is in the oven or on the stovetop. Baking keeps them crispy. For stovetop reheating, use a non-stick pan. Add a splash of water or teriyaki sauce to keep them moist. Heat on medium until warm. Avoid using a microwave if possible. It can make the meatballs tough. Always check that they are heated through before serving. Enjoy every bite of your delicious meatballs! You can enjoy teriyaki glazed meatballs with several tasty sides. Here are some great options: - Steamed rice - Fried rice - Noodles - Stir-fried vegetables - Salad with sesame dressing For a fun twist, serve the meatballs in lettuce wraps. This adds a fresh crunch. You can also drizzle extra teriyaki sauce over the side dishes. It ties the meal together nicely. Making teriyaki sauce is easy and quick. You need a few simple ingredients: - 1/2 cup soy sauce - 1/4 cup honey or brown sugar - 1 tablespoon rice vinegar - 1 tablespoon sesame oil - 1 teaspoon garlic, minced - 1 teaspoon fresh ginger, grated To make the sauce, follow these steps: 1. In a small saucepan, mix all the ingredients. 2. Cook over medium heat. 3. Stir until the sugar dissolves. 4. Let it simmer for 5-10 minutes until it thickens. This homemade sauce adds great flavor to your meatballs. Yes, you can make teriyaki meatballs ahead of time. Here are some tips: - Prepare the meatball mixture and shape the meatballs. - Store them in the fridge for up to 24 hours before baking. For longer storage, freeze the raw meatballs. Place them in a single layer on a baking sheet, then transfer to a freezer bag once frozen. They can last for up to three months. When you are ready to cook, bake directly from the freezer. Add a few extra minutes to the cooking time. To reheat cooked meatballs, use the oven or microwave. If using the oven, heat at 350°F (175°C) for about 10-15 minutes. This keeps them moist and tasty. In this post, we explored making delicious teriyaki glazed meatballs. We discussed key ingredients like ground chicken, panko breadcrumbs, and green onions. I shared steps for mixing and baking, plus tips for even cooking and creative garnishing. You can easily adapt flavors with different proteins or spices. Store meatballs properly and reheat to keep them tasty. Enjoy these simple tips and make a meal your family will love!

Teriyaki Glazed Meatballs Flavorful and Easy Recipe

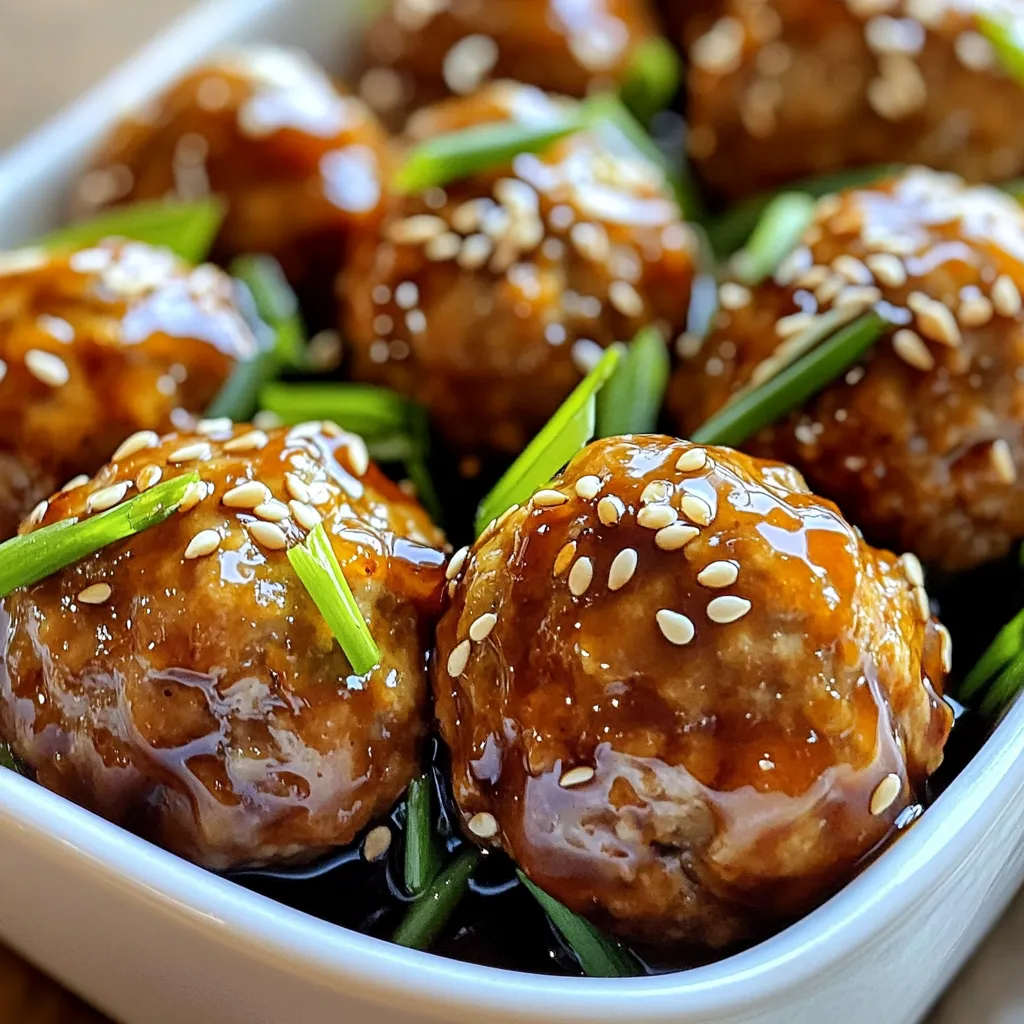
Looking for a tasty, easy dish? You’ll love my Teriyaki Glazed Meatballs! This recipe combines ground chicken or turkey with

Older posts
Newer posts
← Previous Page1 Page2 Page3 … Page83 Next →

dsad

© 2026 eataroundit • Built with GeneratePress

Our Policies

  • Copyright Policy
  • Cookie Policy
  • GDPR Policy
  • Privacy Policy
  • Disclaimer
  • Terms Of Use

More Information

  • Home
  • About
  • Contact
  • Appetizers
  • Dessert
  • Dinner
  • Drinks
©2026, eataroundit About Back To Top