Skip to content
DisclaimerTerms Of UseGDPR PolicyCookie Policy

eataroundit

  • Home
  • Drinks
  • Appetizers
  • Dinner
  • Dessert
  • About
  • Contact
  • Privacy Policy
DisclaimerTerms Of UseGDPR PolicyCookie Policy

NO-ING-IMG

To make these tasty wraps, gather these key ingredients: - 2 lbs boneless, skinless chicken thighs - 1/2 cup low-sodium soy sauce - 1/4 cup honey - 1/4 cup rice vinegar - 2 tablespoons sesame oil - 1 tablespoon fresh ginger, finely minced - 3 garlic cloves, finely minced - 1 teaspoon red pepper flakes (optional, for a touch of heat) - 1 cup shredded carrots - 1 cup chopped green onions - 1 tablespoon cornstarch mixed with 2 tablespoons water (slurry for thickening) - 1 head of butter or iceberg lettuce, leaves carefully separated - Sesame seeds, for garnish You can customize your wraps with these extras: - Add sliced bell peppers for extra crunch. - Include chopped cilantro for a fresh taste. - Use avocado slices for creaminess. - Try different nuts for added texture, like chopped peanuts or cashews. Always pick high-quality ingredients for the best flavor. Fresh chicken thighs give a tender bite. Use low-sodium soy sauce to control salt levels. Fresh ginger and garlic add much-needed zest. Choose ripe veggies to enhance taste. Organic honey can provide a richer sweetness. Start with your chicken thighs. Lay them flat in the slow cooker. Spread them out for even cooking. This helps them cook well and stay juicy. Grab a medium bowl. In it, whisk together the soy sauce, honey, rice vinegar, and sesame oil. Add the minced ginger and garlic, then stir well. If you like heat, toss in the red pepper flakes. Make sure the honey dissolves completely. Pour the teriyaki sauce over the chicken in your slow cooker. Cover it with the lid. Set it to cook on low for 6-7 hours, or high for 3-4 hours. When it's done, the chicken will be tender. Remove the chicken and place it on a cutting board. Use two forks to shred it into bite-sized pieces. With the slow cooker still on high, mix cornstarch with water in a small bowl. Add this slurry to the sauce in the cooker. Stir it well and let it cook for 10 more minutes. This thickens the sauce nicely. Once thick, return the shredded chicken to the cooker. Gently fold it into the sauce. Add the shredded carrots and chopped green onions. Stir until everything is well mixed. To serve, take a lettuce leaf. Spoon some of the teriyaki chicken mixture onto the leaf. Sprinkle sesame seeds on top for crunch. Enjoy the fresh taste and savory flavors! To make teriyaki sauce pop, use low-sodium soy sauce. This keeps the dish balanced. Honey adds sweetness, while rice vinegar gives it a tangy kick. Fresh ginger and garlic bring depth. If you like heat, add red pepper flakes. Mix these ingredients well before pouring over the chicken. Let it marinate. This step helps the chicken soak up all the rich flavors. After cooking, the chicken should be tender. This makes shredding simple. Use two forks to pull apart the chicken. Start in the middle and work your way out. If the chicken feels tough, it may need more cooking time. Always check for tenderness before shredding. Shredded chicken works best when moist, so avoid letting it sit too long without sauce. For eye-catching wraps, use fresh, crisp lettuce. Butter or iceberg lettuce works great. Lay out the filled wraps on a colorful platter. Garnish with sesame seeds and chopped green onions for a pop of color. Adding lime wedges gives a zesty touch. This contrast brightens the dish and enhances flavors. It makes your meal look as good as it tastes! {{image_4}} You can swap chicken thighs for other proteins. Try using boneless chicken breasts for a lighter option. Pork tenderloin also works well; it becomes tender and juicy in the slow cooker. For beef lovers, flank steak can be a great choice. Just adjust the cooking time to ensure the meat becomes tender. For a vegetarian or vegan dish, replace the chicken with tofu or tempeh. Both options soak up the teriyaki sauce well. Use firm tofu for the best texture. You can also add more veggies like bell peppers and mushrooms for added flavor and nutrition. Ensure the soy sauce is vegan-friendly to keep the meal plant-based. To change the heat in your teriyaki chicken, add more or fewer red pepper flakes. If you like it spicy, try adding sriracha or chili paste. For a milder taste, simply leave out the red pepper flakes. You can also serve the wraps with hot sauce on the side for those who enjoy an extra kick. After enjoying your teriyaki chicken lettuce wraps, let the leftovers cool. Store them in an airtight container. This keeps the chicken moist and fresh. Place the container in the fridge. It will stay good for up to four days. To reheat, you can use a microwave. Place the chicken in a bowl. Cover it with a damp paper towel. Heat for one to two minutes. Stir halfway through for even warming. You can also use a skillet on low heat. This helps keep the chicken juicy. If you want to save some for later, freezing is perfect. Put the cooled chicken in a freezer-safe bag. Squeeze out any air before sealing it. Label the bag with the date. It can last in the freezer for up to three months. When you're ready to eat, thaw it in the fridge overnight. Reheat as mentioned above. Enjoy your meal again! Yes, you can use chicken breasts. They will cook faster. Chicken breasts are leaner than thighs. You may need to check for doneness sooner. They can dry out if overcooked, so monitor closely. You can use maple syrup or agave nectar. Both give a sweet flavor. Brown sugar is another option; just mix it with some water. This will help it dissolve better. Each choice will change the taste slightly. To spice it up, add more red pepper flakes. You can also use sriracha or chili paste. Start with a little, then taste. Adjust to your heat level. This way, you keep control over the spice. Yes, you can make this in an Instant Pot. Cook on high for about 15 minutes. Use the natural release method for best results. This will keep the chicken moist and tender. Adjust the sauce thickening step to finish. This blog post covered how to make slow cooker teriyaki chicken. We explored essential and optional ingredients. I shared easy steps for cooking and shredding chicken. Tips helped enhance your teriyaki flavor and presentation. Variations offered choices for proteins and spice levels. Lastly, I provided storage and reheating advice. With this knowledge, you can create a tasty meal that fits your style. Enjoy your cooking adventure!

Savory Slow Cooker Teriyaki Chicken Lettuce Wraps

If you love tasty, easy meals, you’re in the right spot! Today, I’ll show you how to make savory slow

- 2 large sweet potatoes - 2 tablespoons extra virgin olive oil - 4 cloves fresh garlic, minced - 2 teaspoons dried Italian herbs - 1 teaspoon smoked paprika - Sea salt and pepper - Fresh parsley for garnish - Different herbs or spices - Alternative oils To start, gather your ingredients. Sweet potatoes are the star here. They give a nice sweetness and color to the fries. Next, we have the olive oil. It helps the fries crisp up and adds flavor. The fresh garlic is a must for that punchy taste. Dried Italian herbs bring a lovely mix of flavors. Smoked paprika adds a hint of smokiness. You’ll also need sea salt and pepper to season. Finally, fresh parsley will make your dish pop with color. If you want to play around, consider using different herbs or spices. You can also swap out the olive oil for other oils, like avocado oil. Each choice will change the flavor a bit. Enjoy experimenting! Start by peeling the sweet potatoes if you want. This step is optional. Next, cut them into 1/4-inch thick sticks. Make sure the cuts are even. This helps all fries cook the same way. Soaking is key to crispy fries. Place the sweet potato sticks in a bowl of cold water. Let them soak for at least 30 minutes. This removes extra starch. After soaking, drain the fries. Then, pat them dry with a clean towel. Dry fries get crispier. In a big bowl, mix olive oil, minced garlic, dried Italian herbs, and smoked paprika. Add sea salt and pepper to taste. Stir well to combine all flavors. This mix will coat the fries evenly. Make sure every fry gets the tasty blend. Set your air fryer to 400°F (200°C). Let it preheat for about 5 minutes. This step ensures even cooking. Once preheated, place the sweet potato fries in the basket. Arrange them in a single layer. Cook for 15-20 minutes. Shake the basket halfway through. This helps them brown evenly. Look for signs of crispiness while they cook. Fries should turn golden brown and crispy outside. The inside should be soft and fluffy. Check them during the last few minutes. This way, you can catch them at the perfect moment. When the fries are ready, remove them from the air fryer. Place them on a serving platter. Garnish with chopped fresh parsley. This adds color and flavor. Serve them with your favorite dips or sides. Consider pairing with ranch or spicy mayo for extra fun! To ensure your sweet potato fries cook evenly, cut them into uniform 1/4-inch sticks. This step is vital. If the pieces are different sizes, some will cook faster than others. Batch cooking helps keep your fries crispy. If you crowd the air fryer, they will steam instead of fry. Cook in smaller batches to get that perfect crunch. You can boost the flavor of your fries in many ways. Try adding cayenne pepper for heat or smoked paprika for depth. If you want a garlic-free option, use onion powder or a squeeze of lemon. Fresh herbs like rosemary or cilantro can also add a unique twist to your fries. Avoid overcrowding the air fryer. This mistake leads to soggy fries, which we want to avoid. Always leave space for hot air to circulate. Soaking the fries is key. If you don’t soak them long enough, they will not get crispy. Aim for at least 30 minutes in cold water to get the best results. {{image_4}} You can switch up your fries by using different potatoes. Yukon gold or russet potatoes work well. They both have great flavors and textures. If you prefer, you can leave the skins on for added fiber and a rustic look. It’s all about your taste! Want to spice things up? Add cayenne or chili powder for a spicy kick. If you like sweet, sprinkle some cinnamon on your fries. Both options change the flavor and keep things fun. Feel free to mix and match your favorite spices! You can make these fries in different ways. If you don’t have an air fryer, an oven-baked version is easy. Just spread the fries on a baking sheet and bake until crispy. For a more classic taste, try deep-frying them. This method gives you that crunchy texture we all love. However, it involves more oil, so keep that in mind. To keep your sweet potato fries fresh, follow these simple steps: - Refrigeration: Place the cooled fries in an airtight container. This helps keep them from drying out. - Optimal Freshness: Sweet potato fries stay good for about 3 to 5 days in the fridge. You want to enjoy crispy fries again. Here are my tips: - Recommended Methods: Reheat your fries in an air fryer at 350°F (175°C) for 5 to 7 minutes. This method helps restore their crunch. - Maintaining Crispiness: Avoid using a microwave. It makes fries soggy. Instead, use the oven or air fryer for best results. Following these tips will help you savor those delicious garlic herb sweet potato fries again! To make sweet potato fries crispy, soak them in cold water for 30 minutes. This step removes excess starch, which helps them crisp up. After soaking, drain and pat them dry. Coat the fries evenly with olive oil and spices. Air fry at 400°F for 15-20 minutes, shaking the basket halfway through. This technique ensures they cook evenly, resulting in a golden, crispy exterior. Skipping the soaking step can affect texture and taste. Without soaking, fries may turn out softer and less crispy. The soaking process helps to remove starch, which can lead to soggy fries. If you want the best texture, I highly recommend soaking them before cooking. Sweet potato fries taste great with many sauces. Here are some tasty options: - Ketchup - Garlic aioli - Spicy mayo - Honey mustard - Ranch dressing Feel free to get creative and find your favorite pairing! Cooked sweet potato fries can last in the fridge for about 3 to 5 days. Store them in an airtight container to keep them fresh. For the best taste, try to eat them within a few days. Air fryer sweet potato fries are simple and tasty. We covered the key ingredients, like sweet potatoes, garlic, and olive oil. I shared step-by-step instructions, emphasizing the importance of soaking for ideal crispiness. We also explored tips to enhance flavor and avoid common mistakes. In the end, don’t shy away from experimenting with herbs or changing cooking methods. Enjoy these fries with your favorite dips, and they will shine at any meal. Keep your servings crispy and delicious for the best experience!

Air Fryer Garlic Herb Sweet Potato Fries Delight

Craving a tasty treat that’s easy to make and healthy? You’re in the right place! In this article, I’ll show

To make a Caramel Chocolate Chip Skillet Cookie, you will need the following ingredients: - 1 cup unsalted butter, softened to room temperature - 1 cup packed brown sugar - 1/2 cup granulated sugar - 2 large eggs, at room temperature - 2 teaspoons pure vanilla extract - 2 1/4 cups all-purpose flour - 1 teaspoon baking soda - 1/2 teaspoon fine sea salt - 1 cup semi-sweet chocolate chips - 1/2 cup caramel bits (or soft caramel candies, roughly chopped) - Flaky sea salt for finishing These ingredients create a rich and gooey cookie. The butter gives a soft texture, while the sugars add sweetness. The eggs help bind everything together, and the vanilla gives a warm flavor. Flour and baking soda create the cookie base, while sea salt balances the sweetness. The chocolate chips and caramel bits bring a delightful mix of flavors. - Preheat the oven to 350°F (175°C). This helps the cookie bake evenly. - In a large bowl, cream together 1 cup of softened butter, 1 cup of brown sugar, and 1/2 cup of granulated sugar. Mix until fluffy. - Next, add 2 large eggs, one at a time. Beat well after each egg. Then, mix in 2 teaspoons of pure vanilla extract until smooth. - In another bowl, whisk together 2 1/4 cups of all-purpose flour, 1 teaspoon of baking soda, and 1/2 teaspoon of fine sea salt. This blends the dry elements well. - Carefully fold in 1 cup of semi-sweet chocolate chips and 1/2 cup of caramel bits. Use a spatula to mix gently. - Transfer the dough to a well-greased cast-iron skillet. Spread it evenly using the spatula. - Bake in the preheated oven for 25-30 minutes. Look for golden edges while the center remains soft. - Once done, cool the cookie in the skillet for about 10 minutes. Before serving, sprinkle a pinch of flaky sea salt on top. This adds a nice touch! To bake your caramel chocolate chip skillet cookie just right, timing is key. I suggest setting your timer for 25 minutes. This way, you can keep an eye on it. The edges should turn a nice golden brown. The center must still look a bit soft. It will firm up while cooling. To check if it's done, gently poke the center with your finger. If it springs back, it's ready. If it leaves a dent, give it a few more minutes. Trust me; this step saves you from a gooey mess! Want to add a twist? Consider mixing in chopped nuts like pecans or walnuts. They add a nice crunch. You could also try different extracts. Almond or hazelnut extracts bring unique flavors. For serving, I recommend a big scoop of vanilla ice cream on top. The cold ice cream melts into the warm cookie, creating a dreamy dessert. You could even drizzle extra caramel sauce for added sweetness. One common mistake is overmixing the dough. This can make your cookie tough. Mix until the flour just disappears, then stop! Another pitfall is baking at the wrong temperature. Too high can burn the edges, while too low makes it flat. Always use an oven thermometer if you’re unsure. Keeping it at 350°F (175°C) is the sweet spot for this skillet cookie. {{image_4}} You can change some ingredients for your skillet cookie. For sweetness, swap regular sugar with coconut sugar. This gives a nice, rich flavor. If you need gluten-free options, use almond flour or a gluten-free blend. Both will work well and keep the cookie tasty. Mix up your chocolate! Dark chocolate adds a bold taste, while white chocolate makes it sweet and creamy. You can also add spices for extra flavor. A pinch of cinnamon can give warmth and depth. Just a little can change the whole cookie! Want to add some crunch? Toss in nuts like walnuts or pecans. They add a great texture. For a finishing touch, sprinkle flaky sea salt on top. You can also drizzle extra caramel or chocolate sauce for a sweet treat that looks amazing. To keep your caramel chocolate chip skillet cookie fresh, store it in an airtight container. This helps keep the cookie soft and moist. If you have leftover cookie, make sure to let it cool before packing it away. You can refrigerate it for up to a week. For longer storage, freeze the cookie. Cut it into slices and wrap each piece in plastic wrap. Then place them in a freezer bag. This way, you can enjoy a slice whenever you like! When it's time to enjoy your cookie again, reheat it in the oven. Preheat the oven to 350°F (175°C). Place the cookie on a baking sheet for about 5-10 minutes. This helps restore its warm, gooey texture. If you want to get fancy, add a scoop of ice cream on top when serving. You can also repurpose leftovers by crumbling them into yogurt or ice cream. This adds a sweet crunch to your dessert. Another fun idea is to make cookie sandwiches. Just spread some frosting or nut butter between two slices of the cookie. Enjoy the creativity! A skillet cookie is a large, thick cookie baked in a skillet. It has a soft center and crispy edges. This cookie is often served warm and can be enjoyed straight from the skillet. The texture is chewy and gooey, thanks to the melting chocolate and caramel bits. Yes, you can make this recipe ahead of time. Mix the dough and store it in the fridge for up to 24 hours. This helps the flavors blend well. When ready to bake, let the dough sit at room temperature for about 15 minutes. Then spread it in the skillet and bake as usual. To check for doneness, look for golden edges. The center should look set but still soft. You can also gently press the center with your finger; it should feel firm but not hard. Remember, the cookie will continue to firm up as it cools. Absolutely! You can add nuts like walnuts or pecans for a crunch. Swap out semi-sweet chocolate chips for dark chocolate or white chocolate. You can also mix in dried fruits like cherries or raisins. Get creative with your favorite flavors! This blog post covered a delicious skillet cookie recipe. We went over the needed ingredients, clear steps to make it, and tips for a perfect bake. I shared fun ways to mix it up and how to store leftovers. Remember, your skillet cookie can be a true treat! With the right care, it will shine every time you bake. Enjoy experimenting and sharing this sweet creation with loved ones. Your baking journey starts now!

Caramel Chocolate Chip Skillet Cookie Delightful Treat

Are you ready to bake a treat that looks as good as it tastes? This Caramel Chocolate Chip Skillet Cookie

To make the Spicy Miso Ramen Stir Fry, you need the following ingredients: - 200g ramen noodles - 2 tablespoons miso paste - 1 tablespoon soy sauce - 1 tablespoon sesame oil - 1 tablespoon chili paste - 1 cup broccoli florets - 1 red bell pepper, sliced - 1 cup snap peas - 1 medium carrot, julienned - 3 green onions, chopped - 2 cloves garlic, minced - 1 teaspoon fresh ginger, grated - Sesame seeds for garnish You can mix and match some ingredients. For a richer taste, use red miso paste. If you want a milder flavor, go for white miso paste. You can swap the vegetables too! - Try bok choy or zucchini instead of broccoli. - Use yellow or orange bell peppers for a different color. - Add mushrooms for extra umami flavor. When choosing miso paste, quality matters. Here are some brands I trust: - Miso Master: Organic and flavorful, great for any dish. - Hikari: A well-known brand, offers both red and white miso. - Eden Foods: Offers a good variety of organic miso pastes. Using a good miso paste makes a big difference in taste. Enjoy creating your spicy miso ramen stir fry! Start by boiling water in a large pot. You want it to be rolling before adding the ramen noodles. Cook them for 3-4 minutes for fresh noodles, or 5-7 minutes for dried. Once they are tender, drain and rinse them with cold water. This halts the cooking process and keeps them from getting mushy. Set the noodles aside for later. In a small bowl, mix together the miso paste, soy sauce, sesame oil, and chili paste. Use a whisk to combine everything until it is smooth. This sauce is where the magic happens, so make sure it is well blended. Set your flavorful sauce aside; you will need it soon. Heat a large skillet or wok over medium-high heat. Add a tablespoon of oil to the pan. Then, toss in the minced garlic and grated ginger. Sauté them for about 30 seconds. You want the garlic to smell good, but don’t let it brown. That can make it taste bitter. Next, add the broccoli, red bell pepper, snap peas, and julienned carrot. Stir-fry these veggies for about 5-6 minutes. You want them to be tender but still bright and crisp. Keep stirring to cook them evenly. Now, it's time to add your cooked ramen noodles to the skillet. Pour in the special miso sauce you made earlier. Toss everything together gently. This ensures that every noodle and veggie is coated in that spicy miso goodness. Stir-fry everything for another 2-3 minutes to heat through. Once everything is hot, remove the skillet from the heat. Garnish your stir fry with the chopped green onions and a sprinkle of sesame seeds. For a nice touch, serve the stir fry hot in large bowls. The colors of the veggies will pop, making it look as good as it tastes. If you want, drizzle a little sesame oil on top just before serving. Enjoy your creation! To get the best veggies, start with fresh ones. Cut them into even sizes. This helps them cook at the same time. Use high heat when you stir-fry. This keeps them crisp and bright. Add garlic and ginger early for great flavor. Keep stirring so they don’t burn. Aim for a cooking time of about 5-6 minutes. Your veggies should be tender but still have a crunch. You control the heat! Use chili paste based on your taste. Start with 1 tablespoon for a mild kick. If you want more spice, add more. You can also use fresh chili for a different flavor. For less heat, skip the chili paste. You can add a little honey or sugar to balance the flavors. Taste as you go to get it just right. If you don’t have ramen noodles, don’t worry! You can use other types of noodles. Try udon, soba, or rice noodles. Just cook them according to the package. Spiralized zucchini or carrots work well for a low-carb option. This keeps the dish light and fresh. Make sure to adjust cooking times for different noodles. Enjoy the flexibility in your stir fry! {{image_4}} You can add protein to your Spicy Miso Ramen Stir Fry to make it heartier. Chicken works well. Simply slice it into thin strips and cook it before adding the vegetables. Cook until it's no longer pink. Tofu is a great option for vegetarians. Use firm tofu, cut it into cubes, and sauté until golden. Shrimp also adds a tasty twist. Just toss them in when you add the veggies, and cook until they turn pink. If you want to keep it vegetarian, stick with tofu or just use veggies. To make it vegan, ensure your miso paste is vegan-friendly. Most are, but it’s good to check. You can also add extra veggies like mushrooms or zucchini for more flavor and texture. If you need a gluten-free dish, swap regular ramen noodles for gluten-free ones. There are many good options made from rice or buckwheat. Also, check the soy sauce. Use a gluten-free soy sauce or tamari instead. This way, you can still enjoy a delicious stir fry without the gluten. Feel free to explore these options to make the dish your own! To store your spicy miso ramen stir fry, let it cool first. Use an airtight container. You can keep it in the fridge for up to 3 days. Make sure it is sealed tight to keep flavors fresh. If you plan to eat it later, store the noodles and veggies separately. This helps to keep them from getting soggy. Reheat leftovers on the stove for the best taste. Use a non-stick skillet and add a splash of water. Heat on medium until warm, stirring often. You can also use a microwave. Place in a microwave-safe bowl and cover it loosely. Heat for 1-2 minutes, stirring halfway through. Make sure it's hot all the way through. You can freeze your stir fry, but it's best to do this without the noodles. Place cooled veggies and sauce in a freezer bag. Squeeze out extra air and seal it tight. This helps prevent freezer burn. You can freeze it for up to 2 months. When ready to enjoy, thaw overnight in the fridge. Cook fresh noodles when you're ready to eat. Yes, you can use dried ramen noodles. They work well in this recipe. Just cook them longer, about 5-7 minutes. Drain and rinse them before adding to the stir fry. This keeps them from sticking together. To reduce the spice, simply use less chili paste. You can also add more vegetables or a splash of coconut milk. These changes will give you a milder dish while keeping the flavor. You can serve this stir fry with a side salad or steamed dumplings. A light broth or miso soup also pairs well. For a refreshing touch, add pickled vegetables on the side. We discussed all the key steps to make Spicy Miso Ramen Stir Fry. You learned about the ingredients, cooking methods, and ways to adjust flavors. Remember to explore variations with proteins and adapt to dietary needs. Storing and reheating tips will help you enjoy leftovers too. Cooking is fun and creative. Now, grab your ingredients and start making this delicious dish. You’ll impress friends and family with your skills. Enjoy your ramen journey!

Spicy Miso Ramen Stir Fry Delight in Every Bite

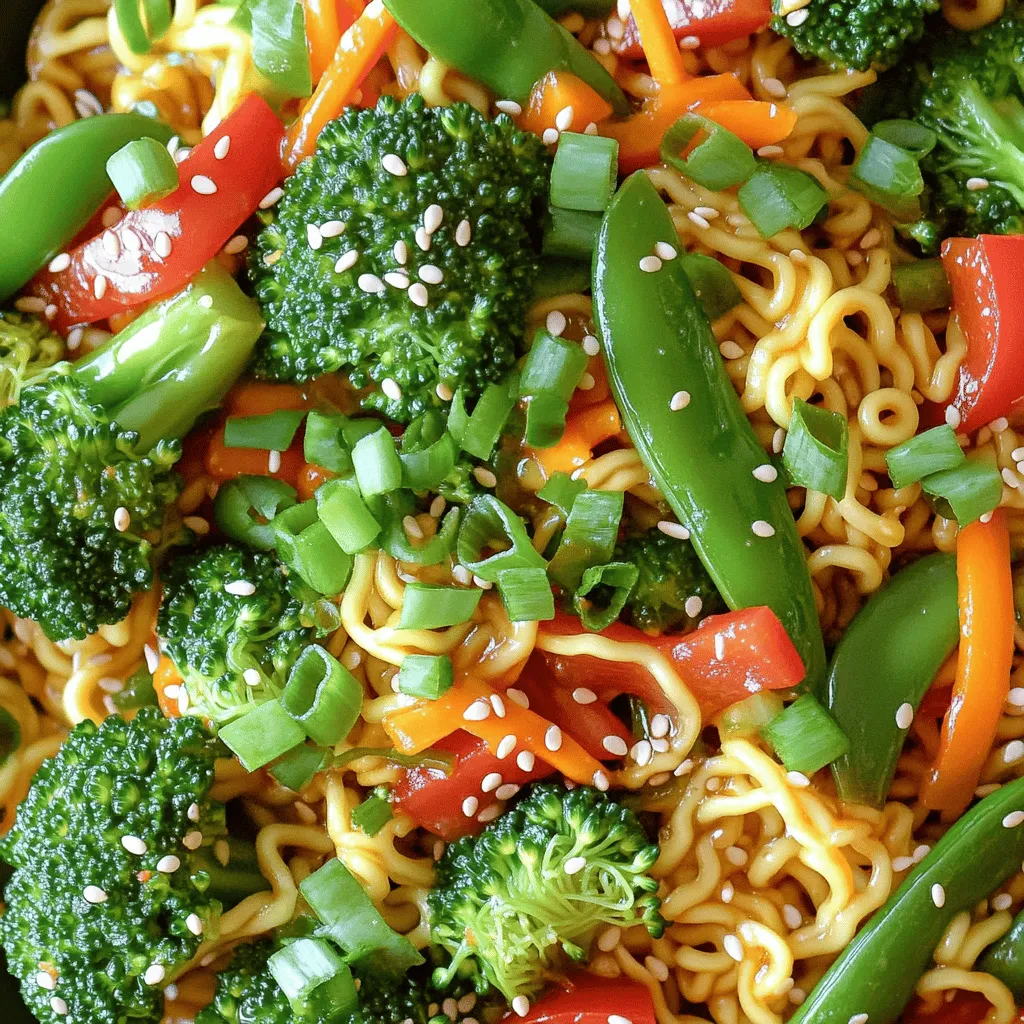
Craving a quick and tasty dinner? You’ve just found your new favorite meal: Spicy Miso Ramen Stir Fry! This dish

For this One-Pot Pesto Shrimp Risotto, you will need: - 1 cup Arborio rice - 1 lb large shrimp, peeled and deveined - 4 cups low-sodium chicken or vegetable broth - 1 small onion, finely chopped - 2 cloves garlic, minced - 1 cup fresh spinach, chopped - 1/2 cup homemade or store-bought pesto - 1/2 cup grated Parmesan cheese - 2 tablespoons olive oil - Salt and pepper to taste - Fresh basil leaves for garnish You can swap some ingredients if needed. If you can’t find Arborio rice, you can use Carnaroli rice. It has a similar texture. For shrimp, you can use scallops or even chicken. If you want a vegetarian dish, replace the shrimp with mushrooms. You can also use vegetable broth instead of chicken broth. Finally, if you don't have Parmesan cheese, you can try Pecorino Romano. For pesto, I love using brands like Classico or Buitoni. They offer great flavor and quality. If you prefer homemade, that’s even better! For broth, Swanson and Pacific Foods provide tasty low-sodium options. Choose a broth that matches your flavor needs, whether chicken or vegetable. Start by heating two tablespoons of olive oil in a spacious pot over medium heat. When the oil shimmers, add one small onion, finely chopped. Sauté the onion for about three to four minutes. You want it to be soft and translucent. Next, add two cloves of minced garlic. Cook it for one minute until it smells great. Now, it’s time for the Arborio rice. Pour in one cup of rice and stir it for two to three minutes. This step helps to toast the rice, which adds flavor. After that, start adding four cups of low-sodium chicken or vegetable broth. Add one cup at a time. Stir the rice as it absorbs the broth. Continue this for about 15 to 20 minutes. You want the rice to be creamy and a bit firm. When the rice is almost done, fold in one pound of large shrimp. Cook for about five minutes. The shrimp will turn opaque pink when they are done. Then, add one cup of chopped spinach and half a cup of pesto. Mix until the spinach wilts and everything blends nicely. Remove the pot from heat. Stir in half a cup of grated Parmesan cheese. This will make the risotto creamy and rich. Taste it and adjust the salt and pepper as needed. Serve the risotto warm and add fresh basil leaves on top for a nice touch. Enjoy your delicious one-pot pesto shrimp risotto! To get creamy risotto, use Arborio rice. This rice has a high starch content. It absorbs liquid well and gives you that sought-after creaminess. As you cook, add broth a cup at a time. Stir often, letting each cup soak in. This process takes about 15-20 minutes. Keep an eye on the rice. It should be al dente, tender yet firm. If it gets too thick, add a bit more broth. That way, you keep the creamy texture. Cooking shrimp is simple but key for flavor. Use fresh, large shrimp for the best taste. Once your risotto is nearly done, fold in the shrimp. Cook them for about 5 minutes. They will turn pink and opaque when done. Don’t overcook them; they can get rubbery. If you want more flavor, season the shrimp with salt and pepper before adding them to the risotto. To take your risotto to the next level, think about adding extras. Fresh herbs like basil or parsley can brighten the dish. You might also try a splash of lemon juice for a zesty kick. If you love cheese, consider adding more Parmesan or even some goat cheese. For a richer flavor, mix in sun-dried tomatoes or artichokes. These small changes can make a big difference! {{image_4}} To make a vegetarian version of this dish, skip the shrimp. You can add more veggies instead. Try mushrooms, bell peppers, or zucchini for texture and taste. Use vegetable broth to keep it rich and flavorful. Add extra pesto for more taste. A sprinkle of nutritional yeast can give a cheesy flavor too. You can swap shrimp for other proteins. Chicken or scallops are great options. If using chicken, cut it into bite-sized pieces. Sauté it until fully cooked before adding rice. For scallops, cook them until they turn golden. They only need a few minutes to cook. Each protein brings a unique taste and texture to the dish. You can change the flavor profile with simple additions. Fresh lemon juice adds brightness. Just a squeeze while cooking makes a big difference. Try adding fresh herbs like thyme or parsley for a garden-fresh taste. You can even mix in sun-dried tomatoes for a tangy kick. These small changes can create a whole new dish! To keep your One-Pot Pesto Shrimp Risotto fresh, store it in an airtight container. Make sure it cools down to room temperature before sealing. This helps prevent moisture build-up, which can make the risotto soggy. Store it in the fridge for up to three days. When you’re ready to enjoy leftovers, heat the risotto gently. Place it in a pot over low heat. Add a splash of broth or water to help rehydrate the rice. Stir often until it warms through. This keeps the risotto creamy and prevents it from getting dry. If you have extra risotto, freezing is a great option. Portion it into freezer-safe bags or containers. Make sure to remove as much air as possible before sealing. It can last in the freezer for about one month. To reheat, let it thaw in the fridge overnight, then follow the reheating instructions. To make risotto creamy, use Arborio rice. This rice has high starch content. The starch helps create a smooth texture. Stir the rice often while adding broth. This process releases starch and thickens the dish. Cook the rice slowly, adding broth one cup at a time. This helps the rice absorb liquid well. When the risotto is almost done, stir in cheese. I recommend using grated Parmesan for the best flavor. You can make this dish in advance, but risotto is best fresh. If you prepare it early, store it in an airtight container. Keep it in the fridge for up to three days. When ready to serve, reheat on low heat. Add a splash of broth or water to loosen it. Stir often to avoid sticking. The risotto may lose some creaminess, but you can add more cheese to help. If you can't find Arborio rice, use another short-grain rice. Carnaroli and Vialone Nano also work well. These types of rice have similar starch levels. You could also try using sushi rice, which is sticky. If you want a healthier option, use farro or quinoa. Keep in mind that these grains will change the dish's texture. Adjust cooking times as needed for different types of rice. In this post, we covered the key ingredients for risotto, along with helpful substitutions. I shared step-by-step instructions to ensure your dish turns out perfectly. You learned tips for achieving the right consistency and how to cook shrimp properly. We also explored delicious variations and provided storage tips. With this knowledge, you can create an amazing risotto that suits your taste and needs. Enjoy making this dish and impress your friends and family. Happy cooking!

One-Pot Pesto Shrimp Risotto Creamy and Flavorful Dish

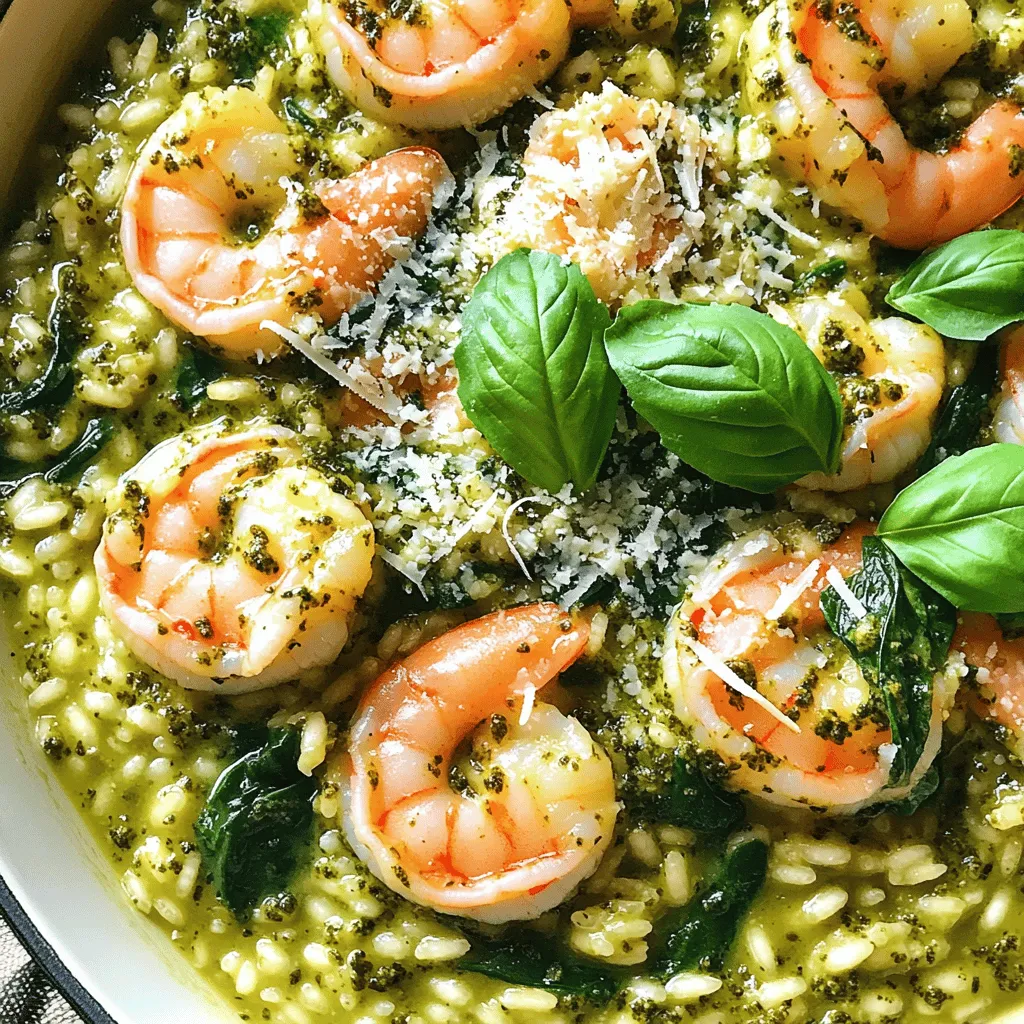
Are you ready to whip up a creamy and flavorful One-Pot Pesto Shrimp Risotto? This easy dish combines tender shrimp

- 1 cup rolled oats - 1 cup almond milk (or milk of your choice) - 1 tablespoon chia seeds - 2 tablespoons caramel sauce - 1 tablespoon maple syrup (or honey) - 1 teaspoon instant coffee granules - 1/2 teaspoon vanilla extract - Pinch of salt The main ingredients for Caramel Latte Overnight Oats create a delightful mix. Rolled oats serve as the base. They soak up all the flavors and become creamy. Almond milk adds a nutty taste, but you can use any milk you like. Chia seeds are great for texture. They help thicken the oats and add nutrition. Caramel sauce gives the signature sweet taste. Use two tablespoons for a rich flavor. Maple syrup or honey sweetens the mix. I usually pick maple syrup for its unique taste. The instant coffee granules provide a nice coffee kick. A teaspoon adds just the right amount. Then there's the vanilla extract, which enhances all the flavors. Finally, remember the pinch of salt. It balances the sweetness and makes everything taste better. - Whipped cream - Chocolate shavings - Crushed nuts Toppings can elevate your oats. Whipped cream adds a fluffy finish. Chocolate shavings bring a touch of sweetness and fun. Crushed nuts add crunch and healthy fats. Feel free to mix and match toppings based on your mood. This way, every bowl can be a new treat. In a medium bowl, combine the rolled oats, chia seeds, and a pinch of salt. Mix well to ensure everything is evenly distributed. This step is crucial for a balanced flavor and texture. The chia seeds will help thicken the oats, making them creamy. In a separate bowl, whisk together the almond milk, 2 tablespoons of caramel sauce, maple syrup, instant coffee granules, and vanilla extract. Mix until smooth. The caramel and coffee will bring a rich flavor to your oats. This mixture creates a sweet and creamy base that enhances the whole dish. Pour the milk mixture over the dry oat mixture. Stir gently to combine everything evenly. Make sure all the oats are coated with the liquid. Next, divide the mixture into two mason jars or airtight containers. Seal them tightly and refrigerate overnight. This soaking time allows the oats to absorb the liquid and thicken. In the morning, take the jars from the fridge and give the oats a good stir. If the oats are too thick, add a splash of almond milk to reach your desired consistency. Top each jar with whipped cream if you like. Drizzle extra caramel sauce on top. You can also add chocolate shavings or crushed nuts for extra flavor and texture. Enjoy your delicious breakfast! To get the right texture, adjust the almond milk. If you want thicker oats, add less milk. For creamier oats, use more milk. This lets you control how your oats feel. Start with one cup of almond milk and tweak it to your taste. You can make your oats even tastier. Try different caramel sauces or flavored syrups. Each type gives a new twist to your breakfast. You might like a salted caramel sauce for a sweet and salty mix. Or, use hazelnut syrup for a fun change. Meal prep is key for busy mornings. You can make these oats up to five days ahead. Just store them in the fridge in sealed jars. This way, you save time and still enjoy a great breakfast. Make a few jars at once for a quick grab-and-go option. {{image_4}} You can make your Caramel Latte Overnight Oats even more fun. Try adding cocoa powder for a mocha twist. This gives a rich chocolate flavor that pairs well with coffee. You can also switch the milk. Using coconut milk adds a creamy, tropical feel. Oat milk is another great choice. It has a mild taste and blends well with other flavors. If you want a change in sweetness, use agave syrup instead of maple syrup. Agave has a milder flavor, which lets the caramel shine. You can also try stevia for a low-calorie option. Just remember, stevia is much sweeter than sugar. Use it sparingly to avoid overpowering your oats. Fruits and nuts can boost both taste and nutrition. Adding sliced bananas brings natural sweetness and creaminess. Berries like strawberries or blueberries add a tart kick. They also look beautiful on top. For crunch, sprinkle some crushed nuts or chocolate shavings. They add texture and flavor, making your breakfast even more special. To keep your caramel latte overnight oats fresh, store them in airtight containers. Glass mason jars work great for this. Make sure to seal them tightly to lock in moisture and flavor. Keep them in the fridge for the best taste. Avoid leaving them open, as this can lead to drying out. You can freeze your overnight oats if you want to make them ahead. Just fill your jars, but leave some space at the top. This space allows for expansion as the oats freeze. To thaw, move them to the fridge overnight before eating. If they seem too thick after thawing, add a splash of almond milk to regain creaminess. These oats stay tasty for about five days in the fridge. The flavor and texture will be best during this time. After five days, they may still be safe to eat, but the taste might change. Always check for any odd smells or textures before eating. Yes, by using plant-based alternatives. You can swap almond milk for any plant milk. Use maple syrup instead of honey. This keeps it dairy-free and still tasty. Generally, they last up to 5 days if stored properly. Store them in airtight containers. This way, they stay fresh and ready for your busy mornings. Yes, but you need to adjust the recipe. Steel-cut oats soak up more liquid. Use 1.5 cups of liquid. Let them soak longer too, about 8-12 hours. This ensures they become soft and creamy. Caramel Latte Overnight Oats blend simple ingredients into a tasty treat. You start with oats, milk, and chia seeds, then mix in caramel and coffee. These oats make a great meal prep option for busy days. Remember, you can customize the flavor with toppings or fruit. Store them in the fridge for up to five days or freeze for later. This recipe offers a quick, delicious breakfast that fits your mornings perfectly. Keep experimenting to find your best mix!

Caramel Latte Overnight Oats Tasty Breakfast Bowl

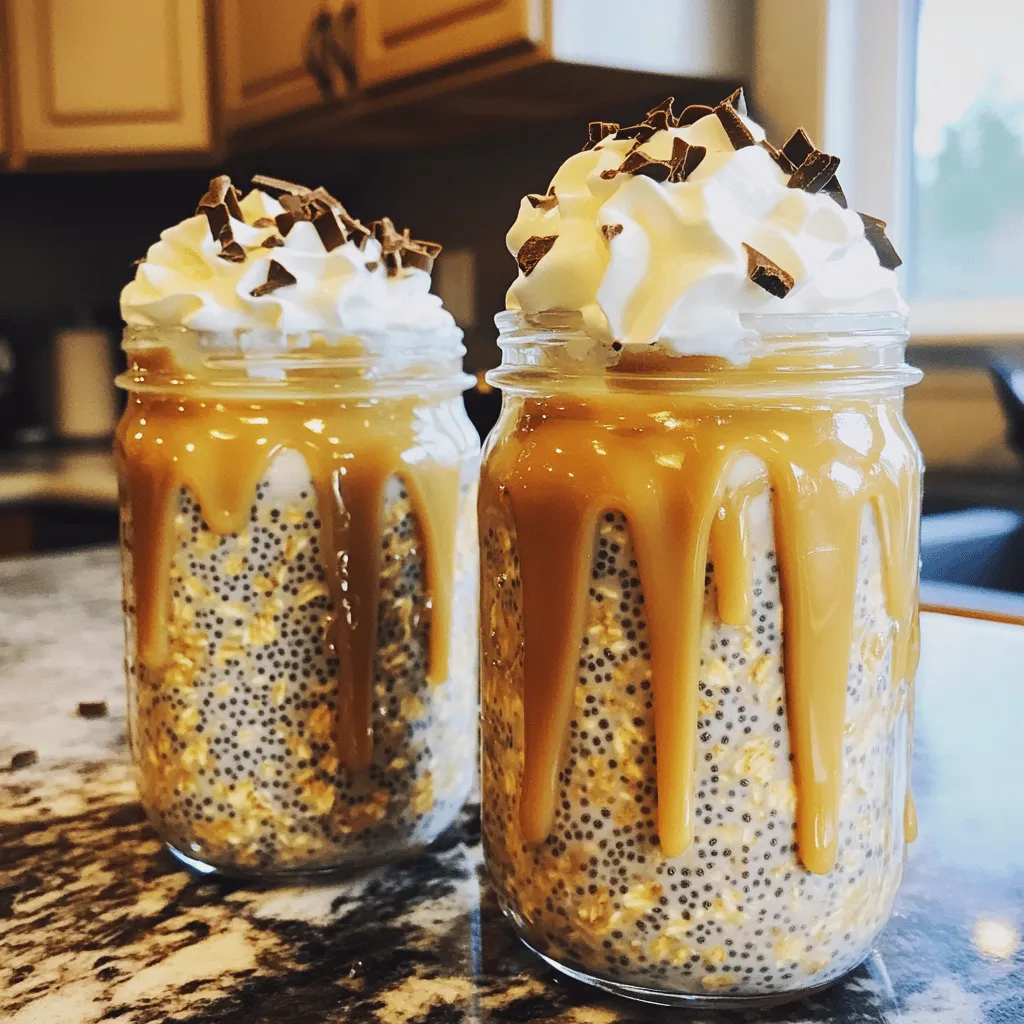
Start your day with a delightful twist: Caramel Latte Overnight Oats! This tasty breakfast bowl mixes the rich flavors of

- 2 cups cooked chicken, shredded - 1 cup BBQ sauce (your choice) - 2 cups shredded cheddar cheese - 1 cup corn kernels (fresh or frozen) - 1 red bell pepper, diced - 1 green bell pepper, diced - 1/2 red onion, finely chopped - 8 large flour tortillas - Fresh cilantro, chopped (for garnish) - Sour cream and salsa (for serving) The main ingredients make this dish shine. The cooked chicken adds protein and flavor. BBQ sauce gives it a sweet and smoky taste. Cheddar cheese melts beautifully, creating a rich, gooey texture. Next, we have the additional ingredients. Corn adds a nice crunch and sweetness. The red and green bell peppers bring color and freshness. Finally, the red onion adds a bit of spice. For garnishes, I love using fresh cilantro. It adds a bright note. Sour cream and salsa are perfect for dipping. They balance the dish with creaminess and tang. This mix of ingredients makes the Sheet-Pan BBQ Chicken Quesadillas a hit. You can customize it based on what you have at home. Enjoy the process of making this fun meal! - Preheat the oven and line the baking sheet: Start by setting your oven to 400°F (200°C). This ensures the quesadillas cook evenly. Line a large baking sheet with parchment paper to stop them from sticking. - Mix the BBQ chicken filling and other ingredients: In a big bowl, combine the shredded chicken and BBQ sauce. Make sure every piece of chicken gets coated. Then, add in the corn, diced red and green bell peppers, and the chopped red onion. Stir well until everything is mixed. - Layer tortillas with BBQ mixture and cheese: Take four tortillas and lay them on a clean surface. Spoon the BBQ chicken mixture evenly onto each tortilla. Spread it out to cover as much area as possible. Add a good amount of shredded cheddar cheese on top of the chicken mixture. - How to stack and transfer to the baking sheet: Carefully place another tortilla on top of each one, making a sandwich. Gently lift each quesadilla and place them onto the lined baking sheet. - Baking time and temperature details: Slide the baking sheet into your preheated oven. Bake the quesadillas for about 15-20 minutes. Watch them closely until the tortillas turn a nice golden brown and the cheese melts. - Tips for achieving a crispy texture: For extra crunch, flip the quesadillas halfway through baking. This helps both sides get crispy. Lightly spraying the tops with olive oil also helps them brown nicely. Selecting the best BBQ sauce Choosing the right BBQ sauce makes a big difference. Look for sauces that suit your taste. Sweet, tangy, or spicy options can change the whole dish. Homemade sauces let you control the flavor, but store-bought ones are great too. Adding spices for extra flavor Spicing up your BBQ chicken adds depth. Try adding a pinch of smoked paprika or chili powder. A bit of garlic powder can also enhance the taste. Mix these spices into your BBQ sauce or the chicken for a flavor boost. Techniques for crispy quesadillas For crispy quesadillas, apply olive oil spray before baking. This helps the tortillas crisp up nicely. Flipping them halfway through cooking also helps them get golden on both sides. How to avoid soggy tortillas To prevent soggy tortillas, use a light hand with the BBQ sauce. If you add too much, it can make the tortillas wet. Also, bake them right after you assemble them. This keeps them crisp. Time-saving tips for shredded chicken Using a rotisserie chicken is a quick way to get cooked chicken. Just shred it and mix with your BBQ sauce. This saves time and gives you great flavor. Using leftovers effectively If you have leftover quesadillas, they can be a fun snack. You can also use any extra filling in salads or wraps. This keeps your meals tasty and reduces waste. {{image_4}} You can switch up the protein in your quesadillas. Try using pork or beef instead of chicken. Both meats work well with BBQ sauce and add a nice flavor. If you prefer a vegetarian option, use black beans or mushrooms. These choices keep the quesadillas hearty and tasty while staying meat-free. BBQ sauce is key in these quesadillas. Go for a spicy sauce if you like heat. A sweet BBQ sauce can also add a great twist. You can also mix sauces for a unique flavor. Don’t forget to add different veggies like spinach or zucchini. You can even try various cheeses like Monterey Jack or pepper jack to change the taste. Pair your quesadillas with tasty sides. Coleslaw is a crunchy option that complements BBQ flavors. Rice is another great choice, especially if you serve it with beans. For fun, you can cut quesadillas into smaller pieces to make sliders. Mini versions are perfect for parties or snacks. Enjoy experimenting with these ideas! To keep your leftover quesadillas fresh, place them in an airtight container. Line each layer with parchment paper to avoid sticking. Keep them in the fridge. They will last for 3 to 4 days. It’s best to eat them sooner for the best taste and texture. If you want to save quesadillas for later, you can freeze them. Wrap each quesadilla in plastic wrap, then place them in a freezer-safe bag. This helps keep them fresh for up to 2 months. To reheat, let them thaw in the fridge overnight. This keeps the filling juicy and the tortillas soft. To warm up your quesadillas, use an oven or skillet. Preheat your oven to 350°F (175°C). Place quesadillas on a baking sheet and heat for 10-15 minutes. If using a skillet, heat on medium for 3-4 minutes on each side. This keeps them crispy. Avoid the microwave, as it makes them soggy. Yes, you can use different cheeses. Popular choices include Monterey Jack, pepper jack, or even mozzarella. Each cheese melts differently. Cheddar gives a sharp taste. Monterey Jack adds creaminess. Pepper jack brings a spicy kick. Try mixing cheeses for more flavor. This can make your quesadillas even tastier. No worries! You can cook raw chicken quickly. Boil or grill it until fully cooked. You can also use rotisserie chicken for a fast option. If you have leftover chicken, that works too! Shred it and mix it with BBQ sauce. This way, you can enjoy your quesadillas even without prepped chicken. To make crispy quesadillas, follow these tips. First, spray the tops with olive oil. This helps them brown nicely. Second, flip them halfway through baking. This ensures even crispiness. Lastly, bake them until golden brown. If you want, use a skillet instead. A hot skillet can give a great crunch! This article shared an easy recipe for delicious BBQ chicken quesadillas. You learned about essential ingredients, like shredded chicken and cheese, and how to mix them. We explored tips to enhance flavors and achieve the perfect texture. Variations and storage options ensure you can adapt this dish effortlessly. With these simple steps and insights, you can make tasty quesadillas that suit your taste. Enjoy cooking and experimenting with your own unique touches!

Sheet-Pan BBQ Chicken Quesadillas Quick and Easy Meal

Looking for a fast and tasty meal? Let me introduce you to Sheet-Pan BBQ Chicken Quesadillas! This recipe combines juicy

Crust components - 1 cup graham cracker crumbs - 1/4 cup unsweetened cocoa powder - 1/3 cup unsalted butter, melted The crust of these bars is rich and tasty. Graham cracker crumbs give a nice crunch. Cocoa powder adds a chocolatey flavor. Melting the butter helps bind it all together. Cheesecake filling components - 1 cup cream cheese, softened to room temperature - 1 cup powdered sugar - 1 teaspoon pure vanilla extract - 1 cup heavy whipping cream - 4 fun-size Snickers bars, chopped into small pieces - 1/4 cup caramel sauce, plus extra for drizzling - 1/4 cup roasted peanuts, chopped The filling is creamy and smooth. Cream cheese provides a rich base. Powdered sugar sweetens it up nicely. Vanilla extract adds depth. Whipping cream makes it light and fluffy. Chopped Snickers and peanuts give a fun crunch. Optional toppings and garnishes - Additional Snickers and caramel for topping Toppings are a great way to dress up your bars. Adding more Snickers makes it extra special. Drizzling caramel on top will make it look fancy. These simple touches really elevate the dish. To start, gather your ingredients for the crust. You need: - 1 cup graham cracker crumbs - 1/4 cup unsweetened cocoa powder - 1/3 cup unsalted butter, melted In a medium bowl, mix the graham cracker crumbs and cocoa powder. Pour in the melted butter. Stir until the mixture looks like wet sand. This means all crumbs are coated. Next, line an 8x8 inch baking dish with parchment paper. Leave some paper over the sides. This helps with easy removal later. Firmly press the crumb mixture into the bottom. Make sure it is even. Place the dish in the fridge for 15 minutes to set the crust. Now, let’s make the filling. You will need: - 1 cup cream cheese, softened - 1 cup powdered sugar - 1 teaspoon pure vanilla extract - 1 cup heavy whipping cream - 4 fun-size Snickers bars, chopped - 1/4 cup caramel sauce - 1/4 cup roasted peanuts, chopped In a large bowl, beat the cream cheese until smooth. Use a hand mixer on medium speed. Slowly add the powdered sugar and vanilla. Mix until fully combined. In another bowl, whip the heavy cream until stiff peaks form. Be careful not to over-whip. You want it light and airy. Gently fold the whipped cream into the cream cheese mixture. Use a spatula and keep it airy. Once mixed, fold in the chopped Snickers, caramel sauce, and chopped peanuts. This adds a nice crunch. Pour the cheesecake filling over the chilled crust. Use a spatula to spread it evenly. Smooth the top for a nice finish. Cover the dish with plastic wrap. Refrigerate for at least 4 hours. This helps the bars firm up. Once ready, lift the cheesecake out using the parchment paper. Place it on a cutting board and slice into 12 bars. Drizzle with extra caramel sauce and sprinkle with more Snickers if you like. Enjoy every bite of your easy and delicious creation! To make a great crust, use fresh graham cracker crumbs. If your crumbs are old, the crust can be dry. Mix the graham cracker crumbs with cocoa powder. This adds a rich flavor. Melt the butter and pour it in. Stir until it looks like wet sand. Press the mix firmly into the baking dish. A tight crust holds the filling well. Chill it for 15 minutes to set. This helps the crust stay firm. Whipping cream gives your cheesecake a light and airy feel. Use cold heavy cream for the best results. Start mixing on medium speed. Watch closely as it thickens. Stop when you see stiff peaks. Over-whipping can make it grainy. Gently fold it into the cream cheese mix. This keeps the air in. The goal is a smooth, fluffy texture that feels like a cloud. To serve, lift the cheesecake bars out using the parchment paper. Slice them into 12 bars for easy sharing. Use a nice cutting board to make it look great. Drizzle caramel sauce over the top for a shiny finish. Sprinkle chopped Snickers on each bar for crunch. For a festive touch, arrange them on a decorative platter. This makes your dessert stand out at any gathering. Enjoy every delicious bite! {{image_4}} You can switch Snickers with other candy bars. Try Milky Way for a smooth caramel taste. Reese's Peanut Butter Cups add a nutty twist. Kit Kat offers a crispy crunch. Each choice brings a new flavor, keeping your dessert exciting. To make this dessert gluten-free, use gluten-free graham crackers. You can find them at most stores. Check the labels to ensure they meet your needs. The rest of the recipe stays the same, so you won’t lose any taste. You can make this cheesecake a bit healthier. Swap regular cream cheese for low-fat cream cheese. Use coconut cream instead of heavy cream for a lighter option. You can also cut back on sugar by using a sugar substitute. These changes keep the taste while making it a bit better for you. To keep your No-Bake Snickers Cheesecake Bars fresh, store them in an airtight container. Place a layer of parchment paper between the bars to prevent sticking. This method helps maintain the texture. You can keep them in the fridge for up to five days. If you notice any signs of spoilage, it's best to toss them. You can freeze these cheesecake bars for longer storage. First, cut the bars into squares. Wrap each piece tightly in plastic wrap. Then, place the wrapped bars in a freezer-safe bag or container. They can last up to three months in the freezer. Just remember to label the container with the date. When you're ready to enjoy your frozen cheesecake bars, thaw them in the fridge overnight. This gentle method helps keep the texture smooth. Avoid using a microwave for thawing, as it can make the bars soggy. Once thawed, you can drizzle on extra caramel sauce and sprinkle more chopped Snickers for a fresh look. Yes, you can use Greek yogurt instead of cream cheese. Greek yogurt gives a tangy taste. It makes the cheesecake a bit lighter too. Just use the same amount. The texture may differ slightly, but it will still taste great. These cheesecake bars can last up to five days in the fridge. Be sure to store them in an airtight container. This keeps them fresh and safe from odors. After five days, they may start to lose their taste and texture. Absolutely! You can make these cheesecake bars a day or two ahead of time. This gives them time to set well in the fridge. They taste even better after chilling overnight. Just cover them well to prevent any drying out. If you want to switch it up, try using Reese's Peanut Butter Cups or Milky Way bars. You can even use any chocolate or caramel candy you like. Just chop them up and fold them into the cheesecake mixture. This gives you a fun new twist on the dessert! This blog post covers everything you need to make perfect cheesecake bars. We explored ingredients, from the crust to toppings, and outlined step-by-step instructions. I shared tips for a flawless crust and creative serving ideas. We also discussed variations for specific diets and how to store leftovers. Now, you have the tools and knowledge to create delicious cheesecake bars. Enjoy your baking and impress friends with your treats!

No-Bake Snickers Cheesecake Bars Easy and Delicious

Craving something sweet and easy? Try my No-Bake Snickers Cheesecake Bars! These bars combine a rich, creamy cheesecake filling with

For this coconut lime chicken curry, I choose 2 lbs of boneless, skinless chicken thighs. They stay tender and juicy during cooking. Thighs absorb the curry flavors well, making every bite rich and delicious. The vegetables and aromatics bring extra flavor and texture. I use: - 1 bell pepper (red or yellow), sliced into strips - 1 medium onion, diced - 4 cloves garlic, finely minced - 1 tablespoon fresh ginger, finely grated These ingredients add depth and freshness to the dish. The bell pepper adds a bit of sweetness, while the onion and garlic create a wonderful base flavor. Ginger gives a zesty kick that pairs well with coconut. The creamy coconut curry base makes this dish special. Here is what you need: - 1 can (13.5 oz) full-fat coconut milk - 1 cup low-sodium chicken broth - 2 tablespoons red curry paste - 2 tablespoons fresh lime juice - Zest of 1 lime - 1 tablespoon fish sauce (optional) - 2 teaspoons packed brown sugar - Salt and black pepper to taste The coconut milk makes the curry rich and creamy. The chicken broth adds depth. Red curry paste and lime juice bring heat and brightness. If you want a stronger taste, fish sauce is a great choice. Brown sugar balances the spices and adds a hint of sweetness. Start by mixing the coconut milk, chicken broth, and red curry paste. Add grated ginger and minced garlic for a strong flavor. Then, squeeze in fresh lime juice and add lime zest. If you want, include fish sauce for depth. Finally, whisk in the brown sugar. This mixture is your base. It brings all the flavors together. Now, take your chicken thighs and cut them into bite-sized chunks. Place them in a single layer at the bottom of your slow cooker. This helps them cook evenly. Next, pour your coconut milk mixture over the chicken, making sure it covers all the pieces. This step ensures the chicken absorbs all those tasty flavors. Next, it’s time for the veggies. Slice your bell pepper into strips and dice the onion. Scatter these over the chicken and curry mix. Press them down gently so they are submerged. This helps them cook well and soak in the sauce, adding more flavor to your dish. Cover your slow cooker with the lid. Set it to low heat for 6-8 hours. If you are short on time, set it to high heat for 3-4 hours. The goal is to let the chicken become tender and soak up all the curry goodness. The longer you cook, the more flavors blend together. After cooking, taste your curry. Add salt and pepper if needed. If you want a stronger lime flavor, add more lime juice. To serve, scoop the curry over fluffy jasmine rice. Garnish with fresh cilantro leaves for a bright touch. This not only looks good but also tastes amazing! For the best texture, use boneless, skinless chicken thighs. They stay moist and tender. Cut them into bite-sized chunks to help them cook evenly. When layering the chicken in the slow cooker, aim for a single layer. This allows the chicken to absorb more flavor and cook consistently. To boost flavor, don’t skip the fresh ginger and garlic. They add depth and warmth. The red curry paste contributes a nice kick. If you want more zest, add an extra splash of lime juice before serving. A sprinkle of fresh cilantro at the end adds brightness. If you like umami, consider adding fish sauce for richness. One common mistake is overcooking the chicken. Set your slow cooker appropriately, and check the meat after a few hours. Another mistake is not seasoning to taste. Always taste the curry before serving. Adjust the salt and pepper as needed to make it perfect. Lastly, don’t forget the rice! This dish pairs wonderfully with fluffy jasmine rice. {{image_4}} You can change the protein in this dish easily. Chicken thighs are great, but you can try chicken breast for a leaner option. For a twist, use shrimp. Just add them in the last 30 minutes of cooking. Tofu works well too, especially if you want a vegetarian meal. Make sure to use firm tofu for the best texture. Feel free to add more veggies to your curry. You can toss in carrots, peas, or even sweet potatoes. These will add color and nutrition. Broccoli or cauliflower also work well. Just cut them into small pieces so they cook evenly. Add your veggies in the last hour of cooking for the best texture. If you like your curry spicy, add more red curry paste. Start with one extra teaspoon, then taste it. You can also add fresh chilies or red pepper flakes for heat. If you prefer milder flavors, reduce the red curry paste. A little coconut milk will help balance the heat too. After you finish your meal, store any leftover coconut lime chicken curry in an airtight container. Keep it in the fridge for up to four days. Make sure to let it cool down before sealing it. This helps keep the curry fresh and tasty. If you want to keep it longer, freezing is a great option. Pour the cooled curry into a freezer-safe container. Leave some space at the top for expansion. Seal it tightly and label the container with the date. You can freeze it for up to three months. When you're ready to eat it, thaw it overnight in the fridge. To reheat your curry, you have a few options. For the best flavor, use the stove. Pour the curry into a pot and heat it over medium heat. Stir often until it is hot. You can also use the microwave. Place the curry in a microwave-safe bowl. Cover it with a lid or microwave-safe wrap. Heat in short bursts, stirring in between, until warmed through. If the curry seems thick, add a splash of chicken broth or water to loosen it up. Yes, you can use chicken breast. Chicken breast cooks faster and is leaner. However, thighs are juicier and more flavorful. If you use breasts, check for doneness after 3 hours on high heat. If you lack red curry paste, you can make a substitute. Mix equal parts of curry powder and paprika. Add a pinch of cayenne for heat. This will give you a similar flavor profile but may taste slightly different. To make this curry vegetarian or vegan, replace chicken with tofu or chickpeas. Use vegetable broth instead of chicken broth. Make sure the fish sauce is omitted or swapped with soy sauce for flavor. Serve this curry with fluffy jasmine rice. The rice helps soak up the tasty sauce. You can also pair it with naan bread or a fresh green salad for a balanced meal. Enjoy the mix of flavors and textures! This blog post covered the key ingredients and steps for a delicious Coconut Lime Chicken Curry. We discussed the main protein, vegetables, and spice base to create rich flavors. I detailed helpful tips to avoid common mistakes and shared tasty variations for all diets. Storing and reheating leftovers is also easy. As you explore making this dish, remember to be creative! Enjoy the process and make it your own. Happy cooking!

Slow Cooker Coconut Lime Chicken Curry Delight

Looking for an easy yet flavorful meal? You’ll love my Slow Cooker Coconut Lime Chicken Curry Delight! This dish combines

- 1 pound ground turkey - 2 cloves garlic, finely minced - 1 tablespoon fresh parsley, finely chopped - 1 tablespoon fresh basil, finely chopped - 1 teaspoon dried oregano - 1 teaspoon onion powder - 1/2 teaspoon smoked paprika - Salt and pepper to taste The first key to great turkey burgers is the ground turkey. I always pick lean turkey for a nice texture. The garlic adds a punch of flavor. I love using fresh herbs like parsley and basil. They give the burgers a fresh taste. Dried oregano, onion powder, and smoked paprika add depth. Always season with salt and pepper. This step is crucial for flavor. - 4 whole wheat burger buns - 1 cup mixed greens - Sliced tomatoes - Avocado slices (optional) For the assembly, I choose whole wheat buns for a healthy twist. The mixed greens add crunch and color. Ripe tomatoes bring juiciness to each bite. If you like, add avocado slices for creaminess. This combination makes each burger not just tasty but also colorful and inviting. Enjoy customizing your burger with these fresh toppings! First, gather your ingredients. In a large mixing bowl, add the ground turkey, minced garlic, chopped parsley, chopped basil, dried oregano, onion powder, smoked paprika, and a good pinch of salt and pepper. Mix gently using your hands. Be careful! Overmixing can make the burgers tough. You want a nice blend without squeezing the meat too hard. Next, divide your mixture into four equal parts. Shape each part into a patty. Aim for about a half-inch thick. This thickness helps them cook evenly. Preheat your grill or skillet to medium-high heat. Lightly coat it with olive oil to stop the burgers from sticking. When hot, place the patties on the grill. Cook them for about 5-6 minutes on one side. You want a nice golden-brown crust. Flip them over and cook for another 5-6 minutes. To be safe, check that they reach an internal temperature of 165°F. This ensures they are fully cooked and safe to eat. While the burgers finish cooking, it’s time to toast the buns. In the last minute, place the cut sides of the buns down on the grill or skillet. Toasting adds a nice crunch and flavor. Just keep an eye on them so they don’t burn! To make juicy turkey burgers, avoid dryness. Use fresh ground turkey. Mix gently. Overmixing can lead to tough burgers. Keep seasoning simple. Garlic and herbs add a lot of flavor. - Use equal parts parsley and basil for a fresh taste. - Add a pinch of smoked paprika to enhance the flavor. - Adjust salt and pepper to suit your taste. Both grilling and skillet cooking work well. Use grilling for a smoky flavor. It gives great marks and a nice crust. Skillet cooking is ideal for year-round cooking. It allows for better control of the heat. - Grilling works best on warm days. - Skillet cooking is great for indoor meals. Pair these turkey burgers with tasty sides. Sweet potato fries complement the meal well. They add a sweet crunch. A fresh salad with mixed greens is also a good choice. - Try adding avocado slices for a creamy touch. - Serve with sliced tomatoes for added freshness. {{image_4}} You can make your turkey burgers even better with tasty add-ins. Consider adding cheese like cheddar or feta. A slice of melty cheese adds richness. You can also try sauces like BBQ sauce or sriracha for spice. Mixing in other herbs, like cilantro or thyme, gives your burgers a unique twist. If you want a change from grilling, try baking or air frying. For baking, preheat your oven to 375°F (190°C). Place the patties on a baking sheet and cook for about 20-25 minutes. This method helps keep them juicy. Air frying is quick and easy too. Preheat your air fryer to 375°F (190°C) and cook the patties for 12-15 minutes. Both methods make for a healthier option. You can make these burgers fit your diet. For low-carb choices, skip the bun and serve with lettuce wraps. This keeps the meal light and fresh. If you need gluten-free options, use gluten-free buns or lettuce. You can also check labels on sauces and seasonings to ensure they are gluten-free. These adjustments keep the flavor while meeting your needs. To keep your leftover turkey burgers fresh, store them in an airtight container. Make sure to refrigerate them within two hours of cooking. They will stay good for about three to four days. If you want to keep them longer, consider freezing them. Always let them cool fully before wrapping or placing them in the fridge. When reheating your turkey burgers, aim for safe methods. You can use a microwave, but I prefer using a skillet. Heat the skillet over medium heat, add a touch of olive oil, and warm each side for about three to four minutes. This keeps the flavor and texture just right. If using the microwave, cover the burger with a damp paper towel. This helps keep moisture in and prevents it from drying out. Freezing turkey burgers is easy! First, let them cool completely. Then, wrap each patty in plastic wrap or foil. Place the wrapped patties in a freezer bag. Be sure to label the bag with the date. They can last for about three months in the freezer. When you want to use them, move them to the fridge to thaw overnight. This helps keep the burgers juicy when you cook them again. Turkey burgers cook in about 10 to 12 minutes. Start by grilling each side for 5 to 6 minutes. You want a golden crust on the outside. Use a meat thermometer to check the internal temperature. It should read 165°F (75°C). This ensures the burger is safe to eat. Cooking times may vary based on the heat of your grill or skillet. Yes, you can use ground chicken. It has a similar texture and flavor. However, chicken tends to be a bit dryer than turkey. To keep it moist, you might add a splash of broth or a little extra oil. The taste will also change slightly, but it can still be delicious. Turkey burgers pair well with many sides. You can serve them with sweet potato fries for a fun twist. A light salad can add freshness to the meal. Other great options include coleslaw or grilled vegetables. For a hearty meal, consider baked beans or corn on the cob. Get creative and mix your favorite sides! This blog post covered everything you need to make great turkey burgers. We outlined key ingredients, steps for mixing and cooking, and tips for perfection. You learned about different cooking methods and flavor variations. Remember, keeping burgers moist matters. Pair your burgers with fresh sides for a complete meal. With practice, your turkey burgers will impress anyone. Enjoy crafting delicious meals that everyone will love.

Minute Garlic Herb Turkey Burgers Easy Homemade Recipe

Are you ready for a quick and tasty meal? These Minute Garlic Herb Turkey Burgers are perfect for busy nights

Older posts
Newer posts
← Previous Page1 … Page22 Page23 Page24 … Page83 Next →

dsad

© 2026 eataroundit • Built with GeneratePress

Our Policies

  • Copyright Policy
  • Cookie Policy
  • GDPR Policy
  • Privacy Policy
  • Disclaimer
  • Terms Of Use

More Information

  • Home
  • About
  • Contact
  • Appetizers
  • Dessert
  • Dinner
  • Drinks
©2026, eataroundit About Back To Top