Skip to content
DisclaimerTerms Of UseGDPR PolicyCookie Policy

eataroundit

  • Home
  • Drinks
  • Appetizers
  • Dinner
  • Dessert
  • About
  • Contact
  • Privacy Policy
DisclaimerTerms Of UseGDPR PolicyCookie Policy

NO-ING-IMG

- 1 large head of cauliflower, cut into bite-sized florets - 1/4 cup Sriracha sauce - 2 tablespoons honey - 1 tablespoon extra virgin olive oil - 1 teaspoon garlic powder - 1 teaspoon onion powder - 1/2 teaspoon sea salt - 1/2 teaspoon freshly ground black pepper - 1 tablespoon sesame seeds - Fresh cilantro, finely chopped For this Air Fryer Sriracha Honey Cauliflower, you need simple, fresh items. The star is the cauliflower. A large head, cut into bite-sized pieces, works best. This size allows for even cooking and perfect bites. Next, you'll want the Sriracha sauce. It brings heat and flavor. Pair it with honey for sweetness. The honey helps balance the spice. Together, they create a tasty glaze. Don't forget the olive oil. Just a tablespoon adds a rich flavor and helps the spices stick. For seasoning, garlic and onion powder add depth. Sprinkle in some sea salt and black pepper. These enhance the overall taste and make each bite pop. Finally, for garnishing, sesame seeds and fresh cilantro add a nice finish. The seeds add crunch, while cilantro gives a fresh touch. Gather these ingredients, and you are ready for a delicious dish that's sure to impress! Set your air fryer to 375°F (190°C). This helps the cauliflower cook evenly and become crispy. Take a large bowl and add bite-sized cauliflower florets. Pour in the olive oil, garlic powder, onion powder, sea salt, and black pepper. Toss everything together. Make sure each floret gets a nice coating of the oil and spices. In a small bowl, whisk together the Sriracha sauce and honey. Mix until it is smooth. This sauce brings the sweet and spicy flavors that make this dish special. Pour the Sriracha-honey mixture over the seasoned cauliflower. Toss gently until all the florets are covered in the sauce. This step is key for flavor. Place the coated cauliflower in the air fryer basket. Try not to overcrowd it. Cook for 12-15 minutes, shaking the basket halfway. This helps to crisp them up nicely. Once cooked, transfer the cauliflower to a serving platter. Sprinkle sesame seeds and chopped cilantro on top. This adds color and flavor, making it look inviting. Enjoy the crunch with every bite! To make sure your cauliflower cooks evenly, avoid overcrowding the air fryer. Place the florets in a single layer. If they are too close, they will steam instead of crisping up. Cook in batches if needed. You want each piece to have space for hot air to flow around. This helps them become golden and crunchy. Want more heat? Add extra Sriracha! For less spice, reduce the amount. You can also mix in some other sauces, like BBQ or teriyaki, if Sriracha is too much for your taste. This way, you can find the perfect balance of sweet and spicy for your dish. Experiment to find what you like best! For super crispy bites, make sure to toss the cauliflower thoroughly in oil and seasonings. This helps the cauliflower achieve that crunchy texture. Shake the air fryer basket halfway through cooking. This ensures every side gets that beautiful crispiness. The result is a tasty treat you can't resist! {{image_4}} If you want a vegan option, you can easily swap out honey. Use maple syrup or agave instead. Both will add sweetness without losing flavor. This change keeps the dish plant-based and still delicious. Feel free to mix up the flavors! You can try different sauces like barbecue or teriyaki. Adding spices like paprika or cumin can give it a new twist. Experimenting with these options will make the dish unique every time. Air Fryer Sriracha Honey Cauliflower pairs well with many sides. Serve it with rice to soak up the sauce. A fresh salad adds a nice crunch and balance. This makes for a well-rounded meal that everyone will enjoy. To keep your Air Fryer Sriracha Honey Cauliflower fresh, store leftovers in an airtight container. Place it in the fridge. This helps maintain flavor and texture. You can keep it for about 3 to 4 days. Before serving, check for any off smells or signs of spoilage. For the best taste and crunch, reheat in the air fryer. Set it to 350°F (175°C). Heat for about 5 to 7 minutes. This method revives the crispiness. You can also use a microwave, but it may make the bites softer. If using the microwave, heat in short bursts to avoid overcooking. To freeze your cauliflower bites, let them cool completely first. Then, spread them in a single layer on a baking sheet. Place them in the freezer for about 1 hour. Once frozen, transfer the bites to a freezer-safe bag. Squeeze out excess air and seal tightly. They can last up to 3 months. To thaw, simply place them in the fridge overnight before reheating. Yes, you can bake Sriracha honey cauliflower in a traditional oven. Preheat your oven to 400°F (200°C). Prepare the cauliflower as described in the recipe. Spread the coated florets in a single layer on a baking sheet lined with parchment paper. Bake for 20-25 minutes, flipping them halfway through. This method will give you tasty, roasted cauliflower. Air Fryer Sriracha honey cauliflower pairs well with many dishes. Here are some ideas to get you started: - Rice: Serve over white or brown rice for a hearty meal. - Salads: Add to a fresh salad for extra crunch and flavor. - Dips: Pair with ranch or yogurt for a cooling contrast. - Wraps: Stuff in wraps or tacos for a fun twist. Cooking cauliflower in an air fryer takes about 12-15 minutes at 375°F (190°C). Shake the basket halfway through to ensure even cooking. You want the florets to be golden brown and crispy. This quick cooking method gives you a delicious and healthy snack or side dish. In this blog post, you learned how to make crispy Air Fryer Sriracha Honey Cauliflower. We covered the main ingredients, simple steps, and helpful tips for perfect results. Remember, you can adjust spice levels and even make a vegan version. Fresh garnishes add a nice touch. Enjoy serving these bites with rice or salads. With easy storage and reheating options, they’ll stay tasty. I hope you try this fun recipe soon and enjoy the flavor!

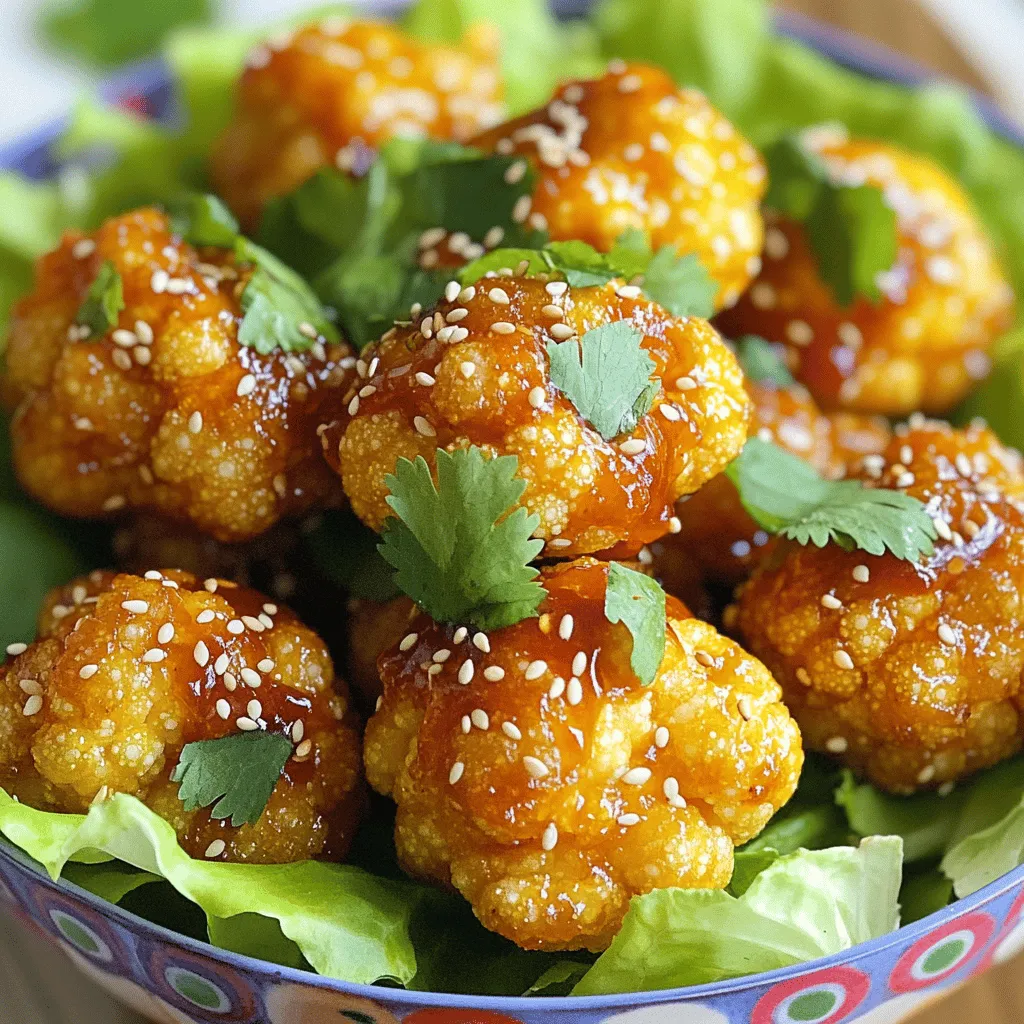
Air Fryer Sriracha Honey Cauliflower Flavorful Delight

Are you ready for a bold, delicious snack? Air Fryer Sriracha Honey Cauliflower brings heat and sweet together in every

Here’s what you need for this dish: - 2 tablespoons extra virgin olive oil - 4 boneless, skinless chicken thighs - Sea salt and freshly cracked black pepper to taste - 1 teaspoon dried oregano - Zest and juice of 1 fresh lemon - 1 bell pepper (any color), diced into bite-sized pieces - 1 small red onion, diced - 3 cloves garlic, minced - 1 cup uncooked orzo pasta - 3 cups low-sodium chicken broth - 1 cup cherry tomatoes, halved - 1 cup fresh spinach leaves - 1/4 cup feta cheese, crumbled - Chopped fresh parsley for garnish You can swap chicken thighs for chicken breasts if you prefer. They will still taste great. For a lighter dish, you can use zucchini noodles instead of orzo. If you want to skip the feta cheese, try goat cheese or omit it completely. For a more robust flavor, add more garlic or herbs like thyme. Using fresh ingredients makes a big difference. Fresh lemon juice brightens the dish. Fresh spinach adds a nice color and crunch. When you pick ripe tomatoes, they will burst with flavor. Fresh herbs really lift the dish. For the best taste, always choose the freshest options you can find. First, heat 2 tablespoons of olive oil in a large skillet over medium-high heat. While the oil heats, season 4 chicken thighs with sea salt, black pepper, and 1 teaspoon of dried oregano. When the oil shimmers, add the chicken thighs. Sear them for 5-6 minutes on each side until they turn golden brown. Once done, remove them from the pan and place them on a plate. In the same skillet, add 1 diced bell pepper and 1 small diced red onion. Sauté these for 3-4 minutes until they soften and the onions look clear. Next, add 3 minced garlic cloves and sauté for another minute until the garlic smells great. Once the veggies are tender, stir in 1 cup of uncooked orzo pasta. Let it toast for about a minute. Gradually pour in 3 cups of low-sodium chicken broth, along with the zest and juice of 1 fresh lemon. Mix everything well to spread the orzo evenly. Return the browned chicken thighs to the pan, placing them into the orzo mix. Bring the dish to a gentle simmer. Cover the pan and lower the heat. Cook for 15-20 minutes, stirring occasionally, until the orzo is al dente and absorbs most of the liquid. After the orzo cooks, gently fold in 1 cup of halved cherry tomatoes and 1 cup of fresh spinach leaves. Cook for another 2-3 minutes until the spinach wilts and the tomatoes warm up. Before serving, sprinkle the dish with 1/4 cup of crumbled feta cheese. Add chopped fresh parsley for a pop of color. For a rustic touch, serve directly from the skillet or plate into bowls. Garnish with extra lemon slices and parsley for a bright finish. Enjoy your meal! To get the best taste from your One-Pan Greek Lemon Chicken Orzo, use fresh herbs. Fresh oregano adds a bright note that dried herbs can’t match. Also, don’t skip the lemon zest; it gives a burst of flavor that makes this dish pop. When cooking, taste as you go. This way, you can adjust the salt and pepper to your liking. Adding a splash of lemon juice at the end brightens the dish even more. For juicy chicken, start with even-sized pieces. I recommend using boneless, skinless chicken thighs. They stay moist and cook evenly. When searing, don't overcrowd the pan. This helps develop a nice crust. Make sure the oil is hot before adding the chicken. You want that golden-brown color! After searing, let the chicken rest for a few minutes before adding it back to the pan. This helps keep the juices inside. To keep your orzo from sticking, stir it well after adding the broth. Use a wooden spoon to break up any clumps. Cooking it with sufficient liquid helps too. I suggest checking the orzo a few minutes before the cooking time ends. If it seems too dry, add a splash of extra broth or water. Stirring occasionally during cooking also helps prevent sticking. Remember, the goal is tender orzo that soaks up all that flavor! {{image_4}} You can easily switch up the protein in this dish. Try using shrimp, fish, or even turkey. If you like lamb, it works well too. Just adjust the cooking time based on what you choose. For shrimp, cook until they turn pink. For fish, ensure it flakes easily with a fork. If you want a meatless meal, replace the chicken with chickpeas or tofu. Both options add protein and texture. You can sauté the chickpeas with the veggies or add cubed tofu near the end to warm it through. This keeps the dish filling and hearty. Enhancing flavors is key! Add olives for a briny kick. Fresh herbs like dill or mint brighten the dish. You can also sprinkle in some red pepper flakes for heat. A splash of white wine while cooking gives depth to the sauce. Each tweak can make this dish feel new and exciting! After enjoying your One-Pan Greek Lemon Chicken Orzo, let it cool down. Store leftovers in an airtight container. It stays fresh in the fridge for up to three days. Be sure to separate chicken and orzo for better storage. To reheat, use the stove or microwave. If using the stove, add a splash of chicken broth. Heat gently over low heat, stirring often. In the microwave, cover the dish and warm in short bursts. Stir in between to heat evenly. You can freeze this dish, but it’s best to freeze before adding spinach and tomatoes. Store in a freezer-safe container for up to three months. When ready to eat, thaw overnight in the fridge and reheat as mentioned above. Yes, you can use brown rice. Brown rice adds a nutty flavor and a chewy texture. However, it takes longer to cook than orzo. You should adjust the cooking time to about 40-45 minutes. Make sure to add more broth to keep it moist. To spice things up, add red pepper flakes or cayenne pepper. Start with a pinch and taste as you go. You can also use spicy sausage instead of chicken for a kick. Another option is to add diced jalapeños when sautéing the veggies. If you don't have feta, try goat cheese or ricotta. Both will add creaminess and flavor. You can also use grated Parmesan for a different taste. For a dairy-free option, try nutritional yeast sprinkled on top. To change the serving size, just multiply the ingredients. If you want to cook for six, multiply each ingredient by 1.5. Make sure your pan is large enough to hold everything. Adjust the cooking time slightly if needed, especially for the orzo. This blog post covered key aspects of cooking with fresh ingredients. I shared a detailed list of what you need and options for substitutions. You learned how to cook chicken and veggies step by step, while ensuring great flavor and texture. Tips for perfecting your dish will help it stand out. You can also explore variations for different diets. Finally, I explained how to store and reheat leftovers safely. Following these tips will lead to tasty meals you’ll enjoy every time. Cooking can be simple and fun!

One-Pan Greek Lemon Chicken Orzo Easy and Delicious

Are you ready to whip up a meal that’s both simple and bursting with flavor? Dive into my recipe for

- 1 cup fresh strawberries, hulled and chopped - 1/2 cup Greek yogurt (plain or vanilla) - 1 scoop vanilla protein powder - 1 tablespoon softened cream cheese - 1 tablespoon honey or maple syrup - 1/2 cup almond milk (or preferred milk) - 1/2 teaspoon pure vanilla extract - 1/4 teaspoon ground cinnamon - Ice cubes (optional) You need fresh strawberries for this smoothie. Strawberries add natural sweetness and bright flavor. Greek yogurt gives a creamy texture and packs in protein. I like using plain or vanilla yogurt. Next, you will use vanilla protein powder. This adds protein to keep you full. Cream cheese gives a cheesecake flavor. Honey or maple syrup adds sweetness. You can adjust this to your taste. Almond milk is a great choice, but any milk works. Vanilla extract enhances the flavor. Ground cinnamon adds warmth and spice. If you want a colder drink, add ice cubes. Each ingredient plays a key role in making this smoothie tasty and healthy. Now, let’s look at the nutritional information to see what you get from this delicious drink. To start, you need to blend strawberries with yogurt. First, take 1 cup of fresh strawberries. Remove the green tops and chop them into smaller pieces. Place the chopped strawberries into a blender. Add 1/2 cup of Greek yogurt next. You can choose plain or vanilla yogurt for more flavor. Blend these on high speed until the mixture is smooth and creamy. Next, it's time to incorporate protein powder and cream cheese. Add 1 scoop of vanilla protein powder to the blender. Then, include 1 tablespoon of softened cream cheese. This will give your smoothie a rich, creamy texture. After adding all ingredients, blend again to achieve a silky consistency. Blend on high speed until everything mixes well. Stop the blender and scrape down the sides if needed. This step makes sure no lumps remain. If you want to adjust sweetness levels, taste your smoothie after blending. If it is not sweet enough, add 1 tablespoon of honey or maple syrup. Blend again to mix it in well. For serving suggestions, pour your smoothie into a tall glass or a rustic mason jar. This makes it look nice and inviting. For garnishing options, you can add a few sliced strawberries on top. A dollop of Greek yogurt also works well. For a final touch, sprinkle a little ground cinnamon to make it beautiful and tasty. You can easily swap ingredients based on your needs. If you're dairy-free, use coconut yogurt instead of Greek yogurt. For a vegan option, choose a plant-based protein powder. Want more flavor? Add a few drops of almond extract or a handful of blueberries. They pair well with strawberries. You can also sprinkle in some chia seeds for extra fiber. To make your smoothie thicker, add more ice. If it's too thick, pour in extra almond milk until you reach your desired texture. If you have leftovers, store them in an airtight container in the fridge. Use them within a day for the best taste. You can also freeze any leftover smoothie in ice cube trays. This way, you can blend them into your next smoothie for a quick treat! {{image_4}} You can have fun with your strawberry cheesecake protein smoothie by adding different flavors. One tasty option is the chocolate strawberry cheesecake. Just add 1 tablespoon of cocoa powder when you blend. This gives a rich twist that many love. You can also mix in more fruits or veggies. Try adding a banana for sweetness or some spinach for added nutrients. These changes can help you enjoy a new smoothie every time! If you want a vegan or dairy-free version, swap out the Greek yogurt and cream cheese for cashew cream or coconut yogurt. Use plant-based protein powder to keep it vegan-friendly. This way, you can enjoy a delicious smoothie while sticking to your diet. For a low-calorie option, use unsweetened almond milk and skip the honey or maple syrup. You can sweeten it with a few drops of stevia instead. This keeps the flavor while cutting down on calories. To keep your strawberry cheesecake protein smoothie fresh, store it in the fridge. Use an airtight container. This helps keep the smoothie from getting too warm or losing flavor. The smoothie stays good for about one day. If you want to save it for later, freezing is a great option. Pour the smoothie into ice cube trays, or use freezer-safe bags. This way, you can enjoy it later. Just remember to leave some space in the container for expansion. If you freeze your smoothie, you may need to revive it. Start by taking it out of the freezer. Let it sit for a few minutes to soften. You can blend the smoothie again if it needs it. Add a splash of almond milk or water to help it mix well. Blend until it's smooth and creamy again. This way, you can enjoy it just as fresh as before. Can I make this smoothie ahead of time? Yes, you can make this smoothie ahead of time. Store it in the fridge for up to 24 hours. The smoothie may separate a bit. Just give it a good shake or stir before drinking. What can I substitute for Greek yogurt? If you need a substitute for Greek yogurt, try regular yogurt, cottage cheese, or a non-dairy option like coconut yogurt. Each will change the taste slightly but will still work well. Is this smoothie suitable for a post-workout snack? Absolutely! This smoothie is great after a workout. It has protein from the yogurt and protein powder. It also offers carbs from strawberries, which help your muscles recover. How many calories are in the smoothie? This strawberry cheesecake protein smoothie has about 300 calories per serving. This can vary based on the ingredients you choose, like the type of milk or sweetener. What is the best protein powder for smoothies? The best protein powder for this smoothie is vanilla-flavored. It blends well with the strawberries and cream cheese. Look for ones low in sugar and high in protein to keep it healthy. This blog post covered how to make a healthy strawberry smoothie. You learned the ingredients, from strawberries to protein powder. I also laid out easy steps for blending and serving. Remember, you can customize the recipe based on your tastes and dietary needs. Try different flavors or ingredients for your perfect smoothie. Enjoy your nutritious drink today, and share your own ideas or tips! With a little creativity, every smoothie can be a new treat.

Strawberry Cheesecake Protein Smoothie Simple Recipe

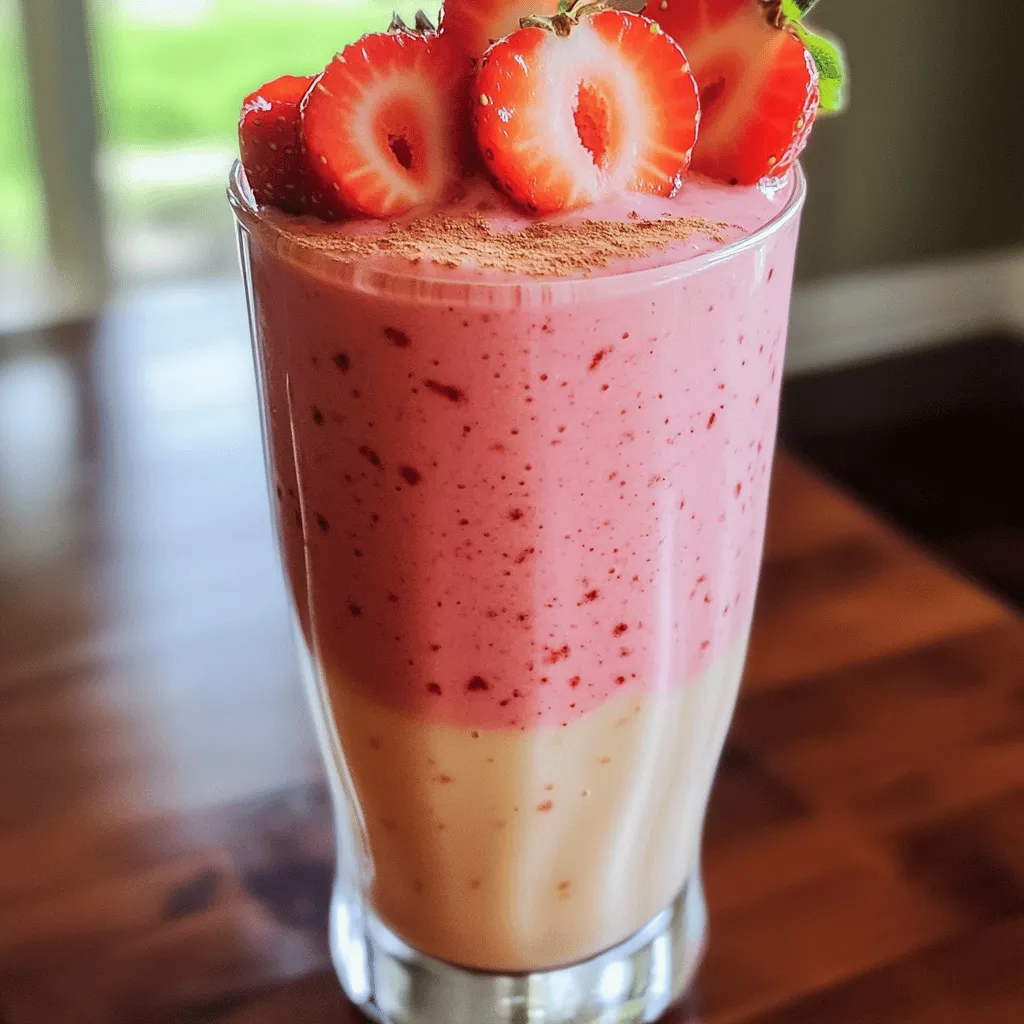
Are you ready to indulge in a delicious Strawberry Cheesecake Protein Smoothie? This simple recipe mixes fresh strawberries with creamy

To make this tasty sheet-pan sweet chili lime salmon, gather the following items: - 4 fresh salmon fillets - 1/4 cup sweet chili sauce - Zest and juice of 2 limes - 2 tablespoons extra virgin olive oil - 2 cloves garlic, finely minced - 1 teaspoon freshly grated ginger - Sea salt and freshly cracked black pepper, to taste - 1 red bell pepper, thinly sliced - 1 cup sugar snap peas, trimmed - Fresh cilantro leaves, for garnish - Lime wedges, for serving I always prefer fresh ingredients for this recipe. Fresh salmon tastes better. It also cooks more evenly. Fresh veggies add crunch and bright colors. However, frozen salmon works if fresh is not available. Just make sure to thaw it properly. Frozen veggies are fine too. They may not be as crisp but still taste good. Want to amp up the flavor? Here are some optional ingredients to try: - A splash of soy sauce for umami - Chopped green onions for a fresh bite - Sesame seeds for a nutty crunch - Sriracha for added heat Feel free to mix and match based on your taste! First, you need to preheat your oven to 400°F (200°C). This helps the salmon cook evenly. Gather all your ingredients: salmon fillets, sweet chili sauce, limes, olive oil, garlic, ginger, salt, pepper, red bell pepper, and sugar snap peas. Having everything ready makes the cooking process smoother. In a small bowl, mix the sweet chili sauce, lime juice, lime zest, olive oil, minced garlic, and grated ginger. This blend creates a tasty glaze that adds a burst of flavor. Don’t forget to add salt and pepper to taste. This step is key for a well-seasoned dish. Take a large sheet pan and place the salmon fillets skin-side down in the center. Now, use a brush or spoon to coat each fillet with the sweet chili lime glaze. Make sure each piece is covered well. Next, add the sliced red bell pepper and sugar snap peas around the salmon. Drizzle any leftover glaze over the veggies. This adds extra flavor and makes everything look colorful. Carefully put the sheet pan in the preheated oven. Bake for 15 to 20 minutes. You want the salmon to be fully cooked and flaky, while the veggies should be tender but still bright. Keep an eye on them to ensure they don’t overcook. Once baked, take the sheet pan out of the oven and let it rest for a few minutes. This helps the flavors settle in. Before you serve, sprinkle fresh cilantro leaves on top for added freshness. Serve with lime wedges for an extra kick of zest. Enjoy your meal! To get the best salmon, aim for 15 to 20 minutes in the oven. The salmon should look opaque and flake easily with a fork. Keep an eye on it to prevent overcooking. If your fillets are thicker, add a few extra minutes. Always check the thickest part for doneness. For crisp veggies, cut them into uniform pieces. This helps them cook evenly. Add them to the pan around the salmon, but do not crowd them. A little space allows hot air to circulate. Drizzle with some of the glaze, but avoid soaking them to keep them crunchy. You will need a large, rimmed sheet pan for even cooking. Use a mixing bowl for the glaze and a brush to coat the salmon. A sharp knife is great for slicing veggies. A fork helps check if the salmon is done. Keep these tools handy to make cooking smooth and easy. {{image_4}} You can easily swap salmon for chicken or tofu. For chicken, use boneless thighs or breasts. Marinate them in the same sweet chili lime glaze. Bake at 400°F for 25-30 minutes. Ensure the chicken reaches 165°F for safety. Tofu works great too! Use firm tofu, cut into cubes. Toss the tofu in the glaze and bake for about 20 minutes. This gives a nice crisp outside while keeping it soft inside. Feel free to change the veggies! Broccoli, zucchini, or asparagus are great options. Cut them into bite-sized pieces for even cooking. Toss them in the same glaze to keep the flavor consistent. For a seasonal twist, use roasted butternut squash or Brussels sprouts. These add a sweet and earthy taste to the dish. Want more heat? Add sliced jalapeños or red pepper flakes to the glaze. Start with a small amount, then taste. You can always add more! If you prefer less spice, use mild sweet chili sauce. You can also leave out the garlic for a simpler flavor. Everyone’s taste is different, so adjust to fit your style! To keep your leftovers fresh, let the salmon cool. Place it in an airtight container. Store it in the fridge. It will stay good for about 3 days. Make sure to include the veggies too! When you're ready to eat, reheat in the oven. Preheat the oven to 350°F (175°C). Put the salmon and veggies on a baking sheet. Heat for about 10-15 minutes. This helps keep the salmon moist and the veggies crisp. You can freeze leftovers for later. Wrap each salmon fillet in plastic wrap. Then, put them in a freezer bag. You can freeze for up to 3 months. When you want to eat it, thaw overnight in the fridge. Reheat as mentioned earlier for the best taste. Yes, you can use other fish. Try trout or tilapia. Both have mild flavors. They cook well and soak up the glaze nicely. Just adjust the cooking time based on thickness. You can store leftovers for up to three days. Place the salmon in an airtight container. Keep it in the fridge for the best taste. Reheat gently to avoid drying out the fish. Serve with rice, quinoa, or a fresh salad. The grains soak up the sauce perfectly. A side of steamed broccoli or asparagus complements the meal well. Yes, you can prep the glaze and chop the veggies. Store them in the fridge for up to one day. Just add the salmon and bake when you are ready to eat. Yes, this recipe is gluten-free. Sweet chili sauce is often gluten-free, but check the label. Always ensure that all ingredients meet your dietary needs. In this article, we explored the key ingredients for your dish, including fresh versus frozen options. We covered step-by-step instructions for prep and baking, ensuring tasty results every time. I also shared helpful tips for perfect cooking times and tools. With variations for proteins and vegetables, your options are endless. Lastly, we discussed how to store leftovers and reheat them for best flavor. Now it’s time to enjoy your meal while being creative. You can make this dish your own and impress everyone at the table.

Savory Sheet-Pan Sweet Chili Lime Salmon Recipe

Looking for a quick and tasty meal that’s perfect for any night? This Savory Sheet-Pan Sweet Chili Lime Salmon recipe

- 1 cup unsalted butter, softened to room temperature - 3/4 cup brown sugar, packed tightly - 3/4 cup granulated sugar - 2 large eggs - 1 teaspoon pure vanilla extract - 2 1/4 cups all-purpose flour - 1 teaspoon baking soda - 1/2 teaspoon fine sea salt - 1 cup semi-sweet chocolate chips - 1 cup mini marshmallows - 1 cup graham cracker crumbs - 1/4 cup chocolate fudge sauce If you have allergies or dietary needs, you can adjust some ingredients. For butter, try coconut oil for a dairy-free option. Replace the granulated sugar with coconut sugar for a healthier choice. You can use egg replacements like flax eggs if you want vegan cookies. For gluten-free cookies, substitute all-purpose flour with a gluten-free blend. Using room temperature ingredients is key. It helps the butter cream better with sugars. When the butter and sugars mix well, they trap air, making your cookies light. Cold eggs can also affect the mixing process. Always take them out ahead of time. This small step can make a big difference in your cookie’s texture. First, preheat your oven to 350°F (175°C). This step is key for perfect baking. Next, line your baking sheet with parchment paper. This prevents sticking and helps with even baking. To start making the dough, cream together 1 cup of softened unsalted butter, 3/4 cup of brown sugar, and 3/4 cup of granulated sugar. I use an electric mixer for about 3-4 minutes until it looks light and fluffy. Next, add 2 large eggs, one at a time. Mix well after each egg. Then, stir in 1 teaspoon of pure vanilla extract until it blends in. In a separate bowl, whisk together 2 1/4 cups of all-purpose flour, 1 teaspoon of baking soda, and 1/2 teaspoon of fine sea salt. Gradually add this dry mix to your creamed butter and sugars. Stir gently until just combined. Be careful! Overmixing will make your cookies tough. Finally, fold in 1 cup of semi-sweet chocolate chips and 1 cup of graham cracker crumbs. Mix until evenly spread throughout the dough. To create the stuffed cookies, take about 2 tablespoons of cookie dough and flatten it into a disc in your palm. In the center, place 3-4 mini marshmallows and a generous drizzle of chocolate fudge sauce. Carefully fold the edges of the dough over the filling. Make sure it is completely encased. Then roll it into a ball. Repeat this step with the remaining dough and filling. Place the stuffed cookie balls on the prepared baking sheet, leaving about 2 inches of space between each. This space allows for spreading as they bake. Bake in the preheated oven for 10-12 minutes. Look for the edges to be golden while the centers should look slightly soft. They will firm up as they cool. Once done, remove the cookies from the oven. Let them sit on the baking sheet for about 5 minutes. After that, transfer them to a wire rack to cool completely. This helps keep their soft and gooey centers. To get the right texture, avoid overmixing the dough. Mix until you see no dry flour. If you mix too much, the cookies can turn tough. This dough needs just the right balance of softness and chewiness. When you add the flour, stop mixing as soon as it blends in. This keeps the cookies nice and tender. To keep your cookies fresh, store them in an airtight container. Line the bottom with parchment paper to soak up any moisture. These cookies taste best within a few days. If you want to enjoy them later, freeze them. Place cookies in a single layer on a baking sheet to freeze. After they are solid, transfer them to a freezer bag. To reheat, just pop them in the microwave for a few seconds. This makes them warm and gooey again. You can also warm them in an oven at 350°F for a few minutes. Serve these cookies with a glass of cold milk or a hot cup of coffee. The chocolate and marshmallow mix well with both drinks. For a fun presentation, arrange them on a rustic wooden platter. Drizzle extra chocolate fudge sauce over the cookies. Add a few mini marshmallows on top for a tasty look. You can also serve some graham crackers on the side to complete the s’mores vibe. {{image_4}} You can easily switch up the flavors in your S’mores Stuffed Chocolate Chip Cookies. Add nuts like walnuts or pecans for a crunchy texture. You can also try different chocolates. Use dark chocolate for a rich taste or white chocolate for a sweet twist. Mixing these flavors makes each bite exciting and unique. If you want a healthier cookie, try using coconut oil instead of butter. Coconut oil adds a nice flavor and is a good fat choice. You can also use sugar substitutes like stevia or monk fruit. These alternatives can help cut down on calories while keeping the cookies sweet and tasty. Get creative with seasonal themes! For Halloween, add orange food coloring to your dough or mini candy corn inside. For Christmas, sprinkle in some peppermint extract or crushed candy canes. These fun themes make the cookies perfect for any celebration. Each season can bring a new twist to this classic treat. To keep your cookies fresh, place them in an airtight container. You can enjoy them for about 3-5 days at room temperature. If you want to keep them longer, consider using the fridge. Just make sure the container seals well to avoid moisture. You can freeze these cookies before or after baking. To freeze before baking, shape the dough into balls and place them on a baking sheet. Freeze until solid, then transfer to a zip-top bag. For baked cookies, let them cool first, then store in a freezer-safe bag. They will last for up to three months. To thaw frozen cookie dough, leave it in the fridge overnight. If you freeze baked cookies, let them sit at room temperature for about 30 minutes. For a warm treat, reheat them in the oven at 350°F for 5-10 minutes. This will make them soft and gooey again! Yes, you can use different chocolates in your cookies. Try dark chocolate, milk chocolate, or even white chocolate. Each will change the taste a bit. Mix and match chocolate chips for fun flavors. You can also chop up chocolate bars for bigger chunks. To prevent marshmallows from melting too much, chill your dough before baking. This helps the cookies hold their shape. Also, try using larger marshmallows and cut them in half. This way, they stay gooey but don’t spill out. You can make the dough ahead of time. Store it in the fridge for up to 3 days. Just wrap it well in plastic wrap to keep it fresh. If you want to store it longer, freeze it for up to 3 months. When ready, thaw it overnight in the fridge before baking. These cookies go great with milk, coffee, or hot cocoa. You can also serve them with graham crackers for a classic s’mores vibe. Try a scoop of vanilla ice cream on the side for a treat. This blog post covered how to make S’mores Stuffed Chocolate Chip Cookies. We discussed the key ingredients, preparation steps, and tips for perfect cookies. Remember, using room temperature ingredients helps the dough mix better. You can switch ingredients for dietary needs or try different flavors for fun. Enjoy these cookies with milk or coffee for a delightful treat. Follow these steps, and your cookies will be a hit! Happy baking!

S’mores Stuffed Chocolate Chip Cookies Irresistible Delight

Get ready for a treat that will make your taste buds sing: S’mores Stuffed Chocolate Chip Cookies! Imagine soft and

- 1 pound sea scallops, thoroughly patted dry - 4 tablespoons unsalted butter, divided - 2 tablespoons olive oil - 4 cloves garlic, finely minced - 1 large lemon (zested and juiced) - 1 teaspoon fresh thyme leaves (or ½ teaspoon dried thyme) - Salt and freshly ground black pepper to taste - Fresh parsley, finely chopped (for garnish) - Use one pound of sea scallops; they should be dry. This helps create a nice sear. - Four tablespoons of unsalted butter add creaminess. Divide it for cooking and sauce. - Measure two tablespoons of olive oil; this helps with browning the scallops. - Four cloves of garlic minced; this gives great flavor. - One large lemon adds brightness through zest and juice. - One teaspoon of fresh thyme adds a lovely herbal note. - Adjust salt and pepper to taste, ensuring a well-seasoned dish. - Fresh parsley for garnish brightens the plate and adds freshness. - A large, sturdy skillet is key for even cooking. - Use a spatula for flipping the scallops gently. - A zester or grater helps get zest from the lemon. - A sharp knife and cutting board are needed for mincing garlic. - Paper towels are essential for drying scallops. - Measuring spoons and cups ensure accuracy with ingredients. These ingredients and tools will help you create a delightful dish. Enjoy the process and the flavors! Start by getting your scallops ready. Take one pound of sea scallops and pat them dry with paper towels. This helps them sear well. If they are wet, they will steam instead of brown. Make sure to check each scallop. Drying them is key to a nice crust. Next, heat your pan. Grab a large skillet and add 2 tablespoons of olive oil and 2 tablespoons of unsalted butter. Put the skillet over medium-high heat. Wait for the butter to melt and bubble lightly. This shows it’s hot enough for the scallops. If the heat is too low, they won’t sear well. Now it's time to sear the scallops. Place them in the skillet in a single layer. Do not crowd them; give them space. Cook them without moving for about 2-3 minutes. You want them to form a beautiful golden brown crust. After that, flip each scallop gently. Cook for another 2 minutes until they are opaque. When done, take them out and set them aside on a plate. This searing step gives the scallops their tasty flavor and texture. To get a great sear on scallops, start with dry scallops. Pat them well with paper towels. A dry surface helps them brown nicely. Heat your skillet until it's hot. Use a mix of olive oil and butter. This combination gives flavor and a high smoke point. Place scallops in the pan without crowding them. Let them sear for 2-3 minutes until golden brown. Then, flip and cook for another 2 minutes. This method ensures they stay juicy inside. For the sauce, fresh garlic and lemon are key. Sauté the garlic just until it turns golden. Be careful not to burn it. Add lemon zest and juice; this brightens the flavor. Fresh thyme adds a nice touch. You can also try herbs like basil or dill for variety. Adjust salt and pepper to taste for a balanced flavor. For extra richness, consider adding a splash of white wine when cooking the sauce. A common mistake is not drying the scallops. Wet scallops will steam instead of sear. Another mistake is overcrowding the pan. This leads to uneven cooking. Always let them sit in the pan to form a crust. Don't rush the cooking process. Scallops cook quickly, so keep an eye on them. Finally, taste the sauce before serving. Adjust seasoning as needed to enhance the dish. {{image_4}} You can easily change the taste of your Lemon Garlic Butter Scallops. For a spicy kick, add a pinch of red pepper flakes to the garlic as it cooks. If you love herbs, try adding fresh basil or dill instead of thyme. You can also use orange zest instead of lemon for a sweeter flavor. If you're looking for a lighter version, replace butter with olive oil. This change keeps the dish flavorful and heart-healthy. For a dairy-free option, use plant-based butter as a substitute. If you want a gluten-free dish, this recipe is already safe since it contains no gluten. These scallops shine on their own, but you can pair them with many sides. Serve over a bed of creamy risotto or with garlic mashed potatoes. A fresh green salad adds a nice crunch. For a complete meal, add steamed veggies or crusty garlic bread to soak up the sauce. To store leftover Lemon Garlic Butter Scallops, place them in an airtight container. Let them cool to room temperature first. This helps keep the scallops fresh. You can also use plastic wrap, but airtight containers work best. Store them in the fridge for up to three days. When ready to enjoy the scallops again, reheat them gently. Place them in a skillet over low heat. Add a touch of butter or olive oil to the pan. This helps keep them moist. Cook for about 2-3 minutes, just until heated through. Avoid high heat to prevent rubbery scallops. Cooked scallops last about 3 days in the fridge. If you want to keep them longer, freeze them. They can stay fresh in the freezer for up to three months. Just make sure to seal them well in a freezer-safe bag or container. Yes, you can use frozen scallops. Just make sure to thaw them first. Place them in the fridge overnight or in a bowl of cold water for quick thawing. After thawing, pat them dry with paper towels. This step is key for a nice sear. Scallops are cooked when they turn opaque. They should also feel firm to the touch. Typically, they take 4 to 5 minutes to cook. The outside will turn golden brown while the inside remains moist. Remove them from heat right when they reach this point. Lemon Garlic Butter Scallops pair well with many sides. Here are a few options: - Light salad with mixed greens - Garlic bread for a nice crunch - Steamed asparagus or green beans - Creamy risotto for a rich taste - Lemon wedges to enhance flavor These sides will elevate your meal and complement the scallops beautifully. Enjoy your delicious dish! In this post, we explored how to cook scallops perfectly. You learned about the key ingredients, tools, and step-by-step instructions for a great dish. I shared tips to help you avoid mistakes and enhance flavors. We also discussed variations for different tastes and needs, along with storage and reheating methods. Remember, practice makes perfect. With these insights, you can now impress anyone with your scallops. Enjoy cooking this delicious seafood!

Lemon Garlic Butter Scallops Savory and Simple Dish

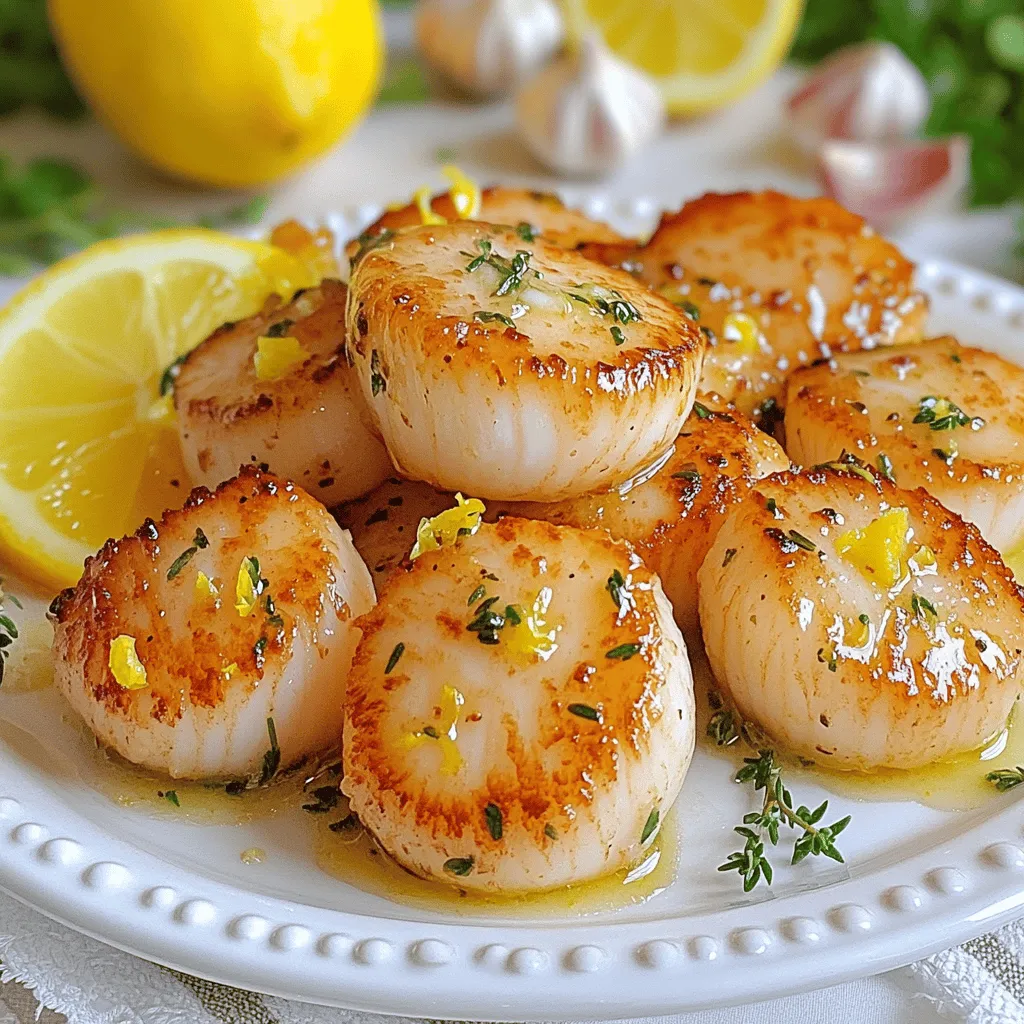
If you crave a dish that feels fancy but is easy to make, you’re in for a treat! Lemon Garlic

- 8 chicken drumsticks - 1/4 cup honey - 3 tablespoons soy sauce - 4 cloves garlic, minced - 1 tablespoon olive oil - 1 teaspoon ground ginger - 1/2 teaspoon black pepper - 1/2 teaspoon salt - 1 teaspoon sesame seeds (for garnish) - Fresh parsley, chopped (for garnish) Using these ingredients, you can create a dish full of flavor. Each item plays a key role. The honey adds sweetness, while the soy sauce gives a savory touch. Garlic brings strong flavor, and ginger adds warmth. Olive oil helps the marinade stick and keeps the chicken moist. - Mixing bowl - Whisk - Air fryer - Tongs Having the right tools makes cooking easier. I recommend a mixing bowl for combining the marinade and a whisk to blend it well. An air fryer is crucial for achieving crispy skin without frying. Tongs help you handle the drumsticks without making a mess. Gather these items before you start. This way, you will be ready to make the best air fryer honey garlic drumsticks. To start, gather your ingredients. In a mixing bowl, combine: - 1/4 cup honey - 3 tablespoons soy sauce - 4 cloves garlic, minced - 1 tablespoon olive oil - 1 teaspoon ground ginger - 1/2 teaspoon black pepper - 1/2 teaspoon salt Whisk these ingredients together until they blend well. This mixture should be smooth and fragrant. The honey adds sweetness, while the garlic and soy sauce bring depth to the flavor. Next, add your chicken drumsticks to the bowl. Use your hands or tongs to coat each piece well in the marinade. Make sure they are fully covered. This helps the flavors seep in. Cover the bowl with plastic wrap and place it in the fridge. Let them marinate for at least 30 minutes, but if you have time, aim for 2 hours. This step makes a huge difference in taste. While the drumsticks marinate, preheat your air fryer to 400°F (200°C). This will take around 5 minutes. Once the drumsticks are ready, take them out of the fridge. Shake off any excess marinade and arrange them in the air fryer basket in a single layer. Cook for 25-30 minutes. Remember to turn them halfway through. This helps them cook evenly and get that crispy skin we love. Once the cooking time is up, check the internal temperature of the drumsticks. They must reach 165°F (74°C) to be safe to eat. If they are done, carefully take them out and let them rest for a few minutes. This allows the juices to settle. Just before serving, sprinkle sesame seeds and chopped parsley on top for a lovely garnish. This adds both flavor and a pop of color to your dish. To make the best honey garlic drumsticks, start with the marinade. You can adjust the honey to fit your taste. If you like it sweeter, add more honey. For a twist, try adding spices like cayenne for heat or herbs like thyme for depth. These small changes can boost the flavor. Nobody likes soggy skin on their chicken. To avoid this, make sure to pat the drumsticks dry before marinating. This helps the skin crisp up nicely. When cooking, stick to the recommended time of 25-30 minutes at 400°F (200°C). Turning the drumsticks halfway ensures even crispiness. Always check that each drumstick reaches an internal temperature of 165°F (74°C). These drumsticks pair well with many sides. Try serving them with rice, coleslaw, or roasted veggies. For plating, arrange the drumsticks on a large serving dish. Drizzle extra honey on top and sprinkle sesame seeds and parsley. This not only adds flavor but makes the dish look great, too. {{image_4}} You can spice things up with different flavors. For a kick, try spicy honey garlic drumsticks. Just add sriracha to your marinade. Use two tablespoons for a mild heat or more if you love spice. Another tasty option is to infuse your marinade with citrus. Lemon or lime juice brightens the dish. Add the juice of one lemon or lime to the mix. This adds a tangy twist that pairs well with the sweetness of honey. You can also bake honey garlic drumsticks in the oven. Preheat your oven to 425°F (220°C). Arrange the drumsticks on a baking sheet lined with parchment paper. Bake for about 35-40 minutes, turning halfway. This method gives you a nice crispy skin too. If the weather is nice, grilling is a fantastic choice. Cook the drumsticks on medium heat for about 20-25 minutes. Flip them often to get that smoky flavor. After enjoying the drumsticks, save leftovers for wraps or sandwiches. Shred the meat and add it to a tortilla with veggies and sauce. It makes a quick and tasty meal. You can also use the drumsticks in salads or grain bowls. Toss the meat with mixed greens, quinoa, or rice. Top it with your favorite dressing for a healthy lunch. Each of these serving styles adds a fun twist to your honey garlic drumsticks. To keep your cooked drumsticks fresh, let them cool down first. Once cooled, place them in an airtight container. This helps to lock in moisture and flavor. You can also wrap them tightly in plastic wrap or aluminum foil. In the fridge, they will stay good for 3 to 4 days. If you want to enjoy them later, freezing is a great option. When it’s time to enjoy leftovers, use your air fryer for the best results. Preheat the air fryer to 350°F (175°C). Place the drumsticks in the basket, ensuring they don’t touch each other. Heat them for about 5 to 10 minutes. This method keeps the skin crispy while warming the meat inside. To keep them juicy, you can lightly brush them with olive oil before reheating. Yes, you can freeze honey garlic drumsticks! To freeze, let them cool completely. Then, wrap each drumstick in plastic wrap. Place the wrapped drumsticks in a freezer bag, squeezing out any air. They can last up to 3 months in the freezer. When you’re ready to eat, thaw them in the fridge overnight. Reheat using the air fryer for the best taste and texture. I recommend marinating drumsticks for at least 30 minutes. For the best taste, aim for 2 hours. The longer they soak, the more flavor they absorb. This wait is worth it for juicy, tasty chicken. Yes, you can use chicken thighs. They will cook well and remain juicy. Just adjust the cooking time. Chicken thighs may need a few extra minutes to cook through. You can try different sauces for variety. Some great options include teriyaki sauce or barbecue sauce. Each will give a unique twist to the flavor. Feel free to experiment and find your favorite! Preheating the air fryer is a good idea. It helps cook the drumsticks evenly. I suggest preheating at 400°F (200°C) for about 5 minutes before cooking. To check if drumsticks are cooked, use a meat thermometer. They should reach an internal temperature of 165°F (74°C). This ensures they are safe to eat and will taste great. If you don’t have a thermometer, cut into one to check that the juices run clear. You’ve learned how to make delicious honey garlic chicken drumsticks. We covered the key ingredients, easy instructions, and tips for perfecting your dish. Whether you choose to grill, bake, or air fry, these drumsticks make a tasty meal. Remember to adjust the marinade to your taste and try fun serving ideas. Enjoy these drumsticks at dinner or as leftovers. With simple steps and a few ingredients, you can impress anyone at your table. Happy cooking!

Air Fryer Honey Garlic Drumsticks Flavorful Delight

If you’re craving a dish that’s both easy to make and packed with flavor, you’re in for a treat. Air

- 200g pasta (fusilli or penne) - 200g block of feta cheese - 400g cherry tomatoes - 4 cloves garlic, minced - Olive oil, salt, and pepper - Fresh basil leaves and grated parmesan cheese The main ingredients in this dish create a tasty base. You start with 200g of pasta, using either fusilli or penne. These shapes hold the sauce well and offer a great bite. Next, you need a 200g block of feta cheese. This cheese brings a creamy texture and rich flavor. Cherry tomatoes are key in this recipe. You’ll need 400g, and I suggest using a mix of colors. This adds visual appeal and a variety of sweet flavors. Seasonings boost the taste. You’ll use 4 cloves of minced garlic for its strong aroma. Olive oil gives smoothness and helps the flavors blend. Don’t forget salt and pepper for balance. For a fresh touch, add some basil leaves on top when serving. If you want a little extra flavor, sprinkle grated parmesan cheese over the dish before serving. It’s a simple yet elegant way to elevate your meal. 1. First, preheat your oven to 200°C (390°F). This step is key for even cooking. 2. In a large baking dish, combine 400g of halved cherry tomatoes and 4 cloves of minced garlic. This mix brings great flavor. 1. Next, add 1 tablespoon of olive oil, along with salt, pepper, and 1 teaspoon of dried oregano. If you like spice, add 1 teaspoon of chili flakes. 2. Toss the mixture gently to coat the tomatoes well. This helps the flavors to blend nicely. 3. Place a 200g block of feta cheese in the center of the dish, surrounded by the tomatoes. Drizzle a little olive oil over the feta and season with more salt and pepper. 1. Transfer the baking dish to your preheated oven. Bake for about 25-30 minutes. The tomatoes should be blistered and soft, and the feta should melt and turn golden. 2. While the feta and tomatoes bake, cook 200g of pasta in a large pot of boiling salted water. Follow the package instructions until the pasta is al dente. 3. Once baked, take the dish out of the oven. Use a fork to mash the feta into the tomatoes, creating a creamy sauce. 4. Add the cooked pasta directly into the baking dish. Toss everything together to coat the pasta with the rich feta-tomato sauce. 5. Taste the dish and adjust the seasoning as needed. 6. Serve warm, adding fresh basil leaves and grated parmesan cheese if you like. Enjoy! Choosing the right pasta is key for texture. I love fusilli or penne. They hold sauce well and add a nice bite. Cook the pasta until al dente for the best result. This way, it stays firm when mixed with the sauce. Next, let’s talk feta. Pick a quality block of feta cheese, ideally from Greece. It should be creamy and not too crumbly. This cheese melts beautifully and makes the sauce rich. Check for freshness by looking for a clean, white color and a good smell. If you want a kick, chili flakes are great. But if you prefer milder heat, try smoked paprika. It adds depth without the spice. You can also leave them out entirely for a sweeter taste. Fresh herbs can boost aroma and flavor. Basil is a classic choice for this pasta. You can also try parsley or oregano. Chop them finely and sprinkle them on just before serving. This adds a fresh pop that makes the dish sing. {{image_4}} You can switch up the pasta you use. Fusilli and penne are great choices. But you can also try farfalle or even spaghetti. Each type brings its own fun twist to the dish. If you want a different cheese, goat cheese works well. It adds a tangy flavor. You can also use ricotta for a creamy touch. Just keep in mind that flavors will change a bit. Add veggies to boost nutrition and taste. Spinach adds a nice color and flavor. Bell peppers bring sweetness and crunch. You can toss them in before baking. For protein, grilled chicken is a good option. It makes the meal heartier. Shrimp also works nicely and cooks quickly. Both options pair well with the feta and tomatoes. To keep your baked feta tomato pasta fresh, store it in an airtight container. This helps prevent moisture loss and keeps the dish tasty. Make sure to let it cool down before sealing the container. In the fridge, this dish lasts about 3 to 5 days. If you want to keep it longer, consider freezing it. When it's time to enjoy your leftovers, you have a few options. The best way to reheat is in the oven. Preheat it to 180°C (350°F). Place the pasta in a baking dish and cover it with foil. Heat for about 15-20 minutes. This keeps the pasta from drying out and keeps the sauce creamy. You can also use the microwave if you're in a hurry. Place a serving in a microwave-safe bowl and cover it. Heat in short bursts, stirring in between, until warm. If you want to freeze baked feta tomato pasta, do it right after cooking. Store it in freezer-safe containers. It can last up to 2 months in the freezer. When you are ready to eat, thaw it in the fridge overnight and follow the reheating tips above. Can I use frozen ingredients? Yes, you can use frozen tomatoes and frozen feta for this dish. Just remember to thaw them first. This may change the texture a bit, but the flavors will still be great. How to make it vegan? To make this dish vegan, swap the feta cheese for a plant-based alternative. You can also use nutritional yeast for a cheesy flavor. Make sure to check the pasta brand for egg-free options. Ideal pairings (sides, salads, or sauces) This baked feta tomato pasta pairs well with a simple green salad. A side of garlic bread also makes a great choice. If you want extra flavor, drizzle some balsamic glaze on top. Meal prep ideas with baked feta tomato pasta This dish is perfect for meal prep. You can make it ahead and store it in the fridge for up to three days. Just reheat in the oven or microwave before serving. For an easy lunch, pack it in a container with some fresh basil. This baked feta and tomato pasta is simple and delicious. You learned about fresh ingredients like cherry tomatoes, feta cheese, and garlic. I shared tips to choose the best pasta and ways to enhance the dish with herbs. You discovered fun variations and how to store leftovers for later. With these easy steps, you can create a meal everyone will enjoy. Try it out, and make it your own! Enjoy cooking and share your delicious results with others.

Baked Feta Tomato Pasta Flavorful and Easy Recipe

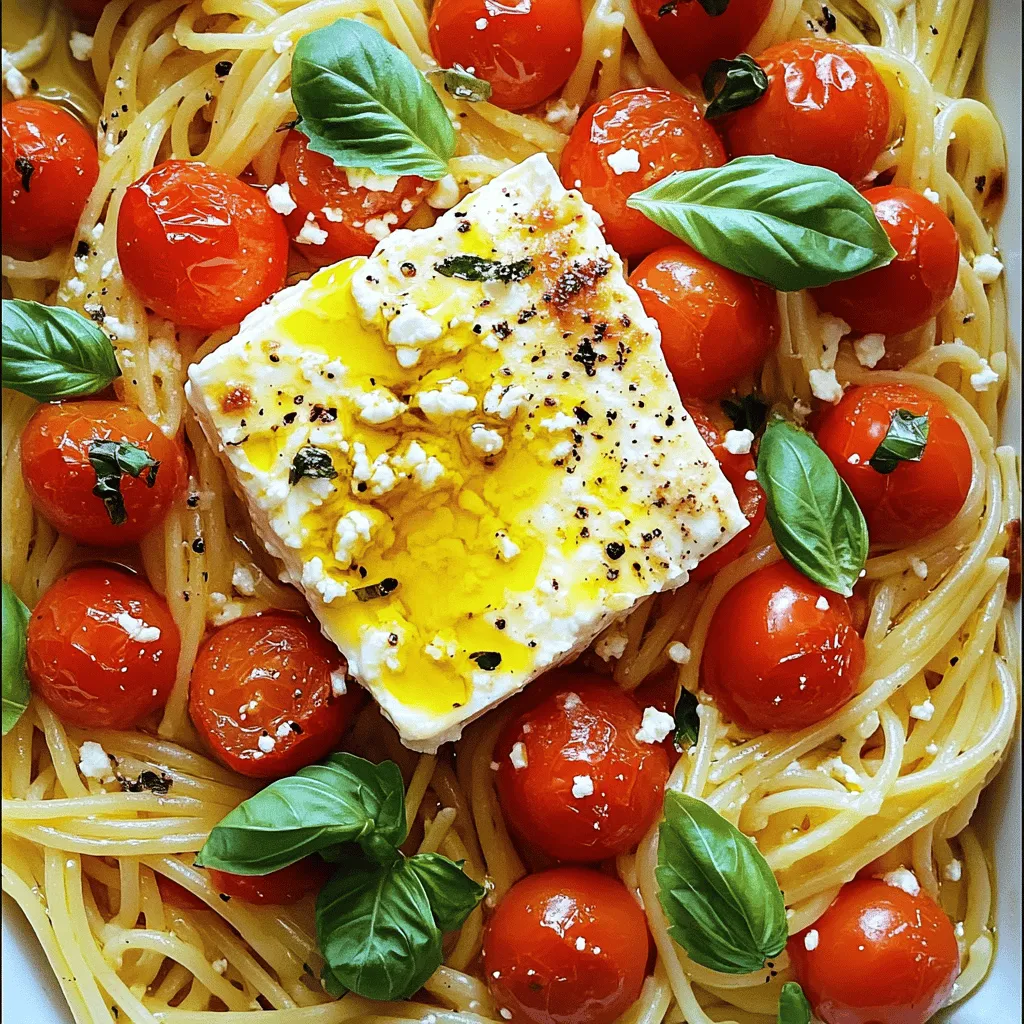
Are you ready to impress your taste buds? This Baked Feta Tomato Pasta recipe is perfect for quick weeknight dinners.

- 1 pound large shrimp, peeled and deveined - 2 tablespoons olive oil - 1 tablespoon chipotle chili powder - 1 teaspoon garlic powder - 1 teaspoon ground cumin - Juice of 1 lime (plus extra wedges for serving) - Salt and freshly ground black pepper to taste - 8 small corn or flour tortillas - 1 cup shredded cabbage (green or purple) - ½ cup diced fresh tomatoes - ¼ cup chopped fresh cilantro - ½ ripe avocado, sliced into thin wedges These ingredients create a burst of flavor. The shrimp soak up the spices, while the lime adds brightness. Corn or flour tortillas hold everything together and add texture. - ¼ cup sour cream or Greek yogurt - Extra lime wedges - Fresh salsa or spicy hot sauce These toppings can enhance your tacos. The sour cream adds creaminess, while salsa brings freshness and heat. Lime wedges let you add zest right before eating. - Medium-sized bowl for marinating shrimp - Large skillet for cooking shrimp - Cutting board and knife for chopping toppings - Serving plate for tacos These tools make cooking easy and organized. A skillet helps achieve the perfect shrimp texture. The bowl ensures the shrimp soak in those tasty spices well. Start with one pound of shrimp. Make sure they are peeled and deveined. In a medium bowl, mix the shrimp with two tablespoons of olive oil. Add one tablespoon of chipotle chili powder, one teaspoon of garlic powder, and one teaspoon of ground cumin. Squeeze the juice of one lime into the bowl. Season with salt and black pepper. Stir well to coat the shrimp in the spice mix. Let the shrimp marinate for about 15 minutes. This step helps enhance the flavor. Heat a large skillet over medium-high heat. Once hot, add the marinated shrimp to the skillet. Cook the shrimp for about 2 to 3 minutes on each side. Watch for the shrimp to turn pink and opaque. Be careful not to overcook them. Overcooked shrimp can become rubbery and tough. If you want, you can warm the tortillas in the same skillet after removing the shrimp. Heat them for about 30 seconds on each side. This makes the tortillas soft and adds a nice texture. Now it's time to build your tacos! Start with a tortilla on a plate. Add a portion of the cooked shrimp. Then, top with shredded cabbage for crunch. Next, add diced tomatoes for freshness. Include slices of creamy avocado for richness. Finally, sprinkle chopped cilantro on top for flavor. For extra zest, drizzle more lime juice over the taco. You can also add a dollop of sour cream or Greek yogurt if you like. Enjoy your colorful and tasty Chipotle Lime Shrimp Tacos! Marinating shrimp is key to tasty tacos. Mix the shrimp with olive oil, chipotle chili powder, garlic powder, cumin, lime juice, salt, and pepper. Let it sit for 15 minutes. This time lets the shrimp soak up all those bold flavors. You can even marinate longer if you want a stronger taste. Just keep it in the fridge. Cooking shrimp is quick and easy. Heat your skillet over medium-high heat. When hot, add your marinated shrimp. Cook for about 2 to 3 minutes per side. Watch for color change; they should turn pink and opaque. Don't overcook them! Overcooked shrimp can become rubbery. If you see them curl up tightly, they are done. Choosing the right tortilla makes a big difference. Small corn tortillas are classic and add a nice flavor. Flour tortillas are soft and chewy, perfect for holding all the toppings. You can even mix them! Warm tortillas for about 30 seconds on each side before serving. This step makes them pliable and adds a nice touch. {{image_4}} You can swap the shrimp for other proteins. Chicken is a great choice. Just marinate it the same way. Tofu is perfect for a vegetarian option. Use firm tofu and press it to remove water. For a unique twist, try fish like tilapia or cod. Each protein brings its own taste and texture to the tacos. Toppings can change the whole taco vibe. Instead of shredded cabbage, try coleslaw for a crunchy twist. You can add pickled onions for a tangy kick. Pineapple salsa adds sweetness and pairs well with chipotle. Don't forget cheese! Cotija or queso fresco can make your tacos extra special. Be creative and mix and match! You can adjust the heat level in your tacos. For a spicy version, add more chipotle chili powder. You can also include jalapeños or hot sauce. If you prefer mild flavors, use less chipotle. Add more lime juice for brightness without heat. Remember, you can balance flavors to suit your taste. To store leftover shrimp tacos, first separate the shrimp from the tortillas. Place the shrimp in an airtight container. You can keep the shrimp in the fridge for up to three days. Store tortillas in a separate bag to prevent them from getting soggy. When reheating shrimp, use a skillet over medium heat. Add a little olive oil to the pan. Heat the shrimp for about three to four minutes. Stir gently to ensure even heating. This keeps the shrimp juicy and prevents them from becoming tough. If you want to freeze the shrimp, place them in a sealed bag. Remove as much air as possible. You can freeze them for up to three months. To thaw, place the shrimp in the fridge overnight. Never thaw shrimp in hot water, as this can change their texture. Chipotle lime shrimp tacos taste great with many sides. Here are some ideas: - Mexican rice: Fluffy rice complements the spices. - Refried beans: Creamy beans add texture and protein. - Corn salad: A fresh corn salad brightens the meal. - Guacamole: Creamy guacamole brings extra flavor. - Chips and salsa: Crispy chips with salsa are always a hit. Yes, you can easily make these tacos gluten-free! Just use corn tortillas instead of flour tortillas. Always check the labels on your tortillas to ensure they are gluten-free. Many brands offer tasty options. You can adjust the spice in a few simple ways: - Less chipotle chili powder: Start with half the amount. - Add more lime juice: Lime can balance out heat. - Include cooling toppings: Add sour cream or Greek yogurt for creaminess. - Fresh veggies: Use more avocado or cabbage for a milder taste. Experiment with these tips to find your perfect spice level! In this blog post, we explored how to make delicious Chipotle Lime Shrimp Tacos. You learned about the key ingredients, along with optional toppings to enhance your meal. We covered step-by-step instructions for perfect shrimp and taco assembly. Tips on marinating and cooking ensured great taste, while variations offered ways to customize. Finally, storage advice helps you keep leftovers fresh. Remember, cooking should be fun and tasty, so enjoy trying these ideas in your kitchen!

Chipotle Lime Shrimp Tacos Flavorful and Easy Meal

If you’re craving a meal that’s both tasty and simple, look no further. My Chipotle Lime Shrimp Tacos hit the

- 1 cup almond milk (or any milk alternative of your choice) - 1/4 cup chia seeds - 1 tablespoon maple syrup (or honey, for a non-vegan option) - 1 teaspoon vanilla extract - 1/2 teaspoon ground cinnamon - 1 medium apple, peeled and finely chopped - 1/4 cup raisins (or substitute with dried cranberries) - 1 tablespoon chopped walnuts (optional, for added crunch) - Pinch of ground nutmeg - Extra apple slices and a sprinkle of cinnamon for garnish When choosing almond milk, look for unsweetened options. This keeps the pudding balanced. The chia seeds should be fresh and whole. Old seeds may not gel well. Pick apples that are firm and crisp. I love Granny Smith for its tartness. Fresh raisins or cranberries add sweetness. If you choose walnuts, select whole ones for the best crunch. If you have nut allergies, use oat or soy milk instead of almond milk. For a sweeter taste, you can use agave syrup instead of maple syrup. To make it nut-free, skip the walnuts or swap them with sunflower seeds. You can also replace chia seeds with ground flaxseeds if you prefer. Start with a medium bowl. Pour in 1 cup of almond milk. Add 1/4 cup of chia seeds, 1 tablespoon of maple syrup, 1 teaspoon of vanilla extract, 1/2 teaspoon of ground cinnamon, and a pinch of nutmeg. Whisk until it looks smooth. Make sure the chia seeds blend well. They need to soak up the liquid. Next, peel and chop your medium apple into small pieces. Add the apple to the bowl. Also, include 1/4 cup of raisins. Stir the mixture gently. You want all the apple pieces coated in the chia blend. This helps the flavors mix together nicely. Now, cover the bowl tightly with plastic wrap. You can also use small jars with lids if you like. Place it in the fridge for at least 4 hours or overnight. Letting it sit overnight gives the best texture. When you’re ready, take it out and stir gently to break any clumps. Adjust the sweetness if needed. Then, serve it in bowls or jars with your favorite toppings. Enjoy! To get the best texture, soak the chia seeds well. Chia seeds need time to absorb liquid. Mix them with almond milk and let them sit overnight. This helps them swell and create a nice, thick pudding. You can also stir the mix after a couple of hours. This keeps the seeds from clumping together. Taste your pudding before serving. If you want it sweeter, add more maple syrup. You can start with one tablespoon and adjust from there. If you prefer a less sweet taste, cut back on the syrup. Remember, the apples also add natural sweetness. For a beautiful presentation, use clear jars. Layer the pudding with apple slices and walnuts. This shows off the colors and textures. Top with a sprinkle of cinnamon for a warm touch. You can also add extra apple slices on top for a fresh look. This makes your breakfast or snack more inviting! {{image_4}} You can change the flavor of your chia pudding. Try using different fruits like peaches or pears. You can also mix in nut butters for creaminess. A spoonful of almond or peanut butter adds richness. For a tropical twist, use coconut milk and mango chunks. The options are endless! This recipe is vegan-friendly if you use maple syrup. If you prefer non-vegan, honey works great too. Both options add sweetness and flavor. You can choose any milk alternative based on your taste. Almond milk is light, while coconut milk gives a creamy texture. Make your chia pudding a full meal by adding protein. Greek yogurt or a scoop of protein powder can boost it. You could also top it with nuts or seeds for healthy fats. Adding oats can make it more filling. This way, it becomes a great breakfast or snack! To keep your Apple Pie Overnight Chia Pudding fresh, use airtight containers. Glass jars work well and look nice too. Make sure to cover each jar tightly. This helps keep the pudding tasty and prevents any odors from your fridge from seeping in. Your chia pudding stays good in the fridge for about 3 to 5 days. After that, the texture may change. It can become too thick or watery. If it looks or smells off, it’s best to toss it out. Always check before eating! You can freeze the chia pudding if you want to save some for later. Just place it in a freezer-safe container. It can last up to 3 months in the freezer. When you are ready to eat it, thaw it in the fridge overnight. Stir it well before serving. The texture may change a bit, but it will still taste great! Yes, you can make this pudding ahead of time. I often prepare it the night before. This gives the chia seeds time to soak and expand. You can enjoy it for breakfast or as a snack. Just remember to chill it for at least four hours for the best texture. If you don't have chia seeds, you can use flaxseeds. Ground flaxseeds work well too. They provide a similar texture and are healthy. However, they may change the flavor a bit. You can also try using tapioca pearls, but the pudding won't have the same look. Absolutely! This recipe is great for meal prep. You can make several servings at once. Just store them in jars or containers. Keep them in the fridge for up to five days. Having healthy snacks ready makes life easier! Yes, you can add more fruits or toppings! Fresh berries, bananas, or peaches work great. You can also try nuts, seeds, or coconut flakes for crunch. Get creative! The recipe is flexible, and you can customize it to suit your taste. You learned about making a tasty Apple Pie Overnight Chia Pudding. First, we covered the right ingredients, tips for selection, and possible substitutes. Next, I shared step-by-step instructions for prep and refrigeration. You also got helpful tips for texture and serving ideas. We explored fun variations and safe storage tips, plus you learned about meal prep and substitutions. Enjoy your pudding and feel free to make it your own!

Apple Pie Overnight Chia Pudding Simple and Tasty

Looking for a healthy and tasty breakfast? Dive into my Apple Pie Overnight Chia Pudding! This simple recipe brings you

Older posts
Newer posts
← Previous Page1 … Page23 Page24 Page25 … Page83 Next →

dsad

© 2026 eataroundit • Built with GeneratePress

Our Policies

  • Copyright Policy
  • Cookie Policy
  • GDPR Policy
  • Privacy Policy
  • Disclaimer
  • Terms Of Use

More Information

  • Home
  • About
  • Contact
  • Appetizers
  • Dessert
  • Dinner
  • Drinks
©2026, eataroundit About Back To Top