Skip to content
DisclaimerTerms Of UseGDPR PolicyCookie Policy

eataroundit

  • Home
  • Drinks
  • Appetizers
  • Dinner
  • Dessert
  • About
  • Contact
  • Privacy Policy
DisclaimerTerms Of UseGDPR PolicyCookie Policy

NO-ING-IMG

- 4 large red bell peppers - 1 medium onion - 2 cloves garlic - 3 cups vegetable broth - 1 cup coconut milk - 1 tablespoon extra virgin olive oil - 1 teaspoon smoked paprika - Sea salt and freshly ground black pepper - Fresh basil leaves (optional) When making creamy roasted red pepper soup, the right ingredients make a big difference. Start with four large red bell peppers. Look for ones that are firm and shiny. These will give the soup a sweet and rich flavor. Next, you will need one medium onion. Dice it finely. The onion adds depth to the soup. Two cloves of garlic are also essential. Mince them well to release their strong flavor. For the base, you will use three cups of vegetable broth. This adds moisture and a savory taste. A cup of coconut milk gives the soup its creaminess. You could use heavy cream if you prefer. Now, let's talk about seasoning. You will need one tablespoon of extra virgin olive oil. This adds a nice richness. One teaspoon of smoked paprika brings a warm, smoky flavor. Lastly, don't forget sea salt and freshly ground black pepper to taste. They enhance all the other flavors. If you want to make your soup even more special, add fresh basil leaves as a garnish. They add a pop of color and fresh taste to each bowl. Choosing fresh, high-quality ingredients is key. They make your creamy roasted red pepper soup truly delightful and simple. - Preheat your oven to 400°F (200°C). - Line a baking sheet with parchment paper. - Place the halved red bell peppers, cut side down, on the sheet. - Roast them for 25-30 minutes. The skins should blister and char. - Remove the baking sheet and let the peppers cool for 10 minutes. - Once cool, peel off the charred skins and set the roasted flesh aside. - In a large pot, heat one tablespoon of olive oil over medium heat. - Add one medium diced onion. Sauté for 5-7 minutes until soft. - Next, add two cloves of minced garlic and one teaspoon of smoked paprika. - Cook for one minute until fragrant. - Add the roasted peppers to the pot. Pour in three cups of vegetable broth. - Stir well and bring the mixture to a gentle boil. - Reduce heat and let it simmer for 10 minutes to meld the flavors. - Use an immersion blender to puree the soup until smooth. - Stir in one cup of coconut milk or heavy cream. - Warm the soup on low for five minutes. Season with salt and pepper to taste. - Serve hot, garnished with fresh basil if desired. To make the best creamy roasted red pepper soup, start with ripe red bell peppers. Look for bright, shiny skin with no blemishes. Ripe peppers taste sweeter and have more flavor. Roasting enhances this flavor. The heat brings out the natural sugars and adds a smoky depth. For blending, you can use an immersion blender or a countertop blender. An immersion blender lets you blend right in the pot. It saves time and cuts down on cleanup. If you use a countertop blender, let the soup cool a bit first. Always blend in batches to avoid spills. For a creamy texture, blend until smooth and silky. Serve the soup hot for the best taste. A warm bowl makes it comforting and inviting. For garnish, sprinkle fresh basil leaves on top. This adds color and a burst of flavor. You might also serve it with crusty bread or a side salad for a complete meal. {{image_4}} You can make this soup dairy-free with coconut milk. Coconut milk gives a creamy texture and a hint of sweetness. Other good options are almond milk or oat milk. Both will work well, but they might change the taste a bit. Want more heat? Add chili flakes or fresh peppers. A dash of red pepper flakes can wake up your soup. You can also chop fresh jalapeños for a spicy kick. Just be careful! Start with a little, then add more if you like. You can add other veggies for more flavor. Try diced carrots or potatoes. They will give your soup extra texture and taste. Just chop them small and add them when you sauté the onion. You can also mix in spinach or kale at the end for a healthy boost. To store leftover creamy roasted red pepper soup, let it cool first. Transfer it to an airtight container. This helps keep the soup fresh. It will last for about 3 to 4 days in the fridge. When ready to eat, check for any off smells or colors. You can freeze this creamy soup for later use. First, let it cool completely. Use freezer-safe containers or bags. Make sure to leave some space for expansion. The soup can stay fresh in the freezer for up to 3 months. Label the containers with the date for easy tracking. To reheat without losing creaminess, use a pot on low heat. Stir often to prevent sticking. You can also add a splash of water or broth if it’s too thick. Avoid using a microwave as it can change the texture. Enjoy your soup warm! Creamy Roasted Red Pepper Soup lasts about 3 to 5 days in the fridge. Store it in an airtight container. This keeps the soup fresh and tasty. Always check for any signs of spoilage before eating. If it smells off or looks strange, it's best to toss it. Yes, you can use jarred roasted red peppers. They are a great time-saver. Just drain them well before using. The flavor might be slightly different, but it still works well. If you want a smoky flavor, you can add a bit more smoked paprika. This keeps the soup's essence intact while saving time. Creamy Roasted Red Pepper Soup is relatively low in calories. Red peppers are full of vitamins and low in calories. A serving has about 150 calories, depending on your ingredients. Coconut milk adds creaminess without too many calories. Plus, it is rich in nutrients. This soup is a healthy option for lunch or dinner. This creamy roasted red pepper soup is easy to make and packs great flavor. We covered key ingredients, from vibrant red peppers to smooth coconut milk. The step-by-step guide makes preparation simple, ensuring a delicious meal every time. Remember to personalize your soup with spices or veggies. Store it correctly to enjoy later. With these tips, you can create a delightful dish that impresses. Dive in and savor the rich taste of your creation!

Creamy Roasted Red Pepper Soup Delightful and Simple

Looking for a warm bowl of comfort that’s both tasty and easy to make? Let me introduce you to my

To make Everything Bagel Cucumber Bites, gather these fresh and simple items: - Large cucumber - Cream cheese (softened) - Greek yogurt (full-fat recommended) - Garlic powder - Onion powder - Dried dill - Everything bagel seasoning - Fresh chives (for garnish) - Salt and pepper to taste These ingredients work together to create a creamy, flavorful topping that pairs perfectly with the crunch of the cucumber. The cream cheese and Greek yogurt provide a rich base, while the seasonings give it that classic everything bagel flavor. The fresh chives add a pop of color and a mild onion taste, making each bite a delightful snack. You can find these ingredients at any grocery store, and they are easy to prepare. 1. Start by washing your large cucumber under cool running water. Make sure it is clean. 2. Slice the cucumber into 1/2-inch thick rounds. Aim for neat and even slices. 3. Arrange the cucumber slices on a clean platter. Space them apart for easier access. 1. In a medium bowl, add 4 oz of softened cream cheese. It should be at room temperature. 2. Next, add 1/4 cup of full-fat Greek yogurt to the bowl. 3. Use a fork or whisk to blend these two until smooth and creamy. 4. Add 1 teaspoon of garlic powder, 1 teaspoon of onion powder, and 1/2 teaspoon of dried dill. 5. Mix in a pinch of salt and pepper. Stir until everything is well combined. 1. Take your cucumber slices from the platter. 2. Using a small spoon or a piping bag, dollop or pipe the cream cheese mixture onto each slice. 3. Make sure to create a nice mound on top of each cucumber. 4. Lightly sprinkle everything bagel seasoning over each topped slice. 5. For a fresh touch, garnish each bite with finely chopped chives. 6. Serve these refreshing bites right away for the best taste. You can chill them for one hour if you prefer them cold. To serve cucumber bites, place them on a nice platter. You can arrange them in a circle for a fun look. For dips, try a light ranch or yogurt dip. Pair these bites with sparkling water or a fresh juice for a great drink option. They are perfect for parties or as a quick snack. Make your cucumber bites pop by using colorful plates. You can add cherry tomatoes or radishes for extra color. Arrange cucumber bites with some space between them. This makes it easy for guests to grab one. Consider placing a small bowl of everything bagel seasoning on the side for fun. You can prepare these bites ahead of time. Just keep the cucumber slices and cream cheese mixture separate until you are ready to serve. This keeps everything fresh and tasty. Store cucumber slices in water to keep them crisp. The mixture can stay in the fridge for up to two days. Just remember to mix it well before using. {{image_4}} You can switch up the cream cheese for different flavors. Try chive, garlic, or herb cream cheese. Each will bring a new taste. If you want a vegan option, use tofu-based cream cheese or cashew cream. Both work well and taste great. Consider adding fresh herbs like parsley or dill. They boost flavor and add color. You can also mix in spices like paprika or cayenne for a kick. Want a crunch? Top with diced tomatoes or radishes. These add-ins give your bites a unique twist. You can use various cucumber types, like English or Persian cucumbers. Each has a different texture and taste. If you want to try something new, use bell peppers or zucchini slices. They hold the cream cheese well and offer a fresh flavor. To keep your Everything Bagel Cucumber Bites fresh, place leftovers in an airtight container. This practice helps to lock in flavor and prevents drying out. Store them in the fridge for up to 2 days for the best taste. After that, the cucumbers may become soggy, and the cream cheese mixture might lose its creaminess. Before serving, chill the cucumber bites in the fridge for about 30 minutes. This step enhances their crispness and flavor. If you prepare them ahead of time, cover them well to maintain their texture. Avoid stacking them too high, which may cause them to squish. Enjoying these bites chilled makes for a refreshing snack! Yes, you can use low-fat cream cheese. It has fewer calories and fat. However, it may not be as creamy. This can affect the taste and texture of your bites. If you want a lighter option, mix it with Greek yogurt. This can help maintain creaminess while reducing fat. You can keep Everything Bagel Cucumber Bites in the fridge for up to one hour. After that, the cucumber may lose its crunch. If you make them ahead of time, store the cream cheese mixture separately. Assemble the bites just before serving for the best taste. Freezing these bites is not recommended. The cucumber will become mushy when thawed. If you want to prepare ahead, make the cream cheese mixture and freeze that. Thaw it in the fridge before serving. Then, slice fresh cucumbers and assemble the bites for a tasty snack. In this post, we explored how to make Everything Bagel Cucumber Bites. You learned about the key ingredients, step-by-step instructions, and serving tips. I also shared variations to try and storage tips to keep your bites fresh. These tasty bites are perfect for any gathering. They offer great flavor and are simple to make. Enjoy creating your version and impress your guests with this fun treat!

Everything Bagel Cucumber Bites Simple and Tasty Snack

Looking for a simple snack that packs big flavor? These Everything Bagel Cucumber Bites are your answer! With fresh cucumber,

To make this hearty soup, you need a few key items: - 4 large russet potatoes, peeled and cut into 3/4-inch cubes - 1 medium onion, finely diced - 4 cloves garlic, minced - 4 cups chicken or vegetable broth - 1 cup heavy cream - 1 cup shredded sharp cheddar cheese - 1/2 cup sour cream - 1 teaspoon smoked paprika - 1/2 teaspoon freshly ground black pepper - 1 teaspoon salt, or adjust to taste These ingredients create a rich and creamy base. The russet potatoes give the soup its comforting texture, while the onion and garlic add depth of flavor. The broth provides the necessary liquid, and the cream, cheese, and sour cream make it truly decadent. If you want to boost the taste, consider adding: - 1/2 cup cooked and crumbled turkey bacon - 1/4 cup green onions, sliced, for serving - 1/4 cup fresh chives, chopped, for garnish Turkey bacon adds a savory crunch, while green onions and chives give a fresh finish. These optional ingredients make the soup even more special. You can easily swap some items for what you have on hand: - Use sweet potatoes instead of russet potatoes for a sweeter flavor. - Substitute half-and-half if you don’t have heavy cream. - Use plant-based cheese for a dairy-free option. These substitutions keep the soup versatile and accessible. Feel free to get creative based on your taste and dietary needs! To start, gather your ingredients. You will need: - 4 large russet potatoes, peeled and cut into 3/4-inch cubes - 1 medium onion, finely diced - 4 cloves garlic, minced - 4 cups chicken or vegetable broth - 1 teaspoon smoked paprika - 1/2 teaspoon freshly ground black pepper - 1 teaspoon salt - 1 cup heavy cream - 1 cup shredded sharp cheddar cheese - 1/2 cup sour cream - 1/2 cup cooked turkey bacon, crumbled (optional) - 1/4 cup green onions, sliced, for garnish - 1/4 cup fresh chives, chopped, for garnish Once you have everything, chop your potatoes, onion, and garlic. This makes the cooking easier. Add the diced potatoes, onion, and garlic into your slow cooker. Next, pour in the broth. Now it’s time to add flavor. Sprinkle in salt, black pepper, and smoked paprika. Stir the mixture well. Cover the slow cooker. Set it to cook on low for 6 to 8 hours or high for 3 to 4 hours. You want the potatoes to be soft and easy to pierce with a fork. After the cooking time, take a potato masher and gently mash some of the potatoes. This gives the soup a nice creamy texture while keeping some chunks. Next, pour in the heavy cream, shredded cheddar cheese, and sour cream. Mix until the cheese melts and the soup is smooth. If you want to add turkey bacon, stir it in now. Taste the soup and adjust the seasoning if needed. Finally, ladle the soup into bowls. Garnish each bowl with sliced green onions and chopped chives. This adds a fresh look and flavor. Enjoy your savory slow cooker loaded baked potato soup! To make your soup extra creamy, use heavy cream. Add it last, after mashing the potatoes. This keeps the cream from curdling. Stir in cheese and sour cream afterward. It melts well and adds more richness. Mashing some potatoes gives a nice texture. You can leave some chunks for heartiness. Store your soup in an airtight container. Let it cool before sealing. It stays fresh in the fridge for up to three days. To freeze, use freezer-safe bags or containers. Leave some space at the top, as it will expand. When you're ready to eat, thaw it overnight in the fridge. You can boost flavor with simple additions. A dash of hot sauce adds heat. Fresh herbs like thyme or rosemary work well too. Smoked paprika adds a nice depth. If you like meat, crumbled bacon offers a tasty crunch. You can swap turkey bacon or leave it out for a vegetarian option. {{image_4}} You can easily make a vegetarian version of this soup. Simply swap the chicken broth for vegetable broth. This change keeps the flavor rich while making it meat-free. You can also add extra veggies like carrots or spinach for extra nutrients. They will blend nicely with the potatoes and enhance the soup’s color. To make the soup gluten-free, check your broth label. Some brands may add gluten. Use a certified gluten-free broth. Also, ensure your cheese and sour cream are gluten-free. This way, everyone can enjoy a bowl without worry. If you love heat, add some spice! You can mix in diced jalapeños for a kick. Another option is to sprinkle cayenne pepper into the soup while cooking. Start with a small amount and adjust to your taste. This twist will make the soup exciting and warm on chilly nights. After you make the soup, let it cool. Place it in an airtight container. This way, it stays fresh for up to four days in the fridge. Make sure to cover it well. When stored correctly, the flavors will stay nice. If you want to keep the soup longer, you can freeze it. Pour the cooled soup into freezer-safe bags or containers. Leave some space at the top for expansion. It can last up to three months in the freezer. Just remember to label the bags with the date. This helps you keep track of how long it's been. To reheat, you can use a pot on the stove. Pour the soup in and heat it over medium heat. Stir it often to prevent sticking. You can also use a microwave. Place the soup in a microwave-safe bowl and cover it loosely. Heat it in short bursts, stirring in between. Make sure it heats all the way through before serving. If the soup is too thick, add a little broth or water to loosen it. Yes, you can make this soup ahead of time. It stores well in the fridge. Just let it cool before you cover it. Place it in an airtight container. When you are ready to eat, reheat it on the stove or in the microwave. The soup tastes even better the next day as the flavors blend. This soup pairs well with many sides. Here are some ideas: - Crusty bread or rolls - Homemade croutons for a crunchy bite - A fresh green salad for a light addition - Grilled cheese sandwiches for a classic combo These sides will enhance your meal and make it even more satisfying. If your soup is too thin, don't worry! There are easy ways to thicken it: - Use a potato masher to mash more potatoes. This adds body. - Stir in a bit more heavy cream or sour cream. - Add instant potato flakes, which absorb liquid and thicken the soup. Adjust these to your liking for the perfect creamy texture. This blog post covered the key ingredients for Slow Cooker Loaded Baked Potato Soup, with options for extra flavor. I shared how to prepare, cook, and add final touches to achieve a creamy texture. We discussed variations like vegetarian and gluten-free options, along with storage tips. With these insights, you can create a delicious soup that suits your taste. Remember, the right ingredients and techniques will make your dish a winner every time. Enjoy your cooking!

Savory Slow Cooker Loaded Baked Potato Soup Recipe

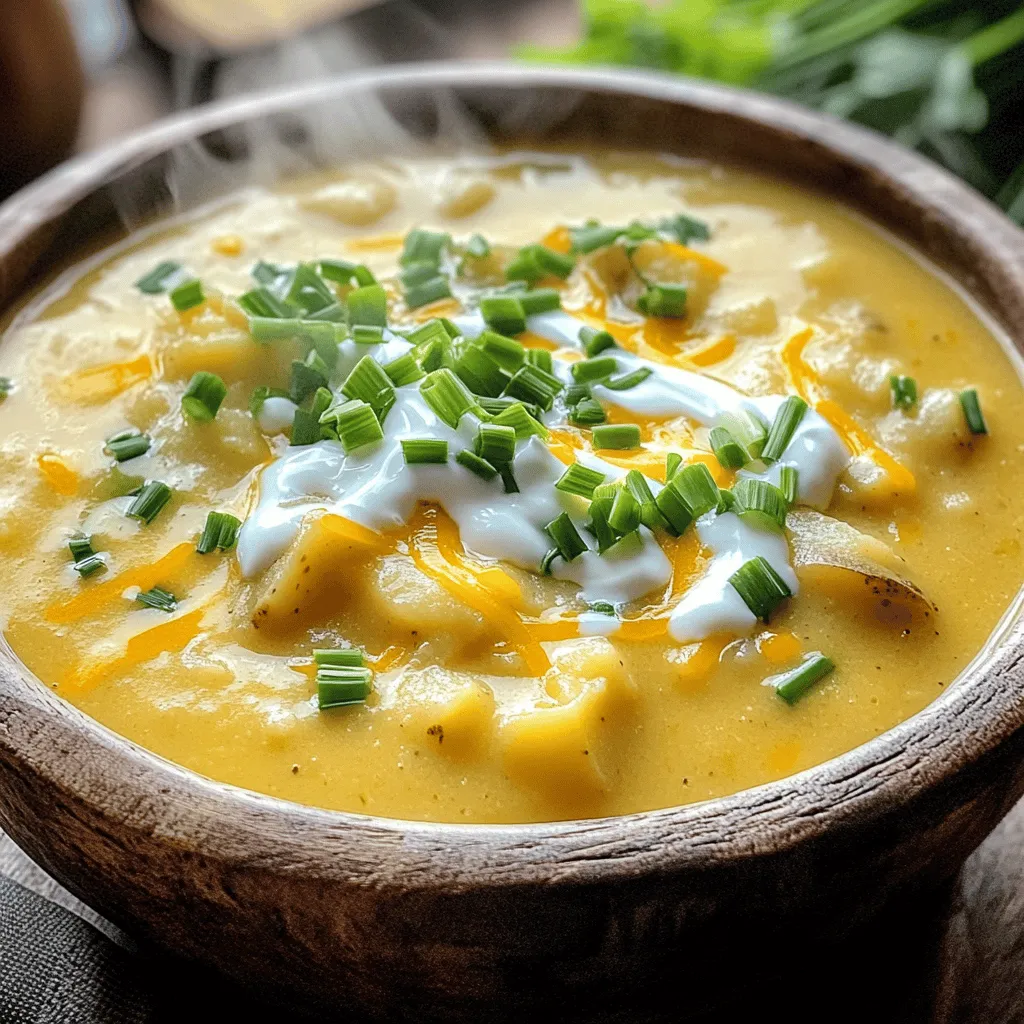
If you love comfort food that also warms your soul, this Savory Slow Cooker Loaded Baked Potato Soup is for

Here’s what you need for these No-Bake Blueberry Cheesecake Squares: - 1 ½ cups graham cracker crumbs - ½ cup unsalted butter, melted - 2 cups cream cheese, softened to room temperature - 1 cup powdered sugar - 1 teaspoon vanilla extract - 1 cup heavy whipping cream - 2 cups fresh blueberries (with extra for topping) - 1 tablespoon freshly squeezed lemon juice - ¼ cup blueberry preserves (optional, for enhanced flavor) Each ingredient plays a key role in creating this dessert. The graham cracker crumbs form a crunchy base. The butter adds richness and helps the crust hold together. Cream cheese gives the cheesecake its creamy texture, while powdered sugar sweetens the filling perfectly. Vanilla extract adds depth of flavor. Heavy whipping cream is essential for a light and airy texture. Fresh blueberries bring a burst of fruity flavor and a lovely color. Lemon juice brightens the taste. If you choose to add blueberry preserves, it enhances the blueberry flavor even more. Having these ingredients ready makes the prep easy and fun! You’ll enjoy mixing and matching flavors as you create this delightful treat. To start, mix 1 ½ cups of graham cracker crumbs with ½ cup of melted butter in a medium bowl. Stir well until all the crumbs are coated. Press this mixture firmly into the bottom of a lined 9x9 inch baking dish. Make sure it is even. Then, place the dish in the refrigerator while you make the cheesecake filling. This will help the crust firm up nicely. Next, in a large bowl, beat 2 cups of softened cream cheese with an electric mixer. Mix until it is smooth and creamy. Gradually add in 1 cup of powdered sugar and 1 teaspoon of vanilla extract. Keep mixing until everything is blended well. You want to avoid any lumps for a perfect texture. In a separate bowl, whip 1 cup of heavy cream using electric beaters until stiff peaks form. This step is key for a light and fluffy cheesecake. Gently fold the whipped cream into the cream cheese mixture. Be careful not to deflate the whipped cream. You want to keep that fluffy texture. Now, take 2 cups of fresh blueberries and mash them in a small bowl with a fork or potato masher. You can leave some whole for extra texture. Add 1 tablespoon of freshly squeezed lemon juice and ¼ cup of blueberry preserves if you like. Mix this well, then gently fold the blueberry mixture into the cheesecake batter. Make sure it is fully combined. Pour the blueberry cheesecake filling over the chilled crust in the baking dish. Use a spatula to spread it out evenly. Smooth the top and gently tap the dish on the counter to release any air bubbles. Cover it with plastic wrap and refrigerate for at least 4 hours. This will help the cheesecake set perfectly. When the cheesecake is set, lift it out of the baking dish using the edges of the parchment paper. Cut it into 12 squares. For a lovely touch, top each square with extra fresh blueberries before serving. Enjoy this delightful treat! - To avoid lumps in the cream cheese mixture, make sure the cream cheese is very soft. Leave it out for an hour before you start. Use an electric mixer on medium speed. Mix until it's smooth, with no lumps left. This step is key for a creamy filling. - When you whip the cream, use a clean bowl and beaters. Whip the cream until it forms stiff peaks. This keeps the cheesecake light and fluffy. Gently fold the whipped cream into the cream cheese mixture. Be careful not to overmix. You want to keep that airy texture. - For blueberry preserves, I recommend brands like Smucker’s or Bonne Maman. They have great flavor and quality. If you want to use fresh blueberries instead, try different types. You can mix in raspberries or blackberries for a fun twist. Each berry adds a unique taste. - For an elegant touch, serve the squares on a pretty platter. You can line the platter with fresh mint leaves or edible flowers. This adds color and freshness. - Use extra blueberries for garnishing. You can also drizzle some blueberry preserves on top. This makes each square look special. A sprinkle of lemon zest also brightens the presentation. {{image_4}} You can change up the fruit in your cheesecake squares. Try using strawberries or raspberries instead of blueberries. These fruits add a nice twist and bring their own flavors. You can also use fruit purees. Blend some strawberries or mangoes for a smooth, fruity layer. If you need a gluten-free treat, swap regular graham crackers for gluten-free ones. Many brands offer tasty options that work great in this recipe. Just make sure to check the label to keep it gluten-free. Want to take your cheesecake to the next level? Add chocolate chips for a sweet touch. You can also mix in lemon zest for a fresh, zesty flavor. If you want a lighter option, try using Greek yogurt instead of cream cheese. It gives a nice tang and keeps it creamy. You can store your no-bake blueberry cheesecake squares in the fridge for up to five days. It’s best to cover them tightly with plastic wrap or place them in an airtight container. This keeps them fresh and prevents any fridge odors from sneaking in. If you want to save some for later, you can freeze the cheesecake squares. First, cut the squares and place them on a baking sheet. Freeze them until firm, about one hour. Then, wrap each square in plastic wrap, and put them in a freezer bag. They can last up to three months in the freezer. When you’re ready to enjoy them, take out the squares and thaw them in the fridge for several hours or overnight. This way, they stay creamy and delicious when you serve them. Yes, you can use frozen blueberries. They work in this recipe. However, frozen blueberries may release more juice than fresh ones. This can make the cheesecake a bit wetter. To avoid this, let the frozen blueberries thaw and drain any excess liquid. If you prefer a firmer texture, fresh blueberries are best. The cheesecake needs at least 4 hours to set. I recommend chilling it overnight for the best results. The longer it chills, the firmer it becomes. This gives the flavors time to meld nicely. Make sure to cover it well to prevent it from absorbing other fridge smells. Yes, you can use a different crust. If you want a gluten-free version, try almond flour or gluten-free cookies. A chocolate crust adds a rich flavor. You can also use a cookie crust made from Oreos or digestive biscuits. Just follow the same steps for mixing and pressing the crust. If you don't have blueberry preserves, don't worry! You can skip it entirely. The cheesecake will still taste great with just the fresh blueberries. For a sweeter touch, try using honey or maple syrup. You can also mix in a bit of jam from another fruit. This will add flavor and color to your cheesecake. This blog post covered every step to make a delicious blueberry cheesecake. We detailed the ingredients, from graham crackers to fresh blueberries, and explained how to prepare each part. You also learned tips for perfecting the texture and creative variations to try. Experimenting with flavors can make your cheesecake unique. Remember to refrigerate it well and enjoy it fresh. Now, you are ready to impress friends and family with your tasty dessert!

No-Bake Blueberry Cheesecake Squares Simple Delight

Are you ready for a sweet treat that’s easy and delicious? These No-Bake Blueberry Cheesecake Squares are perfect for any

- 1 lb boneless, skinless chicken breasts, cut into 1-inch pieces - 1 can creamy coconut milk - 4 cups rich chicken broth - 1 medium onion, finely diced - 3 cloves garlic, minced - 2 tablespoons fresh ginger, grated - 2 medium carrots, peeled and diced - 1 vibrant red bell pepper, chopped - 1 cup fresh baby spinach leaves - 2 tablespoons extra-virgin olive oil Chicken forms the heart of this dish. I use boneless, skinless breasts for lean protein. The creamy coconut milk adds rich flavor and texture. It mixes well with the broth, making a luscious base. Fresh vegetables like onion, garlic, ginger, carrots, and bell pepper bring color and sweetness. - Juice of 2 fresh lemons - Zest of 1 lemon - Salt and freshly cracked black pepper, to taste - Fresh cilantro leaves, for garnish For zest, I squeeze fresh lemon juice and add the zest. This brightens the soup and cuts through the creaminess. I use salt and pepper to enhance all the flavors. Fresh cilantro adds a pop of color and a fresh taste on top. This simple list of ingredients creates a comforting soup that warms the soul. Each bite offers a delightful mix of creamy, tangy, and savory notes. Enjoy the comfort and joy this dish brings! - Sauté Onion, Garlic, and Ginger Start by heating 2 tablespoons of olive oil in a large pot over medium heat. Add 1 finely diced onion, 3 minced garlic cloves, and 2 tablespoons of grated ginger. Stir these together for about 3-4 minutes. The onion should be soft and see-through. - Cook the Chicken Next, add 1 pound of diced chicken breast to the pot. Season it with salt and black pepper. Cook the chicken for 5-7 minutes, stirring often. The chicken should be cooked all the way through and no longer pink. - Add Carrots and Bell Pepper Toss in 2 diced carrots and 1 chopped red bell pepper. Stir these vegetables for about 4-5 minutes. They should start to soften and blend with the chicken. - Brief Sauté This step helps bring out the flavors in the vegetables. Keep stirring until you notice the bright colors of the bell pepper and carrots. - Pour in Chicken Broth Now, pour in 4 cups of rich chicken broth. Stir everything together well. Turn the heat up a bit to bring the soup to a gentle simmer. Let it cook for about 10 minutes. This allows the flavors to mix nicely. - Introduce Coconut and Lemon Reduce the heat to low and stir in 1 can of creamy coconut milk, the juice of 2 fresh lemons, and the zest of 1 lemon. Let this simmer for another 5-7 minutes. You will smell the lovely citrus and coconut scent filling your kitchen. - Add Spinach Fold in 1 cup of fresh baby spinach. Let it wilt in the soup for about 2 minutes. The spinach adds color and nutrition. - Adjust Seasoning Taste your soup and add more salt or pepper if needed. This step ensures you have the perfect flavor. Serve the soup hot, garnished with fresh cilantro leaves for an extra pop of color and flavor. Enjoy! Using Fresh Herbs Fresh herbs add bright flavors to your soup. I love using cilantro or basil. Just chop them finely before adding. This step makes the soup feel fresh and alive. The herbs bring a nice contrast to the creamy coconut. Adjusting Lemon for Acidity Lemon juice gives this soup its zing. You can tweak the amount for your taste. If you want it more tart, add more lemon juice. For a milder flavor, use less. Always taste as you go to find your perfect balance. Ensuring Chicken is Cooked Through To make sure your chicken is safe to eat, cook it until no pink shows. This usually takes about 5-7 minutes. Stir often to cook evenly. I recommend cutting the chicken into small, even pieces for quicker cooking. Perfectly Wilting Spinach Add spinach at the end of cooking. Just fold it in and let it wilt for about 2 minutes. This keeps it bright green and full of nutrients. Overcooking can make it mushy, so keep an eye on it. Serving Suggestions Serve the soup in deep bowls for a cozy feel. Pair it with warm, crusty bread. This adds texture and makes the meal satisfying. You can also serve it with a side salad for a fresh crunch. Garnishing Techniques Garnish with fresh cilantro leaves for a pop of color. You can also sprinkle some lemon zest on top for extra flavor and brightness. This small touch makes the dish look gourmet and inviting. {{image_4}} You can switch out chicken for other proteins. Try using shrimp or tofu. Both options work well. Shrimp cooks quickly and adds a nice flavor. Tofu absorbs the soup's taste and is great for a vegetarian meal. If you want to make this soup dairy-free, use coconut milk. This recipe already includes it, making it creamy and rich. You can also add nut milk for extra creaminess. Almond or cashew milk are good choices. Want some heat? Add red pepper flakes or a diced jalapeño. These will give the soup a nice kick. If you like it milder, skip these spicy options. Feel free to mix in other veggies you enjoy. Peas, corn, or green beans can add more color. Broccoli or zucchini can work too. Just chop them small so they cook quickly. Refrigeration Tips You can keep leftover Creamy Coconut Lemon Chicken Soup in the fridge. Place it in an airtight container. The soup will stay fresh for about 3 to 4 days. When you want to eat it, just check for any off smells or changes in texture. If it smells fine, it’s good to go! Freezing Recommendations To store the soup longer, freezing works well. Use freezer-safe containers or bags. Make sure to leave some space at the top for expansion. You can freeze it for up to 3 months. Label your containers with the date, so you know what you have. Best Methods for Reheating Reheating this soup is easy. You can use the stove or microwave. If you use the stove, pour the soup into a pot. Heat it over medium heat, stirring often until it’s hot. This will help keep the creamy texture. For the microwave, transfer the soup to a microwave-safe bowl. Heat it in 1-minute intervals, stirring in between. This way, it warms evenly. Always check the temperature before serving. Enjoy! It takes about 15 minutes to prep and 25 minutes to cook. In total, you need around 40 minutes. This makes it a quick and tasty meal. Yes, you can make this soup ahead of time. Just store it in the fridge. It stays fresh for about three days. Reheat it before serving for the best taste. This soup pairs well with warm, crusty bread. You might also enjoy it with a fresh salad. Both options complement the flavors nicely. Absolutely! You can swap the chicken for chickpeas or tofu. Use vegetable broth instead of chicken broth. The coconut milk and lemon will still give great flavor. To reheat, pour the soup into a pot. Heat it over medium heat until warm. Stir occasionally to ensure even heating. You can also use the microwave, but heat it in short bursts and stir often. This blog covered how to make a tasty Creamy Coconut Lemon Chicken Soup. You learned about the key ingredients like chicken, coconut milk, and fresh herbs. I provided clear steps to prepare, cook, and serve the soup. Plus, I shared tips for flavor and storage. In the end, this soup is not just easy; it’s very customizable. You can switch ingredients, adjust flavors, or try new add-ins. Enjoy making this dish your own!

Creamy Coconut Lemon Chicken Soup Easy Comfort Dish

Welcome to your next favorite dish! Creamy Coconut Lemon Chicken Soup is a warm and cozy meal that’s simple to

- 1 pound potato gnocchi - 2 cups cherry tomatoes, halved - 1 medium zucchini, diced into bite-sized pieces - 1 bell pepper, diced (choose red or yellow for a pop of color) - 1 cup asparagus, trimmed and cut into 2-inch segments - 4 cloves garlic, minced finely - 3 tablespoons extra virgin olive oil - 1 teaspoon dried Italian herbs (a blend of oregano, basil, and thyme works perfectly) - 1 teaspoon kosher salt - ½ teaspoon freshly ground black pepper - Fresh basil leaves for garnish - Grated Parmesan cheese, optional but highly recommended for a creamy finish If you can't find potato gnocchi, try using sweet potato gnocchi. It adds a sweet twist. You can swap cherry tomatoes for grape tomatoes or even sun-dried tomatoes for a deeper flavor. For the veggies, feel free to replace zucchini with yellow squash or use green beans instead of asparagus. You can also change the herbs. If you have fresh herbs, use them! Fresh basil and parsley add bright flavors. To make this dish, you need a few basic kitchen tools. Grab a large baking sheet and line it with parchment paper. This helps with easy cleaning. You’ll also need a spacious mixing bowl to combine your ingredients. A whisk will help you mix the garlic herb mixture well. Finally, use a sharp knife for chopping veggies. Having these tools ready will make your cooking smooth and fun! First, set your oven to 425°F (220°C). This high heat helps the gnocchi and veggies roast perfectly. Line a large baking sheet with parchment paper. This makes cleanup easy after cooking. In a big mixing bowl, add 1 pound of potato gnocchi, 2 cups of halved cherry tomatoes, 1 diced medium zucchini, 1 diced bell pepper, and 1 cup of cut asparagus. Mix these colorful veggies with the gnocchi to create a hearty base. In a small bowl, combine 4 minced garlic cloves, 3 tablespoons of extra virgin olive oil, 1 teaspoon of dried Italian herbs, 1 teaspoon of kosher salt, and ½ teaspoon of black pepper. Whisk them together until they blend into a fragrant mixture. This adds a burst of flavor to your dish. Pour the garlic herb mixture over the gnocchi and vegetables. Gently toss everything together so each piece gets coated. Spread the mixture evenly on the prepared baking sheet. Make sure not to overcrowd the pan. This allows everything to roast rather than steam. Place the sheet pan in the oven. Bake for 20-25 minutes. Halfway through, stir the mixture gently for even cooking. You want the gnocchi to be golden and the veggies to be tender. Once baked, take the sheet pan out of the oven and let it cool for a few minutes. This resting time lets the flavors blend. Garnish the dish with fresh basil leaves. If you like, sprinkle some grated Parmesan cheese on top for a creamy finish. Serve warm, straight from the pan for a rustic touch! To get the best texture, choose fresh gnocchi. Fresh gnocchi has a light, fluffy texture. When you roast it, aim for a golden-brown color. This gives a nice crisp outside. Don't forget to spread out the veggies and gnocchi on the pan. Crowding can lead to steaming, which makes them soggy. The garlic herb mixture adds great flavor. Make sure each piece is coated well. This ensures every bite bursts with taste. Prep time for this dish is quick, about 10 minutes. Use pre-cut veggies to save even more time. You can also find ready-made gnocchi in stores. While the meal cooks, you can clean up the kitchen. Using one baking sheet makes it easy. You can stir the mix halfway through cooking for even roasting. This is a simple way to ensure your meal is ready in just 35 minutes. For a warm and rustic feel, serve the gnocchi right from the baking sheet. This makes a fun presentation. If you prefer, move it to a serving bowl for a more formal touch. Add fresh basil leaves on top for color. A sprinkle of Parmesan cheese gives a nice creamy finish. For extra flavor, drizzle a bit of olive oil or fresh lemon juice before serving. This will brighten the dish and impress your guests. {{image_4}} You can mix and match your veggies in this dish. Try using broccoli, carrots, or spinach for new flavors. Each veggie brings its own taste and texture. For a sweeter twist, add sweet potatoes or butternut squash. These options roast well and add color to your meal. Remember, the goal is to have fun and experiment! If you want a change from potato gnocchi, there are great options. You can use ricotta gnocchi for a lighter feel. Cauliflower gnocchi is a low-carb choice. For gluten-free diets, try chickpea or zucchini gnocchi. Each type has a unique texture, so feel free to choose what matches your taste. Don’t hesitate to change up the herbs and spices. Instead of Italian herbs, try fresh rosemary or thyme. You can even toss in a bit of cumin or smoked paprika for an earthy flavor. For a zesty kick, add some red pepper flakes or a squeeze of lemon juice. These small changes can brighten up your dish and keep it exciting! Store leftover sheet pan garlic herb veggie gnocchi in an airtight container. It stays fresh for about three days in the fridge. Before sealing, let it cool to room temperature. This helps keep the texture nice and firm. You can freeze this dish if you want to keep it longer. Allow it to cool completely. Then, place it in a freezer-safe container. It can last up to three months in the freezer. For best results, freeze in meal-sized portions. This makes it easy to thaw and reheat. To reheat, you have a few options. You can use the oven or microwave. For the oven, preheat to 350°F (175°C). Spread the gnocchi on a baking sheet and warm for about 15 minutes. If using a microwave, place it in a bowl with a splash of water. Heat in 30-second bursts until warm. This keeps the gnocchi soft and tasty. Enjoy your meal just like the first time! To make gnocchi from scratch, you need a few simple ingredients. Start with 2 pounds of potatoes. Boil them until soft, then mash until smooth. Mix in 1 egg, 1 cup of flour, and a pinch of salt. Knead the dough gently. Roll it into long ropes and cut into small pieces. Use a fork to create a shape. Cook them in boiling water until they float. This method gives you fresh, soft gnocchi. Yes, you can use frozen gnocchi for this recipe. Frozen gnocchi saves time and still tastes great. There's no need to thaw them first. Just toss them with the veggies and garlic mixture. Bake as directed in the recipe. They will cook perfectly and absorb all the flavors. Sheet pan garlic herb veggie gnocchi pairs well with several dishes. A fresh green salad adds a nice crunch. You can also serve it with crusty bread to soak up the flavors. For protein, grilled chicken or shrimp works well. A light vinaigrette can brighten the meal. This recipe is almost vegan-friendly! The gnocchi is often made with potatoes and flour, which are vegan. However, if you add Parmesan cheese, it becomes non-vegan. You can leave it out or use a vegan cheese alternative. Enjoy it with fresh basil for a bright finish. This blog post took you through making sheet pan garlic herb veggie gnocchi. We covered ingredients, substitutions, and tools needed. You learned step-by-step instructions, cooking tips, and serving ideas. We also explored variations and storage options. In my experience, having fun while you cook makes a big difference. Don't hesitate to try new flavors or veggies. Enjoy your meal and share your dish with others!

Sheet Pan Garlic Herb Veggie Gnocchi Delightful Meal

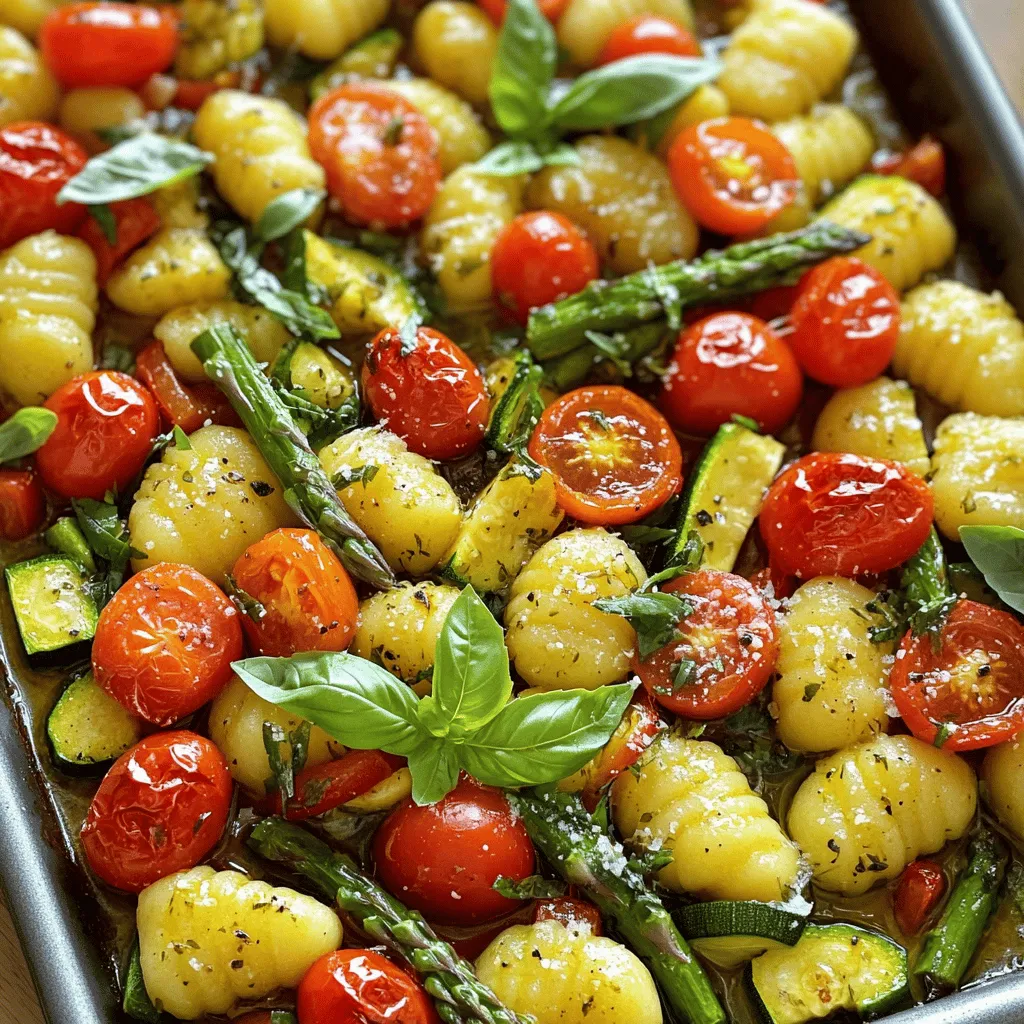
Are you ready to whip up a fun and tasty meal? My Sheet Pan Garlic Herb Veggie Gnocchi is perfect

- 4 tilapia fillets - 1 cup grated Parmesan cheese - 1/2 cup breadcrumbs (preferably panko) - 1 teaspoon garlic powder - 1 teaspoon onion powder - 1 teaspoon Italian seasoning - 1/2 teaspoon paprika - Salt and pepper to taste - 2 tablespoons olive oil - Lemon wedges for serving - Optional garnishes Let's dive into the ingredients for my Air Fryer Parmesan Crusted Tilapia. First, you will need four fresh tilapia fillets. They should be firm and bright in color. Next, grab a cup of grated Parmesan cheese. This cheese adds a rich and nutty flavor that pairs perfectly with tilapia. You’ll also need a half cup of breadcrumbs, and I prefer panko for a nice crunch. The texture of panko makes your crust light and crispy. For seasoning, gather garlic powder, onion powder, Italian seasoning, and paprika. Each spice adds depth and flavor to the fish. Don't forget salt and pepper; they enhance all the other tastes. Finally, you need two tablespoons of olive oil. This oil helps the crust stick and adds a lovely richness. For serving, have fresh lemon wedges ready. They add bright acidity that complements the fish. Optional garnishes like parsley can brighten your dish and make it look even better. Enjoy gathering these simple, yet essential ingredients! Start by mixing the dry ingredients. In a shallow bowl, add: - 1 cup grated Parmesan cheese - 1/2 cup breadcrumbs (preferably panko for a delightful crunch) - 1 teaspoon garlic powder - 1 teaspoon onion powder - 1 teaspoon Italian seasoning - 1/2 teaspoon paprika - Salt and pepper to taste Stir these ingredients together well. This step ensures even flavor distribution, so every bite is tasty. Next, you need to season the tilapia fillets. Pat the fillets dry using paper towels. This removes excess moisture. Then, brush both sides with 2 tablespoons of olive oil. The oil helps the coating stick better and adds flavor. Now for the fun part: coating the fillets! Take each tilapia fillet and dip it into the Parmesan breadcrumb mixture. Make sure to press down lightly. This helps the coating stick well. Cover each fillet evenly for the best texture and crunch. Before you start cooking, preheat the air fryer. Set it to 400°F (200°C) for about 5 minutes. Preheating is key for even cooking and a crispier crust. Once ready, place the coated tilapia fillets in the basket in a single layer. Leave some space between them for proper air circulation. If needed, cook in batches. Cook for 10-12 minutes, or until the crust is golden brown. The fish should flake easily with a fork. When the fillets are done, carefully remove them from the air fryer using a spatula. Serve them right away with fresh lemon wedges on the side. Squeezing lemon over the fish adds brightness to the dish. For a great presentation, arrange the fillets on a platter, garnished with chopped parsley. Pair with a light green salad for a complete meal! To get the best crust on your tilapia, adjust your seasoning as needed. You can add more garlic powder or Italian seasoning if you love bold flavors. If you prefer a milder taste, use less. For the breadcrumbs, I recommend panko. Panko gives your crust a nice crunch. You can also use regular breadcrumbs, but panko is the best for texture. One common mistake is overcrowding the air fryer basket. This can lead to uneven cooking and a less crispy crust. Always leave space between the fillets. If your air fryer is small, cook in batches. Another mistake is not preheating the air fryer. Preheating helps the crust get crispy. Set it to 400°F (200°C) for about 5 minutes before cooking. You can make this dish even better by adding fresh herbs. Try parsley or dill for a bright touch. They add a fresh flavor that pairs well with fish. Additionally, experiment with spices. Add cayenne for heat or lemon zest for brightness. These small changes can elevate your meal and impress your family and friends. {{image_4}} You can swap tilapia for other white fish like cod or haddock. These fish have a mild flavor that works well with the Parmesan crust. When using different fish, adjust the cooking time slightly. Thicker fish may need a few extra minutes. Always check for flakiness to know when it's done. To make this dish gluten-free, use gluten-free breadcrumbs instead of regular ones. You can find these in most grocery stores. For better binding, consider using eggs or a mix of yogurt and lemon juice. This will help the coating stick to the fish. Add a twist to your dish by mixing in different cheeses. Try cheddar or mozzarella for a unique taste. You can also play with herbs and spices. Fresh dill or cilantro can brighten the flavor. A pinch of cayenne can add a nice kick, too! To keep your tilapia fresh, cool it quickly. Place the fillets on a plate and let them sit at room temperature for no more than two hours. After cooling, use an airtight container. Glass or plastic containers work well. Layer parchment paper between fillets to avoid sticking. This keeps the coating crunchy. To reheat the tilapia, the air fryer is best. Set it to 350°F (175°C). Heat for about 5 minutes. This method keeps the crust crispy. You can also use a microwave, but it may make the fillets soft. If you use the microwave, heat in short bursts. Check often to avoid overcooking. You can freeze cooked tilapia. First, let it cool completely. Wrap each fillet in plastic wrap. Then, place them in a freezer-safe bag. Remove as much air as possible before sealing. For thawing, place the fillets in the fridge overnight. This helps maintain texture. Never refreeze thawed tilapia to keep it safe and tasty. Cook tilapia in an air fryer for 10 to 12 minutes at 400°F (200°C). This time ensures the fish cooks through and the crust turns golden brown. Always check that the fish flakes easily with a fork to confirm it is done. Yes, you can use frozen tilapia. Cook it straight from the freezer. Just add a few extra minutes to the cooking time. Check for doneness by ensuring the fish flakes easily. You can pair this dish with several side options: - A light green salad - Steamed vegetables like broccoli or asparagus - Rice or quinoa for a heartier meal These choices complement the tilapia's flavors well. To add heat, try these tips: - Mix cayenne pepper into the breadcrumb coating - Add crushed red pepper flakes to the seasoning - Serve with a spicy dipping sauce These changes will give your dish a nice kick. Yes, air frying is often healthier. Here are some key points: - It uses less oil than deep frying. - It lowers calorie intake while maintaining flavor. - Air frying reduces the risk of harmful compounds often found in fried foods. This method is a great way to enjoy crispy food without the extra fat. This guide covered how to make Parmesan Crusted Tilapia, step by step. You learned about key ingredients, from tilapia to seasonings. We explored practical cooking tips and variations for different diets. Remember, proper techniques make a big difference in flavor and texture. Don’t hesitate to try different fish or spices. Enjoy your cooking and share this tasty dish with others!

Air Fryer Parmesan Crusted Tilapia Recipe Savory Delight

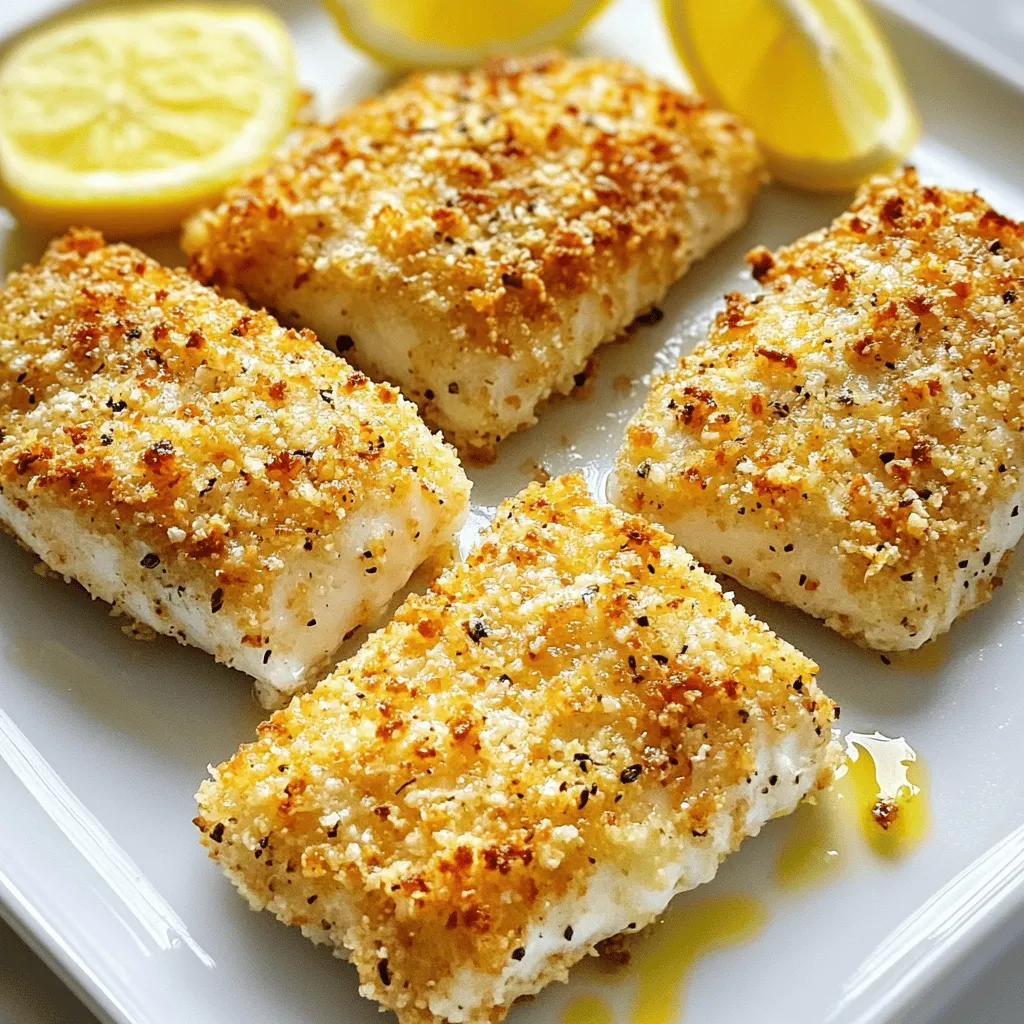
Are you ready to delight your taste buds with a savory twist on tilapia? This Air Fryer Parmesan Crusted Tilapia

- 4 tablespoons all-purpose flour - 4 tablespoons granulated sugar - 2 tablespoons unsweetened cocoa powder - 1/8 teaspoon baking powder - 1/8 teaspoon salt - 3 tablespoons milk (dairy or non-dairy) - 2 tablespoons vegetable oil (or melted coconut oil) - 1 teaspoon pure vanilla extract - 2 tablespoons chocolate hazelnut spread (such as Nutella) - Chopped hazelnuts for garnish (optional) - 4 tablespoons = 1/4 cup - 3 tablespoons = 1.5 ounces - 2 tablespoons = 1 ounce - 1 teaspoon = 5 milliliters - 1/8 teaspoon = 0.5 milliliters These conversions help if you prefer different measuring tools. Use what you have on hand. - Chopped hazelnuts add crunch. - A dollop of whipped cream makes it richer. - A sprinkle of cocoa powder gives a nice touch. - A drizzle of chocolate syrup adds extra sweetness. Feel free to mix and match these toppings to make your mug cake even more tasty! Start with a large, microwave-safe mug. Add 4 tablespoons of all-purpose flour. Next, mix in 4 tablespoons of granulated sugar. Then, add 2 tablespoons of unsweetened cocoa powder. Don’t forget 1/8 teaspoon of baking powder and a pinch of salt. Use a small whisk or fork to blend these dry ingredients well. Make sure there are no clumps. This step sets the base for our cake. Now, pour in 3 tablespoons of milk. You can use dairy or non-dairy milk. Add 2 tablespoons of vegetable oil or melted coconut oil. Lastly, mix in 1 teaspoon of pure vanilla extract. Stir continuously until your batter is smooth. You want to eliminate any lumps here for the best texture. Take 2 tablespoons of chocolate hazelnut spread and place it in the middle of the batter. Use a knife or a toothpick to gently swirl it. Aim for a marbled effect but don’t mix it in too much. You want those delicious pockets of hazelnut spread in the cake. Put your mug in the microwave. Cook it on high for 40 to 60 seconds. At the 40-second mark, start checking if it’s done. The cake should rise and look set in the center. Watch closely to avoid overcooking, as every microwave is different. Once cooked, carefully take the mug out of the microwave. Let it cool for about one minute. This helps to avoid burns and makes it easier to enjoy. If you want to make your mug cake even better, sprinkle some chopped hazelnuts on top. This adds a nice crunch and looks great. Enjoy your chocolate hazelnut mug cake warm and right from the mug! To get the best texture for your mug cake, mix well. Make sure all dry and wet ingredients blend smoothly. I always use a fork or whisk to avoid clumps. The batter should be thick but pourable. This ensures a soft and fluffy cake. If you find it too thick, add a tiny bit more milk for balance. One common mistake is overcooking the cake. Microwaves can vary, so check it at 40 seconds. The cake should rise and look set. If you cook it too long, it will become rubbery. Another mistake is not swirling the hazelnut spread enough. You want a marbled effect, not fully mixed. This gives you pockets of gooey goodness in each bite. I recommend using a large microwave-safe mug. This gives the cake enough room to rise. A small whisk or fork is helpful for mixing. Make sure to use measuring spoons for accuracy. A toothpick or knife is great for swirling the hazelnut spread. Lastly, keep a microwave-safe plate handy to catch any spills. {{image_4}} You can easily make this mug cake vegan. Just swap the milk for a non-dairy milk, like almond or oat milk. Use a plant-based oil, such as coconut oil, instead of vegetable oil. Replace the chocolate hazelnut spread with a vegan version. This way, you keep the rich flavor while staying plant-based. To make this mug cake gluten-free, substitute the all-purpose flour with a gluten-free flour blend. Many blends work well in mug cakes. Just ensure the blend has a good mix of flours to maintain the texture. You may need to adjust the liquid slightly, so keep an eye on the batter's consistency. You can add more flavor to your cake if you want. Try adding a pinch of cinnamon or a dash of espresso powder for a mocha taste. You can also mix in a tablespoon of peanut butter for a nutty twist. Feel free to top it with whipped cream or a scoop of your favorite ice cream for a fun dessert! To keep your chocolate hazelnut mug cake fresh, store it in an airtight container. This helps keep moisture in and prevents it from drying out. You can also wrap the mug tightly with plastic wrap. If you plan to eat it later, store it in the fridge. When you're ready to enjoy the cake again, simply take it out of the fridge. Place it in the microwave for about 10 to 15 seconds. Check it to see if it’s warm enough. If not, heat it in short bursts of 5 seconds to avoid overcooking. The mug cake is best eaten fresh. However, it can last in the fridge for up to three days. After that, the texture may change. If you notice any off smells or changes in color, it’s best to toss it out. To make this mug cake dairy-free, simply swap regular milk for a non-dairy alternative. Almond milk, oat milk, or soy milk work well. You can use any kind you like. Just ensure it has a similar consistency to regular milk. This change keeps the cake moist and tasty. Yes, you can use other nut butters. Almond butter or cashew butter offer unique flavors. Just make sure the nut butter is creamy. This keeps the texture smooth. If you prefer, you can also try sun butter for a nut-free option. Check the mug cake after 40 seconds in the microwave. The cake should rise and look set in the middle. A toothpick inserted should come out clean. If it is still wet, microwave for 10 more seconds. Avoid overcooking, as it can become dry. Yes, you can double this recipe. Use a larger mug to hold more batter. Just mix the ingredients in a bowl first. Then pour half into each mug. Cook one mug at a time in the microwave. This ensures even cooking and delicious results. In this blog post, we explored how to make a delicious mug cake with hazelnut spread. We discussed the key ingredients, from measurement conversions to optional garnishes. You learned the step-by-step process, tips for achieving the right texture, and different variations for your taste. We also covered storage tips to keep your cake fresh. Remember, this mug cake is easy to customize. Enjoy experimenting with flavors and sharing your tasty creations with friends. Happy baking!

Chocolate Hazelnut Mug Cake Quick and Easy Delight

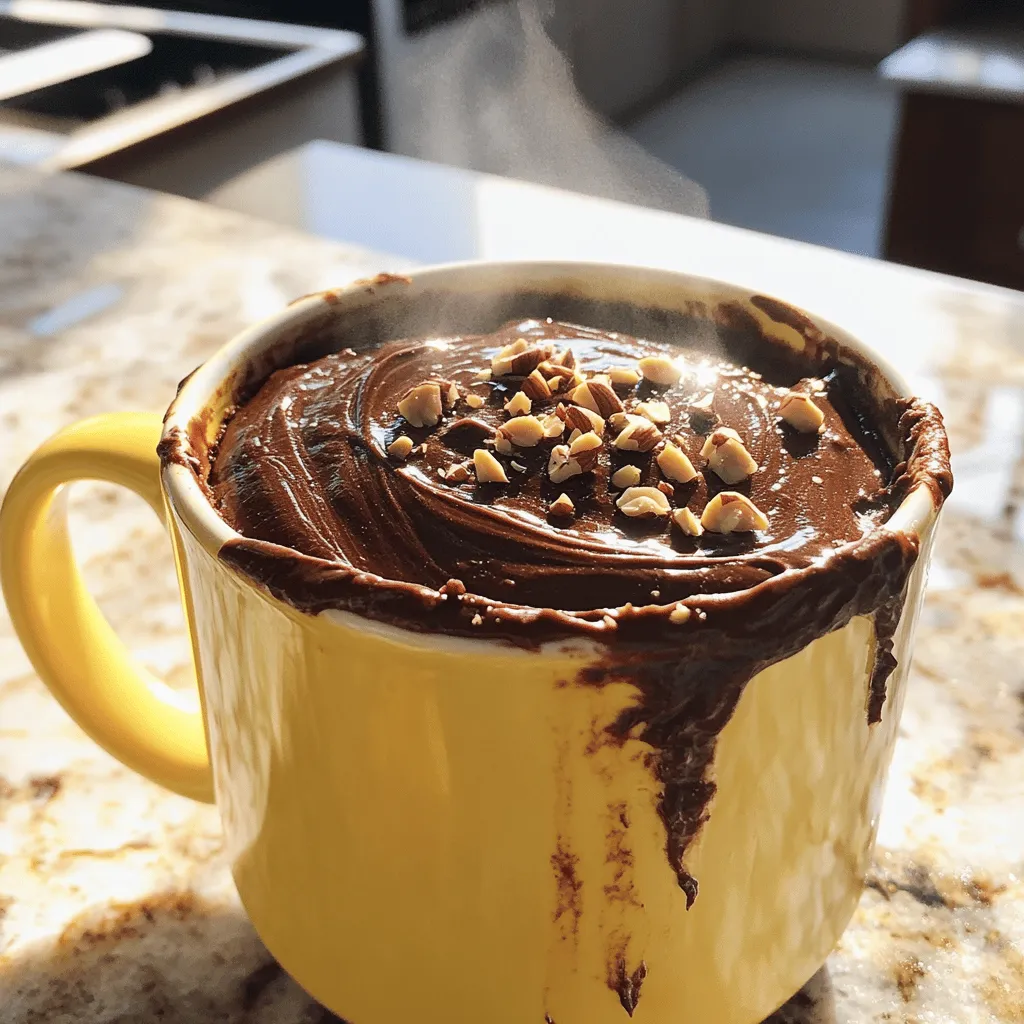
Craving a quick dessert that hits the spot? You’ll love this Chocolate Hazelnut Mug Cake! It’s a simple treat you

To make a tasty Pumpkin Spice Protein Smoothie, gather the following ingredients: - 1 cup pumpkin puree (canned or freshly made) - 1 ripe banana, peeled and sliced - 1 cup unsweetened almond milk (or your choice of milk) - 1 scoop vanilla protein powder (your favorite brand) - 1 teaspoon pumpkin spice blend (or a homemade mix of cinnamon, nutmeg, ginger, and cloves) - 1 tablespoon maple syrup (optional for an extra touch of sweetness) - 1 tablespoon chia seeds (optional, for added nutritional benefits) - Ice cubes (adjust for desired thickness/lumpiness) You can swap some ingredients if you want. Here are a few options: - Use any milk you like, such as oat or soy milk. - If you don’t have pumpkin spice, mix cinnamon, nutmeg, and ginger instead. - You can skip maple syrup if you want less sweetness. - For a fruit swap, use frozen berries instead of banana. - You can leave out the chia seeds if you want a simpler smoothie. Each ingredient in this smoothie brings something good: - Pumpkin puree is rich in vitamins A and C and full of fiber. - Bananas add potassium and natural sweetness, helping with energy. - Almond milk is low in calories and dairy-free, great for many diets. - Protein powder helps build muscles and keeps you full longer. - Chia seeds are high in omega-3s and fiber, boosting health. - Maple syrup gives a natural sweetness with some minerals. This Pumpkin Spice Protein Smoothie is not just tasty; it's also packed with nutrients that can help you feel great! First, gather all your ingredients. You need pumpkin puree, banana, almond milk, and protein powder. Make sure you have your pumpkin spice, maple syrup, and chia seeds if you want them. This setup helps you move quickly and smoothly through the recipe. Now comes the fun part! In your high-speed blender, add the pumpkin puree, sliced banana, almond milk, and protein powder. Blend these together on high speed until everything is mixed well. If you see any bits stuck on the sides, stop the blender and scrape them down. Then blend again until it is creamy and smooth. If you want more flavor, sprinkle in your pumpkin spice blend. You can also add maple syrup and chia seeds now. The syrup makes it sweeter, and chia seeds add health benefits. For a colder and thicker smoothie, toss in some ice cubes. Blend again until everything is well combined. Taste your smoothie! If it needs more sweetness, add a bit more maple syrup and blend again quickly. This blend brings warmth and sweetness to your healthy treat. Enjoy! To make your smoothie creamy, use frozen banana slices. This adds thickness without extra ice. Blend your ingredients well. Stop to scrape the sides of the blender. This helps mix everything evenly. If you want an ultra-smooth texture, blend a bit longer. Use measuring cups for accuracy. This keeps your flavors balanced. For pumpkin puree, pack it in lightly. A heaping cup can change the texture. When adding protein powder, level it off with a knife. This ensures you don’t add too much or too little. You can change this smoothie to fit your taste. Try adding spinach or kale for extra greens. Swap almond milk for coconut milk for a richer flavor. Want more sweetness? Add a date or two instead of maple syrup. You can also try different spices like cardamom for a unique twist. {{image_4}} You can easily make this smoothie dairy-free and vegan. Use almond milk or coconut milk instead of regular milk. These options add a nice flavor and keep it creamy. For protein powder, choose a plant-based option. Pea protein or hemp protein works well. This way, everyone can enjoy this tasty treat! Want to switch it up? Add different spices or flavors! Try a pinch of nutmeg for extra warmth. You can also mix in a spoonful of peanut butter for a nutty twist. If you like it sweeter, add more maple syrup or a few dates. You can even toss in some spinach for a green boost without changing the flavor much! If you want to make several smoothies at once, it's easy! Simply double or triple the recipe. Blend all the ingredients together and pour them into jars. Store them in the fridge for up to two days. Just give them a quick shake before drinking. This saves time and makes mornings easier! To store leftover smoothie, pour it into a clean jar or container. Seal it tightly. Keep it in the fridge. It will stay fresh for about one day. Before drinking, give it a good shake. This helps mix any settled ingredients. You can freeze your smoothie for later. Pour it into ice cube trays or a freezer-safe container. Leave some space at the top, as liquids expand when frozen. Smoothies can last up to three months in the freezer. When you want one, let it thaw in the fridge overnight or blend it straight from the freezer with a splash of milk. If you freeze your smoothie, do not heat it. Smoothies taste best cold. Instead, blend again if it thickens after thawing. You can add a bit of almond milk to help it blend smoothly. Enjoy it chilled for the best flavor! Yes, you can use fresh pumpkin. Start by roasting or steaming your pumpkin. Once it is soft, scoop out the flesh and puree it until smooth. This fresh pumpkin gives a rich flavor. It may be a bit thicker than canned, so adjust your liquid. Pumpkin spice has many health perks. It often includes cinnamon, nutmeg, ginger, and cloves. Each spice brings unique benefits. For instance, cinnamon helps control blood sugar. Ginger aids digestion and can reduce nausea. Cloves are full of antioxidants and may help with inflammation. Together, they make your smoothie taste great while boosting your health. To cut calories, try these tips. Use less maple syrup or skip it entirely. You can also swap almond milk for water or unsweetened coconut milk. Another great option is to use half a banana instead of a full one. This way, you can still enjoy the flavor without the extra calories. This blog covered key ingredients for a delicious smoothie. You learned about swaps and the health perks that come with them. We went through each step, from prep to blending, to get the best flavor. I shared tips for smoothness and ways to make it your own. You also found options for dairy-free and vegan versions, along with storage tips. Experiment with flavors and enjoy creating your smoothie! Each sip can bring health and joy.

Pumpkin Spice Protein Smoothie Healthy and Tasty Treat

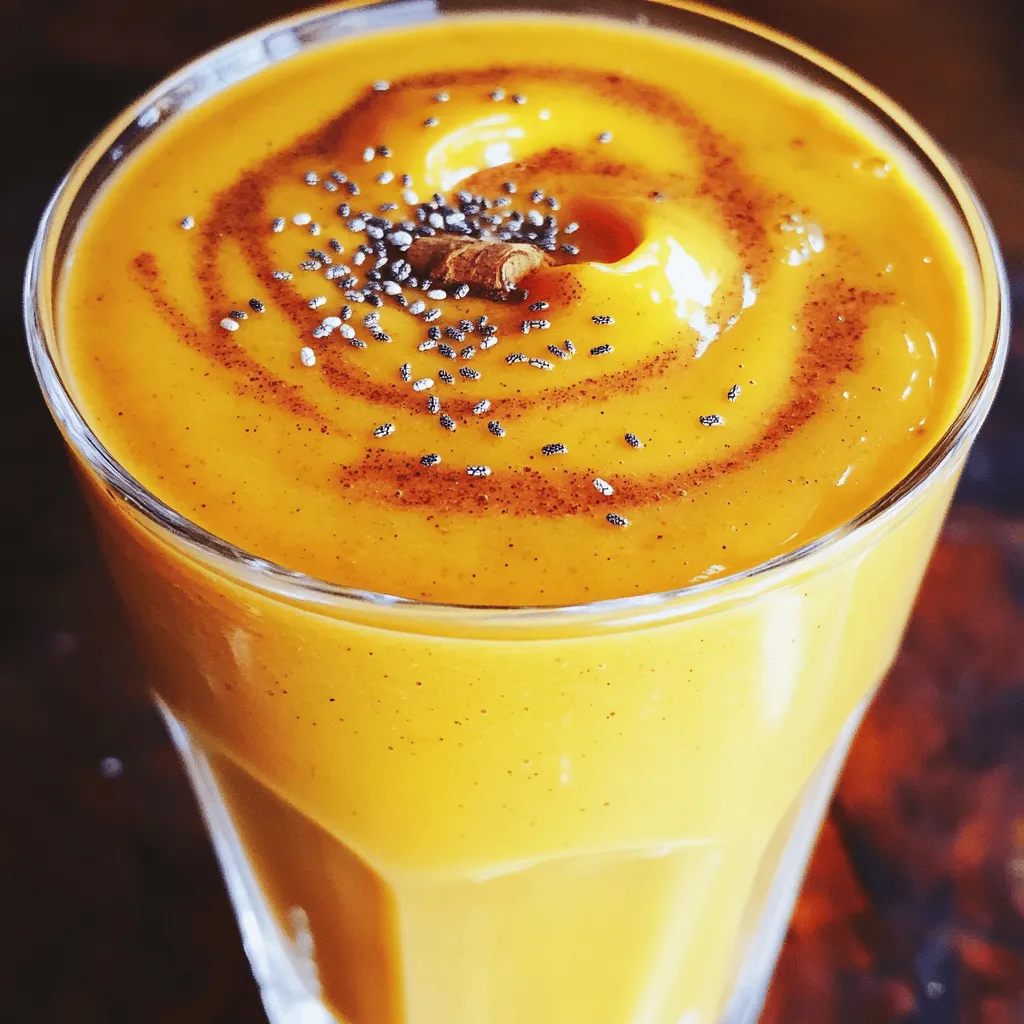
Are you ready to enjoy a delicious drink that’s healthy too? My Pumpkin Spice Protein Smoothie is the perfect blend

- 1 pound shrimp, peeled and deveined - 1 pound chicken sausage, sliced into rounds - 2 cups bell peppers (mixed colors: red, yellow, green), sliced - 1 medium red onion, sliced into rings - 2 cups corn (fresh or frozen) These ingredients form the heart of the dish. The shrimp gives it a sweet flavor, while chicken sausage brings protein and spice. The bell peppers add crunch and color, and the red onion gives a slight sweetness. Corn rounds out the mix with a nice burst of flavor. - 3 tablespoons Cajun seasoning - 4 tablespoons olive oil - Salt and black pepper to taste Cajun seasoning is key here. It adds warmth and depth. Olive oil helps with cooking and adds richness. Don’t forget to season with salt and pepper! This simple mix enhances every bite. - Lemon slices - Fresh parsley Lemon slices add a bright, zesty touch to the dish. Fresh parsley brings a lovely pop of color and freshness. These garnishes make the dish look and taste special. - Preheat your grill or oven to 400°F (200°C). - Cut large pieces of aluminum foil, about 12x18 inches. - In a large bowl, combine shrimp and chicken sausage. - Add sliced bell peppers, red onion, corn, olive oil, Cajun seasoning, salt, and black pepper. Toss well to coat everything evenly. - Spoon the mixture onto the center of each foil piece. Leave space around the edges. - Place thin lemon slices on top of each serving for extra flavor. - Fold the sides of the foil over the filling to create packets. Seal them tightly to avoid leaks. - Cook the foil packs on the grill or on a baking sheet in the oven for 15-20 minutes. The shrimp should turn pink, and the veggies should soften. - Carefully unwrap the foil packs, letting steam escape. Serve right away, garnished with fresh parsley for a pop of color. To ensure shrimp are perfectly cooked, keep an eye on the color. Cook until they are pink and opaque. This usually takes about 15 to 20 minutes. For vegetable tenderness, cut the veggies into even pieces. This helps them cook at the same rate. Bell peppers and onions should be soft, but still crisp. Sealing foil packs properly is key. Fold the edges tightly to prevent leaks. You don’t want any juices escaping. Use heavy-duty aluminum foil for best results. It holds heat well and won’t tear easily. For a beautiful presentation, serve the foil packs on a wooden cutting board. Guests can open them at the table for a fun reveal. Pair your dish with a simple green salad or crusty bread. These sides balance the bold flavors of Cajun seasoning. {{image_4}} You can easily swap proteins in this dish. Try turkey sausage for a lighter option. You can also use fish, like salmon or tilapia, for a different taste. Change up the veggies, too! Use seasonal choices like zucchini or asparagus, depending on what you find fresh. This keeps the meal exciting and new each time. If you love heat, add more Cajun seasoning or a pinch of cayenne pepper. This will kick up the spice level. Fresh herbs like thyme or oregano also work well. A little lemon zest brightens the flavor and adds freshness. These small changes can make a big difference in taste. You have options for cooking these foil packs. You can use the grill for a smoky flavor or bake them in the oven. For the oven, preheat to 400°F. Cooking time stays the same. If you prefer a slow cooker, layer the ingredients in it. Cook on low for 4-6 hours. This method allows flavors to meld wonderfully. To store leftovers, place them in an airtight container. You can also use plastic wrap to cover the foil packs tightly. Keep them in the fridge. These packs last for up to three days. If you wait longer, the flavors may fade. When reheating, you have two good options. You can use a microwave or an oven. For the microwave, place the foil pack on a microwave-safe plate. Heat for about 2-3 minutes. Check that it's hot all the way through. For the oven, preheat it to 350°F (175°C). Place the foil pack on a baking sheet and heat for about 10-15 minutes. Make sure to check it often. You can freeze the assembled packs. Wrap each pack tightly in foil or plastic wrap. They can stay in the freezer for up to three months. If you freeze them cooked, allow them to cool first. Cooked packs last for about two months in the freezer. Uncooked packs hold their texture and flavor better when frozen. Foil packs need about 15-20 minutes to cook. If you use a grill, preheat it to 400°F (200°C). For an oven, the same temperature works well. Cooking times may vary based on the heat level. Always check that the shrimp is pink and the veggies are tender. Yes, you can use frozen shrimp. Just thaw them first. Place the shrimp in cold water for about 15 minutes. After thawing, pat them dry before mixing with other ingredients. This helps keep the seasoning on the shrimp well. Here are some great sides to pair with your foil packs: - Rice or quinoa for a hearty base - Garlic bread to soak up juices - A fresh salad for crunch - Lemonade or iced tea to cool down the spice This recipe for Cajun Shrimp and Chicken Sausage Foil Packs is simple and tasty. You learn about the main ingredients like shrimp and chicken sausage, plus the seasonings that add flavor. The step-by-step instructions make cooking easy. You can customize this dish by swapping ingredients and trying different cooking methods. Leftovers store well, and reheating is simple. Enjoy sharing this meal with friends and family, and have fun experimenting with flavors! Cooking should be enjoyable and satisfying.

Cajun Shrimp & Chicken Sausage Foil Packs Delight

Get ready to impress your taste buds with my Cajun Shrimp & Chicken Sausage Foil Packs! This easy recipe combines

Older posts
Newer posts
← Previous Page1 … Page24 Page25 Page26 … Page83 Next →

dsad

© 2026 eataroundit • Built with GeneratePress

Our Policies

  • Copyright Policy
  • Cookie Policy
  • GDPR Policy
  • Privacy Policy
  • Disclaimer
  • Terms Of Use

More Information

  • Home
  • About
  • Contact
  • Appetizers
  • Dessert
  • Dinner
  • Drinks
©2026, eataroundit About Back To Top