Skip to content
DisclaimerTerms Of UseGDPR PolicyCookie Policy

eataroundit

  • Home
  • Drinks
  • Appetizers
  • Dinner
  • Dessert
  • About
  • Contact
  • Privacy Policy
DisclaimerTerms Of UseGDPR PolicyCookie Policy

NO-ING-IMG

- 2 cups elbow macaroni - 4 cups sharp cheddar cheese, freshly shredded - 1 cup cream cheese, cut into small cubes - 2 cups whole milk - 1 cup chicken broth - 1 teaspoon garlic powder - 1 teaspoon onion powder - 1 teaspoon mustard powder - 1/2 teaspoon cayenne pepper (optional) - Salt and freshly ground black pepper to taste - 1 cup breadcrumbs - 2 tablespoons unsalted butter, melted Using freshly shredded cheese is key for this dish. Pre-shredded cheese often has additives. These can prevent the cheese from melting well. Fresh cheese gives a smooth and creamy texture. The flavor is richer and more satisfying. I recommend using sharp cheddar for a bold taste. It pairs perfectly with the cream cheese. You will notice the difference in every bite. To make this mac and cheese even better, consider adding a few extras. You can mix in cooked bacon for a smoky crunch. Chopped green onions can add a fresh touch. If you want veggies, try steamed broccoli or spinach. These add color and nutrition. You could also sprinkle in some Italian herbs for a new twist. Experiment with what you like! To start, gather your ingredients. You need: - 2 cups elbow macaroni - 4 cups sharp cheddar cheese, freshly shredded - 1 cup cream cheese, cut into small cubes - 2 cups whole milk - 1 cup chicken broth - 1 teaspoon garlic powder - 1 teaspoon onion powder - 1 teaspoon mustard powder - 1/2 teaspoon cayenne pepper (optional) - Salt and freshly ground black pepper to taste - 1 cup breadcrumbs - 2 tablespoons unsalted butter, melted First, place the uncooked elbow macaroni in the bowl of your slow cooker. This pasta is key for that classic mac and cheese texture. Next, pour the whole milk and chicken broth over the macaroni. Make sure all the pasta is submerged to cook evenly. Now, add the cubed cream cheese and the shredded sharp cheddar cheese. These two cheeses create a rich and creamy base. Sprinkle in the garlic powder, onion powder, mustard powder, and the optional cayenne pepper for a tiny kick. Season the mixture with salt and freshly ground black pepper to taste. Stir gently to combine. Make sure every piece of macaroni is coated in that cheesy goodness! Cover your slow cooker with its lid and set it to cook on low. You want to let it cook for 2 to 3 hours. Stir occasionally if you can. This helps the cheese melt and keeps the macaroni from sticking. The dish is ready when the macaroni is tender and the sauce is creamy. If you want a crispy topping, make sure to follow the next steps! To make the creamiest mac and cheese, use fresh cheese. Freshly shredded cheese melts better than pre-shredded. Combine sharp cheddar and cream cheese for a rich taste. Make sure to stir the mixture well before cooking. This helps the cheese coat the pasta evenly. Add whole milk and chicken broth for extra creaminess. The right balance of liquid is key. One common mistake is overcooking the macaroni. Keep an eye on it to avoid mushy pasta. Another mistake is not stirring enough during cooking. Stirring helps the cheese melt and mix well. Avoid using low-fat cheese, as it won’t melt as nicely. Also, don’t skip seasoning. Salt and pepper bring out the flavors. A good slow cooker is essential for this dish. Make sure it has a reliable lid to keep the heat in. Use a sturdy spoon for stirring. A spatula can help scrape the sides. For the crunchy topping, a broiler-safe dish works best. This allows you to achieve that golden crust. Have measuring cups and spoons ready for accuracy in your ingredients. {{image_4}} You can easily change the flavor of your mac and cheese. Adding bacon gives a smoky taste. Just cook the bacon first, then crumble it into the dish. You can also add vegetables like broccoli or spinach. Just chop them small and mix them in before cooking. This adds color and nutrition to your meal. If you want a dairy-free or vegan version, swap the cheese and cream cheese for a plant-based alternative. Use cashew cheese or almond milk instead of whole milk. Nutritional yeast gives a cheesy flavor without dairy. This option keeps the dish creamy and delicious while being kind to your diet. While elbow macaroni is classic, you can try other pasta shapes. Penne, shells, or fusilli also work well. Each shape holds cheese sauce differently, adding fun to your dish. Just make sure to adjust the cooking time if you choose a pasta that cooks faster or slower. To store leftover mac and cheese, let it cool first. Place it in an airtight container. This helps keep it fresh. You can also use plastic wrap. Make sure it covers the dish well. Store in the fridge for up to three days. If you want it to last longer, consider freezing it. When reheating, use a microwave or oven. If using a microwave, place it in a bowl. Add a splash of milk to keep it creamy. Heat in short bursts, stirring in between. In the oven, cover the dish with foil. This helps keep moisture in. Bake at 350°F until heated through. To freeze mac and cheese, use a freezer-safe container. Be sure to leave some space at the top. The cheese may expand when it freezes. To thaw, move it to the fridge overnight. Reheat it as mentioned above. For best taste, eat it within two months of freezing. Yes, you can make this mac and cheese in a regular pot. Just follow the same steps. Start by boiling the elbow macaroni in salted water. Cook it until it's just al dente. Once cooked, drain the pasta. Then, mix in the other ingredients in the pot. Stir until the cheese melts and everything blends well. It’s a quick way to get that creamy goodness without a slow cooker. If your mac and cheese turns out too watery, there are a few things you can try. First, let it cook a bit longer with the lid off. This helps the excess liquid evaporate. You can also add more cheese or a bit of cornstarch mixed with water. Stir this mixture in and cook until the sauce thickens. Always taste and adjust the seasonings as needed. Leftover mac and cheese lasts about 3 to 5 days in the fridge. Store it in an airtight container to keep it fresh. When you're ready to eat it, reheat gently on the stove or in the microwave. Add a splash of milk to help it stay creamy as it warms up. Enjoy those cheesy bites again! In this post, we explored how to make delicious slow cooker creamy mac and cheese. We covered key ingredients and their importance, like freshly shredded cheese. Step-by-step instructions ensured your dish turns out perfect every time. I shared tips for the creamiest results and common mistakes to avoid. Plus, we discussed tasty variations and how to store leftovers correctly. Remember, cooking is about having fun, so experiment with flavors. Armed with these insights, you can create mac and cheese that’s sure to impress everyone at the table.

Creamy Slow Cooker Mac and Cheese Delightful Dish

If you crave a cozy, cheesy meal, my Creamy Slow Cooker Mac and Cheese is for you! This dish is

- 4 salmon fillets (about 6 ounces each) - 2 medium oranges (fresh zest and juice) Salmon fillets are rich in healthy fats. They provide great flavor and texture. Fresh oranges add a bright, zesty taste. Use both juice and zest for the best flavor. - 3 tablespoons honey (preferably raw for a richer flavor) - 2 tablespoons low-sodium soy sauce - 1 tablespoon extra virgin olive oil - 3 cloves garlic, finely minced - 1 teaspoon fresh ginger, grated - 1 teaspoon toasted sesame oil - Salt and freshly cracked black pepper to taste The glaze combines sweet and savory. Honey gives a nice sweetness. Low-sodium soy sauce adds umami. Garlic and ginger bring warmth and depth. Olive oil helps with a smooth glaze. - 1 cup broccoli florets (ideally small-sized) - 1 cup bell peppers (assorted colors, thinly sliced) - 1 cup snap peas (trimmed and cleaned) Choose colorful vegetables for more appeal. Broccoli florets are crunchy and nutritious. Bell peppers add sweetness and color. Snap peas are crisp and fun to eat. They all complement the salmon well. Preheat your oven to 400°F (200°C). While it heats, line a large baking sheet with parchment paper. This makes cleanup easy later. In a medium bowl, mix together the juice and zest from the oranges. Add the honey, low-sodium soy sauce, and olive oil. Next, stir in the minced garlic, grated ginger, and sesame oil. Add a dash of salt and pepper. Whisk until it forms a smooth glaze. Place the salmon fillets skin-side down on one side of the baking sheet. Brush the orange glaze over the tops of the salmon. On the other side, spread the broccoli, bell peppers, and snap peas. Drizzle lightly with olive oil and season with salt and pepper. Toss the veggies to coat them evenly. Put the baking sheet in the oven. Roast for about 15-20 minutes. The salmon is ready when it flakes easily with a fork. The veggies should be tender but still have some crunch. For extra flavor, you can broil the dish for 2-3 minutes. This will give the salmon a nice char and caramelize the veggies. It adds a lovely depth to the dish. To make the best orange glaze, start with good honey. Raw honey has richer flavors, which enhances the glaze. It adds a natural sweetness and depth you can't get from regular honey. For soy sauce, use low-sodium. This option lets you control the saltiness and keeps your dish tasty without being too salty. Mixing these two ingredients with fresh orange juice and zest makes a vibrant glaze. To check if your salmon is done, use a fork. Gently poke the fish. If it flakes easily, it is ready. For perfect cooking, keep an eye on the time. Roast the salmon for 15 to 20 minutes. If you want a little char, broil it for 2 to 3 minutes at the end. This step gives a rich flavor and nice texture. To boost the flavor of your veggies, season them well. A sprinkle of salt and pepper works wonders. When you drizzle olive oil, it helps the seasoning stick. Toss the broccoli, bell peppers, and snap peas to coat them evenly. This simple step makes a big difference in taste. For more variety, feel free to add your favorite herbs or spices. {{image_4}} You can swap salmon with other fish. Try trout or cod for a fresh taste. Chicken thighs are also a great choice. They soak up the orange glaze well. Just adjust the cooking time to ensure they cook through. Fish cooks fast, but chicken may need a bit longer. Use seasonal vegetables for variety. Zucchini, asparagus, or carrots fit nicely in this dish. They add color and flavor, making the meal more exciting. You can mix and match any veggies you love. Just make sure they are cut to a similar size for even cooking. Want some heat? Add chili flakes or a dash of hot sauce to the glaze. You can also stir in a bit of sriracha for extra kick. If you like it spicy, feel free to experiment. Adjust the heat to match your taste. To keep your salmon and veggies fresh, follow these tips: - Allow the dish to cool for about 30 minutes. - Use an airtight container for storage. - Store in the fridge for up to three days. - Place a paper towel in the container to absorb moisture. Keeping the salmon away from air helps maintain its taste. The veggies should stay crisp if stored properly. When you reheat your salmon and veggies, use these techniques: - Preheat your oven to 350°F (175°C). - Place the salmon and veggies on a baking sheet. - Cover them loosely with foil to avoid drying out. - Heat for about 10-15 minutes until warmed through. This method keeps the salmon moist and the veggies crunchy. Avoid using the microwave, as it can make everything soggy. Yes, you can freeze cooked salmon! Here’s how: - Allow the dish to cool completely. - Wrap the salmon tightly in plastic wrap. - Place the wrapped salmon in a freezer bag. - Label the bag with the date and freeze for up to three months. When ready to eat, thaw overnight in the fridge. Reheat using the guidelines above for the best taste. You can tell salmon is done when it flakes easily with a fork. The meat should look opaque and bright pink. If it is still translucent in the middle, it needs more time. Make sure to check the thickest part of the fillet. Using a meat thermometer can help too. The internal temperature should reach 145°F (63°C). Yes, you can use frozen salmon for this recipe. Just make sure to thaw it first. You can leave it in the fridge overnight or use the defrost setting on your microwave. If the fillets are still a bit icy, they may need more cooking time. Keep an eye on them to ensure they cook evenly. This salmon goes well with several side dishes. Here are some tasty options: - Quinoa or rice for a filling base - A simple green salad for freshness - Roasted sweet potatoes for sweetness - Garlic bread for a comforting touch To make this dish low-carb, focus on the veggies. You can skip the honey or use a low-carb sweetener. Replace the soy sauce with coconut aminos for fewer carbs. You can also add more non-starchy vegetables like zucchini or cauliflower. Yes, you can make the orange glaze ahead of time. Store it in an airtight container in the fridge. It will stay fresh for about three days. Just give it a good stir before using it again. If it thickens, you can add a bit of water to loosen it. This article explored making orange glazed salmon, focusing on simple ingredients, easy steps, and helpful tips. We covered all you need, from the fresh salmon and orange glaze to perfect cooking methods. Remember, you can customize this dish with different proteins and veggies. Don't hesitate to tweak the flavors with spices or adjust for low-carb needs. Enjoy cooking and let your taste buds shine with this delicious meal!

Sheet Pan Orange Glazed Salmon Simple and Tasty Meal

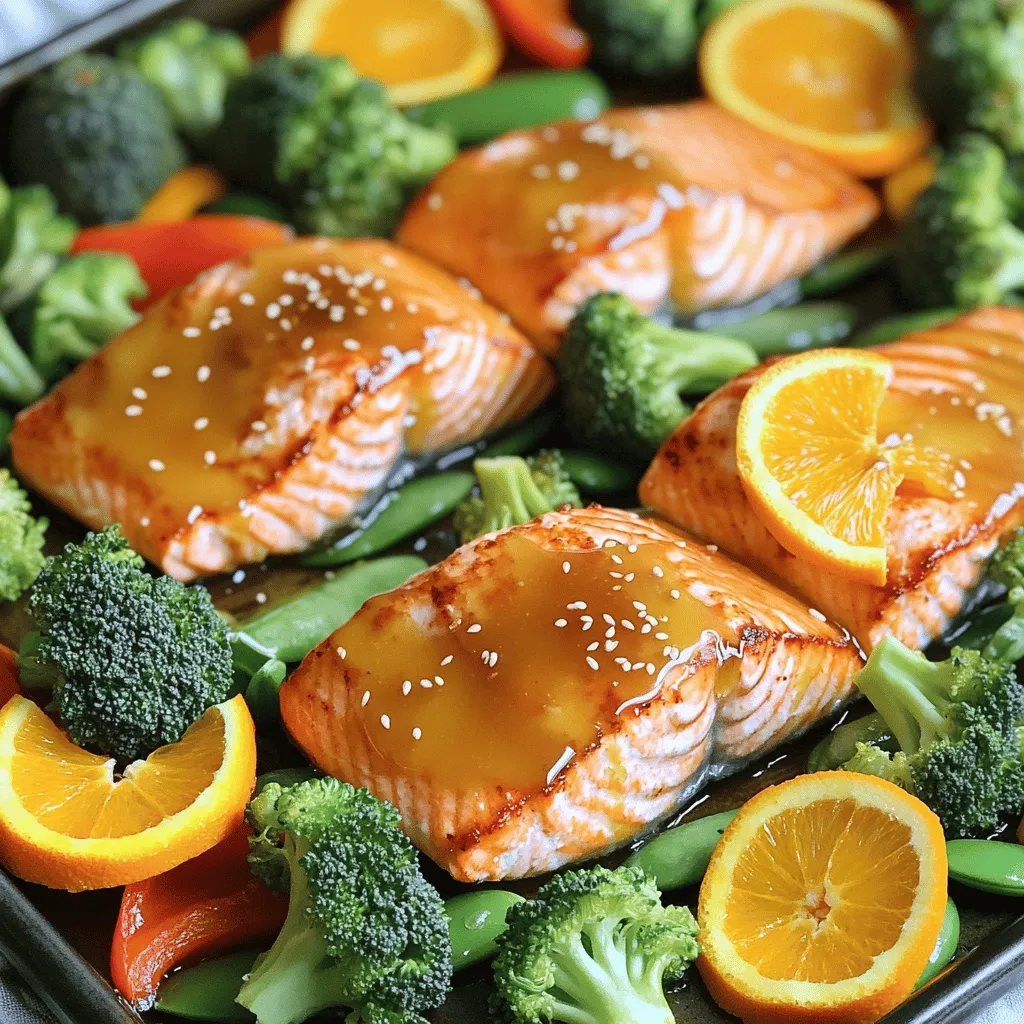
Looking for a quick dinner that bursts with flavor? Try this Sheet Pan Orange Glazed Salmon! It combines fresh salmon

To make Air Fryer Garlic Parmesan Broccoli Bites, gather these fresh ingredients: - 2 cups fresh broccoli florets (about one medium head of broccoli) - 3 cloves fresh garlic, finely minced - Zest of 1 lemon (about 1 teaspoon) - 1 tablespoon freshly squeezed lemon juice Fresh broccoli is key for this dish. Look for vibrant green florets. They should feel firm, not limp. Fresh garlic adds a strong flavor that makes the bites pop. The lemon zest and juice brighten the taste, making each bite refreshing. Use 2 tablespoons of extra virgin olive oil for this recipe. Quality olive oil makes a big difference. It enhances the flavor and helps the broccoli get crispy. Cheap oils often lack taste. Invest in a good bottle. Look for "first cold press" on the label. This means it is high in flavor and nutrients. You can easily boost the nutrition of your broccoli bites. Here are some options: - Add ¼ teaspoon of red pepper flakes for a spicy kick. - Sprinkle in some nutritional yeast for a cheesy flavor without dairy. - Mix in chopped nuts like almonds or walnuts for crunch and healthy fats. These simple add-ins can make your snack even better. They add flavor and nutrients. Experiment to find what you love best! Start by preheating your air fryer to 400°F (200°C). This step is key for crispy bites. It makes sure the air circulates well. A hot air fryer cooks the broccoli evenly. While the air fryer heats, grab a large bowl. Add 2 cups of fresh broccoli florets. Pour in 2 tablespoons of extra virgin olive oil. Then, add 3 cloves of minced garlic. Sprinkle in ½ teaspoon of sea salt and ¼ teaspoon of black pepper. If you like spice, toss in ¼ teaspoon of red pepper flakes. Mix everything well. Each floret should be coated in oil and spices. Next, add ¼ cup of freshly grated Parmesan cheese. Toss the broccoli once more. The cheese should stick to the florets. This gives each bite a great flavor. Carefully place the broccoli in the air fryer basket. Arrange them in a single layer. If your fryer is small, cook in batches. Overcrowding leads to uneven cooking. Cook the broccoli bites for 8-10 minutes. Halfway through, shake the basket. This helps them get crispy all around. When they are done, the edges should be crisp and the insides tender. Once cooked, take them out of the air fryer. Drizzle fresh lemon juice on top. Sprinkle lemon zest for extra flavor. Serve these bites hot for the best taste. Enjoy as a tasty snack or a side dish! To get that perfect crispiness, choose smaller broccoli florets. They cook more evenly and get crispy faster. Preheat your air fryer to 400°F (200°C) before adding the broccoli. This step helps lock in moisture and create a nice outer crunch. Shake the basket halfway through cooking. This action ensures all sides of the florets get nice and crispy. Seasonings can transform your broccoli bites. If you love garlic, add more minced garlic. Want it spicy? Just add more red pepper flakes. Taste your mixture before cooking. You can adjust the salt and pepper to your liking. Don’t be afraid to experiment with herbs like thyme or basil for unique flavors. Cooking in batches is key for great results. If you overcrowd the air fryer, your broccoli won’t crisp up as well. Cook in a single layer for the best texture. This method allows hot air to circulate around each floret. It keeps them crisp and tender. If you have a lot of broccoli, split it into two or more batches. This way, every bite is perfect and tasty. {{image_4}} You can make Air Fryer Garlic Parmesan Broccoli Bites even better by trying other cheeses. For a sharp flavor, use cheddar or gouda. If you want something creamy, add mozzarella or feta. Mixing cheeses can give you more taste. Just remember to keep the amount close to ¼ cup. Want to mix it up? You can add other veggies. Cauliflower works great alongside broccoli. Carrots or bell peppers can add color and crunch. Cut them into similar sizes to cook evenly. Toss them in the same mix of olive oil and spices for an easy change. Adjusting spice levels is a fun way to change the flavor. If you like it spicy, add more red pepper flakes. For a milder taste, skip them or use paprika. You can also sprinkle in some chili powder for a unique kick. Just be careful with the amounts, so it doesn’t overpower the broccoli. To store your Air Fryer Garlic Parmesan Broccoli Bites, place them in an airtight container. This keeps them fresh. Make sure they cool down first. You can keep them in the fridge for up to three days. If you want the best taste, eat them sooner. When you're ready to eat the leftovers, you can reheat them easily. Preheat the air fryer to 350°F (175°C). Place the broccoli bites in the basket in a single layer. Heat them for about 3-5 minutes. This will make them crispy again. You can also use a microwave, but they may become soft. If you want to save them for later, freezing is a great option. First, let the broccoli bites cool completely. Then, lay them out on a baking sheet. Freeze them for about 1-2 hours until firm. After that, transfer them into a freezer bag. They can last up to three months in the freezer. When you're ready, just reheat them in the air fryer. Enjoy your snack anytime! Yes, you can use frozen broccoli. Just make sure to thaw it first. Pat it dry to remove excess moisture. This step helps the broccoli crisp up nicely in the air fryer. Keep in mind that frozen broccoli may cook a bit faster, so check it early. Absolutely! If you do not like garlic, skip it. The bites will still taste great. You can add other spices or herbs instead. Try using onion powder or Italian seasoning to keep the flavor interesting. If you cook a larger batch, you may need to cook them longer. Air fry in small batches for the best results. Keep an eye on the broccoli and shake the basket often. Cook until the edges are crispy, checking every minute after the initial cooking time. This blog covered how to make tasty air-fried broccoli bites. We talked about fresh ingredients, olive oil's quality, and fun add-ins. I shared step-by-step instructions, tips for crispiness, and options for different flavors. Lastly, I gave storage tips and answered common questions. Remember, the key is using good ingredients and adjusting flavors to suit you. Enjoy making these bites your own!

Air Fryer Garlic Parmesan Broccoli Bites Delightful Snack

Are you ready to crunch into a healthy snack that’s packed with flavor? In this guide, I’ll show you how

- 2 3/4 cups all-purpose flour - 1 teaspoon cream of tartar - 1 teaspoon baking soda - 1 teaspoon ground cinnamon - 1/2 teaspoon ground ginger - 1/2 teaspoon ground cardamom - 1/4 teaspoon ground cloves - 1/2 teaspoon salt - 1 cup unsalted butter, softened - 1 1/2 cups granulated sugar - 1/4 cup brown sugar, packed - 2 large eggs - 1 teaspoon pure vanilla extract - 1/4 cup granulated sugar (for rolling) - 1 tablespoon ground cinnamon (for rolling) You can replace all-purpose flour with gluten-free flour for a gluten-free version. If you don’t have cream of tartar, use lemon juice or vinegar. You can swap brown sugar with more granulated sugar if needed. Use fresh spices for the best flavor. Fresh ground spices will give your cookies a warm and rich taste. Ensure your butter is softened to room temperature for easy mixing. High-quality vanilla extract will enhance the overall flavor. Always measure your ingredients accurately for perfect results. Start by preheating your oven to 350°F (175°C). While it warms, line a baking sheet with parchment paper. This helps the cookies not stick and makes cleanup easy. In a medium bowl, combine 2 3/4 cups of all-purpose flour, 1 teaspoon of cream of tartar, 1 teaspoon of baking soda, 1 teaspoon of ground cinnamon, 1/2 teaspoon of ground ginger, 1/2 teaspoon of ground cardamom, 1/4 teaspoon of ground cloves, and 1/2 teaspoon of salt. Whisk these together well and set the bowl aside for later. Take a large mixing bowl and add 1 cup of softened unsalted butter, 1 1/2 cups of granulated sugar, and 1/4 cup of packed brown sugar. Use an electric mixer on medium speed to cream these together for about 3-4 minutes. Your mix should be light and fluffy. Next, add 2 large eggs to the butter-sugar mix, one at a time. Make sure to mix well after each egg. Then, stir in 1 teaspoon of pure vanilla extract until everything combines nicely. Now, slowly add the dry mixture from the medium bowl to the wet mixture. Mix until just combined. Be careful not to overmix; this can make your cookies tough. In a small bowl, mix 1/4 cup of granulated sugar with 1 tablespoon of ground cinnamon. This will be used for rolling the cookies. Now, using a cookie scoop or your hands, form the dough into 1-inch balls. Roll each ball in the cinnamon-sugar mixture to coat it well. Place the coated cookie balls on your prepared baking sheet, leaving about 2 inches between each one. Bake in the preheated oven for 10-12 minutes. The edges should be lightly golden, and the tops should look set. After baking, let the cookies cool on the sheet for about 5 minutes. Then, transfer them to a wire rack to cool completely. When making Spiced Chai Snickerdoodle Cookies, avoid these common errors: - Overmixing the dough: This makes cookies tough. Mix until just combined. - Using cold butter: Always use softened butter. Cold butter doesn’t mix well. - Skipping the chilling step: Even if not required, chilling helps flavors blend. For soft and chewy cookies, follow these tips: - Measure flour correctly: Use the spoon-and-level method to avoid too much flour. - Don't skip the cream of tartar: It gives cookies their signature tang and chewiness. - Watch baking time: Take them out when edges are golden but centers are soft. Rolling cookies in cinnamon sugar adds flavor. Here’s how to do it right: - Make uniform balls: Use a cookie scoop for even sizes. This ensures even baking. - Coat thoroughly: Roll each ball in the cinnamon sugar mix until fully covered. - Space them out: Keep about 2 inches apart on the baking sheet to allow spreading. {{image_4}} You can make your cookies even more exciting by adding spices. Try adding a pinch of nutmeg for warmth. You can also use allspice for a more complex flavor. A dash of black pepper can add a subtle kick. Just be careful not to overpower your chai flavor. Each spice enhances the cookie's taste in a unique way. If you need a gluten-free version, swap out the all-purpose flour. Use a gluten-free flour blend instead. Look for blends that include xanthan gum for the best texture. This will help the cookies hold together well. Adjust your baking time slightly if needed. Enjoy the same great taste without the gluten! Mix-ins can add fun and flavor to your cookies. Try adding chopped nuts like pecans or walnuts for crunch. You can also include chocolate chips for a sweet surprise. If you want a fruity twist, add dried fruit like raisins or cranberries. Mix-ins can change the cookie's texture and taste, making each bite special. Just remember to keep your mix-ins balanced with the cookie dough! To keep your spiced chai snickerdoodle cookies fresh, store them in an airtight container. Line the bottom with parchment paper to absorb moisture. Keep the container at room temperature for the best taste and texture. If the room is warm, you can also store them in the fridge to extend freshness. If you want to save some cookies for later, freezing is the way to go. Place the baked cookies in a single layer on a baking sheet. Freeze them for about an hour until firm. Once frozen, transfer them to a freezer-safe bag. Be sure to label the bag with the date. These cookies can last up to three months in the freezer. These cookies stay fresh for about one week at room temperature. Serve them with a warm cup of chai tea for the perfect pairing. For added fun, sprinkle some extra cinnamon sugar on top just before serving. Enjoy the delightful flavors and warm spices that make these cookies special! You can use lemon juice or white vinegar in place of cream of tartar. Use 1 teaspoon of either for every 1 teaspoon of cream of tartar. This substitution will help the cookies rise and keep them fluffy. The cookies are done when the edges turn light golden brown. The tops should look set and not shiny. Remember, they will firm up as they cool on the baking sheet. Yes, you can make the dough ahead of time. Wrap it tightly in plastic wrap and store it in the fridge for up to 3 days. You can also freeze it for up to 3 months. Just thaw it overnight in the fridge before baking. To make the cookies spicier, add more cinnamon, ginger, or cardamom. Just a pinch can change the flavor! For milder cookies, reduce the spices by half. Taste the dough before baking to get it just right. In this post, we covered key ingredients and steps for making cookies. You learned about ingredient quality, mixing methods, and tips for perfect texture. Variations like gluten-free options and mix-ins add fun. Proper storage can keep your cookies fresh for longer. Remember, baking is both a science and an art. Enjoy the process and share delicious treats with others. Happy baking!

Spiced Chai Snickerdoodle Cookies Fresh and Easy Recipe

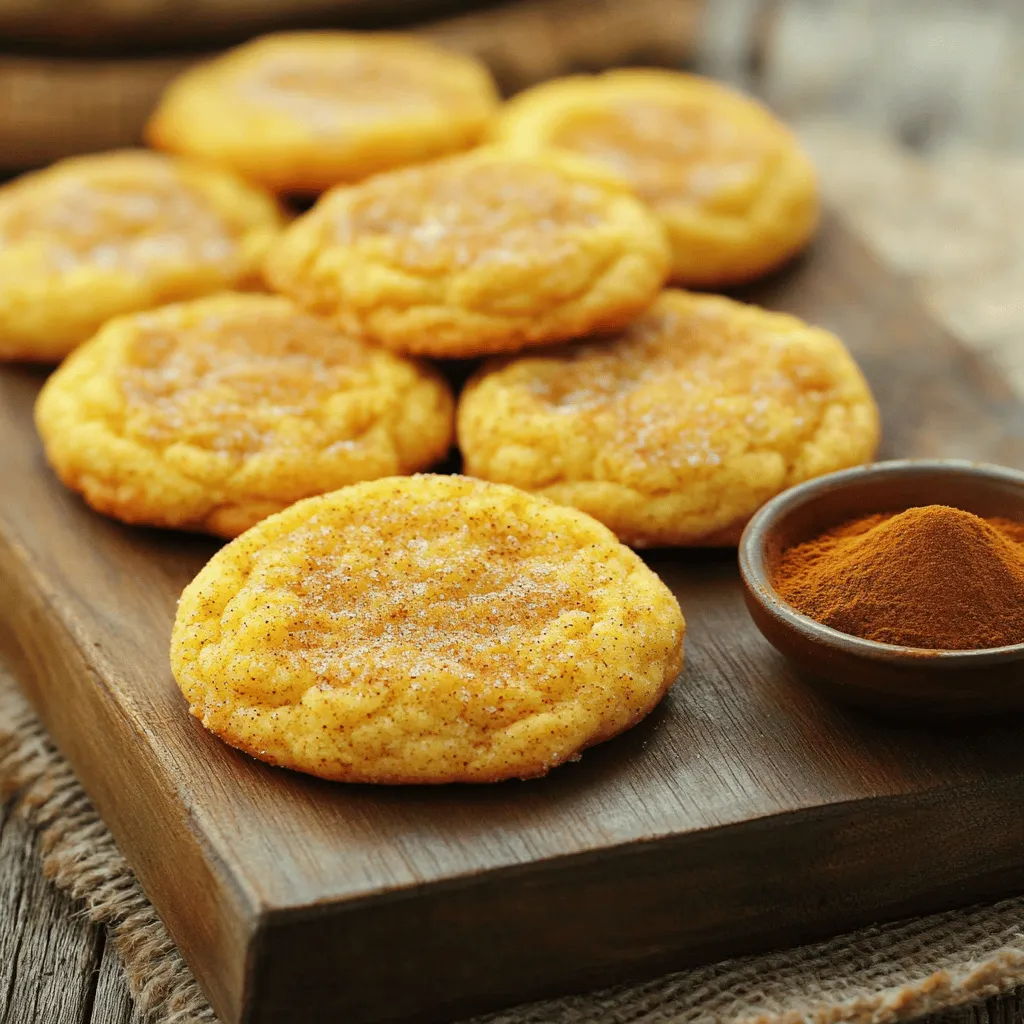
Get ready to bake a treat that warms the heart and spices up your day! My Spiced Chai Snickerdoodle Cookies

Here’s what you need to make Sriracha Honey Roasted Cashews. These simple ingredients create a crunchy snack that packs a punch! - 2 cups raw cashews - 2 tablespoons honey - 1 tablespoon Sriracha sauce - 1 teaspoon soy sauce - 1 teaspoon extra virgin olive oil - 1/2 teaspoon garlic powder - 1/2 teaspoon salt (adjustable to taste) - 1/4 teaspoon freshly ground black pepper Using fresh ingredients makes a huge difference. Raw cashews give the best texture. Honey adds sweetness, while Sriracha gives heat. The soy sauce adds umami. Olive oil helps the spices stick. Garlic powder adds depth, and salt enhances all the flavors. Black pepper adds a nice kick. Feel free to adjust the salt and Sriracha to suit your taste. If you like it spicier, add more Sriracha. For a sweeter touch, increase the honey. This recipe is flexible, so make it your own! {{ingredient_image_2}} - Preheat the oven to 350°F (175°C). Line a baking sheet with parchment paper. This helps the cashews not stick and makes cleanup easy. - In a medium bowl, whisk together the honey, Sriracha sauce, soy sauce, extra virgin olive oil, garlic powder, salt, and black pepper. Mix until smooth and well combined. - Pour the raw cashews into the bowl with the glaze. Toss gently until all the cashews are coated. Each nut should shine with the sauce! - Carefully transfer the coated cashews to the prepared baking sheet. Spread them into a single layer for even roasting. - Place the baking sheet in the oven. Roast the cashews for 15 to 20 minutes. Stir them every 5 minutes. This keeps them from burning and helps them brown evenly. Watch them closely! - Once the cashews are golden and fragrant, take them out of the oven. Let them cool completely on the baking sheet. They will get crunchier as they cool. - After they cool, move the cashews to an airtight container. Store them for up to 2 weeks. Enjoy your tasty, spicy treats! Adjusting spice levels You can change the heat of your cashews. Add less Sriracha for a milder kick. Want more heat? Just add a bit more Sriracha. Always taste your glaze before coating the nuts. This way, you can find your perfect mix. Ensuring even roasting To get a nice, even roast, spread the cashews in a single layer. This helps all sides cook evenly. Stir them every five minutes. This step keeps them from burning and gives you a perfect crunch. Storing for freshness Once your cashews cool, put them in an airtight container. Keep them in a cool, dry place. They can stay fresh for up to two weeks. If you want them to last longer, you can freeze them. Just remember to thaw them before snacking! Presentation tips for serving Serve these cashews in a pretty bowl. You can add some fresh herbs or a sprinkle of sea salt on top. This makes them look more inviting. It’s a great treat for parties or family gatherings. Pairing with beverages These cashews go well with drinks like beer or sweet tea. The heat and sweetness balance nicely with these drinks. You can also try them with cocktails. They add a fun twist to your drink time! Creative ways to use as toppings You can use these cashews as a topping on salads or grain bowls. They add crunch and flavor. Try them on desserts like ice cream or yogurt. The mix of sweet and spicy will surprise your taste buds! Pro Tips Use Fresh Cashews: For the best flavor and crunch, opt for fresh, high-quality raw cashews. Stale nuts can compromise the taste and texture of your snack. Adjust Spice Level: If you prefer a milder flavor, reduce the amount of Sriracha in the recipe. You can also add more honey to balance the heat. Monitor Roasting Time: Keep a close eye on the cashews while they roast. They can quickly go from perfectly golden to burnt, so stir them regularly. Experiment with Flavors: Feel free to customize the recipe by adding other spices or herbs, such as smoked paprika or cayenne pepper, for an extra kick! {{image_4}} You can change the recipe a bit. Here are some easy swaps: - Alternative sweeteners: Use maple syrup or agave instead of honey. Both add a nice sweetness. - Different types of nuts: Try almonds or walnuts if you want a new taste. Each nut brings its own crunch. - Adding spices or herbs: Mix in cayenne for more heat or add rosemary for a fresh twist. These changes keep the recipe fun and tasty! You can mix up the flavors to suit your taste. Here are some ideas: - Sweet and spicy variations: Add extra Sriracha for more heat. You can also try a bit of brown sugar for a sweeter touch. - Savory twists: Try adding smoked paprika or cumin. These spices add depth and a savory kick. - Adding extra crunch with seeds: Toss in sunflower or pumpkin seeds. They add more texture and flavor to your snack. These combinations make your Sriracha honey roasted cashews exciting every time you make them! To keep your Sriracha honey roasted cashews fresh, use an airtight container. Glass jars or plastic containers with a secure lid work great. This helps keep out moisture and air, which can make them stale. Store the cashews at room temperature in a cool, dry spot. Avoid sunlight and heat sources like the stove. You can also place them in the fridge if you want them to last longer. Just remember to let them warm up a bit before eating. These spicy-sweet cashews stay fresh for about two weeks. After that, they may lose their crunch and flavor. Signs of spoilage include a rancid smell or a bitter taste. If you notice any of these, it’s best to toss them out. Enjoy your tasty snack while it’s fresh! Can I use roasted cashews instead of raw? Yes, you can use roasted cashews. However, raw cashews absorb the glaze better. This gives a richer flavor. If you use roasted cashews, reduce the roasting time. How spicy is the Sriracha honey combination? The spice level is adjustable. Sriracha brings heat, but honey adds sweetness. Start with one tablespoon. You can add more Sriracha if you like it spicier. What can I pair these cashews with? These cashews pair well with many snacks. Try them with cheese or on a salad. They also make a great topping for soups. Health benefits of cashews Cashews are packed with healthy fats. They are a great source of protein. They also contain vitamins and minerals. Eating cashews can support heart health. Nutritional content per serving One serving (about 1 ounce) has around 157 calories. It contains 5 grams of protein and 12 grams of fat. This includes good fats that support wellness. Best brands for Sriracha honey roasted cashews Look for brands like Blue Diamond or Trader Joe's. They offer quality cashews with great flavor. Check the labels for Sriracha honey flavors. Online and local options You can find these cashews at most grocery stores. Online retailers like Amazon often have great options too. Just make sure to read reviews for quality. You now have a clear guide to making Sriracha honey roasted cashews. Remember to use fresh ingredients for the best taste. Adjust spice and sweetness to fit your liking. Store them well to keep them fresh and crunchy. These cashews are great as snacks or toppings. Experiment with different nuts and flavors to find your perfect mix. Enjoy this delicious and simple recipe! You’ll impress friends and family alike with your tasty treat.

Sriracha Honey Roasted Cashews Crunchy Snack Delight

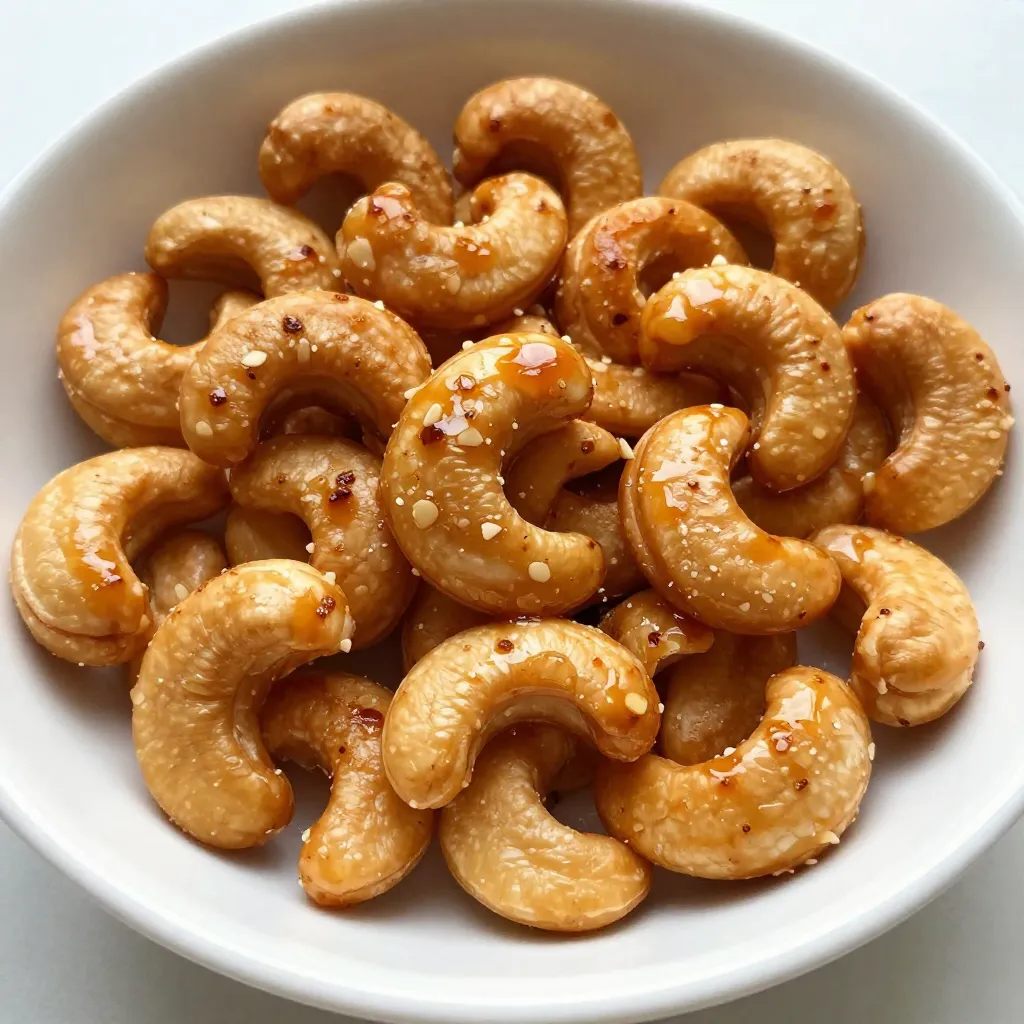
If you crave a snack that perfectly blends sweet and spicy, you’re in for a treat! Sriracha honey roasted cashews

- 1 ½ cups graham cracker crumbs - ½ cup unsalted butter, melted - 2 cups cream cheese, softened - 1 cup powdered sugar, sifted - 1 cup fresh raspberries (plus extra for garnish) - 1 tablespoon finely grated lemon zest - ¼ cup freshly squeezed lemon juice - 1 teaspoon pure vanilla extract - A pinch of salt - Extra fresh raspberries - Lemon zest - Raspberry sauce - Medium-sized mixing bowl - Large mixing bowl - Electric mixer - 8x8 inch baking dish - Parchment paper - Silicone spatula - Measuring cups and spoons - Plastic wrap - Cutting board To begin, grab a medium bowl. Combine 1 ½ cups of graham cracker crumbs and ½ cup of melted unsalted butter. Stir until the crumbs are moist. This mix should feel like damp sand. Line an 8x8 inch baking dish with parchment paper. Leave some paper hanging over the edges for easy removal. Press the crumb mix firmly into the bottom of the dish. Use the back of a measuring cup to make it even. Set it aside while you prepare the filling. Next, take a large mixing bowl and add 2 cups of softened cream cheese. Use an electric mixer on medium speed. Beat for about 2-3 minutes until smooth. Gradually add in 1 cup of sifted powdered sugar. Mix to prevent lumps. After that, add 1 tablespoon of lemon zest, ¼ cup of fresh lemon juice, 1 teaspoon of vanilla extract, and a pinch of salt. Keep mixing for another 2 minutes until the mix is silky. Now, gently fold in 1 cup of fresh raspberries with a silicone spatula. Be sure to keep some whole for texture and looks. Pour the creamy filling over your prepared crust. Spread it evenly with your spatula. Cover the dish with plastic wrap and place it in the fridge. Let it chill for at least 4 hours. This helps it firm up for slicing. Once ready, lift the cheesecake out using the parchment paper overhang. Place it on a cutting board and slice it into 12 bars. For a fun touch, add extra raspberries on top for color. Enjoy your delicious treat! To make the ideal crust, use fresh graham cracker crumbs. I prefer to pulse them in a food processor for a fine texture. Combine these crumbs with melted unsalted butter. Mix until every crumb is moist. Press this mixture firmly into your dish. Use the back of a measuring cup to ensure it's compact. A good crust gives the bars a solid base. For a smooth cheesecake filling, start with room-temperature cream cheese. Beat it well until it's creamy and free of lumps. Gradually add sifted powdered sugar while mixing. This prevents lumps from forming. Don't rush this step; take your time to create a silky texture. Mixing in lemon zest and juice adds a fresh flavor that brightens the filling. Gently fold in fresh raspberries last to keep some whole for texture. Presentation makes a big difference in how we enjoy food. Serve the bars on a chilled platter for a nice touch. Drizzle with raspberry sauce for added color and flavor. A sprinkle of fresh lemon zest on top enhances the visual appeal. Extra raspberries as garnish also bring freshness to each bar. This small effort elevates your no bake lemon raspberry cheesecake bars! {{image_4}} You can easily change the flavors for this cheesecake. Try using lime instead of lemon. The tangy lime pairs well with berries. You can also swap cream cheese for mascarpone for a richer taste. Add a hint of almond extract to give a new twist. Each swap can create a fresh take on this classic treat. Raspberries are great, but many berries work well here. You can use blueberries for a sweet and juicy flavor. Strawberries add a bright color and sweetness. Blackberries offer a bold taste and a fun texture. Mix berries for a colorful and tasty treat. Each berry brings its unique flavor to the bars. If you want to cut back on sugar, try using honey or maple syrup. These natural sweeteners can add a unique flavor. You can also use stevia or monk fruit for a low-calorie option. Just remember, adjust the amount based on your taste. These swaps keep the bars sweet without all the sugar. To keep your no bake lemon raspberry cheesecake bars fresh, store them in the fridge. Use an airtight container to prevent drying out. If you want to keep the bars longer, wrap them tightly in plastic wrap first. This helps lock in moisture and flavor. You can freeze these cheesecake bars if you want to save some for later. First, cut the bars into slices. Wrap each slice in plastic wrap, then place them in a freezer-safe container. They can last up to three months in the freezer. When you’re ready to enjoy, let them thaw in the fridge overnight. These cheesecake bars taste best within the first week. After that, they may start to lose their fresh flavor. Always check for any off smells or changes in texture before serving. For the best taste, serve them chilled and garnish with fresh raspberries just before serving. This keeps them looking vibrant and delicious! Yes, you can make these cheesecake bars a day ahead. This helps the flavors blend well. Just chill them for at least four hours, or overnight for best results. Store them in the fridge, covered with plastic wrap. This keeps them fresh and tasty. If you want a dairy-free option, try using cashew cream. Blend soaked cashews with a little lemon juice and maple syrup. You can also use a vegan cream cheese. It gives you a similar creamy texture. Both options still taste great in this recipe. To make these bars gluten-free, use gluten-free graham crackers. They are easy to find in stores now. Check the label to make sure they are certified gluten-free. This way, you can enjoy the bars without worry. You now have all the steps to make No Bake Lemon Raspberry Cheesecake Bars. We covered the key ingredients, tools needed, and how to prepare each layer. You learned tips for the best crust and the creamiest filling. We even explored tasty variations and smart storage methods. Whether you want a treat for guests or a snack for yourself, this recipe is a winner. With these simple steps, you can whip up delicious bars anytime. Enjoy being creative with flavors and toppings!

No Bake Lemon Raspberry Cheesecake Bars Delightful Treat

If you love sweet treats without the fuss of baking, you’ll adore these No Bake Lemon Raspberry Cheesecake Bars! I’ll

- 1 lb boneless, skinless chicken breasts - 1 tablespoon olive oil - 1 medium onion, finely chopped - 2 cloves garlic, minced - 1 red bell pepper, diced - 1 green bell pepper, diced - 1 can (14.5 oz) diced tomatoes, with juices - 1 can (15 oz) black beans, drained and rinsed - 1 can (15 oz) corn, drained - 4 cups chicken broth - 1 tablespoon chili powder - 1 teaspoon ground cumin - 1 teaspoon smoked paprika - Salt and pepper to taste - Juice of 1 fresh lime The stars of the show here are chicken breasts, beans, and veggies. These ingredients bring great flavor and texture to your soup. The spices like chili powder and cumin give it that warm kick. - Fresh cilantro leaves, for garnish - Crunchy tortilla strips, for serving These optional items add a fresh taste and a satisfying crunch. Cilantro brings brightness, while tortilla strips give a fun texture. - Extra lime wedges - Avocado slices - Shredded cheese Garnishes can make your soup even better. Lime adds a zesty kick, avocado gives creaminess, and cheese adds richness. Feel free to mix and match based on what you enjoy! Start by selecting the 'Sauté' mode on your Instant Pot. Add one tablespoon of olive oil. Once hot, toss in one medium onion, finely chopped, and two cloves of minced garlic. Sauté for about two to three minutes. Stir often until the onion turns soft and fragrant. This step builds a strong flavor base for your soup. Next, add in one diced red bell pepper and one diced green bell pepper. Sauté these for another two minutes. This helps the peppers soften and adds vibrant color. Now, it’s time to combine all the main ingredients. Lay one pound of boneless, skinless chicken breasts on top of the sautéed veggies. Pour in one can of diced tomatoes with juices, one can of black beans (drained and rinsed), and one can of corn (drained). Then, add four cups of chicken broth for richness. Sprinkle in one tablespoon of chili powder, one teaspoon of ground cumin, one teaspoon of smoked paprika, and add salt and pepper to taste. Gently stir to mix everything, making sure the chicken is fully covered in liquid. Secure the Instant Pot lid and set the steam release valve to 'Sealing.' Select the 'Manual' or 'Pressure Cook' option and set the timer for ten minutes. Once done, let the pot naturally release pressure for ten minutes. After that, perform a quick release for any remaining steam. Carefully open the lid and take out the cooked chicken breasts. Shred the chicken into bite-sized pieces using two forks. Add the shredded chicken back into the pot and stir well. Finally, squeeze the juice of one fresh lime into the soup. Taste and adjust the seasoning as needed. Ladle the warm soup into bowls, garnishing with fresh cilantro leaves and crunchy tortilla strips for that perfect finish! To shred chicken well, use two forks. Hold one fork in each hand. Grab a piece of chicken with a fork and pull it apart. The meat should easily fall apart into small pieces. If it’s tough, let it cool a bit. Once shredded, mix the chicken back into the soup for great flavor. To make your soup spicy or mild, adjust the chili powder. Start with one tablespoon if you want mild heat. For more spice, try adding more chili powder or a dash of cayenne pepper. You can also add fresh jalapeños if you like a kick. Taste as you go to find your perfect balance. Serve the soup hot in bowls. Add fresh cilantro on top for a bright taste. Don't forget the tortilla strips for crunch! You can also add avocado slices or a dollop of sour cream. Serve it with lime wedges for extra zest. Enjoy your tasty meal with family and friends! {{image_4}} You can make this soup vegetarian by skipping the chicken. Use vegetable broth instead of chicken broth. Add extra beans or lentils for protein. You can also increase the amount of veggies. Consider adding zucchini, carrots, or even mushrooms. These changes keep the soup hearty and delicious. If you want to switch up the protein, turkey or pork works great. Just use the same cooking time. Shredded rotisserie chicken is a quick option if you're short on time. You can also use tofu for a plant-based twist. Always season the protein well to keep the flavors bold. Spices can change the whole taste of your soup. Try adding cayenne pepper for heat. You can also mix in taco seasoning for a fun kick. Smoked paprika gives a nice depth of flavor too. Don't be afraid to experiment with your favorite spices. Each choice can create a new flavor profile that excites your taste buds. To store your leftover Instant Pot chicken tortilla soup, let it cool first. Pour the soup into an airtight container. Make sure to leave some space at the top for expansion. You can keep it in the fridge for up to 4 days. If you want to enjoy it later, freezing is a great option. When you are ready to eat the soup again, take it out of the fridge or freezer. If frozen, let it thaw overnight in the fridge. You can reheat the soup on the stove over medium heat. Stir often until it is hot. You can also use the microwave. Heat it in a bowl for 2-3 minutes, stirring halfway through. To freeze the soup, pour it into freezer-safe bags or containers. Label them with the date. The soup can last up to 3 months in the freezer. When you crave a warm bowl, just thaw it in the fridge and reheat as mentioned above. Enjoy the flavors anytime! Yes, you can make tortilla soup without chicken. Use beans or tofu as a protein. You can also add more vegetables like zucchini or mushrooms for texture. This keeps the soup filling and delicious while being meat-free. To thicken your soup, try these methods: - Add more beans: Mash a portion of the black beans before adding them to the pot. - Use corn: Blend some corn into a puree and stir it in. - Incorporate a slurry: Mix a tablespoon of cornstarch with water, then add it to the soup and cook for a few minutes. These options will give your soup a richer feel. Here are some tasty side options: - Tortilla chips: Serve them on the side for crunch. - Avocado slices: Fresh avocado adds creaminess. - Mexican rice: A side of rice makes the meal heartier. - Fresh lime wedges: Squeeze lime juice for extra flavor. These pairings enhance the soup and make it a complete meal. You learned how to make Instant Pot Chicken Tortilla Soup with key ingredients, steps, and tips. This dish is easy, quick, and full of flavor. Remember to try variations and serve it with your favorite sides. Don’t forget to store leftovers well for later meals. Enjoy the soup’s warmth and taste, whether for dinner or a gathering. Get ready to impress your family and friends with this comforting dish!

Instant Pot Chicken Tortilla Soup Easy and Flavorful

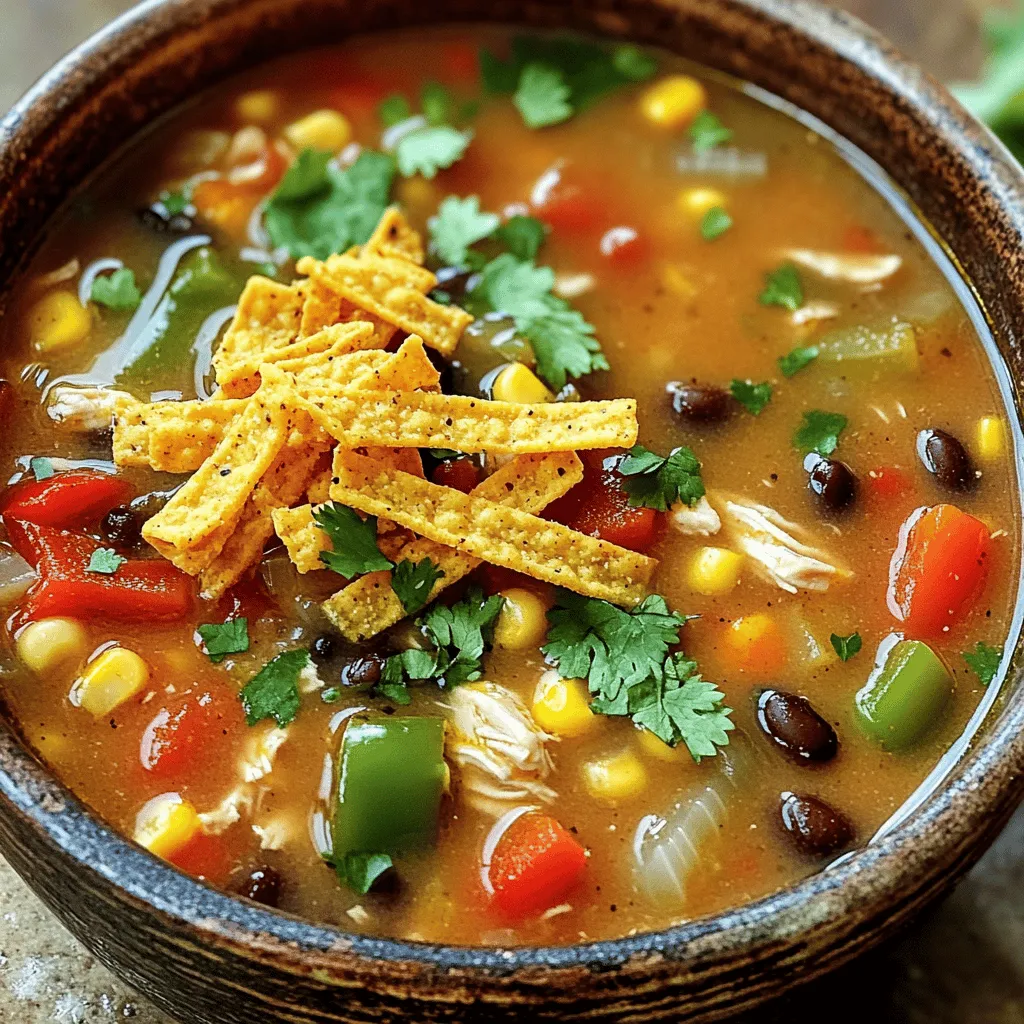
If you’re looking for a soup that’s both easy and bursting with flavor, you’ve come to the right place! My

- Pasta: Use 8 ounces of penne or fusilli for the best texture. - Pumpkin puree: One cup is needed. You can use canned or homemade. - Feta cheese: One block, 8 ounces. Choose a good quality feta for flavor. - Olive oil: Two tablespoons to enhance the creaminess. - Seasonings: - One teaspoon of garlic powder for depth. - One teaspoon of dried thyme for a fragrant touch. - Half a teaspoon of red pepper flakes for a hint of heat. Adjust to your taste! - Salt and black pepper to season to your liking. - Grated Parmesan cheese: A quarter cup adds richness to the dish. - Fresh herbs: Use basil or parsley for a fresh, vibrant garnish. Start by preheating your oven to 400°F (200°C). This step is key for even cooking. While the oven heats, boil water in a large pot. Add 8 ounces of pasta, like penne or fusilli. Cook it until it is al dente, which means it should be firm but not hard. Drain the pasta and set it aside. Next, grab a medium baking dish. Place the block of feta cheese right in the center. Surround the feta with 1 cup of pumpkin puree. Drizzle 2 tablespoons of olive oil over everything. Sprinkle in 1 teaspoon of garlic powder, 1 teaspoon of dried thyme, and ½ teaspoon of red pepper flakes. Season generously with salt and black pepper. Gently mix the ingredients around the feta. This helps all the flavors blend nicely. Now, it's time to bake. Carefully place the baking dish in your preheated oven. Bake for 25-30 minutes. Look for the feta to be soft, bubbly, and golden. Once it's done, take the dish out of the oven. Use a fork to mash the feta into the pumpkin puree. Mix until it turns creamy and smooth. Add the cooked pasta and 1 cup of roughly chopped spinach to the creamy mixture. Stir everything well so that the pasta and spinach are coated in the sauce. If you want an extra creamy texture, you can add ¼ cup of grated Parmesan cheese. To serve, spoon the creamy pumpkin pasta into bowls. Garnish with fresh basil or parsley for a nice touch. Adjusting spice levels can change the whole dish. I like to use red pepper flakes to add heat. Start with a half teaspoon and taste. If you want more spice, add a bit more. This way, you can make it just right for your family. Choosing the best type of pasta is key. I recommend penne or fusilli. They hold sauce well and add texture. Make sure to cook your pasta until it’s al dente. This keeps it firm and helps it mix well with the creamy sauce. For a richer taste, think about adding garlic or herbs. Fresh garlic gives a great punch. You can chop some and add it when you mix the feta and pumpkin. Fresh herbs like basil or parsley can also brighten up the dish. Toss in a handful right before serving for color and flavor. If you want to switch things up, try ingredient substitutions. You can use cream cheese if you can't find feta. For a twist, add sautéed mushrooms or spinach for extra nutrition and taste. Don't be afraid to get creative with what you have on hand! {{image_4}} For those following a vegan diet, you can swap feta cheese for a plant-based alternative. Look for brands that mimic the taste and texture of feta. You can also make a homemade version using blended tofu, lemon juice, and nutritional yeast. This gives you a creamy, tangy flavor without any dairy. If you need gluten-free options, choose gluten-free pasta. Many brands now offer great choices made from rice, quinoa, or chickpeas. These options provide the same enjoyable texture and taste while keeping the dish gluten-free. Add more veggies for extra nutrition and flavor. Spinach is great, but you can also use kale, zucchini, or bell peppers. Just chop them up and mix them in with the pasta. This will give the dish more color and nutrients. You can change the seasonings to fit your taste. Try adding Italian herbs for a classic flavor or toss in some curry powder for an exciting twist. Experimenting with different spices can change the whole vibe of the dish. It’s fun to make it unique to your palate! To keep your creamy baked feta pumpkin pasta fresh, follow these simple steps: - Cool Down: Let the pasta cool to room temperature before storing. - Use Airtight Containers: Place the leftovers in airtight containers. This helps maintain moisture and flavor. - Refrigerate: Store the containers in the fridge. They will stay fresh for about 3-4 days. Reheating your pasta without losing creaminess is key. Here’s how to do it right: - Stovetop Method: Heat a pan over low heat. Add a splash of water or olive oil to prevent sticking. Stir gently until warm. - Microwave Method: Place pasta in a microwave-safe bowl. Add a bit of water, cover with a lid or microwave-safe wrap, and heat in short bursts. Stir between intervals to ensure even heating. - Add Creaminess: If the pasta seems dry, mix in a little extra olive oil or a splash of cream. This keeps the dish rich and smooth. How long does it take to bake the feta? It takes 25 to 30 minutes to bake feta. You want it soft and bubbly. The top should be golden brown. This gives the feta a creamy texture and rich flavor. Can I use fresh pumpkin instead of puree? Yes, you can use fresh pumpkin. Just cook and mash the pumpkin first. Fresh pumpkin adds a nice texture and flavor. Make sure to measure out one cup for the recipe. What type of pasta works best for this recipe? Penne or fusilli works great for this dish. Their shapes hold the creamy sauce well. You can use other pasta types if you prefer, but these are my favorites. The entire dish serves four people and has about 350 calories per serving. Here’s a breakdown of key nutrients: - Carbohydrates: Pasta and pumpkin provide healthy carbs for energy. - Protein: Feta adds protein to help keep you full. - Fiber: Pumpkin and spinach offer fiber for digestion. Health benefits of key ingredients - Pumpkin: High in vitamins A and C. It’s great for your eyes and skin. - Feta Cheese: Contains calcium and can support bone health. - Spinach: Rich in iron and antioxidants. It boosts your immune system. This blog post covers all you need to create a tasty pasta dish with pumpkin and feta. You learned about key ingredients, cooking steps, and helpful tips for success. Remember to pick the best pasta and adjust spices to your liking. With ideas for variations and storage, you'll enjoy this dish for days. Now, go ahead and make this creamy pasta delight. Your taste buds will thank you!

Creamy Baked Feta Pumpkin Pasta Delightful Recipe

Craving a comforting dish that’s packed with flavor? Look no further than my Creamy Baked Feta Pumpkin Pasta! This recipe

- 2 ripe avocados, sliced into wedges - 1 cup panko breadcrumbs - 1/2 cup finely grated Parmesan cheese - 1 teaspoon garlic powder - 1 teaspoon onion powder - 1/2 teaspoon smoked paprika - Salt and freshly ground black pepper, to taste - 2 large eggs, beaten - Cooking spray This recipe starts with ripe avocados. Choosing ripe avocados is key. They should feel slightly soft to the touch. Slice them into wedges for easy frying. Next, you need panko breadcrumbs and Parmesan cheese. Panko gives a nice crunch. Parmesan adds a rich flavor. For seasonings, we use garlic powder, onion powder, and smoked paprika. These spices enhance the taste of the fries. Add salt and pepper to balance the flavors. You will also need beaten eggs. These help the crumbs stick to the avocado. Finally, cooking spray helps achieve a golden finish. Gather these ingredients for a fun and tasty cooking adventure! Set the air fryer to 400°F (200°C). Preheating is key for crispiness. It helps the fries cook evenly and gives them a nice crunch. In a bowl, mix 1 cup panko breadcrumbs, 1/2 cup finely grated Parmesan cheese, 1 teaspoon garlic powder, 1 teaspoon onion powder, 1/2 teaspoon smoked paprika, and a pinch of salt and pepper. Stir until everything is well mixed. This ensures every fry is tasty. Arrange two shallow dishes next to each other. Pour 2 large beaten eggs in one dish and the breadcrumb mix in the other. Dip each avocado wedge into the egg. Let excess egg drip off. This helps the breadcrumbs stick. Next, coat the egg-dipped wedge with the breadcrumb mix. Press gently to ensure a good layer forms. This step is important for a crunchy exterior. Place the breaded avocado fries in the air fryer basket. Arrange them in a single layer. Avoid overcrowding. Lightly spray the tops with cooking spray for extra crunch. Cook the fries for 8-10 minutes. Flip them halfway through to ensure even browning. Look for a golden and crispy finish. Once done, carefully take the fries out of the air fryer. Let them cool for a minute. This makes them easier to handle. For a great presentation, serve the fries on a colorful platter. Pair them with a zesty sauce like lime aioli or chipotle mayo. Garnish with fresh herbs for a nice touch. Enjoy your delicious creation! When selecting ripe avocados, look for ones that feel slightly soft when you squeeze them gently. A ripe avocado will have smooth skin without dark spots. The ideal avocado for frying should be firm but not hard. If it feels mushy, it’s overripe and may not hold its shape during cooking. Using cooking spray is key to getting that golden, crispy finish. Lightly spray the tops of the fries before they go in the fryer. Set your air fryer to 400°F (200°C) for the best results. Preheating for about five minutes helps create a crispy outer layer while keeping the inside creamy. To boost flavor, consider adding spices like cayenne pepper for heat or Italian seasoning for extra depth. Fresh herbs like cilantro or parsley make vibrant garnishes. They not only add color but provide a fresh taste that complements the richness of the avocado fries. {{image_4}} You can add some heat to your avocado fries by including jalapeños. Chop a few jalapeños finely and mix them into the breadcrumb mixture. This will give your fries a spicy kick. If you want to switch up the cheese, try using different kinds. Cheddar, mozzarella, or even a spicy pepper jack can work well. Each cheese will bring its own unique flavor to the dish. If you do not have an air fryer, you can bake these fries in the oven. Preheat your oven to 425°F (220°C). Arrange the breaded avocado wedges on a baking sheet lined with parchment paper. Bake for about 15-20 minutes, flipping halfway through. This will give you crispy fries with a nice texture. Another option is to pan-fry the wedges. Heat some oil in a skillet over medium heat. Fry the avocado wedges for about 2-3 minutes on each side until they are golden brown. Make sure not to crowd the pan to keep them crispy. These avocado fries pair great with salads or tacos. You can use them as a crunchy topping for your favorite salad. They also make a delicious side for tacos, giving a creamy and crunchy contrast. For a fun twist, try serving them with a zesty dipping sauce. Lime aioli or chipotle mayo can enhance the flavor. You can also place them on a colorful platter with fresh herbs for a beautiful presentation. To store your leftover avocado fries, use an airtight container. Glass or plastic containers work well. Make sure to let the fries cool completely before sealing them. This helps prevent moisture build-up. Store them in the fridge for up to three days. To reheat, the best method is to use the air fryer. This helps keep the fries crispy. Set the air fryer to 350°F (175°C). Heat for about 5 minutes. You can also use an oven for reheating. Just place the fries on a baking sheet and bake for 10 minutes. You can freeze these fries before or after cooking. For unbaked fries, place them on a tray to freeze. Once frozen, transfer them to a freezer bag. They can last up to three months. If you freeze baked fries, let them cool first. Reheat straight from the freezer in the air fryer. Cook for about 8-10 minutes at 350°F (175°C). Yes, you can make these avocado fries vegan. Instead of eggs, you can use aquafaba, which is the liquid from canned chickpeas. It works great as a binder. Just dip the avocado wedges in aquafaba instead of beaten eggs. You can also use a plant-based milk mixed with a bit of flour to help the breadcrumbs stick. To check if your avocado fries are done, look for a golden color and a crispy texture. They should be firm to the touch but not hard. If they are slightly soft inside, that’s perfect! You can also use a fork to gently poke one. If it feels hot all the way through, they are ready to eat. Avocado fries go well with many sauces. Here are some tasty options: - Lime aioli: A zesty dip that adds a fresh kick. - Chipotle mayo: Creamy with a smoky flavor that enhances the fries. - Ranch dressing: A classic choice that complements the crispy texture. - Salsa: Fresh and tangy, it adds a vibrant touch. You can use regular breadcrumbs, but the texture will be different. Panko is lighter and crispier because it is larger and flakier. This helps create that perfect crunch you want. Regular breadcrumbs may not give the same crispy outcome, but they will still work if panko is not available. In this post, you learned how to make delicious air-fried avocado fries. We covered the ingredients needed, from ripe avocados to panko and Parmesan. You now know how to prepare, bread, and cook the wedges for a crispy treat. Remember to choose ripe avocados for the best taste. Experiment with spices and serving ideas to make it your own. Enjoy your avocado fries with friends or family for a fun snack!

Air Fryer Parmesan Crusted Avocado Fries Recipe

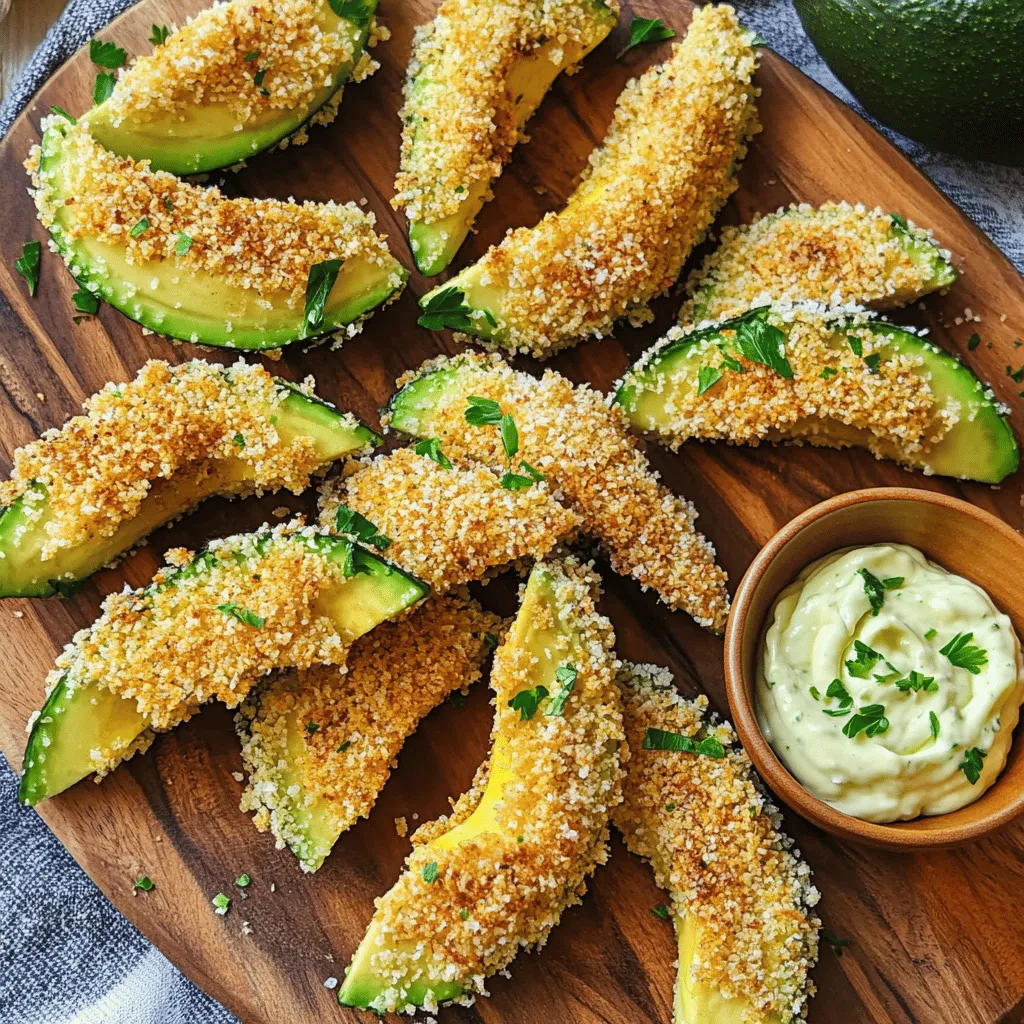
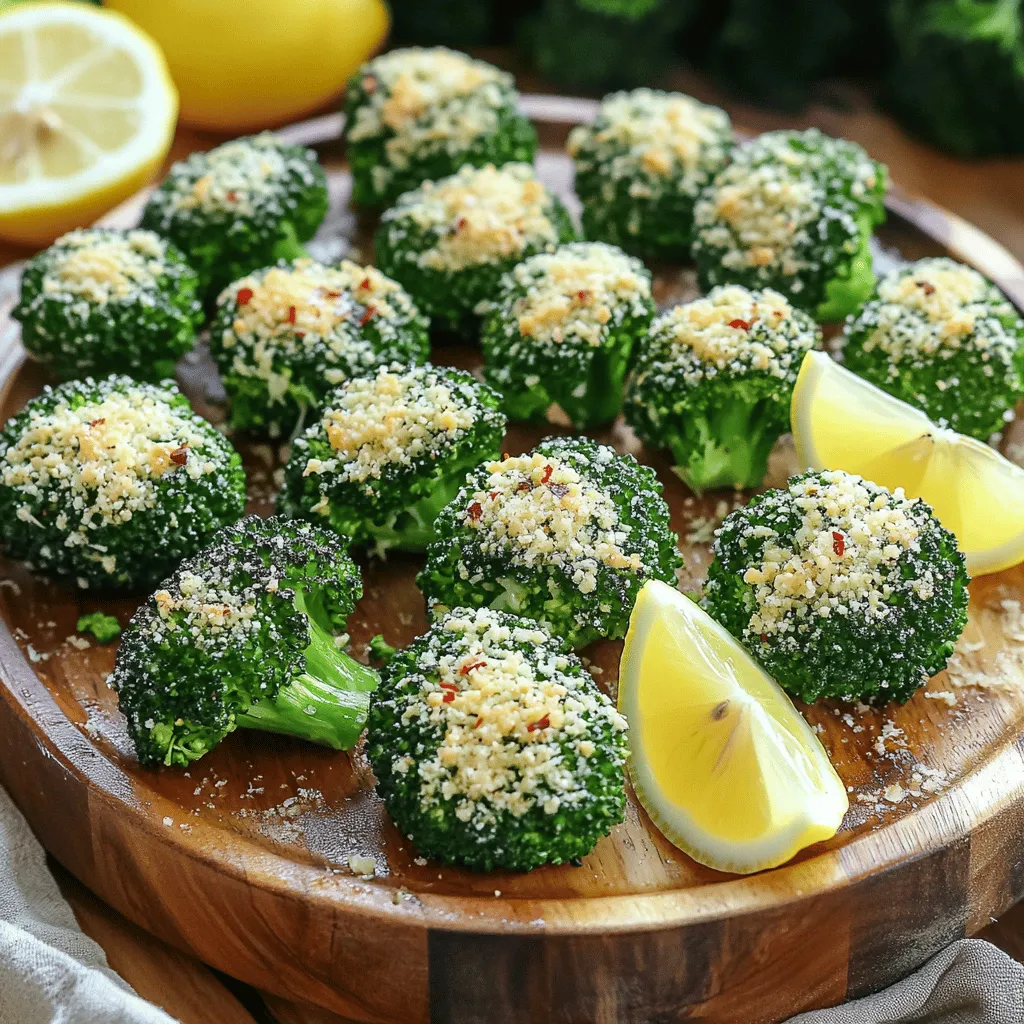
If you’re craving a tasty snack that packs a healthy punch, you’re in the right place! This Air Fryer Parmesan

To make bakery-style cranberry orange scones, you need the following ingredients: - 2 cups all-purpose flour - 3/4 cup granulated sugar - 1 tablespoon baking powder - 1/2 teaspoon salt - 1/2 cup unsalted butter, cold and cut into small cubes - 1/2 cup dried cranberries - Zest of 1 large orange - 1/2 cup heavy cream - 1 large egg - 1 teaspoon pure vanilla extract - For Egg Wash: 1 egg beaten with 1 tablespoon of water - Optional: Coarse sugar for a sparkling finish These ingredients create a scone that balances sweetness with tartness. The cranberries give a pop of flavor while the orange zest adds brightness. If you don’t have some ingredients, here are some easy swaps: - Flour: Use whole wheat flour for a heartier scone. - Butter: Replace with coconut oil for a dairy-free option. - Cranberries: Swap dried cranberries for dried cherries or blueberries. - Heavy Cream: Use milk or almond milk, but scones may be less rich. - Egg: For a vegan option, mix 1 tablespoon of flaxseed meal with 2.5 tablespoons of water as a substitute. Feel free to get creative with your ingredients. Sometimes, these changes can lead to great new flavors. Using fresh ingredients is key to making the best scones. Fresh baking powder ensures your scones rise well. Fresh cranberries add vibrant flavor and color. The zest from a fresh orange brightens the taste and aroma. When you use fresh ingredients, your scones will taste better and look more appealing. This freshness adds to the overall enjoyment of your scones. It makes the experience of eating them even more delightful. Remember, the quality of your ingredients truly makes a difference! Start by preheating your oven to 400°F (200°C). This high temperature helps the scones rise well. Next, line a baking sheet with parchment paper. This step prevents sticking and makes cleanup easier. In a large bowl, whisk together these dry ingredients: - 2 cups all-purpose flour - 3/4 cup granulated sugar - 1 tablespoon baking powder - 1/2 teaspoon salt Mix until well combined. This ensures even flavor. In another bowl, whisk together the wet ingredients: - 1/2 cup heavy cream - 1 large egg - 1 teaspoon pure vanilla extract Make sure this mixture is smooth. This helps to blend well with the dry mix. Add cold, cubed unsalted butter (1/2 cup) to the dry mix. Cut it in until the mixture looks like coarse crumbs. Then, gently fold in: - 1/2 cup dried cranberries - Zest of 1 large orange Pour the wet mixture into the dry mix. Stir gently just until combined. The dough should be crumbly but hold together. Transfer the dough to a floured surface. Knead it a few times, then flatten it into a 1-inch thick circle. Next, cut the dough into 8 wedges, like a pizza. Place each wedge on the baking sheet, leaving space for them to expand. Brush the tops with an egg wash made from: - 1 egg beaten with 1 tablespoon of water If you want, add a sprinkle of coarse sugar for a nice finish. Bake for 15-20 minutes. Look for a golden brown top and check with a toothpick. If it comes out clean, they are done! Cool them on a wire rack for a few minutes before serving. To get the best texture, keep your butter cold. Use cubed butter right from the fridge. When you mix it into the flour, aim for small crumbs. This helps the scones stay flaky. Don't over-mix the dough; it should feel light and crumbly. If you knead too much, your scones may turn out tough. One common mistake is using warm butter. It can ruin the lightness. Be careful not to add too much liquid. The dough should not be sticky. If you find it too wet, sprinkle in a bit more flour. Also, remember to space the scones apart on the baking sheet. They need room to rise and expand. When serving, enjoy them warm for the best taste. A simple glaze made from powdered sugar and orange juice adds a sweet touch. Arrange them on a wooden board for a nice look. Add some orange slices and mint for color. These little details make your scones shine and taste even better. {{image_4}} You can add nuts or chocolate to your scones for a twist. Chopped walnuts or pecans bring a nice crunch. Use about 1/2 cup of nuts for balance. If chocolate is your favorite, mix in 1/2 cup of dark chocolate chips. They melt and create a rich flavor that pairs well with orange and cranberry. Cranberries and oranges work well together, but you can mix it up! Try blueberries or raspberries for a fruity burst. For a tropical vibe, use pineapple or mango. Just make sure to adjust the sugar if the fruit is sweet. About 1/4 cup less sugar works well with sweeter fruits. If you need gluten-free scones, use a gluten-free flour blend. Make sure it has xanthan gum for texture. For a vegan option, replace the butter with coconut oil and the heavy cream with almond milk. Use a flax egg instead of a regular egg. Just mix 1 tablespoon of ground flaxseed with 2.5 tablespoons of water, let it sit for 5 minutes, and use it like an egg. To keep your cranberry orange scones fresh, place them in an airtight container. This prevents moisture loss and keeps them soft. You can also wrap each scone in plastic wrap. This method works well if you want to keep them for a short time. Store the container at room temperature for up to two days. If you need to store them longer, follow the next steps. When you want to enjoy your leftover scones, you can reheat them easily. Preheat your oven to 350°F (175°C). Place the scones on a baking sheet. Heat them for about 5 to 10 minutes. This makes them warm and soft again. You can also use a microwave. Heat each scone for about 15 to 20 seconds. This is quick but may not keep that crisp crust. Freezing is a great option for longer storage. Wrap each cooled scone tightly in plastic wrap. Then, place them in a freezer bag or container. Be sure to remove as much air as possible. They will stay fresh for up to three months. When you’re ready to eat, thaw them in the fridge overnight. Reheat them in the oven for the best texture. Enjoy your scones whenever you crave a fresh delight! To get that flaky texture, keep your butter cold. Cut it into the flour until it resembles coarse crumbs. Avoid mixing too much. This helps the dough stay light and airy. The steam from the butter during baking creates those lovely layers. Yes, you can make the dough ahead of time. After shaping it, wrap the dough in plastic wrap. Refrigerate it for up to 24 hours. When ready, just slice and bake. This helps save time on busy mornings. Enjoy your scones warm from the oven. A drizzle of glaze made from powdered sugar and orange juice adds a nice touch. Pair them with tea or coffee for a perfect snack. You can also serve them with butter or cream for added richness. These scones are best enjoyed fresh. They will stay good for about 2 days at room temperature. Store them in an airtight container to keep them soft. For longer storage, freeze them for up to 2 months. Just reheat when you crave a warm treat. In this post, we covered how to make tasty scones with fresh ingredients. I shared detailed steps and tips to avoid mistakes. You learned about different flavors and how to store scones for later. Remember, using fresh ingredients is key to great results. With practice, you’ll bake perfect scones every time. Now, get started and enjoy your baking journey!

Bakery Style Cranberry Orange Scones Fresh Delight

Love fresh scones? You’re in for a treat! My Bakery Style Cranberry Orange Scones are the perfect blend of sweet

Older posts
Newer posts
← Previous Page1 … Page27 Page28 Page29 … Page83 Next →

dsad

© 2026 eataroundit • Built with GeneratePress

Our Policies

  • Copyright Policy
  • Cookie Policy
  • GDPR Policy
  • Privacy Policy
  • Disclaimer
  • Terms Of Use

More Information

  • Home
  • About
  • Contact
  • Appetizers
  • Dessert
  • Dinner
  • Drinks
©2026, eataroundit About Back To Top