Skip to content
DisclaimerTerms Of UseGDPR PolicyCookie Policy

eataroundit

  • Home
  • Drinks
  • Appetizers
  • Dinner
  • Dessert
  • About
  • Contact
  • Privacy Policy
DisclaimerTerms Of UseGDPR PolicyCookie Policy

NO-ING-IMG

- 1 cup rolled oats - 1 cup unsweetened almond milk (or your choice of milk) - 1 tablespoon chia seeds - 2 tablespoons brewed coffee, cooled to room temperature - 2 tablespoons caramel sauce (plus extra for drizzling) - 1 tablespoon maple syrup (optional, adjust to taste) - Whipped cream (for topping, optional) - Chocolate shavings or cocoa powder (for garnish, optional) To create Caramel Macchiato Overnight Oats, you need key ingredients. Rolled oats form the base. They soak up all the flavors. Unsweetened almond milk makes it creamy without added sugar. If you prefer, you can use any milk you like. Chia seeds add a nice texture. They also thicken the oats as they sit. For flavor, brewed coffee brings that coffeehouse taste. Caramel sauce adds sweetness and richness. You can adjust sweetness with maple syrup if you want. Finally, you can top it off with whipped cream. It makes the oats feel special. Chocolate shavings or cocoa powder can add extra fun. These ingredients work together for an amazing breakfast treat. To start, gather your ingredients: - 1 cup rolled oats - 1 tablespoon chia seeds - 1 cup unsweetened almond milk - 2 tablespoons brewed coffee, cooled - 2 tablespoons caramel sauce - 1 tablespoon maple syrup (optional) - 1/2 teaspoon vanilla extract - Pinch of salt In a large bowl, combine the rolled oats, chia seeds, almond milk, cooled coffee, and caramel sauce. If you want more sweetness, add the maple syrup. Mix everything well. This ensures the oats soak up all the great flavors. Next, carefully pour the mixture into jars or airtight containers. Make sure to seal them tightly. This keeps the oats fresh. Place the jars in the fridge and let them chill overnight. You can also leave them for at least 4 hours. This soaking time helps the oats and chia seeds absorb the liquid, making them creamy. The next morning, take the jars out of the fridge. Give the oats a gentle stir. If they seem thick, you can add a little more almond milk. Taste the oats to see if they need more sweetness. If you want, add a touch more maple syrup. To serve, top each jar with a nice dollop of whipped cream. Drizzle some extra caramel sauce on top. For a fancy touch, sprinkle chocolate shavings or a bit of cocoa powder. Enjoy this beautiful breakfast! To make your oats creamy, soak them long enough. I recommend at least four hours in the fridge. This soaking lets the oats and chia seeds absorb the liquid. If you want a thicker mix, use less milk. If you prefer it thinner, add more milk. Adjusting liquid levels helps you find the right texture for your taste. Finding the right sweetness is key. Start with one tablespoon of maple syrup. Taste the oats after soaking. If they need more sweetness, add a little more syrup. You can also try other sweeteners. Honey or agave work well, too. Just remember, each sweetener has a different flavor. Visual appeal makes breakfast more fun. Serve your overnight oats in clear jars. This way, you can see the pretty layers. Drizzle extra caramel sauce on top for a nice look and taste. You can also add whipped cream for a rich touch. Top with chocolate shavings or a sprinkle of cocoa powder for extra flair. {{image_4}} You can switch up the taste of your oats easily. Try using different types of milk. Oat milk adds a nice creaminess. Coconut milk gives a tropical twist. You can also use flavored coffee or espresso. This adds a rich coffee taste to your oats. If you want a vegan or dairy-free option, use plant milk. Almond, soy, or oat milk works great. For caramel, you can use a vegan caramel sauce. If you want less sugar, try maple syrup or agave nectar. These are good swaps for sweetening your oats. You can change the flavors based on the season. In fall, add pumpkin spice to your oats for a cozy taste. For summer, mix in fresh berries like strawberries or blueberries. These fruits add a burst of flavor and color. Enjoy your oats all year with these fun variations! You can keep your Caramel Macchiato Overnight Oats in the fridge for up to five days. This makes it easy to prepare ahead and grab a quick breakfast. If you want to freeze them, I recommend storing them in airtight containers. They can last in the freezer for up to three months. Just remember to leave some space in the container. This allows the oats to expand as they freeze. I love using mason jars for storing these oats. They are great for portion control and easy to seal. Airtight containers are also a good choice. Choose one that fits your fridge space well. Aim for serving sizes of about one cup. This way, you get a filling breakfast without waste. To make your oats creamy again, take them out of the fridge. Stir in a splash of milk to loosen the texture. If you stored them in the freezer, let them thaw overnight in the fridge. Then, heat in the microwave for about 30 seconds. Stir well before serving. Add whipped cream and a drizzle of caramel for a tasty finish. You can use instant oats, but the texture will change. Instant oats cook faster and soak up liquid quickly. They will make your overnight oats softer and less chewy. If you like a creamier dish, instant oats are a good choice. For more texture, stick with rolled oats. You can keep these oats in the fridge for up to five days. After that, the oats may lose their best texture and taste. Always check for any signs of spoilage, like bad smells or discoloration. Storing them in airtight containers helps keep them fresh. Yes, you can make these oats gluten-free! Look for oats labeled gluten-free. Many brands make special oats that do not contain gluten. Also, check your caramel sauce and any toppings to ensure they are gluten-free. Enjoy a tasty breakfast without worry! Caramel macchiato overnight oats combine flavor and nutrition with ease. We covered key ingredients like rolled oats, almond milk, and chia seeds. You learned how to prepare, store, and serve them for the best taste. Remember to customize with toppings and flavor variations. This dish is simple and fun, plus you can adjust it to fit your preferences. Enjoy experimenting and find what you love most!

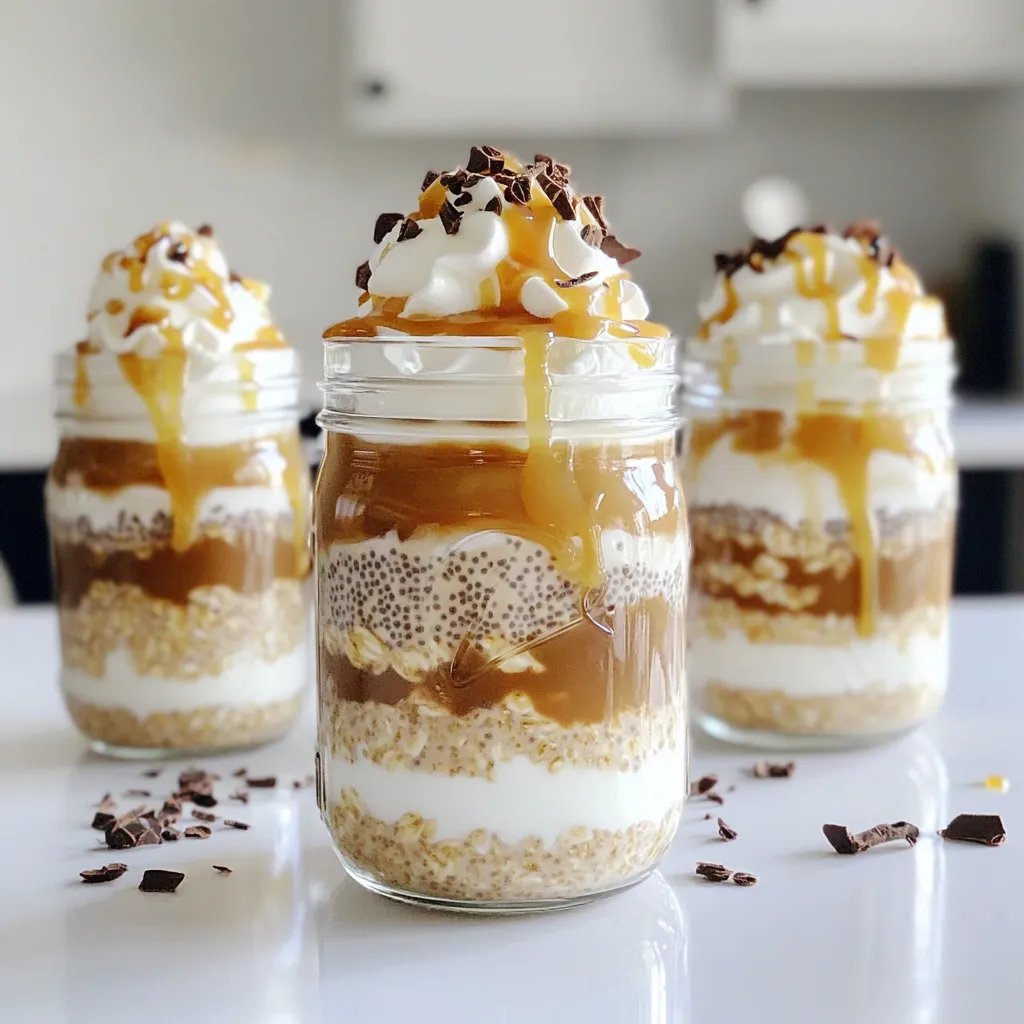
Caramel Macchiato Overnight Oats Simple Breakfast Delight

Are you ready to transform your mornings? Caramel Macchiato Overnight Oats are a simple and delicious way to kickstart your

- 2 cups edamame in pods (fresh or frozen) - 3 tablespoons olive oil - 5 cloves garlic, finely minced - 1 teaspoon red pepper flakes (or to taste) - 1 tablespoon soy sauce - 1 tablespoon sesame oil - 1 teaspoon fresh lemon zest - Sea salt, to taste - Sesame seeds for garnish - Fresh cilantro, chopped (optional for garnish) For this recipe, I use two cups of edamame. You can use fresh or frozen. Fresh offers a nice crunch, while frozen is quick and easy. I use three tablespoons of olive oil for a rich base. Five cloves of garlic add a strong flavor. One teaspoon of red pepper flakes gives the heat, but you can adjust this to your taste. One tablespoon each of soy and sesame oil adds depth. Finally, a teaspoon of lemon zest brightens the dish. If you’re out of edamame, you can use green peas instead. For olive oil, avocado oil works well. If garlic is not your thing, shallots can add a milder flavor. Instead of soy sauce, tamari is a gluten-free option. You can skip sesame oil and still have a tasty dish, but it adds a unique flavor. If you don’t have fresh lemon, bottled lemon juice is a suitable substitute. First, you need to decide if you want fresh or frozen edamame. If you pick frozen, start by boiling water in a pot. Add the edamame pods. Cook them for about five minutes. You want them tender but not mushy. After that, drain them in a colander. Let them sit for a bit to lose extra moisture. Next, take a large skillet and pour in the olive oil. Heat it over medium heat until it shimmers. This means it’s ready! Now, add the minced garlic to the skillet. Stir it for about two to three minutes. The garlic should smell great and turn a light golden color. Don’t let it burn! Burnt garlic can taste bitter, and we want a nice flavor. Now it’s time to spice things up! Sprinkle in the red pepper flakes and cook for an extra 30 seconds. This will wake up the spice's heat and aroma. Then, toss in the drained edamame pods. Mix them well in the garlic oil until they are coated. Next, add the soy sauce and sesame oil. Keep stirring so each pod gets the tasty sauce. Let them stir-fry for two to three minutes. This helps them soak up all those flavors. Finally, take the skillet off the heat. Add fresh lemon zest and a pinch of sea salt. Taste and adjust if you need more salt. Serve warm with sesame seeds and chopped cilantro on top for a fresh touch. Enjoy this tasty snack! To make perfect spicy garlic edamame, start with good quality edamame. Fresh ones are great, but frozen also works well. If you choose frozen, make sure to cook them right. Boil them for about five minutes. This step keeps them tender and tasty. Drain them well to avoid sogginess. For a better crunch, you can sauté them longer. Just watch the heat to avoid burning. Do you like it hot? You can change the spice level easily. Start with one teaspoon of red pepper flakes. Taste the mixture after sautéing. If you want more heat, add more flakes. Remember, it’s easier to add than to take away. If you want less spice, use less red pepper. You can also skip it for a milder taste. Presentation matters! To impress your guests, serve the edamame in a nice bowl. After cooking, top them with sesame seeds and fresh cilantro. The green from the cilantro pops against the edamame. This adds color and makes them look fresh. You can also add a lemon wedge on the side. This gives a nice touch and lets people add more zest if they want. {{image_4}} You can change the heat level by using different spices. Try a blend of chili powder or cayenne pepper for a new twist. For a milder option, use less red pepper flakes. You can also add smoked paprika for a unique flavor that adds depth. Experimenting with spices can create a whole new dish. This recipe is already vegan, but you can make it low-sodium too. Use low-sodium soy sauce to cut back on salt. You can replace soy sauce with coconut aminos for a sweeter taste. This keeps the dish healthy and tasty for everyone. Feel free to get creative by adding more ingredients. You can mix in bell peppers, snap peas, or carrots for extra crunch and color. If you want protein, try adding cooked shrimp or tofu. These additions make the dish more filling and add great flavors. Each ingredient brings its own taste, making your spicy garlic edamame even better. To store your spicy garlic edamame, let it cool first. Then, place it in an airtight container. This keeps the pods fresh. You can store them in the fridge for up to three days. If you need to keep them longer, consider freezing. When you're ready to enjoy your leftovers, you can reheat them easily. The best way is to use a skillet. Heat a small amount of olive oil over medium heat. Add the edamame and stir until warm. This way, they stay flavorful and do not lose texture. You can also microwave them in a bowl. Cover with a damp paper towel and heat for about one minute. Freezing is a great option if you want to save your spicy garlic edamame for later. Place the cooled edamame in a freezer-safe bag. Squeeze out excess air to prevent freezer burn. You can keep them frozen for up to three months. When you’re ready to use them, thaw in the fridge overnight or cook straight from the freezer. Just add a few more minutes to the cooking time. Yes, you can use frozen edamame. It saves time and is easy to find. If you use frozen edamame, just boil it for about five minutes. This cooks the pods until they are soft. After boiling, drain them well. This step helps remove extra water, so the flavor sticks. To make edamame spicy without garlic, you can use different spices. Try using ginger or chili powder for a warm kick. You can also add hot sauce or sriracha for extra heat. Mix in the seasoning with a little oil to create a tasty coating. The key is to find the right balance of spice that you enjoy. Edamame is packed with nutrients. It is a great source of protein, fiber, and healthy fats. Here are some key benefits: - Protein: Edamame provides complete protein, good for muscles. - Fiber: High in fiber, it helps digestion and keeps you full. - Vitamins: Rich in vitamins like K, C, and folate, it supports overall health. - Minerals: Contains iron and calcium, which are vital for strong bones. This makes edamame a smart choice for snacks or meals! This blog post shared how to make great edamame. We covered ingredients, steps, and tips to get it right. You learned about substitutions for ingredients and ways to adapt spice levels. I shared storage tips to keep leftovers fresh. Edamame can be versatile, so feel free to try different flavors. In the end, edamame is a healthy snack and easy to make. Enjoy your cooking and the tasty results!

Spicy Garlic Edamame Flavorful and Simple Snack

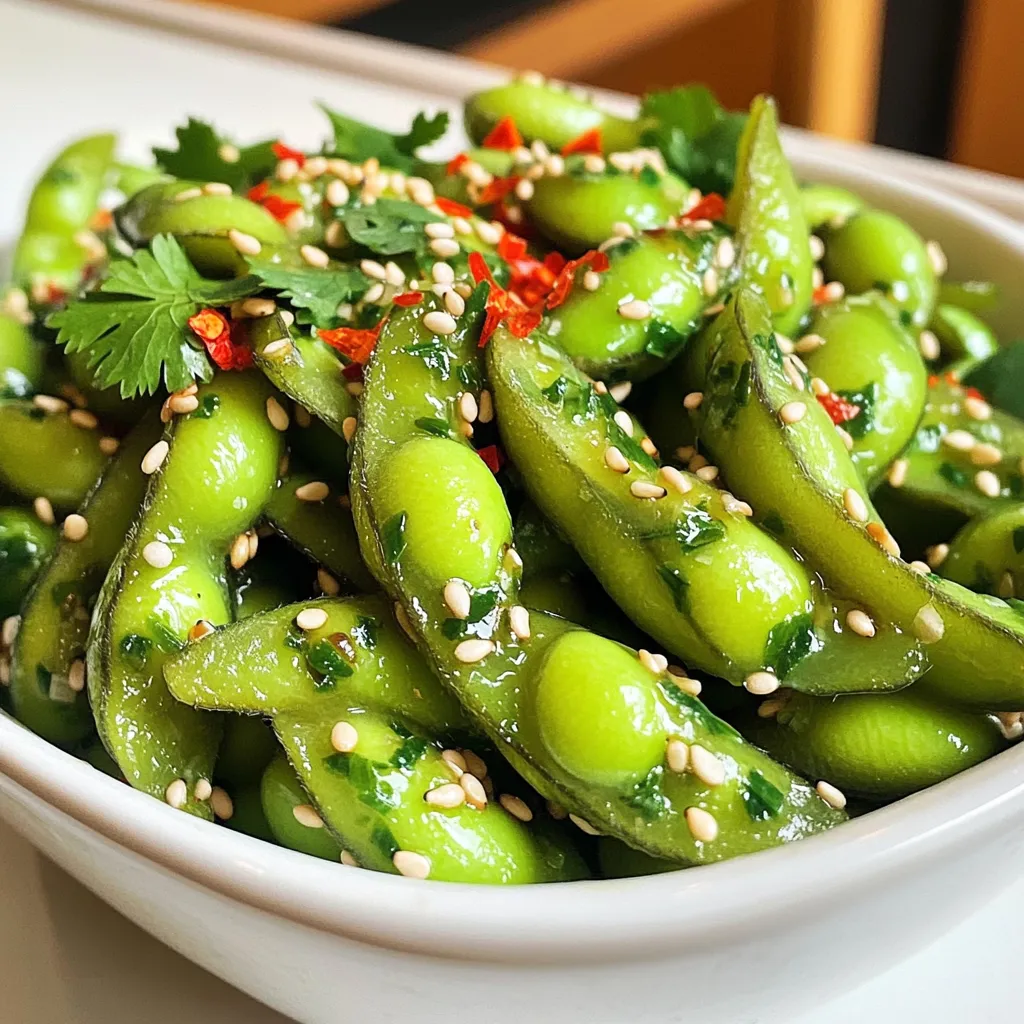
If you’re looking for a quick and tasty snack, you’ve come to the right place! Spicy Garlic Edamame is flavor-packed

To make this tasty Peach Burrata Flatbread, you need a few key items: - 1 piece of store-bought or homemade flatbread - 2 ripe peaches, sliced into thin wedges - 8 oz burrata cheese, torn into pieces - 1 cup fresh arugula - 2 tablespoons honey - 1 tablespoon balsamic glaze - 2 tablespoons extra virgin olive oil - Salt and freshly cracked black pepper, to taste - Fresh basil leaves, for garnish These ingredients come together to create a delightful mix of flavors and textures. The peaches add sweetness, while burrata gives a creamy touch. Using high-quality ingredients makes a big difference. Choose ripe peaches for the best sweetness. Look for burrata that is fresh and creamy. The olive oil should be extra virgin for rich flavor. Fresh arugula adds a peppery bite, so buy it close to the use date. Quality ingredients make your flatbread sing! You can dress up your flatbread in fun ways. Here are some options: - Toasted pine nuts for crunch - A sprinkle of red pepper flakes for heat - Thinly sliced prosciutto for a savory touch - A drizzle of lemon juice for brightness Feel free to mix and match these garnishes. They can add extra flavor and fun to your meal! Start by preheating your oven to 400°F (200°C). This step helps the flatbread crisp up nicely. Take a piece of flatbread and place it on a baking sheet. Drizzle one tablespoon of extra virgin olive oil evenly over the flatbread's surface. This adds flavor and helps it brown. Bake for about 5-7 minutes. Look for a light brown color and crispy edges. This is when the flatbread is ready. While the flatbread bakes, it’s time to prepare the peaches. Slice two ripe peaches into thin wedges. Heat a skillet over medium heat. Add the peach slices to the skillet along with a drizzle of honey. Sauté the peaches for 3-4 minutes. Stir gently until they soften and get a warm, caramelized look. Remove the skillet from heat once done. The sweet smell will fill your kitchen. Now, take the baked flatbread out of the oven and let it cool for a minute. This makes it easier to handle. Tear the burrata cheese into bite-sized pieces. Evenly spread the cheese over the flatbread. Next, add the sautéed peaches on top. Follow this with a generous handful of fresh arugula. Drizzle balsamic glaze over everything for added flavor. Season with salt and freshly cracked black pepper to taste. Finish by garnishing with fresh basil leaves. Use a sharp knife or pizza cutter to slice the flatbread. Serve it warm and enjoy the mix of creamy burrata, sweet peaches, and peppery arugula. To get a crispy flatbread, start with a hot oven. Preheat it to 400°F (200°C). This heat helps the flatbread crisp up fast. Next, drizzle a tablespoon of olive oil on the flatbread. This adds flavor and helps it brown. Bake it for 5-7 minutes. Watch for a light brown color around the edges. That’s how you know it’s ready. If you want extra crunch, use a pizza stone. It holds heat well and cooks flatbread evenly. To boost the flavor of your Peach Burrata Flatbread, try using ripe peaches. The sweeter, the better! Sauté them with honey for a caramel touch. You can also add a sprinkle of fresh herbs, like thyme or mint. They add a fresh taste that pairs well with the peaches. For a savory kick, consider adding thin slices of prosciutto. It brings a nice saltiness to balance the sweetness. Lastly, don’t skip the balsamic glaze. It adds a rich, tangy finish that makes every bite pop. Burrata cheese is delicate, so handle it with care. Use your hands to tear it into pieces. This keeps the creamy inside intact. When placing it on the flatbread, do it gently. If it’s too cold, let it sit out for a few minutes. This brings out its creamy texture and flavor. Remember, burrata works best when it’s fresh. Use it right away for the best taste. If you have leftovers, store them in water to keep them fresh longer. {{image_4}} If you can't find flatbread, don't worry! You can use pita bread or naan instead. Both will give you a nice base. You can even try a gluten-free wrap if needed. Just remember to adjust the baking time. A thinner bread may bake faster. Peaches are sweet and juicy, but many fruits work well here. In summer, try ripe figs or nectarines. In fall, apples or pears can add a nice crunch. In winter, you can use roasted citrus for a fresh twist. Each fruit brings its own flavor to the flatbread. To make a vegan flatbread, swap the burrata for a dairy-free cheese. Cashew cheese or a store-bought vegan cream cheese works great. You can also try avocado slices for a creamy texture. Use maple syrup instead of honey to keep it plant-based. This way, everyone can enjoy this tasty dish! Store leftover Peach Burrata Flatbread in an airtight container. This keeps it fresh. Make sure to let it cool to room temperature before sealing. You can keep it in the fridge for up to three days. If you want to enjoy it later, wrap it tightly in plastic wrap. This will help it stay tasty. To reheat, preheat your oven to 350°F (175°C). Place the flatbread on a baking sheet. Heat for about 5-10 minutes. This will make it warm and crispy again. You can also use a toaster oven for this. If you want it quick, a microwave works too, but it may not stay crispy. You can freeze Peach Burrata Flatbread for longer storage. Wrap each piece in plastic wrap. Then place them in a freezer-safe bag. This will help to prevent freezer burn. When you are ready to eat, thaw in the fridge overnight. Reheat in the oven as mentioned above. Enjoy your flatbread just as delicious as when it was fresh! Yes, you can swap burrata for other cheeses. Try mozzarella or ricotta for a similar taste. These cheeses will still give you that creamy texture. If you want a stronger flavor, goat cheese also works well. Each option will change the dish a bit, but they will all taste great. You can mix and match toppings to suit your taste. Here are some ideas: - Prosciutto for a salty kick - Feta cheese for a tangy flavor - Grilled vegetables for extra crunch - Nuts like walnuts or pine nuts for texture - Honey or hot honey for a sweet twist Feel free to get creative. Each topping adds a new layer of flavor. The total time for this dish is about 20 minutes. You will spend around 10 minutes prepping the ingredients. Baking the flatbread takes another 5-7 minutes. This quick time makes it perfect for a tasty snack or a light meal. Yes, this dish is great for meal prep! You can prepare the flatbread and toppings ahead of time. Just store them separately. Assemble and bake when you're ready to eat. This way, you can enjoy fresh flatbread even on busy days. Peach burrata flatbread is a tasty dish you can easily make. We covered essential ingredients and how to prepare the base and peaches just right. With tips for crispiness and flavor boosts, you will impress anyone. Remember, variations let you adapt this dish to your taste. Store and reheat leftovers so nothing goes to waste. Enjoy creating this fun meal that brings joy to your table.

Peach Burrata Flatbread Flavorful and Simple Recipe

If you’re craving something fresh and delightful, you’ll love my Peach Burrata Flatbread recipe. This dish is simple yet packed

- 1 cup orzo pasta - 1 medium cucumber, diced into small cubes - 1 cup cherry tomatoes, halved lengthwise - 1/2 red onion, finely chopped - 1/2 cup Kalamata olives, pitted and thinly sliced - 1/2 cup feta cheese, crumbled into small pieces The heart of this Greek Orzo Salad lies in its fresh ingredients. Orzo pasta gives a nice base. It cooks quickly and has a fun shape. Next, we have fresh vegetables. The cucumber adds crunch, while cherry tomatoes bring sweetness. Red onion adds a sharp bite. Kalamata olives give a salty depth, and feta cheese adds creaminess. - 1/4 cup extra virgin olive oil - 2 tablespoons freshly squeezed lemon juice - 1 teaspoon dried oregano - Salt and freshly cracked black pepper to taste The dressing ties everything together. Extra virgin olive oil is rich and fruity. Fresh lemon juice brings brightness. Dried oregano adds that classic Mediterranean flavor. Season with salt and pepper for balance. Whisk them together for a smooth blend. - 1/4 cup fresh parsley, finely chopped - Additional feta cheese Garnishes add a finishing touch. Fresh parsley gives color and a fresh taste. Extra feta cheese makes it even richer. These small details elevate the dish, making it look and taste amazing. First, fill a large pot with water. Add a generous amount of salt. Bring the water to a rolling boil. Once boiling, add 1 cup of orzo pasta. Cook the orzo according to the package instructions, usually around 8 to 10 minutes. When it's al dente, drain the pasta. Rinse it under cold water to stop the cooking and cool it down. Set the orzo aside for later. For the vegetables, start with the cucumber. Dice 1 medium cucumber into small cubes. Next, take 1 cup of cherry tomatoes. Halve each tomato lengthwise. For the red onion, use 1/2 onion. Finely chop it. If using Kalamata olives, slice 1/2 cup of them thinly. Keep your knife skills sharp to make this easy. Now, it’s time to mix everything. In a large mixing bowl, combine the diced cucumber, halved cherry tomatoes, chopped red onion, and sliced olives. Add 1/2 cup of crumbled feta cheese to this mix. Gently fold in the cooled orzo pasta. Be careful not to break the feta. Next, prepare the dressing. In a small bowl, whisk together 1/4 cup of extra virgin olive oil, 2 tablespoons of freshly squeezed lemon juice, and 1 teaspoon of dried oregano. Add a pinch of salt and pepper to taste. Drizzle the dressing over the salad. Use a spatula to toss all the ingredients until they are evenly coated. Finally, sprinkle 1/4 cup of finely chopped parsley on top and give it one last gentle toss. Enjoy your fresh and colorful Greek Orzo Salad! To cook orzo well, start with a large pot of water. Bring it to a rolling boil. Add a good amount of salt; this helps flavor the pasta. Cook the orzo until it is al dente. This means it should have a slight bite. Drain the pasta and rinse it under cold water. This stops the cooking and cools it down. Rinsing also helps prevent a sticky mess. To boost flavor, consider adjusting the seasoning. You can add more lemon juice for a zesty touch. A pinch of red pepper flakes brings a bit of heat. Fresh herbs like basil or mint can add brightness. They pair well with the tangy feta and olives. Always taste as you go to find the right balance. For a lovely presentation, serve the salad in a big bowl. You can also use individual plates for a nice touch. Garnish with extra feta and a sprinkle of parsley. This adds a fresh and colorful look. A drizzle of olive oil just before serving makes it shine. Use these tips to impress your guests! {{image_4}} To make a vegan version of Greek orzo salad, swap out the feta cheese. Use vegan cheese or avocado for creaminess. For the dressing, replace the honey (if used) with maple syrup or agave syrup. This keeps it sweet without animal products. You can also add tahini or cashew cream for a rich, nutty flavor. You can boost the protein in your orzo salad. Add grilled chicken for a hearty meal. Shrimp is another tasty option; just sauté it with garlic and lemon. If you want a plant-based protein, chickpeas work great. They add texture and flavor. If you need a gluten-free option, try using quinoa or rice instead of orzo. Both are great at soaking up flavors. There are also gluten-free pasta brands that offer orzo. Just check the package to ensure it's safe. These alternatives will keep your salad delicious and satisfying. Store any leftover Greek Orzo Salad in an airtight container. Make sure it cools down first. Place it in the fridge within two hours of making it. This keeps the salad fresh and safe to eat. The salad will stay good for about three to four days. Before eating, stir it gently to mix the ingredients again. You may want to add a splash of olive oil or lemon juice to refresh the flavors. You can freeze Greek Orzo Salad if you have too much. However, some ingredients may change texture when thawed. To freeze, place the salad in a freezer-safe container. Leave some space at the top for expansion. It will keep well for about one to two months. When ready to eat, move it to the fridge overnight. Thaw it slowly for the best taste. After thawing, stir the salad and check for seasoning. You may need to add more salt or lemon juice. The salad is best when fresh. If stored correctly in the fridge, it can last for three to four days. If you freeze it, try to eat it within two months. Eating it sooner gives you the best taste and texture. Always check for signs of spoilage, like off smells or changes in color. Trust your senses, and you’ll enjoy this dish at its best! Orzo is a small, rice-shaped pasta. It is versatile and easy to use. You can add it to soups, salads, or serve it as a side dish. In Greek Orzo Salad, orzo brings a nice chewy texture. Cooking orzo is simple. Just boil it in salted water until it's al dente. Rinse it afterward to stop cooking. Yes, you can use different cheeses instead of feta. Some good options are goat cheese or mozzarella. Each cheese has a unique taste and texture. Goat cheese is creamy and tangy. Mozzarella adds a soft, mild flavor. Feel free to experiment with your favorite cheeses! Greek Orzo Salad stays fresh for about 3 to 5 days. Keep it in an airtight container. Before enjoying leftovers, check for any signs of spoilage. If it looks and smells good, it’s safe to eat. The flavors will deepen over time, making it even tastier! In this blog post, we explored how to make a delicious Greek Orzo Salad. We covered key ingredients like orzo, veggies, feta, and olives. You learned about making the dressing with olive oil, lemon juice, and spices. We also shared tips for cooking the orzo perfectly and enhancing the flavors. You now know about storage methods and can try different variations. Remember, this salad is fresh, tasty, and easy to customize! Enjoy your cooking adventure and share this flavorful dish with others.

Greek Orzo Salad Fresh and Flavorful Dish

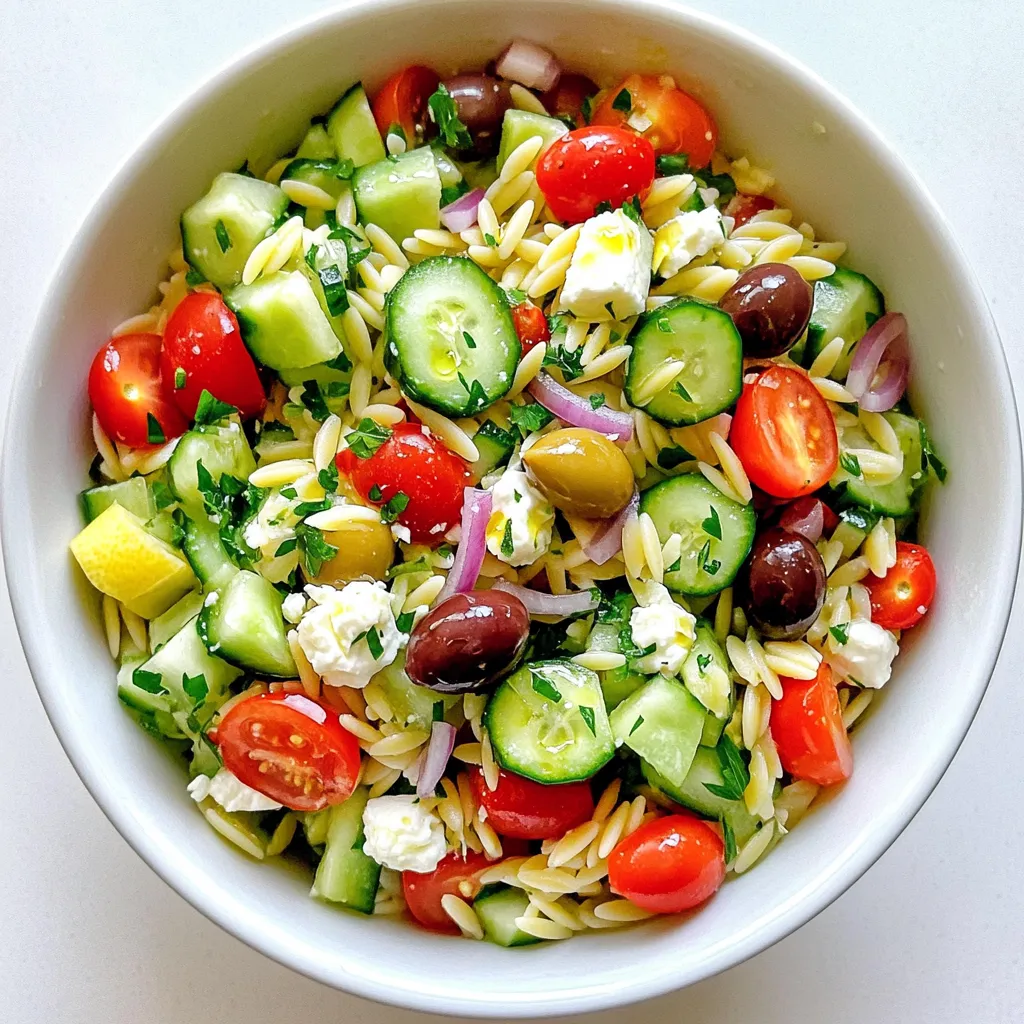
If you’re looking for a dish that’s fresh, flavorful, and simple, Greek Orzo Salad is the answer. This tasty meal

- 1 cup rolled oats - 1 scoop chocolate protein powder - 1 ripe banana, mashed - 2 large eggs - 1 teaspoon baking powder - ½ teaspoon vanilla extract - 1 cup milk (cow's or plant-based) - ¼ cup mini chocolate chips - Pinch of salt - Olive oil or non-stick spray The main ingredients for Chocolate Chip Protein Pancakes are simple yet effective. I use rolled oats because they add fiber and texture. The chocolate protein powder boosts nutrition while making the pancakes rich and tasty. A ripe banana acts as a natural sweetener and gives moisture. The eggs provide structure and help bind everything together. Baking powder makes the pancakes fluffy. Vanilla extract adds a lovely aroma, and milk brings it all together. I also love to mix in mini chocolate chips. They melt beautifully and give bursts of sweetness in each bite. Don’t forget the pinch of salt; it enhances all the flavors. Finally, I grease my skillet with olive oil or non-stick spray to keep the pancakes from sticking. - Fresh fruits (bananas, berries) - Maple syrup - Whipped cream - Nuts or seeds When it comes to toppings, the sky's the limit! Fresh fruits like bananas or berries add color and freshness. Maple syrup gives a sweet finish that complements the chocolate. Whipped cream adds a fun touch, while nuts or seeds can give extra crunch and nutrition. You can mix and match to create your perfect stack! Start by gathering your ingredients. In a high-speed blender, combine the following: - 1 cup rolled oats - 1 scoop chocolate protein powder - 1 ripe banana, mashed until smooth - 2 large eggs - 1 teaspoon baking powder - ½ teaspoon vanilla extract - 1 cup milk (cow's milk or any plant-based alternative) Blend these ingredients on high until you achieve a smooth batter. If the batter seems too thick, add a splash of milk. This adjustment helps get the right consistency. Once blended, pour the batter into a mixing bowl. Add in ¼ cup mini chocolate chips and fold them in gently. Make sure they spread evenly throughout the batter. Now, it's time to cook. Preheat a non-stick skillet over medium heat. Lightly grease it using olive oil or a quick spray of cooking spray. This step prevents sticking. For each pancake, pour about ¼ cup of batter onto the skillet. Cook them for 2-3 minutes. You will see bubbles forming on the surface when they are ready to flip. Gently flip the pancakes with a spatula. Cook for another 2-3 minutes until they turn golden brown. Remove them from the skillet and set aside. Repeat this with the remaining batter. Now for the fun part: serving. Stack your pancakes high and customize them with your favorite toppings. You can use: - Sliced fresh fruit - A drizzle of maple syrup - A sprinkle of extra chocolate chips For a beautiful presentation, layer the pancakes and drizzle with syrup. Top with banana slices and a final sprinkle of chocolate chips. This not only looks great but tastes wonderful too! To get soft and fluffy pancakes, your batter must be just right. The batter should not be too thick or too runny. When you blend your ingredients, look for a smooth, creamy texture. If it feels thick, add a splash of milk. This helps keep your pancakes light. To ensure even cooking, preheat your skillet over medium heat. After pouring the batter, watch for bubbles. When bubbles form, it’s time to flip. This shows the bottom is cooking well. If you have extra pancakes, store them in the fridge. Let them cool first. Then, place them in an airtight container. They will stay fresh for about three days. When you want to eat them again, reheat in a skillet or microwave. For the microwave, heat for about 30 seconds. Check if they are warm enough before enjoying. You can add more fun to your pancakes with mix-ins. Try walnuts, blueberries, or even a pinch of cinnamon. Each adds a unique taste. Adjust the sweetness by adding more or less banana. If you like it sweeter, drizzle some maple syrup on top. You can also use honey or agave as a natural sweetener. {{image_4}} You can change the protein powder for different flavors. Vanilla protein powder works great. If you want a plant-based option, use plant protein. It gives a nice taste, too. For a vegan twist, try using flax eggs or applesauce instead of eggs. Mix one tablespoon of flaxseed with three tablespoons of water. Let it sit for a few minutes until it thickens. Spices can add a special touch to your pancakes. Try mixing in a pinch of cinnamon or nutmeg for warmth. You can also toss in some chopped nuts or dried fruits like raisins or cranberries. These add texture and flavor, making your pancakes even tastier. Toppings can elevate your pancake experience. Fresh fruit like bananas or berries adds sweetness and color. A drizzle of maple syrup or honey gives a lovely finish. If it’s fall, consider adding pumpkin puree or pecans for a seasonal twist. For extra fun, try a scoop of yogurt or a sprinkle of granola on top! Protein helps build and repair muscles. It is key for recovery after exercise. Eating enough protein can keep you feeling full. This helps with weight management. Protein pancakes are a tasty way to add protein to your breakfast. They provide energy and satisfaction to start your day. Each serving of these pancakes has about 350 calories. You get around 20 grams of protein, 45 grams of carbs, and 10 grams of fat. The rolled oats give you fiber, which is good for digestion. The banana adds natural sweetness and potassium. The chocolate protein powder boosts the protein content and flavor. If you need gluten-free options, use certified gluten-free oats. You can swap ingredients easily for dietary needs. For lactose-free, try almond milk or oat milk. If you want a vegan version, replace eggs with flaxseed meal or a banana. Adjust the recipe to suit your needs while still enjoying these delicious pancakes. You can make these pancakes gluten-free by using certified gluten-free oats. Not all oats are gluten-free, so check the label. You can also replace rolled oats with almond flour or coconut flour. If you choose coconut flour, use less, as it absorbs more liquid. Yes, you can freeze these pancakes. First, let them cool completely. Then, stack them with parchment paper between each one. Place them in a freezer bag or container. To reheat, microwave them for about 30 seconds or toast them in a skillet until warm. Absolutely! You can use any milk you like. Almond milk, soy milk, or oat milk work great. Just make sure to choose unsweetened versions to keep the flavor balanced. Each milk adds a unique taste, so feel free to experiment. Store leftover pancakes in an airtight container in the fridge. They will stay fresh for about three days. To keep them warm, you can place them in an oven set at a low temperature until ready to eat. You can customize the flavor in many fun ways. Try adding a teaspoon of cinnamon or a scoop of peanut butter. You can also mix in chopped nuts, dried fruits, or different types of chocolate chips. This way, you can create a new twist each time! These protein-packed pancakes are both easy and fun to make. You learned about the key ingredients, steps, and tips for success. The options for variations and toppings give you a chance to get creative. Remember, these pancakes can suit many diets and taste preferences. They offer good nutrition while tasting fantastic. Enjoying a healthy breakfast can be simple and delicious with this recipe. Try it out, and watch how it can brighten your mornings!

Chocolate Chip Protein Pancakes Soft and Tasty Delight

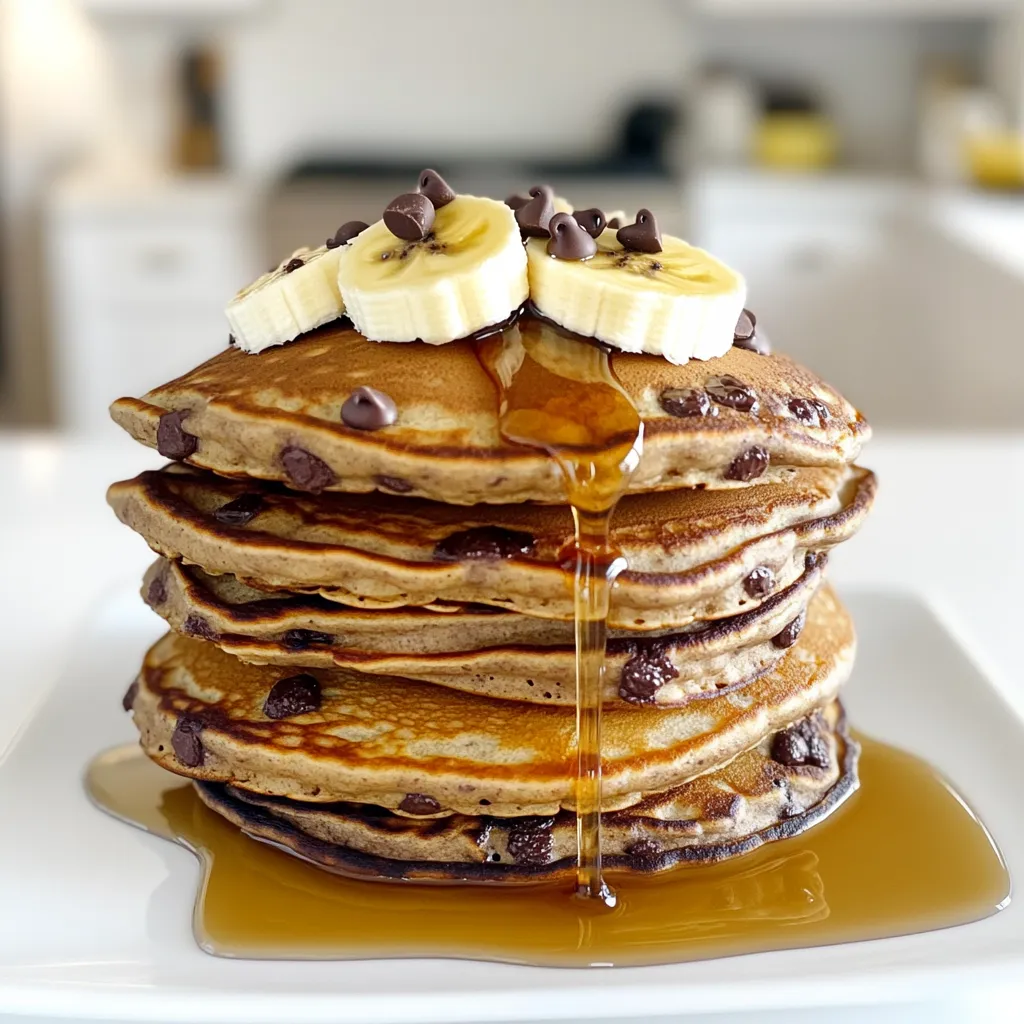
If you love pancakes and want a tasty twist, you’re in for a treat! Chocolate Chip Protein Pancakes are soft,

- 4 large bell peppers (red, yellow, green, or orange) - 1 cup cooked quinoa (preferably cooled) - 1 cup black beans, thoroughly rinsed and drained - 1 cup corn (fresh, frozen, or canned) - 1 cup diced tomatoes (fresh or canned) - 1 teaspoon ground cumin - 1 teaspoon smoked paprika - 1 teaspoon garlic powder - ½ cup shredded cheese (cheddar, pepper jack, or your favorite) - Salt and pepper to taste - Fresh cilantro or parsley for garnish You can make these stuffed peppers your own by adding extra ingredients. Try: - Ground meat (like turkey or beef) for a heartier meal. - Spinach or kale for added greens. - Chopped onions for extra flavor. - Different cheeses like feta or mozzarella for variety. - Hot sauce or jalapeños for a spicy kick. Each ingredient plays an important role in flavor and nutrition. - Bell Peppers: They add crunch and vibrant color. They are rich in vitamins A and C. - Quinoa: This grain is high in protein and fiber. It helps keep you full longer. - Black Beans: They offer protein and fiber. They also add a nice texture. - Corn: It adds a sweet burst of flavor. Corn is also a good source of carbs. - Diced Tomatoes: They bring juiciness and acidity. They add a fresh taste to the mix. - Spices: Ground cumin, smoked paprika, and garlic powder give depth. They enhance the overall flavor. - Cheese: It melts beautifully and adds creaminess. It also brings richness to the dish. - Fresh Herbs: Cilantro or parsley add a fresh touch. They brighten up the whole meal. Using these ingredients, you create a dish that is colorful, tasty, and healthy. Start by cutting off the tops of your bell peppers. This gives you a nice opening for the filling. Make sure to remove all seeds and white membranes inside. Set the peppers upright on a cutting board. This makes it easier to stuff them later. In a large mixing bowl, combine the cooked quinoa, black beans, corn, and diced tomatoes. Add the ground cumin, smoked paprika, and garlic powder to the mix. Stir everything well until it blends nicely. Don't forget to taste and add salt and pepper to your liking. Take each bell pepper and fill it with the quinoa mixture. Use a spoon to pack it down gently. Make sure to leave a little space at the top for the cheese. Once filled, place the peppers upright in the air fryer basket. If needed, preheat the air fryer to 375°F (190°C). Cook the stuffed peppers in the air fryer at 375°F (190°C) for 10-12 minutes. You want the peppers to be tender and the filling to be hot. If you like cheese, sprinkle some on top about two minutes before you finish cooking. This will melt the cheese perfectly. Once done, carefully take the stuffed peppers out of the air fryer. Let them cool for a few minutes. For a fresh look, sprinkle some chopped cilantro or parsley on top. Serve on a colorful plate and maybe drizzle some olive oil or sriracha for a nice touch. A side salad pairs well for a complete meal. - Choose the Right Peppers: Select large, firm peppers. Colors like red, yellow, or green work well. They add flavor and look great on your plate. - Preheat Your Air Fryer: If your model needs it, preheat to 375°F (190°C). This helps cook the peppers evenly. - Don’t Overstuff: Fill the peppers generously but leave some space at the top. This allows cheese to melt nicely without spilling over. - Check for Doneness: Cook for 10-12 minutes. They should be tender but not mushy. A fork should go in easily. - Skipping the Seasoning: Always taste your filling. Add salt and pepper to enhance the flavors. Don't skip this step! - Using Raw Ingredients: Ensure your quinoa is cooked and cooled. This helps the filling heat through without making the peppers soggy. - Not Arranging Properly: Place the stuffed peppers upright in the air fryer. This keeps them stable and helps them cook evenly. - Mixing Bowl: A large bowl helps combine your filling well. - Air Fryer: A good model ensures even cooking and crispy textures. - Spoon: Use a sturdy spoon to fill the peppers. It makes the process quick and easy. - Kitchen Knife: A sharp knife helps cut the tops off the peppers cleanly. - Cutting Board: This protects your counters and makes prepping safe. These tips and tricks will help you make perfect air fryer stuffed peppers every time! Enjoy the fun of cooking and the joy of sharing delicious meals. {{image_4}} You can switch up the filling for your stuffed peppers. For a heartier option, try using ground meat, like beef or turkey. Brown the meat first before mixing it with the other ingredients. You can also use diced chicken for a lighter take. For a veggie-packed option, add chopped mushrooms, zucchini, or spinach. These ingredients add nutrients and flavor. To make this dish vegan, skip the cheese and use plant-based cheese instead. You can also swap quinoa with brown rice or lentils for added protein. For a gluten-free meal, quinoa works well since it is naturally gluten-free. Just ensure any sauces or extras you add are gluten-free, too. Experimenting with spices can elevate your stuffed peppers. Try adding chili powder or oregano for a Southwestern twist. If you like heat, a pinch of cayenne pepper can spice things up. For a saucy finish, drizzle some salsa over the top before air frying. You can also use barbecue sauce or teriyaki sauce for a unique flavor profile. Mixing in fresh herbs like basil or cilantro gives a fresh taste to your stuffing. To store leftover stuffed peppers, let them cool first. Place them in an airtight container. You can keep them in the fridge for up to three days. For best taste, eat them within this time frame. To reheat your stuffed peppers, use the air fryer. Preheat it to 350°F (175°C). Place the peppers inside and heat for about 5-7 minutes. This method keeps them crispy and tasty. You can also use a microwave. Heat on medium for 2-3 minutes, but they may get soft. To freeze stuffed peppers, wrap each one in plastic wrap. Then, place them in a freezer-safe bag. They can last for up to three months. When ready to eat, thaw them overnight in the fridge. Reheat as mentioned above, and enjoy your meal! The best peppers for stuffing are bell peppers. They come in many colors like red, yellow, green, and orange. Each color has a slightly different taste. Choose large, firm peppers to hold the filling well. You can also use poblano peppers for a spicier kick. Yes, you can make stuffed peppers ahead of time. Prepare the filling and stuff the peppers. Store them in the fridge for up to two days before cooking. This saves time on busy days. Just remember to cook them within two days for the best taste. Stuffed peppers are done when they are tender. You can test this by piercing them with a fork. The filling should also be hot throughout. If you added cheese, it should be melted and bubbly. This usually takes about 10 to 12 minutes in the air fryer. Yes, you can use other grains in place of quinoa. Brown rice, farro, or even couscous work well. Just make sure they are cooked before stuffing. Each grain adds a unique flavor and texture to the dish. Stuffed peppers pair well with a variety of sides. A fresh green salad adds a nice crunch. You can also serve them with rice, guacamole, or salsa. For a heartier meal, add some crusty bread. These sides enhance the meal and make it more filling. Stuffed peppers are a tasty and fun dish. We explored essential ingredients and optional add-ins to make them your own. I shared how to prepare, stuff, and cook in an air fryer. Tips help you avoid common mistakes, while variations keep things interesting. Lastly, we discussed storage and reheating methods for leftovers. Enjoy experimenting with flavors and adjust as you like. With these steps, you’ll impress everyone with your delicious creations. Happy cooking!

Air Fryer Stuffed Peppers Flavorful and Easy Recipe

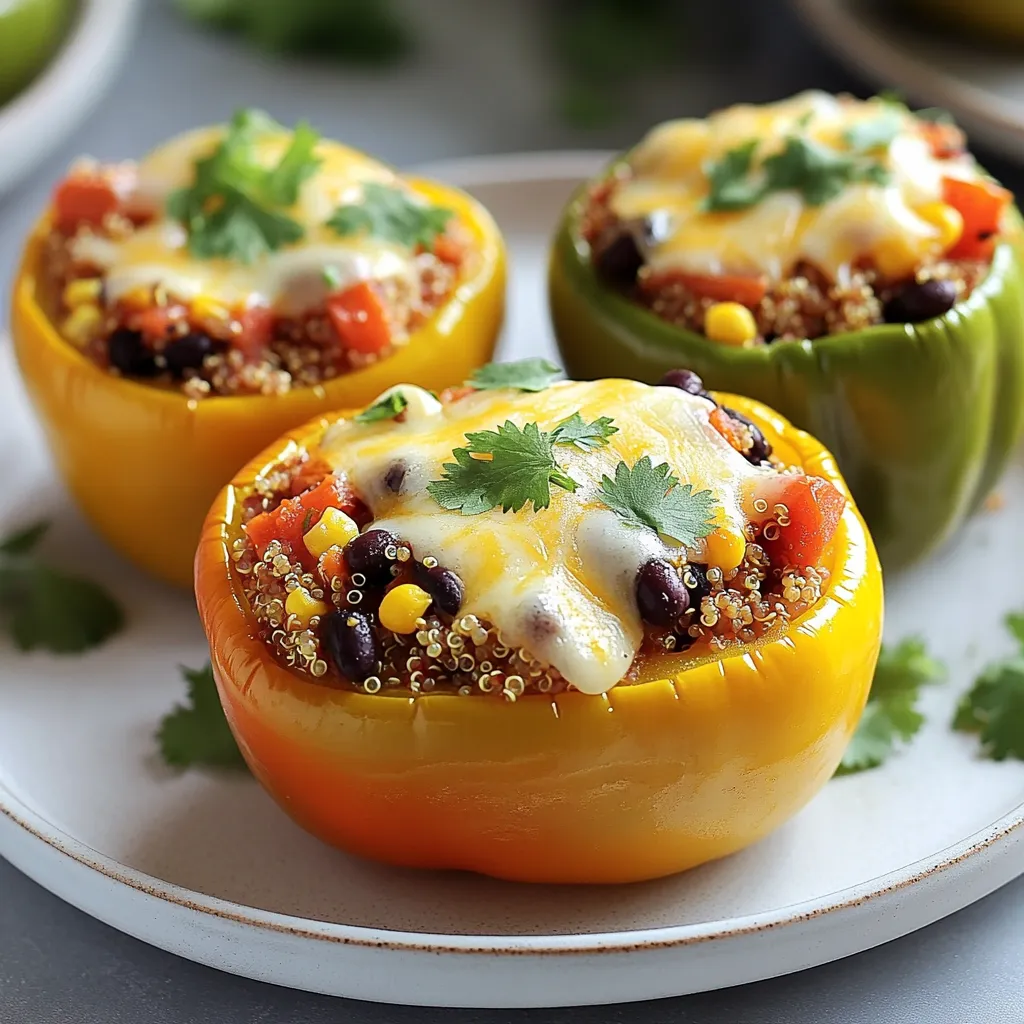
Are you ready to enjoy a dish that’s both flavorful and easy to make? Air fryer stuffed peppers are your

For the perfect lemon poppy seed muffins, you need the right ingredients. Here’s what you will need: - 1 ½ cups all-purpose flour - ½ cup granulated sugar - 2 teaspoons baking powder - 1 teaspoon baking soda - ¼ teaspoon salt - 2 tablespoons poppy seeds - ½ cup unsalted butter, melted - 2 large eggs - ½ cup buttermilk - 1 tablespoon freshly grated lemon zest - 2 tablespoons freshly squeezed lemon juice - 1 teaspoon vanilla extract - Optional: 1 cup powdered sugar and 2 tablespoons lemon juice for glaze Each ingredient adds its own flavor and texture. The flour gives structure, while sugar adds sweetness. Baking powder and baking soda help the muffins rise. Poppy seeds give a nice crunch and a nutty taste. The butter keeps the muffins moist. Eggs provide richness and support the rise. Buttermilk adds tanginess and lightness. Zest and juice from fresh lemons bring a bright flavor. Lastly, vanilla extract enhances all the tastes. If you want a sweet glaze, mix the powdered sugar with lemon juice. Drizzle it on top after the muffins cool. It adds a nice shine and extra sweetness. {{ingredient_image_2}} First, set your oven to 350°F (175°C). This temperature ensures even baking. Next, prepare your muffin tin. You can line it with paper liners or lightly grease it with cooking spray. This will help the muffins come out easily. In a large bowl, mix together the dry ingredients. Combine 1 ½ cups of all-purpose flour, ½ cup of granulated sugar, 2 teaspoons of baking powder, 1 teaspoon of baking soda, ¼ teaspoon of salt, and 2 tablespoons of poppy seeds. Be sure to break up any lumps. This step is key for a smooth batter. Now, grab another bowl to mix the wet ingredients. Whisk together ½ cup of melted unsalted butter, 2 large eggs, ½ cup of buttermilk, 1 tablespoon of freshly grated lemon zest, 2 tablespoons of freshly squeezed lemon juice, and 1 teaspoon of vanilla extract. Make sure it is well combined and smooth. Pour the wet mixture into the dry ingredients. Use a rubber spatula to gently fold them together. Be careful not to overmix. A few lumps are okay. This keeps the muffins light and fluffy. Now, it’s time to fill the muffin cups. Use a scoop or spoon to divide the batter evenly among the prepared cups. Fill each cup about ¾ full. This allows room for the muffins to rise while baking. Place the muffin tin in the preheated oven. Bake for 18 to 20 minutes. Check for doneness by inserting a toothpick in the middle of a muffin. It should come out clean. Once baked, remove the muffins from the oven. Let them cool in the tin for about 5 minutes. After that, transfer them to a wire rack to cool completely. To get the best muffins, you need to avoid overmixing. When you mix the wet and dry ingredients, do it gently. Some lumps are okay. Overmixing can make your muffins tough, and we want them soft and fluffy. Next, checking doneness is key. Bake the muffins for 18-20 minutes. Stick a toothpick in the center of a muffin. If it comes out clean, they are done. If batter sticks, give them more time. When it comes to arranging muffins, presentation matters. Place them on a decorative plate. This makes them look special. You can also dust them with a little powdered sugar. It adds a nice touch and makes them look fancy. For garnishing, serve with lemon wedges. They add color and a fresh vibe. You can also add some fresh mint leaves for a pop of green. Making the glaze is simple. Mix 1 cup of powdered sugar with 2 tablespoons of lemon juice. Stir until it’s smooth. This glaze adds a nice sweet and tangy flavor to the muffins. When applying the glaze, wait until muffins cool. Drizzle it over the top for a beautiful finish. You can use a spoon or a small squeeze bottle for control. Pro Tips Use Fresh Ingredients: Always use fresh lemons for zest and juice to enhance the flavor of your muffins. Don’t Overmix: Gently fold the wet and dry ingredients together to ensure a light and fluffy texture. Overmixing can lead to dense muffins. Check Doneness: Use a toothpick to test for doneness; it should come out clean or with a few crumbs attached but not wet batter. Customize Your Muffins: Feel free to add other ingredients like blueberries or walnuts for a twist on the classic lemon poppy seed flavor. {{image_4}} You can easily change the flavor of your lemon poppy seed muffins. Here are two tasty ideas: - Adding blueberries or cranberries: These fruits add sweetness and color. Just fold in about a cup of fresh or frozen berries into the batter. The berries will burst while baking, giving a juicy surprise in each bite. - Incorporating nuts: Chopped walnuts or almonds add crunch and depth. Use about half a cup of nuts, mixing them in gently. They pair well with the lemon's tartness. If you need a gluten-free or dairy-free version, you can still enjoy these muffins. Here are some simple swaps: - Gluten-free flour: Use a 1-to-1 gluten-free flour blend. This will keep the texture light and fluffy. - Dairy-free substitutes: Replace buttermilk with almond milk or coconut milk mixed with a bit of vinegar. You can also use dairy-free butter. These changes work well without losing flavor. Making mini muffins is a fun twist! Here’s how to adapt the recipe: - Adjustments for baking time: Bake mini muffins for about 12-15 minutes. Keep an eye on them; they bake faster than regular muffins. - Portion sizes: Fill each mini muffin cup about halfway. This helps them rise nicely without overflowing. Enjoy trying these variations to find your perfect lemon poppy seed muffin! You can store lemon poppy seed muffins at room temperature. Just keep them in an airtight container. They will stay fresh for about 2-3 days. If you want to keep them longer, refrigeration is an option. However, this can change the texture, making them a bit dry. I recommend room temperature storage for the best taste. Freezing muffins is easy! First, let them cool completely. Then wrap each muffin tightly in plastic wrap. Place them in a freezer bag or an airtight container. Label the bag with the date. They can last up to three months in the freezer. When you’re ready to eat them, just pull them out and let them thaw at room temperature. To enjoy your muffins later, reheating is key. Preheat your oven to 350°F (175°C). Place the muffins on a baking sheet. Heat them for about 5-10 minutes. This will help restore their soft texture. If you're in a hurry, you can use the microwave. Heat for 10-15 seconds at a time. Be careful not to overheat, as they can get tough. Enjoy your muffins warm! To make your muffins moist, follow these tips: - Use buttermilk as it adds rich flavor. - Don't overmix the batter; mix until just combined. - Add a little extra butter for richness. - Consider adding sour cream for extra moisture. Each of these tips helps keep your muffins soft and tender. Overmixing can lead to dry muffins, so handle the batter gently. Yes, you can use other flours. Here are some options: - Whole wheat flour adds a nutty flavor but may make muffins denser. - Almond flour gives a moist texture but needs more liquid. - Gluten-free flour blends work well for a gluten-free option. Each flour changes the muffin's taste and texture, so experiment to find your favorite. For maximum zest extraction, try these steps: - Use a microplane or fine grater for small pieces. - Roll the lemon on a counter to loosen the skin. - Zest before juicing to make it easier. Zesting properly adds a bright flavor to your muffins. Make sure to zest only the yellow part, avoiding the bitter white pith. These muffins stay fresh for about: - 2 to 3 days at room temperature in an airtight container. - Up to a week in the fridge. For longer storage, freeze them in a freezer bag. They can last up to three months. Reheat in the oven for a fresh taste! We covered all the steps to make tasty lemon poppy seed muffins. You now know the ingredients, how to bake, and tips for success. Remember, practice makes your muffins better each time. Try different flavors and substitutions for variety. Store them right to keep them fresh. Enjoy your baking journey, and share your perfect muffins with friends and family!

Lemon Poppy Seed Muffins Tasty and Easy Recipe

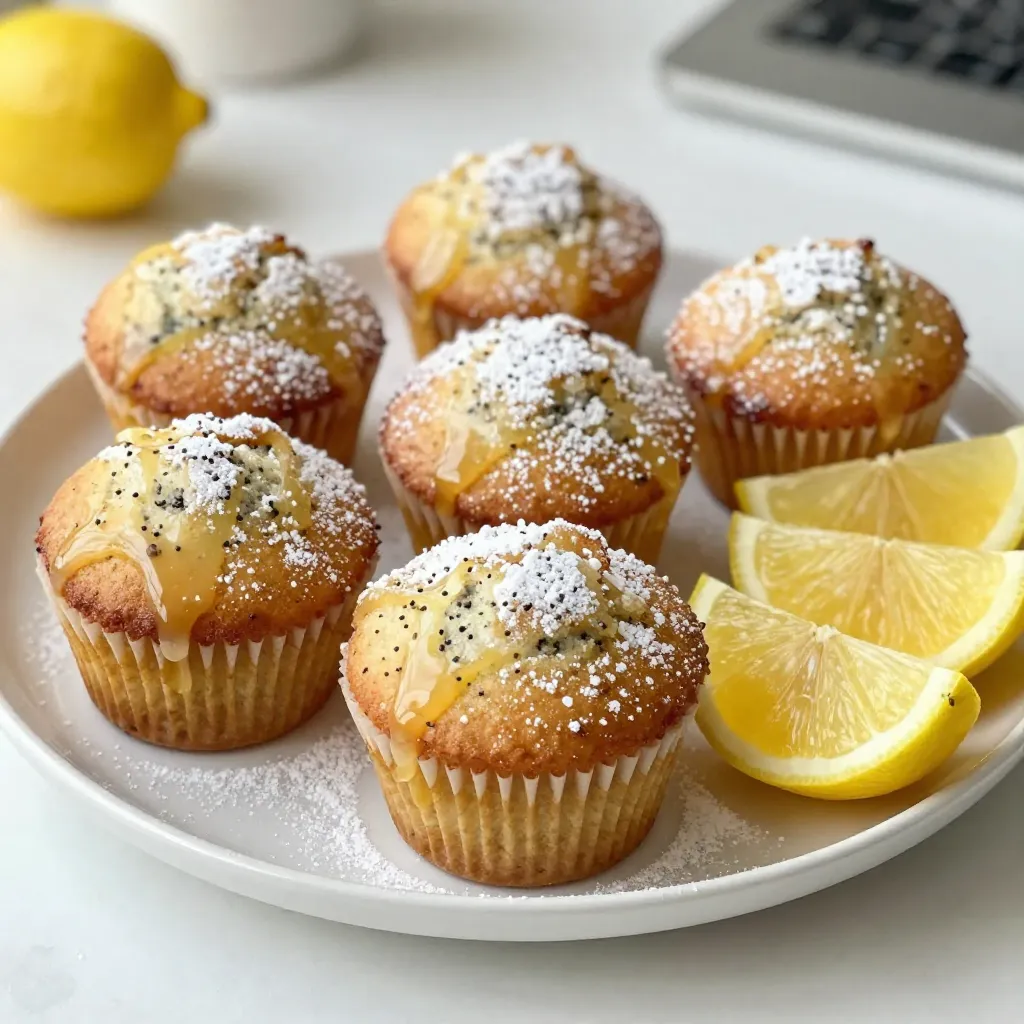
If you crave bright flavors and a soft texture, try my Lemon Poppy Seed Muffins. This easy recipe combines zesty

To make Maple Pecan Granola Parfaits, you need a few key items: - 1 cup rolled oats - 1/2 cup pecans, roughly chopped - 1/4 cup pure maple syrup - 1/4 cup coconut oil, melted - 1/2 teaspoon ground cinnamon - 1/4 teaspoon sea salt - 2 cups Greek yogurt (plain or vanilla) - 1 cup mixed berries (strawberries, blueberries, raspberries) These ingredients create a crunchy, sweet, and creamy delight. You can add even more flavor with these optional items: - A drizzle of honey for serving - Chia seeds for added texture and nutrition - A sprinkle of nutmeg for warmth These extras let you customize the parfait to your taste. If you have dietary needs, here are some easy swaps: - Use gluten-free oats if you're gluten-sensitive. - Substitute maple syrup with agave nectar or honey if needed. - Replace Greek yogurt with a dairy-free option like coconut yogurt. These substitutions help everyone enjoy this tasty breakfast! First, gather your ingredients. You will need rolled oats, chopped pecans, maple syrup, melted coconut oil, ground cinnamon, and sea salt. In a large bowl, mix the oats, pecans, and syrup. Stir well so every piece gets coated. Add the melted coconut oil, cinnamon, and salt. Mix again until everything is well combined. Next, preheat your oven to 350°F (175°C). Spread the granola mixture evenly on a parchment-lined baking sheet. Baking takes about 15 to 20 minutes. Halfway through, stir the granola to help it brown evenly. It should look golden and smell amazing. Once done, take it out and let it cool completely. Now comes the fun part. Grab clear glasses to show off those pretty layers. Start with a layer of Greek yogurt in each glass. Then, add a layer of your baked granola. Next, pile on some mixed berries. Repeat these layers until your glasses are full. For the final touch, top with more berries and a drizzle of honey if you like. This adds sweetness and makes it look fantastic! For the best texture in your granola, use rolled oats. They provide a chewy base. Mix in chopped pecans for crunch. Make sure to stir the granola halfway while baking. This helps it brown evenly. Bake until golden brown, but watch it closely. Burnt granola can ruin your parfait. Allow it to cool completely, as it gets crispier when cool. Serve your parfaits in clear glass cups. This allows you to show off the pretty layers. Start with a spoonful of yogurt at the bottom. Then, add a layer of granola, followed by berries. Repeat until you fill the cup. Finish with a layer of berries on top. Add a drizzle of honey for extra sweetness. You can also sprinkle a few extra pecans on top for a nice touch. Store leftover granola in an airtight container. Keep it in a cool, dry place. It stays fresh for about two weeks. If it gets soft, you can re-crisp it in the oven. Just spread it out on a baking sheet and bake at 350°F (175°C) for 5-10 minutes. This way, you can enjoy your granola longer! {{image_4}} You can switch up the nuts in this recipe. Try walnuts for a richer taste. Almonds add a nice crunch, too. Pecans are great, but don’t be shy to experiment. Use your favorite nuts or even seeds for a fun twist! Berries are the stars of this parfait. In summer, use fresh strawberries and blueberries. Fall brings a chance to add apples or pears. In winter, try frozen mixed berries for tasty results. Each season offers new flavors to explore. For a dairy-free option, use coconut yogurt instead of Greek yogurt. Almond milk yogurt works well, too. These swaps keep the parfait creamy and delicious. Enjoy a healthy breakfast that fits your diet! To keep your granola fresh, store it in an airtight container. I like to use glass jars. This keeps moisture out and lets the granola stay crunchy. Place the container in a cool, dry place. Avoid direct sunlight to prevent the nuts from going bad. If you have leftover parfaits, cover them with plastic wrap or a lid. Store them in the fridge for up to one day. The granola will lose some crunch but still taste great. Layering the yogurt and berries helps keep them fresh longer. Homemade granola can last for about two weeks when stored correctly. Check for any signs of spoilage, like a musty smell. If you see any, it’s best to toss it. For parfaits, eat them within a day for the best taste and texture. Yes, you can make granola ahead of time. I like to prepare a big batch on the weekend. Store it in an airtight container for up to two weeks. This way, breakfast is quick and easy during busy mornings. Just grab and go! If you prefer, you can use regular yogurt, dairy-free yogurt, or cottage cheese. Each option brings a unique taste. I enjoy using coconut yogurt for a tropical twist. Try what fits your diet or taste buds best! Customizing flavors is fun! You can add different fruits like bananas or peaches. Try swapping pecans for almonds or walnuts. You can also mix in spices, like nutmeg or ginger, for a flavor kick. Don’t forget to play with sweeteners too, like agave or honey. The choices are endless! In this blog post, we explored how to make delicious maple pecan granola and parfaits. We covered key ingredients, optional flavors, and tasty substitutions for diets. I shared step-by-step instructions for prep and baking. Tips helped you achieve the best texture and serving ideas. Variations allowed you to try different nuts and berries. Proper storage methods ensure freshness and great shelf life. Enjoy creating your own parfaits and have fun experimenting with flavors! You'll love the results.

Maple Pecan Granola Parfaits Tasty Breakfast Idea

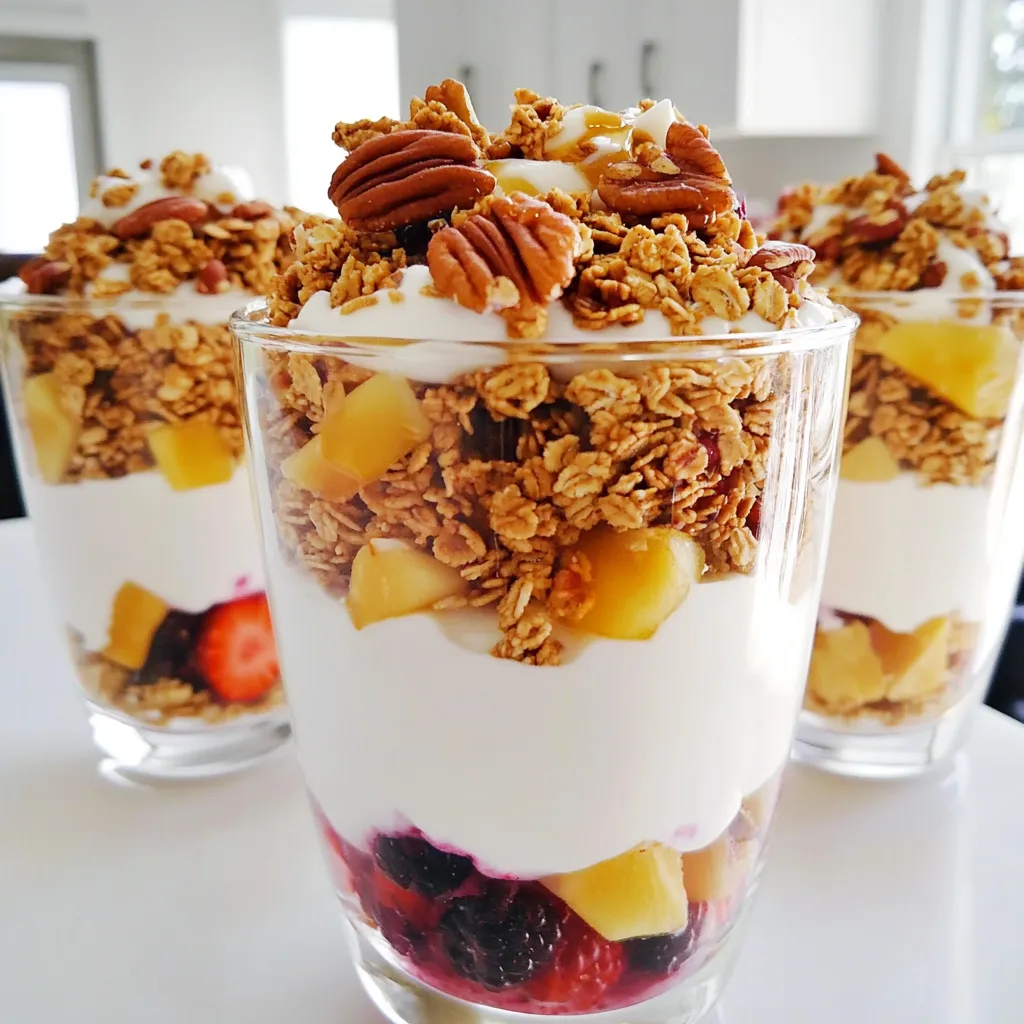
Looking for a delicious breakfast idea? You’ll love these Maple Pecan Granola Parfaits! They’re easy to make, packed with tasty

- 4 cups of fresh or frozen corn kernels - 1 large onion, finely diced - 2 medium potatoes, peeled and diced into ½-inch pieces - 2 cloves of garlic, minced - 3 cups of vegetable broth - 1 cup of heavy cream - 1 teaspoon of dried thyme - 1 teaspoon of smoked paprika - Salt and black pepper to taste - 1 tablespoon of olive oil - Fresh chives or parsley, chopped, for garnish When making slow cooker creamy corn chowder, you need a few key ingredients. Corn is the star of this dish. You can use fresh corn or frozen corn. Both work great! Onion and garlic bring a nice flavor. Chop the onion finely and mince the garlic. Potatoes add heartiness. Dice them into small pieces so they cook well. Vegetable broth adds depth to the chowder. Use a good quality broth for the best taste. Heavy cream makes the chowder rich and creamy. For flavor, add dried thyme and smoked paprika. These spices give the chowder a warm, cozy taste. Don't forget salt and black pepper to enhance all the flavors. Finally, top it off with fresh chives or parsley. They add a pop of color and freshness. This mix of ingredients creates a comforting meal that warms your soul! Sautéing Onions and Garlic Start by heating 1 tablespoon of olive oil in a medium skillet over medium heat. Add the finely diced onion and sauté for about 5 minutes. You want the onion to turn translucent. Next, stir in 2 minced garlic cloves and sauté for one more minute. This adds a lovely aroma to your chowder. Mixing Ingredients in Slow Cooker Transfer the sautéed onion and garlic to your slow cooker. Then, add 4 cups of corn kernels, 2 diced medium potatoes, and 3 cups of vegetable broth. Sprinkle in 1 teaspoon of dried thyme, 1 teaspoon of smoked paprika, and add salt and black pepper to taste. Stir everything together well to combine. Setting Cooking Time and Temperature Now, cover your slow cooker. Set it to cook on low for 6-7 hours or on high for 3-4 hours. You know it's done when the potatoes are tender and easily pierced with a fork. This slow cooking process brings all the flavors together. Mashing for Creaminess Once the cooking time is up, take a potato masher and mash some of the corn and potato mixture in the slow cooker. This will create a creamy texture while keeping some kernels whole for a nice bite. Adding Cream and Adjusting Seasoning Next, stir in 1 cup of heavy cream. Taste the chowder and adjust the seasoning with more salt and pepper if needed. Cover and let it cook on low for an extra 15-20 minutes to warm everything and meld the flavors. Serving and Garnishing Ladle the hot chowder into bowls. For a pop of color, sprinkle freshly chopped chives or parsley on top. This adds flavor and makes your dish visually appealing. Enjoy your comforting bowl of creamy corn chowder! - Seasoning Recommendations: Start with salt and black pepper. Add one teaspoon of dried thyme and smoked paprika for depth. These spices make the chowder pop. You can also try a dash of cayenne for heat. - Cream Substitutions: If you want a lighter option, use half-and-half instead of heavy cream. For a dairy-free version, try coconut cream or cashew cream. Both options keep the chowder rich and creamy. - Options for Chunky vs. Smooth Chowder: If you prefer a smooth texture, mash more of the corn and potatoes. For a chunkier chowder, mash less. You can also blend a portion of the soup in a blender, then mix it back in. This gives you control over the texture. - Best Side Dishes to Accompany: Serve your chowder with crusty bread or a fresh salad. Grilled cheese sandwiches also pair well. They add a nice crunch and complement the creamy soup. A light coleslaw can bring a refreshing balance. {{image_4}} You can easily swap some ingredients in this chowder. For a dairy-free version, replace heavy cream with coconut milk or cashew cream. Both options keep it rich and creamy. Adding crispy bacon can enhance the flavor, giving a nice smoky note. You might also add extra veggies like bell peppers or carrots for more texture. Just remember to adjust the cooking time if you add more ingredients. If you like heat, try making a spicy corn chowder. Add diced jalapeños or a pinch of cayenne pepper. This will give your chowder a nice kick without overpowering the corn flavor. For a fresh twist, an herbed corn chowder is a great option. Add fresh herbs like basil, cilantro, or dill before serving. These herbs brighten up the dish and add a nice aroma. Experiment with these variations to create your perfect bowl of chowder! To store leftovers, let the chowder cool first. Then, place it in an airtight container. It keeps well in the fridge for up to three days. Make sure to label the container with the date. This way, you can keep track of how long it has been stored. For freezing, let the chowder cool completely. Use freezer-safe containers or bags for best results. Leave some space at the top of the container for expansion. The chowder can last up to three months in the freezer. When you're ready to enjoy it again, remember to label it with the date. To reheat safely, thaw the chowder in the fridge overnight if frozen. You can use a pot on the stove over low heat. Stir it often to avoid sticking. You can also use the microwave. Heat in short intervals, stirring in between. Make sure it is hot all the way through before serving. You can use dried corn, but it needs a bit of prep. Soak the dried corn overnight. Then, cook it until tender before adding it to your chowder. Fresh or frozen corn gives a sweeter and juicier taste. This chowder is mild. The smoked paprika adds flavor without heat. If you want spice, add diced jalapeños or a dash of hot sauce. You can adjust the heat to fit your taste. Yes, you can make this chowder vegan easily. Replace the heavy cream with coconut cream or a cashew cream. Also, use vegetable broth to keep it plant-based. This way, you still enjoy a creamy texture. Corn chowder pairs well with crusty bread or cornbread. A fresh salad adds a nice crunch. You can also serve it with grilled cheese sandwiches for a cozy meal. Homemade chowder lasts about 3 to 4 days in the fridge. Store it in an airtight container. If you want to keep it longer, consider freezing it. Properly frozen chowder can last up to 3 months. This corn chowder recipe combines fresh ingredients and easy steps to create a tasty dish. You learned how to prepare, cook, and serve it well, plus tips to make it even better. Remember, you can switch ingredients based on your taste or diet. Store leftovers properly to keep them fresh. With this recipe, you'll impress friends and family. Enjoy making your chowder, and have fun experimenting with flavors!

Slow Cooker Creamy Corn Chowder Easy and Comforting Meal

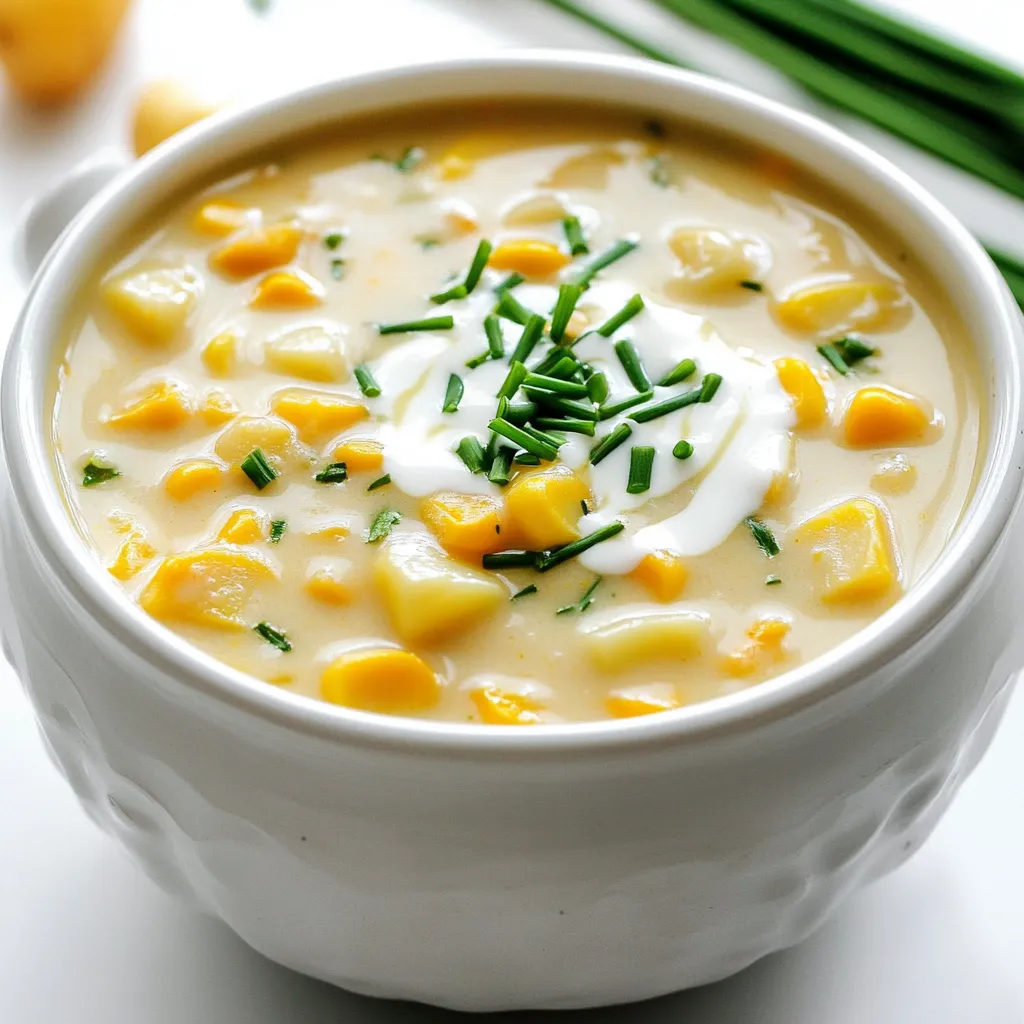
Looking for a comforting meal that’s a breeze to make? This Slow Cooker Creamy Corn Chowder is your answer. With

- 1 block (14 oz) firm tofu - 2 tablespoons honey or maple syrup - 4 tablespoons soy sauce or tamari - 2 cups fresh broccoli florets - 1 medium bell pepper, sliced - 2 medium carrots, peeled and julienned - 2 tablespoons sesame seeds - Fresh cilantro leaves When you prepare this dish, focus on the main ingredients first. The firm tofu is key. It holds its shape well during cooking. Honey or maple syrup adds sweetness. Use maple syrup for a vegan option. Soy sauce gives a savory touch. If gluten-free, use tamari instead. Next, for the vegetables, fresh broccoli florets add crunch. A bell pepper, either red or yellow, brings color and flavor. Carrots, when julienned, add a nice texture. These vegetables roast well and pair nicely with the tofu. Finally, garnishing elements enhance the dish. Sesame seeds add a nutty crunch. Fresh cilantro leaves bring brightness. These simple touches can make your meal look and taste great. Enjoy the process of gathering these ingredients. Each one plays a role in creating a balanced and tasty dish. First, set your oven to 400°F (200°C). This high heat helps the tofu and veggies roast nicely. Next, line a large baking sheet with parchment paper. This step makes cleanup easy and keeps everything from sticking. In a mixing bowl, combine 2 tablespoons of honey or maple syrup, 4 tablespoons of soy sauce, 3 minced garlic cloves, 1 tablespoon of grated ginger, and 1 tablespoon of sesame oil. Mix well. Add the cubed tofu to the bowl. Make sure each piece gets coated in the marinade. Let the tofu marinate for at least 15 minutes. This gives it time to soak up all those great flavors. While the tofu soaks, wash and chop your veggies. Cut the broccoli into florets. Slice the bell pepper into thin strips. Julienne the carrots into thin matchsticks. This prep ensures your veggies cook evenly. Next, spread the marinated tofu on one half of the baking sheet. On the other half, arrange the broccoli, bell pepper, and carrots in a single layer. This layout promotes even roasting. Place the sheet pan in your preheated oven. Bake everything for 25-30 minutes. Halfway through, flip the tofu and vegetables. This step helps them brown evenly and enhances flavor. You want everything to be golden and tender. Once baking is complete, carefully take the sheet pan out of the oven. Sprinkle sesame seeds over the tofu and veggies. For a fresh touch, add some chopped cilantro leaves on top. Plate your honey garlic tofu and roasted veggies over cooked rice or quinoa. This creates a colorful and satisfying meal. To get the best tofu, press it first. This removes moisture and helps it soak up flavors. Use a clean kitchen towel or paper towels. Wrap the tofu and place something heavy on top for about 15 minutes. This method makes it crispier when cooked. Choose firm tofu for this recipe. It holds its shape well during cooking. Soft tofu can fall apart and won’t give you the same texture. If you want a vegan option, use extra-firm tofu. The marination time is very important. Allow the tofu to soak for at least 15 minutes. This helps it absorb all the tasty flavors. You can leave it for longer if you have time. Feel free to add extra spices or herbs. A pinch of red pepper flakes gives it a nice kick. Fresh herbs like basil or parsley can add more flavor, too. Mix and match to find your favorite! Cut your vegetables into even pieces. This ensures they cook at the same rate. If they are all different sizes, some may burn while others remain raw. Aim for 1-inch pieces for the best results. Avoid overcrowding the sheet pan. If the pan is too full, the veggies will steam instead of roast. Give them space to caramelize. Use two pans if needed for a great outcome. {{image_4}} To make this dish vegan, substitute honey with maple syrup. Maple syrup gives the same sweetness without any animal products. You can also use agave syrup as another option. For the soy sauce, use tamari to keep it gluten-free. These changes will keep your meal tasty and plant-based. If you need a gluten-free option, tamari is your best friend. It tastes like soy sauce but has no gluten. Always check the label to ensure it is safe for your diet. This small switch keeps the rich flavor while making it safe for gluten-free eaters. Feel free to switch up the veggies. Seasonal choices like zucchini, asparagus, or bell peppers add great color and taste. You can also try adding snap peas or cherry tomatoes for a fun twist. Mixing different colors makes the dish look even more appealing. Plus, it keeps your meals exciting and healthy. To store leftovers, first let them cool down. Place the honey garlic tofu and veggies in an airtight container. This keeps them fresh. You can store them in the fridge for up to four days. When you're ready to eat, just reheat them. To freeze portions, let the dish cool completely. Divide the tofu and veggies into smaller containers. Use freezer-safe bags for easy storage. You can freeze them for up to three months. For best results when reheating, thaw in the fridge overnight. Then, warm them in the oven or microwave. This keeps the texture nice. For quality retention, the honey garlic tofu lasts well in the fridge for four days. If frozen, aim to use it within three months. After that, it may lose flavor and texture. Always check for any signs of spoilage before eating stored food. You can use maple syrup instead of honey. It works well and is vegan. You may also try agave nectar or brown sugar. Each option adds its own sweet taste. Remember, the syrup will make it a bit runnier. If you use brown sugar, you should mix it with a little water to make a syrup. To add some heat, you can include red pepper flakes. Start with a teaspoon and taste as you go. You could also add sriracha or chili paste to the marinade. For a fresh kick, try adding sliced jalapeños. They bring a nice crunch and heat. Yes, you can prep this dish in advance. Marinate the tofu a day ahead. Just store it in the fridge. You can also chop the veggies early. Keep them in an airtight container. When you are ready, just bake everything together. This saves time and makes dinner easy! This blog post covers a simple yet delicious recipe featuring firm tofu, fresh veggies, and flavorful toppings. You learned how to prepare, marinate, and bake the dish, ensuring great taste and texture. Remember to customize with seasonal vegetables and store leftovers properly for the best quality. With these tips, you can enjoy this healthy meal any day. Explore variations that suit your taste, from vegan swaps to spice levels. Now, it’s time to enjoy your creation and share it with others!

Sheet Pan Honey Garlic Tofu Flavorful and Simple Meal

If you’re craving a quick, tasty meal, look no further than Sheet Pan Honey Garlic Tofu! This dish is packed

Older posts
Newer posts
← Previous Page1 Page2 Page3 Page4 … Page83 Next →

dsad

© 2026 eataroundit • Built with GeneratePress

Our Policies

  • Copyright Policy
  • Cookie Policy
  • GDPR Policy
  • Privacy Policy
  • Disclaimer
  • Terms Of Use

More Information

  • Home
  • About
  • Contact
  • Appetizers
  • Dessert
  • Dinner
  • Drinks
©2026, eataroundit About Back To Top