Skip to content
DisclaimerTerms Of UseGDPR PolicyCookie Policy

eataroundit

  • Home
  • Drinks
  • Appetizers
  • Dinner
  • Dessert
  • About
  • Contact
  • Privacy Policy
DisclaimerTerms Of UseGDPR PolicyCookie Policy

NO-ING-IMG

- 1 pound potato gnocchi - 2 cups fresh spinach, roughly chopped - 1 cup cherry tomatoes, halved - 1 cup heavy cream - 1/2 cup basil pesto - 1/2 cup grated Parmesan cheese - 2 tablespoons olive oil - 2 cloves garlic, minced - Salt and pepper to taste - Fresh basil leaves for garnish I use one pound of potato gnocchi for four servings. Fresh spinach adds color and nutrients. Halve one cup of cherry tomatoes for a sweet burst. The heavy cream creates a rich sauce. I mix in half a cup of basil pesto for flavor. Grated Parmesan cheese gives a cheesy finish. Minced garlic adds depth. Olive oil helps cook the garlic. Salt and pepper enhance the dish. Finally, fresh basil leaves make a lovely garnish. If you want to replace the potato gnocchi, use store-bought or homemade pasta. For a lighter option, you can try zoodles or cauliflower gnocchi. Instead of heavy cream, you can use half-and-half or coconut cream for a dairy-free twist. If basil pesto is not available, try sun-dried tomato pesto or spinach pesto. Grated mozzarella can replace Parmesan if needed. Start by heating the olive oil in a large pot. Use medium heat for this step. Once the oil shimmers, add the minced garlic. Cook it for about one minute. Stir it often until it smells good and turns golden. Next, add the halved cherry tomatoes. Cook them for three to four minutes. Stir now and then until they soften and let out their juices. After that, add the chopped spinach. Cook it for two minutes or until it wilts and turns bright green. Now, lower the heat a bit and pour in the heavy cream and basil pesto. Mix everything well and let it simmer gently. Carefully add the potato gnocchi to the pot. Make sure they spread out evenly in the creamy sauce. Let the gnocchi cook for three to five minutes. They are done when they float to the top. Stir them occasionally to stop sticking. This recipe uses simple yet effective cooking techniques. Sautéing garlic enhances its flavor. Cooking the tomatoes helps release their juices, creating a tasty base. Adding spinach near the end keeps its color bright and fresh. Simmering the cream and pesto forms a rich sauce that coats the gnocchi. This method is easy and makes cleanup quick. When the gnocchi are done, take the pot off the heat. Stir in the grated Parmesan cheese. Mix until the cheese melts and the sauce becomes creamy. Taste the dish and add salt and pepper as needed. Adjust the seasoning to your liking. To finish, garnish your dish with fresh basil leaves. This adds color and extra flavor. Enjoy your creamy pesto gnocchi! When making One-Pot Creamy Pesto Gnocchi, here are some things to watch for: - Overcooking the garlic: Sauté garlic until it's golden. Burnt garlic tastes bitter. - Not stirring the gnocchi: Stir gently to prevent sticking. Sticking gnocchi ruin the dish. - Ignoring seasoning: Always taste your dish. Seasoning brings out the flavors. To make your dish even better, try these ideas: - Use fresh ingredients: Fresh spinach and ripe tomatoes add bright flavors. - Add lemon zest: A little zest brightens the dish. It adds a fresh twist. - Mix in nuts: Pine nuts or walnuts provide a crunchy texture and extra flavor. Having the right tools makes cooking easier. Here’s what I recommend: - Large pot or deep skillet: This helps cook everything evenly. - Wooden spoon: Great for stirring without scratching your pot. - Measuring cups and spoons: Accurate measurements ensure your flavors balance. - Sharp knife: A good knife makes chopping quick and safe. With these tips, you'll create a delicious meal that impresses everyone! {{image_4}} You can switch up the ingredients in this dish. For a twist, try using sweet potato gnocchi instead of regular potato gnocchi. This adds a sweet flavor and vibrant color. You can also swap out the spinach for kale or Swiss chard. Both greens add a nice bite. If you love mushrooms, toss in some sliced button or cremini mushrooms for an earthy taste. This creamy pesto gnocchi pairs well with many sides. A simple green salad with a light vinaigrette cuts through the richness. Garlic bread is another great option. It adds a crunchy texture and complements the meal. You can also serve it with grilled chicken or shrimp for added protein. If you need a gluten-free option, choose gluten-free gnocchi. Many brands offer this. To make the dish vegan, use a plant-based cream instead of heavy cream. You can replace Parmesan with nutritional yeast for a cheesy flavor. Lastly, make sure the pesto you choose is dairy-free. These simple swaps keep the dish tasty while meeting dietary needs. To store leftovers, let the creamy pesto gnocchi cool first. Transfer it into an airtight container. Ensure the container seals well to keep air out. You can store it in the fridge for up to three days. If you want to keep it longer, consider freezing it. When you're ready to eat leftovers, reheat them on the stove. Add a splash of cream or water to help loosen the sauce. Heat over medium-low heat, stirring gently. This keeps the gnocchi creamy and prevents sticking. You can also microwave it in a safe dish, covered loosely, for about two minutes. The shelf life for this dish in the fridge is about three days. If you freeze it, gnocchi can last up to two months. To freeze, place it in a freezer-safe container. Make sure to label it with the date. When ready to eat, thaw it in the fridge overnight before reheating. Gnocchi is a small Italian dumpling. It is made from potatoes, flour, and eggs. These soft pillows are light and tasty. They absorb sauces well, making them perfect for creamy dishes. You can find gnocchi in many stores. Fresh gnocchi cooks quickly and is easy to prepare. Yes, you can make this dish ahead of time. Cook the gnocchi and sauce as directed. Let it cool, then store it in the fridge. When ready to eat, reheat it on the stove. Add a splash of cream if it looks dry. This way, you enjoy a quick meal with great flavor. Gnocchi is done cooking when it floats to the top. This usually takes about 3 to 5 minutes. Stir occasionally to prevent sticking. If you taste one, it should be soft but not mushy. Perfectly cooked gnocchi will have a light and fluffy texture. This article covered all you need for making delicious gnocchi. We discussed the right ingredients, preparation tips, and cooking steps. You learned about common mistakes and how to enhance flavor. Variations help you customize your dish to fit any diet. We also shared storage tips to keep your leftovers fresh. In conclusion, follow these steps for tasty gnocchi every time. Enjoy exploring flavors and making this dish your own!

One-Pot Creamy Pesto Gnocchi Quick and Easy Meal

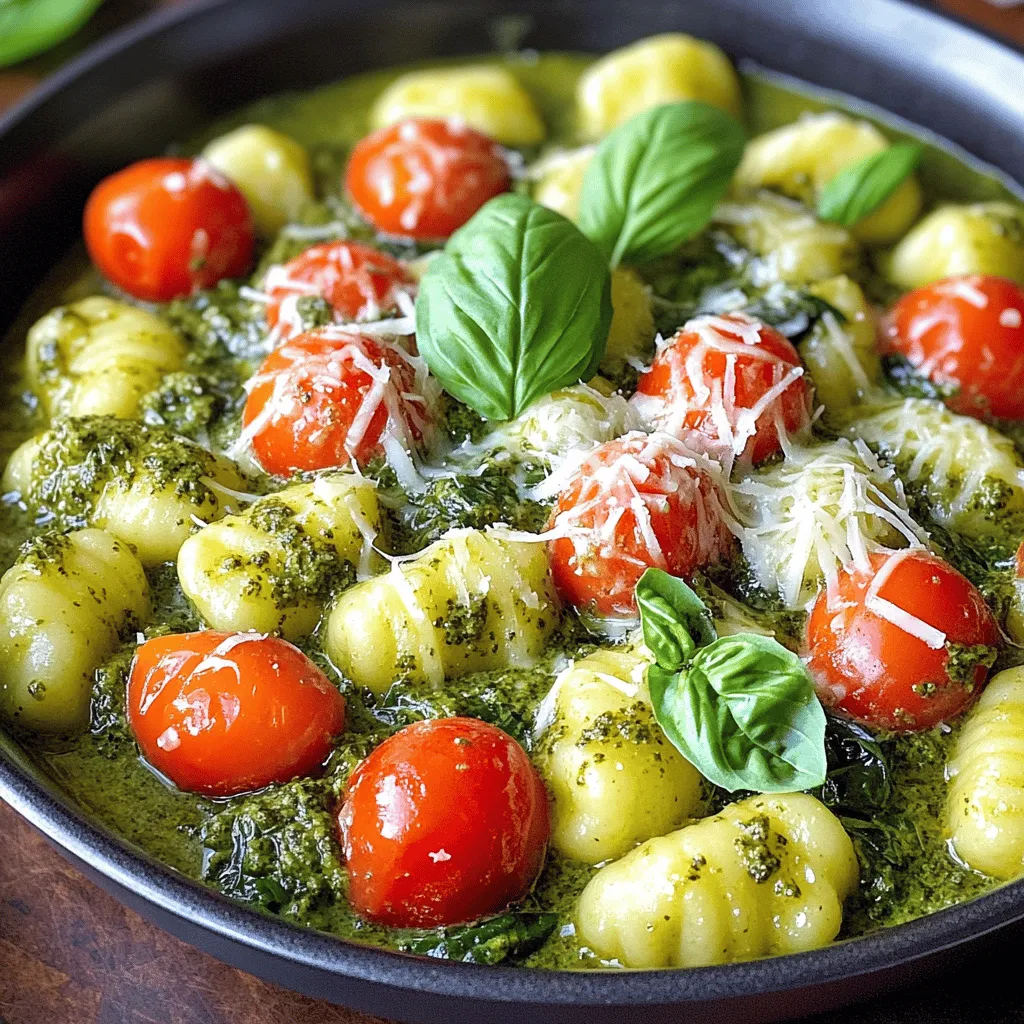
Are you ready for a fast and tasty meal? This One-Pot Creamy Pesto Gnocchi is your answer! With just a

For this tasty Blueberry Peach Crisp, you need fresh fruits that shine. Use: - 2 cups fresh blueberries, rinsed and drained - 2 cups fresh peaches, peeled, pitted, and sliced into thin wedges - 1 tablespoon fresh lemon juice These fruits bring a sweet and tangy flavor. The blueberries burst with juice, and the peaches add a soft texture. To balance the fruit's flavor, we need sweeteners and spices. Gather: - ½ cup granulated sugar, divided - 1 teaspoon ground cinnamon The sugar enhances the fruit's sweetness. The cinnamon adds a warm spice that makes every bite special. Now, let’s create the crunchy topping that makes this dish shine. You will need: - 1 cup rolled oats - ½ cup all-purpose flour - ½ cup packed brown sugar - ½ cup unsalted butter, melted - ¼ teaspoon salt - ¼ cup chopped nuts (optional, like pecans or almonds) The oats provide texture, while the butter makes it rich. If you want extra crunch, add the nuts. This topping will bake to a perfect golden brown, giving your crisp that delightful contrast. {{ingredient_image_2}} Start by preheating your oven to 350°F (175°C). This temperature is perfect for baking. Next, take a 9x13-inch baking dish and grease it lightly. You can use butter or cooking spray. This step helps prevent sticking and makes serving easier later. In a large mixing bowl, add 2 cups of fresh blueberries. Make sure they are rinsed and drained well. Then, add 2 cups of fresh peaches that you peeled, pitted, and sliced into thin wedges. These fruits bring a sweet and juicy flavor. Now, drizzle 1 tablespoon of fresh lemon juice over the fruit. This adds a nice zing and brightens the taste. Next, sprinkle in ¼ cup of granulated sugar and 1 teaspoon of ground cinnamon. Toss the fruit gently to coat it evenly. Be careful not to break the fruit pieces. Once mixed, transfer the fruit into the greased baking dish. Spread it out evenly across the bottom. This will create a lovely base for our crisp. In a separate bowl, combine 1 cup of rolled oats and ½ cup of all-purpose flour. This mix gives the topping a hearty texture. Next, add ½ cup of packed brown sugar and ¼ teaspoon of salt. These ingredients add sweetness and flavor. Slowly pour in ½ cup of melted unsalted butter. Stir until it all forms a crumbly texture. If you want some crunch, fold in ¼ cup of chopped nuts, like pecans or almonds. Now, sprinkle the oat mixture evenly over the fruit layer. Make sure it covers the fruit completely. This topping will crisp up nicely in the oven. Place the baking dish in the oven and bake for 30-35 minutes. Look for a golden brown topping and bubbling fruit edges. Once it’s done, remove it from the oven and let it cool for about 10 minutes. This step helps the flavors blend together beautifully. To get the best crisp, use old-fashioned rolled oats. These oats give a nice chew. Make sure your butter is melted but not too hot. If it’s too hot, it may cook the oats. Mix the topping until it looks crumbly. This texture adds a great bite. Don't skip the salt; it brings out the flavors. Serve your crisp warm for the best taste. A scoop of vanilla ice cream melts perfectly on top. You can also use whipped cream for a light touch. For a pretty look, add whole blueberries and peach slices on top. This makes your dish look great and adds more fruit flavor. One common mistake is overmixing the fruit. You want to keep the fruit pieces whole. This gives a nice texture in every bite. Another mistake is not letting it cool. Cooling helps the flavors mix well. Also, check your oven temperature. If it's too hot, the topping may burn before the fruit cooks. Pro Tips Use Seasonal Fruits: For the best flavor, use fresh, in-season peaches and blueberries. They will be sweeter and more aromatic, enhancing the overall taste of your crisp. Experiment with Spices: While cinnamon is classic, consider adding nutmeg or ginger for a unique twist. These spices can elevate the flavor profile of your crisp. Make Ahead: You can prepare the fruit filling and oat topping separately a day in advance. Just assemble and bake when you're ready to serve for a fresh-out-of-the-oven dessert. Serve with Toppings: This crisp pairs beautifully with vanilla ice cream or whipped cream. Consider adding a drizzle of honey or a sprinkle of chopped nuts on top for added texture and flavor. {{image_4}} You can easily make this blueberry peach crisp gluten-free. Use gluten-free oats and flour instead of regular ones. These swaps will keep the taste and texture just right. Check the labels on your products to ensure they are truly gluten-free. Want to boost the flavor? Try adding a splash of vanilla or almond extract to the fruit mix. You can also toss in some fresh ginger or chopped mint for a fresh twist. For extra crunch, mix in spices like nutmeg or cardamom with the topping. These small changes can take your crisp to the next level! This recipe is flexible with fruits. Use ripe apples or pears in the fall. In spring, swap in strawberries or cherries. You can even mix different fruits together! Just keep the same amount of fruit, and you’ll have a tasty treat all year round. To keep your blueberry peach crisp fresh, store it in an airtight container. You can use glass or plastic containers. Make sure it is at room temperature before covering it. This will help avoid sogginess. If you plan to eat it within a few days, keep it on the counter. For longer storage, place it in the fridge. Just remember to eat it within five days for the best taste. Reheating your blueberry peach crisp is simple. Preheat your oven to 350°F (175°C). Place the crisp in an oven-safe dish. Cover it with foil to prevent burning. Heat for about 15-20 minutes. If you're in a hurry, you can also use the microwave. Heat it in 30-second intervals until warm. Enjoy it warm for the best flavor! You can freeze blueberry peach crisp for later. First, let it cool completely. Cut it into portions, and wrap each piece in plastic wrap. Place them in a freezer-safe bag or container. Be sure to label it with the date. You can freeze it for up to three months. When you're ready to enjoy it, thaw it in the fridge overnight. Then, reheat it in the oven for a warm, tasty treat! Yes, you can use frozen blueberries and peaches. They work well in this crisp. Just remember to thaw them first. Drain any extra juice before mixing them. This helps keep your crisp from being too watery. Your crisp is done when the topping turns golden brown. Look for bubbling fruit around the edges. This bubbling shows that the fruit is hot and juicy. A good baking time is 30-35 minutes at 350°F (175°C). Serve your crisp warm for the best taste. A scoop of vanilla ice cream makes it even better. You can also add whipped cream for a lighter touch. For a pretty look, sprinkle fresh blueberries or peach slices on top. You now know how to make a delicious Blueberry Peach Crisp. We covered key ingredients, from fresh fruits to sweeteners. I shared tips for perfect texture and common mistakes to avoid. You also learned how to store and reheat your crisp. As you try different variations, have fun with flavors and fruits. Each choice makes your dessert unique. Enjoy every bite, and remember to share it with friends and family! Your tasty creation will impress everyone.

Blueberry Peach Crisp Tasty and Fruitful Delight

If you love fruit desserts, you will adore my Blueberry Peach Crisp! This tasty treat combines juicy berries and peaches

- Cream cheese, eggs, and sour cream - Fresh raspberries and honey for the swirl - Graham cracker crumbs and unsalted butter for the crust - 1 ½ cups graham cracker crumbs - ½ cup unsalted butter, melted - 2 cups cream cheese, softened - 1 cup granulated sugar - ½ cup sour cream - 3 large eggs, room temperature - 1 tablespoon pure vanilla extract - 2 teaspoons matcha green tea powder - 1 cup fresh raspberries, washed - 1 tablespoon honey - Pinch of salt The core of this cheesecake lies in its ingredients. Cream cheese gives it that rich, creamy base. The eggs and sour cream add a smooth texture and depth. For the swirl, fresh raspberries mixed with honey create a sweet and tangy contrast. The graham cracker crumbs and melted butter form a delicious crust, adding crunch. Each ingredient plays a crucial role. The cream cheese must be at room temperature for easy mixing. Using fresh raspberries ensures a vibrant color and flavor. Honey sweetens the raspberry puree while balancing its tartness. When measuring, ensure accuracy. Too much or too little can change the cheesecake’s texture. Enjoy the process, and remember, quality ingredients lead to a delightful cheesecake experience. - Preheat the oven to 325°F (160°C). - Grease the springform pan and line it with parchment paper. - Combine 1 ½ cups of graham cracker crumbs and ½ cup of melted butter. - Firmly press this mixture into the bottom of the pan and bake for 10 minutes. - In a bowl, mix 2 cups of softened cream cheese and 1 cup of granulated sugar. - Incorporate ½ cup sour cream, 3 large eggs, and 1 tablespoon of vanilla extract. - Pour 1 cup of the batter into a separate bowl. - Add and mix 2 teaspoons of matcha powder into this batter. - Mash 1 cup of fresh raspberries in a small bowl. - Mix in 1 tablespoon of honey until you have a chunky puree. - Pour half of the plain batter into the springform pan. - Dollop half of the matcha batter on top, then repeat with the remaining batters. - Use a knife to swirl the batters together gently. - Bake for 55-65 minutes until mostly set but slightly jiggly. - Let the cheesecake cool in the oven for an hour. - Chill in the fridge for at least 4 hours before serving. To get the best texture in your cheesecake, start with room temperature ingredients. Room temperature cream cheese blends smoothly, making your batter creamy. Take out your cream cheese, eggs, and sour cream about an hour before you start. This small step makes a big difference. Mix your batter gently. Overmixing can add too much air, leading to cracks while baking. Beat the batter just until everything is combined. After baking, let your cheesecake cool in the oven for an hour. This helps avoid sudden temperature changes that cause cracks. Once the hour is up, transfer the cheesecake to the fridge. Chill it for at least four hours, or overnight if you can. This gives the cheesecake a firmer texture. For a beautiful finish, garnish each slice with fresh raspberries. A light dusting of matcha powder adds a pop of color. You can also top it with a dollop of whipped cream for added richness. Pair this cheesecake with a cup of green tea or coffee. The flavors work well together, creating a delightful dessert experience. Enjoy your creation! {{image_4}} You can make your matcha raspberry swirl cheesecake even more exciting. Adding citrus zest, like lemon or orange, gives a bright touch. This zest balances the sweet and earthy flavors. Another fun idea is to switch the berries. Instead of raspberries, try blueberries or strawberries for a different swirl. Each berry brings its own unique taste, keeping your cheesecake fresh and lively. If you need a gluten-free crust, use almond flour or gluten-free graham crackers. Simply blend them with melted butter. For a dairy-free version, look for cream cheese made from nuts or tofu. These substitutes work well and still make a creamy cheesecake. Want to serve more people? You can easily scale this recipe up. Just double the ingredients and use a larger pan. You can also convert the cheesecake into mini versions. Simply pour the batter into a muffin tin. Bake for about 20-25 minutes, and you have perfect bite-sized treats! To keep your cheesecake fresh, use an airtight container. A glass or plastic container works well. If you don't have one, cover the cheesecake with plastic wrap. Make sure to seal it tightly. Store the cheesecake in the fridge. This keeps it cool and safe for later. If you want to save some for later, freezing is a great option. First, let the cheesecake cool completely. Then, wrap it well in plastic wrap. You can also use aluminum foil for extra protection. Place it in the freezer. When you are ready to eat it, move it to the fridge overnight to thaw. This helps keep the texture and flavor nice. Your cheesecake will stay fresh in the fridge for up to 5 days. If you freeze it, it can last for about 3 months. Always check for signs of spoilage before you eat it. Look for changes in color or any strange smells. If something seems off, it's best to throw it out. You can tell your cheesecake is done by looking for a slight jiggle in the center. It should not be liquid, but it can have a little movement when you gently shake the pan. The edges will look set while the middle remains soft. This method is called the jiggle test. It helps ensure that your cheesecake will be creamy and not overly firm. Yes, you can make this cheesecake a day in advance. It actually tastes better after chilling overnight. Just follow the steps and let it cool before placing it in the fridge. Cover it with plastic wrap to keep it fresh. When you are ready to serve, simply slice and enjoy! If you need a substitute for cream cheese, you can use Greek yogurt or cottage cheese. Both will change the flavor a bit but can work well. You can also try vegan cream cheese for a dairy-free option. This choice can add a unique taste while keeping the texture creamy. Matcha is generally safe for most people. However, those with caffeine sensitivity should be cautious, as it contains caffeine. Pregnant women should consult their doctor before consuming it. Always check for allergies, especially to green tea. It’s a good idea to start with a small amount if you are new to matcha. Yes, you can use frozen raspberries for this recipe. Just make sure to thaw them first and drain any excess liquid. This will help maintain the right texture of the swirl. Frozen raspberries can add a nice tart flavor to your cheesecake, making it just as tasty! This blog post covers how to make a delicious matcha raspberry swirl cheesecake. We discussed key ingredients, step-by-step instructions, tips for perfecting your cheesecake, and ways to store it. You can add fun variations or make dietary adjustments too. Remember, using room temperature ingredients and cooling correctly are key for success. Enjoy this treat with coffee or tea, and share it at your next gathering. With these tips, you can create a cheesecake everyone will love!

Matcha Raspberry Swirl Cheesecake Delight Recipe

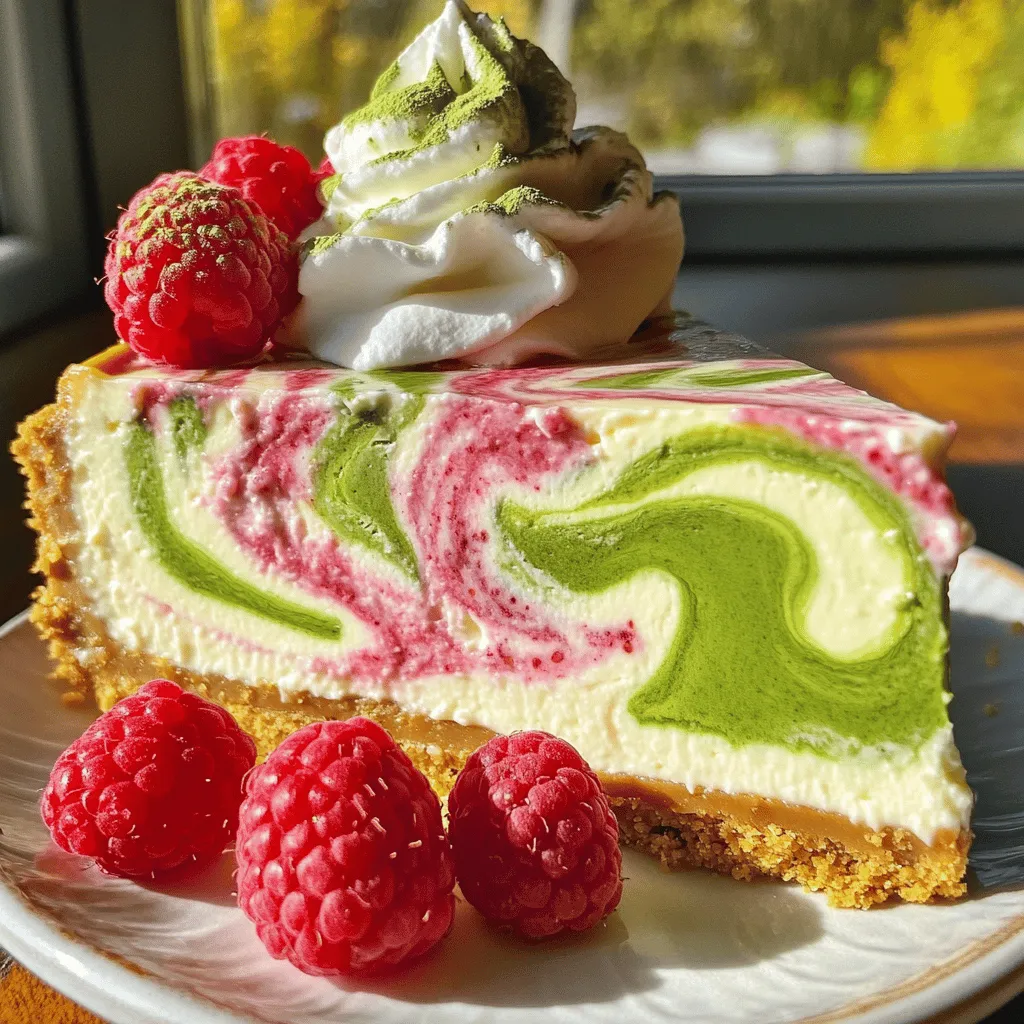
Are you ready to treat your taste buds? This Matcha Raspberry Swirl Cheesecake combines creamy, tangy cheesecake with vibrant raspberry

For this dish, you need 1 pound of fresh broccoli florets. Look for bright green, firm florets with no yellowing. Fresh broccoli not only tastes better, but it also gives your dish a nice crunch. Gather these basic items from your pantry: - 3 tablespoons extra virgin olive oil - 4 cloves of garlic, finely minced - 1/4 cup freshly grated Parmesan cheese - 1 teaspoon fresh lemon zest - Sea salt and freshly cracked black pepper, to taste These ingredients blend together to create a rich flavor. The olive oil coats the broccoli, while garlic adds depth. The Parmesan cheese brings a salty, savory kick. You can make this dish your own with a few extras: - 1/2 teaspoon red pepper flakes (for a spicy touch) - Lemon wedges (for serving) If you like heat, the red pepper flakes will give your broccoli a nice kick. The lemon wedges add fresh flavor when you squeeze them over the top. Enjoy experimenting with these options! Start by getting your fresh broccoli florets. You need one pound for this dish. Wash the florets well and then dry them. Drying helps them get crispy later. In a large bowl, mix the florets with three tablespoons of extra virgin olive oil. Add four cloves of finely minced garlic. Don’t forget to sprinkle in some sea salt and cracked black pepper. Toss everything until the broccoli is coated well. This step is key for flavor. Now it’s time to roast! Preheat your oven to 425°F (220°C). This high heat helps create that nice crisp. Spread the broccoli on a large baking sheet in a single layer. This way, they roast nicely without steaming. Place the baking sheet in the oven for about 20 minutes. Halfway through, stir the broccoli to help it cook evenly. Look for tender florets with golden edges when it's done. Once your broccoli is perfectly roasted, take it out of the oven. Immediately sprinkle one-fourth cup of freshly grated Parmesan cheese on top. Add one teaspoon of fresh lemon zest and red pepper flakes if you want a bit of heat. Return it to the oven for five more minutes. This melts the cheese and adds flavor. After that, let the broccoli cool for a few minutes. Serve it warm with lemon wedges on the side for a zesty kick! To get that perfect crispy broccoli, start with high heat. Preheat your oven to 425°F (220°C). This will help the broccoli roast well. Spread the florets in a single layer on the baking sheet. If they are too close, they will steam instead of roast. Stir the broccoli halfway through cooking. This helps it brown evenly. To boost the flavor, use fresh ingredients. Minced garlic adds a strong aroma and taste. Fresh lemon zest gives a bright note that wakes up the dish. If you like heat, add red pepper flakes. They bring a nice kick to the flavors. Don't forget to season with sea salt and black pepper to taste. For a stunning presentation, serve the broccoli on a large platter. Add extra lemon zest and Parmesan cheese on top for a pop of color. You can even place lemon wedges around the dish. This not only looks nice but also adds a fresh touch when guests squeeze the lemon over the broccoli. {{image_4}} If you want to switch up the cheese, try using feta or goat cheese. Both add a nice tang. You can also use a dairy-free cheese if you want a vegan option. Nutritional yeast is a great choice too. It gives a cheesy flavor without dairy. Just sprinkle it on after roasting. Use seasonal veggies to mix things up. In spring, add asparagus or peas for freshness. Summer is perfect for cherry tomatoes, which add sweetness. In fall, try adding some roasted Brussels sprouts for a hearty twist. These seasonal choices keep the dish exciting and full of flavor. Want some heat? Add more red pepper flakes for a stronger kick. You can also include sliced jalapeños before roasting. For a smoky flavor, try smoked paprika or chipotle powder. These spicy options can elevate your roasted broccoli and make it even more enjoyable. After you roast your garlic Parmesan broccoli, let it cool down. Place it in an airtight container. Store it in the fridge for up to three days. Keep it away from strong-smelling foods to avoid unwanted flavors. When you want to eat it again, just take it out and enjoy! To reheat your broccoli, use the oven for the best results. Preheat your oven to 350°F (175°C). Spread the broccoli on a baking sheet. Heat for about 10 minutes. Check to see if it’s warm enough. You can also reheat it in the microwave. Just use a microwave-safe dish and heat for 1-2 minutes. Stir halfway through for even warmth. If you want to freeze your roasted broccoli, let it cool first. Place it in a freezer-safe bag or container. Make sure to remove as much air as possible. You can freeze it for up to two months. When you’re ready to eat, thaw it in the fridge overnight. Reheat it in the oven or microwave as mentioned above. Roast the broccoli for about 20 minutes at 425°F. This helps it get tender and crispy. Halfway through roasting, stir the broccoli. This step lets it cook evenly. Yes, you can make this dish ahead. Roast the broccoli, then let it cool. Store it in an airtight container in the fridge for up to three days. When you’re ready to eat, just reheat it in the oven or microwave. Garlic Parmesan Roasted Broccoli pairs well with many dishes. Here are some ideas: - Grilled chicken or fish - Quinoa or rice dishes - Pasta with olive oil or butter - A fresh salad Serving this broccoli alongside these meals adds color and flavor to your plate. Enjoy! Roasting broccoli is simple and tasty. We covered fresh ingredients, steps to prepare, and tips for a crisp finish. You can add cheese or spice it up for variety. Keep leftovers fresh in the fridge or freezer. Now, it’s your turn to enjoy this healthy dish. Try different flavors, share your creations, and keep experimenting. This way, you’ll make broccoli a favorite at every meal.

Garlic Parmesan Roasted Broccoli Flavorful Side Dish

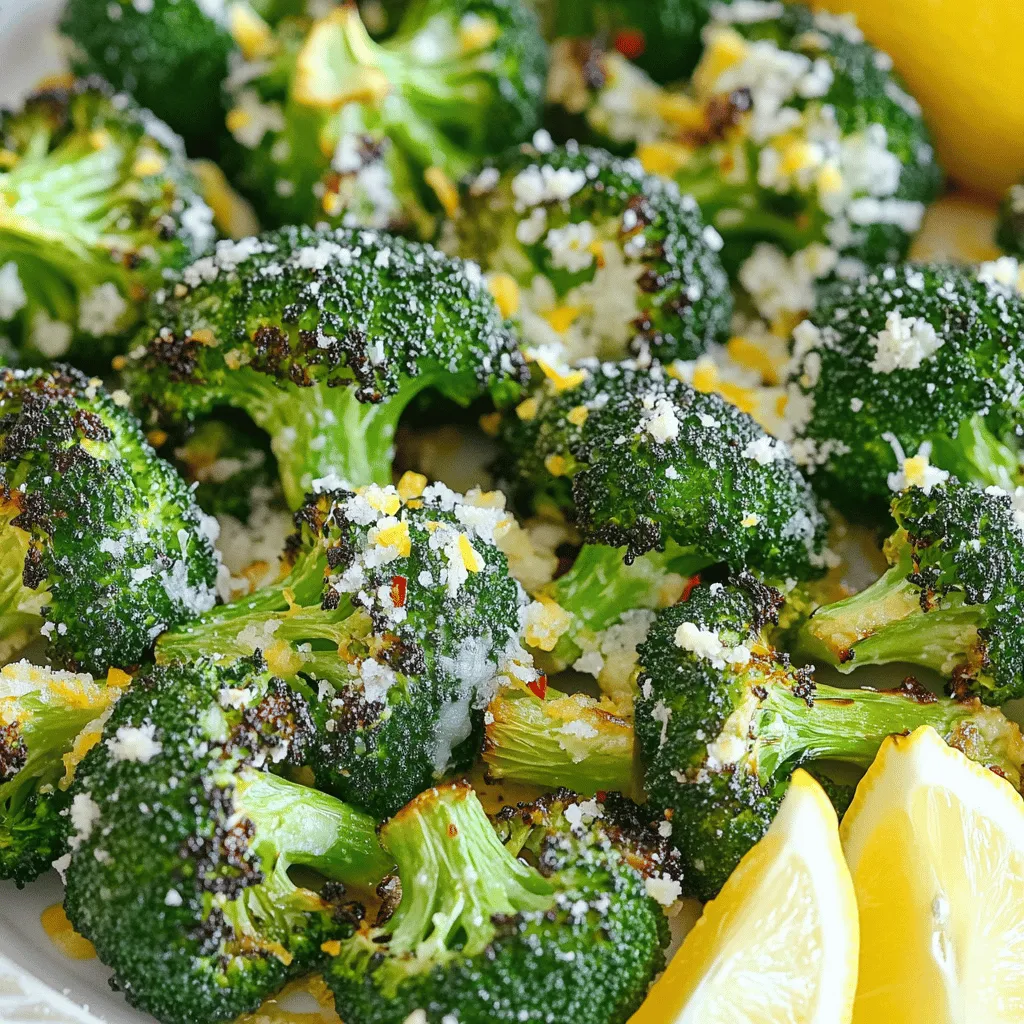
Looking for a side dish that packs a punch? Garlic Parmesan Roasted Broccoli is your answer! This dish combines bold

To make these sticky buns, you need some key ingredients: - 2 cups all-purpose flour, plus extra for dusting - 1/2 cup granulated sugar - 1/2 teaspoon salt - 1 packet (2 1/4 teaspoons) active dry yeast - 1/2 cup warm milk (about 110°F) - 1/4 cup unsalted butter, melted - 1 large egg - 1 teaspoon pure vanilla extract - 1 cup pecans, coarsely chopped - 1 cup dark brown sugar - 1/2 cup unsalted butter, softened to room temperature - 1/4 cup pure maple syrup - 1 teaspoon ground cinnamon - 1/4 teaspoon ground nutmeg - A pinch of salt These ingredients create the soft, fluffy dough and the sweet, gooey filling. To enhance the flavor, consider adding: - 1 teaspoon ground cinnamon - 1/4 teaspoon ground nutmeg - 1 teaspoon pure vanilla extract - 1 cup pecans, coarsely chopped These flavorings bring warmth and richness to the sticky buns. The cinnamon and nutmeg add a cozy touch. The pecans offer a nice crunch that pairs well with the soft dough. To start, you need to activate the yeast. In a small bowl, mix warm milk, sugar, and yeast. The milk should be about 110°F. Stir gently, then let it sit for 5 to 10 minutes. You will see bubbles form. This shows the yeast is ready to use. Next, make the dough. In a large bowl, whisk together 2 cups of flour, salt, melted butter, egg, and the frothy yeast mix. Stir until everything comes together. Now it’s time to knead. Sprinkle some flour on a clean surface. Place the dough on it and knead for 5 to 7 minutes. The dough should feel smooth and elastic. When ready, form the dough into a ball. Put it in a greased bowl and cover with plastic wrap. Let it rise in a warm spot for about 1 hour. It should double in size. While you wait, prepare the filling. In a medium bowl, mix dark brown sugar, softened butter, maple syrup, cinnamon, nutmeg, and a pinch of salt. Stir until you get a smooth paste. Once the dough has risen, gently punch it down. Turn it out onto a floured surface and roll it into a rectangle. Aim for about 12x18 inches. Spread the filling evenly over the dough. Then, scatter the chopped pecans on top. Starting from one edge, tightly roll the dough into a log. Use a sharp knife to cut the log into 12 equal pieces. Arrange the rolls in a greased 9x13 inch baking pan, cut sides up. Cover the pan with a kitchen towel. Let the rolls rise for another 30 to 45 minutes. They should puff up nicely. Preheat your oven to 350°F (175°C) while the rolls rise. Once they have risen, place the pan in the oven. Bake for 25 to 30 minutes. The rolls should be golden brown and cooked through. After baking, let the sticky buns cool in the pan for about 5 minutes. Carefully invert the pan onto a serving platter. Drizzle any caramel sauce left in the pan over the buns for extra sweetness. To get the right dough, you need a soft and smooth texture. Start with 2 cups of flour, but keep extra handy. If the dough feels sticky, add more flour a little at a time. The dough should feel slightly tacky but not stick to your hands. To ensure your yeast is active, mix warm milk, sugar, and yeast in a bowl. Let it sit for 5 to 10 minutes. If it bubbles and foams, your yeast is good to go. If it doesn’t, try again with new yeast. When spreading the filling, use a spatula for even coverage. Start from the center and move outward. Make sure every inch of dough has filling. This way, each bite will be sweet and flavorful. Avoid overfilling the dough. Too much filling can cause it to leak while baking. A thin layer is best, about 1/4 inch thick. This keeps your sticky buns from becoming a gooey mess. Bake your sticky buns at 350°F for about 25 to 30 minutes. You want them golden brown and puffed up. Check for doneness by tapping the top; it should sound hollow. For serving, let the buns cool for about 5 minutes. Then, flip the pan onto a platter. Drizzle leftover caramel sauce over the buns for extra sweetness. Garnish with whole pecans for a beautiful touch. Enjoy your delicious creation! {{image_4}} You can mix things up with your caramel pecan sticky buns. Adding chocolate or caramel chunks gives them an extra sweet kick. The melted chocolate blends well with the gooey caramel. You get a rich flavor that many will love. If you want, try different nuts too. Walnuts add a nice crunch and flavor. Almonds can also work well. They provide a different taste but still pair nicely with the caramel. If you need gluten-free options, you can use gluten-free flour. Make sure it has xanthan gum for the best results. This way, you still get a great texture. For a vegan version, skip the eggs and dairy. Use almond or soy milk instead of regular milk. You can also use vegan butter. This way, everyone can enjoy these sticky buns. Store your sticky buns at room temperature for the best flavor. Place them in an airtight container. If you have a lot left, you can refrigerate them. However, they may dry out a bit. To keep them soft, wrap them tightly in plastic wrap before placing them in the fridge. To freeze your sticky buns, let them cool completely. Wrap each bun in plastic wrap, then place them in a freezer bag. Make sure to remove as much air as possible. When you want to enjoy them, take out the desired amount. Let them thaw in the fridge overnight. Reheat them in the oven at 350°F for about 10-15 minutes. This helps restore their gooey texture. Sticky buns taste best within two days of baking. After that, they are still good for about a week. To keep them fresh, store them properly as mentioned. If you freeze them, they can last for about three months. Always check for any signs of spoilage before eating. Enjoy your sweet treat while it’s at its best! Yes, you can make the dough ahead of time. To do this, follow these steps: - Prepare the dough as usual, and let it rise until it doubles in size. - Cover the bowl tightly with plastic wrap and place it in the fridge. This will slow down the yeast. - Use it within 24 hours for the best taste. - When ready to bake, take it out and let it sit at room temperature for about 30 minutes before rolling it out. This makes baking easier for busy mornings. If you don’t have pecans, worry not! - Walnuts are a great choice. They have a similar taste and crunch. - Almonds can also work. Chop them coarsely for a nice texture. - For a fun twist, try chocolate chips or dried fruits like raisins or cranberries. They add sweet notes. Feel free to mix and match these options to suit your taste! To check if your sticky buns are done, look for these signs: - Golden brown color on top. This means they are baked well. - Puffy and soft texture. They should spring back when you gently press them. - Internal temperature should reach about 190°F for perfect doneness. Keep an eye on them during the last few minutes of baking, as ovens can vary. Enjoy the smell that fills your kitchen as they bake! In this blog post, we've explored how to make caramel pecan sticky buns from scratch. We discussed essential and optional ingredients, along with detailed steps to prepare and bake them. I shared tips for perfecting your dough and filling techniques. You can also try flavor variations, dietary adjustments, and proper storage methods. Remember, baking is fun and a chance to get creative. Use these ideas to make your sticky buns unique. Enjoy sharing this treat with friends and family!

Caramel Pecan Sticky Buns Gooey and Delicious Treat

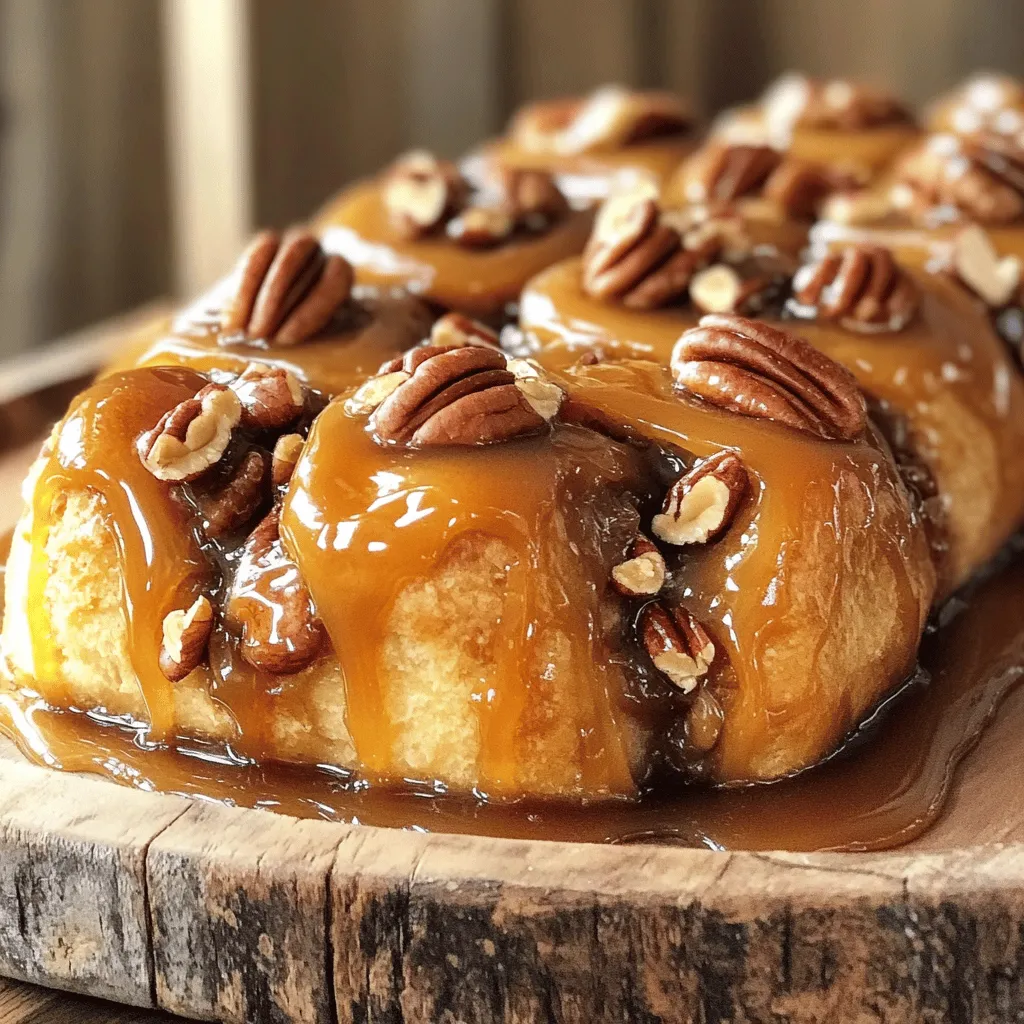
Are you ready to bake something truly special? Caramel Pecan Sticky Buns are a warm, gooey delight that can brighten

To make honey garlic tofu bites, you need the following ingredients: - 1 block (14 oz) firm tofu, pressed and cut into bite-sized cubes - 3 tablespoons honey (or agave syrup for a vegan option) - 2 tablespoons soy sauce (low-sodium preferred) - 3 cloves garlic, minced - 1 tablespoon fresh ginger, minced - 1 tablespoon cornstarch - 2 tablespoons vegetable oil - 1 green onion, finely sliced (for garnish) - Sesame seeds (for garnish) - Salt and pepper to taste You can make this recipe your own by swapping some ingredients. If you prefer a vegan option, use agave syrup instead of honey. Low-sodium soy sauce will help cut down on salt. For extra flavor, you can try different oils like sesame or olive oil. Fresh ginger adds a kick, but you can use ground ginger in a pinch. Always choose what you like best! Fresh ingredients make a big difference in taste. Fresh tofu gives a better texture and flavor. Fresh garlic and ginger add a bright, zesty note. Using fresh green onions and sesame seeds for garnish will enhance the look and taste of your dish. When you choose fresh, your honey garlic tofu bites will shine! To start, you need to press the tofu. This step is key for crispiness. Wrap the block of tofu in a clean kitchen towel. Place something heavy, like a skillet, on top. Let it sit for 15 to 20 minutes. This removes extra moisture. Once pressed, cut the tofu into bite-sized cubes. Now your tofu is ready to soak in flavor. Next, you will make a tasty marinade. In a mixing bowl, whisk together three tablespoons of honey or agave syrup, two tablespoons of soy sauce, three minced garlic cloves, and one tablespoon of minced ginger. Mix until smooth. This marinade is what gives the tofu its sweet and savory taste. Now, let’s cook the tofu bites. First, add the pressed tofu cubes to the bowl with the marinade. Toss gently to coat each piece. Allow the tofu to marinate for at least 20 minutes at room temperature. For even more flavor, cover and refrigerate for up to one hour. After marinating, sprinkle one tablespoon of cornstarch over the tofu. Toss the cubes again to coat them evenly. This helps the tofu get that crispy texture you want. Heat two tablespoons of vegetable oil in a large skillet over medium-high heat. Once hot, add the tofu cubes in a single layer. Cook for about three to four minutes on each side. Look for a golden brown color and a crispy outside. Once cooked, reduce the heat to medium. Pour any leftover marinade over the tofu. Sauté for an additional two to three minutes. This allows the sauce to thicken and glaze the tofu bites. Finally, taste and season with salt and pepper as desired. Don’t forget to garnish! Sprinkle some finely sliced green onions and sesame seeds on top before serving. Enjoy your delicious honey garlic tofu bites! Pressing tofu is key for great texture. Start with a clean kitchen towel. Wrap the tofu block in the towel. Place a heavy object on top, like a skillet or cans. Let it sit for 15 to 20 minutes. This removes excess moisture. Drier tofu fries better and gets crispy. To get that perfect crispy texture, coat the tofu cubes with cornstarch after marinating. Use a gentle tossing motion to evenly coat each piece. This layer helps create a crunchy crust when frying. Make sure your oil is hot before adding tofu. Fry each side for 3 to 4 minutes. Golden brown means you did it right! For extra flavor, try adding spices to the marinade. A pinch of cayenne pepper can give it some heat. You can also add a splash of rice vinegar for tanginess. If you like a deeper flavor, use dark soy sauce instead. Don't forget to garnish your tofu bites! A sprinkle of sesame seeds and sliced green onions adds a fresh touch. {{image_4}} You can easily make this dish vegan. Just swap honey for agave syrup. This change keeps the sweet flavor while making it plant-based. Agave syrup has a mild taste. It blends well with garlic and ginger. Use the same amount as honey in the recipe. Your tofu bites will still taste amazing and sweet. If you like spice, add some heat. You can include red pepper flakes or cayenne pepper. Start with a small amount, like a pinch, and taste. You can always add more if needed. This will give your tofu bites a fun kick. Spicy honey garlic tofu bites will impress your guests. It’s a great way to shake things up. Serve the tofu bites in style. Place them on a nice platter. Drizzle some leftover marinade over the top for extra flavor. Garnish with green onions and sesame seeds for a pop of color. You can also serve them with toothpicks for easy eating. For a full meal, pair them with steamed broccoli or a fresh salad. These ideas will make your dish look and taste fantastic! To store leftover tofu bites, let them cool completely. Place them in an airtight container. Make sure to separate layers with parchment paper. This helps keep them from sticking together. Store in the fridge for up to three days. To reheat your tofu bites, use a skillet for the best results. Heat the skillet over medium heat. Add a splash of oil to help regain crispiness. Cook the tofu bites for about 3-4 minutes, turning them until hot. You can also use a microwave, but the texture may not be as nice. If you want to freeze tofu bites, first cool them completely. Then, place them in a single layer on a baking sheet. Once frozen, transfer them to a freezer bag. Be sure to remove excess air from the bag. You can freeze them for up to two months. When ready to eat, simply thaw in the fridge overnight before reheating. The best type of tofu for honey garlic tofu bites is firm tofu. Firm tofu holds its shape well during cooking. It absorbs flavors nicely and gets crispy on the outside. You can also use extra-firm tofu for an even firmer texture. Just remember to press it to remove excess moisture. Yes, you can bake the tofu instead of frying it. Baking gives you a healthier option. To bake, preheat your oven to 400°F (200°C). Arrange the coated tofu cubes on a baking sheet lined with parchment paper. Bake for 25-30 minutes, flipping halfway through. This method still yields a tasty and crispy result. You can store honey garlic tofu bites in an airtight container in the fridge. They will stay fresh for about 3-4 days. If you want to keep them longer, consider freezing them. Ensure they cool completely before freezing, and they can last up to 2 months in the freezer. Just reheat in the oven for best results. This blog post covered the key steps to make tasty tofu bites. We discussed choosing fresh ingredients, preparing the tofu, and creating the perfect marinade. You learned helpful tips for crispiness and ways to add flavors. We also explored variations, storage methods, and answered common questions. In cooking, great ingredients and techniques make all the difference. Enjoy your tasty tofu bites and feel free to get creative!

Honey Garlic Tofu Bites Tasty and Easy Snack

Looking for a quick and tasty snack? Honey Garlic Tofu Bites are perfect for you! This simple recipe packs a

- 1 cup rolled oats - 1 cup coconut milk (choose between canned or carton) - 1/2 cup Greek yogurt (optional, for extra creaminess) - 1/2 cup fresh blueberries - 2 tablespoons unsweetened shredded coconut - 1 tablespoon honey or maple syrup (adjust based on your preferred sweetness) - 1/2 teaspoon pure vanilla extract - A pinch of salt This recipe packs a punch of flavor and nutrition. The rolled oats form the base of your meal. They provide a lot of fiber and help you feel full. Coconut milk adds creaminess and a lovely coconut taste. You can choose canned milk for a richer flavor or the carton for a lighter touch. If you want a creamier mix, Greek yogurt is a great option. It adds protein and makes the oats smooth. Fresh blueberries bring sweetness and antioxidants. They give your overnight oats a burst of flavor. Unsweetened shredded coconut adds texture and enhances the coconut taste. You can sweeten your dish with honey or maple syrup. Adjust the amount based on how sweet you want it. The vanilla extract adds depth, while a pinch of salt balances all the flavors. Gather these ingredients, and you are ready to create a tasty, nutritious meal that will make your mornings brighter! 1. Start by taking a medium bowl. Add 1 cup rolled oats and 1 cup coconut milk. Stir them together well. 2. If you want more creaminess, add 1/2 cup Greek yogurt. Next, pour in 1 tablespoon honey or maple syrup for sweetness. 3. Add 1/2 teaspoon pure vanilla extract and a pinch of salt. Mix everything until the oats soak up the liquid. 1. Gently fold in 1/2 cup fresh blueberries. Make sure to save a few for topping later. 2. Now, add 2 tablespoons unsweetened shredded coconut to the mixture. Stir it well until fully combined. 1. Divide the mixture evenly into two jars or airtight containers. Leave a little space at the top. 2. Seal the containers tightly. Place them in the fridge overnight, or for at least 4 hours. Eight hours is best for great flavor. When you wake up, your delicious, creamy Blueberry Coconut Overnight Oats will be ready to enjoy! Soaking time is key for great overnight oats. Aim for at least 4 hours in the fridge. Eight hours gives the best flavor and texture. The oats need this time to absorb the liquid fully. If you prefer a looser mix, you can adjust the consistency with coconut milk. Just add a splash before eating to reach your desired creaminess. You can make these oats even better with extra toppings and mix-ins. Try adding nuts, seeds, or even a scoop of nut butter. For sweetness, adjust the amount of honey or maple syrup. Start with one tablespoon, then taste and add more if needed. Fresh fruit can also boost flavor and texture. Making a larger batch saves time on busy mornings. Simply double the recipe and store the extra jars in the fridge. Use airtight containers to keep them fresh. You can prepare these oats ahead of time and enjoy them throughout the week. Just grab and go! {{image_4}} You can change the berries in your overnight oats. Try using strawberries or raspberries instead of blueberries. These fruits add different flavors and colors. If you want a tropical twist, add diced mango or pineapple. These fruits make your oats even more exciting. If you want to switch up the milk, many options exist. Almond milk gives a nutty flavor. Soy milk is a great choice for a creamy texture. Oat milk is another tasty option. Each milk adds a unique taste to your oats, so feel free to experiment! You can easily make these oats fit your diet. For a vegan option, skip the Greek yogurt. You can replace it with more coconut milk or a dairy-free yogurt. For those who need gluten-free meals, use certified gluten-free oats. These simple swaps keep your dish both tasty and healthy. You can store the mixture in the fridge for up to five days. I suggest using airtight containers or jars. This keeps the oats fresh and tasty. Yes, you can freeze overnight oats! Just divide them into containers before freezing. To thaw, place them in the fridge overnight. You can also microwave them for a quick thaw. The best time to enjoy these oats is in the morning. If you like your oats warm, heat them in the microwave for about one minute. This brings back the cozy feel of a warm breakfast. Blueberry Coconut Overnight Oats stay fresh for up to five days in the fridge. To keep them tasty, store them in airtight containers. This helps lock in moisture and flavor. If you notice any change in smell or texture, it’s best to toss them. Yes, you can easily make these oats vegan! Simply skip the Greek yogurt. Instead, use an extra half cup of coconut milk to keep it creamy. You can also use maple syrup as your sweetener. Both options are plant-based and delicious. If you don’t have Greek yogurt, try using silken tofu. It adds a nice creamy texture. You can also use almond yogurt or coconut yogurt for a dairy-free option. Each of these substitutes keeps the flavor rich and smooth, just like Greek yogurt. Blueberry Coconut Overnight Oats are simple and tasty. We covered key ingredients, step-by-step instructions, and helpful tips. You can tweak flavors and store them easily for busy mornings. Making these oats vegan or using different fruits is simple too. Now, you know how to make a delicious breakfast that fits your needs. Enjoy these oats chilled or warm, and make them your own!

Blueberry Coconut Overnight Oats Simple and Tasty Meal

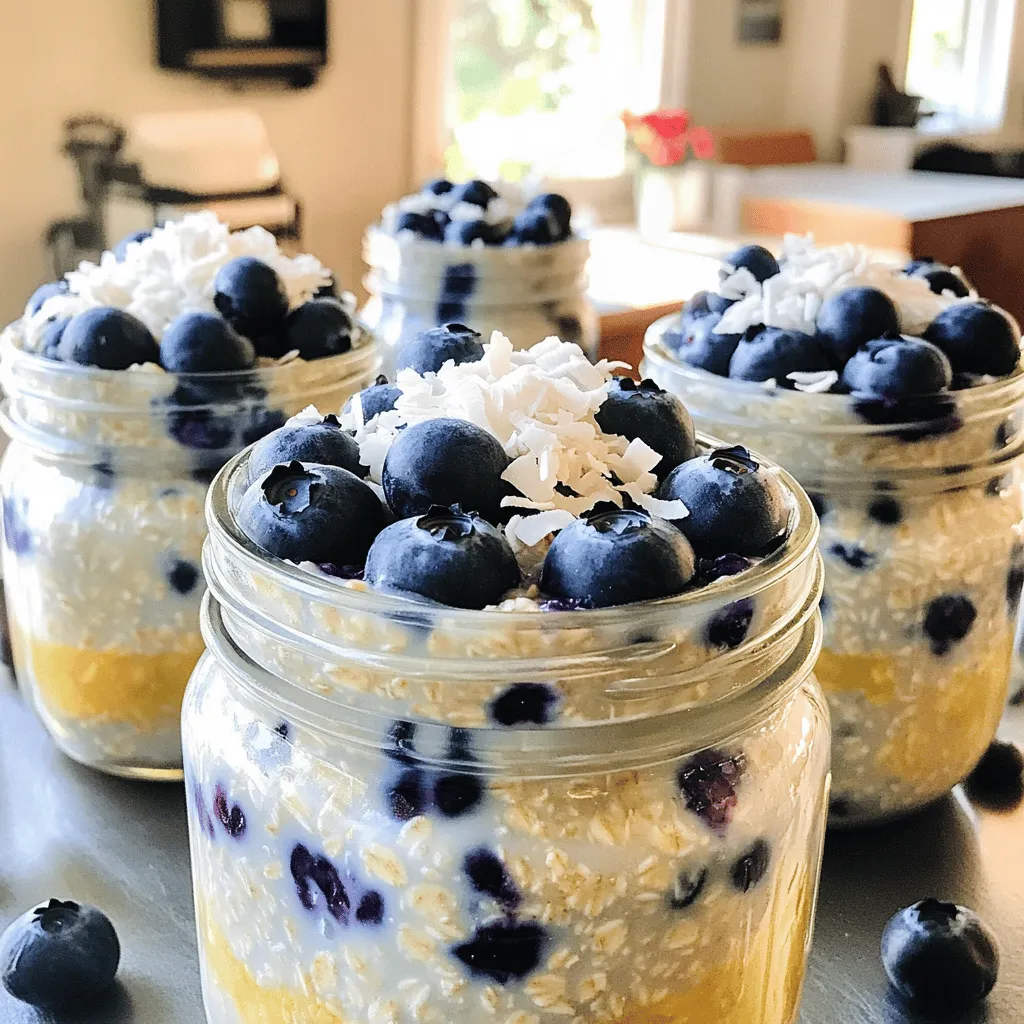
Looking for a quick and tasty breakfast? Blueberry Coconut Overnight Oats are your perfect solution! This simple meal combines creamy

- 2 acorn squashes, halved and seeds removed - 1 cup cooked quinoa - 1 can (15 oz) black beans, drained and rinsed - 1 cup corn (fresh, frozen, or canned) - 1 red bell pepper, diced - 1 small red onion, finely chopped - 2 cloves garlic, minced - 1 teaspoon ground cumin - 1 teaspoon chili powder - 1/2 teaspoon smoked paprika - 1/4 teaspoon cayenne pepper (adjust to taste) - 1 cup shredded cheddar cheese (or vegan cheese substitute) - Salt and pepper, to taste - Fresh cilantro, for garnish - Lime wedges, for serving If you can’t find acorn squash, butternut squash works well. For quinoa, try using rice or farro. If you want a different bean, kidney beans or pinto beans can be tasty. Use sweet potato instead of corn if you want a sweet twist. If you need a cheese substitute, nutritional yeast can add a nice flavor. When picking acorn squash, look for ones that are firm and heavy for their size. The skin should be dull and free from soft spots. Choose corn that has bright yellow or white kernels. For bell peppers, pick ones that are firm and vibrant. A fresh red onion should feel solid and have a papery skin. Always smell the garlic; it should be strong and fresh. Start by preheating your oven to 400°F (200°C). Cut the acorn squashes in half and remove the seeds. Place the squash halves cut side up on a baking sheet. Drizzle a little olive oil on top and sprinkle with salt and pepper. Roast them in the oven for 30 to 35 minutes. The flesh should feel tender and a fork should pierce the skin easily. In a large skillet, add a splash of olive oil and set it over medium heat. Add the finely chopped red onion and sauté it for about 3 to 4 minutes until it turns clear. Next, add the minced garlic and diced red bell pepper to the skillet. Sprinkle in the ground cumin, chili powder, smoked paprika, and cayenne pepper. Cook this mixture for 3 to 5 minutes. Stir it often until the bell pepper softens. Now, stir in the cooked quinoa along with the drained black beans and corn. Mix all the ingredients well. Season with salt and pepper to taste. Lastly, take the skillet off the heat and fold in half of the shredded cheese until it melts and mixes evenly. Once the acorn squashes are done roasting, carefully take them out of the oven using oven mitts. Spoon the quinoa filling into each squash half, packing it down gently. Top each filled squash with the rest of the shredded cheese. Return the baking sheet to the oven for another 10 to 15 minutes. Bake until the cheese is melted, bubbly, and slightly golden. After cooking, let the stuffed squashes cool a bit before serving. Garnish with fresh cilantro and serve with lime wedges for a fresh kick. To roast acorn squash well, start by preheating your oven to 400°F (200°C). Cut the squash in half and scoop out the seeds. This step is key for even cooking. Place the halves cut side up on a baking sheet. Drizzle them lightly with olive oil. Make sure to season with salt and pepper. Roast the squash for 30-35 minutes. You know it’s ready when the flesh is tender. A fork should easily pierce the skin. This method ensures a sweet and soft base for your filling. When it comes to cheese, you have choices! For classic taste, use shredded cheddar cheese. It melts well and adds great flavor. If you prefer a vegan option, try vegan cheese. Many brands offer good melting cheese. You can also use crumbled feta for a tangy twist. If you want to cut calories, consider using low-fat cheese. Each option gives a unique flavor to your stuffed squash. Choose what suits your diet best. To make your dish pop, add more flavor! Ground cumin, chili powder, and smoked paprika are great base spices. For extra heat, add cayenne pepper. Adjust it based on your spice tolerance. Fresh herbs like cilantro add bright notes. Consider adding a squeeze of lime juice for a zesty kick. If you like a savory depth, add a splash of soy sauce. Experiment with these options to find your perfect flavor balance. {{image_4}} You can easily adapt this dish to fit your diet. For a vegetarian version, use regular cheese. If you need a vegan option, swap in vegan cheese. Make sure it melts well for that gooey texture. Both options taste great! Feel free to mix in more veggies. Zucchini, spinach, or mushrooms work well here. You can also add diced tomatoes for extra flavor. These veggies boost nutrition and add color. Plus, they make the dish even more fun! Want to turn up the heat? Add more cayenne pepper for a fiery kick! You can also use fresh jalapeños or hot sauce. If you prefer mild flavors, use less cayenne. Adjust it to fit your taste! Store your Southwest Quinoa Stuffed Acorn Squash in an airtight container. Place it in the fridge. It stays fresh for about 3 to 4 days. Make sure to let it cool first before sealing. This helps keep it from getting soggy. To reheat, place the stuffed squash on a baking sheet. Heat your oven to 350°F (175°C). Bake for about 15-20 minutes until it’s warm. You can also use a microwave. Just cover it with a microwave-safe lid and heat for 2-3 minutes. You can freeze these stuffed squashes too! Wrap each half in plastic wrap, then place them in a freezer bag. They stay good for up to 3 months. To eat them later, thaw in the fridge overnight. Reheat as described above. Enjoy your tasty meal anytime! Yes, you can prepare this recipe in advance. Make the filling and roast the squash earlier in the day. Just keep them separate. When you are ready to serve, stuff the squash and bake it. This method saves time and keeps the flavors fresh. Roasting the acorn squash takes about 30 to 35 minutes. You want the flesh to be tender. A fork should easily pierce the skin. Preheat your oven to 400°F (200°C) for best results. This dish pairs well with a fresh salad or some warm bread. You can also serve it with a side of guacamole or salsa for extra flavor. Lime wedges on the side add a nice zesty touch. This blog post covered all you need to know about making Southwest quinoa stuffed acorn squash. We explored key ingredients, cooking tips, and even tasty variations. We also shared how to store leftovers and answered common questions. Remember, fresh produce elevates your dish, and creativity in flavor and spice makes it fun. Enjoy your cooking journey with this dish. You’ll impress everyone and satisfy your taste buds!

Southwest Quinoa Stuffed Acorn Squash Delight

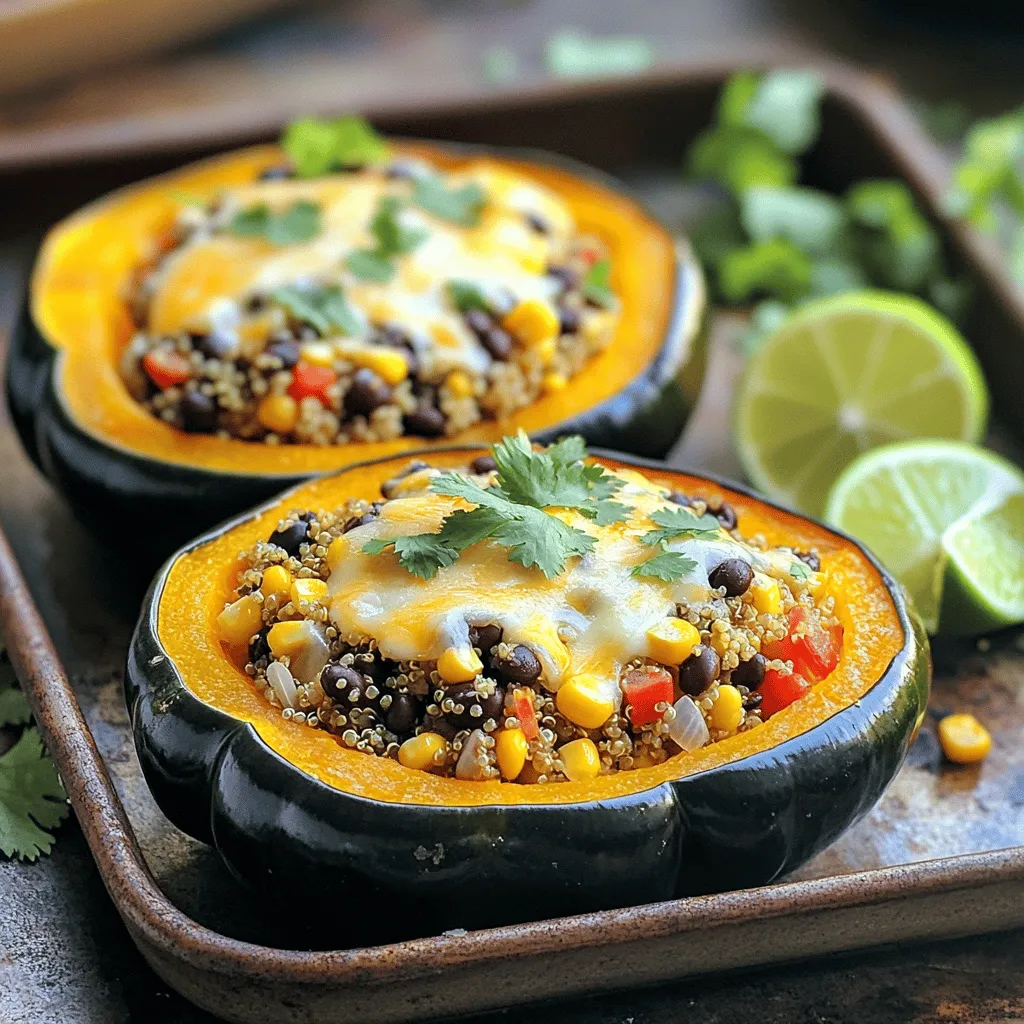
Looking for a hearty and healthy dish? Try my Southwest Quinoa Stuffed Acorn Squash Delight! This recipe combines sweet acorn

Here’s what you need to make chocolate covered peanut clusters: - 2 cups unsalted roasted peanuts - 1 cup semi-sweet chocolate chips - 1/2 cup milk chocolate chips - 1 teaspoon coconut oil (optional) - Sea salt (optional) These ingredients are simple and easy to find. Start with unsalted roasted peanuts for the best flavor. The semi-sweet and milk chocolate chips blend well. The coconut oil helps make the chocolate smooth, but you can skip it if you want. A sprinkle of sea salt adds a nice touch, but it’s not a must. Gather these items, and you’re ready to create a sweet treat! Start by preparing your workspace. Line a baking sheet with parchment paper. This helps prevent sticking and makes cleanup easy. Set this lined sheet aside for later use. Next, we need to melt the chocolate. Combine 1 cup of semi-sweet chocolate chips and 1/2 cup of milk chocolate chips in a heatproof mixing bowl. If you want a smoother texture, add 1 teaspoon of coconut oil. Melt the chocolate using a double boiler on the stove or in the microwave. If using the microwave, heat in 30-second bursts, stirring well in between. This ensures the chocolate melts evenly and stays smooth. Once the chocolate is melted, remove it from the heat. Let it cool for one to two minutes. This prevents the peanuts from getting too hot. Now, gently fold in 2 cups of unsalted roasted peanuts. Stir carefully to coat each peanut evenly with the chocolate. Use a spoon or cookie scoop to portion out the chocolate-coated peanuts. Place them onto the lined baking sheet. Make sure to space each cluster about an inch apart. This gives them room to set without sticking together. To set the clusters, move the baking sheet to the refrigerator. Chill them for about 30 minutes. This time allows the chocolate to harden fully. After chilling, gently lift the clusters off the parchment paper. Store them in an airtight container to keep them fresh. Using coconut oil can improve your chocolate's texture. It makes the chocolate melt smoothly. This is perfect for coating the peanuts. You only need a small amount, about one teaspoon. If you skip this step, your chocolate may not be as silky. The oil helps create a nice sheen on your clusters, making them look great. To keep your chocolate covered peanut clusters fresh, store them in an airtight container. This helps prevent them from getting stale. You can keep them at room temperature for a week. If you want them to last longer, place them in the fridge. Just remember to let them warm up a bit before eating. This keeps the chocolate from being too hard. When serving these clusters, think about how they look. You can use a decorative plate to make them stand out. Another fun idea is to place them in colorful treat bags as gifts. They make great snacks for parties or special occasions. You can also add a little note to the bags for a personal touch. This adds a fun element to your homemade treat! {{image_4}} You can change the nuts in your clusters. Try using almonds, cashews, or pecans. Each nut brings its own taste and crunch. Think about mixing nuts for a fun blend! You can also swap out the chocolate. Dark chocolate offers a richer flavor, while white chocolate gives a sweet twist. Each choice changes the clusters’ taste, so pick what you love. Want to mix it up? Add a splash of vanilla extract to the melted chocolate. This small change adds a warm flavor. You can also sprinkle sea salt on top. The salt balances the sweetness and makes each bite special. Try different spices like cinnamon or even a hint of chili powder for a kick. These flavors can surprise your taste buds! If you need gluten-free snacks, you’re in luck! This recipe is naturally gluten-free, so enjoy without worry. For a vegan version, choose dairy-free chocolate chips. Many brands offer great options. Check the labels to ensure they fit your diet. You can still enjoy these treats without the animal products! To keep your chocolate covered peanut clusters fresh, place them in an airtight container. This helps stop air from making them stale. Glass or plastic containers work well. Remember to store them in a cool, dry place away from sunlight. Avoid areas with strong smells, as chocolate can absorb those scents. These tasty treats can last up to two weeks if stored properly. After that, they may lose their flavor and crunch. Check for any changes in smell or texture before enjoying them after a week. If they look good, they are likely still safe to eat! You can freeze chocolate covered peanut clusters for longer storage. To do this, place them in a single layer on a baking sheet. Freeze them for about an hour until firm. Once frozen, transfer the clusters to an airtight container or freezer bag. They can stay in the freezer for up to three months. When you want to enjoy them, take them out and let them thaw in the fridge for a few hours. This keeps the chocolate smooth and tasty! Yes, you can use different types of chocolate. Each type gives a unique taste. Dark chocolate is rich and bold. Milk chocolate is sweet and creamy. White chocolate offers a sweet, buttery flavor but lacks cocoa. You can mix these chocolates too! This mix can create a more complex taste in your clusters. If you need nut-free options, use seeds instead. Sunflower seeds or pumpkin seeds work well. These seeds add crunch and flavor. You can also try using crispy rice cereal. It gives a nice texture without nuts. Remember to check for allergies in all ingredients! You will know the clusters are set when the chocolate is hard. The chocolate should feel firm to the touch. You can also look for a shiny finish. If the clusters are still soft, they need more time in the fridge. Usually, 30 minutes is enough. Absolutely! There are many fun mix-ins to try. You can add dried fruit like cranberries or raisins. Mini marshmallows or pretzel pieces can add a sweet or salty crunch. Coconut flakes also add a tropical twist. Just remember not to overdo it—keep the balance right! This blog post covers how to make chocolate-covered peanut clusters. You learned the right ingredients and easy steps to create this treat. We discussed tips for smooth chocolate and smart storage to keep them fresh. Remember, you can use different nuts and flavors for fun twists. With these methods, you can impress your friends and family. Enjoy crafting your tasty clusters at home!

Chocolate Covered Peanut Clusters Simple and Delightful

Are you ready to make a sweet treat that everyone loves? Chocolate Covered Peanut Clusters are a simple and delightful

To make teriyaki salmon bowls, you'll need these key ingredients: - 2 fresh salmon fillets - 1 cup brown rice - 1/4 cup low-sodium soy sauce - 2 tablespoons honey or maple syrup - 1 tablespoon rice vinegar - 1 tablespoon sesame oil - 1 teaspoon fresh ginger, minced - 1 teaspoon garlic, minced - 1 cup broccoli florets - 1 carrot, julienned - 1/2 cup shelled edamame - 2 green onions, finely sliced - Sesame seeds for garnish - Salt and pepper to taste These ingredients come together to create a flavorful and healthy meal. You can enhance your teriyaki salmon bowls with these optional ingredients: - Lime wedges for a zesty kick - Avocado slices for creaminess - Red pepper flakes for heat - Peanuts for extra crunch Adding these options can make your dish even more exciting and tailored to your taste. Let’s break down the nutrition of some main ingredients: - Salmon: Rich in omega-3 fatty acids, which support heart health. - Brown Rice: High in fiber, offering sustained energy and aiding digestion. - Broccoli: Packed with vitamins C and K, great for immune support. - Edamame: A good source of protein and healthy fats. These ingredients not only taste great but also provide a balanced mix of nutrients. Enjoying this meal gives you comfort and nourishment. To make the marinade, grab a small bowl. Whisk together 1/4 cup of low-sodium soy sauce, 2 tablespoons of honey or maple syrup, 1 tablespoon of rice vinegar, and 1 tablespoon of sesame oil. Add 1 teaspoon of minced ginger and 1 teaspoon of minced garlic. Mix it all well. This rich blend will give your salmon that sweet and savory teriyaki flavor. Now, take your 2 fresh salmon fillets and place them in a shallow dish. Make sure they have space around them. Pour half of your marinade over the salmon. Turn the fillets gently to coat them well. Cover the dish and let the salmon marinate for at least 20 minutes. This time allows the fish to soak up the yummy flavors. While the salmon marinates, rinse 1 cup of brown rice under cold water. This will help remove the extra starch. In a medium pot, combine the rinsed rice with 2 cups of water and a pinch of salt. Bring the pot to a boil. Then, lower the heat, cover it, and let it simmer for about 40-45 minutes. Once the rice is done, fluff it with a fork to separate the grains. While the rice cooks, it’s time to prepare your veggies. Take 1 cup of broccoli florets and 1 julienned carrot. You can steam them in a steamer basket or microwave them with a bit of water. Steam for about 5-7 minutes until they are tender but still crisp. This will keep their bright colors and nutrients. Next, heat a non-stick skillet over medium-high heat. Carefully take the salmon out of the marinade. Let any extra marinade drip off. Place the fillets skin-side down in the hot skillet. Cook them for about 4-5 minutes. Then, flip the fillets and brush them with the rest of the marinade. Cook for another 3-4 minutes until the salmon is fully cooked and flakes easily. Now comes the fun part—putting it all together! Start with a generous serving of brown rice as the base in each bowl. On top of the rice, place pieces of the cooked salmon. Next, add the steamed broccoli, carrots, and shelled edamame. For a final touch, sprinkle sliced green onions and sesame seeds on top. This adds a nice crunch and makes your dish look amazing. To get the best flavor, marinate your salmon well. Use a shallow dish to help the marinade cover the fish fully. Pour half of the teriyaki mix over the fillets. Turn them gently to coat. Let them marinate for at least 20 minutes. For a stronger taste, marinate for up to one hour. This helps the flavors soak in. Always keep salmon in the fridge while it marinates. Cooking brown rice is simple but needs attention. Start by rinsing the rice under cold water. This removes extra starch and helps it cook better. Use a pot with a lid. For one cup of rice, add two cups of water and a pinch of salt. Bring it to a boil, then reduce the heat. Cover and let it simmer for 40-45 minutes. When done, fluff the rice with a fork to separate the grains. For the best texture, steam your vegetables. Steaming keeps them bright and crisp. Use a steamer basket or a microwave. Steam broccoli and carrots for about 5-7 minutes. They should be tender but still have a little crunch. This way, they add a nice bite to your bowl. Make your bowl look great! Start with a layer of fluffy brown rice. Place the salmon on top, then add your steamed veggies. A sprinkle of green onions adds color. Finish with sesame seeds for crunch. You can drizzle more teriyaki sauce on top for extra flavor. Serve with a lime wedge for a fresh kick. {{image_4}} If you want to switch things up, try different proteins. Chicken is a great choice. Use boneless thighs or breasts. They soak up the teriyaki sauce well. Tofu is another option. Firm tofu can absorb flavors and grill nicely. Shrimp is also tasty. Just cook them until they turn pink and opaque. Brown rice is classic, but many grains work here. Quinoa offers a nutty taste and cooks quickly. It is high in protein too. Farro adds a chewy texture and is very filling. You could also use white rice if you prefer a softer bite. Cauliflower rice is a low-carb choice and adds a nice lightness. To make this dish vegan, swap the salmon for tofu or tempeh. Marinate it just like the salmon for great flavor. Use maple syrup instead of honey for sweetness. For a boost in protein, add chickpeas or lentils. You can still enjoy all the veggies like broccoli and carrots for crunch and color. To keep your teriyaki salmon bowls fresh, store leftovers in airtight containers. Make sure to separate the salmon, rice, and veggies to keep the textures intact. They will stay good in the fridge for up to three days. If you want to keep them longer, you can freeze them. Just be aware that freezing may change the texture of the salmon slightly. When it's time to eat your leftovers, reheat them gently. You can use the microwave, but I recommend using a skillet for the best flavor. Heat the salmon on low for about 3-4 minutes, flipping it halfway. This method keeps the fish moist and delicious. If you use the microwave, heat in short bursts, stirring in between. For busy days, you can prep the teriyaki salmon bowls in advance. Cook the rice and steam the vegetables, then store them in separate containers. You can also marinate the salmon ahead of time. Just remember to cook it fresh when you’re ready to eat. This way, you have a quick, healthy meal ready to go. You should marinate the salmon for at least 20 minutes. This gives the fish time to soak up all the tasty flavors. If you have more time, you can marinate it for up to an hour. Just remember to keep it in the fridge while it marinates to stay fresh. Yes, you can use regular soy sauce. Just keep in mind that regular soy sauce is saltier. You may want to adjust the amount based on your taste. Using low-sodium soy sauce helps control the salt level, making the dish healthier. Teriyaki salmon bowls are great on their own, but you can add more sides. Some good options include: - Steamed green beans - Roasted sweet potatoes - Cucumber salad - Miso soup These sides complement the flavors and add more nutrition to your meal. To make this dish gluten-free, simply swap out the soy sauce for tamari. Tamari is a gluten-free soy sauce option. Always check the labels to ensure no hidden gluten is present in other ingredients like rice vinegar or sesame oil. Enjoy your gluten-free teriyaki salmon bowl! Teriyaki salmon bowls are delicious and healthy. In this blog, I covered the key ingredients, step-by-step cooking instructions, and helpful tips. You learned how to marinate salmon and cook brown rice perfectly. There are also easy variations and storage tips for leftovers. Remember, you can customize this dish to fit your taste. Enjoy making teriyaki salmon bowls that impress friends and family! Keep experimenting with flavors to make it your own. Happy cooking!

Teriyaki Salmon Bowls Flavorful and Nutritious Meal

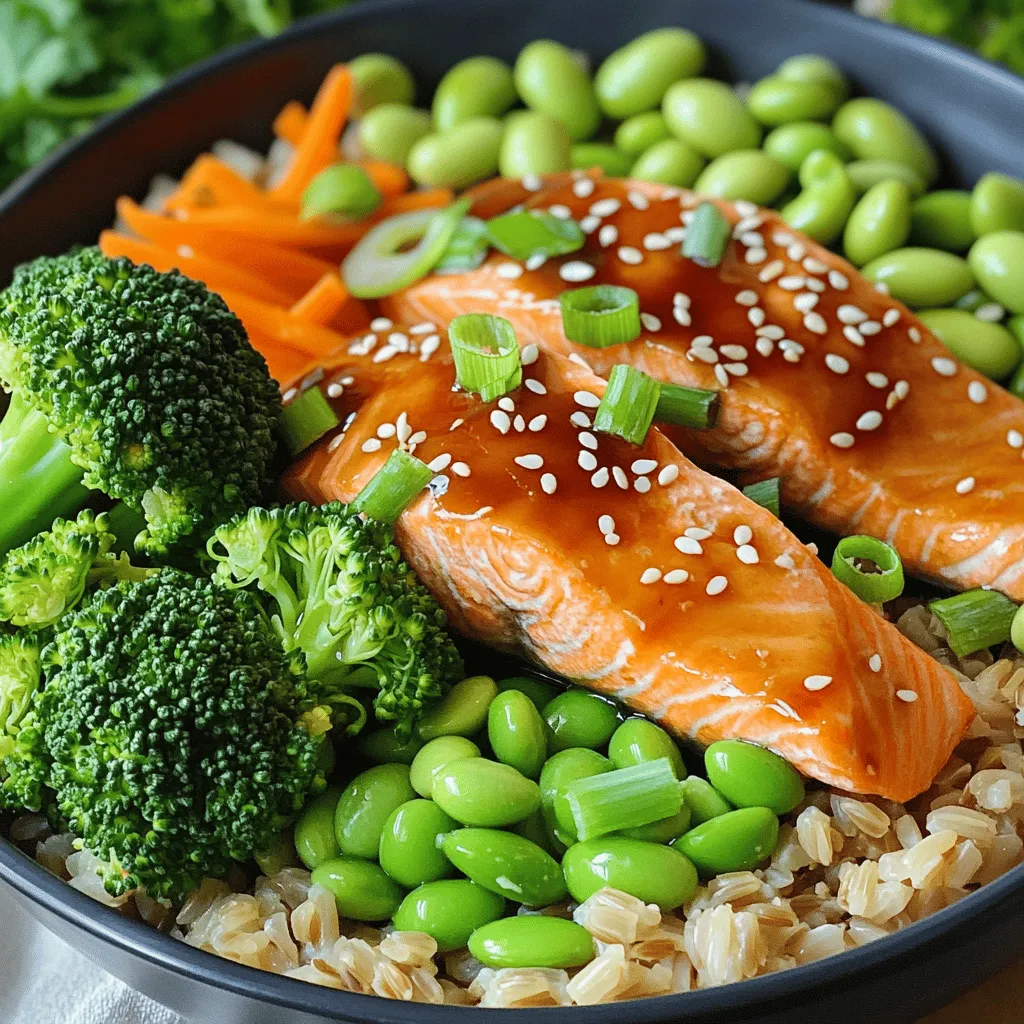
Looking for a tasty and nutritious meal? Let’s dive into Teriyaki Salmon Bowls! This dish is not just full of

Older posts
Newer posts
← Previous Page1 … Page34 Page35 Page36 … Page83 Next →

dsad

© 2026 eataroundit • Built with GeneratePress

Our Policies

  • Copyright Policy
  • Cookie Policy
  • GDPR Policy
  • Privacy Policy
  • Disclaimer
  • Terms Of Use

More Information

  • Home
  • About
  • Contact
  • Appetizers
  • Dessert
  • Dinner
  • Drinks
©2026, eataroundit About Back To Top