Skip to content
DisclaimerTerms Of UseGDPR PolicyCookie Policy

eataroundit

  • Home
  • Drinks
  • Appetizers
  • Dinner
  • Dessert
  • About
  • Contact
  • Privacy Policy
DisclaimerTerms Of UseGDPR PolicyCookie Policy

NO-ING-IMG

- 2 cans of refrigerated cinnamon rolls (8 rolls each) - 4 large eggs - 1 cup milk - 1/4 cup pure maple syrup - 1 teaspoon vanilla extract - 1 teaspoon ground cinnamon - 1/2 teaspoon ground nutmeg - 1/2 cup chopped pecans (optional) - 1/2 cup raisins (optional) - Icing from cinnamon roll cans (for drizzling) - Additional maple syrup - Whipped cream Gathering the right ingredients is key to making a tasty Slow Cooker Cinnamon Roll Casserole. You will need two cans of refrigerated cinnamon rolls. Each can contains eight rolls. This will give you a great base for your casserole. You also need four large eggs. They add richness and help bind the dish together. Next, grab one cup of milk. It makes the texture creamy. You’ll need a quarter cup of pure maple syrup for sweetness. One teaspoon of vanilla extract gives a nice flavor boost. Ground cinnamon is a must. You’ll need one teaspoon for that warm spice taste. Don’t forget the half teaspoon of ground nutmeg. This adds depth to the flavor. You can make it extra special by adding half a cup of chopped pecans or raisins if you like. Finally, save the icing from the cinnamon roll cans. It’s perfect for drizzling on top after cooking. These ingredients combine to create a sweet delight. The mix of flavors and textures will impress everyone. - Start by greasing the inside of your slow cooker with cooking spray. This helps your casserole release easily. - Open the cans of cinnamon rolls carefully. Cut each roll into quarters. Place these pieces into a large mixing bowl. - In a separate bowl, whisk together the eggs and milk until smooth. - Add the pure maple syrup, vanilla extract, ground cinnamon, and nutmeg. Mix well. - Pour this egg mixture over the cinnamon roll pieces. Gently stir to coat all pieces evenly. - If you want, fold in the chopped pecans and raisins for extra flavor and crunch. - Transfer the mixture to the greased slow cooker. Spread it out evenly for even cooking. - Cover the slow cooker with the lid. Set it to cook on low for 2.5 to 3 hours. - The casserole is done when the center is set and the edges are golden brown. - Once it’s done, turn off the slow cooker. Let the casserole rest for about 10 minutes. - Drizzle the icing from the cinnamon roll cans over the warm casserole. This adds a sweet touch. - Serve it warm. Enjoy it as a tasty breakfast treat or a delightful dessert! Greasing the slow cooker is key. This step helps the casserole come out easily. Use cooking spray to coat the bottom and sides. This prevents sticking and makes serving a breeze. After greasing, spread the mixture evenly in the cooker. This way, it cooks uniformly. An uneven spread can lead to some parts being soggy while others are dry. To boost the taste, think about adding spices. A pinch of ginger or cardamom can bring warmth. You can also try a dash of allspice for a unique twist. Besides spices, consider mix-ins. Nuts like chopped pecans add crunch. Dried fruits, such as raisins, bring sweetness. These additions create layers of flavor that elevate your dish. Serve the casserole warm for the best experience. It pairs well with coffee or hot chocolate. For a light touch, enjoy it with fresh fruit on the side. You can also drizzle extra maple syrup on top for added sweetness. This dish works great for brunch or as a dessert, making it versatile. {{image_4}} You can change up the flavor of your casserole easily. One fun option is the pumpkin spice version. Just add pumpkin puree and pumpkin pie spice to the egg mixture. This gives your casserole a warm, fall flavor. Another tasty choice is the chocolate chip cinnamon roll option. Simply sprinkle chocolate chips into the cinnamon roll pieces before pouring the egg mixture on top. The chocolate adds a sweet twist that kids love. If you need gluten-free options, look for gluten-free cinnamon rolls. They work just like regular rolls. Many brands offer tasty choices, so you won’t miss out! For those who want vegan options, use plant-based milk and egg substitutes. Flax eggs or chia eggs are great choices. They help keep the texture while making the dish vegan-friendly. You can also play with seasonal flavors. In the winter, add holiday spices like ginger and cloves to warm up the dish. These spices add a festive touch. During summer, fresh fruits make a great addition. Try topping your casserole with berries or sliced peaches. They not only taste great but also add color to your dish. To store leftovers, let the casserole cool first. Place it in an airtight container. This helps keep it fresh. You can store it in the fridge for up to three days. I like to use glass containers. They are great for easy reheating. For the best reheating, use the microwave. Heat it on medium for 30 seconds. Check if it is warm enough. If not, heat for another 15 seconds. You can also use the oven. Preheat to 350°F. Place the casserole in a baking dish. Cover it with foil to keep moisture. Bake for about 10-15 minutes. This way, it stays soft and tasty. You can freeze portions for later. Cut the casserole into single servings. Wrap each piece in plastic wrap. Place them in a freezer bag, and seal it tightly. It can last up to three months in the freezer. When you are ready to eat, take it out. Thaw it in the fridge overnight. Reheat as mentioned above to enjoy the flavors again. The casserole takes about 2.5 to 3 hours on low heat. You can tell it’s done when the center is set. The edges should look golden brown and fluffy. Yes, you can prepare the mixture the night before. Just store it in the fridge. In the morning, transfer it to the slow cooker and cook as directed. You can use flaxseed meal or applesauce as egg substitutes. Flaxseed provides a nice texture. Applesauce adds sweetness and moisture. Absolutely! Homemade cinnamon rolls will work great. Just cut them into quarters like store-bought ones. This can add a personal touch to your casserole. Yes, you can portion it out after cooking. Store servings in airtight containers in the fridge. Reheat in the microwave for a quick and tasty meal. This blog post detailed a delicious slow cooker cinnamon roll casserole. You learned the essential ingredients needed and the simple steps for preparation. I also shared tips for even cooking and enhancing flavor. Variations for unique twists and storage info help keep your dish fresh. As you whip up this treat, I hope it becomes a favorite in your kitchen. Enjoy every bite and the joy it brings!

Slow Cooker Cinnamon Roll Casserole Delightful Treat

Craving a warm, sweet treat that’s easy to make? Look no further! This Slow Cooker Cinnamon Roll Casserole is a

- 1 block (14 oz) firm tofu, pressed and diced - 2 tablespoons vegetable oil - 1 cup bell peppers, diced (mixed red and yellow for color) - 1/2 cup carrot, finely grated - 3 green onions, sliced (reserve some for garnish) - 1/4 cup teriyaki sauce (store-bought or homemade) - 1 tablespoon sesame seeds (toasted for extra flavor) - 1 head of butter lettuce or romaine, leaves separated and rinsed - Sliced avocado - Fresh cilantro - Spicy mayo Gather these ingredients to make tasty teriyaki tofu lettuce wraps. Each item plays a part in the dish's flavor and texture. Firm tofu forms the base, while colorful bell peppers and carrots add crunch. The teriyaki sauce brings that sweet, savory taste that makes this dish special. Don't forget the sesame seeds! They add a nutty twist and a lovely finish. For toppings, you can get creative. Sliced avocado adds creaminess, while fresh cilantro brings a bright note. If you like spice, a drizzle of spicy mayo will kick things up a notch. With these ingredients in hand, you're ready to create a healthy and delicious meal. - Pressing the tofu: Start by pressing the tofu. This helps remove extra water. Wrap the tofu block in a clean kitchen towel. Place a heavy object on top, like a cast-iron skillet. Let it sit for about 15 minutes. - Cutting the tofu into cubes: After pressing, cut the tofu into small, even cubes. Aim for uniform size for even cooking. - Heating oil in the skillet: Heat 2 tablespoons of vegetable oil in a large skillet. Use medium-high heat for the best results. - Sautéing tofu until golden brown: Carefully add the diced tofu to the hot oil. Don’t overcrowd the pan. Sauté the tofu for about 8-10 minutes. Turn occasionally until it is golden brown on all sides. - Adding bell peppers and carrot: Once the tofu is golden, add 1 cup of diced bell peppers and 1/2 cup of grated carrot. Also, add half of the sliced green onions. Stir everything well. - Incorporating teriyaki sauce: Pour 1/4 cup of teriyaki sauce over the tofu and veggies. Stir to coat all ingredients. Cook for another 2-3 minutes to meld the flavors. - Filling the lettuce leaves: Take a lettuce leaf, like butter lettuce or romaine. Place a generous spoonful of the tofu mixture in the center. - Adding optional toppings: Add your favorite toppings like sliced avocado, fresh cilantro, or spicy mayo. These add great flavor and texture. To achieve the best tofu texture, you need to press it well. Start by wrapping the tofu in a clean kitchen towel. Place a heavy object, like a cast-iron skillet, on top. Let it sit for 15 minutes to remove excess moisture. This step helps the tofu absorb flavor better. For a crispy finish, use high heat. Heat vegetable oil in a large skillet. Once hot, add the pressed and diced tofu cubes. Don’t overcrowd the pan. Sauté the tofu for 8-10 minutes. Turn the pieces often to get a golden-brown crust on all sides. You can choose between homemade and store-bought teriyaki sauce. Homemade sauce lets you control the sweetness and saltiness. It can taste fresher, too. If time is short, store-bought works well. Just check for quality ingredients. For extra flavor, add spices like garlic powder or ginger. A splash of lime juice can brighten the dish. Also, consider a sprinkle of chili flakes for heat. For a beautiful serving, use a large platter. Arrange the lettuce wraps neatly. Garnish with toasted sesame seeds and fresh cilantro for color. These small touches make a big difference. For added appeal, serve small bowls of spicy mayo on the side. Guests can dip their wraps for extra flavor. This simple idea elevates the whole meal. {{image_4}} You can swap tofu for tempeh or chickpeas. Tempeh brings a nutty taste. It also has a firmer texture. Cut tempeh into small pieces and cook it the same way as tofu. Chickpeas offer a different flavor and great protein. Use canned chickpeas for ease. Just rinse and drain them well before cooking. Both options keep the dish tasty and healthy. You can choose different types of lettuce. Butter lettuce is soft and easy to wrap. Romaine adds a nice crunch. For more options, try cabbage leaves. They are sturdy and work well too. Rice paper is another fun choice. Dip them in warm water to soften. This gives a fresh twist to your wraps. Each type of wrap offers a unique eating experience. Change up the sauce for added fun! A sweet and spicy mix can kick things up. Add chili sauce or sriracha for heat. You can also try a peanut sauce for a nutty flavor. If you need gluten-free options, look for tamari. It works just like soy sauce but is gluten-free. These sauce variations allow you to create your perfect teriyaki wrap. To keep your teriyaki tofu lettuce wraps fresh, follow these steps: - Refrigeration Tips for Leftovers: Store leftovers in the fridge right away. Place the tofu filling in a container. Make sure it cools to room temperature first. This helps prevent sogginess. Use the filling within three days for the best taste. - Best Containers for Storage: Use airtight containers. Glass containers work well. They keep food fresh and do not stain. You can also use BPA-free plastic containers. Label them with the date for easy tracking. When it's time to enjoy the leftovers, reheating is key: - How to Reheat Without Losing Texture: The goal is to keep the tofu crispy. Reheat the filling gently. Avoid the microwave, as it can make it soggy. - Recommended Methods: Stovetop vs. Microwave: Use a skillet on medium heat. Add a splash of water to keep it moist. Stir often until heated through. If you must use a microwave, do it in short bursts. Heat for 15-30 seconds at a time, stirring in between. If you want to store the filling longer, freezing is an option: - Can You Freeze Teriyaki Tofu Filling? Yes, you can freeze the filling. It keeps well for about three months. Just be sure to cool it before freezing. - How to Properly Freeze and Thaw: Place the filling in a freezer-safe container. Leave some space at the top, as it expands when frozen. To thaw, move it to the fridge overnight. Reheat gently before serving. I recommend using firm tofu for teriyaki tofu lettuce wraps. Firm tofu holds its shape well when cooked. It has a nice texture and absorbs flavors easily. Extra-firm tofu can also work if you prefer a denser bite. It may be a bit harder to cook evenly. Yes, this recipe is already vegan-friendly! All ingredients, including teriyaki sauce, are plant-based. Just check the label on your teriyaki sauce to ensure it has no animal products. If you use homemade sauce, it can be fully vegan. To add heat, try these options: - Add sliced jalapeños to the filling. - Mix sriracha into the teriyaki sauce. - Drizzle spicy mayo on top before wrapping. - Use chili oil for a subtle kick. These tips will give your wraps a tasty, spicy twist! This recipe shines with its mix of flavors and textures. We used firm tofu and fresh veggies, combined them with teriyaki sauce, and wrapped them in lettuce. You learned cooking tips, storage tricks, and tasty variations. Remember, you can switch out ingredients based on what you like. Homemade wraps are healthy, fun, and easy to make. Enjoy exploring your creativity in the kitchen with these ideas!

Teriyaki Tofu Lettuce Wraps Flavorful and Easy Recipe

Looking for a quick and tasty meal? These Teriyaki Tofu Lettuce Wraps are just what you need! As a fan

- 4 tablespoons all-purpose flour - 2 tablespoons granulated sugar - 1/2 teaspoon baking powder - 1/8 teaspoon fine salt - 3 tablespoons milk (your choice of dairy or non-dairy) - 2 tablespoons creamy peanut butter - 1 tablespoon vegetable oil - 1/4 teaspoon pure vanilla extract - Optional: a sprinkle of chocolate chips or crushed peanuts for topping Using fresh ingredients makes a big difference. Choose flour that is not clumpy. The sugar should be fine, and the baking powder should be fresh for the best rise. Good-quality peanut butter adds rich flavor. I recommend creamy peanut butter for a smooth texture. If you choose milk, pick one that you enjoy drinking. This will enhance the taste of your cake. If you don't have all-purpose flour, try using oat flour or almond flour. These can give different textures but still taste great. You can swap granulated sugar for brown sugar if you want a richer flavor. For the milk, any nut milk or soy milk works well. If you don’t have vegetable oil, melted coconut oil is a good choice. You can also leave out chocolate chips or peanuts if you prefer a simple cake. Pick a microwave-safe mug. It should hold about 8 ounces. This size helps your mug cake cook well. Make sure it is clean and dry before using it. In your mug, add: - 4 tablespoons all-purpose flour - 2 tablespoons granulated sugar - 1/2 teaspoon baking powder - 1/8 teaspoon fine salt Use a fork or small whisk. Mix these dry ingredients well. This step helps to avoid lumps in your cake. Now, add: - 3 tablespoons milk (your choice of dairy or non-dairy) - 2 tablespoons creamy peanut butter - 1 tablespoon vegetable oil - 1/4 teaspoon pure vanilla extract Whisk these wet ingredients together. Make sure you mix until it is smooth. No lumps should remain. This will make your cake nice and creamy. Put the mug in the microwave. Heat it on high for 30-40 seconds. Watch it closely. You want the cake to rise and set in the middle. Don’t overcook it! This can make your cake dry. When it’s done, carefully take it out. It may be hot! Let it cool for about a minute. Now, you can enjoy your warm mug cake. For a special treat, add more peanut butter or sprinkle some powdered sugar on top. To get the best texture in your mug cake, be careful with your mixing. Mix dry ingredients well to avoid lumps. When adding wet ingredients, stir until it’s smooth. Too much stirring can make the cake tough. You want it fluffy and soft, so mix just right. Microwave power varies, so watch your cake closely. Start with 30 seconds. If it’s not done, check every 10 seconds. Overcooking makes it dry and rubbery. If your mug is small, it might overflow. Use a bigger mug to avoid mess. You can make this cake your own in many ways. Add chocolate chips for sweetness. Try crushed peanuts for crunch. Want a twist? Use almond butter instead of peanut butter. You can even mix in a spoonful of your favorite jam for a fruity surprise. {{image_4}} You can switch up the nut butter for fun. Almond butter works well in this recipe. Cashew butter gives a rich, creamy taste. Sunflower seed butter is great for nut-free diets. Each nut butter adds its own flavor, so feel free to experiment. Want to jazz up your cake? Add a teaspoon of cocoa powder for a chocolate twist. You can also mix in a pinch of cinnamon for warmth. If you love fruit, try adding mashed banana or applesauce. These flavors bring new life to your mug cake. Toppings make any dessert more exciting. A drizzle of honey or maple syrup adds sweetness. You can sprinkle crushed nuts or a few chocolate chips on top. If you like whipped cream, add a dollop for richness. Fresh berries also make a colorful and tasty addition. Each topping can change the cake's vibe, so have fun! You might not finish your mug cake in one sitting. If that's the case, store the leftover cake in the refrigerator. Place it in an airtight container. This keeps it fresh for up to two days. If you want to save it longer, you can freeze it. Wrap the mug cake tightly in plastic wrap. Then, place it in a freezer-safe bag. It can last up to a month in the freezer. When you're ready to enjoy your leftover mug cake, reheating is easy. If it's in the fridge, take it out and place it in the microwave. Heat it for about 10 to 15 seconds. If it's frozen, let it thaw in the fridge overnight first. Then, follow the same reheating steps. Check if it’s warm enough. You want it hot, but not too hot to eat. Store your ingredients properly for the best taste. Keep flour in an airtight container in a cool, dry place. Sugar should also be in a sealed container to prevent clumping. For peanut butter, store it in a cool place or in the fridge if you prefer. Check expiration dates on all your ingredients. This way, you always have fresh items for your next mug cake. Yes, you can make this mug cake without milk. Use a milk substitute like water, almond milk, or coconut milk. Each option will change the taste a bit, but it will still be yummy! To stop your mug cake from overflowing, use a larger mug. Fill it only halfway with the batter. Keep an eye on it while it cooks. If it starts to rise too much, you can stop the microwave for a moment. Peanut butter pairs well with many flavors. Try adding chocolate, banana, or honey. You can also mix in spices like cinnamon or nutmeg for a fun twist. Yes, you can double the recipe! Just use a bigger mug and cook it longer. Check it every 30 seconds to avoid overcooking. Let your mug cake cool for about one minute before eating. This gives it time to set and makes it safer to enjoy. You want it warm, not hot! In this blog post, we explored how to make a delicious mug cake. We covered all the ingredients, tips for the best texture, and fun ways to personalize your cake. We also shared storage tips to keep leftovers fresh. Remember, this recipe is easy and fun to adapt with your favorite flavors. Try different nut butters or add toppings. Enjoy your mug cake journey, and don’t be afraid to experiment!

Five Minute Peanut Butter Mug Cake Quick and Easy Treat

Craving a quick and satisfying treat? You’re in the right place! In just five minutes, you can enjoy a delicious

- 1 cup Greek yogurt - 1/2 cup granulated sugar - 1/4 cup pure honey - 3 large eggs - Zest of 1 lemon (finely grated) - 1/4 cup freshly squeezed lemon juice - 1 teaspoon vanilla extract - 1 1/2 cups all-purpose flour - 1 teaspoon baking powder - 1/2 teaspoon baking soda - 1/4 teaspoon salt - 1 cup fresh blueberries (or frozen blueberries, if fresh are not available) - 2 tablespoons unsalted butter, melted (optional for extra moisture) Each ingredient plays a key role in the loaf's texture and flavor. The Greek yogurt gives moisture and tang. Sugar and honey add sweetness. Eggs provide structure. Lemon zest and juice bring that fresh, bright taste. Flour binds it all together, while baking powder, baking soda, and salt help it rise. Blueberries add pops of sweetness. If you choose to add butter, it makes the loaf richer. You can make a few changes if needed. If you don’t have Greek yogurt, use regular yogurt for a slightly different texture. You can swap honey for maple syrup if you want a different sweetness. For a gluten-free option, try almond or coconut flour, adjusting the amount as needed. If you're out of eggs, use flaxseed meal or applesauce as a binder. Just remember, these swaps may change the final taste and texture a bit. First, preheat your oven to 350°F (175°C). This step is key for a well-baked loaf. Next, take a 9x5-inch loaf pan. Grease it well or line it with parchment paper. This makes it easy to remove your loaf later. In a large bowl, add 1 cup of Greek yogurt, 1/2 cup of granulated sugar, and 1/4 cup of honey. Whisk these together until smooth and creamy. This mixture should feel rich and inviting. Then, add 3 large eggs, the zest of 1 lemon, 1/4 cup of freshly squeezed lemon juice, and 1 teaspoon of vanilla extract. Stir this blend until it is well mixed and slightly frothy. In another bowl, sift together 1 1/2 cups of all-purpose flour, 1 teaspoon of baking powder, 1/2 teaspoon of baking soda, and 1/4 teaspoon of salt. This step helps to prevent lumps. Slowly mix the dry ingredients into the wet mixture. Use a spatula and stir gently. Be careful here; overmixing can make your loaf dense. Now, it’s time to add the star of the show: the blueberries! Gently fold in 1 cup of fresh blueberries. If you use frozen blueberries, you don’t need to thaw them first. This helps keep your batter from turning blue. Next, pour the batter into your prepared loaf pan. Spread it evenly. Place the loaf in your preheated oven and bake for 50 to 55 minutes. To check if it's done, insert a toothpick in the center. If it comes out clean, your loaf is ready. After baking, take the loaf out of the oven. Let it cool in the pan for about 10 minutes. Then, transfer it to a wire rack to cool completely. Once cooled, slice your Greek Yogurt Lemon Blueberry Loaf. You can enjoy it warm or at room temperature. For a sweet touch, dust each slice with powdered sugar or drizzle honey on top. Add fresh blueberries on the side for color and flair! To keep your loaf light and fluffy, mix gently. When combining the dry and wet ingredients, stir until just blended. Overmixing makes the loaf dense and tough. Use a spatula to fold the batter. This method helps keep air in the mix. Your loaf will rise nicely and stay soft. For even baking, use the right pan size. A 9x5-inch loaf pan works best. Preheat your oven to 350°F. Place the pan in the center of the oven. This allows hot air to flow around the loaf evenly. Check your loaf at the 50-minute mark. If a toothpick comes out clean, it's ready! Adding a few extra ingredients can boost flavor. Consider drizzling melted butter into the batter. This adds richness and moisture. You can also try a pinch of cinnamon for warmth. If you like more tartness, add more lemon juice. These small changes can take your loaf to the next level! {{image_4}} You can switch up the flavors in your Greek Yogurt Lemon Blueberry Loaf. Try adding different fruits, like raspberries or strawberries. They will give the loaf a new twist. For a fun zing, mix in some lime zest instead of lemon. You can also add a splash of almond extract for a nutty flavor or cinnamon for warmth. If you need a gluten-free version, you can easily adapt this recipe. Use a gluten-free all-purpose flour blend. Just make sure it has xanthan gum for the right texture. This way, you can enjoy the loaf without gluten. The taste will still be delicious! For a vegan version, replace the eggs with flaxseed meal or applesauce. Use a plant-based yogurt instead of Greek yogurt. Maple syrup can replace the honey for sweetness. These swaps keep the loaf moist and flavorful. You won’t miss the dairy or eggs! To keep your Greek Yogurt Lemon Blueberry Loaf fresh, wrap it tightly. Use plastic wrap or aluminum foil. Store it at room temperature for up to three days. If you need to keep it longer, refrigerate it. This helps maintain its flavor and moisture. Remember, before serving, let it warm up a bit. This brings back its lovely taste. Freezing is a great way to save your loaf for later. First, let it cool completely. Then slice it into pieces. Wrap each slice in plastic wrap. Place the wrapped slices in a freezer bag. Squeeze out the air before sealing. This keeps the slices fresh for about three months. When you're ready, just thaw them at room temperature. To enjoy your loaf warm, preheat your oven to 350°F (175°C). Place the slices on a baking sheet. Heat them for about 10 minutes. If you want a quicker option, use a microwave. Heat each slice for 15-20 seconds. Just be careful not to overheat, as this can make it tough. Enjoy the warm and tasty loaf as a delightful treat! Yes, you can use other fruits. Try raspberries, strawberries, or blackberries. Each fruit gives a unique taste. Just make sure they are fresh or frozen. Check the center of the loaf with a toothpick. If it comes out clean, the loaf is done. Baking takes about 50 to 55 minutes. You can use regular yogurt or sour cream. These will give a similar texture. However, the flavor may change slightly. The loaf stays fresh for about 3 to 4 days when stored properly. Keep it in an airtight container at room temperature. Absolutely! You can use mini loaf pans. Adjust the baking time to about 25 to 30 minutes. Check with a toothpick to ensure they are done. This post covered everything you need to make a great loaf. We discussed key ingredients, measurement tips, and tasty substitutions. You learned step-by-step instructions for mixing and baking. We also shared helpful tips to avoid common mistakes and ideas for tasty variations, like gluten-free options. Lastly, we went over best practices for storing leftovers. Making this loaf is fun and easy. You can customize it to fit your needs. Now it’s time to gather your ingredients and start baking!

Greek Yogurt Lemon Blueberry Loaf Fresh and Flavorful

If you love a sweet treat that’s easy to bake, you’ll adore my Greek Yogurt Lemon Blueberry Loaf! This moist,

- 8 lasagna noodles - 1 cup ricotta cheese - 1 cup shredded mozzarella cheese - 1/2 cup grated Parmesan cheese - 1 large egg - 2 cups marinara sauce - 1 teaspoon dried basil - 1 teaspoon garlic powder - Salt and pepper to taste - Fresh basil leaves for garnish Use these amounts for four servings. Adjust the cheese types to your taste. If you prefer a creamier filling, add more ricotta. Fresh herbs can replace dried basil for brighter flavor. Make sure the lasagna noodles are al dente for easy rolling. This helps keep the structure intact while baking. Each serving has about: - Calories: 450 - Protein: 25g - Carbohydrates: 35g - Fat: 22g - Fiber: 2g - Sugar: 5g This dish is hearty and satisfying. It combines rich cheese with smooth sauce. You can enjoy Skillet Lasagna Roll Ups as a wholesome meal. Start by boiling water in a large pot. Add salt to the water for flavor. Once it boils, add the lasagna noodles. Cook them until they are al dente, about 8 to 10 minutes. Stir gently to prevent sticking. After cooking, drain the noodles and lay them flat on a clean surface. Let them cool for a few minutes. This step makes rolling them easier. In a mixing bowl, add 1 cup of ricotta cheese. Then, mix in half of the shredded mozzarella cheese. Add the grated Parmesan cheese and one large egg. Sprinkle in the dried basil and garlic powder. Don’t forget to add a pinch of salt and pepper. Stir the mixture well until it becomes creamy and smooth. This filling adds flavor and richness to the roll-ups. Take one lasagna noodle and lay it flat. Spoon a generous amount of the ricotta mixture onto one edge of the noodle. Carefully roll the noodle from that edge to the opposite end. Place the rolled noodle seam-side down in a large skillet. Repeat this for all noodles. Once all noodles are rolled, pour marinara sauce over the top. Sprinkle the remaining mozzarella cheese on the rolls for a cheesy finish. Cover the skillet with a lid and set the heat to medium. Cook for about 20 minutes. Keep an eye on the skillet as the cheese melts and bubbles. It’s important to let the dish sit for 5 minutes after cooking. This helps the layers set and makes serving easier. Garnish with fresh basil leaves for a pop of color and taste. Enjoy this simple yet delicious meal! To roll the lasagna noodles well, start with cooled noodles. Lay one noodle flat. Spoon the ricotta mixture near one end. Gently roll the noodle away from you, keeping it tight but not too tight. This helps the cheese stay inside. If the noodle tears, don’t worry; it will still taste great! A few common mistakes can ruin your roll ups. First, avoid overcooking the noodles. They should be al dente, which means firm to the bite. If they are too soft, they may tear easily. Second, be careful not to overfill the noodles. A generous spoonful is enough. Too much filling makes rolling hard and messy. For that perfect gooey cheese, use fresh mozzarella. It melts better than pre-shredded types. Layer the cheese on top before cooking. This creates a bubbly, golden crust. Cover the skillet while cooking to trap steam. It helps the cheese melt evenly and keeps the roll ups moist. {{image_4}} You can make skillet lasagna roll ups without meat. Use fresh spinach and mushrooms for a tasty filling. Add roasted zucchini or bell peppers for extra flavor. You can also mix in chopped kale or Swiss chard. These veggies give great taste and boost nutrition too. If you want to add meat, ground beef or turkey works well. Cook the meat before mixing it into the ricotta filling. You can also use Italian sausage for a spicy kick. Simply crumble it and mix it in with the cheese. This will make your dish heartier and more filling. For a twist on flavor, try different cheeses. Goat cheese or feta can replace ricotta for a tangy taste. You can also mix in cream cheese for creaminess. As for sauces, swap marinara for pesto or Alfredo. Each option gives your roll ups a unique twist that keeps dinner exciting. To store your leftover Skillet Lasagna Roll Ups, first let them cool. Place the roll ups in an airtight container. Layer them with parchment paper to keep them from sticking. You can keep them in the fridge for up to three days. Make sure to cover the container tightly. When you want to enjoy your leftovers, you can reheat them easily. Preheat your oven to 350°F (175°C). Place the roll ups in a baking dish. Pour a bit of marinara sauce on top to keep them moist. Cover the dish with foil and heat for about 15–20 minutes. You can also use a microwave. Heat them on medium power for about 2–3 minutes, checking until they are hot. If you want to freeze your Skillet Lasagna Roll Ups, do it before baking. Wrap each roll tightly in plastic wrap. Then, place them in a freezer-safe bag or container. They can last in the freezer for up to three months. When ready to eat, thaw in the fridge overnight. Bake them as per the original recipe instructions. Enjoy a fresh meal anytime! Yes, you can prepare Skillet Lasagna Roll Ups in advance. Just assemble them the day before. Cover the skillet with plastic wrap or a lid. Store it in the fridge until you are ready to cook. This makes dinner easier on busy nights. If you need a ricotta substitute, try cottage cheese or cream cheese. You can also use Greek yogurt for a tangy twist. Blend these options with a bit of salt and herbs for flavor. Each will give a different taste but work well in the recipe. Leftovers from Skillet Lasagna Roll Ups last about 3 to 5 days in the fridge. Store them in an airtight container to keep them fresh. When you're ready to eat, just reheat them in the microwave or on the stove. Yes, no-boil lasagna noodles can work for this dish. Just layer them directly in the skillet with the sauce and filling. Make sure to add extra sauce, as these noodles need more moisture to cook properly. Enjoy the ease of cooking with these noodles! In this article, we covered the key components for making Skillet Lasagna Roll Ups. We listed essential ingredients, provided step-by-step instructions, and offered helpful tips. You learned variations and how to store leftovers. Making this dish can be fun and easy. With practice, your roll-ups will impress everyone. Enjoy creating this tasty meal. Happy cooking!

Skillet Lasagna Roll Ups Flavorful and Easy Dinner

Are you ready to transform your dinner routine? Skillet Lasagna Roll Ups are your answer! This easy dish layers rich

- 2 medium apples, peeled, cored, and diced - 1 cup all-purpose flour - 1/2 cup granulated sugar - 1 teaspoon baking powder - 1/2 teaspoon baking soda - 1/2 teaspoon ground cinnamon - 1/4 teaspoon ground nutmeg - 1/4 teaspoon salt - 1/2 cup whole milk - 1 large egg - 1 teaspoon vanilla extract - 1/4 cup maple syrup (plus extra for drizzling) - Oil for frying (vegetable or canola oil works well) - Powdered sugar for dusting I love using Granny Smith apples. They give a nice tartness. Honeycrisp apples also work well for a sweet twist. You can try other apples too, like Fuji or Braeburn. Each type brings its own flavor and texture. Experiment to find your favorite! For frying, vegetable or canola oil is best. These oils have a high smoke point. This means they fry well and don't burn easily. If you want to use a different flour, try whole wheat flour for a nutty flavor. Just be aware that it may change the texture a bit. Always check the expiration date on your baking powder and soda. Fresh ingredients lead to better results! First, take two medium apples. I prefer Granny Smith or Honeycrisp for their tart taste. Peel, core, and dice them into small pieces. Place the diced apples in a bowl. Add one tablespoon of granulated sugar. Let them sit for about 10 to 15 minutes. This step draws out their juices, giving the fritters extra flavor. Now, grab a large mixing bowl. Add one cup of all-purpose flour. Then, mix in half a cup of granulated sugar. Include one teaspoon of baking powder, half a teaspoon of baking soda, and a quarter teaspoon of salt. Add half a teaspoon of ground cinnamon and a quarter teaspoon of ground nutmeg. Whisk these dry ingredients together until they are well combined. In a separate bowl, combine half a cup of whole milk, one large egg, one teaspoon of vanilla extract, and a quarter cup of maple syrup. Whisk this mixture until it’s smooth. Slowly pour the wet mixture into the dry ingredients. Stir gently until just combined. A few lumps are normal; do not overmix. Next, fold the diced apples into the batter. Make sure they are well coated without breaking them apart. Heat oil in a deep pot or fryer to 350°F (175°C). Ensure there’s enough oil for the fritters to float. Use a spoon or a small ice cream scoop to drop spoonfuls of batter into the hot oil. Fry in batches to avoid crowding. Cook each fritter for about 3 to 4 minutes on each side. They should turn golden brown. Once the fritters are cooked, use a slotted spoon to remove them from the oil. Place them on a plate lined with paper towels to absorb excess oil. While they are still warm, drizzle with extra maple syrup. Then, dust with powdered sugar for added sweetness. Enjoy your delightful treats! Frying fritters can be tricky, but a few tips make it easier. First, use enough oil. The oil should be deep enough for the fritters to float while cooking. Aim for a temperature of 350°F (175°C). A kitchen thermometer helps keep the heat steady. If the oil is too cool, fritters soak up oil and become greasy. If it's too hot, they burn outside but stay raw inside. Fry in small batches. This gives fritters space to cook evenly. The key to great fritter batter is balance. Start by mixing dry ingredients well. When combining wet and dry, mix just until smooth. Lumps in the batter are okay. Overmixing makes fritters tough. After adding diced apples, fold gently to keep them intact. This helps the fritters stay light and fluffy when fried. Presentation turns a good dish into a great one. Serve fritters on a rustic wooden board for charm. Drizzle warm maple syrup on top for a glossy finish. Dust with powdered sugar for a sweet touch. Offer extra syrup and sugar on the side. This allows everyone to customize their fritters. The colors and textures make the dish inviting and fun! {{image_4}} Apple fritters can come in many forms. You can use different apples for unique flavors. Try tart Granny Smith or sweet Honeycrisp apples. You can also mix in other fruits, like pears or berries, for a twist. Each fruit adds its own special taste and texture. You can add more than just apples to your fritters. Try spices like ginger or allspice for warmth. A pinch of cayenne pepper can add heat. For the glaze, mix maple syrup with vanilla or a hint of almond extract. This creates a new layer of flavor that makes each bite exciting. If you want a lighter fritter, swap out some ingredients. Use whole wheat flour instead of all-purpose flour. This adds fiber and nutrients. You can also replace sugar with honey or maple syrup for sweetness. For a dairy-free option, try almond milk instead of whole milk. These changes keep the taste while making it a bit healthier. After enjoying your maple glazed apple fritters, let any leftovers cool. Place them in an airtight container. This keeps them fresh. Store the container in the fridge. They will stay good for about 2-3 days. If you want them to last longer, consider freezing them. To reheat your fritters, use an oven. Preheat it to 350°F (175°C). Place the fritters on a baking sheet. Heat them for about 5-7 minutes. This restores their crispiness. You can also use an air fryer. Set it to 350°F (175°C) and heat for about 3-4 minutes. This method keeps them nice and crunchy. If you want to save some fritters for later, freezing is a great option. First, let them cool completely. Lay them on a baking sheet in a single layer. Freeze for about 1-2 hours until solid. Then, move them to a freezer-safe bag or container. They can last up to 2 months in the freezer. When you are ready to eat them, follow the reheating tips above. Enjoy your treats any time! Yes, you can! Other fruits work well in fritters. Consider using pears, peaches, or even berries. Each fruit adds a unique flavor and texture to the fritters. Fritters are done when they turn golden brown. This usually takes about 3-4 minutes on each side. Use a slotted spoon to check the color as they cook. They should have a crispy outside and soft inside. These fritters pair well with vanilla ice cream or whipped cream. You can also add fresh fruit or a sprinkle of cinnamon for extra flavor. A side of warm maple syrup makes for a delightful touch. Maple glazed apple fritters stay fresh for about 2 days at room temperature. Keep them in an airtight container to maintain their crispness. For longer storage, consider freezing them. Yes! To make vegan fritters, use plant-based milk instead of whole milk. Replace the egg with a flax egg made from ground flaxseed and water. This will give the fritters the same great taste and texture. You learned what you need to make tasty apple fritters. We covered required ingredients, frying steps, and smart tips for the best results. You can try apple variations and healthier choices, too. Now, you can store leftovers and reheat them for more fun later. The FAQs give you quick answers for common questions. Enjoy this sweet treat!

Maple Glazed Apple Fritters Delightful Treat Recipe

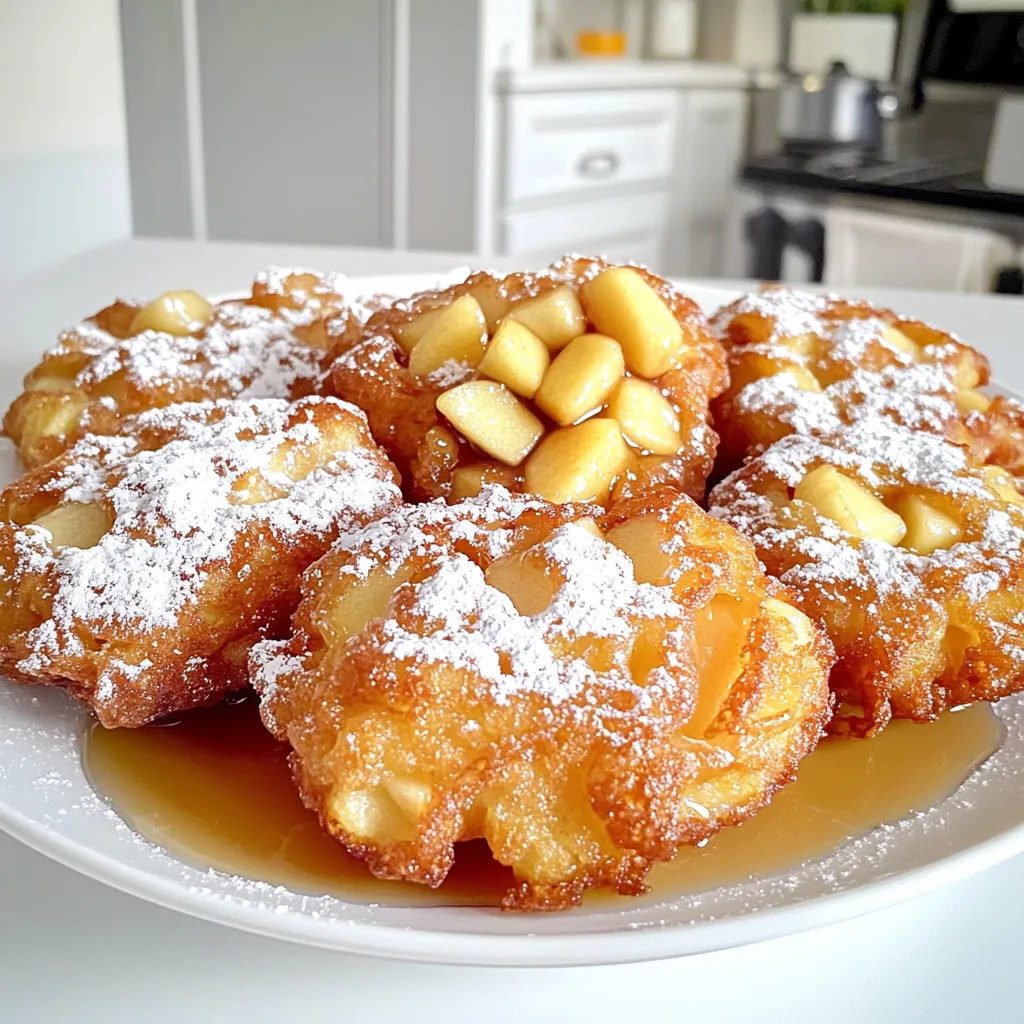
Are you ready to treat yourself to something sweet? These Maple Glazed Apple Fritters are a delightful way to enjoy

- 2 boneless, skinless chicken breasts - 1 tablespoon olive oil - 1 medium onion, finely chopped - 3 cloves garlic, minced - 1 red bell pepper, diced - 1 yellow bell pepper, diced - 1 can (14.5 oz) diced tomatoes with green chilies - 4 cups chicken broth - 1 can (15 oz) black beans, drained and rinsed - 1 cup corn (fresh or frozen) - 1 teaspoon ground cumin - 1 teaspoon chili powder - Salt and freshly ground black pepper to taste - 1 cup heavy cream or coconut cream - 1 cup shredded cheese (cheddar or Mexican blend) - Tortilla chips for garnish - Fresh cilantro leaves, for garnish - Lime wedges, for serving When you pick fresh ingredients, look for bright colors and no bruises. Choose firm, plump chicken breasts. For veggies, get crisp onions and peppers. The tomatoes should smell sweet and fresh. When buying beans, check that the can is not dented. If you go for fresh corn, it should feel firm and have a sweet smell. Fresh herbs should look vibrant and green. If you need a dairy-free option, use coconut cream instead of heavy cream. You can swap chicken for tofu for a vegetarian version. Use vegetable broth instead of chicken broth for a plant-based base. If you can't have beans, skip them or use lentils instead. For a lower-carb option, skip the corn. Always check labels for allergens when using canned goods. Start by setting your Instant Pot to Sauté mode. Pour in 1 tablespoon of olive oil and let it heat. You want the oil to shimmer, which takes about a minute. This step helps build flavor. Once the oil is hot, add 1 medium chopped onion. Stir it for about 3-4 minutes. You want it to turn soft and see-through. Then, add 3 minced garlic cloves. Stir for one more minute. The garlic should smell great! Next, toss in 1 diced red bell pepper and 1 diced yellow bell pepper. Cook them for 2-3 minutes until they start to soften. Now, it’s time to add more ingredients. Sprinkle in 1 teaspoon ground cumin, 1 teaspoon chili powder, and some salt and pepper. Mix it all well. Place 2 boneless chicken breasts on top of the veggies. Pour in 1 can of diced tomatoes with green chilies, 4 cups of chicken broth, 1 can of black beans, and 1 cup of corn. Do not stir. This layering helps keep the chicken moist. After this, close the lid and set the valve to Sealing. Choose the Manual high-pressure cook setting and set it for 15 minutes. When it’s done, let the pot sit for about 10 minutes to release pressure naturally. Then, switch the valve for a quick release. Carefully remove the chicken breasts and shred them with two forks. Return the chicken to the soup. Now, pour in 1 cup of heavy cream or coconut cream and 1 cup of shredded cheese. Stir gently until the cheese melts. This makes the soup so creamy. Taste it and add more salt or pepper if needed. Don’t forget the toppings! Serve the soup with crushed tortilla chips, fresh cilantro, and lime wedges for a tasty finish. To get the best results, set your Instant Pot to high pressure for 15 minutes. This time cooks the chicken perfectly while blending the flavors well. After cooking, let it naturally release for 10 minutes. This step helps keep the chicken moist and tender. To boost flavor, consider adding fresh herbs like cilantro or a squeeze of lime juice just before serving. You can also use smoked paprika for a subtle, smoky taste. If you want a richer soup, replace half the chicken broth with coconut cream. It adds a nice twist to the traditional flavor. One common mistake is stirring before cooking. It's crucial to layer the ingredients as directed. This layering helps create the best flavors. Also, make sure to adjust the seasoning after adding cream and cheese. Taste your soup and add more salt or pepper to enhance the overall flavor. {{image_4}} To make a vegetarian version of this soup, skip the chicken. Instead, add more beans and veggies. Use one can of black beans and one can of kidney beans. Toss in additional chopped veggies like zucchini or carrots. Replace the chicken broth with vegetable broth for a rich flavor. This keeps the soup hearty and satisfying. If you like heat, add diced jalapeños or a dash of hot sauce. You can also increase the chili powder. Consider using spicy diced tomatoes with green chilies. This will give your soup a nice kick. Adjust the spiciness to your taste to find the right balance. For a low-fat option, use skinless chicken thighs instead of breasts. Swap heavy cream for low-fat milk or a non-dairy milk like almond milk. Cut back on cheese, or use a low-fat shredded cheese. This option still provides flavor while reducing calories and fat. After enjoying your Instant Pot creamy chicken tortilla soup, you might have some left. To keep it fresh, store it in an airtight container. Make sure to cool the soup to room temperature first. This helps prevent condensation. You can keep it in the fridge for up to three days. If you want to eat it later, freezing is a great option. When you're ready to enjoy the soup again, reheating is simple. You can use the stove or microwave. If using the stove, pour the soup into a pot. Heat it over low to medium heat, stirring often. This helps it warm evenly. If you choose the microwave, transfer a portion into a microwave-safe bowl. Heat it for about 1-2 minutes, stirring halfway through. Always check the temperature before eating. Freezing this soup is a smart way to save it for later. Use a freezer-safe container or bag. Be sure to leave some space at the top. The soup will expand as it freezes. You can store it for up to three months in the freezer. When you’re ready to eat, thaw it overnight in the fridge. Then, reheat it on the stove or in the microwave. Enjoy the creamy goodness any time! Yes, you can make this soup on the stove. Start by sautéing the veggies in a large pot. Then, add the chicken and remaining ingredients. Cover and simmer until the chicken is fully cooked. Shred the chicken and stir in the cream and cheese. To get a rich and creamy texture, use heavy cream or coconut cream. Add them at the end of cooking. Stir until the cheese melts completely. This step makes the soup smooth and delicious. I love to top my soup with crushed tortilla chips. They add crunch and flavor. You can also use fresh cilantro, lime wedges, and shredded cheese. Avocado slices or sour cream work great too! This soup lasts up to four days in the fridge. Store it in an airtight container. Reheat it on the stove or in the microwave when you’re ready to enjoy it again. This blog shared how to make a tasty chicken tortilla soup in an Instant Pot. I covered key ingredients, tips for picking fresh produce, and substitutions for your diet. The step-by-step guide simplified cooking, from prepping to shredding chicken. I also offered useful tips to avoid mistakes and enhance flavors. Plus, I provided variations to suit different tastes and dietary needs, alongside storage info and answers to common questions. Enjoy making this soup your own! It’s delicious, simple, and perfect for any occasion.

Instant Pot Creamy Chicken Tortilla Soup Delight

Get ready for a flavor-packed journey with my Instant Pot Creamy Chicken Tortilla Soup Delight! This dish is easy to

- 300g pasta (penne or fettuccine) - 2 large red bell peppers - 200ml heavy cream (or coconut cream) - 2 tablespoons extra virgin olive oil - 1 medium onion, finely chopped - 3 cloves garlic, minced - 1 teaspoon smoked paprika - 1/2 teaspoon crushed red pepper flakes - Salt and pepper to taste - Fresh basil leaves for garnish - Grated Parmesan cheese for serving (optional) The main ingredients for this creamy roasted red pepper pasta are simple yet flavorful. First, you need 300 grams of pasta. I love penne or fettuccine for this dish. The next star is two large red bell peppers. They add sweetness and color. To make it creamy, use 200 milliliters of heavy cream. If you prefer, coconut cream works too for a dairy-free option. For the additional ingredients, start with two tablespoons of extra virgin olive oil. It adds richness. Chop one medium onion finely. You will need three cloves of garlic, minced, which give great flavor. One teaspoon of smoked paprika adds depth. If you like heat, use half a teaspoon of crushed red pepper flakes. Don’t forget salt and pepper for seasoning. For the final touch, fresh basil leaves brighten the dish, and grated Parmesan cheese can add a nice finish if you like. - Preheat your oven to 400°F (200°C). - Cut the red bell peppers in half and remove the seeds. - Place the pepper halves cut-side down on a baking sheet. - Drizzle with 1 tablespoon of olive oil. - Roast in the oven for 25-30 minutes, until the skins are charred. - After roasting, put the peppers in a heat-safe bowl. - Cover the bowl tightly with plastic wrap for about 10 minutes. - This steaming makes it easier to peel the skins off. - Boil the pasta in a large pot using package instructions. - Cook until the pasta is al dente, which means firm but not hard. - Once done, drain the pasta and set it aside for later. - In a large pan, heat the remaining tablespoon of olive oil over medium heat. - Add the finely chopped onion and sauté for about 5 minutes. - Cook until the onion turns translucent and soft. - Stir in the minced garlic and cook for one more minute. - Be careful not to let the garlic brown. - Peel the skins off the steamed peppers and place the flesh in a blender. - Add the sautéed onion, garlic, heavy cream, smoked paprika, and crushed red pepper flakes. - Blend until the mixture is smooth and creamy. - Pour the sauce back into the pan and warm it over low heat. - Taste and season with salt and black pepper as needed. - Add the cooked pasta to the creamy sauce and toss gently. - Cook for an additional 2-3 minutes to heat everything through. - To roast the peppers, cut them in half. Remove all seeds. - Place the peppers cut-side down on a baking sheet. Roast at 400°F for 25-30 minutes. - For al dente pasta, follow package instructions. Check a minute early for best results. - Start the sauce while the pasta cooks. This saves time and keeps everything warm. - If you like heat, add more crushed red pepper flakes. Start with a small amount. - Fresh herbs like basil or parsley can boost flavor. Chop them finely for best results. - Serve in nice bowls for an elegant look. - Garnish with fresh basil leaves. A sprinkle of Parmesan cheese adds a nice touch. - Use shallow dishes to show off the creamy sauce and vibrant color. {{image_4}} You can easily make this dish fit your needs. For a dairy-free option, swap the heavy cream with coconut cream. This swap keeps the pasta creamy and adds a hint of sweetness. If you need gluten-free options, use gluten-free pasta. Look for brands that mimic regular pasta in taste and texture. Want to add more flavor? Toss in some fresh vegetables. Spinach or mushrooms blend well with the creamy sauce. They add nutrients and a nice texture. You can also add proteins like chicken or shrimp. Cook the chicken or shrimp first, then mix them into the sauce. This will make your meal heartier. Feel free to explore different cuisines. For a Mediterranean touch, add olives and feta cheese. These ingredients give a salty burst and a unique flavor. You can also spice things up. Consider adding cumin or coriander for an international flair. These spices will change the taste and make it exciting. To store leftovers, place your pasta in an airtight container. It keeps the pasta fresh. Make sure it cools down first to avoid steam buildup. In the fridge, creamy roasted red pepper pasta lasts about 3 to 4 days. Always check for any off smells before eating. You can freeze this dish, but I suggest freezing the pasta and sauce separately. This way, the sauce stays creamy. Use freezer-safe containers. When you want to enjoy it, thaw the sauce in the fridge overnight. Reheat the sauce on low heat and add the pasta. For storage, I recommend using glass or BPA-free plastic containers. They keep food fresh longer. Portion the pasta in individual servings for easy meal prep. This helps you grab a quick meal during busy days. Remember, good storage means tasty meals later! Yes, you can! This recipe works well with many pasta shapes. Here are some great options: - Penne - Fettuccine - Fusilli - Rigatoni - Spaghetti Feel free to pick your favorite shape. Each offers a fun twist on the dish! The recipe has a mild heat from the crushed red pepper flakes. If you want less spice, use less than half a teaspoon. For more heat, add more to your taste. You can also include fresh chili peppers for a different kick. Adjust the spice to enjoy it your way! You can easily make this dish vegan. Here are some simple swaps: - Use coconut cream instead of heavy cream. - Substitute olive oil for any butter. - Skip the Parmesan cheese or use a vegan alternative. These changes will keep the creamy texture and flavor. This pasta pairs well with many sides. Here are a few tasty ideas: - A crisp green salad - Garlic bread - Roasted vegetables - Grilled chicken or shrimp These sides will complement the rich flavors and make your meal complete! This blog post outlined how to make a creamy roasted red pepper pasta. You learned about the main and additional ingredients needed, and I provided step-by-step instructions for preparation. We also covered tips for cooking, ways to enhance flavor, and variations to suit your dietary needs. Finally, I shared storage tips to keep leftovers fresh. Now, you're ready to enjoy a delicious dish that's easy to make and flexible. Cooking can be fun and rewarding. Happy cooking!

Creamy Roasted Red Pepper Pasta Delightfully Simple

Craving a rich and comforting pasta dish? My Creamy Roasted Red Pepper Pasta is your answer! With easy steps and

- 4 large carrots - 2 tablespoons extra virgin olive oil - 3 cloves garlic - 1 teaspoon smoked paprika - 1/2 teaspoon sea salt - 1/4 teaspoon freshly ground black pepper - 1/4 cup freshly grated Parmesan cheese - 1 tablespoon fresh parsley To make these garlic Parmesan carrot fries, you need fresh, simple ingredients. The carrots are the star, so choose four large ones. Peel them and slice them into fry shapes. This will help them cook evenly and get that nice crisp. Next, grab two tablespoons of extra virgin olive oil. This oil adds flavor and helps the fries crisp up in the air fryer. You also want three cloves of garlic. Mince them finely to spread that yummy garlic taste throughout the fries. For seasoning, you need one teaspoon of smoked paprika, which gives a warm flavor. Half a teaspoon of sea salt enhances all the other tastes. Add a sprinkle of freshly ground black pepper, about a quarter teaspoon, for a bit of heat. Finally, you’ll want a quarter cup of freshly grated Parmesan cheese. This will create a cheesy crust that is simply divine. Don’t forget about one tablespoon of fresh parsley for garnish. It adds color and a fresh taste to your dish. With these ingredients, you’re ready to create a delightful and healthy snack that everyone will enjoy! Set your air fryer to 400°F (200°C) and let it preheat for about 5 minutes. Preheating is key because it helps cook the fries evenly. You want that perfect crisp on the outside while keeping them tender inside. First, peel the large carrots. Then cut them into fry-shaped pieces, about 1/4 inch wide. This size helps them cook evenly. In a big bowl, add the carrot fries. Drizzle with 2 tablespoons of extra virgin olive oil. Next, add 3 cloves of minced garlic, 1 teaspoon of smoked paprika, 1/2 teaspoon of sea salt, and 1/4 teaspoon of black pepper. Toss everything well so the carrots are fully coated in this tasty mix. Now, add 1/4 cup of freshly grated Parmesan cheese to the bowl. Toss again to make sure the cheese sticks to each fry. This gives your fries a cheesy crust that you will love. Place the carrot fries in a single layer in the air fryer basket. Avoid overcrowding them. This allows hot air to flow around each fry, giving you that nice, crispy texture. Cook the fries for 15 to 18 minutes. Halfway through, gently shake the basket. This step helps them cook evenly and get that golden brown color. Once they look golden and crispy, take them out and let them rest for a few minutes. This cooling time helps them stay crunchy. Enjoy your delicious garlic Parmesan carrot fries! To get the best crispy carrot fries, avoid overcrowding the fryer. When fries sit too close, steam builds up. This makes them soggy instead of crispy. Place them in a single layer. If you have a lot, cook in batches. Every air fryer cooks a bit differently. If yours runs hot, check the fries earlier. If the fries are not crispy yet, add a few more minutes. Always shake the basket halfway through to ensure even cooking. You can add extra seasonings for more flavor. Consider adding a pinch of cayenne for heat or Italian herbs for a twist. Mix and match spices to find your favorite blend. Adjust the garlic and cheese to taste. If you love garlic, add an extra clove. For a lighter cheese flavor, use less Parmesan. Taste the mixture before cooking to find your perfect balance. Serving matters! Try placing the fries in a rustic basket or on a wooden board. Add parchment paper for a nice touch. This adds charm and makes the dish stand out. Dipping sauces can elevate your fries. Try ranch, garlic aioli, or spicy ketchup. These sauces add a fun twist to each bite. {{image_4}} You can switch carrots for sweet potatoes or zucchini. Sweet potatoes add a sweet taste, while zucchini gives a fresh crunch. - For sweet potatoes, cut them into fry shapes like carrots. - Use the same amount of olive oil and seasonings. - Cook a bit longer, around 18-20 minutes, to get them crispy. Zucchini fries need a little more care. They hold more water. - Cut zucchini thicker to avoid sogginess. - Use the same oil and seasonings but reduce cooking time to 12-15 minutes. To make this recipe dairy-free, skip the Parmesan. - Instead, try nutritional yeast for a cheesy flavor. - You can also use a plant-based cheese that melts well. Simply sprinkle the nutritional yeast or cheese after coating the fries. It adds a nutty taste without the dairy. Want some heat? Add chili flakes or cayenne pepper to the mix. - Start with 1/4 teaspoon and adjust to your taste. - For a fun twist, mix in smoked paprika for a smoky flavor. You can also try adding garlic powder or onion powder. These will give the fries a deeper flavor, making them even more delicious. To keep your carrot fries fresh, store them in an airtight container. Place a paper towel inside to absorb moisture. The fries will stay tasty for up to three days in the fridge. If you want to keep them longer, freezing is a great option. For the best flavor, reheat your fries in the air fryer. Set it to 350°F and heat for about 5-7 minutes. This keeps them crispy. If you use the oven, preheat it to 375°F, and bake for about 10 minutes. A microwave works too, but it may make them soft. Yes, you can freeze carrot fries! First, let them cool completely. Spread them on a baking sheet and freeze for about an hour. Once frozen, transfer them to a freezer bag. To reheat, just air fry them from frozen at 400°F for about 12-15 minutes. Enjoy your tasty, crispy fries anytime! Yes, you can use frozen carrots. However, there are a few things to keep in mind. Frozen carrots tend to have more moisture than fresh ones. This can make your fries less crispy. To counter this, thaw the carrots first. After thawing, pat them dry with a towel. This helps remove excess water before cooking. Then, follow the same steps in the recipe for coating and air frying. For crispier fries, here are some tips: - Don’t overcrowd the basket. Allow air to flow around each fry. - Increase cooking time by a few minutes. Just keep an eye on them to avoid burning. - Use cornstarch. Toss the carrots in a small amount of cornstarch before adding oil and seasonings. This can create a nice crunchy layer. - Make sure your air fryer is preheated. This helps achieve that golden color and crunch. Garlic Parmesan carrot fries pair well with many dishes. Here are some ideas: - Serve them as a side with grilled chicken or fish. - They make a great snack with ranch or garlic dip. - Pair with a fresh salad for a light meal. - Enjoy them alongside burgers for a fun twist on fries. Feel free to get creative with your pairings! This blog post covered how to make tasty air fryer carrot fries. We explored the main ingredients and step-by-step instructions. I shared tips for achieving crispy fries and suggested fun variations. You learned storage info and answered FAQs. Involving yourself in this easy recipe will bring fun to your cooking. Air fryer carrot fries are delicious and healthy. Enjoy them as a snack or side dish any time!

Garlic Parmesan Carrot Fries Air Fryer Recipe Delight

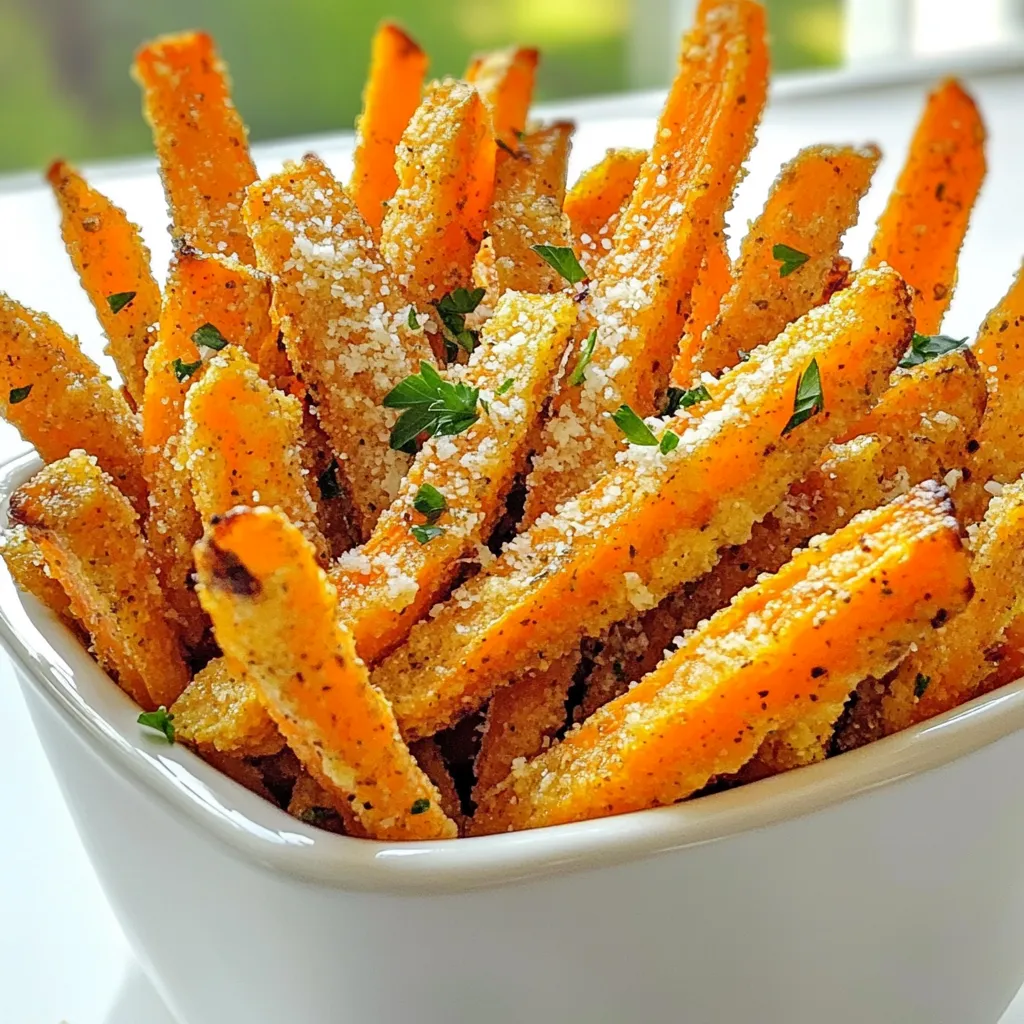
Are you ready to transform your snack time? My Garlic Parmesan Carrot Fries Air Fryer recipe delivers crispy, savory goodness

- 1 cup all-purpose flour - 1/2 cup granulated sugar (for batter) - 1/2 cup unsalted butter, softened to room temperature - 2 large eggs, at room temperature - 1/2 cup milk, at room temperature - 1 teaspoon vanilla extract - 1 teaspoon baking powder - 1/2 teaspoon ground cinnamon - 1/4 teaspoon salt - 1/4 cup granulated sugar (for topping) - 2 teaspoons ground cinnamon (for topping) - Optional: Chocolate sauce or dulce de leche for drizzling To make the best cinnamon sugar churro cupcakes, start with fresh ingredients. Here are some tips: - Flour: Use unbleached all-purpose flour for a better texture. - Butter: Choose high-quality unsalted butter for rich flavor. - Sugar: Granulated sugar should be fine and free of lumps. - Eggs: Large eggs should be fresh and at room temperature for better mixing. - Milk: Whole milk gives a richer taste but use any milk you have. If you need to make changes, here are some easy swaps: - Butter: Use coconut oil or margarine if you want a dairy-free option. - Milk: Almond, soy, or oat milk can replace regular milk. - Eggs: Use flax eggs (1 tbsp flaxseed meal + 2.5 tbsp water) for a vegan option. - Flour: A gluten-free flour blend works well instead of all-purpose flour. These substitutions can help you adjust the recipe to your needs while still enjoying those delightful cupcakes! Start by preheating your oven to 350°F (175°C). This heats the oven evenly for the cupcakes. Next, take a standard cupcake pan and line it with paper cupcake liners. This helps prevent the cupcakes from sticking. In a large mixing bowl, add 1/2 cup of softened butter and 1/2 cup of granulated sugar. Beat the mixture on medium speed for 2-3 minutes until it becomes light and fluffy. Next, add 2 large eggs, one at a time, mixing well after each. Then, pour in 1/2 cup of milk and 1 teaspoon of vanilla extract. Stir gently until smooth. In a separate bowl, mix 1 cup of all-purpose flour, 1 teaspoon of baking powder, 1/2 teaspoon of ground cinnamon, and 1/4 teaspoon of salt. This step ensures that the dry ingredients blend well. Gradually add this flour mix to the wet ingredients. Use a spatula to stir gently. Be careful not to over mix; this keeps your cupcakes light and fluffy. Now, spoon the batter into the lined cupcake pan, filling each about 2/3 full. Bake in the preheated oven for 18-20 minutes. To check if they are done, insert a toothpick into the center of a cupcake. If it comes out clean, they are ready. Once baked, let the cupcakes cool in the pan for about 10 minutes. Then, move them to a wire rack to cool completely. This cooling step is crucial for the best texture. To make sure your cupcakes are light and fluffy, start with room temperature ingredients. This includes butter, eggs, and milk. Softened butter mixes better with sugar, creating air pockets that help the cupcakes rise. When you mix the batter, don't overmix. Stir just until combined. Overmixing can lead to dense cupcakes. For an even coating of cinnamon sugar, let your cupcakes cool completely. This step is key! After cooling, brush the tops with melted butter. This helps the cinnamon sugar stick well. Then, roll or dip each cupcake into the cinnamon-sugar mixture. Make sure to coat all sides for that perfect churro flavor. Presentation makes a big difference! Place your cupcakes on a nice plate. For a fun touch, sprinkle some extra cinnamon sugar on top. You can also add mini chocolate chips for a sweet look. If you like, drizzle chocolate sauce or dulce de leche on top for an extra treat. These small details make your cupcakes truly shine. {{image_4}} You can easily switch up the flavor of these churro cupcakes. For a chocolate twist, replace some flour with cocoa powder. Use 1/3 cup cocoa powder and reduce the flour to 2/3 cup. This will give you a rich, chocolatey flavor. You can also add chocolate chips for extra taste. If you want vanilla, just increase the vanilla extract to 1 tablespoon. This makes your cupcakes taste even better. Toppings can make your cupcakes shine. Besides cinnamon sugar, try other toppings! A simple glaze can be made with powdered sugar and milk. Mix 1 cup of powdered sugar with 2 tablespoons of milk. Drizzle this over the cooled cupcakes for a sweet touch. Alternatively, you can use chocolate sauce or dulce de leche. Just drizzle it on top before serving for a fun, sweet surprise. You can make these cupcakes gluten-free by using a good gluten-free flour mix. Just make sure it has xanthan gum for the right texture. For a vegan option, replace eggs with flax eggs. Mix 1 tablespoon of ground flaxseed with 2.5 tablespoons of water for each egg. Also, use almond milk instead of regular milk and coconut oil instead of butter. These changes will keep the cupcakes tasty and fun. To keep your cinnamon sugar churro cupcakes fresh, store them in an airtight container. This keeps moisture in and prevents them from drying out. Place the container at room temperature for up to three days. If your kitchen is warm, consider putting them in the fridge. Just remember to bring them back to room temp before serving. If your cupcakes lose their warmth, you can easily reheat them. Place the cupcakes in the microwave for about 10-15 seconds. This gives them a nice warmth without drying them out. You can also pop them in a preheated oven at 300°F (150°C) for around 5 minutes. This method helps keep the cupcake texture soft and fluffy. Freezing your cupcakes is simple and effective. First, let the cupcakes cool completely. Then, wrap each one in plastic wrap. Place them in a freezer-safe bag or container. They can stay frozen for up to three months. When you're ready to enjoy them, thaw them in the fridge overnight or at room temperature for a couple of hours. To check if the cupcakes are done, use a toothpick. Insert it into the center of a cupcake. If it comes out clean, your cupcakes are ready. Bake them for 18-20 minutes at 350°F (175°C). If they are golden brown and spring back when touched, they are also done. Yes, you can make the batter ahead of time. Mix it, then store it in the fridge. Use it within 24 hours for the best results. When you are ready to bake, let it sit at room temp for about 15 minutes. This helps the batter rise nicely. If you need a butter substitute, try using coconut oil or vegetable oil. Both will keep your cupcakes moist. You can also use unsweetened applesauce for a healthier option. Just replace the butter with the same amount of your chosen substitute. Cinnamon sugar churro cupcakes bring joy to any dessert spread. We covered ingredients, baking steps, and tips to make these treats shine. Remember to choose quality ingredients for the best flavor. Don’t hesitate to try different flavors or dietary options to match your needs. Storing and reheating them carefully helps keep them fresh. Whether you bake them for a crowd or just yourself, they will delight your taste buds. Happy baking!

Cinnamon Sugar Churro Cupcakes Delightful Dessert Treat

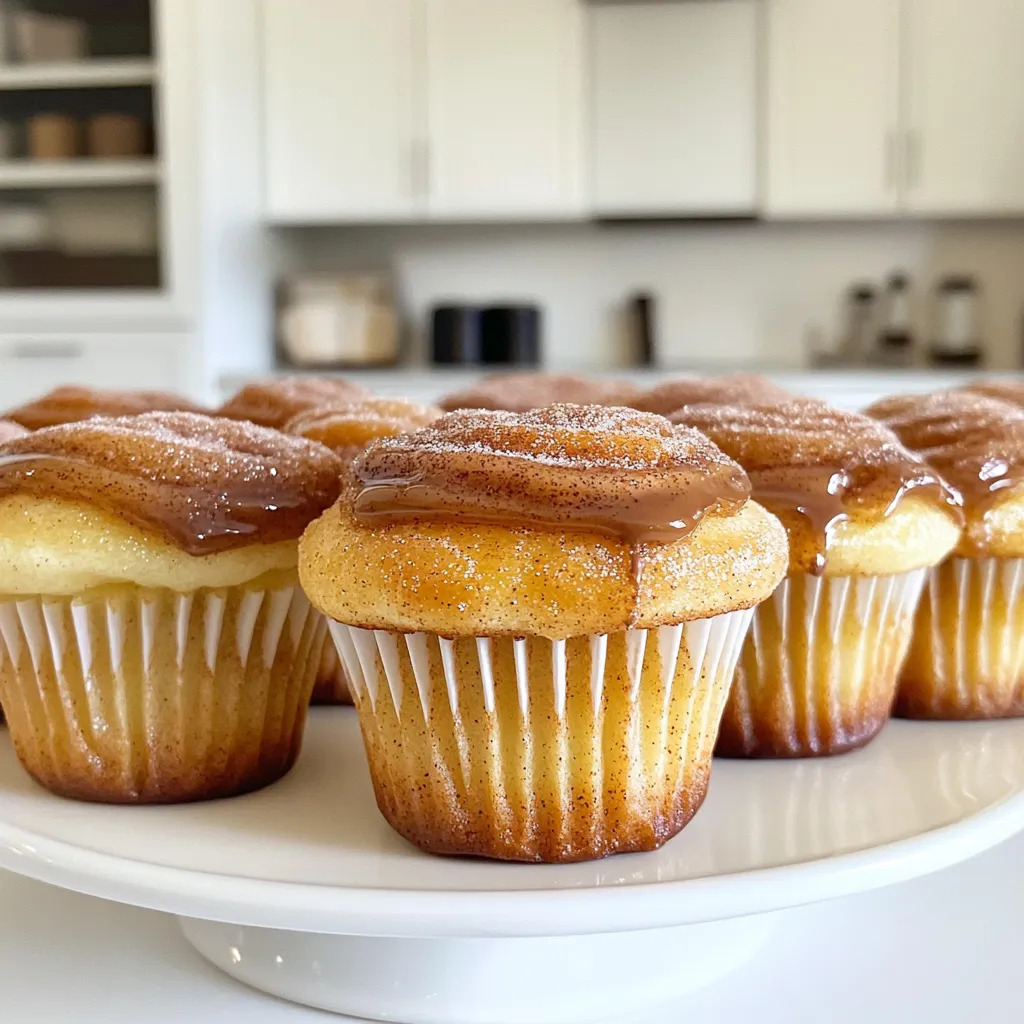
Are you ready to treat your taste buds? Today, I’ll show you how to make Cinnamon Sugar Churro Cupcakes—a fun

Older posts
Newer posts
← Previous Page1 … Page4 Page5 Page6 … Page83 Next →

dsad

© 2026 eataroundit • Built with GeneratePress

Our Policies

  • Copyright Policy
  • Cookie Policy
  • GDPR Policy
  • Privacy Policy
  • Disclaimer
  • Terms Of Use

More Information

  • Home
  • About
  • Contact
  • Appetizers
  • Dessert
  • Dinner
  • Drinks
©2026, eataroundit About Back To Top