Skip to content
DisclaimerTerms Of UseGDPR PolicyCookie Policy

eataroundit

  • Home
  • Drinks
  • Appetizers
  • Dinner
  • Dessert
  • About
  • Contact
  • Privacy Policy
DisclaimerTerms Of UseGDPR PolicyCookie Policy

NO-ING-IMG

- 1 ripe fresh pineapple, peeled and cut into bite-sized chunks - 2 tablespoons sweet chili sauce - 1 tablespoon honey - 2 tablespoons freshly squeezed lime juice - Zest of 1 lime (about 1 teaspoon) - 1 teaspoon ground ginger - A pinch of salt - Fresh mint leaves for garnish (optional) - Skewers (wooden or metal) When making Sweet Chili Lime Grilled Pineapple Skewers, the right ingredients are key. Start with a ripe pineapple. Look for one that feels heavy and has a sweet smell. The sweet chili sauce adds a nice kick. Honey brings in extra sweetness. Fresh lime juice and zest brighten the flavor. Ground ginger adds warmth to the sweet mix. A pinch of salt balances all the flavors. If you want, garnish with fresh mint leaves for a pop of color. Choose either wooden or metal skewers. Wooden skewers need soaking to prevent burning, while metal ones can go straight on the grill. Each ingredient plays an important role in creating a delicious dish. Soak wooden skewers in water for at least 30 minutes. This step stops them from burning on the grill. If you use metal skewers, you can skip this step. Metal skewers heat up quickly but don’t catch fire. In a large bowl, combine sweet chili sauce, honey, lime juice, lime zest, ground ginger, and a pinch of salt. Whisk these ingredients well. A smooth marinade coats the pineapple evenly and adds great flavor. Add the cut pineapple chunks to the marinade. Toss them gently to ensure each piece gets covered. Let the pineapple marinate for 15–20 minutes at room temperature. This time allows the flavors to soak in. While the pineapple marinates, preheat your grill to medium heat. This is key for caramelizing the pineapple. A hot grill gives you those lovely grill marks and a sweet, smoky flavor. Once marinated, take your skewers and thread the pineapple chunks onto them. Leave a small gap between each piece. This gap helps heat circulate around the pineapple, ensuring even cooking. Place the skewers on the grill. Cook for 2-3 minutes on each side. Look for nice grill marks and slight caramelization. The pineapple should smell sweet and inviting. After grilling, let the skewers rest for about a minute. This step lets the juices redistribute, making the pineapple juicy. Garnish the skewers with fresh mint leaves for a burst of color and flavor before serving. When picking a ripe pineapple, look for a few signs: - The color should be bright yellow, especially at the base. - The skin should be firm but slightly soft when pressed. - A sweet smell at the base is a good sign of ripeness. The best varieties for grilling include the Queen and Gold varieties. They are sweeter and have a nice texture that holds up well on the grill. To make your skewers pop, consider adding these seasonings: - A dash of cayenne for heat. - A sprinkle of cinnamon for warmth. - A splash of coconut milk for creaminess. Pair your skewers with yogurt or ice cream for dessert. They also go well with grilled meats or fish for a savory meal. Use direct grilling for a quick sear and caramelization. Place the skewers directly over the flames. For larger grills, try indirect grilling. This method cooks the pineapple evenly without burning. Adjust your grilling time based on your grill type. Gas grills heat quickly, while charcoal may need a bit more time to reach the right temperature. Always check for grill marks to know when to flip! {{image_4}} You can swap honey for maple syrup or agave. These sweeteners offer a different taste. Each adds a nice touch to the marinade. You can also try various sweet chili sauces. Some brands are spicier, while others are milder. Adjust based on your taste. Mixing in bell peppers or zucchini can add color and crunch. These veggies grill well and soak up the marinade. You can also combine pineapple with other tropical fruits. Mango and kiwi work wonderfully. They enhance the sweetness and make a beautiful platter. Skewers can be a sweet dessert or a tasty side dish. Serve them with vanilla ice cream for a fun treat. As a side, they pair well with grilled meats. You can also offer sauces or dips. Yogurt or coconut cream adds a creamy contrast. Enjoy experimenting with these options! To store leftover Sweet Chili Lime Grilled Pineapple Skewers, use airtight containers. Glass or plastic containers work well. They keep the pineapple fresh and tasty. You can also wrap the skewers tightly in plastic wrap. For best quality, eat the leftovers within three days. After that, the pineapple may lose its flavor and texture. To reheat the skewers, avoid overcooking. You want to keep that juicy taste. The best method is to use a grill or an oven. - Grill: Preheat your grill to medium heat. Place the skewers on the grill for about one minute on each side. This method brings back the smoky flavor. - Oven: Preheat the oven to 350°F (175°C). Place the skewers on a baking sheet. Heat for about 5-7 minutes. Check often to prevent overcooking. - Microwave: If you're in a hurry, use the microwave. Heat on low for about 30 seconds. Flip the skewers and heat again for 30 seconds. This method works but may make them a bit softer. Enjoy your tasty grilled pineapple again! You can use canned pineapple, but I prefer fresh. Fresh pineapple has a better flavor and texture. Canned pineapple can be softer and more watery. If you use canned, drain it well and pat it dry. This helps avoid excess moisture on the skewers. Soak wooden skewers for at least 30 minutes. This step is key. Soaking helps prevent the skewers from burning on the grill. If you skip this, you may end up with charred skewers. These skewers pair well with many dishes. Try serving them with grilled chicken or fish. They also go great with coconut rice or a fresh salad. For a fun twist, add them to tacos or serve with yogurt for dipping. Yes, you can make this recipe vegan. Substitute honey with maple syrup or agave nectar. Also, ensure your sweet chili sauce is vegan-friendly. This way, everyone can enjoy the sweet chili lime flavor. Look for grill marks and a slight caramelization. The pineapple should be warm and slightly soft. Generally, grill for 2-3 minutes on each side. Keep an eye on it to prevent overcooking. This ensures a perfect sweet and juicy bite. This blog post shared a simple guide for making Sweet Chili Lime Grilled Pineapple Skewers. You learned about choosing fresh pineapples and how to grill them perfectly. I also covered how to store leftovers and reheat them well. Remember, you can easily tweak the recipe with different fruits and sweeteners. Enjoy these skewers as a fun side or sweet treat. With practice, you'll master this dish and impress everyone at your next cookout. Happy grilling!

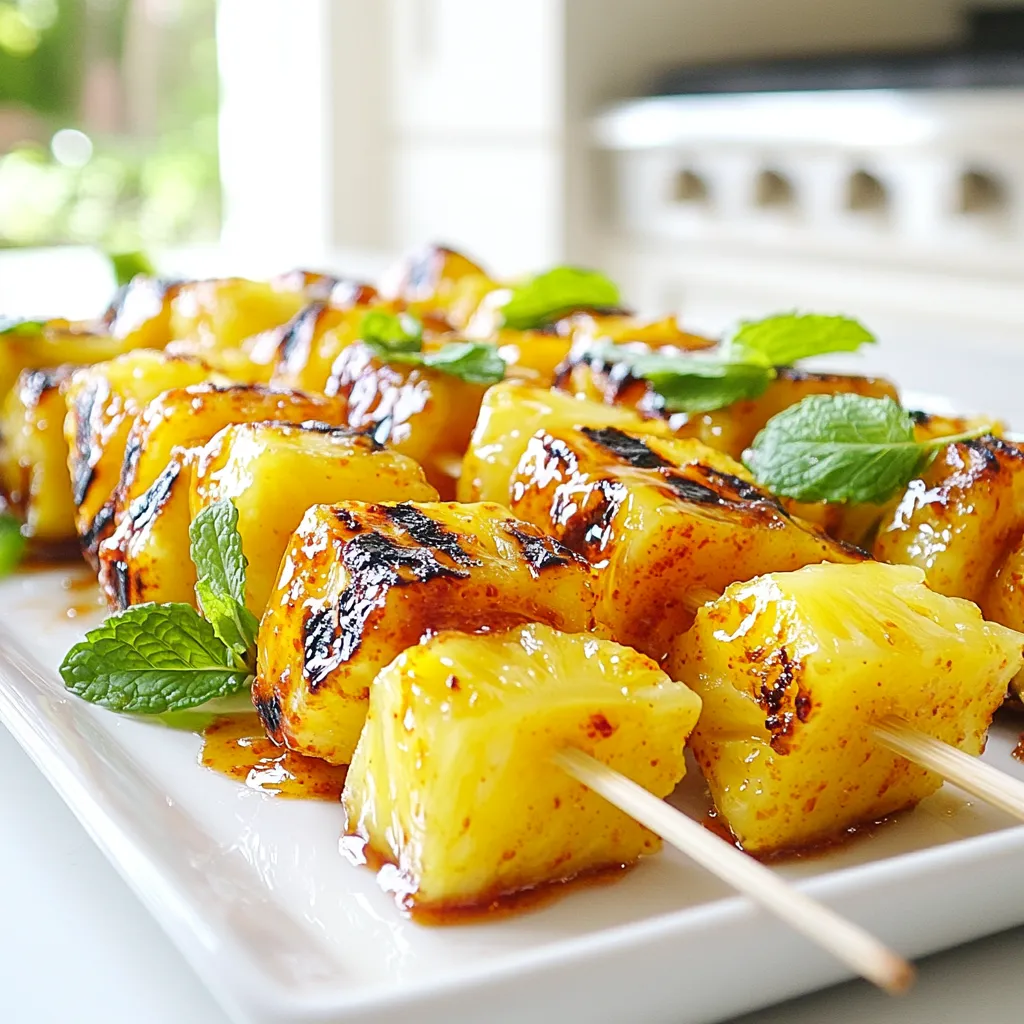
Sweet Chili Lime Grilled Pineapple Skewers Recipe

Are you ready to elevate your grilling game? Sweet Chili Lime Grilled Pineapple Skewers are the perfect blend of sweet

To make Maple Glazed Brussels Sprouts with Cranberries, gather the following ingredients: - 1 pound Brussels sprouts, trimmed and halved - 1/3 cup pure maple syrup - 2 tablespoons extra virgin olive oil - 1/2 teaspoon fine sea salt - 1/4 teaspoon freshly cracked black pepper - 1/2 cup fresh or dried cranberries - 1/4 cup pecans, roughly chopped (optional) - 1 tablespoon apple cider vinegar - 1 teaspoon Dijon mustard Each ingredient plays a key role in creating this dish. The Brussels sprouts provide a nice base. The maple syrup adds sweetness. Olive oil helps with roasting, and salt and pepper enhance flavor. Cranberries give a fruity note, while pecans add crunch. The apple cider vinegar and Dijon mustard bring tang and depth. Using fresh ingredients boosts taste. If you use dried cranberries, they add a chewy texture. Pecans are optional but add a nice crunch. When you gather these ingredients, you set the stage for a fantastic dish that delights the taste buds. - Preheat oven to 400°F (200°C). - Toss Brussels sprouts with 2 tablespoons of olive oil, 1/2 teaspoon of fine sea salt, and 1/4 teaspoon of freshly cracked black pepper. Start by heating your oven. This helps the Brussels sprouts roast better. In a large bowl, mix the halved sprouts with oil, salt, and pepper. Make sure every sprout is well coated. This step is key for flavor. - Arrange on a baking sheet in a single layer. - Roast for 20-25 minutes and stir halfway. Once the oven is hot, spread the sprouts on a baking sheet. Keep them in a single layer for even cooking. Roast them for about 20 to 25 minutes. Halfway through, stir them. This helps them get nice and crispy. They should look golden brown when done. - Combine 1/3 cup of pure maple syrup, 1 tablespoon of apple cider vinegar, and 1 teaspoon of Dijon mustard in a saucepan. - Heat until warmed and slightly thickened. While the sprouts roast, let’s make the glaze. In a small pan, mix the maple syrup, vinegar, and mustard. Heat this over medium-low heat. Stir it gently. In about 5 minutes, it should warm and thicken a bit. This glaze adds a sweet kick! - Drizzle glaze over roasted sprouts and add cranberries and pecans. - Return to oven for an additional 5 minutes. Take the sprouts from the oven and drizzle the glaze over them. Then, sprinkle in 1/2 cup of cranberries and 1/4 cup of chopped pecans if you like. Toss everything together on the baking sheet. This helps the flavors mix. Put them back in the oven for 5 more minutes. This warms the cranberries and caramelizes the glaze. Enjoy the delightful aroma! To get crispy Brussels sprouts, make sure to space them out well. If they crowd together, they will steam instead of roast. This means they won't get that nice golden color. Use a large baking sheet for one pound of sprouts. Roast them at 400°F (200°C) for 20-25 minutes. Stir halfway through to help them brown evenly. You can boost the glaze's flavor easily. Try adding a pinch of cayenne for heat or a sprinkle of garlic powder for depth. These spices add a new layer of taste. When you add cranberries is key too. Add them during the last five minutes of roasting. This keeps them plump and juicy, while also warming them up nicely. Use a large, elegant serving bowl for a beautiful display. This makes the dish pop on your table. Top the Brussels sprouts with extra pecans for a crunch. A light drizzle of maple syrup adds a glossy finish and extra sweetness. You can also sprinkle fresh herbs, like parsley or thyme, for color and aroma. {{image_4}} You can switch pecans for other nuts or seeds. Walnuts or almonds work well. If you want a crunch, try sunflower seeds or pumpkin seeds. These options add flavor and texture. You can also change the vinegar or mustard. Use balsamic vinegar for a sweeter taste. Or, try red wine vinegar for a sharper flavor. For mustard, whole grain gives a nice bite. Yellow mustard is milder but still tasty. If you want a vegan version, skip the honey. Use maple syrup as the main sweetener. Make sure your mustard is vegan too. Most are, but check the label to be sure. For gluten-free options, this recipe works perfectly. All ingredients are naturally gluten-free. Avoid any sauces or condiments that may contain gluten. You can add seasonal herbs or spices. Fresh thyme or rosemary brings a lovely aroma. These herbs enhance the flavor and make your dish pop. Adding roasted root vegetables makes a great medley. Carrots and sweet potatoes pair nicely with Brussels sprouts. They add color and sweetness to your meal. Just cut them to the same size for even cooking. To keep your Maple Glazed Brussels Sprouts fresh, store them in an airtight container. Place the container in the refrigerator right after the meal. This keeps them tasty for later. The dish stays good for about 3 to 5 days when stored properly. To reheat Brussels sprouts, use the oven. Preheat it to 350°F (175°C). Spread the sprouts on a baking sheet and heat for about 10-15 minutes. This method helps keep them crispy. You can also use a microwave. Heat in short bursts of 30 seconds. Stir after each burst to avoid overcooking. For creative serving, try mixing leftovers into a salad. You can also add them to a grain bowl for a quick meal. The sweet maple flavor pairs well with many dishes. Yes, you can prep the Brussels sprouts ahead. Trim and halve them a day before. Store them in an airtight container in the fridge. You can also mix the glaze in advance. Just keep it in a jar in the fridge. This will save time on the day you want to serve them. These Brussels sprouts pair well with many dishes. They complement roasted chicken or pork nicely. You can also serve them with a hearty grain salad. For a vegetarian option, try serving them with quinoa or wild rice. Yes, you can freeze these Brussels sprouts. Roast them fully and let them cool. Place them in a freezer-safe bag. They can last up to three months in the freezer. To thaw, place them in the fridge overnight. Reheat them in the oven for the best texture. If you want some heat, add red pepper flakes to the glaze. You can also mix in some hot sauce. For a fresh kick, try adding diced jalapeños. Just adjust the amount based on your taste. This blog post walked you through making delicious maple glazed Brussels sprouts. You learned about the ingredients, step-by-step instructions, tips for perfecting the dish, and possible variations. Each part contributes to a tasty and beautiful meal. Try this recipe to impress your family and friends. Enjoy the fresh flavors and unique combinations. With these tips, you can create a standout dish every time. Happy cooking!

Maple Glazed Brussels Sprouts with Cranberries Delight

Looking for a dish that turns Brussels sprouts into a tasty treat? You’ve found it! My Maple Glazed Brussels Sprouts

To make this cozy soup, gather these ingredients: - 1 tablespoon olive oil - 1 small onion, finely diced - 2 cloves garlic, minced - 1 medium carrot, diced - 1 stalk celery, diced - 4 cups vegetable broth - 1 (16 oz) package potato gnocchi - 1 cup cherry tomatoes, halved - 1 teaspoon dried oregano - 1 teaspoon Italian seasoning - 1 cup fresh spinach, roughly chopped - 1 cup heavy cream (coconut cream works too) - Salt and freshly ground black pepper to taste - Grated Parmesan cheese for garnish (optional) - Fresh basil leaves for garnish You can swap heavy cream with coconut cream for a lighter soup. This change adds a hint of sweetness and keeps the dish creamy. If you need a dairy-free option, coconut cream is a great choice. You can also use vegetable broth or chicken broth for a different flavor base. Instead of gnocchi, you can use pasta or even rice if you prefer. Choose a small onion that feels firm and heavy. The garlic should smell strong but not sprout. Look for bright orange carrots and crisp celery. Fresh spinach should be vibrant green and free of brown spots. For tomatoes, pick ones that feel firm and smell sweet. When buying gnocchi, check for a fresh date on the package to ensure quality. Start by gathering all your ingredients. Having everything ready makes cooking easy and fun. Dice the onion, carrot, and celery into small pieces. Mince the garlic cloves finely. Halve the cherry tomatoes and chop the spinach roughly. Measure the vegetable broth and cream. This prep will speed up your cooking time. 1. Heat 1 tablespoon of olive oil in a large pot over medium heat. 2. Add the diced onion, carrot, and celery. Sauté for about 5 minutes until they soften. The onion should look clear. 3. Stir in the minced garlic and cook for 1 more minute. This step adds a great smell to your soup. 4. Pour in 4 cups of vegetable broth. Bring the mixture to a gentle boil. 5. Add the potato gnocchi. Cook them according to the package, usually about 3 to 5 minutes. They are ready when they float. 6. Next, stir in the halved cherry tomatoes, dried oregano, and Italian seasoning. Let the soup simmer for 2 minutes. 7. Lower the heat and add the chopped spinach and heavy cream. Stir gently and cook for 2 to 3 minutes until the spinach wilts. 8. Finally, taste your soup and add salt and black pepper as needed. To get soft and fluffy gnocchi, never overcook them. They should float to the top when done. If you want a lighter soup, use coconut cream instead of heavy cream. This keeps the dish creamy while lowering calories. Always stir gently when adding the cream to keep the soup smooth. When making One-Pot Creamy Tuscan Gnocchi Soup, avoid these mistakes for the best results: - Overcooking the vegetables: Sauté your onion, carrot, and celery just until soft. This keeps their fresh taste. - Ignoring the garlic: Garlic adds flavor. Stir it for only a minute so it won’t burn. - Rushing the gnocchi: Cook the gnocchi as the package says. They should float to know they're done. - Not tasting before serving: Always taste your soup. Adjust salt or pepper to your liking. To boost the flavor of your soup, consider adding: - Fresh herbs: A handful of fresh basil or parsley brightens the dish. - Red pepper flakes: For a spicy kick, sprinkle some in while cooking. - Lemon juice: A squeeze of lemon adds freshness and balances the creaminess. - Parmesan rind: Tossing in a rind while simmering adds depth to the broth. Serve your soup with these ideas for a complete meal: - Crusty bread: A warm baguette or sourdough is perfect for dipping. - Side salad: A light arugula salad with lemon vinaigrette pairs well. - Wine: A glass of white wine, like Pinot Grigio, complements the flavors. - Cheese: Extra grated Parmesan on top makes it even more flavorful. {{image_4}} You can easily make this soup vegetarian or vegan. To do this, simply skip the heavy cream. Use coconut cream or cashew cream instead. Both options give a rich texture. Replace the vegetable broth with a vegetable stock that is clearly labeled vegan. This keeps all the flavors you love while making it plant-based. If you want to add protein, chicken or sausage works well. For chicken, use cooked, shredded chicken. Add it to the pot after the gnocchi cooks. If you choose sausage, slice it and brown it in the pot before adding the onions. This adds a nice depth of flavor to your soup. You can also try turkey sausage for a leaner option. Feel free to add more veggies for a nutritional boost. Carrots, zucchini, or kale can mix in nicely. Chop them small so they cook quickly. Adding these vegetables not only makes the soup healthier but also adds more colors. This makes your dish look as good as it tastes! To store your One-Pot Creamy Tuscan Gnocchi Soup, let it cool first. Pour it into an airtight container. This keeps the soup fresh and prevents spills. You can store it in the fridge for up to three days. Label the container with the date you made it. This way, you’ll know when to eat it. When reheating, do it slowly on the stove. Pour the soup into a pot over low heat. Stir often to keep it creamy. If the soup thickens too much, add a splash of broth or water. This helps restore its smooth texture. You can also microwave it in short bursts. Stir between each burst to ensure even heating. You can freeze the soup for up to three months. For best results, freeze it in single-serving portions. Use freezer-safe bags or containers. Leave some space for expansion as it freezes. When ready to eat, thaw it overnight in the fridge. Then, reheat it as mentioned above. This way, you’ll enjoy a tasty meal even later! Yes, you can use frozen gnocchi. They work great in this soup. Just add them straight to the pot with the broth. There is no need to thaw them first. They will cook quickly and become tender in the soup. This saves time and adds convenience to your cooking. To lighten this soup, you can swap heavy cream for coconut cream. This switch cuts calories and adds a hint of sweetness. You can also use low-fat milk or a plant-based milk. Reducing the amount of oil or skipping the cheese garnish can help, too. These changes keep the soup creamy and tasty while being lighter overall. The best garnishes for this soup are grated Parmesan cheese and fresh basil leaves. These add flavor and a nice look to your dish. You could also use a drizzle of olive oil for richness. Crushed red pepper flakes add a spicy kick if you like heat. All these toppings can enhance your soup experience. In this post, we explored how to make One-Pot Creamy Tuscan Gnocchi Soup. We covered the best ingredients, cooking steps, and storage tips. I shared ideas for flavor boosts and avoided common mistakes. You can even try variations to fit your taste. Remember to store leftovers well for future meals. Making this soup can be fun and rewarding. With these tips, you'll impress anyone at your table. Enjoy your cooking!

One-Pot Creamy Tuscan Gnocchi Soup Flavorful Delight

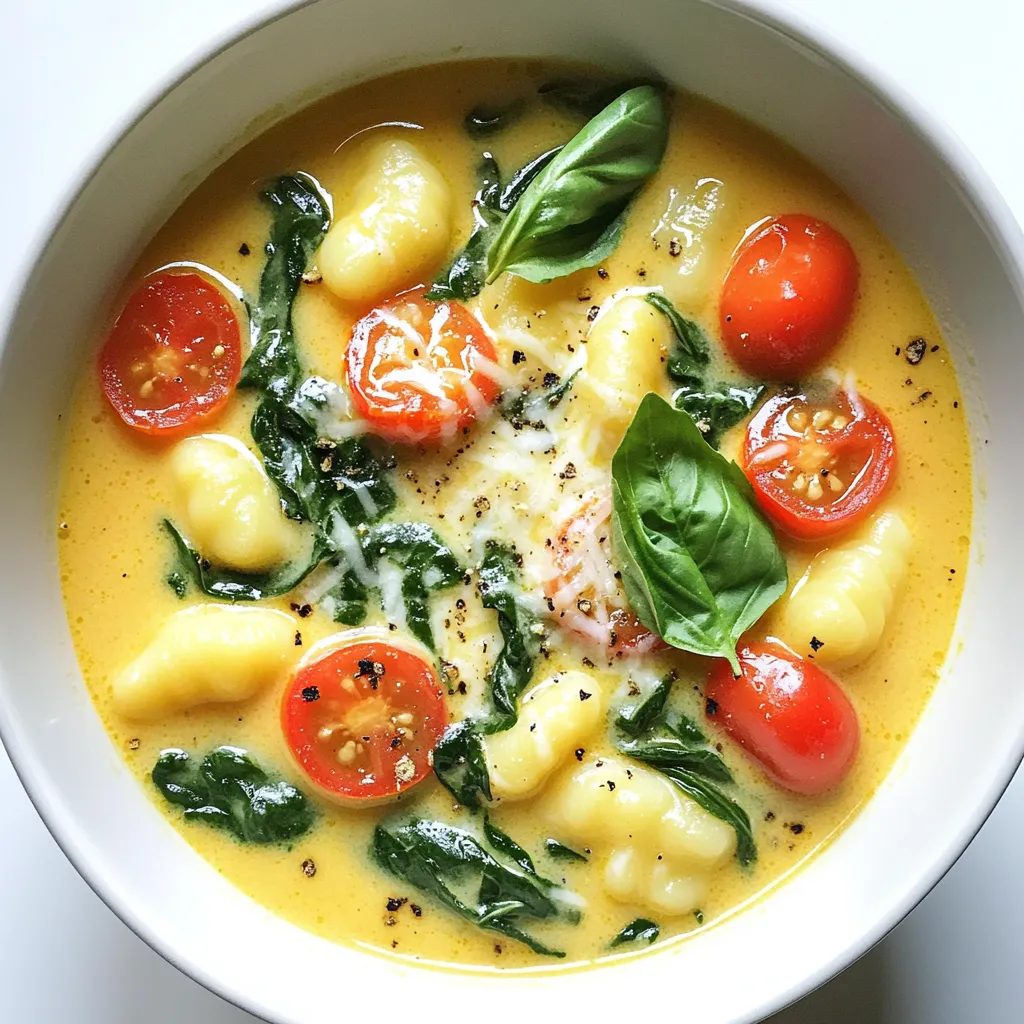
Welcome to your new favorite recipe: One-Pot Creamy Tuscan Gnocchi Soup! This dish is packed with rich flavors and creamy

- 2 pounds boneless, skinless chicken breasts - 4 cups heavy cream - 1 cup chicken broth - 2 cups grated Parmesan cheese - 3 cloves garlic, minced - 1 teaspoon Italian seasoning - Salt and pepper to taste - 1 pound fettuccine pasta - Fresh parsley, chopped (for garnish) Using high-quality ingredients makes a big difference. I recommend fresh chicken breasts. They give you the best flavor. Look for heavy cream with a high fat content. This will ensure your sauce is rich and creamy. Also, choose good Parmesan cheese. Freshly grated cheese melts better than pre-grated options. It adds a depth of flavor that really stands out. If you want a lighter option, use half-and-half instead of heavy cream. This will still give you a creamy sauce but with fewer calories. For a dairy-free choice, try coconut cream. It has a nice texture too. As for Parmesan, nutritional yeast works as a great vegan substitute. It gives a cheesy flavor without any dairy. You can also use a mix of cashew cream or almond milk with nutritional yeast for a creamy sauce. Start by placing the chicken breasts in the slow cooker. Make sure they are boneless and skinless. Season them well with salt, pepper, and Italian seasoning. This step makes the chicken flavorful and tasty. In a large bowl, combine the heavy cream, chicken broth, and minced garlic. Whisk until they mix well. This creamy sauce will coat the chicken nicely. Once mixed, pour this sauce over the seasoned chicken in the slow cooker. Cover the slow cooker with its lid. Set it to cook on low for about 4 hours. This time allows the chicken to become tender and easy to shred. After cooking, take out the chicken and shred it with two forks. Next, add the fettuccine pasta to the slow cooker. Stir it into the creamy sauce. Cook on low for another 30 minutes. This helps the pasta become soft and soak up the flavors. Finally, stir in grated Parmesan cheese to make the dish creamy and rich. Enjoy your delicious meal! To get that rich and creamy texture, use heavy cream. It gives your sauce a smooth feel. When you mix the cream with chicken broth and garlic, whisk until blended. This step helps all the flavors mix well. After cooking, add grated Parmesan cheese slowly. This keeps the sauce silky and luxurious. If you want to adjust the thickness, add more cream or broth bit by bit. Shredding chicken can be simple. After cooking, take the chicken out of the slow cooker. Use two forks to pull it apart. This makes bite-sized pieces that soak up the sauce. If you find it hard to shred, let it cool for a few minutes. Warm chicken shreds easily. Make sure to shred it right before you add it back to the sauce. This keeps the chicken juicy and tender. When serving, ladle the creamy chicken Alfredo into bowls. A sprinkle of fresh parsley on top adds color. For extra flavor, drizzle more grated Parmesan cheese over each bowl. You can also serve it with a side salad or garlic bread. This meal pairs well with a light white wine, too! {{image_4}} You can boost the nutrition of your creamy chicken Alfredo by adding vegetables. Try putting in broccoli, peas, or spinach. These veggies add color and flavor. They also make the dish healthier. I recommend adding them in the last 30 minutes of cooking. This way, they cook through but stay bright and fresh. You can also use bell peppers or zucchini for a fun twist. Fettuccine is a classic choice for Alfredo, but you can switch it up! Try penne, rigatoni, or even gluten-free pasta. Each type brings its own unique texture. Just remember to adjust the cooking time if you use a different pasta. Some shapes may cook faster, so keep an eye on them. This change keeps the dish exciting and new. To give your dish a flavor boost, add herbs and spices. Fresh basil, thyme, or oregano can enhance the taste. Just sprinkle some in during the cooking process. You can also try red pepper flakes for a bit of heat. Experiment with different combinations to find what you love. Each tweak can make your creamy chicken Alfredo feel like a whole new meal! To store leftovers, let the dish cool first. Then, place it in an airtight container. Make sure to divide it into smaller portions. This way, you can easily reheat only what you need later. Keep the container in the fridge. It should stay fresh for about three to four days. When reheating, the sauce may thicken. To fix this, add a splash of chicken broth or cream. Heat it slowly in a pot over low heat. Stir often to mix the sauce evenly. You can also use the microwave. Just cover the dish and heat it in short bursts. Stir after each burst for even heating. If you want to save some for later, freezing works well. First, let the dish cool completely. Next, transfer it to a freezer-safe container. Leave some space at the top to allow for expansion. Seal tightly and label it with the date. When stored correctly, it can last for about three months. To enjoy, thaw it in the fridge overnight before reheating. Yes, you can use frozen chicken breasts. Just add an extra hour to the cook time. The slow cooker will safely cook the chicken. You will still get tender, juicy meat. To make this recipe gluten-free, use gluten-free fettuccine. Many brands offer this option. Always check the label to confirm it is gluten-free. This will keep your dish safe and tasty. If the sauce is too thick, add a bit of chicken broth. Stir it in slowly until you reach the desired consistency. You can also add a splash of heavy cream for extra richness. Fettuccine takes about 30 minutes to cook in the slow cooker. Add it after the chicken is shredded. Stir it well into the sauce to ensure it cooks evenly. In this blog post, we explored the essential ingredients for a creamy dish and shared tips for preparation. We looked at how to achieve the perfect sauce and highlighted helpful storage methods. Remember, good quality ingredients make a big difference. Always consider nutrition by adding veggies. Whether you opt for gluten-free pasta or frozen chicken, these steps can lead to tasty meals. With these insights, you can impress with your cooking. Enjoy making this dish over and over again!

Slow Cooker Creamy Chicken Alfredo Delightful Recipe

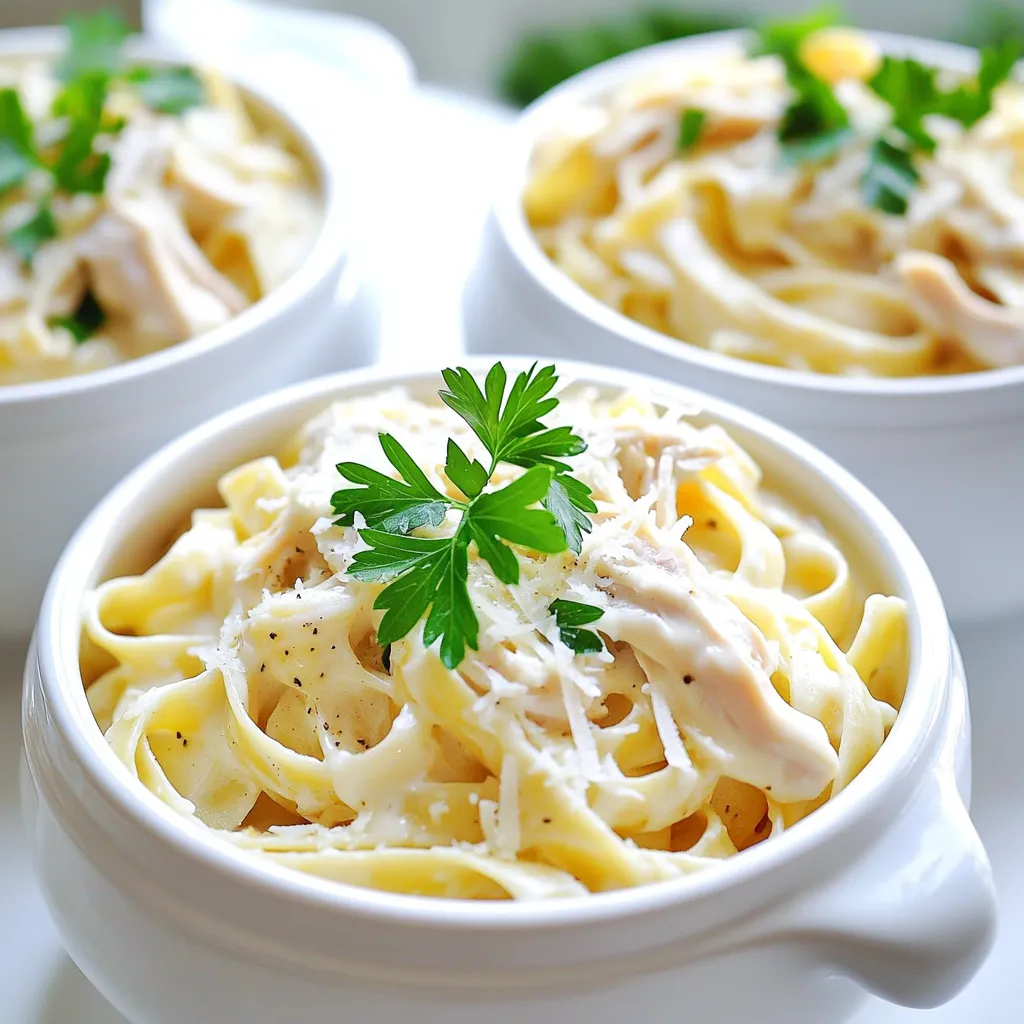
Are you ready to impress your family with an easy and tasty meal? This Slow Cooker Creamy Chicken Alfredo is

To make this dish, you'll need a few key items: - 1 package (16 oz) gnocchi - 4 tablespoons unsalted butter - 4 cloves garlic, finely minced - 1/2 cup freshly grated Parmesan cheese - 1/4 teaspoon red pepper flakes (optional) - Salt to taste - Freshly ground black pepper to taste - Fresh parsley, finely chopped (for garnish) These ingredients blend to create a tasty and quick meal. You can add extra flavors to suit your taste. Consider these options: - Red pepper flakes for heat - Fresh herbs like basil or thyme - Lemon zest for brightness - Sautéed vegetables such as spinach or cherry tomatoes Feel free to mix and match based on what you have. If you can't find certain ingredients, here are some swaps: - Use olive oil instead of butter for a lighter dish. - Try Pecorino Romano cheese if you want a sharper flavor. - Swap fresh garlic for garlic powder, but use less. These options keep the dish flexible while still being delicious. 1. First, fill a large pot with salted water. Bring it to a boil. 2. Add the gnocchi to the boiling water. Cook for 2-3 minutes until they float. 3. While the gnocchi cooks, heat a large skillet on medium heat. Add the butter and let it melt. 4. Once the butter melts, add the minced garlic. Cook for 1-2 minutes while stirring. 5. Use a slotted spoon to move the gnocchi from the pot to the skillet. 6. Gently toss the gnocchi in the garlic butter for about 1 minute. 7. Gradually sprinkle in the Parmesan cheese. Toss until it melts and coats the gnocchi. 8. Taste and add salt and pepper as needed. Remove from heat. 9. Before serving, garnish with chopped parsley for freshness. Timing is key for great gnocchi. The water must boil before adding the gnocchi. When they float, they are ready. This usually takes about 2-3 minutes. Keep an eye on them to avoid overcooking. For the best flavor, use fresh garlic and quality Parmesan cheese. The butter should melt gently without browning. This keeps the flavor bright. Adding red pepper flakes adds a nice kick, but it’s optional. Experiment with the amounts to find your perfect balance. The fresh parsley at the end brightens the dish for a lovely finish. To cook gnocchi well, start with a big pot of salted water. Bring it to a boil. This step is key to flavor. Add the gnocchi when the water bubbles. Gnocchi is done when it floats to the top, usually in 2-3 minutes. Use a slotted spoon to scoop them out. This keeps them intact and ready for the sauce. While garlic and Parmesan shine, add more flavor easily. A pinch of red pepper flakes packs a spicy punch. Fresh herbs like basil or thyme can also brighten the dish. You can use lemon zest for a fresh twist. Consider adding a splash of white wine to the butter, too. This adds depth and a touch of acidity. To serve gnocchi, use warm, shallow bowls. This keeps the gnocchi cozy and inviting. Top with extra Parmesan for a lovely finish. A sprinkle of chopped parsley adds color and freshness. For added texture, a crisp side salad is great. It balances the meal and makes it more appealing. {{image_4}} Want a kick? Add red pepper flakes to your dish. Just sprinkle in 1/4 teaspoon as you toss the gnocchi. This gives the meal a nice heat that warms your palate. You can adjust the amount based on your taste. If you love spice, feel free to add more. This variation makes the dish fun and exciting! You can boost nutrition by adding veggies. Spinach works great. Just toss in a handful during the last minute of cooking. The heat will wilt it perfectly. Cherry tomatoes are another option. Slice them in half and add them to the skillet. They will burst with flavor, adding a sweet touch. Both options make the dish colorful and healthy. Swap the Parmesan for other cheeses to mix things up! Pecorino Romano offers a sharper taste. For a creamier option, try goat cheese. Add it in the last step so it melts beautifully. You can also use mozzarella for a gooey texture. Each cheese gives the dish a unique twist, keeping it fresh and fun. To store leftover gnocchi, first let it cool to room temperature. Then, transfer it to an airtight container. You can keep it in the fridge for up to three days. If you want to keep it longer, freezing is a great option. Just remember to label the container with the date so you can keep track. When reheating gnocchi, you want to keep it soft and tasty. You can use a skillet for the best results. Add a little butter or olive oil to the pan. Heat it on medium-low. Add the gnocchi and stir gently until they warm through. This method helps to regain some of that lovely buttery texture. You can also add a splash of water to create steam, which keeps it moist. Freezing gnocchi is easy! First, lay the cooked gnocchi in a single layer on a baking sheet. Make sure they are not touching. Freeze them for about an hour until they are firm. Once frozen, place them in a freezer bag. Remove as much air as possible before sealing. You can store them in the freezer for up to three months. When you want to eat them, just boil them straight from the freezer. They will be soft and delicious! Yes, you can use homemade gnocchi. Just ensure they are fresh. The cooking time may be similar, about 2-3 minutes in boiling water. Homemade gnocchi will add a personal touch to the dish. They may also have a unique flavor and texture. You can pair garlic parmesan gnocchi with several sides. A crisp side salad adds freshness. Roasted vegetables bring color and taste. Grilled chicken or shrimp can also be great main dish choices. For a complete meal, serve with crusty bread to soak up the sauce. Gnocchi is done when it floats to the top of the water. This usually takes about 2-3 minutes. Once they float, they are light and cooked through. Be careful not to overcook them, or they can become mushy. Always taste one to confirm the texture! In this blog post, we explored how to make delicious garlic parmesan gnocchi. We discussed the key ingredients and options for custom flavors. You learned step-by-step instructions that make cooking easy. I shared tips for perfect texture and flavor. We also covered variations like spicy options and adding veggies. Finally, we explained storage and reheating methods for leftovers. Now, you are ready to impress with your gnocchi skills. Enjoy your cooking journey!

Minute Garlic Parmesan Gnocchi Quick and Tasty Meal

Are you looking for a quick and tasty way to impress your taste buds? I’ve got you covered with Minute

- 1 ½ cups all-purpose flour - ½ cup granulated sugar - ½ cup brown sugar, packed - 1 teaspoon baking powder - ½ teaspoon baking soda - ½ teaspoon ground cinnamon - ¼ teaspoon ground nutmeg - ¼ teaspoon ground ginger - ½ teaspoon salt - 1 cup canned pumpkin puree - ⅓ cup vegetable oil - 2 large eggs - 1 teaspoon vanilla extract - 8 oz cream cheese, softened - ¼ cup granulated sugar - 1 large egg - ½ teaspoon vanilla extract These ingredients come together to create a warm and inviting treat. The dry ingredients form the base, giving the muffins their texture. The pumpkin puree adds moisture and rich flavor. The spices, like cinnamon and nutmeg, bring fall to every bite. The wet ingredients blend seamlessly, creating a smooth batter. Together, they bring out the warmth of the pumpkin. The cheesecake filling adds a creamy surprise. It contrasts the muffin's soft crumb and enhances every mouthful. To prepare, gather all ingredients. Measure them accurately for the best results. This ensures that your muffins rise perfectly and taste delicious. Using room temperature cream cheese helps achieve a smooth filling. Each ingredient plays a key role in making your Cheesecake Stuffed Pumpkin Muffins a delightful experience. - Preheat the oven to 350°F (175°C). - Prepare the muffin tin with liners or cooking spray. - Beat cream cheese and sugar until smooth. - Incorporate the egg and vanilla extract. - In a large bowl, mix dry ingredients. Include flour, granulated sugar, brown sugar, baking powder, baking soda, cinnamon, nutmeg, ginger, and salt. - In another bowl, combine wet ingredients. Whisk together pumpkin puree, vegetable oil, eggs, and vanilla until smooth. - Gently fold the wet mixture into the dry mixture. Stir until just combined; it’s okay if there are small lumps. Now, you have a smooth batter ready for the next steps. Enjoy the process! - Not overmixing the batter: Mix just until combined. A few lumps are fine. Overmixing makes muffins dense. Keep it light and fluffy for the best texture. - Proper baking times and temperatures: Always preheat your oven to 350°F (175°C). Bake muffins for 18 to 20 minutes. Check with a toothpick; it should come out clean or with a few crumbs. - Dusting muffins with powdered sugar: This gives your muffins a sweet, elegant touch. Use a sifter to sprinkle lightly on top. - Decorative presentation ideas: Arrange muffins on a nice platter. Add a sprig of mint for color. This makes your muffins extra special and inviting. - Using cold cream cheese: Always soften cream cheese before mixing. Cold cream cheese does not blend well and results in lumps in your filling. - Overfilling muffin cups: Fill each cup about ¾ full. Overfilling can cause muffins to spill over while baking. This keeps your muffins neat and perfectly shaped. {{image_4}} You can change the flavor of these muffins easily. Adding chocolate chips makes them rich and sweet. Nuts add a nice crunch too. Try walnuts or pecans for great taste. You can also use different spices. Instead of just cinnamon, use allspice or cloves for warmth. Each spice adds a unique twist to the muffins. If you need gluten-free options, try using almond flour or a gluten-free blend. These flours provide great texture without the gluten. For those who want a dairy-free version, use dairy-free cream cheese. Brands like Tofutti or Kite Hill work well. You can still enjoy the creamy filling without dairy. Fall brings many flavors you can add. Toss in dried cranberries for a sweet-tart kick. Chopped apples also work great, giving a fresh bite. For holiday flair, add a pinch of nutmeg or a hint of maple syrup. These seasonal additions make your muffins even more special and festive. To keep your muffins fresh, store them in an airtight container. This will help lock in moisture. You can also line the container with a paper towel. This absorbs extra moisture and keeps the muffins soft. Place the muffins in a cool place, away from sunlight. They stay fresh for about 2 to 3 days. Freezing muffins is a great way to save them for later. First, let the muffins cool completely. Then, wrap each muffin in plastic wrap. This prevents freezer burn. After wrapping, place them in a freezer bag. They can last up to 3 months in the freezer. To thaw, simply remove them from the freezer and let them sit at room temperature for a few hours. Warming up your muffins is easy. You can use a microwave for quick heating. Heat for about 10 to 15 seconds. For a crispier texture, use an oven. Preheat it to 350°F (175°C) and warm the muffins for about 5 to 7 minutes. To keep them moist, cover them with foil while reheating. This way, they stay delicious and soft. Cheesecake stuffed pumpkin muffins stay fresh for about 3 to 4 days. Store them in an airtight container at room temperature. If you want them to last longer, refrigerate them for up to a week. Just make sure to let them cool completely before storing. Yes, you can make these muffins ahead of time. They taste great fresh, but you can bake them the day before. Just store them in a sealed container. This way, they are ready to serve when you want! If you don’t have pumpkin puree, you can use butternut squash puree. Applesauce also works, but it will change the flavor. Just make sure to use a similar amount when you swap it out. Yes, these muffins are great for freezing. Let them cool completely, then wrap each muffin in plastic wrap. Place them in a freezer bag to keep them fresh. You can freeze them for up to three months. To make these muffins more festive, add spices like cloves or allspice. You can also top them with chopped nuts or drizzle caramel over them. Serving them with whipped cream or a scoop of ice cream adds a nice touch too! We explored how to make delicious cheesecake stuffed pumpkin muffins. I shared the key ingredients, step-by-step instructions, and essential tips to ensure your muffins turn out perfect. Remember to keep an eye on baking times and avoid common errors for the best results. These muffins can adapt to seasons and diets, making them a versatile treat! Enjoy these simple, fun recipes to enhance your baking skills and share delightful moments with others. Happy baking!

Cheesecake Stuffed Pumpkin Muffins Delightful Fall Treat

Fall is here, and it’s the perfect time to indulge in tasty treats like Cheesecake Stuffed Pumpkin Muffins. Imagine sinking

For these Air Fryer Crispy Falafel Bites, you will need: - 1 can (15 oz) chickpeas, drained and thoroughly rinsed - 1 small red onion, roughly chopped - 2 cloves garlic, minced - 1/4 cup fresh parsley, finely chopped - 1/4 cup fresh cilantro, finely chopped - 1 teaspoon ground cumin - 1 teaspoon ground coriander - 1/2 teaspoon baking powder - 1/4 teaspoon cayenne pepper (optional for added spice) - 1/4 cup all-purpose flour (or chickpea flour for a gluten-free option) - Salt and freshly ground black pepper to taste - Cooking spray for air frying You can swap out some ingredients if needed: - Use dried chickpeas instead of canned. Just soak and cook them first. - Swap red onion for yellow onion or green onion for a milder taste. - Fresh herbs like dill or mint can replace parsley and cilantro. - If you prefer, use oat flour or almond flour instead of all-purpose flour. - For a kick, add chili powder or smoked paprika instead of cayenne. When shopping for your ingredients, look for: - Chickpeas: Choose a can without added salt for better control over flavor. - Onions: Pick onions that feel firm and heavy for their size. - Herbs: Look for vibrant green colors and fresh scents for the best flavor. - Garlic: Select bulbs that are firm and free of blemishes. - Spices: Check the expiration date and buy whole spices when possible for better flavor. Using fresh and quality ingredients makes a big difference in your falafel bites. Enjoy the process! To start, gather your ingredients. You need chickpeas, red onion, garlic, parsley, cilantro, and spices. Place the drained chickpeas, chopped red onion, minced garlic, parsley, cilantro, cumin, coriander, baking powder, cayenne pepper, salt, and black pepper in a food processor. Pulse until it is coarse; don’t puree it. This mix should look chunky. Next, transfer the mixture to a bowl. Gradually add the flour while mixing. If the mix feels too wet, add a bit more flour. You want it to hold together well for shaping. This is your falafel mixture, packed with flavor. Now, it’s time to shape the falafel. Use a tablespoon to scoop out some mixture. Roll it into small balls or form patties. Place them on a tray or plate as you go. Make sure they are about the same size for even cooking. This step is fun and lets you get your hands a bit messy! Before cooking, preheat your air fryer to 375°F (190°C). This helps the falafel cook evenly. Lightly spray the air fryer basket with cooking spray to prevent sticking. Place the falafel bites in a single layer in the basket. Avoid overcrowding; it’s best to cook in batches. Spray the tops of the falafel bites lightly with cooking spray. This will give them a nice crispy texture. Cook for 12-15 minutes, flipping them halfway through. They should turn golden brown and crispy. Once done, let them cool slightly on a wire rack to keep that crunch. Enjoy your delicious falafel bites! To get your falafel bites nice and crispy, follow these tips: - Preheat your air fryer to 375°F (190°C). This helps cook the falafel evenly. - Lightly spray the falafel with cooking spray before frying. This adds extra crunch. - Don't crowd the basket. Give each piece space to crisp up. Cook in batches if needed. - Flip the falafel halfway through cooking. This ensures both sides get golden brown. Feel free to adjust the flavors in your falafel: - Add more garlic for a stronger taste. - Use fresh herbs like mint for a different flavor profile. - If you like it spicy, increase the cayenne pepper to taste. - Experiment with spices like paprika or turmeric to change the taste. Sometimes things don’t go as planned. Here are fixes for common problems: - If the mixture is too wet, add more flour until it holds shape. - If your falafel bites fall apart, ensure you pulse the mix just enough. - For undercooked falafel, return them to the air fryer for a few more minutes. - If they are too dry, try reducing the cooking time next time. These tips will help you make the best crispy falafel bites. Enjoy the process! {{image_4}} To make your falafel spicy, add more cayenne pepper. You can also use smoked paprika for a smoky flavor. Try adding crushed red pepper flakes for extra heat. Mixing in some harissa paste will give it a North African twist. Adjust the spice level to suit your taste. For a gluten-free option, use chickpea flour instead of all-purpose flour. This keeps the falafel tasty and light. Make sure to check the labels of your spices and any sauces. Most are naturally vegan, so you can enjoy this dish without worry. Serve these falafel bites with tahini sauce or yogurt for a creamy dip. A fresh salad with cucumbers, tomatoes, and herbs pairs nicely. You can also wrap them in pita bread with lettuce and tomatoes. For added flavor, drizzle with lemon juice or your favorite sauce. Enjoy your falafel bites as a snack or a meal! To keep your falafel bites fresh, let them cool first. Place them in an airtight container. Store them in the fridge for up to three days. This way, you can enjoy them later without losing their flavor. To freeze, shape the falafel bites as normal. Place them on a baking sheet lined with parchment paper. Freeze until solid, about an hour. Transfer them to a freezer bag. This method helps prevent sticking. You can freeze them for up to three months. When you want some, just take out what you need. For the best texture, reheat using the air fryer. Preheat it to 375°F (190°C). Cook the falafel bites for about 5-7 minutes. This will restore their crispiness. You can also use an oven for reheating. Just make sure to keep an eye on them to avoid burning. Enjoy your tasty snacks again! To make your air fryer falafel crispy, start by using the right amount of flour. After mixing all the ingredients, ensure the mix is not too wet. This step is key. Shape the falafel into small balls or patties. Lightly spray them with cooking spray before cooking. This helps them brown nicely. Preheat your air fryer to 375°F (190°C). Air fry for 12-15 minutes, flipping halfway through. This method ensures even crispiness. Yes, you can use dried chickpeas. However, they need prep work. Soak the dried chickpeas overnight in water. This step rehydrates them. After soaking, drain and rinse the chickpeas well. Cook them until tender, about 1-2 hours. Then, you can follow the same recipe. The texture may change slightly, but the flavor remains fantastic. Falafel bites pair well with many sides. You can serve them with tahini sauce or yogurt sauce. A fresh vegetable salad adds color and crunch. Pita bread also makes a great option. You can create a falafel wrap with veggies. For a touch of spice, add hot sauce if you like. Falafel bites last about 3-4 days in the fridge. Store them in an airtight container for best results. To keep them fresh, let them cool completely before storing. If you want to enjoy them later, reheating is easy. Just pop them back in the air fryer for a few minutes to regain their crispiness. In this blog post, we covered everything you need for making falafel. We explored essential ingredients, steps for cooking, and tips for great results. You learned how to select fresh ingredients and shape perfect falafel bites. Additionally, we shared variations and storage tips to keep your meals fresh. Remember, making falafel can be fun and tasty. Use these tips, and you’ll impress everyone with your cooking!

Air Fryer Crispy Falafel Bites Easy and Delicious Snack

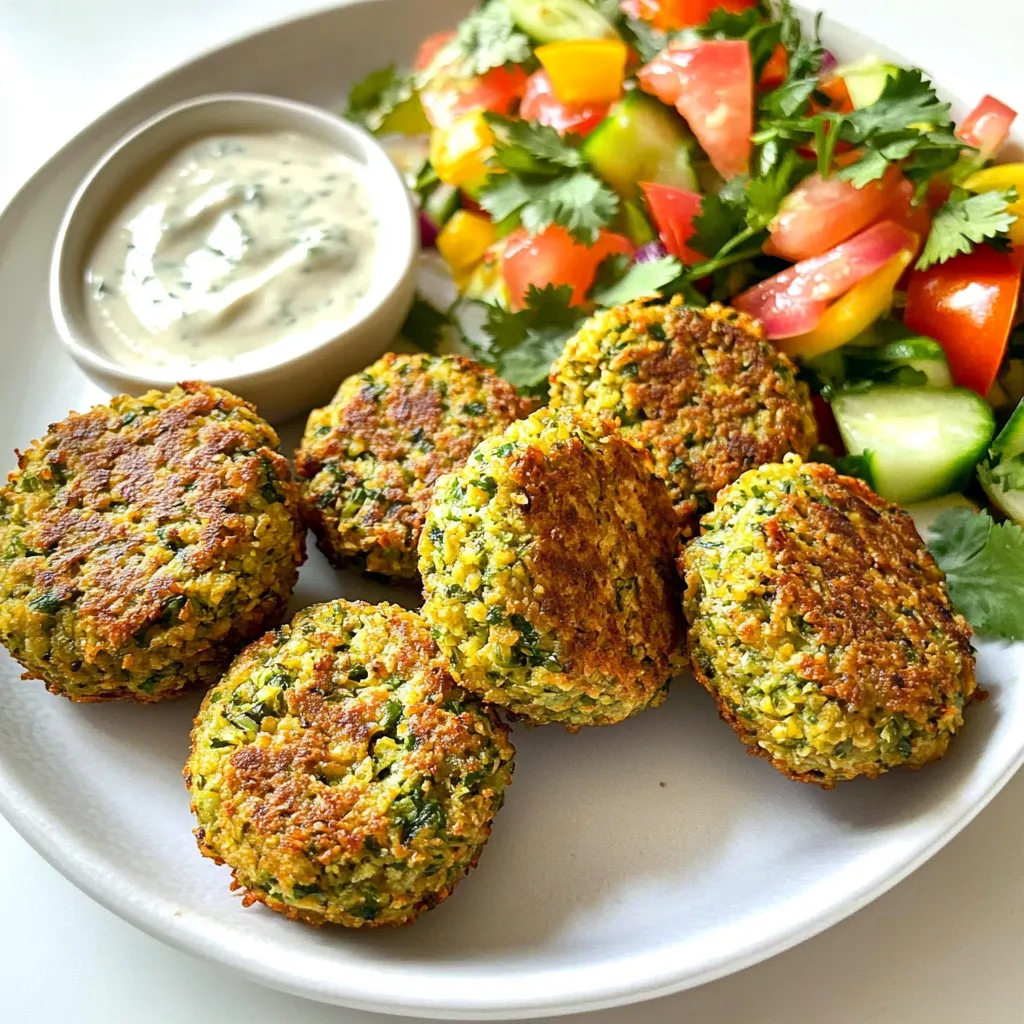
Looking for a tasty snack that’s easy to make? These Air Fryer Crispy Falafel Bites are the perfect choice! With

- 1 lb large shrimp, peeled and deveined - 2 bell peppers (one red and one yellow), thinly sliced - 1 medium red onion, thinly sliced - 4 cloves of garlic, finely minced - 1/4 cup honey - 3 tablespoons low-sodium soy sauce - 2 tablespoons extra virgin olive oil - 1 teaspoon fresh ginger, finely grated - 1/2 teaspoon red pepper flakes (adjust based on your spice preference) - Salt and freshly cracked black pepper, to taste - 3 tablespoons chopped green onions, for garnish - 1 tablespoon sesame seeds, for garnish When I make this dish, I focus on fresh ingredients. The shrimp should be large, easy to peel, and deveined. I love using red and yellow bell peppers for color and sweetness. The red onion adds a nice, mild bite. Fresh garlic gives a great flavor. For the sauce, honey offers sweetness that balances the salt from the soy sauce. I use low-sodium soy sauce to keep it healthier. Extra virgin olive oil adds richness, while fresh ginger gives a zesty kick. I always keep red pepper flakes on hand. You can add more or less based on how spicy you want your dish. I season with salt and black pepper for taste. Finally, I finish with green onions and sesame seeds for a pop of flavor and texture. - Preheat the oven to 400°F (200°C). - Line a large baking sheet with parchment paper. Now, you have a clean surface for your shrimp and veggies. This step helps with easy cleanup, too. - In a medium bowl, mix honey, soy sauce, minced garlic, olive oil, grated ginger, red pepper flakes, and a pinch of salt and pepper. Whisk until smooth. This sauce is the star of the show. It adds sweetness and flavor to your dish. - In a large bowl, add peeled shrimp, sliced bell peppers, and red onion. Pour the honey garlic sauce over everything. - Toss the shrimp and veggies gently until they are well coated. You want every bit to soak up that tasty sauce. - Spread the mixture in a single layer on the baking sheet. Make sure they aren’t crowded so they cook evenly. - Bake in the preheated oven for 15-20 minutes. Check that the shrimp are pink and opaque, and the veggies are tender. Stir halfway through cooking for even roasting. - After baking, let the dish cool for a few minutes. This helps the flavors settle before serving. - Garnish with chopped green onions and sesame seeds. These add a nice crunch and a pop of color. Serve warm and enjoy! For a complete meal, pair it with steamed rice or quinoa. The fluffy grains soak up the sauce well and make every bite delightful. To ensure the shrimp are cooked just right, look for a pink color. They should be opaque and firm. Overcooked shrimp can turn tough. To avoid this, keep an eye on the time. Bake for about 15 to 20 minutes. Stir halfway to help them cook evenly. Avoid overcrowding on the baking sheet. When shrimp and veggies are too close, they steam instead of roast. This affects both texture and flavor. Spread them out in a single layer. This way, everything cooks perfectly and gets that nice caramelized edge. If you like a bit of heat, adjust the spice with red pepper flakes. Start with a small amount and taste the sauce. You can always add more if you want extra kick. This simple tweak can make a big difference. Don't be afraid to experiment with different veggies. Try adding broccoli, snap peas, or carrots for a new twist. Each vegetable brings its own flavor. Mixing them can create a fun and colorful dish. Serve this dish in shallow bowls or plates. This showcases the vibrant colors of the shrimp and peppers. Garnish with chopped green onions and sesame seeds. This adds a nice crunch and looks amazing. Pair with steamed rice or quinoa. This adds a nice base to soak up the sauce. It balances out the meal and makes it filling. Enjoy your beautiful and tasty creation! {{image_4}} You can swap shrimp for chicken or tofu. Both options work well. If you use chicken, cut it into small pieces. Chicken needs a bit more time to cook. Bake it for 25-30 minutes instead. For tofu, choose firm or extra-firm. Cube it and add it to the mix. Tofu cooks quickly, so watch it closely. Around 15-20 minutes should be enough. Feel free to use seasonal veggies in your dish. Zucchini, asparagus, or snap peas are great choices. They add color and taste. You can also mix in broccoli or carrots for extra crunch. For more flavor, try adding a splash of lime or lemon juice. Fresh herbs like cilantro or basil can boost taste too. You can make the sauce spicier or sweeter. Add more red pepper flakes for heat. If you like it sweeter, add more honey. Use maple syrup as a fun swap for honey. For those needing gluten-free options, use tamari instead of soy sauce. This keeps the dish tasty while meeting dietary needs. To keep your sheet-pan honey garlic shrimp and peppers fresh, store leftovers properly. Use airtight containers to avoid spills and keep flavors intact. Glass containers work well, as they do not stain or absorb odors. If you plan to freeze, use freezer-safe bags or containers. Remove as much air as possible to prevent freezer burn. When it's time to enjoy your leftovers, reheat them gently. The best method is using the oven. Preheat to 350°F (175°C) and place the shrimp and peppers in an oven-safe dish. Cover it with foil to keep moisture in. Heat for about 10 minutes. This keeps the shrimp tender. Avoid the microwave, as it can make shrimp rubbery, and overcooking ruins the dish's texture. In the fridge, your dish stays fresh for about 2-3 days. Look for signs of spoilage, like an off smell or slimy texture. If you notice any of these signs, it’s best to discard the leftovers. For frozen shrimp, the dish can last for up to three months. Just remember to label your containers with the date. Yes, you can use frozen shrimp. Just thaw them first. Place the shrimp in a bowl of cold water for about 15-20 minutes. Once thawed, peel and devein if needed. Pat them dry with a paper towel before mixing them with the veggies and sauce. This helps the shrimp cook evenly and absorb the flavor. This dish pairs well with several sides. Here are some great options: - Steamed rice - Quinoa - Cauliflower rice - Noodles - Fresh salad These sides balance the sweet and savory flavors of the shrimp and peppers. To add heat, you can increase the red pepper flakes. Start with one teaspoon for more kick. You can also add fresh sliced chili peppers or a dash of hot sauce. If you love spice, try a sprinkle of cayenne as well. Always remember to taste as you go! Yes, this recipe is great for meal prep. You can make it ahead for lunches or dinners. Cook the shrimp and veggies, then store them in airtight containers. Keep them in the fridge for up to three days. Just reheat in the microwave or on the stove when ready to eat. You can prep components ahead of time. Chop the vegetables and store them in the fridge. You can also make the sauce in advance. Just mix the sauce and keep it in a jar. When you're ready to cook, combine everything and bake. This saves you time on busy days. This blog post covered a tasty sheet-pan honey garlic shrimp dish. We explored the key ingredients, step-by-step cooking instructions, and tips for perfecting the recipe. I shared ways to mix things up with protein and vegetable alternatives. Proper storage and reheating methods ensure your leftovers remain delicious. I hope you feel inspired to try this recipe. You’ll love the flavors and ease of preparation. Enjoy creating a meal that impresses everyone!

Sheet-Pan Honey Garlic Shrimp & Peppers Delight

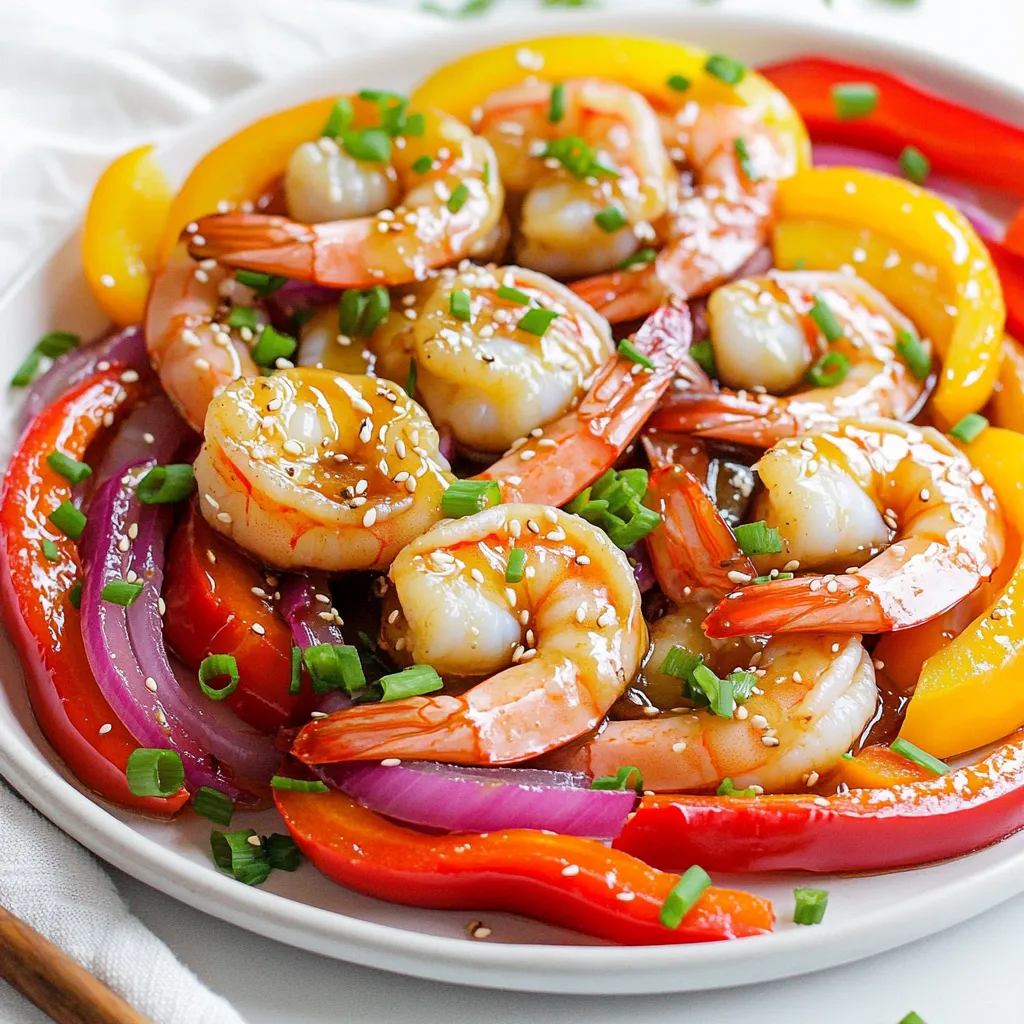
Looking for a quick and tasty meal? You’ll love my Sheet-Pan Honey Garlic Shrimp & Peppers Delight! This dish combines

To make Peanut Butter Banana Nice Cream, gather these simple ingredients: - 3 ripe bananas, sliced and frozen - 1/4 cup natural peanut butter - 1 teaspoon vanilla extract - A pinch of sea salt These main ingredients create the smooth and creamy base for your nice cream. The ripe bananas add natural sweetness and texture. The peanut butter gives a rich, nutty flavor. If you want extra sweetness, consider adding some of these: - 1 tablespoon honey - 1 tablespoon maple syrup These sweeteners are not required, but they can enhance the flavor. Adjust to your taste. If your bananas are very ripe, you might not need any sweetener at all. Toppings can make your nice cream even more fun! Here are some great options: - Chopped peanuts - Granola These toppings add crunch and texture. You can also sprinkle some extra banana slices for a fresh touch. Feel free to mix and match your favorite toppings! Start by slicing three ripe bananas into thin coins. Lay the slices in a single layer in a freezer-safe container. This step helps them freeze evenly. Leave the bananas in the freezer for at least two hours. They need to be solid to create nice cream. After the bananas are frozen, take them out of the freezer. Place the banana slices in a food processor. Add 1/4 cup of natural peanut butter. If you want, you can add 1 tablespoon of honey or maple syrup for sweetness. Also, include 1 teaspoon of vanilla extract and a pinch of sea salt. Blend this mixture on high speed until it looks smooth and creamy. You may need to scrape down the sides a few times. Be patient! This blending can take a couple of minutes. Once the mixture is creamy, taste it. If you want it sweeter, add more honey or syrup. Blend it again briefly to mix. You can serve the nice cream right away for a soft-serve texture. If you prefer it firmer, transfer it to a bowl and freeze for an extra 30 minutes. When ready to eat, scoop the nice cream into bowls. For a fun touch, top it with chopped peanuts or granola. Enjoy your delightful treat! For the best taste, use ripe bananas. Look for bananas with brown spots. These spots mean the bananas are sweet and full of flavor. Overripe bananas work best in this recipe. They blend smoothly into the nice cream. Texture is key for nice cream. Make sure to freeze the banana slices for at least two hours. This helps them become solid and creamy. When blending, keep the food processor running until the mixture is smooth. Scrape the sides often to mix everything well. Sweetness is a personal choice. You can add honey or maple syrup for extra sweetness. Start with a little, then taste the mixture. If it’s not sweet enough, add more and blend again. This way, you can make it just right for your taste! {{image_4}} You can make your Peanut Butter Banana Nice Cream even better with fun add-ins. Try adding a tablespoon of cocoa powder for a chocolate twist. A couple of tablespoons of ground cinnamon can bring warmth and spice. You can also mix in a small handful of dark chocolate chips for a sweet crunch. Each add-in changes the taste and makes it more exciting. If you want to switch things up, use different nut butters. Almond butter gives a nutty flavor that pairs well with bananas. Cashew butter adds a creamy texture without being too strong. Sunflower seed butter is a great choice if you need to avoid nuts. Each option will change the taste but keep that creamy goodness. You can easily make this recipe dairy-free while keeping it rich. Use a splash of coconut milk or almond milk to enhance creaminess. If you want a thicker texture, add some soaked cashews. These options keep the nice cream smooth and delicious, perfect for those who need a dairy-free treat. Store any leftover nice cream in an airtight container. This keeps it fresh and tasty. If you have a lot, divide it into smaller containers. This makes it easy to grab a scoop later. To keep your nice cream creamy, let it sit at room temperature for a few minutes before scooping. This helps soften it a bit. If it gets too hard, you can blend it again quickly. This will restore its smooth texture. The frozen bananas will last about 2 months in the freezer. Peanut butter can last up to a year if stored properly. Honey and vanilla extract have long shelf lives too. Just keep them in a cool, dry place. Make sure to check the dates on your ingredients for the best quality. Yes, you can use other fruits in nice cream! Berries, mangoes, or peaches work well. Just freeze them first. Blend them as you do with bananas. Each fruit gives a different flavor. Try mixing fruits for fun combos! Absolutely! This recipe is perfect for kids. It's simple, tasty, and healthy. Kids love sweet treats, and nice cream fits the bill. Plus, they can help make it. They can slice bananas and add ingredients. It’s a great family activity! To make this recipe sugar-free, skip the honey or maple syrup. The ripe bananas provide natural sweetness. You can also add a splash of vanilla extract for extra flavor. If you need more sweetness, consider using a sugar-free sweetener. Nice cream combines simple ingredients and easy steps to make a delicious treat. Optional sweeteners and toppings can customize each serving. Remember to use ripe bananas for great taste and the right texture. You can add different flavors or nut butters for variety. Store leftovers properly to keep them fresh. This recipe is kid-friendly and can be sugar-free with the right choices. Enjoy making this guilt-free dessert!

Peanut Butter Banana Nice Cream Simple and Delicious

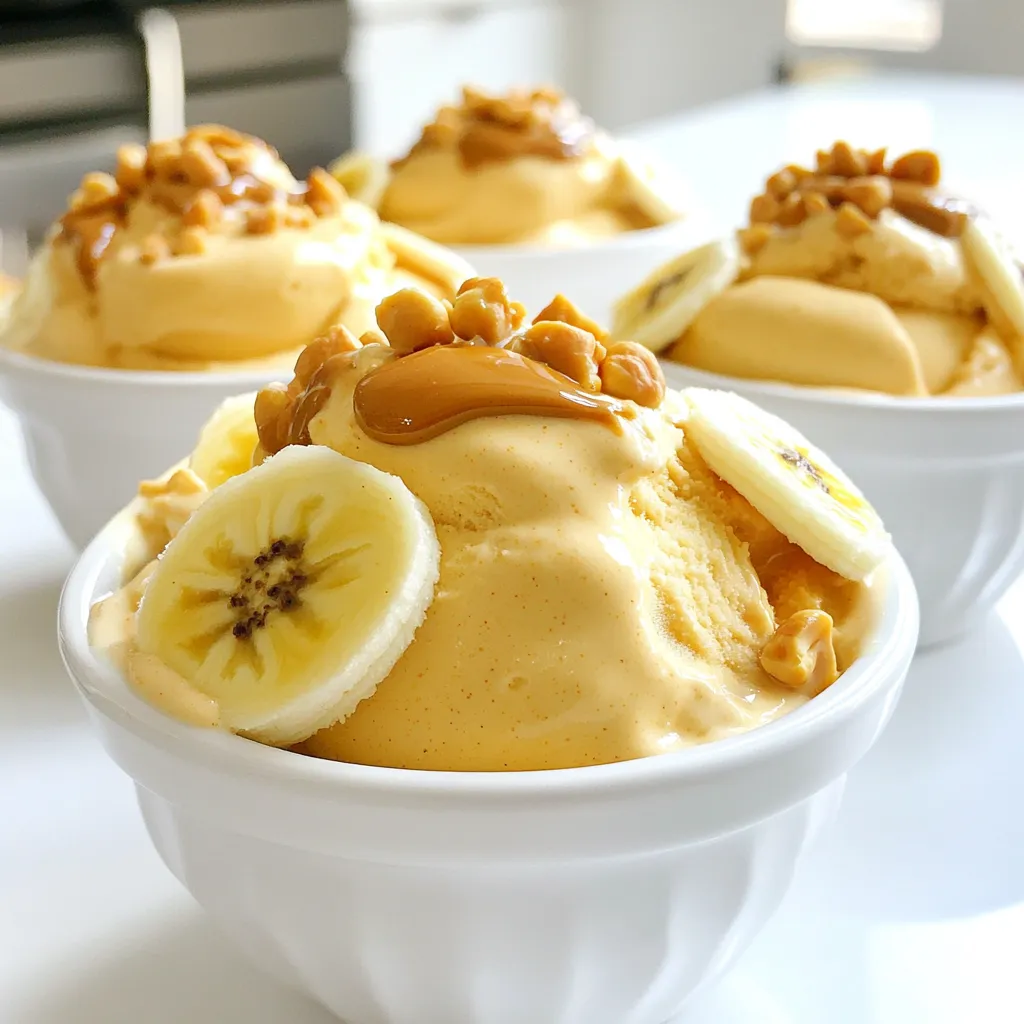
Looking for a sweet treat that’s both simple and healthy? Look no further! Peanut Butter Banana Nice Cream is creamy,

To make Minute Garlic Butter Steak Bites Pasta, you need: - 8 oz fettuccine pasta - 1 lb flank steak, cut into bite-sized cubes - 4 tablespoons unsalted butter, divided - 4 cloves garlic, finely minced - 1 teaspoon dried oregano - 1 tablespoon soy sauce - Salt and freshly ground black pepper, to taste - 1 cup cherry tomatoes, halved - 1/4 cup fresh parsley, roughly chopped - Freshly grated Parmesan cheese, for serving If you can't find flank steak, you can use sirloin or ribeye. Both have great flavor. For the pasta, any long type works well. You could use spaghetti or linguine. If you want a lighter dish, try zucchini noodles. If you don’t have fresh garlic, garlic powder works in a pinch. Use one-eighth teaspoon for each clove. For the soy sauce, tamari is a good gluten-free choice. When picking your flank steak, look for bright red color with little fat. The meat should feel firm but not tough. Fresh pasta should be smooth and not sticky. Choose cherry tomatoes that are plump and firm. They should smell sweet. For parsley, select bright green leaves with no browning. Fresh herbs add a nice touch to your dish. Cook the fettuccine first. Fill a large pot with water. Add a good amount of salt. Bring the water to a rolling boil. Once boiling, add the fettuccine. Cook it until it is al dente, as per the package instructions. Before draining, save 1 cup of pasta water. Drain the pasta and set it aside for later. While the pasta cooks, get the steak ready. Cut the flank steak into bite-sized cubes. Season the cubes well with salt and fresh black pepper. Make sure every piece is coated. This step adds a lot of flavor to the steak. Now, heat a large skillet over medium-high heat. Melt 2 tablespoons of butter in the skillet until it starts to foam. Carefully add the seasoned steak cubes in a single layer. Sear them for about 2-3 minutes. You want them browned on all sides. Once they are browned, take the steak out and set it on a plate. In the same skillet, lower the heat to medium. Add the remaining 2 tablespoons of butter. Once melted, add the minced garlic. Sauté it for about 1 minute. Stir it often until it smells amazing but does not brown. Burnt garlic can ruin the flavor. Add the drained fettuccine back into the skillet. Now, add the seared steak, halved cherry tomatoes, dried oregano, and soy sauce. Toss everything together well. If it seems dry, add a splash of the reserved pasta water. This helps create a silky sauce. Cook for an additional 2-3 minutes. Stir gently so everything heats through and flavors blend. Remove the skillet from the heat. Sprinkle chopped parsley over the pasta. Toss gently to mix. Serve right away with freshly grated Parmesan cheese on top. Enjoy your meal! To cook pasta just right, start with plenty of water. Use a big pot and add salt. The water should taste like the sea. Bring it to a rolling boil before adding the fettuccine. Follow package instructions for cooking time. Stir the pasta a few times to prevent sticking. Check for that al dente bite, where it is firm but not hard. Before draining, save some pasta water. This water helps make the sauce silky later. For tender steak bites, choose flank steak. Cut it into small cubes. Season well with salt and pepper. This adds flavor. Sear the steak in a hot skillet. Use medium-high heat and let it brown without moving it too much. This seals in the juices. Cook it for about 2-3 minutes. Don’t overcrowd the pan; cook in batches if needed. This keeps the heat high and gives a nice crust. Garlic adds great flavor but can burn quickly. To avoid this, lower the heat after searing the steak. Add garlic to melted butter only when it's warm. Stir it constantly for about a minute. You want it to smell good but not turn brown. If it does burn, it turns bitter and ruins the dish. If you’re unsure, keep a close eye on it. Garlic cooks fast, so stay alert! {{image_4}} You can add veggies to boost flavor and nutrition. Cherry tomatoes are a great start. They add sweetness and color. You can also try adding spinach or zucchini. Just toss them in during the last few minutes of cooking. This keeps them fresh and vibrant. Bell peppers or mushrooms can work well too. They add texture and taste. Fettuccine is a classic choice, but many options exist. You might like penne, which holds sauce well. Or try spaghetti for a fun twist. If you want a lighter feel, go for zucchini noodles. They pair nicely with the steak and garlic sauce. You can even mix different shapes for a fun plate! While garlic butter is a winner, you can switch it up. A creamy Alfredo sauce adds richness. A splash of balsamic glaze brings tang and depth. For a spicy kick, add red pepper flakes to the butter. You could also try pesto for a fresh herb flavor. Each sauce changes the dish and keeps it exciting! To store your leftover Minute Garlic Butter Steak Bites Pasta, let it cool first. Place it in an airtight container. You want to keep it fresh. This method helps keep the flavors intact. Store in the fridge for up to three days. If you leave it out too long, it may spoil. When reheating, add a splash of water or broth to the pasta. This helps prevent it from drying out. Heat it in a skillet over medium-low heat. Stir it gently to mix the flavors. You can also use a microwave. Cover it loosely with a lid to keep moisture. Heat for about one to two minutes, stirring halfway through. If you want to save it longer, freezing is a great choice. Place the cooled pasta in a freezer-safe bag. Remove as much air as you can before sealing. Label the bag with the date. You can freeze it for up to three months. When ready to eat, thaw it in the fridge overnight. Reheat as mentioned before for best taste. It takes about 20 minutes to cook this dish. You will spend about 10 minutes prepping the ingredients and 10 minutes cooking. It's quick and easy, perfect for busy days. Yes, you can use other meats. Chicken breast or shrimp works well. Just make sure to adjust the cooking time. For chicken, cook until no longer pink. For shrimp, cook until they turn pink and opaque. This pasta pairs well with a fresh salad. A simple green salad with vinaigrette is great. You can also serve garlic bread or roasted vegetables on the side. These add nice textures and flavors to your meal. In this article, we explored the key ingredients needed for Minute Garlic Butter Steak Bites Pasta. We talked about how to cook the pasta and prepare the steak for the best flavor. I shared tips to ensure perfect pasta and tender steak. You can also try fun variations and know how to store leftovers properly. Remember, cooking is a chance to enjoy fresh flavors. With practice, you will impress everyone with this delicious dish.

Minute Garlic Butter Steak Bites Pasta Quick and Tasty

Craving a quick meal that packs big flavor? Look no further! In this blog post, I’ll show you how to

Older posts
Newer posts
← Previous Page1 … Page5 Page6 Page7 … Page83 Next →

dsad

© 2026 eataroundit • Built with GeneratePress

Our Policies

  • Copyright Policy
  • Cookie Policy
  • GDPR Policy
  • Privacy Policy
  • Disclaimer
  • Terms Of Use

More Information

  • Home
  • About
  • Contact
  • Appetizers
  • Dessert
  • Dinner
  • Drinks
©2026, eataroundit About Back To Top