Skip to content
DisclaimerTerms Of UseGDPR PolicyCookie Policy

eataroundit

  • Home
  • Drinks
  • Appetizers
  • Dinner
  • Dessert
  • About
  • Contact
  • Privacy Policy
DisclaimerTerms Of UseGDPR PolicyCookie Policy

NO-ING-IMG

- 1 block (14 oz) firm tofu, pressed and cubed - 1 cup broccoli florets - 1 bell pepper (any color), sliced into thin strips - 1 medium carrot, sliced thinly - 1 medium zucchini, sliced into half-moons - 3 tablespoons soy sauce (or tamari for a gluten-free option) - 2 tablespoons pure maple syrup - 1 tablespoon rice vinegar - 1 tablespoon toasted sesame oil - 1 teaspoon freshly grated ginger - 2 cloves garlic, minced - 1 tablespoon cornstarch - Sesame seeds for garnish - Green onions, thinly sliced for garnish The tofu is the star of this dish. I prefer firm tofu because it holds its shape well. Pressing it removes extra water, making it crispier when cooked. The colorful veggies add crunch and flavor. Broccoli provides a nice green touch. Bell peppers bring sweetness, while carrots add a pop of color. Zucchini is soft and pairs well with the other veggies. The teriyaki sauce is simple yet packed with flavor. Soy sauce gives saltiness, and maple syrup adds a hint of sweetness. Rice vinegar brings a mild tang, while sesame oil gives a nutty taste. Fresh ginger and garlic add depth and aroma. For garnish, sesame seeds give a nice crunch. Green onions add a fresh bite and color. This blend of ingredients creates a balanced, tasty meal that looks as good as it tastes! 1. Preheat your oven to 400°F (200°C). This temperature is perfect for crispy tofu and tender veggies. 2. Line a large baking sheet with parchment paper. This will help prevent sticking and make cleanup easy. 3. In a medium bowl, mix the teriyaki sauce ingredients. Combine soy sauce, maple syrup, rice vinegar, sesame oil, ginger, and garlic. Whisk them until you have a smooth sauce. 4. In another bowl, coat the cubed tofu with cornstarch. Make sure each piece is covered well. This is key to getting that crispy texture. 1. Spread the coated tofu on one side of the baking sheet. On the other side, place the broccoli, bell pepper, carrot, and zucchini. 2. Drizzle the teriyaki sauce over the tofu and veggies. Make sure everything gets a good coat for the best flavor. 3. Spread the ingredients out evenly. Leave some space between pieces to help them cook well. 4. Bake for 25-30 minutes. Halfway through, toss the tofu and veggies to ensure even cooking and browning. 1. Once baked, take the pan out of the oven. Sprinkle sesame seeds and sliced green onions on top for a nice finish. 2. Serve warm over rice or quinoa. This makes it a filling and tasty meal. To achieve a crispy tofu texture, start by pressing the tofu. This removes excess water. Next, coat the cubes with cornstarch. This helps them become golden and crunchy during baking. Spread the tofu out on one side of the pan. Make sure not to crowd the pieces. For vegetables, choose fresh and vibrant ones. Broccoli, bell peppers, carrots, and zucchini all work well. Cut them into even sizes for uniform cooking. Thin strips of bell pepper add color and sweetness, while carrot rounds add crunch. Zucchini adds tenderness, making the dish more balanced. To add spice or heat, try adding red pepper flakes or sriracha to the teriyaki sauce. This brings a nice kick to the dish. Mix in a teaspoon or two, depending on your heat preference. You can also add a splash of lime juice for a zesty twist. Customizing the teriyaki sauce is simple. You can swap soy sauce for coconut aminos for a sweeter taste. Adding a splash of orange juice gives a bright flavor. Feel free to adjust the maple syrup amount to balance the sweetness. Experiment until you find your favorite blend! {{image_4}} You can switch the tofu for chicken, tempeh, or shrimp. Each option brings a unique taste. For chicken, cut it into bite-sized pieces. Make sure to cook it until it’s fully done. Tempeh is a great vegan choice. It has a nutty flavor and pairs well with teriyaki sauce. Shrimp cooks quickly, so add it later during baking. Adjust cooking times as needed. Feel free to mix in other veggies. Snap peas, asparagus, and cauliflower work well too. You can use bok choy for a fresh twist. If you like spice, add some sliced jalapeños. Remember, cut the veggies evenly for even cooking. This helps all the flavors blend together nicely. For gluten-free needs, use tamari instead of soy sauce. This simple swap keeps the dish tasty. If you want it vegan, make sure the maple syrup is pure. This recipe is already plant-based, so you’re set! Check labels when buying sauces to ensure they fit your diet. To store your leftover Sheet Pan Teriyaki Tofu and Veggies, first let it cool down. Place the cooled dish in an airtight container. Make sure to separate the tofu from the veggies if you can. This helps keep the veggies crisp. Store it in the fridge. It will stay fresh for about 3 to 4 days. If you want to keep it longer, you can freeze it. Use a freezer-safe container or bag. This way, you can enjoy it later. When it's time to reheat, avoid the microwave if you want to keep the texture. Instead, use the oven or a skillet. Preheat your oven to 350°F (175°C). Spread the leftovers on a baking sheet. Heat for about 10 to 15 minutes or until warm. If using a skillet, add a little oil and cook over medium heat. Stir gently until everything is heated through. This keeps the tofu crispy and the veggies tender. Enjoy your meal just as delicious as the first time! You can use tempeh or chickpeas instead of tofu. Tempeh has a nutty flavor and great texture. Chickpeas add protein and a hearty bite. Both options work well with teriyaki sauce. Yes, you can prep this dish ahead. Chop the veggies and tofu, and mix the sauce. Store everything in the fridge. When ready, assemble and bake. This saves time on busy days. To add spice, mix in red pepper flakes or sriracha to the teriyaki sauce. You can also add sliced jalapeños to the veggies before baking. Adjust the spice level to fit your taste. Absolutely! This dish is perfect for meal prep. It keeps well in the fridge for up to four days. Just reheat in the oven or microwave, and enjoy a quick, tasty meal. This blog post covered a tasty teriyaki dish using tofu and colorful veggies. We explored how to prepare ingredients, bake them, and serve with garnishes. You learned tips for crispy tofu and flavor boosting. We even discussed variations for proteins and veggies. Don’t forget, storing and reheating leftovers ensures your meal remains delicious. With these easy steps, you can enjoy a healthy, custom meal anytime. Try experimenting with your favorite flavors for even more fun!

Sheet Pan Teriyaki Tofu and Veggies Savory Feast

Are you craving a satisfying dish that’s easy to make? Look no further! My Sheet Pan Teriyaki Tofu and Veggies

List of Ingredients - 2 cans (16 oz each) refrigerated biscuit dough - 1 cup pumpkin puree - 8 oz cream cheese, cut into small cubes - 1 cup brown sugar - 1 teaspoon ground cinnamon - ½ teaspoon ground nutmeg - ½ teaspoon ground ginger - ½ teaspoon vanilla extract - ½ cup unsalted butter, melted - 1 tablespoon maple syrup (optional) - Pinch of salt - Powdered sugar for dusting (optional) Gathering the right ingredients is key. The refrigerated biscuit dough serves as the base. It is soft and fluffy, perfect for monkey bread. Pumpkin puree adds rich flavor and moisture. Cream cheese gives a creamy surprise with each bite. Brown sugar blends with spices like cinnamon, nutmeg, and ginger, creating warmth. The vanilla extract rounds out the flavors, while melted butter adds richness. You can add maple syrup for extra sweetness. A dusting of powdered sugar on top makes it look lovely. Each ingredient plays a role in making this dish a true delight! First, preheat your oven to 350°F (175°C). This step is key for even baking. Next, grab a bundt pan and grease it well. You can use cooking spray or softened butter. This helps the bread come out easily later. In a medium bowl, mix 1 cup of pumpkin puree with ½ teaspoon of vanilla extract, 1 teaspoon of ground cinnamon, ½ teaspoon of ground nutmeg, and ½ teaspoon of ground ginger. Add a pinch of salt to the mix. Stir everything until it’s smooth. This pumpkin mixture will add flavor to your monkey bread. Now it's time to work with the biscuit dough. Open two cans of refrigerated biscuit dough. Take each piece and roll it into a ball, about the size of a golf ball. This size ensures even cooking for each piece. Next, flatten each dough ball slightly in your hands. Place a small cube of cream cheese, about 1 teaspoon, in the center of each flattened dough. This cream cheese will melt inside, making your monkey bread creamy and rich. Carefully fold the edges of the dough over the cream cheese. Pinch them to seal the dough. Make sure the cream cheese is fully enclosed. In a small bowl, mix 1 cup of brown sugar with 1 teaspoon of cinnamon. This will be the sweet coating for your dough balls. Dip each stuffed dough ball into melted butter, letting any extra drip off. Then, roll each ball in the brown sugar mixture, coating them fully. Start layering your dough balls in the greased bundt pan. Place half of the coated dough balls evenly in the pan. Drizzle half of the pumpkin mixture over this layer of dough. Now, add the remaining dough balls on top. Finish by drizzling the rest of the pumpkin mixture over this layer. To add even more flavor, sprinkle any leftover brown sugar mixture on top. If you like, drizzle the remaining melted butter over everything for extra richness. Place the bundt pan in your preheated oven. Bake for 30-35 minutes. You’ll know it’s done when the bread is golden brown. Insert a toothpick into the center; it should come out clean when it’s ready. Enjoy the warm, inviting aroma as it fills your kitchen! What common mistakes should I avoid when making monkey bread? Do not rush the dough. Make sure each ball is sealed well. If they are not sealed, the cream cheese can leak out during baking. Also, avoid overbaking. This can make the bread dry instead of soft. How can I ensure even cooking and flavor infusion? Layer the dough balls evenly in the bundt pan. Drizzle the pumpkin mixture carefully. This helps the flavors blend well. Make sure to coat each ball fully in brown sugar. This adds sweetness and a nice crust. What are fun ideas for serving and presenting the monkey bread? Serve it warm on a rustic wooden platter. This adds charm. You can also place a small dish of maple syrup on the side for drizzling. A sprinkle of powdered sugar on top looks great too. For a fresh touch, add mint leaves. What are pairing options to enhance the dining experience? Serve the monkey bread with hot drinks like coffee or tea. These drinks balance the sweetness. You can also add fresh fruit like apple slices or berries for a tasty contrast. {{image_4}} You can change this recipe easily to suit your taste. Instead of ground nutmeg, try using allspice or cardamom for a different flavor. You can also mix in some pumpkin pie spice. This spice blend adds warmth and depth to your monkey bread. If you want to adjust sweetness, you have options. Use honey or maple syrup instead of brown sugar. You can also lower the sugar amount if you prefer a less sweet treat. Just remember, the flavor changes with each sweetener. For those who need gluten-free options, find gluten-free biscuit dough at your local store. You can also use gluten-free flour to make your own dough. Just ensure all other ingredients are gluten-free as well. If you want a vegan version, swap the cream cheese with a plant-based cream cheese. You can also use vegan biscuit dough. For the butter, choose a vegan substitute like coconut oil or vegan butter. These swaps still give you a delicious pumpkin cream cheese monkey bread. To store leftover monkey bread, let it cool first. Wrap the bread in plastic wrap or foil. Place it in an airtight container. This keeps it fresh for up to three days. For the best taste, try to eat it within two days. Reheat it in the oven for the best texture. Set your oven to 350°F (175°C). Place the bread on a baking sheet. Heat for about 10-15 minutes. This warms it evenly and keeps it soft. For freezing the monkey bread, let it cool completely. Wrap it tightly in plastic wrap. Then, wrap it again in foil. This prevents freezer burn. You can freeze it for up to three months. When you are ready to eat it, take it out of the freezer. Let it thaw in the fridge overnight. To reheat, set the oven to 350°F (175°C) again. Place the thawed bread on a baking sheet. Heat for about 15-20 minutes until warm. This will help restore its yummy texture. You can skip the cream cheese for a lighter version. Use extra pumpkin puree instead. You can add more spices, like cinnamon and nutmeg, to boost flavor. Consider adding a nut or chocolate chip for a nice touch. This keeps your monkey bread soft and tasty. Yes, you can use homemade biscuit dough. Make sure it is well-chilled. This helps the dough to puff up nicely. Homemade dough may have a different texture but will still taste great. Just shape and stuff it like the refrigerated dough. Your pumpkin cream cheese monkey bread lasts about three days in the fridge. Store it in an airtight container to keep it fresh. You can reheat it in the oven or microwave for a warm treat. Yes, you can prepare it in advance! Assemble the monkey bread and cover it. Store it in the fridge overnight. Bake it the next day for a warm and fresh treat. Just add a few extra minutes to the baking time if it's cold from the fridge. This post covered everything you need to make delicious pumpkin cream cheese monkey bread. You learned about the ingredients, detailed steps to prepare and bake, plus helpful tips for best results. Exploring variations allows you to customize this treat to your tastes, while storage advice ensures you can enjoy it later. Take your time and enjoy the process. With practice, you'll impress everyone with your tasty monkey bread. Happy baking!

Pumpkin Cream Cheese Monkey Bread Delightful Recipe

Get ready to indulge in a fall favorite with my Pumpkin Cream Cheese Monkey Bread! This delightful recipe combines warm

- 1 cup graham cracker crumbs - 4 tablespoons unsalted butter, melted - 1 can (14 oz) sweetened condensed milk - 1/2 cup sour cream - 1/2 cup fresh key lime juice The key to a great No Bake Key Lime Pie Cup lies in its ingredients. First, we need graham cracker crumbs for a tasty crust. The unsalted butter adds richness and helps bind the crumbs. Sweetened condensed milk brings sweetness and a creamy texture. Adding sour cream gives a nice tang to balance the sweetness. Finally, fresh key lime juice is a must for that zesty kick. - Whipped cream - Lime slices - Extra key lime zest Garnishing is where you can get creative! Whipped cream adds a fluffy topping. Lime slices bring freshness and color. Extra key lime zest enhances the flavor and looks beautiful on top. You can mix and match these garnishes to suit your taste. Start by mixing the graham cracker crumbs and melted butter. In a medium bowl, combine 1 cup of graham cracker crumbs with 4 tablespoons of unsalted butter. Stir until it looks like wet sand. This is the base for your cups. Next, you will form the crust in each serving cup. Spoon about one heaping tablespoon of the crumb mixture into each cup. Use the back of a spoon or your fingers to press it down firmly. Aim for a nice, even layer at the bottom of 6 to 8 cups. Now it’s time to make the key lime filling. In a separate bowl, combine 1 can of sweetened condensed milk, 1/2 cup of sour cream, and 1/2 cup of fresh key lime juice. Add the zest of 2 key limes and 1 teaspoon of vanilla extract. Whisk everything together until it is smooth and well mixed. This filling will be creamy and tangy. Pour the filling over the crust in each cup. Carefully fill them right to the top. Make sure not to spill any on the sides. Now, let’s chill the cups to set the filling. Cover each cup with plastic wrap and place them in the fridge for at least 4 hours. This helps the filling firm up nicely, making it easier to enjoy when you serve them. Using fresh key lime juice makes a big difference. It gives your pie cups a bright, tangy taste. You can use regular limes if key limes are hard to find. The zest from the limes adds an extra burst of flavor. Whisk the filling until it is smooth. Start slowly to mix the ingredients well. This step is key to avoiding lumps. A smooth filling creates a creamy texture. It makes each bite delightful. To get an even crust, press the mixture firmly. Use the back of a spoon or your fingers. Aim for a flat base in each cup. This helps keep the crust intact when you serve. You can try different crusts too. Use crushed cookies instead of graham crackers. Oreos or vanilla wafers work well. Each choice gives your pie a unique twist. {{image_4}} You can easily change the flavor of your No Bake Key Lime Pie Cups. One fun option is to add coconut flavor. Simply mix in half a cup of shredded coconut into your filling. This gives a tropical twist that pairs well with the tangy lime. Another idea is using different citrus juices. If you want a twist, try using orange or grapefruit juice. Each juice adds its own unique flavor. Just remember to adjust the sweetness based on the juice you choose. You can serve these treats in many ways. Individual cups are perfect for parties. They are easy to grab and eat. On the other hand, you can make one large pie. This option works well for family gatherings. Just pour the filling into a pie dish instead of cups. When it comes to toppings, feel free to get creative. You can use alternative toppings for different occasions. For a holiday feel, add crushed candy canes or fresh berries. For a summer cookout, try fresh mint leaves or toasted coconut. Each topping adds a special touch to your dessert. To keep your No Bake Key Lime Pie Cups fresh, store them in the fridge. Use an airtight container to prevent any odors from affecting the taste. If you have leftover cups, they can last up to 3 days in the refrigerator. Just remember to cover them well to keep them creamy and delicious. Yes, you can freeze No Bake Key Lime Pie Cups! To do this, place them in a freezer-safe container. Wrap each cup tightly in plastic wrap before sealing. For the best taste and texture, eat them within a month. Thaw them overnight in the fridge before enjoying. This way, you can savor the fresh taste even after freezing. Yes, you can use regular limes. The flavor will be a bit different. Key limes are sweeter and more fragrant. If you use regular limes, the taste will be more tart. You might want to adjust the sugar in your recipe. Adding a little more sweetened condensed milk can help balance the flavor. The cups need at least 4 hours in the fridge. This chilling time helps the filling firm up. For best results, let them chill overnight. This makes the flavors blend well together, giving a tasty treat. You can use Greek yogurt as a substitute. It gives a similar tangy taste and creamy texture. If you want a dairy-free option, try coconut cream. It adds a nice flavor and works well. This blog post covered the key ingredients and steps for making No Bake Key Lime Pie Cups. You learned about essential items like graham cracker crumbs and fresh key lime juice. We explored tips for perfecting the filling and crust, plus fun variations to try. In the end, these cups are easy to make and delicious to eat. Enjoy crafting your treat and share it with friends! Your culinary adventure awaits, so dive in and create something special.

No Bake Key Lime Pie Cups Fresh and Tangy Delight

If you crave a sweet, tangy treat without turning on the oven, then you’re in for a treat! These No

For this One Pot Creamy Roasted Red Pepper Pasta, you will need: - 12 oz penne pasta - 2 cups roasted red peppers - 1 cup heavy cream - 1 cup vegetable broth - 1 tablespoon olive oil - 3 cloves garlic, finely minced - 1 teaspoon Italian seasoning - ½ teaspoon red pepper flakes (adjust according to your spice preference) - Salt and freshly ground black pepper, to taste - Fresh basil leaves, for garnish - Grated Parmesan cheese, for serving (optional) You can make this dish even if you don’t have heavy cream. Use: - Coconut milk for a dairy-free option. - Greek yogurt for a tangy twist. If you don’t have penne pasta, try: - Fusilli or farfalle for a fun shape. - Spaghetti for a classic twist. To make this dish, you will need a few key tools: - A large pot for cooking. - An immersion blender to blend the sauce. - A cutting board and knife for prep. - Measuring cups and spoons for accuracy. These tools make the cooking process smooth and easy. - First, gather all your ingredients. You need 12 oz of penne pasta, 2 cups of roasted red peppers, and 1 cup of heavy cream. Don't forget 1 cup of vegetable broth, 1 tablespoon of olive oil, 3 cloves of garlic, Italian seasoning, red pepper flakes, salt, and black pepper. Fresh basil and Parmesan are great for garnish. - Next, mince the garlic. This means you chop it into tiny pieces. This step helps release the garlic's strong flavor. - Now, heat the olive oil in a large pot over medium heat. Once it's hot, add the minced garlic. Cook for about 30 seconds. The garlic should smell great and turn a light golden color. - After the garlic cooks, add roasted red peppers, vegetable broth, and heavy cream to the pot. Stir it all together. Bring this mix to a gentle simmer. This helps the flavors blend well. - Now it's time to blend the sauce. Use an immersion blender to make it smooth and creamy. If you don’t have one, pour the mix into a regular blender. Blend it, then put it back in the pot. - Stir in the Italian seasoning, red pepper flakes, salt, and black pepper. Taste the sauce and adjust the seasoning if needed. This step makes sure the sauce is just right. - Add the penne pasta to the pot. Stir well so all the pasta gets covered in sauce. Increase the heat to medium-high and cover the pot. Cook for about 12 to 15 minutes. Stir it occasionally to prevent sticking. Check the pasta for doneness; it should be al dente. - If the sauce gets too thick, add more vegetable broth or water. This will help you reach your desired sauce consistency. - Once the pasta is cooked, take the pot off the heat. Let it sit for a minute to thicken a bit more. - Serve the pasta hot. Garnish with fresh basil leaves and sprinkle some grated Parmesan cheese on top if you like. This makes the dish look and taste even better. Enjoy your creamy roasted red pepper pasta! - Quick tips for cooking pasta: Always use a large pot. Fill it with water. A good rule is to add 1 tablespoon of salt for every 4 quarts of water. This helps flavor the pasta. Stir the pasta often while cooking. It prevents sticking. - Enhancing flavor profiles: You can add herbs like basil or parsley to the sauce. Fresh herbs brighten the dish. Try adding lemon zest for a zesty kick. A splash of balsamic vinegar can also deepen the flavor. - Best practices for leftovers: Store leftover pasta in an airtight container. It keeps well in the fridge for up to three days. If you plan to freeze it, do so without the cheese. It can last up to two months in the freezer. - Reheating methods for optimum taste: Reheat pasta on the stove over low heat. Add a splash of vegetable broth or cream to keep it moist. Stir often to prevent burning. You can also use the microwave, but add a little water to help steam it. - Overcooking pasta: Check the pasta a few minutes before the time is up. It should be al dente, or firm to the bite. Overcooked pasta becomes mushy and loses texture. - Under-seasoning the sauce: Always taste your sauce before serving. Adjust salt, pepper, and spices as needed. A well-seasoned sauce makes a big difference in flavor. Don't be shy with the seasonings! {{image_4}} You can switch to whole wheat pasta or gluten-free pasta. Whole wheat pasta adds fiber and nutrients. Gluten-free pasta makes this dish friendly for those with gluten issues. Both options offer great taste and texture. You can add protein like chicken, shrimp, or tofu. Chicken gives a hearty feel, while shrimp adds a light, fresh taste. Tofu is a great choice for a vegan option. You can also play with spices. Add more red pepper flakes for heat or try smoked paprika for a unique twist. Incorporate seasonal veggies like spinach or zucchini. These add flavor, color, and nutrition. For holidays, adapt the recipe by adding festive ingredients. Think of roasted pumpkin in the fall or fresh herbs in spring for a seasonal touch. When serving One Pot Creamy Roasted Red Pepper Pasta, I love to add sides that complement its flavors. Here are a few great options: - Mixed Green Salad: A fresh salad with lemon vinaigrette works well. The acidity cuts through the creaminess. - Garlic Bread: Crispy, buttery garlic bread adds a delightful crunch. You can scoop up any extra sauce too. - Roasted Vegetables: Seasonal veggies like zucchini or asparagus add color and nutrients. Roast them simply with olive oil and salt. This dish is perfect for meal prep. Here’s how you can plan ahead: - Batch Cooking: Make a large pot of pasta on the weekend. Store it in airtight containers in the fridge. - Freezing: You can freeze portions. Just thaw and reheat, adding a splash of broth to loosen the sauce. - Mix and Match: Pair it with different sides throughout the week. Keep the meals exciting! The way you present your pasta can make it even more inviting. Here are some fun ideas: - Wide Shallow Bowls: Use these to show off the creamy sauce. It makes for stunning visuals. - Garnish Well: Add fresh basil and a sprinkle of Parmesan. This adds color and flavor. - Add a Drizzle: Finish with a drizzle of olive oil or balsamic glaze. It adds a touch of elegance. Enjoy making this dish your own with these serving suggestions! Can you use dried roasted red peppers? Yes, you can use dried roasted red peppers. Rehydrate them in warm water before use. This helps them blend well into the sauce. What can I substitute for vegetable broth? You can use chicken broth or water. If you want a richer flavor, consider using homemade vegetable stock. Can this be made vegan? Yes, make it vegan by swapping heavy cream for coconut milk or cashew cream. Use vegetable broth and skip cheese for a lighter dish. How do you make the pasta creamier? To make it creamier, add more heavy cream or a splash of pasta water. Stir well to combine it evenly. How to adjust spice levels? To adjust spice levels, add more or less red pepper flakes. For milder flavors, use just a pinch. What should I do if I have leftovers? Store leftovers in an airtight container in the fridge. Reheat gently on the stove with a splash of water or broth. This blog post shared key steps to make One Pot Creamy Roasted Red Pepper Pasta. We went through the ingredients, tools, and preparation needed. You learned about potential swaps and cooking tips to avoid common mistakes. I hope these ideas inspire you to get creative in the kitchen. Experiment with variations and customize to your taste. Enjoy the process, and make this dish your own!

One Pot Creamy Roasted Red Pepper Pasta Delight

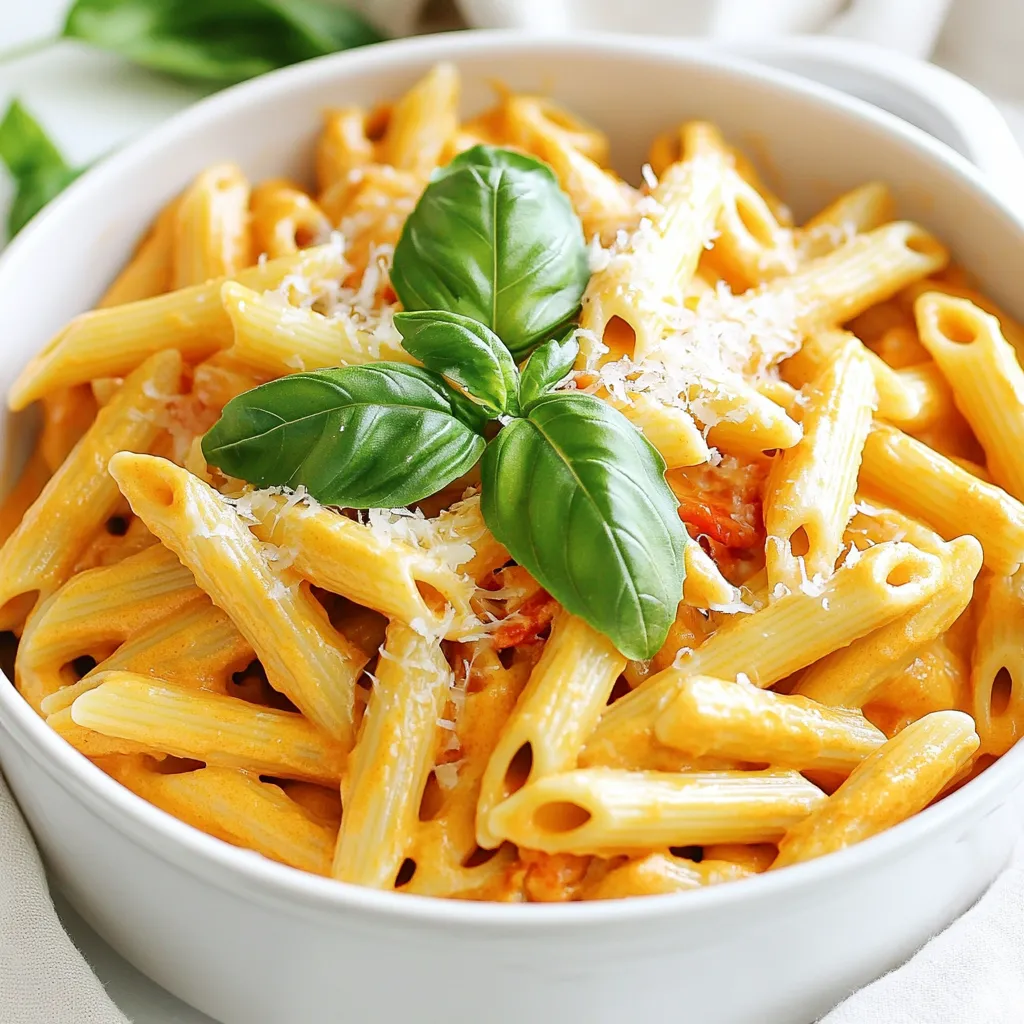
Looking for a quick and tasty meal? One Pot Creamy Roasted Red Pepper Pasta Delight is just what you need.

For this delightful treat, you will need a few key ingredients: - 1 cup graham cracker crumbs - 4 tablespoons unsalted butter, melted - 8 oz cream cheese, softened at room temperature - 1/2 cup powdered sugar - 1 teaspoon vanilla extract - 1 cup heavy cream, chilled - 1 can (15 oz) cherry pie filling - Optional garnishes: Fresh cherries and mint leaves These ingredients create a rich, creamy cheesecake with a buttery crust. The graham crackers give the base a nice crunch. The melted butter helps hold the crust together. Cream cheese adds that smooth, creamy texture we love. The powdered sugar sweetens it just right, while the vanilla adds a warm flavor. Chilled heavy cream makes the filling light and fluffy. Top it all with cherry pie filling for a sweet finish. You can add fresh cherries or mint leaves for a pretty touch. This recipe is simple, fun, and perfect for any occasion! 1. Start by mixing the graham cracker crumbs with melted butter in a bowl. 2. Stir until the mix looks like wet sand. This helps form a great crust. 3. Take small jars and scoop about 2 tablespoons of this mix into each jar. 4. Use the back of a spoon to press the mix down firmly. This makes a solid base. 1. In a new bowl, beat the softened cream cheese with an electric mixer. Mix until smooth. 2. Gradually add the powdered sugar and vanilla extract. Keep mixing until there are no lumps. 3. In another bowl, pour the chilled heavy cream. Whip it until stiff peaks form. This gives the cheesecake a fluffy texture. 1. Carefully fold the whipped cream into the cream cheese mix using a spatula. Don't deflate the whipped cream. 2. Spoon or pipe the cheesecake filling on top of the crust in each jar. Fill them halfway and smooth the tops. 3. Add a layer of cherry pie filling over the cheesecake. This adds a sweet, tangy flavor. 4. If you have enough, repeat the layers of cheesecake and cherry filling until you fill the jars. 5. Finish with cherry pie filling on top for a beautiful look. 6. Cover the jars tightly and place them in the refrigerator. Chill for at least 4 hours. This helps the cheesecake set. Using room temperature ingredients is key. It helps the cream cheese mix well. Softened cream cheese blends into a smooth filling. Cold cream cheese can cause lumps. Remember to take it out early to warm up. Folding whipped cream is a skill. You want to keep its lightness. Gently scoop from the bottom and fold over the top. Avoid stirring too hard. This keeps the air in the cream. Choose fun and decorative jars for serving. Clear jars show off the layers. Use small jars for single servings. It adds charm and makes sharing easy. For garnish, fresh cherries and mint leaves work well. They add color and freshness. You can also use a drizzle of chocolate for extra flair. Adding these touches makes your dessert look amazing. {{image_4}} You can switch up the flavors for your no-bake cherry cheesecake jars. Instead of cherry pie filling, try other fruit toppings. Fresh strawberries, blueberries, or even mango can add a new twist. Each fruit gives a different taste and look. You can also add chocolate or lemon flavor to the cheesecake filling. For chocolate, mix in cocoa powder or melted chocolate. For lemon, add lemon juice and zest. These flavors make the cheesecake bright and fun. If you need to make dietary changes, it’s easy. To create a gluten-free graham cracker crust, use gluten-free graham crackers. Crush them and mix with melted butter just like the original recipe. For a dairy-free option, swap the cream cheese and heavy cream. Use dairy-free cream cheese and coconut cream. This still gives a creamy texture, and it tastes great too. Enjoy these variations while keeping the fun and flavor you love! To keep your no-bake cherry cheesecake jars fresh, store them in the fridge. Use tight lids or plastic wrap. This keeps the flavors strong and the texture smooth. Your jars can last for up to five days in the fridge. Always check for freshness before serving. Yes, you can freeze no-bake cheesecake jars! Just make sure they are covered well. This helps prevent freezer burn. They can stay good for up to two months. To enjoy them later, thaw the jars in the fridge overnight. This keeps the texture creamy. Once thawed, serve them cold. Add fresh cherries on top for a nice touch. Enjoy your delicious treat! No-bake cheesecake jars need to chill for at least 4 hours. This time helps the cheesecake set properly. If you can, let them chill overnight. The longer they chill, the better the flavors meld together. Yes, you can use a different type of crust. Try crushed cookies like Oreos or vanilla wafers. You can also make a nut-based crust for a gluten-free option. Just make sure to mix the crust with melted butter for the right texture. Serve the jars chilled straight from the fridge. You can garnish with fresh cherries or mint leaves for a nice touch. These little jars look great on a table. They are easy to grab for guests, too. This no-bake cherry cheesecake jars recipe is simple and tasty. You can enjoy making the layers of crust and cheesecake filling easily. Remember to use room temperature ingredients for the best texture. Try different fruits and flavors to make it your own. These jars look great and stay fresh in the fridge. End your meal on a sweet note with these treats. Happy baking!

No-Bake Cherry Cheesecake Jars Delightful Dessert Treat

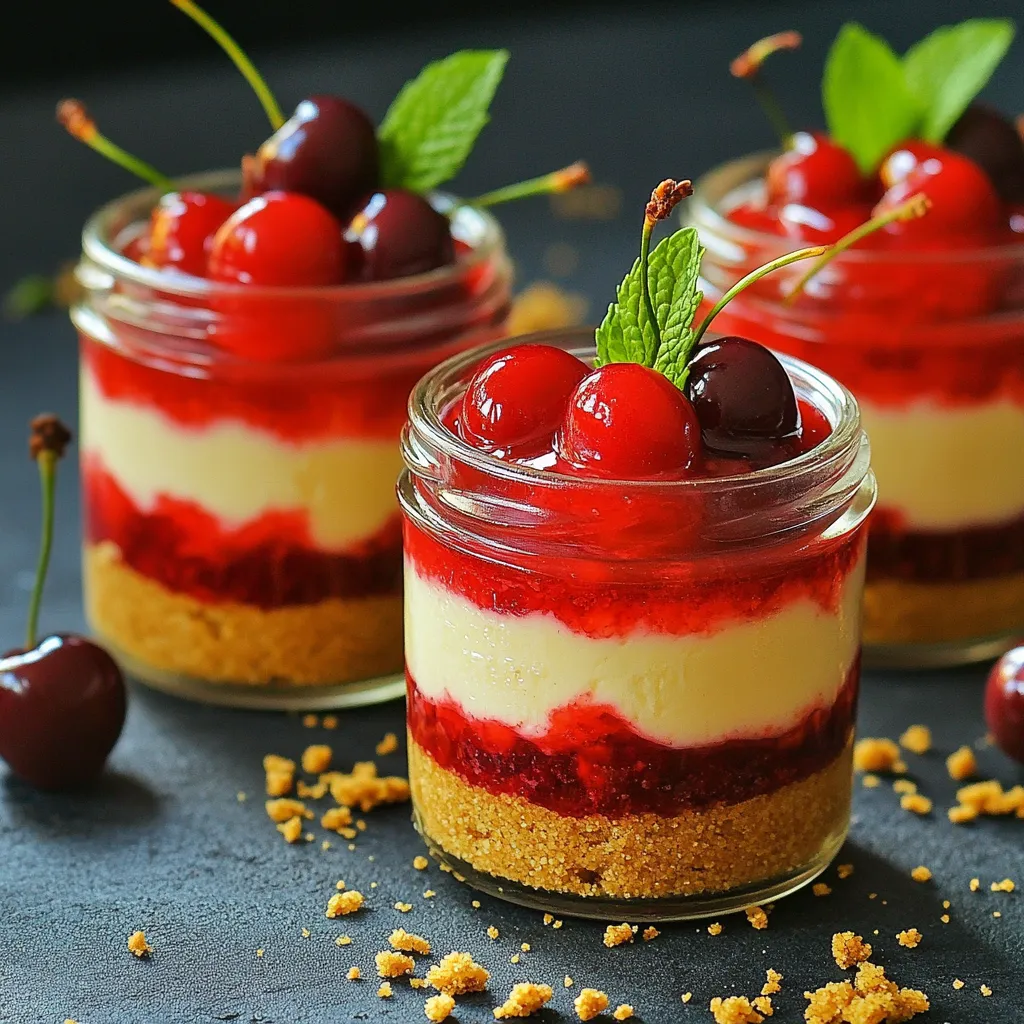
Are you ready to whip up a delicious dessert that’s easy to make and fun to eat? No-bake cherry cheesecake

- 1 cup cream cheese, softened to room temperature - 1/2 cup powdered sugar - 1 cup canned pumpkin puree, preferably organic for richer flavor - 1 teaspoon pure vanilla extract - 1 teaspoon pumpkin pie spice blend - 1/2 teaspoon ground cinnamon - Graham crackers - Fresh apple slices - Pretzels Gathering the right ingredients is key. Cream cheese is the base. It brings a creamy texture. Use softened cream cheese for easy mixing. Next, powdered sugar adds sweetness. It balances the pumpkin flavor well. Canned pumpkin puree gives a rich taste. I like using organic for the best flavor. Pure vanilla extract adds depth to the mix. For spices, pumpkin pie spice blend is a must. It adds warmth and comfort to the dip. Ground cinnamon gives an extra kick. Together, they create that cozy fall flavor. Now, let’s talk about what to dip. Graham crackers are classic. They provide a nice crunch. Fresh apple slices add a juicy and refreshing contrast. Pretzels offer a salty bite that pairs well with the sweet dip. Mix and match these options for fun! First, start with your cream cheese. You want it softened, so let it sit out for about 30 minutes. This step is key. In a large mixing bowl, use an electric mixer to beat the cream cheese. Mix until smooth and creamy. Make sure there are no lumps. This should take about 2 minutes. Next, it's time to sweeten things up. Gradually sift in the powdered sugar. Keep mixing until it’s all blended in well. The mixture should be sweet and smooth, with no sugar clumps left. Now for the fun part! Grab your canned pumpkin puree. Add it into your cream cheese mix along with pure vanilla extract, pumpkin pie spice, and ground cinnamon. Mix on medium speed. You want everything to blend until it’s smooth and uniform. This step gives the dip its rich fall flavor, so don’t rush it! In a clean bowl, pour in the heavy whipping cream. Use a whisk or electric mixer to whip it. Keep going until stiff peaks form, which should take 2-3 minutes. Stiff peaks mean the cream holds its shape well. This adds airiness to your dip. Next, gently fold the whipped cream into your pumpkin mixture. Use a spatula and be careful not to deflate the whipped cream. This keeps your dip light and fluffy. Once combined, you're ready to serve! Room temperature cream cheese is key. It mixes easily and ensures a smooth dip. Cold cream cheese can create lumps. So, let your cream cheese sit out for about 30 minutes before using it. For whipped cream, stiff peaks are a must. Use a clean bowl and beat the heavy cream until it thickens. This usually takes about 2 to 3 minutes. Don't stop too soon! You want peaks to hold their shape when you lift the whisk. You can boost flavor with extra spices. Consider adding nutmeg, cloves, or ginger for a warm touch. These spices add depth and make the dip even more inviting. If you want a different sweetness, try using honey or maple syrup instead of powdered sugar. These natural options add flavor and a hint of richness. To impress, present the dip in a lovely bowl. Smooth the top for a nice look. Drizzle honey or maple syrup on the surface for shine. Surround the bowl with colorful dippers. Use graham crackers, fresh apple slices, and crunchy pretzels. This creates a fun, inviting platter that everyone will enjoy! {{image_4}} You can make this dip even more fun. Adding chocolate or caramel can bring a sweet twist. Just drizzle some chocolate sauce or mix in caramel for a rich taste. You can also try different spices. A pinch of nutmeg or ginger can add a nice kick. Experimenting with flavors can make each dip unique. Want a lighter dip? Use low-fat cream cheese instead of regular. This swap cuts some calories but keeps the creamy texture. You can also try using sweeteners like honey or agave syrup. These options can help reduce sugar while still being tasty. For a holiday-themed dip, you can add crushed candy canes or peppermint extract. This gives a festive touch for winter parties. You can also adapt the dip for other occasions by changing the toppings. For a summer gathering, top it with fresh berries. This makes the dip bright and colorful. Each season can bring new flavors to your pumpkin spice cheesecake dip! The Pumpkin Spice Cheesecake Dip lasts about 3 to 5 days in the fridge. To keep it fresh, cover your bowl tightly with plastic wrap or transfer it to an airtight container. This prevents it from absorbing other fridge smells and helps maintain its creamy texture. Yes, you can freeze the dip! To do this, place it in a freezer-safe container. Make sure to leave some space at the top, as the dip may expand when frozen. When you are ready to enjoy it, simply thaw it in the fridge overnight. To serve, stir it gently after thawing. This will help restore its smooth texture. Enjoy your dip with graham crackers or apple slices for a tasty treat! Yes, you can make this dip ahead of time. To do this, prepare the dip as directed. Once mixed, place it in a bowl and cover it with plastic wrap. Chill it in the fridge for at least 30 minutes. You can prepare it up to two days in advance. Just remember to keep it covered. This helps the flavors blend well. If you need a cream cheese substitute, use ricotta cheese or Greek yogurt. Both options work well and give a nice texture. For a dairy-free option, consider using vegan cream cheese. These alternatives keep the dip creamy and delicious. Adjust the sweetness as needed when using substitutes. Yes, this dip can be gluten-free. The main ingredients do not contain gluten. However, make sure to choose gluten-free dipping options like rice crackers or fresh fruit. Check labels carefully to ensure no gluten is present. This way, everyone can enjoy the dip at your fall party! This blog post covered how to make a delicious pumpkin spice cheesecake dip. We discussed the main ingredients like cream cheese and pumpkin puree, plus the right spices and flavors. You learned about prep steps and helpful tips for perfect texture. I also shared fun ways to serve it and tasty variations. Remember, this dip is perfect for fall gatherings or cozy nights at home. Try it out and enjoy each creamy bite!

Pumpkin Spice Cheesecake Dip Perfect for Fall Parties

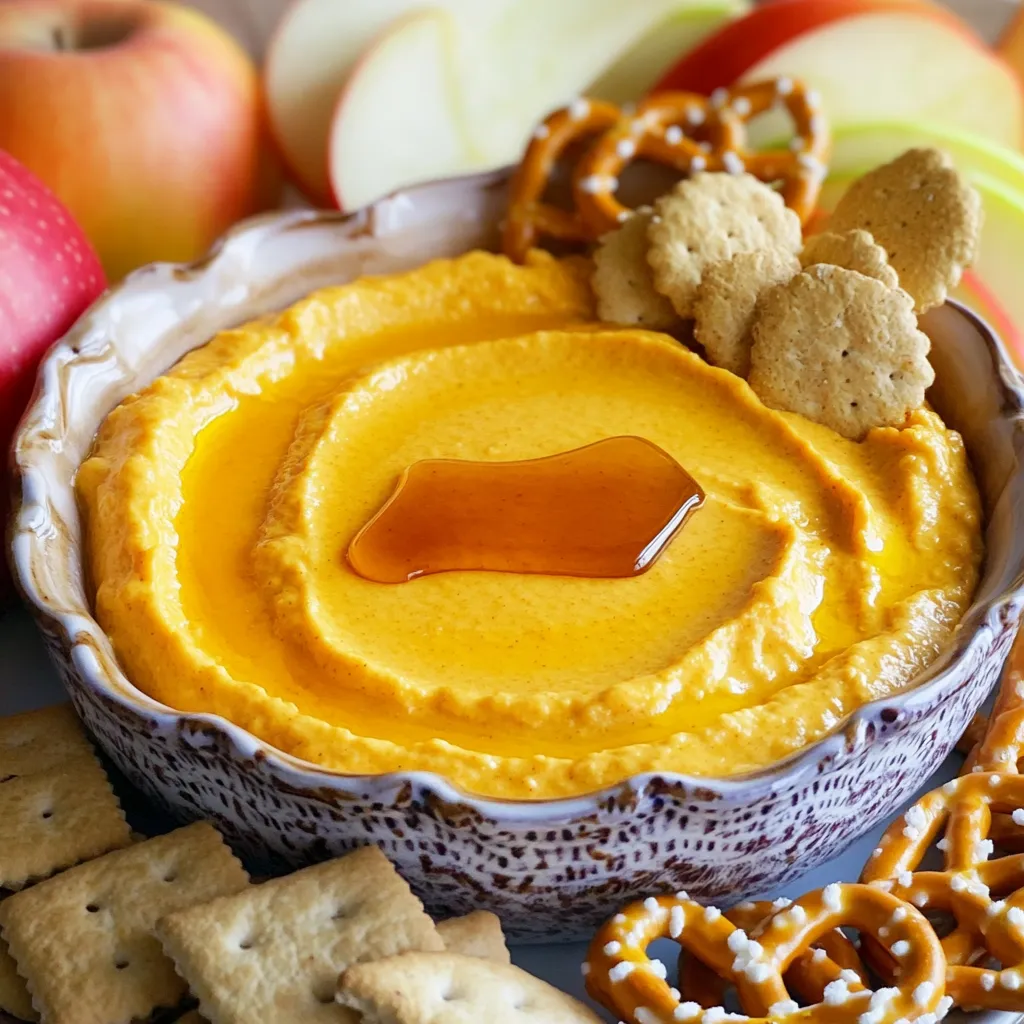
Fall is here, and it’s time to indulge in all things pumpkin! If you love the rich flavors of pumpkin

- 4 boneless, skinless chicken thighs - 1 cup basil pesto (can be store-bought or homemade for an extra touch) - 2 cups cherry tomatoes, halved - 8 ounces fresh mozzarella balls, drained - 1 medium zucchini, sliced into half-moons - 1 red bell pepper, diced into bite-sized pieces - A handful of fresh basil leaves, for garnish - Balsamic glaze, for drizzling (highly recommended for an extra burst of flavor, optional) - 2 tablespoons extra-virgin olive oil - Salt and freshly cracked black pepper, to taste When I make this dish, I love using chicken thighs. They stay juicy and tender. The basil pesto adds a great herbal flavor. You can buy pesto or make your own for a personal touch. For veggies, I always use cherry tomatoes. They burst with flavor when roasted. Fresh mozzarella gives a creamy texture that pairs perfectly with the tomatoes. Zucchini and red bell pepper add color and crunch. Don’t forget the seasonings! Extra-virgin olive oil helps everything cook nicely. A sprinkle of salt and black pepper brings out all the flavors. Finally, fresh basil leaves and balsamic glaze are the finishing touches. They add brightness and a sweet tang. Use the glaze if you want a flavor boost. First, preheat your oven to 400°F (200°C). This step is key for even cooking. While the oven heats, take your chicken thighs and place them in a bowl. Pour in ¾ cup of basil pesto. Use your hands to coat each thigh well. For the best flavor, let them marinate. You can do this at room temperature for 15 minutes or chill them in the fridge for up to 2 hours. Next, line a large sheet pan with parchment paper. This makes cleaning easy. Once your chicken is ready, place the thighs in the center of the pan. Make sure they have space around them. Now, scatter the halved cherry tomatoes, sliced zucchini, and diced red bell pepper around the chicken. These veggies add color and flavor. Drizzle 2 tablespoons of olive oil over everything. Sprinkle salt and freshly cracked black pepper to taste. Put the sheet pan in the hot oven. Roast the chicken and veggies for about 25 minutes. The chicken should be fully cooked, reaching an internal temperature of 165°F (75°C). During this time, the vegetables will get nice and tender. In the last 5 minutes, gently add the fresh mozzarella balls to the pan. This step helps the cheese melt just right, creating a creamy finish. After roasting, let the pan cool for a few minutes before serving. To get the best flavor, marinate your chicken for at least 15 minutes. If you have time, let it soak in the fridge for up to 2 hours. This will let the pesto soak in deep. To enhance the flavors, mix in a pinch of salt or a squeeze of lemon juice. This little touch brightens the taste. Always check the chicken's internal temperature. It should reach 165°F (75°C) to be safe. Use a meat thermometer for best results. For the vegetables, cut them into similar sizes. This helps them cook evenly. If you want extra tenderness, toss the veggies in olive oil and sprinkle them with salt before roasting. For a rustic feel, serve the dish right from the sheet pan. This makes it easy and fun. You can also transfer everything to a large platter for a family-style meal. Pair it with crusty bread to soak up the tasty juices. This adds a nice touch to your dining experience. {{image_4}} You can switch proteins if you want. Chicken breasts work well here. If you prefer a plant-based option, try tofu. Cube the tofu and marinate it like the chicken. It absorbs the flavors nicely. Feel free to mix up the veggies. You can add asparagus, bell peppers, or even broccoli. Slice them into bite-sized pieces for even cooking. This mix adds color and taste to your dish. You can make your own pesto for a fresh touch. Blend fresh basil, garlic, pine nuts, and olive oil until smooth. This way, you control the taste and texture. You can also try different nuts like walnuts or almonds for variety. Drizzling sauces add flair. Besides balsamic glaze, lemon juice works great. It brightens the dish and adds zest. You can also use a mix of both for a sweet and tangy kick. To keep your Sheet-Pan Pesto Chicken Caprese fresh, start by letting it cool. Place the leftovers in an airtight container. This helps prevent moisture loss and keeps the flavors intact. You can refrigerate the dish for up to three days. If you want to keep it longer, freeze the chicken and veggies in a freezer-safe container. They can last up to three months in the freezer. When you are ready to enjoy your leftovers, the best way to reheat them is in the oven. Preheat your oven to 350°F (175°C). Place the chicken and veggies on a baking sheet. Cover them with foil to keep them moist. Heat for about 15-20 minutes until warmed through. If you're in a hurry, you can microwave it. Use a microwave-safe dish and heat for 2-3 minutes. Check to ensure everything is hot, then enjoy! You can use frozen chicken thighs. However, you need to thaw them first. Place them in the fridge overnight or use the defrost setting on your microwave. Once thawed, you can marinate them with pesto. This helps the flavors stick better to the chicken and makes it taste great. If you can’t find mozzarella, try using provolone or burrata. Provolone melts well, just like mozzarella. Burrata adds a creamy texture, making the dish richer. Both options will still give you that tasty flavor you want in this recipe. This dish takes about 40 minutes total. You will spend 15 minutes preparing the ingredients. Roasting the chicken and veggies takes 25 minutes. Make sure the chicken reaches 165°F. This ensures it’s safe to eat and perfectly cooked. This recipe for Sheet-Pan Pesto Chicken Caprese is simple and rewarding. You learned about the main ingredients like chicken thighs and fresh veggies. I shared easy steps to prep and roast your meal. You also got tips to enhance flavors and serve beautifully. Don’t forget, you can customize this dish with other proteins and sauces. Enjoy your cooking and make it your own! Remember, good food brings happiness to every meal.

Savory Sheet-Pan Pesto Chicken Caprese Recipe

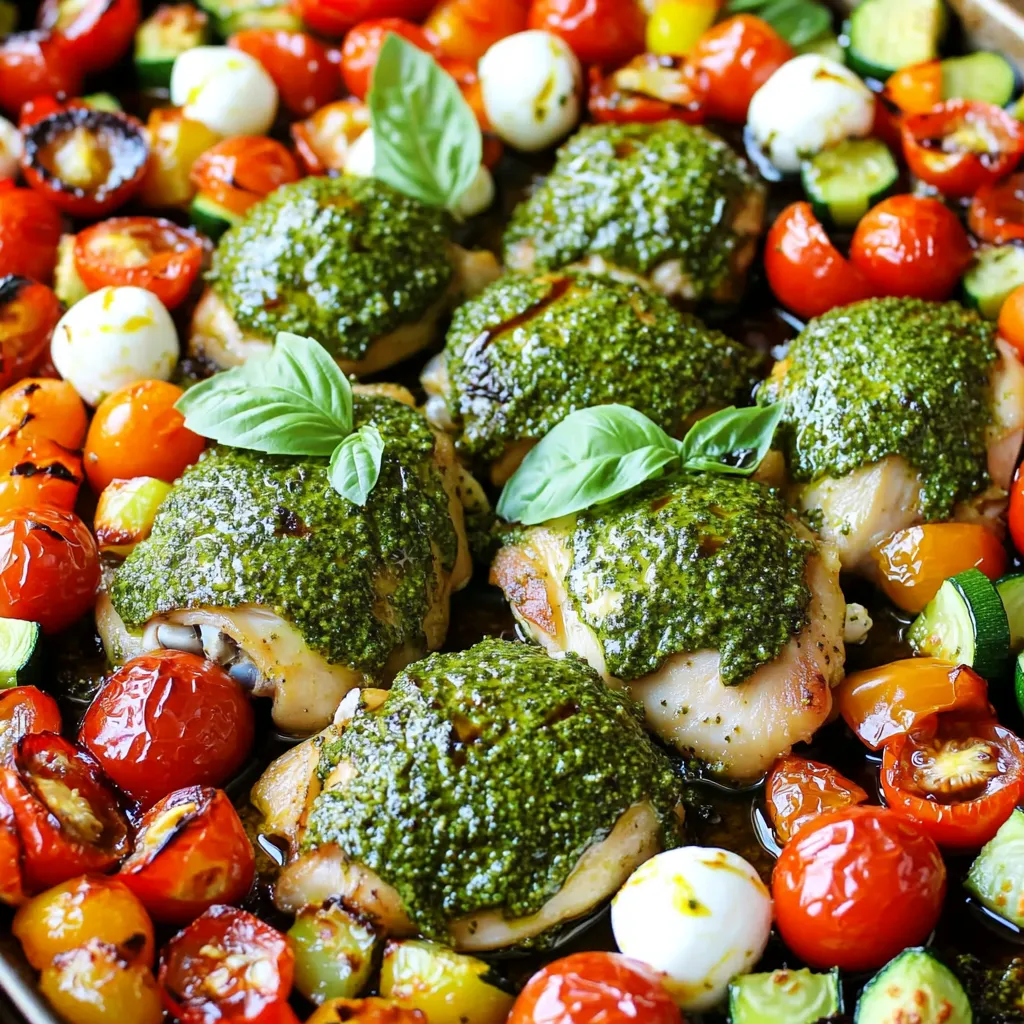
Looking for a simple yet delicious meal? This savory sheet-pan pesto chicken Caprese recipe will wow your taste buds! With

- 1 lb sirloin steak, cut into bite-sized pieces - 4 tablespoons unsalted butter - 4 cloves garlic, minced - 2 tablespoons soy sauce - 1 tablespoon Worcestershire sauce - 1 teaspoon freshly cracked black pepper - 1 teaspoon fine sea salt - 1 cup jasmine rice - 2 cups beef broth (or water) - 1 tablespoon olive oil - 2 green onions, thinly sliced (for garnish) - Fresh parsley, finely chopped (for garnish) - Medium saucepan - Large skillet - Ladle and spatula Gathering the right ingredients is key. I love using sirloin steak because it’s tender and flavorful. The garlic butter makes everything better. I use unsalted butter so I can control the salt. Jasmine rice is my go-to for this dish. It has a lovely aroma and soft texture. Cooking it in beef broth adds a rich flavor that pairs well with the steak. Make sure to have green onions and parsley ready for garnish. These fresh herbs add color and brightness to the dish. For tools, a medium saucepan cooks the rice, while a large skillet sears the steak. A ladle helps serve the rice, and a spatula flips the steak bites. With these ingredients and tools, you set yourself up for success. Enjoy the process of making this dish! - Bring beef broth (or water) to a boil. - Simmer the rice for 15-18 minutes. - Allow rice to steam post-cooking. To cook the rice, I start by putting beef broth in a medium saucepan. You can also use water. I bring it to a rolling boil over high heat. Once it boils, I cover the pan and lower the heat. I let the rice simmer for 15 to 18 minutes. After that, I remove the pan from the heat but keep it covered. This helps the rice steam and become fluffy. - Season sirloin steak with salt and pepper. - Heat olive oil in the skillet. While the rice cooks, I prepare the steak. I take the sirloin and cut it into bite-sized pieces. Then, I season them with salt and pepper. Next, I heat olive oil in a large skillet over medium-high heat. I wait until the oil shimmers, which means it’s ready for the steak. - Add seasoned steak bites in a single layer. - Sear for 2-3 minutes on each side. - Remove from skillet once browned. I carefully add the steak bites to the hot skillet. It’s important to place them in a single layer. This helps them brown nicely. I sear each side for about 2-3 minutes. Once they are browned, I remove them from the skillet and set them aside. - Reduce heat and add unsalted butter. - Sauté minced garlic until fragrant. In the same skillet, I lower the heat and add unsalted butter. I let it melt completely. Once it melts, I stir in the minced garlic. I sauté the garlic for about 1-2 minutes until it smells amazing. I watch carefully not to burn it. - Return steak bites and add soy sauce and Worcestershire sauce. - Toss everything to meld flavors. Next, I return the steak bites to the skillet. I add soy sauce and Worcestershire sauce. I toss everything together for about 2-3 minutes. This lets the flavors mix well and coat the steak. - Fluff rice and prepare plates. - Divide the rice and top with steak bites. - Garnish with green onions and parsley. Finally, I fluff the cooked rice with a fork. I divide the rice among serving plates. I then top each plate with the steak bites. To finish, I sprinkle sliced green onions and chopped parsley over the steak. This adds a nice touch and freshness to the dish. When you cook steak bites, space is key. If you overcrowd the skillet, the heat drops. This can lead to steaming rather than searing. For the best crust, cook in batches if needed. Aim for medium-high heat. This temperature gives you that perfect golden-brown crust while keeping the inside tender. To boost the flavor of garlic butter, think about adding herbs. Fresh thyme or rosemary can add depth. You can also sprinkle in some chili flakes for heat. When cooking garlic, keep a close eye. Garlic can burn quickly, which makes it bitter. Stir it often and remove it from heat once it turns fragrant and golden. Pair your steak bites with a bright salad or roasted veggies. Both add color and balance to your meal. For a beautiful plate, consider a drizzle of garlic butter sauce over the steak. A sprinkle of green onions and parsley adds freshness and a pop of color, making the dish look as good as it tastes. {{image_4}} You can easily swap the sirloin steak for chicken or shrimp. Chicken breast works well when cut into small pieces. Cook it until it reaches a safe temperature. Shrimp adds a nice twist too—just sauté until they turn pink. For a vegetarian option, consider using plant-based meat. Many brands offer great flavors that mimic beef. This way, you can enjoy this dish while keeping it meat-free. Adding spices can change the flavor profile of this dish. Try paprika for a smoky taste. Chili flakes add heat and make it exciting. You can also toss in some fresh herbs like thyme or rosemary for added freshness. You might consider adding vegetables too. Bell peppers, snap peas, or mushrooms blend well. Sauté them along with the garlic for a colorful and tasty mix. If you want a healthier option, use brown rice instead of jasmine rice. It takes longer to cook, but it adds more fiber. Cauliflower rice is another great choice for a low-carb meal. Just sauté it briefly to keep it tender. You can also cook rice in different broths. Using chicken or vegetable broth adds richness. Experiment with seasonings like garlic powder or bay leaves to boost flavor even more. To keep your garlic butter steak bites fresh, store them in an airtight container. Place the container in the fridge. This method helps retain flavor and texture. Aim to eat the leftovers within three days. For the cooked rice, let it cool to room temperature. Once cooled, transfer it into a separate airtight container. This keeps the rice from drying out. Always use stored rice within four days. To reheat steak bites, use a skillet over medium heat. Add a splash of water or broth to ensure moisture. Heat for about five minutes, stirring often. This method keeps the steak juicy. For rice, microwave it covered with a damp paper towel. Heat in short bursts, stirring in between until hot. This prevents the rice from becoming dry or hard. To freeze the dish, place the steak bites and rice in separate freezer-safe bags. Remove as much air as possible before sealing. The steak can last up to three months in the freezer. For thawing, move the steak and rice to the fridge overnight. This gentle method maintains the best flavor and texture. After thawing, reheat as mentioned above for best results. It takes about 30 minutes to make garlic butter steak bites and rice. - Prep time: 10 minutes - Cook time: 20 minutes Yes, you can use other types of steak. Sirloin works well, but try these: - Ribeye for more fat and flavor - Flank for a leaner option - Tenderloin for a melt-in-your-mouth texture To add heat, try these tips: - Include red pepper flakes in the garlic butter. - Use spicy soy sauce for a kick. - Add diced jalapeños while cooking the steak. You can serve many sides with garlic butter steak bites. Here are some ideas: - Steamed broccoli for a green touch - Garlic bread to soak up the sauce - A fresh salad to balance the meal Yes, you can prepare some parts ahead of time. Here’s how: - Cook the rice and store it in the fridge. - Sear the steak bites but skip the sauce. - Reheat both when ready to eat. Garlic butter steak bites are simple yet packed with flavor. You learned about key ingredients, essential cooking tools, and straightforward steps to make this dish shine. Don’t forget the tips for perfecting your preparation. You can even try various proteins or rice alternatives. This dish not only satisfies hunger but also impresses your guests. Enjoy crafting your flavorful meals and feel confident in the kitchen.

Minute Garlic Butter Steak Bites and Rice Delight

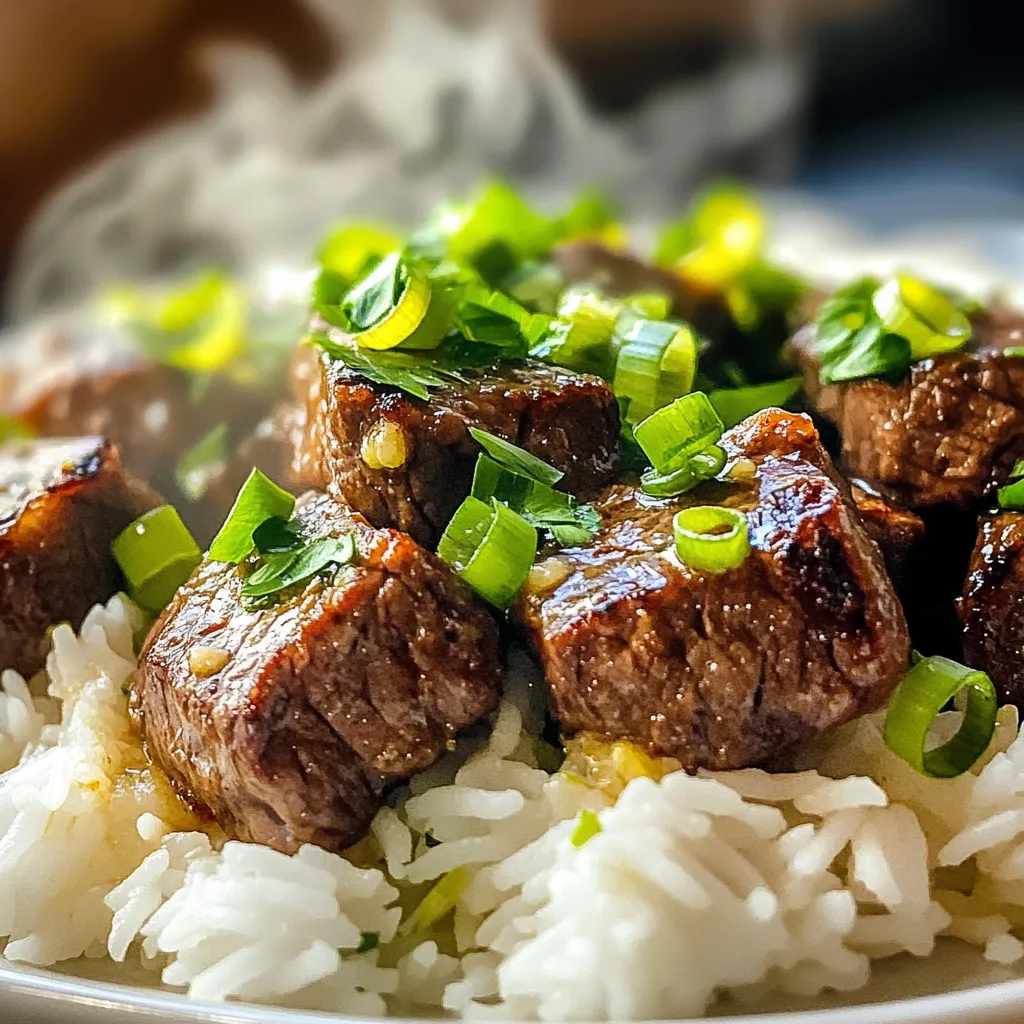
Craving a quick and tasty meal? Look no further! In just minutes, you can whip up flavorful Garlic Butter Steak

To make this dish, you will need: - 8 oz rice noodles - 1 cup coconut milk - 1/2 cup creamy peanut butter - 2 tablespoons soy sauce (or tamari for a gluten-free option) - 2 tablespoons freshly squeezed lime juice - 1 tablespoon brown sugar - 1 tablespoon sesame oil - 2 cups mixed vegetables (like bell peppers, finely sliced carrots, and snap peas) - 2 green onions, thinly sliced - 1/4 cup fresh cilantro, roughly chopped - Crushed peanuts for garnish - Red pepper flakes (optional for extra heat) If you need gluten-free options, use tamari instead of soy sauce. For vegan needs, check that your peanut butter and sugar are vegan-friendly. You can skip the crushed peanuts for a nut-free version. If you want to add protein, consider tofu or chickpeas, both of which fit well into this dish. Choose rice noodles that are smooth and unbroken. Fresh vegetables should be bright and firm. Look for coconut milk that is creamy and without additives. Fresh herbs like cilantro and green onions should smell fragrant. This will help you create a dish that bursts with flavor and looks great on the plate. 1. Start by boiling 4 cups of water in a large pot. 2. Once the water boils, add 8 oz of rice noodles. Cook them until they are al dente, as per the package instructions. 3. Drain the noodles in a colander and set them aside for now. 4. In the same pot, lower the heat to medium. Pour in 1 cup of coconut milk. 5. Add in 1/2 cup of creamy peanut butter, 2 tablespoons of soy sauce, and 2 tablespoons of lime juice. 6. Mix in 1 tablespoon of brown sugar and 1 tablespoon of sesame oil. Stir this well until it forms a smooth sauce. 7. Next, toss in 2 cups of mixed vegetables. Cook them for about 5 minutes. Stir occasionally until they are tender but still a bit crisp. 8. Now, return the cooked rice noodles to the pot. Toss them gently with the sauce and vegetables. Make sure everything is coated well and heated through. 9. Serve the noodles in bowls. Top with sliced green onions, chopped cilantro, and crushed peanuts. Add red pepper flakes if you want extra heat. - Step 1 & 2: Image of boiling water with noodles. - Step 3: Video of noodles being drained. - Step 4: Photo of coconut milk being poured into the pot. - Step 5: Video of mixing peanut butter and other ingredients. - Step 6: Image showing the smooth sauce consistency. - Step 7: Photo of mixed vegetables in the pot. - Step 8: Video of tossing noodles with sauce and veggies. - Step 9: Final dish presentation image with toppings. - Do not overcook the noodles; they should be al dente. - Make sure to stir the sauce well to avoid lumps. - Avoid adding too many vegetables at once; this can make them soggy. - Don’t skip the toppings; they add flavor and texture. - Be careful with the heat level; adjust red pepper flakes to your taste. To get a creamy sauce, start with high-quality coconut milk. Use full-fat coconut milk for best results. Mix the peanut butter in well. Heat the pot on medium for a smooth blend. Stir often to avoid lumps and ensure a creamy texture. If it’s too thick, add a splash of water or more coconut milk. You can swap soy sauce for tamari if you need a gluten-free option. For more zing, add a bit of ginger or garlic. Try using almond butter instead of peanut butter for a twist. If you want more color, add red bell peppers or snap peas. Fresh herbs like basil can also boost the taste. Prep your veggies ahead of time. Slice them the night before and store them in the fridge. You can also cook the noodles early and store them. This makes cooking faster when you’re ready to eat. A large pot saves time by cooking everything in one go. Clean as you go to make it easier later. {{image_4}} You can easily add protein to your One-Pot Creamy Thai Peanut Noodles. For chicken, use cooked, shredded chicken. It adds a nice texture and works well with the sauce. If you like shrimp, add them in the last few minutes of cooking. They cook fast and absorb great flavors. Tofu is a fantastic plant-based choice. Just cube it and sauté it before adding to the noodles. This way, it gets crispy and adds depth to your dish. Making this dish vegan is simple. Start with tofu as your protein. You can also swap the creamy peanut butter for a nut-free butter if you have allergies. Use tamari instead of soy sauce to keep it gluten-free. All other ingredients fit well into a vegan diet. This way, everyone can enjoy the creamy goodness without meat or dairy. To keep things fresh, use seasonal veggies in your Thai peanut noodles. In spring, add snap peas and asparagus. In summer, use bell peppers and zucchini. Fall is great for squash and carrots, while winter calls for hearty greens like kale. Changing the vegetables can change the dish's flavor while keeping it colorful and healthy. Plus, it gives you a chance to try new textures and tastes. To keep your One-Pot Thai Peanut Noodles fresh, store them in an airtight container. Make sure to let the noodles cool down to room temperature before sealing. This helps prevent moisture buildup, which can make them soggy. You can keep them in the fridge for up to three days. If you know you won’t eat them right away, consider freezing them. When ready to eat your leftovers, reheat them gently. You can use a microwave or a stovetop. If using a microwave, place the noodles in a bowl and add a splash of water. Cover the bowl with a damp paper towel to keep moisture in. Heat them in short bursts, stirring in between. For stovetop reheating, place the noodles in a pan over low heat. Add a bit of coconut milk or water to keep them creamy. Stir until they are heated through. To freeze your Thai Peanut Noodles, portion them into freezer-safe bags. Remove as much air as possible before sealing. Label each bag with the date to track freshness. These noodles can last up to three months in the freezer. When you’re ready to eat, thaw them in the fridge overnight. Reheat as mentioned above for the best results. You can use tamari for a gluten-free option. If you want a different flavor, use coconut aminos. This choice has a mild taste and is less salty. Both options work well in this dish. To add heat, sprinkle in red pepper flakes while cooking. You can also add sliced fresh chilies or a dash of hot sauce. Start with a little, then taste as you go. This way, you can find the spice level you enjoy. Yes, you can swap rice noodles for other types. Try soba noodles or whole grain spaghetti. Just be sure to adjust the cooking time based on the noodle type. Each will give a unique twist to your dish. Thai peanut noodles come from Thailand, where peanut sauces are common. The dish blends Thai flavors with Asian noodles. It reflects the balance of sweet, salty, and spicy tastes in Thai cuisine. Leftovers can last up to three days in the fridge. Store them in an airtight container to keep them fresh. When reheating, add a splash of coconut milk if the noodles seem dry. This keeps the dish creamy and delicious. In this post, we covered how to make One-Pot Creamy Thai Peanut Noodles. We explored key ingredients, cooking steps, and tips for a tasty dish. You can customize it with proteins or spices. Remember, choose fresh ingredients for the best flavor. Proper storage will keep your leftovers delicious. Enjoy your cooking, and feel free to ask questions if you have them. Your kitchen will shine with this meal!

One-Pot Creamy Thai Peanut Noodles Quick and Easy Meal

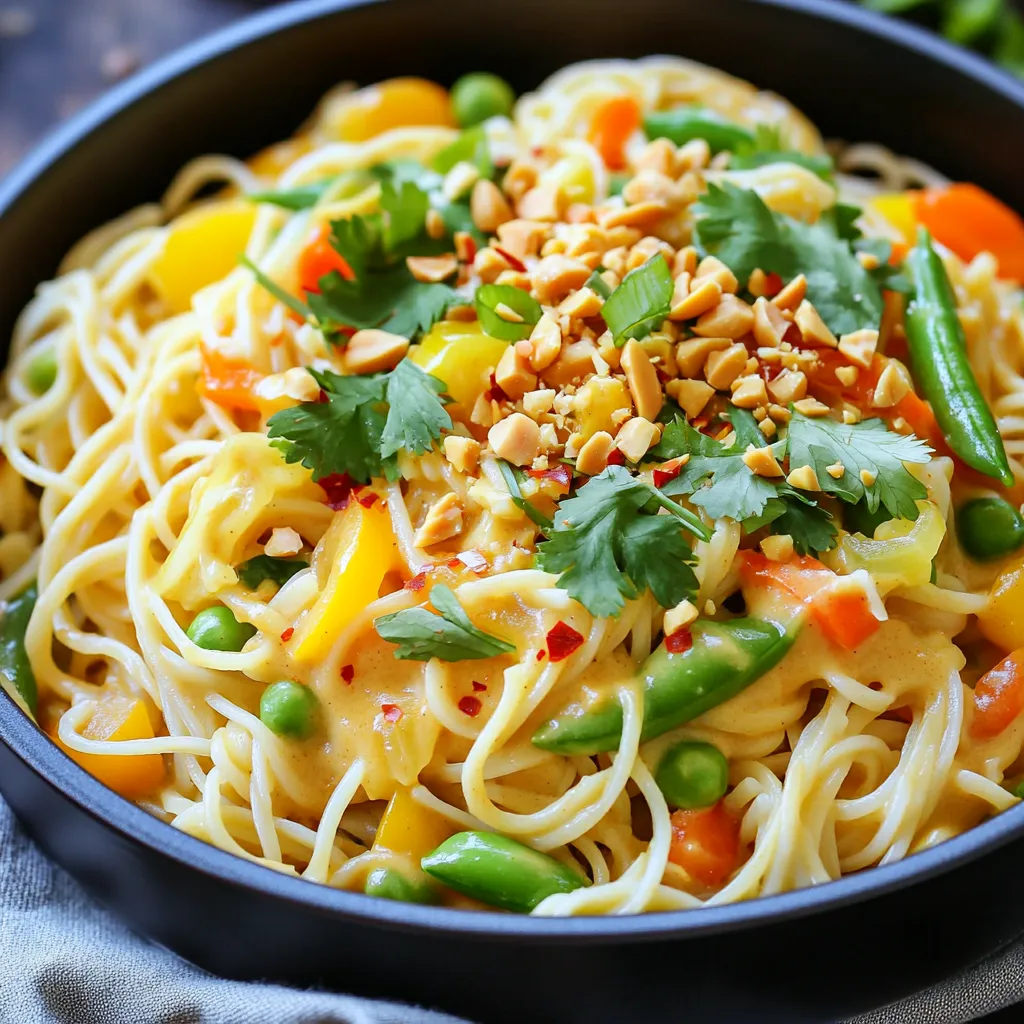
Looking for a quick and easy meal? One-Pot Creamy Thai Peanut Noodles deliver big flavor with little fuss. You’ll enjoy

- 1 medium head of cauliflower, cut into bite-sized florets - 1 cup buttermilk (or a dairy-free alternative) - 1 cup all-purpose flour (or gluten-free flour for a gluten-free option) - 1 tablespoon ranch seasoning mix - 1 teaspoon garlic powder - 1 teaspoon onion powder - 1 teaspoon smoked paprika - 1 cup panko breadcrumbs - Salt and freshly ground pepper, to taste To start, you need the main ingredients. The cauliflower gives a nice crunch and flavor. The buttermilk helps the cauliflower soak in the taste. You can also use a dairy-free option if needed. The flour helps the seasoning stick well. Use all-purpose flour or a gluten-free option if you prefer. Next are the seasonings. Ranch seasoning mix adds a classic taste. Garlic powder and onion powder bring out rich flavors. Smoked paprika gives a nice depth and warmth. For the coating, panko breadcrumbs are great for that crispy bite. Don't forget to add salt and pepper to boost the taste. Salt brings out the best in food, and freshly ground pepper adds a nice kick. Gather these ingredients, and you're set to make a tasty dish. Air Fryer Ranch Cauliflower Bites can be a fun snack or a side dish. Get ready to cook something that impresses! First, grab a large bowl. Pour in 1 cup of buttermilk and add a pinch of salt and pepper. Cut your cauliflower into bite-sized florets. Toss the florets into the bowl. Make sure they are fully covered in the buttermilk. Cover the bowl and place it in the fridge. Let the cauliflower marinate for at least 30 minutes. This helps the flavor soak in and makes it tender. While the cauliflower marinates, let’s prepare the coating. In a separate bowl, mix 1 cup of flour with 1 tablespoon of ranch seasoning, 1 teaspoon of garlic powder, 1 teaspoon of onion powder, and 1 teaspoon of smoked paprika. Stir until everything blends well. In another bowl, pour in 1 cup of breadcrumbs. This is your breadcrumb station. Keep it ready for the next step. After marinating, take the cauliflower out of the fridge. Start by dredging each floret in the flour mix. Shake off any extra flour. Next, dip the floret back into the buttermilk. This makes it wet again. Now roll it in the breadcrumbs. Press lightly to make sure the crumbs stick well. Repeat this for all the florets. Now, it's time to air fry! Preheat your air fryer to 400°F (200°C). Once hot, arrange the coated cauliflower bites in a single layer in the basket. Do not crowd them; this keeps them crispy. Cook for 12-15 minutes. Shake the basket halfway through to get an even brown. When they turn golden brown and crispy, they are ready to enjoy! To get that perfect crunch, avoid overcrowding the air fryer. If you pack too many cauliflower bites together, they steam instead of fry. This means less crispiness. Cook in small batches for the best results. You want to give each floret enough space to get hot air all around it. This helps them become golden and crunchy. You can customize the flavor of your cauliflower bites. Try adding your favorite herbs to the ranch seasoning. Fresh dill or parsley can boost the taste. If you want a kick, toss in some cayenne pepper or chili powder. This will give your bites a nice twist. Feel free to experiment with spices to match your taste buds. These crispy bites pair well with dips. Ranch dressing is a classic choice. You can also try spicy sriracha mayo for a zing. Another great idea is to serve them with a yogurt dip or a fresh salsa. Adding a sprinkle of chopped parsley on top makes them look good too. It adds a pop of color and flavor that everyone will love. {{image_4}} If you want a gluten-free version, you can easily swap the flour and breadcrumbs. Use gluten-free all-purpose flour instead of regular flour. For the breadcrumbs, look for gluten-free panko or make your own by blending gluten-free bread. This way, you can enjoy the same crispy texture and flavor without any gluten. You can change the flavor of your cauliflower bites by adding spices. Try a spicy ranch seasoning for a kick. You can also mix in some grated cheese into the flour mix for a cheesy flavor. Just remember to use a cheese that melts well, like cheddar or mozzarella, to keep it creamy. If you're feeling adventurous, try using other vegetables as well. Broccoli makes a great substitute. It cooks nicely and adds vibrant color. Zucchini is another option that works well. Just cut it into bite-sized pieces like the cauliflower. Each veggie will give you a new taste and texture. To keep your Air Fryer Ranch Cauliflower Bites fresh, store them in an airtight container. Place them in the refrigerator within two hours of cooking. They can last up to three days. When you store them, try to separate layers with parchment paper. This keeps them from getting soggy. To reheat your cauliflower bites, use the air fryer for best results. Preheat it to 350°F (175°C). Place the bites in a single layer, and cook for about 5-7 minutes. This method helps maintain their crispiness. You can also use an oven if needed, but the air fryer is my favorite choice. If you want to freeze your ranch cauliflower bites, place them in a single layer on a baking sheet. Freeze them for about an hour before transferring to a freezer bag. They can stay good for up to three months. When you're ready to eat, there’s no need to thaw. Just cook them in the air fryer straight from the freezer. Expect them to take a few extra minutes to cook through. Yes, you can! If you lack buttermilk, use these substitutes: - Milk with lemon juice: Mix 1 cup of milk with 1 tablespoon of lemon juice. Let it sit for 5 minutes. - Yogurt: Thin out 1 cup of plain yogurt with a little water. - Dairy-free milk: Use a plant-based milk like almond or soy and add lemon juice. These options give you a similar tangy flavor. Cook cauliflower bites for 12 to 15 minutes at 400°F (200°C). Check for golden brown color. Shake the basket halfway through to ensure even cooking. This way, you get that perfect crispy texture! These bites go well with many dishes! Here are some tasty pairings: - Dips: Ranch dressing, blue cheese, or a spicy aioli work great. - Main dishes: Serve alongside grilled chicken, fish, or a veggie burger. - Salads: They add crunch to a fresh green salad or a grain bowl. Feel free to experiment and find your favorite combo! This blog post covered how to make delicious Air Fryer Ranch Cauliflower Bites. You learned about the main ingredients, seasonings, and easy step-by-step instructions. We shared tips for crispiness and variations to suit your taste. You can now enjoy this tasty dish with various dips or alternate veggies. By following these steps, you’ll create a satisfying snack that is both fun and healthy. Start cooking and enjoy the crunch!

Air Fryer Ranch Cauliflower Bites Crispy Delight

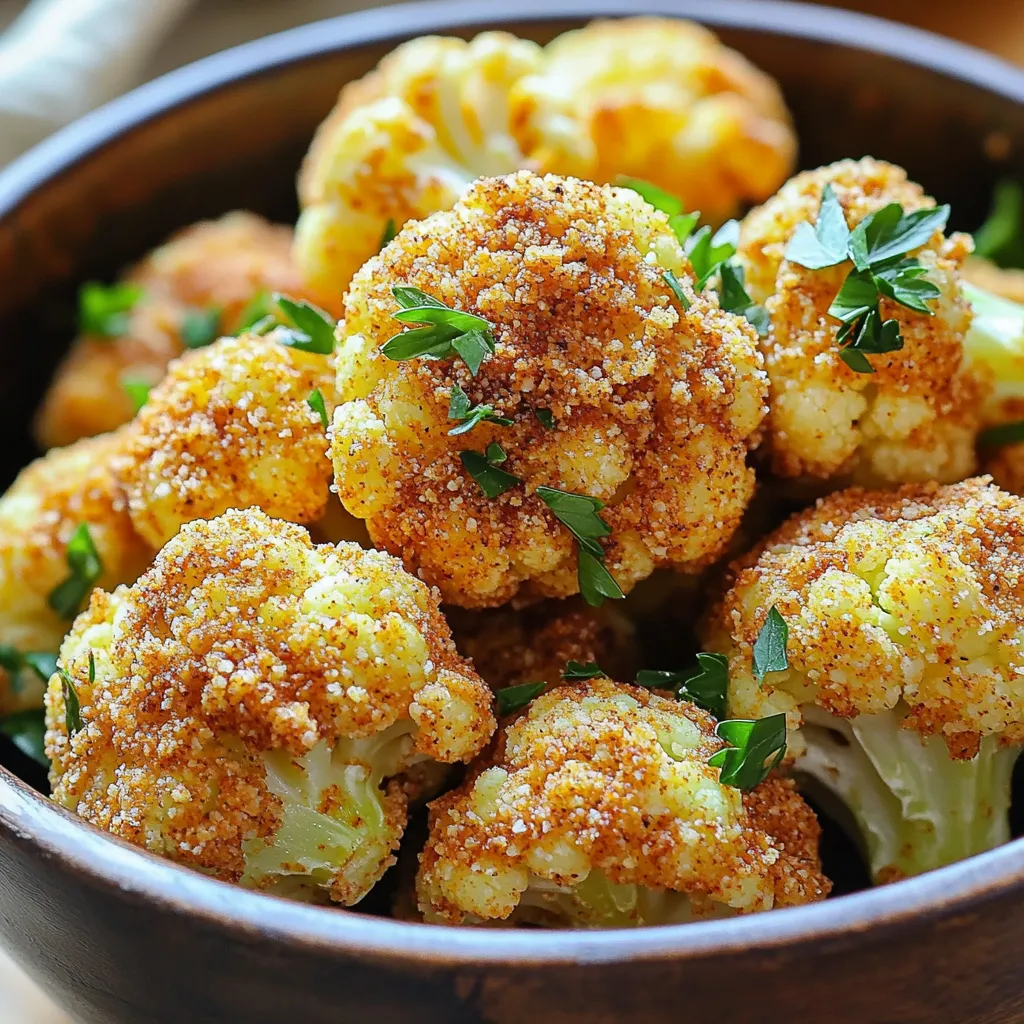
Are you craving a snack that’s both tasty and easy to make? Try my Air Fryer Ranch Cauliflower Bites! These

Older posts
Newer posts
← Previous Page1 … Page7 Page8 Page9 … Page83 Next →

dsad

© 2026 eataroundit • Built with GeneratePress

Our Policies

  • Copyright Policy
  • Cookie Policy
  • GDPR Policy
  • Privacy Policy
  • Disclaimer
  • Terms Of Use

More Information

  • Home
  • About
  • Contact
  • Appetizers
  • Dessert
  • Dinner
  • Drinks
©2026, eataroundit About Back To Top