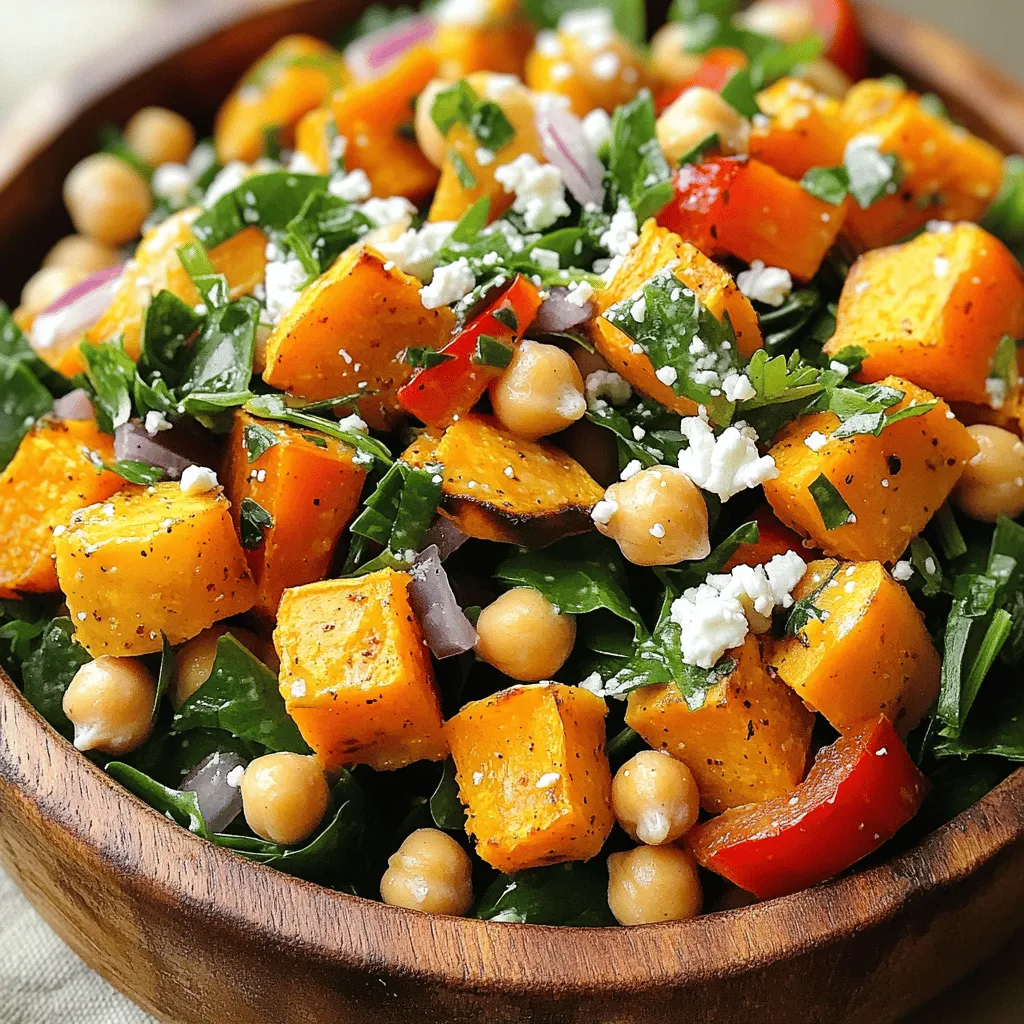
Sweet Potato and Chickpea Salad Fresh and Healthy Dish
Looking for a fresh and healthy dish that bursts with flavor? You’re in the right place! This Sweet Potato and
Looking for a fresh and healthy dish that bursts with flavor? You’re in the right place! This Sweet Potato and
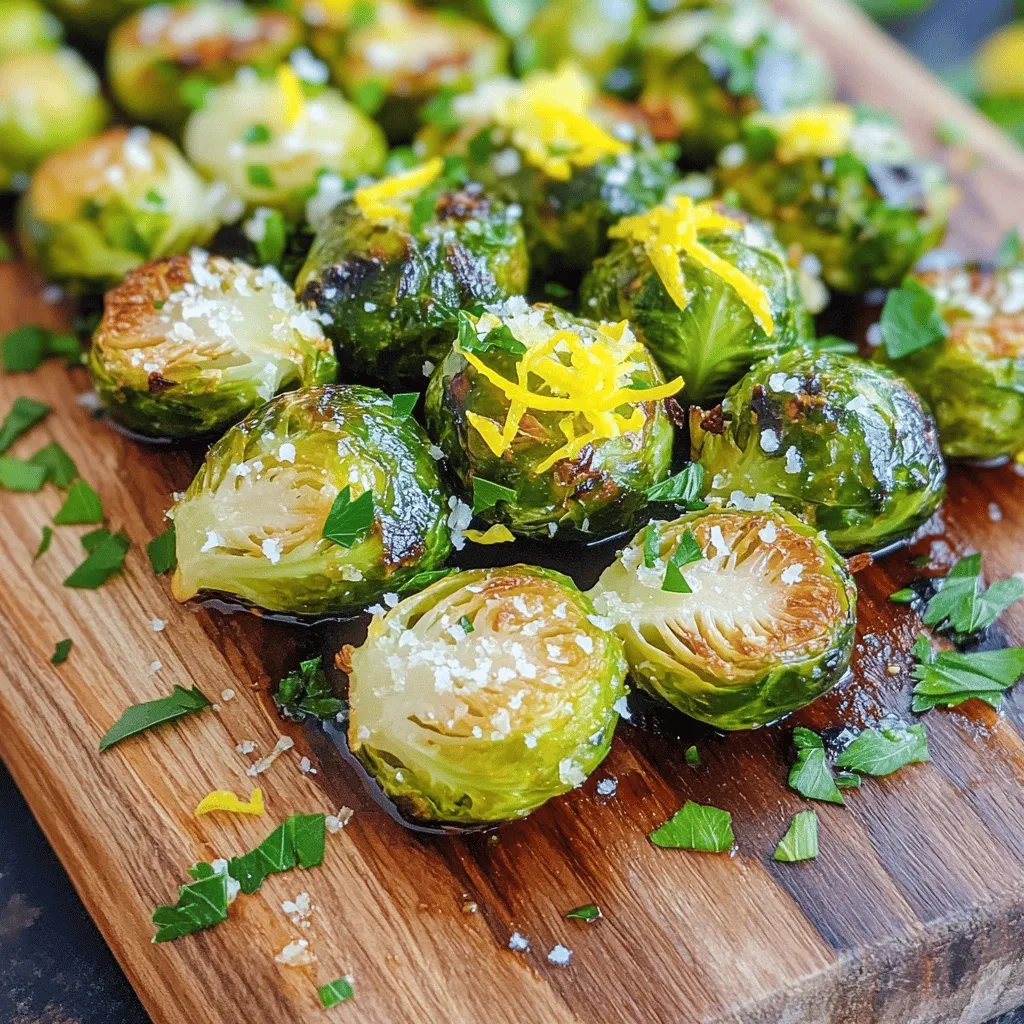
If you’re ready to transform Brussels sprouts into a crunchy delight, you’re in the right place! My recipe for Crispy
![- 4 large eggs - 1 ripe avocado - 2 tablespoons Greek yogurt - 1 tablespoon Dijon mustard - 1 tablespoon freshly squeezed lemon juice - 1 small red onion - 2 tablespoons fresh dill - Salt and freshly ground black pepper The core of this dish is simple yet full of taste. First, we use four large eggs. They provide rich protein and healthy fats. Next, we have a ripe avocado. This adds creaminess and nutrients. For a touch of tang, we mix in two tablespoons of Greek yogurt. It keeps the salad light and fresh. To elevate the flavors, we add Dijon mustard and lemon juice. These ingredients brighten the dish and create a lovely zing. A small red onion gives a sweet and sharp crunch, balancing the smooth avocado. For seasonings, we include fresh dill. It brings a fragrant note that complements the other flavors perfectly. Don’t forget salt and freshly ground black pepper. They enhance the overall taste and tie the dish together. This avocado and egg salad is not just tasty; it’s also packed with nutrients. You can find the complete recipe [Full Recipe] to guide you through making this delightful dish. To start, boil the eggs. Place 4 large eggs in a saucepan and cover them with cold water. Heat on medium until the water boils. Once it boils, cover the pot and remove it from the heat. Let the eggs sit for 9-12 minutes for hard-boiled perfection. After the time is up, cool the eggs quickly. Transfer them to a bowl with ice water for about 5 minutes. This helps with peeling. Once cool, tap the eggs on a hard surface to crack the shell. Peel them under running water to make it easier. Finally, dice the eggs into small pieces. Next, prepare the avocado mixture. Take 1 ripe avocado, peel it, and remove the pit. In a large bowl, mash the avocado with a fork. Aim for a creamy texture, but leave some small chunks for a nice bite. Now, add the creamy goodness. Mix in 2 tablespoons of Greek yogurt, 1 tablespoon of Dijon mustard, and 1 tablespoon of freshly squeezed lemon juice. Toss in 1 small finely chopped red onion and 2 tablespoons of fresh dill. Stir all these together until they blend well and look creamy. It's time to assemble your salad. Carefully fold in the diced eggs using a spatula. Be gentle to keep the egg pieces intact. This adds great texture! Now, season your salad. Sprinkle salt and freshly ground black pepper to taste. Adjust the seasoning to your liking for the best flavor. For serving, spoon the salad onto crisp lettuce leaves or use it as a filling for a sandwich. You can also enjoy it on toast or with crunchy crackers. For the full recipe, check out [Full Recipe]. To boil eggs flawlessly, start with cold water. Place eggs in a pot, cover them fully. Set the heat to medium and wait for a gentle boil. Once boiling, cover the pot and remove it from heat. Let it sit for 9-12 minutes. This method gives you a perfect hard-boiled egg. For easy peeling, cool the eggs quickly. After boiling, move them to a bowl of ice water for about 5 minutes. This shock makes the shell come off easier. Crack the egg gently on a hard surface. Peel it under running water to help remove any stubborn bits. To boost flavors, adjust your seasonings. You might add more lemon juice for brightness or extra dill for a fresh taste. A pinch of cayenne can add a mild kick too. For added crunch, consider mixing in some diced celery or chopped bell peppers. These not only add texture but also enhance the overall taste. You can even try sunflower seeds for a nutty twist. If you want a lighter option, use plain yogurt instead of Greek yogurt. This keeps the creaminess while cutting calories. You can also use avocado oil mayo for a different flavor profile. For herbs, fresh chives or cilantro can be great substitutes. They bring unique flavors that can change your salad completely. Experiment with spices like smoked paprika or curry powder for an exciting twist. For the full recipe, check out the Creamy Avocado & Herb Egg Salad Delight. {{image_4}} You can make a tasty avocado egg salad wrap by using tortillas or wraps. This change offers a fun twist. Simply spread the salad on a wrap, then add some crisp veggies. Roll it tightly for a healthy meal on the go. You can slice it into pinwheels for a cute party snack. The wrap adds a new texture and makes it easy to eat. To boost the protein in your salad, try adding chicken or tofu. Grilled chicken works well and adds a nice flavor. If you prefer a plant-based option, diced tofu is a great choice. Just mix it in gently to keep the salad’s creamy texture. This addition makes the salad more filling and nutritious. You can enjoy it as a meal or a hearty snack. For a vegan version, swap the Greek yogurt for a plant-based alternative. You can use silken tofu blended until smooth or plant-based yogurt. This keeps the creaminess without any dairy. Also, you might want to skip the eggs and replace them with chickpeas. Mash the chickpeas slightly to mimic the egg texture. This vegan twist is still packed with flavor and nutrition. For the full recipe, check out the delicious details above. To keep your avocado and egg salad fresh, store it in the refrigerator. Use an airtight container to prevent air from getting in. This helps keep the salad creamy and tasty. If you have leftover salad, place it in a small bowl and cover it tightly with plastic wrap. This will keep it from drying out and losing flavor. How long does the salad stay fresh? When stored properly, your salad will last for about 3 days in the fridge. After that, the avocado may brown and the eggs can get rubbery. Always check for any off smells or changes in texture before eating. If it looks or smells bad, it's best to throw it away. If you have leftovers, serve them cold for the best taste. Microwaving is not recommended, as heat can change the texture. If you want to enjoy it warm, let it sit at room temperature for a few minutes. This way, the flavors will blend nicely without losing their fun texture. For a fresh twist, add a sprinkle of lemon juice just before serving. You can find the full recipe [here]. Yes, you can use many herbs. Try parsley for a fresh taste. Cilantro adds a unique flavor. Chives give a mild onion taste. You can mix different herbs for a fun twist. Just keep in mind to chop them finely for even flavor. To add heat, consider mixing in diced jalapeños. You could also add a dash of cayenne pepper or hot sauce. Another option is to mix in a pinch of red pepper flakes. Start small, and taste as you go. This way, you can control the spice level. Yes, this salad works well for meal prep. You can make it a day ahead. Store it in an airtight container in the fridge. To keep it fresh, add lettuce just before serving. This way, the lettuce stays crispy and fresh. For best taste, eat within three days. For the full recipe, check out the details. This avocado and egg salad is simple and packed with flavor. You learned about key ingredients like eggs, avocado, and Greek yogurt. I shared tips to make cooking easy and ways to add your twist. You can try different proteins, wraps, or herbs to make it yours. Remember to store it right for freshness. Enjoy making this healthy dish that is quick to prepare and great for meals. With these steps, you're ready to impress anyone with your tasty salad.](https://eataroundit.com/wp-content/uploads/2025/06/da03f113-2fa6-42ff-8aa6-af62a2d6ef5f.webp)
Looking for a quick, tasty meal packed with nutrients? Join me in making Avocado and Egg Salad! This simple dish
![- 1 cup jasmine rice (uncooked) - 1 lb shrimp, peeled and deveined - 4 garlic cloves, minced - 3 tablespoons vegetable oil (divided) - 2 eggs, lightly beaten - 1 cup mixed vegetables (peas, carrots, and corn) - 3 tablespoons soy sauce - 1 tablespoon sriracha (or to taste) - Salt and pepper to taste - Fresh cilantro, chopped (for garnish) In this spicy garlic shrimp fried rice, the main ingredients shine. Start with jasmine rice; it's fragrant and soft. The shrimp adds a nice touch of protein and flavor, while garlic brings that bold punch we crave. Next, we layer in some colorful mixed veggies for crunch and nutrition. The eggs give a rich texture that ties everything together. Don't forget the soy sauce and sriracha. They add depth and heat, making each bite exciting. Season with salt and pepper to taste. Finally, a sprinkle of fresh cilantro brightens the dish. For the full recipe, you can easily follow the steps outlined above. To start, I cook the jasmine rice. I follow the package instructions closely. Once the rice is ready, I spread it out on a baking sheet. This helps it cool quickly. For the best fried rice, I refrigerate the rice. A few hours or overnight works wonders. Cold rice is firmer and fries better. Next, I heat two tablespoons of vegetable oil in a large skillet. I use medium-high heat for this. When the oil shimmers, I add four minced garlic cloves. I sauté the garlic for about 30 seconds. It should smell great but not turn brown. Now, I carefully add the shrimp to the skillet. I stir-fry the shrimp for about 3 to 4 minutes. They will turn pink and opaque when cooked. Once ready, I remove the shrimp and set them aside on a plate. It’s important not to overcook the shrimp. They should be tender and juicy. In the same skillet, I check if I need more oil. If it looks dry, I add one tablespoon of oil. Then, I pour in the lightly beaten eggs. I stir and scramble the eggs until they are fully cooked. Once done, I add the cooked shrimp back into the skillet. Now, it’s time to add the cooled jasmine rice. I also toss in the mixed vegetables, soy sauce, and sriracha. I mix all the ingredients well. I want everything heated through and evenly combined. For a nice texture, I let it fry for a few minutes without stirring too much. After mixing, I taste the dish. I season with salt and pepper as needed. Finally, I fold in the chopped green onion. The rice is now ready to serve hot. For a nice touch, I garnish with fresh cilantro. For the complete process, check the Full Recipe. To get that perfect fried rice texture, start with cooled rice. Freshly cooked rice is too sticky. Spread it on a baking sheet to cool. Refrigerate for a few hours or overnight. This helps the grains firm up. When you fry it, you want a slight crisp. In the skillet, heat your oil until it shimmers. Add the cooled rice and let it fry. Stir less often at first. This gives the rice a chance to get crispy. Flip it gently to keep the texture intact. Want more spice? You can add sriracha to taste. Start with a tablespoon, then adjust. If you like bold flavors, try adding red pepper flakes or chili paste. Fresh herbs like cilantro or basil also brighten the dish. They add a fresh note, balancing the heat. Consider soy sauce alternatives too. Coconut aminos or tamari can work well. They add depth without too much salt. A splash of lime juice can also enhance the dish's flavor. Pair your fried rice with fresh sides. A crisp salad works well. You can also serve it with spring rolls or dumplings. These add variety and texture to your meal. For a great presentation, use a vibrant bowl. You can also plate it individually. Top each portion with cilantro and a drizzle of sriracha. This makes the dish pop. It’s not just delicious, but looks great too. For the full recipe, check the full recipe section. {{image_4}} If shrimp isn't your thing, you have many choices. Chicken works great in this dish. Just cut it into small pieces and cook it the same way as the shrimp. Tofu is also an excellent option for a vegetarian meal. Use firm tofu, and make sure to press it well to remove excess water. This way, it will crisp nicely in the pan. You can easily make this dish vegetarian or vegan by switching the protein and using plant-based eggs. Fried rice is flexible, so feel free to mix up the veggies. You can use bell peppers, broccoli, or snap peas. These add great texture and color. Seasonal vegetables are also a fantastic choice. For example, in summer, zucchini and corn would shine. In the fall, try adding butternut squash or kale for a hearty twist. The key is to choose vegetables you enjoy and that cook quickly. To make your fried rice pop, consider soy sauce alternatives. Coconut aminos offer a sweeter taste and less sodium. You can also add a splash of fish sauce for depth. Explore different cuisines by adding spices or sauces. For a Thai twist, try using a bit of lime juice and fresh basil. If you want an Asian influence, consider sesame oil or even kimchi. Each of these twists gives your fried rice a new and exciting flavor. For the complete recipe, check out the [Full Recipe]. To keep your spicy garlic shrimp fried rice fresh, follow these guidelines: - Refrigerating: Place any leftover rice in an airtight container. It will last up to 3 days in the fridge. - Freezing: For longer storage, freeze the rice in a freezer-safe bag. It can last up to 2 months. Make sure to cool the rice to room temperature before storing. This helps prevent moisture buildup, which can lead to sogginess. When it comes to reheating, you want to keep that delicious taste intact. Here are my best methods: - Microwave: Place the rice in a microwave-safe dish. Add a splash of water. Cover with a lid or plastic wrap. Heat for 1-2 minutes, stirring halfway. - Stovetop: Heat a skillet over medium heat. Add a small amount of oil or water. Stir in the rice and cover. Cook for about 5-7 minutes until heated through. Aim for a temperature of at least 165°F (74°C) when reheating. This ensures your meal is safe to enjoy! For more details, check the full recipe. You can make this dish in advance. Start by cooking the jasmine rice. Once cooked, let it cool and then refrigerate it. Chilling the rice helps it firm up. This way, it won’t clump when you fry it. You can also prep the shrimp and veggies the day before. Store them in separate containers. When you're ready to cook, just stir-fry everything together. It saves time and makes meal prep easy! If you don’t have jasmine rice, you can use several other types. Long-grain rice works well because it has a similar texture. You can also try basmati rice for a fragrant option. Brown rice is a healthy choice, too. Just remember, cooking times may vary. Adjust water and cooking time as needed. Yes, you can easily make this dish without shrimp. If you want a vegetarian option, use tofu instead. Just cut it into small cubes and sauté it until golden. You can also add more vegetables like bell peppers or mushrooms. For a protein boost, try chickpeas or edamame. Adjust the cooking time to ensure everything is cooked well. One common mistake is using hot, freshly cooked rice. Always use cooled rice for the best texture. Another mistake is overcrowding the pan. If the pan is too full, the rice won’t fry properly. Keep each grain separate. Finally, don’t skip the seasoning. Taste and adjust with soy sauce and sriracha. This will enhance the flavor and avoid blandness. Spicy Garlic Shrimp Fried Rice is an easy and tasty dish. We discussed key ingredients, cooking steps, and tips to enhance flavor and texture. I shared options for proteins and vegetables, as well as storage and reheating methods. Now, you have all the tools to make this dish your own. Experiment with flavors and ingredients. Enjoy each bite of your creation!](https://eataroundit.com/wp-content/uploads/2025/06/fc6c5a73-7e17-41e0-8400-aeb89636e99a.webp)
Get ready to tantalize your taste buds with Spicy Garlic Shrimp Fried Rice! This dish packs bold flavors and takes
![- 1 can (15 oz) chickpeas, thoroughly drained and rinsed - 1 cup cherry tomatoes, sliced in half - 1 cucumber, diced into small cubes - ½ medium red onion, finely minced - 1 cup baby spinach or your favorite mixed greens - 4 whole wheat tortillas or wraps of choice Chickpeas form the heart of these wraps. They're full of protein and fiber, making them filling. Fresh vegetables add crunch and flavor. Use ripe tomatoes, crisp cucumbers, and vibrant greens for the best taste. - 1 tablespoon extra virgin olive oil - 1 teaspoon ground cumin - 1 teaspoon smoked paprika - Sea salt and freshly cracked black pepper, to taste Olive oil brings richness, while cumin and smoked paprika add warmth. Season with salt and pepper to enhance the flavors. These spices create a delightful mix, making the chickpeas shine. - ½ cup feta cheese, crumbled (optional for garnish) - ¼ cup tahini sauce or creamy hummus for spreading Feta cheese gives a creamy touch. If you want a vegan option, swap it for a dairy-free cheese. Tahini or hummus adds extra flavor and moisture. These options let you customize your wrap for your taste. For the full recipe, check out the Mediterranean Chickpea Wraps section. Mashing vs. Leaving Whole Start by draining and rinsing the chickpeas. Use a fork to mash half of them in a bowl. Leave the rest whole for texture. This mix gives a great bite in each wrap. Seasoning the Chickpeas Next, drizzle one tablespoon of olive oil over the mashed chickpeas. Add one teaspoon of ground cumin and smoked paprika. Season with sea salt and black pepper to taste. Mix well to coat all the chickpeas. This adds a rich flavor that is key to your wraps. Combining Ingredients In another bowl, toss together one cup of halved cherry tomatoes, one diced cucumber, and half of a finely minced red onion. Add one cup of baby spinach or mixed greens. This mix adds freshness and crunch to your wraps. Seasoning the Vegetables Sprinkle a pinch of salt and pepper over the veggies. Gently toss them to coat. This simple step enhances the natural flavors of the fresh ingredients. Spreading Sauce Lay out each whole wheat tortilla. Spread about one tablespoon of tahini sauce or hummus on each tortilla. This will add creaminess and depth to every bite. Filling and Folding Techniques Spoon the seasoned chickpeas onto each tortilla. Then, layer the vegetable mix on top. For an extra touch, add crumbled feta cheese if you like. To wrap, fold in the sides and roll tightly from the bottom. This secures all the tasty fillings inside. Grilling Instructions If you want a crispy wrap, heat a skillet over medium heat. Place the assembled wraps in the skillet for 2-3 minutes on each side. Cook until golden brown and slightly crispy. Benefits of Toasting Toasting adds a nice crunch and warms the fillings. It enhances the overall flavor, making your wraps even more satisfying. Enjoy your Mediterranean Chickpea Wraps fresh and warm! For the full recipe, check the section above. - Adjusting Seasonings: Start with the basic spices. Taste as you go. If you want more heat, add a pinch of cayenne. For a fresh twist, try adding lemon juice or zest. This brightens the dish and adds layers of flavor. - Enhancing Texture: Mixing whole chickpeas with mashed ones gives a nice contrast. Consider adding crunchy vegetables like bell peppers or radishes. They add bite and freshness. - Presentation Tips: Arrange your wraps on a big platter. Cut them in half for easy eating. Place a small bowl of tahini sauce nearby for dipping. Garnish with fresh herbs like parsley or dill for a colorful touch. - Side Dish Ideas: Pair your wraps with a light salad or some roasted veggies. A side of yogurt or tzatziki can also add creaminess and tang. - Calories and Macros: Each wrap has about 350 calories. They are rich in protein and fiber from the chickpeas. This helps keep you full and satisfied. - Health Benefits of Ingredients: Chickpeas are great for heart health. They lower cholesterol levels. Fresh veggies add vitamins and minerals. Olive oil provides healthy fats, which support brain health. This meal is not just tasty; it’s good for you too! Check out the [Full Recipe] for detailed steps on how to make these wraps. {{image_4}} You can easily change the flavor of your Mediterranean Chickpea Wraps. - Add Different Cheeses: Try goat cheese for tanginess or mozzarella for creaminess. Each cheese gives a new taste and texture. - Alternate Greens: Instead of baby spinach, use arugula or kale. These greens add a unique bite and freshness to your wraps. Want to make your wraps vegan? No problem! - Vegan Cheese Options: Use cashew cheese or almond cheese instead of feta. They melt well and taste great. - Additional Proteins: Add tofu, tempeh, or lentils for more protein. These options keep your wraps filling and delicious. You can easily adapt this recipe if you need gluten-free options. - Gluten-Free Wrap Alternatives: Use rice paper or corn tortillas instead of wheat wraps. These options are light and tasty. - Serving on a Bed of Greens: Skip the wrap and serve the filling on a bed of mixed greens. This makes a refreshing salad and is gluten-free. Feel free to mix and match these ideas to create your perfect wrap! For the full recipe, check out the details in the main article. For storing your Mediterranean chickpea wraps, use airtight containers. Glass or plastic containers work well. These keep your food fresh longer. In the fridge, the wraps last about three days. If you notice the wraps getting soggy, it's time to toss them. You can freeze individual wraps for later use. Wrap each one tightly in plastic wrap, then place them in a freezer bag. They stay good for up to three months. When you're ready to eat, take out a wrap and let it thaw in the fridge overnight. To reheat, unwrap and warm in a skillet for a few minutes on each side. Making these wraps ahead saves time. Prep the chickpeas and vegetables in advance. Store them separately in the fridge. When you're ready for a meal, assemble the wraps quickly. This method keeps everything fresh and crisp. Enjoy your easy, healthy meals anytime! You can start by making your own tortillas. Here’s how: - Mix 2 cups of whole wheat flour and a pinch of salt. - Gradually add about ¾ cup of warm water, mixing until a dough forms. - Knead the dough for 5 minutes until smooth. - Divide the dough into small balls. - Roll each ball into thin circles. - Cook each tortilla on a hot skillet for 1-2 minutes on each side until brown. You now have fresh tortillas for your wraps! Yes, you can! Here are some great options: - Black beans or kidney beans add flavor and protein. - Grilled chicken pieces add a hearty touch. - Tofu cubes, grilled or baked, work well for a vegan option. Mix and match to find your favorite! If you want to skip feta, try these options: - Crumbled goat cheese gives a similar tangy flavor. - Dairy-free cheese can suit vegan diets. - Creamy avocado adds richness without dairy. You can even skip cheese altogether if you prefer! These wraps stay fresh for about 3 days. - Store them in an airtight container to keep them safe. - If they feel dry, add a bit of extra sauce when you eat them. Check for any changes in smell or texture before enjoying leftovers. For a full recipe of Mediterranean Chickpea Wraps, check this link: [Full Recipe]. Mediterranean chickpea wraps are simple yet flavorful. We explored ingredients like chickpeas, fresh veggies, and seasonings. You can customize wraps with various cheeses, proteins, and gluten-free options. Understanding storage helps you keep leftovers fresh. Meal prep tips make quick meals easy. These wraps are healthy and satisfying. Try making them at home to enjoy a tasty, nutritious meal. With the right ingredients, you can enjoy delightful wraps anytime.](https://eataroundit.com/wp-content/uploads/2025/06/956153f8-6e56-409d-9355-63f2ecb70ec9.webp)
Looking for a fresh, tasty meal? Mediterranean Chickpea Wraps are your answer! Packed with protein and vibrant veggies, these wraps
