Vegan Chocolate Peanut Butter Cups Simple Delight

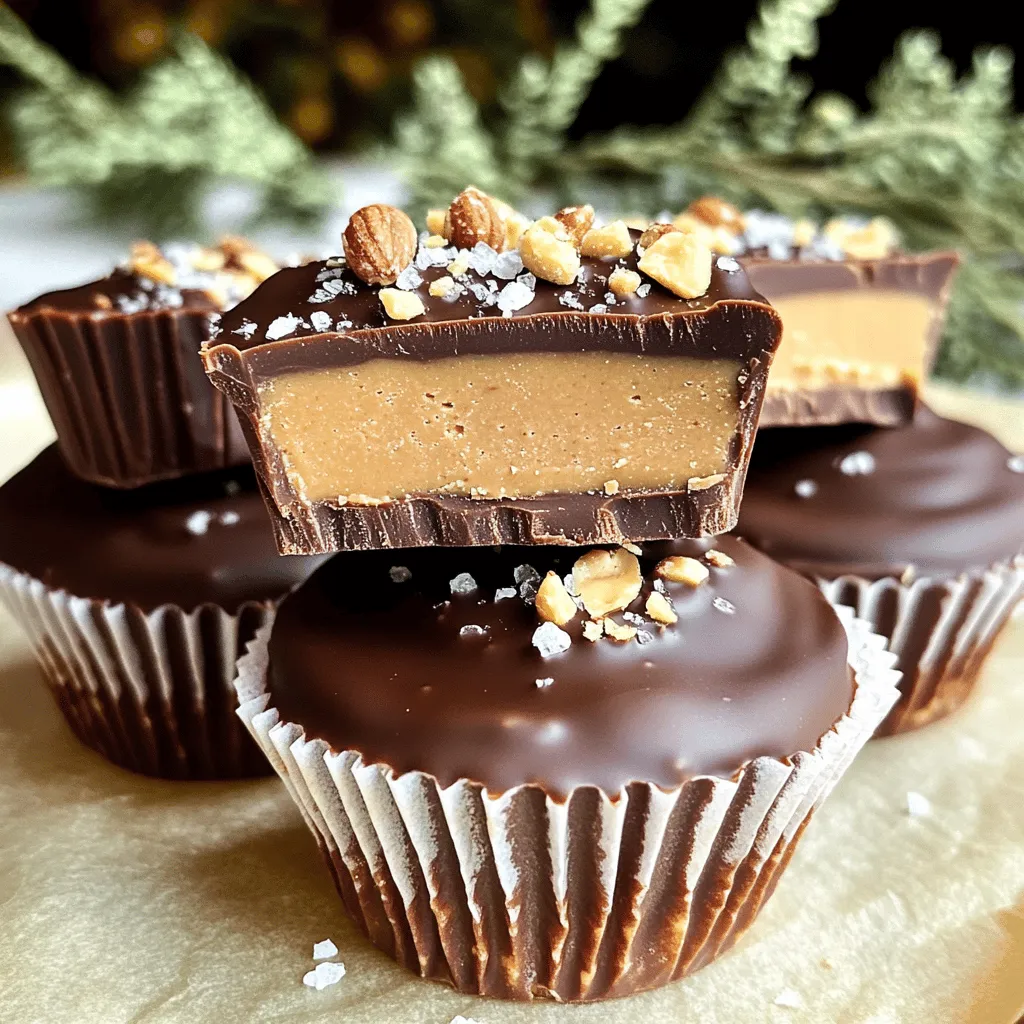
Indulging in a treat that’s both tasty and vegan sounds like a dream, right? In this post, I’ll show you how to make Vegan Chocolate Peanut Butter Cups, a simple delight that combines rich chocolate and creamy peanut butter. With just a few easy ingredients and steps, you’ll have a delicious dessert that anyone can enjoy. Let’s dive in and make these mouthwatering cups together!

Ingredients

To make these vegan chocolate peanut butter cups, you need simple, wholesome ingredients. Here’s what you will need:

– 1 cup dairy-free dark chocolate chips

– 1/2 cup natural peanut butter

– 2 tablespoons pure maple syrup

– 1/4 cup coconut oil, melted

– Pinch of flaky sea salt

– Optional toppings: crushed nuts, extra sea salt flakes, or shredded coconut

These ingredients work together to create a tasty treat. The dairy-free chocolate chips give a rich, chocolate flavor. Natural peanut butter adds creaminess and protein. Pure maple syrup offers just the right amount of sweetness. Melted coconut oil helps everything stick together and adds a nice texture. The pinch of sea salt enhances all the flavors.

Feel free to get creative with the optional toppings. Crushed nuts add crunch, while shredded coconut brings a tropical twist. You can also sprinkle more sea salt for an exciting flavor contrast.

Using quality ingredients makes a big difference. I recommend looking for organic or fair-trade options if you can. This choice not only supports sustainable farming but also elevates the taste of your treats.

For the full recipe, check below and get ready to delight your taste buds!

Step-by-Step Instructions

Preparation of Molds

Start by lining a muffin tin with paper cupcake liners. This is key to easily removing the cups later. If you prefer, use silicone molds. They pop out the cups effortlessly, making cleanup a breeze.

Melting the Chocolate

In a heat-safe bowl, combine 1 cup of dairy-free dark chocolate chips and 1/8 cup of melted coconut oil. Stir well. Microwave the mixture in 30-second bursts. After each burst, give it a good stir. This helps the chocolate melt evenly. Stop when the chocolate is smooth and melted.

Layering the Ingredients

Now, create the chocolate base layer. Use a spoon to scoop about 1 tablespoon of the melted chocolate into the bottom of each cupcake liner. Spread it evenly. Place the muffin tin in the freezer for around 10 minutes. This sets the base layer.

Next, make the peanut butter filling. In a mixing bowl, combine 1/2 cup of natural peanut butter, 2 tablespoons of pure maple syrup, and a pinch of flaky sea salt. Mix until smooth. Remove the muffin tin from the freezer. Spoon about 1 tablespoon of the peanut butter filling onto each chocolate layer. Spread it evenly with the back of the spoon.

Now it’s time to add the top layer of chocolate. Pour the remaining melted chocolate over the peanut butter filling. Ensure each cup is fully covered. Tap the muffin tin on the counter to release air bubbles and smooth the top.

Chilling to Set

Chill the muffin tin again. Return it to the freezer for 20 to 30 minutes. This step is vital for firm cups. If you want them to hold their shape, make sure they chill long enough. Check that both layers are firm before serving.

Tips & Tricks

Making the Perfect Cups

Best practices for melting chocolate: Always use a heat-safe bowl. Mix the chocolate chips with a bit of coconut oil for a smooth texture. Microwave in short bursts of 30 seconds. Stir well after each interval. This way, you avoid burning the chocolate.

Ensuring smooth peanut butter filling: Use natural peanut butter without added sugar or oils. Mix it well with maple syrup and a pinch of salt. This will give you a creamy and tasty filling. If it feels too thick, add a little more maple syrup to help it blend.

Enhancements for Flavor

Suggestions for toppings and variations: Get creative with toppings! You can add crushed nuts for crunch, extra sea salt for contrast, or shredded coconut for a tropical twist. These touches make each cup unique and fun.

Balancing sweetness with sea salt: A small pinch of flaky sea salt can enhance the flavors. It balances the sweetness of the chocolate and peanut butter. Try experimenting with different amounts to find your perfect mix.

Variations

Gluten-Free Options

You can easily make these cups gluten-free. Use gluten-free chocolate chips. Check the label to ensure they are safe. You may also use gluten-free oats in place of any bread crumbs if you want a crunchy texture.

Other Nut Butters

Feel free to swap peanut butter with other nut butters. Almond butter adds a light, nutty taste. Cashew butter offers a creamy, mild flavor. Sunflower seed butter is a great option for nut-free diets. Each nut butter will change the cups’ taste, so experiment to find your favorite.

Dairy-Free Chocolate Brands

Not all chocolate is dairy-free. I recommend brands like Enjoy Life and Hu. You can find these at health stores or online. They offer a rich taste that pairs perfectly with peanut butter. Look for dark chocolate chips that have no added dairy for the best results.

Storage Info

Proper Storage Techniques

To keep your Vegan Chocolate Peanut Butter Cups fresh, you can store them in two main ways: the refrigerator or the freezer.

Refrigerator: If you plan to eat them within a week, simply place them in an airtight container. This keeps them cool and ready to enjoy.

Freezer: For longer storage, the freezer is your best friend. Store them in a freezer-safe container or a zip-top bag. This method can extend their life for up to three months.

When choosing containers, opt for glass or BPA-free plastic. These materials help maintain flavor and texture.

Shelf Life & Freshness

How long do these cups stay fresh? In the refrigerator, they can last about 5 to 7 days. In the freezer, they hold up for about three months.

Look for these signs of spoilage:

Dry or chalky texture: This shows the chocolate has lost moisture.

Off smell: If they smell strange, it’s best to toss them.

Discoloration: Any unusual spots mean it’s time to say goodbye.

By following these tips, you can enjoy your Vegan Chocolate Peanut Butter Cups at their best for longer. For the full recipe, check out the previous sections.

FAQs

How do I make vegan chocolate peanut butter cups?

To make vegan chocolate peanut butter cups, follow these easy steps:

1. Prepare the molds: Line a muffin tin with paper liners or use silicone molds. This helps with easy removal.

2. Melt the chocolate: In a bowl, mix dairy-free dark chocolate chips with half of the melted coconut oil. Heat in the microwave in 30-second bursts, stirring until smooth.

3. Create the base layer: Spoon 1 tablespoon of melted chocolate into each mold. Spread it evenly and freeze for about 10 minutes.

4. Make the filling: In a bowl, mix peanut butter, maple syrup, and a pinch of sea salt until smooth.

5. Add the filling: After the base layer sets, add 1 tablespoon of the peanut butter mixture on top.

6. Top with chocolate: Pour the remaining melted chocolate over the filling. Tap the tin to get rid of air bubbles.

7. Chill to set: Freeze for another 20-30 minutes until firm.

8. Serve: Remove from the liners and enjoy. You can add toppings like crushed nuts or sea salt for extra flavor.

Can I use almond butter instead of peanut butter?

Yes, you can use almond butter instead of peanut butter. Almond butter gives a nutty taste and works well in this recipe. It’s a great option for those with peanut allergies. Just make sure to choose a natural almond butter without added sugars or oils. The texture remains creamy and delightful, and it pairs nicely with the chocolate.

Are these cups healthy?

These vegan chocolate peanut butter cups offer several nutritional benefits:

Dark chocolate: Rich in antioxidants and may improve heart health.

Peanut butter: Packed with protein and healthy fats, it keeps you full longer.

Maple syrup: A natural sweetener that provides minerals like zinc and manganese.

Coconut oil: Contains medium-chain triglycerides, which may aid in weight loss and energy.

These ingredients make the cups tasty and a better choice than many store-bought candies.

Where can I buy vegan chocolate peanut butter cups?

You can find vegan chocolate peanut butter cups at many health food stores. Brands like Unreal and Hu Chocolate offer tasty options. Many local shops and cafes also sell homemade versions. Check online retailers too, as they often have a variety of brands. Making your own, using the Full Recipe, ensures you know exactly what’s inside!

You learned how to make delicious vegan chocolate peanut butter cups. We covered the ingredients, step-by-step instructions, and tips for perfecting your treats. You can customize flavors and even try different nut butters. Proper storage helps keep them fresh.

In conclusion, making these cups is fun and easy. Enjoy creating tasty snacks that fit your diet. With this knowledge, you can impress friends and family with your homemade treats. Trust me, they will love them!

To make these vegan chocolate peanut butter cups, you need simple, wholesome ingredients. Here’s what you will need: - 1 cup dairy-free dark chocolate chips - 1/2 cup natural peanut butter - 2 tablespoons pure maple syrup - 1/4 cup coconut oil, melted - Pinch of flaky sea salt - Optional toppings: crushed nuts, extra sea salt flakes, or shredded coconut These ingredients work together to create a tasty treat. The dairy-free chocolate chips give a rich, chocolate flavor. Natural peanut butter adds creaminess and protein. Pure maple syrup offers just the right amount of sweetness. Melted coconut oil helps everything stick together and adds a nice texture. The pinch of sea salt enhances all the flavors. Feel free to get creative with the optional toppings. Crushed nuts add crunch, while shredded coconut brings a tropical twist. You can also sprinkle more sea salt for an exciting flavor contrast. Using quality ingredients makes a big difference. I recommend looking for organic or fair-trade options if you can. This choice not only supports sustainable farming but also elevates the taste of your treats. For the full recipe, check below and get ready to delight your taste buds! Start by lining a muffin tin with paper cupcake liners. This is key to easily removing the cups later. If you prefer, use silicone molds. They pop out the cups effortlessly, making cleanup a breeze. In a heat-safe bowl, combine 1 cup of dairy-free dark chocolate chips and 1/8 cup of melted coconut oil. Stir well. Microwave the mixture in 30-second bursts. After each burst, give it a good stir. This helps the chocolate melt evenly. Stop when the chocolate is smooth and melted. Now, create the chocolate base layer. Use a spoon to scoop about 1 tablespoon of the melted chocolate into the bottom of each cupcake liner. Spread it evenly. Place the muffin tin in the freezer for around 10 minutes. This sets the base layer. Next, make the peanut butter filling. In a mixing bowl, combine 1/2 cup of natural peanut butter, 2 tablespoons of pure maple syrup, and a pinch of flaky sea salt. Mix until smooth. Remove the muffin tin from the freezer. Spoon about 1 tablespoon of the peanut butter filling onto each chocolate layer. Spread it evenly with the back of the spoon. Now it’s time to add the top layer of chocolate. Pour the remaining melted chocolate over the peanut butter filling. Ensure each cup is fully covered. Tap the muffin tin on the counter to release air bubbles and smooth the top. Chill the muffin tin again. Return it to the freezer for 20 to 30 minutes. This step is vital for firm cups. If you want them to hold their shape, make sure they chill long enough. Check that both layers are firm before serving. - Best practices for melting chocolate: Always use a heat-safe bowl. Mix the chocolate chips with a bit of coconut oil for a smooth texture. Microwave in short bursts of 30 seconds. Stir well after each interval. This way, you avoid burning the chocolate. - Ensuring smooth peanut butter filling: Use natural peanut butter without added sugar or oils. Mix it well with maple syrup and a pinch of salt. This will give you a creamy and tasty filling. If it feels too thick, add a little more maple syrup to help it blend. - Suggestions for toppings and variations: Get creative with toppings! You can add crushed nuts for crunch, extra sea salt for contrast, or shredded coconut for a tropical twist. These touches make each cup unique and fun. - Balancing sweetness with sea salt: A small pinch of flaky sea salt can enhance the flavors. It balances the sweetness of the chocolate and peanut butter. Try experimenting with different amounts to find your perfect mix. {{image_4}} You can easily make these cups gluten-free. Use gluten-free chocolate chips. Check the label to ensure they are safe. You may also use gluten-free oats in place of any bread crumbs if you want a crunchy texture. Feel free to swap peanut butter with other nut butters. Almond butter adds a light, nutty taste. Cashew butter offers a creamy, mild flavor. Sunflower seed butter is a great option for nut-free diets. Each nut butter will change the cups' taste, so experiment to find your favorite. Not all chocolate is dairy-free. I recommend brands like Enjoy Life and Hu. You can find these at health stores or online. They offer a rich taste that pairs perfectly with peanut butter. Look for dark chocolate chips that have no added dairy for the best results. To keep your Vegan Chocolate Peanut Butter Cups fresh, you can store them in two main ways: the refrigerator or the freezer. - Refrigerator: If you plan to eat them within a week, simply place them in an airtight container. This keeps them cool and ready to enjoy. - Freezer: For longer storage, the freezer is your best friend. Store them in a freezer-safe container or a zip-top bag. This method can extend their life for up to three months. When choosing containers, opt for glass or BPA-free plastic. These materials help maintain flavor and texture. How long do these cups stay fresh? In the refrigerator, they can last about 5 to 7 days. In the freezer, they hold up for about three months. Look for these signs of spoilage: - Dry or chalky texture: This shows the chocolate has lost moisture. - Off smell: If they smell strange, it’s best to toss them. - Discoloration: Any unusual spots mean it’s time to say goodbye. By following these tips, you can enjoy your Vegan Chocolate Peanut Butter Cups at their best for longer. For the full recipe, check out the previous sections. To make vegan chocolate peanut butter cups, follow these easy steps: 1. Prepare the molds: Line a muffin tin with paper liners or use silicone molds. This helps with easy removal. 2. Melt the chocolate: In a bowl, mix dairy-free dark chocolate chips with half of the melted coconut oil. Heat in the microwave in 30-second bursts, stirring until smooth. 3. Create the base layer: Spoon 1 tablespoon of melted chocolate into each mold. Spread it evenly and freeze for about 10 minutes. 4. Make the filling: In a bowl, mix peanut butter, maple syrup, and a pinch of sea salt until smooth. 5. Add the filling: After the base layer sets, add 1 tablespoon of the peanut butter mixture on top. 6. Top with chocolate: Pour the remaining melted chocolate over the filling. Tap the tin to get rid of air bubbles. 7. Chill to set: Freeze for another 20-30 minutes until firm. 8. Serve: Remove from the liners and enjoy. You can add toppings like crushed nuts or sea salt for extra flavor. Yes, you can use almond butter instead of peanut butter. Almond butter gives a nutty taste and works well in this recipe. It’s a great option for those with peanut allergies. Just make sure to choose a natural almond butter without added sugars or oils. The texture remains creamy and delightful, and it pairs nicely with the chocolate. These vegan chocolate peanut butter cups offer several nutritional benefits: - Dark chocolate: Rich in antioxidants and may improve heart health. - Peanut butter: Packed with protein and healthy fats, it keeps you full longer. - Maple syrup: A natural sweetener that provides minerals like zinc and manganese. - Coconut oil: Contains medium-chain triglycerides, which may aid in weight loss and energy. These ingredients make the cups tasty and a better choice than many store-bought candies. You can find vegan chocolate peanut butter cups at many health food stores. Brands like Unreal and Hu Chocolate offer tasty options. Many local shops and cafes also sell homemade versions. Check online retailers too, as they often have a variety of brands. Making your own, using the Full Recipe, ensures you know exactly what's inside! You learned how to make delicious vegan chocolate peanut butter cups. We covered the ingredients, step-by-step instructions, and tips for perfecting your treats. You can customize flavors and even try different nut butters. Proper storage helps keep them fresh. In conclusion, making these cups is fun and easy. Enjoy creating tasty snacks that fit your diet. With this knowledge, you can impress friends and family with your homemade treats. Trust me, they will love them!

Vegan Chocolate Peanut Butter Cups

Indulge in these delightful vegan chocolate peanut butter cups that are both decadent and simple to make! With just a few wholesome ingredients, you’ll enjoy a creamy peanut butter filling covered in smooth dairy-free chocolate. Perfect for parties or a sweet treat at home, these cups will satisfy your cravings. Ready to dive into the recipe? Click through now to discover how to create these irresistible vegan treats!

Ingredients
  

1 cup dairy-free dark chocolate chips

1/2 cup natural peanut butter

2 tablespoons pure maple syrup

1/4 cup coconut oil, melted

Pinch of flaky sea salt

Optional toppings: crushed nuts, extra sea salt flakes, or shredded coconut

Instructions
 

Prepare the molds: Begin by lining a muffin tin with paper cupcake liners or using silicone molds. This will make it easy to remove the cups once set.

    Melt the chocolate: In a heat-safe bowl, combine the dairy-free dark chocolate chips and half of the melted coconut oil. Microwave the mixture in 30-second intervals, stirring well after each interval, until the chocolate is completely melted and smooth.

      Create the base layer: Using a spoon, carefully scoop approximately 1 tablespoon of the melted chocolate mixture into the bottom of each cupcake liner. Ensure the chocolate is spread evenly across the base. Pop the muffin tin into the freezer for about 10 minutes to allow this layer to firm up.

        Make the filling: In a separate mixing bowl, thoroughly combine the peanut butter, maple syrup, and a pinch of flaky sea salt. Mix until the ingredients are smooth and well incorporated. Set the mixture aside for later use.

          Add the filling: Once the chocolate base has set in the freezer, take the muffin tin out and spoon about 1 tablespoon of the peanut butter mixture on top of each hardened chocolate layer. Use the back of a spoon to spread the filling evenly.

            Top with chocolate: Pour the remaining melted chocolate over the peanut butter filling in each cup, ensuring it is completely covered. Lightly tap the muffin tin against the counter a few times to release any trapped air bubbles and to ensure a smooth finish on top.

              Chill to set: Return the muffin tin to the freezer for an additional 20-30 minutes, or until the chocolate and peanut butter layers are completely firm.

                Serve: Once set, gently peel away the cupcake liners from each cup and enjoy your delectable creations! For an extra touch, consider garnishing with crushed nuts, a sprinkle of sea salt flakes, or a dusting of shredded coconut just before serving for added flavor and texture.

                  Prep Time: 10 minutes | Total Time: 1 hour | Servings: 12 cups

                    Leave a Comment

                    Recipe Rating