Roasted Garlic Hummus Flavorful and Easy Recipe

If you’re looking to elevate your snack game, try my roasted garlic hummus recipe. It’s simple to make and packed with rich flavor. I’ll guide you through each step, from roasting the garlic to blending the perfect smooth dip. Whether you want a healthy appetizer or a party pleaser, this hummus will impress everyone. Grab your ingredients and let’s get started on this delicious journey together!

Ingredients

Main Ingredients for Roasted Garlic Hummus

To make my roasted garlic hummus, you need a few key items. Here is what you will need:

– 1 can (15 oz) chickpeas, drained and rinsed

– 1 head of garlic

– 3 tablespoons tahini

– 2 tablespoons freshly squeezed lemon juice

– 3 tablespoons extra virgin olive oil, plus extra for drizzling

– 1 teaspoon ground cumin

– 1/2 teaspoon smoked paprika, plus extra for garnish

– Salt, to taste

– Water, as needed for desired consistency

These ingredients work together to create a smooth and rich flavor.

Optional Garnishes

Garnishes can take your hummus from good to great! Here are a couple of things you might add:

– Fresh parsley, finely chopped

– Extra drizzle of olive oil

– A sprinkle of smoked paprika

These toppings add color and flavor, making your dish even more appealing.

Equipment Needed

You will need some tools to make this hummus. Gather these items:

– A food processor

– Aluminum foil

– A measuring spoon

– A serving bowl

Having the right tools makes the process easier and more fun. With these ingredients and tools, you’re ready to create a fantastic roasted garlic hummus. For the full recipe, check the section above!

Step-by-Step Instructions

Prepping the Garlic

To start, you need to roast the garlic. Preheat your oven to 400°F (200°C). Take a whole head of garlic and slice the top off. This exposes the cloves inside. Drizzle some olive oil on the cut side. Wrap the garlic in aluminum foil. Place it in the oven for 30 to 35 minutes. When the garlic is soft and golden, take it out and let it cool. Once cool, squeeze the roasted cloves into a bowl. This gives your hummus a rich, sweet flavor.

Blending the Ingredients

Now it’s time to blend! Grab your food processor. Add the drained chickpeas to the bowl. Next, add the roasted garlic cloves you just squeezed out. Add three tablespoons of tahini and two tablespoons of lemon juice. Pour in three tablespoons of extra virgin olive oil, one teaspoon of ground cumin, and half a teaspoon of smoked paprika. Don’t forget to add a pinch of salt! Blend these ingredients together until they mix well.

Achieving the Perfect Consistency

After blending, check the texture of your hummus. If it seems thick, add cold water, one tablespoon at a time. Blend after each addition until you reach the creamy texture you want. Once smooth, taste it. You may want to add more salt or lemon juice to boost the flavor. Adjust as needed. Your roasted garlic hummus is now ready to serve! Check out the Full Recipe for more details.

Tips & Tricks

How to Roast Garlic for Maximum Flavor

To roast garlic, first, preheat your oven to 400°F (200°C). Take a head of garlic and slice the top off. This exposes the cloves inside. Next, drizzle a bit of olive oil over the exposed cloves. Wrap the garlic in foil and place it in the oven. Roast for 30-35 minutes. The cloves will become soft and sweet. Let it cool, then squeeze the cloves out. This roasted garlic adds a rich, deep flavor to your hummus.

Adjusting Seasoning and Texture for Taste

When making your hummus, taste is key. After blending, taste your hummus. If it needs more flavor, add a pinch of salt or more lemon juice. For a smoother texture, add a tablespoon of cold water. Blend again until it reaches your desired creaminess. Remember, small tweaks can change the whole dish.

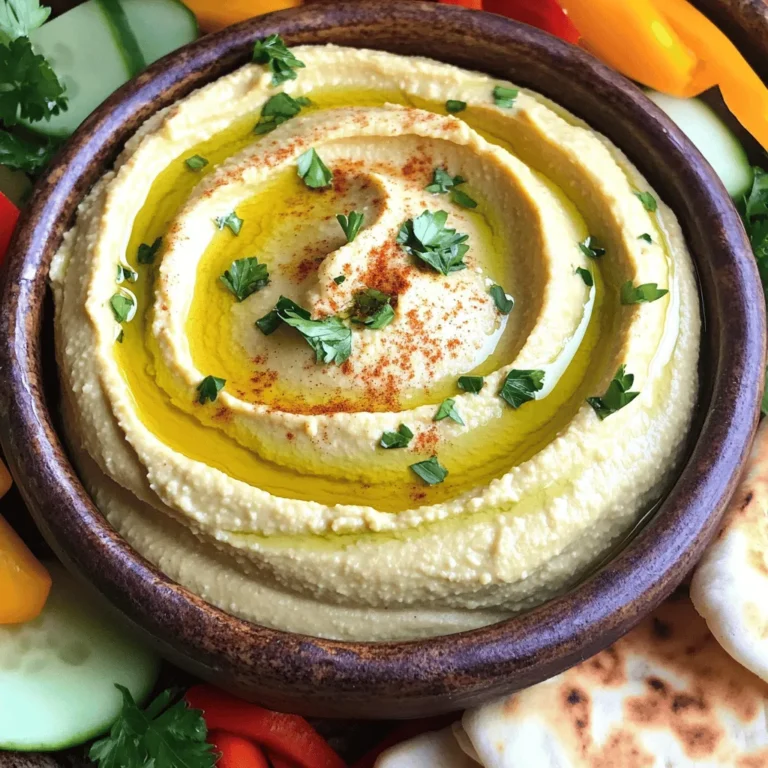
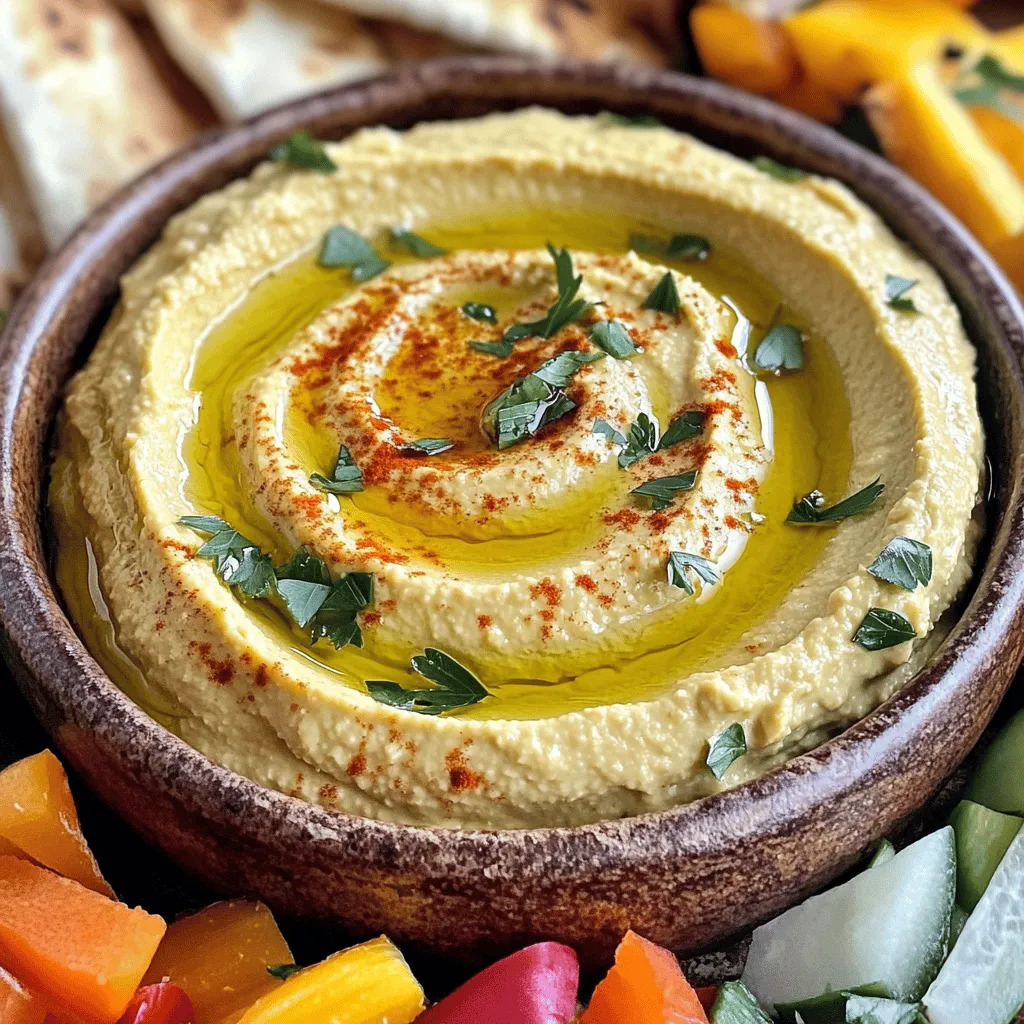
Serving Suggestions for Presentation

Presentation matters! Serve your roasted garlic hummus in a nice bowl. Drizzle extra virgin olive oil on top for shine. Sprinkle smoked paprika for color. Add fresh parsley for a pop of green. Surround the bowl with warm pita bread and colorful raw veggies. This makes a beautiful platter that invites everyone to dig in. For the full recipe, check the link.

Variations

Adding Spices for Different Flavor Profiles

You can change the flavor of hummus by adding spices. For a kick, try cayenne pepper. If you want warmth, add some ground cinnamon. For a fresh touch, consider adding dill or coriander. Just start with a small amount and taste as you go. This way, you can find the perfect mix that you love.

Incorporating Other Ingredients

You can make roasted garlic hummus even better by adding other ingredients. For instance, roasted red peppers add a sweet and smoky flavor. Simply blend in some chopped roasted red peppers with the other ingredients. You can also add sun-dried tomatoes for a tangy twist. Mixing in a handful of spinach or kale boosts nutrients, too!

Vegan and Gluten-Free Options

The great news is that this hummus is already vegan and gluten-free! If you want to keep it that way, just ensure all added ingredients fit these diets. Look for gluten-free pita bread or serve it with fresh veggies. This makes for a perfect snack or meal option for everyone. Enjoy these variations with the Full Recipe to explore the endless possibilities of flavor!

Storage Info

How to Properly Store Homemade Hummus

To keep your roasted garlic hummus fresh, store it in an airtight container. Make sure the container seals well to keep out air. You can also drizzle a little olive oil on top before sealing. This helps keep the hummus moist.

Freezing and Thawing Hummus

You can freeze hummus if you want to save some for later. Pour it into a freezer-safe container, leaving some space at the top. Hummus expands when it freezes. To thaw, move it to the fridge for a few hours or overnight. Stir well before serving, and add a splash of water if it seems too thick.

Shelf Life of Roasted Garlic Hummus

Homemade roasted garlic hummus lasts about five to seven days in the fridge. Check for any off smells or changes in texture before eating. If you freeze it, it can last up to three months. Always remember to label your containers with the date you made it for easy tracking.

FAQs

How long does homemade hummus last in the fridge?

Homemade hummus lasts about five to seven days in the fridge. Store it in an airtight container. This keeps it fresh and tasty. If you notice any change in smell or color, it’s best to toss it.

Can I use fresh garlic instead of roasted?

You can use fresh garlic, but the flavor will be very strong. Roasted garlic gives a sweet, mellow taste. If you want to use fresh garlic, start with a small amount. You can always add more if needed.

What can I substitute for tahini?

If you don’t have tahini, try using peanut butter or sunflower seed butter. These options will change the taste, but they work well. You can also use yogurt for a different texture and flavor.

Is it possible to buy pre-made roasted garlic hummus?

Yes, many stores sell pre-made roasted garlic hummus. Check the refrigerated section of your grocery store. Look for brands that use natural ingredients for the best taste. However, making it at home is easy and fun! For a detailed guide, check out the Full Recipe.

Roasted garlic hummus is easy to make at home. We covered key ingredients, cooking steps, and helpful tips. You can customize flavors and store your hummus safely. Don’t forget to experiment with spices and extra ingredients to make it your own. With these simple steps and tricks, you can enjoy tasty hummus anytime. So go ahead, gather your ingredients, and make your own delicious batch!

To make my roasted garlic hummus, you need a few key items. Here is what you will need: - 1 can (15 oz) chickpeas, drained and rinsed - 1 head of garlic - 3 tablespoons tahini - 2 tablespoons freshly squeezed lemon juice - 3 tablespoons extra virgin olive oil, plus extra for drizzling - 1 teaspoon ground cumin - 1/2 teaspoon smoked paprika, plus extra for garnish - Salt, to taste - Water, as needed for desired consistency These ingredients work together to create a smooth and rich flavor. Garnishes can take your hummus from good to great! Here are a couple of things you might add: - Fresh parsley, finely chopped - Extra drizzle of olive oil - A sprinkle of smoked paprika These toppings add color and flavor, making your dish even more appealing. You will need some tools to make this hummus. Gather these items: - A food processor - Aluminum foil - A measuring spoon - A serving bowl Having the right tools makes the process easier and more fun. With these ingredients and tools, you're ready to create a fantastic roasted garlic hummus. For the full recipe, check the section above! To start, you need to roast the garlic. Preheat your oven to 400°F (200°C). Take a whole head of garlic and slice the top off. This exposes the cloves inside. Drizzle some olive oil on the cut side. Wrap the garlic in aluminum foil. Place it in the oven for 30 to 35 minutes. When the garlic is soft and golden, take it out and let it cool. Once cool, squeeze the roasted cloves into a bowl. This gives your hummus a rich, sweet flavor. Now it’s time to blend! Grab your food processor. Add the drained chickpeas to the bowl. Next, add the roasted garlic cloves you just squeezed out. Add three tablespoons of tahini and two tablespoons of lemon juice. Pour in three tablespoons of extra virgin olive oil, one teaspoon of ground cumin, and half a teaspoon of smoked paprika. Don't forget to add a pinch of salt! Blend these ingredients together until they mix well. After blending, check the texture of your hummus. If it seems thick, add cold water, one tablespoon at a time. Blend after each addition until you reach the creamy texture you want. Once smooth, taste it. You may want to add more salt or lemon juice to boost the flavor. Adjust as needed. Your roasted garlic hummus is now ready to serve! Check out the Full Recipe for more details. To roast garlic, first, preheat your oven to 400°F (200°C). Take a head of garlic and slice the top off. This exposes the cloves inside. Next, drizzle a bit of olive oil over the exposed cloves. Wrap the garlic in foil and place it in the oven. Roast for 30-35 minutes. The cloves will become soft and sweet. Let it cool, then squeeze the cloves out. This roasted garlic adds a rich, deep flavor to your hummus. When making your hummus, taste is key. After blending, taste your hummus. If it needs more flavor, add a pinch of salt or more lemon juice. For a smoother texture, add a tablespoon of cold water. Blend again until it reaches your desired creaminess. Remember, small tweaks can change the whole dish. Presentation matters! Serve your roasted garlic hummus in a nice bowl. Drizzle extra virgin olive oil on top for shine. Sprinkle smoked paprika for color. Add fresh parsley for a pop of green. Surround the bowl with warm pita bread and colorful raw veggies. This makes a beautiful platter that invites everyone to dig in. For the full recipe, check the link. {{image_4}} You can change the flavor of hummus by adding spices. For a kick, try cayenne pepper. If you want warmth, add some ground cinnamon. For a fresh touch, consider adding dill or coriander. Just start with a small amount and taste as you go. This way, you can find the perfect mix that you love. You can make roasted garlic hummus even better by adding other ingredients. For instance, roasted red peppers add a sweet and smoky flavor. Simply blend in some chopped roasted red peppers with the other ingredients. You can also add sun-dried tomatoes for a tangy twist. Mixing in a handful of spinach or kale boosts nutrients, too! The great news is that this hummus is already vegan and gluten-free! If you want to keep it that way, just ensure all added ingredients fit these diets. Look for gluten-free pita bread or serve it with fresh veggies. This makes for a perfect snack or meal option for everyone. Enjoy these variations with the Full Recipe to explore the endless possibilities of flavor! To keep your roasted garlic hummus fresh, store it in an airtight container. Make sure the container seals well to keep out air. You can also drizzle a little olive oil on top before sealing. This helps keep the hummus moist. You can freeze hummus if you want to save some for later. Pour it into a freezer-safe container, leaving some space at the top. Hummus expands when it freezes. To thaw, move it to the fridge for a few hours or overnight. Stir well before serving, and add a splash of water if it seems too thick. Homemade roasted garlic hummus lasts about five to seven days in the fridge. Check for any off smells or changes in texture before eating. If you freeze it, it can last up to three months. Always remember to label your containers with the date you made it for easy tracking. Homemade hummus lasts about five to seven days in the fridge. Store it in an airtight container. This keeps it fresh and tasty. If you notice any change in smell or color, it's best to toss it. You can use fresh garlic, but the flavor will be very strong. Roasted garlic gives a sweet, mellow taste. If you want to use fresh garlic, start with a small amount. You can always add more if needed. If you don't have tahini, try using peanut butter or sunflower seed butter. These options will change the taste, but they work well. You can also use yogurt for a different texture and flavor. Yes, many stores sell pre-made roasted garlic hummus. Check the refrigerated section of your grocery store. Look for brands that use natural ingredients for the best taste. However, making it at home is easy and fun! For a detailed guide, check out the Full Recipe. Roasted garlic hummus is easy to make at home. We covered key ingredients, cooking steps, and helpful tips. You can customize flavors and store your hummus safely. Don’t forget to experiment with spices and extra ingredients to make it your own. With these simple steps and tricks, you can enjoy tasty hummus anytime. So go ahead, gather your ingredients, and make your own delicious batch!

Roasted Garlic Hummus

Indulge in the rich flavors of creamy roasted garlic hummus that will elevate your snacking game! This easy recipe combines roasted garlic, tahini, and spices for a delightful dip perfect with pita bread or fresh veggies. With just a few simple steps, you can whip up this smooth, savory treat in less than an hour. Click through to discover the full recipe and enjoy a deliciously healthy snack that everyone will love!

Ingredients
  

1 can (15 oz) chickpeas, drained and rinsed

1 head of garlic

3 tablespoons tahini

2 tablespoons freshly squeezed lemon juice

3 tablespoons extra virgin olive oil, plus extra for drizzling

1 teaspoon ground cumin

1/2 teaspoon smoked paprika, plus extra for garnish

Salt, to taste

Water, as needed for desired consistency

Fresh parsley, finely chopped for garnish

Pita bread or an assortment of raw veggies, for serving

Instructions
 

Roast the Garlic: Preheat your oven to 400°F (200°C). Carefully slice the top off the head of garlic to expose the individual cloves within. Drizzle the exposed cloves lightly with olive oil, then wrap the head of garlic in aluminum foil. Place the wrapped garlic in the oven and roast for 30-35 minutes, or until the cloves are tender and caramelized. Once done, remove from the oven and allow it to cool for a few minutes before squeezing the roasted cloves out of their skins into a bowl.

    Blend the Ingredients: In a food processor, combine the drained chickpeas, the soft roasted garlic cloves, tahini, lemon juice, 3 tablespoons of extra virgin olive oil, ground cumin, smoked paprika, and a pinch of salt.

      Process Until Smooth: Secure the lid on the food processor and blend the mixture on high speed until it reaches a creamy, smooth consistency. If the hummus appears too thick, gradually add cold water one tablespoon at a time, processing after each addition, until you achieve your desired texture.

        Taste and Adjust: After achieving a smooth consistency, take a moment to taste the hummus. Adjust the seasoning as needed by adding more salt, lemon juice, or spices until it aligns with your flavor preference.

          Serve: Transfer the luscious hummus to a serving bowl. For an appetizing finish, drizzle a little extra virgin olive oil over the top, then garnish with finely chopped fresh parsley and a sprinkle of smoked paprika for an inviting color contrast.

            Prep Time: 10 minutes | Total Time: 45 minutes | Servings: 6

              - Presentation Tips: Serve the creamy hummus surrounded by warm pita bread and an assortment of vibrant raw vegetables such as carrot sticks, cucumber slices, and bell pepper strips for a beautiful and healthy platter.

                Leave a Comment

                Recipe Rating