Skip to content
DisclaimerTerms Of UseGDPR PolicyCookie Policy

eataroundit

  • Home
  • Drinks
  • Appetizers
  • Dinner
  • Dessert
  • About
  • Contact
  • Privacy Policy
DisclaimerTerms Of UseGDPR PolicyCookie Policy

Hannah

Here are the ingredients you will need for Cajun Chicken Pasta. This dish is colorful and packed with flavor. - 400g fettuccine pasta - 2 large chicken breasts, diced into bite-sized pieces - 2 tablespoons Cajun seasoning - 1 tablespoon olive oil - 1 red bell pepper, sliced into strips - 1 yellow bell pepper, sliced into strips - 1 small onion, finely diced - 3 cloves garlic, minced - 300ml chicken broth (low sodium is recommended) - 200ml heavy cream - 1 cup cherry tomatoes, halved - Salt and pepper to taste - Fresh parsley, finely chopped (for garnish) - Grated Parmesan cheese (optional, for serving) These ingredients create a tasty and quick weeknight meal. The Cajun seasoning gives the chicken a nice kick. Fresh veggies add color and crunch. Using low-sodium broth helps control the salt level. You can find the full recipe in the link provided. Enjoy cooking! - Bring a large pot of salted water to a boil. - Add 400g fettuccine pasta and cook according to package instructions. - Reserve 1 cup of starchy pasta water, then drain the pasta and set aside. - Take 2 large chicken breasts and dice them into bite-sized pieces. - Season the chicken with 2 tablespoons of Cajun seasoning. - In a large skillet, heat 1 tablespoon of olive oil over medium-high heat. - Sauté the seasoned chicken until fully cooked, about 5-7 minutes. - In the same skillet, add 1 small diced onion, 1 sliced red bell pepper, and 1 sliced yellow bell pepper. - Add 3 cloves of minced garlic. - Sauté these veggies for about 3-4 minutes, or until they are tender. - Pour in 300ml of low-sodium chicken broth and scrape up any browned bits. - Let the broth simmer for 2-3 minutes. - Stir in 200ml of heavy cream and 1 cup of halved cherry tomatoes, simmering until thickened. - Return the cooked chicken to the skillet and mix everything thoroughly. - If the sauce is too thick, adjust it with reserved pasta water until you get your desired consistency. - Add the cooked fettuccine to the skillet and toss to coat it in the sauce. - Taste and adjust with salt and pepper as needed. - Spoon the pasta onto plates, garnishing with fresh parsley and grated Parmesan cheese if desired. For the full recipe, check out the details above! To make a great Cajun Chicken Pasta, I recommend using low-sodium broth. This helps you control the salt in the dish better. You can adjust the Cajun seasoning to fit your taste. If you like it mild, use less seasoning. For a spicy kick, feel free to add more. Serve your pasta in large bowls for a cozy feel. I love to garnish with a lemon wedge. This adds a bright color and a fresh taste. You can also make your plate look colorful. Add some fresh herbs and a sprinkle of cheese on top. Feel free to swap chicken for shrimp or sausage. Both options bring new flavors. If you want more veggies, add spinach or other greens. They will add color and nutrition to the dish. These small tweaks can make your meal even more exciting! For the full recipe, check out the [Full Recipe]. {{image_4}} You can easily add shrimp to this dish for a seafood twist. First, use about 300 grams of peeled and deveined shrimp. When making this dish, cook the shrimp separately. Add them to the pan after the chicken is done. Sauté the shrimp for about 3-4 minutes until they turn pink. This way, you keep them tender and juicy. Adding more vegetables can boost nutrition and flavor. I recommend using spinach, zucchini, or mushrooms. You can toss in one cup of fresh spinach during the last few minutes of cooking. For zucchini or mushrooms, sauté them with the other veggies for 3-4 minutes until they soften. This makes the dish colorful and healthy. If you need a gluten-free meal, swap the fettuccine for gluten-free pasta. Look for options made from rice or corn. Cook them according to the package instructions. Keep an eye on the cooking time, as gluten-free pasta may cook faster. This way, you can still enjoy the same great flavors without gluten. To store Cajun Chicken Pasta, let it cool first. Then, place it in an airtight container. Use a container that seals well to keep freshness. It stays good in the fridge for about three days. You can use glass or plastic containers. Just make sure they are safe for the fridge. Yes, you can freeze Cajun Chicken Pasta! First, let it cool down. Then, pack it in a freezer-safe container. Leave some space at the top for expansion. It can stay frozen for up to three months. When ready to eat, move it to the fridge to thaw overnight. To reheat Cajun Chicken Pasta, use a skillet or the microwave. If using a skillet, add a splash of chicken broth. Heat it on low, stirring often. This helps keep the pasta creamy. For the microwave, use a microwave-safe bowl. Add a bit of water to keep it moist. Heat in short bursts, stirring in between. Avoid overcooking, as this can make it dry. Cajun Chicken Pasta pairs well with many side dishes. Here are some tasty options: - A fresh garden salad with light dressing - Garlic bread or crusty French bread - Roasted vegetables like zucchini or asparagus - A simple Caesar salad for crunch These sides add balance and enhance your meal's flavor. Yes, you can prep Cajun Chicken Pasta in advance. Cook the pasta and chicken, then store them separately. Keep the sauce in the fridge, too. You can combine everything just before serving. This helps keep the pasta from getting mushy. Store leftovers in airtight containers for up to three days. The spiciness of Cajun Chicken Pasta can vary. Cajun seasoning has a kick, but you control it. Use less seasoning for a milder dish. If you want more heat, add a pinch of cayenne pepper or crushed red pepper flakes. This way, you can adjust the spice to your liking. Absolutely! You can swap fettuccine for other pasta types. Here are some great alternatives: - Penne for a fun shape - Linguine for a lighter feel - Bowtie pasta for a playful twist Just keep the cooking time in mind, as it may vary. Enjoy experimenting with your favorite pasta! This blog post shared a simple recipe for Cajun Chicken Pasta. It covered key ingredients, step-by-step cooking instructions, and useful tips. You can easily adjust spices and even add shrimp or veggies for unique flavors. In the end, making this dish should be fun and creative. Try it your way and enjoy the delicious results. Your kitchen adventures can lead to tasty meals everyone loves. Happy cooking!

Cajun Chicken Pasta Flavorful and Easy Weeknight Meal

Looking for a quick, tasty dish to whip up on busy weeknights? Cajun Chicken Pasta is your answer! This meal

To make hot chocolate cookies, gather these key ingredients: - 1 cup unsweetened cocoa powder - 2 cups all-purpose flour - 1 teaspoon baking soda - 1/2 teaspoon salt - 1 cup unsalted butter, softened - 1 cup granulated sugar - 1 cup packed brown sugar - 2 large eggs, at room temperature - 2 teaspoons pure vanilla extract - 1 cup milk chocolate chips - 1 cup mini marshmallows Each ingredient plays a vital role. The cocoa powder brings rich chocolate flavor. The butter adds moisture. The sugars provide sweetness and help with texture. Eggs bind everything together. You will need some basic tools to bake these cookies: - Mixing bowls - Electric mixer - Measuring cups and spoons - Rubber spatula - Cookie scoop or tablespoon - Baking sheet - Parchment paper - Wire rack Having these supplies ready makes the baking process smooth and fun. Want to make your cookies even better? Here are some fun add-ins: - Chopped nuts for crunch - Different types of chocolate chips, like dark or white - Peppermint pieces for a festive touch - A sprinkle of cinnamon for warmth These add-ins can elevate your hot chocolate cookies, making them truly unique. With the right mix, you can create a delicious twist that fits your taste! For the full recipe, check the details provided earlier. First, preheat your oven to 350°F (175°C). This step is key for baking. While the oven heats, line a baking sheet with parchment paper. This prevents the cookies from sticking. Next, sift together the unsweetened cocoa powder, all-purpose flour, baking soda, and salt in a medium bowl. Sifting helps mix the dry ingredients well. Set this mix aside for later. In a large bowl, cream the softened unsalted butter with the granulated and brown sugars. Use an electric mixer for a light, fluffy mix. This usually takes about 2-3 minutes. Add the eggs one at a time, mixing well after each. Pour in the pure vanilla extract and mix until combined. Now, slowly add the dry mix to the wet mix. Stir gently with a spatula or wooden spoon. Be careful not to overmix, as this can make the cookies tough. Once combined, fold in the milk chocolate chips and mini marshmallows. This adds a sweet surprise in each bite. Using a cookie scoop or tablespoon, drop rounded balls of dough onto your prepared baking sheet. Place them about 2 inches apart. This gives them space to spread. Bake the cookies for 10-12 minutes. The edges will set, but the centers should look soft. They will firm up as they cool. After baking, let the cookies cool on the sheet for about 5 minutes. Then, move them to a wire rack to cool completely. Enjoy the cozy aroma of hot chocolate cookies filling your kitchen! You can find the full recipe above. To get the best cookie texture, focus on a few key steps. First, use room temperature ingredients. This helps the butter mix well, giving your cookies a nice rise. Second, don't overmix the dough. Mix until just combined to keep the cookies soft. Lastly, let the dough rest for about 30 minutes before baking. This helps the flavors meld and improves texture. Many home bakers make simple mistakes. One common error is not measuring ingredients correctly. Use a kitchen scale for best results. Another mistake is baking at the wrong temperature. Always preheat your oven to 350°F (175°C). Lastly, avoid overbaking. The cookies should look slightly soft in the center when you take them out. They will firm up as they cool. Having the right tools makes baking easier. Here’s a list of must-haves: - Mixing bowls - Measuring cups and spoons - Electric mixer - Baking sheets - Parchment paper - Cookie scoop or tablespoon - Wire rack for cooling These tools will help you create the best hot chocolate cookies. For the full recipe, check back to see how to bring these tips to life! {{image_4}} To make gluten-free hot chocolate cookies, swap the all-purpose flour for a gluten-free blend. Look for blends that contain xanthan gum, as this helps with texture. You can use the same measurement, two cups, as the gluten-free flour should mimic regular flour. Follow the full recipe steps, and enjoy chewy, rich cookies without gluten. For a vegan twist, replace the eggs with flax eggs. Mix one tablespoon of ground flaxseed with three tablespoons of water. Let it sit for five minutes until it thickens. Use vegan butter in place of unsalted butter. Choose dairy-free chocolate chips and mini marshmallows for a fully plant-based treat. This version still has all the cozy flavors you love. You can switch up the flavors to match the seasons. For fall, add a teaspoon of pumpkin spice to the dough. During winter, mix in peppermint extract and crushed candy canes. In summer, try adding orange zest for a citrusy twist. Each change gives a new spin while keeping that classic hot chocolate taste. Enjoy the fun of baking these delightful cookies year-round! To keep your hot chocolate cookies fresh, store them in an airtight container. This method helps maintain their soft texture and rich flavor. Layer parchment paper between cookies to prevent sticking. Keep them at room temperature for the best results. Avoid placing cookies in the fridge, as it can dry them out. Freezing cookies is simple. Let the cookies cool completely after baking. Place them in a single layer on a baking sheet. Freeze them for about an hour. Once frozen, transfer them to a freezer-safe bag. They can last up to three months in the freezer. When you're ready to enjoy, just thaw at room temperature or reheat in the oven. Baked hot chocolate cookies stay fresh for about one week. If stored properly, they remain soft and tasty. After that, they may lose their charm but still be safe to eat. Keep an eye on any signs of spoilage, like unusual smells or textures. For the best experience, enjoy them while they are fresh! If you want the full recipe, check out the full recipe above. Yes, you can mix and match chocolate chips. Dark chocolate chips add a rich flavor. White chocolate chips give a sweet contrast. Try peanut butter chips for a fun twist. Just make sure to keep the total amount close to one cup. This way, your cookies stay balanced and tasty. To stop cookies from spreading, chill your dough for 30 minutes. This firms up the butter. You can also use parchment paper on your baking sheet. It helps cookies keep their shape. Another tip is to use a little more flour. Just a few extra tablespoons can work wonders. Check your cookies after 10 minutes. The edges should be firm, while the centers look soft. They will continue to cook after you take them out. If the edges are slightly cracked, they are perfect. Trust your instincts; if they look good, they probably are. Enjoy your cozy and delicious treats! You now have all you need to make delicious hot chocolate cookies. We covered the key ingredients, the baking steps, and useful tips. You learned how to achieve the perfect texture and avoid common mistakes. Plus, I shared variations for gluten-free and vegan diets. Remember to store your cookies well for the best taste. Baking can be fun and rewarding. Enjoy baking these treats for yourself or loved ones!

Hot Chocolate Cookies Cozy and Delicious Treats

There’s nothing like a warm, gooey hot chocolate cookie to make your day better! In this post, I’ll share my

- 1 pound ground beef (or Italian sausage for added flavor) - 1 medium onion, finely chopped - 3 cloves garlic, minced - 1 (28-ounce) can crushed tomatoes - 4 cups beef broth (low-sodium recommended) - 8 ounces lasagna noodles, uncooked and broken into smaller pieces - 1 cup ricotta cheese - 1 cup shredded mozzarella cheese - 1/2 cup grated Parmesan cheese In this recipe, you can choose between ground beef or Italian sausage. Both will give your soup a rich and savory taste. The crushed tomatoes provide a thick base. The beef broth adds depth. Lasagna noodles are key to the dish's hearty feel. The mix of ricotta, mozzarella, and Parmesan gives a creamy and cheesy finish. - 2 teaspoons dried oregano - 2 teaspoons dried basil - 1 teaspoon red pepper flakes (optional for heat) - Salt and freshly ground black pepper to taste Seasonings make this soup shine. Oregano and basil are classic Italian herbs. They add warmth and aroma. Red pepper flakes bring a touch of heat. Adjust the salt and pepper to fit your taste. - Fresh basil leaves - Additional cheese Garnishes make your soup look and taste even better. Fresh basil adds color and flavor. Extra cheese on top enhances the creaminess. You can add these when serving to impress your guests or family. For the full recipe, you can check out the complete guide. Enjoy making your delicious Easy Lasagna Soup! Start by heating a large stock pot over medium heat. Add a drizzle of olive oil to the pot. Once it’s warm, toss in a finely chopped medium onion. Sauté the onion for 3-4 minutes until it turns translucent and smells great. Next, add 3 minced cloves of garlic. Stir it around for another minute until the garlic is fragrant and lightly golden. Now, it’s time to brown the meat. Add 1 pound of ground beef or Italian sausage to the pot. Use a wooden spoon to break the meat into smaller pieces. Cook the meat until it turns brown and is no longer pink. This should take about 5-7 minutes. If you see too much fat, drain some of it out. With the meat browned, it’s time to add flavor. Stir in a 28-ounce can of crushed tomatoes and 4 cups of beef broth. Add 2 teaspoons of dried oregano, 2 teaspoons of dried basil, and 1 teaspoon of red pepper flakes if you like some heat. Increase the heat and bring the mixture to a gentle boil. Once it boils, reduce the heat to a simmer. Now, add 8 ounces of uncooked lasagna noodles, broken into smaller pieces. Cook them according to the package instructions, usually about 10-12 minutes. You want the noodles to be tender but still slightly firm. After your noodles are cooked, it’s time for the creamy goodness. Stir in 1 cup of ricotta cheese. This will melt and blend into the soup, making it rich and delicious. Taste the soup and add salt and freshly ground black pepper to your liking. Now, ladle the hot soup into bowls. Top each bowl with shredded mozzarella and a sprinkle of grated Parmesan cheese. For a lovely finish, garnish each bowl with fresh basil leaves. This adds a burst of color and flavor. You can find the Full Recipe for more details. - Achieving the right noodle texture For the best noodles, avoid overcooking. Cook until they are slightly firm, or al dente. This will keep them from becoming mushy in the soup. Stir occasionally to ensure even cooking. - Adjusting seasoning for personal taste Taste the soup before serving. You can add more salt, pepper, or herbs based on your liking. If you want a kick, sprinkle in more red pepper flakes or add a dash of hot sauce. - Presentation ideas for a restaurant-style look Use deep, rustic bowls to serve the soup. Top each bowl with extra cheese and fresh basil. This makes the dish look inviting and delicious. You can also drizzle a bit of olive oil for shine. - Side dishes to accompany the soup Serve with crusty bread or garlic bread for dipping. A simple green salad can add freshness and balance the meal. Pairing with a light wine can also enhance the flavors. - Making in advance and reheating You can prepare the soup a day ahead. Let it cool, then store it in the fridge. Reheat it on the stove over low heat, stirring often, until warm. This helps blend the flavors even more. - Freezing portions for later For longer storage, freeze portions in airtight containers. Leave a little space at the top for expansion. To thaw, place in the fridge overnight or heat directly from the freezer on low heat. {{image_4}} You can make this soup meat-free. Substitute the ground beef with vegetables like zucchini or bell peppers. You can also use plant-based meat for a similar texture. Instead of beef broth, use vegetable broth for a lighter taste. This keeps the soup rich and full of flavor without meat. Feel free to play with cheese. Instead of just ricotta, try mixing in goat cheese or cream cheese for a unique taste. You can add spinach or mushrooms for extra nutrition and flavor. Both ingredients pair well with the soup’s savory base. They add a nice touch of earthiness. Want a little heat? Start with red pepper flakes. You can add them to taste while cooking. For more heat, use fresh chili or a splash of hot sauce. This lets you control the soup's spiciness and make it just how you like it. To store leftovers safely, let the soup cool first. Use an airtight container to keep it fresh. You can keep it in the fridge for up to three days. For best flavor, eat it within two days. To freeze lasagna soup, let it cool completely. Pour the soup into freezer-safe bags or containers. Be sure to leave some space for expansion. You can freeze it for up to three months. When you want to eat it, thaw it overnight in the fridge. To preserve texture and flavor, reheat the soup on the stovetop. Warm it over medium heat, stirring often. You can also use the microwave, but it may not keep the same texture. Heat it in short bursts, stirring in between, for even warming. Yes, you can! To make Easy Lasagna Soup in a slow cooker, brown the meat first. Then, add the cooked meat, onions, garlic, crushed tomatoes, beef broth, and seasonings to the slow cooker. Stir well. Cook on low for 6 to 8 hours or on high for 3 to 4 hours. Add the broken lasagna noodles in the last 30 minutes of cooking. This way, they will soften but not get too mushy. If you don’t have ricotta cheese, you have options! You can use cottage cheese instead. It gives a similar texture and taste. For a creamier option, try cream cheese. If you want a dairy-free choice, look for vegan ricotta made from nuts or tofu. These substitutes will still give your soup a comforting creaminess. To know when your soup is ready, watch for these signs: the noodles should be tender but still firm. Taste a noodle to check. The soup should be hot and bubbling. If the noodles feel too soft, you may have cooked them too long. Make sure to serve it right away for the best texture. In summary, this blog post detailed how to make Easy Lasagna Soup. We explored key ingredients like ground meat and rich tomatoes, along with seasonings that add great flavor. I shared tips for cooking, serving, and storing your soup, plus variations for different tastes. The goal is to create a warm and tasty dish everyone will love. Enjoy making your lasagna soup and make it your own!

Easy Lasagna Soup Flavorful Comfort Food Recipe

If you love hearty, warm meals, you’re in for a treat! My Easy Lasagna Soup combines all your favorite lasagna

To make this sweet pineapple chicken and rice, you will need: - 2 cups jasmine rice - 1 pound chicken breast, diced into bite-sized pieces - 1 cup fresh pineapple, diced - 1 red bell pepper, thinly sliced - 1 cup snow peas, trimmed - 3 tablespoons soy sauce - 2 tablespoons honey - 1 tablespoon sesame oil - 1 teaspoon freshly grated ginger - 2 cloves garlic, minced - 1 tablespoon cornstarch combined with 2 tablespoons water (cornstarch slurry) - Salt and ground black pepper to taste - Chopped green onions for garnish - Toasted sesame seeds for garnish Choosing quality ingredients makes a big difference in your dish. Fresh chicken breast ensures tenderness and juiciness. Look for bright red meat without any spots. The pineapple should be ripe, sweet, and fragrant. When selecting your bell pepper, choose one that is firm and glossy. Snow peas should snap when fresh. For the soy sauce, use a good brand for rich flavor. Quality honey adds depth to the sauce, while fresh ginger and garlic give it a warm kick. If you need to swap ingredients, there are great options. You can use brown rice instead of jasmine rice for a nuttier flavor and more fiber. For protein, swap chicken with tofu for a vegetarian version. If fresh pineapple is not available, canned pineapple works too. Just drain it well to avoid excess moisture. You can replace snow peas with green beans or broccoli for a different twist. Don't hesitate to get creative with flavors to make this dish your own! For the full recipe, check out the link above. Start by rinsing 2 cups of jasmine rice under cold water. This step washes away excess starch. When the water runs clear, it's ready. Next, cook the rice according to the package instructions. After cooking, fluff it with a fork and set it aside. This will give you light and fluffy rice, perfect for soaking up all the flavors. Now, heat a large skillet over medium heat. Add 1 tablespoon of sesame oil to the hot skillet. Once the oil shimmers, add 1 pound of diced chicken breast. Season the chicken with salt and ground black pepper. Cook for about 5 to 7 minutes. Stir occasionally until the chicken is browned and reaches an internal temperature of 165°F (75°C). After the chicken is done, add 2 cloves of minced garlic and 1 teaspoon of grated ginger to the pan. Stir for about 1 minute. This will bring out the flavors, but be careful not to burn the garlic. Next, toss in 1 sliced red bell pepper and 1 cup of trimmed snow peas. Stir these veggies for about 3 to 4 minutes. You want them tender but still bright and crisp. In a separate bowl, mix 3 tablespoons of soy sauce, 2 tablespoons of honey, and 1 tablespoon of cornstarch mixed with 2 tablespoons of water. Whisk this until smooth. Pour the sauce over the chicken and veggies in the skillet. Gently fold in 1 cup of diced fresh pineapple. Mix everything well to coat in the sauce. Cook for another 2 to 3 minutes. The sauce should thicken and turn glossy. Finally, taste the mixture. If needed, adjust the seasoning with more salt or pepper. Serve this sweet pineapple chicken over your jasmine rice. Garnish with chopped green onions and toasted sesame seeds for a lovely finish. For the full recipe, check out [Full Recipe]. To cook perfect jasmine rice, rinse it well. Rinse it under cold water until it runs clear. This step removes excess starch. It keeps the rice fluffy instead of sticky. Use a ratio of 1 cup rice to 1.5 cups water. Bring the water to a boil, then reduce to low heat. Cover it with a lid. Let it simmer for about 15 minutes. After cooking, let the rice sit for 5 minutes. Fluff it with a fork before serving. For tender chicken, start with evenly sized pieces. Dice your chicken breast into bite-sized chunks. This ensures even cooking. Season the chicken with salt and pepper before cooking. Sauté it in preheated sesame oil. Cook it until it turns golden brown. This usually takes about 5 to 7 minutes. Use a meat thermometer to check the internal temperature. It should reach 165°F (75°C). This guarantees juicy, safe-to-eat chicken. To boost the flavor, add fresh ingredients. Fresh ginger and garlic bring warmth and depth. Sauté them just until fragrant. Be careful not to burn them. Use high-quality soy sauce for a rich umami taste. Honey adds sweetness; adjust it to your preference. Feel free to experiment with spices. A pinch of red pepper flakes can add heat. Garnishing with green onions and toasted sesame seeds adds crunch and color. For more ideas, check the Full Recipe for further enhancements! {{image_4}} You can turn sweet pineapple chicken and rice into a tasty vegetarian dish. Swap the chicken for tofu or tempeh. Both options soak up flavors well. Use firm tofu for great texture. Marinate it in soy sauce and ginger before cooking. This adds depth and taste. You can also use chickpeas for a protein boost. They add a nice chew and fit perfectly in this dish. Feel free to mix in your favorite vegetables. Broccoli, carrots, or even zucchini work great. Each veggie brings its own flavor and texture. For a colorful dish, use a mix of bell peppers. You can also add corn for some sweetness. Just sauté the veggies until they are tender-crisp. This keeps them bright and appealing. If you want to switch up the protein, consider shrimp or beef. Shrimp cooks quickly and pairs well with pineapple. Use the same cooking method as with chicken. Thinly sliced beef can also work. Just make sure to cook it until it is tender. Both options offer a fun twist on the original dish. For the full recipe, check out the Tropical Sweet Pineapple Chicken & Rice! After you enjoy your sweet pineapple chicken and rice, store the leftovers properly. Let the dish cool to room temperature. Then, place it in an airtight container. You can keep it in the fridge for up to three days. Make sure to label the container with the date. This helps you remember when you made it. To reheat your leftovers, you have a few options. You can use a microwave or a stovetop. If using a microwave, place the food in a microwave-safe dish. Cover it with a microwave-safe lid or wrap. Heat for 1-2 minutes, stirring halfway through. If using the stovetop, add a splash of water to the pan. Heat over medium heat, stirring until warm. This keeps the rice from drying out. If you want to save your sweet pineapple chicken and rice for later, freezing is a great option. First, let the dish cool completely. Then, scoop it into freezer-safe bags or containers. Remove as much air as possible before sealing. You can freeze it for up to three months. When you are ready to eat, thaw it in the fridge overnight. Reheat as instructed above for best results. You can serve this dish with simple sides. A fresh green salad pairs well. Steamed broccoli or green beans also make a great choice. If you want more carbs, try some crusty bread or rolls. You can even add a tropical fruit salad for a sweet touch. These sides balance the flavors and add color to your meal. No, this recipe is not spicy. Sweet Pineapple Chicken & Rice focuses on sweet and savory flavors. The ginger adds a little warmth, but it won't make you sweat. If you like heat, you can add sliced jalapeños or a dash of hot sauce. This way, you can adjust the spice level to your taste. Yes, you can make this dish ahead of time. Prepare the chicken and rice a day in advance. Store them in airtight containers in the fridge. When you're ready to eat, just reheat in a pan. Add a splash of water or extra soy sauce to keep it moist. This makes it easy for busy days or meal prep. Check out the Full Recipe for more details on cooking times and tips. In this post, I covered how to make Sweet Pineapple Chicken & Rice. We talked about the best ingredients, cooking steps, and useful tips. You learned about variations and storage tips, ensuring you can enjoy this meal later. Cooking can be fun and creative. With these ideas, you can make the dish your own. Enjoy sharing your version with friends and family!

Savory Sweet Pineapple Chicken & Rice Dinner Dish

Looking for a quick and tasty dinner idea? Sweet Pineapple Chicken & Rice is just the dish you need! This

To make a delicious cinnamon roll cake, you need a few key ingredients. Here’s what you will need: - For the Cake: - 2 cups all-purpose flour - 1 cup granulated sugar - 1 tablespoon baking powder - ½ teaspoon salt - 2 large eggs - 1 cup milk - ½ cup unsalted butter, melted - 1 teaspoon vanilla extract - For the Cinnamon Swirl: - ½ cup brown sugar, packed - 2 tablespoons ground cinnamon - 2 tablespoons unsalted butter, softened - For the Cream Cheese Glaze: - 4 ounces cream cheese, softened - 1 cup powdered sugar - 2 tablespoons milk - ½ teaspoon vanilla extract The dry ingredients make a base for the cake. Here’s how they work together: - All-purpose flour gives structure. It helps the cake rise and hold its shape. - Granulated sugar adds sweetness and helps with browning. It also keeps the cake moist. - Baking powder is a leavening agent. It creates bubbles in the batter, making the cake fluffy. - Salt enhances the flavors. It balances the sweetness and brings out the cake's taste. Mix these dry ingredients well to ensure an even texture in your cake. The cream cheese glaze adds a creamy finish. Here’s what you need: - Cream cheese gives a rich taste. It blends well with the sweetness of the sugar. - Powdered sugar sweetens the glaze. It also helps create a smooth texture. - Milk thins the glaze. It makes it easy to drizzle over the cake. - Vanilla extract adds flavor. It brings warmth and depth to the glaze. This glaze will make your cinnamon roll cake truly irresistible. For the full recipe, check out the details above! Start by preheating your oven to 350°F (175°C). This step is key for even baking. While the oven heats, grease a 9x13 inch baking pan. Use butter or cooking spray to coat it well, so the cake won't stick. In a large mixing bowl, whisk together the dry ingredients. Combine 2 cups of all-purpose flour, 1 cup of granulated sugar, 1 tablespoon of baking powder, and ½ teaspoon of salt. In another bowl, mix 2 large eggs, 1 cup of milk, ½ cup of melted unsalted butter, and 1 teaspoon of vanilla extract. Slowly pour the wet mix into the dry mix. Stir gently until just combined. Be careful not to overmix; lumps are okay. For the swirl, take a small bowl and mix ½ cup of packed brown sugar with 2 tablespoons of ground cinnamon. Add 2 tablespoons of softened unsalted butter to the bowl. Mix until it becomes crumbly. This blend creates the sweet, cinnamon flavor you love. Now, pour half of the cake batter into your greased pan. Spread it evenly across the bottom. Sprinkle the cinnamon sugar mix on top, making sure to cover it fully. Carefully pour the rest of the batter on top. Use a knife or skewer to swirl through the batter in a figure-eight pattern. Bake the cake in the preheated oven for 25-30 minutes. It’s ready when a toothpick comes out clean or with a few moist crumbs. Once done, let it cool in the pan for about 10-15 minutes. While the cake cools, make the cream cheese glaze. In a medium bowl, beat together 4 ounces of softened cream cheese, 1 cup of powdered sugar, 2 tablespoons of milk, and ½ teaspoon of vanilla extract. Mix until it is smooth and creamy. Once the cake cools, drizzle this glaze over the top, letting it soak into the swirls. You can find the full recipe for Cinnamon Roll Cake Delight in the section above. Enjoy every bite of this tasty treat! To get the best texture for your cinnamon roll cake, focus on mixing. Start with room temperature ingredients. This helps everything blend well. Avoid overmixing the batter. Stir until just combined; some lumps are okay. This keeps the cake light and fluffy. Creating a beautiful swirl is key. Pour half the batter into your pan first. Then, sprinkle the cinnamon mixture evenly. When you add the rest of the batter, spread it gently. Use a knife to swirl in a figure-eight motion. This makes lovely patterns. Don’t overdo it! You want defined swirls, not a uniform color. Sometimes, cakes can be tricky. If yours sinks in the middle, you may have overmixed. This adds too much air to the batter. For a dry cake, check your oven temperature. It may run hot. Always use an oven thermometer for accuracy. If the top gets too dark, cover it with foil while baking. This helps it cook evenly without burning. For a complete guide, check the Full Recipe for additional tips! {{image_4}} If you love nuts, try adding them to your cinnamon roll cake. Chopped pecans or walnuts make a great addition. Just mix in about one cup of your favorite nuts into the batter or sprinkle them into the cinnamon swirl. This extra crunch makes the cake even more delightful. For chocolate lovers, adding chocolate chips is a must. Fold in one cup of semi-sweet chocolate chips into the batter before baking. The warm melted chocolate pairs perfectly with the cinnamon flavor and adds a rich touch. Each bite will be a sweet surprise. You can make this cake gluten-free, too. Substitute the all-purpose flour with a gluten-free blend. Make sure the blend has a good mix of starches and flours for the best results. Follow the same recipe steps, and you’ll have a delicious gluten-free treat that everyone can enjoy. For the full recipe, check out the detailed instructions above and get baking! To keep your cinnamon roll cake fresh, store it in an airtight container. This helps prevent it from drying out. You can also cover it tightly with plastic wrap or aluminum foil. Keep it at room temperature for up to three days. If you want to keep it longer, follow the freezing tips below. Freezing cinnamon roll cake is simple. First, let the cake cool completely. Then, cut it into squares. Wrap each square tightly in plastic wrap. After that, place the wrapped pieces in a freezer bag. Label the bag with the date. You can freeze the cake for up to three months. When you are ready to eat, just thaw it in the fridge overnight. Reheating is easy and brings back that warm, fresh taste. You can use an oven or microwave. For the oven, preheat it to 350°F (175°C). Place a piece of cake on a baking sheet and cover it with foil. Heat for about 10-15 minutes until warm. For the microwave, place a piece on a plate. Heat it for 20-30 seconds. Check the warmth and continue in short bursts if needed. Enjoy your cake warm with that tasty cream cheese glaze! To make Cinnamon Roll Cake from scratch, gather your ingredients. You will need flour, sugar, baking powder, salt, eggs, milk, butter, and vanilla. Combine the dry ingredients in one bowl. In another bowl, mix the wet ingredients. Gradually blend the two until smooth. Then, create a cinnamon swirl with brown sugar, cinnamon, and butter. Pour half the batter in a greased pan, add the swirl, and top with the rest. Bake it at 350°F for about 25-30 minutes. For the full recipe, follow the steps above. Yes, you can use other frostings. Simple options include vanilla or chocolate frosting. You might also try a buttercream or a simple glaze made from powdered sugar and milk. Each choice will change the flavor a bit but still taste great. Choose what you love most! Cinnamon Roll Cake can last for up to 3 days at room temperature. Store it in an airtight container to keep it fresh. You can also refrigerate it for about a week. Just make sure to cover it well to keep it moist. Yes, many bakeries and stores sell pre-made Cinnamon Roll Cakes. These options can save you time. Check your local grocery store or bakery for fresh cakes. Just remember that homemade versions often taste better! This post covered how to make a delicious Cinnamon Roll Cake from scratch. We looked at the key ingredients, mixing methods, and perfect baking tips. You now have ideas for fun variations and easy storage options. Remember, practice makes perfect. Enjoy creating your cake and delighting everyone with it. Happy baking!

Cinnamon Roll Cake Irresistible Sweet Treat Recipe

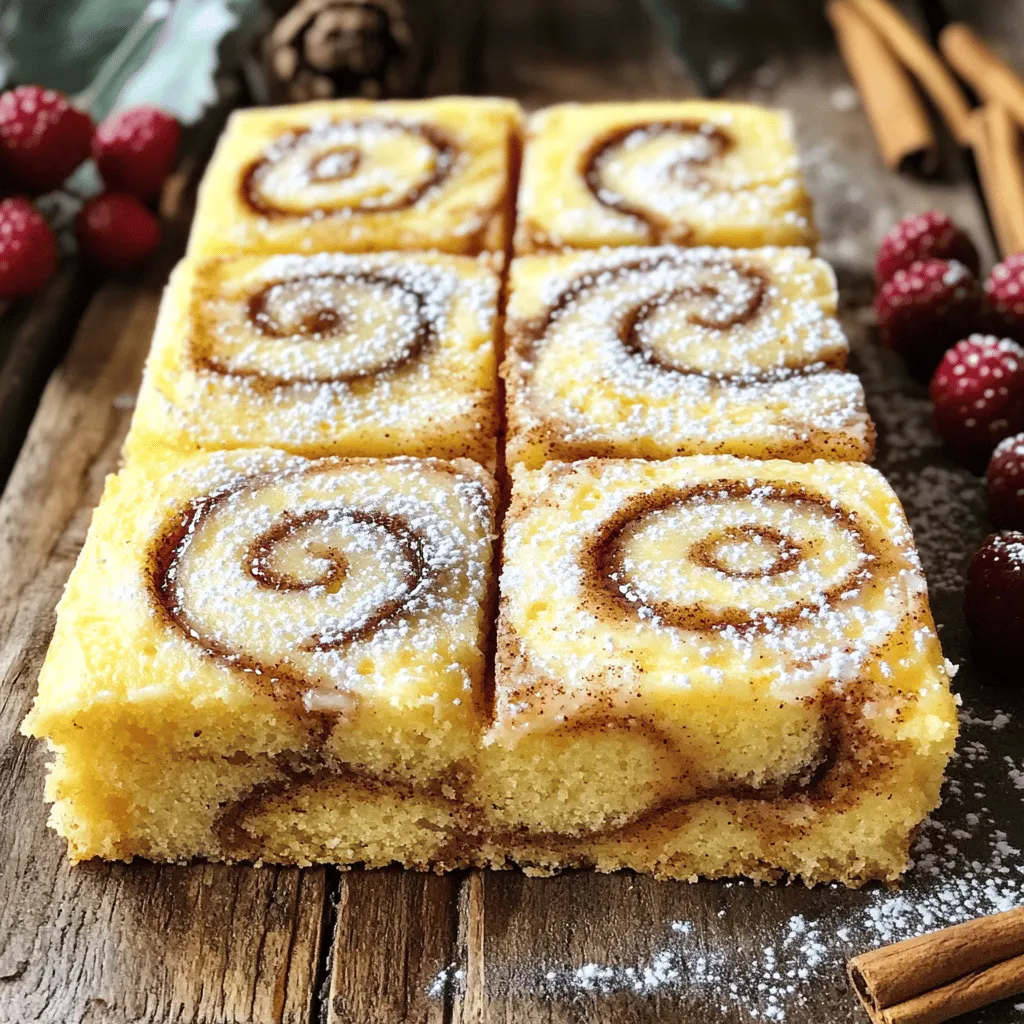
Are you ready to bake something amazing? This Cinnamon Roll Cake recipe is your new go-to sweet treat. It mixes

- Chicken and seasonings - 1 lb (450g) boneless, skinless chicken breasts, cut into bite-sized pieces - 1 teaspoon Italian seasoning - 1/2 teaspoon paprika - Salt and black pepper, to taste - Zest of 1 lemon Chicken is the star here. I prefer using boneless, skinless chicken breasts for tenderness. The Italian seasoning and paprika bring a lovely flavor. Don't forget the salt and pepper to enhance the taste. The lemon zest adds a fresh touch. - Butter and garlic - 4 tablespoons unsalted butter, divided - 4 cloves garlic, minced Butter creates a rich base for the sauce. I use unsalted butter to control the salt level. Garlic is key; it adds depth and aroma. Minced garlic will cook quickly, so keep an eye on it. - Optional ingredients - 1 tablespoon fresh parsley, chopped (for garnish) - Juice of 1/2 lemon - Optional: 1/4 teaspoon crushed red pepper flakes (for a touch of heat) Fresh parsley brightens the dish with color and flavor. The lemon juice boosts the taste with acidity. If you like spice, add crushed red pepper flakes for a kick. For the complete recipe, refer to the [Full Recipe]. Enjoy cooking these garlic butter chicken bites! Start by marinating the chicken. In a medium bowl, mix the chicken with salt, pepper, Italian seasoning, paprika, and lemon zest. This step is key for flavor. Toss everything together until every piece is coated. Next, prepare your cooking space. Set your skillet on the stove and turn the heat to medium-high. This ensures the chicken cooks evenly and gets a nice color. Now, let’s cook! Add 2 tablespoons of unsalted butter to the skillet. Wait until the butter melts and bubbles. Carefully place the seasoned chicken bites in a single layer in the skillet. Cook for about 5-7 minutes. Turn the chicken occasionally, so it browns evenly. The chicken is done when it’s golden brown and cooked through. Once cooked, take the chicken out and set it aside. This gives you space to make the garlic butter sauce. In the same skillet, add the remaining 2 tablespoons of butter and minced garlic. Sauté this over medium heat for 1-2 minutes. Stir constantly to keep the garlic from burning. Return the chicken to the skillet and drizzle lemon juice on top. Stir gently to coat the chicken in the garlic butter sauce. Let it absorb the flavors for about a minute. If you like a bit of heat, add crushed red pepper flakes now. Toss everything together to combine. Before serving, taste the dish. Adjust the seasoning with more salt, pepper, or lemon juice if needed. Finally, sprinkle chopped parsley on top for color and freshness. For the full recipe, refer to the Garlic Butter Chicken Bites section. To ensure chicken doneness, use a meat thermometer. The chicken should reach 165°F (75°C). This keeps it safe to eat and tender. Cut one piece open to check if the meat is white and juices run clear. Perfecting the garlic butter sauce is easy. Start with fresh garlic for the best flavor. Sauté the garlic for 1-2 minutes until it smells great. Avoid burning it, as burned garlic can taste bitter. Once you add the chicken back, let it soak in the sauce for a minute. This allows the chicken to absorb all that delicious flavor. For plating suggestions, use a colorful platter. Place the chicken bites neatly, ensuring they look inviting. Drizzle the extra garlic butter sauce over the top. This adds a shiny, delicious look. For garnishing ideas, sprinkle fresh parsley on top. It adds a pop of color and freshness. You can also add lemon wedges on the side. They not only look great but give a zesty touch. For more serving flair, consider adding a few cherry tomatoes or slices of cucumber. This creates a beautiful, eye-catching dish. {{image_4}} Spicing it up with heat If you like heat, try adding crushed red pepper flakes. This ingredient adds a spicy kick that blends well with the garlic butter flavor. Start with a small amount and adjust to your taste. You can also use hot sauce or cayenne pepper for different heat levels. Alternative herbs and seasonings Feel free to swap out the Italian seasoning with other herbs. You can use fresh thyme, rosemary, or oregano for a new twist. Each herb brings its own unique flavor, making the dish versatile. Try adding some lemon pepper for a bright taste. Mix and match to find your favorite combination. Pairing side dishes Garlic butter chicken bites pair well with many sides. Try serving them with rice or mashed potatoes. A fresh salad adds a crunchy texture and balances the meal. Roasted veggies or steamed broccoli also work great for a colorful plate. These sides enhance the overall dining experience. Using as an appetizer or main dish You can serve these bites as a fun appetizer. They are perfect for parties or game nights. Just set out toothpicks for easy eating. For a main dish, serve them with sides for a complete meal. Either way, they are sure to please your guests and family. For the full recipe, check out the Garlic Butter Chicken Bites section. After you enjoy your garlic butter chicken bites, store any leftovers right away. Place the chicken in an airtight container. This prevents moisture loss and keeps the chicken fresh. You can keep it in the fridge for up to three days. To reheat, simply place the chicken in a skillet over medium heat. Add a splash of water or broth to keep it moist. Stir until it warms through, usually about 5-7 minutes. If you want to store it for a longer time, freezing is a good option. Place the cooled chicken bites in a freezer-safe bag. Remove as much air as possible before sealing. They can last up to three months in the freezer. When you're ready to eat, thaw it overnight in the fridge. Reheat it in the skillet as mentioned above. Garlic butter chicken bites will last about three days in the fridge. If stored properly in the freezer, they can last up to three months. Always check for signs of spoilage before eating. If it smells off or has a strange color, it's best to toss it. Also, if the chicken feels slimy, do not eat it. Always trust your senses when it comes to food safety. Can I use chicken thighs instead of breasts? Yes, chicken thighs work well. They stay juicy and add flavor. Just cut them into bite-sized pieces, like the breasts. How can I make this recipe healthier? You can use less butter or substitute it with olive oil. You can also add more veggies to the dish. Toss in some broccoli or bell peppers for a colorful boost. What can I substitute for butter? Try using ghee or coconut oil. You can also use a plant-based butter for a dairy-free option. Each will give a unique taste. Can this recipe be made ahead of time? Yes, you can prepare the chicken bites in advance. Cook them and store them in the fridge. They taste great even after a day or two! Best storage methods to save for later Store your garlic butter chicken bites in an airtight container. Use glass or plastic containers. They keep well in the fridge for up to three days. How to double or halve the recipe? To double the recipe, just multiply the ingredients by two. For half, divide them by two. It’s easy to adjust the flavors as needed. Serving sizes and adjustments for large gatherings. For a larger crowd, aim for about 4-6 bites per person. You can double or triple the recipe to make enough for everyone. Just remember to increase cooking time if needed. For the full recipe, check the earlier section! You learned about garlic butter chicken bites, from choosing ingredients to serving tips. We covered marinating chicken, cooking it right, and adding a tasty sauce. Remember to store leftovers properly for the best taste. Be bold with flavors and try new twists to fit your style. With these steps, you can make a dish that shines at any meal. Happy cooking!

Garlic Butter Chicken Bites Flavorful and Easy Treat

If you’re craving a tasty treat that’s both easy to make and bursting with flavor, you’ve come to the right

- 8 oz spaghetti - 1 lb large shrimp, peeled and deveined - 1 can (14 oz) crushed tomatoes - 1 cup heavy cream - 3 cloves garlic, minced - 1 small onion, finely chopped - 1 tablespoon olive oil - 1 teaspoon red pepper flakes (adjust for heat preference) - ½ cup grated Parmesan cheese - 1 tablespoon fresh basil, chopped (for garnish) - Salt and pepper to taste Each ingredient plays a special part in this dish. The spaghetti serves as the base, providing a hearty texture. Large shrimp add a nice protein punch and a sweet, ocean flavor. Crushed tomatoes give the sauce its body and rich taste. Heavy cream makes the sauce creamy and smooth, while garlic and onion build a fragrant foundation. Olive oil helps to sauté everything, and red pepper flakes offer a hint of heat. Parmesan cheese adds a salty, nutty flavor, and fresh basil gives a bright finish. Salt and pepper enhance all these flavors, bringing the dish together. For extra flair, consider these garnishes: - Extra chopped basil for freshness - A sprinkle of more Parmesan for richness - A drizzle of olive oil for added flavor - Lemon zest for a citrusy lift These optional touches can elevate your dish and make it even more delightful. For the full recipe, check out the detailed steps and tips. To cook spaghetti, start with a large pot. Fill it with water and add a pinch of salt. Bring the water to a rolling boil. Once boiling, add the spaghetti. Cook it according to the package instructions until it is al dente. This means it should be firm but not hard. After cooking, drain the spaghetti, but save about half a cup of the pasta water. This starchy water helps to adjust the sauce later. Next, we need to build flavor. In a large skillet, pour in some olive oil and heat it over medium heat. Once the oil is hot, add the finely chopped onion. Sauté it for about three minutes until it turns soft and clear. Then, add the minced garlic and sauté for another minute. You want the garlic to be fragrant, but not browned. This mix will give a tasty base to your sauce. Now it’s time for the sauce. In the same skillet, add a can of crushed tomatoes. Stir it well and let it simmer gently. After a few minutes, pour in the heavy cream. Mix it until combined. Add salt and pepper to taste. Let the sauce simmer for about five to seven minutes. Stir it occasionally. This allows it to thicken and develop a rich flavor. After the sauce is ready, return the cooked shrimp to the skillet. Then, add the drained spaghetti. If the sauce seems too thick, use some of that reserved pasta water to loosen it up. Toss everything gently. You want each piece of shrimp and spaghetti coated in that creamy tomato sauce. For the final touch, stir in the grated Parmesan cheese. This makes the sauce extra rich. For the complete recipe, check out the Full Recipe. To cook shrimp just right, start with fresh shrimp. Look for shrimp that smell like the ocean, not fishy. Peel and devein them before cooking. Heat your skillet until it’s hot, then add the shrimp quickly. Cook them for about 2-3 minutes. Watch for their color change to pink. This tells you they are done. Overcooked shrimp can turn rubbery, so keep an eye on them. For a creamy sauce, balance is key. Start with crushed tomatoes and then add heavy cream. Stir well to combine. Let the sauce simmer gently. If it gets too thick, use reserved pasta water to loosen it. This starchy water adds flavor and helps the sauce cling to your pasta. Aim for a smooth and rich texture that coats the spaghetti well. To serve your spaghetti beautifully, choose wide, shallow bowls. This style allows for a lovely presentation. Twirl the spaghetti in the center of the bowl for a nice look. Top with a sprinkle of fresh basil and extra Parmesan cheese. A twist of black pepper adds a nice touch too. The key is to make the dish look as good as it tastes, inviting everyone to dig in. {{image_4}} You can easily add veggies to this dish. Adding vegetables boosts nutrition and flavor. Here are some great options: - Spinach: Stir in fresh spinach at the end. It wilts quickly and adds color. - Bell Peppers: Chop and sauté bell peppers with onions for sweetness. - Zucchini: Slice zucchini thin and add it to the sauce. It cooks fast and blends well. - Mushrooms: Sauté sliced mushrooms for a meaty texture and earthy flavor. These veggies not only add nutrients but also make the dish more colorful and appealing. If you have dietary needs, don’t worry! You can adapt this recipe easily. - Gluten-Free: Use gluten-free spaghetti. Many brands offer great taste and texture. - Dairy-Free: Swap heavy cream with coconut cream or a dairy-free cream. Nutritional yeast can add a cheesy flavor. - Cheese Alternatives: Use a dairy-free cheese for topping. This way, you still get that creamy finish. These swaps keep the dish tasty while meeting your dietary needs. If you want a different protein, consider these options. They work well in this creamy sauce. - Chicken: Use bite-sized pieces of chicken. Cook them until golden brown before adding the sauce. - Tofu: Firm tofu can be cubed and added for a vegetarian choice. Sauté until golden for better texture. - Scallops: If you love seafood, scallops make a great alternative. They cook quickly and add a sweet flavor. These options let you enjoy a new twist on this classic dish. For the full recipe, check the earlier section. After enjoying your spaghetti with shrimp in creamy tomato sauce, store any leftovers in a shallow container. Make sure the dish is cool before sealing it. This helps keep moisture inside. Use an airtight container to avoid any odors from your fridge. Leftovers can stay fresh for up to three days. Always label your containers with the date. When you're ready to enjoy your leftovers, reheating them gently will keep flavors intact. Use a skillet over low heat to warm the dish. Add a splash of water or extra cream to keep it creamy. Stir often to ensure even heating. You can also use the microwave, but cover it loosely to avoid splatters. Heat in short bursts, stirring in between. If you want to save your spaghetti with shrimp for another day, freezing is a great option. Let the dish cool completely, then divide it into portions. Use freezer-safe bags or containers. Remove as much air as you can to prevent freezer burn. Your dish can remain in the freezer for about three months. To reheat, thaw it in the fridge overnight before warming it up. This keeps the texture and flavors fresh. Yes, you can use frozen shrimp. Just make sure to thaw them first. Place the shrimp in a bowl of cold water for about 15-20 minutes. This way, you can cook them evenly. The taste and texture will still be great in your creamy tomato sauce. If you want a lighter option, use half-and-half or whole milk mixed with cornstarch. You can also try coconut cream for a dairy-free choice. Each option gives a different taste, but they can work well in the sauce. To make more servings, simply double the amount of all ingredients. For example, use 16 oz of spaghetti and 2 lbs of shrimp. Keep the same cooking times, but check the sauce to ensure it thickens well. You can add more seasoning to taste. This blog post covered making a tasty spaghetti dish with shrimp and creamy sauce. You learned about key ingredients and how they create flavor. We discussed cooking tips to get perfect shrimp and sauce. I shared variations to suit your diet needs and storage methods to keep your meal fresh. Remember, cooking is fun and easy. Try this dish and enjoy the taste!

Spaghetti with Shrimp in Creamy Tomato Sauce Delight

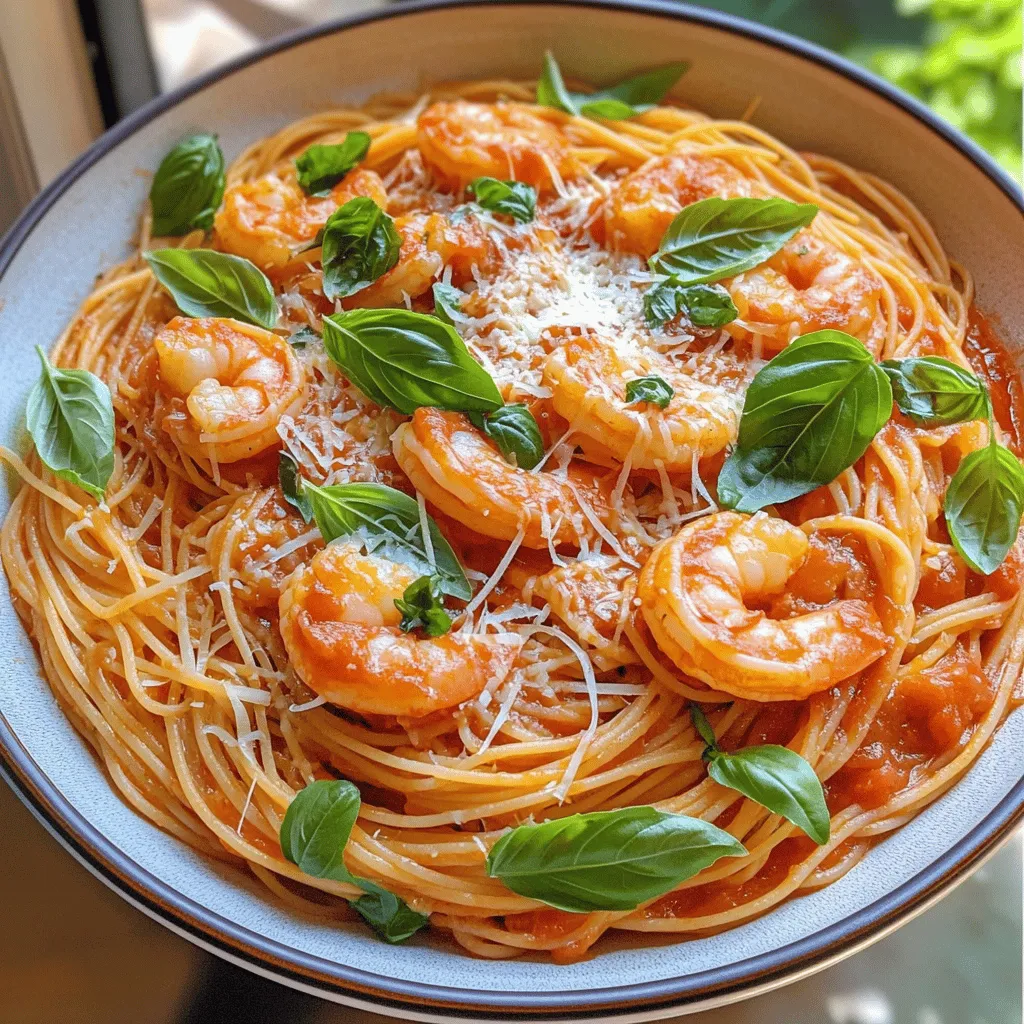
If you love a quick yet fancy meal, then you’ll adore my Spaghetti with Shrimp in Creamy Tomato Sauce! This

- 12 chocolate graham crackers - 1 cup heavy cream - 8 oz cream cheese, softened to room temperature - 1 cup powdered sugar The main ingredients make this dessert rich and creamy. Chocolate graham crackers form the base and layers. Heavy cream adds fluffiness. The cream cheese and powdered sugar mixture brings sweetness and a smooth texture. - 1 cup milk (preferably whole milk for creaminess) - 1 package (3.4 oz) instant chocolate pudding mix - 1 cup semi-sweet chocolate chips - 1 cup Cool Whip or whipped topping The milk and instant chocolate pudding mix create a thick, luscious layer. Semi-sweet chocolate chips add extra chocolate flavor and a nice crunch. Cool Whip gives a light and airy finish to the dessert. - Shaved chocolate or chocolate curls Garnishes like shaved chocolate or curls add a touch of elegance. They make your chocolate lasagna look beautiful and inviting. Plus, they enhance the chocolate flavor, making it even more tempting. For the complete recipe, check out the [Full Recipe]. 1. Start with an 8 oz block of softened cream cheese. Place it in a large mixing bowl. 2. Add 1 cup of powdered sugar gradually. Mix until smooth. Use an electric mixer on medium speed. 3. In a separate bowl, pour 1 cup of heavy cream. Whip it until it forms stiff peaks. 4. Carefully fold the whipped cream into the cream cheese mixture. Use a spatula to keep it light. 1. Grab a clean mixing bowl. Pour in 1 cup of milk, preferably whole milk for the best taste. 2. Add a package of instant chocolate pudding mix (3.4 oz). 3. Whisk the milk and pudding mix together for about 2 minutes. Keep whisking until it thickens. 1. Choose a 9x13 inch dish. Lay 4 chocolate graham crackers flat on the bottom. 2. Spread half of the cream cheese mixture over the graham crackers. Smooth it out for an even layer. 3. Lay down another 4 chocolate graham crackers on top of the cream cheese layer. 4. Pour half of the chocolate pudding over this layer. Spread it evenly. 5. Add the remaining cream cheese mixture on top and smooth it out again. 6. Finish with the last 4 chocolate graham crackers on top. Pour the rest of the chocolate pudding over this layer. 1. Gently spread 1 cup of Cool Whip over the top layer of pudding. Be careful not to disturb the layers. 2. Sprinkle 1 cup of semi-sweet chocolate chips on top for extra flavor. 3. Cover the dish tightly with plastic wrap or a lid. 4. Refrigerate for at least 4 hours, or overnight for the best results. This allows the flavors to blend and the dessert to set. For the full recipe, check the previous section. Enjoy your Chocolate Heaven Lasagna! To make your chocolate lasagna look great, even layers matter. Start with four chocolate graham crackers on the bottom. Press them down gently but firmly for a solid base. When you spread your cream cheese mixture, use a spatula to smooth it out evenly. This helps each bite have the same taste. Avoid soggy graham crackers by not adding too much liquid. When you layer the pudding, spread it evenly. This way, the crackers stay crisp and delicious. Letting the dessert chill for a while also helps the layers set well. Whipping cream is key for a light texture. Start with cold heavy cream. Beat it on high speed until you see stiff peaks. This means the cream holds its shape well. Avoid whipping too long, or it will turn grainy. When you fold the whipped cream into your cream cheese mix, use a spatula. Gently lift and turn the mixture. This keeps the air in the whipped cream, making your dessert light and fluffy. Use pre-made ingredients to save time. You can find ready-made Cool Whip and instant pudding mix at your store. This cuts down on prep time and makes it easy. If you need shortcuts, consider using a food processor for mixing. It speeds up the process of making your cream cheese layer. With these methods, you can whip up this tasty dessert in no time. For the full recipe, check out the Chocolate Heaven Lasagna recipe above. {{image_4}} You can mix things up with flavored lasagna options. One popular choice is peanut butter chocolate lasagna. Just add peanut butter to the cream cheese layer. This gives a rich, nutty taste that pairs well with chocolate. Another fun option is mint chocolate lasagna. You can use mint extract in the cream cheese layer. This adds a fresh taste that makes the dessert feel special. You can also add crushed mint candies on top for extra crunch. If you want a lighter version, try low-fat cream cheese alternatives. These options work well in the cream cheese layer. They reduce calories without losing flavor. You can also use sugar substitutes if you want to cut back on sugar. Stevia or erythritol are good choices for a sweet taste without the extra calories. Seasonal variations can make your dessert even more exciting. In fall, try pumpkin chocolate lasagna. Just mix pumpkin puree with cream cheese for a warm flavor. In summer, you can whip up a berry-infused chocolate lasagna. Add fresh berries to the layers for a fruity twist. This makes the dessert bright and refreshing. For the full recipe, check out the Chocolate Heaven Lasagna. Enjoy experimenting with these fun variations! To keep your chocolate lasagna fresh, use a glass or plastic container. A tight lid is key. Wrap it with plastic wrap if you don't have a lid. Make sure to cover the surface to avoid drying out. This keeps the layers moist and tasty. In the fridge, your chocolate lasagna will last about 3 to 5 days. If you need to store it longer, freezing is an option. For freezing, cut the lasagna into pieces. Wrap each piece well. Use plastic wrap or freezer bags. It can last up to 2 months in the freezer. To revive frozen chocolate lasagna, let it thaw in the fridge overnight. This ensures it stays creamy. When serving, remove it from the fridge and let it sit for about 10 minutes. This makes slicing easier. You can garnish it with shaved chocolate right before serving. Enjoy your delicious treat! For the full recipe, check out the [Full Recipe]. Chocolate lasagna is a fun no-bake dessert. It has layers of chocolate graham crackers, cream cheese, and chocolate pudding. The texture is creamy and crunchy. You get a rich, sweet flavor in every bite. Each layer brings something unique, making this treat a crowd-pleaser. Yes, you can make chocolate lasagna ahead of time! In fact, it tastes better when chilled overnight. Just store it in the fridge, covered tightly. This lets the flavors mix well. It also helps the layers set, making it easier to slice. You can swap chocolate graham crackers for regular ones or even vanilla wafers. If you want a dairy-free option, use dairy-free cream cheese and coconut whipped cream. For a lower sugar option, try sugar-free pudding mix. You can add your favorite flavors! Mix in peanut butter with the cream cheese layer or use mint chocolate pudding. You can also add fruits like strawberries or bananas between the layers. Get creative and make it your own! Chocolate lasagna can be made gluten-free and dairy-free. Use gluten-free graham crackers and dairy-free cream cheese. This way, more people can enjoy this tasty dessert. Always check the labels to confirm that all ingredients fit the diet requirements. For the full recipe, check out the instructions to create your own Chocolate Heaven Lasagna! This blog post covers all you need to know about making chocolate lasagna. We explored main and additional ingredients, offering step-by-step instructions for a delightful dessert. I shared tips for perfect layering and some tasty variations. Storage practices ensure your treat stays fresh, while FAQs address common concerns. Get creative with flavors and enjoy this dessert your way. Chocolate lasagna is fun to make and share, perfect for any occasion.

Chocolate Lasagna Irresistible No-Bake Dessert Recipe

Do you crave a sweet treat that’s easy to make and irresistible? Look no further than Chocolate Lasagna! This no-bake

For soft and chewy snickerdoodle cookies, you will need: - 1 cup unsalted butter, softened to room temperature - 1 ½ cups granulated sugar, plus more for rolling - 2 large eggs, at room temperature - 1 teaspoon pure vanilla extract - 3 cups all-purpose flour - 2 teaspoons cream of tartar - 1 teaspoon baking soda - ½ teaspoon salt - ½ cup granulated sugar (for rolling) - 2 teaspoons ground cinnamon (for rolling) Each ingredient plays a key role in making these cookies special. - Unsalted butter gives richness and flavor. Softening it helps create a creamy dough. - Granulated sugar sweetens the cookies and aids in browning. - Eggs add moisture and help bind the dough. They also provide structure. - Vanilla extract adds a warm, sweet flavor. - All-purpose flour forms the base of the cookies. It provides structure. - Cream of tartar helps create a chewy texture. It also adds a slight tang. - Baking soda acts as a leavening agent, making the cookies rise. - Salt enhances all the flavors. - Cinnamon adds a warm, spicy kick. It’s perfect for rolling the cookies in. If you have allergies or need substitutions, here are some options: - Butter: Use margarine or a dairy-free butter for a dairy-free version. - Granulated sugar: Coconut sugar can work as a substitute for a different flavor. - Eggs: Use flax eggs (1 tablespoon ground flaxseed + 3 tablespoons water per egg) for a vegan option. - All-purpose flour: Gluten-free flour blends can replace regular flour. Just check the blend’s instructions. - Cream of tartar: You can use lemon juice or vinegar as a substitute. Use 1 ½ teaspoons of either for 1 teaspoon of cream of tartar. These adjustments will keep your cookies delicious and friendly for different diets! For the full recipe, check out the complete instructions! First, gather your ingredients. You will need: - 1 cup unsalted butter, softened to room temperature - 1 ½ cups granulated sugar, plus additional for rolling - 2 large eggs, at room temperature - 1 teaspoon pure vanilla extract - 3 cups all-purpose flour - 2 teaspoons cream of tartar - 1 teaspoon baking soda - ½ teaspoon salt - ½ cup granulated sugar (for rolling) - 2 teaspoons ground cinnamon (for rolling) Now, preheat your oven to 350°F (175°C). Line two baking sheets with parchment paper. This helps the cookies not stick. In a large bowl, cream the softened butter and 1 ½ cups of granulated sugar together. Use an electric mixer for this. Mix until it’s light and fluffy. This takes about 2-3 minutes. Next, add the eggs one at a time. Mix well after each egg to make sure they blend in completely. Then, stir in the vanilla extract until everything is smooth. In another bowl, whisk together the flour, cream of tartar, baking soda, and salt. Once mixed, add this dry mixture to the butter and sugar mix. Stir gently until just combined. Be careful not to overmix. This keeps your cookies soft. In a small bowl, mix ½ cup of granulated sugar with 2 teaspoons of ground cinnamon. This makes your rolling mixture. Using a cookie scoop or your hands, take about 2 tablespoons of dough and roll it into a ball. Coat each ball in the cinnamon-sugar mix until fully covered. Place the dough balls on your baking sheets. Leave about 2 inches between each one. They will spread while baking. Bake in your preheated oven for 10-12 minutes. The edges should be set, and the centers should look soft and slightly puffy. They may seem a little underbaked, but this gives them that soft, chewy texture. After baking, take the cookies out of the oven. Let them cool on the baking sheets for about 5 minutes. This helps them set. Then, transfer the cookies to wire racks to cool completely. For a fun display, stack the cookies on a plate. You can dust them with extra cinnamon sugar. Pair them with a cold glass of milk for a great treat. Enjoy your soft and chewy snickerdoodle cookies! You can find the full recipe above. To get that soft and chewy texture, you need the right balance. First, use unsalted butter at room temperature. Cream it well with sugar for a light mix. Adding cream of tartar gives snickerdoodles their classic taste and texture. Avoid overmixing when adding flour. This keeps the cookies tender. Bake them just until the edges set. The centers should look slightly underbaked. This helps them stay chewy. One common mistake is using cold butter. Cold butter does not cream well. It can lead to flat cookies. Another mistake is overbaking. Snickerdoodles look best when they’re soft in the middle. Also, do not skip the rolling in cinnamon sugar. This adds flavor and a nice look. Lastly, remember to leave space between cookies on the baking sheet. They spread while baking. Here are some tools I recommend for the best snickerdoodle cookies: - Electric mixer for creaming butter and sugar - Measuring cups and spoons for accuracy - Mixing bowls for dry and wet ingredients - Cookie scoop for uniform cookie sizes - Parchment paper for easy baking - Wire racks for cooling cookies Using these tools makes the baking process easier and more fun. For the full recipe, follow the steps above for delicious results! {{image_4}} You can change the taste of your snickerdoodles easily. Adding different spices creates fun flavors. You might try: - Nutmeg for a warm spice kick. - Ginger for a zesty touch. - Almond extract for a sweet twist. Mix these into your dough. Just a little can make a big difference! You can still enjoy snickerdoodles if you follow special diets. For gluten-free cookies, swap all-purpose flour with: - Gluten-free flour blend (make sure it has xanthan gum). For vegan cookies, replace eggs with: - Flaxseed meal (1 tablespoon flaxseed mixed with 2.5 tablespoons water). - Applesauce (1/4 cup for each egg). These swaps keep the cookies soft and chewy! Mix-ins add fun textures to your cookies. Here are some tasty options: - Chocolate chips for a sweet surprise. - Chopped nuts, like pecans or walnuts, for crunch. - Dried fruits, like raisins or cranberries, for sweetness. Add about 1 cup of your favorite mix-ins to the dough. This makes each bite exciting! For the full recipe, check out the earlier sections. To keep your soft and chewy snickerdoodle cookies fresh, store them in an airtight container. This helps keep them soft. You can place parchment paper between layers to avoid sticking. Store the cookies at room temperature for up to a week. If you want them to last longer, consider freezing them. Freezing snickerdoodle cookies is simple. First, let the cookies cool completely. Then, place them in a single layer on a baking sheet. Freeze them for about an hour. Once frozen, transfer the cookies to a zip-top freezer bag. Remove as much air as possible. These cookies can stay in the freezer for up to three months. When you are ready to enjoy your frozen cookies, take them out of the freezer. Let them sit at room temperature for about 10-15 minutes. If you want them warm, preheat your oven to 350°F (175°C). Place the cookies on a baking sheet and heat them for about 5 minutes. This makes them soft and chewy again. Enjoy your delicious treat! For the full recipe, refer back to the original instructions. Snickerdoodles get their chewy texture from a few key factors. First, the cream of tartar plays a big role. It adds a slight tang and helps create that soft bite. Second, the balance of butter and sugar makes the cookies tender. When you mix them well, it traps air, giving the cookies lift while keeping them soft. Lastly, taking them out of the oven just before they look fully baked keeps them chewy. Yes, you can use brown sugar! It adds moisture and richness. Brown sugar has molasses, which gives a deeper flavor. This will change the cookie's taste a bit, making it more caramel-like. If you use all brown sugar, the cookies may be chewier and darker. A mix of both sugars works well too. Snickerdoodle cookies stay fresh for about a week when stored properly. Keep them in an airtight container at room temperature. If you want them to last longer, you can freeze them. They freeze well for up to three months. Just make sure to wrap them tightly in plastic wrap or place them in freezer bags. Yes, you can make the dough ahead of time! Chill the dough in the fridge for up to three days. This helps the flavors develop. When you’re ready to bake, scoop and roll the dough into balls. Then, coat them in the cinnamon-sugar mixture before baking. Rolling the dough balls in cinnamon sugar is easy. After scooping the dough, gently roll each ball in your hands to make it smooth. Then, roll the ball in the cinnamon-sugar mix until it is fully coated. This gives snickerdoodles their classic look and sweet flavor. Yes! Adding nuts or chocolate chips gives a fun twist. If you want nuts, chop them roughly and fold them into the dough. For chocolate chips, just mix them in after the flour. Keep in mind that this changes the flavor, but it can be a delicious variation! Look for the edges to be set while the center is still soft. They will puff up but may look underbaked. They will firm up as they cool. If you let them bake too long, they may become crunchy. Remember, soft and chewy is the goal! If your snickerdoodles flatten, it could be due to warm dough. Make sure to chill the dough if it feels too soft. Also, check your oven temperature. An oven that runs hot can cause cookies to spread too much. Use an oven thermometer for the best results. To boost flavor, add a bit more cinnamon or a pinch of nutmeg. You can also use vanilla bean paste instead of extract for a rich taste. Mixing in some lemon zest can add a nice brightness. Small tweaks can really enhance the overall flavor of your cookies. You can find the full recipe for Soft and Chewy Snickerdoodle Cookies in the main article. This will guide you through all the steps to create these delicious treats! This blog post covered how to make snickerdoodle cookies from start to finish. You learned about essential ingredients, their functions, and good substitutes. I provided step-by-step instructions for mixing, baking, and cooling. We explored tips for that perfect texture and common errors to avoid. Variations let you adapt for diets or add fun flavors. I also shared the best storage methods and answered your questions. Enjoy your baking, and remember, the perfect snickerdoodle is just a mix away!

Soft and Chewy Snickerdoodle Cookies Delightful Treat

Are you ready to bake the perfect soft and chewy snickerdoodle cookies? These delightful treats are simple to make, and

- Overview of Fresh Ingredients The Street Corn Chicken Rice Bowl uses vibrant and fresh ingredients. You will need: - 1 cup jasmine rice - 2 cups chicken broth - 2 chicken breasts, grilled and sliced - 1 cup corn (fresh, frozen, or canned) - 1 red bell pepper, diced - 1 ripe avocado, diced - 1 cup cherry tomatoes, halved - 1/2 cup crumbled cotija cheese - 1/4 cup fresh cilantro, chopped - 1 tablespoon lime juice These ingredients make the dish colorful and tasty. - Recommended Substitutions You can swap some ingredients if needed. If you want, use brown rice instead of jasmine rice. This adds more fiber. For a lighter option, try grilled shrimp or tofu instead of chicken. Instead of cotija cheese, use feta or a dairy-free option. - Seasoning and Herbs Seasoning is key to flavor. You will use: - 1 teaspoon chili powder - 1 teaspoon smoked paprika - Salt and pepper to taste These seasonings bring a warm, smoky taste. Fresh herbs, like cilantro, add brightness. A squeeze of lime juice brightens every bite. For more flavor, you can add garlic powder or cumin. For the full recipe, follow the steps to create this delicious bowl. Enjoy your cooking adventure! To make the rice tasty, I use chicken broth instead of water. This adds a rich flavor that makes the rice shine. - Start by rinsing 1 cup of jasmine rice. This removes extra starch and helps the rice stay fluffy. - In a medium saucepan, combine the rinsed rice and 2 cups of chicken broth. - Bring this to a boil over high heat. Once boiling, reduce the heat to low. - Cover the saucepan with a lid and let it simmer for 15 minutes. - After that, remove it from heat and let it sit for 5 minutes. - Fluff the rice with a fork to keep it light and airy. Perfectly cooked rice should be soft but not mushy. For the chicken, I pick fresh breasts for the best taste. - Start by seasoning 2 chicken breasts with olive oil, salt, pepper, chili powder, and smoked paprika. - Make sure to coat both sides with the seasoning. - Preheat your grill or grill pan to medium-high heat. - Grill the chicken for about 6-7 minutes on each side. - Use a meat thermometer to check the inside temperature. It should reach 165°F (75°C). Let the chicken rest for a few minutes after grilling. This keeps it juicy when you slice it. The corn topping adds a sweet crunch to each bite. - In a large skillet, heat a small amount of olive oil over medium heat. - Add 1 cup of corn and 1 diced red bell pepper to the skillet. - Sauté the mixture for about 5-6 minutes. Stir occasionally until the corn and pepper are tender and slightly charred. - Season with salt and pepper to taste. This step enhances the flavors and makes the topping stand out. Now you are ready to assemble the Street Corn Chicken Rice Bowl! For the full recipe, check out the details above. - Temperature Control: Keep your grill at medium-high heat. This helps the chicken cook evenly. Use a meat thermometer to check that the inside hits 165°F (75°C). This ensures it is safe to eat and juicy. - Marinading for Extra Flavor: Mix olive oil, chili powder, and smoked paprika for a simple marinade. Let the chicken sit in the marinade for at least 30 minutes. This step packs in flavor and helps the chicken stay moist on the grill. - Plating for Visual Appeal: Start by placing a mound of jasmine rice in the bowl. Layer the grilled chicken and sautéed corn on top. This creates height and makes the dish look inviting. - Garnishing Suggestions: Add diced avocado and halved cherry tomatoes for a pop of color. A sprinkle of cotija cheese adds both flavor and a beautiful finish. Finally, toss on some cilantro for a fresh, green touch. - Overcooking Rice: Keep an eye on your cooking time. Rice can go from perfect to mushy quickly. Follow the instructions closely, and remove it from heat when tender. - Under-seasoning Ingredients: Don’t skip the seasoning! A little salt and pepper can change the whole dish. Taste your ingredients while cooking to ensure they are flavorful enough. Season as you go for the best results. {{image_4}} You can easily change this recipe to suit your tastes. Vegetarian Options For a meatless meal, swap chicken for grilled zucchini or mushrooms. Use vegetable broth instead of chicken broth. Add chickpeas for extra protein. They add a nice texture and flavor. Different Proteins You can use shrimp, beef, or tofu instead of chicken. Cook them similarly. Each protein brings its unique taste. Adjust the cooking time based on what you choose. How you serve this dish can make it special. Pairing with Sides or Salads Serve the rice bowl with a fresh green salad. A simple lime vinaigrette works great. You can also enjoy it with tortilla chips or a side of beans. These sides add more texture and flavor. Creative Serving Styles Try serving this bowl in a large platter for sharing. Everyone can scoop their portions. You can also use small bowls for a fun twist. This idea makes it perfect for gatherings. Experimenting with flavors can make this dish even more exciting. Experimenting with Spices Try adding cumin or coriander for a warm taste. A dash of garlic powder gives it a nice kick. You can also mix in smoked paprika for a richer flavor profile. Each spice can change the bowl’s overall taste. Adding Heat with Peppers If you like heat, add jalapeños or serrano peppers. Dice them up and mix them in with the corn. You can also use a spicy salsa on top. This adds a fun, fiery twist to your meal. For the full recipe, check the details above. Enjoy! To keep your Street Corn Chicken Rice Bowl fresh, store leftovers properly. First, let the bowl cool to room temperature. This helps avoid steam which can make food soggy. Then, divide the rice, chicken, and toppings. The best way to store leftovers is to use airtight containers. - Containers to Use - Glass containers work great for storage. - Plastic containers are fine too, as long as they seal well. When it's time to eat again, you’ll want to reheat your bowl just right. This keeps the flavors and texture nice. - Maintaining Texture and Flavor - For the best taste, reheat slowly. - Add a splash of water to keep the rice moist. - Microwave vs. Oven - Use the microwave for quick reheating. Heat for about 1-2 minutes. - For a crispier finish, use the oven. Preheat to 350°F (175°C) and bake for about 10 minutes. If you want to save your bowl for later, freezing is a good option. - Freezable Components - The rice and chicken freeze well. - Avoid freezing fresh toppings like avocado and tomatoes. - Thawing Procedures - To thaw, place the bowl in the fridge overnight. - If you're in a hurry, you can use the microwave on the defrost setting. Following these tips helps keep your Street Corn Chicken Rice Bowl tasty and ready for your next meal. For the complete recipe, check out the [Full Recipe]. Making a Street Corn Chicken Rice Bowl takes about 40 minutes in total. This includes 15 minutes for prep and 25 minutes for cooking. You can cook the rice while grilling the chicken. This way, you save time and keep things moving in the kitchen. Yes, you can use brown rice instead of jasmine rice. Brown rice is more nutritious. It has more fiber and nutrients. However, it takes longer to cook. You should plan for an extra 20-25 minutes if you choose brown rice. If you need a substitute for cotija cheese, try feta or ricotta salata. Both options work well. You can also use vegan cheese or nutritional yeast for a dairy-free choice. These alternatives still give you a nice flavor and texture. Yes, you can make this recipe ahead of time. Cook the rice and chicken, then store them separately. Keep the corn topping in an airtight container. This way, you can enjoy your meal later. Just reheat everything before serving. The Street Corn Chicken Rice Bowl is quite healthy. It has protein from chicken, fiber from rice, and vitamins from veggies. The healthy fats in avocado add nutrition too. Overall, this meal is balanced and nourishing. Enjoy it guilt-free! This guide covers key ingredients, cooking steps, and helpful tips for a delicious Street Corn Chicken Rice Bowl. You learned about substitutions and flavor options. I shared error-proof techniques for cooking rice and grilling chicken. Remember to avoid common mistakes to make it perfect. Explore variations to suit your taste and follow storage tips for freshness. With these new skills, you’re ready to enjoy a great meal. Cooking should be fun and your dish will impress everyone. Enjoy your delicious creation!

Street Corn Chicken Rice Bowl Flavorful and Easy Recipe

Looking for a meal that’s both tasty and simple? The Street Corn Chicken Rice Bowl packs a punch with fresh

Older posts
Newer posts
← Previous Page1 … Page71 Page72 Page73 … Page77 Next →

dsad

© 2025 eataroundit • Built with GeneratePress

Our Policies

  • Copyright Policy
  • Cookie Policy
  • GDPR Policy
  • Privacy Policy
  • Disclaimer
  • Terms Of Use

More Information

  • Home
  • About
  • Contact
  • Appetizers
  • Dessert
  • Dinner
  • Drinks
©2025, eataroundit About Back To Top