Skip to content
DisclaimerTerms Of UseGDPR PolicyCookie Policy

eataroundit

  • Home
  • Drinks
  • Appetizers
  • Dinner
  • Dessert
  • About
  • Contact
  • Privacy Policy
DisclaimerTerms Of UseGDPR PolicyCookie Policy

Hannah

To make crispy air fryer chickpeas, you need just a few main items. Here’s what you’ll need: - 1 can (15 oz) chickpeas, drained and rinsed - 1 tablespoon extra virgin olive oil - 1 teaspoon garlic powder - 1 teaspoon smoked paprika - 1/2 teaspoon ground cumin - 1/2 teaspoon sea salt - 1/4 teaspoon freshly ground black pepper These ingredients work together to create a tasty and crunchy snack. You can customize your chickpeas with extra seasonings. Here are some ideas: - Pinch of cayenne pepper for heat - Italian herbs like oregano or basil - A sprinkle of nutritional yeast for a cheesy flavor - Lemon zest for brightness Feel free to mix and match to find your favorite flavor! To make these crispy chickpeas, you’ll need a few tools: - Air fryer for cooking - Mixing bowl for combining ingredients - Kitchen towel or paper towel for drying chickpeas Using these tools will make your cooking easier and more fun. For the full recipe, check the detailed steps provided. First, open a can of chickpeas. Drain and rinse them well under cold water. This helps remove any canning liquid. Next, spread the chickpeas on a kitchen towel or paper towel. Pat them dry gently. This step is key. Dry chickpeas will get crispier when cooked. In a large bowl, add your dried chickpeas. Drizzle with olive oil. Then, sprinkle in garlic powder, smoked paprika, ground cumin, sea salt, and black pepper. If you like it spicy, add a pinch of cayenne pepper. Toss everything well so each chickpea is coated in seasoning. This mix brings out the best flavor. Now, transfer the seasoned chickpeas to the air fryer basket. Arrange them in a single layer. This helps them cook evenly. Set your air fryer to 400°F (200°C). Cook the chickpeas for 12-15 minutes. Shake the basket halfway through cooking. This step ensures that they crisp up nicely. Watch them closely; they should turn golden brown and be crunchy. When done, take them out and let them cool. They will get even crispier as they cool down. For the full recipe, check out the steps above. To get the crispiest chickpeas, start by drying them well. After rinsing, spread them on a towel. Pat them gently to soak up extra moisture. This step is key! Less moisture means more crunch. When you toss them in oil and spices, make sure they are evenly coated. Arrange them in a single layer in the air fryer. This helps them cook nicely and crisp up evenly. One common mistake is using wet chickpeas. Always dry them well before cooking. Another mistake is overcrowding the air fryer. If the chickpeas are too close together, they will steam instead of fry. Also, don’t skip the halfway shake! This helps them cook evenly. Lastly, keep an eye on the cooking time. Overcooking can lead to burnt chickpeas, which nobody wants. You can play with many flavors for your chickpeas. Try adding a pinch of cayenne for heat. For a zesty twist, sprinkle in some lemon zest before serving. If you love herbs, add dried oregano or thyme. For a sweet touch, mix in a bit of cinnamon and sugar. The options are endless! Explore and find your favorite flavor mix. For the full recipe, check out the details above. {{image_4}} For a fiery kick, add spices like cayenne pepper. Mix 1/4 teaspoon with your other spices. This will heat up your chickpeas and make them pop! You can also use chili powder for a different flavor. Adjust the amount to fit your taste. Enjoy the spicy crunch! If you love fresh flavors, use herbs. Dried herbs like thyme or rosemary work well. Mix in 1 teaspoon of your favorite herb with the other spices. This will give your chickpeas a fresh, fragrant taste. You can also sprinkle fresh herbs on top after cooking. It adds color and flavor! For a sweet twist, try adding a little honey or maple syrup. Use 1 teaspoon and mix it with your oil before adding spices. A pinch of cinnamon can also enhance the sweetness. This combo makes a tasty snack that balances sweet and savory. Perfect for those who love a mix of flavors! For more details on making these tasty snacks, check the Full Recipe. To store leftover chickpeas, let them cool first. Place them in an airtight container. Use parchment paper to help absorb any moisture. This keeps them crispy for longer. You can store them in the fridge for up to a week. If you want to store them longer, consider freezing. Just know that freezing may change the texture slightly. To reheat your chickpeas, use the air fryer again. Set the air fryer to 350°F (175°C). Cook for about 5 minutes. This helps restore the crunch. You can also use an oven. Preheat to 350°F (175°C) and bake for about 10 minutes. Keep an eye on them to avoid burning. Crispy air fryer chickpeas last for about a week in the fridge. If stored properly, they stay fresh and tasty. If you freeze them, they can last up to three months. The key is to ensure they are dry and stored in a sealed container. Enjoy your snack at its best! Don't forget to check the [Full Recipe] for more tips! You can use dried chickpeas, but you need to cook them first. Start by soaking the dried chickpeas overnight. After soaking, boil them for about an hour until they’re tender. Drain and rinse them well before air frying. This extra step gives you the same crunch as canned chickpeas. The best temperature for air frying chickpeas is 400°F (200°C). This high heat helps them get crispy and golden. Make sure to preheat your air fryer before adding the chickpeas. This way, they cook evenly and get that perfect crunch. Crispy air fryer chickpeas can last for about 3 to 5 days. Store them in an airtight container at room temperature. If they start to lose their crunch, you can pop them back into the air fryer for a few minutes to revive their crispiness. Yes, you can make these chickpeas ahead of time! Prepare them and let them cool completely. Then, store them in an airtight container. They make a great snack or topping for salads. Just remember to reheat them in the air fryer to bring back that crunch. You can find the full recipe for crispy air fryer chickpeas in the recipe section above. This post covered everything about crispy air fryer chickpeas. You learned about the main ingredients, optional seasonings, and the right equipment. The step-by-step process made prepping and cooking easy. I shared tips for maximum crispiness and common mistakes to avoid. You also discovered tasty variations and storage tips to keep them fresh. My final thought is that these chickpeas are simple, fun, and delicious. Try them out and enjoy your tasty snacks!

Crispy Air Fryer Chickpeas Flavorful and Easy Snack

Looking for a quick, tasty snack that packs a crunch? Try these Crispy Air Fryer Chickpeas! With just a few

To make delicious pumpkin spice latte cupcakes, gather these simple ingredients: - 1 ½ cups all-purpose flour - 1 teaspoon baking powder - ½ teaspoon baking soda - 1 teaspoon ground cinnamon - ½ teaspoon ground nutmeg - ½ teaspoon ground ginger - ¼ teaspoon salt - ½ cup unsalted butter, softened to room temperature - 1 cup granulated sugar - 2 large eggs, at room temperature - 1 cup pumpkin puree (canned or freshly made) - ½ cup brewed coffee, cooled to room temperature - 1 teaspoon vanilla extract Each ingredient plays a key role. The flour gives structure. Baking powder and baking soda make the cupcakes rise. The spices add warmth and flavor. Butter and sugar create a soft texture. Eggs help bind everything together. Pumpkin puree brings moisture and that signature taste. Coffee enhances the flavor and adds depth. Finally, vanilla makes it all sing. For the full recipe, follow the detailed instructions to create these irresistible treats. Happy baking! - Preheat your oven to 350°F (175°C). - Prepare a muffin tin with cupcake liners. - In a bowl, combine 1 ½ cups all-purpose flour, 1 teaspoon baking powder, ½ teaspoon baking soda, 1 teaspoon ground cinnamon, ½ teaspoon ground nutmeg, ½ teaspoon ground ginger, and ¼ teaspoon salt. - In a large bowl, cream ½ cup softened butter and 1 cup granulated sugar until light and fluffy. - Add 2 large eggs one at a time, mixing well after each. Then, mix in 1 cup pumpkin puree and ½ cup cooled brewed coffee. - Gradually mix the dry ingredients into the wet ingredients. Stir gently until just combined to avoid overmixing. - Fill each cupcake liner about two-thirds full with batter. - Bake in the preheated oven for 18-20 minutes. Check doneness by inserting a toothpick into the center of a cupcake; it should come out clean. Now you have a delicious batch of pumpkin spice latte cupcakes. For the complete recipe and more tips, check out the full recipe above! To get the best cupcakes, avoid overmixing. When you combine the wet and dry ingredients, mix gently. Stop as soon as you see no dry flour. Overmixing makes the cupcakes tough. Using room temperature ingredients is key. When butter, eggs, and pumpkin are at room temp, they blend better. This creates a smooth batter and light cupcakes. If your butter is cold, it won't cream well with sugar. For a tasty frosting, I love cream cheese frosting. It pairs perfectly with the spices in the cupcakes. To make it, mix 8 oz of cream cheese, ½ cup of softened butter, 4 cups of powdered sugar, and a splash of vanilla extract. If you're looking for alternatives, whipped cream works great too. You can also try a rich chocolate ganache. Just melt chocolate with cream for a sweet, gooey topping. Add a festive touch to your cupcakes. You can sprinkle cinnamon or nutmeg on top. A drizzle of caramel sauce makes them extra special. For a flavor boost, think about toppings. Try crushed nuts or mini chocolate chips. You can even place a coffee bean or a candy pumpkin on top for fun. These little details make your cupcakes shine! {{image_4}} You can mix things up with flavor combinations. Adding chocolate chips gives a sweet touch. Chopped nuts like walnuts or pecans add crunch and flavor. For a twist, try spices like cardamom or allspice instead of cinnamon. Each change can turn the same cupcake into a new treat. If you need gluten-free cupcakes, use almond flour or a gluten-free blend. For vegan options, swap eggs with applesauce or flaxseed meal. You can also use coconut oil instead of butter. When it comes to sugar, use honey or maple syrup for a healthier choice. These swaps keep the taste great! You can play with seasonal flavors too! In winter, add peppermint extract for a minty kick. For fall, use maple syrup in place of some sugar. These ideas make your cupcakes match any holiday theme. Each season brings a new way to enjoy pumpkin spice latte cupcakes. For the full recipe, check back to make these delightful treats! To keep your pumpkin spice latte cupcakes fresh, follow these simple steps. First, let them cool completely. This helps avoid soggy cupcakes. Store them in an airtight container. You can place parchment paper between layers to keep them from sticking together. If you want to store them in the fridge, wrap each cupcake tightly in plastic wrap. This method helps maintain moisture and flavor. They can last up to five days in the fridge. For longer storage, freeze your cupcakes. Place them in a freezer-safe container or bag. They can stay fresh in the freezer for up to three months. Just remember to label them with the date. If your cupcakes feel a bit stale, don’t worry! You can refresh them easily. To do this, preheat your oven to 350°F (175°C). Place the cupcakes on a baking sheet for about five minutes. This warms them up and brings back some moisture. If you’ve frozen your cupcakes, thaw them slowly. The best way is to move them from the freezer to the fridge for a few hours or overnight. This method helps keep the texture nice. Once thawed, you can frost them and enjoy! For the full recipe of these delightful treats, refer to the earlier section. You can prepare the batter a day in advance. Just store it in the fridge. When you are ready to bake, let it sit at room temperature for about 30 minutes. This helps the batter warm up. You can also bake the cupcakes ahead of time. Once cooled, place them in an airtight container. They last for up to three days at room temperature. For longer storage, keep them in the fridge for up to a week. Yes, fresh pumpkin makes a great choice! It can add a richer flavor. To use fresh pumpkin, start by cutting a small pumpkin in half. Remove the seeds and stringy bits. Roast the halves cut-side down at 350°F (175°C) for about 45 minutes. Once it’s soft, scoop out the flesh and mash it well. Measure out one cup for your cupcakes. Fresh pumpkin can give your treats a vibrant taste. If you need an egg substitute, you have options. For each egg, use one of the following: - ¼ cup unsweetened applesauce - ¼ cup mashed banana - 2 tablespoons ground flaxseeds mixed with 6 tablespoons water These options work well and keep your cupcakes moist. They also help if you want a vegan treat. These cupcakes stay fresh for about three days at room temperature. To keep them longer, store them in the fridge for up to a week. If you want to save them for later, you can freeze them. Wrap each cupcake in plastic wrap and place them in a freezer bag. They can last for up to three months in the freezer. When ready to enjoy, thaw them in the fridge overnight. These pumpkin cupcakes are simple and delicious. We covered ingredients, steps, and tips for baking. You learned how to flavor them, store them, and even adjust for diets. Remember, using room temperature ingredients helps with texture. Also, don't forget to have fun with toppings and frostings! With these steps and ideas, you can enjoy or share a tasty treat that everyone will love. Happy baking!

Pumpkin Spice Latte Cupcakes Irresistible Treats

If you love fall flavors, you can’t miss these Pumpkin Spice Latte Cupcakes! They mix warm spices, rich pumpkin, and

- 8 oz cream cheese, softened - 1 cup sour cream - 1 cup shredded cheddar cheese - 1/2 cup shredded mozzarella cheese - 1/2 cup crumbled cream cheese - 4-6 fresh jalapenos, diced - 1/4 cup green onions, finely sliced - 1 teaspoon garlic powder - 1 teaspoon onion powder - Salt and pepper to taste - 1/2 cup breadcrumbs (panko or regular) - 2 tablespoons extra virgin olive oil How do I adjust the jalapeno quantity for spice level? You can add more or less jalapenos based on your heat preference. For milder dip, use fewer jalapenos. For more heat, add more. What type of cheese should I choose for flavor? I recommend using a blend of cheeses. Cheddar adds sharpness while mozzarella gives creaminess. What are cream cheese alternatives for dairy-free options? You can use cashew cream or dairy-free cream cheese. These options still provide a creamy texture. What are breadcrumb substitutes for gluten-free diets? Try using gluten-free breadcrumbs or crushed cornflakes. Both work well in this dip for a crunchy topping. For the full recipe, check out the Baked Jalapeno Popper Dip instructions above. 1. Preheat your oven to 375°F (190°C). This step is key for even baking. 2. Lightly grease a medium-sized baking dish. You can use cooking spray or a thin layer of olive oil. 3. In a large mixing bowl, combine: - 8 oz cream cheese, softened - 1 cup sour cream - 1 cup shredded cheddar cheese - 1/2 cup shredded mozzarella cheese - 1/2 cup crumbled cream cheese 4. Blend these ingredients until smooth and creamy. Use a spatula or electric mixer to help mix well. 5. Gently fold in the diced jalapenos. You can adjust the amount to fit your heat level. Add: - 1/4 cup green onions, finely sliced - 1 teaspoon garlic powder - 1 teaspoon onion powder - Salt and freshly cracked black pepper to taste 6. Mix until all ingredients are evenly combined. Be careful not to overmix. 7. Carefully pour the creamy mixture into the greased baking dish. Use a spatula to spread it evenly. 8. In a small bowl, combine: - 1/2 cup breadcrumbs (panko or regular) - 2 tablespoons extra virgin olive oil 9. Stir until the breadcrumbs are well coated. Evenly sprinkle this topping over the dip. 10. Place the baking dish in your preheated oven. Bake for 20-25 minutes. Check when the dip is bubbling and the top is golden brown. 11. Once baked, remove it from the oven. Let it cool for a few minutes before serving. These steps ensure you enjoy a creamy and flavorful dip. For the full recipe, check out the guide to Baked Jalapeno Popper Dip. To make the best Baked Jalapeno Popper Dip, focus on texture. You want it creamy, not too thick or runny. Start with room temperature cream cheese. This helps it mix smoothly with the other ingredients. Avoid overmixing. After adding the jalapenos and spices, stir gently. This keeps the dip fluffy. Too much mixing can make it dense. For dipping, tortilla chips work great. They add crunch and hold up well. You can also use slices of a fresh baguette. Both pair nicely with the creamy dip. Garnish for a nice touch. Sprinkle some green onions or fresh cilantro on top. It adds color and makes your dip look even more inviting. To keep your dip warm, use a slow cooker. Set it on low to keep the dip gooey and hot. This is great for parties, so guests can help themselves. If you have leftovers, you can reheat the dip. Use an oven set to 350°F (175°C). Heat for about 10-15 minutes. Watch it closely to avoid burning the top. For the full recipe, check above! {{image_4}} You can easily boost the flavor of your dip. Adding bacon or sausage gives it a savory twist. Cook the bacon until crispy, then crumble it into the dip. If you prefer sausage, cook and crumble it as well. Using different cheeses can change the taste, too. Try adding pepper jack for a spicy kick or gouda for a smoky flavor. Mixing cheeses creates layers of flavor that make each bite exciting. You might want your dip milder or spicier. To lower the heat, use fewer jalapenos or remove the seeds. If you like it spicier, add more diced jalapenos or try a dash of hot sauce. You can also swap jalapenos for other peppers. Use poblano peppers for a milder taste, or serrano peppers for a stronger heat. This way, you can cater to everyone's taste buds. There are a few ways to cook this dip. You can air fry it for a quicker option. Just keep an eye on it to avoid burning. Traditional baking gives a nice, even heat and a golden top. You can also make this dip in different dishes. Using a casserole dish is great for sharing. Mini dutch ovens work well for single servings, making it fun for guests to have their own. For the complete recipe, check [Full Recipe]. To store your Baked Jalapeno Popper Dip, let it cool first. Place it in an airtight container. This helps keep it fresh. You can store it in the fridge for up to 3-4 days. Yes, you can freeze Baked Jalapeno Popper Dip! Just make sure it is in a freezer-safe container. It will stay good for about 2-3 months in the freezer. When you're ready to eat it, thaw it in the fridge overnight. Reheat your dip in the oven for the best texture. Set your oven to 350°F (175°C) and bake for 15-20 minutes. Cover it with foil to avoid burning the top. Avoid using the microwave, as it can make the dip uneven and soggy. For the best results, keep an eye on it until it’s hot and bubbly. To make your dip creamier, use room temperature cream cheese. This helps blend better. You can also add extra sour cream or cream cheese. Mixing in a bit of heavy cream will add richness. Be sure to mix until smooth, with no lumps. Yes, you can prepare this dip a day ahead. Mix all the ingredients and store in the fridge. Just cover it well to keep it fresh. When ready to bake, let it sit at room temp for 30 minutes. This helps it cook evenly. This dip pairs well with crispy tortilla chips. You can also serve it with sliced baguette or crackers. Fresh veggies like celery sticks or bell peppers add a nice crunch. For extra flavor, try adding pickles or olives on the side. To make this dip healthier, use low-fat cream cheese and sour cream. You can also reduce the amount of cheese. Add more vegetables like spinach or artichokes for extra nutrients. Using whole grain bread crumbs instead of regular can also help. This article covered a delicious baked jalapeno popper dip. We discussed key ingredients, including cream cheese and cheddar. You learned about spice adjustments and ingredient substitutions too. Remember, serving this dip with tortilla chips makes it a hit. Keep it warm using a slow cooker for easy serving. With its creamy texture and bold flavors, this dip is perfect for any gathering. Enjoy making your own version and experimenting with flavors!

Baked Jalapeno Popper Dip Flavorful and Simple Treat

Are you ready to elevate your snack game? My Baked Jalapeno Popper Dip is a flavorful and simple treat that

To make a hearty beef and bean chili, gather these essential ingredients: - 1 pound ground beef, preferably lean - 1 can (15 oz) kidney beans, thoroughly drained and rinsed - 1 can (15 oz) black beans, thoroughly drained and rinsed - 1 can (28 oz) diced tomatoes with juices - 1 medium onion, finely chopped - 2 cloves garlic, minced - 2 tablespoons chili powder - 1 tablespoon ground cumin - 1 teaspoon smoked paprika - 1 teaspoon salt, or to taste - 1/2 teaspoon freshly ground black pepper - 1 bell pepper (your choice of color), chopped into bite-sized pieces - 1 cup beef broth, low sodium preferred - 2 tablespoons olive oil You can enhance your chili with these tasty garnishes and sides: - Fresh cilantro, for garnish (optional but recommended) - Sour cream or Greek yogurt, for serving (optional) - Grated cheese (cheddar or Mexican blend), for serving (optional) - Crusty bread or tortilla chips, for dipping To prepare this chili, you will need: - A large, heavy-bottomed pot - A wooden spoon or spatula for stirring - A sharp knife and cutting board for chopping - Measuring spoons for precise ingredient amounts - A can opener for the beans and tomatoes These tools make cooking smooth and easy. When you have everything ready, you can follow the full recipe and enjoy a warm bowl of chili. Start by gathering your ingredients. This helps you stay organized. Heat 2 tablespoons of olive oil in a large pot over medium heat. Once hot, add 1 medium chopped onion and 1 chopped bell pepper. Sauté these for about 5 minutes, or until the onion becomes soft and clear. This step builds flavor and aroma. Next, stir in 2 minced garlic cloves and cook for another minute. You want that garlic to smell amazing. Increase the heat to medium-high. Add 1 pound of ground beef to the pot. Break it up with a spatula as it cooks. You need to brown the beef for about 5 to 7 minutes. Ensure it's no longer pink. Once done, drain any extra fat from the pot. This keeps the chili from being greasy. Now, it's time to add spice! Stir in 2 tablespoons of chili powder, 1 tablespoon of ground cumin, 1 teaspoon of smoked paprika, 1 teaspoon of salt, and 1/2 teaspoon of black pepper. Cook this mixture for 2 minutes to release the spices’ full flavor. Then, pour in 1 can of diced tomatoes (28 oz) along with their juice. Add the drained kidney beans and black beans from 2 cans (15 oz each) and 1 cup of beef broth. Stir everything together well. Raise the heat and let the chili simmer gently. Once it bubbles, lower the heat to low. Cover the pot and let it cook for at least 30 minutes. Stir it occasionally to blend the flavors. If you have time, simmer for up to an hour for richer taste. Taste your chili and adjust seasoning as needed. When you're ready to serve, ladle it into bowls. Add fresh cilantro on top and a dollop of sour cream or Greek yogurt if you want. A sprinkle of grated cheese also adds a nice touch. Enjoy your hearty beef and bean chili! For the complete recipe, check the [Full Recipe]. To boost your chili’s flavor, use fresh spices. Fresh spices add depth. Toast them briefly in oil before adding other ingredients. This enhances their taste. Adding a pinch of sugar can balance acidity from the tomatoes. Taste as you go to adjust flavors. You can also add a splash of vinegar for brightness at the end. The longer you cook chili, the better it tastes. Simmering for 30 minutes is great. For richer flavor, cook for up to an hour. Stir occasionally to prevent sticking. If you have time, let it rest after cooking. This helps the flavors meld together even more. Chili is versatile. Serve it over rice for a filling meal. Add crusty bread or tortilla chips for crunch. Top with fresh cilantro, sour cream, or cheese for extra flavor. You can also serve it with a side salad for freshness. Don’t forget to check the Full Recipe for more details! {{image_4}} You can easily make this chili meatless. Use lentils instead of ground beef. They cook well and add great texture. You can also use mushrooms for a hearty feel. They give a rich flavor and meaty bite. For a vegan twist, skip any dairy toppings. Use avocado or cashew cream instead for creaminess. Want more heat? Add chopped jalapeños or cayenne pepper to the mix. If you prefer less heat, reduce the chili powder. You can also add a touch of honey or sugar to balance spicy flavors. Taste as you go, so you get your perfect spice level. Feel free to mix up the beans! Pinto beans, navy beans, or chickpeas work well. You can also try ground turkey or chicken for a leaner chili. Each option brings a new flavor profile. Be creative and use what you have on hand. The key is to keep it delicious and satisfying. For the full recipe, check the earlier section. To store your leftover chili, let it cool first. Place it in an airtight container. Make sure it’s sealed well to keep out air. You can store chili in the fridge for up to four days. If you want it to last longer, freezing is a great option. When you’re ready to enjoy your chili again, you can reheat it in a few ways. The microwave works well for quick meals. Just heat it in a bowl, stirring every minute until hot. You can also use a pot on the stove. Pour your chili into the pot and heat it over medium heat. Stir often to prevent sticking. It should take about 10 minutes to warm up. To freeze chili, pour it into freezer-safe bags or containers. Make sure to leave some space for expansion. Label the bags with the date to keep track. Your chili can stay good in the freezer for about three months. When you’re ready to eat, thaw it in the fridge overnight. Then, reheat as mentioned above. This makes for a quick and tasty meal later! You can use ground turkey, chicken, or plant-based meat. Each option has a unique taste. Ground turkey is lean and mild. Ground chicken is similar but slightly richer. Plant-based meat mimics beef well. They all work nicely in chili. Chili stays fresh in the fridge for up to five days. Make sure to store it in an airtight container. This keeps the flavors strong and prevents spoilage. You can reheat it on the stove or in the microwave. Yes, both methods work great! For a slow cooker, brown the meat first. Then add all ingredients and cook on low for 6-8 hours. For an Instant Pot, sauté the meat and veggies first. Then add all ingredients, seal, and cook on high pressure for about 20 minutes. Each method lets the flavors blend well. You can find the full recipe in the earlier sections. You now know how to make classic beef and bean chili. We explored essential ingredients, tools, and step-by-step instructions. I shared tips to perfect the flavor and different variations for everyone. You also learned how to store, reheat, and adapt your chili. Chili is a great dish for meals and gatherings. Enjoy making it your own with spices and sides. Happy cooking!

Classic Beef and Bean Chili Hearty and Filling Meal

Are you ready for a warm bowl of comfort? This Classic Beef and Bean Chili is your answer. Packed with

- 8 oz linguine or spaghetti - 1 lb large shrimp, peeled and deveined - 4 cloves garlic, finely minced - 1/4 cup unsalted butter - 2 tablespoons extra virgin olive oil - 1/4 teaspoon red pepper flakes - Sea salt and black pepper, to taste - Fresh parsley, finely chopped - Grated Parmesan cheese, for serving - Large pot - Skillet - Colander - Measuring cups and spoons To make Easy Shrimp Scampi Pasta, gather these ingredients. The main ingredients create a tasty base. Linguine or spaghetti gives a nice texture. Large shrimp adds a sweet flavor. Garlic gives a strong taste. Butter and olive oil create a rich sauce. Optional ingredients add fun touches. Red pepper flakes give heat. Salt and pepper enhance flavor. Fresh parsley makes it bright and pretty. Parmesan cheese adds creaminess. You will need some simple tools. A large pot cooks the pasta. A skillet brings everything together. A colander helps drain the pasta. Measuring cups and spoons ensure accuracy. For the full recipe, check the details provided. This dish is simple, quick, and delicious! To make this dish, start with cooking the pasta. First, boil a large pot of water. Don’t forget to add salt! The salt helps flavor the pasta. Once the water is boiling, add 8 ounces of linguine or spaghetti. Cook it until it is al dente, which is usually about 8 to 10 minutes. Before you drain the pasta, reserve half a cup of the starchy pasta water. This water will help bring the dish together later. Next, we need to sauté the garlic. Grab a large skillet and set it over medium heat. Add 1/4 cup of unsalted butter and 2 tablespoons of extra virgin olive oil to the skillet. Let the butter melt and bubble gently. After that, add 4 finely minced garlic cloves. Sauté the garlic for 1 to 2 minutes. Keep stirring it so it doesn’t burn. You want it fragrant but not browned. Now, it's time to cook the shrimp! Add 1 pound of large shrimp, peeled and deveined, to the skillet. Season them with sea salt, black pepper, and red pepper flakes if you like some heat. Cook the shrimp for 2 to 3 minutes without stirring. You will see the underside turn pink. Flip the shrimp over and cook for another 2 to 3 minutes until they are pink and opaque. Once the shrimp are ready, it's time to combine everything. Stir in the zest and juice of one fresh lemon. This brightens up the dish! Next, gently fold in the drained pasta. If it looks dry, add a bit of the reserved pasta water. Do this one tablespoon at a time until it reaches your desired creaminess. Finally, let’s add the finishing touches! Remove the skillet from the heat. Garnish your dish with finely chopped fresh parsley. Serve it with a sprinkle of grated Parmesan cheese on top. This adds a nice richness to the meal. Enjoy your easy shrimp scampi pasta, a dish that impresses with every bite! For a full recipe, check the Full Recipe mentioned earlier. Choosing the right pasta I love using linguine for shrimp scampi. Its flat shape holds the sauce well. Spaghetti works too, but linguine gives a nice touch. Cook your pasta until it’s al dente. This means it’s firm to the bite. How to avoid overcooking shrimp Cook shrimp quickly. Overcooked shrimp can become rubbery. Start by cooking them without stirring for 2-3 minutes. When they turn pink, flip them. Cook for another 2-3 minutes. They should look opaque and feel firm. Alternative pasta types You can switch to whole wheat or gluten-free pasta. Both options taste great. They also add more fiber or cater to dietary needs. Vegetarian options or substitutes for shrimp Try using mushrooms or zucchini instead of shrimp. They soak up flavors and offer a great texture. You can also use tofu for added protein. Pairing with side dishes or salads Serve shrimp scampi with a crisp green salad. A simple Caesar or arugula salad works well. Garlic bread is a classic side that complements the dish nicely. Best beverages to complement the dish A light white wine, like Sauvignon Blanc, pairs well. If you prefer non-alcoholic, try sparkling water with lemon. Both options enhance the meal's flavors. For details on the ingredients and steps, check the Full Recipe. {{image_4}} You can spice up your shrimp scampi by adding red pepper flakes or hot sauce. This gives your dish a nice kick. Just sprinkle red pepper flakes while cooking the shrimp. If you like it hot, add more! Hot sauce is great, too. A few drops can change the flavor. The heat balances well with the garlic and lemon. If you love creamy pasta, try adding heavy cream or mascarpone. This makes your sauce rich and smooth. Pour in the cream after you sauté the garlic. Stir it in before adding the shrimp. This will give a whole new texture. You can also mix in some cheese for extra flavor. Adding veggies can make your dish more colorful and healthy. Asparagus, spinach, or cherry tomatoes boost nutrition. You can toss in the asparagus during the last few minutes of cooking. For spinach, add it just before serving. It wilts down nicely. Cherry tomatoes add sweetness; toss them in with the shrimp. This adds freshness to your meal. For more details, check the Full Recipe to help guide your cooking adventure! Store shrimp scampi in an airtight container. This keeps it fresh and tasty. It lasts about 2 to 3 days in the fridge. Make sure to let it cool down before sealing. This helps to avoid moisture build-up. When you're ready to eat, just reheat it gently. If you want to keep it longer, freezing is a great option. First, let the shrimp scampi cool completely. Then, place it in a freezer-safe container. You can also use freezer bags. Squeeze out as much air as possible. It will stay good in the freezer for about 2 to 3 months. When you're ready to enjoy it, thaw it in the fridge overnight. For reheating, you can use a skillet over low heat. Add a splash of water or broth to keep it moist. You can also microwave it, but do it in short bursts. This way, it heats evenly without drying out. For the full recipe, check out the details. Yes, you can use frozen shrimp. First, thaw the shrimp in cold water. This takes about 15-20 minutes. Once thawed, pat them dry with a paper towel. This helps them cook better and absorb flavors. You can use gluten-free pasta or zucchini noodles. Both options are tasty. Spaghetti squash is also a fun choice. These alternatives keep the dish light and healthy. You can skip the wine and use extra lemon juice or broth. These add flavor without alcohol. The lemon gives a bright taste, while broth adds depth. Both work great in this dish. Serve shrimp scampi with a crisp salad or garlic bread. A simple green salad balances the meal. Roasted vegetables also make a good side. They add color and nutrients to your dinner. You can find the Full Recipe for complete instructions and ingredient details. This will guide you step by step to make perfect shrimp scampi pasta. In this post, we covered how to make a delicious shrimp scampi. You learned the key ingredients, cooking steps, tips, and variations. Whether you enjoy spicy or creamy, there are options for everyone. Don't forget to store leftovers properly for later use. Now, you can cook an impressive meal that will impress family and friends. Enjoy experimenting with flavors, and don’t be afraid to make it your own!

Easy Shrimp Scampi Pasta Simple and Quick Meal

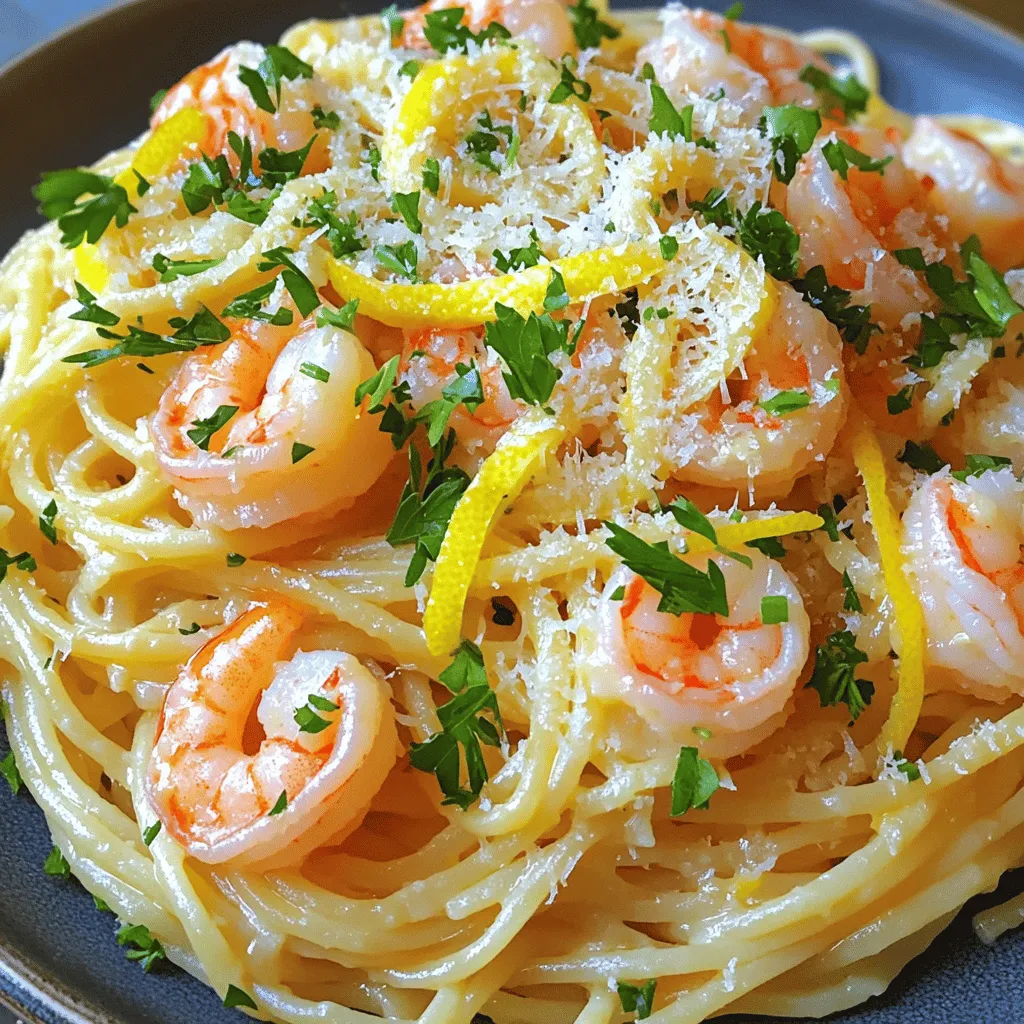
If you’re craving a quick, delicious meal, my Easy Shrimp Scampi Pasta is for you. This dish comes together in

- 8 oz egg noodles (or alternative noodles) - 4 tablespoons sesame oil - 6 cloves garlic, minced - 1 teaspoon red pepper flakes - 2 tablespoons soy sauce - 1 tablespoon vegetarian oyster sauce - 1 tablespoon sriracha - 1 cup mixed bell peppers (julienned) - ½ cup green onions (sliced) - Garnishes: sesame seeds, cilantro These simple ingredients make the spicy garlic noodles shine. The egg noodles serve as a base. You can swap them for rice noodles or spaghetti if you prefer. The sesame oil adds a nutty flavor that brings everything together. Garlic is key here. I use six cloves, minced finely for a strong taste. Red pepper flakes give the dish its spicy kick. Adjust this amount based on your heat preference. The sauce blends soy sauce, vegetarian oyster sauce, and sriracha. This mix offers a perfect balance of salty, sweet, and spicy. The vegetables add color and crunch. I use a mix of bell peppers for a vibrant look. Green onions add freshness and a mild onion taste. For the finishing touch, sprinkle sesame seeds and fresh cilantro on top. These garnishes make your dish not only tasty but also beautiful. You can find the full recipe to enjoy this meal at home. To start, you need to cook the noodles. First, bring a medium pot of salted water to a boil. Make sure it boils vigorously. Then, add 8 oz of egg noodles to the pot. Cook them according to the package instructions. You want them to be al dente. This means they should be firm but not hard. Once cooked, drain the noodles well. Set them aside in a large mixing bowl. Next, prepare the sauce. In a medium mixing bowl, gather your sauce ingredients. You’ll need 2 tablespoons of soy sauce, 1 tablespoon of vegetarian oyster sauce, and 1 tablespoon of sriracha. Whisk these together until well blended. This will help the flavors mix nicely. Set the sauce aside to let the flavors meld while you cook. Now, it’s time to sauté and combine everything. Heat 4 tablespoons of sesame oil in a large skillet over medium heat. Once the oil is hot, add 6 cloves of minced garlic and 1 teaspoon of red pepper flakes. Sauté them for about 1-2 minutes. Keep stirring until the garlic is fragrant and golden. Be careful not to burn it. Next, introduce 1 cup of julienned mixed bell peppers to the skillet. Stir-fry them for 2-3 minutes. You want them soft but still crunchy. Once the peppers are ready, add the drained noodles to the skillet. Pour the prepared sauce over the mixture. Gently toss everything together with tongs or a spatula. Make sure the noodles are well-coated with the sauce. Finally, add in ½ cup of sliced green onions. Give everything a gentle stir to combine. Let it cook for another minute to heat through. The noodles should be warm and full of flavor. Now you're ready to serve! These spicy garlic noodles are not just quick to make, but they’re also full of flavor. Enjoy the process, and don’t forget to check the Full Recipe for all the details! - Achieving the perfect al dente noodles: Start by boiling water in a pot. Make sure it's salty, like the ocean! Add your noodles and cook them for the time listed on the package. Check them a minute early. They should be firm but not hard. This texture makes the noodles great for soaking up sauce. - How to properly sauté garlic: Use medium heat to warm your oil in a pan. When hot, add minced garlic. Stir it constantly for 1-2 minutes. You want it golden, not brown. Burnt garlic tastes bitter. So, watch it closely and enjoy the aroma! - Adjusting spice levels with sriracha: If you like heat, add more sriracha. It’s easy to boost the spice in your dish. Start with one tablespoon. Then taste and add more if you want. This lets you control the heat in your noodles. - Additional sauce options: Want to mix it up? Try adding hoisin sauce or chili garlic sauce. Both bring a new flavor. You can even mix soy sauce with lime juice for a fresh kick. - Serving suggestions for visual appeal: Use deep bowls to serve your noodles. This helps to keep them warm. Sprinkle sesame seeds and cilantro on top. They add color and make the dish look fancy. A wedge of lime on the side adds a pop of color too. - Best dishes for serving: I love using wide, shallow bowls. They allow the toppings to sit nicely on the noodles. You can also place a few extra bell pepper strips on top for added color and crunch. Enjoy making your dish as beautiful as it is delicious! {{image_4}} You can easily add protein to your spicy garlic noodles. Chicken, tofu, or shrimp work great. If you choose chicken, use bite-sized pieces. Sauté them in the sesame oil until cooked through. For tofu, use firm tofu and cube it. Sauté until golden and crispy. Shrimp cooks quickly, so add it to the skillet for just a few minutes until pink. Each option adds a satisfying twist to the dish. To make the dish vegetarian or vegan, swap the oyster sauce. Use mushroom sauce or soy sauce instead. These options give you a similar umami flavor. If you need a gluten-free version, choose gluten-free noodles. Rice noodles or gluten-free pasta work well. This way, everyone can enjoy the dish without dietary concerns. You can change the flavor of your spicy garlic noodles by adding different sauces and spices. Try hoisin sauce or teriyaki for a sweet touch. A splash of fish sauce adds depth, while lime juice brings brightness. For regional twists, add local spices like curry or chili paste. Each change creates a unique dish that reflects your taste. To keep your spicy garlic noodles fresh, store them in an airtight container. Make sure to cool them to room temperature first. This helps to prevent moisture build-up. Place the container in the fridge. They can stay good for about 3 to 4 days. When you want to reheat, use a microwave or a skillet. If using a microwave, add a splash of water to keep them moist. Stir the noodles halfway through to heat evenly. In a skillet, add a little sesame oil and heat over medium. Stir until warmed through. If you want to freeze your noodles, let them cool completely first. Portion them into freezer-safe bags or containers. Remove as much air as possible before sealing. This helps to keep the texture nice. They can last up to 2 months in the freezer. When ready to eat, take them out and thaw in the fridge overnight. For a quicker method, place the bag in cold water for about 30 minutes. Reheat them in a skillet with a little sesame oil to bring back the flavor and texture. For the best quality, eat your spicy garlic noodles within 3 to 4 days if stored in the fridge. If frozen, use them within 2 months. Look for any signs of spoilage like a bad smell or mold. If you see any of these, it’s best to throw them away. Always trust your senses; if it seems off, don’t eat it! Spicy garlic noodles are a quick and tasty dish. They combine soft noodles, garlic, and spicy sauce. You usually find them in Asian cuisine. The key flavors come from garlic, sesame oil, and red pepper flakes. They are savory and have a nice kick. Yes, you can prep these noodles ahead of time. Cook the noodles and store them in the fridge. Make the sauce and keep it separate. When you are ready to eat, heat a pan and add everything. This keeps the noodles fresh and tasty. Spicy garlic noodles pair well with many dishes. Here are some great options: - Grilled chicken or tofu for protein. - Stir-fried vegetables for added crunch. - A simple salad to balance the dish. - Steamed dumplings for a fun side. You can make spicy garlic noodles gluten-free. Use gluten-free noodles, like rice noodles or quinoa noodles. Check the soy sauce label, too. Many brands offer gluten-free versions. This way, you can enjoy the dish without worries. Spicy garlic noodles are flavorful, easy to make, and adaptable. You learned about ingredients, from egg noodles to mixed veggies. I shared tips for cooking and enhancing flavors. We explored yummy variations, plus storage info to keep leftovers fresh. Now, you can cook this dish with confidence. Enjoy experimenting with flavors and make it your own!

Spicy Garlic Noodles Flavorful and Easy Dinner Dish

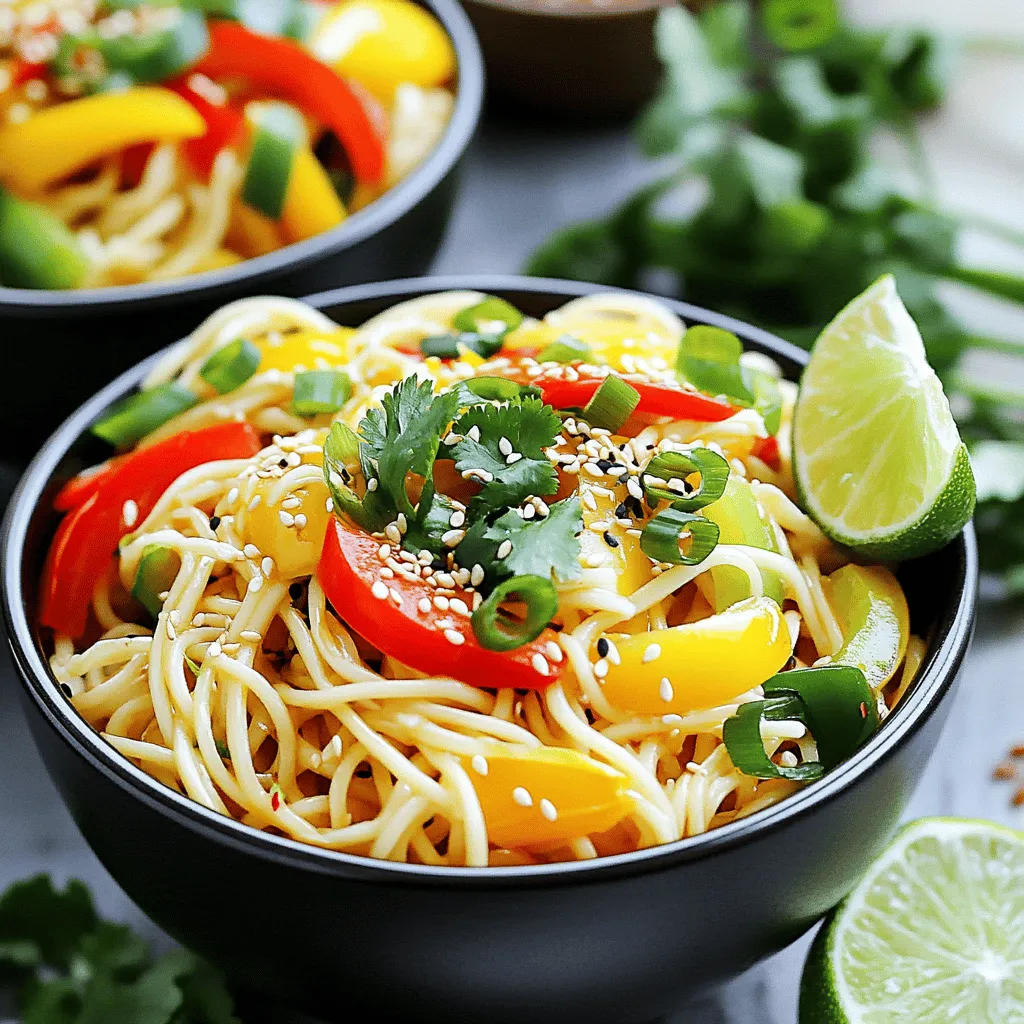
Craving a quick and tasty meal? Let me introduce you to Spicy Garlic Noodles! This dish packs a punch with

To make this dish, you need a few key ingredients: - 4 boneless, skinless chicken breasts - 1 cup broccoli florets, steamed and finely chopped - 1 cup shredded sharp cheddar cheese - 1/2 cup cream cheese, softened to room temperature - 1/4 teaspoon garlic powder - 1/4 teaspoon onion powder - 1/2 teaspoon smoked paprika - Salt and black pepper, to taste - 2 tablespoons extra virgin olive oil These main ingredients bring together great flavors. The broccoli adds nutrients while the cheeses create a creamy, cheesy filling. If you want to enhance the taste, consider adding these: - 1/4 cup panko breadcrumbs (for a crispy topping) - Fresh herbs like parsley or thyme for garnish Using panko gives a nice crunch. Fresh herbs brighten the dish and make it look appealing. You will need some simple tools to cook this meal: - Baking dish - Mixing bowl - Knife - Cutting board - Measuring spoons Having the right tools makes cooking easier. A sharp knife helps you cut the chicken properly, and a good mixing bowl allows for easy blending of the filling. For the full recipe, check the details provided above. Each step helps you create an easy and flavorful meal your family will love! Start by steaming 1 cup of broccoli florets. Once soft, chop them finely. In a large bowl, mix the chopped broccoli with 1 cup of shredded sharp cheddar cheese. Add 1/2 cup of softened cream cheese, 1/4 teaspoon each of garlic powder and onion powder, and 1/2 teaspoon of smoked paprika. Season this mix with salt and black pepper. Stir until it’s creamy and well-blended. This filling packs a punch of flavor. Take 4 boneless, skinless chicken breasts. Carefully slice a pocket into the thickest side of each breast. Be careful not to cut all the way through. Once you have your pockets, fill each one generously with the broccoli and cheese mixture. Use your fingers to press the filling in gently. This will help keep the filling secure while cooking. Preheat your oven to 375°F (190°C). Lightly grease a baking dish with olive oil. Place the stuffed chicken breasts in the dish. Brush the tops with olive oil for moisture. If you like crunch, sprinkle panko breadcrumbs on top. Bake for 30-35 minutes, or until the chicken reaches an internal temperature of 165°F (75°C). Let the chicken rest for 5 minutes after baking. This step helps keep the juices inside. For the full recipe, check out the instructions above. Select boneless, skinless chicken breasts for this dish. Look for breasts that feel firm and are a light pink color. Avoid any that seem slimy or discolored. Fresh chicken should smell clean, not foul. Ask your butcher for the best options if you're unsure. Cook the chicken until it reaches an internal temperature of 165°F (75°C). Use a meat thermometer to check this. Baking it at 375°F (190°C) helps keep it juicy. Letting chicken rest for five minutes after cooking locks in moisture. This ensures each bite is tender and flavorful. If you're short on cheddar cheese, use mozzarella or gouda instead. You can replace cream cheese with Greek yogurt for a lighter option. For a twist, add spinach or bell peppers to the filling. If you want a gluten-free version, skip the panko breadcrumbs entirely. Always adjust seasoning to your taste for the best flavor. For the full recipe, check out the [Full Recipe]. {{image_4}} You can swap out the cheddar cheese for other types. Mozzarella gives a nice stretch. Creamy goat cheese adds a tangy twist. You can also use pepper jack for some heat. Mixing cheeses can create a unique flavor blend. Just be sure to use cheese that melts well. Feel free to add more veggies to the filling. Spinach and bell peppers work great. You can also mix in cooked mushrooms or carrots for extra crunch. If you want more protein, consider adding diced cooked chicken or turkey into the mix. This makes the dish heartier and even more delicious. You can cook this dish in both the air fryer and the oven. Baking gives a classic taste and texture. It takes about 30-35 minutes at 375°F. The air fryer cooks faster, around 25 minutes at 375°F. It also creates a crispy outside without extra oil. Both methods work well, so use whichever you prefer. For the best results, check the chicken's internal temperature. It should reach 165°F to be safe to eat. To store your cheesy broccoli stuffed chicken, let it cool first. Place leftovers in an airtight container. Keep the container in the fridge. It stays good for about three to four days. If you want to keep it longer, consider freezing. Freezing is great for meal prep. Wrap each stuffed chicken breast in plastic wrap. Then place them in a freezer-safe bag. Squeeze out the air to prevent freezer burn. You can freeze the chicken for up to three months. When ready to eat, thaw it in the fridge overnight. Reheating is easy. For best results, use the oven. Preheat the oven to 350°F (175°C). Place the chicken in a baking dish. Cover it with foil to keep it moist. Heat for about 20-25 minutes or until warm. You can also use a microwave if you’re in a hurry. Just heat in short bursts, checking to avoid overcooking. Enjoy your tasty meal again! For the full recipe, be sure to check the details above. You can serve this dish with many sides. Here are some ideas: - Steamed rice or quinoa for a filling base. - A fresh garden salad with light dressing. - Roasted sweet potatoes for a sweet contrast. - Garlic bread to soak up the juices. These sides can balance flavors and add nutrition. To check if the chicken is done, use a meat thermometer. Insert it into the thickest part of the chicken. Cooked chicken should reach 165°F (75°C). If you don't have a thermometer, cut into the chicken. The meat should be white, not pink. Juices should run clear. Yes, you can prepare Cheesy Broccoli Stuffed Chicken in advance. Stuff the chicken breasts and place them in the fridge. This can be done up to 24 hours before cooking. Just remember to cover them well. When ready, bake as directed. This makes dinner easy on busy nights. For healthy sides, consider these options: - Steamed green beans or asparagus for crunch. - A light quinoa salad with veggies for fiber. - Grilled zucchini or bell peppers for color. - A mixed greens salad with vinaigrette for freshness. These sides will make your meal balanced and nutritious. Cheesy broccoli stuffed chicken is a tasty dish with simple steps. We covered the main and optional ingredients, equipment needed, and step-by-step instructions. You learned tips for picking chicken and perfect cooking methods. Explore different cheese options and cooking methods like air frying. Storing and reheating leftovers is easy too. Now, you have all you need to make this dish. Enjoy making your cheesy broccoli stuffed chicken!

Cheesy Broccoli Stuffed Chicken Easy and Flavorful Meal

If you’re looking for a simple yet tasty dish, Cheesy Broccoli Stuffed Chicken is it! This meal combines juicy chicken

To make these delightful brownies, you'll need: - 1 cup unsalted butter - 1 cup granulated sugar - 1/2 cup packed brown sugar - 4 large eggs - 1 teaspoon vanilla extract - 1 cup all-purpose flour - 1/2 cup unsweetened cocoa powder - 1/2 teaspoon salt - 1/2 teaspoon baking powder - 1 cup chocolate hazelnut spread - 1/2 cup chopped hazelnuts (optional) You can add chopped hazelnuts for extra crunch. If you want a nut-free version, simply leave them out. If you're out of unsalted butter, use equal parts margarine or coconut oil. For sugar, you can swap granulated sugar with coconut sugar for a different taste. If you need a gluten-free option, use almond flour instead of all-purpose flour. Remember, the chocolate hazelnut spread is key to the flavor. If you want to try a twist, you can substitute it with almond butter or peanut butter, but the taste will change. For the full recipe, check out the detailed instructions that follow. To start, preheat your oven to 350°F (175°C). Next, prepare your 9x13-inch baking pan. Grease it lightly and line it with parchment paper. Let the paper hang over the edges for easy lifting later. This step makes serving the brownies a breeze. Next, melt 1 cup of unsalted butter in a medium saucepan over low heat. Once melted, take it off the heat. Stir in 1 cup of granulated sugar and 1/2 cup of packed brown sugar. Mix until smooth. Add 4 large eggs to the butter-sugar mix, one at a time. Make sure to mix well after each egg. Then, stir in 1 teaspoon of vanilla extract. This adds flavor! In another bowl, whisk together 1 cup of all-purpose flour, 1/2 cup of unsweetened cocoa powder, 1/2 teaspoon of salt, and 1/2 teaspoon of baking powder. This step helps to aerate the dry ingredients. Now, fold the dry mix into the wet mix slowly. Gently combine them to avoid tough brownies. It's important not to overmix here. Then, fold in 1 cup of chocolate hazelnut spread until it's well mixed. For a little crunch, add 1/2 cup of chopped hazelnuts if you want. Reserve some for the top, if you like. Pour the brownie batter into your prepared pan. Use a spatula to smooth it evenly. Bake your brownies in the preheated oven for 25 to 30 minutes. To check if they are done, insert a toothpick into the center. It should come out with a few moist crumbs. Once baked, let the brownies cool in the pan for about 10 minutes. Then, use the edges of the parchment paper to lift them out. Transfer them to a wire rack to cool completely. Wait until they are cool before slicing into squares. You can find the full recipe for these delicious brownies above. Enjoy your baking! To get the perfect brownie texture, you want a fudgy center. Use the right oven temperature. Preheating to 350°F (175°C) is key. Check your brownies at 25 minutes. A toothpick should show a few moist crumbs, not wet batter. This way, they won't come out dry. For uniform baking, spread the batter evenly. Use a spatula to smooth the top. Make sure your baking pan is the right size. A 9x13-inch pan works best for this recipe. Rotate the pan halfway through baking to help them bake evenly. To ensure rich flavor development, use high-quality chocolate hazelnut spread. The better the spread, the more flavor your brownies will have. Mixing in the brown sugar adds a deep sweetness. Also, folding in hazelnuts gives a nice crunch. For a creative serving idea, place brownies on a rustic wooden board. Dust them lightly with powdered sugar. This adds a nice touch. You can also serve them with a scoop of vanilla ice cream. This makes the treat even more special. To enhance the visual appeal, sprinkle chopped hazelnuts on top. You can also add a drizzle of chocolate sauce. This makes the brownies look fancy and inviting. Pairing suggestions include serving with fresh berries. They add a nice tartness that balances the sweetness. Another option is to enjoy brownies with a cup of coffee or tea. The flavors complement each other well. {{image_4}} You can play with flavors in these brownies. If you want a nutty twist, try using different nuts. Walnuts or pecans can add great texture and taste. You can also swap the chocolate hazelnut spread with other spreads, like almond butter or peanut butter. Each choice gives a unique flavor. Adding extracts can enhance the taste, too. A dash of almond or hazelnut extract can bring out the best in your brownies. If you need gluten-free brownies, use a gluten-free flour blend instead of all-purpose flour. This simple swap keeps the treat tasty. For vegan brownies, replace the eggs with flax eggs or applesauce. You can also use coconut oil in place of butter. If you're cutting sugar, use a sugar substitute that measures cup for cup. These changes allow everyone to enjoy these brownies! To keep your chocolate hazelnut spread brownies fresh, store them in an airtight container. This helps keep moisture in and prevents them from drying out. If you use a glass container, it works great too. You can place parchment paper between layers to avoid sticking. For the best taste, enjoy them within four days. If you want to store them longer, freezing is a good option. Wrap each brownie in plastic wrap, then place them in a freezer-safe bag. This keeps them fresh for up to three months. Just remember to label the bag with the date. When you want to enjoy your brownies again, reheating is simple. The best method is to use the oven. Preheat it to 350°F (175°C). Place the brownies on a baking sheet and cover them with foil. Bake for about 10 minutes. This method keeps them moist and warm. You can also use a microwave. Place a brownie on a microwave-safe plate and cover it with a damp paper towel. Heat it for about 10-15 seconds. Check to see if it’s warm enough, but don’t overdo it. This can dry them out. Enjoy your delicious brownies warm and gooey! Can I substitute ingredients in this recipe? Yes, you can! You can swap unsalted butter for coconut oil. If you need a dairy-free option, use a plant-based butter. You can also use maple syrup or honey instead of granulated sugar. Remember, these changes can affect taste and texture, so keep that in mind. How can I fix dry brownies? If your brownies turn out dry, you can add a bit of moisture. Try adding a splash of milk or a tablespoon of melted butter. You can also serve them warm with ice cream or whipped cream to add moisture and flavor. What is the best way to cut brownies for perfect squares? To cut brownies neatly, use a sharp knife. First, make one cut down the center of the pan. Then make cuts across to form squares. For easy cutting, wipe the knife with a damp cloth between cuts. This keeps the edges clean and neat. How long do homemade brownies last? Homemade brownies can last for about 3 to 5 days when stored in an airtight container at room temperature. If you want them to last longer, consider refrigerating them. They can stay fresh for up to a week in the fridge. What should I do if I don't have a baking pan? If you lack a baking pan, you can use a cast-iron skillet or a baking sheet. Just adjust the baking time since a different pan may change how the heat circulates. Keep an eye on your brownies as they bake! Can I make this recipe ahead of time? Absolutely! You can make the batter a day in advance. Just cover it and store it in the fridge. When you're ready to bake, let it sit at room temperature for about 20 minutes before pouring it into the pan. For the full recipe, check out the details above! This blog post covered everything you need for perfect brownies. We discussed key ingredients, precise preparation steps, and tips for baking success. You learned about variations for flavor and accommodations for different diets. Storing and reheating methods will keep your brownies fresh and tasty. Remember, baking is fun and creative. Don’t hesitate to try new twists. Happy baking!

Chocolate Hazelnut Spread Brownies Delightfully Simple

Are you ready to whip up a treat that everyone loves? These Chocolate Hazelnut Spread Brownies are easy to make

- 1 pound Brussels sprouts, trimmed and halved - 3 tablespoons extra virgin olive oil - 1/4 cup pure maple syrup - 2 tablespoons balsamic vinegar - 1 teaspoon Dijon mustard - 2 cloves garlic, finely minced - 1/2 teaspoon salt - 1/4 teaspoon freshly ground black pepper - 1/4 teaspoon red pepper flakes (optional) - 1/4 cup pecans, roughly chopped - Fresh parsley, finely chopped Using fresh and quality ingredients makes a big difference in flavor. Brussels sprouts are a great choice. They have a natural sweetness that pairs well with maple syrup. The olive oil adds richness, while balsamic vinegar gives a tangy twist. For the seasonings, Dijon mustard adds depth. Garlic brings a lovely aroma and enhances the dish. Salt and pepper balance the flavors. Red pepper flakes can kick up the heat if you like a little spice. Finally, the garnish of pecans gives a nice crunch. Fresh parsley adds color and freshness. Together, these ingredients create a dish that is not only tasty but also beautiful. Try this full recipe for a delightful experience! - Preheat your oven to 400°F (200°C). - Trim and halve the Brussels sprouts. Getting your oven hot is key. A hot oven helps the Brussels sprouts roast well. Trimming the sprouts makes them cook evenly. Halving them allows the glaze to seep in. - Toss Brussels sprouts with olive oil, salt, black pepper, and optional red pepper flakes. - Spread in a single layer on a baking sheet and roast for 20-25 minutes. Coating the sprouts in olive oil helps them brown. Salt and pepper add flavor. If you like heat, add red pepper flakes. Spread them out on the baking sheet so they don’t steam. Roasting them for 20 to 25 minutes gives a nice crispy finish. - Combine maple syrup, balsamic vinegar, Dijon mustard, and minced garlic in a saucepan. - Simmer and thicken the glaze for about 5 minutes. For the glaze, mix maple syrup, balsamic vinegar, Dijon mustard, and minced garlic. This combo adds sweet and tangy flavors. Simmer it for about 5 minutes to thicken. The warm glaze adds a delicious touch to the sprouts. Once you have the roasted Brussels sprouts, drizzle the warm maple glaze over them. Toss gently to coat every piece. For the full recipe, check the details above. To get the right glaze, aim for a syrupy texture. Start by mixing the maple syrup, balsamic vinegar, Dijon mustard, and garlic in a saucepan. Heat it gently. Stir until it simmers. This step is key. Let it simmer for about five minutes. The glaze will thicken as it cooks. When it comes to garnishing, pecans add crunch. Fresh parsley brings color. Both make the dish pop visually. Sprinkle them on top right before serving. This gives your dish a beautiful finish. Look for Brussels sprouts that are bright green. They should feel firm and heavy. Avoid any that are yellow or wilted. Fresh sprouts taste better and roast nicely. Store Brussels sprouts in the fridge. Keep them in a loose bag or container. They stay fresh for up to a week. Do not wash them until you're ready to cook. This keeps them crisp. Toss Brussels sprouts halfway through roasting. This helps them brown evenly. You want crispy edges and tender centers. It’s an important step for the best flavor. If you don’t want to roast, try sautéing. Use a pan and some oil. Cook them on medium heat for about ten minutes. This method gives you a different but tasty result. You can still use the maple glaze for flavor. {{image_4}} You can make maple glazed Brussels sprouts even tastier. Try adding pancetta or bacon. Both bring a savory depth to the dish. The salty, crispy bits contrast with the sweet glaze. This mix creates a balance that everyone will love. You can also add nuts or seeds for extra crunch. Pecans are great, but walnuts or sunflower seeds work well too. Just sprinkle them on top after roasting. They will add a nice texture and flavor boost. If you want a different sweet taste, use honey or agave syrup instead of maple syrup. Honey gives a floral note. Agave syrup is mild and smooth. Both options can create a unique twist on the classic flavor. To keep this dish vegan-friendly, stick to the maple syrup for sweetness. Avoid any animal products like bacon or butter. You can use a plant-based oil, like olive oil, for roasting. This way, you keep all the deliciousness while being kind to the planet. For the full recipe, check out the Maple Glazed Brussels Sprouts Delight section. To keep your maple glazed Brussels sprouts fresh, follow these steps. Allow them to cool down to room temperature. Place them in an airtight container. Store the container in your fridge. They will stay fresh for about three to four days. When you are ready to eat them, check the sprouts for any signs of spoilage. Reheating maple glazed Brussels sprouts can be easy. I recommend using a skillet for the best taste. Heat a bit of olive oil over medium heat. Add the sprouts and stir them gently. Cook for about five to seven minutes until they get warm. You can also use a microwave. Place the sprouts in a microwave-safe bowl. Heat them in short bursts of 30 seconds, stirring in between, until hot. This way, they keep their texture and flavor. Can you freeze maple glazed Brussels sprouts? Yes, you can! Start by letting them cool completely. Next, spread them in a single layer on a baking sheet. Freeze them for about one hour. Once frozen, transfer the sprouts to a freezer-safe bag. Remove as much air as possible before sealing. They will last for up to three months. When ready to eat, thaw them in the fridge overnight before reheating. Follow the reheating guidelines for the best results. For the full recipe, check out the Maple Glazed Brussels Sprouts Delight. How can I make maple glazed Brussels sprouts ahead of time? You can prepare the Brussels sprouts by cutting and seasoning them in advance. Store the seasoned sprouts in the fridge for up to one day. When ready, roast them as directed. For the glaze, you can make it a day ahead too. Just warm it before serving. What do I serve with maple glazed Brussels sprouts? These Brussels sprouts pair well with a variety of dishes. Try serving them with roasted chicken or pork. They also complement quinoa or rice nicely. For a vegetarian option, serve them with a hearty grain salad. Can I use frozen Brussels sprouts for this recipe? Yes, you can use frozen Brussels sprouts. However, they may not be as crispy. Make sure to thaw and drain them first. Toss them with olive oil and seasonings, then roast them longer to achieve a nice texture. What is the caloric content of maple glazed Brussels sprouts? A serving of maple glazed Brussels sprouts has about 150 calories. This includes the calories from the olive oil and maple syrup. Keep in mind that portion sizes can change the total calories. Are Brussels sprouts healthy? Yes, Brussels sprouts are very healthy! They are low in calories and high in fiber. They also contain vitamins C and K, along with antioxidants. Eating them can help support your immune system and overall health. What should I do if my Brussels sprouts are not crispy? If your Brussels sprouts are not crispy, check a few things. First, ensure you spread them out on the baking sheet. They need space to roast. If they are crowded, they will steam instead of roast. Also, make sure to toss them halfway through cooking for even crispiness. You can roast them longer if needed. Maple glazed Brussels sprouts are simple and tasty. You start with fresh sprouts, olive oil, and make a sweet glaze. Roasting adds flavor, and proper storage keeps leftovers fresh. You can add fun variations, like nuts or different sweeteners. Enjoy this dish as a side or main by cooking with care. These tips will help you create a delicious meal everyone will love. Embrace your cooking skills and impress your family and friends with this recipe!

Maple Glazed Brussels Sprouts Perfectly Roasted Delight

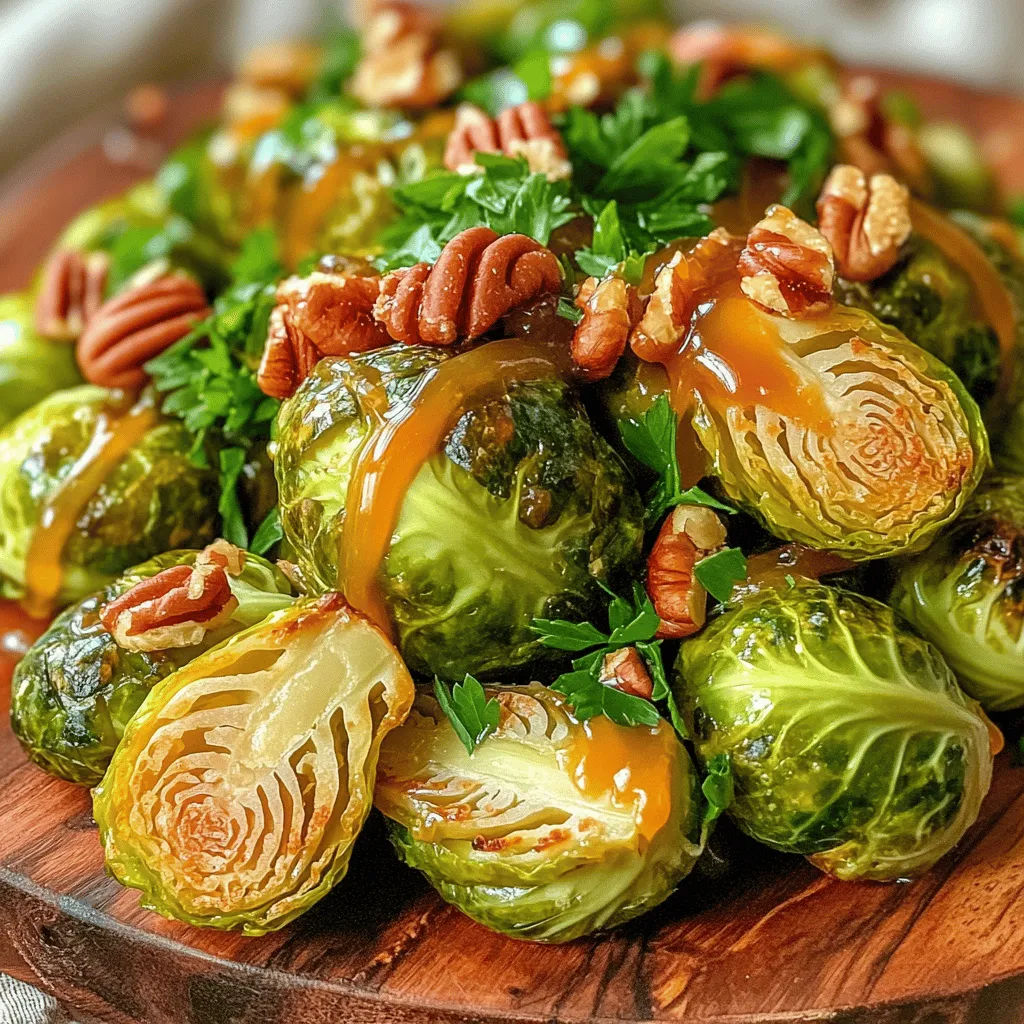
Are you ready to transform Brussels sprouts into a delightful dish? This Maple Glazed Brussels Sprouts recipe delivers perfectly roasted

To make creamy sun-dried tomato pasta, gather these simple ingredients: - 8 oz (225g) pasta of your choice (fettuccine or penne are excellent options) - 1 cup sun-dried tomatoes, packed in oil, drained and finely chopped - 1/2 cup heavy cream or coconut cream (for a dairy-free twist) - 1/4 cup grated parmesan cheese (optional; or use nutritional yeast for a vegan alternative) - 3 cloves garlic, minced - 1/4 cup fresh basil, finely chopped - 1 tablespoon olive oil - Salt and freshly cracked pepper to taste - Crushed red pepper flakes (optional, for a spicy kick) - 1/4 cup baby spinach (optional, for an extra boost of greens) When measuring your ingredients, use dry measuring cups for solids. For liquids, use a liquid measuring cup. This way, you get the right amounts every time. If you don’t have a scale, remember that 1 cup of dry pasta typically weighs about 4 oz. This can help you adjust your recipe if you want to make a bigger batch. You can easily adapt this recipe for different diets. For a vegan option, replace heavy cream with coconut cream and parmesan with nutritional yeast. If you want it gluten-free, swap regular pasta for gluten-free pasta. You can also leave out the cheese for a lighter dish. These changes keep the flavor while meeting your needs. Enjoy this creamy sun-dried tomato pasta with these tasty alternatives! Start by boiling a large pot of salted water. Once the water bubbles, add your pasta. Cook it according to the package directions until it’s al dente. This usually takes about 8 to 10 minutes. After that, drain the pasta but save half a cup of water. Set the pasta aside while you make your sauce. In a big skillet, heat olive oil over medium heat. Add minced garlic and cook for about a minute until it smells great. Then, stir in the chopped sun-dried tomatoes. Let them cook for 2 to 3 minutes to bring out their flavors. Now, lower the heat and slowly pour in the heavy cream. Stir until it’s mixed well. If you’re using parmesan cheese, add it now and mix until it melts. Season with salt and pepper. If you like it spicy, toss in some crushed red pepper flakes. Add the drained pasta to the skillet and toss it in the creamy sauce. If the sauce is too thick, add a bit of the reserved pasta water until it’s just right. Now, fold in the fresh basil and baby spinach, if you chose to use it. Stir until the spinach wilts. Taste the sauce and adjust the seasoning if needed. Your pasta dish is now ready to serve! For the full recipe, check out the complete instructions above. To make the best pasta, start with lots of water. Use about 4 to 6 quarts for each pound of pasta. This helps the pasta cook evenly. Add a good amount of salt to the water. It should taste like the sea. For perfect texture, cook until al dente, which means firm to the bite. You can boost the flavor in many ways. Add more garlic for a stronger taste. Toss in some crushed red pepper flakes if you like spice. Fresh herbs like parsley or oregano can brighten the dish. For a tangy twist, squeeze fresh lemon juice over the pasta before serving. You can also mix in cooked chicken, shrimp, or even roasted veggies for extra nutrition. A beautiful plate makes your food more appealing. Serve the creamy sun-dried tomato pasta in a large, inviting bowl. Garnish with fresh basil leaves on top. A sprinkle of parmesan cheese adds a nice touch. Drizzle a little olive oil to enhance the look and flavor. Pair it with crusty bread for a delightful meal. For the full recipe, check out the Creamy Sun-Dried Tomato Pasta Delight. {{image_4}} You can easily make this dish vegetarian or vegan. To keep it vegetarian, use heavy cream and parmesan cheese. For a vegan twist, replace heavy cream with coconut cream. Nutritional yeast works great as a parmesan substitute. This way, you still get rich flavor without dairy. You can also add more veggies like zucchini or bell peppers for extra taste and nutrition. Want to add protein? Chicken and shrimp are great choices. For chicken, use cooked, diced pieces. Sauté them with garlic before adding sun-dried tomatoes. For shrimp, cook them in the skillet until pink, then mix them in. Both options add richness and make the dish more filling. If you need gluten-free pasta, there are many options. Look for pasta made with rice, quinoa, or lentils. These types cook well and hold the sauce nicely. Many brands offer great tastes and textures that mimic traditional pasta. Just follow the package directions for cooking time. To store leftovers, let the pasta cool first. Place it in an airtight container. Make sure you seal it well to keep it fresh. Store the container in the fridge. The pasta will stay good for up to three days. When you want to reheat, take the pasta out of the fridge. You can use a microwave or a skillet. If using a microwave, add a splash of water or cream to keep it moist. Heat for 1-2 minutes, stirring halfway through. For a skillet, warm it over low heat, adding a little water if needed. Stir until heated through. You can freeze this dish for later. First, cool the pasta completely. Then, place it in a freezer-safe container. Seal it tightly to avoid freezer burn. It can last up to three months in the freezer. To thaw, move it to the fridge overnight before reheating. This way, you can enjoy creamy sun-dried tomato pasta anytime! For the full recipe, check the section above. You can use coconut cream for a dairy-free option. This gives a rich taste. Whole milk or half-and-half also works if you want a lighter version. For a nutty flavor, try cashew cream. Each option changes the dish's vibe a bit, so choose what you like best. Yes, you can use fresh tomatoes. However, the flavor will differ. Sun-dried tomatoes add a deep, sweet taste that fresh tomatoes lack. If you use fresh, chop them finely and sauté them longer to develop the flavor. You might want to add a bit of tomato paste for extra richness. To add heat, sprinkle in crushed red pepper flakes. Start with a small amount and taste as you go. You can also add diced jalapeños or a dash of hot sauce. For a smoky twist, try a pinch of smoked paprika. Adjust to your spice level! Absolutely! This dish stores well in the fridge for a few days. Just keep the pasta and sauce separate to avoid sogginess. When ready to eat, reheat gently on the stove or in the microwave. It’ll taste almost as good as fresh! For the full recipe, check out the recipe section above. We covered the key ingredients and step-by-step instructions for a creamy pasta dish. You learned tips for perfect cooking and ways to adapt the recipe for dietary needs. I shared storage methods to keep leftovers fresh. Remember, cooking should be fun and creative. Use the tips provided to make this dish your own. Enjoy experimenting with flavors and ingredients. Happy cooking!

Creamy Sun-Dried Tomato Pasta Easy and Quick Meal

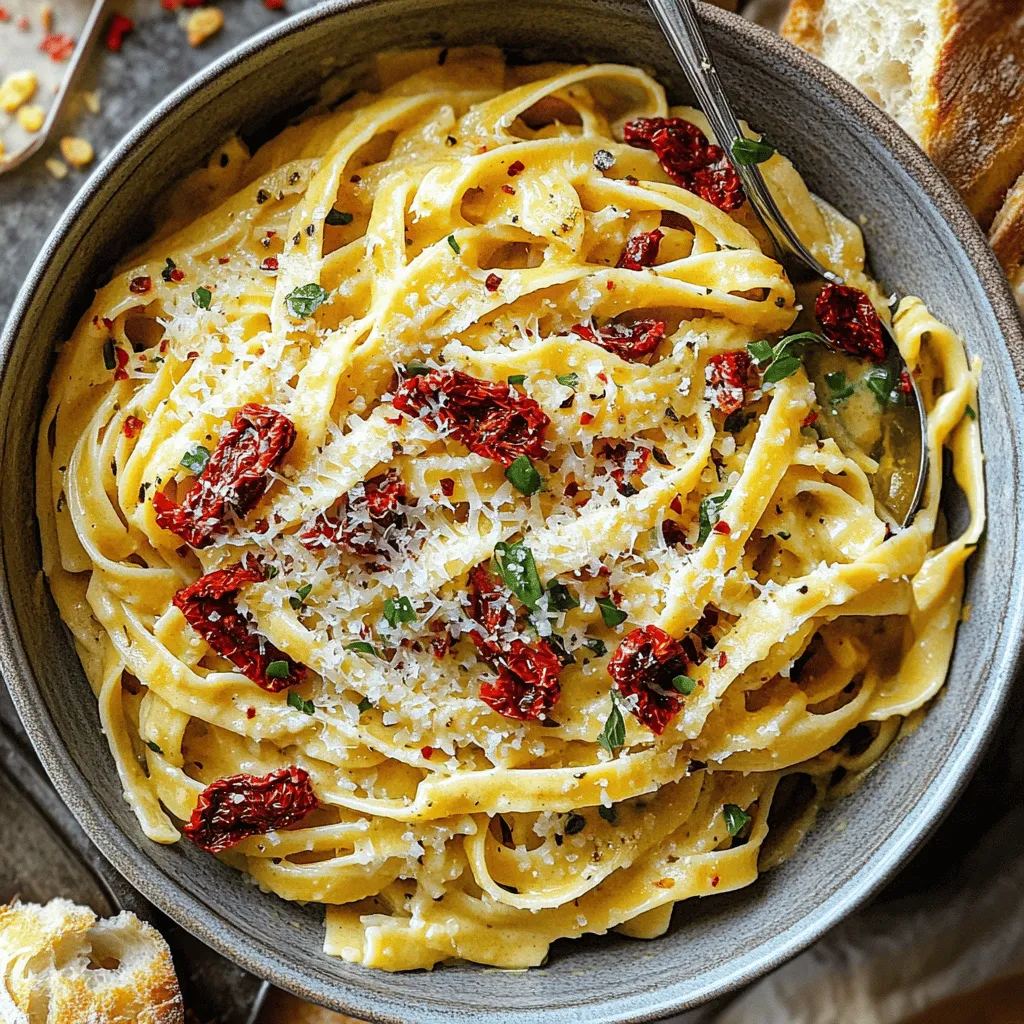
Looking for a quick and tasty meal? You’re in the right place! This Creamy Sun-Dried Tomato Pasta is not just

Older posts
Newer posts
← Previous Page1 … Page16 Page17 Page18 … Page60 Next →

dsad

© 2025 eataroundit • Built with GeneratePress

Our Policies

  • Copyright Policy
  • Cookie Policy
  • GDPR Policy
  • Privacy Policy
  • Disclaimer
  • Terms Of Use

More Information

  • Home
  • About
  • Contact
  • Appetizers
  • Dessert
  • Dinner
  • Drinks
©2025, eataroundit About Back To Top