Skip to content
DisclaimerTerms Of UseGDPR PolicyCookie Policy

eataroundit

  • Home
  • Drinks
  • Appetizers
  • Dinner
  • Dessert
  • About
  • Contact
  • Privacy Policy
DisclaimerTerms Of UseGDPR PolicyCookie Policy

Hannah

To make this tasty Chocolate Chip Zucchini Bread, you need these key ingredients: - 2 cups grated zucchini (from about 1 large zucchini, squeezed to remove excess moisture) - 1 cup all-purpose flour - 1 cup whole wheat flour - 1 teaspoon baking soda - 1 teaspoon baking powder - 1/2 teaspoon salt - 1 teaspoon ground cinnamon - 1/4 teaspoon ground nutmeg (optional for extra warmth) - 1/2 cup granulated sugar - 1/2 cup packed brown sugar - 1/2 cup vegetable oil (or melted coconut oil for a hint of coconut flavor) - 3 large eggs, at room temperature - 1 teaspoon pure vanilla extract - 1 cup semi-sweet chocolate chips - 1/2 cup chopped walnuts or pecans (optional for added crunch) These simple ingredients create a moist and rich bread that everyone loves. The zucchini adds moisture and keeps the bread soft. The chocolate chips bring sweetness and a fun crunch. You can make this bread even better with some optional add-ins: - Chopped nuts: Walnuts or pecans add a nice crunch. - Spices: A pinch of ginger or cardamom can add unique flavors. - Dried fruits: Raisins or cranberries bring extra sweetness and chew. - Coconut flakes: Shredded coconut adds a tropical twist. Feel free to mix and match these add-ins. Each choice adds a new layer of taste that makes this bread special. To make this delicious bread, you will need some basic kitchen tools: - A large mixing bowl - A whisk for mixing dry ingredients - A spatula for folding in the batter - A 9x5 inch loaf pan - A toothpick for testing doneness - Parchment paper (optional, for easy removal) Having the right tools helps you create the perfect loaf. With these items, you can easily whip up a delightful Chocolate Chip Zucchini Bread. For the complete process, check out the Full Recipe. Start by preheating your oven to 350°F (175°C). This step is key to baking. While the oven heats, prepare your 9x5 inch loaf pan. You can grease it with butter or oil. If you prefer, line it with parchment paper. This makes it easier to remove the bread later. In a large bowl, combine the grated zucchini with the vegetable oil. Add in the granulated sugar and brown sugar. Next, crack in the eggs and pour in the vanilla extract. Mix these wet ingredients well. You want everything to blend until it looks smooth. In a separate bowl, whisk together the all-purpose flour, whole wheat flour, and baking soda. Add baking powder, salt, cinnamon, and nutmeg if you like. This step ensures even flavor and rise in your bread. Now, gradually add the dry mixture to the wet ingredients. Use a spatula to stir gently. Mix just until combined; some lumps are okay. Avoid overmixing, as this can make the bread dense. Carefully fold in the chocolate chips and optional nuts. Pour the batter into your prepared loaf pan. Smooth the top with a spatula for even baking. Place the pan in the oven and bake for 50-60 minutes. Check doneness by inserting a toothpick into the center. It should come out clean or with a few crumbs. Once baked, let the bread cool in the pan for about 10 minutes. Then, transfer it to a wire rack to cool completely before slicing. Enjoy your rich and moist chocolate chip zucchini bread! For the full recipe, refer to the recipe section. To get the best flavor, start with fresh zucchini. Grate it using a box grater. Place the grated zucchini in a clean kitchen towel. Twist the towel to squeeze out excess moisture. Aim for about one cup of dry zucchini. This step helps avoid a soggy loaf, so don't skip it. Mixing is key to great texture. First, combine wet ingredients in one bowl. In another bowl, mix the dry ingredients. When combining both, stir gently. Stop mixing once you see no dry flour. A few lumps are okay. Overmixing can lead to dense bread, which we want to avoid. Before baking, make sure your oven is preheated to 350°F (175°C). Grease your loaf pan or use parchment paper. Pour the batter in and smooth the top with a spatula. Bake for 50 to 60 minutes. To check for doneness, insert a toothpick into the center. It should come out clean or with just a few crumbs. This helps ensure that your zucchini bread turns out soft and fluffy. For the full recipe, refer to the instructions above. {{image_4}} You can change the nuts in your zucchini bread for fun. Walnuts bring a nice crunch. Pecans add a sweet, buttery taste. You can also skip nuts entirely if you prefer. For the chocolate, use dark chocolate chips for a richer flavor. Or try white chocolate chips for a sweet twist. Mixing different chocolates can make each slice unique and exciting. If you need a gluten-free option, use a gluten-free flour blend. Many blends work well in baking. You can also try almond flour or oat flour as a base. Just make sure to add a binder, like xanthan gum, to help the bread hold together. This way, you can enjoy the same moist and rich taste without the gluten. Want to add more flavor? Try mixing in fruits like bananas or apples. They can make your bread even sweeter and moister. You can also add grated carrots for an extra veggie boost. Just remember to squeeze out any extra liquid from these ingredients to keep the texture right. With these additions, each loaf can be a new adventure in taste! For the full recipe, check out the section above. To store leftover zucchini bread, cool it completely first. Wrap it tightly in plastic wrap or foil. This keeps it moist. You can also place it in an airtight container. Store it at room temperature for up to three days. For longer freshness, keep it in the fridge for about a week. Freezing is a great option for saving zucchini bread. Once it cools, slice it first. Wrap each slice in plastic wrap. Then, put the wrapped slices in a freezer bag. Make sure to remove excess air. You can freeze the bread for up to three months. When ready, thaw it overnight in the fridge. Reheating zucchini bread is simple. For the best taste, use the oven. Preheat it to 350°F (175°C). Place slices on a baking sheet. Heat for about 10 minutes, or until warm. You can also microwave it for 15-20 seconds. Enjoy your rich and moist chocolate chip zucchini bread again! For the full recipe, check out the steps above. You can make this bread healthier by using whole wheat flour instead of all-purpose flour. You can also cut the sugar by using less granulated and brown sugar. Try replacing some oil with unsweetened applesauce for moisture. Adding nuts increases healthy fats and protein. You can also use dark chocolate chips, as they have less sugar. Yes, you can substitute eggs in this recipe. Use 1/4 cup of unsweetened applesauce per egg. You can also use flaxseed meal mixed with water. To do this, combine 1 tablespoon of flaxseed meal with 2.5 tablespoons of water and let it sit for five minutes. This will help bind the ingredients. If your zucchini bread is too dense, you may have overmixed the batter. Mix just until combined. Make sure to squeeze out excess moisture from the grated zucchini. You can also add a bit more baking powder to help it rise better. Finally, check your oven's temperature. An oven that runs too cool can lead to dense bread. Chocolate chip zucchini bread lasts about 3 to 4 days at room temperature. Store it in an airtight container. If you want it to last longer, you can refrigerate it for up to a week. You can try many fun variations with this bread. Swap in different nuts like pecans or almonds for added crunch. Use a mix of chocolate chips, like white and dark chocolate, for a twist. You can even add spices like ginger or cardamom for a warm flavor. For added moisture, consider mixing in mashed bananas or applesauce. For the full recipe, check out the previous sections. In this article, we covered how to make delicious chocolate chip zucchini bread. We looked at key ingredients, step-by-step instructions, tips for perfecting your bread, tasty variations, and how to store leftovers. Zucchini bread is fun to bake and easy to enjoy. You can change it up with nuts, fruits, or even gluten-free options. With these tips, you’ll create a treat that’s moist and flavorful each time. Happy baking!

Chocolate Chip Zucchini Bread Rich and Moist Delight

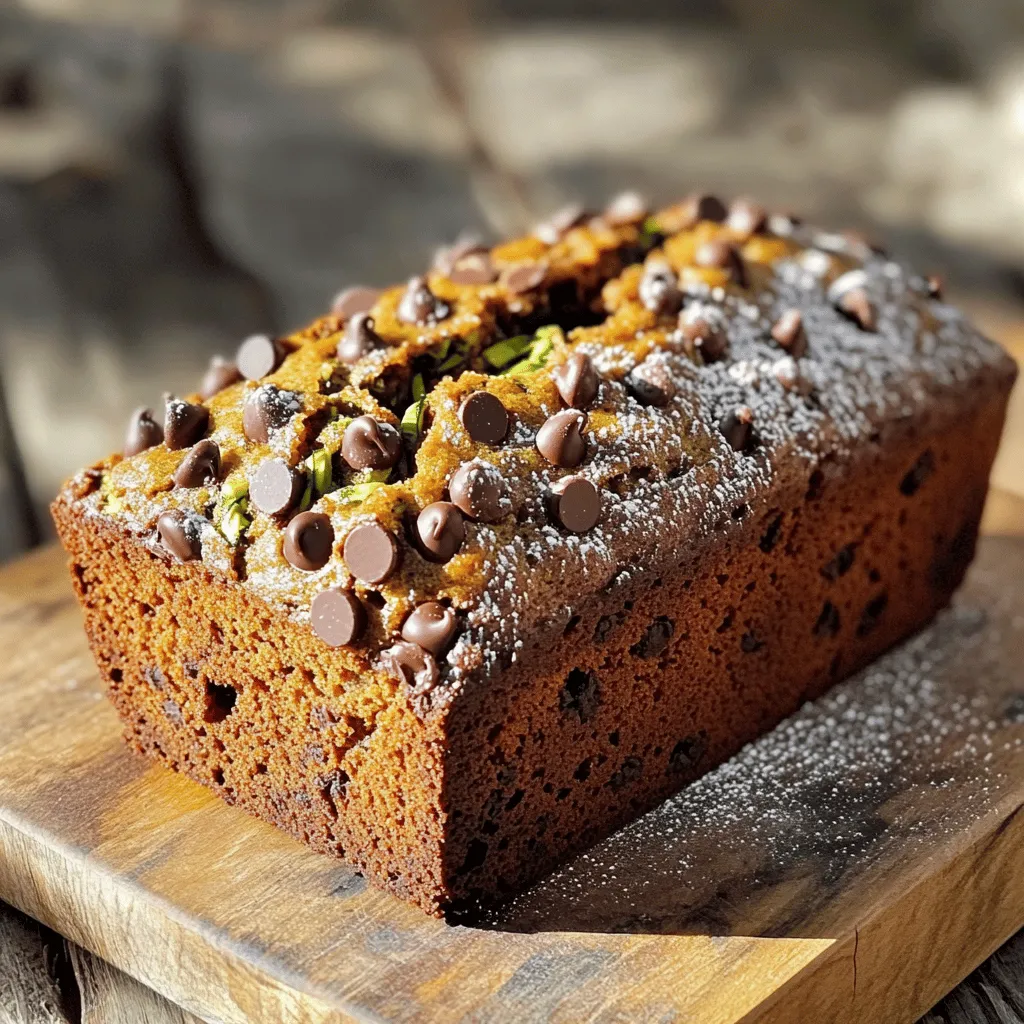
If you’re looking for a tasty twist on a classic, you must try my Chocolate Chip Zucchini Bread! This rich

To make these vegan stuffed bell peppers, you will need: - 4 large bell peppers (choose a variety of colors for visual appeal) - 1 cup quinoa, thoroughly rinsed - 2 cups vegetable broth - 1 can (15 oz) black beans, well rinsed and drained - 1 cup corn (use fresh or frozen, depending on availability) - 1 cup diced tomatoes (either canned or fresh) - 1 small red onion, finely chopped - 2 cloves garlic, minced - 1 teaspoon ground cumin - 1 teaspoon smoked paprika - 1/2 teaspoon chili powder - 1/2 teaspoon sea salt - 1/4 teaspoon freshly ground black pepper - 1/4 cup fresh cilantro, chopped - Juice of 1 lime - 1 avocado, sliced (for serving) You can add vegan cheese to the recipe. This cheese gives the peppers a creamy texture. It melts nicely on top, adding flavor and richness. If you love cheese, don't skip this step! You can swap out some ingredients if needed. For quinoa, use brown rice or couscous. Black beans can be replaced with chickpeas or lentils. If you don’t have corn, consider using diced zucchini or mushrooms. These swaps keep the dish tasty and enjoyable. Always feel free to experiment! Start by preheating your oven to 375°F (190°C). Take four large bell peppers and cut off their tops. Remove the seeds and membranes gently. This way, they stay whole and look great. Place the peppers upright in a baking dish. This helps catch any flavors that drip down during cooking. In a medium saucepan, combine one cup of rinsed quinoa with two cups of vegetable broth. Bring the mixture to a boil over high heat. Once it boils, reduce the heat to low. Cover the pan and let it simmer for about 15 minutes. The quinoa will absorb all the broth. When it's done, fluff it with a fork and let it cool a bit. While the quinoa is cooking, heat a large skillet over medium heat. Add one small, finely chopped red onion and two minced garlic cloves. Sauté for about three to four minutes. The onion should turn soft and fragrant. Next, add one can of rinsed black beans, one cup of corn, and one cup of diced tomatoes to the skillet. Then stir in one teaspoon of ground cumin, one teaspoon of smoked paprika, half a teaspoon of chili powder, sea salt, and black pepper. Cook for another five minutes. This allows all the flavors to mix. Now, fold the cooked quinoa into the filling mixture. Add a quarter cup of chopped fresh cilantro and the juice of one lime. Mix this well. Then, take the filling and spoon it into each bell pepper. Pack it in firmly for a nice, hearty bite. If you like, sprinkle some vegan cheese on top. To bake, pour a little water into the bottom of the dish. Cover it tightly with foil and bake for 30 minutes. After that, remove the foil and bake for another 10 to 15 minutes. The peppers should be tender and a bit blistered. Let them cool for a few minutes before serving. Top each stuffed pepper with slices of avocado for a creamy finish. For more details, check out the Full Recipe. When making vegan stuffed bell peppers, the cooking method is key. I suggest using the oven for even cooking. Preheat your oven to 375°F. Baking allows the peppers to become tender while keeping the filling warm and flavorful. Cover the dish with foil to trap steam. This helps cook the peppers evenly. After half the bake time, remove the foil to brown the tops. To boost flavor, use fresh herbs like cilantro or parsley. Add lime juice for a bright finish. You can also mix in spices like cumin and smoked paprika. These spices give a warm, smoky taste that makes the dish pop. For a little kick, add chili powder. If you like more depth, try sautéing the garlic and onion until golden. A great-looking dish makes a meal even better. Arrange the stuffed peppers on a colorful plate. Surround them with fresh cilantro for a pop of green. Serve lime wedges on the side for extra zest. For a gourmet touch, add slices of avocado on top. This adds creaminess and looks appealing too. Each detail can turn your meal into a feast for the eyes! {{image_4}} You can add many ingredients to your stuffed peppers. Try brown rice or lentils as a base. Both add fiber and protein. You can also use couscous or farro for a different texture. Adding nuts, like walnuts or pine nuts, gives a nice crunch. For a creamy touch, consider vegan cream cheese or cashew cheese. Switching up your veggies can make this dish even better. You can use zucchini, mushrooms, or spinach. These add great flavor and nutrition. Chopped carrots or celery can bring extra crunch. If you want a savory twist, add olives or sun-dried tomatoes. Feel free to mix and match to find your favorite combo. For those who love heat, spice things up! Add chopped jalapeños or a pinch of cayenne. You can use spicy salsa instead of diced tomatoes for added flavor. A dash of hot sauce in the filling can also kick it up a notch. Just remember, balance the heat with creamy avocado or a dollop of vegan sour cream. This way, every bite is full of flavor and excitement. For more details on these ideas, check out the Full Recipe. To store leftover vegan stuffed bell peppers, let them cool down first. Place the cooled peppers in an airtight container. They will stay fresh in the fridge for about 3 to 4 days. If you want to enjoy them later, this is a good way to keep them tasty. When you are ready to eat the leftovers, there are simple ways to reheat them. You can use the microwave for quick heating. Place one stuffed pepper on a microwave-safe plate, cover it with a damp paper towel, and heat for about 2 to 3 minutes. If you prefer the oven, preheat it to 350°F (175°C). Bake the peppers for about 15 to 20 minutes until they are warm throughout. This helps keep the flavors intact. If you want to store the stuffed peppers for longer, freezing is a great option. Wrap each pepper tightly in plastic wrap or foil. Place them in a freezer-safe bag or container. They can last up to 3 months in the freezer. When ready to eat, thaw them overnight in the fridge. Then, reheat as described above. This method makes it easy to enjoy a delicious meal anytime. Yes, you can prepare Vegan Stuffed Bell Peppers in advance. Stuff the peppers and keep them in the fridge for up to two days before baking. This makes meal prep easy. You can also freeze them. Wrap each pepper tightly in plastic wrap and place them in a freezer bag. When ready, bake them straight from the freezer. Just add a bit of time to the cooking process. If you want to swap quinoa, you have options. Rice, couscous, or lentils work well. Brown rice adds a nutty flavor. Couscous cooks fast and is light. Lentils are packed with protein and fiber. Choose what you like best. Each will give your dish a unique twist. You can tell the peppers are done when they are tender. The skin should look slightly blistered and soft. You can pierce them with a fork easily. The filling should be hot and steaming. If you see the peppers change color, it’s a good sign they are ready. Yes, you can cook these peppers on the stovetop. Use a large skillet with a lid. After stuffing, place the peppers upright in the skillet. Add a bit of water to create steam. Cover the skillet and cook on low heat for about 30 minutes. This method works great, and you still get a tasty meal! You learned how to make delicious vegan stuffed bell peppers. We covered the key ingredients, tips, and different variations. This dish is easy to store and reheat, making it perfect for meal prep. Remember, you can swap ingredients based on your taste. Don’t be afraid to experiment with flavors and textures. Making vegan stuffed bell peppers can be fun and rewarding. Enjoy your creation and share it with others!

Vegan Stuffed Bell Peppers Savory and Easy Recipe

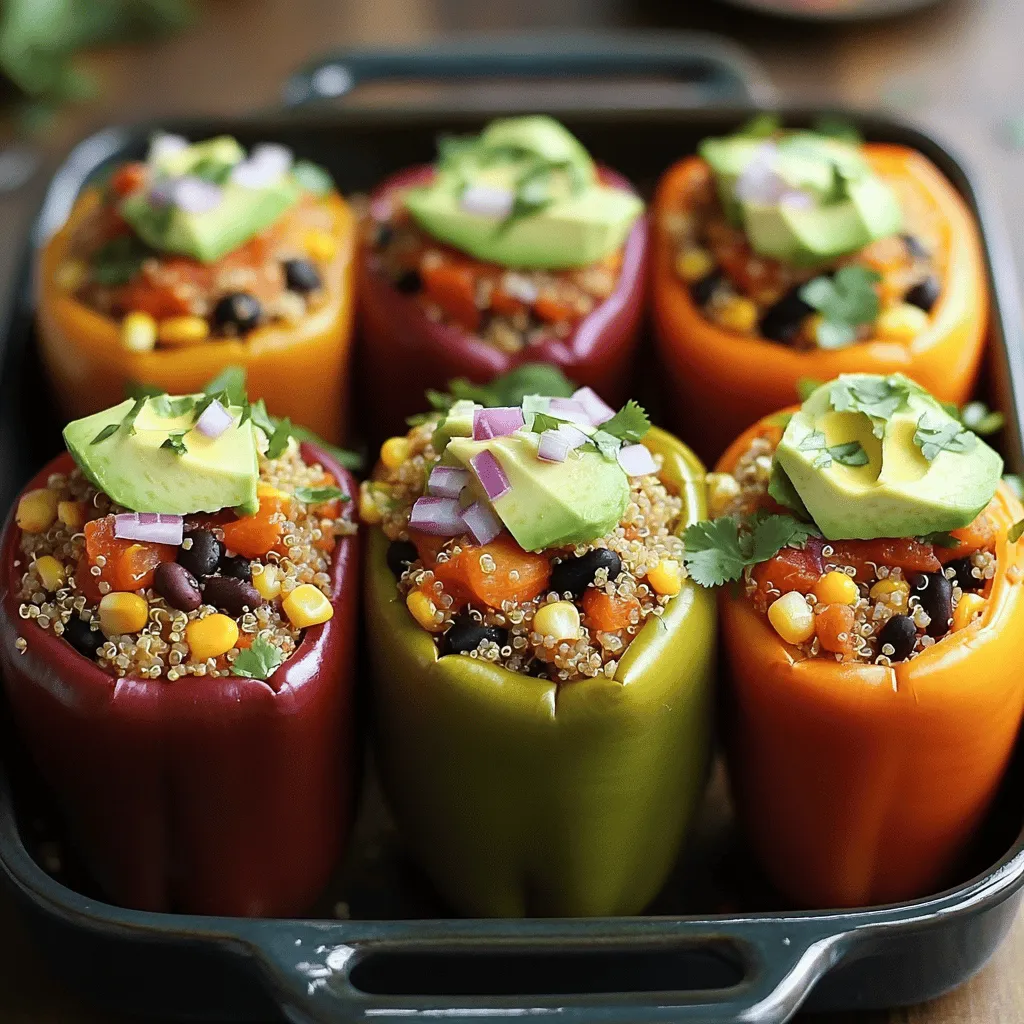
Looking for a tasty and easy dinner idea? Vegan stuffed bell peppers are your answer! This recipe packs colorful, fresh

- 4 boneless, skinless chicken breasts - 2 ripe mangos, diced into small cubes - 1 red bell pepper, diced finely - 1/2 red onion, finely chopped - 1 jalapeño, deseeded and minced for heat - 1/4 cup fresh cilantro, chopped for garnish - 2 tablespoons freshly squeezed lime juice - 1 tablespoon extra virgin olive oil - 1 teaspoon ground cumin for depth of flavor - Salt and black pepper to taste - Ground cumin, salt, and black pepper - Olive oil and lime juice - Fresh cilantro and lime wedges When I think about ingredients for mango salsa chicken, I feel excited. The fresh flavors make this dish shine. You need ripe mangos. They add sweetness and bright color. Choose firm, yellow mangos for the best taste. For the salsa, I mix in red bell pepper. It gives crunch and a sweet taste. The red onion adds a nice bite. If you love heat, use jalapeño. Just remove the seeds. It makes the salsa spicy but not too hot. I season the chicken with ground cumin, salt, and black pepper. These spices boost the flavor of the chicken. Olive oil keeps it moist on the grill. Lime juice adds a zesty twist, pulling all the flavors together. Garnish the dish with fresh cilantro. It adds a pop of green. Lime wedges offer a fresh squeeze right before eating. This makes each bite bright and fresh. You can find the full recipe at the end. Enjoy your cooking! - Preheat the grill: Start by heating your grill or grill pan to medium-high. This will ensure that the chicken cooks evenly and gets those nice grill marks. - Prepare the mango salsa: In a bowl, combine diced mangos, red bell pepper, red onion, jalapeño, cilantro, and lime juice. Mix well and set aside. This salsa will bring fresh, bright flavors to your dish. - Season the chicken breasts: Take your chicken breasts and coat them with olive oil. Sprinkle ground cumin, salt, and black pepper on both sides. Make sure to rub the spices in well for great flavor. - Grill the chicken to perfection: Place the chicken on the hot grill. Cook for about 6-7 minutes on each side, or until the chicken reaches 165°F. You want it juicy and cooked through. - Let the chicken rest before serving: Once cooked, take the chicken off the grill and let it rest for about 5 minutes. This helps the juices stay inside the meat, making it tender. - Top the chicken with mango salsa: Serve the chicken on a plate and spoon the salsa on top. The sweet and spicy salsa pairs perfectly with the savory chicken. This dish will impress anyone you serve it to! Check the [Full Recipe] for more details. To grill chicken well, start by preheating your grill. Set it to medium-high heat. This heat helps create nice grill marks and sears the meat. A hot grill also seals in the juices. Aim for an internal temperature of 165°F (75°C) for safety. Use a meat thermometer to check this. It ensures your chicken is cooked and safe to eat. Mango salsa shines with fresh flavors. You can add other ingredients like diced pineapple or chopped avocado. This adds more depth and sweetness. If you enjoy heat, add minced jalapeño. Adjust the spice level based on your taste. Remove the seeds for less heat or keep them for more kick. Serving is key to making your dish look great. Place the grilled chicken on a large platter. Spoon the mango salsa generously over each piece. For a colorful touch, add extra chopped cilantro on top. Lime wedges on the side allow guests to add a fresh squeeze. This makes each bite even better. For the best look, arrange everything neatly, and enjoy your vibrant meal! {{image_4}} You can switch the chicken for shrimp or fish. Shrimp cooks quickly and takes on flavor well. Just marinate them in lime juice, salt, and cumin for a bit. Fish like tilapia or mahi-mahi works great too. Grill or pan-sear the fish until it's flaky and tender. The salsa pairs nicely with these proteins, adding a fresh taste. While mango is the star, you can try other fruits. Pineapple adds a sweet and tangy twist. Peaches or nectarines provide a juicy, summer flavor. Dice them up just like the mango. Mix them with the same salsa ingredients. This keeps the dish bright and colorful while adding new tastes. You don’t have to grill the chicken. Baking is an easy option too. Set your oven to 375°F (190°C). Bake for about 25-30 minutes until the chicken is cooked through. You can also sauté the chicken in a pan. Use medium heat and cook for about 6-7 minutes on each side. Both methods keep the chicken juicy and allow the flavors to shine. For the full recipe, check out the detailed steps. To keep your mango salsa chicken fresh, store it in an airtight container. Place the chicken and salsa in separate containers. This helps maintain the chicken's texture and the salsa's flavor. Make sure to refrigerate them within two hours of cooking. Properly stored, the chicken lasts up to four days. The salsa stays good for about three days. When you're ready to enjoy your leftovers, reheat the chicken gently. The best method is to use the oven. Preheat it to 350°F (175°C). Place the chicken on a baking sheet and cover it with foil. Heat for about 15 minutes or until it's warm throughout. For the salsa, you can warm it in the microwave for 30 seconds. Stir it well before serving to bring back its fresh taste. Yes, you can freeze mango salsa chicken! To do this, let the chicken cool completely. Wrap each piece tightly in plastic wrap, then place them in a freezer bag. Remove as much air as possible before sealing. For the salsa, freeze it in a separate container. It can last up to three months in the freezer. When you're ready to use, thaw in the fridge overnight before reheating. Enjoy the flavors of mango salsa chicken anytime! You can find the full recipe here. The cooking time for Mango Salsa Chicken is about 30 minutes. You should grill the chicken for 6-7 minutes per side. Always check that it reaches an internal temperature of 165°F (75°C) for safe eating. This ensures the chicken is juicy and cooked through. Yes, you can make the mango salsa ahead of time. Just mix all the salsa ingredients, then cover and chill in the fridge. It tastes even better after sitting for a few hours. This allows the flavors to blend nicely. A few sides go well with Mango Salsa Chicken. Here are some great options: - Rice: Coconut rice or jasmine rice adds a nice touch. - Salad: A fresh green salad with lime dressing works well. - Beans: Black beans or refried beans are tasty choices. - Grilled Veggies: Zucchini or corn on the cob adds color and flavor. These sides balance the sweet and spicy notes of the dish, making your meal complete. For the full recipe, check out [Full Recipe]. You now have a complete guide for making delicious Mango Salsa Chicken. Start with fresh ingredients and keep grilling tips in mind. Season your chicken well and serve it topped with vibrant mango salsa. Feel free to experiment with proteins and fruits to find your favorite twist. Remember to store leftovers properly for future meals. With these steps, you'll create a dish that's not only tasty but enjoyable to share. Get ready to impress with this colorful recipe!

Mango Salsa Chicken Flavorful and Simple Dish

Are you ready to spice up your dinner routine? Mango Salsa Chicken is a simple yet delicious meal that bursts

To make Classic Chicken Cacciatore, gather these key ingredients: - 4 chicken thighs, bone-in and skin-on - 2 tablespoons extra virgin olive oil - 1 large onion, finely diced - 2 cloves garlic, minced - 1 bell pepper (red or yellow), sliced into strips - 1 medium zucchini, sliced into half-moons - 1 cup fresh mushrooms, sliced - 1 can (14 oz) crushed tomatoes (preferably San Marzano) - 1 cup low-sodium chicken broth - 1 teaspoon dried oregano - 1 teaspoon dried basil - Salt and freshly cracked black pepper to taste - Fresh parsley, finely chopped (for garnish) - Al dente spaghetti or crusty bread (for serving) These ingredients bring out rich flavors in the dish. The chicken thighs keep the meat juicy and tender. The veggies add color and texture. You can enhance the dish with these optional ingredients: - 1/2 cup red wine for depth - 1 tablespoon capers for extra tang - A pinch of red pepper flakes for heat Adding these will give your meal a unique twist. The wine adds a rich taste, while capers provide a nice saltiness. If you need alternatives, here are some ideas: - Use chicken breasts instead of thighs for a leaner option. - Swap zucchini for bell peppers or eggplant for more variety. - Use vegetable broth instead of chicken broth for a vegetarian choice. These substitutions can fit your diet or preferences. Don't be afraid to mix and match ingredients to make this dish your own. For the full recipe, check out the details above. Start by gathering all your ingredients. This will make your cooking easier. You need chicken thighs, olive oil, onion, garlic, bell pepper, zucchini, mushrooms, crushed tomatoes, chicken broth, oregano, basil, salt, and pepper. Chop the onion, garlic, bell pepper, zucchini, and mushrooms. Set them aside. Next, heat the olive oil in a large skillet or a Dutch oven. Make sure the oil is hot before adding the chicken. This helps to sear the skin and adds flavor. Place the chicken thighs in the skillet skin-side down. Sear for 5 to 7 minutes until the skin turns golden brown. Flip the chicken and cook for another 5 minutes. Once done, take them out and set them aside. In the same skillet, add the diced onion. Sauté it for about 3 minutes until it becomes soft and clear. Then, add the minced garlic and cook for another minute. The garlic should smell great. Now, toss in the bell pepper, zucchini, and mushrooms. Sauté these for 5 minutes until they soften. Next, pour in the crushed tomatoes and chicken broth. Stir in the oregano, basil, salt, and pepper. Let this mixture simmer gently. Return the seared chicken thighs to the skillet. Nestle them into the sauce. Cover the skillet and reduce the heat. Let it simmer for 30 to 35 minutes. This step will make the chicken tender and juicy. To get the best flavor, taste the sauce after it simmers. If you want a thicker sauce, uncover the skillet and let it simmer for an extra 10 minutes. It helps the sauce reduce. When serving, place the chicken cacciatore over al dente spaghetti. You can also serve it with crusty bread for dipping. For a bright touch, garnish with chopped parsley. This adds color and freshness to the dish. Remember, the key is to enjoy every bite! For more details, check the Full Recipe. When making chicken cacciatore, you want to avoid a few common missteps. First, do not skip browning the chicken. This step adds rich flavor. If you rush it, the chicken may taste bland. Next, watch your heat. Cooking too fast can dry out the chicken. A gentle simmer helps keep it juicy. Lastly, don’t forget to taste the sauce. Adjust the seasoning to make it shine. To boost the taste of your chicken cacciatore, use high-quality ingredients. Fresh herbs like basil and parsley make a big difference. Opt for San Marzano tomatoes for their natural sweetness. Add a splash of red wine to your sauce for depth. If you like a little heat, toss in red pepper flakes. Letting the dish sit for a while before serving allows the flavors to meld beautifully. For serving, use al dente spaghetti or crusty bread to soak up the sauce. Both options are crowd-pleasers. You can also pair this dish with a fresh salad for balance. A simple arugula salad with lemon dressing works well. For drinks, a light red wine, like Pinot Noir, complements the flavors nicely. For the full recipe, check out the Rustic Chicken Cacciatore section. {{image_4}} If you want a meat-free version of this dish, try using hearty veggies. Replace chicken with a mix of mushrooms, eggplant, and bell peppers. These ingredients give great flavor and texture. You can also add chickpeas for protein. Cook the veggies just like the chicken. Sauté them until soft, then add the sauce. This way, you keep the classic taste while making it vegetarian. To spice things up, add red pepper flakes or fresh chili peppers. Use about 1 teaspoon of red pepper flakes for a mild heat. For more kick, chop 1-2 small fresh chilies and mix them in. You can also add a splash of hot sauce at the end. This gives a nice layer of heat without losing the dish's essence. Pair this with a cool side salad to balance the spice. Using a slow cooker or instant pot can save time. For a slow cooker, brown the chicken first, then add all other ingredients. Cook on low for 6-8 hours or high for 4 hours. For the instant pot, sauté the chicken and veggies, then add the sauce. Seal the lid and cook on high for 10 minutes. Always let the steam release naturally for best results. This method keeps the chicken tender and juicy while infusing all flavors. For full details on making this dish, check the Full Recipe. After enjoying your meal, let the chicken cacciatore cool. Place it in an airtight container. Make sure the lid seals tight to keep out air. Store the container in the fridge. It will stay good for about three to four days. Label the container with the date. This helps you track how long it has been stored. For the best results, reheat your chicken cacciatore on the stove. Pour it into a saucepan over medium heat. Stir it often to heat evenly. This helps the chicken stay juicy. You can also use the microwave if you're in a hurry. Place it in a microwave-safe dish. Cover it with a paper towel to avoid splatters. Heat in short bursts of one minute. Stir in between until warm. If you want to save your cacciatore for later, freezing is a great option. Use a freezer-safe container or heavy-duty freezer bag. Make sure to remove as much air as possible. Label it with the date. It can last up to three months in the freezer. When ready to eat, thaw it in the fridge overnight. Reheat it on the stove for the best flavor. Enjoy your tasty meal again! Classic Chicken Cacciatore is an Italian dish. It means "hunter's chicken." This dish features juicy chicken cooked with fresh vegetables and a rich tomato sauce. The sauce includes onion, garlic, bell pepper, and herbs like basil and oregano. Together, these flavors create a warm, hearty meal. This dish is perfect for family dinners and gatherings. Yes, you can use chicken breasts instead of thighs. However, chicken thighs add more flavor and stay moist during cooking. If you choose breasts, be careful not to overcook them. They can dry out quickly. For the best results, adjust the cooking time to ensure they remain tender. Making Classic Chicken Cacciatore gluten-free is easy. The main ingredients are naturally gluten-free. Just ensure the chicken broth and any canned tomatoes you use are gluten-free. Serve the dish with gluten-free pasta or rice. You can also enjoy it with crusty gluten-free bread. This way, everyone can enjoy the delicious flavors. Classic Chicken Cacciatore is a flavorful dish packed with essential ingredients and optional add-ins. You learned preparation steps and cooking methods to achieve great texture and taste. Avoid common mistakes and use tips to elevate your meal. Try variations like vegetarian or spicy versions to mix things up. Store your leftovers properly, and reheating is easy with the right methods. Chicken Cacciatore offers many ways to enjoy a delicious meal at home. Start cooking now, and enjoy a dish loved by many!

Classic Chicken Cacciatore Flavorful Family Dinner

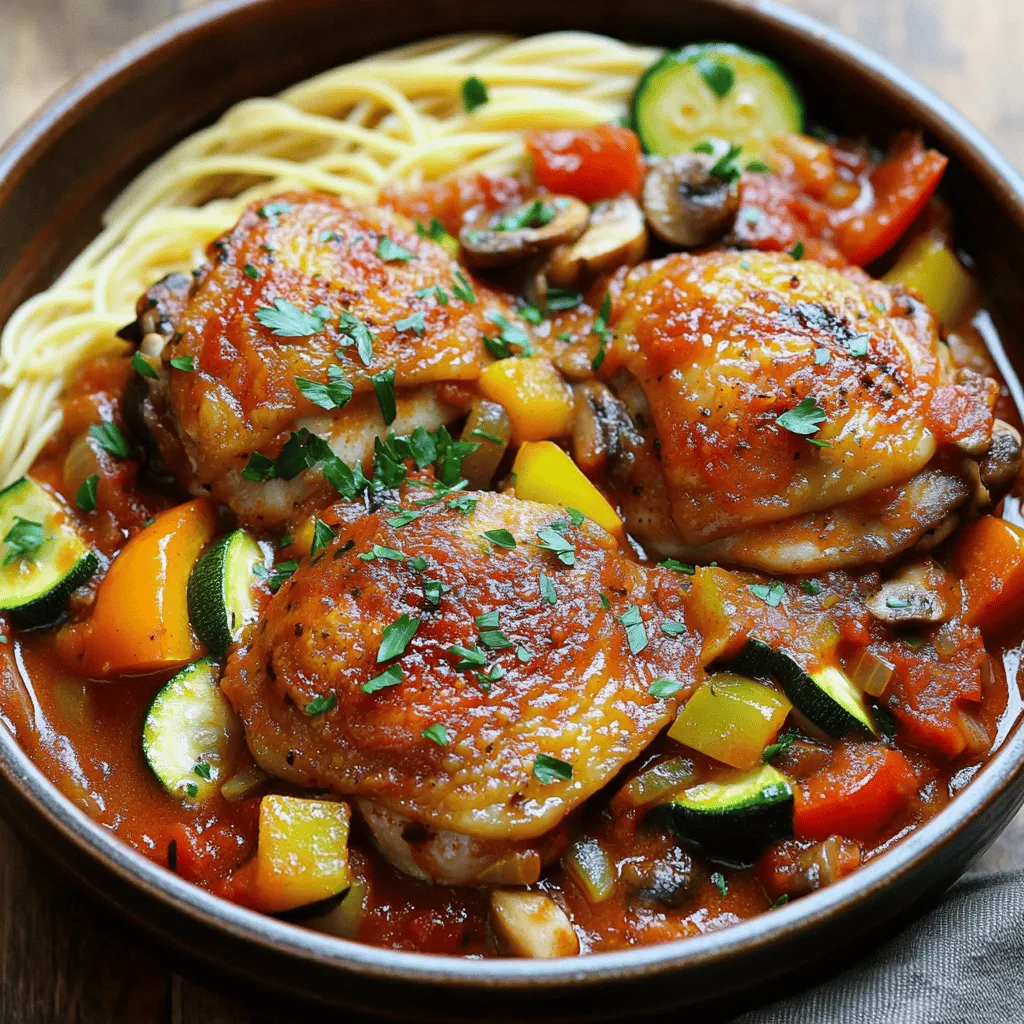
Looking for a delicious family dinner? You’ve come to the right place! Classic Chicken Cacciatore brings rich flavors and warmth

The joy of making No-Bake Cookie Dough Bites starts with gathering the right ingredients. Each one plays a key role in flavor and texture. Here’s what you need: - 1 cup almond flour - ½ cup creamy peanut butter (or nut-free alternative) - ¼ cup pure maple syrup - 1 teaspoon pure vanilla extract - ½ cup mini chocolate chips - ¼ teaspoon fine sea salt - ¼ cup chopped nuts (optional) Almond flour offers a nutty taste and a great base. Peanut butter adds creaminess and richness. Maple syrup gives natural sweetness, while vanilla enhances the flavor. Mini chocolate chips add a delightful texture and taste. Sea salt balances the sweetness, and nuts add crunch if you like. Using these simple ingredients makes this recipe easy and fun. You can substitute peanut butter with sunflower seed butter for a nut-free option. Have fun experimenting with your favorite flavors! For the full recipe, you can refer to the provided details. Enjoy the process! 1. Mix almond flour and nut butter Start by placing 1 cup of almond flour in a large mixing bowl. Add ½ cup of creamy peanut butter or almond butter. Both options work well. 2. Add maple syrup and vanilla extract Pour in ¼ cup of pure maple syrup and 1 teaspoon of pure vanilla extract. Stir these ingredients together until you have a smooth dough. 3. Fold in chocolate chips and sea salt Gently fold in ½ cup of mini chocolate chips and ¼ teaspoon of fine sea salt. For added crunch, include ¼ cup of chopped nuts if you like. 4. Knead and roll into bite-sized balls Knead the mixture lightly with your hands. Then, scoop out tablespoon-sized portions. Roll each portion into a small ball. 5. Chill before serving Place the cookie dough bites on a parchment-lined baking sheet. Space them apart, and refrigerate for at least 30 minutes. This helps them firm up. - How to present cookie dough bites Serve your cookie dough bites on a nice plate. Scatter extra chocolate chips and nuts on top for a pretty touch. Drizzle melted chocolate over them for an extra treat. - Recommended pairings and drinks These bites pair well with milk or a cup of coffee. You can also serve them with fresh fruit for a balanced snack. To get the best texture for your no-bake cookie dough bites, you want a smooth mix. Start with room-temperature peanut butter. This makes it easier to blend with the almond flour. If your mix is too thick, add a little maple syrup. When kneading the dough, use clean hands for the best control. Lightly press the dough together, but don’t overdo it. You want to combine the ingredients without making the dough tough. One common mistake is overmixing the dough. This can make the bites dry and hard. Mix just until everything is combined. Another mistake is using the wrong ingredients. Always use pure maple syrup, not pancake syrup. Pancake syrup can change the taste and texture. You can change the flavor of your cookie dough bites easily. Try using cashew butter instead of peanut butter for a different taste. Adding flavors can also enhance your bites. A pinch of cinnamon or a splash of almond extract brings new life to the dough. You can also swap chocolate chips for dried fruit or coconut flakes for added texture. For the full recipe, check out the details above. {{image_4}} You can easily change the taste of your cookie dough bites. Using different nut butters can create new flavors. Try cashew butter or sunflower seed butter for a twist. Each nut butter brings its unique taste and richness. Mix-ins and toppings can also change the game. You can add shredded coconut, dried fruit, or even spices. A pinch of cinnamon or a dash of sea salt can make your bites pop. If you like crunch, add chopped pretzels or crushed graham crackers. The options are endless! If you follow a vegan diet, swap out the maple syrup for agave nectar. Use a plant-based butter if you want a creamier texture. These bites can be gluten-free too! Simply use certified gluten-free oats or flour. For those with nut allergies, I recommend using sunbutter or soy nut butter. These options keep the bites nut-free without losing flavor. You can still enjoy the joy of cookie dough without worry. To keep your no-bake cookie dough bites fresh, store them in an airtight container. Use a glass container or a plastic one with a tight lid. This helps prevent them from drying out. You can also layer the bites with parchment paper. This keeps them from sticking together. Always make sure they are completely cool before storing. If you store the bites in the refrigerator, they last about a week. You can also freeze them for longer storage. In the freezer, they stay good for about three months. Just remember to thaw them in the fridge before eating. The cookie dough bites taste best chilled, fresh, and ready to enjoy! For the full recipe, check out the previous sections. Can I freeze cookie dough bites? Yes, you can freeze cookie dough bites. Place them in a single layer in a freezer-safe bag. They will stay fresh for about three months. When you want to enjoy them, let them thaw in the fridge for a few hours. How long does it take for cookie dough bites to firm up? It takes about 30 minutes for cookie dough bites to firm up in the fridge. This chilling time helps them hold their shape and enhances the flavors. Caloric content per serving Each serving of cookie dough bites has about 100 calories. This can vary based on the ingredients you choose. Health benefits of the ingredients used - Almond flour is low in carbs and high in healthy fats. - Peanut butter offers protein and healthy fats. - Maple syrup provides natural sweetness with some nutrients. - Chocolate chips add a bit of joy, and dark chocolate has antioxidants. These ingredients make cookie dough bites a tasty treat that can fit into a balanced diet. In this blog post, we covered how to make delicious cookie dough bites. We listed the simple ingredients and provided clear steps for preparation. I shared tips to ensure your bites come out just right and offered ways to personalize them. We also discussed storage methods for freshness and answered common questions. Remember, these bites are easy to customize and perfect for anyone! Enjoy making your own versions.

No-Bake Cookie Dough Bites Simple and Delicious Treat

If you love delicious snacks but want to skip the oven, you’re in the right place! I’m excited to share

- 2 medium zucchinis, thinly sliced - 2 tablespoons extra virgin olive oil - 1 teaspoon garlic powder - 1 teaspoon onion powder - 1 teaspoon smoked or sweet paprika - Salt and freshly ground black pepper to taste - Optional: 2 tablespoons freshly grated Parmesan cheese - Mandoline slicer (recommended for uniform slices) - Large mixing bowl - Air fryer - Wire rack or plate for cooling The main star of this recipe is the zucchini. Choose firm and fresh zucchinis for the best flavor. The olive oil adds richness and helps the spices stick. Garlic powder gives a nice kick, while onion powder adds depth. Paprika brings a smoky or sweet note, depending on your choice. Salt and pepper enhance all these flavors. For tools, a mandoline slicer is great for even slices. This helps the zucchini cook evenly. A large mixing bowl allows for easy tossing of the zucchini with oil and spices. An air fryer makes these chips crispy without deep frying. Lastly, a wire rack or plate lets them cool down and stay crunchy. If you want to add more flavor, sprinkle some Parmesan cheese right after cooking. It melts beautifully into the warm chips, making them even more delicious. Start by washing the zucchinis under cool water. Make sure to rinse off any dirt. Next, slice them into rounds. Aim for about 1/8 inch thick slices. This thickness helps them cook evenly and become crispy. A mandoline slicer works best for uniform slices. Now, it's time to add flavor. In a large mixing bowl, combine the sliced zucchinis with extra virgin olive oil. Add garlic powder, onion powder, paprika, salt, and black pepper. Toss everything together gently. Make sure every slice gets coated with oil and spices. This step is key to tasty chips. Preheat your air fryer to 375°F (190°C). This takes about five minutes. Once ready, place the seasoned zucchini slices in a single layer in the air fryer basket. Avoid overcrowding; it helps them crisp up. Cook for 10-12 minutes. Remember to shake the basket halfway through. This ensures even cooking and a golden brown color. Enjoy the satisfying crunch of your zucchini chips! To get the best crunch from your zucchini chips, avoid overcrowding the air fryer basket. If you stack too many slices, they won't cook evenly. Instead, place them in a single layer. This way, each chip gets hot air all around. Another great tip is to shake the basket halfway through cooking. This helps the chips turn over and fry evenly for that perfect golden color. For a fun twist, serve your zucchini chips with marinara sauce for dipping. The sweet and tangy sauce pairs well with the chips' crunch. You can also garnish them with fresh basil or parsley. This adds color and a burst of flavor. A simple garnish makes your dish look even more appealing. You can easily boost the flavor of your zucchini chips. Right after cooking, consider adding freshly grated Parmesan cheese. It melts slightly and adds a rich taste. Don't be afraid to experiment with different spices too. Maybe add some Italian herbs, or a pinch of cayenne for heat. Tailoring the flavor makes your chips unique every time. {{image_4}} If you like some heat, try adding cayenne pepper or chili powder. Just sprinkle a bit into the mixing bowl when you coat your zucchini slices. This will give your chips a nice kick. You can adjust the spice level to match your taste. Start small, then add more if you want it hotter. The spice blends well with the zucchini's natural flavor. For a fresh taste, add dried herbs like oregano or thyme to your mix. Herbs bring out the best in zucchini and add a lovely aroma. Just a teaspoon or two is enough. This option is great if you want to impress your guests. You can mix different herbs to create your own unique flavor. If you love cheese, mix different types for a rich taste. Try cheddar, parmesan, or even a sprinkle of feta. Add them right after air frying, while the chips are still hot. The cheese will melt slightly, giving you a deliciously cheesy crunch. Each cheese brings its own character, so feel free to experiment. After you enjoy your crispy zucchini chips, let them cool completely. This step helps keep them crunchy. If you store them warm, steam builds up. This steam makes the chips soft, and nobody likes soft chips! Use an airtight container to store your zucchini chips. This keeps air out and helps maintain their crunch. You can also use a resealable bag, but make sure to push out as much air as you can before sealing it. Store in a cool, dry place. Avoid light and heat, as these can spoil the chips. To bring back that tasty crunch, reheat the chips in the air fryer. Set your air fryer to 350°F (175°C) and cook for about 3-5 minutes. This process will make them crispy again. You can also enjoy them cold, but reheating adds that fresh-out-of-the-air-fryer goodness! Yes, you can bake them in the oven. Preheat the oven to 425°F (220°C). Place the seasoned zucchini slices on a baking sheet. Bake for 20-25 minutes, flipping halfway through. This method will also make crispy chips, but watch them closely. Ensure slices are evenly coated and avoid overcrowding in the air fryer. Spread them out in a single layer. This helps air circulate and keeps them crispy. Shaking the basket halfway through cooking also helps them crisp up. Properly stored, they can last up to a week. Keep them in an airtight container at room temperature. If they lose their crunch, reheat them briefly in the air fryer to restore texture. Yes, many vegetables can be air-fried similarly, like carrots or sweet potatoes. Just adjust cooking times based on the vegetable's thickness. For example, sweet potatoes may take a bit longer than zucchini. For the complete cooking process, refer to the Crispy Air Fryer Zucchini Chips recipe. In this blog post, I shared how to make crispy air fryer zucchini chips. We covered the main ingredients, tools, and step-by-step instructions. I offered tips to achieve the perfect crunch and tasty serving ideas. You can try fun variations by adding spices or cheeses. Remember, these chips are easy to store and reheat. Making these zucchini chips is simple and fun. You can enjoy a healthy snack that tastes great and can be shared with others. Now, it’s time to grab some zucchinis and start cooking!

Easy Air Fryer Zucchini Chips Crunchy and Tasty Snack

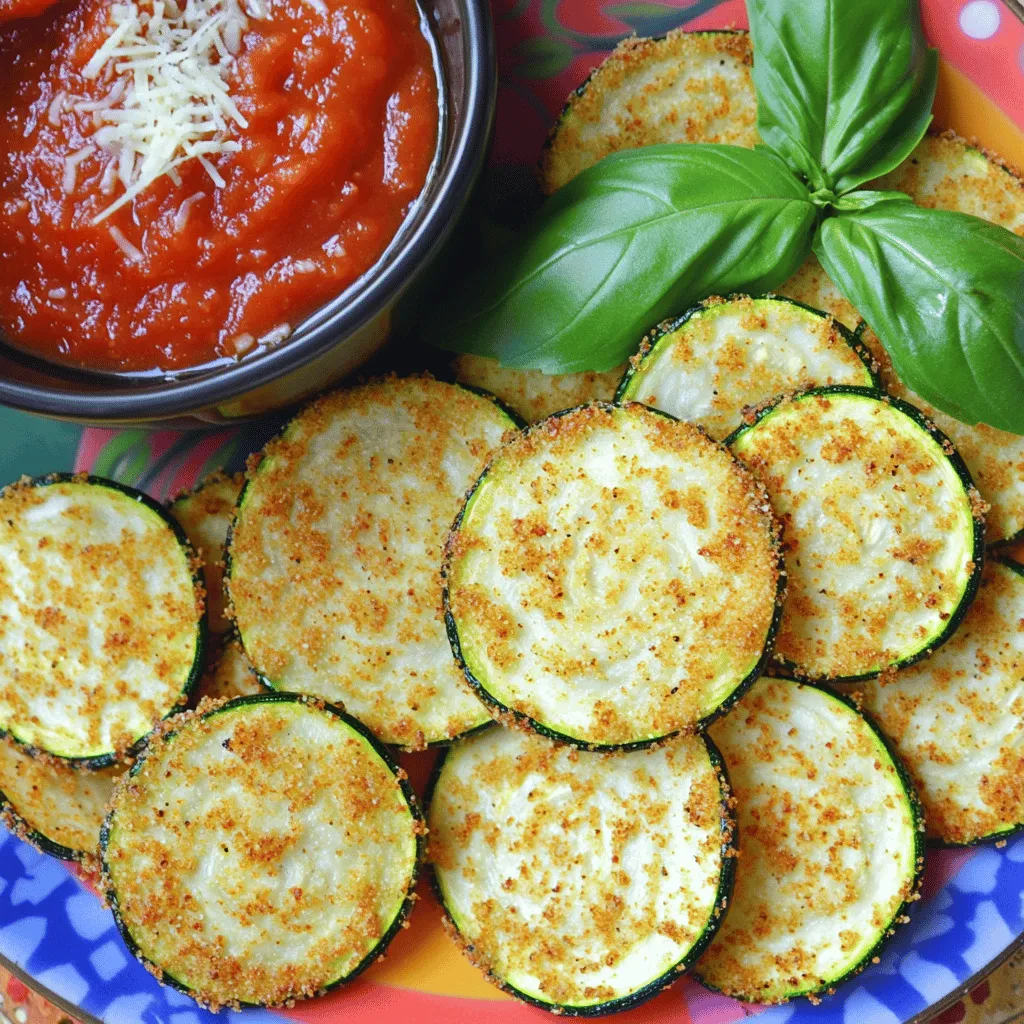
Looking for a tasty snack that’s also good for you? These Easy Air Fryer Zucchini Chips deliver crunch and flavor

Gathering the right ingredients is key to making a great spinach quiche. Here is what you'll need: - Pre-made pie crust: 1 (9-inch) - Fresh spinach: 2 cups, trimmed and chopped - Ricotta cheese: 1 cup, at room temperature - Shredded mozzarella cheese: 1 cup, divided - Large eggs: 3, at room temperature - Whole milk: 1 cup - Freshly grated nutmeg: 1/2 teaspoon - Garlic powder: 1/2 teaspoon - Kosher salt: 1/2 teaspoon - Freshly cracked black pepper: 1/4 teaspoon - Freshly grated Parmesan cheese: 1/4 cup - Extra virgin olive oil: 1 tablespoon Each ingredient plays a role in flavor and texture. The fresh spinach brings color and nutrition, while the cheeses add creaminess. Eggs and milk create a rich custard that binds it all together. I love using freshly grated nutmeg and garlic powder for a warm, earthy taste. The pie crust gives a nice crunch, creating a perfect balance. For the full recipe, follow the steps outlined in this guide. Enjoy the process and the delicious results! Set your oven to 375°F (190°C). This is the perfect temperature for baking. In a medium skillet, heat 1 tablespoon of extra virgin olive oil over medium heat. Wait for the oil to shimmer. Add 2 cups of chopped spinach. Sauté for about 3-4 minutes. Stir the spinach often until it is wilted. Once done, remove it from heat and set aside to cool. Grab a large mixing bowl. Whisk together 3 large eggs, 1 cup of whole milk, and 1 cup of ricotta cheese. Add in half of the shredded mozzarella cheese. Season with 1/2 teaspoon of nutmeg, 1/2 teaspoon of garlic powder, 1/2 teaspoon of kosher salt, and 1/4 teaspoon of black pepper. Whisk until the mixture is smooth. Once the spinach cools, fold it into the egg mixture. Stir gently. Make sure the spinach is evenly mixed in. Carefully pour the spinach and egg mixture into the pre-made pie crust. Use a spatula to spread it evenly. Place the quiche in the oven. Bake for 30-35 minutes. The center should be set, and the top should look golden. To check, insert a toothpick. It should come out clean. After baking, take the quiche out and let it rest for about 10 minutes. This helps it set and makes slicing easier. Once cooled, slice and enjoy your savory spinach delight! For the full recipe, see the section above. To bake a perfect quiche, start with the crust. Blind bake the crust before adding the filling. This step helps prevent a soggy bottom. Place parchment paper on the crust and fill it with pie weights or dried beans. Bake for about 10 minutes, then remove the weights. The crust will turn golden and stay crisp. For the custard filling, whisk the eggs and milk until smooth. Use room temperature eggs and milk for a better texture. This will help your filling set nicely without lumps. Add spices like nutmeg and garlic powder to enhance the flavor. When serving your quiche, cut it into wedges for a nice look. Place it on a bright platter to make it pop. Garnish each slice with fresh herbs like parsley or basil. These touches add color and make the dish more appealing. You can serve the quiche warm or at room temperature. It pairs well with a light salad or fresh fruit. This makes it a great option for brunch or a cozy dinner. One common mistake is overcooking the quiche. Keep an eye on the baking time. The center should be set but not dry. A clean toothpick test is your friend here. Another mistake is under-seasoning. Taste your mixture before baking. Adjust the salt and spices to your liking. This step ensures every bite is full of flavor. Remember, these small tweaks can make a big difference. For the full recipe, you can check the detailed instructions provided. {{image_4}} You can easily add proteins to your quiche. Ham, bacon, or tofu work great. If you like ham, chop it into small pieces. Cook the ham slightly before adding it to the mix. For bacon, fry it until crispy, then crumble it. If you prefer tofu, use firm tofu. Crumble it and sauté it with the spinach for extra flavor. These proteins can make the quiche heartier and more filling. Cheese is key in quiche, but you can switch things up. If you want a sharper taste, try cheddar cheese. Feta cheese gives a nice salty kick. Goat cheese adds creaminess and tang. For a milder flavor, use Monterey Jack. Each cheese brings its own unique taste and texture, so feel free to experiment! Get creative with your veggies! Besides spinach, you can add mushrooms, bell peppers, or zucchini. Just remember to sauté these veggies first. This helps soften them and brings out their flavors. You can also mix in broccoli or asparagus for a vibrant touch. Customizing with different vegetables makes each quiche unique and exciting. To keep your uneaten quiche fresh, wrap it tightly in plastic wrap. You can also use an airtight container. Place it in the fridge within two hours of baking. This helps keep the quiche moist and tasty. It’s best to eat it within three to four days. Freezing quiche is easy. First, let the quiche cool completely. Then, slice it into individual pieces. Wrap each slice in plastic wrap, then in foil. This prevents freezer burn. You can store it in the freezer for up to three months. To reheat, thaw it in the fridge overnight, then bake at 350°F (175°C) until warm. In the fridge, your quiche lasts about three to four days. If you freeze it, it stays safe for about three months. Always check for any off smells or discoloration before eating. Proper storage keeps your classic spinach quiche tasty and safe to enjoy later! The best way to reheat quiche is in the oven. Preheat it to 350°F (175°C). Place your quiche on a baking sheet and cover it with foil. Heat for about 15-20 minutes. This keeps the crust crisp and the filling warm. You can also use a microwave, but it may make the crust soggy. To do this, place a slice on a microwave-safe plate and heat for 1-2 minutes. Yes, you can make this quiche in advance. Prepare it up to the baking step. Cover it with plastic wrap and store it in the fridge for up to 24 hours. You can also bake it and store leftovers. Just let it cool, then wrap it tightly. Reheat before serving for the best taste. Quiche lasts about 3-4 days in the refrigerator. Store it in an airtight container to keep it fresh. If you notice any signs of spoilage, like an off smell or mold, discard it. Always check your leftovers before eating. Yes, you can use frozen spinach instead of fresh. Thaw the spinach and squeeze out the extra water. This prevents a watery quiche. Then, add it to your egg mixture as you would with fresh spinach. Frozen spinach is a great option when fresh is not available. Spinach quiche pairs well with many side dishes. A fresh salad with vinaigrette is a great choice. You can also serve it with roasted vegetables for added flavor. For drinks, try a light white wine or iced tea. These options enhance the meal's taste and presentation. For the full recipe, check out the link. This blog post covered how to make a delicious spinach quiche. You learned about the key ingredients, step-by-step instructions, and helpful tips. I shared ideas on variations, storage, and common mistakes to avoid. Quiche is a versatile dish that's easy to make and customize. Enjoy experimenting with flavors and presentations. You can create a tasty meal everyone will love. Remember, practice makes perfect, so don't hesitate to try it out!

Classic Spinach Quiche Tasty and Simple Delight

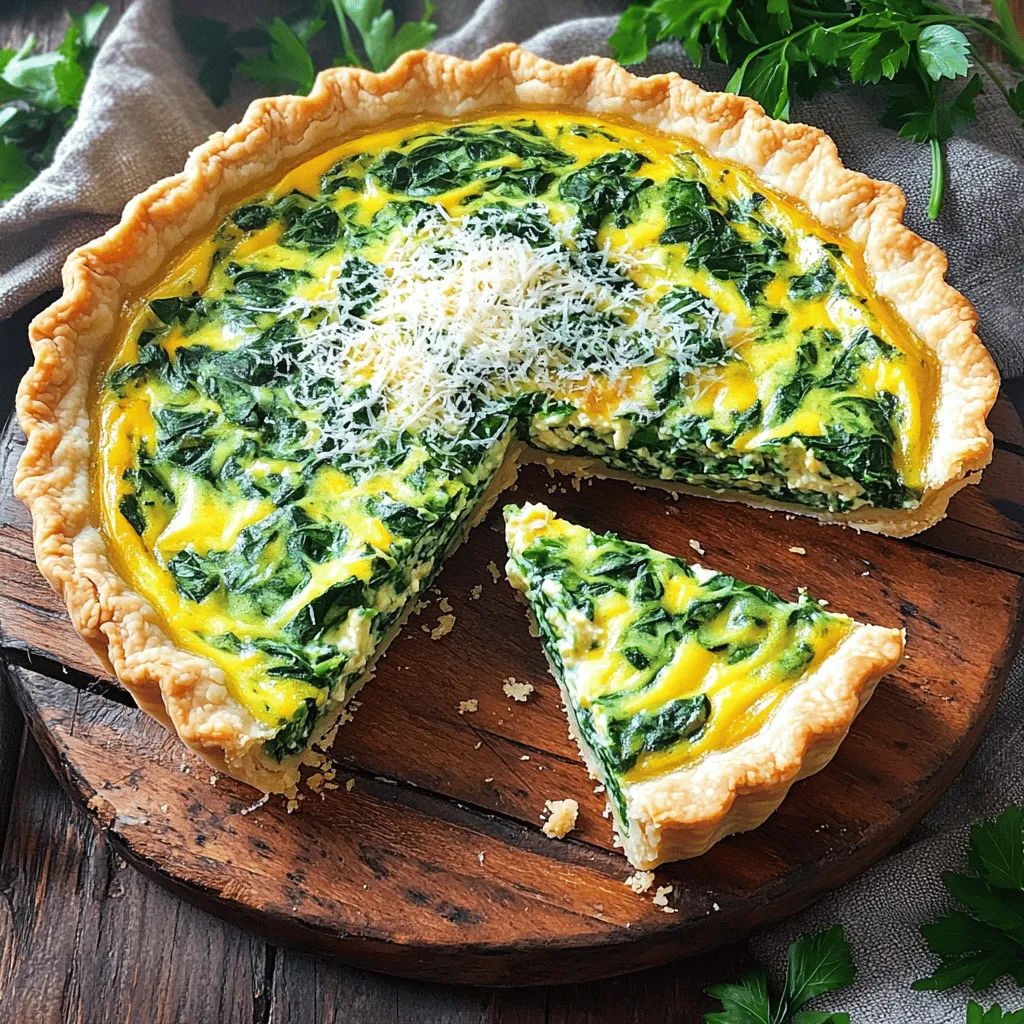
Looking for a dish that’s both tasty and easy to make? Let me introduce you to my Classic Spinach Quiche!

This sheet pan lemon garlic salmon recipe brings bright flavors to your dinner table. It combines salmon, fresh veggies, and a simple marinade. The best part? Everything cooks in one pan! - 4 salmon fillets (approximately 6 oz each) - 4 tablespoons extra virgin olive oil - 4 cloves garlic, finely minced - 2 lemons (1 sliced into thin rounds, 1 juiced) - 1 teaspoon dried oregano - 1 teaspoon smoked paprika - Salt and freshly ground black pepper to taste - 1 cup cherry tomatoes, halved - 1 cup fresh green beans, washed and trimmed - Fresh parsley, finely chopped (for garnish) To make this dish, you need a few simple tools: - A large baking sheet - Parchment paper - A small mixing bowl - A whisk or fork - A brush for the marinade - A sharp knife for slicing These tools will help you create a meal that tastes great and looks lovely. You’ll want to have everything ready before you start cooking. To start, I mix the marinade. In a small bowl, I combine 4 tablespoons of olive oil and 4 minced garlic cloves. Then, I squeeze the juice of one lemon into the bowl. I also add 1 teaspoon of oregano and 1 teaspoon of smoked paprika. Finally, I sprinkle in some salt and black pepper. I whisk this mixture until it blends well. This marinade adds a bright flavor to the salmon. Next, I prepare the baking sheet. I line it with parchment paper for easy cleanup. Then, I place 4 salmon fillets on one side of the sheet. I use a brush to coat the top of each fillet with the marinade. On the other side, I add 1 cup of halved cherry tomatoes and 1 cup of trimmed green beans. I drizzle the leftover marinade over the veggies and toss them gently. This helps each piece soak up the flavors. I finish by topping the salmon with lemon slices. Now, it’s time to bake. I preheat my oven to 400°F (200°C). Once it’s hot, I carefully place the baking sheet inside. I bake for about 15 to 18 minutes. The salmon should look opaque and flake easily with a fork. The veggies will be tender but still crisp. After baking, I take the sheet out and let it rest for a few minutes. This resting time helps the flavors come together. I garnish with chopped parsley and serve hot. For the full recipe, check above! The best cooking time for salmon is about 15 to 18 minutes at 400°F (200°C). Salmon is done when it turns opaque and flakes easily with a fork. If your fillets are thicker, you might need an extra few minutes. Always check your salmon to avoid overcooking. When selecting salmon, look for bright, moist fillets. The flesh should be firm and spring back when pressed. Avoid any fish with a strong fishy smell or dull color. Fresh salmon also has clear eyes and shiny skin. Ask your fishmonger for the day’s catch to ensure quality. You can boost the flavor of your lemon garlic salmon by adding fresh herbs. Try dill or thyme for a fresh twist. Basil also works well if you want a sweeter flavor. Simply sprinkle your chosen herbs on the salmon before baking for added aroma and taste. This can elevate your dish to new heights! For the full recipe, check out the entire guide on making this tasty dish. {{image_4}} If you can't find salmon, try other fish. Cod, trout, or tilapia work well. Each fish has a unique flavor, but they all pair nicely with lemon and garlic. You can also use chicken breast for a different twist. Just adjust the cooking time; chicken needs about 25-30 minutes to cook through. For a vegetarian side, swap green beans with broccoli or asparagus. Both add great texture and nutrients. You could also roast bell peppers or zucchini. They soak up the lemon and garlic flavor too! Serve with a side of quinoa or couscous for a heartier meal. To spice things up, add red pepper flakes to the marinade. This will give your dish a warm kick. If you prefer herbs, try fresh basil or thyme instead of oregano. Both add fresh notes that brighten the dish. Mix and match these ideas to create your perfect plate! For the full recipe, check here: [Full Recipe]. To keep your leftover salmon, place it in an airtight container. Make sure to cool it first. Store it in the fridge for up to three days. If you have leftover vegetables, store them in a separate container. They will also stay fresh in the fridge for the same time. When you want to reheat your salmon, the oven is best. Set it to 350°F (175°C). Place the salmon on a baking sheet and cover it with foil. Heat for about 10 minutes. This way, the salmon stays moist. You can also reheat the vegetables in the microwave for about one minute. Stir them halfway to heat evenly. If you want to freeze leftovers, wrap them tightly in plastic wrap or foil. Place them in a freezer-safe bag. You can freeze salmon for up to three months. The vegetables can also be frozen but may lose some crispness. When ready to eat, thaw them overnight in the fridge before reheating. This method keeps the best taste and texture. Enjoy your meal anytime! Cooking salmon in the oven usually takes 15 to 18 minutes. The time may change based on the thickness of the fillet. A good rule is to cook it for about 4 to 6 minutes per half-inch of thickness. When done, the salmon should look opaque and flake easily with a fork. This method keeps the fish juicy and full of flavor. Yes, you can use frozen salmon. Just make sure to thaw it first. The best way to thaw salmon is in the fridge overnight. If you're in a hurry, you can run it under cold water for about an hour. After thawing, pat it dry before marinating. This helps the flavors stick better. Lemon garlic salmon pairs well with many sides. Here are some ideas: - Rice: Fluffy white rice or wild rice complements the dish well. - Quinoa: This grain adds a nice nutty flavor and texture. - Roasted Vegetables: Carrots, broccoli, or zucchini work great. - Salad: A fresh green salad adds crunch and brightness. - Potatoes: Mashed or roasted potatoes are always a hit. For more ideas and the full recipe, check out the complete details in the article! This blog post covered everything you need for a delicious lemon garlic salmon meal. We explored key ingredients, essential tools, and clear steps to make cooking easy. You learned tips for perfect cooking times, how to choose fresh salmon, and ways to add extra flavor. We even discussed substitutes, vegetarian sides, and how to store leftovers. Cooking can be simple and fun. Now, you have the knowledge to create a tasty dish anytime.

Sheet Pan Lemon Garlic Salmon Flavorful Dinner Recipe

Looking for a quick and tasty dinner? This Sheet Pan Lemon Garlic Salmon recipe is your answer! With vibrant flavors

Easy Chicken Chimichangas are a fun and tasty meal. You can make them quickly using simple ingredients. The best part? You can customize them to fit your taste. - 2 cups cooked chicken, shredded - 1 cup creamy refried beans - 1 cup shredded cheese (cheddar, Monterey Jack, or Mexican blend) - 1 small onion, finely diced - 1 jalapeño, finely chopped (optional) - 1 teaspoon ground cumin - 1 teaspoon chili powder - Salt and freshly ground black pepper, to taste - 6 large flour tortillas - Vegetable or canola oil, for frying - Sour cream, for serving - Fresh cilantro leaves, for garnish You can swap ingredients based on what you have. Here are some ideas: - Use black beans instead of refried beans for a different taste. - Try rotisserie chicken for quick prep. - Substitute cheese with a dairy-free option if needed. - Skip the jalapeño for a milder flavor. - Whole wheat tortillas add a healthy twist. Feel free to mix and match these ingredients. This flexibility makes the recipe fun and unique. If you're interested, check out the full recipe for more details! Start by gathering your ingredients. You need cooked chicken, creamy refried beans, and some cheese. Use a large bowl to mix the filling. Combine the shredded chicken, refried beans, diced onion, and jalapeño if you want some heat. Add ground cumin and chili powder for flavor. Don't forget to season with salt and pepper. Mixing well is key to a tasty filling. It should all blend together nicely and smell amazing. Lay one tortilla flat on a clean surface. Spoon about one-sixth of the filling into the center. Fold in the sides of the tortilla. Then roll it tightly from the bottom up, like a burrito. Make sure the filling stays inside. Repeat this for the other tortillas and filling. It’s like wrapping a present, but much tastier! Heat some vegetable or canola oil in a large skillet. You want enough oil to cover the bottom. Wait until the oil gets hot, about 350°F. Carefully place each chimichanga seam-side down in the oil. Fry them for 3-4 minutes until they turn golden brown. Flip them gently to fry the other side for another 3-4 minutes. Use tongs to avoid splashes. When done, drain them on paper towels to remove excess oil. Now, sprinkle the remaining cheese on top while they’re hot. This helps it melt perfectly. Enjoy your delicious chimichangas with sour cream and cilantro. To get that perfect crunch, always use hot oil. Heat it until it shimmers. A good temperature is about 350°F. The tortilla should sizzle when you add it. This helps to seal the edges and create a crisp outer layer. Fry in small batches to avoid cooling the oil. Too many at once can make them soggy. To stop your filling from leaking, make sure to seal the edges tightly. Roll the chimichanga snugly. Use a bit of water on your fingers to moisten the edges before sealing. This helps the tortilla stick together. Also, avoid overfilling. A generous amount is great, but too much can cause spills. Serve these chimichangas with sour cream and fresh cilantro. You can also add salsa for extra flavor. A side of guacamole brightens the dish. For a fun twist, try a sprinkle of lime juice. This adds a zesty kick and enhances the flavors. For the full recipe, check the detailed steps provided. {{image_4}} For a tasty vegetarian chimichanga, swap the chicken for 2 cups of cooked black beans or lentils. This gives you a hearty filling with great texture. Add in some sautéed bell peppers and corn for extra flavor. Using the same spices, like cumin and chili powder, will keep the taste bold and vibrant. You can follow the Full Recipe for the assembly instructions. If you like heat, make spicy chimichangas! Start with the base recipe, but add more jalapeño or some diced green chilies. You can also mix in a bit of chipotle sauce for a smoky kick. Don't forget to adjust the salt and spices to match your heat level. This twist will surely excite your taste buds! For cheese lovers, a cheese-only filling is simple and delicious. Use 2 cups of your choice of cheese, like a blend of cheddar and Monterey Jack. Melt the cheese in a pan with a splash of cream to make it extra gooey. You can add herbs like cilantro or green onions for freshness. This filling is rich and satisfying, perfect for a quick meal! To store leftover chimichangas, let them cool first. Place them in an airtight container. Keep them in the fridge for up to three days. If you need to store them longer, freezing is a good option. Make sure they are completely cool before freezing. When you want to eat your leftovers, reheat them in the oven. Preheat your oven to 350°F (175°C). Place the chimichangas on a baking sheet. Heat for about 15-20 minutes or until warm. This keeps them crispy. You can also use a microwave, but this may make them soft. If you use the microwave, heat them for one to two minutes. To freeze chimichangas, wrap each one tightly in plastic wrap. Then, place them in a freezer-safe bag. They can last in the freezer for up to three months. When ready to eat, thaw them in the fridge overnight. For best results, reheat in the oven after thawing. This ensures they stay crunchy and delicious. Yes, you can bake chimichangas. Preheat your oven to 425°F (220°C). Place the assembled chimichangas seam-side down on a baking sheet. Lightly spray them with cooking oil for crispiness. Bake for about 20-25 minutes, turning halfway through. This method is healthier and still gives you a nice crunch. If you want a change, you can use black beans or pinto beans. Just mash them well before mixing. You can also try hummus for a different taste. Another great option is using cream cheese for a rich, creamy filling. Feel free to experiment! To prepare chimichangas ahead, you can assemble them and freeze them before frying. Wrap each chimichanga tightly in plastic wrap or foil. When you're ready to cook, you can fry them from frozen. Just add a couple of minutes to the cooking time. Alternatively, bake them after thawing for a quick meal. You now have all the tools to make tasty chimichangas. We covered the ingredients, step-by-step instructions, and tips for perfect results. Don't forget the variations to suit your taste. Feel free to experiment with fillings and spices. Store leftovers correctly to enjoy them later. I hope you feel confident to try this recipe. Enjoy each bite of your crispy chimichangas!

Easy Chicken Chimichangas Tasty and Quick Meal Guide

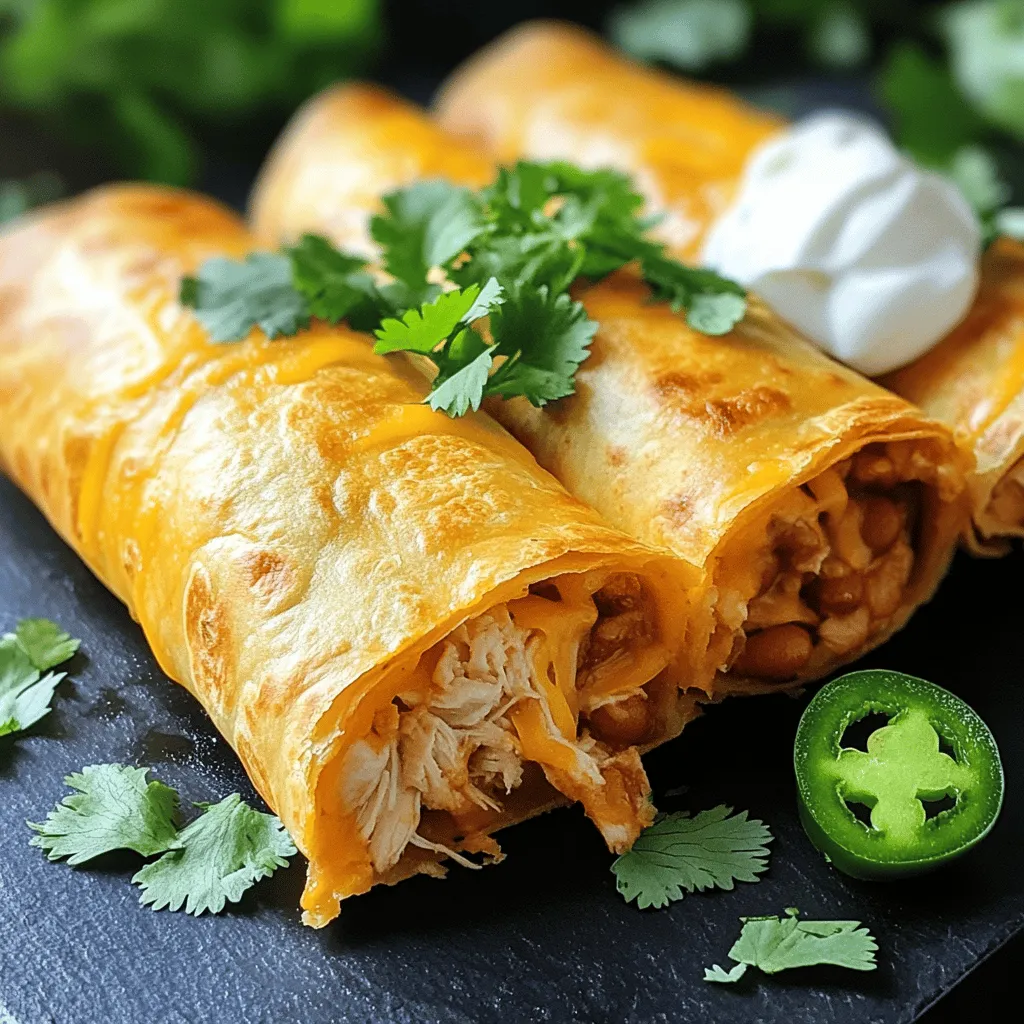
Craving a tasty meal but short on time? You’re in the right spot! My Easy Chicken Chimichangas are a quick

To make the Classic BLT Pasta Salad, you need a few tasty ingredients. Here’s what to gather: - Pasta options: rotini or fusilli - Protein: crispy turkey bacon - Fresh produce: cherry tomatoes, romaine lettuce, red onion - Dressing components: mayonnaise, apple cider vinegar, Dijon mustard - Seasoning: salt, pepper, fresh herbs for garnish These ingredients give your pasta salad a classic BLT taste. The rotini or fusilli hold the dressing well and make each bite fun. Crispy turkey bacon adds a salty crunch, while fresh cherry tomatoes and romaine lettuce offer bright flavors. Red onion gives a nice bite, balancing everything perfectly. The dressing is simple yet flavorful. Mayonnaise makes it creamy, while apple cider vinegar and Dijon mustard add a tangy zing. Don’t forget to season with salt and pepper to taste. Fresh herbs like parsley or basil not only look good but also boost the flavor. For the full recipe, check out the Classic BLT Pasta Salad 🥓. It’s easy and sure to impress your friends and family! To start, bring a large pot of salted water to a boil. Make sure the water is really bubbling. Then, add 8 ounces of rotini or fusilli pasta. Cook it until it's al dente, which means it's firm but not hard. This usually takes about 8 to 10 minutes. Once the pasta is ready, drain it in a colander. Rinse it under cold running water. This helps cool it down and stops the cooking. While the pasta cooks, you can make the dressing. Grab a small bowl and add 1/2 cup of mayonnaise, 2 tablespoons of apple cider vinegar, and 1 tablespoon of Dijon mustard. Add a pinch of salt and a little pepper. Whisk it all together until it’s smooth and creamy. This dressing adds great flavor to the salad. Now, it’s time to mix everything. In a large bowl, combine the cooled pasta, 4 strips of crispy chopped turkey bacon, 1 cup of halved cherry tomatoes, 1 cup of chopped romaine lettuce, and 1/2 cup of finely diced red onion. Drizzle the dressing over the top and gently toss everything together. Make sure all the bits get coated in that tasty dressing. After mixing, taste the salad. If it needs more flavor, adjust the seasoning as needed. You can add a bit more vinegar or salt for a zing. If you want to take this dish to the next level, check out the Full Recipe for more details! To achieve the best flavor balance in your Classic BLT Pasta Salad, think about the mix of ingredients. Start with your base: the pasta. I prefer rotini or fusilli because they hold the dressing well. Add crispy turkey bacon for a savory touch. Fresh cherry tomatoes add sweetness, while romaine lettuce brings a nice crunch. Use red onion for a bit of sharpness. To avoid soggy pasta, cook it until it's just al dente. This means it should be firm to the bite. After cooking, drain the pasta and rinse it with cold water. This stops the cooking and helps keep the pasta firm. If you plan to serve the salad later, toss the pasta with a little olive oil to prevent sticking. For a creative presentation, serve the pasta salad in a large, colorful bowl. You can also use individual plates for a fun touch. Sprinkle some extra crispy bacon on top for added texture. Fresh herbs like parsley or basil not only look great but also boost flavor. Pair your pasta salad with grilled chicken or fish for a complete meal. A light vinaigrette dressing can enhance the flavors of the salad. You can also serve it alongside crusty bread or a fresh green salad. Don't forget to check out the Full Recipe for more tips on making this dish shine! {{image_4}} You can easily switch up the proteins in this dish. If you want a different flavor, try chicken or tofu instead of turkey bacon. Both options work well and keep the salad hearty. For greens, you don’t have to stick with romaine. Spinach or kale can add a fresh twist. They’re both healthy and tasty. Just chop them up and mix them in. Want to kick up the flavor? You can add spices like garlic powder, paprika, or even black pepper. These spices give a nice kick to each bite. If you’re a cheese lover, consider adding feta or Parmesan. They add creaminess and richness. You might also want to include optional ingredients like avocados or olives. Avocados add creaminess, while olives bring a nice briny flavor. Both can make your salad even more exciting. For the full recipe, check out the Classic BLT Pasta Salad 🥓 section above. Chilling your pasta salad is key. It lets the flavors mix well. I recommend chilling it for at least 30 minutes. This time allows the dressing to soak into the pasta and veggies. When storing, use a tight-sealing container. A glass bowl with a lid works well. This keeps the salad fresh and prevents any strong smells in your fridge. Your classic BLT pasta salad lasts about 3 to 5 days in the fridge. Always check for signs of spoilage. Look for any off smells or changes in color. If the salad looks slimy or the veggies seem wilted, toss it out. Trust your senses! Keeping it in the right container helps it last longer. Enjoy the salad while it’s fresh for the best taste. For the full recipe, check the earlier sections. Yes, you can make this salad ahead of time. I often prepare it a few hours before serving. This allows the flavors to blend well. Just remember to store it in the fridge until you’re ready to serve. To keep the salad fresh, store it in an airtight container. This limits exposure to air. Also, consider adding the dressing just before serving. This helps keep the pasta and veggies crisp. You can serve this salad with grilled chicken or shrimp for protein. It pairs well with crusty bread or garlic bread. You could also offer a light soup as a side, like tomato soup. Absolutely! You can use any pasta shape you like. Penne or bowtie pasta work great, too. Just make sure to cook it to al dente for the best texture. Yes, you can make a gluten-free version. Use gluten-free pasta made from rice or quinoa. The flavors will still shine through, making it a delicious option for everyone. For the full recipe, check out the link. This post shared how to make a tasty Classic BLT Pasta Salad. We covered key ingredients like pasta, turkey bacon, fresh veggies, and a creamy dressing. You learned effective steps to cook pasta, mix ingredients, and enhance flavor. Tips for serving, storage, and variations were also shared. In the end, this pasta salad brings great flavors and can fit many meals. Enjoy making it your own!

Classic BLT Pasta Salad Simple and Tasty Delight

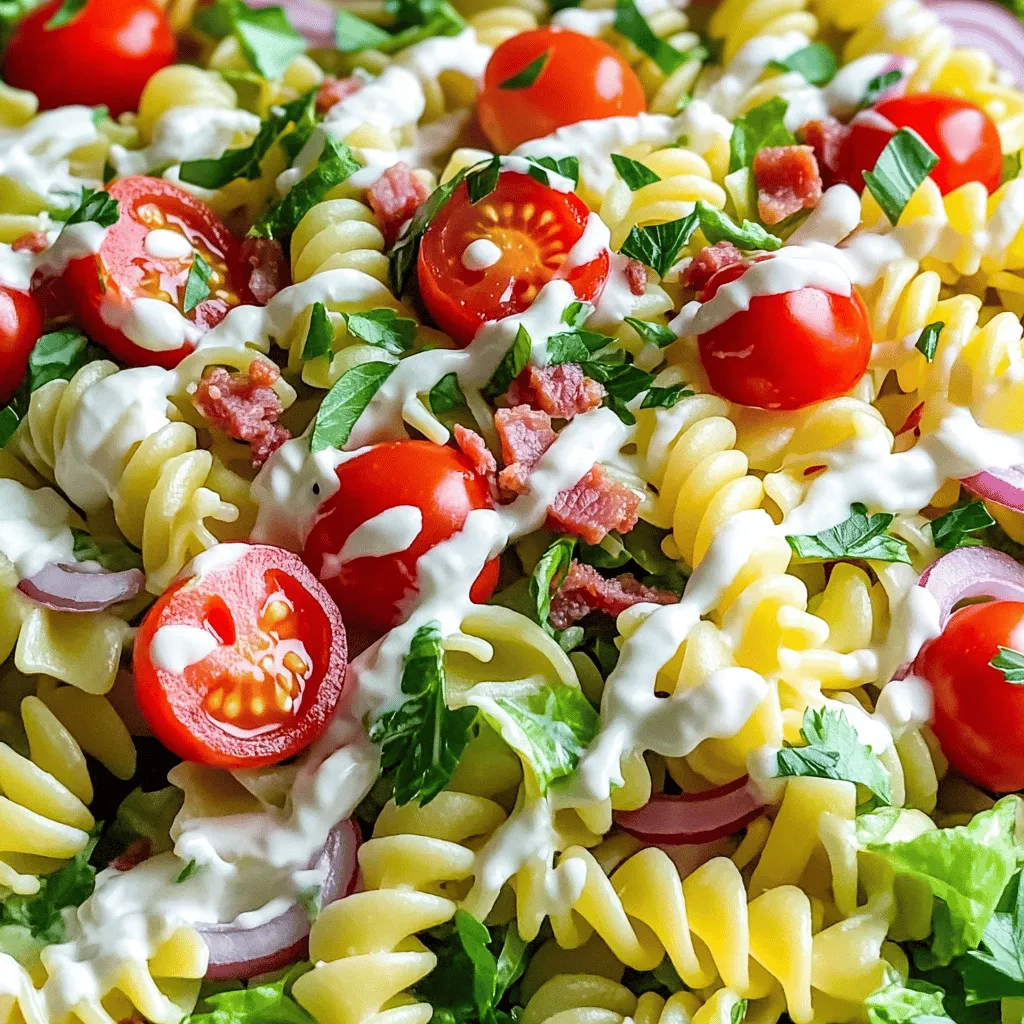
Are you ready to enjoy a fresh and tasty twist on a classic favorite? My Classic BLT Pasta Salad brings

Older posts
Newer posts
← Previous Page1 … Page20 Page21 Page22 … Page60 Next →

dsad

© 2025 eataroundit • Built with GeneratePress

Our Policies

  • Copyright Policy
  • Cookie Policy
  • GDPR Policy
  • Privacy Policy
  • Disclaimer
  • Terms Of Use

More Information

  • Home
  • About
  • Contact
  • Appetizers
  • Dessert
  • Dinner
  • Drinks
©2025, eataroundit About Back To Top