Skip to content
DisclaimerTerms Of UseGDPR PolicyCookie Policy

eataroundit

  • Home
  • Drinks
  • Appetizers
  • Dinner
  • Dessert
  • About
  • Contact
  • Privacy Policy
DisclaimerTerms Of UseGDPR PolicyCookie Policy

Hannah

- 4 boneless pork chops (approximately 1 inch thick) - 4 cloves garlic, finely minced - 1 tablespoon extra virgin olive oil - 1 tablespoon unsalted butter - 1 teaspoon dried thyme - 1 teaspoon smoked paprika - 1 teaspoon fresh lemon zest - ½ teaspoon red pepper flakes (or to taste) - Sea salt and freshly ground black pepper, to taste - Fresh parsley, finely chopped (for garnish) Using fresh garlic makes a big difference in flavor. Fresh garlic has a bright taste and strong aroma that dried garlic lacks. You want your dish to shine, so choose the best. Next, pick the right cut of pork chops. Boneless chops are tender and cook quickly. They soak up flavors well, making them perfect for this garlic sauce. If you want substitutes, consider using organic ingredients. Organic pork might have better taste and quality. You can also swap out the red pepper flakes for a milder spice, if needed. For the olive oil, extra virgin is the best choice. It has a rich flavor that enhances the dish. You can even experiment with flavored oils for a twist. Remember, quality ingredients lead to better meals, so choose wisely! For the full recipe, check out the Zesty Garlic-Infused Pork Chops recipe. First, pat the pork chops dry with paper towels. This step is key for a good sear. Next, season both sides of the pork chops. Use sea salt, black pepper, smoked paprika, and dried thyme. This mix adds great flavor. Now, heat a large skillet over medium-high heat. Add one tablespoon of extra virgin olive oil. Wait until the oil shimmers before you add the pork chops. This helps achieve a nice crust. Place the seasoned pork chops in the hot skillet. Sear each chop for about 4-5 minutes. Flip them and cook for another 4-5 minutes. Use a meat thermometer to check the temperature. The chops should reach 145°F (63°C) for safe eating. Once done, transfer them to a plate and cover with aluminum foil. This keeps them warm while you make the sauce. In the same skillet, lower the heat to medium. Add one tablespoon of unsalted butter and let it melt. After the butter melts, add four cloves of minced garlic and red pepper flakes. Sauté the garlic for about 30-45 seconds. Watch closely to avoid burning it. Next, stir in one teaspoon of fresh lemon zest. Scrape any browned bits from the skillet. This adds flavor to the sauce. Let the mixture simmer for 1-2 minutes. This step helps the flavors blend well. Finally, return the pork chops to the skillet. Spoon the garlic sauce over each chop. Cook for an additional minute to warm them through. Let the pork chops rest in the sauce for a couple of minutes. This helps the flavors soak in. For a complete cooking guide, check out the Full Recipe. To get that perfect sear on your pork chops, start with a dry surface. Pat them down with paper towels. This helps the meat brown well. Use a hot skillet, and don’t crowd the pan. Each chop needs space to sear nicely. For seasonal herbs, think about what’s fresh. In spring, try fresh rosemary. In summer, basil works great. In fall, consider sage. Each herb brings a unique taste to your dish. Pork chops pair well with many sides. Creamy mashed potatoes add comfort. Roasted vegetables can add color and nutrition. A fresh green salad can lighten the meal. For a lovely touch, garnish with lemon slices or fresh parsley. This adds brightness and makes your dish look great. One big mistake is overcooking pork chops. They can dry out fast if cooked too long. Always check the internal temperature. Aim for 145°F (63°C) for juicy, tender meat. Another mistake is not letting the sauce meld. After cooking, let the pork chops rest in the sauce. This allows the flavors to blend well, making each bite delicious. {{image_4}} You can make your pork chops even better. Try adding mushrooms or spinach to the garlic sauce. These veggies bring a rich taste and a nice texture. Sauté the mushrooms until they are soft, then add them to the sauce. Spinach wilts quickly, so stir it in just before serving. You can also switch up the herbs. Instead of thyme, use rosemary or basil. Each herb gives a unique twist to the dish. Rosemary adds a piney flavor, while basil brings a sweet touch. Feel free to mix and match based on what you like. Not everyone has a skillet, and that’s okay! You can grill the pork chops for a smoky flavor. Preheat your grill and cook the chops until they are golden brown on the outside. This method keeps them juicy too. If you have a slow cooker, you can use it for this recipe. Season the chops as usual and place them in the slow cooker. Pour the garlic sauce over them and let it cook on low for 6 to 8 hours. This method makes the pork really tender. For those on a keto diet, you can make some easy changes. Use a sugar-free garlic sauce or omit any added sugars. You can also substitute butter with ghee for a dairy-free option. If you need a gluten-free meal, be sure to check your ingredients. Use gluten-free soy sauce if you want that umami flavor. Most spices and fresh herbs are naturally gluten-free, making it easy to enjoy this dish. For the complete process, you can check the Full Recipe. After you enjoy your pork chops, store any leftovers in the fridge. Place them in an airtight container. This keeps the meat fresh and tasty. Pork chops can last up to three days in the fridge. Make sure they cool down first before sealing them up. To reheat your pork chops, use a skillet on low heat. This method helps keep the meat juicy. Heat them for about 5-7 minutes, flipping once. If you want to refresh the garlic sauce, warm it up separately. Pour it over the chops just before serving. This adds that fresh garlic flavor back to your meal. For more details, check out the Full Recipe. Cook pork chops for 4-5 minutes per side. This gives them a nice brown crust. The inside should reach 145°F (63°C). Use a meat thermometer to check the temperature. Yes, you can use bone-in pork chops. They have a richer flavor than boneless ones. Bone-in pork chops also tend to stay juicier during cooking. Look for a nice golden crust on the outside. The inside should be slightly pink and juicy. Always check the internal temperature to make sure it is 145°F (63°C). If you can't use garlic, try shallots or garlic powder. You can also use herbs like thyme or rosemary for flavor. Yes, you can make this dish ahead. Cook the pork chops and sauce, then store them separately. Reheat them gently in a skillet before serving. For detailed instructions, check out the [Zesty Garlic-Infused Pork Chops recipe](#). This article covered how to make delicious garlic-infused pork chops. We looked at ingredients, preparation steps, and cooking tips. Understanding how to choose the right pork chops and use fresh garlic is key. You can enhance these flavors with herbs or even try different cooking methods. Avoid common mistakes, like overcooking, to ensure your dish shines. With this guide, you can enjoy tasty pork chops every time. Now, it’s time to cook and impress your family and friends!

Savor Pork Chops with Garlic Sauce Recipe Now

Are you ready to elevate your dinner game? This Pork Chops with Garlic Sauce recipe offers a delicious mix of

- Beef tenderloin roast specifications: - Choose a roast that weighs between 2 to 2.5 lbs. This size ensures even cooking and great flavor. - Fresh herbs and spices required: - 2 tablespoons fresh rosemary, chopped finely. - 2 tablespoons fresh thyme, chopped finely. - 1 tablespoon fresh parsley, chopped finely. - 1 teaspoon sea salt. - 1 teaspoon freshly ground black pepper. - Additional ingredients for herb butter: - 4 tablespoons unsalted butter, softened at room temperature. - 3 cloves garlic, finely minced. - 1 tablespoon Dijon mustard. - 2 tablespoons extra-virgin olive oil. These ingredients create a rich and flavorful dish. Each herb adds a unique taste that enhances the beef. The butter keeps the meat moist during the roast. For the full recipe, refer to the above list. Start by preheating your oven to 425°F (220°C). This heat will help create a nice crust on the beef tenderloin. While the oven heats up, let’s prepare the herb butter. In a mixing bowl, combine: - 4 tablespoons unsalted butter, softened - 3 cloves garlic, finely minced - 2 tablespoons fresh rosemary, chopped finely - 2 tablespoons fresh thyme, chopped finely - 1 tablespoon fresh parsley, chopped finely - 1 teaspoon sea salt - 1 teaspoon freshly ground black pepper - 1 tablespoon Dijon mustard Mix these ingredients well. You want a smooth blend that will soak into the meat. Now, take your beef tenderloin and pat it dry using paper towels. This is key for a good sear. After it’s dry, season it with salt and pepper. This will enhance the meat's flavor. Next, heat 2 tablespoons of extra-virgin olive oil in a large, oven-safe skillet over medium-high heat. Once the oil shimmers, add the tenderloin. Sear the beef on all sides until it gets a rich, golden-brown crust. This should take about 2-3 minutes for each side. After searing, take the skillet off the heat. Generously coat the tenderloin with your herb butter mixture. Make sure every inch of the meat is covered for the best flavor. Now, place the skillet in the preheated oven. Roast the beef for about 25-30 minutes. You want the internal temperature to reach 130-135°F (54-57°C) for a perfect medium-rare finish. Once the roast is done, take it out of the oven. Loosely cover it with aluminum foil and let it rest for 10-15 minutes. This helps the juices stay in the meat, making it more tender. After resting, slice the beef into about 1-inch thick medallions. Arrange the slices on a platter or individual plates. For a lovely touch, garnish with fresh herbs for a beautiful presentation. For the full recipe, check out the details above. - Checking doneness: Use a meat thermometer to check the beef. Insert it into the thickest part. Aim for 130-135°F for medium-rare. This will ensure your roast is juicy and tender. - Tricks for keeping the roast juicy: Always let the roast rest after cooking. Cover it loosely with foil for about 10-15 minutes. This helps the juices redistribute, making each slice moist. - Ideal side dishes to accompany the meal: Pair your roast with roasted vegetables, mashed potatoes, or a fresh salad. These sides complement the rich flavors of the beef. - Garnishing tips for presentation: Use fresh herbs like parsley or rosemary to add color. A drizzle of the pan juices enhances the look and flavor, making your dish pop. - Best types of skillets and ovens to use: A heavy, oven-safe skillet works best for searing and roasting. Cast iron or stainless steel are great choices for even cooking. - Essential tools for slicing and serving: A sharp carving knife is key for clean slices. A cutting board with a juice groove can catch any drippings, keeping your workspace tidy. For the complete method, check the full recipe for Herb Butter Beef Tenderloin Roast. {{image_4}} You can change the herb butter to suit your taste. If you love basil, add it instead of rosemary. For a fresh twist, try dill or tarragon. You can even mix different herbs for a unique flavor. Adding citrus zest can brighten the taste. Try orange or lemon zest in the butter. This adds a nice zing to the beef. You can also include a pinch of red pepper flakes for some heat. You can grill or roast the tenderloin. Grilling gives the meat a smoky flavor. It works well for warm summer days. However, roasting keeps the meat tender and juicy. If you want an easy method, use a slow cooker. This makes the beef very tender. Just add the herb butter before cooking. It will melt into the meat as it cooks. If you can’t find beef tenderloin, don’t worry. You can use other cuts like filet mignon or sirloin. Just remember that cooking times may change. You can also adapt this recipe for pork or lamb. Each meat has its own flavor, but the herb butter works great with any. Just follow the same steps from the Full Recipe to ensure tasty results. To keep your tenderloin fresh, place it in an airtight container. This helps lock in moisture. You can store it in the fridge for up to three days. If you want it to last longer, freezing is a great option. When you reheat the roast, do it gently. Use your oven set to 250°F (120°C). Place the beef in a baking dish and cover it with foil. This keeps the meat from drying out. You want to heat it just until warm. This usually takes about 20-30 minutes. To keep the flavor and texture, add a splash of beef broth or water to the dish. This little trick makes the meat juicy and tasty. Yes, you can freeze herb butter beef tenderloin! It freezes well, keeping the flavor intact. To freeze, wrap the roast tightly in plastic wrap. Then, place it in a freezer bag or container. Make sure to label it with the date. You can safely freeze it for up to three months. To thaw, move it to the fridge a day before you plan to cook it. This way, it defrosts slowly and stays juicy. What is the best way to cook beef tenderloin? The best way to cook beef tenderloin is to sear it first and then roast it. Start by preheating your oven to 425°F (220°C). Sear the tenderloin in a hot skillet with oil until it gets a nice crust. Then, transfer it to the oven to finish cooking. This method locks in flavor and keeps the meat juicy. How do I know when my beef tenderloin is done? You can check doneness with a meat thermometer. For medium-rare, the internal temperature should be 130-135°F (54-57°C). Insert the thermometer into the thickest part of the meat. Always let your roast rest after cooking. This helps the juices settle. Can I make the herb butter ahead of time? Yes, you can make herb butter ahead of time. Simply mix the ingredients and store them in the fridge. It will keep well for about a week. This makes it easy to prep your roast when you’re ready to cook. What can I use as a substitute for Dijon mustard? If you don't have Dijon mustard, you can use yellow mustard or whole grain mustard. Both will give a nice tangy flavor. You can also try using a mix of vinegar and honey for a sweet and sour touch. For the complete cooking process and more tips, check the Full Recipe. This guide covered everything about making a tasty herb butter beef tenderloin roast. We discussed the key ingredients and gave easy steps for cooking and serving. I shared tips to keep your roast juicy and how to customize flavors. You also learned how to store and reheat leftovers safely. Embrace these tips and enjoy your cooking journey. You’ll impress your guests with this flavorful dish. Happy cooking!

Herb Butter Beef Tenderloin Roast Simple and Savory

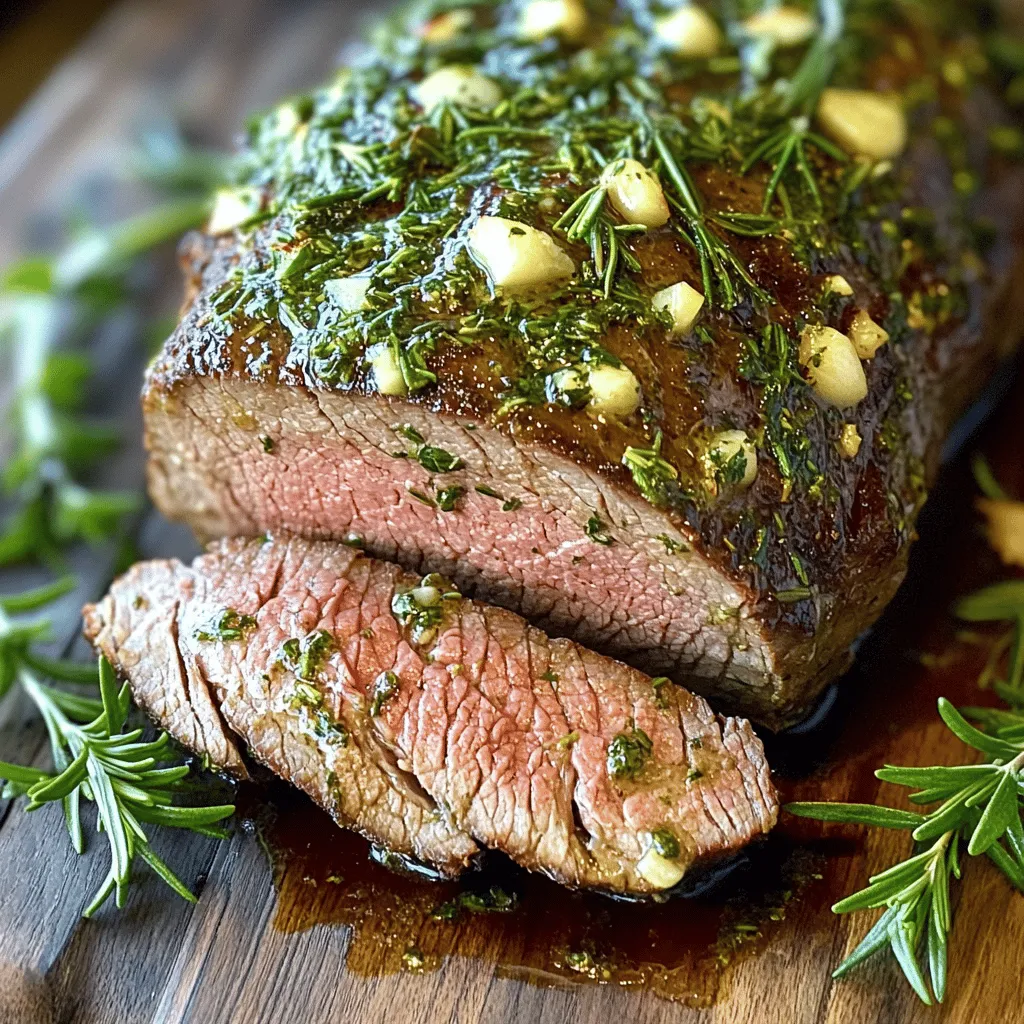
Ready to impress your dinner guests? This Herb Butter Beef Tenderloin Roast is simple yet bursting with flavor. With just

- 4 boneless, skinless chicken breasts - 1 cup finely chopped mushrooms (cremini or button) - 1/2 cup roughly chopped fresh spinach - 1/2 cup ricotta cheese - 1/4 cup grated Parmesan cheese - 2 cloves minced garlic - 1 tablespoon olive oil - 1 teaspoon dried thyme - Salt and pepper, to taste - Toothpicks or kitchen twine This recipe is simple and uses fresh ingredients. The chicken breasts provide lean protein, while mushrooms add a deep, earthy flavor. Spinach brings in nutrients and a pop of color. Ricotta and Parmesan create a creamy, savory stuffing that keeps the chicken moist. When I prepare this dish, I focus on using fresh mushrooms. They give the stuffing a wonderful texture. You can use cremini or button mushrooms, depending on your taste. Fresh spinach is key, too. It adds a nice green touch and balances the richness of the cheese. The spices are vital. Dried thyme adds a lovely aroma, while garlic gives depth. You can adjust the salt and pepper to your liking. For securing the stuffed chicken, toothpicks work well. Kitchen twine is also a great option if you have it. Both keep the filling inside while baking, so you get all the flavors in each bite. Check out the Full Recipe for the complete steps to make this dish. First, preheat your oven to 375°F (190°C). This helps cook the chicken evenly. Next, gather all ingredients and tools. You will need a skillet, mixing bowl, and baking dish. Having everything ready makes cooking easier and faster. In a medium skillet over medium heat, add one tablespoon of olive oil. Once the oil is hot, add two cloves of minced garlic. Sauté for about one minute until it smells great. Then, add one cup of finely chopped mushrooms and one teaspoon of dried thyme. Cook for 5-7 minutes, stirring often. You want the mushrooms to get soft and lose their moisture. After that, add half a cup of roughly chopped spinach. Stir gently for about two minutes until the spinach starts to wilt. Remove the skillet from heat and let it cool for a few moments. In a mixing bowl, combine this mixture with half a cup of ricotta cheese and a quarter cup of grated Parmesan cheese. Add salt and pepper to taste. Mix well to create your stuffing. Now, prepare the chicken breasts. Take each breast and slice it horizontally on the side. Be careful not to cut all the way through. This creates a pocket for the stuffing. Generously fill each chicken pocket with your mushroom stuffing. Secure the opening with toothpicks or kitchen twine to keep the filling inside during baking. Season the outside of the stuffed chicken with a sprinkle of salt and pepper for extra flavor. Place the stuffed chicken in a baking dish and cover it with aluminum foil. This helps keep the chicken moist. Bake in the preheated oven for 25 minutes. After that time, remove the foil and bake for another 15-20 minutes. Check to ensure the chicken is cooked through, reaching an internal temperature of 165°F (75°C). Once done, let the chicken rest for a few minutes before slicing. Enjoy your delicious creation! For the full recipe, check out the detailed instructions above. - Use low-fat cheese options to cut calories. - Substitute olive oil with cooking spray for less fat. These small swaps can make your meal lighter without losing flavor. Low-fat cheese still melts well and adds creaminess. Cooking spray helps reduce added oils, keeping your dish healthy. - Add herbs and spices of your choice for extra taste. - Try different cheese combinations to find your favorite. Adding fresh herbs can brighten up the dish. Consider basil, parsley, or oregano. Mixing cheeses like mozzarella or feta can also create new flavors. Experiment to make it your own! - Recommended pans include a non-stick skillet and a baking dish. - Useful kitchen gadgets for stuffing are a sharp knife and toothpicks. A good non-stick skillet helps with easy cooking. A sharp knife makes cutting the chicken simpler. Toothpicks secure the filling while baking. These tools make the process smoother and more enjoyable. For the full recipe, check out the details above. {{image_4}} You can switch up your mushroom stuffing to keep things exciting. Try adding sun-dried tomatoes for a tangy twist. Artichokes give a nice flavor and texture too. You can also mix in some nuts or seeds. This adds a great crunch and healthy fats. Walnuts or pine nuts work well here. Each of these choices can make your dish more unique and tasty. If you want to change your protein, there are good options. Turkey works great as a lean substitute for chicken. Tofu is an excellent choice for a plant-based meal. It picks up flavors well and provides protein. Another fun idea is to use fish fillets. They give a lighter taste and cook quickly. Each option allows you to enjoy the same great stuffing in a new way. If you follow a gluten-free diet, you can still enjoy this dish! Just make sure to use gluten-free breadcrumbs or omit them. For those who prefer a vegan option, substitute the chicken with a large portobello mushroom cap. You can also use vegan cheese in the stuffing. These changes keep the flavors intact while meeting your dietary needs. Enjoy exploring these variations for a delicious meal! After enjoying your Healthy Mushroom Stuffed Chicken Breast, you may have some left. To store leftovers, place them in an airtight container. Refrigerate them within two hours of cooking. This keeps the chicken fresh and safe to eat. The stuffed chicken can last in the fridge for up to three days. If you want to save your stuffed chicken for later, freezing is a great option. Wrap each stuffed chicken breast tightly in plastic wrap. Then, place them in a freezer-safe bag. Label the bag with the date. This way, you can enjoy your meal for up to three months. When you’re ready to enjoy your leftover stuffed chicken, reheating is key. To do this without drying it out, you can use two methods. The oven method keeps the chicken juicy. Preheat your oven to 350°F (175°C). Place the chicken on a baking sheet and cover it with foil. Heat for about 20-25 minutes, or until warmed through. The microwave is faster but may dry out the chicken. If using a microwave, place the chicken on a microwave-safe plate. Add a splash of water to the plate. Cover it with a damp paper towel. Heat on medium for 2-3 minutes, checking frequently. If you lead a busy life, meal prep can help. You can make the mushroom stuffing in advance. Store it in the fridge for up to three days. When you’re ready to cook, stuff the chicken breasts and bake them. For easy meals, try portioning the chicken. Slice the cooked stuffed chicken into servings. Store each portion in a container. This way, you can quickly grab a meal on the go. Pair it with some veggies or a salad for a complete dinner. To keep your chicken juicy, cook it at the right temperature. Bake the chicken at 375°F (190°C). This temperature allows for even cooking without drying it out. Use a meat thermometer to check if it reaches 165°F (75°C) inside. Cover the chicken with foil for the first part of baking. This traps heat and moisture, helping the chicken stay tender. Yes, you can bake without foil. However, this may dry out the chicken. The foil helps keep moisture in during cooking. If you skip the foil, check the chicken often. You may need to baste it with its juices to maintain moisture. You can pair this chicken with many sides. Here are some tasty ideas: - Steamed broccoli or green beans - A fresh garden salad - Quinoa or brown rice - Mashed sweet potatoes - Roasted vegetables These sides add color and flavor to your plate. For vegetarian options, swap the chicken with large portobello mushrooms. They hold stuffing well and taste great. For gluten-free diets, ensure the cheese and any added ingredients are certified gluten-free. You can also use gluten-free breadcrumbs if you want added texture in the stuffing. Absolutely! You can try various cheeses for new flavors. Here are some tasty options: - Mozzarella for a creamy texture - Feta for a tangy kick - Goat cheese for a rich taste Experimenting with cheese can make this dish your own! For more ideas, check the Full Recipe. In this article, we explored a delicious and healthy recipe for mushroom stuffed chicken. We covered key ingredients, detailed step-by-step instructions, and helpful tips to enhance flavors. Variations reveal many options for different diets and tastes. Remember, cooking should be fun and let you express your creativity. Now, get in the kitchen and try this recipe. Enjoy a tasty meal that’s good for you!

Healthy Mushroom Stuffed Chicken Breast for Dinner

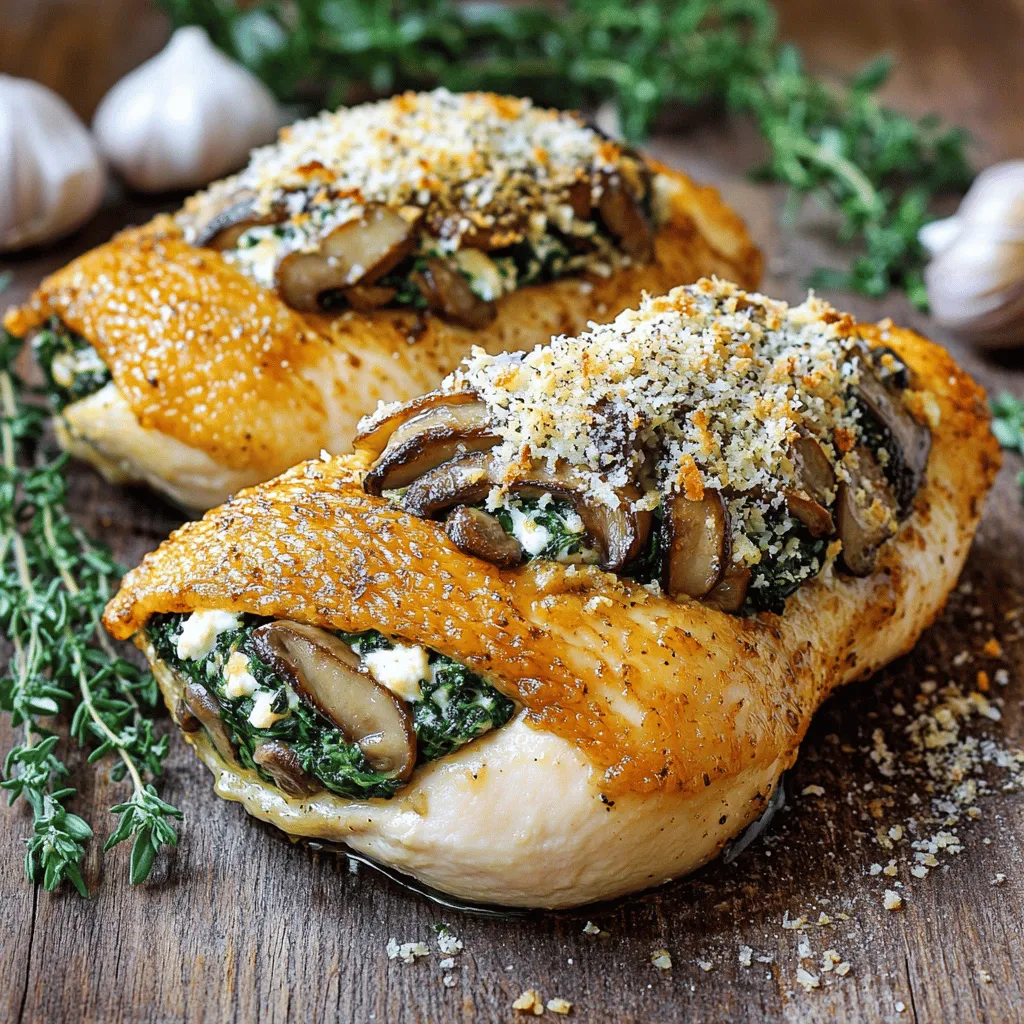
Looking for a delicious yet healthy dinner idea? Try my Healthy Mushroom Stuffed Chicken Breast! This dish combines tender chicken

- 1 pound pizza dough (store-bought or homemade) - 1 cup marinara sauce (for dipping) - 2 cups shredded mozzarella cheese - 1 cup sliced pepperoni - 1 cup mixed bell peppers, sliced - 1/2 cup sliced black olives - 1/2 teaspoon garlic powder - 1/2 teaspoon dried Italian herbs - 1 egg, beaten - Flour, for dusting When making a delicious Stromboli, you need the right ingredients. The key is to use fresh items. This ensures each bite bursts with flavor. First, you need pizza dough. You can buy it or make it at home. I often choose store-bought dough for speed. Next, grab some marinara sauce. This will be your tasty dip. Now, let's talk cheese. Mozzarella is a must. It melts beautifully and gives that stretchy, gooey texture. Pepperoni adds a savory kick that kids love. For crunch and color, add mixed bell peppers. I like to use red, yellow, and green for a vibrant look. Black olives add a salty bite. Lastly, don't forget garlic powder and Italian herbs. They boost flavor and aroma. A beaten egg helps give the Stromboli a lovely golden crust when baked. Before you start cooking, grab flour for dusting. This prevents the dough from sticking. With these ingredients, you're ready to create a family-friendly dinner that everyone will enjoy. - Baking sheet - Rolling pin - Parchment paper - Knife You need a few tools to make your Stromboli. A baking sheet is essential for cooking. It holds the Stromboli while it bakes. A rolling pin helps you flatten the dough evenly. This is important for a good roll. Parchment paper makes cleanup easy. It also prevents sticking. Lastly, have a sharp knife on hand. You’ll use it to slice the Stromboli before serving. These tools make the process smooth and simple. - Additional vegetables (e.g., mushrooms, spinach) - Different cheese types (e.g., cheddar, provolone) - Garlic butter for brushing You can customize your Stromboli with different toppings. Want more veggies? Add mushrooms or spinach. They add nutrition and flavor. If you love cheese, try mixing in cheddar or provolone. They bring their own unique tastes. For a special touch, brush the top with garlic butter before baking. This gives your Stromboli a rich flavor and a golden finish. Feel free to get creative! Each tweak can make your meal even better. The full recipe will guide you in making your Easy Stromboli Dinner. - Preheat the oven to 425°F (220°C). - On a floured surface, roll out the pizza dough into a rectangle. - Evenly sprinkle mozzarella cheese across the dough. - Layer on the sliced pepperoni, bell peppers, and black olives. - Start at one long edge and roll the dough tightly. - Pinch the edges to seal and prevent filling from escaping. - Place the rolled Stromboli seam-side down on a lined baking sheet. - Brush with beaten egg for a golden crust. - Cut a few slits on top to let steam escape. - Bake for 20-25 minutes until golden brown. - Let cool for 5 minutes before slicing. Serve warm with marinara sauce for dipping. For the complete process, check the Full Recipe. To make the best Stromboli, focus on the dough. Roll it out evenly, about 12 x 16 inches. This helps it bake uniformly. If the dough is too thick in spots, some areas may burn while others stay raw. Next, cut slits in the top of the rolled Stromboli. This lets steam escape and keeps it from getting soggy. Without these cuts, the dough might trap moisture and ruin your meal. Serve your Stromboli warm. A cup of marinara sauce is perfect for dipping. The rich sauce adds flavor and moisture with each bite. You can also pair it with a fresh salad or a side of pasta. This adds color and nutrition to your meal. Presentation matters! Garnish your Stromboli with fresh basil leaves for a pop of green. It looks great and adds a fresh flavor. Use a rustic wooden board for serving. This creates a warm and inviting display. Place the marinara sauce in a small bowl at the center for easy dipping. This simple touch makes your meal feel special. For the full recipe, check out the Stromboli Delight section. {{image_4}} You can make Stromboli your own. One option is a vegetarian Stromboli. This version uses only vegetables and cheese. Try spinach, mushrooms, or zucchini for a fresh taste. Add some ricotta or feta for creaminess. If you love meat, go for a meat-lover’s Stromboli. Stack it with ham, sausage, or bacon. You can even mix meats for more flavor. Just remember to balance the ingredients, so it doesn't overflow! The sauce can change everything. While marinara is a classic dip, try other options. Pesto is a vibrant choice, adding herbs and nuts. Alfredo sauce provides a creamy twist. Both bring a new flair to your Stromboli. Don't feel stuck with regular dough. You can use whole wheat pizza dough for a healthier option. It adds fiber and a nutty taste. If you're gluten-free, many stores sell gluten-free pizza dough. It makes Stromboli accessible for everyone. For more great ideas, check the Full Recipe! Store any leftovers in an airtight container. This keeps your Stromboli fresh for up to three days. When you want a quick bite, just grab it from the fridge. If you have more Stromboli than you can eat, freeze it. You can freeze unbaked Stromboli for up to two months. When you are ready to enjoy it, bake it directly from the freezer. There’s no need to thaw it first. For the best texture, reheat your Stromboli in the oven. Set it to 350°F (175°C) and heat until warm. If you need a quicker option, use the microwave. Just heat it in short bursts to avoid sogginess. For the full experience, you can check the [Full Recipe]. Yes, using store-bought dough saves time and effort. It allows you to focus on adding your favorite toppings. I often choose this option when I need a quick meal. The dough still bakes beautifully, giving you that warm, fluffy texture. I usually serve Stromboli with marinara sauce for dipping. It enhances the dish's flavor and adds a nice touch. You can also pair it with a fresh salad or some crispy garlic bread. These sides balance out the meal and make it even more enjoyable. Your Stromboli should be golden brown when it is ready. Tap the top gently; it should sound hollow. If it does, you can be sure it’s fully cooked. This simple trick ensures a perfect Stromboli every time! You learned how to make a tasty Stromboli using simple ingredients and easy steps. With tips for storage and serving, you can enjoy it fresh or save some for later. Feel free to customize it with your favorite toppings and sauces. Cooking should be fun and creative, so experiment and make it your own. Enjoy this delicious meal with family and friends, and share the joy of homemade food.

Easy Stromboli Dinner for a Quick Family Meal

Looking for a quick family meal that’s both fun to make and tasty? Try this easy Stromboli dinner! With just

To make a Savory French Onion Pot Roast, gather the following ingredients: - 3 to 4 pounds of beef chuck roast - 4 large yellow onions, thinly sliced - 4 cloves of garlic, minced - 2 cups of beef broth - 2 tablespoons of Worcestershire sauce - 1 tablespoon of balsamic vinegar - 2 tablespoons of olive oil - 1 teaspoon of dried thyme - 1 teaspoon of dried rosemary - Salt and pepper to taste - Fresh parsley, chopped (for garnish) - 1 loaf of crusty French bread (for serving) Each ingredient plays a vital role in building the rich flavors you want. The beef chuck roast serves as the star, providing tenderness and depth. Onions add sweetness and caramelization, while garlic gives a fragrant punch. The broth, Worcestershire sauce, and vinegar create a savory base. Herbs like thyme and rosemary add earthy notes, rounding out the dish beautifully. Do not overlook the garnishes! Fresh parsley adds a pop of color and brightness. And of course, crusty French bread is essential for soaking up the delicious broth. This meal is all about layers of flavor and comfort. Use the full recipe for a step-by-step guide on how to bring this dish to life. - Preheat the oven to 325°F (160°C). - Season and sear the beef chuck roast. Start by adding salt and pepper. Heat olive oil in a large pot. Place the roast in the pot. Sear it for 3 to 4 minutes on each side. This gives the roast a nice crust. Remove the roast and set it aside. - Sauté the onions until golden brown. Add the thinly sliced yellow onions to the same pot. Stir them often. Cook for about 15 to 20 minutes. You want them to become sweet and soft. - Add garlic and sauté further. When the onions are ready, add minced garlic. Cook for an additional 2 to 3 minutes. This makes the kitchen smell amazing. - Deglaze the pot with Worcestershire sauce and balsamic vinegar. Pour these liquids into the pot. Use a wooden spoon to scrape the bottom. This gets all the tasty bits stuck on the pot. - Return the roast and add beef broth and herbs. Place the seared roast back in the pot. Pour in enough beef broth to cover it halfway. Sprinkle dried thyme and rosemary on top. - Cover and place in the oven for 3 to 4 hours. Put a lid on the pot. Bake until the meat is fork-tender. - Check for fork-tenderness. Use a fork to test the roast. If it falls apart easily, it's ready. - Let the roast rest before slicing. After cooking, take the pot out of the oven. Let the roast sit for about 15 minutes. This helps the juices stay inside the meat. - Toasting the French bread. While the roast rests, slice the French bread. Arrange the slices on a baking sheet. Toast them in the oven until golden. - Arrange pot roast with caramelized onions. On a serving platter, place sliced pot roast. Top it with the sweet onions. - Serve with the rich broth and toasted bread. Ladle the savory broth over the roast. Don't forget to include the toasted bread for dipping. Enjoy this warm and hearty meal! To get the best crust on your pot roast, make sure to use high heat. This helps form a nice, brown outer layer. Season your beef well with salt and pepper before searing. Place the roast in a hot pot and don’t move it for a few minutes. Let it brown before flipping. Sear each side for about 3-4 minutes. This step locks in flavor and moisture. Caramelizing onions adds depth to your dish. To avoid burning them, cook over medium heat. Stir them often for even cooking. Start with the onions, cooking them for 15-20 minutes until golden brown. Add garlic later, just for 2-3 minutes. This timing keeps the garlic fresh and tasty. Sweet onions bring out the best flavor. Enhancing the broth can make your pot roast even better. Try adding fresh herbs like parsley or thyme for extra flavor. A splash of red wine can deepen the taste too. If you want a richer broth, consider adding more Worcestershire sauce or beef broth. Adjust these flavors to suit your taste. Enjoy experimenting with different spices! For the full recipe, check out the detailed steps and ingredients needed to make this dish a success. {{image_4}} You can switch up the meat for your pot roast. Brisket works well, adding rich flavor. Round roast is another option. It’s leaner but still tasty. Both cuts can give you a unique twist on the classic dish. Just remember to adjust cooking times if needed. Want to enhance the taste? Add a splash of red wine to deepen flavor. It brings a nice acidity that balances the richness of the meat. You can also play with different herbs. Try tarragon or oregano for a fresh twist. Each herb adds a unique note to your dish. If you're short on time, use an Instant Pot for quicker cooking. It cuts the cooking time down to about one hour. Just follow the same steps as the oven method. A slow cooker is also a great choice. It allows the flavors to meld over several hours. Both methods yield a delicious, tender pot roast. For the full recipe, check out the link. After enjoying your Savory French Onion Pot Roast, store any leftovers in the fridge. Place the pot roast in an airtight container. This keeps it fresh and prevents odors from mixing. Leftovers can last up to four days in the fridge. If you will not eat them soon, consider freezing instead. To freeze, slice the pot roast into smaller pieces. This helps it freeze faster and makes it easier to thaw. Wrap each piece tightly in plastic wrap or foil. Place the wrapped roast in a freezer-safe bag. Remove as much air as possible. The pot roast can last up to three months in the freezer. For thawing, move the roast from the freezer to the fridge overnight. This ensures even thawing. You can reheat the pot roast on the stovetop or in the microwave. For stovetop reheating, place the roast in a pan with a little beef broth. Heat over medium-low, stirring gently. For the microwave, place the roast in a microwave-safe dish. Add a splash of broth, cover with a lid, and heat in short bursts. To keep the meat moist, add some broth while reheating. This prevents dryness and keeps it flavorful. Always check the meat's temperature before serving. Enjoy your delicious leftovers! A pot roast takes about 3 to 4 hours at 325°F. Cooking time depends on the roast's weight. For a 3 to 4-pound chuck roast, expect this range for tenderness. You want it to be fork-tender, which means it should pull apart easily. You can pair this dish with many sides. Here are some great choices: - Mashed potatoes - Roasted vegetables - Creamy polenta - Green beans - A fresh garden salad These sides complement the rich flavors of the pot roast and bring balance to your meal. Yes, you can prep the roast a day in advance. Season and sear it, then place it in the fridge. On cooking day, simply follow the recipe to finish. You can also reheat leftovers. For best results, use the oven or stovetop. This way, the meat stays juicy. Check the roast for fork-tenderness. If a fork easily goes in and pulls the meat apart, it's ready. You can also use a meat thermometer; the internal temperature should reach 195°F to 205°F for optimal tenderness. Store leftovers in an airtight container. Refrigerate for up to 3 days. Make sure to keep the broth with the meat. This helps keep the pot roast moist. If you want to save it longer, freeze it for up to 3 months. Thaw in the fridge before reheating. For the complete Savory French Onion Pot Roast recipe, check out the [Full Recipe]. In this blog post, we covered how to make a delicious Savory French Onion Pot Roast. You now know the key ingredients, step-by-step instructions, and helpful tips for perfecting your roast. Remember, the right sear and caramelized onions are crucial for deep flavor. I encourage you to try different meat cuts and cooking methods, too. Whether you choose to slow cook or use an Instant Pot, enjoyment awaits. With proper storage, leftovers can last. Use what you’ve learned today to impress friends and family at your next meal. Happy cooking!

Savory French Onion Pot Roast Flavorful Comfort Meal

Craving a cozy meal that warms you from the inside out? My Savory French Onion Pot Roast is it! This

- 4 lobster tails - 1/2 cup unsalted butter (1 stick) - 4 cloves garlic, minced Lobster tails stand out as the main star in this dish. They are sweet and tender. I often pick fresh lobster tails for the best flavor. The unsalted butter adds richness. I always use high-quality butter for the best taste. Garlic is key too. You want to mince it well to release all that flavor. - 2 tablespoons fresh parsley, finely chopped - 1 tablespoon fresh thyme leaves, chopped - 1 teaspoon lemon zest Fresh herbs make a big difference. I love the bright taste of parsley and thyme. They add freshness that pairs well with lobster. Lemon zest brings a zing that pops in every bite. It’s a simple way to enhance the dish. - 1 tablespoon fresh lemon juice - 1 teaspoon paprika - Salt and freshly cracked black pepper The lemon juice adds acidity. It helps balance the richness of the butter. Paprika gives a nice color and a slight warmth. I always add salt and pepper to taste. Be sure to use fresh cracked pepper for the best flavor. Lastly, serve with lemon wedges for a burst of freshness. You can find the Full Recipe to make this dish truly shine. Preparing for Cooking 1. Preheat the oven to 425°F (220°C). This step helps cook lobster tails evenly. 2. Prepare the lobster tails. Use kitchen scissors to cut down the center of each shell. Stop just before the tail fin. Gently pull up the lobster meat. This makes a lovely display. Making the Sauce 3. Melt the butter and sauté the garlic. In a small pot, melt the butter on low heat. Add the minced garlic and cook for 1-2 minutes. Keep an eye on it so it does not brown. 4. Add herbs and seasoning to the butter. Mix in chopped parsley, thyme, lemon zest, lemon juice, paprika, salt, and pepper. Stir well to blend all the flavors. Cooking the Lobster Tails 5. Arrange the lobster tails on a tray. Place the tails on a baking tray lined with parchment paper. Brush the garlic herb butter sauce over the lobster meat. Save some sauce for later. 6. Bake in the oven and baste for flavor. Cook the lobster tails for 12-15 minutes. They are ready when the meat is opaque and firm. Baste with the saved butter halfway through. 7. Serve after cooking. Take the lobster tails out of the oven and let them cool for a few minutes. Drizzle the remaining garlic herb butter on top. Serve with lemon wedges for a fresh touch. Try the full recipe for a delightful dish that impresses anyone! To achieve perfectly tender lobster meat, start with fresh tails. Freshness keeps the meat juicy and sweet. When you cut the shell, be careful not to slice the lobster meat. This helps keep it moist. Baking at 425°F cooks the lobster evenly. Monitor closely to avoid overcooking. For basting, use a pastry brush. Brush the garlic herb butter on the meat halfway through baking. This adds flavor and keeps the meat juicy. You can baste every few minutes for more flavor. Serve lobster tails on a large white platter. The contrast makes the dish pop. Arrange them in a fan shape for a stunning look. Add fresh parsley and lemon wedges around the edges. This adds color and freshness. You can also place the leftover garlic herb butter in a small bowl. Guests can add more flavor to their liking. Cooking times can vary based on tail size. For tails weighing about 6-8 ounces, bake for 12-15 minutes. If they weigh more, add a few minutes to the time. The ideal internal temperature for lobster is 140°F. You can check this with a meat thermometer. The meat should be firm and opaque when done. Following these tips will ensure a great lobster dish. For the full recipe, check out the instructions above. {{image_4}} You can enhance the garlic herb butter by adding white wine. A splash of dry white wine brings a nice depth of flavor. It pairs well with the butter and garlic. Simply add it to the butter after the garlic cooks. Let it simmer for a minute before adding herbs. Spice variations can also change the taste. For a kick, try adding red pepper flakes. If you enjoy a smoky flavor, consider smoked paprika. You can also use different herbs, like dill or basil, for a fresh twist. Grilling lobster tails is a fun way to get a smoky flavor. To grill, brush the tails with the garlic herb butter. Place them on a hot grill, meat side down. Grill for about 5-6 minutes. Flip, add more butter, and grill for another 5-6 minutes. Broiling is another option for a different texture. Broiling gives the tops a nice char. Place the prepared lobster tails under the broiler for about 10 minutes. Keep an eye on them to avoid burning. Lobster pairs well with many sides. Try serving it with garlic mashed potatoes. The creamy potatoes balance the richness of the lobster. Grilled asparagus or sautéed green beans also work well. They add color and nutrients to your meal. For wine pairing, a crisp Chardonnay is a great choice. Its fruity notes complement the seafood nicely. If you prefer red wine, a light Pinot Noir can also be a good match. For the full recipe, check out the complete instructions provided. To keep leftover lobster tails fresh, follow these tips: - Cool Quickly: Let the lobster tails cool to room temp before storing. - Use Airtight Containers: Place them in a sealed container. Glass or plastic works well. - Refrigerate: Store the container in the fridge. It should stay fresh for 1-2 days. To reheat lobster tails, follow these easy steps: - Avoid Drying Out: Use a pan with a lid. This keeps the moisture in. - Steam Method: Add a little water to the pan. Heat on low for about 5-7 minutes. - Microwave Method: Place lobster tails on a plate. Cover with a damp paper towel. Heat in short bursts of 30 seconds until warm. These methods help you enjoy your lobster tails again, keeping them tasty and juicy. For the complete recipe, check out the Full Recipe. How long to cook lobster tails per weight? Cooking lobster tails is easy once you know the time needed. For every 4 ounces, cook for about 1 to 1.5 minutes. A 6-ounce tail needs about 6 to 9 minutes. Always check for an opaque color to know they are done. Can I make garlic herb butter in advance? Yes, you can make garlic herb butter ahead of time. Just mix the butter, garlic, and herbs, then store it in the fridge. This way, you save time when you are ready to cook. What can I use instead of unsalted butter? If you want a dairy-free option, try using coconut oil or olive oil. Both add nice flavor and work well in this dish. Alternatives for fresh herbs If you don't have fresh herbs, you can use dried ones. Use one-third of the amount since dried herbs are stronger. Basil or oregano can also work well in this recipe. Are lobster tails healthy? Yes, lobster tails are low in calories and high in protein. They are a smart choice for a healthy meal. Nutritional benefits of this dish Lobster tails offer many nutrients. They are rich in omega-3 fatty acids, vitamins, and minerals. Eating lobster can support heart health and boost your immune system. Enjoying them with garlic herb butter adds flavor and richness. To see how to make this dish, check out the Full Recipe. To sum up, cooking lobster tails is simple and rewarding. Focus on fresh ingredients like butter, garlic, and herbs for the best flavor. Follow the steps to prepare, cook, and serve your dish perfectly. Remember the tips for timing and presentation, and feel free to explore variations. Enjoy your lobster tails with ideal sides and sauces. With these methods, you can create a meal that impresses every time. Dive in and start cooking—you’ll love the results!

Lobster Tails with Garlic Herb Butter Sauce Delight

Are you ready to impress your friends and family with a delicious seafood dish? In this guide, I’ll show you

- 8 oz linguine pasta - 2 boneless, skinless chicken breasts, cut into bite-sized pieces - 4 tablespoons cowboy butter - 3 cloves garlic, minced - 1 teaspoon smoked paprika - 1/2 teaspoon cayenne pepper (adjust based on spice preference) - 1 cup heavy cream - 1 cup cherry tomatoes, halved - 2 cups fresh spinach - Salt and freshly ground black pepper to taste - Fresh parsley, chopped for garnish - Grated Parmesan cheese, for serving (optional) - 1 cup unsalted butter, melted - 2 tablespoons Worcestershire sauce - 2 tablespoons fresh lemon juice - 1 teaspoon garlic powder - 1 teaspoon smoked paprika - 1 teaspoon dried thyme - 1/2 teaspoon chili powder - Salt and freshly ground black pepper to taste In Cowboy Butter Chicken Linguine, the main ingredients shine. The linguine pasta gives a nice base, while chicken adds protein. Cowboy butter provides rich flavor. It’s easy to make and packs a punch. The additional ingredients bring depth. Garlic, spices, and heavy cream create a creamy sauce. Cherry tomatoes add sweetness and color. Fresh spinach gives a nice, bright touch. You can also top it with grated Parmesan for extra flavor. The cowboy butter is simple yet flavorful. Melted unsalted butter forms the base. Worcestershire sauce and lemon juice add tang. Garlic powder and spices elevate the taste. This sauce is key for flavor in the dish. You can find the full recipe in the linked section. Knowing these ingredients helps you prepare. You will enjoy each step as you cook. The blend of flavors makes this dish a winner. - In a medium bowl, mix melted butter, Worcestershire sauce, lemon juice, garlic powder, smoked paprika, thyme, chili powder, salt, and pepper. - Whisk until smooth and set aside. Let the flavors meld for a bit. - Boil salted water in a large pot. - Add linguine and cook until al dente, about 8-10 minutes. - Drain the pasta, but save 1/2 cup of the cooking water for later. - Heat 2 tablespoons of cowboy butter in a large skillet over medium heat. - Add chicken pieces and season with smoked paprika, cayenne, salt, and pepper. - Sauté for 5-7 minutes until the chicken is browned and cooked through. - Remove chicken from the skillet and set it aside. - In the same skillet, add the remaining cowboy butter. - Once melted, add minced garlic and sauté for 30 seconds. - Pour in heavy cream and mix well. - Bring to a gentle simmer, then add halved cherry tomatoes. - Cook for 2-3 minutes until they soften. - Return the cooked chicken to the skillet. - Add fresh spinach and stir until it wilts. - If the sauce is too thick, add reserved pasta water a little at a time. - Toss the drained linguine into the skillet. - Mix gently to coat the pasta in the sauce. - Taste and adjust seasoning with salt and pepper. - Serve in shallow bowls, garnished with chopped parsley and optional Parmesan cheese. For the full recipe, check the main section! To make Cowboy Butter Chicken Linguine shine, focus on the spice levels. Adding cayenne pepper can give your dish a kick. Start small if you are unsure. You can always add more later. Using fresh ingredients also makes a big difference. Fresh garlic and ripe tomatoes boost the taste. Perfecting your cooking skills is key. Sautéing the chicken just right gives a nice brown color. Cook it until it is no longer pink. Simmering the sauce gently will help the flavors blend. Timing matters too. Boil the pasta until it is al dente. This keeps it firm and tasty. Garnishing with fresh parsley adds a pop of color. Grated Parmesan cheese on top adds creaminess. For a complete meal, pair your dish with a fresh side salad or warm bread. This balances flavors and fills your plate. You can find the Full Recipe to guide your cooking journey. {{image_4}} You can switch up the protein in cowboy butter chicken linguine. Shrimp works great instead of chicken. Cook shrimp until they turn pink and firm. Turkey also makes a tasty swap. Use ground turkey for a lighter dish. For a vegetarian option, try using tofu or mushrooms. Tofu absorbs flavors well. Sauté it until golden. Mushrooms add a nice umami taste. Both options keep the dish hearty and satisfying. Make this dish fit your diet with some easy swaps. If you need gluten-free pasta, look for options made from rice or lentils. They cook up nicely and taste great. For a dairy-free sauce, use coconut cream instead of heavy cream. It adds a hint of sweetness. You can also use nut milk, but ensure it’s unsweetened. These changes keep your meal creamy while fitting your needs. Boost the flavors with extra veggies or spices. Bell peppers add a sweet crunch and color. You can toss them in with the garlic. For a cheesy twist, try adding goat cheese or feta. They melt beautifully and give a tangy kick. Fresh herbs, like basil or chives, brighten up the dish. Experiment with these options to find your favorite mix. Each variation keeps the spirit of cowboy butter chicken linguine alive while offering something new. To keep your cowboy butter chicken linguine fresh, use airtight containers. Glass or plastic containers both work well. Make sure to let the dish cool down first. This helps avoid moisture buildup. Separate the pasta and sauce if you can. This keeps them from drying out. If mixed, add a little extra cream when reheating. You can reheat your dish in the microwave or on the stovetop. The microwave is quick but can make pasta chewy. Stir every minute for even heating. The stovetop keeps the texture better. Use low heat and add a splash of cream. This helps keep the sauce smooth and rich. Yes, you can freeze cowboy butter chicken linguine! Divide it into portions for easy meals later. Use freezer-safe containers or bags. Press out air to avoid freezer burn. When ready, thaw in the fridge overnight. Reheat on the stovetop for best results. Add a bit of cream if needed to restore creaminess. Cowboy butter is a flavorful mix of butter and spices. It adds a rich taste to dishes. You can use it in many ways, like on meats or veggies. This recipe calls for cowboy butter made with: - Unsalted butter - Worcestershire sauce - Fresh lemon juice - Garlic powder - Smoked paprika - Dried thyme - Chili powder - Salt and black pepper Mixing these ingredients creates a zesty, buttery sauce perfect for cowboy butter chicken linguine. Yes, you can prepare this dish ahead of time. Here are some tips for meal prep: - Cook the chicken and pasta, then refrigerate them separately. - Prepare the cowboy butter and store it in an airtight container. - When you are ready to eat, just reheat the chicken and pasta. This way, you save time and still enjoy a tasty meal. If you need a substitute for heavy cream, try these options: - Whole milk with a bit of butter - Coconut cream for a dairy-free choice - Cashew cream for a nut-based option These will help you create a creamy sauce without heavy cream. To adjust the spice level, you can: - Add more cayenne pepper for heat. - Include red pepper flakes for extra spice. - Omit cayenne if you prefer less heat. You can customize the dish to fit your taste. Pair this dish with these tasty sides: - Garlic bread for a crunchy bite - A fresh salad for a light touch - A glass of white wine for a nice drink These options will make your meal even better. In this blog post, I shared how to make Cowboy Butter Chicken Linguine. We covered the main and additional ingredients, which create strong flavors. I guided you through the cooking steps, ensuring your dish turns out delicious. Lastly, I shared tips for flavor, variations, and storage. With this recipe, you can impress anyone with your cooking. Enjoy your meal, and don’t shy away from experimenting with ingredients!

Cowboy Butter Chicken Linguine Simple and Tasty Dish

Are you ready to spice up your dinner with a fun twist? Cowboy Butter Chicken Linguine is both simple and

To make white sangria, you need the following ingredients: - 2 cups white grape juice - 1 cup sparkling water or lemon-lime soda - 1 cup peach or apricot nectar - 1 medium green apple, thinly sliced - 1 cup fresh strawberries, halved - 1 orange, thinly sliced - 1 lemon, thinly sliced - A handful of fresh mint leaves - Ice cubes For a great white sangria, I suggest using a dry white wine. Here are some options: - Sauvignon Blanc - Pinot Grigio - Chardonnay These wines have nice fruit notes and mix well. Keep the wine light. Avoid overly sweet options for balance. You can add more fruits for extra flavor. Here are some tasty choices: - Pineapple chunks - Raspberries - Kiwi slices Experiment with herbs, too. Try a sprig of basil or rosemary. They give a unique taste. For sweetness, consider adding a splash of agave syrup or honey. This can help balance the tartness of citrus fruits. To make white sangria, you need a pitcher and some fun. Start by pouring 2 cups of white grape juice into the pitcher. Next, add 1 cup of peach or apricot nectar. Stir them well. This mix is the base of your drink. Now, slowly add 1 cup of sparkling water or lemon-lime soda. Adding it slowly keeps the bubbles fresh. Then, it's time for the fruits. Slice 1 medium green apple and add it. Halve 1 cup of fresh strawberries and toss them in too. Don't forget to slice 1 orange and 1 lemon thinly. Add these slices to the mix. As you stir, gently press the fruit. This helps their juices blend into the sangria. Next, toss in a handful of fresh mint leaves. This step adds a nice, fresh scent. Cover your pitcher and let it chill in the fridge for at least 30 minutes. This waiting time helps the flavors mix well. To keep your sangria bubbly, add the sparkling water last. Pour it in gently. If you need to serve later, wait until just before serving to add the fizz. This way, your drink stays lively and fun. When you’re ready to serve, grab some glasses and fill them with ice cubes. Pour the chilled sangria over the ice. Make sure each glass has fruit. For a pretty touch, garnish with more mint leaves and a slice of citrus. This not only looks nice but also makes each sip even better. Enjoy your refreshing drink! To make your white sangria shine, start with the right wine. I recommend a dry white wine, like Sauvignon Blanc. This wine adds a crisp taste. Next, focus on your fruit. Use fresh, ripe fruit for the best flavor. Slice them thin to help the juices mix well. Let your sangria sit in the fridge for at least 30 minutes. This time helps the flavors blend perfectly. Finding the right balance is key. If your sangria tastes too sweet, add more citrus. Squeeze in fresh lemon or lime juice. This adds acidity and brightens the drink. If it’s too tart for your taste, stir in a bit of sugar or honey. Start with a teaspoon and taste as you go. Remember, you can always add more but can't take it out! Want a tasty drink without the wine? Try the refreshing white sangria mocktail recipe. It’s perfect for everyone. The full recipe includes white grape juice, sparkling water, and fresh fruit. This drink is just as fun and flavorful as the original! Enjoy it at parties or on a sunny afternoon. {{image_4}} To make a tropical white sangria, you can use pineapple and mango. Start with 2 cups of white grape juice. Add 1 cup of pineapple juice. Mix in 1 cup of sparkling water. Include slices of fresh pineapple and mango for a sweet twist. Garnish with coconut flakes for a fun touch. This tropical version will bring a taste of the islands to your glass. For a zesty taste, try a citrus-infused sangria. Use 2 cups of white grape juice. Add 1 cup of orange juice for a bright flavor. Squeeze in juice from a lime and a lemon. Include slices of blood oranges and grapefruits for extra zing. The mix of citrus will wake up your taste buds and keep you refreshed. Change your sangria with the seasons. In summer, use berries like blueberries and raspberries. In fall, add slices of crisp pears and a sprinkle of cinnamon. Winter can bring in pomegranate seeds and cranberries for a festive look. In spring, try fresh herbs like basil or lavender for a fresh touch. Each season offers new flavors to explore in your sangria. Store leftover white sangria in a sealed container. This keeps it fresh. Use a pitcher with a lid or a glass jar. Make sure to keep it in the fridge. Consume the sangria within three days for the best taste. To keep your sangria fresh, avoid adding fruit until serving. Add fruits just before you pour. This prevents the fruits from getting too soggy. If you have leftover fruit, store it in the fridge too. Use it in smoothies or salads later. You can freeze the fruits used in sangria. Slice the fruits and place them on a tray. Freeze them for a couple of hours, then transfer to a bag. Frozen fruits are great for later. They add chill and flavor to your next batch of white sangria. The best wine for white sangria is light and fruity. I recommend using a dry white wine. Good options include Sauvignon Blanc, Pinot Grigio, or Chardonnay. These wines blend well with fruits and juices. Avoid heavy wines, as they can overpower the drink. You can keep white sangria in the fridge for up to three days. However, the fruit will start to lose its freshness after one day. For the best taste, enjoy it within 24 hours. If you want to keep the fizz, add sparkling water just before serving. Yes, you can make white sangria ahead of time! Prepare it a few hours before your event. This allows the flavors to mix well. Just remember to add sparkling water or soda right before serving. This keeps the drink bubbly and refreshing. For a non-alcoholic version, check out the Full Recipe! You learned how to make a tasty white sangria. We covered ingredients, key wines, and more. I shared easy steps for prep and tips for fizz. You can make fun variations, like tropical or citrus sangria. Don't forget about storing leftovers the right way. With this guide, you can impress friends and family. White sangria is refreshing for any occasion. Enjoy making it your own!

White Sangria Refreshing and Flavorful Recipe Guide

Looking for a drink that’s both refreshing and flavorful? You’ve found it! In this guide, I’ll show you how to

- 4 boneless, skinless chicken breasts - 2 cups fresh spinach, chopped - 1 cup ricotta cheese - 1 cup grated mozzarella cheese, divided - 1/2 cup grated Parmesan cheese - 1 clove garlic, minced - 1 tablespoon olive oil - 1 teaspoon Italian seasoning - Salt and pepper to taste - 1/4 teaspoon red pepper flakes (optional) - Fresh basil leaves for garnish To start, gather all your ingredients. This helps keep your cooking area tidy. Prepping will make the cooking flow smoother. First, preheat your oven to 375°F (190°C). This step is crucial for even cooking later. While the oven heats, season your chicken. Use salt, pepper, and Italian seasoning. Next, heat the olive oil in a skillet. Add the minced garlic. Sauté it for about 30 seconds. You want it fragrant but not brown. Then, add the chopped spinach. Cook just until it wilts, about 2-3 minutes. This brings out its bright flavor and color. Remove the skillet from the heat and let it cool a bit. In a separate bowl, mix the ricotta cheese, half of the mozzarella, and the cooked spinach. Stir well and add a pinch of salt and pepper. If you like spice, toss in some red pepper flakes. This filling is creamy and packed with flavor. Chicken Florentine is a healthy dish. Each serving provides a good amount of protein from the chicken and cheese. Spinach adds vitamins A and C, along with iron. Here’s a rough breakdown for one serving: - Calories: 400 - Protein: 40g - Carbohydrates: 6g - Fat: 24g This dish fits well into a balanced meal. Enjoy it with a side of veggies or a salad for a complete experience. For the full recipe, please refer to the mentioned source. First, preheat your oven to 375°F (190°C). This step warms the oven so your chicken cooks evenly. While the oven heats, take your chicken breasts and season them well. Use salt, pepper, and Italian seasoning to add flavor. Be sure to coat both sides evenly. This seasoning enhances the taste and brings out the best in your dish. Next, grab a large skillet and heat one tablespoon of olive oil over medium heat. Add one clove of minced garlic. Sauté it for about 30 seconds until it smells great. Then, add two cups of chopped spinach. Cook the spinach until it wilts, which usually takes 2-3 minutes. Keep an eye on the color; it should stay vibrant green. Once cooked, remove the skillet from heat and let the spinach cool slightly. Now, let’s prepare the filling. In a mixing bowl, combine one cup of ricotta cheese, half of the grated mozzarella, and the sautéed spinach. Mix everything well and add a pinch of salt and pepper. If you like some heat, add a little red pepper flakes. Take each chicken breast and slice it horizontally to create a pocket. Be careful not to cut all the way through. Stuff each chicken breast generously with the spinach and ricotta mixture. If needed, use toothpicks to secure the openings. This keeps the filling inside while cooking. Place the stuffed chicken in a greased baking dish. Sprinkle the remaining mozzarella and grated Parmesan cheese on top. This will create a tasty, bubbling crust. Bake the dish for 25-30 minutes. The chicken should be cooked through and the cheese melted and golden. Once it’s done, let the chicken rest for 5 minutes before serving. This helps keep the juices inside. Finish by garnishing with fresh basil leaves for a lovely touch. You can find the full recipe above for more detailed steps. Enjoy your Chicken Florentine! To make your Chicken Florentine shine, focus on the chicken. Always choose fresh, high-quality chicken breasts. This choice makes a big difference in taste. Season the chicken well. Use salt, pepper, and Italian seasoning. This will add depth to your dish. When you sauté the garlic, keep an eye on it. Garlic can burn quickly. You want it fragrant, not brown. Cook the spinach just until it wilts. This keeps its bright color and nutrients. Mixing the filling is fun! Make sure to taste it. Adjust the salt and pepper to your liking. Presentation matters. Serve your Chicken Florentine on warm plates. A drizzle of olive oil adds a nice touch. Garnish with fresh basil for color and flavor. This enhances the dish's look and taste. You can also add a squeeze of fresh lemon juice. It brightens the flavors and adds a fresh twist. Chicken Florentine pairs well with many sides. Consider serving it with roasted vegetables. They add color and nutrition to your plate. A light salad with vinaigrette works great too. The acidity of the dressing balances the richness of the chicken. If you want something heartier, try garlic bread or pasta. Both are excellent choices. They soak up the tasty juices from the chicken. For a refreshing drink, serve a crisp white wine or sparkling water. This enhances your meal and makes it special. For the complete recipe, check the Full Recipe link. {{image_4}} You can switch up the cheese in Chicken Florentine. Instead of ricotta, try cream cheese for a richer taste. Goat cheese adds a nice tang. You can also use feta for a salty kick. Mixing cheeses creates exciting flavors. Cheese blends let you customize the dish to your liking. You can make Chicken Florentine for different diets. For a dairy-free option, use cashew cream instead of cheese. If you're gluten-free, ensure your seasonings and ingredients are safe. You can also swap chicken for tofu or tempeh. These changes keep the dish tasty while meeting your needs. Spinach isn't the only green you can use. Kale works well and has a hearty texture. Swiss chard also makes a great choice. If you want something different, try arugula for a peppery flavor. Mixing these greens gives you a fun twist on the classic dish. The full recipe shows how you can easily adapt it. You can keep leftover Chicken Florentine in the fridge. Place it in an airtight container. It stays fresh for up to three days. If you want to enjoy it later, cool it down first. This helps keep the flavors intact. Reheat Chicken Florentine in the oven. Set your oven to 350°F (175°C). Place the chicken in a baking dish. Cover it with foil to keep it moist. Heat for about 15-20 minutes. You can also use a microwave. Just place the chicken on a plate and cover it. Heat for 1-2 minutes on medium power. Freezing is a great way to save Chicken Florentine. Wrap each piece tightly in plastic wrap. Then place them in a freezer bag. They can last up to two months in the freezer. When ready to eat, thaw in the fridge overnight. Then reheat as mentioned above. Enjoy your Chicken Florentine again with these simple storage tips! For the complete cooking process, check the Full Recipe. Chicken Florentine is a tasty dish featuring chicken breast and spinach. It often includes creamy cheese and herbs. The dish reflects Italian flavors and offers a great mix of textures. You bake it until the cheese melts and the chicken cooks perfectly. Yes, you can make Chicken Florentine ahead of time. Prepare the chicken and stuff it with the spinach and cheese. Then, cover it and store it in the fridge for up to 24 hours. When you are ready to cook, just bake it as you normally would. This saves time and effort on busy days. To check if the chicken is cooked, use a meat thermometer. The chicken should reach 165°F (75°C) inside. If you do not have a thermometer, cut into the thickest part. The juices should run clear, and the meat should not be pink. This ensures your Chicken Florentine is safe to eat and delicious. In this post, we explored Chicken Florentine. We covered ingredients, preparation, and nutrition. I shared step-by-step cooking instructions and tips to perfect your dish. You learned how to modify the recipe for different tastes and dietary needs. We also discussed storage and answered common questions. Remember, cooking is fun and open to change. Experiment and make this dish your own! Enjoy your Chicken Florentine journey.

Chicken Florentine Delightful and Easy Recipe

Are you ready to impress your family with a delicious meal? Chicken Florentine is simple and packed with flavor. In

- 12 oz pasta (penne or rotini) - 1 lb ground beef or ground turkey - 1 medium onion, finely diced - 2 cloves garlic, minced - 1 can (15 oz) black beans, rinsed and drained - 1 can (15 oz) diced tomatoes with green chilies - 1 cup corn kernels - 1 tablespoon chili powder - 1 teaspoon ground cumin - 1 teaspoon smoked paprika - Salt and black pepper to taste - 1 cup shredded cheese - 2 tablespoons olive oil - Fresh cilantro or parsley for garnish When making cowboy pasta, fresh ingredients make a big difference. I love using a mix of flavors that dance together. Start with your choice of pasta; penne or rotini works best here. Then, choose your protein: ground beef or turkey both add great taste. Next, you'll need an onion and garlic for that aromatic base. Do not skip the black beans; they add protein and fiber. The diced tomatoes with green chilies give a nice kick. Corn adds some sweetness, while chili powder, cumin, and smoked paprika bring warmth to the dish. Season with salt and black pepper to taste. Top it all off with shredded cheese for creaminess. Finally, a sprinkle of fresh herbs like cilantro or parsley makes it pretty and fresh. For the full recipe, follow the steps I outlined to create a hearty meal that's sure to please the whole family. - Bring salted water to a boil. - Add the pasta and cook until al dente, about 8-10 minutes. - Drain and set aside. - Heat olive oil in a skillet over medium heat. - Sauté the diced onion until it becomes translucent, about 3-4 minutes. - Add the minced garlic and ground meat. Cook until browned, about 6-8 minutes. - Season the mixture with chili powder, ground cumin, smoked paprika, salt, and black pepper. - Stir in the diced tomatoes, black beans, and corn. - Simmer for about 5 minutes to meld the flavors. - Add the cooked pasta to the skillet. - Toss everything to combine, adjusting consistency with a splash of water if needed. - Top with shredded cheese and cover to let it melt. Enjoy making this cowboy pasta! For the full recipe, check the recipe card above. To avoid mushy pasta, cook it until al dente. This means it should be firm to the bite. When you drain it, don’t rinse the pasta. Rinsing washes away the starch that helps the sauce stick. For seasoning meat, always start with salt and pepper. Then, use chili powder, cumin, and smoked paprika. These spices add depth and warmth. Adjust the seasoning based on your taste. To melt cheese perfectly, sprinkle it generously on top. Then, cover the skillet with a lid for a few minutes. The steam helps melt the cheese without burning it. For presentation, use rustic dishes or cast iron skillets. These add a hearty feel to the meal. A bright lime wedge on the side adds a zesty touch and looks great. Pair cowboy pasta with a light salad or cornbread. A cold drink, like iced tea, complements the flavors well. For garnishing, fresh cilantro or parsley adds color and freshness. You can also sprinkle extra cheese on top for richness. For the full recipe, check the main section. {{image_4}} You can easily make a vegetarian version of cowboy pasta. Simply substitute the meat with lentils or mushrooms. Lentils add protein and fiber, while mushrooms give a nice texture. You can also add more vegetables for nutrition. Try bell peppers, zucchini, or spinach. This not only boosts the health factor but also adds color and flavor to your dish. Want to adjust the spice level? You can make it mild or hot. To keep it mild, reduce the chili powder. For those who love heat, add jalapeños or crushed red pepper flakes. You can also serve extra hot sauce on the side. This way, everyone can adjust to their own taste. If you need a gluten-free option, use gluten-free pasta brands. They work well in this recipe. Just check the cooking time, as it may differ. You might also want to add a splash of extra sauce to keep it moist. This ensures that you enjoy every bite without worrying about gluten. You can store leftovers of cowboy pasta in the fridge for up to three days. Use airtight containers to keep the pasta fresh and flavorful. Glass or plastic containers work well. Make sure to let the pasta cool down before sealing it. This helps prevent moisture build-up. To freeze cowboy pasta, let it cool completely. Then, transfer it to freezer-safe bags or containers. Remove as much air as possible to prevent freezer burn. This meal can last up to three months in the freezer. When reheating frozen cowboy pasta, it's best to thaw it overnight in the fridge first. Then, heat it in a skillet over medium heat. Add a splash of water or broth to keep it moist. Stir until it’s heated through. You can also microwave it in short bursts, stirring in between, for a quicker option. For the full recipe, check out the Cowboy Pasta Delight section. Enjoy your hearty meal! Cowboy pasta is a hearty dish that blends pasta with flavors of the Southwest. It brings together ground meat, beans, corn, and spices. This dish is not just filling; it also tells a story of comfort food from cowboy culture. Many families enjoy this meal for its rich taste and easy prep. It’s a favorite for gatherings and weeknight dinners. Yes, you can use turkey instead of beef in cowboy pasta. Turkey gives a lighter flavor and less fat. It may change the overall taste slightly, but it still works well. If you choose turkey, make sure to season it well to enhance its flavor. Ground turkey cooks just like beef, so you can follow the same steps in the recipe. If you want a dairy-free option, you can skip the cheese altogether. Nutritional yeast adds a cheesy flavor without dairy. You can also use plant-based cheese made from nuts or soy. These alternatives melt differently, so be sure to check the package instructions. For those who prefer no cheese, fresh herbs can add flavor. In this blog post, we explored how to make Cowboy Pasta, a tasty and hearty dish. We covered the ingredients, step-by-step cooking instructions, and tips for a perfect meal. Don't forget to try the variations to suit your taste. This dish is versatile and fun to serve. I hope you feel inspired to create your own Cowboy Pasta at home. Enjoy the cooking process and the great flavors that come together in this comforting dish!

Cowboy Pasta Flavorful and Hearty Family Meal

Are you ready to dig into a meal that’s as hearty as it is tasty? Cowboy Pasta is a family

Older posts
Newer posts
← Previous Page1 … Page53 Page54 Page55 Next →

dsad

© 2025 eataroundit • Built with GeneratePress

Our Policies

  • Copyright Policy
  • Cookie Policy
  • GDPR Policy
  • Privacy Policy
  • Disclaimer
  • Terms Of Use

More Information

  • Home
  • About
  • Contact
  • Appetizers
  • Dessert
  • Dinner
  • Drinks
©2025, eataroundit About Back To Top