Skip to content
DisclaimerTerms Of UseGDPR PolicyCookie Policy

eataroundit

  • Home
  • Drinks
  • Appetizers
  • Dinner
  • Dessert
  • About
  • Contact
  • Privacy Policy
DisclaimerTerms Of UseGDPR PolicyCookie Policy

Hannah

- 1 can (15 ounces) chickpeas, drained and rinsed - 2 tablespoons olive oil - 1 teaspoon smoked paprika - 1 teaspoon ground cumin - 1/2 teaspoon cayenne pepper (adjust for spice preference) - 1/2 teaspoon garlic powder - Salt to taste - Fresh cilantro for optional garnish - Baking sheet - Parchment paper - Mixing bowl - Paper towels To make spicy roasted chickpeas, you need simple, fresh ingredients. I love using canned chickpeas because they save time. Just drain and rinse them well. This step is crucial. It helps remove excess salt and prepares them for roasting. I use olive oil for flavor and crispiness. It also helps the spices stick to the chickpeas. For spices, smoked paprika brings warmth and depth. Ground cumin adds a nutty kick. Cayenne pepper gives that spicy heat. You can adjust the cayenne based on your taste. Garlic powder adds a savory note, while salt enhances the flavors. Garnishing with fresh cilantro is optional. It adds a pop of color and a fresh taste. Now, let’s gather the tools you need. A baking sheet is key for roasting. Lining it with parchment paper makes cleanup easy. You’ll also need a mixing bowl to combine the spices and oil. Lastly, paper towels help dry the chickpeas, ensuring they get nice and crunchy. With these ingredients and tools ready, you are set for a tasty snack. Make sure to check the [Full Recipe] for detailed steps to create your spicy roasted chickpeas! - Preheat the oven to 400°F (200°C). - Dry the chickpeas thoroughly with paper towels. To make crispy roasted chickpeas, start with a hot oven. Preheating helps them cook evenly. Next, drying the chickpeas is key. If they are wet, they will steam instead of roast. Drying gives them that crunchy bite we love. - Whisk together olive oil and spices. - Coat chickpeas with the spice mixture. In a medium bowl, mix the olive oil with smoked paprika, cumin, cayenne, garlic powder, and salt. This spice blend packs a punch! Once mixed, add the dried chickpeas. Toss them well to ensure each one is coated. The oil helps the spices stick and adds flavor. - Spread chickpeas on the baking sheet. - Roast for 30-35 minutes and shake halfway through. Place the chickpeas on a lined baking sheet in a single layer. This space will help them crisp up. Roast for about 30 to 35 minutes. Halfway through, shake the pan to move them around. This way, they roast evenly. You'll know they're ready when they turn golden and crunchy. For the full recipe, check out the cooking instructions and enjoy your tasty snack! To get the best crunch, drying the chickpeas is key. After rinsing, use paper towels to pat them dry. This removes excess moisture. If you skip this step, your chickpeas may turn out soggy. Spread them out on the baking sheet, leaving space between each one. This helps them roast evenly and become crisp. You can easily change up the flavor of your chickpeas. Try adding herbs like oregano or thyme for a fresh twist. You can also adjust the spice level. If you like it hot, add more cayenne pepper. For a milder snack, reduce the cayenne. This way, you can cater to your taste buds and make it just right for you. Spicy roasted chickpeas are best served warm or at room temperature. They make a great snack on their own. You can also pair them with dips like hummus or tzatziki. Toss them into salads for extra crunch. They add flavor and texture to any dish. These ideas can help you enjoy your chickpeas in different ways. For the full recipe, check out the details above. {{image_4}} You can change the flavor of your spicy roasted chickpeas with different spices. - For an Indian-inspired taste, try using curry powder. This adds warmth and depth. - If you want a Mediterranean twist, sprinkle on za'atar. It gives a fresh, herby flavor. You can make your chickpeas even tastier by adding extra ingredients. - Toss in nuts or seeds for a crunchy texture. Almonds or pumpkin seeds work well. - Mix in colorful veggies like bell peppers or carrots. This adds color and nutrition. There are other ways to cook these tasty snacks too. - If you have an air fryer, set it to 400°F (200°C). Cook the chickpeas for 15-20 minutes. Shake them halfway through for even cooking. - For stovetop roasting, heat a pan over medium heat. Add the chickpeas and stir often for 10-15 minutes until they are crispy. With these variations, you can find your perfect flavor and crunch. You can check the Full Recipe for more details on making these delicious snacks! To keep your spicy roasted chickpeas fresh, use an airtight container. Glass jars or plastic containers work well. Make sure to let the chickpeas cool for about 15 minutes before sealing them. This cooling time helps prevent moisture build-up, which can make them soggy. You can store roasted chickpeas at room temperature for about 3 to 5 days. Keep them in a cool, dry place. For longer storage, freezing is a great option. Place the cooled chickpeas in a freezer-safe bag. When you want to enjoy them again, just reheat in the oven at 350°F (175°C) for 10-15 minutes. This will help restore their crunch. Yes, you can use dried chickpeas. To do this, soak one cup of dried chickpeas overnight in water. The next day, drain them and place them in a pot. Add fresh water and bring to a boil. Cook them for about 1 hour or until tender. Then, drain and dry them well before following the steps in the Full Recipe. If you prefer less heat, reduce the cayenne pepper to 1/4 teaspoon or omit it entirely. You can also add a bit of sugar to balance the heat. Mixing in some more olive oil can help tone down the spice as well. Chickpeas are packed with protein, fiber, and vitamins. They help with digestion and can aid in weight management. These little legumes are also great for heart health, lowering bad cholesterol. Plus, they are rich in iron and folate, making them a smart choice for your diet. Spicy roasted chickpeas are easy to make and taste great. We covered the main ingredients needed, like chickpeas, olive oil, and spices. The steps involve prepping, mixing, and roasting. Remember to dry your chickpeas for the best crunch and feel free to experiment with flavors. Store them properly for lasting freshness. These snacks are healthy and perfect for sharing. Enjoy your crunchy, spicy treat!

Spicy Roasted Chickpeas Crispy and Flavorful Snack

Are you craving a snack that packs a punch? Look no further than my Spicy Roasted Chickpeas! Crunchy, flavorful, and

To make your Rainbow Veggie Wraps, you need a few simple items. These ingredients help create a colorful and tasty dish. Here’s what you will need: - Whole Grain or Spinach Tortillas - Hummus Options (Store-bought vs. Homemade) - Colorful Vegetables Selection You can use either whole grain or spinach tortillas. Whole grain adds nutty flavors and fiber. Spinach tortillas bring a nice green color and extra nutrients. Choose what you like best! For the spread, you can use store-bought hummus or make your own. Store-bought hummus is quick and easy. Homemade hummus allows you to control the flavors. Both options work well and taste great! The fun part is choosing colorful veggies! Here are some tasty options: - Shredded purple cabbage - Grated carrots - Diced cucumber - Thinly sliced red bell pepper - Thinly sliced yellow bell pepper - Sliced ripe avocado - Fresh baby spinach Using a variety of colors makes your wraps more appealing. Each vegetable adds a unique crunch and flavor. You can also add sesame seeds for a little extra crunch if you like! For the full recipe, check out the complete details to get started on your vibrant meal! 1. Spreading the Hummus Start with one tortilla on a clean surface. Use about 1/4 cup of hummus. Spread it evenly across the tortilla. Leave an inch around the edges. This helps with rolling later. 2. Layering the Vegetables Begin layering at one end of the tortilla. First, add a handful of fresh baby spinach. Next, pile on shredded purple cabbage. Then, add grated carrots and diced cucumber. You want a mix of colors and textures. Continue with sliced red and yellow bell peppers. These add more color and crunch. Finally, place slices of avocado on top. Sprinkle salt and pepper lightly for flavor. 3. Rolling the Wrap Fold in both sides of the tortilla over the veggies. Start rolling from the bottom. Roll it tightly to keep the filling secure. Repeat this with the other tortillas and ingredients. Once done, slice each wrap in half diagonally. Arrange the halves on a platter. For a final touch, add cilantro or mint leaves for freshness. For the full details, check the Full Recipe. Enjoy your colorful and healthy meal! Enhancing Flavor with Seasonings To make your Rainbow Veggie Wraps pop, add seasonings. A sprinkle of garlic powder or a dash of lemon juice lifts the taste. Try adding a pinch of cayenne for a kick. Fresh herbs like cilantro or mint also brighten the flavors. These small touches make a big difference. Suggestions for Texture Contrast Texture adds fun to your wraps. Use crunchy veggies like cucumbers and bell peppers. Creamy avocado balances crispness. For extra crunch, top with sesame seeds or sunflower seeds. Mixing these textures keeps each bite exciting. Presentation Tips for a Colorful Platter A colorful platter catches the eye. Arrange your wraps in a circle or create a rainbow pattern. Slice them in half to show off the vibrant layers. Garnish with fresh herbs for a pop of color. This makes your meal not only tasty but also beautiful. For a full guide on making these wraps, check out the Full Recipe. {{image_4}} Alternative Vegetables to Use You can switch up the veggies in your Rainbow Veggie Wraps. Try adding sliced radishes for a peppery bite. Zucchini adds a nice crunch too. For a sweeter touch, use roasted sweet potatoes. You can also mix in sprouts or kale for extra nutrients. Different Spreads for Variety Hummus is great, but you can use other spreads too. Try guacamole for a creamy twist. Cream cheese or a yogurt-based spread works well too. If you want a kick, add some spicy salsa or chipotle sauce. This keeps your wraps exciting! Adding Protein Options Need more protein? Add grilled chicken or turkey slices. Tofu or tempeh is perfect for a plant-based option. Canned chickpeas or black beans also give a good protein boost. These swaps will make your wraps filling and delicious. For more ideas, check out the Full Recipe to inspire your next meal! Refrigeration Guidelines To keep your Rainbow Veggie Wraps fresh, wrap them tightly in plastic wrap or foil. Place them in a container with a lid. Store them in the fridge for up to three days. Best Practices for Freezing If you want to freeze your wraps, wrap each one in plastic wrap. Then, place them in a freezer bag. You can freeze them for up to a month. To avoid sogginess, freeze without any sauces or dressings. Tips for Reheating and Serving When you are ready to eat your stored wraps, you can thaw them overnight in the fridge. For a warm wrap, heat it in a skillet for a few minutes on each side. This will crisp the tortilla and warm the veggies without losing flavor. Enjoy your meal with a fresh dip or sauce for extra taste. For the full recipe, check it out here. How can I make this recipe gluten-free? To make rainbow veggie wraps gluten-free, choose gluten-free tortillas. Many brands offer tasty options made from rice or corn. Check the labels to ensure they fit your needs. You can still fill them with the same colorful veggies and hummus. What are some healthy dip options to accompany the wraps? Pair your wraps with healthy dips like tzatziki, guacamole, or a yogurt-based sauce. These dips add flavor and creaminess. You can also try a spicy salsa or a simple vinaigrette for a zesty kick. Can I make these wraps in advance? Yes, you can prepare these wraps ahead of time. Wrap each one in plastic wrap or foil. Store them in the fridge for up to a day. This keeps them fresh and ready for a quick meal. Just remember to add your avocado right before serving, so it stays green! For the full recipe, check out the earlier sections. This post covered how to make tasty rainbow veggie wraps. We looked at the best tortillas and hummus options, along with vibrant veggies. I gave you easy steps for spreading, layering, and rolling your wraps. Tips for flavor and presentation will make your wraps pop. We also discussed swaps, protein, and storing extras. With these ideas, you can enjoy healthy and colorful meals anytime. Dive into your kitchen, and get creative with your wraps!

Rainbow Veggie Wraps Crisp and Colorful Healthy Meal

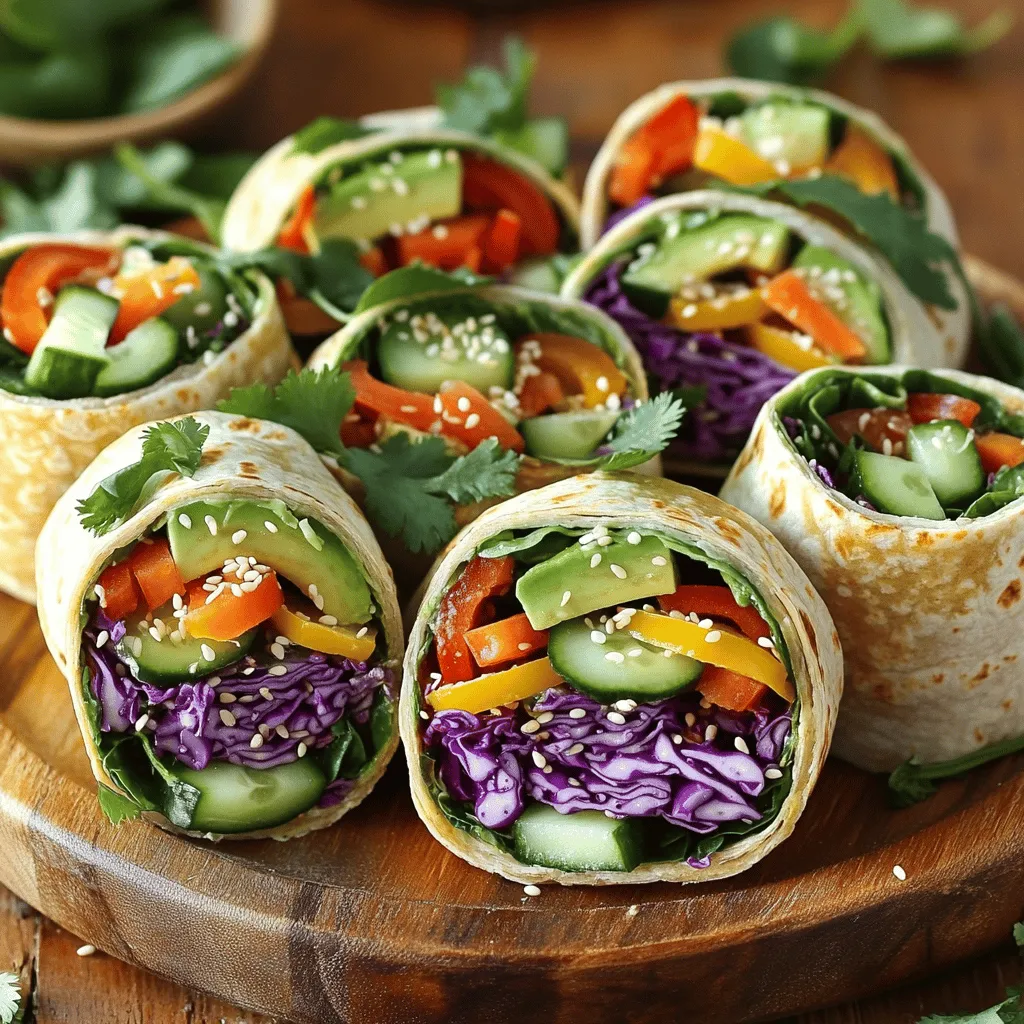
Are you ready to create a meal that’s as vibrant as it is healthy? My Rainbow Veggie Wraps are packed

- 2 boneless, skinless chicken breasts - 1 cup cooked quinoa (preferably cooled) - 1 cup cherry tomatoes, halved - 1 cucumber, diced into small cubes - ½ red onion, thinly sliced - ½ cup Kalamata olives, pitted and sliced in half These main ingredients form the heart of the Easy Greek Chicken Bowls. The chicken gives great protein, while the quinoa adds healthy grains. Fresh tomatoes and cucumbers bring crunch and color, while red onion and olives add depth of flavor. - 2 tablespoons extra virgin olive oil - 1 teaspoon dried oregano - 1 teaspoon garlic powder - Salt and freshly ground black pepper to taste - 1 cup crumbled feta cheese - 2 tablespoons fresh lemon juice The dressing and seasoning are key. The olive oil, oregano, and garlic powder create a tasty marinade for the chicken. Feta cheese adds a creamy, salty bite. Fresh lemon juice brightens the dish and balances the flavors. - ¼ cup fresh parsley, chopped finely - Lemon wedges Garnishes bring it all together. Fresh parsley adds a pop of color and freshness. Lemon wedges let you add more zing just before eating. These little touches make your meal even more inviting and fun. For the full recipe, check out the Easy Greek Chicken Bowls . - Preheat the Grill: Start by heating your grill or grill pan to medium-high. This step is key for juicy chicken. Make sure it’s hot before you cook. - Create the Marinade: In a small bowl, mix the olive oil, oregano, garlic powder, salt, and black pepper. Whisk until it blends well. This marinade adds great flavor to your chicken. - Marinate and Grill Chicken: Coat the chicken breasts with the marinade. Rub it into both sides for full flavor. Then, place them on the hot grill. Cook for about 6-7 minutes on each side until the chicken reaches 165°F (75°C). This ensures it is safe to eat. - Rest the Chicken: Once cooked, take the chicken off the grill. Let it rest for about 5 minutes. This helps keep the juices inside. - Prepare Salad Mixture: In a large bowl, combine the cooled quinoa, cherry tomatoes, cucumber, red onion, Kalamata olives, feta cheese, parsley, and lemon juice. Toss gently until all ingredients mix well. This salad adds freshness to the bowls. - Slice and Arrange Chicken: After resting, slice the chicken into thin strips. Arrange these slices on top of the quinoa salad mixture in your bowls. This makes a beautiful presentation. You can find the full recipe [here](#). Enjoy creating these Easy Greek Chicken Bowls! Ensuring Perfectly Grilled Chicken To get juicy, grilled chicken, start with good preparation. First, marinate the chicken well. This adds flavor and moisture. Make sure your grill is hot before you cook. This helps sear the chicken and lock in the juices. Grill for about 6-7 minutes on each side. Check for an internal temperature of 165°F (75°C) to ensure it's fully cooked. Flavor Enhancements If you want to make your dish stand out, try adding fresh herbs. Oregano and parsley work well. You can also mix in some lemon zest for a fresh kick. A sprinkle of smoked paprika can give your chicken extra depth. Experiment with these flavors to find what you love. Pairing Ideas These Greek chicken bowls pair well with a light, crisp white wine. A side of warm pita bread or tzatziki sauce adds a nice touch. You can also serve a simple green salad alongside for extra crunch and freshness. Plating Techniques To make your bowls look appealing, use a wide bowl. Start with a base of quinoa. Then, layer the colorful veggies and chicken on top. Finish with an extra sprinkle of parsley and a lemon wedge on the side. This not only looks great but also invites your guests to squeeze lemon for more flavor. Make-Ahead Options You can prepare the chicken and quinoa a day in advance. Store them in the fridge until you're ready to serve. This saves time on busy days. Just reheat the chicken and mix the salad when it’s time to eat. Storage Suggestions Keep leftovers in airtight containers. They will stay fresh for up to three days in the fridge. If you want to save them longer, consider freezing them. Just make sure to separate the chicken and salad components to retain their best textures. {{image_4}} You can switch up the protein in your Greek chicken bowls. Using turkey instead of chicken gives a lean option. Just marinate it the same way. Turkey cooks fast, so keep an eye on it. Tofu is another great choice. For a vegan option, use firm tofu. Press it to remove extra water, then cut it into cubes. Marinate it like the chicken and grill until golden. Adding shrimp is also fun. Shrimp cooks quickly and brings a nice flavor. Toss them on the grill for just 3-4 minutes until they turn pink. Quinoa is a classic choice in these bowls, but you can try other grains too. Brown rice works well for a hearty base. It adds fiber and a nutty taste. Couscous is quick and easy. It cooks in just a few minutes. Use whole wheat couscous for added nutrition. Both grains will soak up the dressing nicely. To elevate the flavor, try a Mediterranean spice blend. Mix cumin, paprika, and coriander for a warm taste. Sprinkle some on your chicken before grilling. You can also add avocado for creaminess. Slice it up and place it on top of your bowl. Nuts like almonds or walnuts add crunch too. Toss in some for added texture. For the full recipe, check out Easy Greek Chicken Bowls! To keep your Easy Greek Chicken Bowls fresh, store leftovers in the fridge. Place the chicken and quinoa salad in separate containers. This helps keep the chicken juicy and the salad crisp. Use airtight containers for the best results. Glass containers are great for this, but plastic ones work too. When it’s time to eat, you can reheat your bowls. The microwave is quick and easy, but it might dry the chicken out. If you use the oven, set it to 350°F (175°C). Place the chicken in a baking dish with a splash of water. Cover it with foil to keep it moist while it warms up. If you want to save the bowls for later, freezing is a good option. Just make sure the chicken and salad are cool before you freeze them. Use freezer-safe containers. When ready to eat, thaw them overnight in the fridge. To reheat, use the oven or microwave as described above. Enjoy your meal even on busy days! For the full recipe, check the section above. How do I know when the chicken is cooked? You can tell the chicken is cooked when it reaches 165°F (75°C). Use a meat thermometer to check. The chicken should be white and opaque. If you cut it, the juices should run clear, not pink. Can I make this recipe vegetarian? Yes, you can make this recipe vegetarian. Replace the chicken with grilled vegetables or chickpeas. Tofu or tempeh also works well. Just make sure to marinate them for good flavor. Can I use different types of cheese? Absolutely! You can use goat cheese, mozzarella, or even a dairy-free cheese. Each will give a unique flavor. Just be mindful of the texture and taste you want. What can I replace quinoa with? If you prefer, you can use rice, couscous, or farro instead of quinoa. Just cook them according to package instructions. Each grain adds its own twist to the dish. How to make it gluten-free? To make the dish gluten-free, use quinoa, as it is naturally gluten-free. Ensure all other ingredients, like dressings and spices, are gluten-free as well. Always check labels for hidden gluten. How long does this recipe take to prepare? This recipe takes about 30 minutes in total. You’ll spend about 15 minutes prepping and about 15 minutes cooking. It's quick and perfect for busy days. For the full recipe, check the earlier section. In this post, we covered tasty ingredients like chicken, quinoa, and fresh veggies. You learned to create a simple yet flavorful dish using olive oil, feta, and easy grill steps. We explored tips for perfect results, variations for more options, and smart storage methods. Try these steps at home and enjoy a healthy meal. With just a few changes, you can make it your own. Happy cooking!

Easy Greek Chicken Bowls Flavorful and Fresh Meal

If you’re looking for a quick and tasty meal, you’ve come to the right spot. These Easy Greek Chicken Bowls

Let's dive into what you'll need for these tasty Lemon Poppy Seed Energy Bites. This list keeps it simple and fun, perfect for a quick snack or a boost of energy! - 1 cup rolled oats - 1/2 cup almond butter or alternative nut butter - 1/4 cup honey or maple syrup - Zest and juice of 1 medium lemon - 2 tablespoons poppy seeds - 1/4 teaspoon pure vanilla extract - 1/4 teaspoon sea salt - Optional: 1/4 cup unsweetened shredded coconut - Optional: Extra poppy seeds for garnish These ingredients come together to create a burst of lemony flavor. The rolled oats give a hearty base, while the almond butter adds richness. Honey or maple syrup sweetens the deal, and the lemon zest and juice bring in that fresh zing. Don't forget the poppy seeds for a delightful crunch! If you want to amp up the flavor, consider adding shredded coconut. It adds a nice texture and taste. Remember, the extra poppy seeds are great for rolling the bites, giving them a fun look. For the full recipe, check out the detailed steps to make these energy bites. Let's get cooking! In a large bowl, combine the following: - 1 cup rolled oats - 1/2 cup almond butter - 1/4 cup honey - Zest of 1 medium lemon - 2 tablespoons lemon juice - 2 tablespoons poppy seeds - 1/4 teaspoon pure vanilla extract - 1/4 teaspoon sea salt Use a spatula to mix all the ingredients well. You want to make a dough-like texture that sticks together. If your mix feels too sticky, add more oats, a little at a time. This keeps your bites from being too wet. If it feels dry, add more almond butter or honey. This helps keep them moist and tasty. Cover the bowl and chill the mix in the fridge for 30 minutes. This step makes it easier to shape. After chilling, take the mix out and roll it into small balls, about 1 inch wide. You can roll them in extra poppy seeds or shredded coconut for a fun touch. Store them in an airtight container in the fridge. These bites are great for a quick snack or a boost of energy. For the complete recipe, check out the Full Recipe. To shape your energy bites easily, chill the mixture well. I find that 30 minutes in the fridge makes a huge difference. If your mixture feels too sticky, add more oats. Just sprinkle in a bit at a time. If it’s too dry, mix in a little more nut butter or honey. This way, you’ll create the perfect dough. You can boost the flavor with spices. A pinch of cinnamon or nutmeg can add warmth. Chopped nuts like almonds or walnuts also work well. Rolling the bites in extra poppy seeds or shredded coconut gives them a fun look and taste. It’s an easy way to make them even more delightful! These energy bites are great for snacks or quick breakfasts. Enjoy them on busy mornings or during afternoon slumps. They pair well with smoothies or fresh fruit. A banana or a handful of berries makes a nice side. You’ll love how these bites fit into your day! {{image_4}} If you have nut allergies, you can swap almond butter for sunflower seed butter. This tasty option gives a similar texture. You can also use tahini, which adds a unique flavor. For sweeteners, honey is great, but you can use agave syrup or date syrup if you prefer. These choices keep your bites sweet and delicious. To add more taste, try mixing in dried fruits like cranberries or apricots. These fruits bring a nice chewiness and extra sweetness. You can also incorporate spices like cinnamon or ginger. A pinch of these spices can give your energy bites a warm, cozy flavor. For those who follow a vegan diet, you can easily make these bites vegan. Just swap honey for maple syrup. If you need gluten-free options, ensure your oats are certified gluten-free. For a low-sugar option, use a sugar-free sweetener. These small changes let everyone enjoy this treat. Explore the [Full Recipe] to see how these variations can enhance your energy bites. To keep your Lemon Poppy Seed Energy Bites fresh, store them in an airtight container. This helps keep moisture out. You can use a glass jar or a plastic container with a tight lid. Avoid leaving them uncovered. This will prevent them from drying out or absorbing smells from your fridge. When stored properly in the fridge, these energy bites can last up to one week. If you want to keep them longer, consider freezing them. In the freezer, they can stay fresh for up to three months. Just remember to separate them with parchment paper. This will stop them from sticking together. Batch preparing these energy bites is easy and fun. You can double or triple the recipe. This way, you have snacks ready for days. After shaping them, place them in a container and label it with the date. For on-the-go convenience, pack a few in a small bag or container. This makes it easy to grab a healthy snack anytime. Yes, you can use other nut butters. Peanut butter works well and adds a rich taste. Sunflower seed butter is another great option for nut allergies. Each nut butter gives a unique flavor. You can also try cashew or hazelnut butters for fun twists. These energy bites last up to one week in the fridge. Store them in an airtight container. To keep them fresh, avoid leaving them out at room temperature. If you want them to last longer, pop them in the freezer. Yes, you can freeze these energy bites. Place them in a single layer on a tray. Once frozen, transfer them to a freezer-safe bag. They can stay frozen for up to three months. To thaw, leave them in the fridge overnight. Lemon poppy seed energy bites pack many nutrients. They are high in fiber from the oats. Almond butter adds healthy fats and protein. The lemon provides vitamin C, while poppy seeds add minerals like calcium and magnesium. This makes them a nutritious snack. Yes, kids love these energy bites! They are sweet and tasty. To make them more fun, let kids help mix and roll them. You can also add chocolate chips or dried fruit for extra appeal. These bites make a great after-school snack. You now have a simple recipe for Lemon Poppy Seed Energy Bites. With just a few ingredients, you can make a tasty and healthy snack. Mixing the right ingredients creates a great texture. Remember to chill them well for easy shaping. You can switch up flavors with different nuts and spices, too. These energy bites are quick to make and perfect for on-the-go. Enjoy the blend of sweet lemon and crunchy poppy seeds in each bite!

Lemon Poppy Seed Energy Bites Quick and Easy Treat

Looking for a quick and tasty snack? Try these Lemon Poppy Seed Energy Bites! They’re easy to make and packed

To make my Strawberries and Cream Overnight Oats, you will need: - 1 cup rolled oats - 1 ½ cups almond milk (or any milk of your choice) - 1 cup fresh strawberries, hulled and sliced - 1 tablespoon honey or maple syrup (adjust based on your desired sweetness) - ½ teaspoon vanilla extract - ½ cup Greek yogurt (or a dairy-free yogurt alternative) - 2 tablespoons chia seeds - A pinch of salt These ingredients create a creamy and delightful mix. They blend well and make a great base for your oats. You can add some fun toppings to enhance your overnight oats. Here are some options: - Sliced almonds - Coconut flakes - Additional fresh strawberries These toppings not only add flavor but also give your dish a nice crunch. If you need a dairy-free or gluten-free option, it's easy to swap out a few ingredients. Try these: - Use coconut milk or oat milk instead of almond milk. - Replace Greek yogurt with a dairy-free yogurt, such as coconut or almond yogurt. - Ensure your oats are labeled gluten-free, as some brands may process oats with gluten products. These simple swaps keep your overnight oats delicious and suitable for different diets. For the complete recipe, check the Full Recipe section. To start, gather your base ingredients. You will need rolled oats, almond milk, chia seeds, honey or maple syrup, vanilla extract, Greek yogurt, and a pinch of salt. In a medium bowl, pour in the rolled oats and almond milk. Add the chia seeds, honey, vanilla, and salt. Stir until everything mixes well. You want a smooth blend, so take your time. This mixture forms the heart of your overnight oats. Next, it’s time for the strawberries. Take your fresh strawberries and slice them. Make sure they are hulled and ready to go. Add the sliced strawberries to your oat mixture. Gently fold them in with a spatula. You want to keep them whole, so avoid mashing. This way, each bite will have juicy strawberry pieces. Now, you need to put your oats in jars. Spoon the oat mixture into two jars or airtight containers. Make sure you fill each jar evenly. After that, add a few dollops of Greek yogurt on top of each jar. Smooth it out to create a nice layer. Once done, secure the lids and place the jars in the fridge. Let them chill overnight or for at least four hours. This step is key, as it lets the oats soak up the liquid. In the morning, they’ll be soft and creamy. To make your oats creamy, use rolled oats. They soak up the liquid well. I like to use almond milk, but you can choose any milk you prefer. Add chia seeds for a boost in creaminess and nutrition. They help thicken the mix and give it a nice texture. Make sure to stir well when mixing. This helps each oat absorb the milk evenly. Sweetness is key to delicious overnight oats. Start with one tablespoon of honey or maple syrup. This amount is a good baseline. After mixing, taste the oats. If you want more sweetness, add a little more syrup. Keep in mind that fresh strawberries also add natural sweetness. You can adjust based on your taste. Store your oats in jars with tight lids. They stay fresh this way in the fridge. These oats can last up to three days. If you want to heat them, use a microwave. Heat in short bursts to avoid overcooking. You can also enjoy them cold for a refreshing breakfast. Try adding toppings right before serving for the best crunch. For more details, check out the Full Recipe. {{image_4}} You can change the fruit in your oats to match the season. In spring, use fresh blueberries or raspberries for a bright taste. Summer calls for peaches or cherries to add sweetness. In fall, try diced apples or pears with a sprinkle of cinnamon. Winter is perfect for frozen fruits like mixed berries. Each fruit brings its own flavor and texture, making your oats fun and exciting. You can boost the flavor of your oats using extracts and spices. A splash of almond or coconut extract adds a nice twist. Try adding a pinch of cinnamon or nutmeg for warmth. Cardamom can give your oats a unique flavor. You can even mix in cocoa powder for a chocolatey treat. These small changes can make a big difference in taste. If you want to switch up the nut and seed toppings, there are many choices. Use walnuts for a rich flavor or pecans for a sweet crunch. Sunflower seeds add a nice texture, while pumpkin seeds bring a touch of nuttiness. You can also mix in flaxseeds for extra nutrition. These options keep your oats interesting and full of flavor. For the full recipe, check out the detailed instructions. Overnight oats stay fresh for about 3 to 5 days in the fridge. This means you can make a batch and enjoy it throughout the week. The oats soak up the liquid, and flavors deepen over time. Just be sure to check for any off smells or changes in texture before eating. Use airtight containers to keep your oats fresh. Glass jars with tight lids work great. They help prevent moisture and odors from getting in. You can also use plastic containers, but glass is better for taste and health. Label each jar with the date so you know when to eat them. You can freeze overnight oats for up to 3 months. Just scoop the mixture into freezer-safe containers. When you’re ready to eat, move the oats to the fridge the night before. This way, they thaw slowly and stay creamy. If needed, add a splash of milk after thawing to refresh the texture. Yes, you can use quick oats. Quick oats cook faster and absorb liquid quickly. This may change the texture a bit, making it softer. I recommend checking the consistency after mixing. If it's too thick, add a little more milk to reach your desired texture. To make this recipe vegan, swap Greek yogurt for a plant-based yogurt. Use maple syrup for sweetening instead of honey. Choose almond milk or another plant-based milk. This keeps the recipe creamy and tasty without any animal products. You can use many fruits! Bananas add creaminess and sweetness. Blueberries give a nice pop of color and taste. Peaches add a juicy bite. Apples bring crunch and flavor. Mix and match to find your favorite fruit combo. This blog post shared all about making delicious strawberries and cream overnight oats. We covered key ingredients, step-by-step instructions, and helpful tips to get creamy oats. You learned about variations and storage options to keep your oats fresh. Remember, you can switch out ingredients to suit your tastes or diet needs. Enjoy experimenting with flavors and toppings! With these basics, you can create a tasty and healthy breakfast any day. Happy cooking!

Strawberries and Cream Overnight Oats Easy Recipe

Are you ready for a tasty treat that takes just minutes to prepare? Strawberries and cream overnight oats are a

- 2 cups Greek yogurt - 1 cup fresh strawberries, hulled and sliced - 1/4 cup honey (adjust sweetness to taste) - 2 tablespoons fresh lemon juice - 1 teaspoon lemon zest - 1 cup granola (store-bought or homemade) - Fresh mint leaves for garnish When making strawberry lemon yogurt parfaits, I always start with high-quality ingredients. Greek yogurt gives a rich taste and thick texture. Fresh strawberries add natural sweetness and bright color. Honey can be adjusted for your desired sweetness. Fresh lemon juice and zest bring a zesty kick, brightening every bite. Granola provides a nice crunchy layer, which I love for texture. Finally, mint leaves add a fresh finish that looks great too. If you don’t have Greek yogurt, you can use regular yogurt or even dairy-free yogurt. For sweeteners, maple syrup or agave nectar work well in place of honey. If you want a different crunch, try using nuts or seeds instead of granola. You can also use toasted coconut flakes for a unique twist. Using these substitutions can still give you a delicious parfait. The goal is to have fun and enjoy your cooking. For the full recipe, check the full recipe section. To start, grab a medium bowl. Add 2 cups of Greek yogurt. Next, pour in 1/4 cup of honey, 2 tablespoons of fresh lemon juice, and 1 teaspoon of lemon zest. Use a spatula or whisk to mix everything together. Keep stirring until the mixture is smooth and creamy. Taste it! If you want it sweeter, add more honey. Now, find some clear glasses or dessert cups. Begin by spooning a generous layer of the yogurt mixture into each glass. Fill about 1/4 of the glass height for this first layer. Next, add your sliced strawberries. Place them evenly on top of the yogurt. This makes it look pretty and ensures each bite has fruit. For the third layer, sprinkle granola over the strawberries. This adds a great crunch and pairs well with the yogurt and berries. Continue building your parfait by repeating the layers of yogurt, strawberries, and granola. Stop before reaching the rim of the glass. Leave some space for the last layer, which should be yogurt. To finish, add a few more sliced strawberries on top of the yogurt. Top it off with a fresh mint leaf for a nice touch. This looks great and adds extra flavor. You can find the full recipe to make this delicious treat! To make your parfait shine, layer wisely. Start with yogurt at the bottom. This keeps granola from getting soggy. Use a spoon to add yogurt, then smooth it out. Next, layer strawberries evenly. This ensures every bite has fruit. Add granola next, but don’t pack it down. Lightly sprinkle it on top. Repeat layers until you reach the top. Leave a little space to add a final yogurt layer. Choose clear glasses or cups. Tall glassware shows off your layers. This makes your parfait look stunning. Use a small spoon to add honey on top for shine. For a fun touch, add a mint leaf. It adds a pop of color and fresh aroma. You can also use a few extra strawberry slices on top. This gives a beautiful finish that invites tasting. Want to mix things up? Try adding cinnamon to the yogurt. It gives a warm twist. You can also swap strawberries for other fruits, like blueberries or peaches. Fresh herbs like basil can brighten flavors. Just chop a few leaves and sprinkle on top. These small changes can make your parfait unique and tasty. {{image_4}} You can change up the flavors in your Strawberry Lemon Yogurt Parfaits easily. Try using seasonal fruits like blueberries or peaches. They add new tastes and colors to your dish. You could also mix in flavors into the yogurt. Adding vanilla or almond extract gives a nice twist. Experiment to find your perfect mix! If you want a vegan option, swap Greek yogurt for cashew or coconut yogurt. These alternatives still offer creaminess. For nut-free options, make sure to choose granola that is free from nuts. This way, everyone can enjoy the parfaits without worry! These parfaits are great for breakfast or as a light dessert. Pair them with a refreshing drink, like iced tea or lemonade, for a delightful meal. You can serve them in pretty glasses to show off the layers. Your guests will be impressed by the colors and textures! For more ideas, check out the Full Recipe for inspiration. To keep your parfaits fresh, use airtight containers. Glass jars work great for this. They help keep the yogurt creamy and the strawberries juicy. Make sure to layer the ingredients carefully. Store them in the fridge for best results. Avoid mixing layers before storing to keep the granola crunchy. You can freeze yogurt parfaits, but the texture may change. If you plan to freeze them, layer them in freezer-safe containers. Leave some space at the top for expansion. When you're ready to eat, let them thaw in the fridge overnight. This makes for easy meal prep. You can also prep a big batch and enjoy them later. Eat your leftovers within three days for the best taste. After that, the strawberries may lose their flavor and texture. If you see any water at the bottom of your container, it’s a sign to eat them soon. Always trust your senses; if it smells or looks off, it’s best to toss it. If you want to switch up the toppings, there are many options. You can use: - Crushed nuts for a crunchy texture. - Oats mixed with a little honey. - Cereal for a different crunch. - Coconut flakes for tropical flavor. These alternatives add great taste and texture to your parfait. Yes, this recipe is great for kids! It has nutrients and flavors they love. Greek yogurt gives protein, while strawberries add vitamins. The sweet honey makes it a fun treat. Plus, kids can help layer the parfaits, making it a fun activity. You can make these parfaits a few hours ahead! Just store them in the fridge. Here are some tips: - Prepare the yogurt mix and fruit in advance. - Layer them just before serving for the best crunch. - If you want to keep granola fresh, add it right before eating. To make this recipe dairy-free, swap Greek yogurt for dairy-free yogurt. Here are some good options: - Almond milk yogurt for a mild flavor. - Coconut yogurt for a creamy texture. - Soy yogurt for a protein boost. These choices keep the flavor while meeting dietary needs. You now have a clear guide to making delicious yogurt parfaits. We covered essential ingredients, step-by-step instructions, and tips for great presentation. Remember, you can customize flavors and make this recipe fit your needs. Whether you want a quick breakfast or a fancy dessert, these parfaits are versatile. Use the storage tips to keep your leftovers fresh. Enjoy experimenting with different flavors and ingredients. Your parfaits will impress anyone, and they are fun to make!

Strawberry Lemon Yogurt Parfaits Fresh and Flavorful Treat

Looking for a fresh and tasty treat? Strawberry Lemon Yogurt Parfaits are the perfect choice. Packed with creamy Greek yogurt,

Here is a simple list of what you need for the veggie burrito bowls: - 1 cup cooked quinoa - 1 can black beans, rinsed and drained - 1 cup corn kernels (fresh, frozen, or canned) - 1 large red bell pepper, diced - 1 small zucchini, diced - 1 cup cherry tomatoes, halved - 1 ripe avocado, sliced - 1 cup leafy greens (spinach or romaine) - Seasoning essentials: ground cumin, smoked paprika, olive oil, salt, pepper - Fresh cilantro leaves for garnish - Lime wedges for serving These ingredients make a quick and tasty meal. I love how colorful and fresh this dish looks. You can find the full recipe in the article to guide you through the process. - Heat olive oil in a large skillet. - Add diced bell pepper and zucchini. Start with medium heat. Let the oil shimmer. Toss in the bell pepper and zucchini. Cook for about five minutes. Stir often until they soften and smell great. - Add corn, black beans, cumin, smoked paprika, salt, and pepper. - Stir and cook until heated through. Next, mix in the corn and black beans. Sprinkle the cumin and smoked paprika. Don’t forget a pinch of salt and pepper. Stir everything well. Cook for three to four minutes until warm. - Create a base layer with cooked quinoa. Grab four bowls. Place a generous scoop of quinoa in each bowl. This will be your base layer. It adds great texture and nutrition. - Spoon the vegetable mixture over the quinoa. Now, take the veggie mix and spoon it over the quinoa. Make sure to spread it evenly across the bowls. This way, every bite is packed with flavor. - Top with leafy greens and cherry tomatoes. Add a handful of leafy greens to each bowl. Then, place the halved cherry tomatoes on top. They add a nice pop of color and taste. - Arrange avocado slices and garnish with cilantro. Slice the avocado and arrange it on top of the bowls. The creamy avocado makes it rich. Finally, sprinkle fresh cilantro leaves as a garnish. It adds a lovely aroma. Serve with lime wedges on the side for a zesty touch. Enjoy your flavorful veggie burrito bowls! For the complete recipe, check the Full Recipe section. - Ensure vegetables are chopped uniformly for even cooking. This helps them cook at the same rate. - Adjust seasoning to taste for kitchen preferences. Everyone has different likes, so don't be afraid to experiment. - Use colorful bowls to enhance visual appeal. Bright colors make the meal more inviting and fun. - Serve lime wedges on the side for added zest. A squeeze of lime brightens up the flavors. - Add extra protein with grilled tofu or chicken. This makes the bowls more filling and balanced. - Include more fiber with additional veggies. Bell peppers, spinach, or carrots are great options for this! These tips will help you create a veggie burrito bowl that is not just tasty but also visually appealing and nutritious. For more details, check out the [Full Recipe]. Enjoy your cooking journey! {{image_4}} You can easily swap quinoa for other grains. Brown rice is a great choice. It offers a nutty flavor and chewy texture. Cauliflower rice is another option. It’s low in carbs and adds a fresh crunch. Both grains work well in the burrito bowls. They hold all the flavors nicely. If you want to change the beans, try chickpeas. They add a different taste and texture. Kidney beans also work well if you prefer a heartier option. You can mix and match beans for more variety. This keeps your meals exciting and full of surprises. To amp up the flavor, consider adding roasted corn. It brings a sweet touch to each bite. Jalapeños add a spicy kick, perfect for those who love heat. You can also sprinkle cheese on top for creaminess. All these add-ins make your veggie burrito bowls burst with flavor. Check the Full Recipe for more ideas on how to make your bowls unique! Store leftovers in an airtight container in the refrigerator for up to 3 days. This keeps the flavors fresh and the veggies crisp. It's easy to grab a bowl for lunch or dinner later. Just make sure the container is sealed well to prevent any odors. Can be frozen in individual portions for up to 2 months. This is perfect for meal prep. Use freezer-safe containers or bags. Label them with the date to keep track. When you're ready to eat, just pull one out and defrost it in the fridge overnight. Gently reheat in a skillet or microwave before serving. For the skillet, add a splash of water to keep the dish moist. Heat over medium until warm. If using a microwave, cover the bowl to trap steam. This keeps your burrito bowl tasty and enjoyable. You can easily swap quinoa for other grains. Here are some great options: - Brown rice - White rice - Couscous - Cauliflower rice Each choice brings its own flavor and texture, making your burrito bowl unique. Brown rice offers a nutty taste and chewy bite. White rice is soft and light. Couscous cooks fast and has a fluffy texture. Cauliflower rice is low-carb and adds a mild flavor. To spice up your burrito bowls, you can add a few ingredients that pack a punch: - Jalapeños, diced - Red pepper flakes - Hot sauce, to taste - Chipotle powder Add these spices during cooking for a warm kick. You can also sprinkle them on top just before serving. This way, you control the heat level for each bowl. Yes, you can prepare these bowls ahead of time. Meal prep makes busy days easier. - Cook the grains and store them in the fridge. - Sauté the veggies and let them cool before storing. - Keep the toppings like avocado and greens separate until serving. Store everything in airtight containers. This way, your meals stay fresh and ready to enjoy. Making veggie burrito bowls is quick and easy. Here’s a quick overview: - Prep time: 15 minutes - Cooking time: 15 minutes - Total time: 30 minutes In just half an hour, you can create a hearty meal for yourself or your family. If you need to skip avocado, there are tasty alternatives. Options include: - Hummus for a creamy texture - Greek yogurt for a tangy flavor - Sliced olives for a salty kick - Guacamole for a similar taste These choices keep your bowls delicious while catering to different diets or preferences. Enjoy creating your own flavor combos with the full recipe! This blog post shared how to make tasty veggie burrito bowls. You learned the basic ingredients, step-by-step instructions, and tips for perfect flavor. The options for variations expand your choices and keep meals exciting. Remember, you can store leftovers easily. Whether you add proteins, swap grains, or adjust spices, these bowls are fun to customize. Enjoy your cooking, and make these dishes your own!

Easy Veggie Burrito Bowls Flavorful and Quick Meal

Looking for a quick meal that’s packed with flavor? These Easy Veggie Burrito Bowls are perfect for you! With fresh

For Chocolate Peanut Butter Banana Bites, you need a few simple items. Here’s what to gather: - 2 ripe bananas - 1/2 cup creamy peanut butter - 1 cup dark chocolate chips - 1 tablespoon coconut oil - Sea salt (for garnish) - Optional toppings: Chopped nuts or crushed graham crackers These ingredients create a tasty and fun snack. Ripe bananas give the best flavor. Creamy peanut butter adds smoothness. Dark chocolate chips bring richness. Coconut oil helps the chocolate melt evenly. Sea salt tops it off, enhancing all the flavors. You can add nuts or graham crackers for extra crunch. This easy list makes it simple to get started. Once you have everything, you’re ready to make these delightful bites. If you're interested in the complete process, check the Full Recipe for all the steps! Start by peeling the ripe bananas. Slice them into 1/2-inch thick rounds. Arrange the slices neatly on a plate or cutting board. This setup helps when you dip them later. In a microwave-safe bowl, combine the dark chocolate chips with coconut oil. Microwave this mix in 30-second bursts. Stir well in between until the chocolate melts and is smooth. This method keeps the chocolate from burning. Now, take a fork and dip each banana slice into the melted chocolate. Make sure the chocolate covers each slice completely. Let the excess chocolate drip back into the bowl. This step ensures an even coating that looks great. Place the chocolate-covered banana slices on a parchment-lined baking sheet. Make sure they have space between them. This helps them not stick together. Then, use a small spoon to add peanut butter on top of each slice. This combination is what makes these bites special. Transfer the baking sheet to the freezer. Let the bites chill for about 30 minutes. This time allows the chocolate to set properly. After chilling, check the texture. The bites should be firm and ready to enjoy. For the full recipe, refer to the recipe section above. To get the best flavor, use ripe bananas. They should be yellow with a few brown spots. This means they are sweet and soft. The right banana makes a big difference in taste. Also, focus on your chocolate. Melt the chocolate chips with coconut oil. This mix helps keep the chocolate smooth and shiny. If it’s too thick, it won’t coat the bananas well. For a smooth melt, use a microwave. Heat the chocolate in short bursts of 30 seconds. Stir well between heats. This way, the chocolate won’t burn or get lumpy. If you see clumps, don’t panic. Just keep stirring until it is smooth. A little coconut oil helps here, too. It keeps the chocolate creamy. Toppings can add fun and flavor. You can use chopped nuts or crushed graham crackers. These add crunch and taste. For serving, make it look nice. Place the bites in a bowl or on a platter. Add some fresh banana slices nearby. A drizzle of melted chocolate on top can make it pop! {{image_4}} If you want to change things up, try using different nut butters. Almond butter is a great choice. It has a slightly sweet and nutty taste. Cashew butter is another option. It is creamy and has a mild flavor. Both options work well with bananas. Different nut butters add new flavors to your bites. You can also switch the chocolate. Milk chocolate gives a sweeter taste. If you prefer a creamier option, use white chocolate. Both create rich bites that please the palate. For a fun twist, try flavored chocolate. Mint chocolate can add a refreshing touch. You can add more fun ingredients too. Fresh strawberries can enhance the fruity flavor. They pair well with bananas and chocolate. For a salty crunch, add pretzels. They add texture and contrast. You can also use vanilla extract for a richer flavor. Just a few drops can make a big difference. Check the Full Recipe for more ideas to enjoy these bites! To keep your chocolate peanut butter banana bites fresh, store them in an airtight container. This prevents freezer burn and keeps them tasting great. If you have a lot, you can layer them with parchment paper. This keeps them from sticking together. For long-term storage, use a freezer-safe bag. Squeeze out as much air as possible before sealing. This helps maintain their flavor and texture. You can also use a shallow plastic container. Just make sure it's tightly sealed. These bites can last in the freezer for about two months. After that, they may lose some flavor. If you notice any frost or freezer burn, it’s best to toss them out. Signs that they are no longer good to eat include a change in color or a strange smell. If they feel icy or hard, that means they may not taste as good. Always trust your senses when deciding if food is still safe. To make Chocolate Peanut Butter Banana Bites, follow these steps: 1. Peel and slice two ripe bananas into half-inch rounds. 2. Melt one cup of dark chocolate chips with one tablespoon of coconut oil in the microwave. 3. Dip each banana slice into the melted chocolate until fully coated. 4. Place the coated slices on a parchment-lined baking sheet. 5. Add a dollop of creamy peanut butter on top of each slice. 6. Sprinkle with sea salt and any optional toppings. 7. Freeze for about 30 minutes until set. Yes, you can use frozen bananas. They add a nice creaminess. However, they can be mushy when thawed. If you prefer a firmer bite, fresh bananas are best. Absolutely! They provide good nutrition. Bananas offer potassium and fiber. Peanut butter adds protein and healthy fats. Dark chocolate gives antioxidants. Together, they make a great snack. You can use many alternatives. Try dairy-free chocolate chips for a vegan option. You can also use cocoa powder mixed with coconut oil for a lower-sugar choice. Yes! You can prep these bites in advance. Make a batch, freeze them, and grab them later. They last well in the freezer. Enjoy them as a quick snack anytime. For the full recipe, click here. These Chocolate Peanut Butter Banana Bites are fun and easy to make. We started with simple ingredients, like bananas and peanut butter, and followed step-by-step instructions. I shared tips for the best texture and ideas for tasty variations. You can store these bites for freshness, ensuring they last longer. In closing, this treat is not only delicious but also allows for creativity. Enjoy making them your way!

Chocolate Peanut Butter Banana Bites Easy Healthy Snack

Ready for a snack that’s both delicious and good for you? Chocolate Peanut Butter Banana Bites are the perfect treat!

- 4 medium sweet potatoes - 1 can chickpeas (15 oz), drained and rinsed - 1/2 cup buffalo sauce - 1 tablespoon olive oil - 1 teaspoon garlic powder - 1 teaspoon onion powder - Salt and pepper to taste - 1/2 cup Greek yogurt or dairy-free yogurt - 1 green onion, finely sliced - Fresh cilantro, chopped (optional) In this recipe, you need a few simple ingredients to create a flavorful meal. Sweet potatoes are the star here. They add a sweet and creamy base. Chickpeas give protein and a nice crunch. The buffalo sauce brings heat and tang. Olive oil helps blend the flavors. For spices, garlic powder and onion powder add depth. Salt and pepper enhance all the tastes. Finally, you can top with Greek yogurt for creaminess. Use green onions for a fresh bite. If you like, add cilantro for a pop of color and flavor. This combination makes a tasty dish! For the full recipe, check the instructions. - Preheat the oven to 400°F (200°C). - Rinse the sweet potatoes under cool water. Use a fork to poke several holes in each potato. This step allows steam to escape while they bake. - Place the sweet potatoes on a baking sheet. Bake them for 45-50 minutes. They are ready when a fork easily pierces the flesh. - In a medium bowl, mash the drained chickpeas with a fork. Leave some whole for texture. - Add buffalo sauce, olive oil, garlic powder, onion powder, salt, and pepper. Stir until well mixed. - If the sweet potato pockets are too shallow, scoop out a bit of flesh to make more room. Mix this into the chickpea filling for extra flavor. These steps create a fun and tasty dish. The sweet potatoes and chickpeas blend well together. For the full recipe, check the section above. To get the perfect texture for sweet potatoes, start by picking medium-sized ones. They should feel firm and smooth. Rinse them well and poke holes using a fork. This helps steam escape as they bake. Bake them at 400°F for 45-50 minutes. They are done when a fork goes in easily. For the chickpea mixture, balance flavors by adjusting the buffalo sauce. Start with half a cup. If you like it spicier, add more sauce later. Mix in olive oil, garlic powder, onion powder, salt, and pepper. Taste the mix before stuffing. You want a bold but balanced flavor. Pair these stuffed sweet potatoes with a fresh salad. A crisp green salad with lemon dressing adds a nice touch. You can also serve them with a side of roasted veggies. They add color and crunch. For a creative look, use a colorful plate. Drizzle extra buffalo sauce on top. Add chopped green onion and cilantro for a pop of color. This makes your dish not just tasty but also beautiful. You can make these stuffed sweet potatoes ahead of time. Bake them, then let them cool. Store them in the fridge for up to three days. When ready to eat, reheat in the oven at 350°F for 15-20 minutes. For quick toppings, consider using other sauces or fresh herbs. Try ranch dressing or a squeeze of lime. These add fun flavors on the fly. If you're short on time, skip the toppings or use store-bought yogurt. Check out the Full Recipe for more details! {{image_4}} You can easily make this dish vegan and gluten-free. Simply use a dairy-free yogurt for the topping. Chickpeas are naturally gluten-free, so they fit right in. If you want more protein, try adding lentils or quinoa to the filling. Both options boost nutrition without losing flavor. If you love heat, add more hot sauce to the chickpea mixture. You can also try different sauces. A barbecue sauce can give a sweet twist. For a tangy flavor, use ranch dressing as a topping. Mixing in spices like cumin or smoked paprika can change up the taste too. You don’t have to stick to chickpeas. Black beans or kidney beans work well too. If you want a different kind of sweet potato, try purple or even Japanese sweet potatoes. They offer unique flavors and colors to make your dish pop. For the full recipe, check out the Full Recipe section. To keep your stuffed sweet potatoes fresh, store them in the fridge. Wrap each stuffed potato in plastic wrap or place them in an airtight container. This helps them stay moist and flavorful. If you want to freeze them, do so before baking. Place the uncooked stuffed sweet potatoes on a baking sheet. Once they freeze, transfer them to a freezer-safe bag. They can stay fresh for up to three months. When you’re ready to eat, reheating is key. For the best texture, use the oven. Preheat it to 350°F (175°C). Place the stuffed sweet potatoes on a baking sheet. Heat them for about 15-20 minutes, or until warm. You can also use a microwave, but this may make them a bit soggy. If using the microwave, heat them for about 2-3 minutes on high. Leftover stuffed sweet potatoes last about 3-5 days in the fridge. Look for signs of spoilage, like a sour smell or soft spots on the sweet potatoes. If you see any mold, it's best to throw them away. Enjoy your meal prep and keep it safe! For the full recipe, check out the details I shared earlier. Can I make Buffalo Chickpea Stuffed Sweet Potatoes in advance? Yes, you can prepare these stuffed sweet potatoes ahead of time. Bake the sweet potatoes and prepare the chickpea filling. Store them separately in the fridge for up to two days. Just reheat them before serving. What can I serve with stuffed sweet potatoes? These stuffed sweet potatoes pair well with a fresh salad, steamed veggies, or a side of quinoa. For a heartier meal, serve with grilled chicken or tofu. You can also enjoy them with a tangy slaw for added crunch. How do I adjust the spiciness of the buffalo sauce? To adjust spiciness, add more or less buffalo sauce to your chickpea mix. If you want less heat, use a mild sauce or mix in some Greek yogurt into the filling. For more heat, add a dash of hot sauce or cayenne pepper. Are Buffalo Chickpea Stuffed Sweet Potatoes healthy? Yes, they are quite healthy. Sweet potatoes are packed with vitamins A and C. Chickpeas add protein and fiber, making this dish filling and nutritious. This meal is great for a balanced diet. What is the calorie count per serving? Each serving has about 300-350 calories, depending on the toppings you choose. This count includes healthy fats from olive oil and yogurt. Adjust toppings to fit your dietary needs. Can I microwave the sweet potatoes instead of baking them? Yes, you can microwave them! Poke holes in the sweet potatoes and cook for 5-10 minutes until soft. This method saves time but may not give the same depth of flavor as baking. What's the best way to mash chickpeas for this recipe? Use a fork to mash the chickpeas in a bowl. Leave some whole for texture. You can also use a potato masher for a smoother mix. Just don’t overdo it; you want some chunks in the filling. For the complete recipe, check out the Full Recipe. Buffalo Chickpea Stuffed Sweet Potatoes combine healthy ingredients and tasty spices. You learned how to prepare and cook sweet potatoes, mix chickpeas with buffalo sauce, and season them for the perfect filling. I shared tips for serving and storing, plus fun variations to keep meals exciting. These stuffed sweet potatoes are easy to make and great for any meal. Enjoy making them your own with different flavors and toppings. Get ready to impress your friends and family with this delicious dish!

Buffalo Chickpea Stuffed Sweet Potatoes Delight

Get ready for a tasty experience with my Buffalo Chickpea Stuffed Sweet Potatoes Delight! This dish bursts with flavor and

- 1 cup plain Greek yogurt - 2 tablespoons freshly squeezed lemon juice - Zest from 1 medium lemon - 1 clove garlic, finely minced - 1 tablespoon fresh dill, finely chopped - 1 tablespoon extra virgin olive oil - Sea salt and freshly ground black pepper, to taste - 1/4 teaspoon cayenne pepper (optional for a kick) - A colorful array of vegetable sticks (carrots, cucumbers, bell peppers) for serving When I prepare Zesty Lemon Greek Yogurt Dip, I love the fresh taste of lemon. The plain Greek yogurt serves as a creamy base. It is rich and tangy. The lemon juice adds brightness. Using fresh lemon zest gives it a zesty punch. I always recommend squeezing the lemon juice right before using it. This way, you get the best flavor. For flavor, I add minced garlic. Garlic gives the dip a savory depth. Fresh dill brightens the dish with its herbal notes. I splash in some extra virgin olive oil for richness. This combination makes the dip really special. Seasoning is key. I sprinkle in sea salt and black pepper to taste. If you like a little heat, cayenne pepper works well. It adds a fun kick without overwhelming the other flavors. Finally, I love to serve this dip with fresh vegetable sticks. Carrots, cucumbers, and bell peppers look great on a platter. This dip is perfect for parties or a healthy snack. Try it with your favorite veggies for a fresh treat. For the full recipe, check out the details above. To start, take a medium bowl. Combine 1 cup of plain Greek yogurt, 2 tablespoons of freshly squeezed lemon juice, and zest from 1 medium lemon. Mix these ingredients well using a whisk or spoon. You want it to be smooth and creamy. Next, add 1 clove of finely minced garlic, 1 tablespoon of fresh dill, and 1 tablespoon of extra virgin olive oil. Stir these components together until they blend perfectly. This step adds depth and richness to your dip. Now, it's time to season. Add sea salt and freshly ground black pepper to taste. If you like a little heat, sprinkle in 1/4 teaspoon of cayenne pepper. Mix everything thoroughly until the flavors are well-distributed. Cover the bowl tightly with plastic wrap or a lid. Place it in the refrigerator for at least 30 minutes. This chilling period lets the flavors meld and intensify, making your dip even better. After chilling, taste the dip. Adjust the seasoning as needed. You might want to add more salt, pepper, or cayenne. This is your chance to make it just right for your taste. When you're ready to serve, choose a nice bowl for your dip. Garnish it with a sprig of fresh dill or a sprinkle of lemon zest. Arrange colorful vegetable sticks like carrots, cucumbers, and bell peppers around the dip for a beautiful presentation. This recipe is a breeze to make and perfect for gatherings. Check out the Full Recipe for more details! To get a smooth dip, whisk thoroughly. This step blends the yogurt, lemon juice, and zest well. A good whisking helps avoid lumps. Make sure to mix until it feels creamy and velvety. Boost the flavor with fresh herbs and spices. Dill is great, but you can also try parsley or chives. Adding a pinch of garlic powder can give it depth. Don't forget to use fresh lemon zest for an extra zing. You can serve this dip in many fun ways. Try using a colorful bowl to catch the eye. Place the vegetable sticks around the bowl for a beautiful look. You can even add a sprig of dill on top for a fresh touch. For a rustic feel, serve it on a wooden board. Enjoy this dip with your favorite snacks or as part of a big meal. Check out the Full Recipe for more tips! {{image_4}} You can switch up the herbs in this dip for a new taste. Try using fresh basil for a sweet note. Oregano adds a Mediterranean twist. If you like a more earthy flavor, use parsley. Each herb brings its own charm and freshness. If you want some heat, add jalapeños or hot sauce. Chopped jalapeños give a nice crunch and spice. A splash of hot sauce can elevate the dip with bold flavor. Adjust the amount to fit your taste. You can use sour cream or cottage cheese instead of Greek yogurt. Sour cream creates a rich and tangy dip. Cottage cheese offers a thicker texture and a bit of creaminess. Both options can make this dip your own. For the full recipe, check out the Zesty Lemon Greek Yogurt Dip. To keep your Zesty Lemon Greek Yogurt Dip fresh, store it in an airtight container. This helps lock in flavor and moisture. Place the container in the fridge, away from strong-smelling foods. This dip loves to stay cool and dry. Your dip stays fresh for about 4 to 5 days in the fridge. After that, the taste and texture may change. If you see any signs of spoilage, it’s best to toss it. Always trust your senses when it comes to food safety. If you want to save it for later, you can freeze the dip. Use a freezer-safe container and leave some space at the top. This allows for expansion as it freezes. When ready to enjoy, thaw it in the fridge overnight. Stir well before serving to restore its creamy texture. For the best taste, use it within 2 months. You can find the full recipe to make this delightful dip in the earlier sections. You can serve this dip with a variety of dippers. Here are some great options: - Carrot sticks - Cucumber slices - Bell pepper strips - Celery sticks - Pita chips - Crackers These pairings add crunch and flavor to your dip. They also make for a bright and healthy platter. Yes, you can make this dip ahead of time. It tastes even better after chilling. I recommend making it a few hours or the day before. Just cover it well and store it in the fridge. This lets the flavors blend nicely. This dip can fit many diets. To make it gluten-free, just check your dippers. For a vegan option, use dairy-free yogurt. You can also skip the garlic if you need a low-FODMAP choice. There are plenty of ways to adapt this recipe to meet your needs. You can easily change the dip's thickness. Add a bit of water or more lemon juice for a thinner dip. Mix well until smooth. If you want it thicker, use less yogurt or strain it through a cheesecloth. This way, you control the texture to fit your preference. The Zesty Lemon Greek Yogurt Dip is simple and fun to make. You mix yogurt, lemon, and garlic for great flavor. Then, adding fresh herbs and spices makes it even better. Remember to chill it for 30 minutes to blend the tastes. Serve it with colorful veggies for a healthy snack. This dip is versatile and tasty. You can try new herbs or add spice for a twist. Enjoying this dip brings a fresh taste to any table!

Zesty Lemon Greek Yogurt Dip Flavorful and Fresh Treat

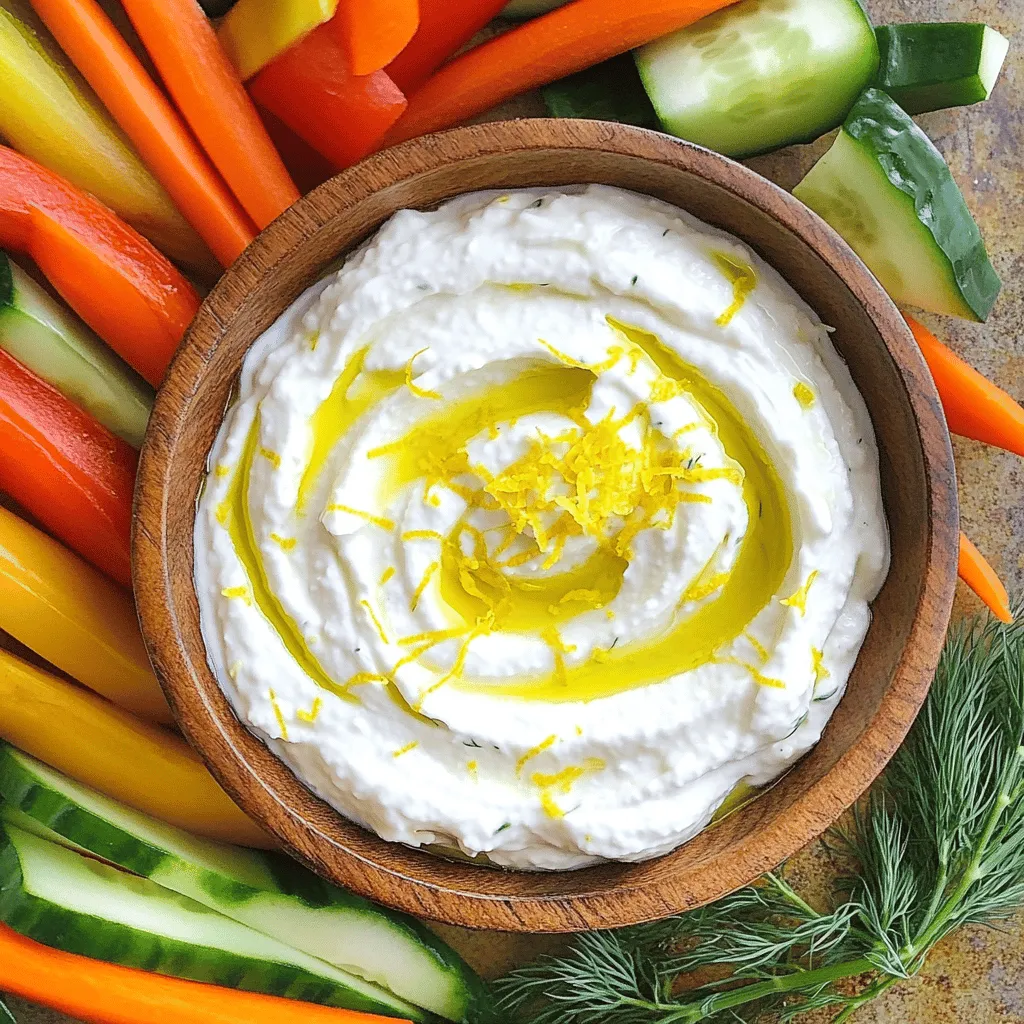
Looking for a fresh and flavorful dip that bursts with zesty goodness? You’ve found it! My Zesty Lemon Greek Yogurt

Older posts
Newer posts
← Previous Page1 … Page7 Page8 Page9 … Page59 Next →

dsad

© 2025 eataroundit • Built with GeneratePress

Our Policies

  • Copyright Policy
  • Cookie Policy
  • GDPR Policy
  • Privacy Policy
  • Disclaimer
  • Terms Of Use

More Information

  • Home
  • About
  • Contact
  • Appetizers
  • Dessert
  • Dinner
  • Drinks
©2025, eataroundit About Back To Top