Craving a sweet treat that’s easy to make and totally delicious? Look no further than these Chocolate Chip Cookie Dough Truffles! With simple steps and tasty flavors, you can whip up this delightful dessert in no time. I’ll guide you through mixing the dough, forming the truffles, and coating them with chocolate. Plus, I’ll share tips and variations to make them your own. Let’s dive into this fun, tasty recipe!
Ingredients
List of Ingredients
– 1 cup unsalted butter, softened to room temperature
– 3/4 cup packed brown sugar
– 1/4 cup granulated sugar
– 2 teaspoons pure vanilla extract
– 2 cups all-purpose flour (ensure it has been heat-treated for safety)
– 1 can (14 oz) sweetened condensed milk
– 1 cup mini chocolate chips
– 1 1/2 cups semi-sweet chocolate chips (for coating)
– Sea salt (for garnish, optional)
Importance of Heat-Treated Flour
Heat-treated flour is key for safety. Regular flour can have bacteria, which may be harmful. Heating flour kills germs. You can heat it by spreading it on a baking sheet and baking at 350°F for five minutes. This step makes your truffles safe to eat.
Optional Garnishes
You can add fun garnishes to your truffles. A sprinkle of sea salt adds a nice touch. It balances the sweetness. You can also drizzle more melted chocolate on top. These small details make your truffles look fancy and taste even better.
Step-by-Step Instructions
Mixing the Dough
First, gather your ingredients. You need butter, sugars, vanilla, flour, and sweetened condensed milk. In a large bowl, cream the softened butter, brown sugar, and granulated sugar. Use an electric mixer on medium speed. Mix until the mixture is light and fluffy, which takes about 2-3 minutes. Next, add in the vanilla extract. Mix until it’s well combined.
Now, it’s time to add the flour. Make sure the flour is heat-treated for safety. Gradually sift it into the bowl while mixing on low speed. This helps avoid overworking the dough. Once the flour is mixed in, pour in the sweetened condensed milk. Mix until the dough is smooth. Finally, fold in the mini chocolate chips with a spatula or spoon. Make sure they are evenly spread throughout the dough.
Forming the Truffles
After mixing, it’s time to shape the dough. Use a small cookie scoop or your hands to portion the dough. Aim for balls about 1 inch wide. Place these balls on a parchment-lined baking sheet. Once you’ve formed all the truffles, put the baking sheet in the freezer. Let them chill for about 30 minutes. This makes the dough easier to handle and helps keep their shape.
Coating with Chocolate
While the truffles chill, melt the semi-sweet chocolate chips. Use a microwave-safe bowl and heat in 30-second intervals, stirring after each time. Keep heating until the chocolate is smooth.
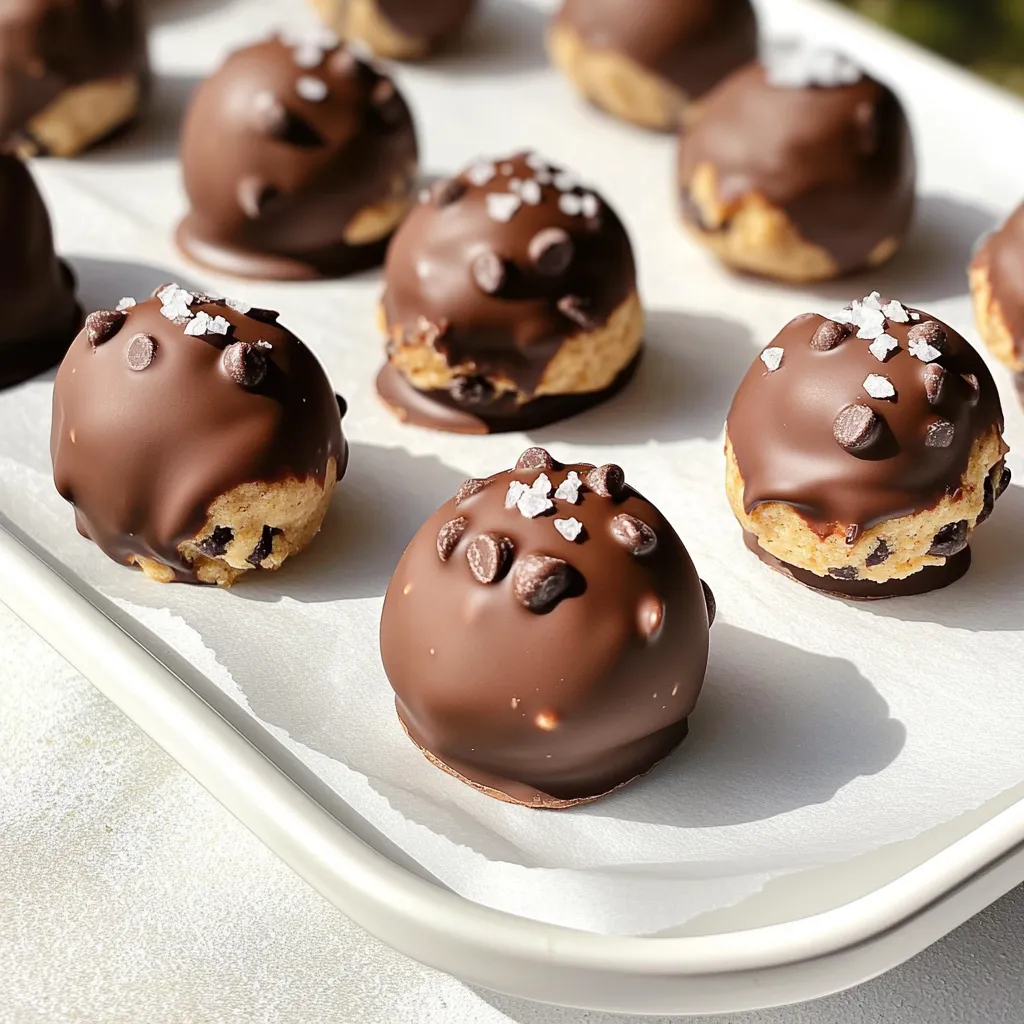
Once the truffles are firm, take them out of the freezer. Dip each truffle into the melted chocolate. Make sure each one is fully coated. Let any extra chocolate drip off before placing them back on the parchment-lined sheet. For an extra touch, sprinkle a tiny bit of sea salt on each one for a sweet and salty blend. Finally, return the baking sheet to the fridge. Chill for another 30 minutes so the chocolate can set perfectly.
Tips & Tricks
Achieving the Perfect Consistency
To get the right texture for your truffles, follow these steps. First, cream the butter and sugars well. This step adds air and makes your dough fluffy. When adding the flour, do it slowly. Mix just until combined. Overmixing can lead to tough truffles. After adding the sweetened condensed milk, the dough should feel smooth and soft. If it seems too sticky, chill it in the fridge for a few minutes before forming the balls.
Storing Leftover Dough
If you have leftover dough, store it right. Place it in an airtight container. You can keep it in the fridge for up to a week. To make it last longer, freeze it. Roll the dough into balls and freeze them on a tray. Once frozen, transfer them to a freezer-safe bag. They can stay good for up to three months. Just thaw them in the fridge before dipping in chocolate.
Best Practices for Melting Chocolate
Melting chocolate can be tricky. Here’s how to do it well. Use a microwave-safe bowl. Heat the chocolate in short bursts—about 30 seconds at a time. Stir between each burst. This method helps avoid burning. If you see lumps, keep stirring. The heat of the melted chocolate will help melt them. For a smooth coating, let the melted chocolate cool slightly before dipping the truffles.
Variations
Flavor Variations
You can make your truffles more fun by changing the flavors. Try adding nuts like walnuts or pecans for a nutty twist. You can also mix in mint extract for a fresh taste. If you enjoy spices, cinnamon or espresso powder can add warmth and depth. Each flavor will give a new life to your truffles.
Different Coating Options
The coating can change the look and taste of your truffles. You can use white chocolate instead of semi-sweet chocolate for a sweeter treat. Sprinkles can also make them festive and fun. For a crunch, try crushed nuts or cookie crumbs. These coatings add both taste and style to your delightful treats.
Dietary Alternatives
If you need to adapt the recipe, there are options for everyone. For a gluten-free version, use gluten-free flour. You can also make vegan truffles by using coconut oil instead of butter and plant-based milk instead of condensed milk. These changes keep the flavor intact while meeting dietary needs.
Storage Info
Best Storage Practices
To keep your chocolate chip cookie dough truffles fresh, store them in an airtight container. This prevents moisture and keeps them tasty. Place a piece of parchment paper between layers for easy access. If you leave them out, they might become dry or lose their charm.
Freezing Tips for Longer Shelf Life
Freezing is a great way to extend the life of these treats. After forming the truffles and before coating them, place them on a baking sheet. Freeze them for about 30 minutes. Once firm, transfer them to an airtight bag. They can last up to three months in the freezer. Just remember to label the bag with the date!
Recommended Containers for Storage
I recommend using glass or plastic containers with tight-fitting lids. These work best to keep your truffles fresh. You can also use silicone bags for saving space. Avoid using metal containers, as they can alter the taste over time.
FAQs
Can I eat cookie dough truffles raw?
Yes, you can eat cookie dough truffles raw. The dough is safe because we use heat-treated flour. This process kills harmful bacteria. To heat-treat flour, spread it on a baking sheet and bake it for about five minutes at 350°F (175°C). This step is key for safety.
How long do chocolate chip cookie dough truffles last?
Chocolate chip cookie dough truffles last about one week in the fridge. Store them in an airtight container to keep them fresh. You can also freeze them for up to three months. Just make sure they are in a freezer-safe container. They taste great even after freezing!
What can I substitute for condensed milk?
If you need a substitute for condensed milk, you have options. You can mix equal parts of milk and sugar. For a dairy-free option, try coconut cream with a bit of sweetener. Almond milk with sugar also works well. These substitutes keep the truffle’s creamy texture.
This blog post covered how to make delicious cookie dough truffles. We talked about the key ingredients, including heat-treated flour, and why they matter. I gave clear steps for mixing, forming, and coating the truffles. You learned helpful tips for the best consistency and how to store leftovers. We also explored fun variations to please any taste.
In closing, enjoy experimenting with these truffles. They are easy and fun to make!