Craving a sweet treat that's easy and delicious? You're in for a real delight with my Chocolate Peanut Butter Banana Ice Cream! This creamy dessert is packed with flavor and made with simple ingredients. I’ll guide you through quick steps to make this tasty ice cream at home. Whether you're a chocolate lover or seeking a fun twist, you've come to the right place! Let’s dive into this tasty recipe!
Why I Love This Recipe
- Healthy Indulgence: This ice cream is made entirely from natural ingredients, making it a guilt-free treat that satisfies your sweet tooth while providing essential nutrients.
- Quick and Easy: With only a few simple steps and minimal prep time, you can whip up this delicious dessert in no time, perfect for last-minute cravings.
- Customizable Flavor: You can easily adjust the sweetness and add extras like nuts or chocolate to suit your taste, making it versatile for everyone.
- Kid-Friendly Fun: This recipe is a hit with kids, as they can help with the blending and topping, making it a fun family activity that results in a tasty reward!
Ingredients
Complete List of Ingredients
To make this delightful chocolate peanut butter banana ice cream, you will need:
- 4 ripe bananas, sliced and frozen
- 3 tablespoons natural peanut butter
- 2 tablespoons unsweetened cocoa powder
- 1 teaspoon vanilla extract
- 1-2 tablespoons honey or maple syrup (optional, adjust to taste)
- A pinch of salt
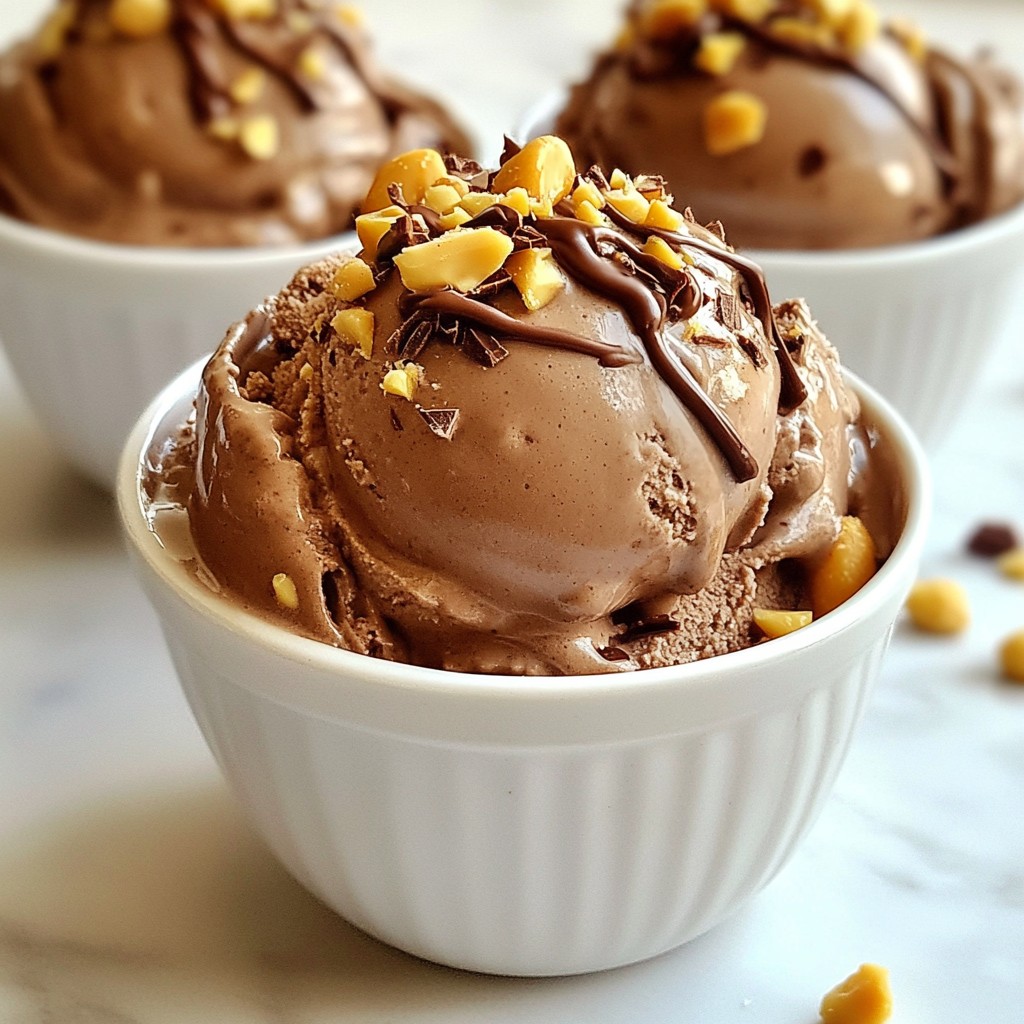
- Chopped peanuts and dark chocolate shavings for garnish
Optional Add-ins and Variations
You can add fun twists to this ice cream. Here are some ideas:
- Nut Butters: Try almond butter or cashew butter for different flavors.
- Fruits: Blend in some strawberries or raspberries for a fruity burst.
- Spices: Add a dash of cinnamon for warmth.
- Extracts: Use almond extract instead of vanilla for a new taste.
Nutritional Information
This ice cream is not just tasty; it's also packed with nutrients!
- Calories: About 200 per serving
- Fat: 8g (mostly healthy fats from peanut butter)
- Carbohydrates: 30g (natural sugars from bananas)
- Protein: 4g (thanks to the peanut butter)
- Fiber: 3g (bananas add fiber for digestion)
This yummy treat is a great way to enjoy dessert while fueling your body!

Step-by-Step Instructions
Preparing the Bananas
Start by peeling the ripe bananas. Cut them into thick rounds. Place the slices on a baking sheet lined with parchment paper. Make sure they are in a single layer. Freeze the banana slices for at least four hours. They should be completely frozen solid. This step is key for a creamy texture.
Blending the Ingredients
Once the bananas are frozen, take them out of the freezer. Place the slices in a food processor. Pulse the bananas a few times. Stop to scrape down the sides often. You want them to break down and clump together. Next, add natural peanut butter, unsweetened cocoa powder, vanilla extract, and a pinch of salt. If you like it sweeter, add honey or maple syrup. Blend everything until smooth and creamy. This should remind you of soft-serve ice cream.
Freezing and Serving Tips
After blending, taste the mixture. If it's not sweet enough, add more honey or syrup and blend again. Transfer the ice cream to an airtight container. Use a spatula to smooth the top. Seal it well and freeze for one to two hours. This firms up the ice cream even more. When ready to serve, scoop the ice cream into chilled bowls. Don’t forget to garnish with chopped peanuts and dark chocolate shavings for a crunchy finish. Enjoy your delicious creation!
Tips & Tricks
How to Achieve the Creamiest Texture
To get the best texture, freeze ripe bananas. Choose bananas with spots. Slice them thickly and freeze them for at least four hours. This step is key. When blending, pulse the bananas first. Stop to scrape the sides. Then add peanut butter and cocoa powder. Blend until it’s smooth. If it seems too thick, add a splash of milk or water. This will help it blend better.
Sweetness Adjustment Suggestions
Taste your mixture after blending. If you like it sweeter, add honey or maple syrup. Start with one tablespoon and blend again. Taste it again. You can always add more. Remember, some bananas are sweeter than others. Adjust based on your preference. It’s all about what you like!
Recommended Kitchen Tools
You will need a few tools to make this ice cream. Here’s a handy list:
- Food processor for blending
- Baking sheet for freezing banana slices
- Parchment paper to prevent sticking
- Airtight container to store your ice cream
- Spatula to help transfer the mixture
Using these tools will make your process smooth and easy!
Pro Tips
- Use Overripe Bananas: The riper the bananas, the sweeter and creamier your ice cream will be. Look for bananas with brown spots for the best flavor.
- Chill Your Equipment: For an extra creamy texture, chill your food processor bowl and blade in the freezer for 10-15 minutes before blending.
- Mix-In Ideas: Feel free to add other mix-ins like chopped nuts, chocolate chips, or even a swirl of caramel for added flavor and texture.
- Portion Control: Scoop the ice cream into smaller servings and store them in individual containers for easy access and to maintain freshness.
Variations
Dairy-Free Options
You can make this ice cream dairy-free easily. The main ingredients are already dairy-free. You only need ripe bananas and natural peanut butter. If you want creaminess, use coconut milk instead of any dairy. Coconut milk adds a rich, smooth texture. You can also try almond milk for a lighter option.
Flavor Enhancements
Want to mix things up? Use other nut butters! Almond butter, cashew butter, or even sunflower seed butter work well. Each nut butter adds a different taste. Almond butter gives a sweet and nutty flavor. Cashew butter adds creaminess without overpowering the chocolate. Sunflower seed butter is great for nut allergies.
Mix-ins for Added Texture
Mix-ins add fun and texture to your ice cream. Try adding chopped nuts like walnuts or pecans for crunch. You can also add mini chocolate chips for a sweet surprise. Fresh berries or chunks of fruit can brighten every bite. For a salty twist, sprinkle in some pretzel pieces. Don’t be afraid to experiment!
Storage Info
Best Practices for Freezing
To keep your chocolate peanut butter banana ice cream fresh, use an airtight container. This helps prevent freezer burn. Make sure to smooth the top of the ice cream before sealing it. You can also press a piece of parchment paper against the surface to reduce air exposure. This simple step helps maintain the ice cream's creamy texture.
How Long Does It Last?
If stored properly, your ice cream can last up to two weeks in the freezer. After that, it may start to lose its flavor and texture. For the best taste, try to enjoy it within the first week.
Thawing and Serving Again
When you're ready to enjoy your ice cream again, take it out of the freezer. Let it sit at room temperature for about 5 to 10 minutes. This will soften it just enough for easy scooping. If you find it too hard, you can also microwave it for a few seconds, but be careful not to melt it. Then, scoop it into your bowls and add your favorite toppings!
FAQs
Can I use other fruits?
Yes, you can use other fruits! Try ripe mangoes, strawberries, or peaches. Each fruit brings a unique taste. Frozen berries can add a nice tartness. Just make sure to keep the same method. Blend the frozen fruit with the peanut butter and cocoa powder. You might need to adjust the sweetness based on the fruit you choose.
How do I make it without a food processor?
If you don't have a food processor, you can use a blender. Cut the frozen bananas into smaller pieces. Add them to the blender with the other ingredients. Blend in small batches to avoid overloading the blender. You may need to stop and stir often. If it gets too thick, add a splash of milk or water to help blend.
Is it possible to make it vegan?
Yes, you can make it vegan! Use maple syrup instead of honey for sweetness. Make sure the cocoa powder is dairy-free. All the other ingredients are already plant-based. This way, you enjoy a delicious treat that fits a vegan diet.
We explored the key steps to create a tasty treat from bananas. You learned about the essential ingredients, optional add-ins, and their nutrition. I walked you through the steps from preparing bananas to serving tips. You now have tips on texture, sweetness, and kitchen tools for the best results. Plus, you discovered fun variations and storage methods. Embrace your creativity with this healthy recipe, and enjoy your delicious creation!


