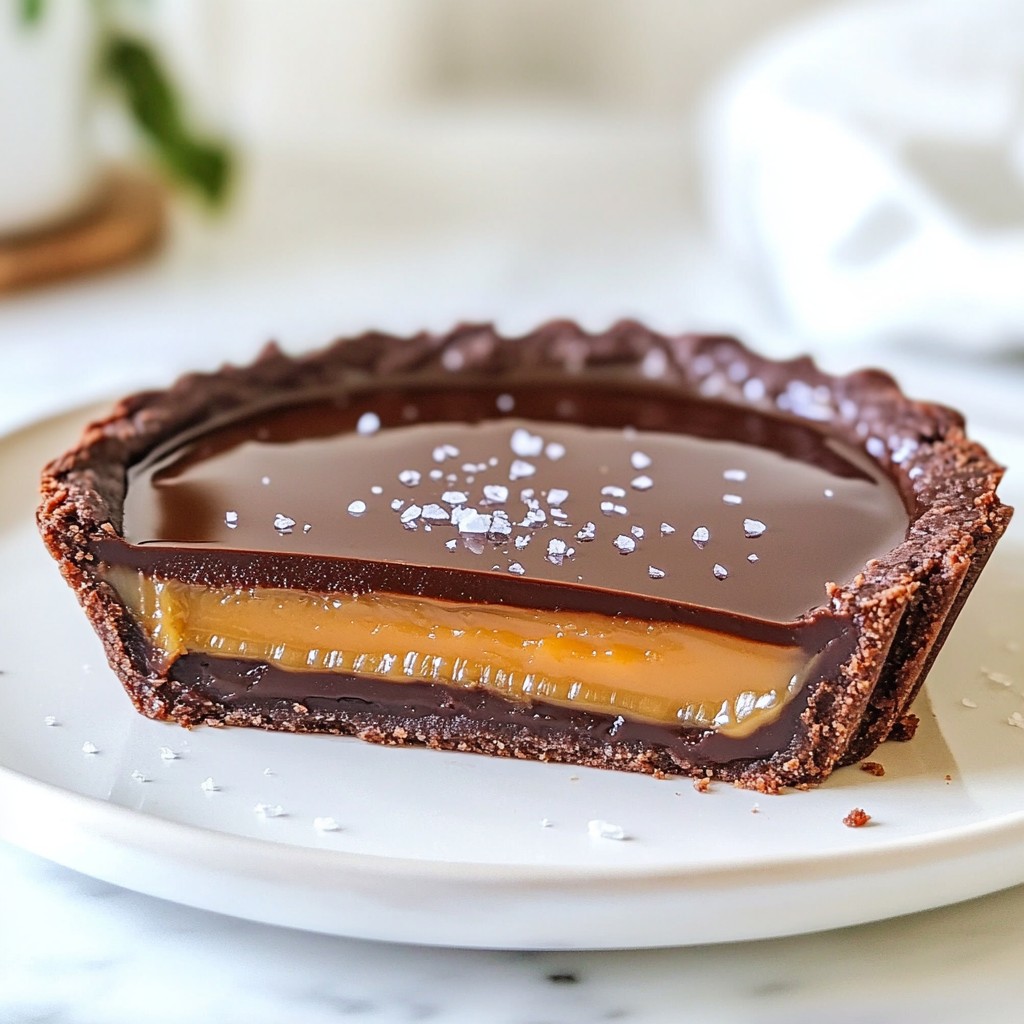
Indulging in a Chocolate Salted Caramel Tart is a true delight for your taste buds! This rich dessert has a crunchy crust, smooth caramel layer, and silky chocolate ganache. In this guide, I'll share how to create this irresistible treat step by step. Whether you are an experienced baker or a beginner, you’ll find tips that make this dessert easy to master. Get ready to impress your family and friends with a show-stopping dessert!
Why I Love This Recipe
- Decadent Flavor Combination: The rich chocolate crust pairs perfectly with the smooth salted caramel and luscious chocolate ganache, creating a heavenly dessert experience.
- Impressive Presentation: This tart looks stunning with its glossy ganache and delicate sprinkle of sea salt, making it a show-stopping centerpiece for any occasion.
- Perfect Balance of Sweet and Salty: The addition of sea salt enhances the flavors, providing a delightful contrast that keeps you coming back for another bite.
- Customizable and Fun to Make: This recipe allows for creativity, whether you want to experiment with different types of chocolate or add your favorite toppings.
Ingredients
Crust Ingredients
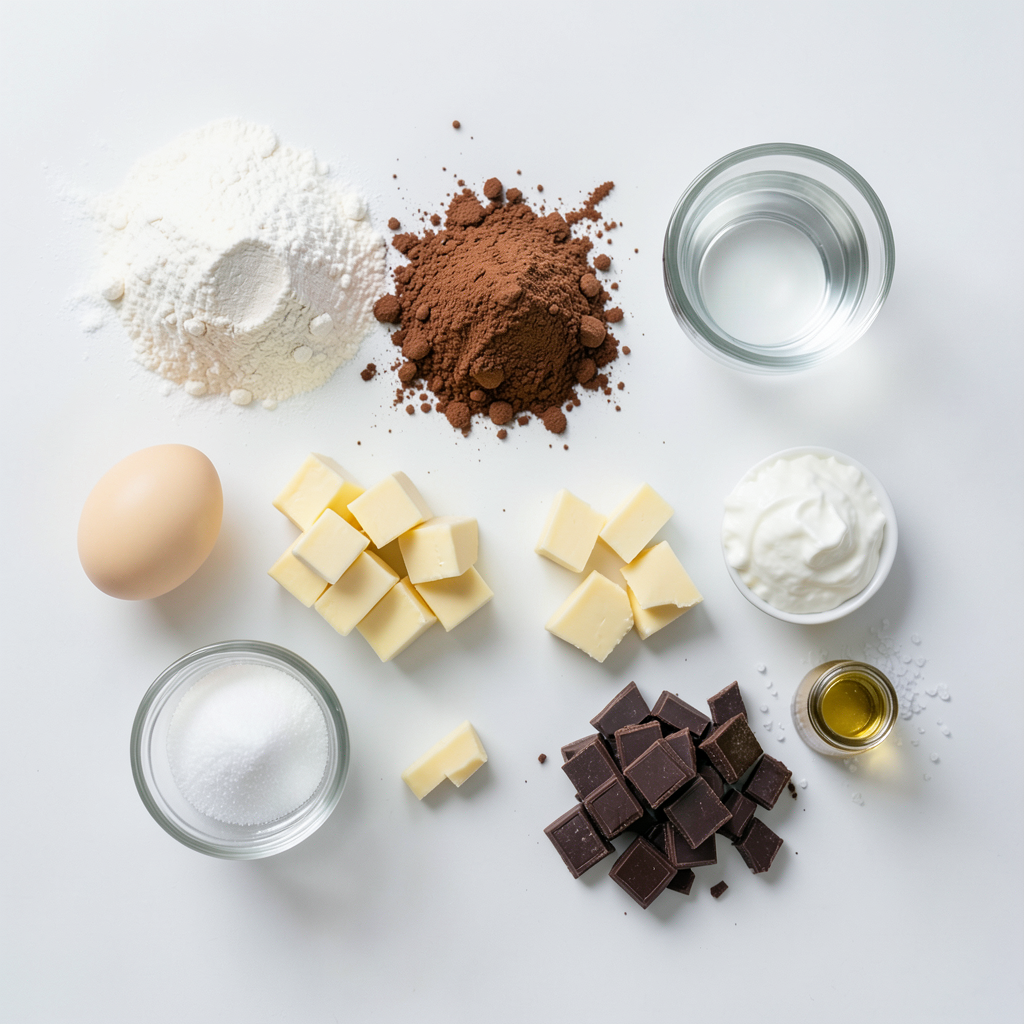
- 1 ½ cups all-purpose flour
- ½ cup unsweetened cocoa powder
- ⅓ cup powdered sugar
- ½ cup cold unsalted butter, cubed
- 1 large egg yolk
- 2-3 tablespoons cold water
Salted Caramel Filling Ingredients
- 1 cup granulated sugar
- 6 tablespoons unsalted butter, cut into pieces
- ½ cup heavy cream
- 1 teaspoon sea salt
Chocolate Ganache Ingredients
- 8 ounces dark chocolate, chopped
- 1 cup heavy cream
- 1 teaspoon vanilla extract
- Additional sea salt for garnish
For this chocolate salted caramel tart, I use simple yet rich ingredients. The crust is a blend of all-purpose flour, cocoa powder, and powdered sugar. This mix gives a deep chocolate flavor. I add cold unsalted butter to create a flaky texture. The egg yolk binds everything together while cold water brings the dough to life.
For the salted caramel filling, I start with granulated sugar. I heat it until it melts into a lovely amber hue. Then, I mix in unsalted butter and heavy cream. This step creates a smooth, creamy filling. Finally, I add sea salt for that essential salty kick.
The chocolate ganache tops off the tart. I use dark chocolate for a rich taste, and I combine it with heavy cream and a touch of vanilla. This ganache is glossy and smooth. I also sprinkle more sea salt on top for an extra flavor pop.
With these ingredients, you will craft a dessert that is truly irresistible. Each layer brings flavors that blend perfectly.
Step-by-Step Instructions
Prepare and Bake the Crust
To make the crust, start by mixing the dry ingredients. In a large bowl, whisk together 1 ½ cups of all-purpose flour, ½ cup of cocoa powder, and ⅓ cup of powdered sugar. This mix gives a rich chocolate flavor.
Next, add the cold, cubed butter. Use your fingertips or a pastry cutter to mix until it looks like coarse crumbs. Then, add one large egg yolk. Mix this in too.
Now, add 2-3 tablespoons of cold water, one at a time, until the dough comes together. Form it into a disk, wrap it in plastic wrap, and chill it in the fridge for at least 30 minutes.
While the dough chills, preheat your oven to 350°F (175°C). Once ready, sprinkle flour on a clean surface and roll out the dough to fit a 9-inch tart pan. Press the dough into the pan, covering the bottom and sides. Trim any extra dough from the edges.
Poke holes in the bottom with a fork to stop air bubbles. Bake the crust for 15-20 minutes. It should feel firm when done. Let it cool completely in the pan.
Make the Salted Caramel Filling
To make the salted caramel, start by melting the sugar. In a medium saucepan over medium heat, add 1 cup of granulated sugar. Stir with a wooden spoon until it melts and turns a deep amber color.
Once it reaches this color, quickly add 6 tablespoons of unsalted butter. Stir until all the butter melts. Now, slowly whisk in ½ cup of heavy cream. This step can cause bubbles, so be careful.
After mixing, remove it from the heat and stir in 1 teaspoon of sea salt. Let the caramel cool for a few minutes, then pour it into the cooled tart crust.
Create the Ganache and Assembly
Now, let’s make the ganache. In a separate saucepan, heat 1 cup of heavy cream over medium heat. Watch closely until it just begins to simmer. Then, remove it from the heat.
Pour the hot cream over 8 ounces of chopped dark chocolate in a heatproof bowl. Let it sit for a few minutes to soften and melt the chocolate. Stir until smooth and glossy. Add 1 teaspoon of vanilla extract and mix again.
Carefully pour the chocolate ganache over the cooled salted caramel layer in the tart shell. Use a spatula to spread it evenly.
Finally, put the tart back into the fridge for at least 1 hour to let the ganache set. Before serving, sprinkle some extra sea salt on top for a lovely finish.
Tips & Tricks
Perfecting the Crust
To get the right texture for your crust, use cold butter. It helps keep the crust flaky. When mixing, rub the butter into the dry mix until it looks like sand. Avoid overworking the dough. This can make it tough. Roll the dough on a floured surface to prevent sticking. If it cracks, simply press it back together. Poke holes in the bottom with a fork. This stops bubbles during baking.
Mastering the Salted Caramel
For perfect caramel, melt the sugar slowly over medium heat. Stir it gently to avoid burning. Watch closely as it changes to a deep amber color. Once you reach this color, add the butter right away. Be careful, as it will bubble up. Gradually whisk in heavy cream after the butter melts. Let it cool slightly before pouring it into the crust. Chill it in the fridge to set properly. A good set means a slice that holds its shape.
Ganache Tips
To create a smooth ganache, heat the cream until it simmers. Then, pour it over the chopped chocolate. Let it sit for a few minutes to soften. Stir until it is fully smooth and shiny. If your ganache is too thick, add a bit more cream. If it’s too thin, warm it slightly and add more chocolate. Always aim for a glossy finish for the best look.
Pro Tips
- Chill the Dough: Ensure your tart dough is well chilled before rolling it out. This helps maintain its structure and prevents shrinking during baking.
- Use a Candy Thermometer: For perfect salted caramel, consider using a candy thermometer to monitor the sugar temperature. Aim for a deep amber color, around 350°F (175°C).
- Allow Ganache to Cool: Let the ganache cool slightly before pouring it over the caramel layer. This prevents the two layers from mixing and helps maintain distinct flavors.
- Garnish Wisely: When garnishing with sea salt, sprinkle it just before serving to keep the crystals crunchy and enhance the tart's presentation.
Variations
Alternative Crust Options
You can change the crust to fit your needs.
- Gluten-free crust option: Use gluten-free flour for a safe choice. Mix it with cocoa powder and powdered sugar. Add cold butter and an egg yolk.
- Nut-based crust alternatives: Try almond flour or ground pecans. Mix the nuts with cocoa powder and a bit of butter. This gives a rich taste and crunchy texture.
Flavor Variations for Salted Caramel
You can switch up the salted caramel flavor.
- Adding vanilla or espresso flavor: A touch of vanilla adds warmth. Espresso gives a coffee kick. Just mix it in after the caramel cools.
- Infusing spices or extracts: You can add a pinch of cinnamon or nutmeg. These spices bring warmth and depth to the flavor. Experiment with what you like best!
Creative Toppings
The tart can shine with different toppings.
- Fresh fruits or nuts as garnishes: Top with sliced strawberries or raspberries. Chopped nuts like pecans or almonds add crunch.
- Serving suggestions with different sides: Pair this tart with whipped cream or ice cream. A scoop of vanilla ice cream goes well with the rich chocolate. Enjoy your dessert in new ways!
Storage Info
Storing Leftover Tart
To keep your chocolate salted caramel tart fresh, refrigerate it in an airtight container. This method prevents it from absorbing other food odors. Aim to enjoy it within three days for the best taste and texture. After that, the caramel may lose its creamy goodness.
Freezing Instructions
You can freeze the tart if you have leftovers. First, make sure it is completely chilled. Wrap it tightly in plastic wrap, then place it in a freezer-safe container. This will help avoid freezer burn. The tart can last up to three months in the freezer. When you’re ready to eat it, thaw it overnight in the fridge. This helps maintain its smooth texture and rich flavor.
Reheating and Serving Suggestions
To serve the tart after freezing, take it out of the fridge and let it sit for at least 30 minutes. This warms it slightly, enhancing the flavors. You can also transform leftovers into a new dessert! Try crumbling the tart over ice cream or mixing it into a parfait with whipped cream and fruits. These ideas make every bite a new adventure!
FAQs
How do I know when the caramel is done?
To know when your caramel is ready, watch for a few key signs. First, the sugar will melt and turn a deep amber color. This usually takes about 10 minutes on medium heat. If you smell a rich scent, it’s a good sign. You should also see smooth, bubbling edges. Once you see these signs, quickly add the butter and cream. Stir until fully melted and smooth. Be careful, as the mixture may bubble up.
Can I use milk chocolate instead of dark chocolate?
Yes, you can use milk chocolate. However, this will change the flavor. Milk chocolate is sweeter and creamier than dark chocolate. This may make the tart taste less rich. The texture will also be softer. If you prefer a sweeter tart, milk chocolate works well. If you like a deeper flavor, stick with dark chocolate.
Is it possible to make the tart ahead of time?
You can make this tart ahead of time. For best results, prepare the crust and filling a day before. Store the tart in the fridge after it sets. Cover it tightly with plastic wrap. This keeps it fresh and tasty. You can also freeze the tart if you want to save it for later. Just make sure to wrap it well. When ready to eat, thaw it in the fridge overnight.
You now have everything you need to create a delicious salted caramel tart. We covered the key ingredients for the crust, filling, and ganache. You learned step-by-step instructions to bake and assemble this treat. We also discussed tips for perfecting your tart and variations to make it your own.
With these insights, you can impress friends and family with your baking skills. Enjoy making your tart and experimenting with flavors! Happy baking!


