Easy Chicken Chimichangas Tasty and Quick Meal Guide

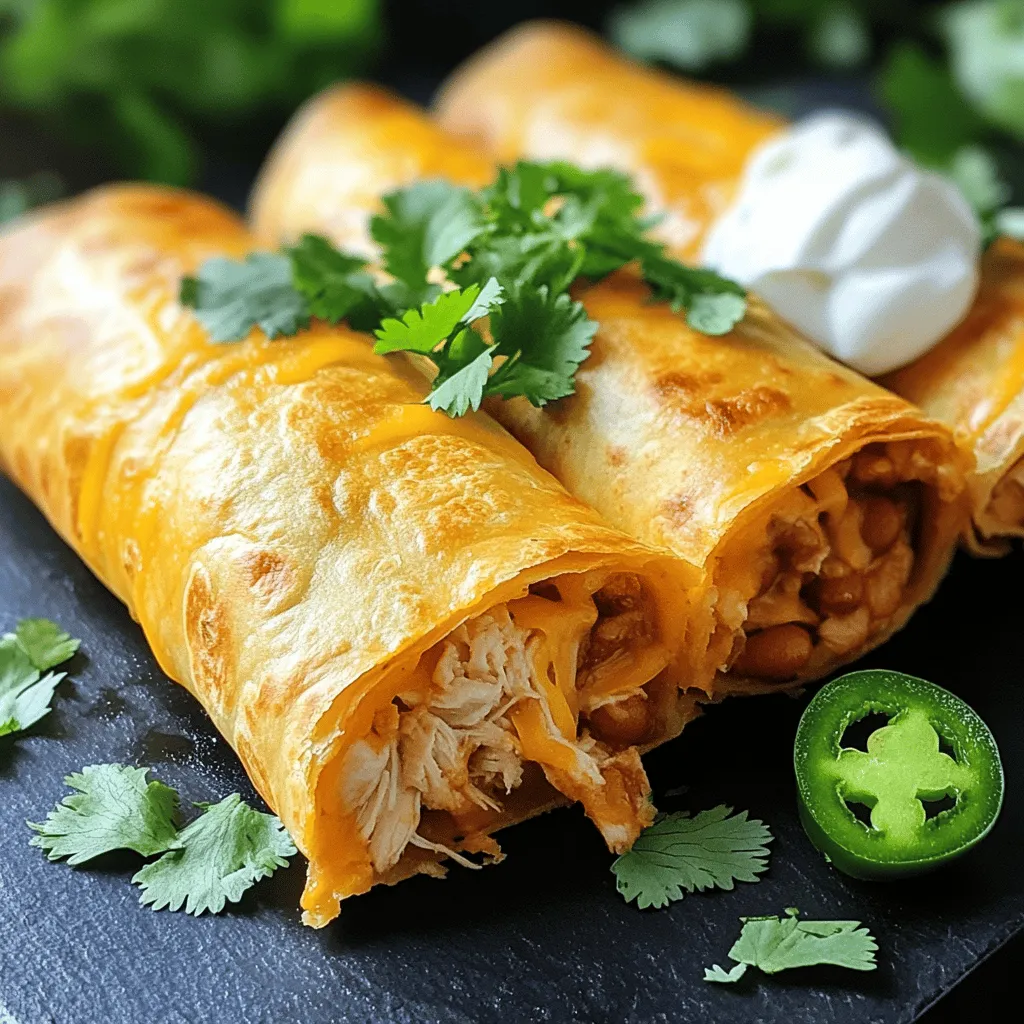
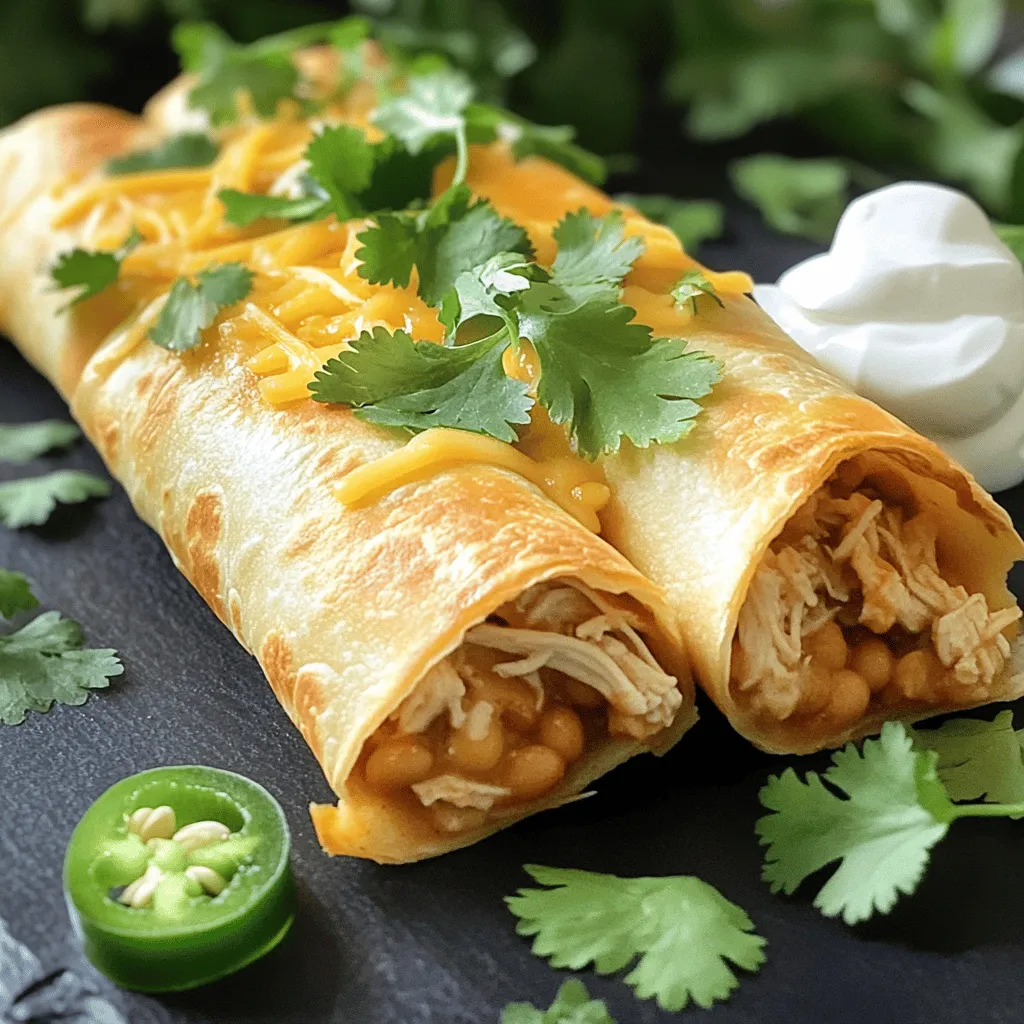
Craving a tasty meal but short on time? You’re in the right spot! My Easy Chicken Chimichangas are a quick and delicious choice for any day. With just a few ingredients and simple steps, you’ll create a crispy, flavorful dish your family will love. Whether you’re cooking for work nights or a weekend treat, this guide makes it easy. Let’s dive into making your new favorite meal!

Ingredients

Full Recipe Overview

Easy Chicken Chimichangas are a fun and tasty meal. You can make them quickly using simple ingredients. The best part? You can customize them to fit your taste.

List of Ingredients

– 2 cups cooked chicken, shredded

– 1 cup creamy refried beans

– 1 cup shredded cheese (cheddar, Monterey Jack, or Mexican blend)

– 1 small onion, finely diced

– 1 jalapeño, finely chopped (optional)

– 1 teaspoon ground cumin

– 1 teaspoon chili powder

– Salt and freshly ground black pepper, to taste

– 6 large flour tortillas

– Vegetable or canola oil, for frying

– Sour cream, for serving

– Fresh cilantro leaves, for garnish

Ingredient Substitutions

You can swap ingredients based on what you have. Here are some ideas:

– Use black beans instead of refried beans for a different taste.

– Try rotisserie chicken for quick prep.

– Substitute cheese with a dairy-free option if needed.

– Skip the jalapeño for a milder flavor.

– Whole wheat tortillas add a healthy twist.

Feel free to mix and match these ingredients. This flexibility makes the recipe fun and unique. If you’re interested, check out the full recipe for more details!

Step-by-Step Instructions

Preparing the Filling

Start by gathering your ingredients. You need cooked chicken, creamy refried beans, and some cheese. Use a large bowl to mix the filling. Combine the shredded chicken, refried beans, diced onion, and jalapeño if you want some heat. Add ground cumin and chili powder for flavor. Don’t forget to season with salt and pepper. Mixing well is key to a tasty filling. It should all blend together nicely and smell amazing.

Assembling the Chimichangas

Lay one tortilla flat on a clean surface. Spoon about one-sixth of the filling into the center. Fold in the sides of the tortilla. Then roll it tightly from the bottom up, like a burrito. Make sure the filling stays inside. Repeat this for the other tortillas and filling. It’s like wrapping a present, but much tastier!

Frying Techniques

Heat some vegetable or canola oil in a large skillet. You want enough oil to cover the bottom. Wait until the oil gets hot, about 350°F. Carefully place each chimichanga seam-side down in the oil. Fry them for 3-4 minutes until they turn golden brown. Flip them gently to fry the other side for another 3-4 minutes. Use tongs to avoid splashes. When done, drain them on paper towels to remove excess oil.

Now, sprinkle the remaining cheese on top while they’re hot. This helps it melt perfectly. Enjoy your delicious chimichangas with sour cream and cilantro.

Tips & Tricks

Best Practices for Crispy Chimichangas

To get that perfect crunch, always use hot oil. Heat it until it shimmers. A good temperature is about 350°F. The tortilla should sizzle when you add it. This helps to seal the edges and create a crisp outer layer. Fry in small batches to avoid cooling the oil. Too many at once can make them soggy.

How to Avoid Filling Leaks

To stop your filling from leaking, make sure to seal the edges tightly. Roll the chimichanga snugly. Use a bit of water on your fingers to moisten the edges before sealing. This helps the tortilla stick together. Also, avoid overfilling. A generous amount is great, but too much can cause spills.

Serving Suggestions

Serve these chimichangas with sour cream and fresh cilantro. You can also add salsa for extra flavor. A side of guacamole brightens the dish. For a fun twist, try a sprinkle of lime juice. This adds a zesty kick and enhances the flavors. For the full recipe, check the detailed steps provided.

Variations

Vegetarian Option

For a tasty vegetarian chimichanga, swap the chicken for 2 cups of cooked black beans or lentils. This gives you a hearty filling with great texture. Add in some sautéed bell peppers and corn for extra flavor. Using the same spices, like cumin and chili powder, will keep the taste bold and vibrant. You can follow the Full Recipe for the assembly instructions.

Spicy Chimichangas

If you like heat, make spicy chimichangas! Start with the base recipe, but add more jalapeño or some diced green chilies. You can also mix in a bit of chipotle sauce for a smoky kick. Don’t forget to adjust the salt and spices to match your heat level. This twist will surely excite your taste buds!

Cheese-Only Filling

For cheese lovers, a cheese-only filling is simple and delicious. Use 2 cups of your choice of cheese, like a blend of cheddar and Monterey Jack. Melt the cheese in a pan with a splash of cream to make it extra gooey. You can add herbs like cilantro or green onions for freshness. This filling is rich and satisfying, perfect for a quick meal!

Storage Info

How to Store Leftovers

To store leftover chimichangas, let them cool first. Place them in an airtight container. Keep them in the fridge for up to three days. If you need to store them longer, freezing is a good option. Make sure they are completely cool before freezing.

Reheating Tips

When you want to eat your leftovers, reheat them in the oven. Preheat your oven to 350°F (175°C). Place the chimichangas on a baking sheet. Heat for about 15-20 minutes or until warm. This keeps them crispy. You can also use a microwave, but this may make them soft. If you use the microwave, heat them for one to two minutes.

Freezing Instructions

To freeze chimichangas, wrap each one tightly in plastic wrap. Then, place them in a freezer-safe bag. They can last in the freezer for up to three months. When ready to eat, thaw them in the fridge overnight. For best results, reheat in the oven after thawing. This ensures they stay crunchy and delicious.

FAQs

Can I bake chimichangas instead of frying?

Yes, you can bake chimichangas. Preheat your oven to 425°F (220°C). Place the assembled chimichangas seam-side down on a baking sheet. Lightly spray them with cooking oil for crispiness. Bake for about 20-25 minutes, turning halfway through. This method is healthier and still gives you a nice crunch.

What can I use in place of refried beans?

If you want a change, you can use black beans or pinto beans. Just mash them well before mixing. You can also try hummus for a different taste. Another great option is using cream cheese for a rich, creamy filling. Feel free to experiment!

How to make chimichangas ahead of time?

To prepare chimichangas ahead, you can assemble them and freeze them before frying. Wrap each chimichanga tightly in plastic wrap or foil. When you’re ready to cook, you can fry them from frozen. Just add a couple of minutes to the cooking time. Alternatively, bake them after thawing for a quick meal.

You now have all the tools to make tasty chimichangas. We covered the ingredients, step-by-step instructions, and tips for perfect results. Don’t forget the variations to suit your taste.

Feel free to experiment with fillings and spices. Store leftovers correctly to enjoy them later. I hope you feel confident to try this recipe. Enjoy each bite of your crispy chimichangas!

Easy Chicken Chimichangas are a fun and tasty meal. You can make them quickly using simple ingredients. The best part? You can customize them to fit your taste. - 2 cups cooked chicken, shredded - 1 cup creamy refried beans - 1 cup shredded cheese (cheddar, Monterey Jack, or Mexican blend) - 1 small onion, finely diced - 1 jalapeño, finely chopped (optional) - 1 teaspoon ground cumin - 1 teaspoon chili powder - Salt and freshly ground black pepper, to taste - 6 large flour tortillas - Vegetable or canola oil, for frying - Sour cream, for serving - Fresh cilantro leaves, for garnish You can swap ingredients based on what you have. Here are some ideas: - Use black beans instead of refried beans for a different taste. - Try rotisserie chicken for quick prep. - Substitute cheese with a dairy-free option if needed. - Skip the jalapeño for a milder flavor. - Whole wheat tortillas add a healthy twist. Feel free to mix and match these ingredients. This flexibility makes the recipe fun and unique. If you're interested, check out the full recipe for more details! Start by gathering your ingredients. You need cooked chicken, creamy refried beans, and some cheese. Use a large bowl to mix the filling. Combine the shredded chicken, refried beans, diced onion, and jalapeño if you want some heat. Add ground cumin and chili powder for flavor. Don't forget to season with salt and pepper. Mixing well is key to a tasty filling. It should all blend together nicely and smell amazing. Lay one tortilla flat on a clean surface. Spoon about one-sixth of the filling into the center. Fold in the sides of the tortilla. Then roll it tightly from the bottom up, like a burrito. Make sure the filling stays inside. Repeat this for the other tortillas and filling. It’s like wrapping a present, but much tastier! Heat some vegetable or canola oil in a large skillet. You want enough oil to cover the bottom. Wait until the oil gets hot, about 350°F. Carefully place each chimichanga seam-side down in the oil. Fry them for 3-4 minutes until they turn golden brown. Flip them gently to fry the other side for another 3-4 minutes. Use tongs to avoid splashes. When done, drain them on paper towels to remove excess oil. Now, sprinkle the remaining cheese on top while they’re hot. This helps it melt perfectly. Enjoy your delicious chimichangas with sour cream and cilantro. To get that perfect crunch, always use hot oil. Heat it until it shimmers. A good temperature is about 350°F. The tortilla should sizzle when you add it. This helps to seal the edges and create a crisp outer layer. Fry in small batches to avoid cooling the oil. Too many at once can make them soggy. To stop your filling from leaking, make sure to seal the edges tightly. Roll the chimichanga snugly. Use a bit of water on your fingers to moisten the edges before sealing. This helps the tortilla stick together. Also, avoid overfilling. A generous amount is great, but too much can cause spills. Serve these chimichangas with sour cream and fresh cilantro. You can also add salsa for extra flavor. A side of guacamole brightens the dish. For a fun twist, try a sprinkle of lime juice. This adds a zesty kick and enhances the flavors. For the full recipe, check the detailed steps provided. {{image_4}} For a tasty vegetarian chimichanga, swap the chicken for 2 cups of cooked black beans or lentils. This gives you a hearty filling with great texture. Add in some sautéed bell peppers and corn for extra flavor. Using the same spices, like cumin and chili powder, will keep the taste bold and vibrant. You can follow the Full Recipe for the assembly instructions. If you like heat, make spicy chimichangas! Start with the base recipe, but add more jalapeño or some diced green chilies. You can also mix in a bit of chipotle sauce for a smoky kick. Don't forget to adjust the salt and spices to match your heat level. This twist will surely excite your taste buds! For cheese lovers, a cheese-only filling is simple and delicious. Use 2 cups of your choice of cheese, like a blend of cheddar and Monterey Jack. Melt the cheese in a pan with a splash of cream to make it extra gooey. You can add herbs like cilantro or green onions for freshness. This filling is rich and satisfying, perfect for a quick meal! To store leftover chimichangas, let them cool first. Place them in an airtight container. Keep them in the fridge for up to three days. If you need to store them longer, freezing is a good option. Make sure they are completely cool before freezing. When you want to eat your leftovers, reheat them in the oven. Preheat your oven to 350°F (175°C). Place the chimichangas on a baking sheet. Heat for about 15-20 minutes or until warm. This keeps them crispy. You can also use a microwave, but this may make them soft. If you use the microwave, heat them for one to two minutes. To freeze chimichangas, wrap each one tightly in plastic wrap. Then, place them in a freezer-safe bag. They can last in the freezer for up to three months. When ready to eat, thaw them in the fridge overnight. For best results, reheat in the oven after thawing. This ensures they stay crunchy and delicious. Yes, you can bake chimichangas. Preheat your oven to 425°F (220°C). Place the assembled chimichangas seam-side down on a baking sheet. Lightly spray them with cooking oil for crispiness. Bake for about 20-25 minutes, turning halfway through. This method is healthier and still gives you a nice crunch. If you want a change, you can use black beans or pinto beans. Just mash them well before mixing. You can also try hummus for a different taste. Another great option is using cream cheese for a rich, creamy filling. Feel free to experiment! To prepare chimichangas ahead, you can assemble them and freeze them before frying. Wrap each chimichanga tightly in plastic wrap or foil. When you're ready to cook, you can fry them from frozen. Just add a couple of minutes to the cooking time. Alternatively, bake them after thawing for a quick meal. You now have all the tools to make tasty chimichangas. We covered the ingredients, step-by-step instructions, and tips for perfect results. Don't forget the variations to suit your taste. Feel free to experiment with fillings and spices. Store leftovers correctly to enjoy them later. I hope you feel confident to try this recipe. Enjoy each bite of your crispy chimichangas!

Easy Chicken Chimichangas

Indulge in the deliciousness of crispy chicken chimichangas with this easy recipe! Packed with shredded chicken, creamy refried beans, and melty cheese, these crispy delights are perfect for a satisfying meal or fun snack. Learn the step-by-step instructions to create a golden-brown masterpiece, and discover tips for perfect presentation. Click through to explore the full recipe and elevate your kitchen game today!

Ingredients
  

2 cups cooked chicken, shredded

1 cup creamy refried beans

1 cup shredded cheese (choose cheddar, Monterey Jack, or a flavorful Mexican blend)

1 small onion, finely diced

1 jalapeño, finely chopped (optional for an added kick)

1 teaspoon ground cumin

1 teaspoon chili powder

Salt and freshly ground black pepper, to taste

6 large flour tortillas

Vegetable or canola oil, for frying

Sour cream, for serving

Fresh cilantro leaves, for garnish

Instructions
 

Prepare the Filling: In a large mixing bowl, combine the shredded chicken, creamy refried beans, diced onion, jalapeño (if opting for spice), cumin, chili powder, and half of the shredded cheese. Season vigorously with salt and freshly ground black pepper to enhance the flavor. Mix thoroughly until all ingredients are well incorporated.

    Assemble the Chimichangas: On a clean flat surface, lay one tortilla down. Spoon approximately 1/6 of the chicken mixture into the center of the tortilla.

      Roll Them Up: Fold the sides of the tortilla inward over the filling, then roll it tightly from the bottom up to create a burrito shape. Ensure the filling is well secured within. Repeat this process using the remaining tortillas and filling mixture.

        Heat the Oil: In a large skillet, add enough vegetable or canola oil to cover the bottom, heating it over medium heat until shimmering (approximately 350°F or 175°C).

          Fry the Chimichangas: Carefully place each chimichanga seam-side down into the hot oil. Fry for 3-4 minutes on one side, until golden brown and crispy. Flip them gently and fry for an additional 3-4 minutes on the other side. Use a slotted spoon or tongs to prevent oil splatter.

            Drain Excess Oil: Once crispy and beautifully browned, remove each chimichanga from the skillet and place them on a plate lined with paper towels to absorb any excess oil.

              Melt the Cheese: Sprinkle the remaining shredded cheese on top of each chimichanga while they are still hot, allowing it to melt slightly.

                Serve: Serve your chimichangas hot, accompanied by a generous dollop of sour cream and a sprinkle of fresh cilantro leaves for a vibrant finish.

                  Prep Time: 20 minutes | Total Time: 40 minutes | Servings: 6

                    - Presentation Tips: Arrange the chimichangas on a large serving platter, drizzle with a little extra sour cream, and garnish with a colorful cilantro and lime wedge for an eye-catching presentation.

                      Leave a Comment

                      Recipe Rating