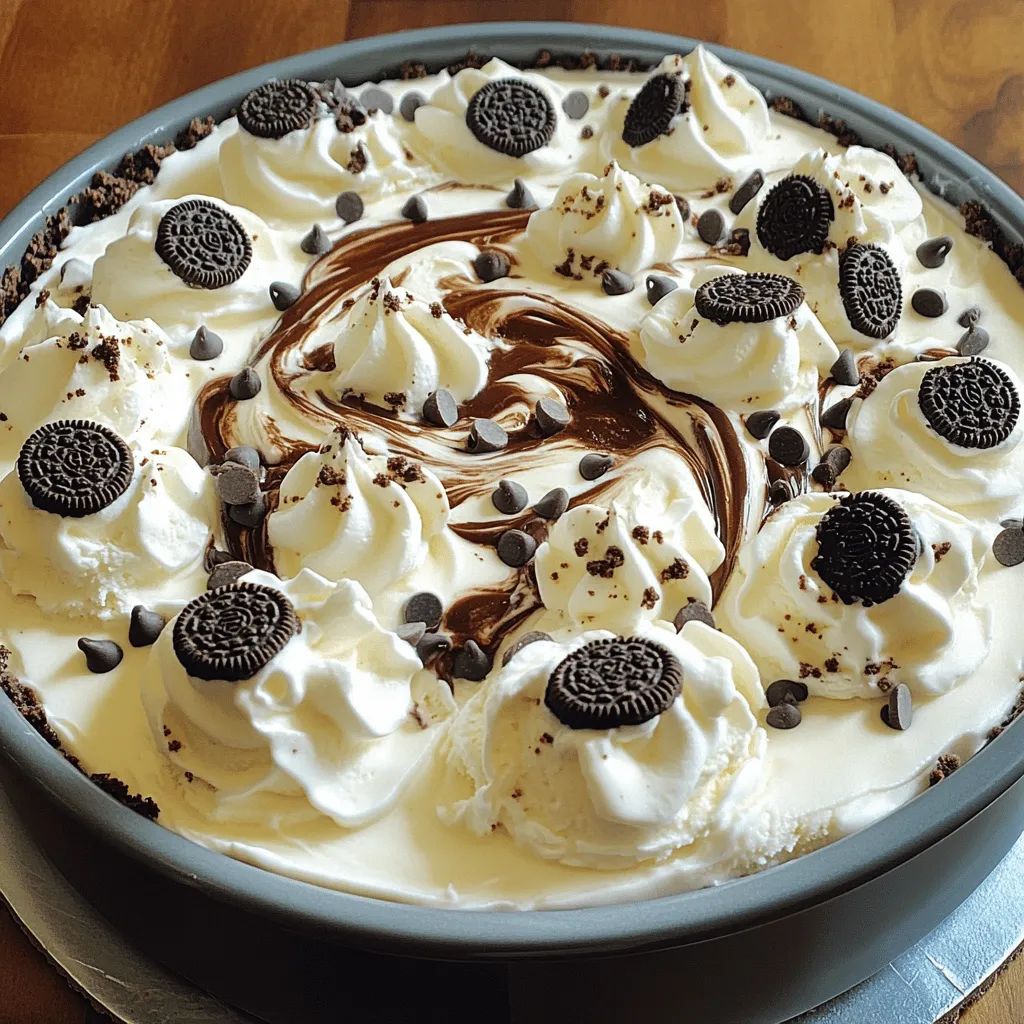
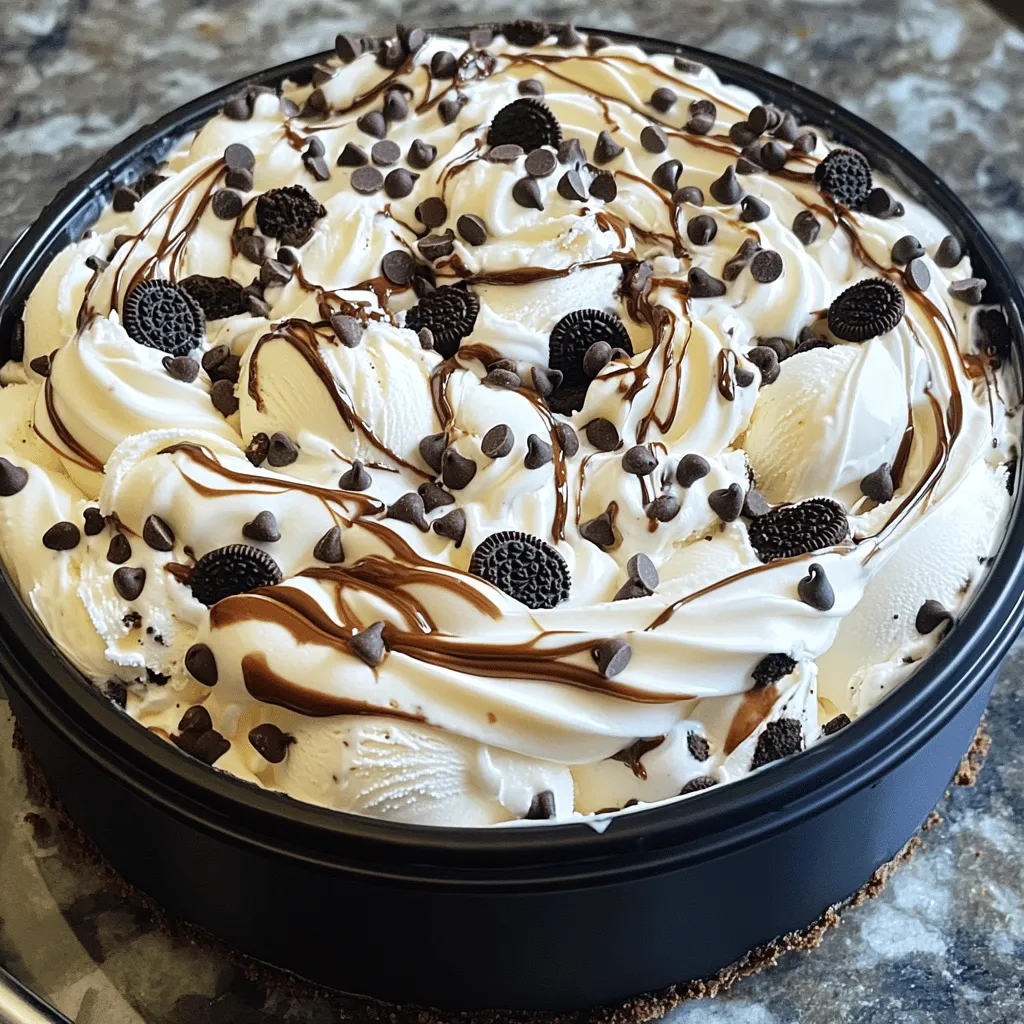
Are you craving something sweet and creamy? Look no further! This Indulgent Oreo Blizzard Ice Cream Cake recipe combines rich vanilla ice cream, crunchy Oreo cookies, and a drizzle of hot fudge. It’s easy to make and perfect for any occasion. Get ready to impress your friends and family with every delicious layer. Let’s dive into the simple steps to create this decadent dessert that everyone will love!
Ingredients
Main Ingredients
– 1 box of Oreo cookies (approximately 14.3 ounces)
– 1/2 cup unsalted butter, melted
– 1/2 gallon vanilla ice cream, softened
Optional Ingredients
– 1 cup whipped cream (store-bought or homemade)
– 1/2 cup hot fudge sauce (store-bought or homemade)
– 1/2 cup mini chocolate chips (optional)
Toppings
– 1/2 cup crushed Oreos
– Extra hot fudge or whipped cream for serving
To make the Oreo Blizzard Ice Cream Cake, you need a few key items. The main star is the Oreo cookies. They give the cake its rich flavor and crunchy texture. You will also need butter to hold the crust together. Softening the vanilla ice cream is very important. This makes it easy to spread later.
If you want to add more flair, whipped cream is a great choice. It makes the cake light and fluffy. Hot fudge sauce adds a sweet touch that everyone loves. The mini chocolate chips are fun but not necessary.
For toppings, crushed Oreos give a nice crunch on top. Adding extra hot fudge or whipped cream when serving makes it even better. Use this list to gather your ingredients before you start making the cake.
Step-by-Step Instructions
Preparing the Cookie Crust
– Preheat your oven to 350°F (175°C).
– Crush 1 box of Oreo cookies into fine crumbs. You can use a food processor or a rolling pin with a sealed plastic bag.
– Mix the crushed Oreos with 1/2 cup of melted unsalted butter until it looks like wet sand.
Forming the Base
– Press this crumb mixture firmly into a 9-inch springform pan to make an even crust.
– Bake for about 10 minutes until the crust is set. Let it cool completely on a wire rack.
Layering the Cake
– Once the crust has cooled, spread 1/2 gallon of softened vanilla ice cream over it.
– Drizzle 1/2 cup of hot fudge sauce on top and use a knife or toothpick to swirl it in.
Whipped Cream Layer
– Fold 1 cup of whipped cream into any leftover softened ice cream. This gives a light, fluffy mix.
– Spoon this mixture over the fudge layer, spreading it evenly.
Adding Toppings
– Sprinkle 1/2 cup of crushed Oreos and 1/2 cup of mini chocolate chips on top. This adds crunch and sweetness.
– Freeze the cake for at least 4 hours before you serve it.Enjoy every bite!
Tips & Tricks
Perfecting the Crust
– Use a food processor for fine crumbs.
– Allow crust to cool completely before layering.
A fine crumb crust is a must for this cake. A food processor makes it easy to achieve that perfect texture. If you don’t have one, you can place cookies in a bag and crush them with a rolling pin. Just make sure they are very fine.
Once baked, let the crust cool fully. This step is key. If you skip this, the ice cream can melt and make a mess.
Ice Cream Tips
– Soften ice cream to room temperature for easy spreading.
– Use a spatula for an even layer.
Make sure you let your vanilla ice cream sit out for about 10 minutes. It will soften, making it easier to spread. I like to use a spatula to create a smooth, even layer. This gives the cake a nice look and texture.
Serving Suggestions
– Serve with an extra drizzle of hot fudge.
– Add a dollop of whipped cream on each slice.
For serving, I love to drizzle extra hot fudge over each slice. It adds a rich flavor. A dollop of whipped cream also enhances the dessert. It’s the perfect touch to make every bite special. Enjoy each slice with these simple tips!
Variations
Flavor Variations
You can change the ice cream flavor to mix things up. Try using chocolate ice cream instead of vanilla. This adds a rich, deep taste that pairs well with Oreos. For a fun twist, add a few drops of mint extract. This gives your cake a refreshing minty flavor that complements the chocolate.
Add-ins
Want to make your cake even more exciting? Incorporate crushed nuts or your favorite candy pieces. Chopped peanuts or caramel bits can add a nice crunch. You can also use different flavored sauces or toppings. Try caramel or raspberry sauce for a fruity kick. These add-ins create layers of flavor and texture.
Healthier Options
Looking for a lighter version? Substitute low-fat ice cream or whipped topping. This way, you keep the taste but lower the calories. You can also use sugar-free Oreos for a lower-calorie option. This makes it easier to enjoy this treat without feeling guilty.
Storage Info
Freezing the Cake
Store your Oreo Blizzard Ice Cream Cake in the freezer. It stays fresh for up to 2 weeks. Make sure to cover it tightly with plastic wrap or foil. This keeps the cake from getting freezer burn.
Thawing Instructions
Before serving, let the cake sit at room temperature for about 10 minutes. This makes it easier to cut. Slice while it is slightly softened. You will get clean cuts that look nice on your plate.
Reusing Leftovers
If you have leftover cake, don’t throw it away! You can use it in fun ways. Blend it into milkshakes for a tasty treat. You can also crumble it for toppings on ice cream sundaes. It adds a delightful crunch and extra flavor.
FAQs
How do I make Oreo Blizzard Ice Cream Cake?
– Follow the step-by-step guide provided above.
Can I use homemade whipped cream?
– Yes, homemade whipped cream can enhance the cake’s texture. It adds a fresh flavor and a light feel. Just whip heavy cream until soft peaks form. This method makes the cake richer.
What is the best way to cut the cake?
– Use a warm knife, dipping it in hot water, for clean slices. This technique helps cut through the layers smoothly. Wipe the knife after each cut to keep it clean.
How long does the cake last in the freezer?
– The cake can last up to 2 weeks when properly covered. Use plastic wrap or foil to keep it fresh. After two weeks, it may lose some taste.
Is there a gluten-free option for this recipe?
– You can use gluten-free Oreo cookies for a gluten-free version. Many brands offer these cookies now. This way, everyone can enjoy this treat.
Where can I buy Oreo Blizzard Ice Cream Cake?
– Check local ice cream shops or dessert restaurants for availability. Some may even make custom cakes. You might also find it at grocery stores during summer months.
This Oreo Blizzard Ice Cream Cake combines crunch and cream for a sweet treat. Start with a simple cookie crust, layer on vanilla ice cream, and add whipped cream. Experiment with flavors and toppings to make it your own. Remember to freeze it well for the best texture. Whether you enjoy it at a party or a quiet night in, this cake is sure to impress. Keep this recipe safe; it’ll be a hit for years to come. Enjoy making your delicious dessert!