Craving a cool treat that's easy to make and full of flavor? Look no further! My Peanut Butter Chocolate Nice Cream combines the rich taste of peanut butter and cocoa with the creaminess of frozen bananas. It's a delicious dessert that's also healthy and vegan! In just a few simple steps, you can whip up a bowl of this delightful treat. Ready to learn how? Let's dive into the recipe!
Why I Love This Recipe
- Delicious Flavor Combination: The mix of creamy peanut butter and rich cocoa creates a mouthwatering treat that satisfies both sweet and savory cravings.
- Healthy Ingredients: This nice cream is made with all-natural ingredients, making it a guilt-free dessert option that’s packed with nutrients.
- Quick and Easy to Make: With only a few simple steps, you can whip up this delightful dessert in no time, perfect for a last-minute treat!
- Customizable Toppings: Feel free to get creative with your toppings, whether it’s nuts, chocolate chips, or a drizzle of honey, to make it uniquely yours.
Ingredients
To make Peanut Butter Chocolate Nice Cream, you need a few simple ingredients. Here’s what you'll need:
- 3 ripe bananas, sliced and frozen
- 2 tablespoons natural peanut butter
- 2 tablespoons cocoa powder
- 1 tablespoon maple syrup (optional)
- 1 teaspoon vanilla extract
- A pinch of sea salt
- Toppings: chopped peanuts and dark chocolate chips
These ingredients create a delicious and creamy treat. The ripe bananas give it sweetness, while the peanut butter adds a rich flavor. Cocoa powder brings in that chocolatey goodness we all love. If you want it sweeter, the maple syrup is a great option. The sea salt highlights all the flavors, making each bite even better. Don't forget the toppings! Chopped peanuts and dark chocolate chips add a nice crunch and extra flavor.
You can use this list to gather everything you need. It’s quick and easy to find these items at your local store. Make sure your bananas are ripe for the best taste. Now you’re all set to create this tasty treat!

Step-by-Step Instructions
Preparing the Bananas
Start with your frozen banana slices. Place them in a food processor. Blend them on high speed. You want them to be creamy. Stop blending every so often. Scrape down the sides. This helps mix everything well. The texture should feel like soft serve ice cream.
Incorporating the Flavors
Once the bananas are creamy, it’s time to add flavor. Add the natural peanut butter and cocoa powder. If you want more sweetness, pour in the maple syrup. Don’t forget the vanilla extract and a pinch of sea salt. Mix well to ensure the flavors spread evenly.
Final Blending
Blend again until everything is smooth. You should see a rich, creamy mixture. Taste it to see if it’s sweet enough. If not, add a bit more maple syrup. Blend again for a few seconds to mix it all in.
Transferring the Nice Cream
Now, it’s time to transfer your nice cream. Use a spoon to scoop it into a bowl or an airtight container. Spread it out evenly so it chills well.
Chilling to Desired Consistency
If you like it firmer, cover the container and freeze it. Leave it in the freezer for 30 minutes to 1 hour. If you want to eat it right away, it’s ready to enjoy!
Serving Suggestions
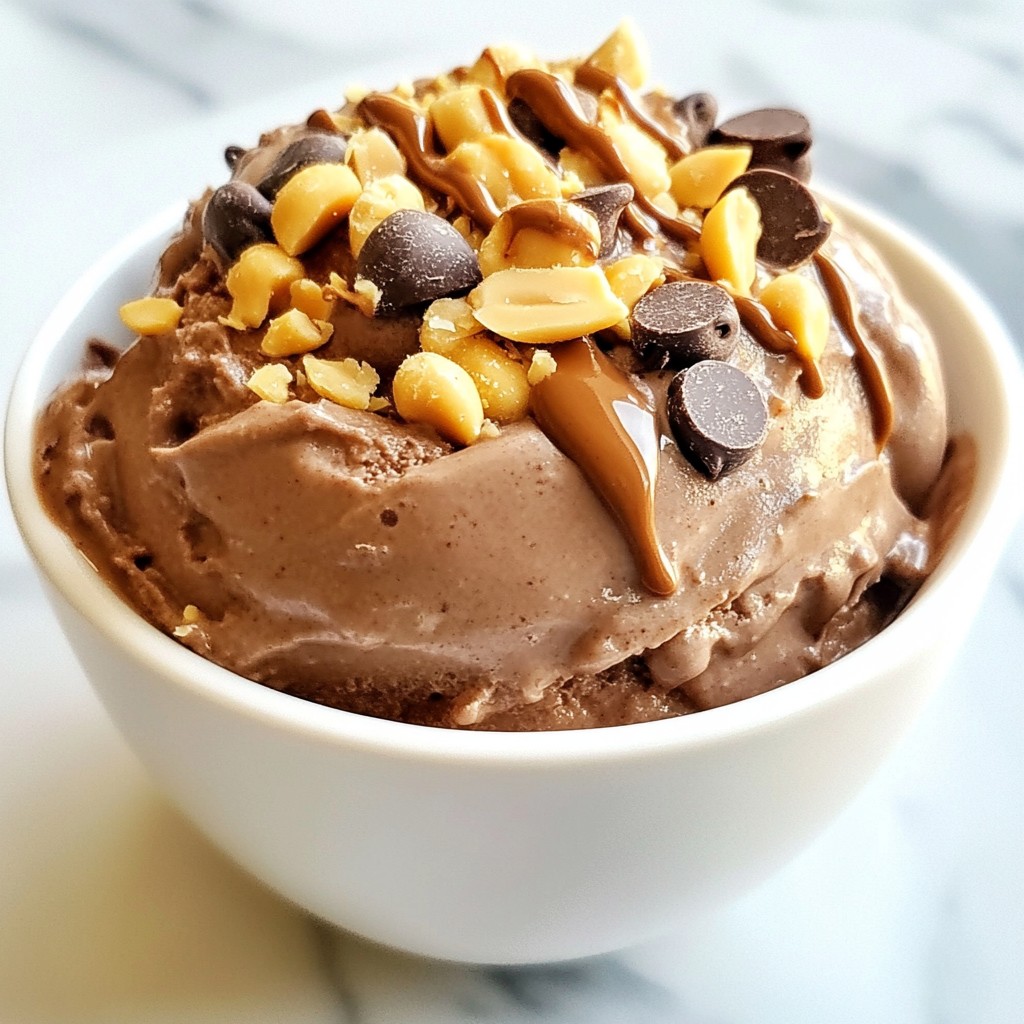
When you’re ready to serve, grab an ice cream scoop. Use it to portion the nice cream into chilled bowls. Top each bowl with chopped peanuts and dark chocolate chips. This adds a nice crunch and extra flavor. Enjoy your treat!
Tips & Tricks
Perfecting the Nice Cream Texture
To get the best texture, freeze your nice cream for about 30 minutes to 1 hour. This helps it firm up nicely. If you want it softer, you can eat it right after blending.
Using ripe bananas is key for sweetness. They should have a few brown spots. These spots show that the bananas are sweet and ready for blending.
Swapping Ingredients
You can swap peanut butter for other nut butters like almond or cashew. Each nut butter brings its own flavor. If you want it sweeter, use honey or agave syrup instead of maple syrup.
If you need dairy-free chocolate, look for cocoa powder made without milk. There are many options that fit your diet.
Presentation Tips
Serve your nice cream in chilled bowls. The cold bowls keep it nice and refreshing. For a fun touch, drizzle extra peanut butter on top and sprinkle cocoa powder.
You can add chopped peanuts and dark chocolate chips for crunch. Fresh fruit like sliced strawberries or raspberries also makes a great topping.
Pro Tips
- Use Ripe Bananas: The riper the bananas, the sweeter and creamier your nice cream will be. Look for bananas that are heavily speckled with brown spots for the best flavor.
- Adjust Sweetness to Taste: Depending on your preference and the ripeness of your bananas, you may want to adjust the amount of maple syrup in the recipe. Start with less and add more if needed.
- Experiment with Mix-Ins: Feel free to customize your nice cream by adding mix-ins such as shredded coconut, protein powder, or even a dash of cinnamon for a unique flavor twist.
- Store Properly: If you have leftovers, store your nice cream in an airtight container in the freezer. Let it sit out for a few minutes before scooping for easier serving.
Variations
Flavor Combinations
You can make peanut butter chocolate nice cream even more fun by adding fruits. Try adding strawberries for a fruity twist. Strawberries blend well with the peanut butter and chocolate. You can also use other fruits like blueberries or raspberries. Each fruit gives a unique taste.
Another option is to add mint or coconut. A few mint leaves can bring freshness. Coconut can add a creamy, tropical flavor. Just add a spoonful of shredded coconut or a drop of coconut extract when you blend the nice cream.
Vegan and Allergy-Friendly Options
If you have allergies, don't worry! You can easily adapt this recipe. To make it nut-free, use sun butter or soy nut butter instead of peanut butter. These options still taste great and are safe for those with nut allergies.
For a sugar-free version, skip the maple syrup. The ripe bananas provide natural sweetness. You can also use a sugar substitute, like stevia, if you want. Just remember to adjust the amount based on your taste.
Sundae Style Additions
Want to make your nice cream even better? Try adding toppings! Chopped nuts, like almonds or walnuts, can add crunch. You can also drizzle some chocolate or caramel sauce on top for extra sweetness.
Layer your nice cream with different flavors. For example, put a layer of chocolate nice cream, then a layer of strawberry nice cream. This gives a fun look and taste. Mixing flavors makes it a sundae feast!
Storage Info
Freezing the Nice Cream
To keep your nice cream fresh, store it in an airtight container. This helps lock in flavor. Avoid using plastic wrap, as it does not seal tightly. When you freeze it, keep it away from strong odors. This will help prevent any unwanted tastes. To avoid freezer burn, press a layer of parchment paper on top of the nice cream before sealing. This extra step creates a barrier against air.
Thawing the Nice Cream
When you're ready to enjoy, take it out of the freezer. Let it sit at room temperature for about 5 to 10 minutes. This softens it just enough for easy scooping. If you leave it too long, it may turn mushy. To keep the perfect texture, check it often. Once it’s soft enough, serve it right away.
Shelf Life
Peanut butter chocolate nice cream lasts about 1 month in the freezer. After that, it may lose flavor and texture. Signs that it has gone bad include ice crystals forming or a change in color. If it smells off or has a strange taste, it’s best to toss it. Always trust your senses when it comes to food safety.
FAQs
What is nice cream?
Nice cream is a dairy-free ice cream made from frozen bananas. It is creamy and smooth. The benefits include being healthy and easy to make. You can enjoy nice cream without added sugars and dairy. This makes it a great option for kids and adults alike!
Can I make this recipe without bananas?
Yes, you can! Use frozen mango or avocado as a base. These fruits add creaminess. You can also try coconut milk for a different texture. Just remember, the taste will change based on your choice.
Is this recipe suitable for vegans?
Yes, this recipe is perfect for vegans. It has no dairy products. The peanut butter and cocoa powder are both plant-based. You can enjoy this treat while sticking to a vegan diet.
How can I make this healthier?
To make this nice cream healthier, reduce the maple syrup. You can skip it altogether if your bananas are ripe enough. Use less peanut butter for fewer calories. Adding nuts or seeds will boost nutrition without much sweetness.
Can I use a blender instead of a food processor?
You can use a blender, but it may take longer. A food processor blends frozen bananas well. It keeps the mixture thick and creamy. If you use a blender, add a splash of almond milk to help. Just be careful not to make it too runny!
In this article, I covered how to make delicious nice cream from ripe bananas and peanut butter. You can blend them with cocoa powder, vanilla, and a pinch of salt for a rich treat. I shared tips on texture, ingredient swaps, and cool variations to try. This easy dessert is perfect for all ages and diets. Experiment with your favorite flavors and toppings to make it your own. Enjoy a fun and healthy treat any time!