Skip to content
DisclaimerTerms Of UseGDPR PolicyCookie Policy

eataroundit

  • Home
  • Drinks
  • Appetizers
  • Dinner
  • Dessert
  • About
  • Contact
  • Privacy Policy
DisclaimerTerms Of UseGDPR PolicyCookie Policy

NO-ING-IMG

- 2 packs of instant ramen noodles (discard the seasoning packets) - 3 tablespoons honey - 4 cloves of garlic, finely minced - 2 tablespoons soy sauce - 1 tablespoon sesame oil - 1 tablespoon rice vinegar - 1 cup snap peas, trimmed - 1 cup bell peppers, sliced (a vibrant mix of red and yellow) - 2 green onions, finely chopped - Sesame seeds for garnish - Crushed red pepper flakes (optional, for a spicy kick) When making honey garlic ramen noodles, you need fresh ingredients. The instant ramen noodles are quick and easy. You can find them at any store. Honey adds a sweet touch. Garlic gives it a strong flavor. For the sauce, soy sauce adds saltiness. Sesame oil gives a rich taste. Rice vinegar adds a nice tang. Don’t forget the veggies! Snap peas and bell peppers bring color and crunch. Green onions add freshness. Sesame seeds give a nice finish. If you like heat, add crushed red pepper flakes. These ingredients come together to create a delicious dish. Enjoy the sweet and savory flavors of honey garlic ramen noodles! {{ingredient_image_2}} 1. Start by boiling about 4 cups of water in a medium saucepan. 2. Add 2 packs of instant ramen noodles. Ignore the seasoning packets. 3. Cook the noodles for about 3-4 minutes, or as directed on the package. 4. Once cooked, drain the noodles using a colander and set them aside. 1. In a large skillet, add 1 tablespoon of sesame oil and heat it over medium heat. 2. Add 4 cloves of minced garlic to the skillet. Sauté for about 1 minute. 3. Keep stirring to avoid burning the garlic. You want it fragrant, not brown. 4. Pour in 3 tablespoons of honey, 2 tablespoons of soy sauce, and 1 tablespoon of rice vinegar. 5. Mix well and cook for 2-3 minutes until the sauce thickens. 1. Add 1 cup of trimmed snap peas and 1 cup of sliced bell peppers to the sauce. 2. Cook for 3-4 minutes until the veggies are bright and tender. 3. Gently add the reserved ramen noodles to the skillet. 4. Toss everything together until the noodles are well coated in the sauce. 5. Cook for an additional 1-2 minutes to let the noodles absorb the flavors. To get the perfect noodle texture, cook your ramen just until it’s tender. Usually, this means boiling for about 3-4 minutes. Drain them quickly so they don’t get too mushy. You want them to have a nice bite. Burnt garlic can ruin your dish. To avoid this, cook the garlic on medium heat. Stir it often for about one minute until it smells great. If it starts to brown, turn down the heat right away. For beautiful plating, use large bowls. Arrange the noodles and veggies in a way that looks nice. Sprinkle sesame seeds and green onions on top for color. A drizzle of extra sesame oil adds shine and flavor. Adding protein can make your dish heartier. Try cooked chicken, shrimp, or tofu for a boost. Just toss them in with the noodles and sauce. If you like it spicy, add crushed red pepper flakes. Start with a little and taste as you go, so it doesn't get too hot. This lets you customize the heat just how you like it! Pro Tips Use Fresh Garlic: Freshly minced garlic will provide a more vibrant flavor compared to pre-minced or powdered garlic. Aim for the freshest cloves for the best results. Customize Your Veggies: Feel free to swap in any seasonal vegetables you enjoy, such as broccoli or carrots, to keep the dish fresh and exciting. Adjust Sweetness: Depending on your taste preference, you can modify the amount of honey to create a sweeter or more savory dish. Start with less and add more if needed. Leftover Noodles: If you have leftovers, store the noodles and sauce separately to avoid mushiness. Reheat the noodles in a pan with a splash of water for the best texture. {{image_4}} You can switch up the veggies in your honey garlic ramen noodles. Try adding broccoli, carrots, or zucchini for fresh flavors. Seasonal veggies like asparagus or green beans work well too. They add color and crunch. Just remember to adjust cooking time based on the veggie you pick. You want them tender but not mushy. If you need gluten-free options, use gluten-free ramen noodles. They taste just as good. For a vegan twist, swap honey with maple syrup or agave. This keeps the sweetness without using animal products. You can also use tamari instead of soy sauce for a gluten-free sauce. These changes keep the dish tasty while meeting your dietary needs. Feel free to get creative with the sauce. You can try brown sugar or coconut sugar in place of honey. Each one brings a different sweetness. Adding a splash of chili sauce gives a kick. You can also mix in peanut butter for a creamy twist. Each variation makes the dish unique and exciting! Store your honey garlic ramen noodles in an airtight container. This keeps them fresh. Allow the noodles to cool before sealing. You can keep them in the fridge for 3-4 days. When you’re ready to eat, reheat the noodles in a skillet over medium heat. Add a splash of water or broth to help them warm evenly. Yes, you can freeze honey garlic ramen noodles. To freeze, let them cool completely. Place them in a freezer-safe bag or container. Squeeze out as much air as possible. They can last up to 2 months in the freezer. To thaw, move them to the fridge overnight. When ready to eat, reheat in a skillet. Add a little water or broth for moisture. In the refrigerator, honey garlic ramen noodles stay fresh for about 3-4 days. In the freezer, they can last 2 months. After that, the quality may decline. Always check for any signs of spoilage before eating. Enjoy your noodles while they are still tasty! You can use tamari, coconut aminos, or liquid aminos. Each has a unique taste. Tamari is gluten-free and has a rich flavor. Coconut aminos is sweeter and less salty. Liquid aminos offer a similar taste to soy sauce but with a milder kick. Choose based on your diet and taste preference. Yes, you can prepare honey garlic ramen noodles in advance. Cook the noodles and store them separately from the sauce and veggies. This keeps them fresh and prevents sogginess. You can store everything in airtight containers in the fridge for up to three days. When ready to eat, just reheat everything together in a skillet. To add heat, mix in crushed red pepper flakes or sriracha. Start with a small amount and adjust to your taste. You can also add sliced fresh chili peppers for a fresh kick. If you want a deeper flavor, try adding chili garlic sauce. This will boost both heat and flavor. This blog post describes a simple and tasty honey garlic ramen dish. We covered the main and extra ingredients, as well as vegetables and garnishes to boost flavor. I shared step-by-step cooking instructions and offered helpful tips for perfect noodles and presentation. You can also explore variations for dietary needs and storage advice to keep your ramen fresh. Remember, cooking is about creativity, so feel free to experiment. Enjoy making and personalizing your honey garlic ramen!

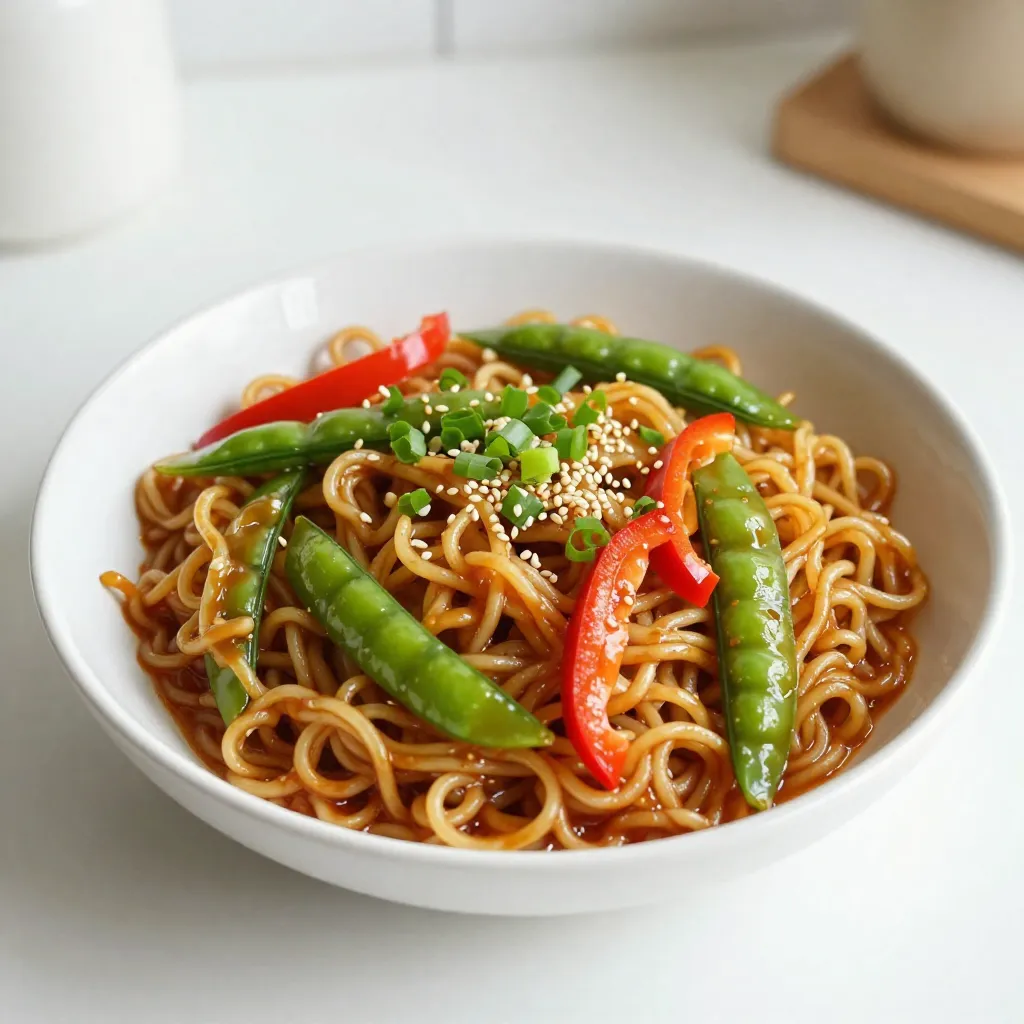
Honey Garlic Ramen Noodles Easy and Quick Recipe

Craving a quick and tasty meal? My Honey Garlic Ramen Noodles recipe is here to save the day! This dish

- 1 pound large shrimp, peeled and deveined - 4 cloves garlic, minced - 2 tablespoons extra virgin olive oil - Juice of 2 fresh lemons - Zest of 1 lemon - 1 teaspoon smoked paprika - 1 teaspoon dried oregano - ½ teaspoon red pepper flakes (optional for heat) - Salt and freshly cracked black pepper to taste - 1 cup cherry tomatoes, halved - 1 cup asparagus, trimmed and cut into 2-inch pieces - Fresh parsley, chopped (for garnish) - Lemon slices (for garnish) When I cook Garlic Lemon Shrimp Foil Packs, I love using fresh ingredients. The large shrimp should be peeled and deveined, ensuring each bite is clean and tasty. I always mince the garlic because it adds a strong flavor. The olive oil helps blend all the flavors together. Fresh lemons are key; their juice and zest brighten the dish. Smoked paprika gives a nice depth, while dried oregano adds a touch of earthiness. If you want some heat, add red pepper flakes. I also include cherry tomatoes and asparagus for color and nutrition. They roast beautifully in the foil pack. To finish, I like to sprinkle fresh parsley and add lemon slices for a pop of freshness. This dish is simple yet packed with flavor and healthy goodness. {{ingredient_image_2}} To start, I mix garlic, olive oil, and spices in a bowl. This blend creates a tasty marinade. I add: - 4 cloves garlic, minced - 2 tablespoons extra virgin olive oil - Juice of 2 fresh lemons - Zest of 1 lemon - 1 teaspoon smoked paprika - 1 teaspoon dried oregano - ½ teaspoon red pepper flakes (optional) - Salt and pepper to taste I whisk these until smooth. Next, I add the shrimp to the bowl. I toss the shrimp in the marinade, ensuring they are well coated. I let them sit for about 10 minutes. This time helps the shrimp soak up all that flavor. Now, I grab a large piece of aluminum foil, about 18 inches long. I lay it flat on a clean surface. In the center, I layer the veggies. I use: - 1 cup cherry tomatoes, halved - 1 cup asparagus, cut into 2-inch pieces I spread them out to make a nice base. Then, I pour the marinated shrimp over the veggies. I make sure to include all the marinade from the bowl. Next, I fold the sides of the foil tightly over the shrimp and veggies. I fold the ends too, sealing the packet securely. This helps trap steam and cooks everything evenly. Before cooking, I preheat my grill or oven to 400°F (200°C). This step ensures even cooking. Once hot, I carefully place the foil pack on the grill or in the oven. I set a timer for 10 to 12 minutes. To check if the shrimp are done, I look for them to be opaque and cooked through. Cooking time may vary a bit based on shrimp size and heat source. After cooking, I use tongs to remove the foil pack. I let it rest for a few minutes before opening. The steam inside will be hot! Finally, I garnish the shrimp and veggies with fresh parsley and lemon slices. This adds a pop of color and flavor. I serve it right away for a bright and tasty meal. To get the best shrimp, marinate them for about 10 minutes. This time allows the shrimp to absorb the rich garlic and lemon flavors. Use a bowl to mix garlic, olive oil, lemon juice, and spices. Toss in the shrimp and coat them well. Cooking time is key. Large shrimp need about 10 to 12 minutes on the grill or in the oven. They cook quickly and will turn pink when done. Always check for a firm texture. If they are opaque, they're ready! Herbs and spices can take your dish to the next level. Adding fresh parsley at the end gives a bright taste. You can also try fresh basil or dill for a twist. A pinch of extra red pepper flakes boosts heat if you enjoy spice. For veggies, cherry tomatoes and asparagus work well. You can swap them for bell peppers or zucchini for different flavors. Just remember to cut them into similar sizes for even cooking. Pro Tips Use Fresh Shrimp: Always opt for the freshest shrimp you can find. Fresh shrimp not only tastes better but also has a firmer texture that holds up well during cooking. Marinate for Flavor: Allow the shrimp to marinate for at least 10 minutes, but no longer than 30 minutes, to absorb the flavors from the garlic and lemon without becoming mushy. Seal the Foil Tightly: Ensure that the foil pack is sealed tightly to trap steam, which helps cook the shrimp and vegetables evenly and prevents any juices from leaking out. Experiment with Vegetables: Feel free to swap out the asparagus and cherry tomatoes for other vegetables like bell peppers or zucchini to suit your taste or use what's in season. {{image_4}} You can switch the shrimp for scallops or chicken in this recipe. Scallops cook quickly, just like shrimp. If you use chicken, cut it into small pieces. Chicken needs more time to cook. Check your foil pack after 15 to 20 minutes. The protein should be fully cooked and have no pink left. For a vegetarian twist, try using a mix of hearty vegetables. Bell peppers, zucchini, and broccoli work well. You can also add plant-based proteins like tofu or tempeh. Adjust the flavors by adding more herbs or a splash of soy sauce. This keeps the dish tasty and satisfying. Use the same cooking method, and check that everything is tender and flavorful. To keep your Garlic Lemon Shrimp Foil Packs fresh, store leftovers in the fridge. Place them in an airtight container. This helps prevent any odors from mixing. You can keep them for up to three days. If you want to store them longer, freeze the shrimp and veggies. Use freezer-safe bags and squeeze out the air. They can last up to three months in the freezer. For reheating, the oven works best. Preheat it to 350°F (175°C). Place the foil pack on a baking sheet and heat for about 10 minutes. You can also use a microwave. Just make sure to open the pack slightly to let steam escape. Heat for 1-2 minutes, then check if it’s warm enough. Leftovers from your Garlic Lemon Shrimp Foil Packs last about three days in the fridge. After that, the shrimp may spoil. In the freezer, they can last up to three months. Watch for signs of spoilage. If the shrimp smell sour or look slimy, throw them away. Also, if the veggies turn brown or mushy, it's time to discard them. Always trust your senses! You can tell shrimp is done when it turns pink and opaque. The flesh should feel firm to the touch. If you cut one open, it should be white inside, not translucent. Overcooked shrimp can become tough, so check them closely. Yes, you can prepare these foil packs ahead of time. Assemble them and keep them in the fridge for up to 24 hours. Just make sure to seal them well so they don't leak. When ready to cook, just place them on the grill or in the oven. Garlic lemon shrimp tastes great with simple sides. Here are some ideas: - Rice: White or brown rice soaks up the sauce. - Quinoa: A healthy, nutty option. - Salad: A fresh green salad adds crunch. - Bread: Crusty bread is perfect for dipping in juices. - Vegetables: Grilled or roasted veggies complement the dish nicely. These sides add flavor and balance to your meal. This article covered how to make Garlic Lemon Shrimp Foil Packs. You learned about the key ingredients, step-by-step instructions, and tips for perfect shrimp. We also explored variations for different proteins and the best ways to store leftovers. I hope you feel ready to try this easy and tasty dish. Enjoy experimenting with flavors and make it your own. Your kitchen adventures await!

Garlic Lemon Shrimp Foil Packs Simple and Tasty Meal

Looking for a quick and tasty dinner idea? Garlic Lemon Shrimp Foil Packs offer a simple way to enjoy a

To create the perfect Rosemary Garlic Roasted Potatoes, you will need the following ingredients: - 2 pounds baby potatoes, halved - 4 cloves garlic, finely minced - 3 tablespoons fresh rosemary, finely chopped (or 1 tablespoon dried rosemary) - 3 tablespoons extra virgin olive oil - 1 teaspoon sea salt - ½ teaspoon freshly ground black pepper - 1 tablespoon freshly squeezed lemon juice - Optional garnish: Fresh parsley, chopped These ingredients are simple but pack a big flavor punch. Baby potatoes are perfect for roasting. They stay tender inside and crisp outside. Garlic adds a rich, savory taste, while rosemary brings a fresh, earthy note. Olive oil helps everything roast evenly and adds a lovely richness. The lemon juice gives a bright touch that balances the dish. Feel free to play with the amounts of garlic and rosemary. If you love garlic, add more! If you prefer a milder flavor, use less. The optional parsley adds color and a fresh taste. You can skip it, but it makes your dish pop! This list gives you all you need for a tasty side dish. Grab your ingredients, and let’s get cooking! {{ingredient_image_2}} Start by preheating the oven to 425°F (220°C). This is the best temperature for roasting. Preheating ensures that the potatoes cook evenly. If the oven is not hot enough, the potatoes may become soggy. A hot oven helps to crisp the outside while keeping the inside soft. Grab a large mixing bowl and combine the halved baby potatoes, minced garlic, chopped rosemary, olive oil, sea salt, and black pepper. Use your hands or a spatula to toss the potatoes. Make sure each piece is coated well with the mixture. This step adds flavor to every bite. After mixing, drizzle the lemon juice over the potatoes and toss gently. This keeps the potatoes intact while adding brightness to the dish. Line a baking sheet with parchment paper for easy cleanup. Spread the seasoned potatoes evenly on the sheet. Leave space between each potato. This helps them roast instead of steam. Place the baking sheet in the preheated oven. Roast the potatoes for 25-30 minutes. Halfway through cooking, turn the potatoes to ensure even browning. They should be golden brown and crispy on the outside. To check if they are done, pierce a potato with a fork. If it goes in easily, they are ready. Once cooked, remove them from the oven and let them cool for a few minutes. If you like, sprinkle chopped parsley on top before serving for extra color. To get that crispy texture, you must space the potatoes well. If they are too close, they will steam instead of roast. Spread them out in a single layer on the baking sheet. This allows hot air to flow around each piece. For extra crunch, turn the potatoes halfway through cooking. To boost the taste, try adding other seasonings. A pinch of paprika or a dash of chili powder can work wonders. If you don't have fresh herbs, dried ones can substitute well. Just remember, dried herbs are stronger, so use less. These roasted potatoes pair great with meats like chicken or beef. They also taste good next to fish. For dips, consider serving them with garlic aioli or a zesty ranch sauce. These add flavor and make the dish more fun to eat. Pro Tips Choose the Right Potatoes: For best results, use waxy baby potatoes like Yukon Gold or red potatoes, as they hold their shape well during roasting. Don't Skip the Lemon Juice: The acidity from the lemon juice brightens the flavors and balances the richness of the olive oil and potatoes. Experiment with Herbs: Feel free to mix in other herbs such as thyme or oregano for a different flavor profile that complements the rosemary. Check for Doneness: Potatoes are done when they are golden brown and crispy on the outside and can be easily pierced with a fork. {{image_4}} You can switch up the herbs in this dish. Try thyme, oregano, or parsley instead of rosemary. Mixing herbs can also add great depth of flavor. For instance, using both rosemary and thyme gives a lovely taste. Want to try something sweeter? Use sweet potatoes or other root veggies. Just remember that sweet potatoes cook faster than regular ones. Cut them smaller to match the cooking time of baby potatoes. You may need to check for doneness sooner. This recipe is easy to make gluten-free. Just ensure your olive oil and seasonings are gluten-free. If you are low-carb, skip the potatoes and replace them with cauliflower. Cauliflower roasts well and takes on the flavors nicely. To keep your leftover potatoes fresh, refrigerate them within two hours. Place them in an airtight container. This helps keep them safe to eat later. - Use a glass or plastic container with a tight lid. - Make sure to label the container with the date. To enjoy your leftover roasted potatoes, reheating them well is key. You want them crispy, not soggy. - Oven: Preheat your oven to 375°F (190°C). Spread the potatoes on a baking sheet. Bake for 10-15 minutes. This method crisps them up nicely. - Microwave: Place the potatoes on a microwave-safe plate. Heat for 1-2 minutes. This is quick but may make them soft. You can freeze cooked potatoes if you want to keep them longer. However, freezing changes their texture. - Allow the potatoes to cool completely before freezing. - Store them in a freezer-safe bag or container. Use frozen potatoes within three months for the best taste. After thawing, reheat them in the oven for better texture. Roasting baby potatoes at 425°F takes about 25 to 30 minutes. This high heat helps them get crispy. Halfway through, turn the potatoes to help them brown evenly. You want a golden finish, so check for doneness by poking a potato with a fork. If it goes in easily, your potatoes are ready. Yes, you can use different potatoes! Red potatoes, Yukon gold, or fingerlings work well. Just cut them into similar sizes as baby potatoes. The cooking time may change slightly, so keep an eye on them as they roast. Each type adds its unique flavor and texture. You can prep the potatoes ahead of time! Cut and season them, then store in the fridge for up to 24 hours. This makes dinner easy. When ready to cook, just spread them on a baking sheet and roast. Enjoy the fresh taste and save time! Roasting baby potatoes is simple and rewarding. You start with fresh ingredients and follow easy steps. Preheat your oven, coat the potatoes well, and roast them to perfection. Use tips for better texture and flavor to elevate your dish. Get creative with herbs or add sweet potatoes for a twist. Store any leftovers properly for future meals. With this guide, you can enjoy delicious roasted potatoes anytime. Explore your options and make this dish your own!

Rosemary Garlic Roasted Potatoes Tasty and Simple Dish

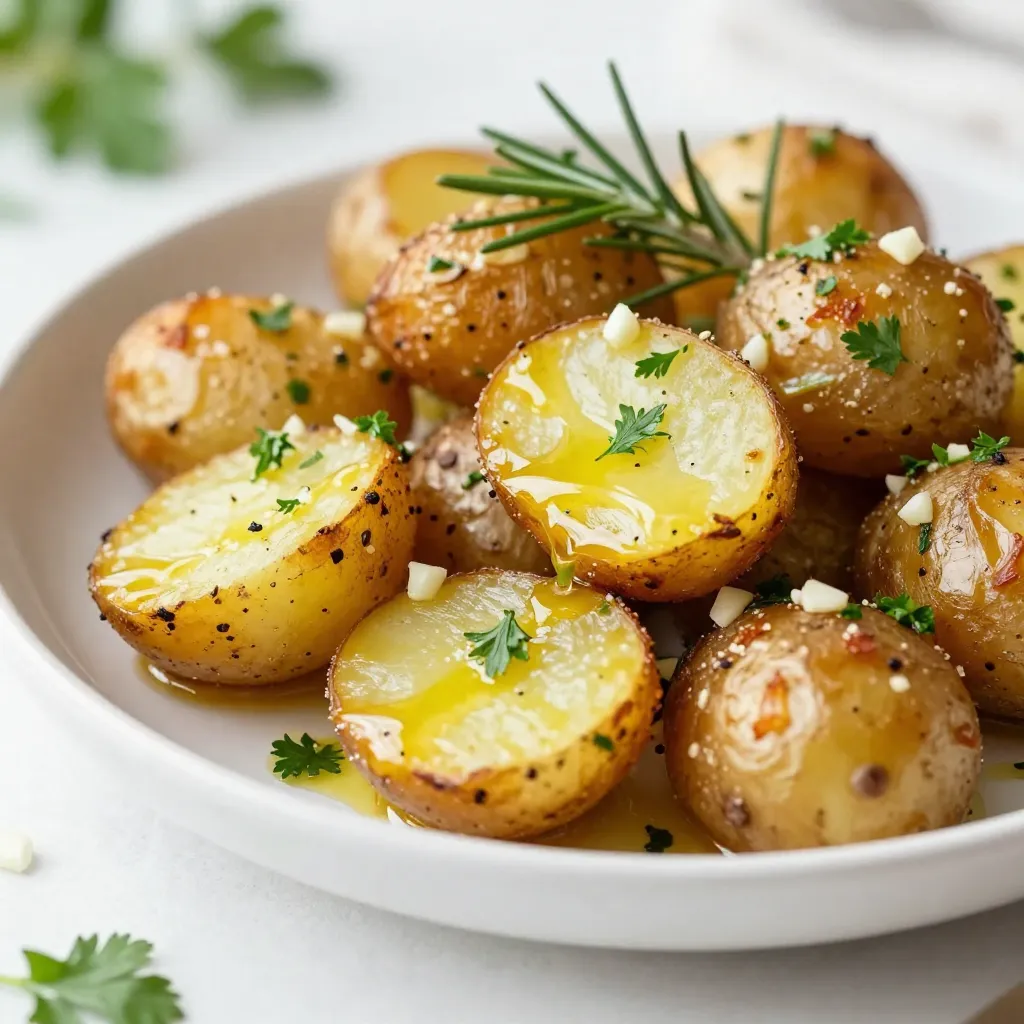
Are you ready to elevate your potato game? Rosemary Garlic Roasted Potatoes are not just a side dish; they’re a

- 1 cup fresh raspberries (plus additional for garnish) - 6 oz dark chocolate, finely chopped - 1/2 cup heavy cream The main ingredients of this dessert shine with flavor. Fresh raspberries bring a tart taste. They add a pop of color and freshness. Dark chocolate gives a rich, deep flavor. Its smoothness pairs perfectly with the raspberries. Heavy cream adds creaminess and volume to the mousse. This trio creates a delightful mix. - 2 tablespoons powdered sugar - 1 teaspoon vanilla extract - 1/2 teaspoon gelatin (optional, for added firmness) - 1 tablespoon water (for gelatin) You can enhance the mousse with optional ingredients. Powdered sugar sweetens the cream. Vanilla extract adds warmth and richness. If you want a firmer texture, use gelatin. To activate it, mix it with water. This helps the mousse hold its shape better. - A pinch of sea salt - Additional raspberries for garnish - Fresh mint sprig Seasoning your mousse makes a big difference. A pinch of sea salt enhances the flavors. For garnish, use extra raspberries for a colorful touch. A fresh mint sprig adds a burst of freshness. This final touch makes the dessert look elegant and inviting. {{ingredient_image_2}} To melt dark chocolate, you can use two methods. The first is the double boiler method. For this, place a heatproof bowl over a pot of simmering water. Make sure the bowl does not touch the water. Stir the chocolate as it melts until smooth. The second method is the microwave method. Place the chopped chocolate in a microwave-safe bowl. Heat it in 20-second bursts. Stir in between each burst until the chocolate is fully melted and smooth. Let it cool a bit while you prepare other ingredients. If you want a firmer mousse, you can use gelatin. Start by sprinkling the gelatin over the water in a small bowl. Let it sit for about 5 minutes to bloom. After it blooms, heat the mixture in the microwave for about 10 seconds. Stir until it is fully dissolved, then set aside. You will need a medium mixing bowl and an electric mixer for this step. In the bowl, add the heavy cream, powdered sugar, and vanilla extract. Mix until soft peaks form. Watch closely so you don't overwhip it. You want a light, airy texture. Now it's time to combine the chocolate and cream. Gently fold the cooled melted chocolate into the whipped cream. If you used gelatin, add the dissolved gelatin here. Fold it in gently to combine. Add a pinch of sea salt to balance the sweetness. Next, fold in the fresh raspberries. Be careful not to crush them too much. You want to keep some of their shape for texture. Now, it's time to fill the cups. Use a spoon or a piping bag to fill individual cups or glasses with the raspberry chocolate mousse mix. Smooth the tops and chill them in the fridge for at least 2 hours. This helps the mousse set properly. To create creamy mousse, avoid overwhipping your cream. Whip until you see soft peaks. If you whip too long, the cream can turn grainy. Gently fold the melted chocolate into the whipped cream. This helps keep it light and airy. For extra smoothness, add a pinch of sea salt. It enhances the flavor and balances the sweetness. When plating your mousse, use clear cups. This shows off the beautiful layers. You can also stack them for a fun look. For garnishing, add whole raspberries on top. A sprig of fresh mint adds color and freshness. You can even drizzle some chocolate sauce over the top for flair! You can prepare these mousse cups up to a day in advance. Store them in the fridge, covered tightly with plastic wrap. They stay fresh for about three days. If you want to freeze them, use an airtight container. However, freezing may change the texture a bit. Thaw in the fridge before serving to keep them cool and delicious. Pro Tips Choose Quality Chocolate: Opt for high-quality dark chocolate with at least 70% cacao for richer flavor and smoother texture in your mousse. Room Temperature Ingredients: Ensure your heavy cream and eggs (if using) are at room temperature for better incorporation and fluffiness. Gentle Folding Technique: Use a spatula to gently fold the whipped cream into the chocolate mixture to maintain the airy texture of the mousse. Chill for Optimal Texture: Allow the mousse to chill for at least 2 hours to achieve the perfect set and enhance the flavors before serving. {{image_4}} You can change the taste of your mousse by adding different berries. Strawberries, blueberries, or blackberries work well. Each berry brings its own flavor. This keeps the dessert fresh and fun. Another option is to use white or milk chocolate instead of dark chocolate. White chocolate gives a sweeter flavor. Milk chocolate adds a creamy touch. You can mix and match to find your favorite blend. For dairy-free options, swap heavy cream with coconut cream. It has a rich texture and adds a hint of coconut flavor. You can also use dairy-free chocolate for a fully dairy-free dessert. If you're looking for vegan alternatives, use aquafaba instead of cream. Aquafaba is the liquid from canned chickpeas. It whips up nicely and gives a light texture. Use vegan chocolate to keep it plant-based. Layering the mousse with other desserts can make it special. Try adding a layer of crumbled cookies or cake at the bottom of your cups. This adds a crunchy texture and extra flavor. Using flavored mousse cups can elevate your dessert too. Consider using cups made from chocolate or fruit puree. These add a fun twist and make your mousse stand out. To keep your raspberry chocolate mousse cups fresh, use airtight containers. These containers help prevent the mousse from absorbing other smells in your fridge. Store the mousse cups in the fridge for up to three days. After that, the quality may start to decline. You can freeze mousse cups if you want to save some for later. Here’s how: First, place the mousse cups in a freezer-safe container. Cover them well to avoid freezer burn. They can last up to a month in the freezer. When you're ready to enjoy them, take out the cups and let them thaw in the fridge for a few hours. This way, they will stay creamy and smooth. Check your mousse cups before eating. If you see any strange colors or an off smell, it's time to toss them. The texture may also change, making them grainy or watery. Always be safe and throw away any mousse that looks or smells bad. Yes, you can make raspberry chocolate mousse in advance. It keeps well in the fridge. Store the mousse in airtight containers. This prevents it from absorbing odors. You can make it up to two days ahead. Just remember to add the garnish right before serving. Gelatin helps the mousse set firmly. It gives the mousse a nice, smooth texture. This is great for presentation. Using gelatin makes the mousse hold its shape better. It also adds a bit of structure without changing the flavor. Chocolate mousse stays fresh for about three days in the fridge. After that, it may lose its texture. Always check for any off smells or changes in appearance. If it looks or smells bad, it’s best to throw it out. You can use coconut cream for a lighter option. Another choice is whipped topping. If you want a dairy-free version, almond milk can work. Just note that the texture may change slightly. Each substitute will bring its own flavor too. Yes, you can use frozen raspberries. They are convenient and still tasty. Just thaw them first and drain excess liquid. This helps prevent the mousse from becoming too watery. Keep in mind that frozen raspberries may be softer than fresh ones. This blog post covered everything about making raspberry chocolate mousse. You learned about the main ingredients, optional items, and how to assemble this treat. I shared step-by-step instructions for melting chocolate, preparing gelatin, and whipping cream. With these tips, you'll achieve a perfect texture and impressive presentation. Remember, you can customize your mousse with different flavors and dietary substitutions. Enjoy this dessert fresh, or store it properly to keep it delicious. Happy cooking!

Raspberry Chocolate Mousse Cups Delightful Dessert Treat

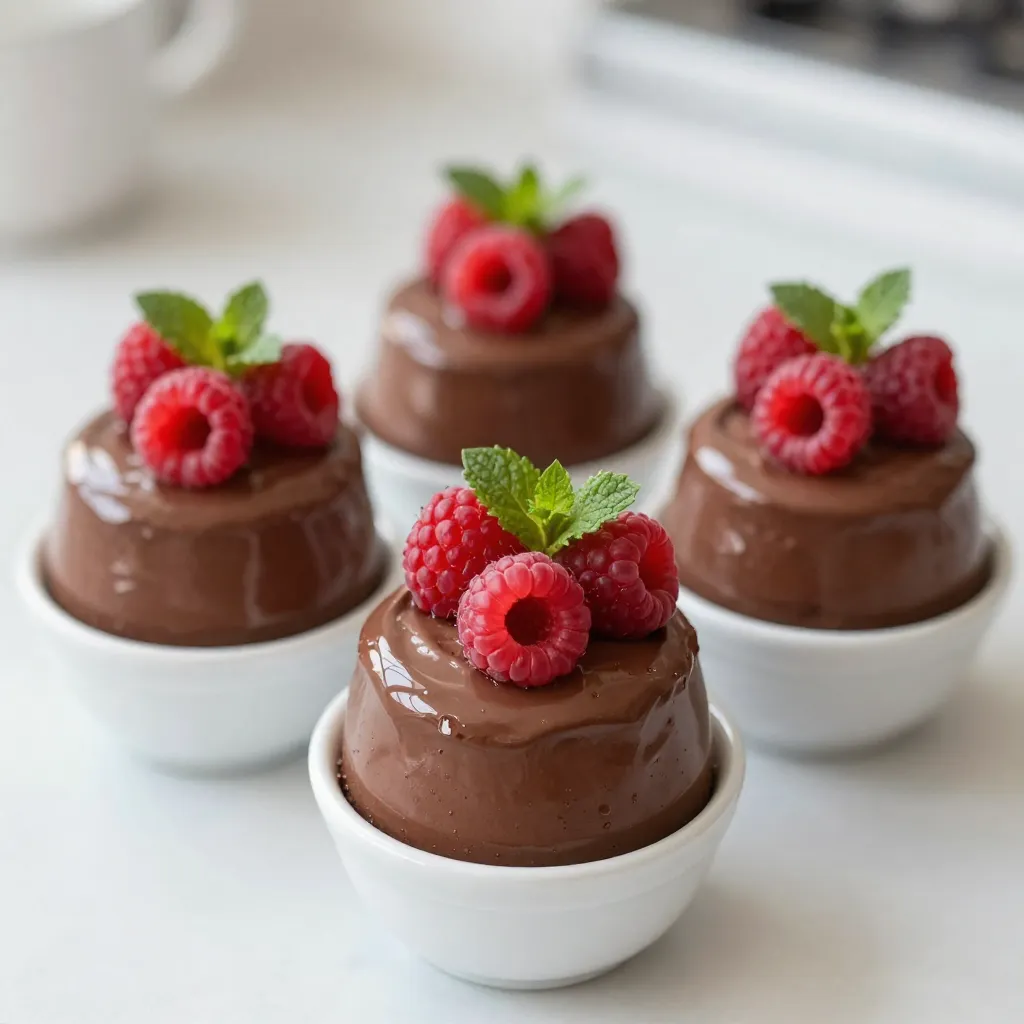
Indulge in the rich, creamy goodness of Raspberry Chocolate Mousse Cups! This delightful dessert combines fresh raspberries and smooth dark

- 4 bone-in chicken thighs, skin-on - 1/4 cup honey - 4 cloves garlic, minced - 1 tablespoon soy sauce - 1 tablespoon apple cider vinegar - 1 teaspoon fresh ginger, grated - Salt and pepper to taste - 2 tablespoons olive oil - 1 teaspoon sesame seeds (for garnish) - Green onions, finely sliced (for garnish) These main ingredients create a sweet and savory dish. The honey gives a lovely glaze. The garlic adds a strong flavor. Soy sauce brings saltiness, while vinegar adds tang. Ginger gives a nice warmth. - Fresh herbs like cilantro - Chili flakes for spice - Lemon juice for brightness Adding fresh herbs can boost flavor. Chili flakes add heat for those who like spice. A splash of lemon juice can lighten the dish. - Steamed broccoli - Fluffy jasmine rice - Roasted vegetables Steamed broccoli pairs well with the chicken. It adds color and crunch. Jasmine rice soaks up the tasty sauce. Roasted veggies add a hearty touch. These sides make the meal balanced and delicious. {{ingredient_image_2}} To marinate the chicken, start by mixing the marinade. In a bowl, whisk together: - 1/4 cup honey - 4 cloves garlic, minced - 1 tablespoon soy sauce - 1 tablespoon apple cider vinegar - 1 teaspoon fresh ginger, grated - Salt and pepper to taste This blend creates a sweet and tangy flavor. Next, take 4 bone-in, skin-on chicken thighs and place them in a resealable bag or a shallow dish. Pour the marinade over the chicken, ensuring each piece is well coated. Seal the bag or cover the dish. Refrigerate this for at least 30 minutes, but 3 hours gives the best taste. After marinating, it’s time to sear the chicken. Preheat your oven to 400°F (200°C). While it heats, take a large, oven-safe skillet and heat 2 tablespoons of olive oil over medium-high heat. Remove the chicken from the marinade, but keep the marinade for later. Place the thighs skin-side down in the hot skillet. Sear them for about 4 minutes until the skin turns golden and crispy. Flip the thighs over and sear for another 2 minutes. This step builds a nice crust and adds flavor. Now, it’s time to bake. Pour the reserved marinade over the chicken in the skillet, coating them evenly. Transfer the skillet to the preheated oven. Bake for 25-30 minutes or until the chicken is fully cooked. The internal temperature should reach 165°F (75°C). To keep the chicken moist and flavorful, baste it with the sauce halfway through cooking. Once done, take the skillet out and let the chicken rest for 5 minutes before serving. This resting time helps keep the juices inside. For the best flavor, marinate the chicken thighs for at least 30 minutes. You can go up to 3 hours for even more taste. Use a resealable bag or a shallow dish. Make sure the thighs are coated well. This helps the chicken absorb all the sweet and sticky flavors. Don't skip the salt and pepper; they bring out the taste. To get that perfect crispy skin, start with a hot skillet. Heat the olive oil on medium-high heat. Place the chicken skin-side down and let it sear for about 4 minutes. Don't move the chicken around; let it cook until golden. Then flip and sear the other side for 2 minutes. This step locks in juices and adds texture. The safest way to check if chicken is cooked is by using a meat thermometer. The internal temperature should reach 165°F (75°C). If you don’t have a thermometer, look for clear juices when you cut into the thickest part of the thigh. If the juices run clear, it’s done. Make sure to let the chicken rest for 5 minutes before serving. This keeps it juicy and flavorful. Pro Tips Marinade Timing: The longer you marinate the chicken, the more flavorful it becomes. Aim for at least 3 hours or overnight for the best results. High Heat Searing: Make sure your skillet is hot enough before adding the chicken. This helps achieve that crispy skin while locking in juices. Basting for Flavor: Baste the chicken with the marinade halfway through cooking to keep it moist and enhance the flavors. Rest Before Serving: Allow the chicken to rest for a few minutes after baking. This helps the juices redistribute, making it more tender and juicy. {{image_4}} You can switch up the protein in this dish. Try using chicken breast for a leaner option. If you want something different, pork chops work well too. For seafood lovers, shrimp can soak up the sweet marinade nicely. Just adjust cooking times to keep everything juicy and tender. Want to mix things up? You can add or swap ingredients in the marinade. Try adding a splash of orange juice for citrus notes. Or mix in some chili flakes for heat. You could also use maple syrup instead of honey for a different sweet flavor. Experiment with your favorite spices and herbs to find your perfect blend. You don’t have to bake the chicken. Grilling adds a nice smoky flavor. Just marinate as usual, then grill on medium heat for about 6-7 minutes per side. You can also use a slow cooker for a hands-off approach. Cook on low for 6-7 hours or high for 3-4 hours. The chicken will be so tender, and the flavor will soak in. To store leftover honey garlic chicken thighs, let them cool first. Place the chicken in an airtight container. This keeps the chicken fresh and safe. You can store it in the fridge for up to 3 days. If you want to keep it longer, consider freezing. When reheating, aim to keep the chicken juicy. You can use an oven or a microwave. For the oven, preheat it to 350°F (175°C). Place the chicken in a baking dish with a splash of water. Cover it with foil to keep moisture in. Bake for about 15-20 minutes. If using a microwave, heat on medium power for 2-3 minutes. Check to ensure it warms evenly. To freeze honey garlic chicken thighs, wrap each piece tightly in plastic wrap. Place the wrapped chicken in a freezer bag or container. Remove as much air as possible. Label the bag with the date. You can freeze the chicken for up to 3 months. When you’re ready to eat, thaw it in the fridge overnight. Then, reheat as mentioned above for the best flavor. Yes, you can use boneless chicken thighs. They will cook faster than bone-in thighs. Just remember to adjust the cooking time. Boneless thighs usually need about 20 to 25 minutes in the oven. Always check for a safe internal temperature of 165°F (75°C). To change the sweetness, you can add more or less honey. If you want it sweeter, add an extra tablespoon of honey. If you prefer less sweetness, reduce the honey by one tablespoon. You can also balance sweetness with more soy sauce or vinegar for a tangy flavor. I recommend serving honey garlic chicken thighs with fluffy jasmine rice. You can also add fresh steamed broccoli or a crisp salad. These sides complement the sweet and savory flavors well. Feel free to get creative with your favorite vegetables! In this post, we explored how to make delicious honey garlic chicken thighs. We covered key ingredients, marinating techniques, and cooking methods to ensure perfect results. You learned about variations with different proteins and how to store leftovers properly. Cooking can be fun, and this dish is simple yet satisfying. Use these steps to enjoy tasty meals, impressing friends and family alike. Dive in, experiment, and enjoy every bite!

Honey Garlic Chicken Thighs Easy and Flavorful Recipe

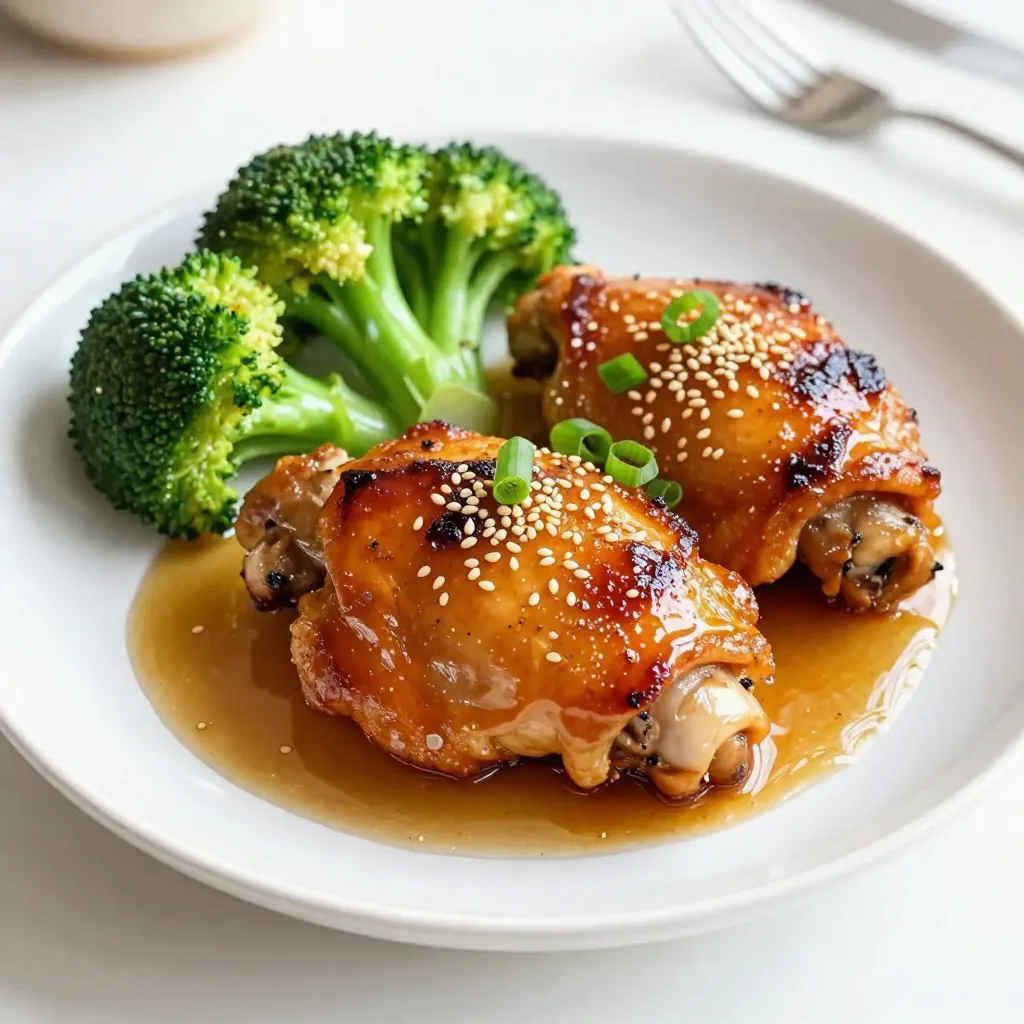
Are you ready for a meal that’s both easy and packed with flavor? This Honey Garlic Chicken Thighs recipe delivers

- 12 oz tortellini (fresh or frozen) - 2 cups ricotta cheese - 1 cup shredded mozzarella cheese - 1 cup grated Parmesan cheese - 1 cup heavy cream - 2 cups fresh spinach, roughly chopped - 3 cloves garlic, minced - 1 teaspoon Italian seasoning - 1/2 teaspoon red pepper flakes (optional) - Salt and pepper to taste - 2 tablespoons olive oil - Fresh basil leaves for garnish In this creamy spinach tortellini bake, you start with a base of tender tortellini. You can use fresh or frozen, both work great. The key flavors come from three cheeses: ricotta, mozzarella, and Parmesan. These cheeses bring a rich, creamy taste. Next, we add heavy cream to make the sauce even smoother. Fresh spinach adds a nice green touch and a healthy boost. Garlic brings a lovely aroma and taste. For seasonings, we use Italian herbs and a pinch of red pepper flakes for heat. Finally, a drizzle of olive oil adds richness. You can adjust salt and pepper to your liking. Don’t forget fresh basil leaves! They add a burst of color and flavor when you serve the dish. This mix of ingredients comes together to create a comforting, flavorful meal that’s sure to please everyone. {{ingredient_image_2}} - Preheat your oven to 375°F (190°C). - Lightly grease a 9x13 inch baking dish with olive oil. - Bring a large pot of salted water to a boil. - Add 12 oz of tortellini and cook until al dente. - Once cooked, drain the tortellini and set aside. - In a large skillet, heat 2 tablespoons of olive oil over medium heat. - Add 3 cloves of minced garlic and sauté for about 1 minute. - Stir in 2 cups of chopped spinach and cook for 2-3 minutes. - The spinach should wilt and become tender. Remove from heat. - In a large mixing bowl, combine: - 2 cups of ricotta cheese - 1 cup of shredded mozzarella cheese - 1 cup of grated Parmesan cheese - 1 cup of heavy cream - 1 teaspoon of Italian seasoning - A pinch of salt and pepper - Red pepper flakes if you want some heat - Mix until smooth and well combined. - Gently fold in the cooked tortellini and sautéed spinach, ensuring even coating. - Pour the mixture into the prepared baking dish and spread evenly. - For extra richness, sprinkle more mozzarella and Parmesan on top. - Cover with aluminum foil and bake for 25 minutes. - After 25 minutes, remove the foil and bake for 10-15 more minutes. - Look for a golden-brown top that bubbles delightfully. - Let it rest for a few minutes before serving. To make your dish truly creamy, I suggest using a mix of cheeses. The blend of ricotta, mozzarella, and Parmesan creates a rich texture. Each cheese adds its unique flavor and creaminess. For the best sauce consistency, the heavy cream is key. It keeps the sauce smooth and helps it coat the tortellini well. Mix until smooth, and don’t rush this part. Herbs and spices can take your dish up a notch. I love adding fresh basil for aroma and a sweet note. Italian seasoning brings warmth and depth. If you like heat, sprinkle in red pepper flakes. Start with a little and taste as you go. You can always add more if you want it spicier. When serving, you can scoop the creamy tortellini bake directly from the dish. For a fancy touch, serve individual portions on plates. Garnish each plate with fresh basil leaves. This adds color, freshness, and a nice aroma. Enjoying your meal is not just about taste; it’s also about how it looks! Pro Tips Choose Your Tortellini: Fresh tortellini will give you a softer texture, while frozen tortellini is convenient and holds up well in the bake. Customize the Greens: Feel free to swap out spinach for other greens like kale or Swiss chard, or mix in some sautéed mushrooms for added depth. Control the Creaminess: Adjust the amount of heavy cream based on your preference. For a lighter version, you can substitute with half-and-half or milk. Make Ahead: This dish can be assembled ahead of time and stored in the fridge. Just bake it when you’re ready for a fresh, hot meal! {{image_4}} You can add meat to your creamy spinach tortellini bake for more flavor. Chicken or sausage works great. For chicken, use cooked, shredded meat. Mix it into the cheesy sauce. If you prefer sausage, choose Italian sausage for a tasty kick. Cook it before adding to the dish. Both options give your bake a hearty touch. If you want a vegetarian dish, try using different vegetables. Zucchini, bell peppers, or mushrooms can add great taste and texture. Just chop them up and sauté them with the spinach. This way, you get a colorful and nutritious meal. For a vegan option, use plant-based cheese. Look for vegan ricotta and mozzarella. These alternatives keep the creamy texture without dairy. You can also add nutritional yeast for a cheesy flavor. For those who need gluten-free meals, there are many brands of gluten-free tortellini. Look for options made with rice or corn. Some brands even offer lentil-based tortellini. These choices taste great and hold up well in the baking process. Always check labels to ensure they meet your needs. To store leftovers, cool the dish first. Once cool, transfer it to an airtight container. Make sure the lid fits snugly. Store it in the fridge for up to three days. When you want to eat it again, just reheat in the oven or microwave. For freezing, let the tortellini bake cool completely. Then, wrap it tightly in plastic wrap. Place it in a freezer-safe container. This helps prevent freezer burn. It can stay in the freezer for up to three months. To reheat, thaw it in the fridge overnight. Heat it in the oven at 350°F (175°C) until warmed through. The creamy spinach tortellini bake lasts about three days in the fridge. If frozen, it can last up to three months. Always check for signs of spoilage before eating. If it smells off or looks strange, discard it. Enjoy your delicious dish while it’s fresh! Yes, you can use frozen spinach. Make sure to thaw and drain it first. Frozen spinach has more moisture than fresh. This extra water can make the dish soggy. To keep it tasty, squeeze out any extra water. This helps the dish stay creamy and flavorful. Absolutely! You can prepare the dish ahead of time. Just follow the recipe up to the baking step. Cover the dish with foil and refrigerate it for up to 24 hours. When you’re ready to bake, add about 10 extra minutes to the cooking time. This lets it heat all the way through while still getting that nice golden top. This dish pairs well with many sides. Here are a few ideas: - A simple green salad with vinaigrette - Garlic bread for a crunchy contrast - Roasted vegetables for added nutrients - A light soup, like minestrone, to start the meal These pairings balance the creamy flavors and make your meal complete. Enjoy! This article covered how to make a Creamy Spinach Tortellini Bake. We explored the main ingredients, preparation steps, and cooking techniques. I shared helpful tips for creaminess and flavor, with variations to suit different diets. Proper storage methods ensure your leftovers stay fresh. This dish is versatile and fun to make. I hope you enjoy experimenting with it in your kitchen!

Creamy Spinach Tortellini Bake Simple and Tasty Meal

Are you ready to whip up a delicious dinner that’s both simple and satisfying? I’ll show you how to make

To make this delightful treat, you need: - 8 cups popcorn (popped, unsalted) - 1 cup dried strawberries (or freeze-dried) - 1 cup dark chocolate chips - 1 tablespoon coconut oil - 1 tablespoon strawberry extract (optional) - Sea salt, to taste - Sprinkles (optional) If you want to switch things up, you can try: - White chocolate chips instead of dark chocolate - Other dried fruits like cherries or blueberries - Coconut oil can be replaced with butter - Use vanilla extract if you don’t have strawberry extract Using quality ingredients makes a big difference. Fresh popcorn gives a great crunch. Good chocolate melts smoothly and tastes rich. Dried strawberries add natural sweetness and flavor. When you choose the best, your treat shines! It tastes better and looks more appealing. Always remember, quality leads to a delightful experience for you and your guests. {{ingredient_image_2}} Start by popping 8 cups of popcorn. Follow the package instructions closely. Once popped, pour the popcorn into a large bowl. Let it cool for a few minutes. This step is key. You want the popcorn to be warm, not hot. Next, take 1 cup of dried strawberries. If they are whole, chop them into small pieces. Aim for bite-sized bits. Set these aside for later. You want them ready when the popcorn is coated. To melt the chocolate, use 1 cup of dark chocolate chips. Add 1 tablespoon of coconut oil to make it smooth. Place this in a microwave-safe bowl. Heat it in 30-second bursts. Stir well between each interval until fully melted. If you like, add 1 tablespoon of strawberry extract for extra flavor. Now, drizzle the melted chocolate over the popcorn. Toss the popcorn gently to coat each piece. Once coated, sprinkle the chopped dried strawberries on top. Fold everything carefully to mix without breaking the popcorn. To balance the sweetness, lightly sprinkle sea salt over the mixture. This step brings out the chocolate flavor. Then, spread the popcorn on a parchment-lined baking sheet. Keep it in a single layer. Let it cool at room temperature or place it in the fridge for about 30 minutes. This helps the chocolate set well. To make the best popcorn, use high-quality kernels. Always pop the corn without salt or butter first. This keeps the taste clean for the chocolate. I like to use an air popper. It gives the popcorn a great texture. After popping, let it cool a bit. This step helps the chocolate stick better. Chocolate can seize and become clumpy. To avoid this, never let water touch the chocolate. Always use a dry bowl for melting. I recommend using coconut oil. It makes the chocolate smooth and shiny. Heat the chocolate slowly, stirring often. If it gets too thick, add a bit more oil to loosen it up. Presentation matters! Serve the popcorn in bright paper cones for fun. You can also use glass jars for a chic look. Sprinkle extra dried strawberries on top for color. For a festive touch, add colorful sprinkles. This makes your treat more inviting and fun to eat! Pro Tips Use Fresh Popcorn: For the best texture, pop your popcorn just before you start the recipe. Freshly popped corn will be crispier and better at holding the chocolate coating. Choose Quality Chocolate: Opt for high-quality dark chocolate for melting. This will enhance the flavor of your popcorn and provide a smoother coating. Experiment with Flavors: Don’t hesitate to customize your popcorn by adding different extracts such as vanilla or almond, or even incorporating other dried fruits like blueberries or raspberries. Storing Leftovers: To keep your chocolate-covered popcorn fresh, store it in an airtight container at room temperature. Avoid refrigeration as it can cause the chocolate to become sticky. {{image_4}} You can switch up the dried strawberries for other fruits. Dried raspberries, blueberries, or bananas work great too. Each fruit brings its unique taste. This change can make your popcorn even more exciting. Try adding a mix for a colorful treat. You can experiment with different flavors. The key is to chop them small like the strawberries. This helps distribute the sweetness throughout the popcorn. Dark chocolate is rich, but white or milk chocolate adds a sweet twist. If you want a creamier taste, use milk chocolate. White chocolate gives a nice contrast with the strawberries. Melt it the same way as dark chocolate. Just remember, you may need less coconut oil for white chocolate. Both options make the popcorn look pretty, too! You can even swirl the chocolates together for a fun look. Want to take your popcorn to the next level? Try adding flavor extracts. Strawberry extract boosts the strawberry taste. You can also use vanilla or almond extract for a new flavor. Just a little goes a long way. For a bit of spice, sprinkle some cinnamon or a pinch of sea salt. These flavors can make your popcorn stand out at any gathering. Be bold and mix flavors to find your favorite combo! To keep your chocolate covered strawberry popcorn fresh, store it in an airtight container. Use a container that seals well to avoid air exposure. This keeps the popcorn crunchy and tasty. You can also use a resealable plastic bag. Just make sure to squeeze out as much air as possible before sealing. When stored properly, this popcorn stays fresh for about one week. After that, it may lose its crunch. To enjoy it longer, check for any signs of moisture. If it feels soggy, it's time to toss it. Keep the popcorn in a cool, dry place away from sunlight. Avoid the fridge, as it can cause the chocolate to sweat. If your popcorn loses some crunch, you can refresh it. Preheat your oven to 250°F (120°C). Spread the popcorn on a baking sheet. Heat it for about 5 to 10 minutes. This brings back the crunch without melting the chocolate. Allow it to cool before enjoying it again. You can use fresh strawberries, but they change the texture. Fresh strawberries add moisture. This can make the popcorn soggy over time. If you prefer fresh strawberries, add them just before serving. This keeps the popcorn crispy. To make this recipe vegan, swap dark chocolate chips for dairy-free chocolate chips. Use coconut oil as your fat. Ensure your sprinkles are also vegan. This way, you keep the delicious taste without using animal products. You can find chocolate covered strawberry popcorn at specialty stores or online. Many gourmet popcorn shops offer this treat. Check local stores too. If you want to try making it, follow this recipe! - What are the nutritional values? One serving has around 200 calories. The values can change based on ingredients. Each serving has healthy fats from coconut oil. Plus, you get fiber from popcorn and some natural sugars from strawberries. - Can I freeze chocolate covered popcorn? Yes, you can freeze chocolate covered popcorn. Place it in an airtight container. It stays fresh for about two months. When you want to eat it, let it thaw at room temp. This keeps the texture just right! In this blog post, we explored the tasty world of chocolate-covered strawberry popcorn. We gathered key ingredients, provided step-by-step instructions, and shared tips for the perfect treat. Don't forget to try different variations and store it the right way to keep it fresh. This fun snack is easy to make and enjoy at any time. So, get creative and surprise your friends with your tasty popcorn mix!

Chocolate Covered Strawberry Popcorn Delightful Treat

If you love fun snacks, get ready for a treat! Chocolate covered strawberry popcorn mixes crunchy, sweet, and fruity flavors

- 1 cup cooked quinoa - 1 can (15 oz) black beans, thoroughly rinsed and drained - 1 cup corn kernels, either fresh or frozen - 1 cup cherry tomatoes, halved for a pop of color and sweetness - 1 ripe avocado, diced into bite-sized pieces - 1/2 medium red onion, finely chopped for a mild zing - 1 cup shredded lettuce, for crunch - 1 tablespoon extra virgin olive oil - 1 tablespoon fresh lime juice, for brightness - 1 teaspoon chili powder, to add depth - 1/2 teaspoon ground cumin, for warmth - Salt and black pepper, to taste - Store-bought options - Homemade tortilla cups The main ingredients create a balanced and tasty salad. Quinoa adds protein and fiber. Black beans boost the protein and fiber even more. Corn gives sweetness and crunch. Cherry tomatoes add color and a juicy bite. The ripe avocado brings creaminess. Red onion adds a mild kick, while shredded lettuce gives a refreshing crunch. For the dressing, the olive oil and lime juice blend well. Chili powder and cumin add rich flavor. Salt and black pepper enhance every bite. You can choose tortilla cups from the store or make them at home. Making your own adds a personal touch. To make them, drape small tortillas over muffin tin cups and bake until crispy. This adds a fun and crunchy base for the salad. This mix of fresh ingredients and homemade tortilla cups makes the Fiesta Taco Salad Cups a hit for any gathering. {{ingredient_image_2}} 1. First, preheat your oven to 375°F (190°C). This step is key for crispy cups. 2. If you want to make homemade tortilla cups, drape small tortillas over a muffin tin. 3. Bake them for about 10-12 minutes, until they get a nice golden color. 1. In a large bowl, mix cooked quinoa, black beans, corn, cherry tomatoes, avocado, red onion, and lettuce. 2. Use a gentle hand to toss the ingredients. This keeps the avocado and tomatoes from bruising. 1. Grab a small bowl and whisk together olive oil, lime juice, chili powder, cumin, salt, and pepper. 2. Whisk until the mixture is well blended and slightly thick. This ensures all the flavors blend well. 1. Carefully fill each tortilla cup with the salad mixture. Pack it nicely to the top. 2. Top each cup with fresh cilantro. You can add a dollop of sour cream or Greek yogurt for creaminess. 3. Serve the cups right away for the best taste and texture. If you prefer, chill them for 15-20 minutes. To cook quinoa perfectly, rinse it first. This removes the bitter coating. Use two parts water to one part quinoa. Bring water to a boil, then lower the heat. Simmer for about 15 minutes until the quinoa is fluffy. Fluff it with a fork afterward for the best texture. Choosing the best avocado is simple. Look for a dark green skin and a slight give when pressed. If it's too soft, it may be overripe. A ripe avocado adds creaminess to your salad cups. For a festive look, arrange the salad cups on a colorful platter. Add lime wedges around the cups for extra color and flavor. This also lets guests add a squeeze of lime to their salad. You can also personalize your cups with toppings. Try adding sliced jalapeños for heat or a sprinkle of feta cheese for creaminess. Fresh cilantro adds both flavor and a pop of green. One common mistake is overstuffing the tortilla cups. Fill them, but don’t pack too tightly. This keeps them from breaking apart. Another mistake is not seasoning your salad well. Be generous with salt and pepper. This enhances the flavors of all the fresh ingredients. Adjust the seasoning to your taste for the best results. Pro Tips Fresh Ingredients: Using fresh vegetables will enhance the flavor and texture of your salad cups. Opt for ripe avocados and sweet cherry tomatoes for the best taste. Customize Your Spice: Adjust the amount of chili powder and cumin based on your spice preference. For a milder version, reduce the spices or omit them entirely. Make Ahead: You can prepare the salad mixture in advance and store it in the refrigerator. Just fill the tortilla cups right before serving to maintain their crunch. Serving Suggestions: Pair the cups with a side of salsa or guacamole for an extra layer of flavor. Lime wedges are also great for adding a fresh zest! {{image_4}} You can easily change the protein in these cups. Grilled chicken adds a nice flavor. You can also use shrimp for a seafood twist. If you want a meat-free option, try adding more beans. You could also use lentils for a hearty texture. To kick up the flavor, you can add spices or herbs. Cumin and chili powder work great. You might also want to add fresh cilantro for a burst of freshness. If you like heat, adding jalapeños gives a spicy kick. They pair well with the creamy avocado. For those needing gluten-free options, use corn tortillas. They work just as well. If you want to make this dish vegan, skip the sour cream and use a plant-based yogurt. You can still enjoy all the flavors without any animal products. To keep your Fiesta Taco Salad Cups fresh, follow these tips: - Store the salad filling in an airtight container. - Keep tortilla cups separate to avoid sogginess. - Add lime juice to the salad to help prevent browning. To refresh your tortilla cups: - Preheat your oven to 350°F (175°C). - Place cups on a baking sheet for about 5 minutes. For the filling: - Reheat in a skillet over low heat. - Stir gently to warm it evenly without overcooking. In the fridge, your salad lasts about 3 days. - Quinoa and black beans stay good for 3-5 days. - Avocado should be eaten within 1-2 days after cutting. For freezing: - The salad filling can freeze for up to 3 months. - Avoid freezing the tortilla cups, as they lose crispness. Yes, you can prepare many parts ahead of time. Cook the quinoa and store it in the fridge. You can also chop the veggies and beans a day early. Keep them in airtight containers to stay fresh. - Storage tips: - Store the salad mix separate from the tortilla cups. - Keep the dressing in a jar to drizzle later. - Assemble the cups just before serving to keep them crisp. If you want to swap quinoa, you have great options. Rice and couscous are both tasty choices. - Rice options: - Brown rice gives a nutty taste. - White rice cooks faster and is soft. - Couscous: - This tiny pasta cooks quickly. - It adds a nice texture and flavor. Keeping tortilla cups crisp is key. Here are some simple tips. - Baking: - Bake the cups until golden and firm. - Let them cool completely before filling. - Storage: - Don’t fill the cups until right before serving. - If you have leftovers, store the filling in a separate container. These tips will help you enjoy your Fiesta Taco Salad Cups at their best! In this article, we explored how to make delicious Fiesta Taco Salad Cups. We covered the main ingredients, including cooked quinoa, black beans, and ripe avocado, and highlighted simple steps to prepare your tortilla cups. I provided tips on avoiding common mistakes and making tasty variations for everyone. Remember, you can make this recipe your own and enjoy every bite. Happy cooking!

Fiesta Taco Salad Cups Savory and Fresh Delight

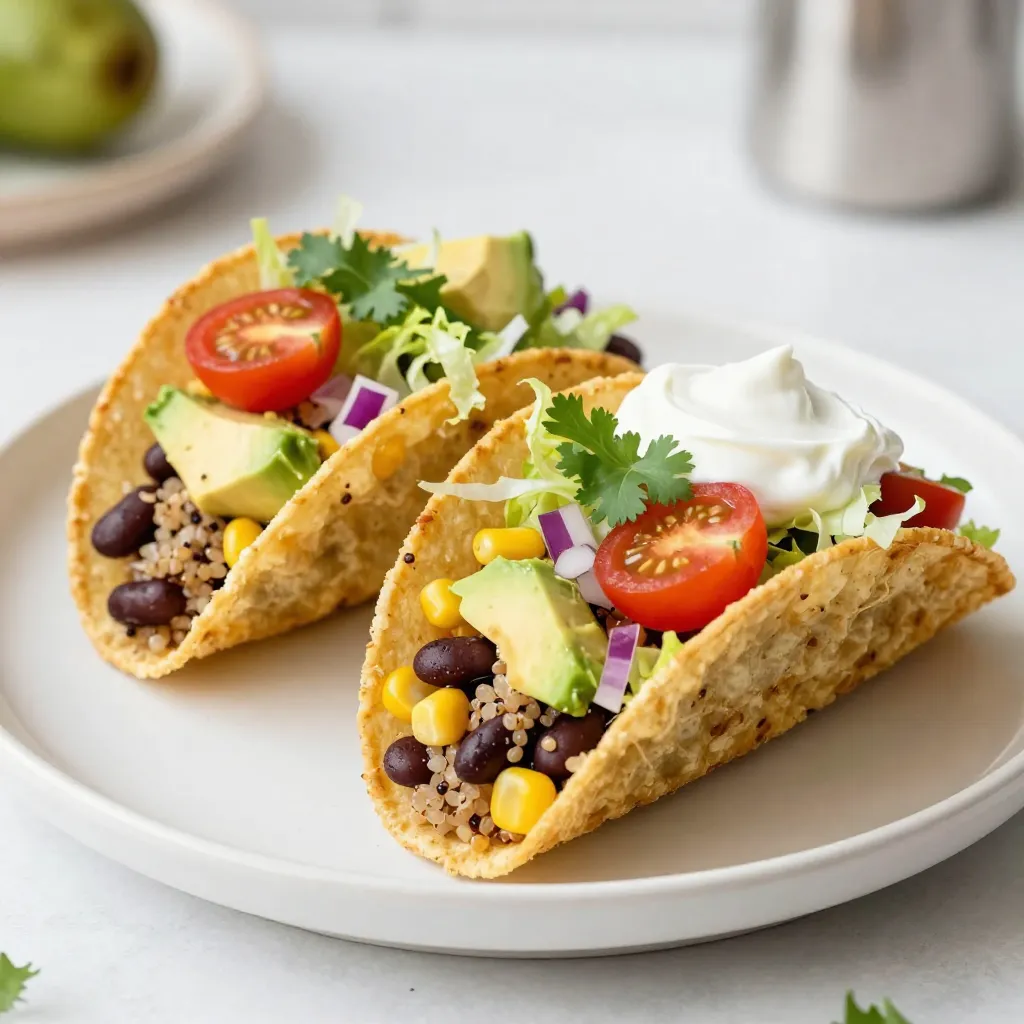
Craving a vibrant, fresh dish that’s easy to whip up? Look no further! Fiesta Taco Salad Cups combine delicious flavors

To make these delicious brownies, gather these key items: - 1/2 cup unsalted butter, melted - 1 cup granulated sugar - 2 large eggs - 1 teaspoon vanilla extract - 1/3 cup unsweetened cocoa powder - 1/2 cup all-purpose flour - 1/4 teaspoon salt - 1/4 teaspoon baking powder - 1/2 cup creamy peanut butter For an extra treat, consider adding: - 1/4 cup chocolate chips These chocolate chips will boost the brownie’s chocolate flavor. They add little bursts of chocolatey goodness with each bite. Make sure you have these tools ready: - A 9x9-inch baking pan - Mixing bowls - A whisk - A spatula - A microwave-safe bowl - A knife or skewer for swirling Having the right tools makes baking much easier and more fun! {{ingredient_image_2}} Start by preheating your oven to 350°F (175°C). This step helps the brownies bake evenly. Take a 9x9-inch baking pan, and grease it well. You can also line it with parchment paper. This makes it easier to lift the brownies out later. In a large bowl, pour in the melted butter and granulated sugar. Whisk them together until smooth. Next, add the eggs one at a time. Whisk after each egg to mix well. Then, stir in the vanilla extract. Sift in the cocoa powder, flour, salt, and baking powder. Gently fold these dry ingredients into the wet mixture. Be careful not to overmix, or your brownies may turn out dense. Pour three-quarters of the brownie batter into the prepared pan. Spread it evenly with a spatula. In a small bowl, microwave the peanut butter for about 20-30 seconds. This makes it easier to drizzle. Pour the warm peanut butter over the brownie base. Now, take the remaining batter and dollop it over the peanut butter. Use a knife or skewer to swirl the two batters together. This creates a lovely marbled effect. Place the pan in the preheated oven. Bake for 20-25 minutes. To check if they are done, insert a toothpick into the center. It should come out mostly clean, with a few moist crumbs. After baking, let the brownies cool in the pan for at least 10 minutes. If you used parchment paper, lift them out carefully before cutting into squares. To get the best brownie texture, focus on mixing. Start with melted butter and sugar. Whisk them well until they blend smoothly. Next, add eggs one at a time. This helps create a nice, airy mix. When you add dry ingredients, mix gently. Overmixing makes them tough. Your batter should be thick but pourable. Swirling adds beauty to your brownies. After pouring the peanut butter, dollop the brownie batter on top. Use a knife or skewer to swirl gently. Move in an "S" shape for a lovely marbled look. Don’t go too deep. You want to see both colors. The top will look amazing when baked. Make these brownies your own! Add nuts like walnuts or pecans for crunch. You can also try different chocolate types, like dark or milk. Want a little spice? Add a pinch of cinnamon or espresso powder. For a fun twist, mix in some crushed candies. This gives your brownies unique flavors and textures. Pro Tips Use Room Temperature Ingredients: For the best texture, ensure your eggs and peanut butter are at room temperature before mixing. This helps create a smoother batter. Don't Overmix: When combining the dry ingredients with the wet, mix just until combined. Overmixing can lead to tough brownies. Check for Doneness Carefully: Insert a toothpick into the center of the brownies. It should come out with a few moist crumbs, indicating they are perfectly fudgy. Cool Before Cutting: Allow the brownies to cool in the pan for at least 10 minutes. This helps them set and makes cutting easier without crumbling. {{image_4}} If you want to make these brownies nut-free, you can try sun butter. This spread comes from sunflower seeds and tastes great. Another option is soy nut butter, which is also nut-free. Both choices work well in place of peanut butter. Just use the same amount as the recipe calls for. These swaps keep the brownies rich and tasty. Mix-ins can make these brownies even more fun. You can add a handful of chocolate chips or chopped nuts. For a fruity twist, try dried cherries or raspberries. You can sprinkle these on top before you bake. You can also add a layer of caramel sauce for extra sweetness. Just drizzle it before swirling the batters. If you want gluten-free brownies, swap the all-purpose flour for a gluten-free blend. Many brands offer great mixes that work well in baking. You can also use almond flour or coconut flour, but adjust the amounts. Start with less and add as needed for the right texture. Just remember, the baking time might change slightly, so keep an eye on them! To keep your peanut butter chocolate swirl brownies fresh, store them in an airtight container. This helps maintain their softness and flavor. Place a piece of parchment paper between layers to avoid sticking. Store them at room temperature for up to 3 days. For longer storage, consider freezing. Freezing brownies is simple. First, let them cool completely. Then, cut them into squares. Wrap each square tightly in plastic wrap. Place the wrapped brownies in a freezer-safe bag or container. They can last up to 3 months in the freezer. When you’re ready to eat, just thaw them at room temperature. To enjoy your brownies warm, preheat your oven to 350°F (175°C). Place the brownies on a baking sheet. Heat them for about 5 to 10 minutes. This will restore their soft texture. For a quick fix, you can also microwave a square for 10 to 15 seconds. Enjoy them warm! You can tell your brownies are done when a toothpick comes out mostly clean. Insert it into the center of the brownies. If it has a few moist crumbs, they are ready. If the toothpick has wet batter, bake for a few more minutes. Keep an eye on them! Yes, you can use oil instead of butter. Use a light oil, like canola or vegetable oil. Replace the butter with the same amount of oil, but the taste will change a bit. Brownies may taste less rich but will still be soft and good. To make brownies more chocolatey, add chocolate chips. Mix in 1/4 cup of chocolate chips into the batter. You can also use dark cocoa powder instead of regular cocoa powder. This change will boost the chocolate flavor. For clean edges, let the brownies cool first. Use a sharp knife to cut them. Wipe the knife with a damp cloth between cuts. This step helps keep the edges neat. You can also chill the brownies for a bit before cutting to make this easier. You now have all you need to make awesome brownies. We covered the key ingredients, with options to boost flavor. I shared simple steps for mixing, swirling, and baking. I also gave you tips for texture and personalization. Plus, I included variations for different diets and preferences. Finally, I shared how to store and reheat your tasty treats. With these insights, you can create perfect brownies every time. Happy baking!

Peanut Butter Chocolate Swirl Brownies Delight Recipe

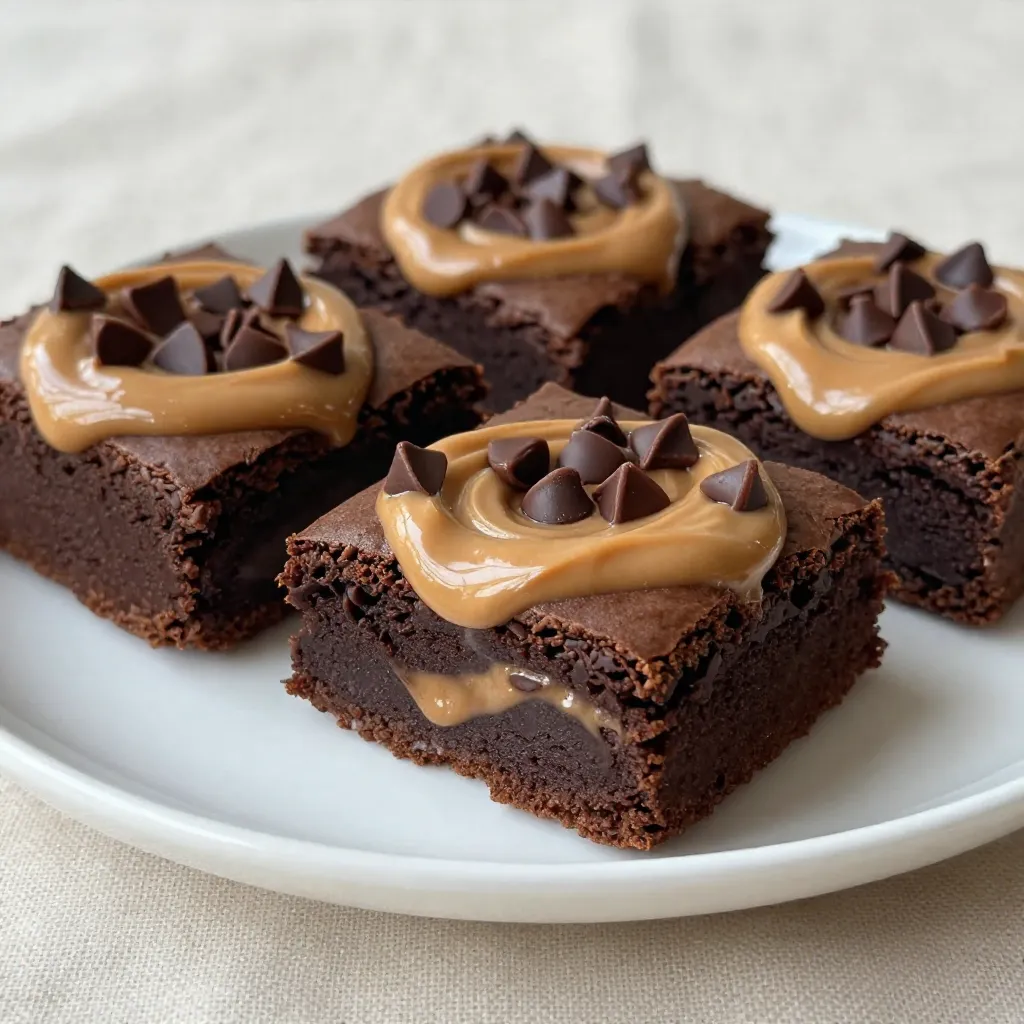
If you love rich, fudgy brownies, you’re in for a treat! Introducing my Peanut Butter Chocolate Swirl Brownies Delight Recipe—where

To make Garlic Parmesan Pull-Apart Bread, gather these simple ingredients: - 1 round loaf of artisan or sourdough bread - 1/2 cup unsalted butter, melted - 4 cloves garlic, finely minced - 1 cup shredded mozzarella cheese - 1/2 cup freshly grated Parmesan cheese - 1 tablespoon fresh parsley, finely chopped - 1 teaspoon dried oregano - 1 teaspoon garlic powder - Salt and black pepper, to taste These ingredients create a delightful blend of flavors, making each bite a treat. You can swap ingredients based on what you have at home. Here are some ideas: - Bread: Use any crusty bread if artisan or sourdough isn't available. - Butter: Olive oil can replace unsalted butter for a lighter version. - Cheese: Feel free to mix different cheeses like cheddar or gouda. - Garlic: Garlic powder can substitute fresh garlic if needed. - Herbs: Use dried parsley or basil if fresh herbs are not available. These substitutions keep the recipe flexible and fun. Using fresh herbs gives a bright taste. Fresh parsley adds color and zest. Dried herbs, like oregano, have a stronger flavor. They work well in this recipe, too. For best results, use fresh herbs when you can. If you only have dried, that’s fine! Adjust the amount based on your taste. Generally, use one-third of the amount when using dried herbs instead of fresh. This choice enhances the flavor and makes the bread even more enjoyable. {{ingredient_image_2}} Start by preheating your oven to 375°F (190°C). This step is key. A hot oven helps the bread bake evenly and become crispy. Make sure it’s fully heated before you add the bread. In a small saucepan, melt 1/2 cup of unsalted butter over low heat. Add 4 finely minced garlic cloves, 1 teaspoon of garlic powder, 1 teaspoon of dried oregano, salt, and black pepper. Stir gently for 2-3 minutes. You want the garlic to soften and the mix to smell great. Once fragrant, remove it from heat and let it cool slightly. Place your round loaf of artisan or sourdough bread on a lined baking sheet. Use a serrated knife to make a crisscross pattern. Cut about 1-inch apart, both horizontally and vertically. Be careful not to cut all the way through the bottom. This creates small squares that stay attached at the base. Gently pull apart the cut sections of the bread. This makes openings for the butter and cheese. Take a pastry brush and baste the garlic butter mixture into the cuts. Make sure each piece gets some of that tasty butter. Then, stuff the shredded mozzarella and grated Parmesan cheese into the gaps. Spread it out evenly so every piece is cheesy. Loosely wrap the bread in aluminum foil to keep it moist. Place it in the preheated oven and bake for 15-20 minutes. Afterward, carefully remove the foil. Bake for another 10-15 minutes until the cheese is bubbly and the crust is golden brown. Once done, sprinkle finely chopped parsley on top. Serve it warm and enjoy! For pull-apart bread, I recommend using a round loaf of artisan or sourdough bread. These types have a sturdy crust that can hold the filling well. They also have a soft, chewy inside, which is perfect for soaking up the garlic butter. Other great options include ciabatta or focaccia. These breads also offer a nice texture and flavor. To get that gooey, cheesy texture, choose high-quality mozzarella and Parmesan. Shred them yourself for the best melt. When you stuff the bread, make sure to pack the cheese into every gap. This helps create an even melt. Bake the bread covered in foil first, then uncover it to allow the cheese to bubble and brown nicely. This two-step baking ensures the cheese melts perfectly while keeping the bread moist. A few common mistakes can ruin your pull-apart bread. First, avoid cutting the bread too deep. You want the pieces to stay attached at the base. Also, don’t skimp on the garlic butter mixture. Make sure it soaks into all the cuts for maximum flavor. Lastly, keep an eye on your oven. Every oven is different, so adjust the baking time if needed. This way, you’ll avoid burning the bread or leaving the cheese undercooked. Pro Tips Use Fresh Garlic: Freshly minced garlic will provide a more robust and aromatic flavor compared to pre-minced options. Make sure to use high-quality garlic for the best taste. Choose the Right Bread: An artisan or sourdough bread works best for pull-apart bread as they have a sturdy structure to hold all the ingredients without falling apart. Customize Cheese Choices: Feel free to experiment with different cheese combinations, such as adding provolone or cheddar for a unique twist on the classic flavor. Serve Immediately: For the best experience, serve the bread right out of the oven while it's warm and the cheese is gooey. This ensures maximum flavor and enjoyment. {{image_4}} You can change up the cheese for more flavor. Try using gouda or cheddar for a twist. These cheeses melt well and add a nice depth. Mixing mozzarella with fontina gives a creamy texture. Don’t be afraid to experiment, as cheese adds richness to each bite. Adding fresh herbs can brighten the taste. You can use basil, thyme, or rosemary. These herbs bring a fresh aroma and flavor that complements garlic. Just chop them finely and mix with the butter. You can also sprinkle herbs on top for a pretty finish. If you like heat, add red pepper flakes. This small addition will give your bread a kick. Mix a teaspoon or two into the butter for a spicy touch. It’s a great way to make your pull-apart bread stand out. You can adjust the amount to match your spice level. To store leftover garlic Parmesan pull-apart bread, wrap it tightly in plastic wrap. You can also place it in an airtight container. This keeps the bread fresh for about 2 days at room temperature. If you want it to last longer, consider refrigerating it. Just remember, the bread may dry out in the fridge. When you’re ready to enjoy the leftover bread, preheat your oven to 350°F (175°C). Remove the bread from its wrap and place it on a baking sheet. Cover it loosely with aluminum foil to keep it moist. Heat for about 10 to 15 minutes. If you want a crispier crust, uncover it for the last 5 minutes. If you have more leftovers, freezing is a great choice. Wrap the bread tightly in plastic wrap and then in aluminum foil. This keeps out air and prevents freezer burn. The bread can stay in the freezer for up to 3 months. When you're ready to eat it, thaw it in the fridge overnight and reheat as mentioned above. Enjoy the cheesy goodness any time! Yes, you can make Garlic Parmesan Pull-Apart Bread in advance. Prepare the bread and garlic butter mixture the day before. Cut the bread and baste it with the butter. Cover it tightly with foil and store it in the fridge. When you are ready, simply bake it as directed. This method will enhance the flavors too! You will know the bread is done when the cheese is bubbly and golden. The crust should also be a nice, deep brown color. If you poke the bread with a fork, it should feel soft but not wet. Always trust your eyes and nose; the smell will be amazing when it’s ready! You can serve this bread with many tasty sides. Try it with marinara sauce for dipping. Garlic butter or olive oil also goes well. Pair it with a fresh salad for a balanced meal. You can even enjoy it as a side with pasta dishes. The choices are endless! This blog post shared the essentials for making Garlic Parmesan Pull-Apart Bread. We covered ingredients, from fresh herbs to cheese choices. You also learned step-by-step instructions for perfect preparation and baking. Remember the tips to choose the best bread and avoid common mistakes. Variations let you add your own twist, making every batch unique. Finally, the storage info ensures your leftovers last longer. Enjoy your baking adventure and impress everyone with your delicious bread!

Garlic Parmesan Pull-Apart Bread Tasty and Easy Recipe

If you’re craving a savory treat that’s easy to make, you’ve come to the right place! My Garlic Parmesan Pull-Apart

Older posts
Page1 Page2 … Page83 Next →

dsad

© 2026 eataroundit • Built with GeneratePress

Our Policies

  • Copyright Policy
  • Cookie Policy
  • GDPR Policy
  • Privacy Policy
  • Disclaimer
  • Terms Of Use

More Information

  • Home
  • About
  • Contact
  • Appetizers
  • Dessert
  • Dinner
  • Drinks
©2026, eataroundit About Back To Top