Skip to content
DisclaimerTerms Of UseGDPR PolicyCookie Policy

eataroundit

  • Home
  • Drinks
  • Appetizers
  • Dinner
  • Dessert
  • About
  • Contact
  • Privacy Policy
DisclaimerTerms Of UseGDPR PolicyCookie Policy

NO-ING-IMG

- 2 cups all-purpose flour - 1 tablespoon baking powder - 1 teaspoon baking soda - 1/2 teaspoon salt - 1 cup granulated sugar - 1/2 cup packed brown sugar - 1/2 cup unsalted butter, softened - 2 large eggs - 1 cup buttermilk For this cake, I use basic kitchen staples. All-purpose flour gives the cake structure. Baking powder and baking soda help it rise. The salt enhances all the flavors. Granulated sugar adds sweetness, while brown sugar adds depth. Softened butter makes the cake rich and moist. Eggs bind everything together. Buttermilk adds a nice tang and keeps the cake tender. - 1 tablespoon cinnamon - 1/2 cup packed brown sugar - 1/2 cup chopped pecans The cinnamon swirl adds warmth and spice. Cinnamon gives a lovely flavor. Brown sugar adds sweetness and moisture. Chopped pecans provide crunch and nutty taste. Together, they create a delightful mix that makes each bite special. - 1 cup caramel sauce (store-bought or homemade) - 1/2 cup chopped pecans (for garnish) The caramel sauce is the star of this dessert. It adds a sweet, gooey layer on top. You can buy it or make your own. Chopped pecans on top add a nice finishing touch. They give extra crunch and flavor. This topping takes the cake to the next level! - Preheat the oven to 350°F (175°C). - Grease a 9x13 inch baking pan. - Combine 2 cups of all-purpose flour, 1 tablespoon of baking powder, 1 teaspoon of baking soda, and 1/2 teaspoon of salt in a bowl. - In another bowl, cream together 1 cup of granulated sugar, 1/2 cup of packed brown sugar, and 1/2 cup of softened unsalted butter until fluffy. - Add 2 large eggs and 1 cup of buttermilk to the mixture, mixing well until combined. - In a small bowl, mix 1 tablespoon of cinnamon with 1/2 cup of packed brown sugar. - Layer half of the batter in the prepared pan, then sprinkle half of the cinnamon-sugar mixture and 1/2 cup of chopped pecans over it. - Pour the remaining batter on top and gently spread it to cover. Use a knife to swirl the remaining cinnamon mixture into the batter for a marble effect. - Bake for 30-35 minutes, or until a toothpick comes out clean from the center. - Remove the cake from the oven and let it cool for 10 minutes. Drizzle 1 cup of caramel sauce evenly over the top and sprinkle with 1/2 cup of chopped pecans. - Let the cake cool for another 30 minutes before serving. - Check for doneness with a toothpick. Stick it in the center. If it comes out clean, your cake is ready. - Don’t overmix the batter to keep it fluffy. Mix just until you see no dry flour. - Serve warm or at room temperature. This cake is great either way. - Pair with vanilla ice cream for an indulgent touch. The ice cream adds creaminess to the warm cake. - Add chocolate chips for extra richness. They melt and blend well with the cake. - Substitute nuts or use a different type of icing. You can try walnuts or a cream cheese frosting. {{image_4}} You can make this cake gluten-free. Just substitute the all-purpose flour with a gluten-free blend. Many brands work well and keep the cake fluffy. This way, everyone can enjoy it. If you want a vegan cake, it’s simple. Replace the eggs with flax eggs. Just mix one tablespoon of ground flaxseed with three tablespoons of water. Let it sit for a few minutes. Also, use plant-based milk and vegan butter. This makes a delicious cake without any animal products. For a fun twist, bake this cake in a muffin tin. This gives you small, individual servings. Just pour the batter into the cups and follow the same baking time. These mini cakes are perfect for sharing at parties or gatherings. You can store Caramel Pecan Cinnamon Roll Cake at room temperature. Just cover it well. It will stay fresh for up to three days. This way, you can enjoy it each morning with your coffee. For long-term storage, wrap slices in plastic. You can freeze them for up to three months. When you crave a sweet treat, just take out a slice. It's a great way to save leftovers! To reheat, use a microwave or an oven. This helps restore the cake's soft texture. If you use the oven, wrap it in foil to keep it moist. Enjoy your warm slice with a drizzle of caramel! Yes, walnuts or almonds can be used as alternatives. Both nuts have great flavor and texture. Walnuts add a nice crunch, while almonds give a sweet touch. Feel free to mix and match nuts based on your taste. Making homemade caramel sauce is easy. Start with sugar in a pan over medium heat. Stir until it melts into a golden color. Then add butter, mixing well. Finally, pour in heavy cream slowly, stirring until smooth. This sauce will taste rich and fresh! This cake pairs well with coffee, tea, or a scoop of ice cream. The warm cake balances nicely with cold ice cream. It also goes great with a cup of coffee for breakfast or dessert. Enjoy it however you like! This blog post covered making a delicious Caramel Pecan Cinnamon Roll Cake. We discussed key ingredients, followed easy step-by-step instructions, and explored tips for success. You learned about variations for dietary needs and how to store your cake. Enjoy this cake warm, with ice cream or coffee. It’s quick to make and sure to impress. I hope you feel inspired to bake and share this treat! Enjoy every bite!

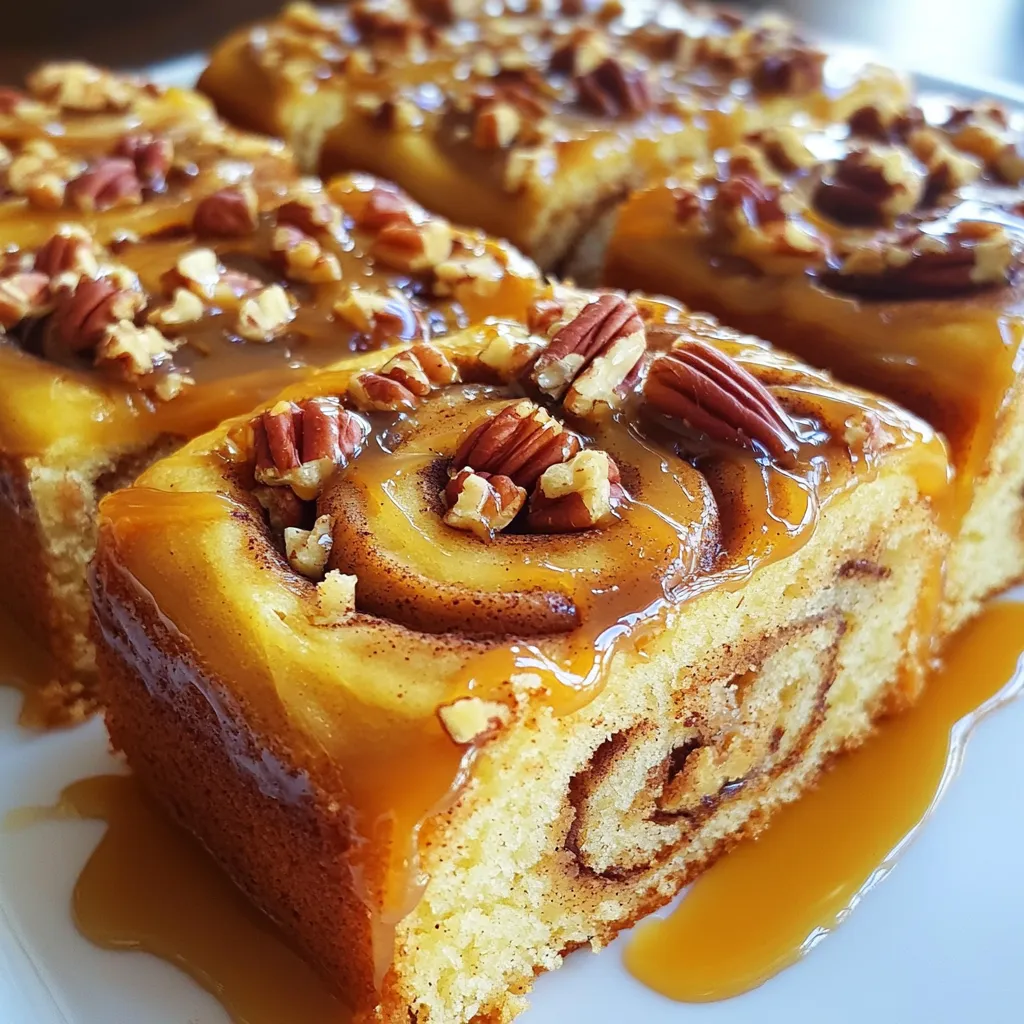
Caramel Pecan Cinnamon Roll Cake Heavenly Dessert Delight

If you’re searching for a dessert that’s pure indulgence, look no further! The Caramel Pecan Cinnamon Roll Cake combines warm

For these tasty bites, you need: - 1 cup graham cracker crumbs - 4 tablespoons unsalted butter, melted - 12 oz cream cheese, softened - 1 cup powdered sugar - Zest of 1 large lemon - 2 tablespoons freshly squeezed lemon juice - 1 teaspoon pure vanilla extract - 1 cup fresh raspberries, plus extra for garnish - Fresh mint leaves for garnish These ingredients come together to create a creamy, dreamy dessert. The graham cracker crumbs form a crunchy crust. Cream cheese adds richness, while lemon brings a bright zing. Raspberries give a sweet, tart burst in each bite. To make your bites even more special, consider these garnishes: - Extra fresh raspberries on top - A sprig of mint for color - A drizzle of raspberry puree for flair These extras not only look nice but also add flavor. You can impress your friends with a simple touch. If you need to change things up, here are some easy swaps: - Use almond flour instead of graham cracker crumbs for a gluten-free crust. - Substitute mascarpone cheese for cream cheese for a creamier filling. - Try lime or orange zest for a different citrus twist. These substitutions help you adapt the recipe to your taste or needs. You can still enjoy delicious cheesecake bites without stress. {{ingredient_image_2}} To start, you make the crust. Grab a medium mixing bowl. Add 1 cup of graham cracker crumbs and 4 tablespoons of melted unsalted butter. Mix them well until they look crumbly. Next, press this mixture firmly into the bottom of mini muffin tins. Make sure it's even. This forms a solid base for your cheesecake bites. Once done, put the tins in the refrigerator to chill while you prepare the filling. Now, let's work on the filling. In a large mixing bowl, beat 12 ounces of softened cream cheese. Use an electric mixer for this. Mix until it's smooth and creamy. Slowly add 1 cup of powdered sugar, the zest of 1 large lemon, 2 tablespoons of lemon juice, and 1 teaspoon of pure vanilla extract. Keep mixing on medium speed until everything is incorporated and fluffy. This filling is what makes your bites so rich and delicious. It's time to add some color and flavor. Take 1 cup of fresh raspberries. Gently fold them into the cheesecake mixture with a spatula. Be careful not to mash them too much. You want to keep some shape for texture and taste. This step adds a nice burst of raspberry goodness in each bite. Once mixed, you’re ready to fill the crusts. To get a smooth and creamy cheesecake, start with softened cream cheese. Cold cream cheese will not mix well. Beat it well until it is fluffy. This adds air and makes the texture light. Mix in the other ingredients slowly. Over-mixing can make the cheesecake dense. Chill the bites for at least four hours to set. Overnight is even better for the best taste. When adding raspberries, be gentle. Use a spatula to fold them into the mixture. This keeps the berries whole and prevents mushiness. If you stir too hard, you may break them apart. Aim for a swirl of color and flavor. This adds a lovely look and taste to each bite. Serve your cheesecake bites on a nice plate. Arrange them neatly in rows for a clean look. For a fun touch, drizzle raspberry puree on the plate. This adds color and a burst of flavor. Top each bite with extra raspberries and mint leaves. This makes the bites look even more appealing. Enjoy these treats at parties or family gatherings! Pro Tips Fresh Ingredients: Always use fresh raspberries for the best flavor and texture. They add a delightful burst of sweetness to the cheesecake bites. Chill Time: For the best results, let the cheesecake bites chill overnight. This allows the flavors to meld, resulting in a richer taste. Variations: Experiment with different fruits such as strawberries or blueberries for varied flavors. You can also add a splash of almond extract for a unique twist. Presentation: Garnish with a drizzle of raspberry sauce or a dusting of powdered sugar for an elegant finish that enhances both taste and visual appeal. {{image_4}} You can swap raspberries for other fruits. Strawberries give a sweet twist. Blueberries add a fun pop of color and flavor. Cherries bring a tart kick. Mango can offer a tropical vibe. Each fruit changes the taste, so feel free to experiment! If you need a gluten-free crust, use almond flour. Mix it with melted butter for a nutty base. You can also try gluten-free graham crackers. They give the same great taste without the gluten. Just make sure to check the label for any hidden gluten. Want to mix things up? Add a pinch of salt to the filling. This helps boost the flavors. You can also try different extracts, like almond or lemon. A splash of coconut milk can add creaminess. For a hint of spice, consider a dash of cinnamon. These additions make each bite unique and fun! To keep your lemon raspberry cheesecake bites fresh, store them in an airtight container. Place a layer of parchment paper between the bites to prevent sticking. This method keeps them nice and tasty for days. These cheesecake bites will stay fresh in the fridge for about five days. After that, they may lose flavor and texture. If you want to enjoy them longer, consider freezing. To freeze your cheesecake bites, first, let them chill in the fridge. Once set, remove them from the muffin tins. Arrange them on a baking sheet in a single layer. Freeze for about two hours. Then, transfer them to a freezer-safe bag. They can last up to three months in the freezer. When you’re ready to eat them, just thaw in the fridge overnight. Enjoy your tasty treat! Yes, you can make these cheesecake bites ahead of time. They taste great when chilled. I suggest making them the day before your event. This gives them time to set well in the fridge. Cover them tightly with plastic wrap or foil. This keeps them fresh and prevents any odors from mixing in. If you want a lighter option, use Greek yogurt. It adds creaminess and tanginess. You can also try ricotta cheese for a different texture. Just blend it well until smooth. For a dairy-free choice, use vegan cream cheese. These options can create tasty variations in flavor. You know the cheesecake is set when it feels firm to the touch. It should not jiggle when you move the muffin tin. The bites also need at least four hours in the fridge. For the best results, let them chill overnight. This helps the flavors meld and improves the texture. Lemon raspberry cheesecake bites are a delightful treat. We covered key ingredients, like graham crackers and fresh fruit. I shared step-by-step instructions for a creamy filling and perfect texture. You can customize these bites with different fruits and gluten-free options. Store them well and enjoy their freshness later. With these tips, you can create your own delicious bites. Now it's your turn to enjoy making and sharing these tasty treats!

Lemon Raspberry Cheesecake Bites Tasty and Simple Treat

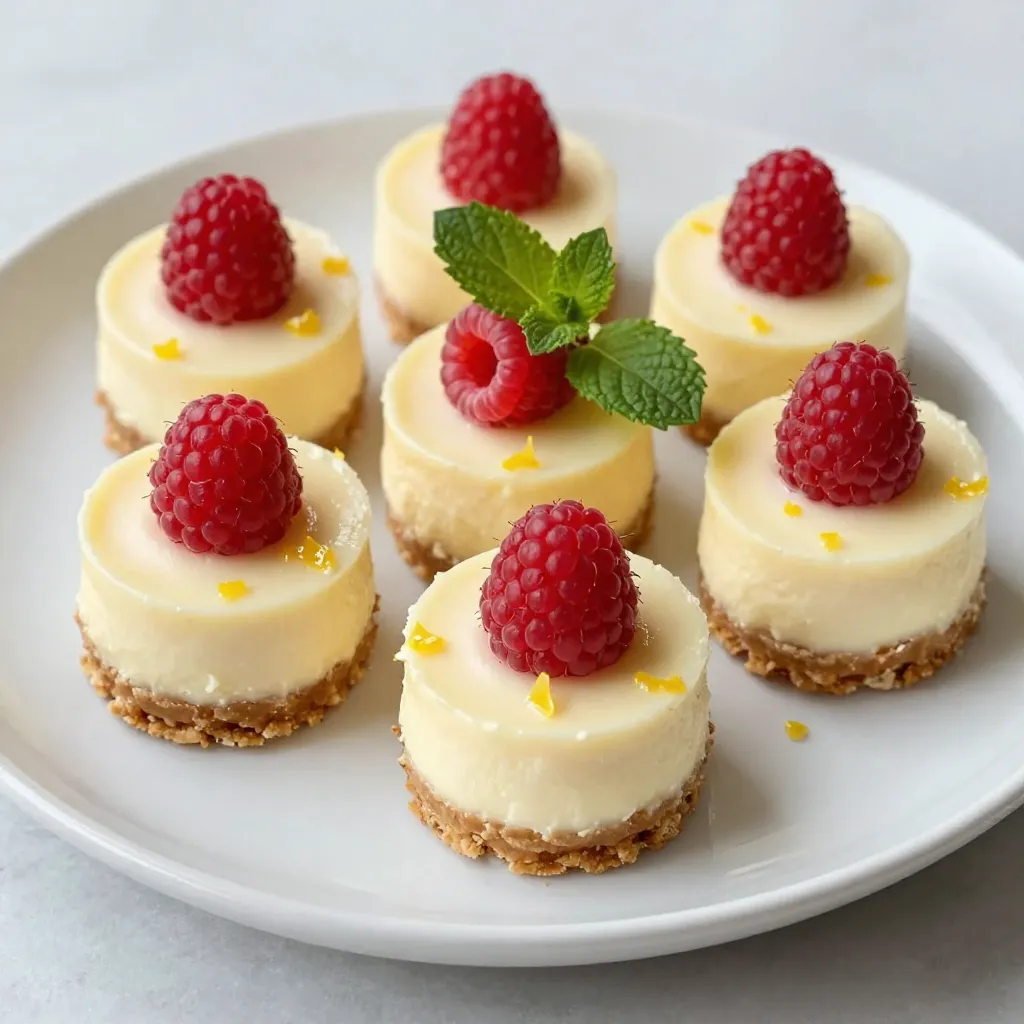
If you’re craving a sweet treat that combines bright flavors with creamy goodness, you’re in for a delight! Lemon Raspberry

- 2 cups all-purpose flour - 1/2 cup packed brown sugar - 1 tablespoon baking powder - 1/2 teaspoon baking soda - 1/2 teaspoon salt - 1 teaspoon ground cinnamon - 1/2 teaspoon ground nutmeg - 1/4 teaspoon ground ginger - 1/2 cup unsalted butter, cold and cubed - 3/4 cup pumpkin puree - 1/4 cup heavy cream - 1 large egg - 1 cup semi-sweet chocolate chips To make pumpkin chocolate chip scones, gather all the ingredients first. This helps keep things organized. You will need flour, sugar, baking powder, and baking soda. These dry ingredients give the scones their rise. Next, add salt and spices. The salt balances the sweet. Cinnamon, nutmeg, and ginger bring warmth and flavor. Use fresh spices for the best taste. Chill your butter before using it. Cold butter makes the scones flaky. Cube the butter into small pieces. This helps it mix evenly. For the wet ingredients, you need pumpkin puree, heavy cream, and one egg. Pumpkin adds moisture and flavor. The cream gives richness, while the egg helps bind the dough. Finally, don’t forget the chocolate chips. They add sweetness and a lovely texture. Make sure to use semi-sweet chocolate for the best balance. Now you have everything ready to create these tasty treats! - Preheat oven to 400°F (200°C). - Line baking sheet with parchment paper. - Sift together dry ingredients in a large bowl. This helps mix the flour, sugar, and spices well. - Blend cold, cubed butter into dry mixture. Use a fork or your fingers to mix until it looks like coarse crumbs. This step is key for making your scones flaky. - Whisk together pumpkin puree, heavy cream, and egg. Make sure this mixture is smooth and well mixed. - Gradually combine wet and dry ingredients without overmixing. Stir gently until everything is just combined. - Fold in chocolate chips gently. This ensures even distribution without making the dough tough. - Form dough into a round disc about 1 inch thick. - Cut dough into wedges, making about 8 equal pieces. - Place the scones on the prepared baking sheet with space between each. - Bake for 18-20 minutes. Look for golden edges and a clean toothpick when done. Enjoy the process and the lovely smells that fill your kitchen! To get that perfect flaky texture, use cold butter. Cold butter keeps its shape in the dough. This helps create air pockets during baking. These pockets make the scones light and fluffy. Avoid overmixing the dough. Mix just until the ingredients come together. Overmixing can make the scones tough instead of flaky. You can enhance the flavor with spices. Besides cinnamon, nutmeg, and ginger, consider adding allspice or cloves. For a warm touch, add a splash of vanilla extract. This adds depth to the pumpkin flavor. Each spice brings its own charm, making your scones special. Serve your warm scones with pumpkin butter. The sweet and spicy flavors pair well. You can also drizzle honey over them. This adds a nice touch of sweetness. For extra fun, try a light dusting of powdered sugar. Enjoy these treats with a cup of coffee or tea for a cozy experience. {{image_4}} You can easily switch things up! Try using sweet potato or butternut squash instead of pumpkin. Both options add a different but tasty flavor. Sweet potato gives a nice sweetness. Butternut squash adds a creamy texture. These choices make the scones fun and unique. If you love chocolate, consider using white chocolate or dark chocolate chips. White chocolate adds a sweet, creamy twist. Dark chocolate brings a rich, bold taste. You can even mix chocolate types for extra fun. Each variation gives the scones its own special flair. Want a healthier scone? Use whole wheat flour instead of all-purpose flour. This change adds fiber and nutrients. You can also cut back on the sugar if you prefer. Reducing the brown sugar by a little still keeps the scones tasty. These simple swaps make your treat a bit better for you! To keep your pumpkin chocolate chip scones fresh, store them in an airtight container at room temperature. This method helps maintain their flaky texture. If you live in a humid area, I suggest wrapping each scone in plastic wrap before placing them in the container. This extra layer prevents moisture loss. If you want to keep them longer, you can refrigerate the scones. Place them in an airtight container to avoid any fridge odors. However, the cold can change their texture slightly, making them less flaky. So, only refrigerate if you plan to eat them within a few days. Freezing scones is a great way to enjoy them later. To freeze, place the baked and cooled scones on a baking sheet. Make sure they are not touching. Freeze them for about two hours until solid. Then, transfer them to a freezer-safe bag or container. Label the bag with the date for easy tracking. When you are ready to enjoy a scone, remove it from the freezer. Let it thaw in the fridge overnight, or at room temperature for a few hours. If you want a warm scone, pop it in the oven at 350°F (175°C) for about 5-10 minutes. This step will refresh the scone’s texture and flavor. Yes, you can make these scones ahead. Prepare the dough, shape it, and freeze the scones before baking. Wrap them tightly in plastic wrap. When you are ready to bake, just add a few extra minutes to the baking time. This keeps them fresh and easy to bake later. If you don't have pumpkin puree, you can use sweet potato puree or butternut squash puree. Both options work well and give a similar taste and texture. Just ensure they are smooth, like pumpkin puree, for the best results. The scones are done when they turn golden brown at the edges. Insert a toothpick into the center. If it comes out clean, they are ready. You can also gently press the tops; they should feel firm, not soft. Yes, these scones freeze well. After baking, let them cool completely. Place them in an airtight container or a freezer bag. They can last up to three months. To enjoy, simply thaw at room temperature and warm in the oven. Absolutely! You can add nuts like walnuts or pecans for crunch. Dried fruits such as cranberries or raisins also add a nice flavor. Just fold them in gently with the chocolate chips to keep the dough light. These scones are easy to make and full of flavor. We covered the ingredients, step-by-step instructions, and helpful tips. Remember to use cold butter for the best texture. Feel free to try different flavors and substitutes to fit your taste. These scones are great for sharing or enjoying at home. I hope you find joy in baking these delicious treats!

Pumpkin Chocolate Chip Scones Flaky and Delicious Treat

Warm, flaky, and packed with flavor, Pumpkin Chocolate Chip Scones are a fall favorite! You’ll love how easy they are

These cookies have a mix of classic and tasty ingredients. Here’s what you need: - 1 cup unsalted butter, softened - 1 cup granulated sugar - 1 cup packed brown sugar - 2 large eggs - 1 teaspoon vanilla extract - 3 cups all-purpose flour - 1 teaspoon baking soda - 1 teaspoon baking powder - 1/2 teaspoon salt - 2 teaspoons ground cinnamon - 1 1/2 cups fresh apples, peeled and diced (about 2 medium apples) - 1 cup caramel sauce, warmed for drizzling - Additional cinnamon sugar (1/4 cup granulated sugar mixed with 1 teaspoon ground cinnamon) You can add some fun twists to your cookies. Here are some ideas: - Chopped nuts like pecans or walnuts for crunch - Dried fruit like cranberries or raisins for sweetness - A pinch of nutmeg for a warm spice note Gather your tools before you start baking. You will need: - Two baking sheets - Parchment paper for lining - Large mixing bowl - Electric mixer for creaming - Medium bowl for mixing dry ingredients - Spatula for folding - Cookie scoop or tablespoon for portioning dough - Measuring cups and spoons for accuracy - Cooling rack for letting cookies cool down Preheat your oven to 350°F (175°C). While it warms, grab two baking sheets. Line them with parchment paper. This helps the cookies not stick. In a large bowl, add 1 cup of softened butter, 1 cup of granulated sugar, and 1 cup of packed brown sugar. Use an electric mixer on medium speed. Beat for 2-3 minutes until it’s light and fluffy. Add 2 large eggs one at a time. Mix well after each egg. Next, pour in 1 teaspoon of vanilla extract. Continue mixing until it is all combined. In a separate bowl, whisk together 3 cups of all-purpose flour, 1 teaspoon of baking soda, 1 teaspoon of baking powder, 1/2 teaspoon of salt, and 2 teaspoons of ground cinnamon. This step ensures even flavor and rise. Slowly add the dry mix to the wet mix. Use a spatula or low mixer speed. Combine until you no longer see dry flour. Be careful, as overmixing can make the cookies tough. Now, fold in 1 1/2 cups of diced apples. Make sure they are evenly spread in the dough. Avoid breaking the apple pieces. Use a cookie scoop or tablespoon to drop rounded dough balls onto the sheets. Leave about 2 inches apart for spreading. Before baking, sprinkle each dough ball with cinnamon sugar. To make this, mix 1/4 cup of granulated sugar with 1 teaspoon of ground cinnamon. This adds a tasty crunch. Bake the cookies for 10-12 minutes. They should be lightly golden at the edges and set in the center. Check them regularly so they don't overbake. Once the cookies cool on the sheet for a few minutes, transfer them to a wire rack. After they cool completely, warm 1 cup of caramel sauce. Drizzle it generously over the cookies for a sweet finish. To get the best cookie texture, follow these steps: - Use room temperature butter. This helps the butter mix well with sugars. - Don’t overmix the dough. Mix until you see no dry flour. - Chill the dough for 30 minutes. This helps cookies hold their shape. These tips keep your cookies soft and chewy on the inside, with nice edges. Avoid these common mistakes to make great cookies: - Skipping the parchment paper can lead to sticky cookies. - Not measuring ingredients can change the dough. Use a scale or measuring cups. - Overbaking can make cookies hard. Watch them closely in the oven. Each mistake can change the final taste and texture of your cookies. To make your cookies even better, add spices: - Ground cinnamon adds warmth and sweetness. - A pinch of nutmeg can give a cozy flavor. - Try adding a bit of ginger for a kick. These spices can take your caramel apple pie cookies to the next level! {{image_4}} You can add nuts or dried fruits to your cookies for extra flavor and texture. Try chopped pecans or walnuts for a nutty crunch. You can also use dried cranberries or raisins for a sweet twist. Mix in about 1/2 cup of your choice with the diced apples. This will enhance each bite and make your cookies even more delightful. To make gluten-free cookies, swap all-purpose flour for a gluten-free blend. Ensure the blend has xanthan gum for the best results. For a vegan version, use plant-based butter and replace eggs with flax eggs. To make a flax egg, mix 1 tablespoon of ground flaxseed with 2.5 tablespoons of water. Let it sit for a few minutes before adding it to your mix. These swaps keep the flavor while meeting dietary needs. You can adjust your caramel apple pie cookies for various holidays. In fall, add pumpkin spice to capture the season’s essence. For winter, include a hint of peppermint extract. Around the holidays, mix in chopped candied ginger for a festive touch. These seasonal tweaks will keep your cookies fresh and exciting throughout the year. Each variation brings a new twist to the classic flavor of caramel apple pie. To keep your caramel apple pie cookies fresh, store them in an airtight container. Place parchment paper between layers to avoid sticking. This helps keep the cookies soft and chewy. It also prevents them from absorbing moisture, which can make them soggy. When stored properly, these cookies can last up to one week at room temperature. If you want them to last longer, consider refrigerating them. In the fridge, they can stay fresh for about two weeks. Just remember to let them come to room temperature before enjoying. You can freeze these cookies for up to three months. To freeze, place them in a single layer on a baking sheet. Once frozen, transfer them to a freezer-safe bag. To thaw, simply leave them at room temperature for a few hours. For a warm treat, pop them in the microwave for a few seconds. Enjoy those delicious bites anytime! Yes, store-bought caramel sauce works great! It saves time and still tastes good. Just warm it slightly before drizzling. You can find it in any grocery store. For baking, I love using Granny Smith or Honeycrisp apples. They add a nice tartness and hold their shape well. Avoid soft apples like Red Delicious, as they turn mushy. To make your cookies softer, add a bit more brown sugar. Brown sugar keeps cookies moist. You can also try baking them for a shorter time. Keep an eye on them! Yes, you can substitute unsalted butter with coconut oil. You can also use gluten-free flour if needed. Just keep in mind that this may change the texture a bit. Absolutely! You can make the dough and store it in the fridge for up to three days. Just let it sit at room temperature for a bit before baking. Look for lightly golden edges and set centers. They might seem soft, but they will firm up as they cool. If they look dry, they may be overbaked. In this post, we explored how to make caramel apple pie cookies. We covered essential ingredients, tools, and step-by-step instructions for baking. I shared tips for perfect texture and common mistakes to watch for. You can also try fun variations and find smart storage tips to keep your cookies fresh. Baking cookies can be fun and tasty. With practice, you’ll make delicious treats everyone loves. Happy baking!

Caramel Apple Pie Cookies Irresistible and Tasty Treat

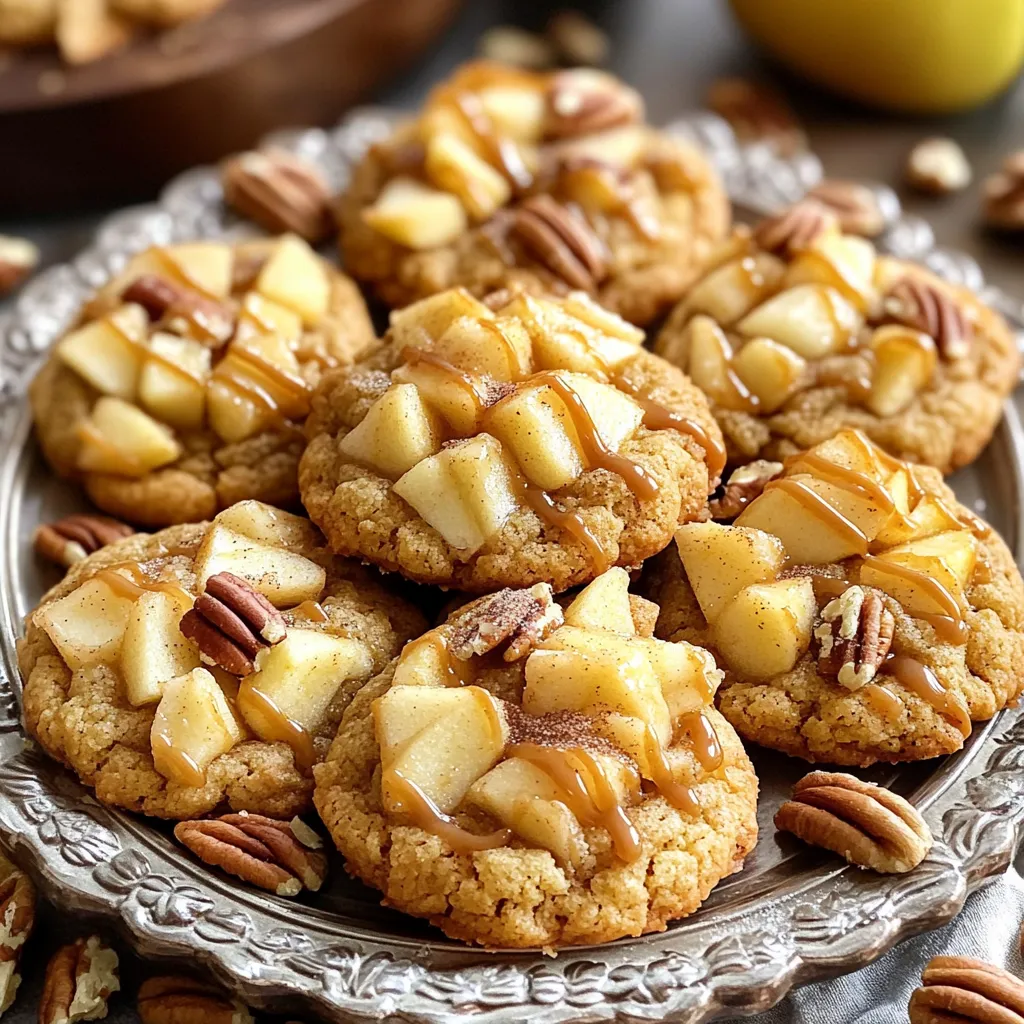
If you love the sweet and cozy taste of fall, you’ll adore my Caramel Apple Pie Cookies. These delightful treats

To make One-Pot Creamy Tomato Basil Tortellini, gather these items: - 2 tablespoons extra virgin olive oil - 3 cloves garlic, finely minced - 1 can (14 oz) diced tomatoes, with juices included - 4 cups vegetable broth (low sodium preferred) - 1 package (9 oz) refrigerated cheese tortellini - 1 cup heavy cream - 1 cup fresh basil leaves, loosely packed and roughly chopped - 1 teaspoon Italian seasoning blend - Salt and pepper to taste - Freshly grated Parmesan cheese, for serving You can swap some ingredients for others if needed: - Use canola oil instead of olive oil for a neutral flavor. - If you lack fresh garlic, use garlic powder (1/4 teaspoon for each clove). - Swap heavy cream with half-and-half for a lighter sauce. - Use chicken broth instead of vegetable broth for added flavor. - If you want a dairy-free option, use coconut cream or a plant-based cream. Fresh ingredients bring bright flavors and vibrant colors. Use fresh basil for its sweet, peppery taste. Fresh garlic adds a punch that canned versions lack. Canned ingredients, like diced tomatoes, are convenient and still flavorful. They last longer and save time. Always choose no-salt-added varieties for better control over seasoning. Balancing fresh and canned ingredients helps you create a tasty dish without much fuss. To make this dish, start by heating 2 tablespoons of extra virgin olive oil in a large pot over medium heat. Once the oil is hot, add 3 finely minced garlic cloves. Sauté the garlic for 1-2 minutes. It should smell great and turn golden. Be careful not to burn it. Next, pour in 1 can of diced tomatoes and 4 cups of vegetable broth. Stir everything well with a wooden spoon. Bring the mixture to a gentle simmer. Now, add 1 package of refrigerated cheese tortellini. Cook it for about 5-7 minutes. Stir it occasionally to stop it from sticking. When the tortellini are tender and cooked through, lower the heat. Gradually stir in 1 cup of heavy cream. Then, add 1 cup of roughly chopped fresh basil and 1 teaspoon of Italian seasoning. Mix until the sauce is creamy and warm. Taste the dish and add salt and pepper as you like. If the sauce is too thick, add a splash of broth or water. Serve it hot, topped with freshly grated Parmesan cheese and some extra basil leaves for color. To make your tortellini perfect, always check the package instructions. Different brands may have varying cooking times. Stir the tortellini gently while it cooks to prevent them from sticking together. If you have a big pot, it helps to keep them from clumping. Using fresh ingredients, like basil and tomatoes, improves flavor. Fresh basil adds a bright taste that dried herbs can't match. For creaminess, don’t rush when stirring in the heavy cream. It should blend in slowly to make the sauce smooth. Cooking times can change based on your stove and pot. If you use a larger pot, the water may heat faster. This can shorten cooking time for your tortellini. On the other hand, a smaller pot might take longer. If you use a slow cooker, the dish will need more time. You can set it for 2-3 hours on low. Just add the cream and basil near the end. This keeps the flavors fresh. Always check for doneness before serving, no matter the method. To make your creamy tomato basil tortellini shine, try a few simple tricks. Start with fresh garlic for a bold taste. A splash of balsamic vinegar can add depth. For a kick, sprinkle in some red pepper flakes. Fresh basil is key, so don’t skimp on it. You can also use fresh Parmesan cheese for a richer flavor. Remember, good seasoning makes all the difference. Taste and adjust salt and pepper as needed. Many people rush the garlic step. If garlic burns, it turns bitter. Always keep an eye on it while it cooks. Another mistake is not stirring the tortellini. This can lead to sticking. Don’t forget to taste your dish before serving. Adjust the seasoning to your liking. If your sauce is too thick, add more broth. Lastly, avoid overcooking the tortellini. They should be tender but not mushy. For a full, satisfying meal, pair this dish with a salad. A simple green salad adds freshness. You can also serve it with crusty bread. This is perfect for soaking up the creamy sauce. For a festive touch, add some roasted vegetables on the side. They balance the richness of the tortellini. Finally, consider a light dessert. A fruit sorbet can cleanse the palate after your meal. Enjoy your delicious creation! {{image_4}} You can easily make this dish vegetarian. Just use vegetable broth and skip the cheese. For a vegan version, swap heavy cream with coconut cream or cashew cream. This keeps the dish rich and creamy while adding a unique flavor. You can also add more veggies, like spinach or mushrooms, for extra nutrition. Want to boost the protein? Try adding cooked chicken, shrimp, or sausage. These options blend well with the creamy sauce. Make sure to cook the protein separately first. Then, stir it in just before serving. This will add heartiness to your meal. If you like spice, you can add red pepper flakes when cooking. Start with a pinch, then taste as you go. You can also mix in some diced jalapeños for a fresh kick. These spicy additions will balance the creamy sauce and bring warmth to each bite. To keep your creamy tomato basil tortellini fresh, store it in a sealed container. Let the dish cool before sealing. This helps prevent moisture build-up. Refrigerate your leftovers within two hours of cooking. Proper storage can keep your dish tasty for up to three days. When ready to enjoy your leftovers, reheat gently. Place your tortellini in a pot over low heat. Add a splash of broth or cream to prevent sticking. Stir often until warmed through. You can also use the microwave. Heat in short bursts, stirring in between to ensure even heating. Freezing creamy dishes can be tricky. The texture may change once thawed. If you wish to freeze your tortellini, do so before adding cream. Store it in an airtight container. It can last up to three months in the freezer. When ready to use, thaw in the fridge overnight and add cream when reheating. Yes, you can use frozen tortellini. Just add it directly to the pot. Cook it a bit longer than fresh tortellini. Typically, frozen tortellini takes about 8-10 minutes to cook. This option is great when you want a quick meal. You can serve this dish with many sides. Here are a few ideas: - A simple green salad - Crusty artisanal bread for dipping - Garlic bread to complement the flavors - Steamed vegetables for a healthy touch These sides add variety and make your meal more satisfying. The creamy tomato basil tortellini lasts about 3-5 days in the fridge. Store it in an airtight container to keep it fresh. Reheat it gently on the stove or in the microwave. If the sauce has thickened, add a splash of broth or water to loosen it up. This post covers ingredients, steps, tips, variations, and storage for creamy tomato basil tortellini. You learned the best ingredients and substitutes, plus cooking tips for great taste. Avoiding common mistakes can enhance your meal. You can explore fun variations, like vegan options or adding heat. Finally, proper storage makes leftovers tasty and safe. Enjoy your cooking adventure and make this dish your own!

One-Pot Creamy Tomato Basil Tortellini Delight

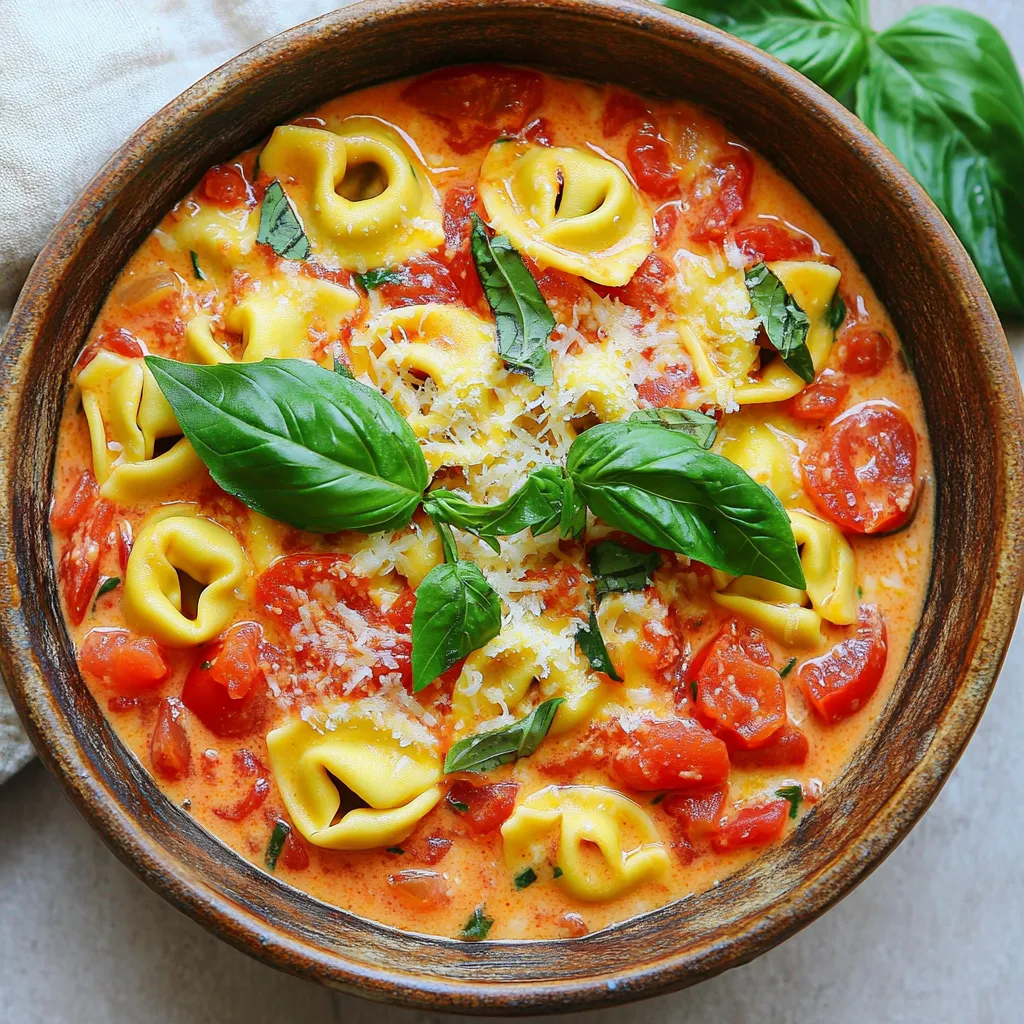
Craving a quick and tasty meal? Look no further! My One-Pot Creamy Tomato Basil Tortellini is perfect for busy nights.

For these Sheet-Pan Greek Chicken Gyro Bowls, you will need: - 1.5 lbs boneless, skinless chicken breast, sliced into strips - 1 red bell pepper, sliced into strips - 1 yellow bell pepper, sliced into strips - 1 medium red onion, sliced into wedges - 1 cucumber, diced into bite-sized pieces - 1 cup cherry tomatoes, halved - 1 cup cooked quinoa or brown rice - 1/2 cup feta cheese, crumbled - 1/4 cup Kalamata olives, pitted and sliced - Fresh parsley, chopped (for garnish) These fresh ingredients bring a nice crunch and balance to the dish. The marinade is key to flavor. You'll need: - 2 tablespoons extra virgin olive oil - 2 teaspoons dried oregano - 2 teaspoons garlic powder - 1 teaspoon smoked paprika - Salt and freshly ground black pepper, to taste This mix gives the chicken a tasty, Mediterranean flair. The olive oil keeps everything moist while the spices add depth. To make your bowls even better, consider these toppings: - Tzatziki sauce (for serving) Tzatziki brings a creamy, cool element that pairs well with the warm chicken and veggies. It's a must for a true gyro feel! Feel free to customize your bowls with any other toppings you love. Enjoy making and sharing this delicious meal! Start by preheating your oven to 425°F (220°C). Then, grab a large mixing bowl. In this bowl, whisk together 2 tablespoons of olive oil, 2 teaspoons of dried oregano, 2 teaspoons of garlic powder, and 1 teaspoon of smoked paprika. Add salt and pepper to taste. This mixture makes a tasty marinade. Slice 1.5 pounds of boneless, skinless chicken breast into strips. Toss the chicken strips in the marinade until they are well coated. Let the chicken sit for a few minutes so it absorbs the flavors. Next, line a large baking sheet with parchment paper. This makes cleanup easy. Spread the marinated chicken on one side of the sheet in a single layer. On the other side, place sliced red and yellow bell peppers and red onion. Make sure the veggies are in a single layer too. This helps them roast evenly. Bake for about 20-25 minutes. Check that the chicken is cooked through and the veggies are tender. Don’t forget to flip the chicken and stir the veggies halfway through roasting. When everything is done roasting, take the baking sheet out of the oven. Let it cool for a few minutes. Now, it’s time to build your gyro bowls! Start with a base of cooked quinoa or brown rice. On top of that, layer the roasted chicken and veggies. Add diced cucumbers and halved cherry tomatoes for extra crunch. Crumble some feta cheese and sprinkle sliced Kalamata olives on top. Finish with fresh parsley and a drizzle of tzatziki sauce. Your bowl is now ready to enjoy! Marinating chicken makes it tender and full of flavor. Use extra virgin olive oil, dried oregano, garlic powder, and smoked paprika. These give your chicken a great taste. - Combine the marinade in a bowl. - Add the chicken strips and coat them well. - Let it sit for at least 30 minutes. For best results, marinate overnight in the fridge. The longer it sits, the better it tastes. Just remember to keep it covered to stay fresh. Roasting vegetables brings out their natural sweetness. To get the best results, cut your veggies into uniform sizes. This helps them cook evenly. - Use red and yellow bell peppers along with red onion. - Toss them in some olive oil, salt, and pepper before roasting. - Spread them out on the baking sheet. Avoid crowding to ensure they roast rather than steam. Roast them alongside the chicken for about 20-25 minutes. Stir them halfway through to ensure even cooking. These bowls are fun and versatile. Start with a base of cooked quinoa or brown rice. This adds a nutty flavor and makes it filling. - Top your base with the roasted chicken and veggies. - Add fresh cucumber, cherry tomatoes, and crumbled feta cheese for a burst of flavor. - Don’t forget the Kalamata olives for a salty kick. - Finish with a drizzle of tzatziki sauce and a sprinkle of fresh parsley. This meal is great for lunch or dinner. Enjoy it warm or cold, and share it with family or friends! {{image_4}} You can easily make this dish vegetarian or vegan. Swap the chicken for chickpeas or tofu. Both provide protein and soak up flavor well. For a vegan twist, use a plant-based tzatziki made from coconut yogurt. Add more veggies like zucchini or spinach to keep it fresh and colorful. Quinoa and brown rice are great, but you can choose other grains. Try farro for a nutty flavor or barley for a chewy texture. You can also use cauliflower rice for a low-carb option. Each grain brings its own taste and texture, making your bowl unique. If you want to change the protein, go for shrimp or salmon. Both cook quickly and add a seafood flair. If you’re feeling adventurous, try lamb or beef for a rich, hearty dish. The spices in the marinade work well with any protein choice, keeping your meal flavorful. To keep your Sheet-Pan Greek Chicken Gyro Bowls fresh, store leftovers in an airtight container. This helps maintain flavor and moisture. Place the bowls in the fridge within two hours of cooking. They will stay good for up to three days. If you have extra tzatziki sauce, store it separately to prevent sogginess. When you’re ready to enjoy leftovers, reheating is easy. Preheat your oven to 350°F (175°C). Place the bowls in an oven-safe dish and cover with foil. Heat for about 15-20 minutes. This method keeps the chicken juicy and the veggies tender. You can also use a microwave. Heat for 1-2 minutes or until hot, stirring halfway through. Freezing is a great option if you want to save some for later. Pack the chicken and veggies in freezer-safe bags or containers. Make sure to remove as much air as possible. You can freeze the bowls for up to three months. To reheat, thaw in the fridge overnight, then follow the reheating instructions above. Enjoy your tasty meal anytime! Yes, you can use chicken thighs. Thighs stay juicy and tender. They have more flavor than breasts. Just cut them into strips like the breasts. You may need to adjust the cooking time. Thighs might take a bit longer to cook through. Always make sure the chicken is fully cooked. You can use many grains if you don’t have quinoa or brown rice. Try couscous, farro, or even barley. For a low-carb option, use riced cauliflower or zucchini noodles. These options add great texture and flavor. Each grain or veggie brings a unique twist to your bowl. The marinaded chicken lasts about 2 days in the fridge. Keep it in an airtight container. This helps maintain flavor and freshness. If you need to store it longer, freeze it. Frozen chicken can last for several months. Just make sure to thaw it in the fridge before cooking. This post covered how to make delicious gyro bowls, from key ingredients to serving. We explored main ingredients, marinade tips, and tasty toppings. I shared step-by-step instructions for marinating chicken, roasting veggies, and assembling bowls. We also discussed variations and storage methods for leftovers. With these easy steps and tips, you can create a healthy meal your family will love. Enjoy your cooking adventure!

Sheet-Pan Greek Chicken Gyro Bowls Fresh and Tasty

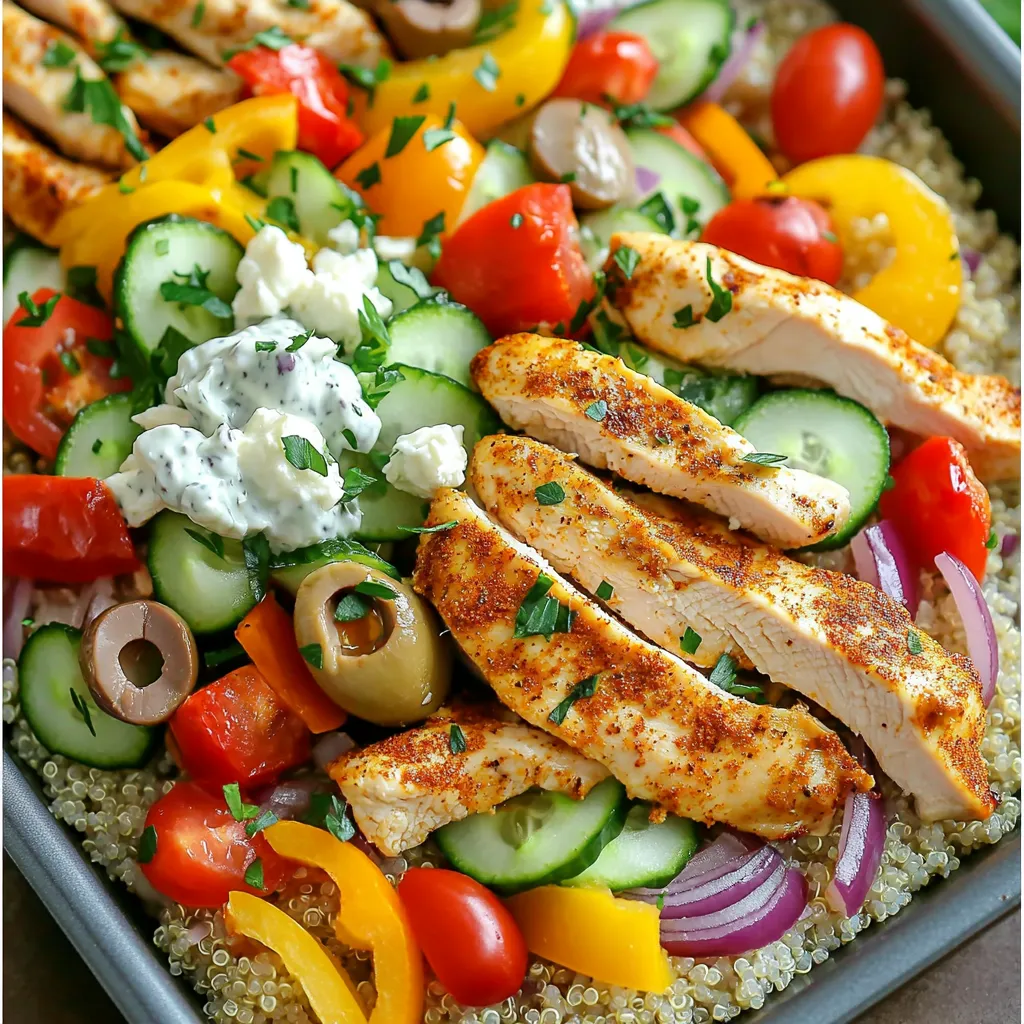
Who doesn’t love a meal that’s fresh, tasty, and easy to make? Welcome to my guide on Sheet-Pan Greek Chicken

To make Air Fryer Crispy Coconut Shrimp, you need a few simple ingredients. Here’s what you will need: - 1 lb large shrimp, peeled and deveined - 1 cup shredded coconut - 1 cup panko breadcrumbs - 2 large eggs, beaten - 1/2 cup all-purpose flour - 1 tsp garlic powder - 1 tsp paprika - Salt and pepper, to taste - Cooking spray These ingredients work together to create a crunchy, flavorful shrimp dish. I recommend choosing sweetened coconut for a sweeter taste or unsweetened for a more natural flavor. The panko breadcrumbs add a nice crunch that makes this dish extra special. The garlic powder and paprika spice things up, giving your shrimp a great depth of flavor. Gather these ingredients before you start cooking. It makes the process easier and faster. Trust me, having everything ready helps you enjoy the cooking experience. - Start by patting the shrimp dry with paper towels. This step is key. Dry shrimp help the coating stick well. If you skip this, the coating may fall off. - Now, set up your breading station. You will need three bowls. In the first bowl, mix flour, salt, pepper, garlic powder, and paprika. In a second bowl, beat the eggs until smooth. In the last bowl, combine shredded coconut and panko breadcrumbs. - Take a shrimp and coat it in the flour mixture. Shake off the excess flour. This helps avoid clumps on the shrimp. - Next, dip the floured shrimp into the beaten eggs. Make sure it is fully coated. This step helps the next layer stick. - Now, roll the shrimp in the coconut and panko mix. Press gently to make sure the coating sticks to each shrimp nicely. - Preheat your air fryer to 400°F (200°C). This takes about 5 minutes. Preheating helps cook the shrimp evenly. - Lightly spray the air fryer basket with cooking spray. This prevents sticking and helps with crispiness. - Arrange the coated shrimp in a single layer in the basket. Don’t overcrowd it. If needed, cook in batches for even cooking. - Give the tops of the shrimp a light spray of cooking spray. This is key for that golden crispiness we want. - Air fry for 8-10 minutes. Flip the shrimp halfway through to ensure they cook evenly. Look for a golden brown color. - Once cooked, carefully remove the shrimp from the air fryer. Repeat the breading and frying process for any remaining shrimp. To get that perfect crunchy texture, start by patting the shrimp dry. This step is key. It removes extra moisture. When the shrimp are dry, the coating sticks better. Next, use cooking spray wisely. A light mist on the shrimp makes them golden and crispy. Sometimes the coating clumps. To avoid this, shake off excess flour after coating each shrimp. This helps keep the layers smooth. For batch cooking, do not overcrowd the air fryer. Cook in small groups. This way, every shrimp gets even heat. For dipping sauces, sweet chili sauce works great. It adds a nice balance to the shrimp's flavors. You can also try fresh mango salsa for a fruity twist. For a lovely presentation, garnish with lime wedges. Adding bright cilantro on top makes the dish pop! {{image_4}} You can switch up the coating for your coconut shrimp. Instead of shredded coconut, you can use larger coconut flakes. This gives a different texture and bite. You can also use crushed cornflakes or even almond flour to mix things up. Each option adds a unique crunch and flavor. Want to kick up the flavor? Try adding spices to your flour mix. A pinch of cayenne pepper gives a nice heat. You can also add cumin for a warm, earthy taste. Mixing in fresh herbs, like cilantro or parsley, into the breading makes it fresh and bright. This gives your shrimp an extra layer of flavor. To create a full meal, think about your sides. Serve the shrimp with a fresh salad or rice for balance. Grilled vegetables work well too. As for dipping sauces, sweet chili sauce is a classic choice. You could also try a creamy mango dip or a zesty lime sauce. Each one enhances the shrimp's delicious taste. After you enjoy your crispy coconut shrimp, you might have some leftovers. To keep them fresh, let them cool down to room temperature first. Then, place them in an airtight container. This helps keep the shrimp from drying out. You can store them in the fridge for up to two days. If you want to eat them later, freezing is a great option. Reheating shrimp can be tricky. You want to keep them crispy. The best way is to use the air fryer again. Preheat your air fryer to 350°F (175°C). Put the shrimp in the basket and heat for about 5 minutes. Check them to make sure they are hot and crispy. You can also use an oven for reheating, but the air fryer works best. If you want to freeze shrimp, do it right after cooking. Let them cool completely. Then, place them in a single layer on a baking sheet. Freeze them for about an hour. After that, you can move them to a freezer bag. This keeps them from sticking together. You can freeze cooked shrimp for up to three months. If you freeze uncooked shrimp, they can last even longer, up to six months. Yes, you can use frozen shrimp. Just make sure to thaw them first. Place the shrimp in cold water for about 10-15 minutes. Pat them dry before breading. This step is key for a crispy finish. Cook the shrimp for 8-10 minutes. Flip them halfway through cooking. This ensures even browning and crispiness. Keep an eye on them. They should turn golden brown when done. If your shrimp aren't crispy, check a few things. First, make sure you pat the shrimp dry. Excess moisture can hurt crispiness. Also, ensure you use enough cooking spray. Spraying the tops helps create that crunchy layer. Yes, sweetened coconut can add a nice twist. It will make the shrimp taste sweeter. This option works well if you want a fun dessert-like flavor. Adjust the seasonings in your flour mix if needed. This blog post detailed how to make delicious air-fried coconut shrimp. We covered the key ingredients, including shrimp, coconut, and panko. I explained each step, from preparing the shrimp to breading and air frying them. Tips for achieving the perfect crispness and troubleshooting common issues were also shared. In conclusion, this recipe is simple and fun. You can enjoy a tasty meal in no time. Don't hesitate to try different flavors or serve it with your favorite sauces. Your culinary adventures start here!

Air Fryer Crispy Coconut Shrimp Tasty and Simple Meal

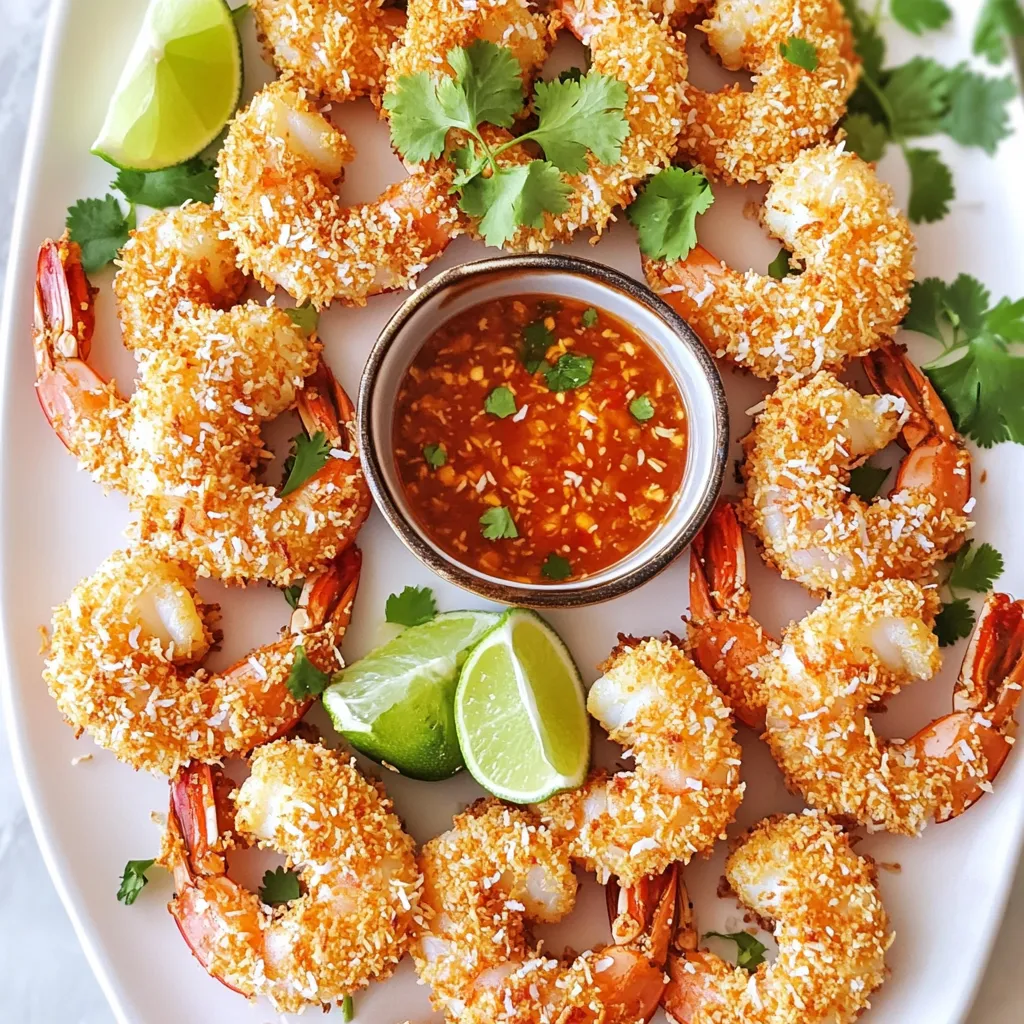
If you’re craving a tasty and simple meal, Air Fryer Crispy Coconut Shrimp is your answer! This quick recipe turns

For this dish, you need 4 salmon fillets. Each fillet should weigh about 6 ounces. Fresh salmon works best, as it gives a nice texture and flavor. If you want, you can also use frozen fillets. Just make sure to thaw them before cooking. The marinade is what makes this dish special. Here’s what you need: - ¼ cup honey - 2 tablespoons Sriracha sauce - 2 tablespoons soy sauce - 1 tablespoon fresh ginger, grated - 2 cloves garlic, minced - 1 tablespoon sesame oil - 1 tablespoon rice vinegar - Salt and pepper to taste Mixing these ingredients creates a sweet and spicy glaze. The honey adds sweetness, while the Sriracha gives it a nice kick. The ginger and garlic add depth to the flavor. Garnishes make your dish look great! For this recipe, you need: - 2 green onions, thinly sliced - Sesame seeds The green onions add a fresh crunch. The sesame seeds give a nutty flavor and a pop of color. These small touches make your meal not just tasty but also beautiful! First, preheat your oven to 400°F (200°C). This step is key for even cooking. Next, line a baking sheet with parchment paper. This will make cleanup easy later. In a medium mixing bowl, combine the following ingredients: - ¼ cup honey - 2 tablespoons Sriracha sauce - 2 tablespoons soy sauce - 1 tablespoon fresh ginger, grated - 2 cloves garlic, minced - 1 tablespoon sesame oil - 1 tablespoon rice vinegar Whisk these items together until smooth. This glaze adds sweet and spicy flavor to the salmon. Season both sides of the salmon fillets with salt and pepper. Place them skin-side down on the lined baking sheet. Use a basting brush to apply a thick layer of the honey Sriracha glaze on each fillet. Save some glaze for basting later. Bake the salmon in the oven for 12-15 minutes. It’s done when it flakes easily with a fork. Halfway through baking, baste the salmon with the reserved glaze for extra flavor. After baking, let the salmon rest for a few minutes. This keeps it juicy. Before you serve, add sliced green onions and a sprinkle of sesame seeds on top. This adds a nice touch to your dish. Enjoy your meal! To get the best glaze, mix your sauce well in a bowl. Use honey, Sriracha, and soy sauce for a sweet and spicy flavor. Whisk until smooth. This mix should coat the salmon nicely. Apply it with a basting brush for even coverage. Baste halfway through baking for a stronger taste. Cook salmon at 400°F (200°C) for 12-15 minutes. The fish is done when it flakes easily with a fork. Use a food thermometer to check. The ideal internal temperature is 145°F (63°C). If you don’t have one, look for a slight opacity in the center. This shows it’s cooked just right. Make your dish pop with color and texture. Serve the salmon on a bed of fluffy jasmine rice. Add steamed veggies for a bright look. Garnish with green onions and sesame seeds for style. Drizzle a bit of glaze on top before serving. This gives it a shiny, attractive finish. {{image_4}} You can change the flavors in this dish by swapping some ingredients. For a sweeter taste, try using maple syrup instead of honey. If you like heat, add more Sriracha or use chili paste. For a tangy twist, use lime juice instead of rice vinegar. If you want to try a different protein, you can use chicken or tofu. These changes keep the dish fresh and fun! You can cook honey Sriracha glazed salmon in different ways. Baking is simple and gives a nice, even cook. Just follow the oven steps in the recipe. Grilling adds a smoky flavor. To grill, preheat your grill and oil the grates. Cook the salmon for about 4-5 minutes on each side. This method also gives you lovely grill marks! When it comes to serving, think about color and texture. Plating the salmon over jasmine rice looks great and helps soak up the glaze. You can also serve it on a bed of steamed veggies, like broccoli or green beans, for a healthy choice. For an extra touch, drizzle more honey Sriracha glaze on top. It adds flavor and looks beautiful! After enjoying your Honey Sriracha Glazed Salmon, store leftovers in an airtight container. Keep the salmon in the fridge for up to three days. Make sure it cools to room temperature before sealing. This keeps the fish fresh and tasty for your next meal. To reheat, place the salmon on a baking sheet. Preheat your oven to 350°F (175°C). Heat for about 10 minutes or until warm. This keeps the fish moist and preserves the glaze. You can also use the microwave, but be careful not to overcook it. Heat in short bursts to avoid drying it out. You can freeze the salmon if you want to save it longer. Wrap each fillet tightly in plastic wrap, then place them in a freezer bag. Remove as much air as you can. This helps prevent freezer burn. You can keep the salmon in the freezer for up to three months. When ready to eat, thaw it in the fridge overnight before reheating. Yes, you can use other fish. Options include trout, tilapia, or cod. These fish have a mild taste that works well with the glaze. They cook at similar times as salmon. Just check the cooking times for each fish. Keep the glaze the same for best flavor. Salmon is ready when it flakes easily with a fork. You can also check the inside color. It should be a light pink. Use a food thermometer for more accuracy. The internal temperature should reach 145°F (63°C). If you see opaque flesh, it is done. Many side dishes go well with this salmon. Here are a few ideas: - Steamed jasmine rice - Quinoa salad - Roasted vegetables - Stir-fried bok choy - Cucumber salad These sides balance the flavors of the dish. They also add color to your plate. Enjoy mixing and matching! This blog post shared easy steps to make Honey Sriracha Glazed Salmon. We discussed the best ingredients, from salmon fillets to marinade flavors. You learned how to prepare and bake the salmon to perfection. Using tips and tricks can help you achieve the ideal glaze and presentation. Exploring variations lets you change flavors and cooking methods. Finally, proper storage and reheating keep your leftovers tasty. Enjoy a delicious meal that is both simple and satisfying. You’re now ready to impress with your cooking skills!

Honey Sriracha Glazed Salmon Flavorful and Easy Meal

Are you looking for a simple and tasty dinner? Honey Sriracha Glazed Salmon is the answer! This recipe combines sweet

- 1 block firm tofu, pressed and cubed - 2 tablespoons cornstarch - 3 tablespoons soy sauce - 1 tablespoon sesame oil - 1 cup quinoa, rinsed and cooked - 1 cup broccoli florets - 1 cup shredded carrots - 1 bell pepper, sliced into thin strips - 1 ripe avocado, sliced - 2 tablespoons sesame seeds - Fresh cilantro leaves for garnish - Salt and pepper to taste - Optional: 1 teaspoon chili flakes for an extra kick Crispy tofu Buddha bowls are not just tasty; they are also packed with nutrients. Tofu gives you protein and healthy fats. Quinoa is a great source of fiber and amino acids. The veggies add vitamins and minerals. Avocado brings in healthy fats too. This meal can keep you full and satisfied. If you want to switch things up, consider these options: - Swap tofu for tempeh for a nuttier taste. - Use brown rice or farro instead of quinoa for a different grain. - Choose your favorite veggies. Zucchini or spinach work well too. - For a kick, use sriracha instead of chili flakes. These changes help tailor the bowl to your taste and pantry. Start by preheating your oven to 425°F (220°C). This step is key for crispy tofu! Take the block of firm tofu and press it to remove excess water. Once pressed, cut the tofu into cubes. In a large bowl, mix the cubed tofu with soy sauce. Make sure every piece is coated well. Then, sprinkle 2 tablespoons of cornstarch over the tofu. Gently toss until all cubes have a light dusting. This cornstarch will help create that crispy crust! Line a baking sheet with parchment paper. This makes cleanup a breeze! Spread the tofu cubes out in a single layer. Drizzle 1 tablespoon of sesame oil over them. This adds great flavor and helps with crispiness. Bake the tofu for about 25-30 minutes. Be sure to turn the cubes halfway through for even browning. You want them golden brown and deliciously crispy. While the tofu bakes, rinse 1 cup of quinoa under cold water. This removes any bitterness. In a medium saucepan, bring 2 cups of water to a boil. Add the rinsed quinoa, then reduce the heat to low. Cover and let it simmer for about 15 minutes, or until all the water is absorbed. Fluff the quinoa with a fork when done, and set it aside to cool a bit. Grab a steamer basket or a microwave-safe bowl. Place 1 cup of broccoli florets into the steamer. Steam for 5-7 minutes until bright green and tender-crisp. If you prefer, you can sauté the broccoli with 1 cup of shredded carrots and 1 sliced bell pepper. Use a little olive oil and cook for about 3-4 minutes until they are just tender. Take a large bowl or plate and add a big scoop of quinoa at the bottom. It's the perfect base! Next, artfully arrange your crispy tofu, steamed broccoli, shredded carrots, and bell pepper on top. Don’t forget the creamy avocado slices! Make it look beautiful; it’s part of the fun. To finish, sprinkle 2 tablespoons of sesame seeds over the top. Add fresh cilantro leaves for a pop of color. If you like some heat, toss in a pinch of chili flakes. Season with salt and pepper to taste. Your vibrant Buddha bowl is ready to enjoy! Serve it in colorful dishes and maybe add a lemon wedge on the side for extra zest. To get crispy tofu, start with firm tofu. Press it to remove excess water. Cutting it into cubes helps it cook evenly. Toss the cubes in soy sauce for flavor. Then sprinkle cornstarch over the tofu. This gives it a nice crunch when baked. Don’t forget to bake at 425°F for the best results. Bake until golden brown, turning halfway through. To boost flavor, use sesame oil. It adds a nutty taste and helps with crispiness. You can also try adding garlic powder or onion powder to the cornstarch mix. A pinch of chili flakes gives a spicy kick. Fresh herbs like cilantro or parsley brighten the dish. Mixing in a splash of lime juice before serving enhances the taste further. Presentation matters for a Buddha bowl. Start with a base of quinoa, making it the focal point. Arrange colorful veggies in sections for a vibrant look. Place the crispy tofu on top, and don’t forget the avocado slices. A sprinkle of sesame seeds adds a nice touch. Serving in deep, colorful bowls makes the dish pop. A lemon wedge on the side can brighten up the whole meal. {{image_4}} You can mix it up with different proteins. Tempeh is a great choice. It adds a nutty flavor and healthy benefits. Chickpeas also work well. They add protein and texture. For a meat option, try grilled chicken or shrimp. Both options pair nicely with the spices. Feel free to play with your veggies! Spinach or kale can add greens. Sweet potatoes or zucchini bring extra flavor and nutrition. You can also use snap peas for a nice crunch. The key is to use fresh, colorful veggies to keep it exciting. The sauce can change everything! A simple tahini dressing adds creaminess. You can mix lemon juice, tahini, and water for a drizzle. A peanut sauce also adds a great taste. For a spicy kick, try sriracha mixed with soy sauce. Experiment with your favorites to find the perfect match! To store leftovers, place the Buddha bowl in an airtight container. Keep it in the fridge for up to three days. Make sure to separate the tofu and veggies if you want to keep them extra crispy. This helps prevent sogginess. To reheat, warm the tofu in an oven at 350°F (175°C) for about 10 minutes. This will revive the crispiness. You can also use a microwave, but the texture may change. If using a microwave, heat in short bursts, checking often. You can freeze the tofu separately if you want to store it longer. Place it in a freezer-safe bag. Squeeze out as much air as possible. Use within three months for the best quality. The veggies and quinoa don’t freeze well, so it's best to enjoy them fresh. Yes, this recipe is vegan as it uses tofu, quinoa, and fresh veggies. All ingredients are plant-based. You can enjoy this dish without animal products. To get crispy tofu, start with firm tofu. Press it to remove excess water. Coat the tofu in soy sauce first, then sprinkle cornstarch. The cornstarch creates a crunchy outer layer when baked. Bake at a high temperature for the best results. You can use brown rice, farro, or barley instead of quinoa. These grains add different textures and flavors. Choose what you like or have handy. Yes, you can prep many parts ahead of time. Cook the quinoa and tofu earlier in the day. Chop the veggies and store them in the fridge. Assemble your bowl when ready to eat for the best taste. Serve your Buddha bowl with a side of lemon wedges for extra zing. You can also add a drizzle of your favorite sauce, like tahini or sriracha. Garnishing with fresh herbs like cilantro adds flavor and color. This blog post covered how to make a tasty Buddha bowl. We highlighted the key ingredients, cooking steps, and storage tips. You learned how to ensure your tofu is crispy and how to customize your meal with different veggies and sauces. Remember, this dish is flexible. You can swap ingredients and adapt it to your taste. With these tips, you can enjoy healthy meals that are both fun and satisfying. Make your next Buddha bowl unique and delicious!

Crispy Tofu Buddha Bowls Nourishing and Flavorful Dish

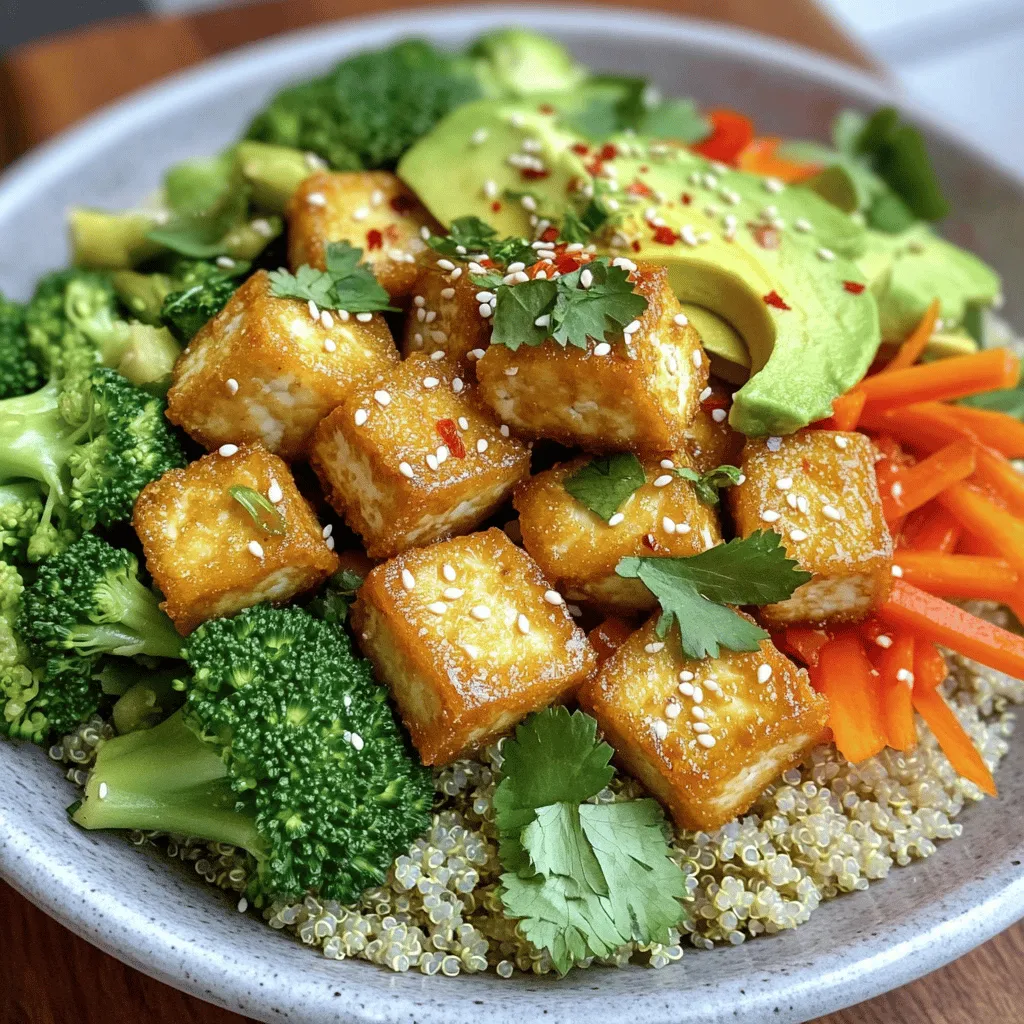
Looking for a hearty meal that’s packed with flavor and nutrition? Crispy Tofu Buddha Bowls are your answer! These bowls

To make Chocolate Peanut Butter Banana Nice Cream, you need: - 4 ripe bananas, peeled, sliced into coins, and frozen - 2 tablespoons unsweetened cocoa powder - 3 tablespoons natural peanut butter - 1 teaspoon pure vanilla extract - A pinch of sea salt These ingredients create a rich and smooth base for your nice cream. The frozen bananas give it that creamy texture, while cocoa and peanut butter add flavor. If you want to add more sweetness, consider these options: - 1 tablespoon maple syrup or honey This step is not a must, but it can make your nice cream even sweeter. Taste the mixture during blending. If it needs more sweetness, add the maple syrup or honey, then blend again briefly. To elevate your nice cream, you can add these garnishes: - Chopped roasted peanuts - Chocolate chips These toppings add crunch and extra flavor. They make your nice cream look even more appealing and fun. Sprinkle them on just before serving for a delightful finish! First, take 4 ripe bananas. Peel each one and slice them into coins. Lay the banana coins on a baking sheet lined with parchment paper. It is key to spread them in a single layer. Next, place the baking sheet in the freezer. Leave them in the freezer for at least 4 hours. This step makes sure the bananas are completely frozen. Once the bananas are frozen, it is time to blend. Put the frozen banana coins into a food processor. Add 2 tablespoons of unsweetened cocoa powder, 3 tablespoons of natural peanut butter, and 1 tablespoon of maple syrup or honey if you want extra sweetness. Don’t forget to add 1 teaspoon of pure vanilla extract and a pinch of sea salt. Secure the lid on the food processor. Blend everything until it is smooth and creamy. This should take about 2-3 minutes. Stop every now and then to scrape down the sides. Taste the nice cream. If you want it sweeter, add more maple syrup or honey. Blend again for just a few seconds to mix it well. You can serve the nice cream right away for a soft-serve feel. Just scoop it into bowls and enjoy! If you like it firmer, put the mixture into an airtight container. Freeze it for an extra hour before serving. For a fun touch, sprinkle chopped roasted peanuts and chocolate chips on top. Serve in chilled bowls to keep it cold longer. Enjoy your treat! To get that smooth and creamy nice cream, frozen bananas are key. Make sure your bananas are ripe. Ripe bananas have more sweetness and flavor. Slice them into coins before freezing. This helps them blend easier. Blend the frozen bananas for 2-3 minutes. Stop to scrape the sides to mix well. This ensures every bit gets creamy. Freeze banana slices for at least 4 hours. This gives the best texture. If you want soft-serve, serve it right after blending. For firmer nice cream, freeze it in a container for an hour. When ready to serve, let it thaw for about 5-10 minutes. This makes it easier to scoop. You can use maple syrup or honey for extra sweetness. If you want a healthier touch, try agave syrup or stevia. For a richer flavor, add a bit more cocoa powder. You can also try mixing in a scoop of protein powder. This adds nutrition without changing the taste much. {{image_4}} You can add other fruits to your nice cream for fun flavors. Berries work great. Try strawberries or blueberries for a sweet twist. You can also add mango or pineapple for a tropical taste. Just mix them in when you blend the bananas. This way, you get a fruity nice cream that’s still creamy. If you want to switch up the nut butter, you have options. Almond butter gives a nice flavor too. Cashew butter is creamy and sweet, perfect for this recipe. Sunflower seed butter is a great choice for those with nut allergies. Each option adds a unique taste to your nice cream. For chocolate lovers, add extra cocoa powder for a rich flavor. You can also mix in some chocolate chips while blending. A dash of espresso powder enhances the chocolate taste. If you love mint, add a drop of peppermint extract for a minty twist. These easy changes will keep your nice cream exciting! To keep your Chocolate Peanut Butter Banana Nice Cream fresh, freeze it right. Use an airtight container to prevent ice crystals. Before sealing, smooth the top. This helps keep the nice cream creamy and prevents freezer burn. You can also cover the top with plastic wrap before sealing. This extra step adds more protection. Your nice cream can last up to two weeks in the freezer. After that, it may lose flavor and texture. For best taste, try to enjoy it within the first week. Label your container with the date you made it. This way, you can track how long it has been stored. When you are ready to enjoy your nice cream again, take it out of the freezer. Let it sit at room temperature for about 10 to 15 minutes. This softens it enough to scoop easily. If it still feels too hard, give it a few more minutes. You want it creamy, not icy. If you want to speed things up, you can blend it again for a few seconds. This helps restore its smooth texture. Yes, you can make it without a food processor. Use a strong blender instead. It may take longer to get smooth. You can also mash the bananas by hand. Then, mix in the cocoa powder and peanut butter with a fork. This method works, but the texture will not be as creamy. Yes, this nice cream is vegan-friendly. It uses ripe bananas, cocoa powder, and natural peanut butter. Maple syrup can replace honey for sweetness. All these ingredients are plant-based. You can enjoy this treat without worrying about animal products. To make this recipe healthier, try these tips: - Use less maple syrup or skip it. The ripe bananas are sweet enough. - Add spinach or kale for extra nutrients without changing the flavor much. - Use unsweetened cocoa powder for lower sugar. - Swap regular peanut butter for a nut butter with no added sugar. These changes will still give you a tasty treat and boost its health benefits. You learned how to make delicious nice cream using easy steps and simple ingredients. We discussed essential ingredients, flavor variations, and how to store your treats. By using tips for creamy texture, you can elevate your nice cream game. Remember, this treat is fun to make and enjoy! Now go ahead and create your own unique flavors. Your nice cream journey starts here!

Chocolate Peanut Butter Banana Nice Cream Delight

Looking for a sweet treat that’s healthy and easy to make? Meet Chocolate Peanut Butter Banana Nice Cream! This creamy

Older posts
Newer posts
← Previous Page1 … Page15 Page16 Page17 … Page83 Next →

dsad

© 2026 eataroundit • Built with GeneratePress

Our Policies

  • Copyright Policy
  • Cookie Policy
  • GDPR Policy
  • Privacy Policy
  • Disclaimer
  • Terms Of Use

More Information

  • Home
  • About
  • Contact
  • Appetizers
  • Dessert
  • Dinner
  • Drinks
©2026, eataroundit About Back To Top