Skip to content
DisclaimerTerms Of UseGDPR PolicyCookie Policy

eataroundit

  • Home
  • Drinks
  • Appetizers
  • Dinner
  • Dessert
  • About
  • Contact
  • Privacy Policy
DisclaimerTerms Of UseGDPR PolicyCookie Policy

NO-ING-IMG

- 9 oz (250g) cheese tortellini - 1 cup sun-dried tomatoes in oil, drained and coarsely chopped - 1 cup heavy cream - ½ cup grated Parmesan cheese - 1 tablespoon extra-virgin olive oil - 1 teaspoon Italian seasoning - Salt and freshly cracked black pepper to taste - Fresh basil leaves, torn To start, you need to boil salted water. Use a large pot, and bring it to a rapid boil. Once boiling, add your cheese tortellini. Follow the package instructions for cooking time. Usually, this takes about 3 to 5 minutes. You want the tortellini to be al dente, meaning it should be firm yet tender. After cooking, drain the tortellini and set it aside. Now, let’s prepare the sauce. In a large skillet, heat a tablespoon of extra-virgin olive oil over medium heat. Once the oil is hot, add 2 finely minced garlic cloves. Sauté the garlic for about 1 minute. It should smell nice but avoid browning it. Next, add 1 cup of chopped sun-dried tomatoes. Sprinkle in 1 teaspoon of Italian seasoning. Cook this mixture for an additional 2 minutes. This helps the flavors blend and softens the tomatoes. After the tomatoes are ready, it's time to create the creamy base. Lower the heat to medium-low and pour in 1 cup of heavy cream. Stir continuously to mix everything well. Let it simmer gently for about 3 to 4 minutes. You want it to thicken a bit. Then, gradually add ½ cup of grated Parmesan cheese. Mix well until the cheese melts fully and the sauce is smooth. Season with salt and freshly cracked black pepper to taste. Finally, add the drained tortellini to the creamy sauce. Gently toss to coat each piece. This will help the rich flavors cling to the tortellini. Now, you’re ready to enjoy a delightful dish! To avoid curdling your sauce, make sure to stir as you add the cream. This keeps the temperature even and helps the cream blend well. If the heat is too high, the cream can separate. Keep it on low heat once you add the cream. To achieve the right thickness, let the sauce simmer gently. This allows flavors to meld and the sauce to reduce. Aim for a creamy texture that coats the back of a spoon. If it’s too thin, let it simmer a bit longer. Adding fresh herbs can boost the taste of your dish. Try mixing in basil, oregano, or thyme for a fresh twist. A pinch of red pepper flakes can add a nice kick if you enjoy some heat. For cheese variations, consider using goat cheese or mozzarella. These cheeses can give the dish a different but delightful flavor. You can also mix in some ricotta for extra creaminess. When cooking tortellini, aim for al dente texture. This means it should be firm but cooked through. Keep an eye on the cooking time, usually 3-5 minutes. Overcooked tortellini can become mushy. To store and reheat leftovers, place them in an airtight container. Keep it in the fridge for up to three days. When reheating, use low heat on the stove or microwave. Add a splash of cream or water to help revive the sauce and avoid drying it out. {{image_4}} Adding a twist to your creamy sun-dried tomato tortellini can make it even more exciting. Let’s explore some fun variations you can try! If you want to keep it vegetarian, consider these options: - Adding spinach or kale: Toss in fresh spinach or kale during the sauce prep. They add color and nutrients. - Incorporating mushrooms: Sauté sliced mushrooms with the garlic. They bring a rich, earthy taste to the dish. Boost the protein in your meal with these choices: - Adding grilled chicken: Slice grilled chicken and mix it into the tortellini. It makes the dish heartier and adds a lovely flavor. - Including shrimp or sausage: Cook shrimp or sausage in the skillet before adding the sauce. They both complement the creamy base well. Need to adjust for dietary needs? Here are some easy swaps: - Gluten-free tortellini options: Look for gluten-free tortellini in stores. They taste great and work well in this recipe. - Dairy-free cream alternatives: Use coconut cream or cashew cream instead of heavy cream. They create a rich texture without dairy. These variations let you customize your creamy sun-dried tomato tortellini to fit your tastes or dietary needs. Enjoy experimenting! To keep your creamy sun-dried tomato tortellini fresh, use airtight containers. Glass or plastic containers both work well. Make sure to cool the dish to room temperature before sealing. Place it in the fridge, where it can last for up to three days. If you want to keep it longer, freezing is a great option. For reheating, the stovetop is best. Add a splash of cream or water to help with moisture. Heat over low heat while stirring gently. This keeps the sauce smooth. Avoid high heat or the microwave, as these can overcook the pasta and make it mushy. You can freeze creamy sun-dried tomato tortellini before or after cooking. If freezing before cooking, place the uncooked tortellini in a single layer on a baking sheet. Once frozen, transfer them to a freezer bag. If freezing after cooking, allow it to cool, then store it in an airtight container. To thaw, place the frozen dish in the fridge overnight. Reheat it on the stovetop as mentioned. Always check for freshness before eating. Tortellini usually cooks in 3 to 5 minutes. Fresh tortellini cooks faster than frozen. Always check the package for exact times. For best results, cook until the pasta is al dente. This means it should be firm but not hard. Yes, you can use fresh sun-dried tomatoes. They will taste different, though. Fresh tomatoes have more moisture and less intense flavor. If you use fresh, dry them out first. You can roast them or let them dry in the sun. Adjust the amount in the recipe. You may need more fresh tomatoes to match the flavor. This dish pairs well with a simple salad. A spinach or arugula salad adds freshness. You can also serve garlic bread on the side. This will soak up the creamy sauce. For a heartier meal, add grilled chicken or shrimp to the plate. This dish brings together simple ingredients like cheese tortellini and sun-dried tomatoes. You learned how to create a creamy sauce and combine it all for a tasty meal. Experiment with flavors by adding different herbs or proteins to suit your taste. Storing and reheating tips will help you enjoy leftovers. With these easy steps, delicious cooking is within reach. Enjoy making this dish again and again!

Creamy Sun Dried Tomato Tortellini Flavorful Delight

Are you ready to elevate your pasta night? This Creamy Sun Dried Tomato Tortellini is a flavorful delight you won’t

- 4 tablespoons all-purpose flour - 3 tablespoons granulated sugar - 2 tablespoons unsweetened cocoa powder - 1/8 teaspoon baking powder - 1/8 teaspoon fine sea salt - 3 tablespoons milk (any kind you prefer) - 2 tablespoons vegetable oil (or any neutral oil) - 1/4 teaspoon vanilla extract - 2 tablespoons mini marshmallows - 1 tablespoon chocolate chips (optional, but highly recommended for extra richness) To make your Chocolate Marshmallow Mug Cake, you need simple ingredients. These items are easy to find. Start with all-purpose flour. This helps give the cake its structure. Granulated sugar adds sweetness to balance the cocoa. Unsweetened cocoa powder gives that rich chocolate flavor. Next, we have baking powder. It helps the cake rise. A pinch of fine sea salt enhances all the flavors. For the wet ingredients, choose your favorite milk. You can use dairy or a non-dairy option. Vegetable oil keeps the cake moist. You can also use any neutral oil you have at home. Don't forget the vanilla extract! It adds a lovely aroma. Mini marshmallows are the star of this cake. They melt and create gooey pockets of joy. If you want an extra treat, add chocolate chips. They make the cake even richer and more delicious. Gather these ingredients, and you're ready to bake! In a microwave-safe mug, add: - 4 tablespoons all-purpose flour - 3 tablespoons granulated sugar - 2 tablespoons unsweetened cocoa powder - 1/8 teaspoon baking powder - 1/8 teaspoon fine sea salt Use a small whisk or fork to mix. Make sure there are no lumps. This step is key for a smooth cake. Next, pour in: - 3 tablespoons milk - 2 tablespoons vegetable oil - 1/4 teaspoon vanilla extract Stir well until the batter is smooth. You want to eliminate all dry patches. This makes the cake light and fluffy. Now, fold in: - 2 tablespoons mini marshmallows - 1 tablespoon chocolate chips (optional) Make sure these goodies are spread evenly. This way, you get sweet bites in every forkful. Put your mug in the microwave. Cook on high for 30-40 seconds. Keep a close eye on it. Start with 30 seconds, then add more time in 10-second bursts if needed. The cake should rise and stay moist. Once it's done, let it cool for 1-2 minutes. This helps the marshmallows get even gooier. Serve it right in the mug for a cozy treat. For extra fun, top it with ice cream or a drizzle of chocolate sauce. Enjoy the warm, sweet goodness! To make the best mug cake, avoid overcooking. The cake should rise and stay moist. Start with a 30-second cook time. If it's not done, add time in 10-second steps. Use the right microwave power setting. A standard microwave should work well. If your microwave is strong, reduce the cook time slightly. You can make this treat even tastier with toppings. A scoop of ice cream on top melts into the warm cake. Drizzle chocolate sauce for extra sweetness. Try flavor variations to mix things up. Add a pinch of cinnamon for warmth. A drop of almond extract gives a nice twist. Want to share? You can adjust the recipe for larger servings. Simply double the ingredients and use a bigger mug. For parties, serve in a small dish. You can make a mug cake bar with toppings. Let guests create their own sweet treats! {{image_4}} You can easily tweak this recipe to fit your needs. If you're gluten-free, try using gluten-free flour. Almond flour or coconut flour works well too. For dairy-free options, use almond milk or oat milk instead of regular milk. You can also swap vegetable oil for coconut oil or avocado oil for a healthier choice. Want to mix things up? Add a spoonful of peanut butter or Nutella to the batter before cooking. This gives your mug cake a rich, nutty flavor. You can also toss in fresh fruit, like sliced bananas or berries. These add natural sweetness and a bit of fun texture. You can make your mug cake fit any occasion. For holidays, try adding festive spices like cinnamon or nutmeg. For birthdays or anniversaries, top it with sprinkles or a dollop of whipped cream. These little touches make your treat even more special and fun to enjoy! To keep your leftover mug cake fresh, use an airtight container. This helps prevent air from drying it out. You can store it at room temperature if you plan to eat it soon. If not, put it in the fridge. When you want to enjoy it again, use the microwave. Heat it in short bursts, about 10 to 15 seconds at a time. Check frequently to avoid overheating it. If you have extra mug cake, freezing it is easy. First, let the cake cool completely. Then, wrap it tightly in plastic wrap. Place it in a freezer-safe bag or container. This keeps it fresh for up to a month. When you want to eat it, remove it from the freezer. Thaw it in the fridge overnight. Reheat it in the microwave for about 20 to 30 seconds. In the fridge, your mug cake can last about 3 days. Watch for signs of spoilage, like a dry texture or strange smell. If you see mold or changes in color, it’s best to toss it. Enjoy your delicious treat while it's still fresh! If your mug cake overflows, don't worry! Here are some tips to help: - Use a larger mug. A 12 oz mug works best. - Don't overfill it. Leave some space at the top. - Watch your cake closely as it cooks. Stop the microwave if it rises too high. - If it spills, clean the microwave right away for easy cleanup. Yes, you can bake this cake in the oven! Here’s how: - Preheat your oven to 350°F (175°C). - Mix the batter as usual in an oven-safe dish. - Pour the batter into a small ramekin or baking dish. - Bake for about 15-20 minutes. Check for doneness with a toothpick. - Once a toothpick comes out clean, let it cool before enjoying. You can double the recipe, but keep a few things in mind: - Use a larger mug or bowl. A bigger size helps prevent overflow. - Adjust cooking time. Start with 60-70 seconds, then check in 10-second bursts. - Mixing may take longer. Ensure all ingredients blend well for a great texture. - Enjoy sharing this treat with a friend or keep it all for yourself! In this blog post, you learned how to make a quick and tasty mug cake. We covered the key ingredients and provided step-by-step instructions for mixing and cooking. You can enhance flavors with toppings or make fun variations. Remember to watch your mug cake while it cooks to get the best texture. Finally, store any leftovers properly to enjoy later. Making this sweet treat is easy and fun, whether it's for yourself or a special event. Enjoy your delicious creation!

Chocolate Marshmallow Mug Cake Quick and Easy Treat

Craving something sweet in minutes? You’re in for a treat with this Chocolate Marshmallow Mug Cake! It’s quick, easy, and

To create a rich and flavorful chocolate espresso banana bread, you'll need the following ingredients: - 3 ripe bananas, thoroughly mashed - 1/3 cup melted coconut oil (or vegetable oil as an alternative) - 1/2 cup packed brown sugar - 1/4 cup granulated sugar - 2 large eggs, at room temperature - 1 teaspoon pure vanilla extract - 1 teaspoon espresso powder - 1 teaspoon baking soda - 1/2 teaspoon baking powder - 1/2 teaspoon salt - 1 1/2 cups all-purpose flour - 1/2 cup dark chocolate chips - 1/4 cup chopped walnuts (optional for added crunch) If you need to make some swaps, here are a few ideas: - Oil: Use melted butter instead of coconut oil. - Sugar: Try using coconut sugar or maple syrup. Adjust the liquid in the batter if using syrup. - Eggs: Use flax eggs (1 tablespoon flaxseed meal + 2.5 tablespoons water = 1 egg). - Flour: Substitute whole wheat flour for a nuttier flavor. - Chocolate Chips: Use white chocolate chips or milk chocolate for a sweeter twist. These alternatives can change the taste and texture slightly, so experiment to find what you enjoy most. Ripe bananas are key for great banana bread. Here’s how to pick them: - Look for bananas with a deep yellow color and brown spots. These spots show ripeness. - Avoid bananas that are too green or too brown. Green ones lack flavor, and brown ones may be overly mushy. - If you have green bananas, place them in a brown paper bag. This speeds up the ripening process. - For a strong banana flavor, choose bananas that are very ripe. The sweetness will enhance your bread. Choosing the right bananas makes a big difference in flavor. Enjoy the process! First, set your oven to 350°F (175°C). This heat will cook the bread just right. Next, grab a 9x5-inch loaf pan. Grease it well or line it with parchment paper. This step helps the bread come out easily after baking. In a large bowl, mash three ripe bananas until smooth. Add 1/3 cup of melted coconut oil to the bananas. Mix these until they blend well. Now, add 1/2 cup of brown sugar and 1/4 cup of granulated sugar. Stir until the mixture is creamy. Then, add two large eggs, one at a time. Don’t forget to mix in 1 teaspoon of pure vanilla extract and 1 teaspoon of espresso powder. This adds rich flavor! In another bowl, whisk together 1 1/2 cups of all-purpose flour, 1 teaspoon of baking soda, 1/2 teaspoon of baking powder, and 1/2 teaspoon of salt. This helps to mix the dry things well. Slowly add the dry mix to the wet mix. Fold gently until just combined. Be careful not to overmix or the bread may turn out dense. Finally, fold in 1/2 cup of dark chocolate chips and 1/4 cup of chopped walnuts if you like. Now, pour the batter into the loaf pan. Smooth the top with a spatula. Bake the bread in your preheated oven for 50 to 60 minutes. When the time is up, check doneness by inserting a toothpick into the center. If it comes out clean or with a few moist crumbs, your bread is ready. Let it cool in the pan for about 10 minutes. After that, transfer the bread to a wire rack to cool completely. Enjoy the wonderful smell as it cools! To get the best texture in your chocolate espresso banana bread, start with ripe bananas. They should be brown and soft. This gives the bread the right sweetness and moisture. When mixing, mash the bananas well. This helps blend them smoothly with the other ingredients. Avoid overmixing the batter. Mix until just combined for a light and airy loaf. For a richer chocolate flavor, use high-quality dark chocolate chips. They melt beautifully and add depth. Adding the espresso powder boosts the coffee taste without being too strong. You can also try adding a pinch of cinnamon for warmth. This simple touch can elevate the flavor profile. One common mistake is using cold eggs. Always use room temperature eggs; they mix better with the batter. Another mistake is not measuring the flour correctly. Too much flour can lead to a dry loaf. Use the spoon and level method for accuracy. Finally, don’t skip the cooling time. Letting it cool helps the flavors meld and makes slicing easier. {{image_4}} You can make this banana bread gluten-free. Use a gluten-free flour blend instead of all-purpose flour. Look for blends that include xanthan gum. This helps mimic the texture of regular flour. You might also want to add a bit more liquid to the batter. A splash of almond milk can help keep it moist. If you want a vegan version, swap out the eggs. Use flax eggs instead. Mix one tablespoon of ground flaxseed with three tablespoons of water. Let it sit until thickened. For the coconut oil, use a bit of unsweetened applesauce or a vegetable oil. This keeps the bread soft and tasty. To make your banana bread even more special, try adding spices. A pinch of cinnamon or nutmeg can elevate the flavor. You could also mix in some chopped nuts like walnuts or pecans. They add a nice crunch. If you want more chocolate, toss in extra chocolate chips. This makes each bite rich and delightful. To keep your chocolate espresso banana bread fresh, wrap it tightly in plastic wrap. You can also use a resealable bag. Store it at room temperature for up to three days. If you want to keep it longer, consider freezing it. Just make sure it's well-wrapped to avoid freezer burn. For long-term storage, slice the banana bread. Place wax paper between the slices to separate them. Wrap each slice in plastic wrap. Then, put them in a freezer-safe bag. This way, you can grab just what you need. Frozen banana bread lasts for about three months. When you want to enjoy your banana bread, you have a few options. For a quick reheat, use the microwave. Heat a slice for about 15-20 seconds. If you prefer a warm crust, use the oven. Preheat it to 350°F (175°C) and bake the slice for about 10 minutes. This keeps it soft and tasty. Enjoy your warm banana bread! Yes, you can use other flours. Almond flour gives a nutty flavor. Coconut flour can work too, but you need to adjust the liquid. Be aware that these flours change the texture. They may make the bread denser or moister. If you try a different flour, start with less and add more as needed. If your banana bread is dense, check your mixing. Overmixing can create tough bread. Make sure to mix until just combined. Another tip is to check your leavening agents. Ensure your baking soda and baking powder are fresh. If they are old, they may not work well. You can also add a bit more liquid, like milk or water, to lighten the batter. To boost the chocolate flavor, add more dark chocolate chips. You could also try using cocoa powder. Replace some flour with cocoa powder for a richer taste. Another option is to drizzle melted chocolate on top after baking. This adds a nice touch and extra flavor. This blog covered the key ingredients and tips for making chocolate espresso banana bread. I discussed ingredient choices, preparation steps, and common mistakes to avoid. You learned about variations for gluten-free and vegan diets, as well as storage tips. Remember to choose ripe bananas for the best flavor. Experiment with flavors and have fun. Enjoy your baking journey and create something delicious!

Chocolate Espresso Banana Bread Flavorful and Rich

Are you ready to elevate your banana bread game? This Chocolate Espresso Banana Bread is rich, flavorful, and a treat

- 1 cup quinoa - 2 cups water - 4 cups fresh baby spinach - 1 cup strawberries - 1/2 cup feta cheese - 1/4 cup sliced almonds - 1/4 cup red onion - 1/4 cup extra virgin olive oil - 2 tablespoons balsamic vinegar - 1 tablespoon honey (or maple syrup for vegan) - Salt and black pepper to taste I love using these fresh ingredients to create a colorful dish. Quinoa is my base. It adds protein and fiber. The baby spinach brings a lovely green color and essential vitamins. Strawberries not only look great but also add a sweet taste. Feta cheese gives a creamy touch that balances the flavors. To add crunch, I use sliced almonds, which also boost nutrition. The red onion adds a mild bite that works well with the other flavors. Extra virgin olive oil and balsamic vinegar make a simple dressing that ties everything together. Honey adds a touch of sweetness, but you can use maple syrup if you prefer. This mix of ingredients provides a nutritious meal. It's full of vitamins and minerals, making it perfect for a healthy lifestyle. To start, we need to rinse the quinoa. Place 1 cup of quinoa in a fine-mesh strainer. Rinse it under cold running water for about 2 minutes. This step removes any bitter taste. Next, combine the rinsed quinoa with 2 cups of water in a medium saucepan. Bring this mixture to a boil over medium-high heat. Once it boils, reduce the heat to low. Cover the pot and let it simmer for about 15 minutes. The quinoa is ready when it’s fluffy and all the water is absorbed. Remove it from heat and let it cool. Now, let’s prepare the salad. In a large mixing bowl, combine the cooled quinoa, 4 cups of fresh baby spinach, 1 cup of sliced strawberries, 1/2 cup of crumbled feta cheese, 1/4 cup of toasted sliced almonds, and 1/4 cup of thinly sliced red onion. Make sure to mix everything gently. This helps distribute each ingredient evenly, so every bite is full of flavor. For the dressing, gather your ingredients. You need 1/4 cup of extra virgin olive oil, 2 tablespoons of balsamic vinegar, and 1 tablespoon of honey. You can swap honey for maple syrup if you prefer a vegan option. In a small bowl, whisk these ingredients together. Whisk until the mixture is well blended and creamy. This process emulsifies the dressing, giving it a smooth texture. Next, it’s time to toss the salad. Drizzle the dressing over the salad mixture. Use your hands or a large spoon to mix everything together gently. Make sure each ingredient is coated with the dressing. After mixing, taste the salad. Adjust the seasoning with salt, black pepper, or extra honey as needed. You want the flavors to shine through. Serve your salad right away for the freshest taste or let it sit for about 30 minutes in the fridge. This helps the flavors meld beautifully. To avoid mushy quinoa, start by rinsing it well. This step removes the bitter coating called saponin. Use a fine mesh strainer for best results. After rinsing, combine the quinoa and water in a medium pot. Bring it to a hard boil, then reduce the heat to a simmer. Cover it and cook for about 15 minutes. When cooked, let it sit off the heat for 5 minutes before fluffing with a fork. This method keeps each grain separate and fluffy. Cooling quinoa properly is also key. After cooking, spread it on a baking sheet. This helps it cool quickly and evenly. A quick cool down enhances the texture when mixed with other salad ingredients. To add more flavor, try topping your salad with grilled chicken or chickpeas. These options add protein and make the meal heartier. You can also sprinkle some fresh herbs like basil or mint for a fresh twist. Balancing sweetness and acidity is important in your dressing. Start with the recommended olive oil and balsamic vinegar mix. If you find the dressing too sweet, add a touch more vinegar. Conversely, if it’s too tangy, stir in a bit more honey or maple syrup. Taste as you go to find your perfect balance. For a stunning presentation, serve the salad in a large, colorful bowl. This makes it inviting and appetizing. You can also plate individual servings for a fancy touch. To garnish, consider topping the salad with whole strawberries and a sprinkle of toasted almonds. This adds a pop of color and texture, making your dish visually appealing. A squeeze of lemon juice on top can also brighten the flavors and enhance the look. {{image_4}} To make this salad vegan, swap out the feta cheese. You can use crumbled tofu for a similar texture. Nutritional yeast also adds a cheesy flavor. For the honey, simply use maple syrup. This swap keeps the salad sweet without animal products. You can also add avocado for creaminess and healthy fats. If you need a gluten-free option, ensure your quinoa is certified gluten-free. This step prevents cross-contamination. You can also try other grains like brown rice or millet. Both options work well and bring unique flavors to the salad. Quinoa is still the best choice for its protein content and texture. Fresh, in-season ingredients can change the flavor of your salad. In spring, add peas or radishes. In summer, try peaches or nectarines for a sweet twist. Fall brings apples and walnuts, while winter can include citrus fruits like oranges. Each season gives you a chance to mix and match flavors for a new experience. To store your Strawberry Spinach Quinoa Salad, cover it tightly. Use a glass or plastic container with a lid. This keeps it fresh and prevents it from drying out. The salad stays fresh for about 3 days in the fridge. If you want to keep the spinach crisp, add the dressing just before serving. This helps avoid soggy greens. Freezing this salad is not ideal, but you can freeze components. Quinoa freezes well, so cook and cool it first. Store it in an airtight bag. You can also freeze sliced strawberries. Just wash and slice them, then spread them on a tray to freeze. After they freeze, place them in a bag. Avoid freezing the spinach and dressing; they do not thaw well. To serve after freezing, thaw quinoa and strawberries in the fridge overnight. Mix them with fresh spinach and dressing before serving. This keeps your salad looking and tasting fresh. You can store the salad in the refrigerator for up to three days. The flavors will blend well, but the spinach may wilt over time. To keep it fresh, use an airtight container. Yes! You can add protein to make this salad heartier. Here are some great options: - Grilled chicken for a savory touch. - Shrimp for a seafood twist. - Tofu for a plant-based option. These additions boost the salad’s nutrition and make it more filling. To meal prep this salad, keep the dressing separate. Prepare the quinoa and chop the veggies. Store everything in separate containers. Combine them just before serving for the best taste and texture. Absolutely! If strawberries aren't your favorite, you can try these fruits: - Blueberries for a sweet burst. - Mandarins for a citrusy zing. - Apples for a crunchy bite. These fruits add new flavors while keeping the salad fresh and tasty. This blog post covered a fresh Strawberry Spinach Quinoa Salad recipe. We explored ingredients, cooking steps, and nutrition facts. I also shared tips for taste and storage. You learned about variations for diet needs, plus answers to common questions. This salad is healthy and easy to make. Experiment with seasonal flavors or toppings. Enjoy your own take on this colorful dish!

Strawberry Spinach Quinoa Salad Fresh and Nutritious

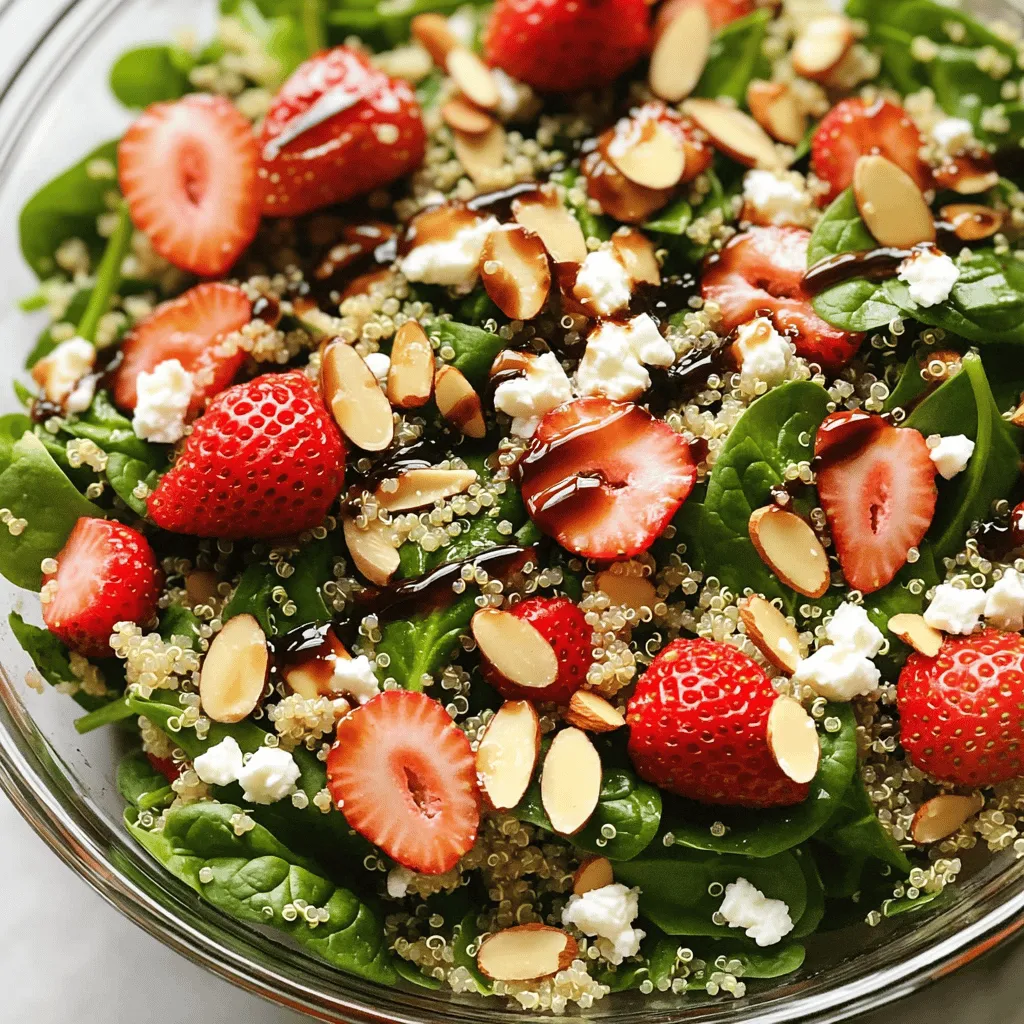
Are you ready to enjoy a vibrant, healthy dish? The Strawberry Spinach Quinoa Salad is both fresh and nutritious. Packed

- 4 large bell peppers, diced into bite-sized pieces - 1 pound ground turkey or beef, crumbled - 1 medium onion, finely chopped - 3 cloves garlic, minced - 1 can (14.5 oz) diced tomatoes, with juices included - 4 cups vegetable broth, or chicken broth for extra flavor - 1 cup uncooked rice, choose between white or brown In this soup, the bell peppers add a sweet crunch. The ground meat gives it a hearty base. You can use turkey or beef, depending on what you like. The onion and garlic bring great flavor. Diced tomatoes add a juicy burst. The broth helps tie everything together. Finally, the rice makes it filling and comforting. - 1 tablespoon Italian seasoning blend - 1 teaspoon smoked paprika for richness - Salt and freshly ground black pepper, to taste Seasoning is key in this soup. The Italian blend gives it a classic taste. Smoked paprika adds depth and warmth. Adjust salt and pepper to match your taste. These flavors will make each bite enjoyable. - 1 cup shredded cheese, like cheddar or mozzarella, for serving - Fresh parsley, chopped, for garnish Cheese makes everything better! I love using cheddar or mozzarella to top my soup. It melts beautifully and adds creaminess. Fresh parsley gives a lovely pop of green. It also adds freshness to the rich soup. First, cook the ground turkey or beef in a large skillet over medium heat. Stir often. You want the meat to brown nicely. This usually takes about 5 to 7 minutes. Once the meat is fully cooked, drain any extra fat. Then, transfer the cooked meat to your slow cooker. This step adds great flavor to your soup. Now it's time to add the fun stuff! In the slow cooker with your meat, add the diced bell peppers, chopped onion, and minced garlic. Next, pour in the can of diced tomatoes, including all the juices. Then, add the vegetable or chicken broth, uncooked rice, Italian seasoning, and smoked paprika. Don't forget to sprinkle in some salt and black pepper. Stir everything well so the flavors mix together. Cover your slow cooker with its lid. Set it to cook on low for 6 to 8 hours. If you're in a hurry, you can cook it on high for 3 to 4 hours. The soup is ready when the rice is tender and the peppers and onions are soft. After the cooking time is up, taste your soup. This is the best part! If it needs more flavor, adjust the seasoning as needed. If you want a thinner soup, stir in some extra vegetable broth. This helps get the consistency just right. Ladle the soup into bowls. Top each bowl with a sprinkle of shredded cheese. I love using cheddar or mozzarella. Finally, finish with a handful of freshly chopped parsley for color and freshness. Enjoy every bite! To boost the flavor of your soup, try adding spices. A pinch of cayenne pepper adds heat. You can also toss in fresh herbs like basil or oregano for a nice touch. If you want a smoky flavor, use smoked paprika. You can explore flavors by adding a splash of hot sauce or a squeeze of lime juice. Personalizing this soup is easy. You can switch the meat for ground chicken or add some beans for protein. Want it spicier? Add diced jalapeños or red pepper flakes. You can also change the broth based on what you have. Use chicken broth for a richer taste or vegetable broth for a lighter feel. For the best results, set your slow cooker on low. This allows the flavors to meld together. Cooking for 6-8 hours gives you the best taste and texture. If you’re short on time, you can cook on high for 3-4 hours. Avoid common pitfalls by not opening the lid too often. Each time you lift the lid, heat escapes, and cooking time increases. Also, make sure to stir well. This ensures the rice cooks evenly and absorbs all the flavors. Serving your soup can be a fun experience! Use deep, rustic bowls to give a warm vibe. Place extra cheese in a small bowl. Guests can add it as they like. This makes it interactive and enjoyable. Pair your soup with crusty bread. A slice of warm bread goes well with the rich flavors. You can also serve a simple green salad on the side for some freshness. This adds color and balances the meal nicely. {{image_4}} For a tasty vegetarian version, you can swap the meat. Here are some great substitutes: - 1 can of black beans or kidney beans, drained and rinsed - 1 cup of lentils, rinsed - 1 cup of chopped mushrooms for added texture When you choose these options, the cooking time stays about the same. You can still cook on low for 6-8 hours or high for 3-4 hours. Just make sure the lentils are tender before serving. If you want to change up the base, try different grains instead of rice: - Quinoa: Use 1 cup, rinsed. Add it during the last 30 minutes of cooking. - Noodles: Add 2 cups of egg noodles or whole grain noodles in the last 10 minutes of cooking. These swaps bring new flavors and textures to your soup. You can easily give your soup a unique twist. Here are a few ideas: - For a Southwest flavor, add cumin, corn, and diced jalapeños. - For a Mediterranean touch, toss in olives, feta cheese, and oregano. You can also add different vegetables like zucchini, carrots, or spinach. Feel free to mix in proteins like chicken for extra heartiness. These variations help you make the recipe your own. Enjoy experimenting! To store leftover soup, let it cool first. Then, place it in an airtight container. I recommend using glass containers, as they are safe and easy to clean. Leave some space at the top of the container. This helps the soup expand when it freezes. For freezing your slow cooker soup, use freezer-safe containers or heavy-duty freezer bags. Make sure to label them with the date. When ready to eat, thaw the soup in the fridge overnight. Reheat it on the stove or in the microwave. Stir well to ensure even heating. In the fridge, the soup lasts about 3 to 4 days. In the freezer, it can last up to 3 months. Check for signs it has gone bad, like a sour smell or changes in color. If you see mold, throw it away. Always trust your senses to keep your meals safe. Yes, you can use brown rice. However, it takes longer to cook. Brown rice needs about 45-50 minutes. This is more than white rice, which takes just 15-20 minutes. If you use brown rice, be sure to adjust the cooking time. You may need to add more broth for the right texture. If you don’t have bell peppers, try using zucchini or carrots. Both add a nice crunch and flavor. Zucchini gives a more mild taste, while carrots add a hint of sweetness. You can mix and match veggies, too. Just remember that each one changes the soup's flavor a bit. Yes, you can cook this soup on the stovetop. Start by browning the meat in a pot. Then add the veggies, broth, and rice. Bring it to a boil, then lower the heat. Let it simmer for about 30-40 minutes. Check the rice for doneness, and adjust the seasoning as needed. Absolutely! Beans add protein and texture. You can use black beans or kidney beans. Drain and rinse them first. Add them in with the other ingredients. If you add beans, reduce the amount of rice slightly to balance the soup. Enjoy the extra flavor and nutrition they bring! This blog post walks you through making a flavorful slow cooker soup. You learned about key ingredients like ground meat, veggies, and spices. I shared step-by-step instructions for seamless cooking and tips for flavor and presentation. Variations cater to different tastes, and storage info helps you keep leftovers fresh. In making this soup, you can explore your creativity. Adjust flavors, try new grains, or add personal touches. Enjoy the process and the hearty meal you'll create. Happy cooking!

Savory Slow Cooker Stuffed Pepper Soup Recipe

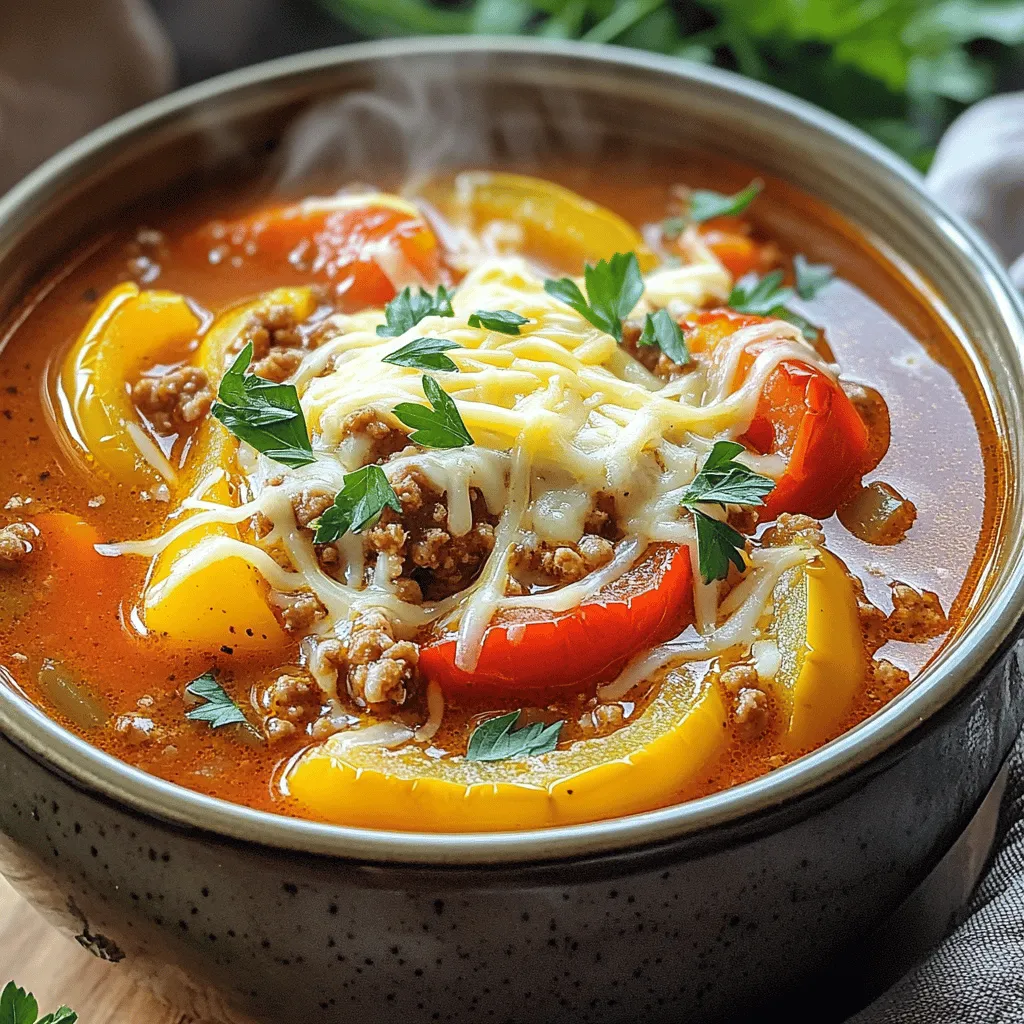
Looking for a hearty meal that warms you from the inside out? This Savory Slow Cooker Stuffed Pepper Soup will

- 1 pound Brussels sprouts, halved - 1 pound baby carrots, peeled - 4 cloves garlic, finely minced - 3 tablespoons extra virgin olive oil - 2 teaspoons dried thyme - 1 teaspoon dried rosemary - Salt and freshly ground black pepper, to taste - 1 tablespoon fresh parsley, finely chopped (for garnish) To create this Garlic Herb Roasted Brussels and Carrots dish, gather fresh ingredients. Start with one pound of Brussels sprouts. Halve each one for even cooking. Next, grab one pound of baby carrots. Make sure they are peeled and ready to go. You will need four cloves of garlic. Finely mince them to release all the flavor. For oil, use three tablespoons of extra virgin olive oil. This adds richness to the dish. Herbs are key! You will use two teaspoons of dried thyme and one teaspoon of dried rosemary. These herbs complement the veggies well. Don't forget salt and black pepper to taste. Finally, for a fresh touch, chop one tablespoon of fresh parsley to garnish. Having these ingredients prepped makes cooking easier. They all work together to create a tasty, colorful, and healthy side dish. - Preheat oven to 425°F (220°C). - Cut Brussels sprouts in half. Peel baby carrots. - Mix garlic, olive oil, thyme, rosemary, salt, and pepper in a bowl. - Stir well until combined. - Pour the herb mixture over the veggies. - Use your hands to coat each piece well. - Spread the Brussels sprouts and carrots on a baking sheet. - Roast for 25-30 minutes. - Stir halfway to ensure even cooking. - Let the veggies cool for a minute. - Transfer to a serving dish. - Sprinkle fresh parsley on top for a nice touch. To get the best roast, space is key. Place the Brussels sprouts and carrots on the baking sheet with room to breathe. This helps hot air flow and evenly cooks the veggies. If they are too close, they will steam instead of roast. Caramelization adds flavor and color. To achieve this, use a high oven temp like 425°F. Toss the veggies halfway through roasting. This helps them brown and caramelize well on all sides. If you can't find Brussels sprouts, try using broccoli or cauliflower. Both offer a nice crunch and flavor. For carrots, you can use parsnips or sweet potatoes. They will add a different taste and texture. When it comes to herbs, feel free to mix it up. Oregano or basil can add a fresh twist. You can also play with the spices. A pinch of chili powder can add some kick if you like heat. These roasted veggies pair well with many proteins. Serve them with grilled chicken or salmon for a tasty meal. They also go great with tofu for a veggie option. For side dishes, think about a fresh salad or some quinoa. A light grain will balance the richness of the roasted veggies. You can also add a dollop of yogurt or a sprinkle of feta for extra flavor. {{image_4}} You can mix in other veggies for more flavor. Think about using sweet potatoes, parsnips, or zucchini. These add color and taste. For seasonal options, try beets in fall or asparagus in spring. Each vegetable has a different cooking time. Cut them to similar sizes to roast evenly. Want to spice things up? Add some smoked paprika or cumin for a warm kick. You can also drizzle a balsamic glaze for a sweet tang. If you like crunch, toss in some chopped walnuts or sunflower seeds. They give a nice texture contrast to the soft veggies. This dish is already vegan and gluten-free! To keep it friendly, stick to plant-based oils and herbs. You can enhance the flavors with nutritional yeast. It adds a cheesy taste without dairy. Adjust the herbs to your liking. Fresh herbs like basil or dill can work wonders too. To store leftovers, place the Brussels sprouts and carrots in an airtight container. Make sure they are cool before sealing. This helps keep them fresh. The recommended maximum storage time is three to five days. After that, they may lose their taste and texture. The best methods for reheating roasted vegetables are in the oven or on the stovetop. Reheat them in the oven at 350°F (175°C) for about 10-15 minutes. This method helps keep their flavor and texture. If you use the stovetop, heat them in a pan over medium heat. Stir often to avoid burning. To freeze, first let the veggies cool completely. Spread them in a single layer on a baking sheet and freeze for a few hours. Once frozen, transfer them to a freezer bag. This process helps save space. For the best flavor, use them within three months. If you plan to use frozen veggies, you may need to adjust the cooking time. Frozen veggies may need longer to cook than fresh ones. Yes, you can use frozen Brussels sprouts and carrots. However, fresh veggies give better texture. Frozen ones may need extra roasting time. Thaw them first for even cooking. The vegetables are done when they are tender and have a nice golden color. Check them after 25 minutes. A fork should easily pierce them. If they need more time, roast for an extra 5 minutes. These veggies pair well with many dishes. Try serving them with grilled chicken, fish, or a hearty grain like quinoa. They also go great with a fresh salad for a light meal. Yes, you can make this dish ahead of time. Roast the veggies and let them cool. Store them in the fridge for up to three days. Reheat in the oven before serving for the best taste. Feel free to mix herbs! Oregano, basil, or even dill work well. Fresh herbs add a bright flavor. Just remember to adjust the amounts based on your taste. Add some red pepper flakes or a pinch of cayenne pepper to the herb mixture. For a bold kick, try adding sliced jalapeños before roasting. Adjust the heat to fit your taste! This blog post guides you through making a tasty garlic herb roasted dish. You learned about choosing fresh veggies, seasoning them, and roasting them to perfection. Remember to space the vegetables well for even cooking. You can boost flavor with different herbs or add other veggies. Storing leftovers is easy, and reheating keeps them delicious. With these tips, you’ll serve a dish that delights everyone at the table. Enjoy trying out new flavors and making this recipe your own!

Garlic Herb Roasted Brussels & Carrots Simple Dish

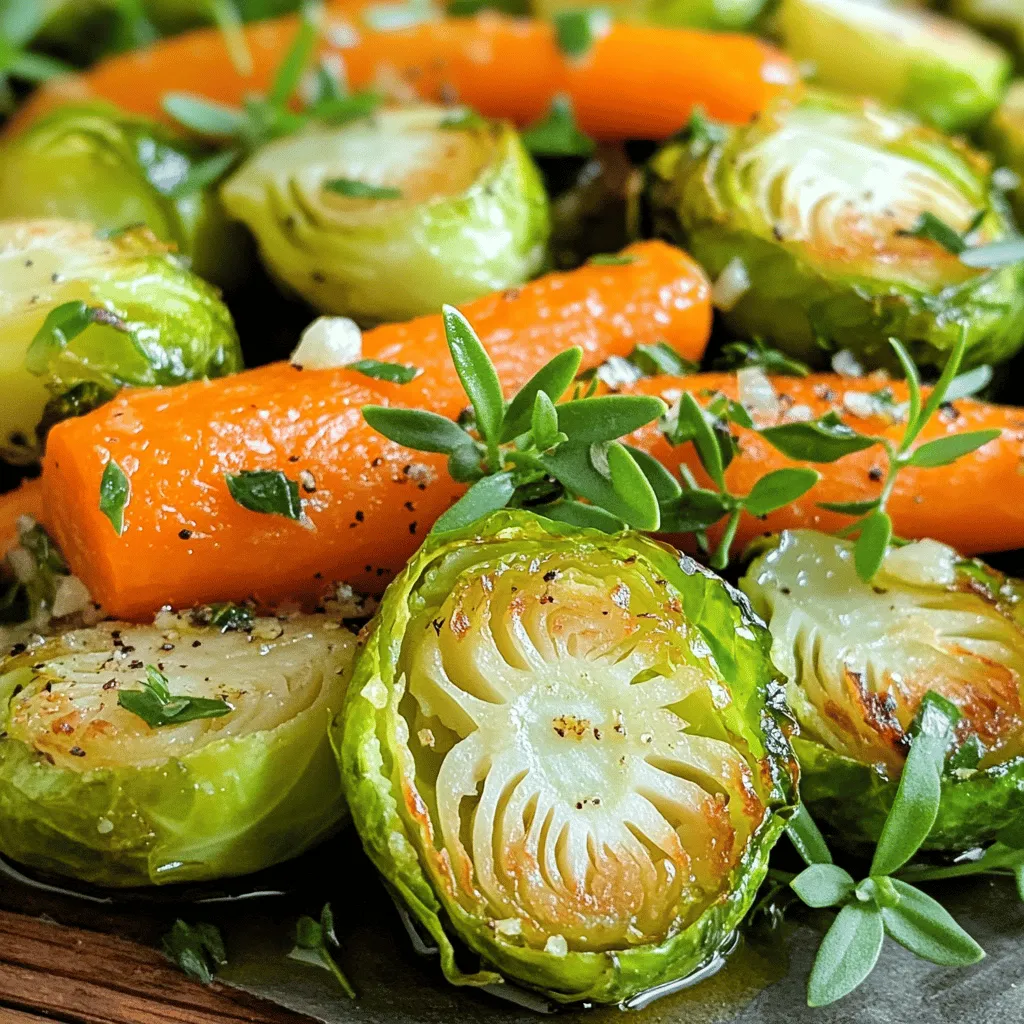
Are you looking for a hearty side that’s bursting with flavor? This Garlic Herb Roasted Brussels & Carrots dish is

- 12 oz smoked sausage, sliced (preferably andouille or turkey sausage) - 12 oz penne pasta For this dish, I recommend using smoked sausage for great flavor. Andouille sausage gives a nice kick, while turkey sausage is a leaner choice. Both options work well. For the pasta, I choose penne. Its hollow shape holds the sauce perfectly. - 1 teaspoon Cajun seasoning - 1/2 teaspoon smoked paprika - 1 medium onion, diced - 3 cloves garlic, minced - 1 bell pepper (choose either red or green), diced - 1 cup cherry tomatoes, halved A mix of Cajun seasoning and smoked paprika really brings the heat. Fresh ingredients bring out the best flavor. Onions and garlic add depth, while bell peppers and cherry tomatoes add sweetness. The tomatoes also release juices, making the sauce tasty. - 1 cup heavy cream - 1 cup shredded cheddar cheese - Fresh parsley, chopped (for garnish) Heavy cream creates a rich and creamy sauce. Cheddar cheese adds a nice sharpness. For garnish, fresh parsley brightens the dish and enhances the look. A sprinkle of cheese on top makes it even more inviting. First, heat two tablespoons of olive oil in a large pot over medium heat. This oil makes the sausage crispy and tasty. Add 12 ounces of sliced smoked sausage. I prefer andouille or turkey sausage for the best flavor. Sauté the sausage for about 5 to 7 minutes until it turns brown and crispy. Once it is done, remove the sausage from the pot and set it aside. This step adds depth to your dish. In the same pot, add one medium diced onion, one diced bell pepper, and three minced garlic cloves. Sauté these for about 3 to 4 minutes. Stir regularly to prevent burning. You want the onion to become soft and clear, and the bell pepper to soften slightly. These aromatics create a wonderful base for your sauce. Next, incorporate one cup of halved cherry tomatoes, one teaspoon of Cajun seasoning, and half a teaspoon of smoked paprika. Cook for an additional 2 minutes to let the tomatoes break down. This will give your dish a rich flavor. Now, pour in 4 cups of chicken broth and bring the mixture to a boil. Once boiling, stir in 12 ounces of penne pasta. Cover the pot, reduce the heat, and simmer for about 12 to 15 minutes. Stir occasionally to make sure the pasta cooks evenly. The pasta should be al dente and most of the liquid absorbed when done. After the pasta is cooked, reduce the heat to low. Gradually stir in 1 cup of heavy cream and 1 cup of shredded cheddar cheese. Mix until the cheese melts and the sauce becomes creamy. This is where your dish gets its luscious texture. Finally, return the cooked sausage to the pot and fold it into the pasta and sauce. Season with salt and pepper to taste. Let everything heat together for 2 to 3 minutes, then it's ready to serve. Enjoy this creamy, flavorful meal! To ensure a creamy consistency, start with high-quality heavy cream. Add it slowly after the pasta cooks. Stir it well to mix with the cheese. If the sauce seems too thick, add a splash of chicken broth. This will help keep it smooth and rich. If you want to switch up proteins, try chicken or shrimp instead of sausage. For a lighter option, use turkey sausage. For dairy, you can swap heavy cream for half-and-half or a non-dairy milk. Just be aware that this might change the final flavor a bit. Overcooking pasta is a common mistake. Always check for al dente texture, which means it should be firm to the bite. Also, be careful with the seasoning. Taste as you go. This helps you avoid a bland dish or one that is too salty. {{image_4}} You can make this dish vegetarian by swapping out the sausage. Use plant-based sausage for a similar taste. Add more vegetables to enhance the dish. Consider using mushrooms, zucchini, or spinach. These veggies add flavor, texture, and nutrients. You’ll still enjoy a creamy, rich sauce with every bite. To spice things up, increase the amount of Cajun seasoning. You can also add red pepper flakes for extra heat. Start with a small amount and taste as you go. This way, you control the spice level. The added heat will bring a new layer to the creamy sauce, making it even more exciting. This dish is versatile. You can use different proteins or pasta types. For proteins, try shrimp, chicken, or even tofu. Each option will give a unique flavor. As for pasta, any shape works, but penne holds the sauce well. Rotini or fusilli are great alternatives too. Enjoy experimenting with flavors and textures! To keep your One-Pot Creamy Cajun Sausage Pasta fresh, store leftovers in an airtight container. Let the pasta cool before sealing it. This helps avoid steam buildup, which can make it soggy. Properly stored, it lasts for up to three days in the fridge. When ready to enjoy, just pull it out and think about reheating. If you want to save some for later, freezing is a great option. First, let the dish cool down completely. Then, transfer it to a freezer-safe container. Make sure to leave some space at the top for expansion. It can stay in the freezer for up to three months. When you're ready to eat, simply thaw it overnight in the fridge. To reheat, I recommend using a stove or microwave. If using the stove, place the pasta in a pan over low heat. Add a splash of chicken broth or cream to keep it creamy. Stir often until it’s hot. If using the microwave, heat in short bursts, stirring in between. This helps keep the flavor and texture just right. Enjoy your delicious pasta again! Yes, you can make this dish gluten-free. Use gluten-free penne pasta instead of regular pasta. Many brands offer great options that taste just as good. Check the package for cooking times, as they may differ. Also, ensure that your sausage is gluten-free. Many smoked sausages are safe, but always read labels to be sure. To reduce the spiciness, cut back on Cajun seasoning. Start with half the amount and taste as you go. You can also add more cream to soften the heat. Mixing in extra cheese will help balance the flavors too. If you want more creaminess, stir in a bit more heavy cream at the end. This dish pairs well with simple side salads. A crisp green salad with vinaigrette adds a refreshing contrast. Garlic bread is another great choice for dipping. You might also enjoy serving it with roasted vegetables for added flavor and texture. In summary, this guide walks you through making Cajun sausage pasta. We covered ingredients, cooking steps, and tips for perfecting your dish. Remember to choose fresh ingredients and sauté until browned for the best flavor. You can create variations like vegetarian options or one-pot meals to suit your taste. Store any leftovers properly to enjoy later, and don’t hesitate to adjust spices for your spice level. With these steps and tips, you are ready to impress with Cajun sausage pasta. Happy cooking!

One-Pot Creamy Cajun Sausage Pasta Delightful Meal

Are you ready to spice up your dinner routine? This One-Pot Creamy Cajun Sausage Pasta packs bold flavors and creamy

When making No-Bake Birthday Cake Cheesecake Bars, you need these key ingredients: - 1 ½ cups graham cracker crumbs - 1/2 cup unsalted butter, melted - 2 tablespoons granulated sugar - 16 oz cream cheese, softened to room temperature - 1 cup powdered sugar - 1 teaspoon pure vanilla extract - 1 cup heavy whipping cream - 1/2 cup rainbow sprinkles, plus extra for topping Each ingredient plays a vital role in creating a creamy, dreamy dessert. The graham cracker crumbs form the base. They provide a crunchy contrast to the smooth cheesecake. The unsalted butter helps bind the crumbs together. The granulated sugar adds a subtle sweetness to the crust. The cream cheese is the star of the filling. It gives the bars their rich and creamy texture. The powdered sugar sweetens the filling and helps it set. Pure vanilla extract adds a warm, inviting flavor that enhances the overall taste. Heavy whipping cream is essential for that light and fluffy texture. Whipping the cream creates air, making the dessert feel light. Rainbow sprinkles add color and fun. They bring a festive touch to your birthday cake cheesecake bars. By using these ingredients, you create a treat that is not only tasty but also visually appealing. Each bite is a celebration, perfect for any special occasion. First, gather your graham cracker crumbs, melted butter, and granulated sugar in a medium bowl. Mix these ingredients well until it looks like wet sand. This texture is key for a great crust. Next, take the mixture and press it into a lined 9x9-inch baking pan. Use a measuring cup or spatula to press it down firmly. Make sure it forms a solid layer across the bottom. In a large bowl, beat the softened cream cheese with an electric mixer. Do this on medium speed for about 1-2 minutes until it becomes smooth. After that, slowly add the powdered sugar and pure vanilla extract. Keep mixing on medium speed for 2-3 minutes until it is fluffy and well combined. In a separate bowl, pour in the heavy cream. Use a mixer on high speed to whip it. This can take about 3-5 minutes. You need to whip it until stiff peaks form, which means it holds its shape well. Carefully fold the whipped cream into the cream cheese mixture using a spatula. Be gentle so you keep that light texture. Keep folding until there are no streaks left. Then, mix in the rainbow sprinkles. Pour this cheesecake filling over your prepared crust and spread it evenly. Cover the pan with plastic wrap and place it in the fridge. Chill for at least 4 hours, or even overnight for the best texture. This step helps the cheesecake set properly and makes it easier to cut later. When the cheesecake is firm, lift it out using the parchment paper edges. Cut it into bars. For a fun touch, sprinkle extra rainbow sprinkles on top of each bar. Present them on a bright platter for a festive look. Using room temperature ingredients is key. When cream cheese is soft, it mixes better. This helps create a creamy filling. Cold cream cheese can become lumpy. For best results, remove it from the fridge an hour before you start. Folding whipped cream takes care. Start by adding a small amount to the cream cheese mix. Use a spatula to gently mix in. This helps lighten the cream cheese. Then, add the rest of the whipped cream. Fold carefully to keep air in. If you stir too hard, your filling can deflate. Toppings can make your cheesecake bars shine. You can sprinkle extra rainbow sprinkles on top. Whipped cream also adds a nice touch. Try adding fresh berries for a fruity look. Edible flowers can give a fancy feel. Use funfetti or chocolate shavings for more flair. Make it pretty, and enjoy the smiles! {{image_4}} You can mix things up with this cheesecake! Try adding chocolate or strawberry flavors. For a chocolate cheesecake, melt about 4 ounces of chocolate. Fold it into the cream cheese mixture after you beat it smooth. If you want strawberry flavor, use strawberry puree. This can replace some of the powdered sugar for sweetness. You can also toss in some chopped strawberries for extra texture! If you are gluten-free, use gluten-free graham cracker crumbs. Many brands offer these now. You can also use almond flour mixed with a bit of sugar and melted butter for the crust. It works well and adds a nice nutty flavor. Just press it into the pan like you would with regular crumbs. Want a vegan version? Use vegan cream cheese and coconut cream. For the crust, swap in vegan butter for the melted butter. If you want it low-sugar, use a sugar substitute in place of the granulated and powdered sugar. Just be sure to check the conversion ratio on the package. This way, you can enjoy the bars without all the sugar! To keep your cheesecake bars fresh, place them in an airtight container. Make sure to layer parchment paper between the bars to prevent sticking. Store them in the fridge for best taste. They will stay fresh for about five days. If you want to save some for later, you can freeze them. Wrap each bar in plastic wrap, then place them in a freezer bag. This helps protect them from freezer burn. To enjoy them later, thaw the bars in the fridge overnight. These cheesecake bars can last in the fridge for up to five days. If frozen, they can stay good for about three months. Just remember, the sooner you eat them, the better the taste! You can make these bars a day or two in advance. Start by preparing the crust and filling. Follow all the steps but do not cut them yet. After chilling, cover the bars tightly with plastic wrap. This keeps them fresh and tasty. When you are ready to serve, slice them into bars. Add extra sprinkles on top for fun. Yes, you can use low-fat cream cheese if you want a lighter option. Flavored cream cheese, like strawberry or chocolate, adds a twist. Just make sure it is softened for easy mixing. This keeps the texture creamy and smooth. You can use coconut cream or Greek yogurt as lighter options. Both will change the flavor a bit. Coconut cream adds a hint of coconut, while Greek yogurt gives tanginess. Whip them like you would with heavy cream. This keeps your bars fluffy and delicious. You now have a complete guide to making delicious cheesecake bars. We covered every step, from choosing your ingredients to serving them perfectly. Remember to use room temperature ingredients for a smooth texture. Feel free to explore fun flavor variations, like chocolate or strawberry. Lastly, store any leftovers properly to keep them fresh. Enjoy making these treats—they're sure to impress friends and family! Your baking skills can shine with these easy and tasty bars.

No-Bake Birthday Cake Cheesecake Bars Delightful Treat

Get ready to impress at your next celebration with my No-Bake Birthday Cake Cheesecake Bars! These fun, creamy treats are

- 2 ripe avocados, peeled and pitted - 1/2 cup unsweetened cocoa powder - 1/3 cup maple syrup or honey - 1/4 cup almond milk (or any milk of your choice) - 1 teaspoon pure vanilla extract - A pinch of sea salt - Shavings of dark chocolate or cocoa nibs for garnish For this creamy and delightful avocado chocolate mousse, each ingredient plays a key role. The ripe avocados are the star, giving a rich and smooth texture. The unsweetened cocoa powder adds the deep chocolate flavor we all love. Sweeteners like maple syrup or honey balance the flavors perfectly. Using almond milk makes the mousse silky and light. If you prefer, you can swap it with any milk you enjoy. The pure vanilla extract enhances the taste, making every bite even better. A pinch of sea salt helps to lift all the flavors. Finally, garnishing with dark chocolate shavings or cocoa nibs adds a nice crunch and makes your dessert look fancy. Each ingredient works together to create a delicious treat that feels indulgent yet healthy. Start with two ripe avocados. Peel and pit them carefully. The ripe avocados form the creamy base of your mousse. Use a sharp knife to remove the pit. Then, scoop the flesh into your food processor. Next, measure out your cocoa powder. You need half a cup for rich chocolate flavor. Also, measure one-third cup of maple syrup or honey for sweetness. This will balance the cocoa's bitterness. Then, pour in one-quarter cup of almond milk or any milk you like. This helps create a smooth texture. Add the cocoa powder to the food processor with the avocados. Then, pour in your maple syrup or honey. Next, add the almond milk. This mix of dry and wet ingredients is essential for the mousse. Now, enhance the flavor with one teaspoon of pure vanilla extract. A pinch of sea salt helps balance the sweetness. It brings out the rich chocolate flavor. Close the lid on the food processor. Blend all the ingredients together. Stop occasionally to scrape down the sides. This ensures everything mixes well. Taste the mousse after blending. If it needs more sweetness, add extra maple syrup or honey. If it feels too thick, add more almond milk. Blend again until you reach the right texture. Scoop the smooth mousse into your serving bowls. Fill them generously, as this treat is rich and satisfying. Place the bowls in the fridge for at least 30 minutes. Chilling helps the mousse firm up and lets the flavors mix well. Before serving, garnish with dark chocolate shavings or cocoa nibs. This adds a nice crunch and extra chocolatey goodness. Enjoy this creamy delight! To get the best mousse, start with ripe avocados. They should feel soft but not mushy. Ripe avocados blend smoothly, giving you that creamy texture we want. When using a food processor, blend the avocados first until smooth. This step is key for a velvety mousse. You can change the sweetness in this recipe. Maple syrup and honey are great options. Try using agave or stevia if you want a lower-calorie choice. Adding a pinch of sea salt makes the flavors pop. A splash of pure vanilla extract adds warmth to the taste, making it even better. Presentation is fun and easy! Layer the mousse with fresh berries in clear glasses. It looks beautiful and adds a fruity taste. For a special touch, use mint leaves as a garnish. You can also sprinkle dark chocolate shavings or cocoa nibs on top for extra crunch and flair. {{image_4}} You can change the taste of your mousse with fun flavors. Try adding spices like cinnamon for warmth or cayenne for a kick. These spices add depth and make your dessert special. You can also mix in nut butters, like almond or peanut butter, to create a richer flavor. This twist makes the mousse even creamier and adds healthy fats. If you want a vegan mousse, you can swap out the sweeteners and milk. Use agave syrup instead of honey, and choose coconut or soy milk instead of almond milk. This way, everyone can enjoy the treat. For those with nut allergies, simply use oat or rice milk in place of almond milk. This keeps the mousse safe and tasty for all. Your mousse pairs well with many desserts or snacks. Try serving it with fresh fruit like strawberries or raspberries for a refreshing contrast. You can also layer it with granola for added crunch. For festive occasions, consider using fancy glasses and adding a sprig of mint on top. This makes your mousse look as good as it tastes! To keep your avocado chocolate mousse fresh, use airtight containers. Glass containers work great. They keep flavors in and other smells out. Make sure to seal them tightly. This helps prevent the mousse from browning. Store the mousse in the fridge. The cool temperature keeps it creamy. Avoid leaving it out for long. Heat can change its texture and taste. Your mousse should last about three days in the fridge. After that, its quality may drop. Check for any signs of spoilage. If the mousse smells off or has changed color, it’s time to toss it. Trust your senses; they guide you well. If your mousse thickens too much, you can refresh it. Just add a bit more almond milk. Blend it again until it’s smooth. If you have leftovers, think of ways to reuse them. You can layer the mousse with yogurt or fresh fruit. It makes a fun dessert! Yes, you can use ripe bananas. However, they will change the taste. Bananas are sweeter and more fruity. Avocados have a creamy texture, while bananas are softer. Nutritional comparisons: - Ripe avocados are high in healthy fats. - Bananas are rich in potassium and fiber. - If you want healthy fats, stick with avocados. Flavor and texture differences: - Avocados give a rich, creamy taste. - Bananas add sweetness and a fruity flavor. - The mousse will have a different feel. Yes, it is healthy. It has good fats, fiber, and antioxidants. This mousse uses natural sweeteners like maple syrup or honey. Breakdown of health benefits: - Avocados help heart health with their fats. - Cocoa powder has antioxidants that fight free radicals. - Maple syrup or honey provides vitamins and minerals. Comparison to traditional chocolate mousse: - Traditional mousse uses heavy cream and sugar. - Avocado mousse has fewer calories and more nutrients. - It’s a guilt-free dessert that still tastes great. Look for a few signs when buying avocados. A ripe avocado feels slightly soft when you press it gently. Tips for choosing avocados at the store: - Choose firm avocados if you plan to use them later. - If they feel soft, they are likely ripe now. - Darker skin usually means they are ripe. Signs of ripeness to look for at home: - Press gently; it should give slightly. - If it feels mushy, it is overripe. - Store them at room temperature to ripen. This mousse recipe is simple and fun. You learned about the key ingredients and how to prepare them. We discussed blending techniques for the perfect texture and flavor. You also picked up tips on storage and serving ideas. Remember, this dessert is both tasty and healthy. Experiment with flavors and presentations to make it your own. Enjoy making and sharing your delicious avocado chocolate mousse!

Avocado Chocolate Mousse Creamy and Delightful Treat

Are you ready to indulge in a rich, creamy treat that’s good for you? My Avocado Chocolate Mousse combines healthy

To make these tasty vegan cookie dough bites, you need: - 1 cup almond flour - 1/2 cup rolled oats - 1/2 cup almond butter (or peanut butter) - 1/4 cup pure maple syrup - 1 teaspoon vanilla extract - 1/4 teaspoon fine sea salt - 1/2 cup dairy-free dark chocolate chips - 1/4 cup chopped walnuts (optional) You can swap several ingredients to fit your taste. Here are some options: - Almond flour: Use oat flour or whole wheat flour. - Almond butter: Peanut butter works well too. - Maple syrup: Agave syrup or honey can replace it (note: honey is not vegan). - Rolled oats: Quick oats or ground oats can be used. - Dairy-free dark chocolate chips: Any dairy-free chocolate will work. - Chopped walnuts: Try pecans or skip them for nut-free bites. Each ingredient brings its own health perks: - Almond flour: Low in carbs and high in protein. - Rolled oats: Good for fiber and helps with digestion. - Almond butter: Offers healthy fats and protein for energy. - Maple syrup: Natural sweetener with minerals like manganese. - Vanilla extract: Adds flavor and has antioxidant properties. - Fine sea salt: Enhances taste and helps with hydration. - Dairy-free dark chocolate chips: Rich in antioxidants and lowers stress. - Chopped walnuts: Great source of omega-3 fatty acids and vitamins. These ingredients not only taste great but also support your health in various ways! Making vegan cookie dough bites is easy and fun. You will need simple ingredients that mix well. This process takes about 15 minutes of prep time. You will chill the bites for 30 minutes before enjoying them. 1. Mix Dry Ingredients: Start with a large bowl. Add 1 cup of almond flour and 1/2 cup of rolled oats. Use a whisk or spoon to mix them well. This step gives a good base for the bites. 2. Combine Wet Ingredients: In another bowl, mix 1/2 cup of almond butter, 1/4 cup of pure maple syrup, 1 teaspoon of vanilla extract, and 1/4 teaspoon of fine sea salt. Stir until this mixture is smooth and creamy. 3. Make the Dough: Slowly pour the wet mixture into the dry mixture. Stir as you pour. You want a thick, pliable dough. If it feels too dry, add a splash of water or more maple syrup. 4. Add Mix-ins: Gently fold in 1/2 cup of dairy-free dark chocolate chips. If you like a crunch, add 1/4 cup of chopped walnuts. Mix until everything is evenly distributed. 5. Shape the Bites: Use your hands to scoop about one tablespoon of dough. Roll it into a ball. Repeat this until all dough is shaped into bites. Place the cookie dough bites on a baking sheet lined with parchment paper. Put the baking sheet in the fridge for about 30 minutes. This helps the bites firm up. When ready to serve, enjoy them cold as a snack or dessert. For added flair, serve them on a nice platter. A dusting of cocoa powder or a sprinkle of sea salt can make them look even more delightful! To make the best vegan cookie dough bites, start with good ingredients. Use fresh almond flour and rolled oats. Measure carefully. For the nut butter, I recommend almond butter for creaminess. You can also use peanut butter if you prefer. Mix the dry and wet ingredients well for a smooth dough. If the dough feels dry, add a splash of water. This makes it easier to shape into bites. One common mistake is not mixing enough. If you don’t mix well, the bites may crumble. Another mistake is using too much almond flour. This will make the dough too dry. Always check your measurements. Also, don’t skip the chilling step. Chilling helps the bites firm up and hold their shape. To boost flavor, use pure vanilla extract. It adds depth and sweetness. You can also add spices like cinnamon for warmth. If you want crunch, include walnuts or pecans. For a sweeter taste, increase the maple syrup slightly. These tips help create a more delightful treat. {{image_4}} To make gluten-free vegan cookie dough bites, use almond flour as your base. Almond flour is naturally gluten-free and gives a nice texture. Always check your oats to ensure they are certified gluten-free. You can also try coconut flour as a substitute, but use less, as it absorbs more moisture. If you want sugar-free cookie dough bites, swap the maple syrup for a sugar-free sweetener. Stevia or monk fruit work well. You might need to adjust the wet ingredients to keep the dough moist. Always taste the dough as you mix to find the right sweetness level. You can add fun flavors to your cookie dough bites. Try mixing in spices like cinnamon or nutmeg for warmth. For a twist, add a splash of almond extract for a different taste. You can also include mix-ins like dried fruit, coconut flakes, or seeds. Each add-in changes the flavor and makes each bite special. Get creative and find your favorite combinations! To keep your vegan cookie dough bites fresh, store them in an airtight container. This helps prevent them from drying out or absorbing other flavors. Placing parchment paper between layers can also keep them from sticking together. Always keep them in the fridge for the best taste and texture. When stored properly, vegan cookie dough bites can last up to one week in the fridge. After that, they may lose some freshness. If you notice changes in texture or smell, it’s time to toss them out. Always check for signs of spoilage before enjoying your treats. Want to make your cookie dough bites last longer? Freeze them! To do this, place the bites in a single layer on a baking sheet. Freeze them for about an hour until firm. Then, transfer them to a freezer-safe bag or container. They can stay fresh for up to three months. When you crave a treat, just thaw them in the fridge or enjoy them frozen for a cool snack. Yes, you can swap almond butter for peanut butter or sunflower seed butter. Each nut butter adds its own flavor. Peanut butter gives a strong taste, while sunflower seed butter is nut-free. This makes the bites safe for schools. These cookie dough bites last about one week in the fridge. Store them in an airtight container. This keeps them fresh and tasty. If you want them to last longer, consider freezing them. Absolutely! These cookie dough bites are a fun and healthy treat for kids. They are made with wholesome ingredients and no raw eggs. Kids love the sweet taste and chocolate chips. They can enjoy them as a snack or dessert. You can find ready-made vegan cookie dough bites at health food stores or online. Many brands offer tasty options. Look for ones with simple, natural ingredients. You can also check local vegan cafes or bakeries for fresh options. This blog post covered key ingredients and how to make delicious cookie dough bites. You learned about ingredient substitutions, health benefits, and step-by-step instructions. We shared tips to perfect your recipe and avoid common mistakes. Plus, we explored tasty variations and essential storage tips. Remember, making cookie dough bites is simple and fun. Use this guide to create tasty treats your friends and family will love! Enjoy the process and share your creations. Happy baking!

Vegan Cookie Dough Bites Tasty Treat for Everyone

Craving a tasty treat that fits your diet? Try my Vegan Cookie Dough Bites! These delicious snacks are simple to

Older posts
Newer posts
← Previous Page1 … Page18 Page19 Page20 … Page83 Next →

dsad

© 2026 eataroundit • Built with GeneratePress

Our Policies

  • Copyright Policy
  • Cookie Policy
  • GDPR Policy
  • Privacy Policy
  • Disclaimer
  • Terms Of Use

More Information

  • Home
  • About
  • Contact
  • Appetizers
  • Dessert
  • Dinner
  • Drinks
©2026, eataroundit About Back To Top