Skip to content
DisclaimerTerms Of UseGDPR PolicyCookie Policy

eataroundit

  • Home
  • Drinks
  • Appetizers
  • Dinner
  • Dessert
  • About
  • Contact
  • Privacy Policy
DisclaimerTerms Of UseGDPR PolicyCookie Policy

NO-ING-IMG

- 1 lb Brussels sprouts, halved - 3 tablespoons olive oil - 4 garlic cloves, minced Brussels sprouts are the star here. Their nutty flavor shines when roasted. Olive oil helps them crisp up nicely. Garlic adds a wonderful aroma and taste. - 1/4 cup honey - 1 tablespoon soy sauce - 1 teaspoon apple cider vinegar This sauce is a sweet and savory dream. Honey brings sweetness, while soy sauce gives depth. Apple cider vinegar adds a touch of tang. Together, they create a sticky glaze. - Salt and pepper - 1/4 teaspoon crushed red pepper flakes (optional) - 1/4 cup toasted sesame seeds - 2 green onions, sliced Seasoning is key to great flavor. Salt and pepper enhance every bite. Crushed red pepper flakes add heat, if you like spice. Toasted sesame seeds provide crunch. Sliced green onions give color and freshness. - Step 1: Preheat the Skillet Start by placing your large skillet over medium heat. Pour in the olive oil. Let it warm for one minute. It should be hot but not smoking. - Step 2: Sauté Brussels Sprouts Carefully add the halved Brussels sprouts to the skillet. Make sure the cut sides face down. Sprinkle a pinch of salt and pepper on top. Cook them for about 5-7 minutes. You want a nice golden brown crust on one side. - Step 3: Add Garlic Once the sprouts are browned, add the minced garlic. Stir gently and let it cook for 1-2 minutes. Keep an eye on it so the garlic does not burn. - Step 4: Create Sauce In a small bowl, whisk together honey, soy sauce, and apple cider vinegar. If you like heat, add crushed red pepper flakes. This mix brings a sweet and savory flavor. - Step 5: Combine and Glaze Pour that sticky sauce over the Brussels sprouts. Stir well to coat them evenly. Let them cook for another 3-4 minutes. This helps the sauce thicken and the sprouts become tender yet crispy. - Step 6: Taste and Adjust Seasoning After cooking, taste the dish. Adjust the seasoning with salt and pepper as needed. When you're happy with the flavor, remove the skillet from heat. To ensure Brussels sprouts develop a golden crust, start with a hot skillet. Heat the olive oil until it shimmers. Place the sprouts cut side down in the skillet. Do not overcrowd the pan; this helps them brown evenly. Let them cook undisturbed for 5-7 minutes. This patience pays off with a nice crust. Preventing garlic from burning is key to great flavor. Add the minced garlic only after the Brussels sprouts brown. Stir it gently to release the aroma. Cook it for just 1-2 minutes. Watch closely, as garlic burns quickly and can turn bitter. For presentation, transfer the glazed Brussels sprouts to a serving platter. A sprinkle of toasted sesame seeds adds crunch and color. Scatter sliced green onions on top for freshness. This simple step makes the dish look gourmet. Pair these Brussels sprouts with roasted chicken or grilled fish. They also shine as a main vegetarian dish, served with quinoa or rice. The sweet and savory flavors complement many main courses. To store leftovers, let the Brussels sprouts cool first. Place them in an airtight container. They last in the fridge for up to 3 days. For longer storage, freeze them in a freezer-safe bag. When reheating, use a skillet for best results. Heat over medium for 5-7 minutes until warmed through. You can also use the microwave, but this may soften them. Enjoy your delicious dish even days later! {{image_4}} You can easily change the flavor of honey garlic Brussels sprouts. - Adding bacon or pancetta for a savory twist: Adding crispy bacon or pancetta gives a nice salty flavor. Just cook the bacon first, then add the Brussels sprouts to the same skillet. The bacon fat adds richness to the dish. - Incorporating other vegetables: You can mix in other veggies like carrots or bell peppers. They bring extra color and texture. Just make sure to cut them to a similar size for even cooking. There are ways to adapt this dish to fit different diets. - Making it vegan: You can make this dish vegan by replacing honey with maple syrup or agave nectar. This keeps the sweetness while keeping it plant-based. - Low-sugar alternatives: If you want a lower sugar option, use less honey or a sugar-free syrup. You can also add more garlic and spices for flavor without the sugar. The way you serve honey garlic Brussels sprouts can change the meal. - Using as a side dish vs main entrée: This dish works well as a side. Pair it with your favorite protein like chicken or fish. It can also stand alone as a main dish, especially if you add grains like quinoa or brown rice. - Options for different occasions: You can serve this dish for casual family dinners or special occasions. Its bright colors and taste make it a hit at any gathering. You can store leftover Honey Garlic Brussels Sprouts in the fridge for about 3 to 4 days. Place them in an airtight container to keep them fresh. If you want to save them longer, you can freeze them. Just make sure to spread them out on a baking sheet first. Once frozen, transfer them to a freezer bag. They can last for up to 2 months in the freezer. To keep the texture nice, I recommend reheating on the stovetop. Heat a skillet over medium heat and add a splash of olive oil. Add the sprouts and stir until warmed through. This method helps to bring back that crispy edge. You can use the microwave if you're in a hurry, but it might make them a bit soggy. If you choose the microwave, heat in short bursts and stir in between. You can easily add these sprouts to other dishes. Try chopping them up and mixing them into pasta or grain bowls. They also work great in salads. Toss them with some greens, nuts, and a light dressing for a tasty meal. You can even use them as a topping for pizza, adding a sweet and savory twist to your slice. How do you know when Brussels sprouts are done cooking? You can tell Brussels sprouts are done when they are tender. They should also have a nice golden crust. You can test their doneness by piercing them with a fork. If it goes in easily, they are ready. Can I substitute other sweeteners for honey? Yes! You can use maple syrup or agave nectar instead of honey. Each will give a unique flavor. Adjust the amount to taste, as some sweeteners are sweeter than honey. What can I add to the recipe for extra flavor? You can add bacon or pancetta for a savory twist. Nuts like almonds or walnuts add crunch. Try adding a splash of lemon juice for fresh brightness. You can also mix in other veggies like carrots or bell peppers. Can I make this dish ahead of time? Yes, you can prep the Brussels sprouts ahead. Cook them, then store in the fridge for up to two days. Reheat in a skillet when you're ready to serve. This helps the flavors meld nicely, making them even tastier. Are Brussels sprouts healthy? Yes, Brussels sprouts are very healthy! They are low in calories and high in vitamins. They contain fiber, which is good for digestion. They also have antioxidants that support overall health. How can I make this recipe gluten-free? To make this recipe gluten-free, use tamari instead of soy sauce. Tamari is a gluten-free soy sauce. Always check labels to ensure other ingredients are gluten-free. This allows everyone to enjoy this tasty dish! This blog post shared a tasty Brussels sprouts recipe with easy steps and helpful tips. You learned about key ingredients, like honey and garlic, that elevate the dish. I also provided storage and reheating advice. Embrace creativity by trying variations, like adding bacon or making it vegan. With these ideas, you can enjoy a delightful meal any time. Dive in and savor every bite!

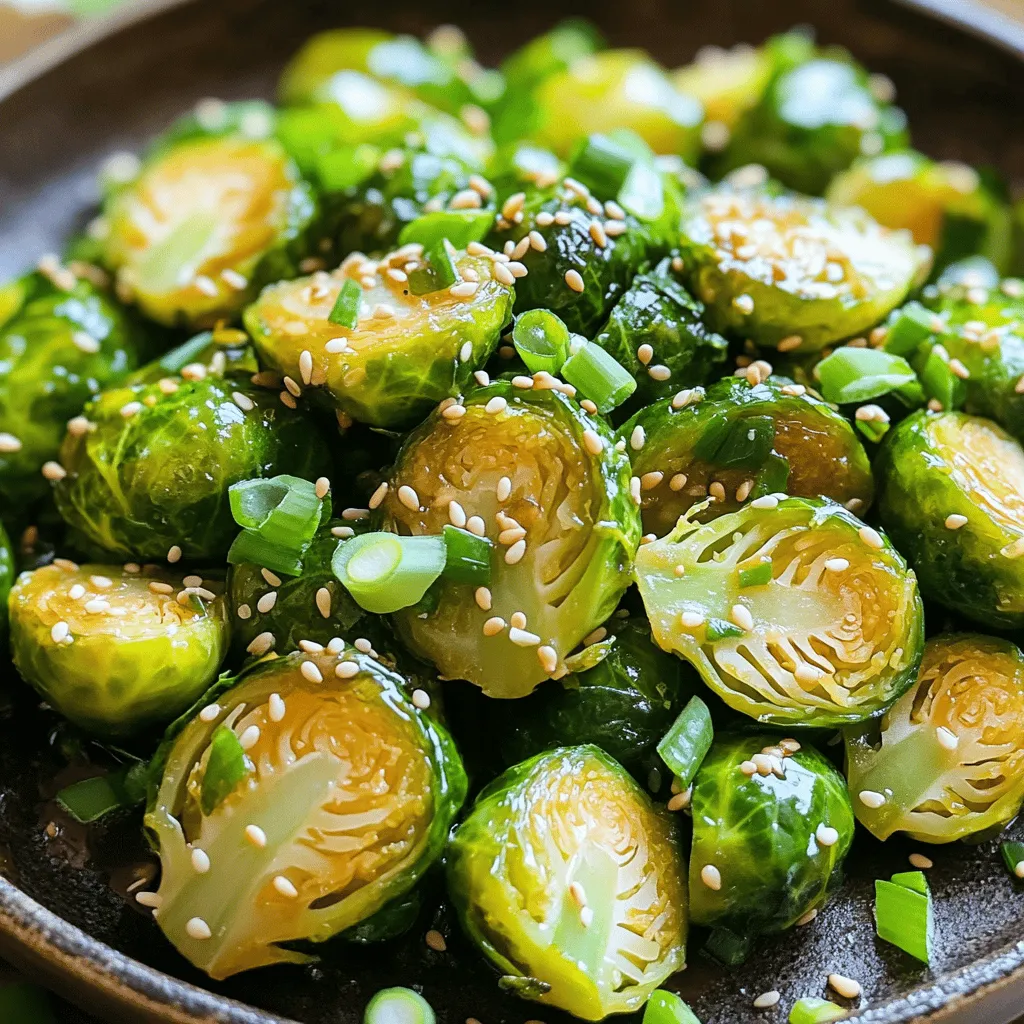
Honey Garlic Brussel Sprout Skillet Flavorful Delight

Welcome to my kitchen, where we’re making a Honey Garlic Brussel Sprout Skillet that dances with flavor! This easy recipe

To make a tasty chocolate hazelnut mug cake, gather these ingredients: - 4 tablespoons all-purpose flour - 2 tablespoons unsweetened cocoa powder - 3 tablespoons granulated sugar (adjust to taste) - 1/8 teaspoon baking powder - 1/4 teaspoon fine sea salt - 3 tablespoons milk (can substitute with any plant-based milk) - 2 tablespoons vegetable oil (or melted coconut oil for a richer flavor) - 1 teaspoon pure vanilla extract - 1 tablespoon chocolate hazelnut spread (such as Nutella) - Chopped hazelnuts for garnishing (optional) You can easily swap some ingredients for others. Here are a few ideas: - Flour: Use whole wheat flour for a healthier option. - Cocoa Powder: Dark cocoa powder can give a richer taste. - Sugar: You can use brown sugar or coconut sugar for a different flavor. - Milk: Almond, oat, or soy milk works well. - Oil: Melted butter can replace vegetable oil for added richness. - Hazelnut Spread: Any nut butter can be a good substitute for a different flavor. Garnishes can take your mug cake to the next level! Consider these options: - Top with extra chocolate hazelnut spread for a gooey touch. - Add a scoop of vanilla ice cream for creaminess. - Sprinkle chopped hazelnuts for extra crunch and flavor. - Drizzle with chocolate sauce for a touch of sweetness. These simple additions can make your mug cake even more delightful! Grab a microwave-safe mug. Add 4 tablespoons of all-purpose flour, 2 tablespoons of unsweetened cocoa powder, and 3 tablespoons of granulated sugar. You can adjust the sugar for your taste. Next, add 1/8 teaspoon of baking powder and 1/4 teaspoon of fine sea salt. Use a small whisk to mix these dry ingredients well. Make sure there are no lumps. This step is key for a smooth cake. Now, pour in 3 tablespoons of milk. You can use any plant-based milk if you prefer. Next, add 2 tablespoons of vegetable oil or melted coconut oil for a richer taste. Don't forget to add 1 teaspoon of pure vanilla extract. Mix all these wet ingredients together until you see no dry flour. The batter should be smooth and thick. Take 1 tablespoon of chocolate hazelnut spread and gently spoon it into the batter. Use a spatula or spoon to fold it in. Aim for a marbled look. Be careful not to overmix. You want to see swirls of chocolate hazelnut spread throughout your batter. If you like, sprinkle some chopped hazelnuts on top for extra crunch. This is optional but adds great flavor! Now you are ready to cook your mug cake! Cooking a mug cake in the microwave is quick and easy. Make sure to use a microwave-safe mug. This helps prevent any accidents. Start by cooking for 1 minute, then check. If it looks wet in the center, add 10 seconds. Repeat this until it’s done. Remember, every microwave is different. For a soft and fluffy mug cake, mix carefully. Combine the dry and wet ingredients gently. Overmixing can make it tough. You want a smooth batter with some small lumps. When adding the chocolate hazelnut spread, fold it in lightly. This keeps that rich, gooey texture. You can adjust the sweetness to fit your taste. If you like it sweeter, add more sugar. Want less sugar? Reduce it a bit. You can also try different milks. Almond or oat milk works great. For a twist, use flavored oils, like hazelnut oil. Add a pinch of cinnamon or espresso powder for extra depth. {{image_4}} To make a gluten-free mug cake, swap the all-purpose flour with a gluten-free flour blend. Many options work well, like almond flour or coconut flour. Just remember, if you use coconut flour, adjust the amount. You may need less. This change keeps the cake tasty while catering to gluten-free diets. For a vegan version, replace the milk with any plant-based milk. Almond milk or oat milk are great choices. Use a vegan chocolate hazelnut spread, like Nutiva or Justin's. You can also switch the vegetable oil for melted coconut oil for a richer taste. This keeps all the flavors but makes it plant-based. Experiment with fun flavors! You can add a pinch of cinnamon for warmth. A dash of espresso powder brings out chocolate's richness. Want more texture? Toss in some mini chocolate chips or even a swirl of peanut butter. Each of these adds a twist to the classic mug cake. Enjoy mixing and matching until you find your favorite flavor! If you have extra mug cake, store it in an airtight container. This keeps the cake moist. Place it in the fridge to keep it fresh. It will last for up to three days. To reheat your mug cake, use the microwave. Heat it for about 10 to 15 seconds. Check if it’s warm enough. If not, add a few more seconds. Be careful not to overheat, or it may dry out. For the best taste, eat the mug cake right away. If you must store it, make sure the lid is secure. When ready to eat, consider adding a touch of milk. This adds moisture back to the cake. Enjoying it warm is always best! Cooking a mug cake takes about 1 minute and 30 seconds in the microwave. Every microwave is different, so check it at 1 minute. The cake should rise and look set. You want it moist in the center, not dry. Yes, you can make this mug cake in an oven. Preheat your oven to 350°F (175°C). Pour the batter into an oven-safe dish instead of a mug. Bake for about 15 minutes. Keep an eye on it to avoid overcooking. You can use peanut butter or almond butter instead. Both will give a rich taste. You could also try a chocolate spread that is nut-free. Just adjust the flavor to your liking. This blog post covered the key steps to make a delicious chocolate hazelnut mug cake. We looked at essential ingredients, how to mix them, and helpful techniques for cooking. I also included variations and storage tips to keep your cake fresh. Feel free to customize flavors or textures to suit your taste. Enjoy your tasty mug cake and share it with friends! Happy baking!

Chocolate Hazelnut Mug Cake Quick and Easy Treat

Craving something sweet? Let me introduce you to the Chocolate Hazelnut Mug Cake! This quick and easy treat will satisfy

- 2 ripe avocados - 1 lb shrimp, peeled and deveined - 1 tablespoon Cajun seasoning - 2 tablespoons olive oil - 1/2 red bell pepper, diced - 1/4 cup red onion, finely chopped - 2 cloves garlic, minced - 1/4 cup corn (either fresh or canned) - 1/4 cup cherry tomatoes, halved - Juice of 1 lime - 2 tablespoons fresh cilantro, chopped - Salt and pepper to taste Cajun Shrimp Stuffed Avocados need fresh ingredients to shine. Start with ripe avocados. They should feel soft but not mushy. The shrimp is the star here. Use peeled and deveined shrimp for ease. Cajun seasoning adds a spicy kick. You can find this at any grocery store. For the vegetables, I love using red bell pepper and red onion. They add color and crunch. Fresh garlic gives a nice flavor boost. You can use corn, fresh or canned. Cherry tomatoes add sweetness and make the dish vibrant. Finally, lime juice brings it all together. It adds freshness and balances the flavors. Don't forget the cilantro! It adds a bright, fresh taste. The salt and pepper enhance all the other flavors. Gather all these ingredients before you begin. It makes the process much smoother. Each ingredient plays a role in making this dish delicious and fresh. Coating the shrimp with Cajun seasoning Start by taking 1 pound of peeled and deveined shrimp. Place them in a bowl. Sprinkle 1 tablespoon of Cajun seasoning over the shrimp. Toss gently until they are well coated. This step infuses great flavor into the shrimp. Cooking the shrimp in a skillet Heat 2 tablespoons of olive oil in a skillet over medium heat. Once the oil is hot, add 2 minced cloves of garlic. Sauté for around 30 seconds until fragrant. Next, add the seasoned shrimp to the skillet. Cook the shrimp for 2-3 minutes on each side. They should turn pink and opaque. Once done, remove the skillet from heat and let the shrimp cool slightly. Mixing the cooked shrimp with vegetables In a separate bowl, combine the cooked shrimp with diced vegetables. Use 1/2 a diced red bell pepper, 1/4 cup of finely chopped red onion, and 1/4 cup of corn. You can use fresh or canned corn. Also, add 1/4 cup of halved cherry tomatoes. Adding lime juice and seasoning Squeeze the juice of 1 lime into the bowl. Add 2 tablespoons of chopped fresh cilantro. Season the mixture with salt and pepper to taste. Stir everything gently until well combined. This filling is fresh and so tasty! Halving and hollowing the avocados Take 2 ripe avocados. Carefully slice each avocado in half and remove the pit. Use a spoon to scoop out a bit of the flesh from each half. This creates extra space for the filling. Filling the avocado halves with shrimp mixture Now, take the shrimp mixture and spoon it into the hollowed-out avocado halves. Fill them generously. Each half should be packed with this delicious mix. These stuffed avocados are ready to enjoy! To ensure shrimp are perfectly cooked, watch their color. Cook them until they turn pink and opaque. This usually takes about 2-3 minutes on each side. Avoid overcooking, as it makes the shrimp tough. Use medium heat to keep things steady. For the best seasoning, coat the shrimp well with Cajun seasoning. I like to use a tablespoon for a pound of shrimp. Toss the shrimp gently in the bowl to make sure each piece gets the spice. If you want more heat, add a pinch of cayenne pepper. For serving, arrange the stuffed avocados on a colorful platter. This adds a nice pop to your table. Garnish with extra cilantro leaves and lime wedges to make it look fresh. To create visual appeal, scoop the avocado flesh out carefully. This gives you more room for the shrimp mixture. Fill each half generously, letting the colorful filling peek out. It makes for a dish that is as tasty as it is beautiful. {{image_4}} You can change the proteins in this dish. For example, use cooked chicken or crab instead of shrimp. Both options fit well with the flavors. If you want a vegetarian choice, try black beans or tofu. Switching vegetables is also easy. Add diced cucumbers for crunch, or try corn for sweetness. You can use scallions instead of red onion for a milder taste. Mix in some jalapeños if you want a spicy kick. Adjust the spice levels to match your taste. If you like it mild, reduce the Cajun seasoning. For a bolder flavor, add more seasoning or include hot sauce. You can enhance the dish with sauces. A drizzle of creamy ranch or a zesty vinaigrette adds depth. I often mix a little sour cream with lime juice for extra creaminess. These tweaks keep the dish fresh and exciting. To keep your Cajun shrimp stuffed avocados fresh, store them properly. First, separate the shrimp filling from the avocado halves. This helps keep the avocado from browning. - For the filling: - Place the shrimp mixture in an airtight container. - It can last in the fridge for up to 2 days. - For the avocados: - Wrap each half tightly in plastic wrap. - If you want to slow browning, squeeze a bit of lime juice on the flesh before wrapping. - Store in the fridge for up to 1 day. When you're ready to enjoy the leftovers, reheat the shrimp mixture. - Best practices: - Use a skillet over medium heat. - Add a splash of olive oil to keep it moist. - Stir often for about 2-3 minutes until the shrimp is warm. Avoid microwaving the shrimp, as it can make them tough. Enjoy your meal! Can I prepare this dish in advance? Yes, you can prep the shrimp filling ahead of time. Just make sure to store it in the fridge. I recommend filling the avocados just before serving. This keeps them fresh and prevents browning. What are the best sides to serve with it? I love pairing these stuffed avocados with a light salad or grilled veggies. You can also serve them with tortilla chips for a fun crunch. How do I know if avocados are ripe? Ripe avocados feel slightly soft when you gently squeeze them. The skin should be dark green or black, depending on the type. If they are too firm, give them a few days to ripen. Substitutes for shrimp? If you’re not a fan of shrimp, try diced chicken or crab. You could also use beans for a vegetarian option. Is this recipe gluten-free? Yes, this recipe is gluten-free! All the ingredients are safe for those avoiding gluten. Enjoy without worry! You can make delicious Cajun shrimp stuffed avocados using simple steps. Start with ripe avocados and seasoned shrimp, then mix in some veggies. With tips on cooking and presentation, you can impress anyone. Don’t forget about the fun variations and storage tips. This dish is not just tasty, it's also adaptable! Enjoy your cooking and experiment with flavors. Now, you have all the tools to create a great meal. Happy cooking!

Cajun Shrimp Stuffed Avocados Flavorful and Fresh Dish

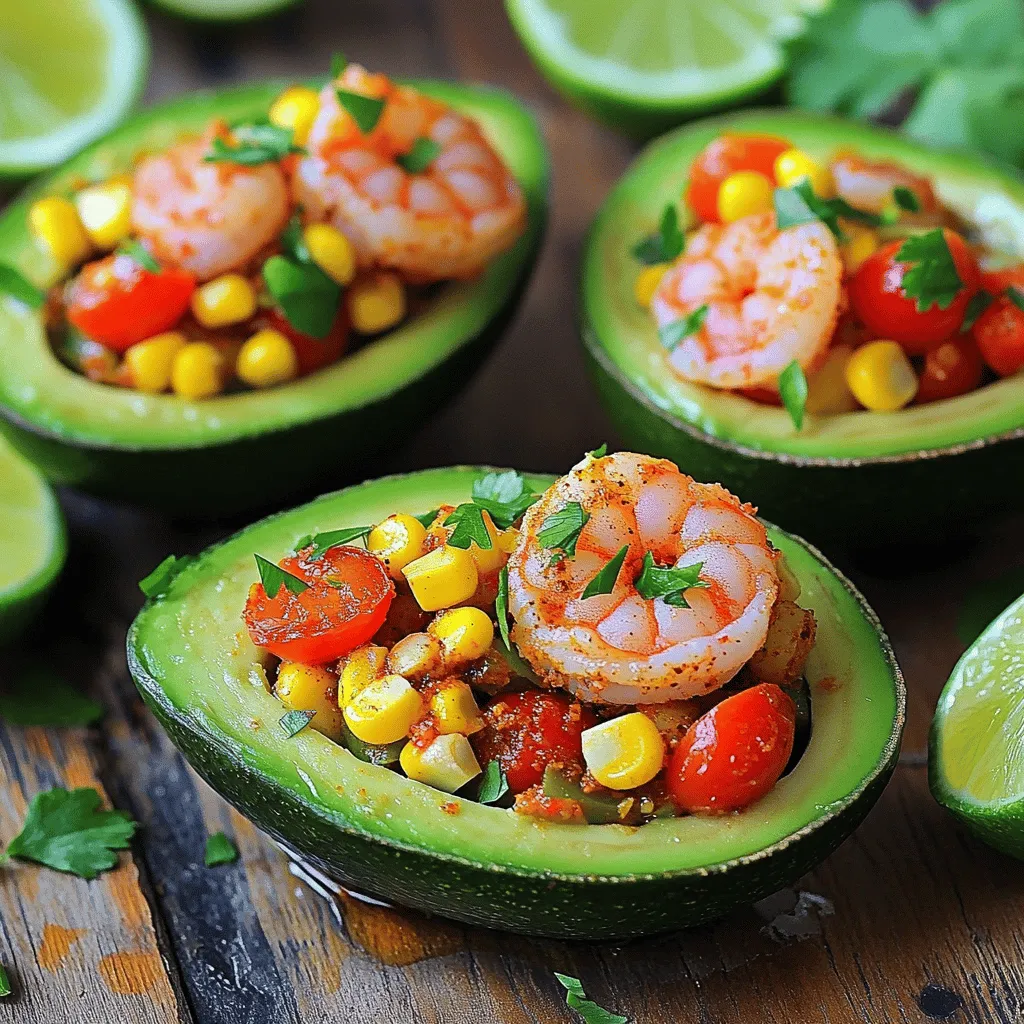
Craving a dish full of flavor and freshness? You’re in the right place! Cajun shrimp stuffed avocados combine spicy shrimp,

To make delicious strawberry cheesecake yogurt parfaits, you will need the following ingredients: - 2 cups Greek yogurt (choose plain or vanilla for added flavor) - 1 cup cream cheese, softened to room temperature - 1/4 cup honey or maple syrup (adjust sweetness to taste) - 1 teaspoon pure vanilla extract - 1 cup fresh strawberries, hulled and sliced - 1/2 cup granola (your preferred variety for texture) - Fresh mint leaves for garnish (optional, but recommended for freshness) Each ingredient plays a key role in creating a creamy, sweet treat. Greek yogurt gives a thick texture and protein boost. Cream cheese adds rich creaminess that blends well with yogurt. Sweeteners like honey or maple syrup offer a touch of natural sweetness. Fresh strawberries bring bright flavors and vibrant color. Granola adds a satisfying crunch, balancing the smooth layers. Mint leaves can bring a fresh touch to your final dish. When choosing your ingredients, focus on quality. Fresh strawberries should be ripe and sweet. For yogurt, opt for a brand you trust. A good cream cheese can elevate the whole dish. Using high-quality granola will add great texture. This combination makes each bite a delightful experience. To start, gather your ingredients. In a mixing bowl, add the softened cream cheese, Greek yogurt, honey (or maple syrup), and vanilla extract. Use a hand mixer and beat everything on medium speed. You want it to be smooth and creamy. Make sure there are no lumps; this gives the best texture. Next, grab your fresh strawberries. Hull them and slice them into thin pieces. If you want, drizzle a teaspoon of honey over the strawberries and toss gently. This step adds sweetness and makes them even tastier. Now, it's time to layer your parfaits. Take clear serving glasses or bowls. Start by spooning a layer of the cheesecake mixture into the bottom. Then, add a layer of your sliced strawberries on top. Make sure they are evenly spread out. After the strawberries, sprinkle a layer of granola over them. This adds a nice crunch to your parfait. Repeat the layers: cheesecake mixture, strawberries, and granola. Finish with a layer of the cheesecake mixture on top. For the final touch, you can add a few sliced strawberries and a mint sprig on top. Place the parfaits in the fridge to chill for at least 30 minutes. This helps the flavors mix and the parfaits to set. To get the best texture for your parfait, softening the cream cheese is key. When it sits at room temperature, it blends smoothly. This makes mixing easier. If the cream cheese is cold, it can clump. You want a creamy, lump-free mix. I recommend using a hand mixer to beat the mixture. This ensures it becomes smooth and fluffy. For a beautiful look, use clear glasses. They let you see the lovely layers. Each layer of cheesecake, strawberries, and granola should be visible. Just before serving, add extra strawberry slices on top. A light drizzle of honey also makes it look nice. You can even add fresh mint leaves for a pop of color. You can easily adjust the sweetness to fit your taste. Start with the 1/4 cup of honey or maple syrup. Taste the mixture after mixing. If you want it sweeter, you can add more. Just remember, the strawberries will add some sweetness too. Balancing the flavors is important for a perfect treat. {{image_4}} You can switch up the fruit in your parfaits. Try using blueberries or raspberries for a fun twist. Both berries add a burst of flavor. Seasonal fruits like peaches or mangoes also work well. These fruits can bring bright colors and new tastes to your dish. Using Greek yogurt gives your parfaits a rich texture. You can also use regular yogurt for a lighter feel. If you prefer dairy-free, try coconut or almond yogurt. Both options blend well with the cheesecake mixture. They also provide a nice taste without dairy. Consider adding nuts or seeds for extra crunch. Chopped almonds or sunflower seeds can enhance the texture. You can also use different granola types for variety. If you love chocolate, drizzling some syrup on top can make it even better. It adds a sweet finish to your parfaits. To store your parfaits, use airtight containers. Glass jars or plastic containers work well. This keeps the parfaits fresh and tasty. You can store them in the fridge for up to three days. Make sure to cover them well to avoid drying out. You can freeze parfaits, but it’s best to layer the components separately. Freeze the cheesecake mixture and fruit in individual containers. This way, they stay fresh longer. When you want to enjoy them, thaw the cheesecake mixture in the fridge overnight. For the fruit, let it sit at room temperature until soft. Avoid refreezing once thawed to keep the flavors and texture right. Yes, you can make these parfaits ahead of time. Prepare them a day before serving. Keep them in the fridge to chill. This gives the flavors time to blend well. Greek yogurt parfaits last about 3 days in the fridge. Store them in a sealed container. This keeps them fresh and tasty for longer. Yes, flavored yogurt works great! Use strawberry or vanilla for extra taste. Just remember that this may change the overall sweetness. You can use Greek yogurt as a substitute. It gives a creamy texture and adds protein. Silken tofu is another good option for a dairy-free choice. Yes, there are low-calorie options! Use low-fat cream cheese and sweetener. You can also opt for sugar-free yogurt. These swaps reduce calories while keeping flavor. You learned how to make tasty Greek yogurt parfaits. We covered ingredients, steps, tips, and storage. You can customize this treat with your favorite fruits and toppings. Remember, using soft cream cheese is key for smooth texture. These parfaits are easy to prepare and perfect for any occasion. Enjoy your delicious creation! You'll impress friends and family while staying healthy. Always feel free to switch things up based on your taste. Happy parfait making!

Strawberry Cheesecake Yogurt Parfaits Delightful Treat

Craving a delicious treat that’s also healthy? Let me introduce you to Strawberry Cheesecake Yogurt Parfaits! This delightful dessert combines

- 2 ripe avocados - 1 cup panko breadcrumbs - ½ cup all-purpose flour - 2 large eggs - ½ teaspoon garlic powder - ½ teaspoon smoked paprika - ¼ teaspoon cayenne pepper (optional) - Salt and pepper Using fresh, ripe avocados makes all the difference. Their creamy texture pairs perfectly with the crispy coating. Panko breadcrumbs add a light crunch that regular breadcrumbs cannot match. Using cooking spray is key. It helps the fries crisp up nicely in the air fryer. Without it, the fries may stick to the basket, making a mess. If you don’t have cooking spray, you can use a brush to apply a thin layer of oil. Just make sure it coats the basket well. You could also use parchment paper, but make sure it fits properly to avoid blocking airflow. Dipping sauces bring out extra flavor. I love spicy mayo for a zesty kick. Just mix mayo with a bit of sriracha for heat. Tangy salsa is another great choice. It adds freshness and pairs well with the avocado. You could also try ranch or guacamole for a fun twist. Experimenting with different dips can make this snack even more exciting! To start, cut each ripe avocado in half. Use a knife to slice around the pit, then twist to separate the halves. Carefully remove the pit with a spoon. Next, slice each half into wedges, keeping the skin on. The skin helps you hold the wedges while coating them. Now, let’s create a three-bowl breading station. In the first bowl, add the all-purpose flour. The second bowl should hold the beaten eggs. For the third bowl, mix the panko breadcrumbs with garlic powder, smoked paprika, cayenne pepper, salt, and pepper. Mix it well to spread the spices evenly. Each layer needs seasoning to boost flavor. Take each avocado wedge and dip it in the flour first. Shake off any extra flour. Next, dip it into the beaten eggs, letting the excess egg drip off. Finally, roll the wedge in the breadcrumb mix. Press gently to help the breadcrumbs stick well. This method keeps clumps at bay. Before cooking, spray the air fryer basket with cooking spray. This step is key to prevent sticking. You want to make sure the fries come out easily and stay crispy during cooking. For the cooking, set the air fryer to 400°F (200°C). Cook the avocado fries for 8-10 minutes. Flip them halfway through. This step ensures even cooking and a golden brown color on all sides. You want that perfect crispiness! After cooking, remove the fries carefully. Allow them to cool for a couple of minutes. Serve them warm for the best taste. For a great look, place them on a wooden board. Garnish with fresh herbs and offer dipping sauces on the side. To get that perfect crisp on your avocado fries, temperature is key. Set your air fryer to 400°F (200°C). This high heat helps create a golden crust while keeping the avocado creamy inside. Panko breadcrumbs are your best friend here. They are lighter and crispier than regular breadcrumbs. Using panko gives you that delightful crunch you crave. Regular breadcrumbs can make them dense and less enjoyable. One big mistake is overcrowding the air fryer basket. If you pack too many fries in, they won’t crisp up. Fry in batches to let hot air circulate around each fry. Also, check your avocados. If they are too ripe, they can become mushy. Adjust the cooking time if your avocados are firm or soft. Softer avocados need less time, while firmer ones may need a bit more. Adding spices can take your avocado fries up a notch. Try mixing in onion powder, chili powder, or even nutritional yeast for a cheesy flavor. You can also marinate the avocado wedges. A quick soak in lime juice adds a zesty kick. Season them with salt and pepper before coating for extra flavor. This step makes each bite a true delight. {{image_4}} For a vegan twist, you can skip the eggs. Instead, use plant-based options like unsweetened almond milk or aquafaba (the liquid from a can of chickpeas). Both work well to help the coating stick. For coatings, try using ground flaxseed mixed with water. This creates a nice binding effect. You could also use chickpea flour mixed with water as a great substitute. Want to spice things up? Add fresh herbs like cilantro or parsley to your breadcrumb mix. You can also try adding a pinch of cumin or onion powder for extra flavor. If you love cheese, sprinkle some nutritional yeast into the breadcrumb mixture. It gives a cheesy taste without dairy. You can even use finely grated vegan cheese for a melty twist. If you don't have an air fryer, don’t worry. You can bake these fries in the oven. Preheat to 425°F (220°C). Place the coated avocado wedges on a baking sheet and bake for about 15-20 minutes. Flip them halfway for even cooking. Deep-frying is another option. Heat oil in a pot to 350°F (175°C). Fry the wedges for about 2-3 minutes until golden brown. This method gives them a great crunch but uses more oil. To keep your avocado fries fresh, store them in the fridge. Place them in an airtight container. This helps to keep moisture away, which can make them soggy. Try to eat them within two days for the best taste. If you want to keep them crispy, put a paper towel in the container. This will absorb extra moisture. When it's time to enjoy your leftover fries, use the air fryer for reheating. Preheat the air fryer to 350°F (175°C). Place the fries in a single layer. Heat them for about 3-5 minutes. This method helps them regain their crispiness. Avoid using a microwave, as it can make them soggy. You want that perfect crunch back! If you want to freeze avocado fries, do it before frying. Slice the avocados and coat them with flour, egg, and panko. Lay them flat on a baking sheet and freeze until solid. Once they are frozen, transfer them to a freezer bag. When you want to fry them, thaw them in the fridge overnight. Then cook them straight in the air fryer. This keeps them tasty and fresh! Yes, you can prep these fries ahead. Slice the avocados and coat them. Place them in a single layer on a baking sheet. Cover with plastic wrap and store in the fridge. They stay fresh for a few hours. Just pop them in the air fryer when you are ready to cook. This method saves time and keeps them tasty. If you don't have panko, use regular breadcrumbs. They work well but won't be quite as crispy. You can also try crushed cornflakes for a different crunch. Ground nuts, like almonds, add flavor too. Just make sure to season them well for best results. Yes, avocado fries are a healthy snack. Avocados are rich in healthy fats, fiber, and vitamins. They help keep your heart healthy and improve digestion. When air-fried, they use less oil than traditional frying. This makes them a lighter option. Enjoy them guilt-free! A ripe avocado feels slightly soft when you press it. The skin should be dark green or almost black. If it’s too hard, it needs more time. If it's very soft or has dark spots, it may be overripe. For the best fries, use avocados that are just ripe. Using frozen avocados isn't ideal for frying. They can become mushy when thawed. If frozen, let them thaw in the fridge. Pat them dry to remove excess moisture. This helps improve texture, but fresh avocados are best for crispiness. If you have to use frozen ones, expect a softer fry. To sum up, we explored making crispy avocado fries. You learned the right ingredients, like ripe avocados and panko breadcrumbs. I shared tips on preparing, coating, and cooking in an air fryer. We also covered fun serving ideas and how to store leftovers. These avocado fries are tasty and easy to make. Enjoy this fun twist on a classic snack!

Air Fryer Crispy Avocado Fries Irresistible Snack

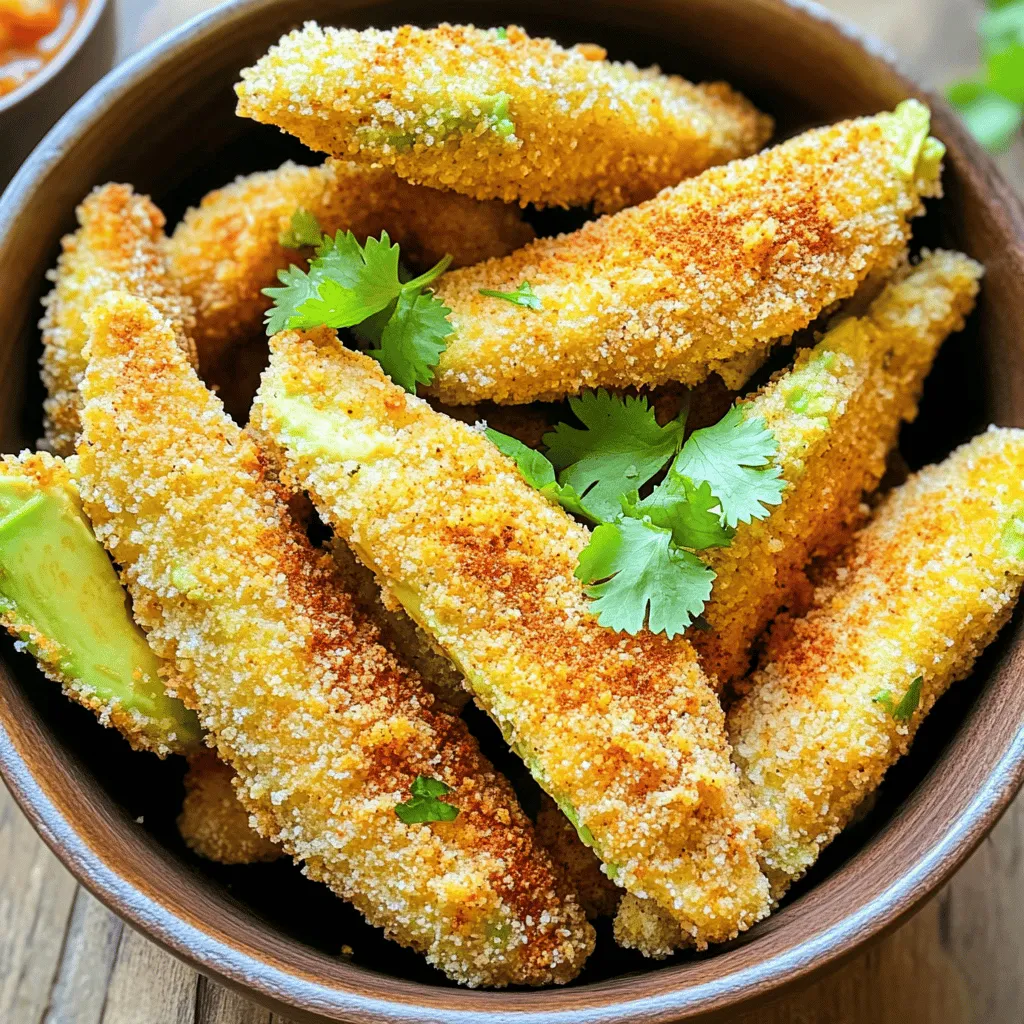
Craving a snack that’s both tasty and healthy? Let me introduce you to Air Fryer Crispy Avocado Fries! These golden

To make these tasty tacos, you need some key ingredients. Here’s what to gather: - 4 boneless, skinless chicken breasts - 1 cup corn kernels (fresh, frozen, or canned) - 1 can (15 oz) black beans, rinsed and drained - 1 cup diced tomatoes (canned or fresh) - 1 packet taco seasoning (about 1 oz) - 1 cup cream cheese, softened - 1/2 cup chicken broth (low sodium works best) - 1 tablespoon fresh lime juice - Salt and black pepper, to taste - Flour or corn tortillas, for serving Using the right seasonings makes all the difference. Taco seasoning adds great flavor. You can also mix in: - Garlic powder for depth - Onion powder for sweetness - A pinch of cayenne for heat - Fresh herbs, like cilantro, for brightness Garnishes can take your tacos to the next level. Consider these tasty options: - Fresh cilantro, finely chopped - Sliced avocado for creaminess - Lime wedges to squeeze on top - Salsa for added zest These ingredients and garnishes will help you create a delicious meal that everyone will love. Enjoy the process of gathering and preparing! To start, gather all your ingredients. You need four boneless, skinless chicken breasts. Place them flat at the bottom of your slow cooker. Next, take one cup of corn kernels. You can use fresh, frozen, or canned corn. Spread the corn evenly over the chicken. Then, rinse one can of black beans and drain them well. Add these beans on top of the corn. Now, chop one cup of tomatoes. You can use fresh or canned tomatoes. Add the diced tomatoes to the slow cooker, too. This mix will build a great base for your dish. Now for the fun part! Sprinkle one packet of taco seasoning over the ingredients. Make sure to coat the chicken well. In a separate bowl, mix one cup of softened cream cheese with half a cup of low sodium chicken broth. Add one tablespoon of fresh lime juice to the mixture. Stir until it is smooth and creamy. Carefully pour this creamy mix over everything in the slow cooker. Cover the pot with the lid. Set your slow cooker to low heat for six to seven hours. If you are in a hurry, you can set it to high heat for three to four hours. Cook until the chicken is tender and fully cooked. After the cooking time is up, it’s time to shred the chicken. Use two forks to pull the chicken apart right in the slow cooker. As you shred, mix everything together well. This helps the flavors blend nicely. Once it’s all mixed, taste your filling. Add salt and freshly ground black pepper to your liking. When it’s perfect, it’s time to serve! Spoon this creamy chicken corn filling into warm tortillas. Top each taco with fresh cilantro and sliced avocado for a tasty finish. To shred the chicken, wait until it’s fully cooked. Use two forks to pull apart the chicken right in the slow cooker. This way, it mixes well with all the flavors. Shredding in the slow cooker keeps the chicken juicy and tender. Make sure to stir everything together once shredded. This helps blend the seasonings and creates a creamy filling. You can easily change the spice level in this recipe. If you like it mild, just use less taco seasoning. For more heat, add diced jalapeños or a pinch of cayenne pepper. Always taste the mixture before serving. This lets you adjust the spices to your liking. Remember, you can always add more, but it’s hard to take away. Serve your tacos with warm flour or corn tortillas. Top them with fresh cilantro and sliced avocado for a burst of flavor. You can also add a squeeze of lime for extra zest. Consider offering a side of salsa or guacamole. This gives your guests options to personalize their tacos. For a complete meal, pair with a fresh salad or some rice. {{image_4}} You can easily swap ingredients to fit your diet. If you prefer turkey, use ground turkey instead of chicken. For a vegetarian twist, try using chickpeas or lentils. You can replace cream cheese with a dairy-free option like cashew cream for vegan tacos. For gluten-free needs, use corn tortillas instead of flour ones. These swaps keep the dish tasty while meeting dietary needs. You can also cook these tacos on the stovetop or in the oven. For stovetop cooking, sauté the chicken and veggies in a large pan. Add the cream cheese and broth, then simmer until the chicken cooks through. It will take about 20-30 minutes. If using the oven, place everything in a baking dish, cover it with foil, and bake at 350°F for about 45 minutes. Both methods give great flavor and texture. Get creative with your taco filling! You can add sautéed onions and bell peppers for extra flavor. Try mixing in jalapeños for some heat. For a sweet touch, consider pineapple or mango chunks. Fresh herbs like parsley or chives can add brightness. You can even top with shredded cheese for more richness. Each addition makes the tacos uniquely yours! To store your leftover creamy chicken corn filling, let it cool first. Place it in an airtight container. Make sure to seal it tightly. You can keep leftovers in the fridge for about three to four days. This helps keep the flavors fresh and tasty. When you're ready to eat the leftovers, take them out of the fridge. You can reheat them in the microwave or on the stovetop. If using the microwave, heat in 30-second intervals. Stir in between to ensure even warming. For the stovetop, use low heat and stir often. Add a splash of chicken broth to keep it creamy. You can freeze the creamy chicken corn filling for later meals. Place it in a freezer-safe container. Leave some space at the top for expansion. Label the container with the date. It can last for up to three months in the freezer. To use, thaw it overnight in the fridge before reheating. This way, you can enjoy a quick meal anytime! Yes, you can use frozen chicken. Just add an extra hour to the cooking time. The slow cooker will thaw and cook the chicken well. Make sure to check that the chicken reaches 165°F for safety. I like to use flour tortillas for their softness. Corn tortillas are great too, especially if you seek a gluten-free option. Both types hold the creamy filling well and taste delicious. To add heat, use a spicy taco seasoning. You can also mix in chopped jalapeños or a dash of hot sauce. Try adding cayenne pepper for extra kick. Adjust the spice level until it meets your taste. Yes, you can prepare the filling a day in advance. Just store it in the fridge. When you're ready to serve, warm it up in the microwave or on the stovetop. This makes it a great option for busy days. Absolutely! Replace the chicken with a mix of beans or lentils. Use vegetable broth instead of chicken broth. You can also add more veggies, like bell peppers or zucchini, for extra texture and flavor. This blog post covered how to make slow cooker creamy chicken corn tacos. We explored the main ingredients, seasonings, and optional garnishes. You learned step-by-step instructions for cooking and shredding chicken, plus tips to perfect each bite. We also shared storage tips and answered key FAQs. These tacos are easy to make and can fit many diets. Feel free to get creative with your ingredients! Enjoy your tasty tacos today.

Slow Cooker Creamy Chicken Corn Tacos Flavorful Recipe

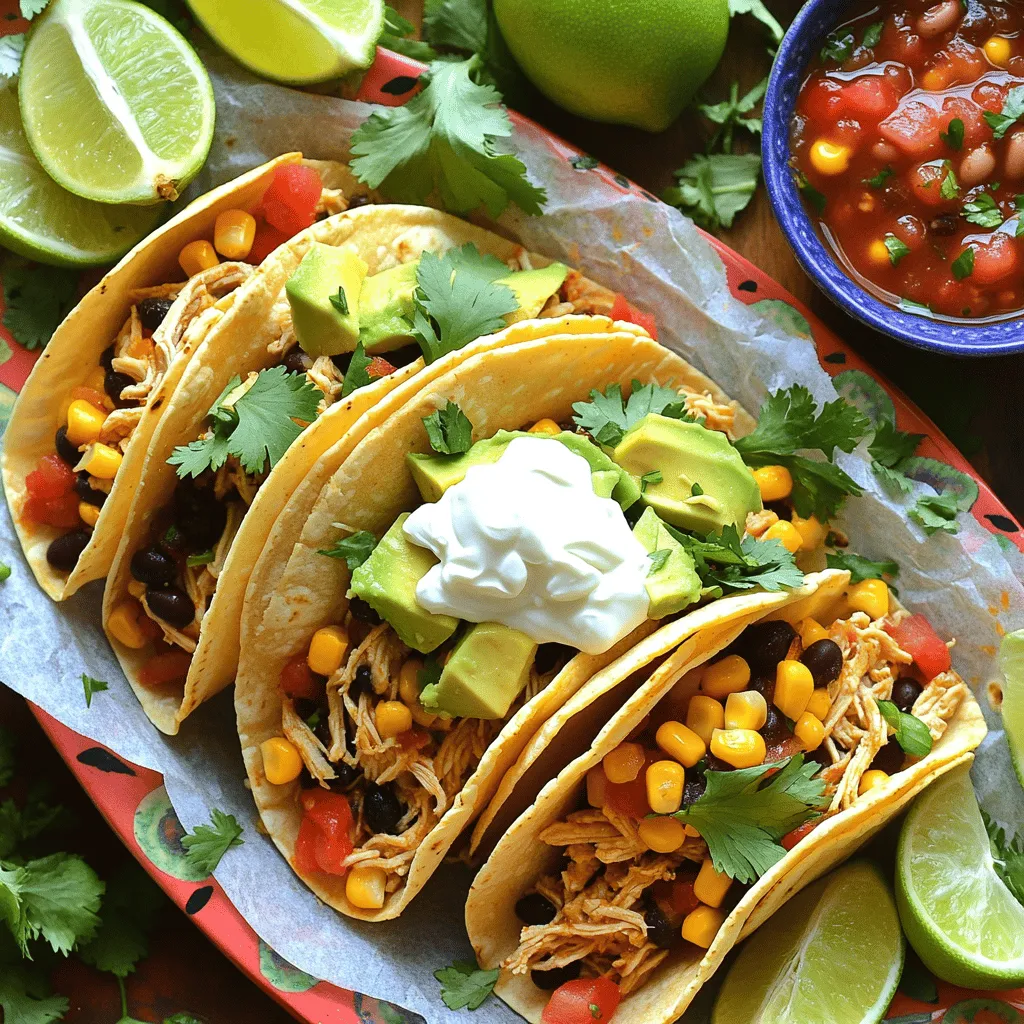
Get ready to savor a tasty twist on taco night! My Slow Cooker Creamy Chicken Corn Tacos bring big flavor

- 1 lb Brussels sprouts, trimmed and halved - 3 tablespoons olive oil - ¼ cup pure maple syrup - 2 tablespoons balsamic vinegar - ¼ teaspoon sea salt - ¼ teaspoon freshly ground black pepper - ¼ cup pecans, roughly chopped - ¼ teaspoon red pepper flakes (optional, for a spicy kick) - Fresh parsley, finely chopped for garnish If you run out of pecans, walnuts work great too. You can use apple cider vinegar in place of balsamic vinegar for a different twist. For a vegan option, check that the maple syrup is pure and free from additives. Instead of olive oil, avocado oil can also do the trick. If you want a sweeter touch, try honey if you’re not strict about vegan choices. When picking Brussels sprouts, look for bright green ones. They should feel firm and heavy in your hand. Avoid any yellow or wilted leaves; they may taste bitter. Smaller sprouts are sweeter than larger ones, so choose those for better flavor. Store them in the fridge to keep them fresh until you're ready to cook. Start by preheating your oven to 400°F (200°C). This heat is key for getting that nice caramel color on your Brussels sprouts. A hot oven helps the maple syrup create that sweet, sticky glaze we all love. Next, grab 1 pound of Brussels sprouts. Trim off the ends and slice them in half. This step lets the flavors soak in and helps them cook evenly. In a large bowl, mix the halved sprouts with 3 tablespoons of olive oil, ¼ cup of pure maple syrup, 2 tablespoons of balsamic vinegar, ¼ teaspoon of sea salt, and ¼ teaspoon of black pepper. Use your hands or a spoon to toss everything well. You want each sprout to be coated nicely for maximum flavor. Now, it's time to roast! Spread the Brussels sprouts on a baking sheet in a single layer. Make sure the cut sides are facing down. This position helps with caramelization. Roast them for 20 minutes. Halfway, give them a gentle stir for even cooking. After 20 minutes, sprinkle ¼ cup of chopped pecans and ¼ teaspoon of red pepper flakes over them. If you like heat, add the red pepper flakes! Then, roast for another 10-15 minutes until they’re tender and caramelized. Once done, let them cool slightly. If you want, drizzle a bit more maple syrup for extra sweetness. Toss them gently and transfer to a serving platter. Finish with a sprinkle of fresh parsley for color and flavor. Enjoy this tasty and healthy dish! To get that nice caramel color, start by preheating your oven to 400°F (200°C). A hot oven helps the sprouts cook evenly. When you prepare the Brussels sprouts, make sure to cut them in half. This way, the cut sides can get nice and crispy. Spread them out on your baking sheet, cut side down. This will also help with caramelization. Halfway through cooking, stir them gently to avoid burning but keep that great color. Maple syrup gives these Brussels sprouts a sweet touch. Balsamic vinegar adds a nice tang. You can also add pecans for crunch. They give a nutty flavor, which pairs well with the sweet. If you want to play with taste, try adding garlic or shallots. These will bring out more depth in the dish. Fresh parsley on top adds a pop of color and freshness. If you like some heat, red pepper flakes are a great addition. Just sprinkle a little when you add the pecans. This will give your dish a nice kick. Don’t worry if you prefer it mild; you can leave them out. Taste as you cook, and adjust the spice to your liking. Cooking should be fun, so make it your own! {{image_4}} To make this dish vegan, simply replace the balsamic vinegar with a splash of apple cider vinegar. It adds a nice tang without losing the flavor. You can also skip the pecans or use another nut, like walnuts. Both options keep the dish plant-based while still being delicious. Feel free to mix in other veggies! Carrots, sweet potatoes, or butternut squash work well. Just cut them into similar sizes as the Brussels sprouts for even cooking. The added colors make the dish more fun and tasty. Nuts add a nice crunch. Try using almonds or hazelnuts if you want a change. You can also play with spices! Garlic powder, cumin, or smoked paprika give unique flavors. Just sprinkle them in when you toss the sprouts. For a kick, add a pinch of cayenne or chili powder. These choices make your dish exciting and full of taste! To store your maple caramelized Brussels sprouts, let them cool. Place them in an airtight container. Make sure you seal it well. Store them in the refrigerator for up to three days. This keeps them fresh and tasty. You can also layer some parchment paper in between to absorb moisture. When you are ready to enjoy leftovers, preheat your oven to 350°F (175°C). Spread the Brussels sprouts on a baking sheet. Heat them in the oven for about 10-15 minutes. This helps them regain their crispness. You can also reheat them in a microwave. Just microwave for 1-2 minutes, but they may lose some texture. If you want to freeze maple caramelized Brussels sprouts, first let them cool completely. Then place them in a freezer-safe bag. Try to remove as much air as possible before sealing. They can last up to three months in the freezer. When you want to eat them, thaw in the fridge overnight before reheating. Yes, you can use frozen Brussels sprouts. However, fresh ones taste better. Frozen sprouts may not caramelize as well. To use frozen sprouts, thaw and drain them first. Pat them dry to remove excess moisture. This helps them crisp up in the oven. Brussels sprouts are done when they are tender and golden brown. You can test them with a fork. If it goes in easily, they are ready. Look for a caramelized exterior, which adds flavor. Trust your nose too; they should smell sweet and nutty. Maple caramelized Brussels sprouts pair well with many dishes. Here are some ideas: - Roast chicken or turkey - Grilled salmon or fish - Quinoa or rice dishes - A fresh green salad - Pasta with garlic and olive oil These sides enhance the sweet and savory flavors of the sprouts. Enjoy mixing and matching! In this post, we explored how to prepare delicious Maple Caramelized Brussels Sprouts. We covered the right ingredients and fresh selection tips. You learned step-by-step instructions for roasting, enhancing flavors, and achieving that perfect caramelization. I shared variations, storage tips, and answered common questions. Now, you can confidently cook and enjoy this tasty side dish. Make it your own by trying different flavors and serving options. With these tips, your Brussels sprouts will impress everyone at the table. Enjoy your cooking adventure!

Savory Maple Caramelized Brussels Sprouts Recipe

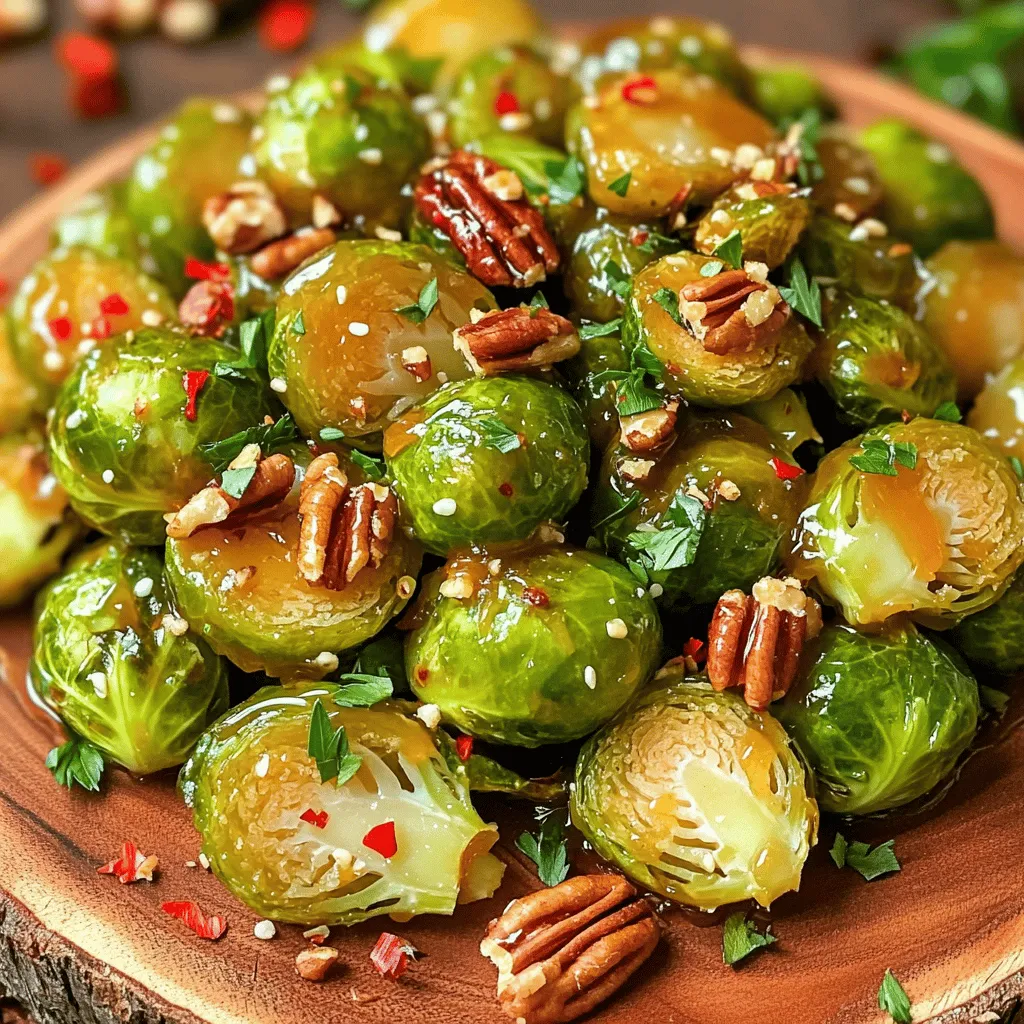
If you’re looking for a side dish that’ll impress your guests and your taste buds, you’ve come to the right

- 12 oz (340g) penne pasta - 1 can (14 oz) crushed tomatoes - 1 cup vegetable broth - 1 cup heavy cream or coconut cream - 1 small onion, finely diced - 3 cloves garlic, minced - 1 teaspoon Italian seasoning - 1/2 teaspoon red pepper flakes (optional) - Salt and pepper, to taste - 1 cup fresh basil leaves, roughly chopped - 1/2 cup grated Parmesan cheese (optional) If you need dairy-free options, use coconut cream instead of heavy cream. For gluten-free pasta, select a gluten-free penne. You can also swap in vegetable broth for chicken broth, if you prefer. For a lighter dish, try using half-and-half in place of heavy cream. - Always choose fresh basil; it adds great flavor. - Use ripe, high-quality canned tomatoes for the best taste. - Store your pasta in a cool, dry place away from moisture. - Check the expiration dates on broth and cream for freshness. - Keep your garlic and onion in a dry, dark space to maintain flavor. Start by setting your Instant Pot to the sauté function. Add a splash of olive oil. Next, add the finely diced onion. Sauté for 3-4 minutes until the onion looks clear and smells great. Then, add the minced garlic. Stir for another 30 seconds. You want the garlic to smell good but not get brown. Now, pour in the penne pasta. Add the crushed tomatoes and vegetable broth next. Sprinkle in the Italian seasoning and red pepper flakes if you want some heat. Season with salt and pepper. Stir everything well. Make sure all the pasta is under the liquid. Next, secure the lid on the Instant Pot. Ensure the valve is set to sealing. Cook on manual high pressure for 5 minutes. When it’s done, turn the valve to venting for a quick release. After the steam stops, open the lid carefully. Gently stir in the heavy cream or coconut cream. Mix until it blends well. Then, fold in the roughly chopped basil leaves. Stir them through the pasta for a fresh taste. Now, taste the pasta. Add more salt and pepper if you think it needs more flavor. For a creamier dish, you can add more cream or a bit of reserved pasta water. Serve the creamy pasta hot in bowls. If you like, top each bowl with grated Parmesan cheese. You can also add extra fresh basil leaves for color and flavor. For a nice touch, include a piece of crusty bread on the side. It’s perfect for soaking up that creamy sauce! To make the best creamy tomato basil pasta, follow these tips: - Use penne pasta for its shape, which holds sauce well. - Always measure your liquid. Too little can lead to burnt pasta. - Stir the pasta well to ensure it cooks evenly. - Let the Instant Pot release pressure quickly to keep the pasta from overcooking. Watch out for these mistakes: - Don’t skip the sauté step. It adds flavor to your dish. - Avoid using too much cream at once. Add gradually for better control. - Don’t forget to adjust the seasoning. Taste is key to a great dish. - Don’t rush when adding the basil. It adds freshness and flavor. To boost creaminess, try these ideas: - Use full-fat coconut cream for a rich, dairy-free option. - Add more cream or a splash of pasta water for a silkier sauce. - Stir in grated cheese at the end for added richness. - Top with extra basil to enhance the creamy texture. These tips will help you create a delightful pasta dish that impresses everyone! {{image_4}} You can boost the protein in this dish easily. Try adding cooked chicken, shrimp, or sausage. Just sauté the protein with the onion and garlic. If you want a meat-free option, use chickpeas or white beans. Both add protein and texture. Remember to adjust the cooking time if using raw meat. Cook it until it's fully done before adding the pasta. This recipe works great for vegetarians! Just skip the Parmesan cheese for serving. If you want it vegan, swap heavy cream for coconut cream. Use vegetable broth to keep it plant-based. You can also add more veggies, like spinach or bell peppers. They bring color and nutrients to your meal. To enhance the flavor, think about adding fresh herbs. A sprinkle of parsley or thyme can add a nice touch. You can toss in more garlic for a stronger taste. If you like spice, add more red pepper flakes. For a smoky flavor, try a dash of smoked paprika. These small changes can make a big difference in taste! After enjoying your pasta, store leftovers in an airtight container. Let it cool first. Place it in the fridge for up to three days. Make sure to cover it well to keep it fresh. If you plan to eat it later, save some basil for garnish. To reheat, use the microwave or stovetop. If using a microwave, place the pasta in a bowl. Heat it in short bursts, stirring in between. This helps it warm evenly. If using the stovetop, add a splash of water to a pan. Heat on low, stirring until it’s warm. This keeps the pasta creamy. You can freeze this pasta for up to three months. To do this, let it cool completely. Transfer it to a freezer-safe container. For best results, divide into meal-sized portions. When ready to eat, thaw overnight in the fridge. Reheat as mentioned above. Remember, fresh basil should be added after reheating for the best flavor. Yes, you can use gluten-free pasta in this recipe. Look for penne made from rice or chickpeas. Keep in mind that gluten-free pasta may cook faster, so check it after 3 minutes under pressure. This helps prevent mushiness. You can use coconut cream for a dairy-free option. It gives a rich and creamy texture. Cashew cream is another great substitute. Simply blend soaked cashews with water until smooth. To prevent sticking, ensure all pasta is submerged in the liquid. Stir well before sealing the pot. Using enough sauce helps too. Adding a bit of oil to the sauté step can also help. A natural release usually takes about 10 minutes. After cooking, let the pot sit without touching the valve. This helps the flavors meld and the pasta finish cooking perfectly. Yes, you can make this dish in advance! Just store it in an airtight container in the fridge. It tastes even better the next day, as the flavors deepen. Reheat on the stove or in the microwave, adding a splash of water or cream to keep it creamy. In this blog post, I covered key ingredients and tips for making a great pasta dish. You learned about main ingredients and useful substitutes. I walked you through step-by-step instructions to ensure ease and success. We also explored variations and how to store leftovers. Remember, with practice, you’ll perfect your pasta skills. Embrace your creativity with flavors, adjustments, and choices. Cooking can be fun and rewarding, so dive in and enjoy every bite.

Instant Pot Creamy Tomato Basil Pasta Delight Recipe

Are you ready to make a dinner that’s quick, creamy, and satisfying? My Instant Pot Creamy Tomato Basil Pasta Delight

- 1 lb flank steak, cut into thin strips - 2 tablespoons unsalted butter, melted - 1 bell pepper (any vibrant color), sliced - 1 medium red onion, sliced into thin rings - 1 medium zucchini, sliced into half-moons The flank steak is the star of this dish. It cooks quickly and stays juicy. I love using unsalted butter to control the salt level. Fresh vegetables add color and crunch. Bell peppers, red onions, and zucchini work well here. They soak up all that garlic butter flavor. - 1 teaspoon ground cumin - 1 teaspoon smoked paprika - 1 teaspoon chili powder - Salt and freshly ground black pepper, to taste Seasoning is key to a great fajita. Ground cumin adds warmth. Smoked paprika gives a nice depth. Chili powder adds just the right kick. Don’t forget to season with salt and black pepper for balance. - 8 small flour tortillas - Fresh cilantro, chopped, for garnish - Lime wedges, for serving Flour tortillas are perfect for wrapping all that goodness. Fresh cilantro brightens up the dish. Lime wedges give a zesty finish. These elements complete your fajita experience. 1. First, preheat your oven to 400°F (200°C). This temperature makes the steak and veggies cook nicely. 2. Next, line a large baking sheet with parchment paper. This makes cleanup easy and prevents sticking. 3. In a small bowl, mix 2 tablespoons of melted unsalted butter with 4 finely minced garlic cloves. 4. Add 1 teaspoon of ground cumin, 1 teaspoon of smoked paprika, and 1 teaspoon of chili powder to the bowl. Whisk until fully combined. 1. In a large mixing bowl, combine 1 pound of sliced flank steak, 1 sliced bell pepper, 1 medium red onion, and 1 sliced zucchini. 2. Pour the garlic butter mixture over the steak and vegetables. 3. Season with salt and freshly ground black pepper to taste. 4. Gently toss everything together until all pieces are well-coated with the garlic butter and spices. 1. Spread the steak and vegetable mixture evenly on the prepared baking sheet. 2. Be careful not to overcrowd the pan. This helps everything cook evenly. 3. Roast in the oven for 20-25 minutes. Check to see if the steak reaches your preferred doneness and the veggies are tender. 4. Once done, take the baking sheet out of the oven and let it rest for a few minutes. 5. While the fajitas rest, warm eight small flour tortillas in a dry skillet over medium heat for about 30 seconds on each side. 6. To serve, place some of the savory fajita mixture on a warm tortilla. 7. Top with fresh chopped cilantro and a squeeze of lime juice for added flavor. To get your steak just right, use a meat thermometer. Aim for 130°F for medium-rare. For medium, go for 140°F. Remember, the steak will keep cooking after you take it out. Let it rest for a few minutes before slicing. This helps the juices stay in. Avoid overcooking your vegetables. They should be tender but still have a bit of crunch. Keep an eye on them while roasting. If they start to brown too much, take them out. For more flavor, think about adding spices like cayenne pepper or onion powder. You can also try a bit of lime zest for a fresh twist. Marinating the steak is a great way to boost its taste. Mix the garlic butter with some soy sauce or lime juice. Let the steak marinate for at least 30 minutes. This will help it soak up all the great flavors. When serving, make your fajitas look great. Arrange the steak and veggies neatly on the tortillas. Garnish with bright cilantro and lime wedges. This adds color and freshness. Consider serving with sides like rice or beans. A small bowl of salsa also looks nice. It makes the meal more fun and colorful for your guests. {{image_4}} You can easily change the protein in this recipe. Try chicken or shrimp instead of flank steak. Both options cook well and absorb the garlic butter flavor nicely. For vegetables, feel free to mix it up! You can add mushrooms, asparagus, or even corn. Each veggie brings its own twist to the dish, so get creative! Want to kick up the heat? Add diced jalapeños or a pinch of cayenne pepper to the garlic butter mix. This will give your fajitas a spicy kick. If you prefer a milder taste, skip the chili powder. You can also use sweet bell peppers for a friendly flavor that everyone will enjoy. If you want a gluten-free option, use corn tortillas. They are sturdy and add a nice flavor. Another fun idea is to use lettuce wraps. They make for a fresh, low-carb choice that keeps the meal light. Both options are great for serving your fajitas in a new way! To keep your fajitas fresh, place leftovers in the fridge. Use an airtight container to maintain flavor. Store them within two hours of cooking. Label the container with the date to track freshness. This helps you avoid waste and enjoy your meal later. When reheating, aim for a method that keeps the flavor intact. I recommend using a skillet over medium heat. Add a splash of water to create steam and heat the fajitas evenly. Avoid using the microwave, as it can make the tortillas soggy. To keep the texture, warm the tortillas separately in a skillet for about 30 seconds. If you want to freeze your fajitas, allow them to cool first. Pack them in freezer-safe bags or containers. Remove as much air as possible to prevent freezer burn. For best results, consume within three months. When ready to eat, thaw them overnight in the fridge. Reheat in a skillet to regain that delicious taste and texture. It takes about 40 minutes to make Garlic Butter Steak Fajitas. Here’s the breakdown: - Prep time: 15 minutes - Cook time: 20-25 minutes - Total time: 40 minutes Yes, you can make the recipe ahead of time. Here are some tips: - Pre-prep ingredients: Cut the steak and veggies a day in advance. - Store in the fridge: Keep them in airtight containers. - Reheat later: When ready, roast the mixture until hot. Several sides go great with steak fajitas. Consider these options: - Rice: Fluffy white or brown rice adds a nice touch. - Beans: Black or pinto beans offer extra protein and flavor. - Salads: A fresh salad with lime dressing brightens the meal. You can tell when the steak is done in two ways: - Use a meat thermometer: Aim for 135°F for medium-rare. - Visual cues: The steak should be brown on the outside and slightly pink inside. You learned how to make Garlic Butter Steak Fajitas with simple steps. We went over the ingredients, from flank steak to fresh veggies. I shared how to prep and perfectly roast everything for maximum flavor. Don't forget the tips for cooking and serving your fajitas right. You can always switch up the ingredients or spice levels too. Enjoy your delicious meal, and remember to have fun with it!

Garlic Butter Steak Fajitas Sheet Pan Delight

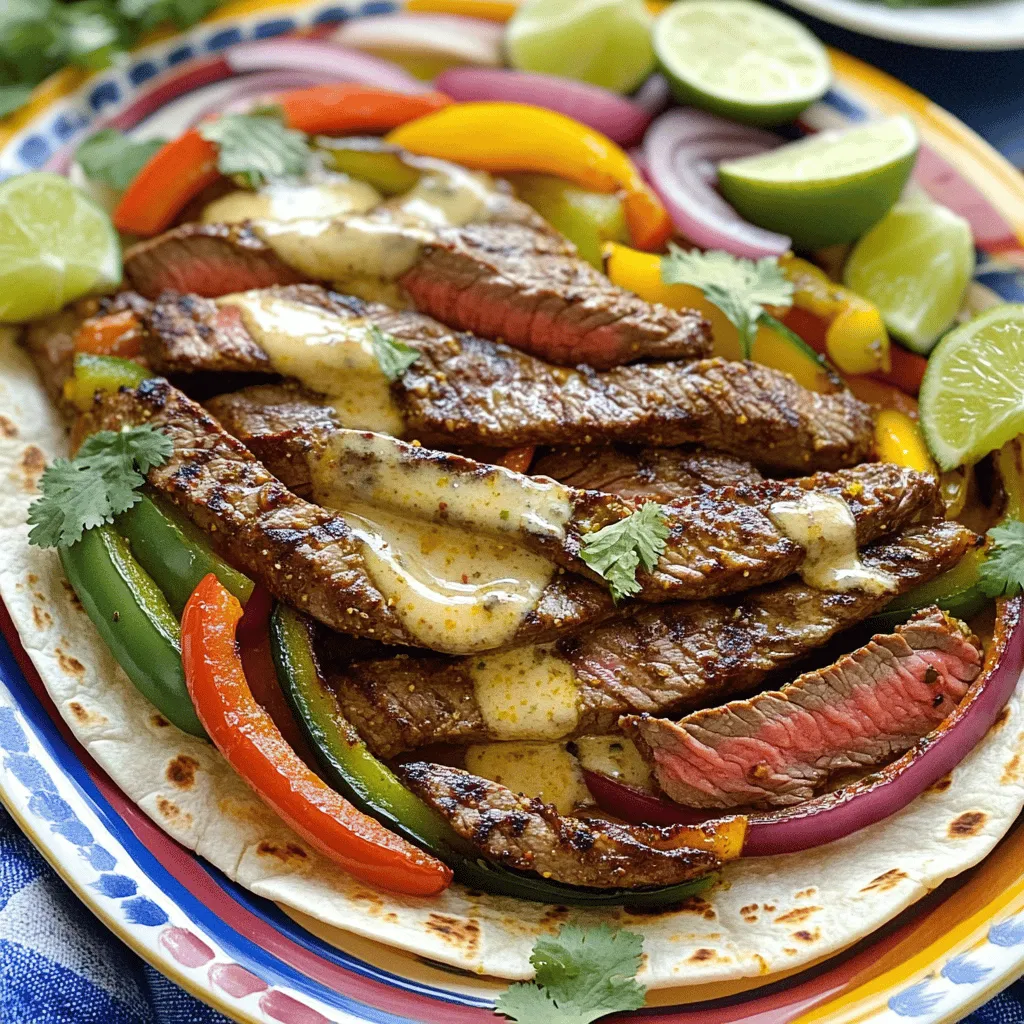
Ready for a meal that bursts with flavor? My Garlic Butter Steak Fajitas Sheet Pan Delight is the answer! This

- 1 cup orzo pasta - 1 cup cherry tomatoes, halved - 1 cucumber, diced - 1 bell pepper (red or yellow), diced - ½ red onion, finely chopped - 1 cup Kalamata olives, pitted and halved - ½ cup feta cheese, crumbled - ¼ cup fresh parsley, chopped When you gather these fresh ingredients, you set the stage for a bright and tasty salad. The orzo pasta forms the base, holding onto all the flavors. Cherry tomatoes add sweetness and color. Cucumbers bring a nice crunch, while bell peppers add a hint of sweetness. The red onion offers a bite that contrasts well with the other veggies. Kalamata olives give a briny kick that is just delightful. Finally, feta cheese adds creaminess, and fresh parsley gives a pop of green. - ¼ cup extra-virgin olive oil - 3 tablespoons fresh lemon juice - 1 teaspoon lemon zest - Salt and pepper to taste The pantry ingredients are simple yet vital. Extra-virgin olive oil serves as the heart of the dressing. It adds richness and helps blend the flavors. Fresh lemon juice and lemon zest bring bright acidity, making each bite refreshing. Salt and pepper are essential for enhancing all the tastes in your salad. Use them wisely to make the flavors sing. {{ingredient_image_2}} To start, bring 2 cups of vegetable broth or water to a rolling boil in a medium saucepan. This step is key for cooking the orzo just right. You want to use enough liquid so the pasta cooks evenly. Once it boils, add 1 cup of orzo pasta. Cook it for about 8 to 10 minutes. Check the package for exact times, as it can vary. The orzo should be al dente, which means it has a slight bite. After cooking, drain the pasta in a colander. Rinse it under cold water to stop the cooking. This helps cool it down and keeps it from getting mushy. Set the orzo aside for later. Next, it’s time to chop your fresh veggies. Use a sharp knife for clean cuts. Dice 1 cucumber and chop ½ a red onion finely. Cut 1 cup of cherry tomatoes in half, and dice 1 bell pepper. You can choose red or yellow bell peppers based on your taste. Put all these chopped veggies into a large mixing bowl. Also, add 1 cup of pitted and halved Kalamata olives. Use a spatula or wooden spoon to mix everything well. This helps the flavors blend evenly. Now, let’s make the dressing. In a small bowl, whisk together ¼ cup of extra-virgin olive oil, 3 tablespoons of fresh lemon juice, and 1 teaspoon of lemon zest. This mix brings bright flavors to the salad. Add a generous pinch of salt and pepper to taste. Whisk until the dressing is smooth. If you want, you can adjust the flavors to your liking. Add more lemon juice for tang or more salt for flavor. Once ready, pour the dressing over the orzo and veggie mix. Gently toss everything together to coat. Be careful not to break the feta when you add it later. This simple dressing really elevates the dish! To make a great Greek lemon orzo salad, you need to cook the orzo just right. Cook it al dente. This means it should be firm but not hard. When you cook orzo, follow the package instructions. Usually, it takes about 8-10 minutes in boiling broth or water. After cooking, cool the orzo quickly. Rinse it under cold water right after draining. This stops the cooking process and keeps the pasta from getting mushy. Let the salad sit for a while to allow flavors to blend. I suggest letting it marinate for at least 15 minutes. This simple step makes a big difference. The oil and lemon juice soak into the pasta and veggies, enhancing taste. Adjusting the seasoning is also key. After mixing in the dressing, taste your salad. You can add more salt or pepper if needed. Start with a little and add more as you go. For serving, think about how to make your salad eye-catching. Use a large, colorful platter or individual bowls. This makes it feel special. Garnish with fresh parsley and lemon wedges for a pop of color. This not only looks good but adds a fresh flavor with each bite. A simple touch can elevate your dish and impress your guests. Pro Tips Use Fresh Ingredients: Opt for the freshest vegetables and herbs you can find to enhance the salad's flavor and nutrition. Cook Orzo Perfectly: Ensure the orzo is cooked al dente for the best texture; it should have a slight bite to it. Chill Before Serving: Letting the salad sit for at least 15 minutes or refrigerating it for a couple of hours allows the flavors to meld beautifully. Customize Your Add-Ins: Feel free to add other ingredients like grilled chicken, chickpeas, or artichokes for a heartier salad. {{image_4}} You can change up the vegetables in this salad. Try using zucchini or radishes for a twist. If you want a different cheese, try goat cheese instead of feta. Both options add a unique flavor. For a gluten-free option, look for orzo made from rice or quinoa. These swaps keep the salad fresh and fun. Want to cut down on fat? Use less olive oil and add more lemon juice. You can also skip the cheese or use a low-fat version. If you need a vegan option, leave out the feta. Instead, try using avocado for creaminess. These changes keep it light without losing flavor. Adding protein makes this salad more filling. You can use grilled chicken for a hearty meal. Chickpeas are a great plant-based choice, too. They add texture and nutrients. If you prefer tofu, try marinating it in lemon juice and herbs. Each protein pairs well with the salad's bright flavors. To keep your Greek lemon orzo salad fresh, store it in an airtight container. Make sure the salad cools to room temperature before sealing it up. This helps to prevent condensation, which can make your salad soggy. The salad stays fresh in the fridge for up to three days. If you plan to eat it later, leave the feta cheese and dressing off until serving. This keeps the salad crisp and flavorful. I don’t recommend freezing this salad because the texture of the orzo and vegetables can change. However, if you must freeze it, use a freezer-safe container. Keep in mind that the olives and feta may not taste the same after thawing. If you freeze it, thaw in the fridge overnight. Reheat gently in the microwave, but consider adding fresh herbs and lemon juice to revive the flavor. Can I prepare this salad in advance? Yes, you can make this salad ahead of time. It tastes even better after chilling. Just store it in the fridge for a few hours. The flavors get a chance to mix well. What is the best way to store leftover salad? For storing leftovers, place the salad in an airtight container. Keep it in the fridge. It should stay fresh for about 2-3 days. Is this salad suitable for vegans? This salad is not vegan due to feta cheese. To make it vegan, simply skip the cheese. You can add avocado for creaminess instead. What are the calorie counts per serving? This salad has about 250 calories per serving. This may vary based on the exact ingredients used. How can I substitute orzo? You can use quinoa or rice instead of orzo. Both options offer a different texture but still taste great. Can I use dried herbs instead of fresh parsley? Yes, you can use dried herbs. Use about one-third of the amount called for fresh. Dried herbs are stronger in flavor, so be careful not to overdo it. You learned how to make a fresh and tasty Greek Lemon Orzo Salad. We covered important ingredients like orzo, fresh veggies, olive oil, and spices. I shared step-by-step cooking tips to get the best texture and flavor. Lastly, I provided storage tips and answered common questions. I hope you feel ready to try this healthy salad. Enjoy making it your own—your plate is a blank canvas!

Greek Lemon Orzo Salad Fresh and Flavorful Recipe

If you’re craving a bright and tasty dish that’s easy to make, you’re in the right place! My Greek Lemon

Older posts
Newer posts
← Previous Page1 … Page19 Page20 Page21 … Page83 Next →

dsad

© 2026 eataroundit • Built with GeneratePress

Our Policies

  • Copyright Policy
  • Cookie Policy
  • GDPR Policy
  • Privacy Policy
  • Disclaimer
  • Terms Of Use

More Information

  • Home
  • About
  • Contact
  • Appetizers
  • Dessert
  • Dinner
  • Drinks
©2026, eataroundit About Back To Top