Skip to content
DisclaimerTerms Of UseGDPR PolicyCookie Policy

eataroundit

  • Home
  • Drinks
  • Appetizers
  • Dinner
  • Dessert
  • About
  • Contact
  • Privacy Policy
DisclaimerTerms Of UseGDPR PolicyCookie Policy

NO-ING-IMG

To make this dish, you need a few key ingredients: - 2 packs of instant ramen noodles (discard the flavor packet) - 1 cup finely grated Pecorino Romano cheese - 2 tablespoons unsalted butter - 1 tablespoon extra-virgin olive oil - 1 teaspoon freshly cracked black pepper (adjust to taste) - 2-3 tablespoons reserved pasta cooking water These ingredients create a rich and creamy base. The ramen noodles serve as a quick canvas for the flavors. Pecorino Romano cheese is the star of this dish. Its sharp taste adds depth. You might also consider: - Parmesan cheese for a milder flavor - Grana Padano for a nutty twist Feel free to mix or match these cheeses based on your taste. Each adds a unique touch. Adding garnishes enhances both flavor and presentation. Try these options: - Fresh parsley, finely chopped - Fresh basil, finely chopped - A sprinkle of extra Pecorino Romano for a cheesy finish These garnishes bring freshness and color, making your dish look and taste even better. First, grab a medium pot and fill it with water. Bring the water to a rolling boil. Add the instant ramen noodles and cook them for 3 to 4 minutes. You want them al dente. Before you drain the noodles, save 2-3 tablespoons of the cooking water. This water is your secret to a creamy sauce. After that, drain the noodles well. In the same pot, lower the heat to medium. Add 2 tablespoons of unsalted butter and 1 tablespoon of extra-virgin olive oil. Stir gently until the butter melts and starts to bubble. Don’t let it brown. Now, add 1 teaspoon of freshly cracked black pepper to the pot. Sauté it for about 30 seconds. This wakes up the flavor. Now it's time to mix everything together. Add the cooked ramen noodles to the pot. Toss them gently to coat every strand in the buttery pepper mix. Next, sprinkle in 1 cup of finely grated Pecorino Romano cheese. Toss well. If the mixture feels too thick, add a tablespoon of the reserved pasta water at a time. Mix until you get a nice, creamy sauce. Taste it. Adjust the seasoning with more pepper or cheese if needed. Serve hot in deep bowls and finish with fresh parsley or basil on top. Enjoy! To get that creamy sauce, start with the right cheese. Pecorino Romano melts well and adds great flavor. When mixing in the cheese, do it slowly. If the mix is too thick, add a bit of the reserved pasta water. Just one tablespoon at a time. This helps create a smooth and creamy sauce that clings to the noodles. Stir well after each addition. Taste your dish as you go. If you want more kick, add extra black pepper. If you love cheese, don’t hold back on the Pecorino Romano. You can also mix in a bit of salt if needed. Everyone has different tastes, so feel free to adjust until it’s just right for you. This dish is all about your preferences. Presentation makes a big difference. Serve your ramen in deep bowls for a nice look. After plating, add a sprinkle of extra Pecorino on top. This adds a pop of flavor and makes it look fancy. Don’t forget to finish with fresh herbs like parsley or basil. This adds color and brightens up the dish. A beautiful presentation makes every meal feel special. {{image_4}} You can make Minute Cacio e Pepe Ramen heartier by adding protein. Some great options include: - Cooked chicken, sliced thin - Shrimp, peeled and deveined - Tofu, cubed and sautéed - Crispy pancetta or bacon, crumbled Adding protein not only boosts flavor but also makes the meal more filling. Simply cook the protein separately and mix it in with the noodles. Adding vegetables brings color and nutrition to your dish. Here are some tasty choices: - Spinach or kale, wilted - Peas, fresh or frozen - Bell peppers, sliced thin - Mushrooms, sautéed You can sauté the veggies in the butter and oil before adding the noodles. This adds great flavor and makes the dish more vibrant. While Pecorino Romano is classic, you can switch it up. Try these cheeses for a unique twist: - Parmesan, finely grated - Grana Padano, for a milder taste - Gouda, for a creamy texture Experimenting with different cheeses allows you to create a new flavor experience while still keeping the dish simple and delicious. After making Minute Cacio e Pepe Ramen, let it cool down. Store it in an airtight container. Place it in the fridge. It will stay fresh for about 2-3 days. To keep it tasty, try to eat it sooner rather than later. To reheat, use a pan on low heat. Add a splash of water or broth to help it warm up. Stir often to avoid burning. You can also use the microwave. Heat in 30-second bursts, stirring in between. Freezing this dish is not the best idea. The cheese and butter can change texture. However, if you must, place it in a freezer-safe container. It can last for up to a month. When ready to eat, thaw in the fridge overnight before reheating. Cacio e Pepe is a classic Roman dish. It means "cheese and pepper" in Italian. The dish is simple but rich. It uses few ingredients, mainly pasta, cheese, and black pepper. Traditionally, it features spaghetti or tonnarelli. The cheese is usually Pecorino Romano, which gives it a sharp flavor. This dish showcases how simple ingredients can create amazing taste. Yes, you can use other types of pasta instead of ramen. While ramen adds a fun twist, spaghetti or fettuccine work well too. The key is to use pasta that cooks quickly. Choose a shape that holds sauce well. Cooking time may vary, so keep an eye on it. No matter the pasta, follow the same steps to make this dish. To make your Cacio e Pepe Ramen spicier, add more black pepper. Freshly cracked pepper gives the best heat. Start with a teaspoon and adjust to your taste. You can also add crushed red pepper flakes for extra kick. Mix these in with the black pepper for a spicy twist. Just remember to taste as you go! Cacio e Pepe Ramen pairs well with many dishes. Garlic bread is a great side; it adds crunch. A fresh green salad balances the rich flavors. You can also serve grilled vegetables for extra color and taste. If you love protein, consider adding a poached egg on top. This makes for a hearty meal! In this post, we explored making Minute Cacio e Pepe Ramen. We discussed key ingredients, like cheese and optional garnishes. I shared step-by-step cooking instructions for the noodles and sauce. We also covered tips for a creamy texture and personalized flavor adjustments. For variety, I suggested adding proteins and veggies. Finally, we touched on storage and reheating. Now, it's your turn to create this simple yet tasty dish. Enjoy experimenting and making it your own!

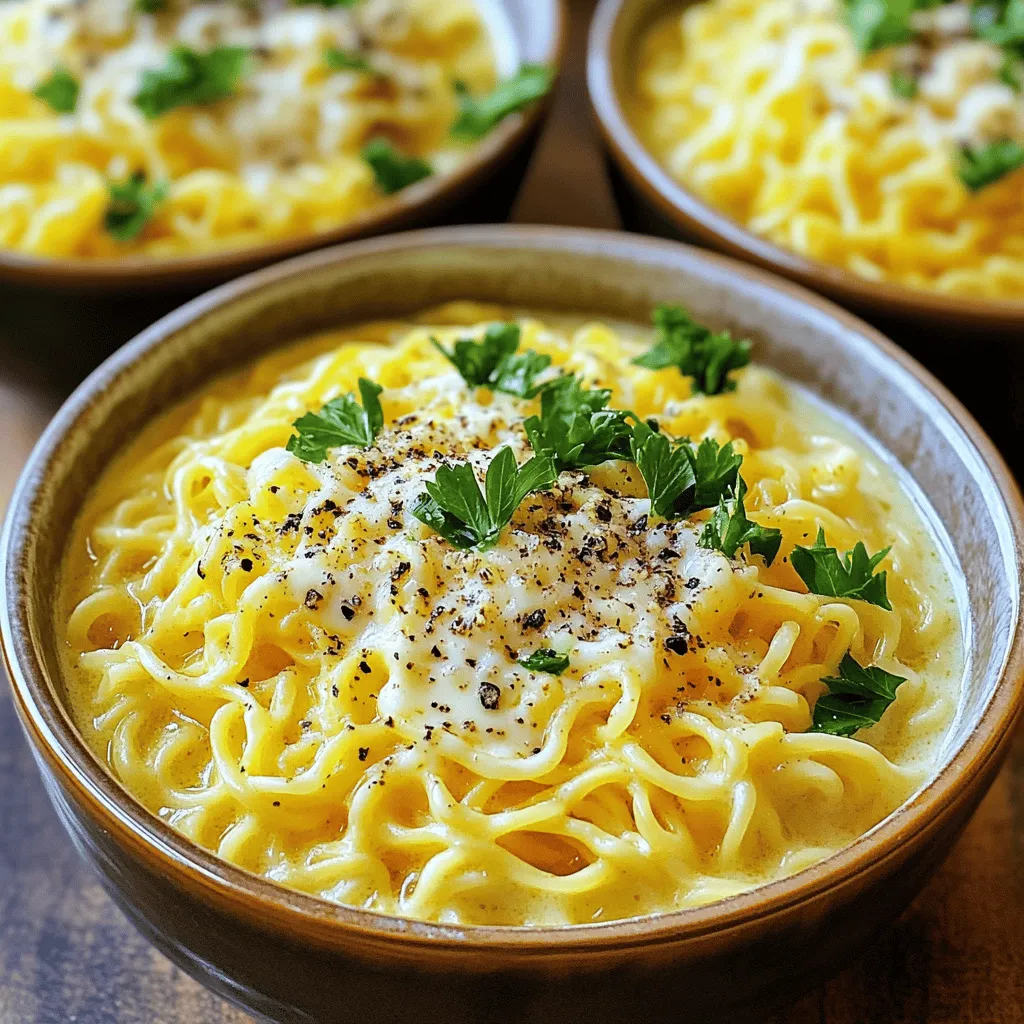
Minute Cacio e Pepe Ramen Simple and Savory Dish

If you’re craving a quick yet tasty meal, Minute Cacio e Pepe Ramen is the answer. This dish combines classic

- 2 cups shelled edamame (fresh or frozen) - 3 tablespoons extra virgin olive oil - 5 cloves garlic, finely minced - 1 teaspoon red pepper flakes (adjust to taste) - 1 tablespoon low-sodium soy sauce - 1 tablespoon toasted sesame oil - 1 teaspoon sesame seeds - Sea salt, to taste - Fresh cilantro or sliced green onions, chopped Gathering your ingredients is the first step in making spicy garlic edamame. This dish is simple but packs a big punch of flavor. The star ingredients are edamame and garlic. They work together to create a tasty snack. Shelled edamame is green soybeans. You can use fresh or frozen. If you choose frozen, they save time and still taste great. The garlic adds a rich flavor. It gives the dish warmth and depth. Now, for the spices and sauces. Red pepper flakes add heat. You can adjust how much you use based on your taste. Soy sauce brings a savory taste. The toasted sesame oil adds a nutty aroma. Together, they make a delicious blend. Don't forget the garnishes! Sesame seeds give a nice crunch. Sea salt enhances all the flavors. Fresh cilantro or green onions add color and freshness. When you have your ingredients ready, you're set for a fun cooking experience. This snack is not only quick to make but also full of taste and nutrition. To cook the edamame, start by getting a pot. Fill it with lightly salted water and bring it to a boil. If you use frozen edamame, add it to the pot once the water boils. Cook for about 3-5 minutes. You want them bright green and tender. After cooking, drain the edamame in a colander and set it aside. Next, grab a large skillet. Pour in the extra virgin olive oil. Heat it on medium. Once hot, add the finely minced garlic to the oil. Sauté for 1-2 minutes. Stir continuously so the garlic does not burn. You want it fragrant and just turning golden. Now it’s time to spice things up! Add the red pepper flakes to the skillet. Stir them in for about 30 seconds to release their flavor. Then, carefully add the drained edamame. Toss it gently to coat every piece with the garlic mixture. Next, drizzle the low-sodium soy sauce and toasted sesame oil over the edamame. Stir well to mix all the flavors. Cook for another 2-3 minutes. This lets the edamame soak up the savory goodness. Finally, taste and adjust the sea salt if needed. When cooking garlic, watch it closely. Garlic can burn fast and lose its taste. You want it golden, not brown. If you like spice, add more red pepper flakes. Start with one teaspoon and taste as you go. Everyone has different heat levels. Serve your spicy garlic edamame in a nice bowl. For fun, use chopsticks for eating. You can pair it with sushi or rice for a full meal. Add colorful toppings like cilantro or green onions for a fresh look. Edamame is packed with nutrients. It's high in protein, fiber, and healthy fats. These small beans can help lower cholesterol and improve heart health. They also contain vitamins and minerals, like vitamin K and folate. Eating edamame can support your overall wellness. {{image_4}} You can play with the flavors in this dish. Try adding different spices or oils. For a smoky kick, use smoked paprika. A drizzle of chili oil can add heat and depth. If you like citrus, a squeeze of lime or lemon juice brightens the dish. Fresh herbs like basil or mint can also add a unique twist. This recipe is easy to modify for different diets. To make it vegan, just ensure your soy sauce is plant-based. For a gluten-free option, use tamari instead of soy sauce. You can also skip the sesame oil if you have a seed allergy. This way, everyone can enjoy this tasty snack! If you're short on time, look for pre-packaged options. Many stores sell ready-made spicy edamame. Check the ingredients to ensure they fit your dietary needs. Some brands offer organic choices that are both healthy and tasty. This way, you can enjoy a quick snack without any hassle. After enjoying your spicy garlic edamame, you may have some left. To keep it fresh, store it in an airtight container. Place it in the fridge. It will stay good for about three days. When you're ready to eat, simply reheat it in a skillet over medium heat. Stir it gently until it warms through. You can also microwave it for a quick option. Just heat it in short bursts, so you don’t overcook it. If you want to save some for later, freezing is a great choice. First, let the edamame cool completely. Then, transfer it to a freezer-safe bag. Try to remove as much air as possible to avoid freezer burn. It can last up to three months in the freezer. When you want to eat it, thaw it overnight in the fridge. Then, reheat in a skillet or microwave like before. Spicy garlic edamame has a decent shelf life. In the fridge, it will stay fresh for up to three days. If you freeze it, it can last for about three months. Just remember, the sooner you eat it, the better the flavor will be. Enjoying it fresh is always the best way! You can make this snack quickly in just a few steps. 1. Cook the Edamame: Boil 2 cups of shelled edamame in salted water for 3-5 minutes. Drain it well. 2. Heat the Oil: In a skillet, warm 3 tablespoons of extra virgin olive oil over medium heat. 3. Sauté the Garlic: Add 5 cloves of finely minced garlic to the skillet. Cook for 1-2 minutes until it smells great. 4. Add Spice: Stir in 1 teaspoon of red pepper flakes and cook for another 30 seconds. 5. Combine Edamame: Toss in the drained edamame and mix well. 6. Incorporate Sauces: Pour in 1 tablespoon each of low-sodium soy sauce and toasted sesame oil. Cook for 2-3 minutes. 7. Final Seasoning: Taste and add sea salt if needed. 8. Serve and Garnish: Transfer to a bowl, sprinkle with sesame seeds, and add fresh cilantro or green onions. This method is quick and keeps the flavors vibrant. Yes, you can make it milder or spicier. - For Milder Edamame: Use less red pepper flakes, maybe just ½ teaspoon. You can also skip them altogether. - For Spicier Edamame: Add more red pepper flakes or use a hotter chili oil. You can even mix in fresh chopped chili peppers for an extra kick. Adjusting the heat lets you customize the snack to your taste. Edamame is not just tasty; it's also good for you. - High in Protein: Edamame is packed with plant-based protein, making it great for vegetarians. - Rich in Fiber: It helps with digestion and keeps you full longer. - Packed with Vitamins: Edamame contains vitamins like K and C, plus folate, which is good for your health. - Low in Calories: This snack is low in calories, making it a smart choice for weight management. Eating edamame offers many health benefits while enjoying a delicious snack. In this article, we explored how to create a tasty garlic edamame dish. We reviewed key ingredients, cooking steps, and helpful tips. Edamame is not only delicious but also packed with nutrients. You can modify the flavors to suit your taste. Remember, this dish is perfect for sharing or enjoying as a snack. I encourage you to try these methods and enjoy the healthy twist on your meals. Embrace your creativity with edamame, and your taste buds will thank you!

Spicy Garlic Edamame Snack Quick and Flavorful Recipe

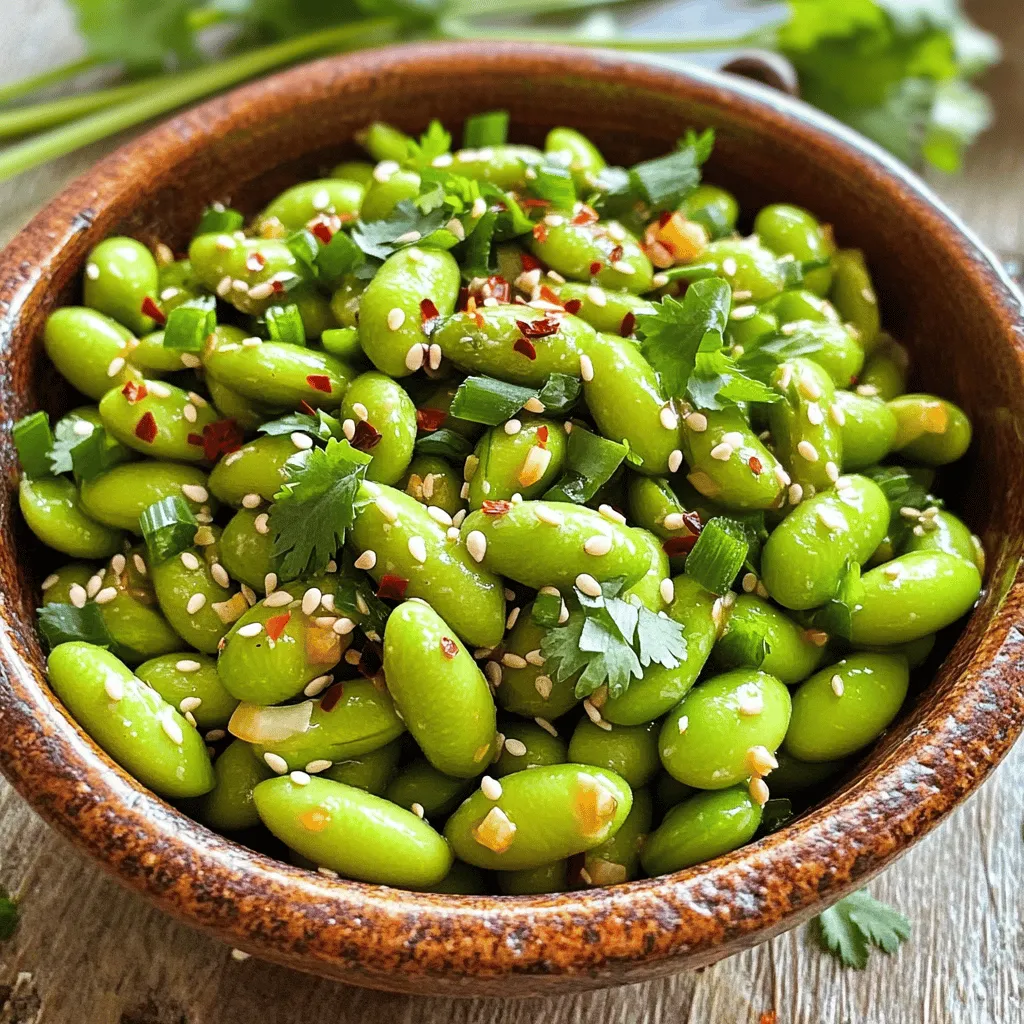
Looking for a quick and tasty snack? This Spicy Garlic Edamame recipe is just what you need! With just a

- 1 cup all-purpose flour - 1/2 teaspoon baking soda - 1 teaspoon ground ginger - 1 teaspoon ground cinnamon - 1/2 teaspoon ground nutmeg - 1/4 teaspoon ground cloves - 1/4 teaspoon salt - 1/2 cup unsalted butter, softened - 1/2 cup packed brown sugar - 1/4 cup granulated sugar - 1/4 cup unsulfured molasses - 1 large egg, at room temperature - 1 teaspoon pure vanilla extract - 1/2 cup chopped pecans or walnuts (optional) - Whipped cream or vanilla ice cream, for serving Each ingredient plays a key role in the flavor and texture of the cookie. For instance, the flour gives structure. The butter adds richness. The sugars create sweetness and moisture. The spices bring warmth and depth. The molasses provides a lovely chewiness and that signature gingerbread taste. You can customize your cookie! Add chopped nuts for crunch. Pecans or walnuts work great. You can also mix in chocolate chips for a sweet twist. If you want a spice kick, try adding a pinch of cayenne pepper. Each addition can change the flavor profile while keeping the core recipe intact. First, preheat your oven to 350°F (175°C). This step is key for even cooking. Next, grease your 10-inch cast iron skillet. This helps the cookie slide out easily later. In a medium bowl, combine the dry ingredients. You’ll need: - 1 cup all-purpose flour - 1/2 teaspoon baking soda - 1 teaspoon ground ginger - 1 teaspoon ground cinnamon - 1/2 teaspoon ground nutmeg - 1/4 teaspoon ground cloves - 1/4 teaspoon salt Whisk them together until blended well. This ensures every bite has great flavor. In a large bowl, cream the softened butter with sugars. Use an electric mixer on medium speed. Add: - 1/2 cup unsalted butter - 1/2 cup packed brown sugar - 1/4 cup granulated sugar Beat for about three minutes. You want the mixture to look light and fluffy. Now, it's time to add the wet ingredients. To the butter mixture, add: - 1/4 cup unsulfured molasses - 1 large egg - 1 teaspoon pure vanilla extract Mix on low speed until it’s all smooth. This will make your cookie rich and tasty. Slowly add the dry mix to the wet ingredients. Use low speed to combine. Avoid overmixing. If you want, fold in: - 1/2 cup chopped pecans or walnuts (optional) This adds a nice crunch to your cookie. Once mixed, transfer the dough to your greased skillet. Use a spatula to spread it evenly. This helps it bake evenly. Place the skillet in your preheated oven. Bake for 20-25 minutes. The cookie is done when it’s set in the center and golden on the edges. Once baked, cool it for about five minutes. Serve it warm with whipped cream or vanilla ice cream on top for a treat. To get the best texture for your warm gingerbread molasses skillet cookie, pay attention to a few key points. First, use room temperature butter. This helps create a creamy mix with the sugars. Second, don’t overmix the dough. Mix just until combined to keep your cookie soft. Check the baking time closely, too. If you bake too long, the edges will dry out. Aim for a golden brown edge and a soft center. This cookie is best served warm. You can slice it straight from the skillet. Top each slice with a generous scoop of whipped cream or vanilla ice cream. The warm cookie and cold ice cream create a great contrast. For an extra treat, drizzle some caramel sauce or molasses over the top. You can also sprinkle chopped nuts for added crunch. Make your skillet cookie look as good as it tastes. Serve it directly from the skillet for a cozy, rustic vibe. Add a few extra sprinkles of cinnamon on top. You can also place some chopped nuts around the edge. This adds color and makes it inviting. Serve with a side of ice cream or whipped cream for a fun touch! {{image_4}} If you want a nut-free cookie, just skip the nuts. Your warm gingerbread skillet cookie will still be rich and tasty. You can replace nuts with extra spices. Try adding more ginger or a dash of allspice for a kick. You can use different sweeteners if you prefer. Instead of brown and granulated sugar, try using coconut sugar or honey. Keep in mind that honey adds moisture. You might need to reduce the molasses a bit to balance flavors. Feel free to get creative with flavor add-ins. You can mix in chocolate chips for a sweet twist. Dried fruits like cranberries or raisins work well too. Citrus zest, like orange, adds a fresh note. These options make your cookie unique and fun to enjoy! To store leftover gingerbread molasses skillet cookie, let it cool completely. Then, cover it with plastic wrap or store it in an airtight container. This keeps it fresh for up to three days at room temperature. If you want to keep it longer, consider refrigerating it. When you're ready to enjoy your cookie again, preheat your oven to 350°F (175°C). Place the cookie in the oven for about 10 minutes. This warms it up and restores its soft texture. For a quick fix, you can microwave a slice for 15-20 seconds. To freeze your skillet cookie, cut it into slices first. Wrap each slice tightly in plastic wrap, then place them in a freezer bag. They can last for up to three months in the freezer. When you're ready to eat, simply thaw them in the fridge overnight and reheat as needed. No, molasses is key for flavor and texture. It gives the cookie its rich taste and moistness. If you skip it, the cookie will not taste the same. You might try a mix of brown sugar and honey, but the result will differ. Check the edges first. They should be golden brown. The center needs to be set, not jiggly. A toothpick test works too. Insert it in the center; if it comes out clean, the cookie is ready. You can serve it with whipped cream or vanilla ice cream. Both enhance the warm cookie’s flavors. Drizzle extra molasses or caramel sauce on top for added sweetness. Chopped nuts also make a nice touch. Yes, you can use any oven-safe skillet. A ceramic or non-stick skillet works well too. Just make sure it can handle high heat. If you use a different size, adjust the baking time accordingly. The cookie stays fresh for about 2-3 days at room temperature. Store it in an airtight container. If you want it to last longer, you can freeze it for up to 3 months. Just remember to wrap it well! This blog post covered how to make a delicious gingerbread skillet cookie. We explored the key ingredients, step-by-step instructions, and helpful tips. I shared variations to suit your taste and how to store leftovers properly. Remember, you can adjust ingredients and flavors to make it your own. Cook with joy and enjoy your warm cookie creation. Happy baking!

Warm Gingerbread Molasses Skillet Cookie Delight

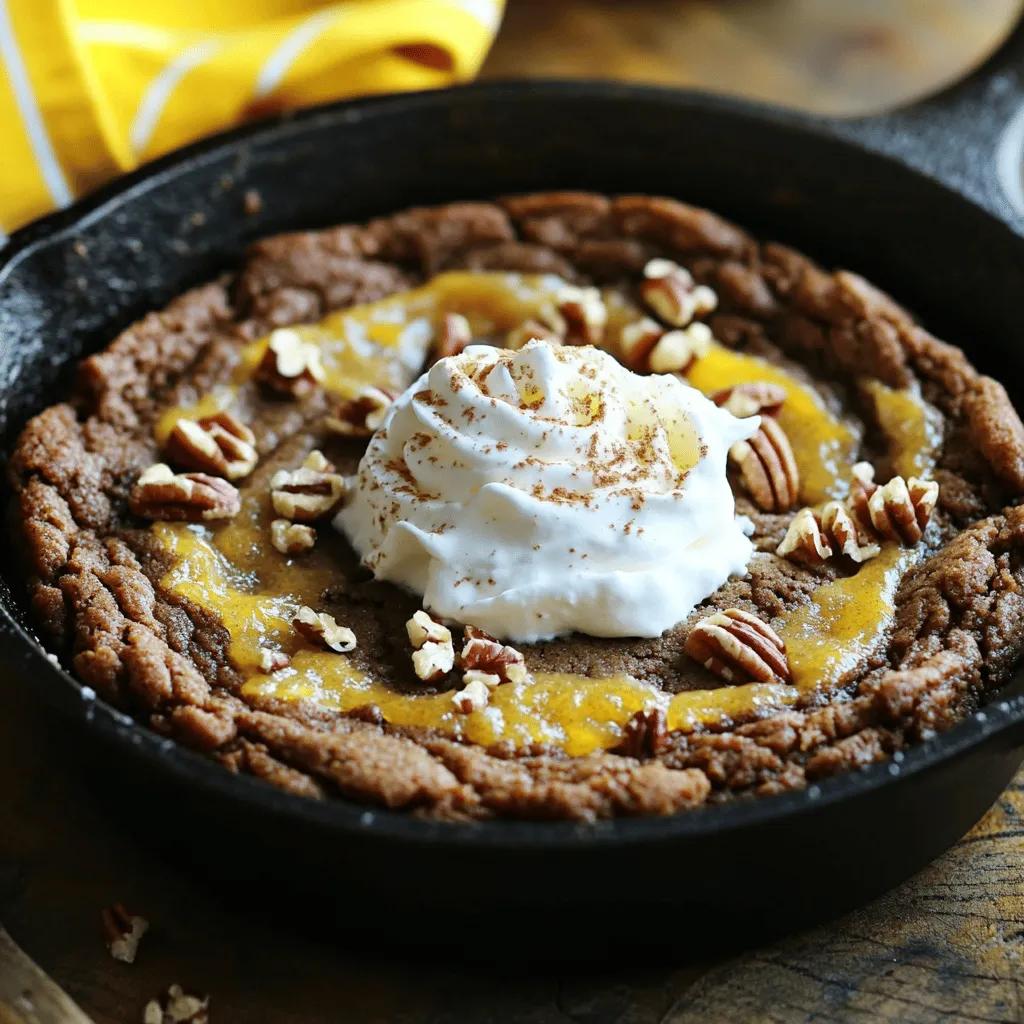
Craving a warm, gooey treat? Let me introduce you to the Warm Gingerbread Molasses Skillet Cookie Delight. This easy-to-make dessert

To make No-Bake Coconut Chocolate Energy Bites, you will need: - 1 cup rolled oats - 1/2 cup almond butter (or any nut/seed butter of your choice) - 1/4 cup honey or maple syrup (to taste) - 1/2 cup shredded unsweetened coconut - 1/4 cup dark chocolate chips (ensure dairy-free if required) - 1 tablespoon chia seeds (optional for added nutrition) - 1 teaspoon pure vanilla extract - A pinch of salt These simple ingredients create a tasty treat that packs energy. Each energy bite offers a balanced mix of carbs, protein, and healthy fats. You can expect: - Calories: About 100 per bite - Protein: 3 grams - Fat: 5 grams - Carbohydrates: 13 grams - Fiber: 2 grams - Sugars: 5 grams This snack is great for kids and adults alike. You can easily swap out some ingredients. Here are some ideas: - Use peanut butter instead of almond butter for a different taste. - Replace honey with agave syrup for a vegan option. - Use coconut flakes instead of shredded coconut for added texture. - Try using mini chocolate chips or dried fruit for a sweet twist. These simple swaps keep the energy bites fun and versatile! Start by gathering your ingredients. You will need rolled oats, almond butter, honey, and vanilla extract. Mix these in a large bowl. Use a spatula or wooden spoon to blend. Make sure the mixture is smooth and sticky. Next, add shredded coconut, dark chocolate chips, chia seeds, and a pinch of salt. Stir again until everything is well mixed. This is the base of your energy bites. Now comes the fun part: making the bites! With clean hands, scoop out spoonfuls of the mixture. Roll each scoop into a small ball, about one inch in size. This part can get a little messy, but that’s okay! Place the rolled balls on a baking sheet lined with parchment paper. Leave some space between each ball. This ensures they don't stick together. Once you’ve rolled all the bites, it’s time to chill them. Place the baking sheet in the fridge for at least 30 minutes. This helps them firm up nicely. After chilling, move the energy bites to an airtight container. They stay fresh in the fridge for up to a week. Perfect for quick snacks or a boost of energy on the go! To get the right texture, mix the rolled oats and almond butter well. This step is key. The mixture should feel sticky but not too wet. If it is too dry, add a bit more honey or nut butter. If it's too wet, add more oats. The right balance helps them hold together. You can add different flavors to your energy bites. Try using peanut butter instead of almond butter for a nutty twist. You can also use maple syrup for a different sweetness. Adding spices like cinnamon or cocoa powder can give them a unique taste. For a fruit kick, toss in some dried fruit or nuts. A fun way to serve these bites is to place them in a colorful bowl. You can also use skewers to make them easy to grab. For a fancy touch, sprinkle extra shredded coconut on top. This adds color and texture. Make your presentation pop to impress your guests! {{image_4}} If you want nut-free energy bites, use sunflower seed butter. This option keeps the bites tasty and safe for nut allergies. You can also swap almond butter for pumpkin seed butter. Both will still give you a great texture and flavor. You can change the flavors to fit your taste. Add dried fruit like cranberries or raisins for a sweet touch. You can also mix in seeds like flaxseed or hemp seeds for extra crunch. For those who love spice, try adding a pinch of cinnamon or a dash of sea salt to elevate the taste. To make these bites fit special diets, there are easy swaps. Use maple syrup instead of honey for a vegan option. For gluten-free bites, check that your oats are certified gluten-free. If you want to lower sugar, reduce the amount of honey or maple syrup. Each change can help meet your dietary needs while keeping the bites delicious. I find the best way to store energy bites is in an airtight container. This keeps them fresh and tasty. Place the container in the refrigerator. These bites stay good for up to a week. You can also layer parchment paper between bites for easy access. You can freeze these energy bites for longer storage. Just place them in a single layer on a baking sheet. Freeze them for about two hours until firm. Then, transfer them to a freezer-safe bag. They can last up to three months in the freezer. When you're ready to eat, let them thaw in the fridge. When stored correctly, energy bites can last up to one week in the fridge. If frozen, they can stay good for three months. Always check for any changes in smell or texture before eating. Storing them right helps maintain their yummy taste and texture. Yes, you can make these energy bites vegan. Just swap honey for maple syrup. Both sweeteners work well and keep the bites sticky. Use dairy-free chocolate chips for a vegan option. This way, everyone can enjoy them! To lower the sugar in these bites, use less honey or maple syrup. You can even skip the sweetener entirely if you want. The chocolate chips add some sweetness, so adjust the amount to your taste. You can replace almond butter with any nut or seed butter. Peanut butter, sunflower seed butter, or cashew butter work great. Each option brings its own flavor and texture. Just choose one you like! Yes, these energy bites are very kid-friendly! They are easy to eat and packed with good ingredients. Kids love the chocolate and coconut flavors. Plus, they make a fun snack for lunchboxes or after school. You now know all about making energy bites. We covered key ingredients, steps for preparation, and tips for great taste. Don’t forget the variations that let you customize based on your needs. Storing your energy bites correctly keeps them fresh longer. Whether you need a quick snack or a healthy treat, you have the tools to make it work. Enjoy experimenting with flavors and share these bites with friends! Your journey to healthier snacking starts here.

No-Bake Coconut Chocolate Energy Bites Delight

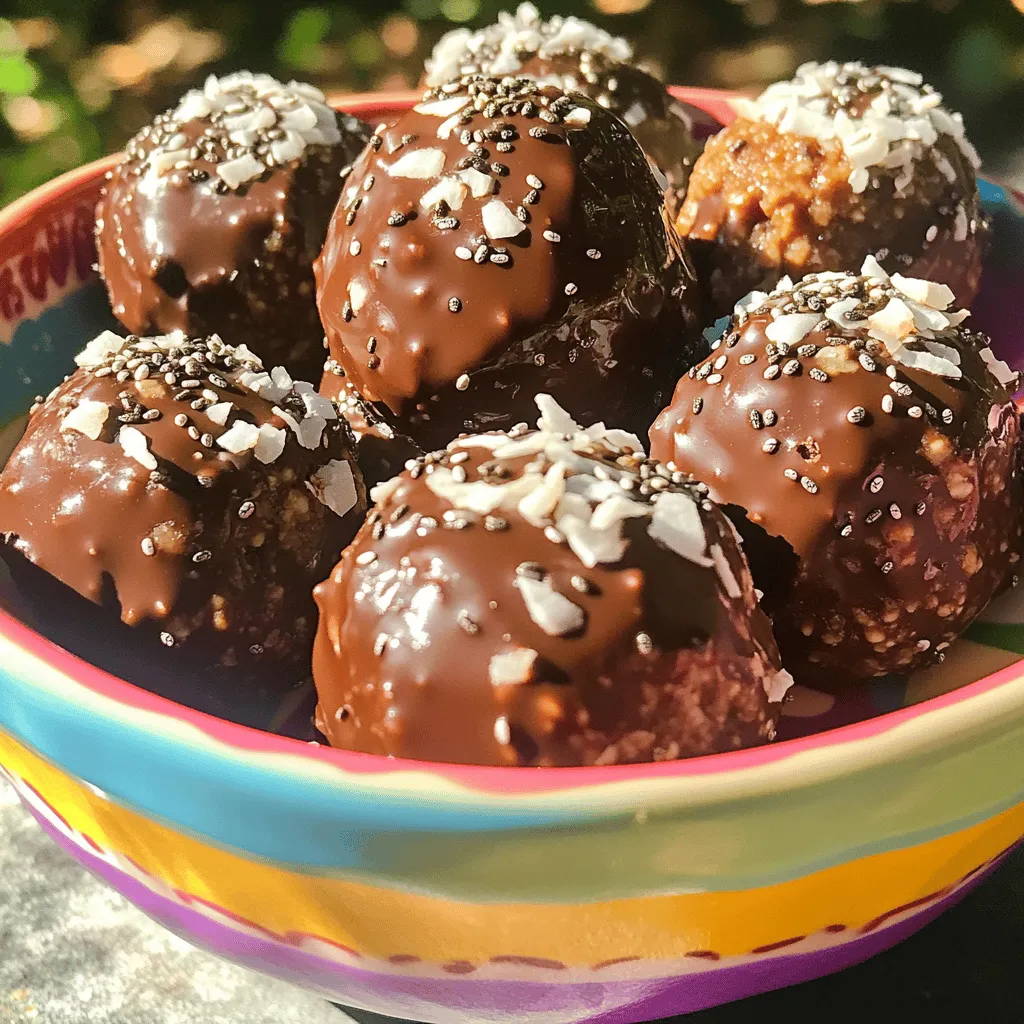
Looking for a quick, healthy snack? You’ll love my No-Bake Coconut Chocolate Energy Bites! These bites pack rich flavor and

To make my One-Pot Creamy Spinach Ravioli, you need a few key items. These will help create a tasty dish. - Ravioli Variations: - 12 oz fresh or frozen spinach ravioli. Fresh ravioli cooks faster, but frozen is great too. - Stationary Ingredients and Seasonings: - 2 cups fresh spinach, chopped roughly. - 1 cup heavy cream for that rich taste. - 1 cup vegetable broth to add flavor. - 1/2 cup grated Parmesan cheese for creaminess. - 2 tablespoons olive oil to sauté garlic. - 2 cloves garlic, minced for a nice aroma. - 1 teaspoon Italian seasoning for extra flavor. - Salt and pepper to taste for seasoning. - Optional Garnishes: - Fresh basil leaves to add color and freshness. These ingredients come together to create a simple yet delightful dish. Each ingredient plays a role in making the ravioli creamy and flavorful. You can mix and match based on what you have at home. Enjoy getting creative with your cooking! - Heating the Olive Oil and Sautéing Garlic Start by warming 2 tablespoons of olive oil in a large pot over medium heat. Once hot, add 2 cloves of minced garlic. Sauté the garlic for 1-2 minutes. Watch it closely. You want it fragrant and golden but not browned. - Adding Vegetable Broth for Simmering Carefully pour in 1 cup of vegetable broth. Turn up the heat a bit to bring it to a gentle simmer. This will create a nice base for the ravioli. - Cooking the Ravioli Toss in 12 ounces of fresh or frozen spinach ravioli. Cook them according to the package instructions. Fresh ravioli takes about 3-4 minutes, while frozen needs 5-7 minutes. Stir gently to avoid sticking. - Mixing in Heavy Cream Once the ravioli are tender, lower the heat. Pour in 1 cup of heavy cream and add 2 cups of roughly chopped fresh spinach. Stir well. The spinach will wilt and mix in nicely. - Adding Grated Parmesan Cheese Gradually sprinkle in 1/2 cup of grated Parmesan cheese and 1 teaspoon of Italian seasoning. Stir constantly until the cheese melts and the sauce turns creamy. - Adjusting Seasonings Taste your dish. Add salt and pepper as needed to enhance the flavor. This step makes a big difference. - Serving Suggestions Remove the pot from heat. Let it sit for a couple of minutes to thicken. Serve hot, garnished with fresh basil leaves for a pop of color and flavor. Enjoy your creamy spinach ravioli! For the best sauce, keep an eye on the cream. You want it smooth and thick. If it feels too thin, let it simmer a bit longer. The heat helps it thicken up. Always stir while it cooks. This way, it won’t stick or burn. A nice tip is to add more cheese if you want it creamier. Adding flavor is key. Use fresh garlic for a strong taste. You can also add a pinch of nutmeg. It brings a warm, cozy flavor. Fresh basil at the end brightens the dish. Don't forget to taste while cooking. Adjust salt and pepper as needed. To keep ravioli tender, time is important. Fresh ravioli needs about 3-4 minutes. Frozen ones take a bit longer, around 5-7 minutes. Stir gently while they cook. This helps them not stick. Test one to check if it's done. You want it soft but not mushy. Sautéing spinach adds great taste. Use medium heat for best results. Add it after the cream. This way, it wilts quickly and keeps its bright color. Stir it in gently. Cook until it’s just soft. This keeps it fresh and vibrant in the dish. {{image_4}} Alternative Cheese Options You can switch up the cheese in this dish. Try mozzarella for a gooey texture. Feta adds a salty kick. For a sharper taste, use aged cheddar. Each cheese brings its own flavor and character. Vegetables to Add or Substitute Feel free to add more veggies. Peas or mushrooms fit well in this mix. You can also swap spinach for kale for a different taste. Broccoli or zucchini can add color and crunch. Experiment with what you like best! Vegan Version To make this dish vegan, swap the heavy cream for coconut cream. Use nutritional yeast instead of Parmesan for a cheesy flavor. Be sure to check that your ravioli is vegan-friendly, too. This way, you keep the creamy texture without dairy. Gluten-Free Options You can easily make this meal gluten-free. Use gluten-free ravioli made from rice or quinoa. Check the labels for other ingredients like broth and seasonings. This ensures everyone can enjoy this creamy delight without worry. When you have leftover creamy spinach ravioli, store it in an airtight container. This keeps the dish fresh for up to three days in the fridge. Let the ravioli cool to room temperature before sealing the container. Avoid placing hot food directly into the fridge, as it can raise the temperature inside. If you want to keep it longer, freezing is a great option. Place the ravioli in a freezer-safe container or a zip-top bag. Make sure to remove as much air as possible to prevent freezer burn. The ravioli can stay good for up to three months in the freezer. To enjoy your creamy spinach ravioli again, you can reheat it in a few ways. The best method is using the stove. Place the ravioli in a pan over low to medium heat. Add a splash of vegetable broth or cream to keep it creamy. Stir gently until it’s hot. You can also use the microwave. Put the ravioli in a microwave-safe bowl. Cover it with a damp paper towel to keep moisture in. Heat it in short bursts, stirring in between, until warm. This method works well, but the stove gives better results. Enjoy your meal! Can I use frozen spinach instead of fresh? Yes, you can use frozen spinach. Just thaw and drain it well. This cuts down on prep time. Frozen spinach also works great in the sauce. It saves you time and still tastes good. How can I make the sauce richer? To make the sauce richer, add more heavy cream. You can also mix in cream cheese or mascarpone. These ingredients boost the creaminess and flavor. If you want more depth, try adding a splash of white wine. What else can I serve with creamy spinach ravioli? You can serve a fresh salad for a nice crunch. Garlic bread pairs well too. Another option is roasted veggies, adding color and texture. For a fun twist, try a side of sautéed mushrooms. These choices make your meal even better. You've learned how to make creamy spinach ravioli from scratch. We covered key ingredients, cooking steps, and variations. You also discovered tips for perfecting the sauce and best storage methods. Now you can create a delicious meal that suits your taste. Experiment with different ingredients to make it your own. Enjoy your cooking journey and share it with others. Happy cooking!

One-Pot Creamy Spinach Ravioli Simple Dinner Delight

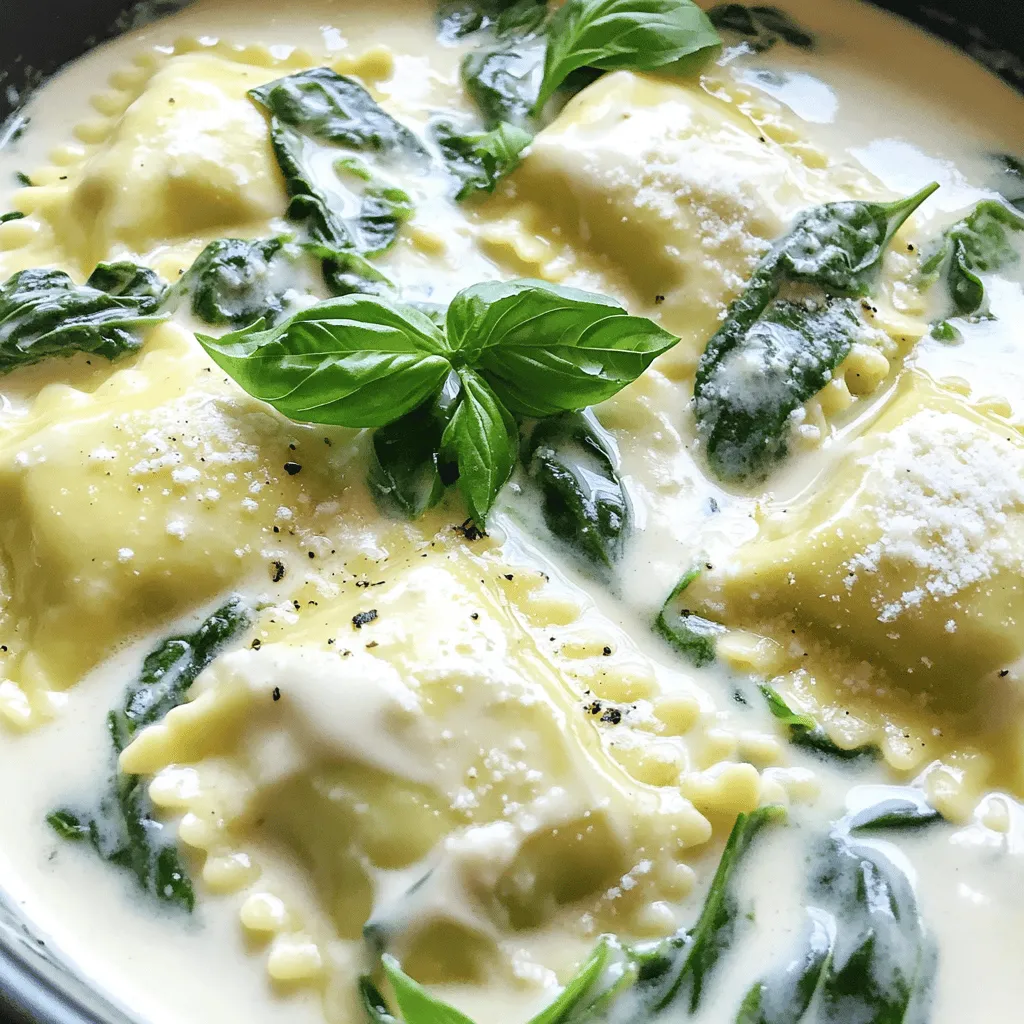
Looking for a simple dinner that packs flavor? You’ve come to the right place! This One-Pot Creamy Spinach Ravioli is

For this recipe, you need 1 pound of fresh salmon fillet. Remove the skin and cut it into bite-sized cubes. Fresh salmon gives your nuggets the best taste and texture. You will mix several key items for the marinade: - 2 tablespoons olive oil - 1 teaspoon lemon zest - 2 tablespoons fresh lemon juice - 1 teaspoon freshly cracked black pepper - 1 teaspoon garlic powder - 1 teaspoon onion powder - ½ teaspoon smoked paprika - Salt to taste These ingredients create a bright, zesty flavor. The lemon juice and zest make the salmon fresh and vibrant. Garlic and onion powder add a nice depth, while smoked paprika gives a subtle warmth. To finish your dish, consider fresh parsley. Chop it finely and sprinkle it on top of the salmon nuggets. This adds color and a fresh taste. You can also serve these nuggets with lemon wedges for extra zing. Enjoy your meal! Start by gathering your ingredients. In a large bowl, mix: - 2 tablespoons olive oil - 1 teaspoon lemon zest - 2 tablespoons fresh lemon juice - 1 teaspoon freshly cracked black pepper - 1 teaspoon garlic powder - 1 teaspoon onion powder - ½ teaspoon smoked paprika - Salt to taste Whisk these together until smooth. This mix is your tasty marinade. Take your salmon fillet, which is cut into bite-sized cubes. Gently add the salmon to the marinade. Toss each cube carefully. You want every piece coated well. Let the salmon soak in the marinade for 15-20 minutes. This time helps the flavors blend and soak in. While the salmon marinates, preheat your air fryer to 400°F (200°C). Let it heat for 3-5 minutes. Once ready, lay the salmon nuggets in the air fryer basket. Don't overcrowd them; this helps them get crispy. Cook for 8-10 minutes. Halfway through, shake the basket gently. The nuggets should turn golden brown and be fully cooked. When done, move them to a plate and garnish with fresh parsley. Enjoy your meal! To get that perfect crispiness, you need to preheat your air fryer. Set it to 400°F (200°C) for 3-5 minutes. This step helps the nuggets cook evenly. When you cook them, place the salmon in a single layer. If you stack the pieces, they won’t crisp up. Turning or shaking the basket halfway through also helps. Marinating your salmon is key for deep flavor. I recommend at least 15-20 minutes. This time allows the marinade to soak into the fish. If you have more time, you can marinate it longer, up to one hour. Just keep it in the fridge. The longer it sits, the better the taste will be! Overcrowding the air fryer basket is a common mistake. When you cram too many pieces in, they steam instead of crisp. For the best results, cook in batches if needed. Each nugget should have some space around it. This way, hot air can circulate freely and cook each piece evenly. {{image_4}} You can change the flavor of your lemon pepper salmon nuggets easily. Try adding herbs like dill or thyme for a fresh taste. If you like heat, sprinkle in some cayenne pepper or red pepper flakes. For a sweeter note, mix in a bit of honey with the marinade. This adds a nice balance to the savory flavors. You can also use different spices, like cumin or coriander, for a unique twist. If you don't have an air fryer, you can bake or pan-sear the nuggets. To bake, preheat your oven to 400°F (200°C). Spread the nuggets on a baking sheet and cook for about 12-15 minutes. For pan-searing, heat oil in a skillet over medium heat. Cook the nuggets for 3-4 minutes on each side until golden brown. Both methods keep the salmon juicy and flavorful. These salmon nuggets are great on their own. You can serve them with a side of steamed veggies or a light salad. Try adding a dip, like tzatziki or a spicy mayo, for extra flavor. You can also place the nuggets on a bed of rice or quinoa for a complete meal. Garnishing with fresh parsley adds color and freshness. Enjoy this tasty dish in many fun ways! After you enjoy your Air Fryer Lemon Pepper Salmon Nuggets, store any leftovers. Place the nuggets in an airtight container. They will stay fresh for up to three days in the fridge. Make sure they cool down before sealing the container. This keeps them from getting soggy. To reheat your salmon nuggets, use the air fryer again. Set it to 350°F (175°C) for about 3-5 minutes. This method helps them regain their crispiness. You can also use a microwave, but this may make them soft. If using the microwave, heat them for 30 seconds at a time until warm. You can freeze the salmon nuggets if you want to save some for later. Place them in a freezer-safe bag or container. They will keep well for up to three months. When ready to eat, thaw them overnight in the fridge. Reheat them in the air fryer for the best texture. Yes, you can use frozen salmon. Just make sure to thaw it first. Place the salmon in the fridge overnight or use cold water for a quick thaw. Once thawed, remove the skin and cut it into bite-sized cubes. This allows the marinade to soak in well. I love these nuggets with several tasty sauces. Here are my favorites: - Lemon aioli - Tartar sauce - Honey mustard - Spicy mayo - Soy sauce with ginger Each sauce adds a unique flavor that complements the salmon. Feel free to try different ones to find your favorite! To check if the salmon is done, look for a few signs: - The color should change from translucent to opaque. - It should flake easily with a fork. - An internal temperature of 145°F (63°C) indicates it’s cooked. If you notice these signs, your salmon nuggets are ready to enjoy! This blog post covered how to make delicious salmon nuggets using fresh ingredients. You learned about key ingredients, easy steps, and helpful tips for the best results. We explored variations to suit your taste and shared smart ways to store leftovers. You can try frozen salmon and find tasty dips too. Cooking can be fun and simple. Enjoy making these salmon nuggets and share them with family and friends!

Air Fryer Lemon Pepper Salmon Nuggets Tasty and Easy

Are you ready to whip up a delicious meal in no time? In this post, I’ll show you how to

- 1 cup unsalted butter (equivalent to 2 sticks) - 2 cups granulated sugar - 4 large eggs - 1 teaspoon pure vanilla extract - 1 cup all-purpose flour - 1 cup unsweetened cocoa powder - ½ teaspoon kosher salt - 1 cup pecans, chopped - 1 cup chocolate chips (semi-sweet or dark) - 1 cup caramel sauce (can be store-bought or homemade) - Flaky sea salt, for a finishing sprinkle To make Caramel Pecan Turtle Brownies, you need rich, simple ingredients. Each one plays a key role in flavor and texture. First, unsalted butter creates a rich base. Granulated sugar adds sweetness and helps the brownies rise. Eggs bind the mix and give it a nice lift. Pure vanilla extract brings warmth and depth to the taste. Next, all-purpose flour provides structure. Unsweetened cocoa powder gives that deep chocolate flavor we crave. Kosher salt enhances the sweetness and balances the flavors. Chopped pecans add crunch and a nutty taste. Chocolate chips melt into the brownies, giving pockets of gooey goodness. Caramel sauce adds sweetness and a sticky, decadent layer. Finally, flaky sea salt on top gives a perfect finish, making each bite special. These ingredients blend to create a dessert that is both rich and comforting. Each element contributes to the overall taste. So, gather these items, and get ready to bake! - Preheat the oven to 350°F (175°C). - Prepare a 9x13 inch baking pan. You can grease it with butter or line it with parchment paper. This helps with easy removal of the brownies later. - Start by melting the unsalted butter in a medium saucepan over medium heat. Once it melts, take it off the heat. - Stir in the granulated sugar until it mixes well and is smooth. - Now, add the eggs one by one. Mix each egg in well before adding the next. - Next, stir in the pure vanilla extract. This adds a nice flavor to the batter. - In another bowl, sift together the all-purpose flour, unsweetened cocoa powder, and kosher salt. - Gently fold this dry mix into the wet mixture. Be careful not to overmix. This keeps the brownies fudgy. - Finally, fold in the chopped pecans and chocolate chips. Make sure they spread evenly in the batter. - Pour half of the brownie batter into the prepared baking pan. Spread it evenly across the bottom. - Drizzle half of the caramel sauce over the brownie layer. You can spread it slightly with a spatula if needed. - Carefully pour the rest of the brownie batter over this caramel layer. Spread it gently to avoid mixing with the caramel. - Now, drizzle the remaining caramel sauce over the top. - Use a toothpick or a knife to swirl the caramel into the brownie batter. Make sure to leave some caramel visible on the surface. - Put the pan in your preheated oven. Bake for 25-30 minutes. - To check if they are done, insert a toothpick into the center. It should come out with a few moist crumbs, not wet batter. - After baking, take the pan out of the oven. Let the brownies cool in the pan for at least 15 minutes. - Before cutting, sprinkle a pinch of flaky sea salt on top. This enhances the sweet flavors. - Once cooled, cut the brownies into squares. You can serve them warm or let them cool to room temperature. Enjoy! To get that fudgy texture, mix the batter gently. When you add the dry ingredients, stir until just combined. Overmixing can make your brownies cakey instead of fudgy. Checking doneness is vital. Insert a toothpick in the center; it should come out with a few moist crumbs. If it’s clean, you may have baked them too long. Use high-quality chocolate chips for deeper flavor. Semi-sweet or dark chocolate chips work best. They bring richness that enhances the overall taste of the brownies. You can add extra toppings to boost flavor. Try sprinkling extra chopped pecans or chocolate chips on top before baking. A pinch of flaky sea salt can also make a big difference. Serve the brownies on a nice platter. Drizzle additional caramel sauce on top for a beautiful look. Garnish with more chopped pecans for that extra touch. Pair each brownie with a scoop of creamy vanilla ice cream. The cold ice cream complements the warm brownies perfectly. Whipped cream is another great option for a delightful finish. {{image_4}} You can make these brownies gluten-free. Use a gluten-free flour blend instead of all-purpose flour. This swap keeps the brownies rich and tasty. For vegan substitutes, replace eggs with flax eggs. Mix one tablespoon of ground flaxseed with three tablespoons of water and let it sit until thick. Use a plant-based butter for a dairy-free option. It works well and keeps the brownies moist. If you want to change the nuts, try walnuts or almonds. They add a new texture and flavor. You can also skip the nuts for a nut-free version. For different sauce variations, try chocolate sauce or peanut butter. These can add fun flavors to your brownies. You can mix sauces together for a unique twist. Adding fruits can elevate your brownies. Chopped cherries or raspberries can bring a fresh taste. You can also add spices like cinnamon for warmth. Seasonal variations can make your brownies special. For fall, add pumpkin spice. For winter, consider peppermint extract. These twists can create a festive treat for any holiday. Store your leftover brownies in a cool, dry place. Use an airtight container to keep them fresh. This helps prevent them from drying out. Layer parchment paper between the brownies to avoid sticking. * Recommended containers: - Airtight glass containers - Plastic food storage containers - Aluminum foil wraps If you want to save some brownies for later, freezing works well. First, cut the brownies into squares. Wrap each square in plastic wrap. Then, place the wrapped brownies in a freezer-safe bag. * Proper freezing techniques: - Ensure brownies are fully cooled before wrapping - Remove as much air as possible to prevent freezer burn To enjoy your frozen treats, thaw them in the fridge overnight. You can also warm them in the microwave for a few seconds. This brings back their gooey goodness. To make these brownies fudgier, you can adjust the baking time and ingredients. Bake them for less time, around 20 to 25 minutes. Check for doneness with a toothpick. It should have moist crumbs, not dry. You can also add more butter or chocolate chips to increase the richness. Yes, you can use different nuts if you prefer. Walnuts, almonds, or hazelnuts work well. Just chop them up and use the same amount as pecans. Keep in mind that each nut has a unique flavor, which can change the taste of your brownies. To make homemade caramel sauce, you need just sugar, butter, and cream. Start by melting sugar in a pan until it turns golden brown. Then add butter and stir until melted. Finally, slowly mix in heavy cream. This gives you a rich, smooth sauce that pairs nicely with brownies. These brownies can last up to a week when stored properly. Keep them in an airtight container at room temperature. For longer storage, you can freeze them for up to three months. Just wrap them well in plastic wrap and place them in a freezer bag. You now have a complete guide to making rich, fudgy brownies. We covered all the key ingredients, step-by-step instructions, and useful tips. Remember to check for doneness and try different toppings. Feel free to explore variations like gluten-free or vegan options. Make these brownies your own by adding flavors you love. Enjoy your baking and indulge in your delicious treats!

Caramel Pecan Turtle Brownies Delightful Recipe Guide

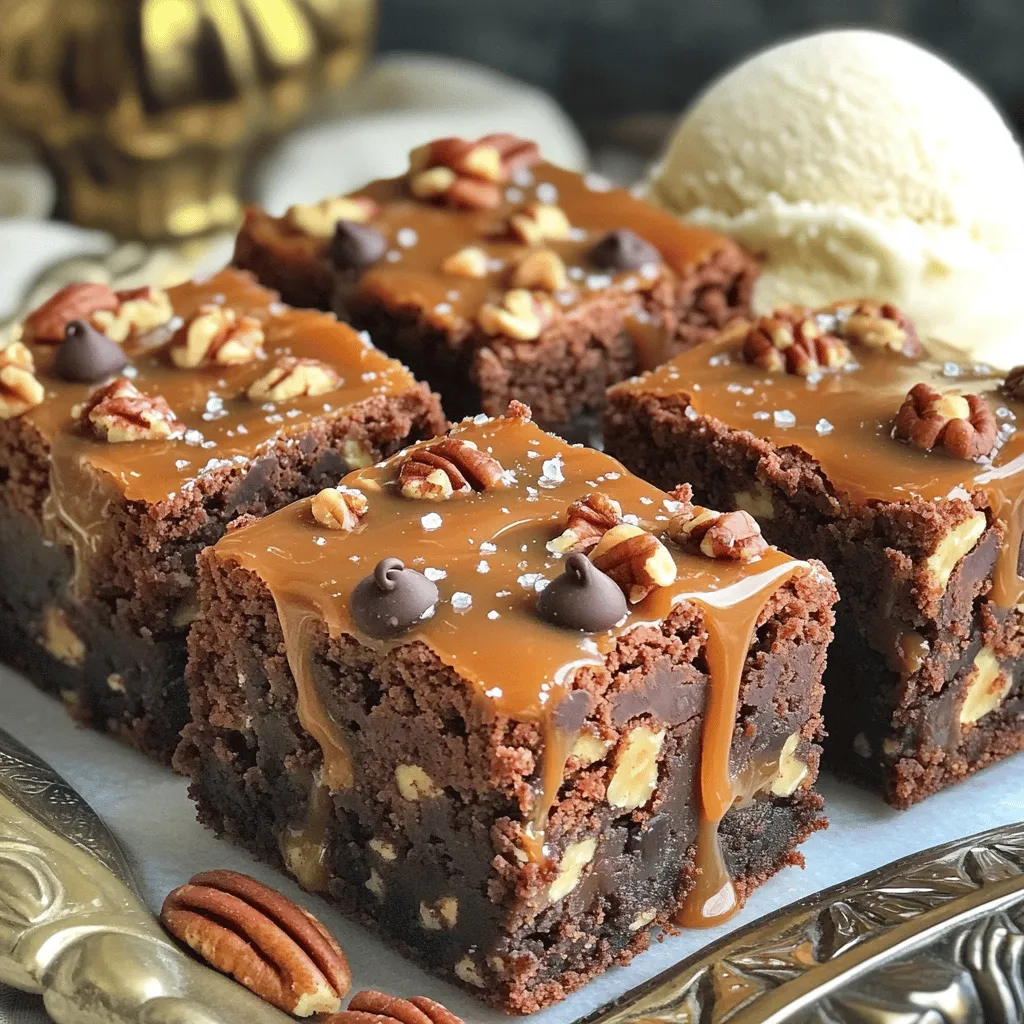
Get ready to treat yourself with my Caramel Pecan Turtle Brownies—a recipe you can’t resist! These brownies blend rich chocolate,

- 2 whole grain mini bagels, cut in half - 1 cup low-fat cottage cheese - 1/4 cup shredded cheddar cheese - 1/4 teaspoon garlic powder - 1/4 teaspoon onion powder - 1/2 teaspoon dried oregano - Salt and freshly ground black pepper, to taste - 2 tablespoons cherry tomatoes, diced - Fresh basil leaves for garnish These ingredients combine to create a tasty and healthy snack. Whole grain mini bagels give you fiber and texture. Low-fat cottage cheese adds protein and creaminess. Shredded cheddar cheese melts nicely, giving a rich flavor. The seasonings enhance the taste. Garlic powder adds a savory note. Onion powder gives warmth, while oregano brings a hint of earthiness. Salt and pepper balance all the flavors. For an extra pop, you can add diced cherry tomatoes. They add color and freshness. Fresh basil leaves finish the dish with a bright aroma. Gather these ingredients, and you are ready to make a delightful snack that is both high in protein and full of flavor. Enjoy the process of creating these bagel bites! - Preheat the oven to 375°F (190°C). - Prepare the baking sheet with parchment paper. - In a medium bowl, combine 1 cup cottage cheese, 1/4 cup shredded cheddar, and 1/4 cup cooked spinach. - Add 1/4 teaspoon garlic powder, 1/4 teaspoon onion powder, salt, black pepper, and 1/2 teaspoon dried oregano. - Stir the mixture until it’s creamy and smooth. - Take your whole grain mini bagels and cut them in half. - Place the bagel halves cut-side up on the prepared baking sheet. - Spoon the cottage cheese filling generously onto each bagel half. - Scatter diced cherry tomatoes over the filling for extra flavor. - Bake the bagel bites for 12-15 minutes. - Watch for golden edges and melted cheese. - Once done, remove them from the oven and let them cool for about a minute. - Garnish with fresh basil leaves for a nice touch before serving. You can swap out cheese based on your taste. Here are some options: - Ricotta cheese: Creamy and mild, great for a soft texture. - Feta cheese: Add a tangy flavor that pairs well with spinach. For vegetables, consider these substitutes: - Kale: A firm option that adds more nutrients. - Roasted red peppers: Sweet and colorful, they enhance the flavor. To get your bagel bites crispy, adjust your baking time: - Crispier edges: Bake for the full 15 minutes. - Chewy texture: Bake closer to 12 minutes. Even distribution of filling is key. Here’s how: - Use a spoon: Spread the filling evenly on each bagel half. - Layer it well: Don’t rush; a thick layer adds more flavor. Pair these bagel bites for a balanced snack: - Fresh fruit: Serve with apple slices or berries for sweetness. - Yogurt: A side of yogurt adds creaminess and protein. Perfect accompaniments include: - Herbal tea: A light herbal tea enhances the flavors. - Crunchy salad: A crisp salad adds freshness and crunch. {{image_4}} You can make these bagel bites even tastier. Here are some ideas: - Add spices or herbs: Try adding a pinch of smoked paprika or a dash of cayenne for heat. Fresh herbs like chives or dill can brighten the flavor. - Incorporate different cheeses: Swap the cheddar for mozzarella, feta, or goat cheese. Each cheese gives a unique taste. These bagel bites can fit different diets. Here’s how to adapt them: - Gluten-free variations: Use gluten-free mini bagels. Many brands offer great options that taste just as good. - Vegan alternatives: Replace cottage cheese with tofu or a nut-based cheese. Use nutritional yeast to mimic cheesy flavor. You can change the bagel bites with the seasons. Here are some fresh ideas: - Incorporating seasonal vegetables: In spring, add asparagus or peas. In fall, try roasted pumpkin or sweet potatoes. - Adapting flavors to the time of year: Use fresh basil in summer and rosemary in winter. These herbs pair well with seasonal veggies. Experimenting with these variations keeps your bagel bites exciting and fun! To keep your bagel bites fresh, store them in the fridge. Use an airtight container. They stay good for about 3 days. Make sure they cool before sealing. This helps keep moisture at bay. If you want to enjoy them later, just reheat. For longer storage, you can freeze the bagel bites. Place them in a single layer on a baking sheet. Freeze them for about an hour until solid. Then, transfer them to a freezer bag. They can last up to 2 months in the freezer. Just label the bag with the date. To reheat, use the oven for the best taste. Preheat your oven to 350°F (175°C). Place the bagel bites on a baking sheet. Heat for about 10-15 minutes until warm. This way, they stay crispy on the outside. You can also use a microwave, but they might get soft. If you want to keep them crunchy, stick to the oven. These bagel bites are both tasty and healthy. Each serving has about 180 calories. You get around 12 grams of protein, which helps build muscles. The fat content is low, at just about 6 grams. The cottage cheese adds a lovely creaminess and boosts protein. Whole grain bagels offer fiber, helping with digestion. You can enjoy this snack without guilt! Yes, you can make these bagel bites ahead of time! Prepare the filling and spread it on the bagels. Then, store them in the fridge for up to one day. When you're ready to eat, just bake them. This saves time and ensures a quick snack. You can also freeze the assembled bites for later. Just remember to bake them straight from the freezer, adding a few extra minutes to the cooking time. You can have fun with this recipe! Here are some ideas to make it your own: - Cheese: Swap cheddar for mozzarella or feta for a different flavor. - Veggies: Try bell peppers, mushrooms, or zucchini for more color and taste. - Spices: Add chili flakes for heat or fresh herbs for a burst of freshness. - Meat: You could add cooked bacon bits or ham for extra protein. These simple swaps can change the flavor and keep things exciting! Watch for a few key signs! The bagel edges should turn a golden brown. The cheese needs to be melted and bubbly. A light touch can help too; they should feel firm but not hard. If they look inviting, they are ready to eat. Let them cool for a minute before serving. Enjoy the tasty crunch! These bagel bites are simple to make and full of flavor. You combine whole grain bagels, cottage cheese, and seasonings for a tasty snack. You learned how to prepare and bake them, along with tips for variations and storage. Experiment with garnishes and flavors to suit your tastes. Enjoy them fresh or save some for later. Making these bites can be fun and rewarding. I hope you try this recipe and make it your own!

High-Protein Cottage Cheese Bagel Bites Delight

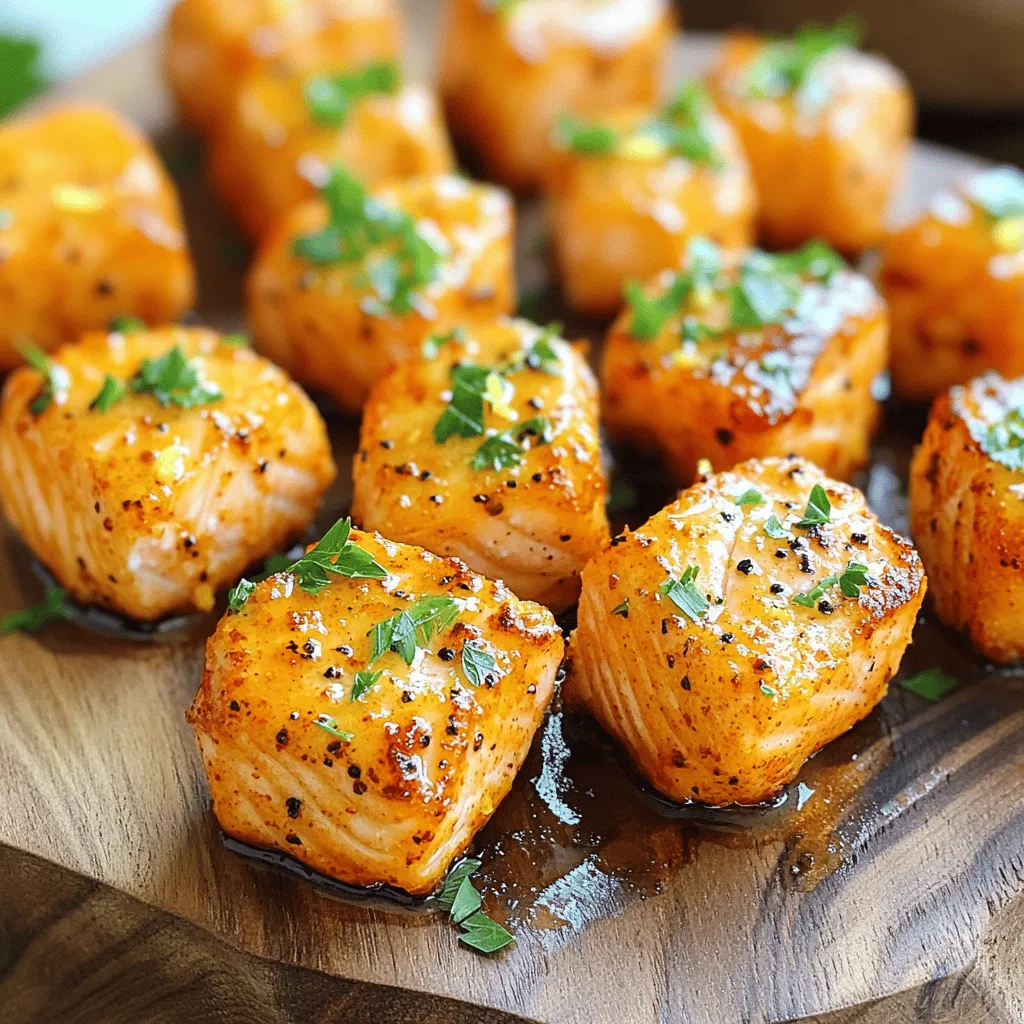
Are you ready to supercharge your snack game? These High-Protein Cottage Cheese Bagel Bites are packed with flavor and nutrition!

- 4 medium russet potatoes - 2 cups corn kernels - 1 medium onion - 3 cloves garlic - 1 cup celery - 1 cup carrots - 4 cups vegetable broth - 1 cup heavy cream - 1 teaspoon smoked paprika - 1 teaspoon dried thyme - Salt and black pepper - 1 cup shredded cheddar cheese (optional) - Garnishes: Chopped green onions, crispy fried onions This loaded potato corn chowder packs a punch of flavor. The main stars are the russet potatoes and corn. They work beautifully together to create a creamy base. The smoked paprika adds warmth and depth. I love how it enhances the chowder without overpowering it. Dried thyme brings a touch of earthiness. Together, these spices lift the dish from ordinary to extraordinary. The onion, garlic, celery, and carrots provide a great flavor base. When you sauté them, the aroma fills your kitchen. It makes your mouth water in anticipation. Use fresh vegetables for the best taste. The heavy cream adds richness. If you prefer a lighter option, substitute it with coconut cream. This way, you keep the creaminess but avoid dairy. Optional cheese can turn this chowder into a cheesy delight. When you stir it in, it melts and blends well with the chowder. The garnishes add a fun crunch. Chopped green onions brighten the dish, while crispy fried onions give it texture. Selecting high-quality ingredients is key. Fresh corn gives a sweet burst, while good broth enriches the chowder. Quality matters when you want to impress your family or friends. Remember, flavor is what makes a meal memorable. 1. First, set your Instant Pot to sauté mode. 2. Add a splash of olive oil and wait until it shimmers. 3. Toss in the diced onion, minced garlic, diced celery, and diced carrots. 4. Sauté these for about 5 minutes until they soften and smell great. 5. Next, add the diced potatoes and corn. Mix well to coat them with the veggies. 1. Pour in the vegetable broth. 2. Sprinkle in the smoked paprika, thyme, salt, and black pepper. 3. Stir all the ingredients to blend the flavors. 4. Secure the Instant Pot lid and set the vent to sealing. 5. Select manual mode and cook on high pressure for 10 minutes. 1. After cooking, let the pressure release naturally for 5 minutes. 2. Carefully switch to quick release to let out any steam. 3. Open the lid, then stir in the heavy cream (or coconut cream). 4. For a thicker texture, use an immersion blender to puree some of the chowder. 5. If you like, mix in the shredded cheddar cheese until it melts. 6. Taste your chowder and adjust seasoning with more salt or pepper if needed. Using fresh corn gives your chowder a sweet crunch. Frozen corn works just as well and saves time. Just make sure to thaw it first. For spice, start small. Add a pinch of cayenne or crushed red pepper. Taste as you go. You can always add more, but it’s hard to take spice away. Blend some of the chowder for thickness. Use an immersion blender for this step. If you want a creamier texture, add more cream or use coconut cream for a dairy-free option. This keeps it rich while being lighter. Garnish your chowder with chopped green onions for a pop of color. Crispy fried onions add a nice crunch. For an extra touch, drizzle olive oil or sprinkle more smoked paprika on top. Serve in warm bowls to keep the chowder hot longer. {{image_4}} Swapping heavy cream for coconut cream makes the chowder lighter. Coconut cream is rich and dairy-free. You can also add more vegetables for extra nutrients. Try zucchini, spinach, or bell peppers. These choices keep it tasty and vibrant. Want to elevate the chowder? Introduce proteins like crispy bacon or cooked chicken. They add a hearty taste. If you like spice, toss in chopped jalapeños. They give a nice kick and an exciting twist. Using seasonal produce can enhance flavors. In summer, sweet corn shines. In winter, root vegetables like parsnips add depth. You can also try pumpkin for a cozy fall dish. These ingredients make your chowder fresh and exciting all year round. After you enjoy your loaded potato corn chowder, let the leftovers cool. Store them in a tight container. Glass or BPA-free plastic containers work best. They keep the chowder fresh. You can store it in the fridge for up to three days. If you want to keep it longer, freezing is a great option. First, let the chowder cool completely. Pour it into freezer-safe bags or containers. Make sure to leave some space for expansion. It freezes well for up to three months. When ready to eat, thaw it in the fridge overnight. Reheat it on the stove or in the microwave until hot. In the fridge, your chowder stays good for about three days. Look for signs that it has gone bad. If you see mold or if it smells sour, it's time to toss it. Always trust your senses. If it looks or smells off, do not eat it. Yes, you can use other types. Yukon Gold or red potatoes work well too. Each type adds its own flavor and texture. Just ensure they are cut into small cubes for even cooking. Yes, you can make this chowder vegan. Simply replace the heavy cream with coconut cream. Use vegetable broth to keep it plant-based. You can skip the cheese or use a vegan alternative. To boost the heat, add some diced jalapeños or a pinch of cayenne pepper. You can also mix in hot sauce to taste. Start small and adjust until it’s just right for you. This chowder pairs well with crusty bread or a fresh salad. Grilled cheese sandwiches are a classic match too. For a fun twist, serve it with tortilla chips for crunch! Yes, you can double the recipe. Just make sure your Instant Pot has enough space. You might need to adjust the cooking time slightly, but the high pressure method stays the same. This blog post covered making a tasty loaded potato corn chowder. We explored key ingredients, from russet potatoes to smoked paprika. I shared clear steps for cooking in the Instant Pot and tips for flavor and texture. You learned variations for health and season, along with storage tips. This chowder is easy to adapt and enjoy year-round. Try your version and share it with friends. Happy cooking!

Instant Pot Loaded Potato Corn Chowder Flavor Boost

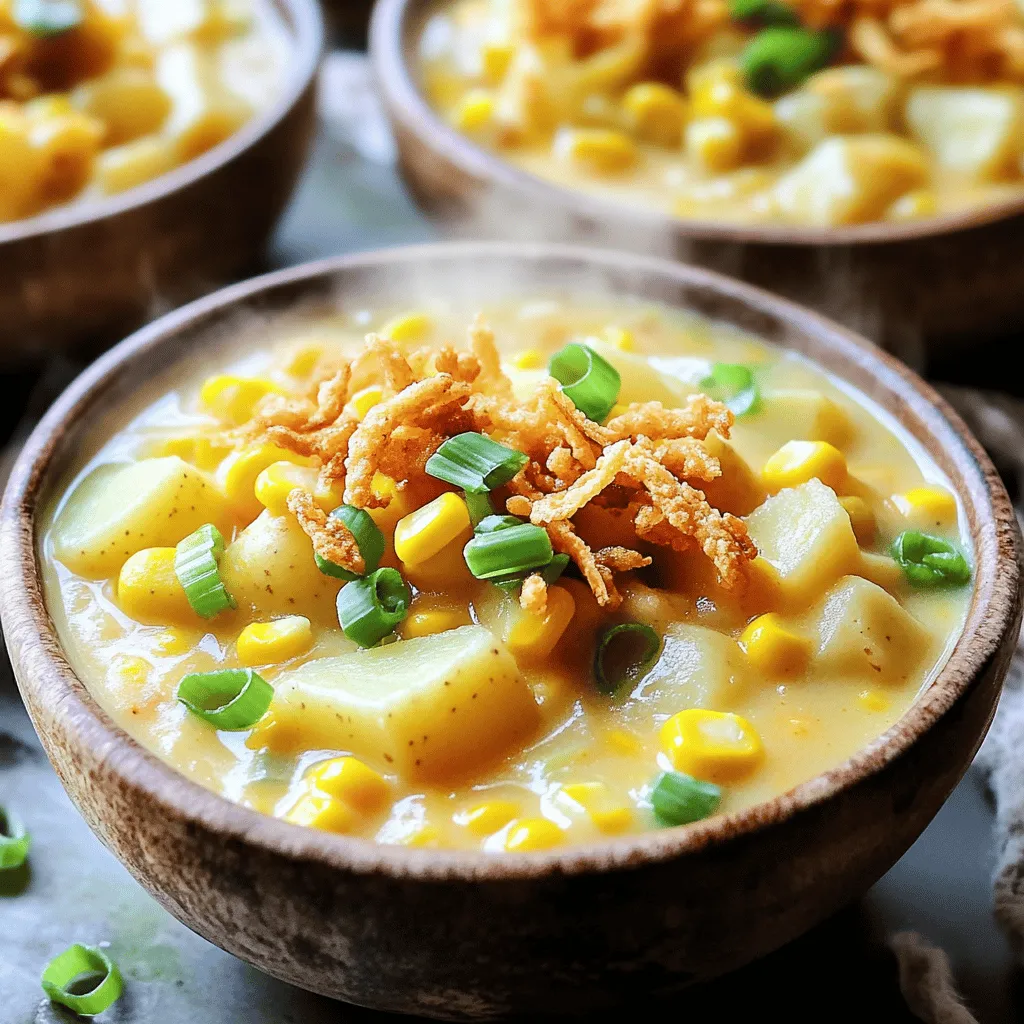
Looking to elevate your dinner with an easy, delicious recipe? You’re in the right spot! This Instant Pot Loaded Potato

- 1 lb ground beef (or ground turkey for a lighter option) - 3 tablespoons sesame oil - 4 cloves garlic, minced - 2 tablespoons soy sauce (or tamari for gluten-free) - 1 tablespoon oyster sauce (or hoisin sauce) - 1 teaspoon freshly grated ginger - 1 cup bell peppers, diced - 1 cup green onions, sliced - Fresh cilantro and lime wedges for garnish (optional) For these Sesame Garlic Beef Lettuce Wraps, you will need some key ingredients. First, choose your meat. Ground beef gives rich flavor, while ground turkey offers a lighter choice. Next, sesame oil adds a nutty taste that makes this dish shine. Don’t skip the garlic; it adds a punch of flavor. Now let’s talk about flavor enhancers. Soy sauce brings saltiness, and oyster sauce adds depth. Ginger brightens your dish with freshness. For a pop of color and crunch, use bell peppers and green onions. These veggies not only taste great but also make your wraps look pretty. Lastly, consider garnishing with fresh cilantro and lime. They add zest and make every bite special. Gather these ingredients, and you’re ready to create a fast and tasty meal! - Heat 3 tablespoons of sesame oil in a large skillet over medium-high heat. Watch for it to shimmer. - Add 4 minced cloves of garlic and 1 teaspoon of freshly grated ginger. Sauté for about 30 seconds. The aroma will be amazing! - Add 1 pound of ground beef or ground turkey to the skillet. Cook until browned, about 5 to 7 minutes. Break it apart with a spatula as you cook. - Pour in 2 tablespoons of soy sauce and 1 tablespoon of oyster sauce. Stir well to coat the meat. - Add 1 cup of diced bell peppers. Cook for another 2 to 3 minutes. The peppers should stay crunchy and colorful. - Remove the skillet from heat, then gently mix in 1 cup of sliced green onions and 1 tablespoon of toasted sesame seeds. This adds great flavor! - Take a head of butter or romaine lettuce and gently separate the leaves. - Place a generous spoonful of the beef mixture in the center of each leaf. - Top with fresh cilantro and a squeeze of lime if you like. - Carefully wrap the lettuce around the beef. Enjoy your tasty and healthy wraps right away! - Best practices for sautéing: Heat your sesame oil until it shimmers. This ensures a nice sear and helps the flavors bloom. - Timing for seasoning the beef: Add the soy sauce and oyster sauce when the beef is browned. This adds depth to the meat while keeping it juicy. - Ensuring bell peppers maintain crunch: Add the diced bell peppers last. Stir them in for just 2-3 minutes. This keeps them crisp and colorful. - Presentation tips for wraps: Serve on a stylish platter. Arrange the wraps neatly, and sprinkle extra sesame seeds for flair. - Suggested side dipping sauce: Mix soy sauce with a bit of sweet chili sauce. This adds a sweet and spicy kick that pairs well with the wraps. - Balancing flavors with additional garnishes: Fresh cilantro and lime are great. They add brightness and freshness to the rich beef. {{image_4}} You can switch out the beef in these wraps. Ground turkey or chicken works well. Both options keep the dish light but still tasty. If you want a vegan choice, try lentils or mushrooms. These options add great texture and flavor, making your wraps just as delicious. For those avoiding gluten, use tamari instead of soy sauce. It still gives you that savory kick. You can also spice things up! Add chili garlic sauce or sriracha for a hot twist. This adds a fun kick to your wraps. Feel free to get creative with your veggies. You can use carrots, cucumbers, or even jicama for extra crunch. Adding more greens, like spinach or arugula, boosts nutrition and flavor. This way, you can make the dish your own while keeping it fresh and exciting. To store leftovers, place the beef mixture in an airtight container. Let it cool to room temperature first. Seal it tightly and store it in the fridge. This keeps the beef fresh for up to three days. For best results, eat the wraps within this time frame. To maintain flavor and freshness, keep the lettuce separate. Wrap the leaves in a damp paper towel. Place them in a plastic bag or container. This helps them stay crisp and crunchy. You can freeze the beef mixture for later use. First, let it cool completely. Then, place it in a freezer-safe container. Label it with the date and contents. The beef can stay frozen for up to three months. When you’re ready to eat, thaw it overnight in the fridge. Reheat the beef mixture in a skillet over medium heat. Stir it well to make sure it heats evenly. You can also add a splash of water or broth to keep it moist. Enjoy your delicious wraps again! Yes, you can! Ground turkey works great as a lighter choice. You can also try ground chicken or pork for a different taste. If you want a vegetarian option, use lentils or mushrooms. These alternatives keep the dish tasty while adding variety. To make these wraps gluten-free, use tamari instead of soy sauce. Tamari has a similar taste but is safe for those avoiding gluten. You can also replace oyster sauce with a gluten-free hoisin sauce. These swaps ensure you enjoy the same delicious flavors without gluten. Butter lettuce is my top pick for wraps. It has soft, pliable leaves that hold the filling well. Romaine lettuce is another good option. It’s crisp and sturdy, so it won’t tear easily. Both types add a fresh crunch to your wraps. This article explored the key ingredients and steps for making tasty lettuce wraps. You learned how to prepare a beef mixture, enhance flavors, and personalize your dish. Remember to try different proteins and veggies to match your taste. Proper storage tips can help keep leftovers fresh. By following these tips, you can create delicious wraps every time. Enjoy making these flavorful dishes in your kitchen!

Sesame Garlic Beef Lettuce Wraps 15-Minute Delight

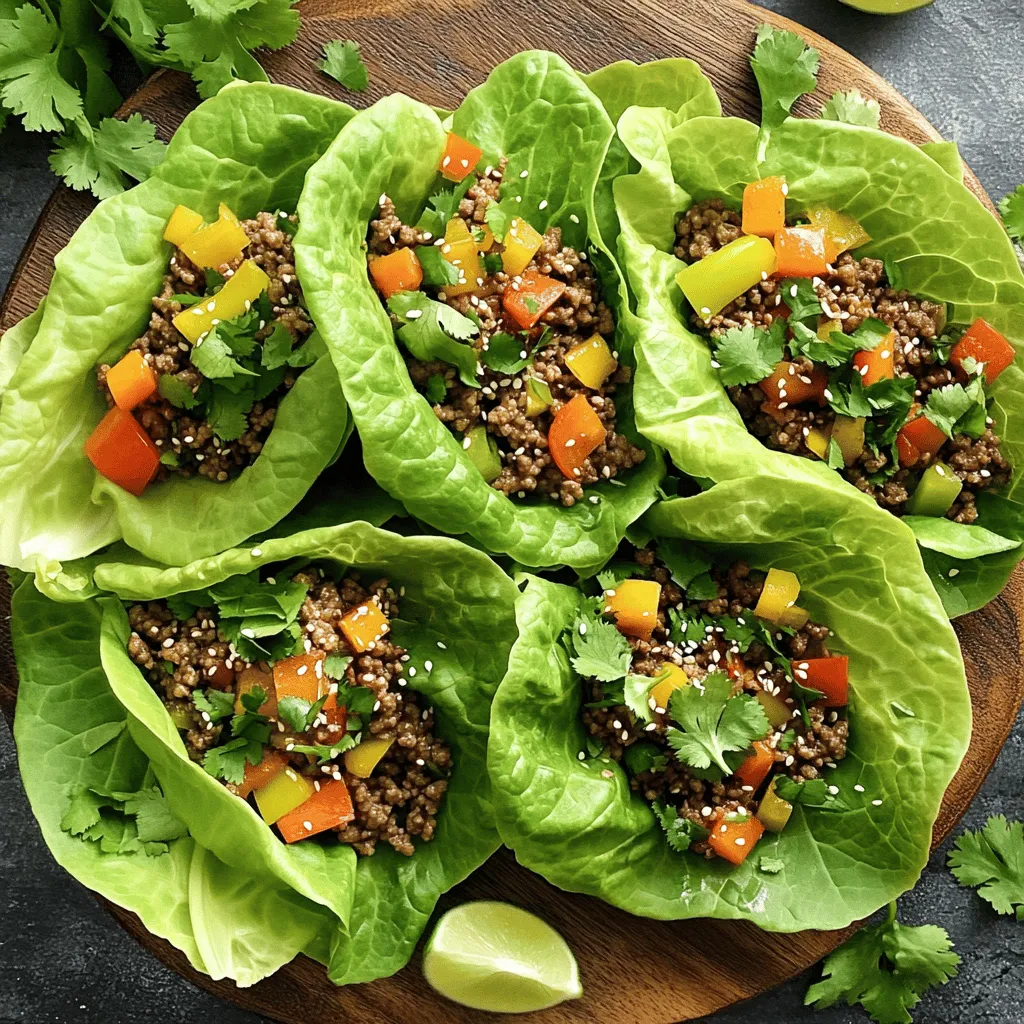
Looking for a quick and tasty meal? These Sesame Garlic Beef Lettuce Wraps are ready in just 15 minutes! You’ll

Older posts
Newer posts
← Previous Page1 … Page25 Page26 Page27 … Page83 Next →

dsad

© 2026 eataroundit • Built with GeneratePress

Our Policies

  • Copyright Policy
  • Cookie Policy
  • GDPR Policy
  • Privacy Policy
  • Disclaimer
  • Terms Of Use

More Information

  • Home
  • About
  • Contact
  • Appetizers
  • Dessert
  • Dinner
  • Drinks
©2026, eataroundit About Back To Top