Skip to content
DisclaimerTerms Of UseGDPR PolicyCookie Policy

eataroundit

  • Home
  • Drinks
  • Appetizers
  • Dinner
  • Dessert
  • About
  • Contact
  • Privacy Policy
DisclaimerTerms Of UseGDPR PolicyCookie Policy

NO-ING-IMG

- 3 cups rolled oats - 1 cup nuts (almonds, walnuts, or pecans), roughly chopped - 1/2 cup pumpkin seeds - 1/2 cup unsweetened coconut flakes - 1/3 cup pure maple syrup - 1/4 cup coconut oil, melted - 1 teaspoon pure vanilla extract - 1 teaspoon ground cinnamon - 1/2 teaspoon sea salt - 1/2 cup dried fruit (raisins, cranberries, or apricots), optional To make Slow Cooker Maple Cinnamon Granola Clusters, gather these ingredients. The rolled oats form the base. They provide fiber and a chewy texture. You can use any nuts you like. Almonds, walnuts, or pecans add crunch and healthy fats. Pumpkin seeds bring a nice crunch and extra nutrients. Unsweetened coconut flakes add a hint of sweetness and tropical flavor. Pure maple syrup serves as the sweetener. It gives a rich, natural taste. Melted coconut oil helps bind the mixture and adds healthy fat. Vanilla extract enhances the flavor. Ground cinnamon adds warmth and spice. A pinch of sea salt balances the sweetness. If you want, you can add dried fruit for extra flavor. Raisins, cranberries, or apricots work well. These ingredients combine to make a delicious and healthy snack. You’ll love how easy this recipe is! In a large bowl, combine 3 cups of rolled oats, 1 cup of roughly chopped nuts, and 1/2 cup of pumpkin seeds. You can use almonds, walnuts, or pecans—whichever you like best! Next, add 1/2 cup of unsweetened coconut flakes, 1 teaspoon of ground cinnamon, and 1/2 teaspoon of sea salt. Stir everything well until it is evenly mixed. This blend will be the base of your granola clusters. In another bowl, whisk together 1/3 cup of pure maple syrup, 1/4 cup of melted coconut oil, and 1 teaspoon of pure vanilla extract. Keep whisking until the mixture is smooth and slightly frothy. This sweet and fragrant blend will help bind all your dry ingredients together. Lightly grease the inside of your slow cooker with a bit of coconut oil or cooking spray. Then, pour the wet mixture over the dry ingredients. Use a spatula to fold everything together until all the oats and nuts are coated. Spread the mixture evenly in the slow cooker. Cover it with the lid and set the heat to low. Cook for about 2 to 2.5 hours, stirring every 30 minutes. This way, the granola cooks evenly and turns golden brown. Once the cooking time is up, turn off the slow cooker and let the granola cool for 30 minutes with the lid off. This cooling time is key! It helps the granola clump into tasty clusters. If you want to add dried fruit, wait until the granola is completely cool before you mix it in. Finally, transfer your granola clusters to an airtight container and store them for up to two weeks. Enjoy your delicious and crunchy treat! To make your granola clusters just right, stir the mixture every 30 minutes while it cooks. This helps the granola cook evenly and develop a nice golden color. If you like your clusters extra crunchy, you can adjust the cooking time. Try cooking for up to 3 hours instead of 2.5 hours. Just keep an eye on it to avoid burning. When serving, use a clear glass jar or a decorative bowl. This makes the clusters look inviting and fun. You can sprinkle extra coconut flakes on top for a finishing touch. Drizzle a bit of maple syrup over the top to enhance the flavor. For a yummy breakfast, pair it with yogurt or milk. This adds creaminess to the crunchy granola. Each ingredient offers great health benefits. Rolled oats are full of fiber, which helps digestion. Nuts provide healthy fats and protein, keeping you full longer. Pumpkin seeds are rich in magnesium. Coconut flakes add healthy fats and a bit of sweetness. Using pure maple syrup instead of refined sugar gives natural sweetness and minerals. Adding dried fruit can give extra vitamins and flavor. {{image_4}} You can boost the taste of your granola with spices and extracts. Try adding: - Nutmeg for warmth. - Ginger for a zesty kick. - Almond extract for a sweet touch. For sweetness, consider using: - Honey or agave syrup instead of maple syrup. These changes let you customize the flavor to your liking. If you need nut-free options, use seeds instead. Sunflower seeds or pumpkin seeds work great. For gluten-free alternatives, choose certified gluten-free oats. This way, everyone can enjoy your granola. You can switch up your granola based on the season. In autumn, add: - Chopped apples and a sprinkle of pumpkin spice. For summer, mix in: - Dried mango or pineapple for a tropical twist. These seasonal touches make your granola feel fresh and fun all year long! To keep your granola clusters fresh, use an airtight container. Glass jars work great. They help keep the granola crunchy and tasty. Make sure the lid seals tightly. If you use plastic, choose BPA-free options. This helps avoid any bad chemicals. For best freshness, store the granola in a cool, dry place. Avoid areas with heat or moisture, like near the stove. Always scoop the granola with a clean, dry spoon. This helps keep it safe from bacteria. Granola clusters last up to two weeks at room temperature. After that, they may lose crunch and flavor. If you want to store them longer, freezing is a great option. Place the clusters in a freezer-safe bag. Remove as much air as you can before sealing. They can last up to three months in the freezer. To enjoy frozen granola, let it thaw in the fridge. Or, you can enjoy it straight from the freezer for a crunchy snack. Just remember, the texture may change a bit after thawing. Yes, you can make this granola nut-free. Simply replace the nuts with more seeds. Use extra pumpkin seeds or sunflower seeds. You can also add more coconut flakes for texture. This way, you still get a tasty crunch without nuts. You can use different sweeteners. Honey is a great choice. Agave syrup works too. If you want a low-calorie option, try stevia or monk fruit sweetener. Just remember, the liquid amount may change, so adjust as needed. You can add many types of dried fruits. Raisins, cranberries, and apricots are great options. You might also try dried figs or dates for a chewy texture. Just make sure to chop any large pieces into smaller bits. This way, they mix in well. To make your granola crunchier, cook it longer. Stir every 30 minutes for even cooking. You can also let it cool completely before breaking it apart. If you want extra crunch, bake it in the oven for a few minutes after slow cooking. Making your own granola is easy and fun. You learned about essential ingredients like oats, nuts, and seeds. The step-by-step guide showed you how to mix and cook everything just right. We also shared great tips to make your granola clusters perfect and delicious. As you explore flavor variations and storage tips, you’ll find endless ways to enjoy it. Keep experimenting to find what you love best, and soon you’ll have a special granola that’s all your own! Enjoy your homemade snack and the joy it brings.

Slow Cooker Maple Cinnamon Granola Clusters Recipe

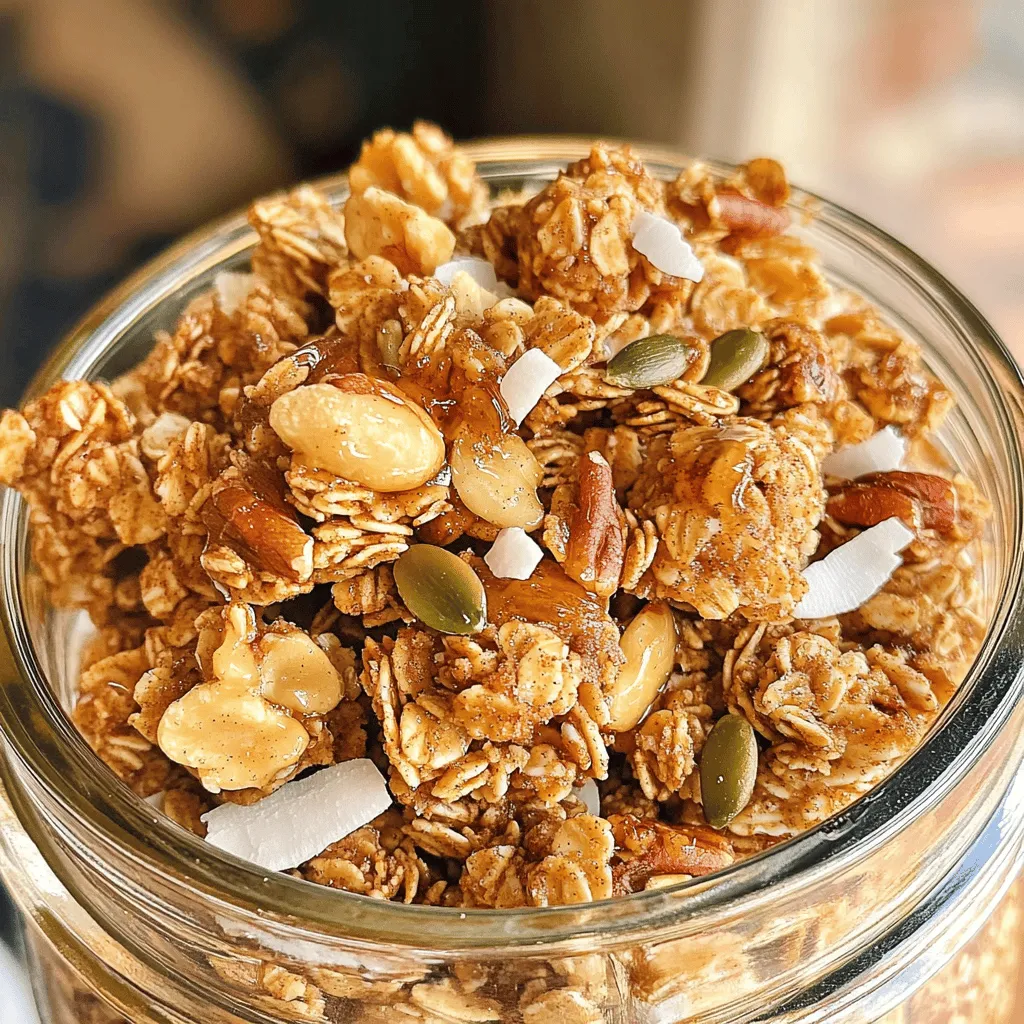
Looking for a tasty and easy snack? You’ll love my slow cooker maple cinnamon granola clusters! This recipe is simple

To make these No Bake Chocolate Espresso Pumpkin Truffles, gather the following items: - 1 cup pumpkin puree (canned or freshly made) - 1 cup almond flour (finely ground) - 1/2 cup unsweetened cocoa powder - 1/2 cup pure maple syrup - 1 tablespoon espresso powder (adjust for stronger coffee flavor) - 1 teaspoon vanilla extract - 1/4 teaspoon ground cinnamon - Pinch of sea salt - 1/2 cup dark chocolate chips (opt for dairy-free if desired) - Unsweetened shredded coconut or additional cocoa powder for rolling If you don’t have almond flour, try using oat flour or coconut flour. Both work well in this recipe. For a nut-free option, you can use sunflower seed flour. If you want less sugar, substitute maple syrup with agave nectar or honey. You can also adjust the espresso powder based on your taste. Add less for a milder flavor or more for a stronger kick. If you can’t find dark chocolate chips, semi-sweet chips work too. Each truffle offers a blend of flavors and nutrients. Here is a rough idea of their nutrition per truffle: - Calories: 120 - Protein: 2g - Fat: 6g - Carbohydrates: 15g - Fiber: 2g - Sugar: 5g These truffles are a delightful treat without being overly sweet. They provide a tasty way to enjoy pumpkin and chocolate while getting some healthy fats from almond flour and dark chocolate. Start by gathering a large mixing bowl. Add 1 cup of pumpkin puree. Then, mix in 1 cup of almond flour. Next, pour in 1/2 cup of unsweetened cocoa powder. This adds rich chocolate flavor. Follow with 1/2 cup of pure maple syrup for sweetness. Stir in 1 tablespoon of espresso powder for a coffee kick. Add 1 teaspoon of vanilla extract for aroma. Then, sprinkle in 1/4 teaspoon of ground cinnamon. Finally, include a pinch of sea salt to balance flavors. Use a spatula to mix everything until smooth and thick. Once your mixture is well combined, cover the bowl. Use plastic wrap or a clean kitchen towel. Place the bowl in the refrigerator for about 30 minutes. Chilling helps the mixture firm up. This step makes it easier to shape later. After chilling, take the bowl out. Use a tablespoon to scoop portions of the mixture. Roll each portion between your palms. Aim for small balls, about 1 inch wide. Place the truffles on a lined baking sheet. Make sure they are spaced apart. This prevents them from sticking. Now, melt the dark chocolate chips in a microwave-safe bowl. Heat them in the microwave at 20-second intervals. Stir in between each interval. Stop when the chocolate is smooth and melted. Be careful not to overheat. Dip each truffle into the melted chocolate. Make sure it is fully coated. Use a fork to lift it out. Let any excess chocolate drip back into the bowl. Place the coated truffle back onto the baking sheet. While the chocolate is still wet, roll the truffles in shredded coconut or cocoa powder. This adds extra flavor and looks nice. Once coated, put the truffles back in the fridge. Let them chill for about 15 minutes. This helps the chocolate set properly. Enjoy these treats chilled or at room temperature. To get the best texture in your truffles, start with good mixing. Make sure the pumpkin puree is smooth. It should blend well with the almond flour and cocoa powder. If the mixture feels too wet, add more almond flour. If it’s too dry, a splash of maple syrup can help. After mixing, chill the dough for about 30 minutes. This step makes it easier to form truffles. The cold mixture holds its shape better. When melting chocolate, do it slowly. Place chocolate chips in a microwave-safe bowl. Heat them in short bursts, about 20 seconds at a time. Stir the chocolate after each burst. This method helps avoid burning. If you see small lumps, keep stirring. The heat will melt them away. Once smooth, use it right away for dipping. If it cools too much, it will thicken and won’t coat well. These truffles look great when served nicely. Use a decorative box or a tiered stand for a fancy touch. You can also sprinkle extra cocoa powder or shredded coconut on top. This adds color and makes them more appealing. For a fun twist, pair the truffles with coffee or tea. The flavors work very well together. Enjoy them chilled or at room temperature for a treat anytime! {{image_4}} You can add new flavors to your truffles. Try adding a splash of orange zest for a bright twist. Ground ginger adds a warm spice that pairs well with pumpkin. If you love nuts, mix in some finely chopped walnuts or pecans for crunch. You can also switch the espresso powder for instant coffee for a milder taste. Each addition brings a unique touch to your truffles. These truffles can easily fit different diets. To make them vegan, ensure you use dairy-free chocolate chips. Almond flour is already gluten-free, making these truffles perfect for gluten-sensitive folks. Instead of maple syrup, you could use agave nectar for a different sweetener. Always check labels to ensure all your ingredients meet dietary needs. Rolling your truffles in different coatings can change their look and taste. Unsweetened shredded coconut gives a tropical feel. You can also roll them in crushed nuts or finely chopped coffee beans for extra texture. For a sweeter touch, use powdered sugar or cocoa powder. Each choice adds a fun twist to every bite, making these truffles even more exciting. To keep your No Bake Chocolate Espresso Pumpkin Truffles fresh, store them in an airtight container. Line the bottom with parchment paper to avoid sticking. Place a layer of truffles in the container, leaving space between each one. Cover the container tightly to keep out air. This helps maintain their rich flavor and soft texture. These truffles can last up to one week in the fridge. If you keep them sealed, they stay delicious and safe to eat. After a week, you may notice a change in texture. They might not taste as fresh, but they will still be safe to enjoy. Freezing these truffles is a great option for longer storage. First, let the truffles set in the fridge for about 15 minutes. Then, place them on a baking sheet lined with parchment paper, making sure they aren’t touching. Freeze them for about two hours. Once they are firm, transfer the truffles into a freezer-safe bag or container. They can last up to three months in the freezer. When you want to eat them, just let them thaw in the fridge overnight. Yes, you can use different nut flours. Almond flour works great, but try cashew or hazelnut flour too. Each will bring a unique flavor. Just keep the same amount as the almond flour in the recipe. Remember, different flours may change the texture slightly. To make these truffles sweeter, add more maple syrup. Start with an extra tablespoon and taste as you go. You can also use powdered sugar or agave syrup if you prefer. Adjust until you reach your desired sweetness. Serve the truffles chilled for the best taste. Place them in a decorative box or on a tiered stand. A light dusting of cocoa powder or shredded coconut makes them look fancy. They are perfect for parties or as a sweet gift! In this blog post, we covered how to make delicious truffles. We discussed ingredients, step-by-step instructions, and tips to improve texture. You learned about variations for different diets and how to store your truffles. Truffles can be fun and easy to make. With the right ingredients and methods, you can impress anyone. Enjoy the process and share your tasty truffles with friends!

No Bake Chocolate Espresso Pumpkin Truffles Delight

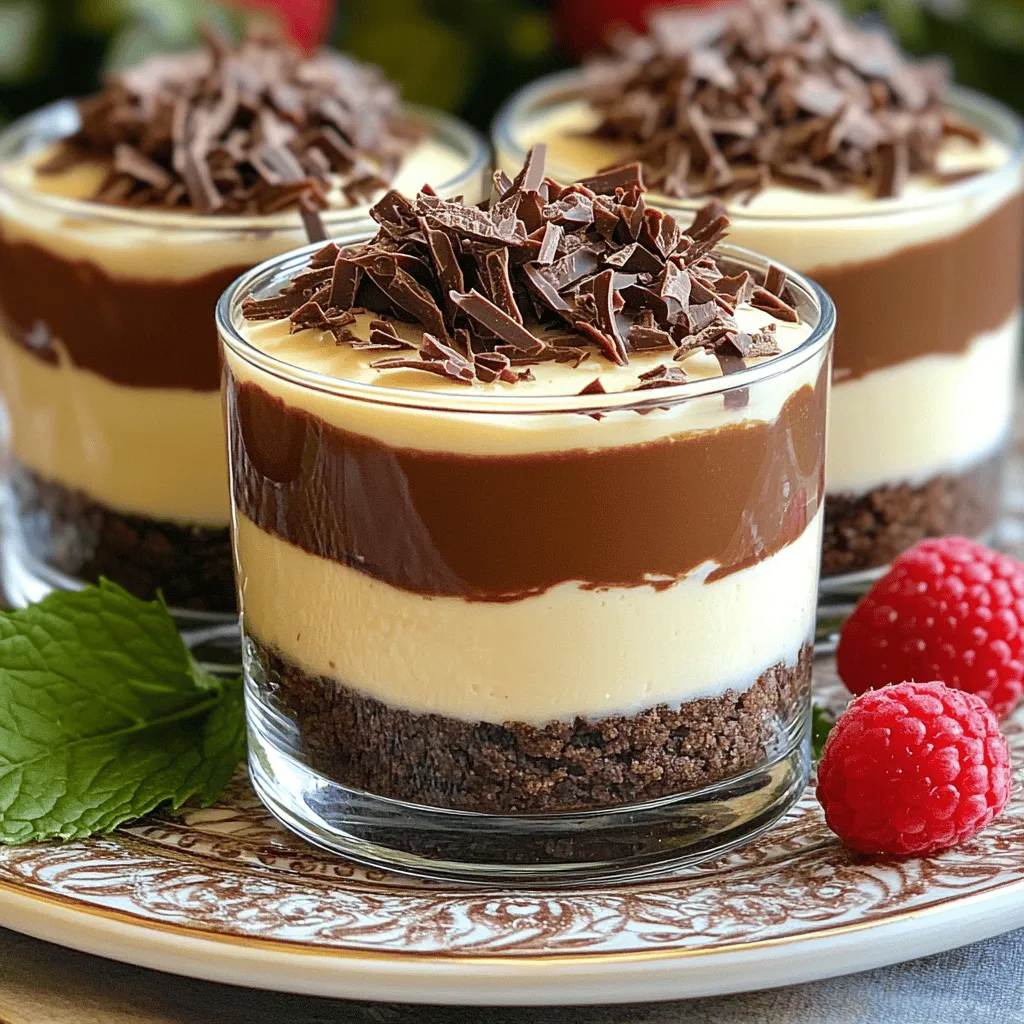
Get ready to indulge in a dessert that combines rich chocolate, bold espresso, and cozy pumpkin flavors—all without needing to

- 8 oz linguine pasta - 1 lb sea scallops, cleaned and patted dry - 4 tablespoons unsalted butter Linguine is a long, thin pasta that pairs well with seafood. Sea scallops are tender and sweet, making them a star in this dish. Unsalted butter adds richness and depth to the sauce. - 4 cloves garlic, minced - 1 tablespoon fresh lemon juice - 1 teaspoon red pepper flakes (optional) Garlic brings a bold aroma that enhances the dish. Fresh lemon juice adds brightness and balances the richness. Red pepper flakes offer a hint of heat, which you can adjust to your taste. - Salt and freshly ground black pepper to taste - Fresh parsley, chopped, for garnish - Zest of 1 lemon Salt and pepper are essential for bringing out flavors. Fresh parsley adds a pop of color and freshness. Lemon zest gives a fragrant touch that ties everything together. Gather these ingredients, and you're ready to create a savory delight that is sure to impress! Bring a large pot of salted water to a strong boil. Add 8 oz of linguine pasta. Cook it according to the package instructions until it is al dente, about 8-10 minutes. Once done, drain the pasta. Be sure to save 1/2 cup of the starchy pasta water for later. While the pasta is cooking, take 1 lb of sea scallops. Use paper towels to pat them dry. This step is key for a good sear. After drying, season both sides with salt and freshly ground black pepper. Proper seasoning brings out their natural flavor. Heat a large skillet over medium-high heat. Add 2 tablespoons of unsalted butter. Wait until the butter bubbles and smells great. Place the scallops in the skillet, giving them space. Sear each side for 2-3 minutes. Look for a golden brown crust. The scallops should be opaque when done. Set them aside on a plate once seared. In the same skillet, lower the heat to medium. Add the remaining 2 tablespoons of butter and let it melt. Then, add 4 cloves of minced garlic. Stir it for about 1 minute. You want the garlic to smell good but not brown. If you like spice, add 1 teaspoon of red pepper flakes for extra flavor. Add the drained linguine to the skillet with the sauce. Toss it well to coat in the garlic butter. Gradually pour in the reserved pasta water. Add 1 tablespoon of fresh lemon juice and the zest of 1 lemon. Mix everything gently. Carefully add the seared scallops back in. Be gentle to avoid breaking them. Take the skillet off the heat. Taste the dish and adjust the seasoning with more salt and pepper if needed. Serve the linguine right away. For a nice touch, sprinkle freshly chopped parsley on top. This adds color and freshness to your dish. To cook scallops well, remember these key points: - Dry Them Well: Use paper towels to remove excess moisture. - Season Generously: Use salt and black pepper on both sides. - Avoid Overcrowding: Cook in batches to ensure even cooking. Common mistakes include: - Cooking scallops too long, which makes them rubbery. - Not letting them sear properly, which prevents a good crust. You can boost flavor with these ingredient additions: - Fresh Herbs: Try adding basil or thyme for an aromatic touch. - Extra Garlic: More minced garlic adds depth to the dish. For pairing suggestions, consider these sides or drinks: - A fresh green salad complements the meal well. - A crisp white wine balances the richness of the dish. To manage your cooking time effectively: - Prep Ingredients First: This helps prevent delays while cooking. - Cook Pasta and Scallops Simultaneously: Start the pasta before the scallops to save time. Multitasking during cooking is key: - While the pasta boils, dry and season the scallops. - Use the time while the scallops sear to prepare your garlic butter sauce. {{image_4}} If you want to try different pasta, you can swap linguine for spaghetti or fettuccine. You can even use whole wheat or chickpea pasta for a twist. If you prefer seafood, shrimp works great in this dish. Just follow the same cooking steps as the scallops. For a gluten-free option, choose gluten-free pasta made from rice or quinoa. This keeps the dish tasty and safe for those with gluten sensitivities. If you want a vegan or vegetarian version, replace the scallops with sautéed mushrooms or tofu. Use plant-based butter or olive oil in place of the butter. To make the dish more exciting, add fresh herbs like basil, dill, or thyme. These herbs bring a fresh taste and vibrant color. You can also try different butter blends. Garlic herb butter adds depth, while lemon butter gives a zesty kick. Just melt it and mix it into the sauce as you would with regular butter. To store leftovers, let the dish cool first. Place it in an airtight container. Glass or plastic containers work well. Ensure the lid seals tightly to keep out air. Store in the fridge for up to three days. If you want to enjoy it later, freezing is a good option. Use freezer-safe containers or bags for this purpose. To reheat without losing texture, use a skillet on medium heat. Add a splash of water or broth to create steam. This helps the pasta stay moist. Stir gently while heating to avoid sticking. You can also use a microwave, but cover the dish with a damp paper towel. This keeps moisture in and prevents drying. To freshen the flavors, squeeze in more lemon juice while reheating. A sprinkle of fresh parsley adds color and taste. If you like spice, add a pinch of red pepper flakes too. Enjoy your dish just as tasty as when you first made it! This dish takes just 10 minutes to prep and 10 minutes to cook. You can have a tasty meal in only 20 minutes! Yes, you can use frozen scallops. Just remember to thaw them first. Thawing scallops makes them easier to cook and taste better. If you want a substitute, try shrimp or fish. Chicken or tofu also works well if you prefer non-seafood options. To avoid rubbery scallops, don’t overcook them. Sear them for 2-3 minutes on each side. They should be golden and opaque. Yes, you can meal prep this recipe! Just store the pasta and scallops separately. Reheat them when you’re ready to eat. This blog post shared an easy way to make Minute Garlic Butter Scallop Linguine. You learned about key ingredients, like linguine, scallops, and garlic. The steps included cooking the pasta, searing scallops, and making a tasty sauce. Remember, perfect scallops need care, and adjusting seasonings is essential. You can even explore variations or dietary adjustments. Enjoy your meal prep and feel confident in your cooking. With practice, you'll impress everyone at the table!

Minute Garlic Butter Scallop Linguine Savory Delight

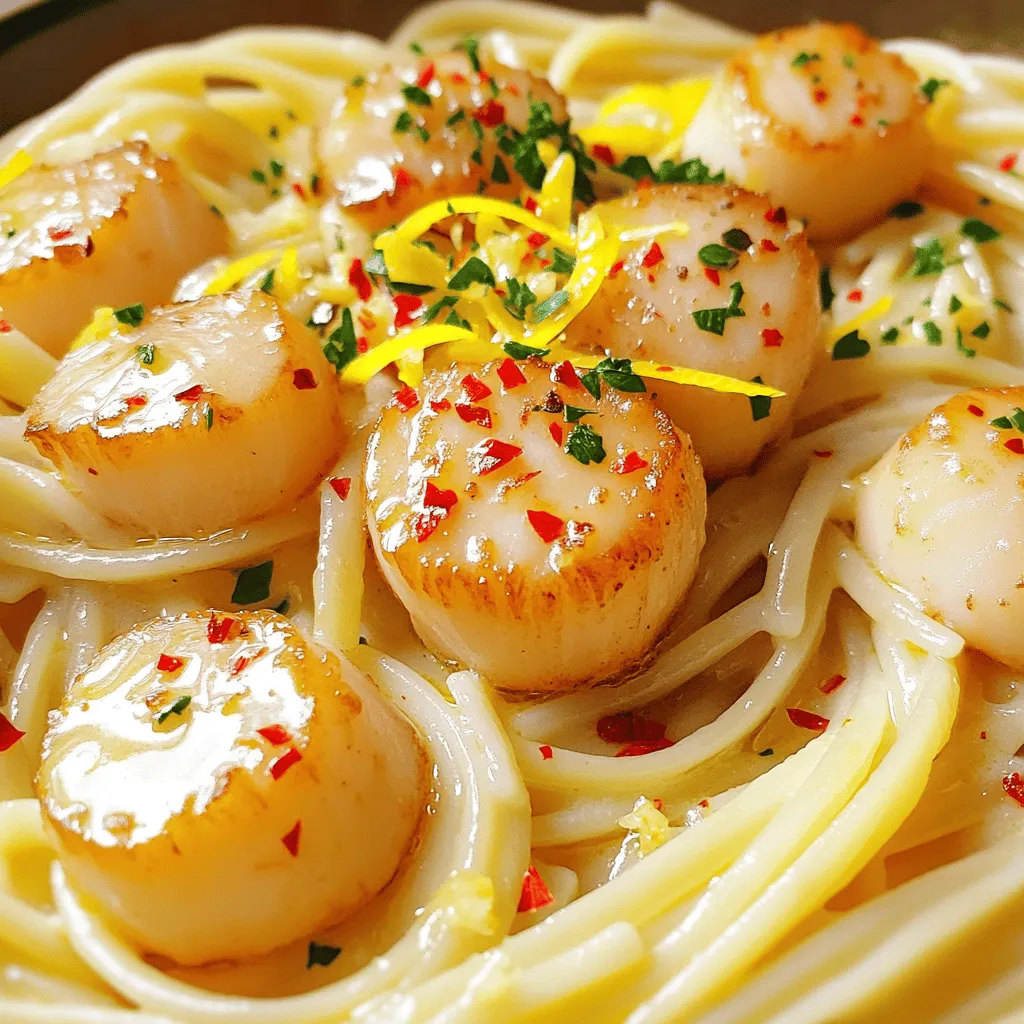
If you’re craving a quick and tasty meal, I’ve got just the recipe for you. Minute Garlic Butter Scallop Linguine

- 1 lb boneless, skinless chicken breasts, cut into bite-sized pieces - 1/2 cup cornstarch - 2 tablespoons vegetable oil - 1/4 cup honey - 3 tablespoons soy sauce - 1 tablespoon sesame oil - 2 cloves garlic, minced - 1 inch ginger, grated - 1 tablespoon rice vinegar - 1 teaspoon sesame seeds (toasted) - 2 green onions, sliced (for garnish) - Cooked white rice or quinoa (for serving) - For 4 servings, use the above amounts. - For 2 servings, cut each ingredient in half. - For 6 servings, multiply each ingredient by 1.5. - Large mixing bowl for preparing chicken - Large skillet or wok for frying - Measuring cups and spoons for accuracy - Wooden spoon or spatula for stirring - Knife and cutting board for chopping ingredients - Serving plates for a beautiful presentation Start by placing your chicken pieces in a large bowl. Sprinkle cornstarch over the chicken. Toss until each piece is well coated. This step is key for a crispy texture. The cornstarch helps seal in moisture and creates a crunchy crust when fried. Heat vegetable oil in a large skillet over medium-high heat. When the oil shimmers, carefully add the chicken in a single layer. Let the chicken cook undisturbed for 4-5 minutes. This helps achieve a perfect golden brown color. Flip the pieces occasionally to cook them evenly. Once done, remove the chicken and set it aside. In the same skillet, lower the heat to medium. Add honey, soy sauce, sesame oil, minced garlic, grated ginger, and rice vinegar. Stir well to mix the ingredients. Let the sauce simmer for 2-3 minutes. This allows the sauce to thicken and the flavors to meld. Return the crispy chicken to the skillet with the sauce. Gently toss the chicken in the honey sesame sauce. Make sure all pieces are coated and heated through. This should take about 1-2 minutes. Just before serving, sprinkle toasted sesame seeds on top for crunch. Garnish with sliced green onions for a fresh touch. - Soy Sauce Alternatives: If you need a soy sauce swap, use coconut aminos. It offers a similar flavor without the soy. - Honey Alternatives: For those avoiding honey, maple syrup or agave nectar works well. They add sweetness and keep the dish tasty. - Vegetarian Options: Use tofu or tempeh instead of chicken. Coat them in cornstarch for crunch. - Gluten-Free Options: Replace soy sauce with tamari. It’s gluten-free and has a rich taste. - Crispiness Tips: To get your chicken extra crispy, coat it well in cornstarch. Fry in hot oil without crowding the pan. This helps it brown evenly. - Sauce Consistency: For a thicker sauce, simmer longer. If it’s too thick, add a splash of water. Stir well to combine. - Pairing with Rice or Quinoa: Serve this dish over white rice or fluffy quinoa. Both soak up the sauce nicely. - Plating Ideas: Use a large bowl for an appealing look. Drizzle extra sauce on top and sprinkle sesame seeds. Finish with green onions for color and freshness. {{image_4}} You can add mixed vegetables to your honey sesame chicken for extra nutrition. This not only boosts the meal's health benefits but also adds color and texture. Some great vegetable combinations include: - Bell peppers - Broccoli - Snow peas - Carrots Simply chop the veggies and stir-fry them in the skillet before adding the sauce. Cook until they are tender but still crisp. Then, toss in the chicken and sauce for a delicious mix. If you like heat, you can make a spicy version of this dish. Add chili sauce or flakes to the sauce mix. Start with a small amount and taste as you go. This way, you keep a good balance of sweetness and spice. You might want to reduce the honey a bit if you prefer less sweetness. You can switch up proteins for this recipe too. Tofu and shrimp work well as alternatives. If using tofu, press it to remove excess water. Then, cut it into cubes and fry until golden. For shrimp, cook them for about 2-3 minutes until they turn pink. Adjust cooking times based on the protein you choose, but always make sure it’s fully cooked. To store your honey sesame chicken, place it in an airtight container. This helps keep the chicken fresh. It lasts in the fridge for about 3-4 days. Before storing, let it cool down to room temperature. This prevents moisture buildup. Freezing is a great way to save leftovers. Start by letting the chicken cool completely. Then, place it in a freezer-safe bag. Remove as much air as possible from the bag. Label it with the date and freeze it. Your honey sesame chicken can stay good for up to 3 months. When you are ready to eat, thaw it in the fridge overnight. You can reheat honey sesame chicken on the stove or in the microwave. For the stove, heat a pan over medium heat. Add a splash of water or oil to keep it moist. Cook for a few minutes until hot. In the microwave, place the chicken in a bowl and cover it with a damp paper towel. Heat in short bursts of 30 seconds. Check the chicken each time. To keep the chicken crispy while reheating, avoid using the microwave. Use the stove for the best texture instead. To make Honey Sesame Chicken healthier, try these tips: - Use skinless chicken thighs for less fat. - Substitute honey with a sugar-free syrup. - Replace soy sauce with low-sodium soy sauce. - Add more veggies like broccoli or bell peppers. - Serve over brown rice instead of white rice. These changes can cut calories and sugar while keeping flavor. Yes, you can prepare Honey Sesame Chicken ahead of time. Here are some ideas: - Cook the chicken and sauce separately. - Store them in airtight containers in the fridge. - Reheat the chicken before adding the sauce. - This way, you can enjoy it fresh any day. Pair Honey Sesame Chicken with these side dishes: - Steamed broccoli adds nutrition. - Fried rice gives a tasty twist. - Quinoa is a great grain option. - A simple cucumber salad adds crunch. These sides complete your meal for a delightful experience. Yes, you can use a slow cooker for this recipe. Follow these steps: - Coat the chicken with cornstarch. - Sear chicken in a skillet for best texture. - Add chicken to the slow cooker with sauce ingredients. - Cook on low for 4-5 hours. This method makes the chicken tender and full of flavor. This blog post covered the essential ingredients and steps for making Honey Sesame Chicken. We explored the right measurements, tools, and techniques for the crispiest chicken. I shared tips on customizing the dish with different ingredients and storing leftovers effectively. In closing, by following these guidelines, you can create a tasty meal that impresses everyone. Enjoy experimenting with flavors and making this dish your own.

Better Than Takeout Honey Sesame Chicken Recipe

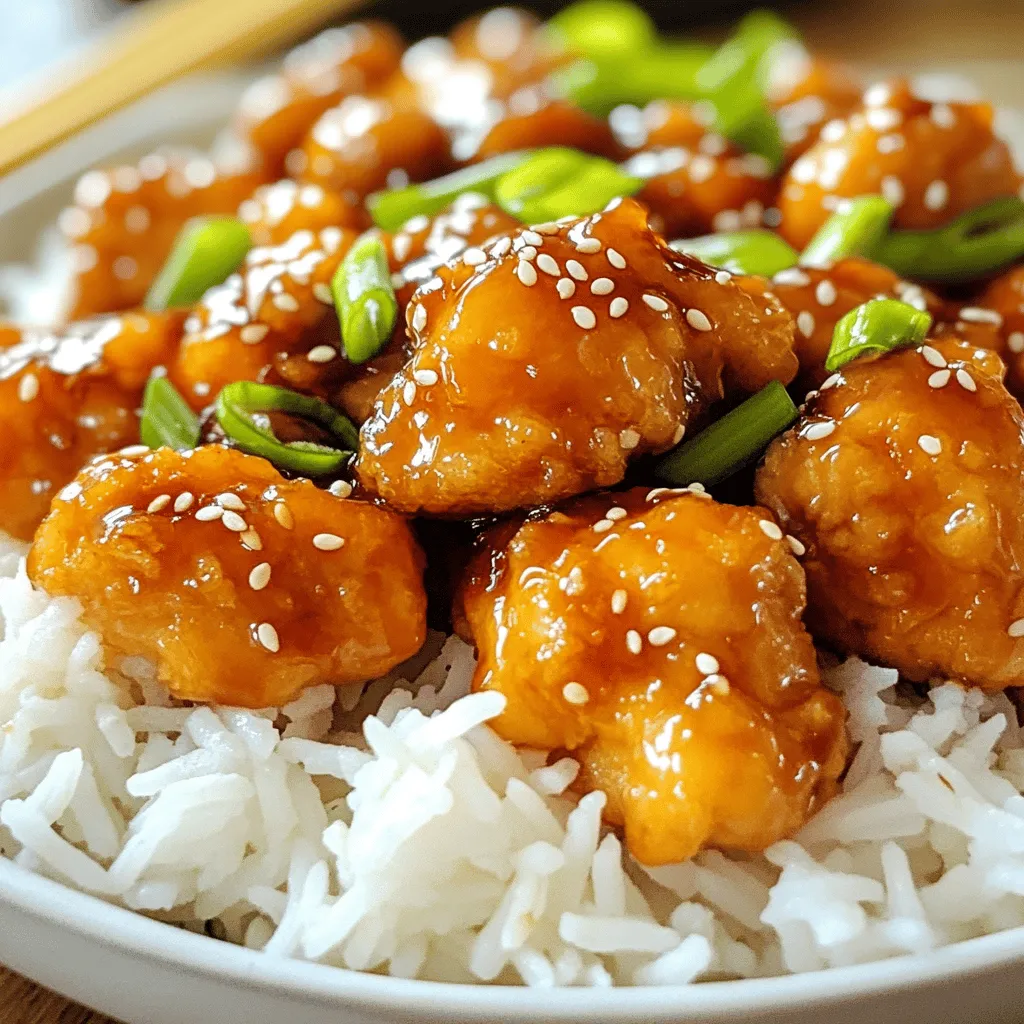
Craving takeout but want to save some cash? My Better Than Takeout Honey Sesame Chicken recipe is easy, quick, and

- 1 pound baby carrots (or 4 medium-sized carrots, sliced into sticks) - 3 tablespoons pure maple syrup - 2 tablespoons extra virgin olive oil - 1 teaspoon ground cinnamon - 1/2 teaspoon sea salt - 1/4 teaspoon freshly ground black pepper These key ingredients make up the base of your maple-glazed carrots. The baby carrots add natural sweetness and tenderness. The maple syrup gives the dish its signature flavor. Olive oil helps the glaze stick and adds richness. Cinnamon, salt, and pepper enhance the taste and balance the sweetness. - 1 tablespoon fresh rosemary, finely chopped Adding fresh rosemary is a great way to boost flavor. It provides an earthy note that pairs well with the sweetness of the carrots. You can also try using thyme or parsley for a different taste. If you don’t have baby carrots, you can use regular carrots. Just slice them into sticks. If you want a different sweet flavor, consider honey or agave syrup instead of maple syrup. For a healthier fat option, use avocado oil in place of olive oil. These swaps let you customize the dish based on what you have at home. Start by preheating your air fryer to 375°F (190°C). Give it about 5 minutes to heat up. While it warms, wash your baby carrots. If you're using larger carrots, slice them into sticks. In a big bowl, mix the carrots with olive oil and maple syrup. Add cinnamon, sea salt, and black pepper. You can also add fresh rosemary if you like. Toss everything together so each carrot gets coated well. Once your air fryer is ready, place the coated carrots in a single layer in the basket. Make sure they have space and are not crowded. If needed, cook them in batches for best results. Set the timer for 15 to 18 minutes. Halfway through, shake the basket to help them cook evenly. When they are tender and golden, take them out carefully. To get that nice caramelization, ensure you shake the basket during cooking. This helps all sides of the carrots brown well. The maple syrup works magic here, turning the carrots sweet and glossy. If you want more caramelization, you can add a minute or two to the cooking time. Just keep an eye on them to avoid burning. Using an air fryer is easy and fun. Here are some tips: - Preheat your air fryer for best results. Set it to 375°F (190°C) for five minutes. - Don’t overcrowd the basket. Leave space for air to flow. This helps the carrots cook evenly. - Shake the basket halfway through cooking. This ensures even browning. - Use a light coating of oil. It helps the glaze stick without making the dish greasy. Sometimes things don’t go as planned. Here’s how to fix common problems: - Carrots are not tender after cooking. Cook them a few more minutes. Check every two minutes. - Carrots are soggy. This may happen if there’s too much oil. Use less oil next time. - Glaze is not sticking. Make sure to coat the carrots well before cooking. Making your dish look great is part of the fun! Here are some ideas: - Use a large platter for serving. Arrange the carrots in a colorful pattern. - Garnish with fresh rosemary or a sprinkle of sea salt. This adds color and flavor. - Drizzle leftover glaze over the carrots. It adds a nice shine and extra sweetness. - Serve with a side of crunchy bread or rice to balance the sweetness. {{image_4}} You can switch up the sweetener in this recipe. Honey works great and adds a floral note. Brown sugar gives a rich, caramel flavor. Agave syrup is a good vegan option and has a mild taste. Each sweetener changes the dish slightly, so feel free to experiment. Spices can transform your maple glazed carrots. Try adding nutmeg for warmth or ginger for a kick. Cumin adds an earthy taste, while chili flakes can bring heat. Don’t be afraid to mix and match spices to find your favorite flavor blend. Carrots are not the only veggie you can glaze. Sweet potatoes or butternut squash are excellent choices. They both cook well in the air fryer and absorb flavors nicely. You can also use parsnips for a sweet and nutty taste. Just adjust your cooking time based on the vegetable you choose. To keep your maple glazed carrots fresh, let them cool first. Place the carrots in an airtight container. You can use glass or plastic. Make sure to seal it tight to keep out air. This helps prevent them from drying out. If you want, you can also wrap them in plastic wrap before storing. When you’re ready to eat the leftovers, reheat them in the air fryer. Set it to 350°F (175°C). Heat for about 5 to 7 minutes. This will help them regain their crispness. You can also use a microwave if you want a faster option. Just use a microwave-safe dish and cover it. Heat for 1-2 minutes. Maple glazed carrots can stay fresh in the fridge for about 3 to 5 days. If you want them to last longer, you can freeze them. They can be frozen for up to 3 months. Just make sure to label the container with the date. This helps you keep track of how long they’ve been stored. You should air fry carrots for 15 to 18 minutes. Start checking them at 15 minutes. Shake the basket halfway through cooking. This helps them cook evenly and get that nice glaze. Yes, you can use regular carrots. Just slice them into sticks about the same size as baby carrots. This will help them cook evenly. The flavor will be just as sweet and tasty. You can get creative with your seasonings! Try adding garlic powder for a savory kick. Thyme or ginger can add a fresh twist. Experiment to find what you love. Just remember to keep the balance of flavors in mind. In this blog post, we covered the key ingredients and steps to make delicious air-fried carrots. We discussed how to enhance flavor and shared tips for perfect caramelization. You learned about ingredient swaps, best practices, and serving ideas to impress your guests. Storing and reheating tips help keep leftovers fresh. Finally, I answered common questions to guide your cooking. Embrace these tips to create amazing dishes. Enjoy each bite of your tasty air-fried carrots!

Air Fryer Maple Glazed Carrots Simple and Sweet Dish

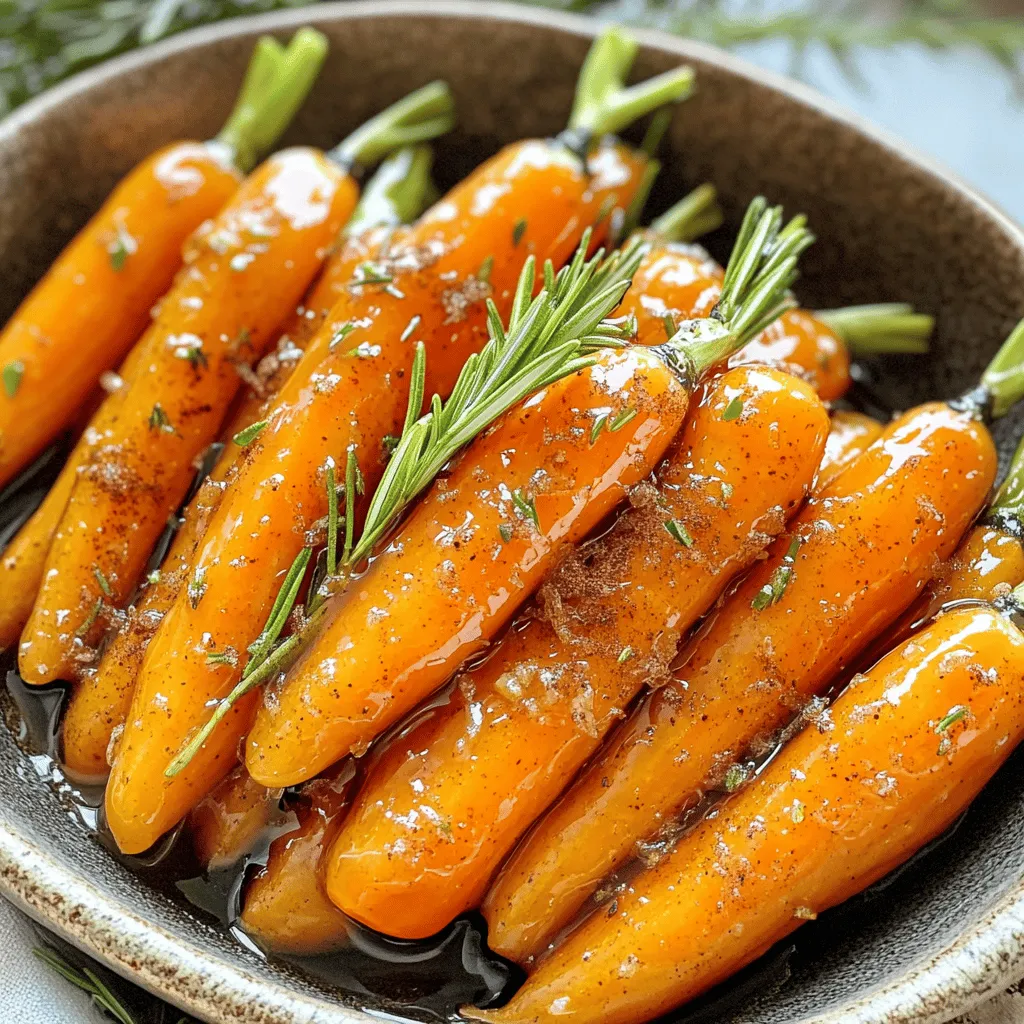
Looking for a sweet side dish that is easy and fun? My Air Fryer Maple Glazed Carrots bring out the

- 1 medium head of cauliflower, cut into bite-sized florets - 1 tablespoon cornstarch - 2 tablespoons vegetable oil, divided - 1 bell pepper (red or yellow), diced into small pieces - 1/2 cup unsalted roasted peanuts - 3 green onions, sliced thinly - 2 cloves garlic, minced - 1 tablespoon fresh ginger, minced - 1/4 cup soy sauce (low sodium is preferred for a healthier option) - 2 tablespoons rice vinegar - 1 tablespoon hoisin sauce - 1 tablespoon sugar (can be adjusted for sweetness) - 1 teaspoon sesame oil for depth of flavor - 1-2 teaspoons red pepper flakes (adjust according to your heat preference) - Salt to taste You can swap cauliflower for broccoli if you prefer. For a nut-free option, use sunflower seeds instead of peanuts. If you want a gluten-free dish, choose tamari instead of soy sauce. For sweetness, you can try maple syrup or agave nectar in place of sugar. When picking cauliflower, look for firm heads without dark spots. The florets should be tight and white. For bell peppers, choose ones that feel heavy and have smooth skin. Bright colors often mean they are fresh. Always check for soft spots, which can signal spoilage. To start, grab a medium head of cauliflower. Cut it into bite-sized florets. Next, place the florets in a large mixing bowl. Sprinkle 1 tablespoon of cornstarch over the cauliflower. Toss gently until each piece is coated. This step helps the cauliflower get crispy when cooked. Heat 1 tablespoon of vegetable oil in a large skillet or wok over medium-high heat. When the oil shines, add the coated cauliflower. Stir-fry for 5 to 7 minutes. You want them golden brown and crispy. Once done, remove the cauliflower and set it aside. In the same skillet, add another tablespoon of vegetable oil. Toss in the diced bell pepper. Stir-fry for 2 to 3 minutes, until it softens and brightens. Then, add the minced garlic and ginger. Stir for about 30 seconds. You want that lovely aroma without burning them. Next, mix the sauce. In a small bowl, whisk together 1/4 cup soy sauce, 2 tablespoons rice vinegar, 1 tablespoon hoisin sauce, 1 tablespoon sugar, 1 teaspoon sesame oil, and 1 to 2 teaspoons red pepper flakes. Pour this sauce into the skillet over the bell peppers. Stir well, then add the crispy cauliflower back in. Toss everything together until coated. Now, gently fold in 1/2 cup of roasted peanuts and 3 sliced green onions. Cook for 2 more minutes. This warms everything and blends the flavors. Taste the dish and add salt if needed. Remember, the soy sauce already adds some saltiness. Serve your Kung Pao Cauliflower hot over fluffy cooked rice or quinoa. Enjoy the colorful dish topped with more green onions and a sprinkle of sesame seeds for a beautiful finish. To get your cauliflower nice and crispy, start with cornstarch. Coat the florets evenly. This helps them turn golden brown when you fry them. Use high heat in your skillet or wok. The oil should shimmer before adding the cauliflower. Stir-fry until they are crispy. This usually takes about 5-7 minutes. Don't overcrowd the pan; fry in batches if needed. This way, you can achieve that perfect crunch. Want more heat? Add more red pepper flakes! Start with 1 teaspoon if you like mild spice. You can always add more later. Taste your dish after cooking. If it’s too spicy, balance it with sugar or extra soy sauce. For a milder flavor, skip the flakes entirely or use just a pinch. This way, everyone can enjoy the dish at their own heat level. To deepen the flavor, use fresh garlic and ginger. They make a big difference! Adding sesame oil gives a nice nutty taste. You can also experiment with hoisin sauce. It adds sweetness and richness. If you want a tangy kick, try adding a bit more rice vinegar. Each of these tweaks helps you create a Kung Pao Cauliflower that suits your taste perfectly. Enjoy the process and make it your own! {{image_4}} You can add protein to this dish for more nutrition. Chicken, shrimp, or tofu work great. For chicken, use bite-sized pieces and stir-fry until cooked. For shrimp, add them when you sauté the bell peppers. Tofu should be pressed, cubed, and sautéed until golden. All options blend well with the sauce and flavors. This recipe is already vegetarian, but you can make it vegan. Simply use tofu instead of any meat. Choose a vegan hoisin sauce since some brands use animal products. This keeps the dish tasty while meeting vegan needs. You can also add extra veggies like snow peas or carrots for more color and crunch. Feel free to play with the sauces to change the taste. You can swap soy sauce with tamari for a gluten-free version. Adding chili garlic sauce can kick up the heat. For a sweet twist, include pineapple juice in the sauce. Each option offers a new layer of flavor, making this dish exciting every time! To keep your Kung Pao Cauliflower fresh, let it cool down first. Then, place it in an airtight container. This will help seal in flavors and moisture. Store it in the fridge for up to three days. If you plan to enjoy it later, don’t forget to label the container with the date. Reheating is easy! You can use a microwave or a skillet. If using a microwave, heat it in 30-second intervals until warm. Stir it gently to ensure even heating. For the skillet, add a splash of water and cover it. Heat over low heat until warm. This keeps the cauliflower from getting too soft. You can freeze Kung Pao Cauliflower if you want to save some for later. Make sure to store it in a freezer-safe container. It will last up to two months. When ready to eat, thaw it in the fridge overnight. Reheat it in a skillet for the best taste and texture. Yes, you can make Kung Pao Cauliflower ahead of time. Cook the dish and let it cool. Store it in an airtight container in the fridge. It stays fresh for up to three days. When ready to eat, reheat it in a pan on low heat. You can also microwave it, but the pan keeps it crisp. Kung Pao Cauliflower pairs well with many sides. Here are some great options: - Fluffy white rice - Brown rice for a healthier choice - Quinoa for added protein - Stir-fried vegetables for more color and taste - A simple salad with a light dressing These sides balance the flavors and textures of the dish. To make Kung Pao Cauliflower gluten-free, swap the soy sauce for gluten-free tamari. This change keeps the taste but removes gluten. Ensure the hoisin sauce you use is also gluten-free. Check the labels to be sure. This way, everyone can enjoy this tasty dish! This blog covers the key steps for making Kung Pao Cauliflower. We discussed the fresh ingredients needed and tips for picking the best produce. You learned how to prepare and cook your dish, plus ways to add your personal touch. We also talked about storing leftovers and answered common questions. Now you can make a delicious Kung Pao Cauliflower your way. Enjoy the process and have fun cooking!

Better-Than-Takeout Kung Pao Cauliflower Delight

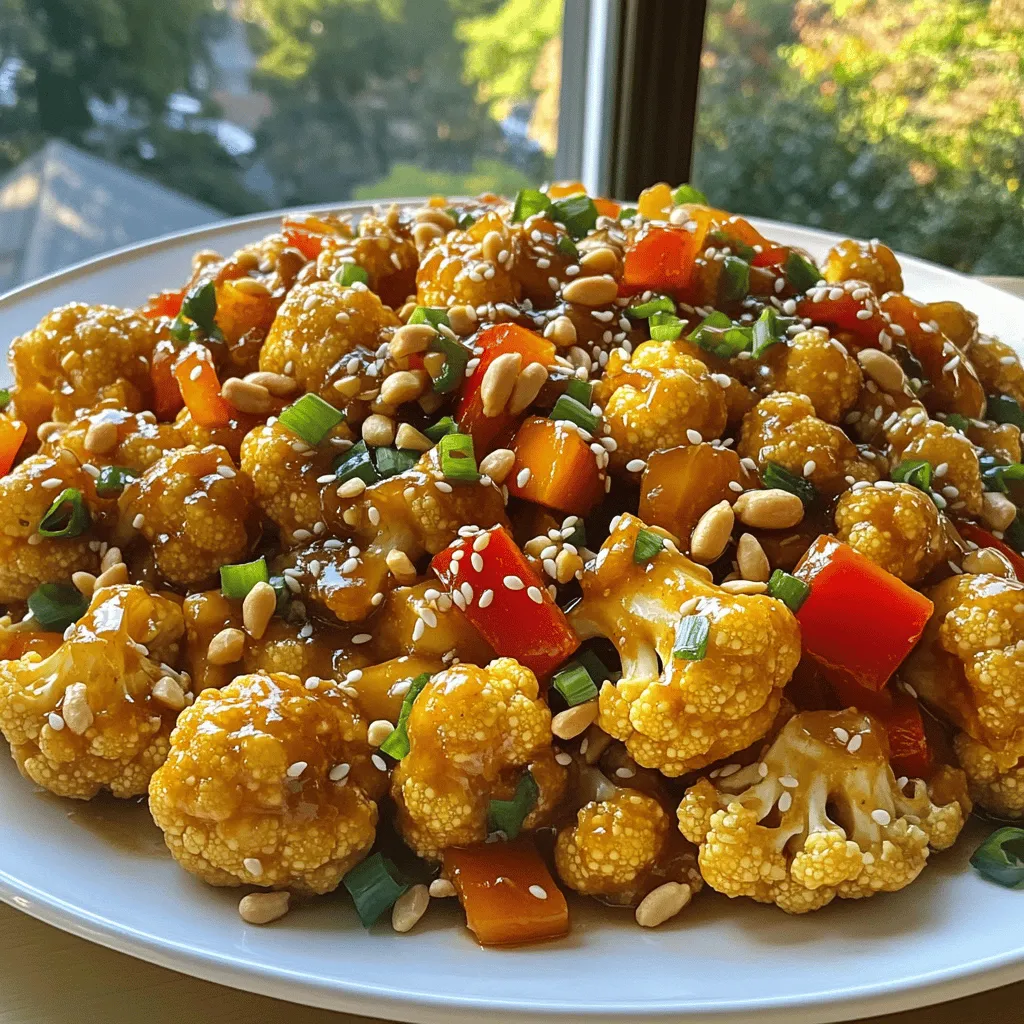
Are you tired of bland takeout options? Let’s spice things up! My Better-Than-Takeout Kung Pao Cauliflower is a game-changer. This

When making No-Bake Nutella Cheesecake Cups, gather these simple ingredients. Each item plays a key role in creating that rich and creamy goodness. - 1 cup chocolate cookie crumbs - 4 tablespoons unsalted butter, melted - 1 cup cream cheese, softened at room temperature - 1 cup Nutella - 1/2 cup powdered sugar - 1 teaspoon pure vanilla extract - 1 cup heavy whipping cream - 1/4 cup chocolate shavings or colorful sprinkles for garnish These ingredients come together to form a delightful treat. Chocolate cookie crumbs create a tasty base. The melted butter helps bind the crumbs for a firm crust. Cream cheese gives the filling its smooth texture. Nutella adds a rich, chocolate-hazelnut flavor that is hard to resist. Powdered sugar sweetens the mix, while pure vanilla extract enhances the taste. Heavy whipping cream makes the filling light and fluffy. Finally, chocolate shavings or sprinkles make each cup look special. With just a few steps, you can create a dessert that impresses. First, get a medium-sized bowl. Add 1 cup of chocolate cookie crumbs and 4 tablespoons of melted butter. Mix them well until it looks like damp sand. This step is key for a tasty crust. Now, grab 6 to 8 serving cups. Evenly distribute the mixture into them. Press down firmly to make a solid base. Make sure it sticks well. In a large bowl, take 1 cup of softened cream cheese. Beat it using an electric mixer on medium speed until it is smooth. This should take about 2-3 minutes. Next, add 1 cup of Nutella, 1/2 cup of powdered sugar, and 1 teaspoon of vanilla extract. Mix on low speed until it is creamy and lump-free. Now, let’s make the whipped cream. In a separate bowl, whip 1 cup of heavy cream until soft peaks form. This will take about 3-5 minutes. Once it’s ready, gently fold the whipped cream into the Nutella mixture. Use a spatula for this. Be careful not to deflate the whipped cream. This keeps your filling light and fluffy. Take the Nutella mixture and spoon it into your cups. Smooth the tops with a spatula for a nice finish. Place the cups in the fridge. Let them chill for at least 4 hours. If you can, chill them overnight. This helps the cheesecake set properly. Enjoy the wait, as your tasty treat will be worth it! To get the best texture in your cheesecake cups, fold the whipped cream gently. This keeps the air in the cream. If you mix too hard, it gets dense. You also need to ensure the cream cheese is at room temperature. Cold cream cheese is hard to mix, and it may create lumps. For a beautiful dessert, think about how you plate it. Use clear cups to show off the layers. You can also add fresh fruit or mint on top for color. A raspberry or mint sprig looks nice and adds flavor. Use a hand mixer for the cream cheese and whipped cream. It’s fast and easy. A spatula is great for folding ingredients without losing air. For serving, choose small clear cups or jars. They let everyone see the yummy layers inside. {{image_4}} You can switch up the flavors of your cheesecake cups. A peanut butter variant uses creamy peanut butter instead of Nutella. Blend it with the cream cheese for a nutty twist. You can also add some crushed peanuts for extra crunch. For a white chocolate version, melt white chocolate and mix it with cream cheese. This gives your cups a sweet and creamy finish. If you need gluten-free options, swap chocolate cookie crumbs for gluten-free cookies. You can also use almond flour mixed with butter for the crust. For dairy-free substitutions, try using vegan cream cheese and coconut cream instead of heavy cream. Both options still give you that creamy texture without the dairy. Toppings can really make your cheesecake cups pop. Try adding fresh fruit like strawberries or raspberries on top. Nuts like chopped hazelnuts or almonds also add a nice crunch. If you want a fun look, use colorful sprinkles or chocolate shavings. You can even drizzle some chocolate sauce for that extra touch. To keep your No-Bake Nutella Cheesecake Cups fresh, store them in the fridge. Use airtight containers or cover each cup tightly with plastic wrap. This helps prevent any strange smells from mixing with your dessert. These cheesecake cups stay fresh for about 3 to 5 days in the fridge. Look for signs that they have gone bad, such as a sour smell or watery texture. If you see any mold, throw them away right away. Yes, you can freeze these cheesecake cups! Just make sure to use freezer-safe containers. When you want to enjoy them, take them out and let them thaw in the fridge overnight. Avoid thawing them at room temperature, as this can mess with the texture. Yes, you can use any cookie you like. Graham crackers or Oreos both work well. Just crush them finely and mix with melted butter. Different cookies can change the flavor. Experiment with what you enjoy! You should chill these cups for at least 4 hours. For the best taste and texture, leave them overnight. This helps the cheesecake set up perfectly and enhances the flavors. Absolutely! You can make these cups a day or two ahead. Just store them in the fridge until you’re ready to serve. This makes hosting easy and stress-free. Your guests will love them! If you want a different flavor, try using peanut butter or almond butter. You can also use any chocolate spread. Just make sure it has a similar texture. This will keep your cups creamy and delicious. Yes, you can make a vegan version! Use vegan cream cheese and a plant-based chocolate spread. For the whipped cream, try coconut cream instead. These swaps make it easy to enjoy this treat without dairy. In this blog post, I shared a simple recipe for No-Bake Nutella Cheesecake Cups. You learned about the key ingredients and step-by-step instructions, from preparing the crust to chilling the dessert. To make your cups perfect, folding whipped cream gently is essential. You can also explore tasty variations like peanut butter or gluten-free options. Lastly, proper storage ensures your cheesecake stays fresh. Enjoy making this easy and delicious treat that’s great for any occasion!

No-Bake Nutella Cheesecake Cups Delightfully Easy Treat

Are you ready to impress your friends with a dessert that’s utterly delicious and super easy? These No-Bake Nutella Cheesecake

- 1 lb ground turkey - 1/2 cup breadcrumbs - 1/4 cup grated Parmesan cheese - 1/4 cup fresh parsley, finely chopped - 1 large egg - 3 cloves garlic, minced - 1 teaspoon Italian seasoning - 2 tablespoons olive oil - 1 cup chicken broth - 1 cup heavy cream - 1/2 cup additional grated Parmesan cheese - Extra fresh parsley, chopped In this recipe, I use ground turkey for a leaner option. It keeps the meatballs moist and tasty. Breadcrumbs help bind the meatballs and add a bit of texture. Parmesan cheese adds a rich flavor, making every bite delightful. Fresh parsley gives a nice color and fresh taste. You also need a large egg to hold everything together. Garlic gives a strong and aromatic flavor, while Italian seasoning brings warmth and depth. Olive oil is perfect for cooking the meatballs to a golden brown. Chicken broth adds moisture and richness to the sauce, while heavy cream makes it luxuriously creamy. Finally, I like to sprinkle extra Parmesan and parsley on top. It not only looks good but also adds extra flavors. Each ingredient plays a key role in making these meatballs a true delight for your taste buds! To make the meatballs, start by combining the main ingredients in a large bowl. You need: - 1 lb ground turkey - 1/2 cup breadcrumbs - 1/4 cup grated Parmesan cheese - 1/4 cup fresh parsley, finely chopped - 1 large egg - 3 cloves garlic, minced - 1 teaspoon Italian seasoning - Salt and freshly ground black pepper, to taste Mix these together with your hands. This helps blend the flavors well. Do not overmix. You want a tender meatball, not a dense one. Next, heat 2 tablespoons of olive oil in a large skillet over medium heat. Once the oil is hot, add the meatballs in batches. Avoid crowding the skillet. This helps them brown nicely. Cook them for about 6-8 minutes, turning occasionally. Each side should turn golden brown. After cooking, gently remove the meatballs and set them aside on a plate. In the same skillet, pour in 1 cup of chicken broth. Bring it to a gentle simmer. Use a wooden spoon to scrape the bottom of the pan. This adds flavor from the browned bits. Reduce the heat to low and stir in 1 cup of heavy cream. Let the mixture simmer for about 5 minutes, until it thickens slightly. Now, gradually whisk in an additional 1/2 cup of grated Parmesan cheese. Keep stirring until the sauce is creamy and smooth. Taste and adjust with salt and freshly ground black pepper if needed. Finally, return the meatballs to the skillet. Coat them well in the sauce and let them simmer for another 5 minutes. This allows the meatballs to absorb the creamy goodness. Serve them warm, garnished with extra parsley for a fresh touch. To make the best meatballs, you must get the ingredient ratios right. Ground turkey is lean, so the right amount of breadcrumbs and egg helps keep the meatballs moist. Too much breadcrumb can make them dry. To prevent drying out, do not overcook the meatballs. Cook them until they are golden brown but still juicy inside. Use a meat thermometer to check the center; it should reach 165°F. Want a bit more flavor? Add red pepper flakes for some heat. You can also try smoked paprika for a deeper taste. If you run out of garlic, garlic powder works too. You can swap fresh parsley with basil or oregano for different herbal notes. You can cook these meatballs in different ways. Skillet cooking gives them a nice brown crust. However, oven-baking is easier for larger batches. Just place them on a baking sheet at 400°F for 20 minutes. If you love slow cookers, you can adapt this recipe. Brown the meatballs first, then place them in the slow cooker. Pour the sauce over them and cook on low for 4 to 6 hours. {{image_4}} You can switch up the ground turkey in this recipe. Ground chicken works well. It has a similar taste and texture. If you prefer beef, feel free to use it instead. Just keep in mind that beef has a richer flavor. For a vegetarian option, try plant-based meat. These alternatives mimic turkey's taste and texture. They also absorb the creamy sauce nicely. Want to mix up the flavor? Add tomato sauce instead of the creamy sauce. It adds a nice tang and a pop of color. You can also try adding mushrooms or spinach to the cream sauce. This gives the dish more depth. The mushrooms bring an earthy taste, while spinach adds freshness. Both variations make the dish more exciting. These meatballs shine when served with pasta or rice. You can also toss them on a salad for a lighter meal. For a fun twist, serve them as sliders on mini buns. This makes them perfect for parties. Top them with extra Parmesan and fresh parsley for a nice touch. This dish is all about creativity and enjoying good food. To store leftover meatballs, place them in an airtight container. Make sure the sauce covers the meatballs completely. This keeps them moist and fresh. Store them in the fridge for up to three days. For best taste, eat them within two days. When reheating, use the stove or microwave, adding a bit of chicken broth if needed to keep them creamy. To freeze your meatballs and sauce, let them cool completely first. Place the meatballs in a single layer on a baking sheet. Freeze them for about an hour until solid. Then, transfer them to a freezer-safe bag or container. You can also freeze the sauce separately. When you're ready to eat, thaw the meatballs in the fridge overnight. Reheat them in a skillet on low heat, adding a splash of chicken broth for creaminess. Stored meatballs can last up to four months in the freezer. In the fridge, they stay fresh for about three days. Signs of spoilage include a sour smell, off-color, or a change in texture. If you see any of these signs, it’s best to throw them away. Always trust your nose and eyes when checking for freshness. Yes, you can use different meats for this recipe. Ground chicken, beef, or pork work well too. Each type of meat brings its unique flavor. For a leaner option, choose ground chicken. If you like rich flavors, ground beef adds depth. Ensure you adjust cooking times if using different meats. Cook them until they reach the right internal temperature. Absolutely! You can make this recipe gluten-free easily. Use gluten-free breadcrumbs instead of regular ones. Many stores sell these now. For the sauce, check the chicken broth label to ensure it's gluten-free. Some brands offer gluten-free options. This way, you can enjoy creamy meatballs without gluten. Adjusting the spice level is simple. If you want a milder dish, reduce or skip the black pepper. For more spice, add red pepper flakes or cayenne pepper. Start with a small amount, then taste as you go. This lets you control the heat to your liking. Enjoy your meal just the way you want it! This guide walked you through making delicious meatballs from scratch. We covered main ingredients like ground turkey, breadcrumbs, and parmesan cheese. You learned steps for mixing and cooking, plus tips to get the perfect texture. I shared variations to suit your taste and advice for storing leftovers. Lastly, I tackled common questions on meat substitutes and gluten-free options. Now, you can confidently impress family and friends with your meatball skills. Enjoy every bite and make this recipe your own!

Creamy Garlic Parmesan Turkey Meatballs Delight

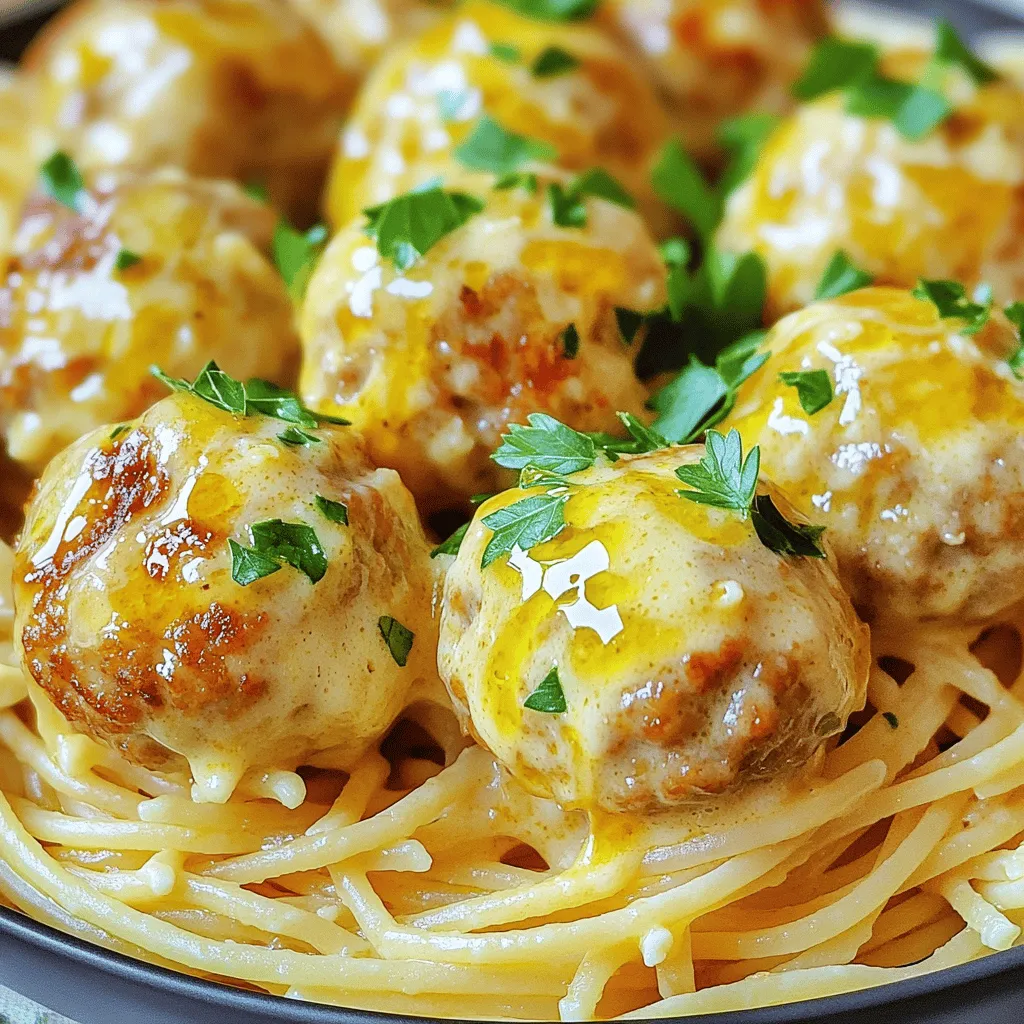
Get ready to indulge in a delicious dinner with my Creamy Garlic Parmesan Turkey Meatballs! This dish combines ground turkey,

- 4 medium Yukon Gold potatoes, peeled and cut into wedges - 3 tablespoons olive oil - 1 teaspoon dried oregano - 1 teaspoon garlic powder - 1 teaspoon smoked paprika - 1/2 teaspoon salt - 1/4 teaspoon black pepper - 2 tablespoons fresh lemon juice - Fresh parsley, chopped (for garnish) - Optional serving suggestions: tzatziki dip, lemon wedges To make these crispy Greek air fryer potatoes, you need simple, fresh ingredients. Yukon Gold potatoes shine here due to their creamy texture. They hold flavor well and get nice and crispy. Olive oil keeps the potatoes moist while helping them crisp up. The seasonings add depth. Oregano brings a lovely herbal note, while garlic powder adds warmth. Smoked paprika gives a hint of smokiness, making these potatoes special. Don't forget the fresh lemon juice! It brightens the dish and balances the richness. Finally, fresh parsley adds color and freshness as a garnish. You can serve these potatoes with tzatziki for a creamy dip or lemon wedges for extra zing. Enjoy! Start by preheating your air fryer to 400°F (200°C). This takes about 5 minutes. Preheating helps the potatoes cook evenly and become crispy. Take 4 medium Yukon Gold potatoes and peel them. Cut them into wedges that are about the same size. This ensures they cook evenly. In a large bowl, mix the potato wedges with 3 tablespoons of olive oil. Then add 1 teaspoon of dried oregano, 1 teaspoon of garlic powder, 1 teaspoon of smoked paprika, 1/2 teaspoon of salt, and 1/4 teaspoon of black pepper. Toss everything together well. Make sure each wedge is coated with the tasty mix. Carefully place the seasoned wedges in the air fryer basket. Arrange them in a single layer. This allows hot air to circulate and crisp them up. You may need to cook them in batches if your air fryer is small. Set the timer for 15-20 minutes. Halfway through, shake the basket gently. This helps all sides of the potatoes crisp nicely. When they are golden brown, they are ready to enjoy! To get that perfect crispiness, cook the potatoes in a single layer. This method allows hot air to circulate around each wedge. If you stack them, they will steam instead of crisp. You may need to cook in batches if your air fryer is small. Adjust cooking time based on your air fryer model. Some models run hotter than others. Start with 15 minutes, then check for doneness. If they're not golden brown, add a few more minutes. Remember to shake the basket halfway through for even cooking. For more flavor, try adding herbs and spices. Fresh rosemary or thyme pairs well with the potatoes. You can also experiment with a pinch of cayenne for heat or lemon zest for brightness. Marinating the potatoes before cooking can boost flavor, too. Mix them with olive oil, lemon juice, and your favorite spices. Let them sit for at least 30 minutes. This step adds depth and makes the potatoes even tastier. {{image_4}} You can easily change the flavor of your crispy Greek air fryer potatoes. Here are two fun ways: - Mediterranean spice blend: Mix in some dried thyme, rosemary, or even sumac. This blend gives a fresh, earthy flavor. - Cheese crusted version: Add some grated Parmesan cheese to the seasoning mix. It adds a savory, cheesy crunch that is hard to resist. Feel free to experiment! These variations can make your potatoes even more exciting. Crispy Greek air fryer potatoes pair well with many dishes. Here are some ideas: - Complementary dishes: Serve these potatoes with grilled chicken, lamb, or fish. The flavors blend beautifully. - Full meal ideas: Create a meal by adding a fresh Greek salad and tzatziki dip. This makes for a colorful and balanced dinner. These suggestions can help you enjoy your crispy potatoes in a whole new way! To keep your crispy Greek air fryer potatoes fresh, follow these steps: - Allow the potatoes to cool to room temperature. - Place them in an airtight container. - Store in the fridge for up to 3 days. This keeps them from becoming soggy. Avoid stacking them too high, as this can cause them to lose crispiness. Reheating your potatoes can be tricky, but here’s how to keep them crispy: - Preheat your air fryer to 350°F (175°C). - Place the leftover potatoes in a single layer in the basket. - Heat for about 5-7 minutes, shaking halfway through. This method restores their crunch while warming them up. You can also use a skillet on medium heat for a quick reheat. Just remember to stir gently to keep them intact. Yes, you can use other potatoes. Some tasty options include: - Russet potatoes: They are starchy and crisp well. - Red potatoes: Their waxy texture gives a creamy inside. - Fingerling potatoes: They add a unique shape and flavor. Each type offers a different taste and texture, so feel free to experiment! If your potatoes are not crispy, here are some tips: - Make sure to cut them evenly. Uneven sizes cook at different rates. - Avoid overcrowding the basket. This blocks airflow and causes sogginess. - Shake the basket halfway through cooking. This helps all sides crisp up. - Check your oil amount. Too little oil can lead to dryness. These steps will help you achieve that perfect crunch! Yes, you can prepare these potatoes ahead of time. Here’s how: - Cut and season the potatoes. Store them in an airtight container in the fridge. - For best results, cook them fresh. However, you can cook them and store leftovers. - Store cooked potatoes in the fridge for up to three days. Reheat in the air fryer to bring back the crispiness! This blog post covered how to make tasty air fryer potato wedges. You learned about key ingredients like Yukon Gold potatoes and olive oil. We discussed step-by-step instructions, including how to prep, cook, and add flavor. Don't forget tips for crispiness and fun variations for your wedges. In the end, air fryer potato wedges are simple and delicious. Enjoy experimenting with different spices and serving ideas. Happy cooking!

Crispy Greek Air Fryer Potatoes Simple and Delicious

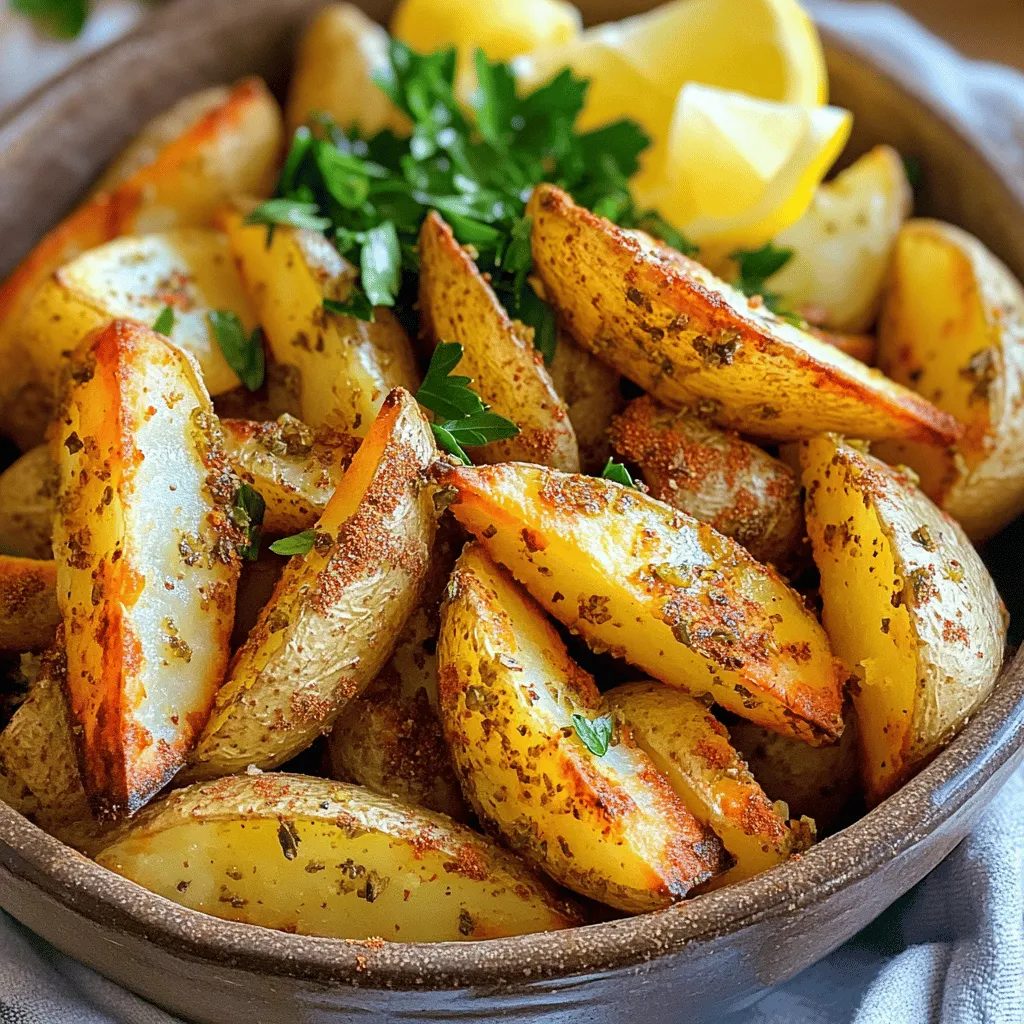
If you’re craving a tasty side dish that’s simple to make, look no further! My Crispy Greek Air Fryer Potatoes

To make these tasty scones, gather the following ingredients: - 2 cups all-purpose flour - 1/4 cup granulated sugar - 1 tablespoon baking powder - 1/2 teaspoon salt - 1/2 teaspoon ground cinnamon - 1/2 cup unsalted butter, cold and cubed - 1/2 cup buttermilk (or substitute with milk + 1/2 tablespoon vinegar) - 1 large egg - 1 cup brown sugar, packed - 2 tablespoons ground cinnamon (for the swirl) - 1/2 cup walnuts or pecans, chopped (optional) - 1 cup powdered sugar (for glaze) - 2-3 tablespoons milk (for glaze) - 1 teaspoon vanilla extract (for glaze) You can customize your scones with some fun add-ins. Here are a few ideas: - Chopped walnuts or pecans add crunch and flavor. - Dried fruits like raisins or cranberries can bring sweetness. - Chocolate chips are a great treat for chocolate lovers. If you don’t have certain ingredients, don’t worry! Here are some easy swaps: - Buttermilk: Use regular milk mixed with 1/2 tablespoon of vinegar. - Unsalted Butter: You can use salted butter. Just cut back on added salt. - Granulated Sugar: Brown sugar can replace granulated sugar for more flavor. These tips can help you make the best scones with what you have on hand! Start by gathering your ingredients. You will need 2 cups of all-purpose flour, 1/4 cup of granulated sugar, 1 tablespoon of baking powder, 1/2 teaspoon of salt, and 1/2 teaspoon of ground cinnamon. 1. In a large bowl, mix these dry ingredients well. This step makes sure every bite tastes great. 2. Next, add 1/2 cup of cold, cubed unsalted butter. Use a pastry cutter or your fingers to blend it in. You want small pieces of butter that will make your scones flaky. 3. In another bowl, whisk together 1/2 cup of buttermilk and 1 large egg until smooth. This mix will add moisture to your dough. 1. Pour the wet mixture into the dry bowl. Use a fork to gently stir until just combined. Be careful not to overmix; you want tender scones. 2. Now, let’s make the filling! In a small bowl, mix 1 cup of packed brown sugar with 2 tablespoons of ground cinnamon. If you like nuts, add 1/2 cup of chopped walnuts or pecans. 3. Transfer the dough to a floured surface. Knead it gently a few times. Roll it out into a rectangle about 1/2-inch thick. 4. Spread the cinnamon filling evenly over the dough. Starting from one long edge, roll it tightly into a log. 1. Use a sharp knife to cut the rolled dough into 8 equal scones. Place them cut-side up on a baking sheet lined with parchment paper. 2. Preheat your oven to 400°F (200°C) and bake the scones for 15-18 minutes. They should be light golden and firm. 3. While the scones cool slightly, make the glaze. In a small bowl, whisk 1 cup of powdered sugar with 2-3 tablespoons of milk and 1 teaspoon of vanilla extract. Adjust the thickness by adding more milk if needed. 4. Drizzle the glaze over the warm scones and let it soak in. Enjoy your bakery-style cinnamon roll scones fresh! To get flaky and tender scones, keep your butter cold. Cold butter forms pockets in the dough. These pockets create that delightful flakiness. Use a pastry cutter or your fingertips to mix the butter into the flour. Stop when the mixture looks like coarse crumbs. Don't overmix your dough. Stir until just combined. This ensures your scones stay tender. A few common mistakes can lead to tough scones. One mistake is overworking the dough. Remember, less is more! Another mistake is not using cold butter. Warm butter will make the dough dense. Also, make sure your baking powder is fresh. Expired baking powder can lead to flat scones. Lastly, always let the scones cool on the baking sheet. This helps them set properly. To make a smooth glaze, whisk the powdered sugar, milk, and vanilla together. Start with less milk and add more if needed. You want it creamy but not too runny. Drizzle the glaze over warm scones. This allows it to soak in and add flavor. For a fun touch, sprinkle a little cinnamon on top after glazing. It makes them look as good as they taste! {{image_4}} You can change the flavor of these scones to suit your taste. Try adding chocolate chips for a sweet twist. You can also use pumpkin spice for a fall flavor. Just mix in 1 cup of chocolate chips or 1 tablespoon of pumpkin spice into the dry ingredients. These simple swaps can take your scones to the next level. If you need gluten-free scones, you can use a gluten-free flour blend. Just replace the all-purpose flour with a 1:1 gluten-free blend. Make sure to check that all your other ingredients are also gluten-free. This way, everyone can enjoy these tasty scones without worry. You can add seasonal spices to your scones for extra flavor. In the winter, try adding nutmeg or cardamom. For spring, consider lemon zest for a fresh taste. Adding 1 teaspoon of your chosen spice can really enhance the flavor of your scones and make them feel festive. To keep your cinnamon roll scones fresh, store them in an airtight container. This helps maintain their moisture and flavor. You can keep them at room temperature for up to three days. If you want them to last longer, consider refrigerating them. Just remember to let them cool completely before sealing. To enjoy your scones warm, preheat your oven to 350°F (175°C). Place the scones on a baking sheet. Heat them for about 5 to 10 minutes. This method brings back their soft texture and delicious taste. You can also microwave them for about 15-20 seconds, but this may not give the same crispness. You can freeze both unbaked and baked scones. If you freeze unbaked scones, place them on a baking sheet first. Once frozen, transfer them to a freezer bag. This way, you can bake them straight from the freezer. For baked scones, cool them completely before wrapping tightly. Use freezer-safe bags to avoid freezer burn. They can last up to three months in the freezer. Yes, you can make these scones ahead. Prepare the dough and cut them into pieces. Place the cut scones on a baking sheet and cover them with plastic wrap. You can keep them in the fridge for up to 24 hours. When you're ready to bake, just pop them in the oven. This saves time and allows for fresh scones with your morning coffee. Serve these scones warm for the best taste. Drizzle them with the glaze right before serving. You can also add a sprinkle of cinnamon on top for extra flavor. Pair them with coffee or tea for a delightful treat. For a fun twist, serve them with fresh fruit or whipped cream. Check the scones after 15 minutes in the oven. They should be lightly golden on top and firm to the touch. If you press gently, they should spring back. If they feel soft and are not golden, bake them for a few more minutes. You want them to be cooked through but not dry. Cinnamon roll scones combine warmth with sweetness. We covered ingredients, mixing, and baking steps. You learned how to avoid mistakes and create a perfect glaze. Variations and storage tips help you enjoy these scones longer. With the right choices, you can make these scones yours. Embrace different flavors and options for every season. Start baking today and share these treats with family and friends!

Bakery-Style Cinnamon Roll Scones Easy and Delicious

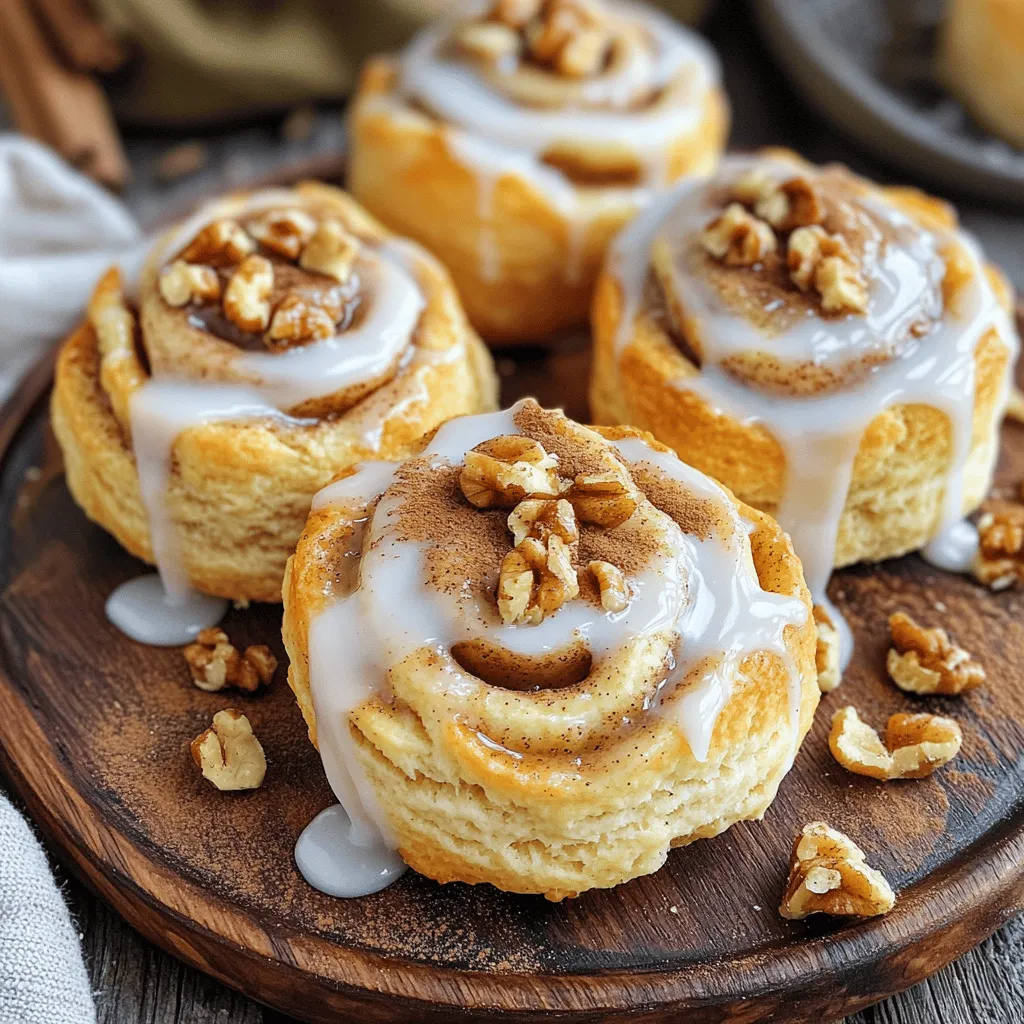
If you crave a warm, sweet treat that’s easy to make, these Bakery-Style Cinnamon Roll Scones are just for you!

Older posts
Newer posts
← Previous Page1 … Page28 Page29 Page30 … Page83 Next →

dsad

© 2026 eataroundit • Built with GeneratePress

Our Policies

  • Copyright Policy
  • Cookie Policy
  • GDPR Policy
  • Privacy Policy
  • Disclaimer
  • Terms Of Use

More Information

  • Home
  • About
  • Contact
  • Appetizers
  • Dessert
  • Dinner
  • Drinks
©2026, eataroundit About Back To Top