Skip to content
DisclaimerTerms Of UseGDPR PolicyCookie Policy

eataroundit

  • Home
  • Drinks
  • Appetizers
  • Dinner
  • Dessert
  • About
  • Contact
  • Privacy Policy
DisclaimerTerms Of UseGDPR PolicyCookie Policy

NO-ING-IMG

To make Pesto Spinach Turkey Meatballs, gather these simple ingredients: - 1 lb ground turkey - 1 cup fresh spinach, finely chopped - 1/2 cup basil pesto - 1/4 cup breadcrumbs (preferably whole wheat for added fiber) - 1/4 cup finely grated Parmesan cheese - 1 large egg, at room temperature - 2 cloves garlic, minced - 1 teaspoon salt - 1/2 teaspoon freshly ground black pepper - 1/2 teaspoon red pepper flakes (optional, for a spicy kick) - 1 tablespoon olive oil (for cooking and enhancing flavor) Choosing fresh ingredients makes a big difference. When picking spinach, look for vibrant green leaves without dark spots. For the turkey, select lean ground turkey for a healthy option. Check the pesto jar for a fresh seal, and ensure it has a bright green color. Fresh garlic should be firm with no soft spots. Always choose eggs that feel heavy and have no cracks. These steps ensure your meatballs taste their best. If you need alternatives, there are great options. For a vegetarian dish, try using lentils or chickpeas instead of turkey. You can swap breadcrumbs for gluten-free oats or ground almonds for a gluten-free option. If dairy is a concern, use nutritional yeast instead of Parmesan cheese. These swaps keep the flavor while meeting your diet needs. 1. Preheat the oven: Set your oven to 400°F (200°C). This makes cooking easy and quick. 2. Combine the ingredients: In a big bowl, add the ground turkey, chopped spinach, pesto, breadcrumbs, Parmesan, garlic, and egg. 3. Season the mix: Add salt, black pepper, and red pepper flakes if you want some heat. 4. Mix carefully: Use your hands or a spoon. Combine everything, but don’t overdo it. The mix should be sticky but hold together. 5. Shape the meatballs: Wet your hands to stop the mix from sticking. Roll the mixture into small balls, about 1 to 1.5 inches wide. 6. Arrange on a baking sheet: Place the meatballs on a lined baking sheet. Give them space so they can cook well. 7. Add olive oil: Drizzle olive oil over the meatballs. This keeps them moist and adds great flavor. 8. Bake: Put the baking sheet in the oven. Bake for 20-25 minutes until they are golden brown. 9. Check the temperature: Use a meat thermometer to see if they hit 165°F (74°C). This means they are safe to eat. 10. Cool before serving: After baking, let them sit for a few minutes. This helps them stay juicy. Now, you have delicious pesto spinach turkey meatballs ready to enjoy! To keep your meatballs tender, do not overmix. Just mix until the ingredients are combined. Overmixing makes the meatballs tough. I also suggest using ground turkey with some fat. Lean turkey can dry out. Adding breadcrumbs helps keep the meat moist, too. You can boost the flavor in these meatballs. Use fresh garlic for a strong taste. A touch of red pepper flakes adds a nice kick. If you love herbs, try adding chopped parsley or oregano. Drizzling olive oil over the meatballs before baking helps keep them juicy. These meatballs shine when served right. Try them on a bed of whole grain pasta. A vibrant salad makes a great side, too. You could even nestle them in a whole-grain wrap for lunch. For a beautiful finish, drizzle more pesto on top and sprinkle fresh basil leaves. This adds color and flavor to your dish. Enjoy your meal! {{image_4}} You can swap ground turkey for other meats. Chicken or lean beef works well. Each meat brings a unique taste. If you want a richer flavor, use pork. Just be mindful of cooking times. Different meats may need different baking times. Adding veggies can boost nutrition and taste. Try finely chopped carrots or bell peppers. You can also add herbs like parsley or oregano. For a kick, mix in jalapeños or a dash of hot sauce. Feel free to play with flavors until you find your favorite mix. To make these meatballs gluten-free, use gluten-free breadcrumbs. You can also use ground oats as a binder. This keeps the meatballs moist and tasty. Always check labels for hidden gluten in sauces like pesto. Enjoy these meatballs without worry! Store any leftover meatballs in an airtight container. Place a piece of parchment paper between layers to keep them from sticking. They can stay fresh in the fridge for up to three days. Make sure to let them cool before sealing the container. This way, they won’t trap steam and get soggy. To reheat, you can use the oven or a skillet. For the oven, preheat it to 350°F (175°C). Place the meatballs on a baking sheet and heat for about 10-15 minutes. If using a skillet, add a splash of water, cover it, and warm them over low heat. This method keeps them moist. You can freeze the meatballs for up to three months. First, place them on a baking sheet in a single layer. Freeze them for about an hour until firm. Once frozen, transfer them to a freezer bag. Label the bag with the date. When you’re ready to enjoy them, thaw in the fridge overnight before reheating. Yes, you can! Ground chicken or lean beef works well. Each meat adds its own flavor. If you choose beef, opt for lean cuts to keep it healthy. For a vegetarian option, try using plant-based meat substitutes. These meatballs stay fresh for about three to four days in the fridge. Make sure to store them in an airtight container. This helps keep them moist and flavorful. These meatballs pair great with many sides. You can serve them with whole grain pasta or a fresh salad. They also taste amazing in a whole grain wrap. Drizzle some extra pesto on top for added flavor. This blog post covers all you need to make tasty pesto spinach turkey meatballs. You learned about fresh ingredients, preparation steps, and cooking tips. We shared ways to avoid tough meatballs and add flavor. You also saw how to make variations to fit your diet. Finally, we provided storage and reheating tips for leftovers. Cooking can be fun and easy. Enjoy your meatballs and share them with friends!

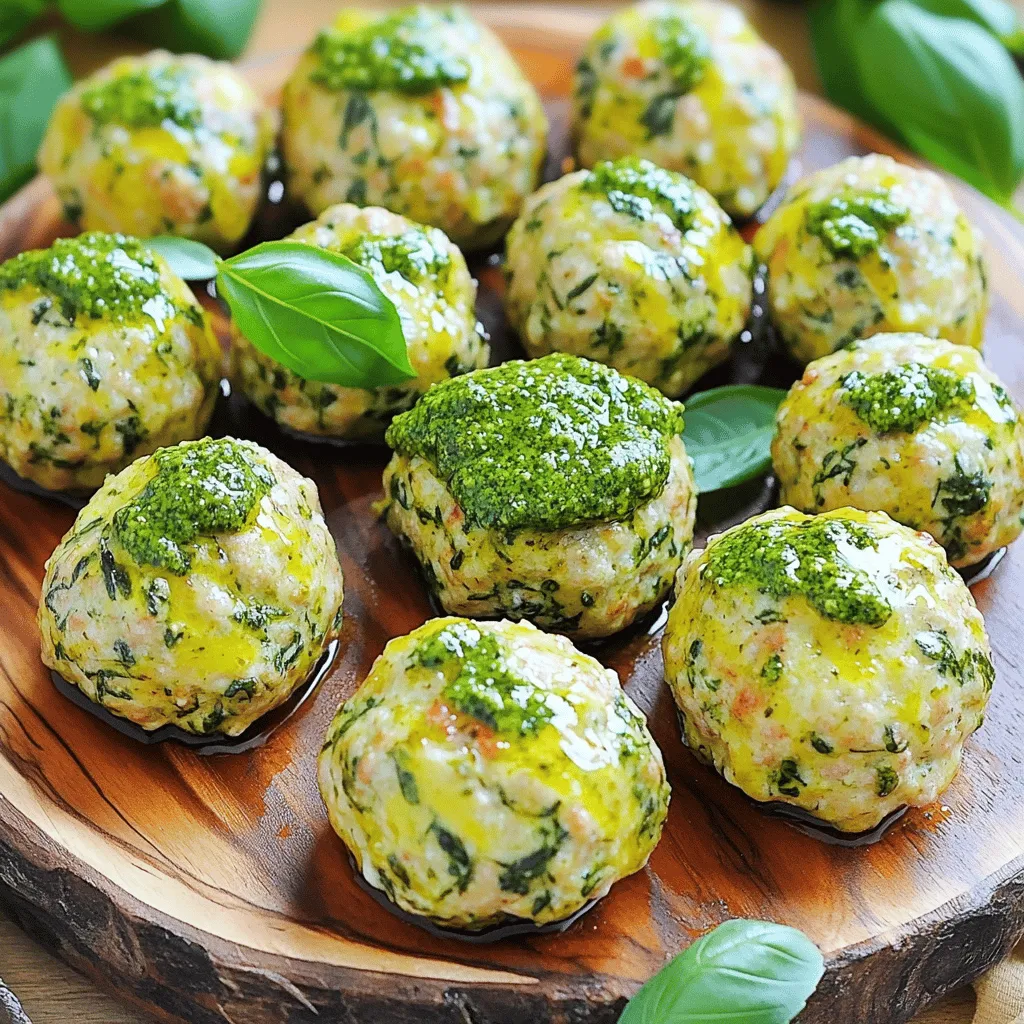
Pesto Spinach Turkey Meatballs Flavorful and Nutritious

Looking for a tasty and healthy meal? You’ve found it! My Pesto Spinach Turkey Meatballs pack a punch of flavor

- 1 cup canned pumpkin puree - 1/4 cup packed brown sugar - 1/4 cup granulated sugar - 1 teaspoon pure vanilla extract - 1/2 teaspoon ground cinnamon - 2 1/4 teaspoons active dry yeast (1 packet) - 1/4 cup warm water (approximately 110°F) - 3 cups all-purpose flour - 1 teaspoon salt - 1/4 teaspoon ground nutmeg - 1/2 cup baking soda (for boiling) - 1 egg, beaten (for egg wash) - Additional granulated sugar and cinnamon for coating (about 1/4 cup each) These ingredients create a tasty treat that’s perfect for fall. The pumpkin puree gives the pretzels a soft texture and a rich flavor. Using both brown sugar and granulated sugar adds depth to the sweetness. Vanilla extract and spices like cinnamon and nutmeg enhance the warm flavors. The yeast is key for making the dough rise. Warm water helps activate the yeast. All-purpose flour provides the structure for the pretzels. Salt balances the sweetness and brings out all the flavors. Baking soda is crucial for boiling the pretzels. It gives them that classic pretzel taste and texture. The egg wash makes the tops golden and shiny. Finally, a sprinkle of cinnamon-sugar adds the finishing touch, making these pretzels irresistible. Gather these ingredients, and you are ready to create a delightful batch of cinnamon sugar pumpkin pretzels! 1. Start by mixing 1/4 cup warm water with 2 1/4 teaspoons active dry yeast in a small bowl. 2. Let it sit for 5-10 minutes. Watch for bubbles. This shows the yeast is active. 3. In a large bowl, combine 1 cup pumpkin puree, 1/4 cup brown sugar, 1/4 cup granulated sugar, 1 teaspoon vanilla extract, 1/2 teaspoon ground cinnamon, and 1/4 teaspoon ground nutmeg. 4. Stir until the mixture is smooth and well blended. 5. Once your yeast is frothy, add it to the pumpkin mixture and stir thoroughly. 1. Gradually mix in 3 cups all-purpose flour and 1 teaspoon salt. Stir until a soft dough forms. 2. Transfer the dough to a lightly floured surface. 3. Knead the dough for 5-7 minutes. It should be smooth and elastic. 1. Place the kneaded dough in a greased bowl. Cover it with a clean towel. 2. Let it rise in a warm spot for about 1 hour, until it doubles in size. 3. After rising, punch down the dough gently. 4. Divide the dough into 8 equal pieces. 5. Roll each piece into a long rope. Shape each rope into a pretzel. 1. Preheat your oven to 425°F (220°C). Line a baking sheet with parchment paper. 2. In a large pot, bring 8 cups of water to a boil. Add 1/2 cup baking soda. 3. Drop each pretzel into the boiling water. Boil for 30 seconds, flipping halfway. 4. Remove them with a slotted spoon and place them on the baking sheet. 5. Brush each pretzel with a beaten egg. 6. Generously sprinkle with cinnamon and sugar. 7. Bake for 12-15 minutes until golden brown. 8. Let the pretzels cool on the baking sheet before serving. Enjoy these warm, tasty treats with your favorite dip! - Ensuring the right dough texture: The dough should feel soft and slightly sticky. If it’s too dry, add a bit more water. If it’s too wet, sprinkle in more flour. You want a dough that holds its shape but is still easy to work with. - How to check if the yeast is active: Mix warm water with yeast and let it sit for about 5-10 minutes. Tiny bubbles will form on top if the yeast is good. If you see no foam, the yeast may be old or the water too hot. - Alternatives for pumpkin puree: You can use butternut squash puree or sweet potato puree if you don’t have pumpkin. Both give a similar taste and texture. - Sugar options and spice variations: Try using coconut sugar or honey instead of brown sugar. You can also mix in a pinch of ginger or cloves for a different spice kick. {{image_4}} You can easily change up the flavor of your cinnamon sugar pumpkin pretzels. Here are a few ideas: - Adding chocolate chips or nuts: Stir in semi-sweet chocolate chips or chopped nuts. Both options add a great crunch and flavor. Try walnuts or pecans for a nutty twist. - Incorporating different spices: Along with cinnamon, you can add ginger or cloves. This will give your pretzels a warm, autumn spice flavor. Just a pinch is enough to change things up. Dipping sauces can take your pretzels to the next level. Here are some tasty options: - Cream cheese dip recipes: Mix cream cheese with a bit of sugar and vanilla. This dip is smooth and pairs well with the sweetness of the pretzels. - Pumpkin spice dip recommendations: Blend cream cheese with pumpkin puree, sugar, and pumpkin spice. This dip echoes the flavors in the pretzels, making it a perfect match. Feel free to mix and match these ideas to find your favorite flavor combinations! To store your leftover pretzels, let them cool completely first. Place them in an airtight container. You can also wrap them in plastic wrap. This keeps them fresh for about 2-3 days at room temperature. If you want to keep them longer, store them in the fridge. Just remember to reheat them before serving. For reheating, preheat your oven to 350°F (175°C). Place the pretzels on a baking sheet. Heat them for about 5-10 minutes. This warms them up and makes them taste fresh again. You can also use a microwave, but the oven gives better results. Freezing pretzels is easy and a great way to save some for later. Once they are cool, wrap each pretzel in plastic wrap. Then, place them in a freezer bag. Squeeze out as much air as you can before sealing. This helps prevent freezer burn. To thaw, take a pretzel out of the freezer and unwrap it. Let it sit at room temperature for about 1 hour. You can also heat it straight from the freezer. Preheat your oven to 350°F (175°C) and bake for about 10-15 minutes. This way, you get a warm, tasty treat whenever you want! Yes, you can make these pretzels vegan. Simply replace the egg wash with a plant-based milk like almond or soy. This will still give them a nice shine. For the cream cheese dip, choose a vegan cream cheese. These pretzels stay fresh for about 2-3 days at room temperature. Store them in an airtight container to keep them soft. If you want to keep them longer, freeze them. They can last up to 3 months in the freezer. Yes, using fresh pumpkin is a great option. Make sure to cook and puree it first. Drain any excess water to avoid a soggy dough. Fresh pumpkin adds a vibrant taste to your pretzels. Serve these pretzels warm for the best experience. A rustic wooden board adds charm. Pair them with a creamy dip, like cream cheese or pumpkin spice dip. You can also sprinkle extra cinnamon on top for an added touch. Making cinnamon sugar pumpkin pretzels is fun and tasty. First, gather your ingredients like pumpkin puree, sugars, and yeast. Then, follow steps to proof the yeast, make the dough, shape, and boil the pretzels. Don’t forget tips for the right dough texture and possible ingredient swaps. You can also get creative with flavors and dipping sauces. In closing, these pretzels are easy to make and full of flavor. Make them for any occasion and enjoy!

Cinnamon Sugar Pumpkin Pretzels Easy and Tasty Treat

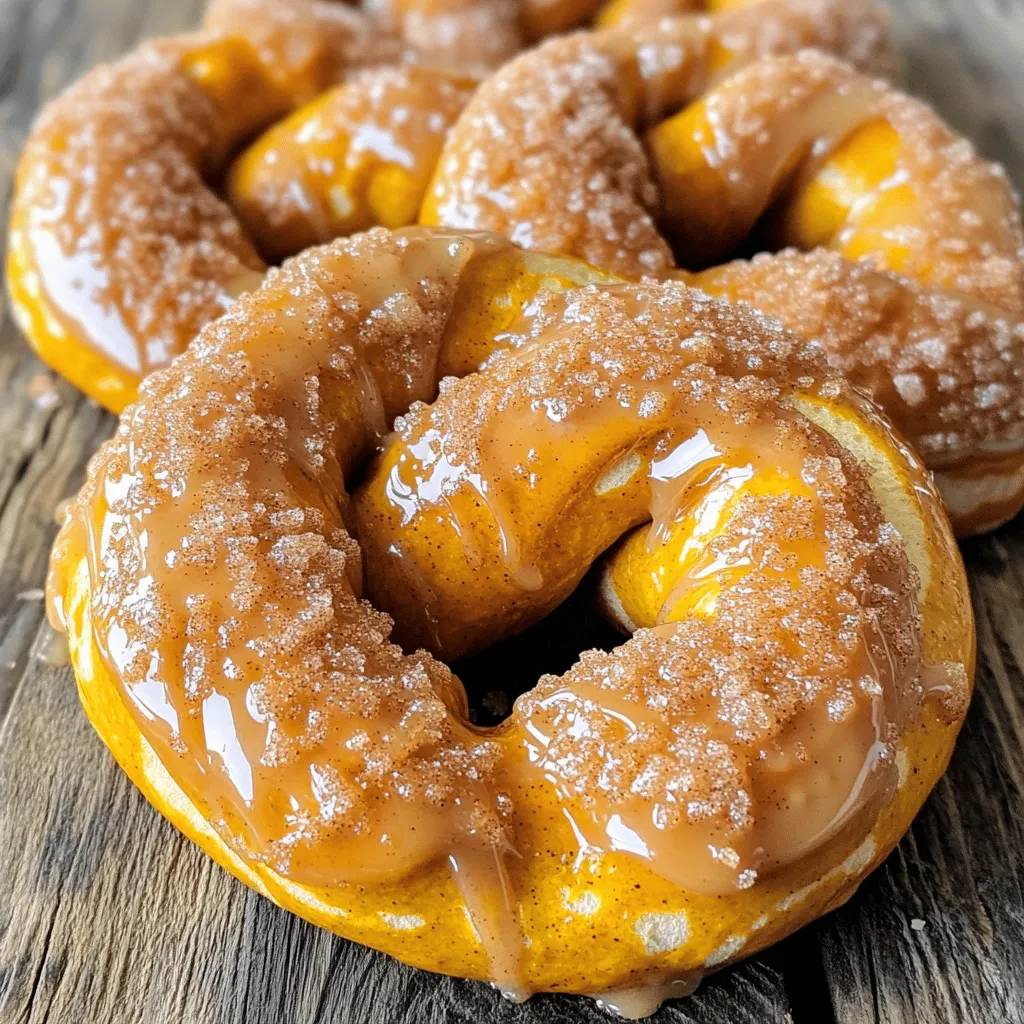
Get ready for a fall treat that combines sweet and savory in every bite! My Cinnamon Sugar Pumpkin Pretzels are

- 4 boneless, skinless chicken breasts - 1 cup fresh spinach, finely chopped - 1 cup canned artichoke hearts, drained and chopped - 1 cup cream cheese, softened to room temperature - 1/2 cup sour cream - 1 cup shredded mozzarella cheese - 1/4 cup grated Parmesan cheese - 2 garlic cloves, minced - 1 tablespoon olive oil - Freshly cracked salt and pepper to taste - 1 teaspoon Italian seasoning - Fresh parsley for garnish - Red pepper flakes for extra heat - Sliced black olives for added flavor - Large skillet - Mixing bowl - Wooden spoon or spatula - Oven-safe dish or skillet - Measuring cups and spoons - Knife and chopping board This list gives you everything you need for the creamy spinach artichoke chicken. Make sure you have the tools ready before you start. Having all ingredients at hand makes cooking smoother and more fun! Start by preheating your oven to 375°F (190°C). This makes sure it’s hot when you bake. Take 4 boneless, skinless chicken breasts. Season both sides well with salt, pepper, and Italian seasoning. Use enough to coat them evenly. Heat 1 tablespoon of olive oil in a large skillet over medium-high heat. When the oil shimmers, add the seasoned chicken breasts. Sear each side for about 5 minutes. Look for a nice golden-brown crust. Once done, remove the chicken and set it on a plate. In the same skillet, lower the heat to medium. Add 2 minced garlic cloves. Sauté for about 1 minute until fragrant. Next, add 1 cup of chopped spinach and 1 cup of chopped artichoke hearts. Cook for 2-3 minutes, stirring often, until the spinach wilts. In a bowl, mix 1 cup of softened cream cheese, 1/2 cup of sour cream, 1 cup of shredded mozzarella, and 1/4 cup of grated Parmesan cheese. Blend until smooth. Then, fold in the spinach and artichoke mixture. Spread this creamy mix evenly over the seared chicken. Place the skillet in the preheated oven and bake for 25-30 minutes. The chicken should be cooked through, and the cheese should be bubbly and golden. Let it rest for 5 minutes before serving. To ensure your chicken is juicy and tender, start with fresh chicken breasts. Season both sides well with salt, pepper, and Italian seasoning. Searing the chicken on medium-high heat gives it a nice crust. This step locks in the juices. After searing, bake it in the oven until fully cooked. The internal temperature should reach 165°F (75°C). Let the chicken rest for five minutes before serving. This resting time helps keep the juices in. You can easily change up the flavors in this dish. Try adding some diced sun-dried tomatoes for a tangy twist. If you love spice, a pinch of red pepper flakes can add heat. For a smoky flavor, consider using smoked paprika. You can also swap the spinach for kale if you want a different green. Each variation brings its own unique taste to the creamy sauce. Serve this dish with a side of pasta or rice to soak up the creamy sauce. You could also pair it with lightly sautéed seasonal vegetables for a fresh touch. A crisp garden salad makes a great side, too. For an elegant look, drizzle more creamy sauce over the chicken and garnish with fresh parsley. This adds color and a burst of flavor. {{image_4}} You can make this dish vegetarian by skipping the chicken. Instead, use hearty vegetables like mushrooms or zucchini. These will add great flavor and texture. You can also add more spinach and artichokes for a veggie-packed delight. If you need a dairy-free option, swap the cream cheese and sour cream for cashew cream or a dairy-free cream cheese. Look for brands that mimic the texture of cream cheese. Use dairy-free mozzarella to keep the cheesy goodness. To boost flavors, add spices like paprika or cayenne pepper. A touch of lemon zest brightens the dish. Consider fresh herbs like basil or thyme to mix in with the spinach. These small changes can transform the dish and make it uniquely yours. Once you finish your meal, let the chicken cool down. Place any leftovers in an airtight container. Make sure to store it in the fridge. It will stay fresh for about 3 to 4 days. This dish is great for meal prep, so don’t hesitate to enjoy it later. When you want to reheat the chicken, preheat your oven to 350°F (175°C). Place the chicken in a baking dish. Cover it with foil to keep it moist. Heat for about 20 minutes or until warm. You can also use a microwave, but the oven keeps it better. To freeze, wrap each piece of chicken tightly in plastic wrap. Then, place it in a freezer-safe bag. This way, it won’t get freezer burn. The chicken can last up to 2 months in the freezer. When you're ready to eat, thaw it in the fridge overnight before reheating. Yes, you can use frozen spinach. Just thaw and drain it well. Frozen spinach is often picked at peak freshness. This keeps its flavor and nutrients intact. It can save time, too. Use about 1/2 cup of thawed spinach for this dish. If you need a substitute for cream cheese, try Greek yogurt. It adds creaminess and tang. You can also use ricotta cheese or cottage cheese for a lighter option. Just blend it until smooth for the best results. Check the chicken's internal temperature. It should reach 165°F (75°C). You can use a meat thermometer for accuracy. If you don’t have one, cut into the thickest part. The meat should be white and juices clear. Yes, you can prepare it ahead of time. Cook the chicken and make the creamy mixture. Store them separately in the fridge. When you are ready, bake them together until hot and bubbly. This saves time on busy days! This blog post covered everything you need for a tasty dish. You learned about key ingredients, kitchen tools, and step-by-step instructions. I shared tips for cooking chicken perfectly and how to add your own flavor. You also found vegetarian options and storage tips. Remember, cooking is fun! Enjoy experimenting with flavors and making this dish your own. With these steps, you can impress anyone at the table. Happy cooking!

Creamy Spinach Artichoke Chicken Delightful Recipe

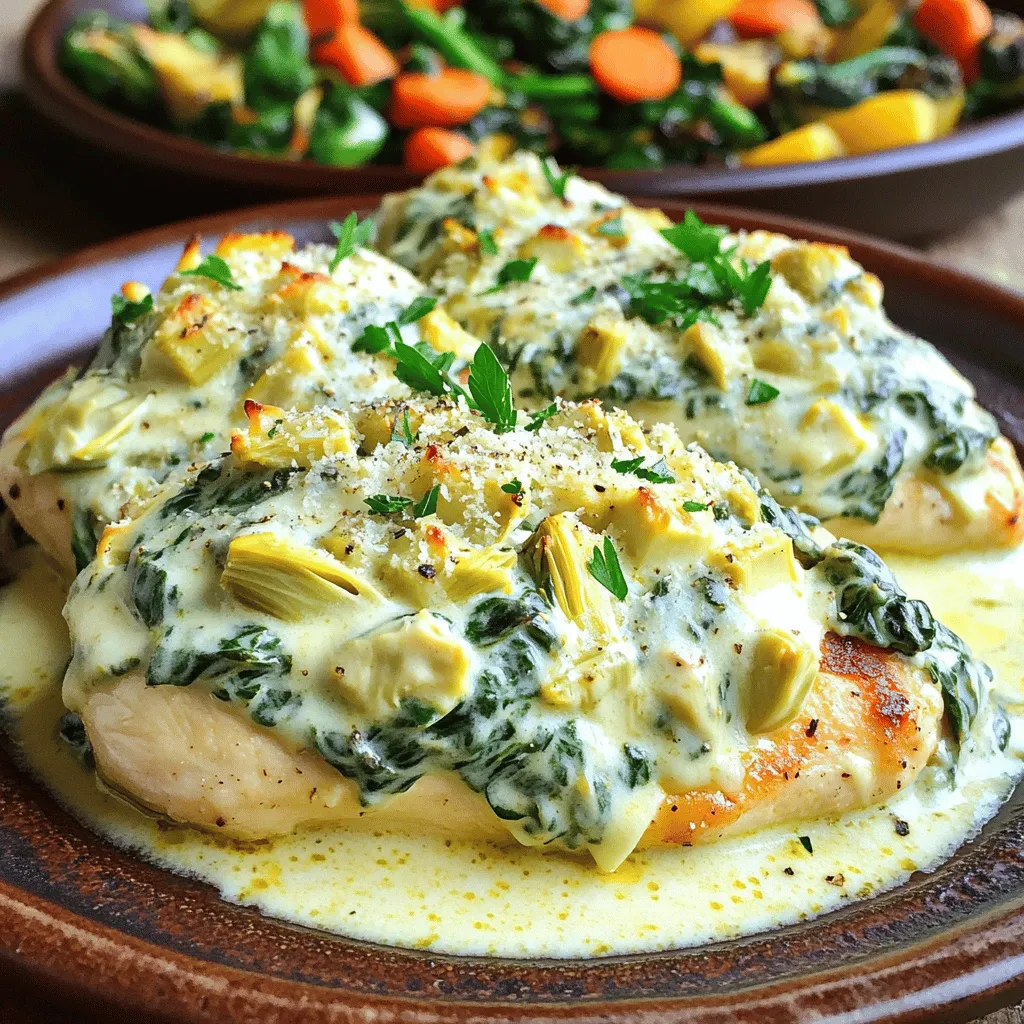
Craving a dish that’s both creamy and packed with flavor? My Creamy Spinach Artichoke Chicken will hit the spot! This

To make a Spicy Thai Mango Salad, you need fresh and vibrant ingredients. Here’s what you should gather: - 2 ripe mangoes, peeled and diced into bite-sized cubes - 1 cucumber, julienned into thin strips - 1 red bell pepper, sliced thinly into strips - 1 medium carrot, grated finely - 3 tablespoons freshly squeezed lime juice - 2 tablespoons fish sauce (or soy sauce for a vegetarian alternative) - 1 tablespoon honey or agave syrup for sweetness - 1 red chili, finely sliced (adjust quantity based on your heat preference) - ¼ cup fresh cilantro leaves, roughly chopped - ¼ cup roasted peanuts, crushed into pieces - Salt, to taste These ingredients work together to create a perfect balance of flavors. The sweet mango and crunchy veggies make it colorful and fun. You can customize your salad based on your taste. Here are some optional ingredients you might like: - Avocado for creaminess - Green onions for extra crunch - Other types of chili for different heat levels - A splash of sesame oil for depth Feel free to mix and match these items. They add unique flavors and textures. Fresh ingredients are key in Thai cooking. They bring brightness and flavor to dishes. Using ripe mangoes makes your salad sweet and juicy. Fresh herbs, like cilantro, add a fragrant note. Crunchy veggies enhance texture. When you use fresh produce, you get the best taste and nutrition. Fresh ingredients also make your meals look appealing. In Thai cuisine, we focus on balance in flavors, colors, and textures. So, always choose the best ingredients for your salad. Start with fresh mangoes. Peel and dice two ripe mangoes into small cubes. Next, take one cucumber and julienne it into thin strips. Slice one red bell pepper into thin strips, too. Grate one medium carrot finely. In a large mixing bowl, add the mangoes, cucumber, bell pepper, and carrot. Gently mix them together to combine well. This step ensures each bite has a burst of flavor. For the dressing, grab a small bowl. Whisk together three tablespoons of freshly squeezed lime juice. Add two tablespoons of fish sauce, or soy sauce if you want a vegetarian option. Then, mix in one tablespoon of honey or agave syrup for sweetness. Season with a pinch of salt. Taste the dressing and adjust as needed. You can add more lime juice or sweetener based on your taste. Now, drizzle the dressing over the salad mix. Toss it gently to coat all the ingredients. Be careful not to bruise the mangoes. Next, add one finely sliced red chili. This gives a spicy kick! Mix in a quarter cup of roughly chopped cilantro. Let the salad sit for about ten minutes. This resting time helps the flavors blend nicely. Before serving, sprinkle a quarter cup of crushed roasted peanuts on top for a crunchy finish. Serve your salad in a colorful platter or individual bowls. Enjoy the vibrant flavors of your Spicy Thai Mango Salad! To slice mangoes well, start by picking ripe ones. Ripe mangoes feel soft but not mushy. Use a sharp knife to cut the mango. Slice it lengthwise along the pit. Make long cuts, then crosswise cuts. Finally, scoop out the cubes with a spoon. This method keeps the mango neat and helps avoid waste. Spicy Thai Mango Salad has a kick from the red chili. If you want less heat, use fewer chili slices. For more spice, add extra slices or use a spicier chili. You can also remove the seeds from the chili for milder heat. Always taste as you go. This helps you find the right balance for your taste. Letting the salad rest boosts the flavor. After mixing the ingredients, allow it to sit for about 10 minutes. This marination time lets the dressing soak in. The lime juice and fish sauce blend well with the mangoes. This step makes each bite burst with flavor. Trust me, your taste buds will thank you! {{image_4}} You can easily make this salad vegetarian or vegan. Instead of fish sauce, use soy sauce or tamari. These options add a salty flavor without fish. If you want a sweeter touch, agave syrup works well. It keeps the salad light and fresh. If you have nut allergies, skip the peanuts. You can replace them with sunflower seeds or pumpkin seeds for crunch. These options give texture without nuts. For those who are gluten-free, use tamari instead of soy sauce. This keeps the salad safe for everyone. You can change the fruits based on the season. In summer, use peaches for a juicy twist. In fall, try apples for a crisp bite. Each fruit adds its own flavor, making the salad unique. Get creative with the fruits you love most! To store leftover Spicy Thai Mango Salad, place it in an airtight container. This keeps the salad fresh and prevents moisture loss. If you have any dressing left, store it separately. This way, the salad won't get soggy. Always use fresh ingredients when you make the salad. Store mangoes, cucumbers, and other veggies in the fridge. Keep the salad away from direct sunlight. For extra freshness, add a paper towel inside the container. This absorbs excess moisture and keeps the salad crisp. When stored properly, Spicy Thai Mango Salad lasts for about 2 days in the fridge. After that, the texture and flavor may change. Always check for any signs of spoilage before eating. If it looks or smells off, it's best to discard it. Enjoy your salad while it's fresh for the best taste! Spicy Thai Mango Salad is packed with vitamins. Mangoes provide vitamin C and A, which boost your immune system. Cucumbers add hydration and fiber, great for digestion. Carrots are full of beta-carotene, which is good for your eyes. Fresh herbs like cilantro add antioxidants. The healthy fats from peanuts also help keep you full. Overall, this salad is a colorful mix of nutrients. Yes, you can prepare this salad ahead of time. However, I recommend you wait to add the dressing until just before serving. This keeps the salad fresh and crunchy. If you mix it too early, the mangoes can get mushy. Store the salad in an airtight container in the fridge. It stays good for one day. This salad pairs well with many dishes. Serve it alongside grilled chicken or shrimp for a complete meal. It also goes great with spring rolls or rice paper rolls. For a vegetarian option, try it with tofu or quinoa. You can even serve it as a refreshing side for barbecued meats. The bright flavors of the salad enhance any dish you choose. Spicy Thai Mango Salad brings together fresh ingredients, bold flavors, and simple steps. Start with ripe mangoes and customize your dish with optional ingredients. Freshness is key in Thai cuisine, making your salad pop with flavor. Follow the step-by-step guide to prepare and dress your salad perfectly. Don’t forget the tips on slicing mangoes and adjusting heat for your taste. You can explore variations and store leftovers properly for future meals. Enjoy this tasty salad as a healthy option anytime. Your kitchen adventures with this salad will be both fun and rewarding!

Spicy Thai Mango Salad Fresh and Flavorful Delight

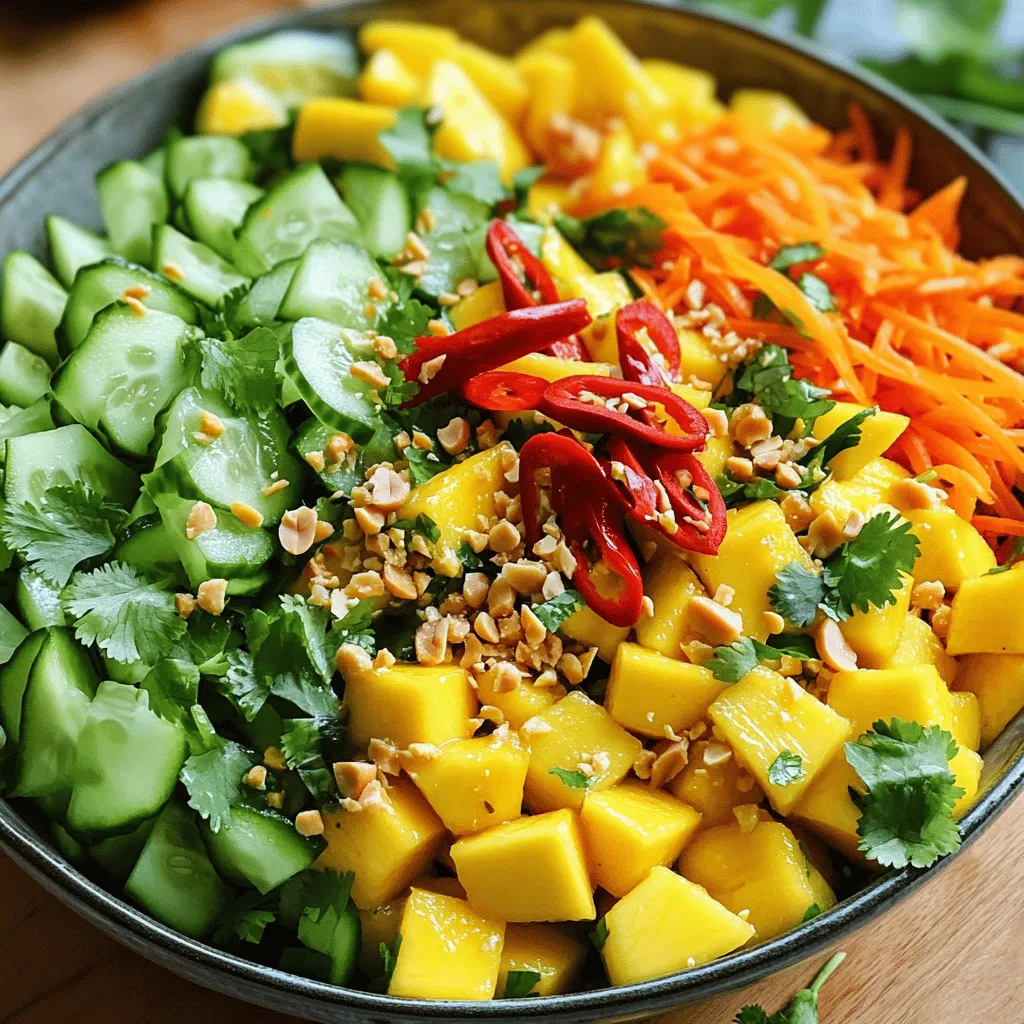
If you’re craving a burst of flavor, the Spicy Thai Mango Salad is a must-try! This dish brings together sweet

- 14 oz firm tofu, thoroughly drained and pressed - 3 tablespoons honey - 3 tablespoons soy sauce (use tamari for gluten-free) - 2 tablespoons sesame oil, plus more for cooking - 4 cloves garlic, finely minced - 1 tablespoon fresh ginger, finely grated - 1 tablespoon rice vinegar - 1 tablespoon cornstarch - 2 tablespoons mixed sesame seeds (white and black) - 2 green onions, finely chopped (for garnish) The main ingredients in this dish give it a rich, sweet, and savory taste. Firm tofu is key for the right texture. It soaks up the flavors from honey and soy sauce very well. In cooking essentials, sesame oil adds a nutty taste. Garlic and ginger bring warmth and depth to the dish. They work together to make each bite delicious. For the added components, rice vinegar adds a slight tang. Cornstarch is essential to make the tofu crispy. Sesame seeds provide crunch and visual appeal. Green onions finish the dish with freshness and color. These ingredients come together to create a delightful meal. Each plays an important role in the taste and texture of Honey Garlic Sesame Tofu. First, cut the firm tofu into bite-sized cubes. This helps the tofu absorb flavor and cook evenly. I like to use a sharp knife for clean cuts. Next, press the tofu to remove excess water. Place the cubes between two plates or use a tofu press. Let it sit for about 15 minutes. This step is crucial for the best texture. Now, let’s mix the marinade. In a separate bowl, combine 3 tablespoons of honey, 3 tablespoons of soy sauce, and 2 tablespoons of sesame oil. Add 4 cloves of finely minced garlic and 1 tablespoon of grated fresh ginger. Pour in 1 tablespoon of rice vinegar. Whisk this mixture well until fully blended. You want a smooth marinade that will coat the tofu well. After mixing the marinade, pour it over the tofu cubes. Make sure each piece is evenly coated. Cover the bowl with plastic wrap or a lid. Now, refrigerate the tofu for at least 30 minutes. If you have time, marinate it for up to 2 hours. This allows the tofu to soak up all that delicious flavor. Marinating is key. The longer you let it sit, the more flavor the tofu will absorb. This step transforms plain tofu into a tasty dish. Once the tofu is marinated, it’s time to cook. First, sprinkle 1 tablespoon of cornstarch over the tofu. Toss the cubes gently to coat them evenly. This helps create a crispy texture when cooked. Heat a non-stick skillet over medium heat. Add a drizzle of sesame oil to the pan. Once the oil is hot, lay the tofu cubes in a single layer. Cook for about 5 to 7 minutes on each side. You want them to be golden brown and crispy. In the last minute of cooking, sprinkle 2 tablespoons of mixed sesame seeds over the tofu. Gently toss to combine. This adds extra flavor and crunch to your dish. Once done, remove the tofu from the heat. Enjoy it hot over cooked rice or quinoa for a complete meal. Tofu can be tricky. Pressing it is key. - Importance of pressing tofu: Pressing removes excess water. This step helps the tofu absorb the marinade better. A firm texture is the goal. Use a tofu press or wrap it in a clean towel. Place a weight on top for about 30 minutes. - Best cooking methods for crispiness: For crispy tofu, pan-frying is great. Use a non-stick skillet and a little sesame oil. Cook the tofu in a single layer. This helps it brown evenly. Aim for 5-7 minutes on each side until golden. You can boost flavor in many ways. - Suggestions for additional spices: Try adding chili flakes for heat or smoked paprika for depth. Garlic powder and onion powder can also enhance flavor without overwhelming the dish. - Variations in marinades: Feel free to mix things up! Instead of honey, use maple syrup for a vegan twist. You can also add citrus juice for a fresh taste. Experiment with different vinegars, like apple cider or balsamic. How you plate your dish can impress. - Ideas for side dishes: Pair the tofu with steamed broccoli or a fresh salad. Rice or quinoa works well too. You can also add stir-fried veggies for color and nutrition. - Plating tips for visual appeal: Use a large, white plate to make colors pop. Arrange the tofu in a neat row and sprinkle green onions on top. Drizzle some marinade for a glossy finish. Add a wedge of lime for a touch of freshness. {{image_4}} You can easily make this dish gluten-free. Just swap soy sauce for tamari. Tamari is a great choice, as it lacks gluten. You can also look for other health-conscious swaps. For example, use coconut aminos instead of soy sauce. This gives a sweet, mild taste. If you want a vegan version, substitute honey with agave syrup. Agave syrup has a similar sweetness. You can also mix in other plant-based proteins. Chickpeas or lentils can add texture and boost protein. To give your tofu a unique flavor, add fresh herbs. Try adding cilantro, basil, or mint for a fresh twist. You can also fuse this dish with other cuisines. For example, add Thai chili paste for a spicy kick. Or, mix in curry powder for an Indian twist. These options make your dish exciting and new. To keep your Honey Garlic Sesame Tofu fresh, follow these easy steps: - Refrigeration: Place leftovers in an airtight container. Your tofu will stay good for up to 3 days in the fridge. - Freezing: For longer storage, you can freeze the tofu. Place it in a freezer-safe bag and remove as much air as you can. It can last for up to 3 months in the freezer. Just remember that freezing may change its texture a bit. When it’s time to enjoy your leftovers, reheating is key: - Preserving Texture: The best way to keep your tofu crispy is to reheat it in a skillet. Use low to medium heat and add a small amount of sesame oil. This helps restore the crispiness. - Microwave vs. Oven: You can use the microwave for quick reheating, but it may make the tofu soft. If you prefer a crispy bite, use the oven. Preheat it to 350°F (175°C) and heat for about 10 minutes. This keeps the texture nice and crunchy. To add spice to Honey Garlic Sesame Tofu, use chili flakes or hot sauce. Both options work well. Chili flakes add a nice crunch and heat. Hot sauce gives a liquid kick. Start with a small amount. You can always add more if needed. This way, you control the heat. Your taste buds will thank you! Yes, you can use different types of tofu. Firm tofu is best for this dish. It holds its shape well during cooking. Soft tofu can break apart too easily. Extra-firm tofu also works if you want a denser bite. Just remember to press it well to remove excess water. This step helps it absorb flavors better. You can serve Honey Garlic Sesame Tofu with several tasty sides. Here are some ideas: - Cooked rice or quinoa for a filling base - Steamed broccoli or green beans for a fresh touch - A simple salad with greens and sesame dressing - Stir-fried vegetables for extra color and crunch These sides balance the rich flavors of the tofu and create a well-rounded meal. This blog post covered the essentials for making Honey Garlic Sesame Tofu. We explored the key ingredients, cooking steps, and tips to enhance flavor and texture. You learned about storage options and ways to adapt the recipe for various diets. Tofu can be a canvas for many flavors. I encourage you to try different spices and sides. With practice, you'll create an amazing dish that impresses everyone. Cooking can be fun and rewarding, so enjoy every step!

Honey Garlic Sesame Tofu Irresistible Flavor Boost

Are you ready for a flavor explosion? Honey Garlic Sesame Tofu will change your dinner game! This dish combines firm

- Watermelon: Use 4 cups of fresh watermelon, cut into 1-inch cubes. Look for a ripe watermelon by checking for a uniform shape and a creamy spot on the bottom. This spot means it ripened on the vine. - Feta Cheese: You'll need 1 cup of creamy feta cheese. When selecting feta, choose one that is moist and crumbly. Crumble it gently with your fingers to keep its texture. This adds a nice contrast to the juicy watermelon. - Mint Leaves: Prepare 1/4 cup of fresh mint leaves. Use your hands to roughly tear the leaves. This process releases their oils and adds a fresh, fragrant note to the salad. Mint plays a key role in balancing the sweetness of the watermelon. - Lime Zest: For a citrus kick, add the zest of 1 lime. Lime zest brightens the dish and enhances the flavors of the salad. - High-Quality Olive Oil: Use 2 tablespoons of high-quality olive oil. A good olive oil adds a rich flavor. Look for options labeled as "extra virgin" for the best taste. - Sweet Balsamic Glaze: Consider using 1 tablespoon of sweet balsamic glaze. This glaze adds a touch of sweetness and a beautiful glaze to your salad. Look for brands that have a thick consistency for the best results. To start, you need to cut the watermelon into cubes. First, slice the watermelon in half. Then, lay each half flat on a cutting board. Use a sharp knife to cut 1-inch slices. Next, turn the slices and cut them into 1-inch cubes. This size helps the flavors mix well. Now, let’s talk about the feta cheese. Crumble it gently over the watermelon. Be careful here. You want to keep the feta pieces intact. Mixing too hard can mash the cheese. This will keep your salad looking pretty. Next, grab a small bowl. In it, mix the olive oil and balsamic glaze. Use a whisk or fork to blend them well. This creates a smooth dressing that coats your salad. Now, it’s time to season! Sprinkle salt and pepper over the watermelon and feta. This step enhances the taste. Don’t skip it! If you want a citrus kick, now is the time to add lime zest. After mixing, let the salad sit for about 5-10 minutes. This time allows the flavors to blend together. It makes every bite tasty! For a beautiful presentation, use a wide, shallow bowl. Arrange the salad nicely, and add more mint leaves on top. A light drizzle of balsamic glaze adds a stunning finish. Enjoy your fresh and colorful salad! To choose a ripe watermelon, look for a uniform shape. A round or oval shape indicates a good fruit. Check for a yellow spot on one side. This spot shows where the watermelon rested on the ground. A creamy yellow spot means it ripened well. Tap the watermelon; it should sound hollow. This sound means the fruit is juicy. Lastly, feel the weight; it should feel heavy for its size. To elevate the dish, you can use a few seasonings. Freshly cracked black pepper adds a nice kick. A pinch of sea salt enhances the sweetness. If you want a bit of zest, lime zest works wonders. You can also drizzle more balsamic glaze for extra flavor. Experiment with fresh herbs like basil for a different taste. Each addition brings a new layer of flavor. This salad pairs well with grilled meats like chicken or fish. Serve it as a side dish at summer barbecues or picnics. It also works as a light lunch on hot days. For a fun twist, serve it in small cups for parties. The bright colors and fresh taste make it a crowd-pleaser. It's an ideal dish for summer gatherings or casual dinners with friends. {{image_4}} You can make this salad even more fun! Adding fresh berries gives a fruity twist. Try strawberries or blueberries for a sweet burst. They pair well with the salty feta. Nuts can also add crunch. Toasted almonds or walnuts give a great texture. Mix them in right before serving to keep them crisp. If you're vegan, you can swap feta cheese for cashew cheese. It mimics the creamy taste and works well. There are also many store-bought vegan options. Just check the label for quality. For gluten-free needs, this salad is naturally safe. All the main ingredients are gluten-free. Want to change up the herbs? Use fresh basil or cilantro instead of mint. Each herb adds a different flavor profile. If you want a unique taste, try different dressings. A citrus vinaigrette can brighten the dish. Experiment with flavors to find your favorite combination! To keep your watermelon feta mint salad fresh, store it in an airtight container. This helps to lock in flavors and moisture. If you have extra salad, it can last in the fridge for up to three days. After that, the taste may change. If you plan to make the salad ahead of time, keep the ingredients separate. Watermelon releases water over time, which can make the salad soggy. Store the watermelon, feta, and mint in different containers. Mix them together just before serving to maintain the best texture and flavor. Check for signs of spoilage before eating. If the watermelon looks mushy or smells off, it’s time to toss it. Also, if the feta cheese appears slimy or has a strong odor, discard it. Freshness is key for this salad to be enjoyable. You can keep watermelon salad in the fridge for up to three days. To store it, place the salad in an airtight container. This helps keep it fresh and tasty. If you see any water pooling, drain it off before serving. Yes, you can make this salad in advance. Prepare the watermelon, feta, and mint, but keep them separate. This way, they stay fresh and do not become soggy. Mix them together just before serving for the best taste. This salad is packed with health benefits. Here are some key ingredients and their perks: - Watermelon: Hydrating and low in calories. - Feta cheese: Good source of protein and calcium. - Mint: Aids digestion and adds flavor without extra calories. - Olive oil: Rich in healthy fats and antioxidants. Yes, you can substitute feta cheese. Try these alternatives: - Goat cheese: Creamy with a tangy flavor. - Ricotta: Soft and mild, though not as salty. - Vegan cheese: Made from nuts or soy for a plant-based option. In this blog post, I covered how to make a refreshing watermelon feta salad. We explored choosing the best ingredients, like ripe watermelon and crumbled feta. I shared tips for combining flavors and presenting your salad. You learned about fun variations and storage methods to keep it fresh. Enjoy crafting this easy dish for any occasion. Remember, the right ingredients and techniques can make your salad shine!

Watermelon Feta Mint Salad Fresh and Flavorful Dish

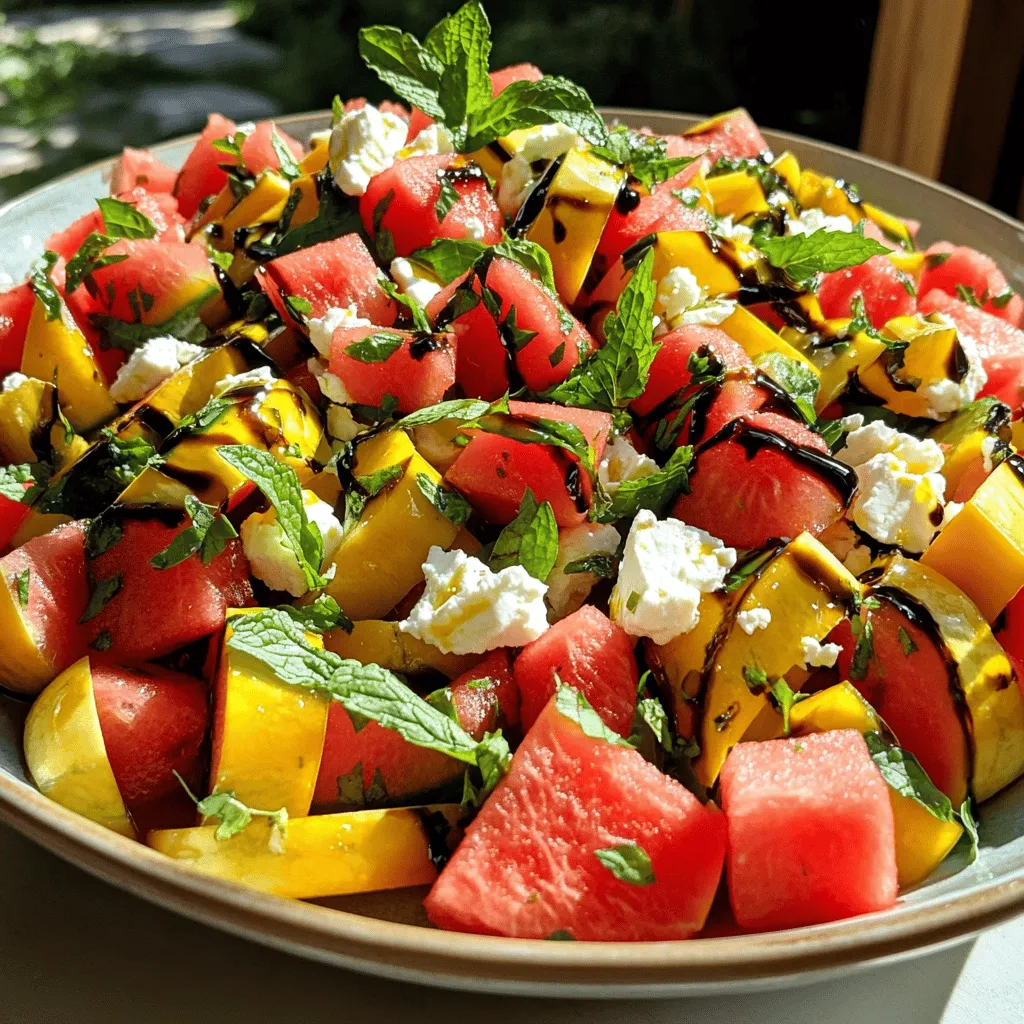
Looking for a refreshing salad that bursts with flavor? Try my Watermelon Feta Mint Salad! This dish combines juicy watermelon,

- 1 lb Brussels sprouts, trimmed and halved - 3 tablespoons olive oil - 4 cloves garlic, minced - 1 cup heavy cream - 1 cup freshly grated Parmesan cheese - 1 teaspoon salt - 1/2 teaspoon freshly ground black pepper - 1/2 teaspoon red pepper flakes (optional) - Fresh parsley, finely chopped (for garnish) To create creamy garlic Parmesan Brussels sprouts, you need quality ingredients. Start with fresh Brussels sprouts. Choose ones that are firm and bright green. The olive oil adds flavor and helps with roasting. Fresh garlic packs a punch and gives the dish its signature taste. Heavy cream makes the sauce rich and smooth. I always use freshly grated Parmesan cheese. It melts better and tastes great. Salt and pepper are key to enhancing flavors. Red pepper flakes can add a kick if you like some heat. Finally, parsley adds color and freshness. With this ingredient list, you set the stage for a delicious dish. Every part plays a role in making the sprouts creamy and flavorful. Remember to have fun while cooking; it’s all about enjoying the process! Set your oven to 400°F (200°C). This temperature helps roast the Brussels sprouts perfectly. In a large bowl, add 1 lb of halved Brussels sprouts. Drizzle in 3 tablespoons of olive oil. Sprinkle 1 teaspoon of salt, 1/2 teaspoon of black pepper, and 1/2 teaspoon of red pepper flakes if you want some heat. Toss well to coat each sprout evenly. Spread the seasoned Brussels sprouts in a single layer on a baking sheet. Roast them for 20-25 minutes. Be sure to toss them halfway through cooking for even browning. Look for a golden-brown color and a tender texture. While the sprouts roast, heat a large skillet over medium heat. Add 4 cloves of minced garlic and sauté for 1-2 minutes. Do not let the garlic burn; it should become fragrant. Next, pour in 1 cup of heavy cream and bring it to a gentle simmer. Lower the heat and stir in 1 cup of grated Parmesan cheese. Keep stirring until the cheese melts and the sauce is creamy. Once the Brussels sprouts are roasted, transfer them to the skillet with the creamy garlic sauce. Gently toss the sprouts to ensure they are well coated with the sauce. Let the mixture cook together for an additional 2-3 minutes. This step helps meld the flavors beautifully, making each bite a delight. Transfer the creamy Brussels sprouts to a serving dish. For a vibrant touch, garnish with finely chopped fresh parsley. This adds freshness and makes the dish look elegant. Serve warm and enjoy every bite! To get the best roast on your Brussels sprouts, follow some key steps. First, make sure to trim and halve them evenly. This helps them cook at the same rate. Use enough olive oil for even coating. A good rule is about three tablespoons for one pound of sprouts. Spread them out on the baking sheet without crowding. This ensures hot air circulates around each sprout, giving you that nice golden brown color. Toss them halfway through cooking. This trick promotes even browning and helps develop flavor. Even seasoning is crucial. Always add salt and pepper to the oil before coating the sprouts. This ensures every sprout gets the same flavor. If you like heat, add red pepper flakes into the mix for some zing. You can easily switch up the creamy sauce! If you want a lighter option, try using half-and-half or whole milk instead of heavy cream. For a vegan version, use coconut cream or cashew cream. Both will give you a rich texture without dairy. Feel free to mix in other cheeses. Goat cheese or feta can add a unique flavor twist. You can also sprinkle in some smoked paprika or Italian herbs for extra taste. These small changes can make the dish your own. Creamy Garlic Parmesan Brussels Sprouts pair well with many main dishes. They go great alongside roasted chicken or grilled steak. You can also serve them with pasta for a delightful vegetarian meal. For portion control, consider serving them in small bowls. This way, each guest can take what they want. It makes the meal feel special. Plus, it helps prevent overindulging. Remember, these sprouts are rich and creamy, so a little goes a long way! {{image_4}} To add some heat, use red pepper flakes. Just a half teaspoon gives a nice kick. If you want more spice, feel free to add a bit more. You can also use fresh chopped jalapeños for a different flavor. Balance the spice with the creamy sauce. The cream and cheese will help tone down the heat. If you want to make this dish vegan, you can swap the heavy cream. Use coconut cream or cashew cream instead. Both options create a rich texture. For a cheesy flavor, try nutritional yeast. Blend soaked cashews with garlic for a creamy sauce. This keeps the dish delicious and dairy-free. To make this dish heartier, add protein. Cooked chicken or crispy bacon works well. For chicken, simply dice and sauté it with the garlic. For bacon, cook it first, then add the garlic to the fat. Toss the sprouts with your chosen protein for a filling meal. This adds flavor and texture to your creamy garlic Parmesan Brussels sprouts. To keep your Creamy Garlic Parmesan Brussels Sprouts fresh, store them in the fridge. Use an airtight container to prevent moisture loss. Placing a paper towel inside can absorb extra moisture. This helps keep the sprouts crisp. Enjoy them within three days for the best taste. When reheating, use a skillet on low heat. This method helps to keep the creaminess intact. Stir gently to ensure even warming. If the sauce thickens, add a splash of cream or water. This will revive the dish’s smooth texture. Yes, you can freeze these Brussels sprouts! To freeze, let them cool completely first. Place them in freezer-safe bags, removing excess air. They can last up to three months in the freezer. When ready to eat, thaw in the fridge overnight. Reheat them on the stove to bring back their creamy goodness. Yes, you can prepare Brussels sprouts in advance. First, trim and halve the sprouts. Toss them in olive oil, salt, and pepper. Store them in the fridge for up to a day. When you’re ready, roast them as usual. The creamy sauce can also be made ahead. Just reheat it gently before combining with the sprouts. If you don’t have Parmesan, try Pecorino Romano or Grana Padano. Both options offer a nice salty flavor. Nutritional yeast is a great dairy-free alternative too. It adds a cheesy taste without the cheese. To reduce bitterness, try these tips. Roast the Brussels sprouts until they are golden brown. The caramelization adds sweetness. Season them with a little sugar or honey while cooking. Adding cream and cheese also helps mask any bitterness. You can use frozen Brussels sprouts, but they need adjustments. Thaw and drain them first to remove excess moisture. Roast them at a lower temperature, around 375°F (190°C), for about 30 minutes. This helps them get crispy without becoming mushy. In this blog post, I covered how to make Creamy Garlic Parmesan Brussels Sprouts. You learned about the key ingredients, like fresh Brussels sprouts, garlic, and Parmesan cheese. I provided step-by-step cooking instructions and helpful tips for perfecting the dish. In conclusion, this recipe shines with its creamy sauce and bright flavors. Try variations to suit your taste. Enjoy your cooking and impress your guests with this tasty side!

Creamy Garlic Parmesan Brussels Sprouts Savory Delight

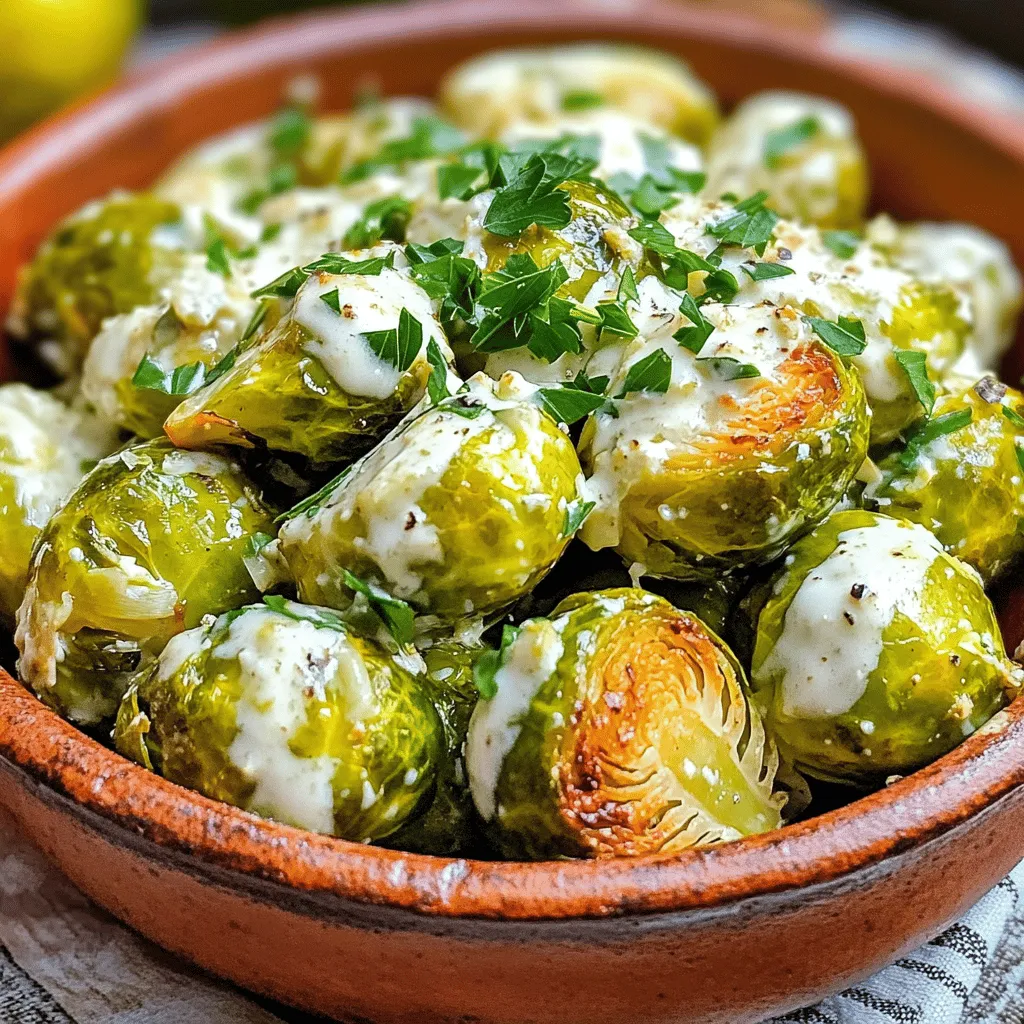
Are you ready to elevate your veggie game? These Creamy Garlic Parmesan Brussels Sprouts will transform your meals. With rich

- 1 cup pretzel rods, broken into smaller pieces - 1 cup milk chocolate chips - 1 cup white chocolate chips - 1/2 cup mini marshmallows - 1/4 cup crushed graham crackers - 1/4 cup rainbow sprinkles - Sea salt, for a light sprinkle When measuring ingredients, use measuring cups for dry items. For chips, scoop and level off. Make sure to break pretzel rods into smaller pieces. This helps them mix well with the chocolate. For chocolate chips, I recommend using a kitchen scale if you have one. One cup of chips is usually about 6 ounces. This can help you get it just right. You can make this bark your own! Try using dark chocolate instead of milk chocolate. It adds a rich taste. You can also add nuts like almonds or pecans for a crunch. Dried fruits, like cranberries, can add a sweet and tangy touch. Feeling festive? Use colored sprinkles that match a holiday! First, preheat your oven to 350°F (175°C). Line your baking sheet with parchment paper. This helps the bark come off easily later. In a large bowl, add 1 cup of broken pretzel rods. Toss in half of the rainbow sprinkles. Mix gently until combined. Spread this mixture evenly on the baking sheet to make a nice layer. Next, grab a microwave-safe bowl to melt the chocolate. Start with the milk chocolate chips. Heat them in the microwave for 30 seconds. Stir the chocolate and heat again in 30-second bursts until it is smooth. Pour the melted milk chocolate over the pretzel layer. Make sure to cover it well. Now, melt the white chocolate chips using the same method. Drizzle the white chocolate over the milk chocolate. Use a knife to swirl the two chocolates for a fun design. Now it’s time to add toppings! Scatter mini marshmallows, crushed graham crackers, and the rest of the rainbow sprinkles over the chocolate layers. This adds great texture and looks nice too. For a tasty twist, sprinkle sea salt on top. It brings out the chocolate's flavor. Place the baking sheet in the fridge for at least 1 hour. Once the chocolate is hard, break the bark into pieces. Enjoy your sweet treat! When melting chocolate, consistency is key. Here are some tips to help you: - Use a microwave-safe bowl. - Chop the chocolate into small pieces. - Heat in 30-second intervals. - Stir after each interval to check the progress. - Stop when the chocolate is mostly melted. - Stir until smooth and shiny. This method prevents overheating. Overheated chocolate can seize and become grainy. To create a stunning swirl, follow these steps: 1. Melt both milk and white chocolate separately. 2. Pour the milk chocolate over the pretzel layer first. 3. Drizzle the white chocolate on top. 4. Use a knife or skewer to swirl gently. Be careful not to mix them completely. You want distinct swirls for visual appeal. Presentation matters when serving your bark. Here are some fun ideas: - Use a decorative plate for an elegant look. - Drizzle more melted chocolate over the top. - Cut the bark into fun shapes with cookie cutters. - Package pieces in clear bags with ribbons for gifts. These tips add charm and make your treat stand out. Enjoy sharing your delicious creation! {{image_4}} You can change the flavor of your chocolate covered pretzel bark in fun ways. Try using dark chocolate for a richer taste. It pairs well with the salty pretzels. You can also use white chocolate only for a sweeter treat. If you love peanut butter, mix in some peanut butter chips. This adds a nutty flavor that makes each bite special. Get creative with your toppings! Instead of marshmallows, use nuts like almonds or pecans. This adds a nice crunch. Dried fruits like cranberries or apricots also work well. They give a chewy texture that contrasts with the crunch of pretzels. You can even sprinkle on some coconut flakes for a tropical twist. Make your bark match the seasons! For holidays, use festive colors. Add red and green sprinkles for Christmas or orange and black for Halloween. For Easter, pastel-colored candies can brighten up your bark. You can even shape the bark into hearts for Valentine's Day. This makes your treat extra special for any occasion. To keep your chocolate covered pretzel bark fresh, store it in an airtight container. This helps to keep moisture out. Line the container with wax paper to prevent sticking. If you cut the bark into pieces, place parchment paper between layers to avoid clumping. Chocolate covered pretzel bark lasts about two weeks at room temperature. Keep it cool and dry for best results. If you want to store it longer, you can freeze it. Wrap each piece in plastic wrap, then place them in a freezer bag. It can last up to three months in the freezer. When you’re ready to eat it, let it thaw in the fridge overnight. For a sweet gift, use clear gift bags. Place a few pieces of bark inside and tie them with a colorful ribbon. You can also use small boxes. Add a layer of tissue paper for a nice touch. This way, your friends will love the look and taste of your homemade treat! Yes, you can use different types of chocolate. You might try dark chocolate or even flavored chocolates. Each type brings a new taste to your treat. Dark chocolate gives a rich flavor, while white chocolate adds sweetness. Feel free to mix and match to find your favorite blend. To keep chocolate from seizing, avoid moisture. Make sure all bowls and utensils are dry. When melting, use short bursts in the microwave. Stir between each burst to help it melt evenly. If chocolate does seize, you can try adding a small amount of vegetable oil. This can help bring it back to a smooth state. If your bark is too thick, you can break it into smaller pieces. This makes it easier to eat. Next time, you can spread the chocolate layer thinner on the pretzels. Also, try using a larger baking sheet. This way, the chocolate spreads out more, and the bark will be thinner. You now have all the know-how to make chocolate covered pretzel bark. Remember the key ingredients and tips. Melting chocolate is easy if you follow the best practices. You can even customize with fun flavors and toppings. Store it well to keep it fresh. This treat is perfect for gifts or celebrations. I hope you enjoy creating it as much as I do!

Chocolate Covered Pretzel Bark Tasty Treat Recipe

If you crave a sweet and salty snack, look no further! My Chocolate Covered Pretzel Bark recipe is simple, fun,

- 4 boneless, skinless chicken thighs - 1 large red bell pepper, sliced into thin strips - 1 large yellow bell pepper, sliced into thin strips - 1 red onion, cut into wedges - 1 cup cherry tomatoes, halved - 1 cup kalamata olives, pitted and halved The main ingredients create a colorful and tasty base. The chicken thighs are juicy and tender. The bell peppers add sweetness and crunch. The red onion gives a nice bite, while the cherry tomatoes burst with flavor. Kalamata olives bring a salty touch that ties it all together. - 3 tablespoons extra-virgin olive oil - 4 cloves garlic, minced - 1 tablespoon dried oregano - 1 tablespoon fresh lemon juice - Salt and pepper to taste The marinade is key to great flavor. Extra-virgin olive oil keeps the chicken moist. Fresh garlic adds a punch, while dried oregano gives an earthy note. Lemon juice brightens everything up. Salt and pepper enhance all the tastes. - Fresh parsley, finely chopped - Crumbled feta cheese Garnishes make your dish look and taste even better. Fresh parsley adds a pop of green and freshness. Crumbled feta cheese adds a tangy finish that pairs well with the olives. These touches make your meal feel special. - Preheat the Oven: Start by preheating your oven to 425°F (220°C). This step is key for roasting the chicken and veggies just right. - Prepare the Marinade: In a large bowl, whisk together 3 tablespoons of extra-virgin olive oil, 4 cloves of minced garlic, 1 tablespoon of dried oregano, the juice from 1 fresh lemon, salt, and pepper. This blend gives the chicken a bright and tasty flavor. - Marinate the Chicken: Add 4 boneless, skinless chicken thighs to the marinade. Make sure each piece is well-coated. Let the chicken marinate for at least 15 minutes. If you have more time, let it soak longer for better flavor. - Arrange Vegetables on Sheet Pan: While the chicken marinates, take a large sheet pan. Arrange 1 large red bell pepper and 1 large yellow bell pepper (both sliced), 1 red onion (cut into wedges), 1 cup of halved cherry tomatoes, and 1 cup of halved kalamata olives on the pan. The colors here look stunning and taste amazing together. - Combine Chicken and Vegetables: Once the chicken is ready, place it on top of the arranged vegetables. Make sure everything is spread out evenly. This helps it cook well without steaming. - Roast the Dish: Slide the sheet pan into the preheated oven. Roast the chicken and vegetables for about 25-30 minutes. Check that the chicken reaches an internal temperature of 165°F (75°C) and the veggies are tender. - Resting and Garnishing: After cooking, take the pan out of the oven. Let it rest for 5 minutes. This helps the juices stay in the chicken. Then, sprinkle fresh chopped parsley and crumbled feta cheese on top for that final touch. - Serve with Style: For a fun presentation, serve the chicken and veggies right from the pan. This makes it easy for everyone to help themselves and enjoy the vibrant Mediterranean dish. - Time Recommendations for Deeper Flavor: Marinade the chicken for at least 15 minutes. For even more flavor, try to marinate it for 30 minutes or more. This helps the chicken soak up all the tasty notes from the garlic, lemon, and herbs. - Alternative Marinades: If you want to mix things up, try yogurt with herbs or a simple balsamic mix. Both can add unique flavors and keep the chicken juicy. - Ensuring Even Cooking: Spread the chicken and vegetables out on the sheet pan. Make sure they are not too crowded. This helps everything cook evenly and get that nice roasted flavor. - Monitoring Internal Temperature: Use a meat thermometer to check the chicken. It should reach 165°F (75°C) to be safely cooked. This step is key for perfect, juicy chicken every time. - Rustic Serving Ideas: Serve the chicken and veggies right from the pan. It gives a warm, homey feel to the meal. Plus, it looks great with all the colors from the peppers and tomatoes. - Garnishing for Visual Appeal: Top with fresh parsley and crumbled feta cheese. This not only adds brightness but also enhances the dish's Mediterranean vibe. A sprinkle of lemon zest can also add a nice touch! {{image_4}} You can switch up the vegetables in this dish. Try using zucchini, asparagus, or eggplant. These veggies add a fresh taste and different textures. You can also mix in broccoli or cauliflower for added crunch. Remember to cut them into similar sizes for even cooking. If you want a change from chicken, use turkey thighs or even fish. Salmon works well with Mediterranean flavors too. For a lighter option, grilled shrimp can be a great substitute. Just keep in mind that cooking times will vary based on what you choose. Herbs can change the entire taste. Instead of oregano, try thyme or rosemary for a different twist. Basil adds a sweet note, while dill gives a fresh zing. Experiment until you find your favorite blend. For those who enjoy spice, add chili peppers to the mix. Sliced jalapeños or crushed red pepper flakes can bring heat to your dish. Start with a small amount and adjust to your taste. You want a kick but not to overpower the other flavors. This recipe is naturally gluten-free. Just make sure your olives and any other ingredients are also gluten-free. You can enjoy this dish with confidence if you have gluten sensitivities. To make this dish vegan, swap chicken for chickpeas or tofu. Both options absorb flavors well. For cheese, try using a plant-based feta or nutritional yeast. This keeps the taste exciting while meeting dietary needs. - Best Practices for Refrigeration: Let the dish cool to room temperature. Place leftovers in an airtight container. Store in the fridge. - How Long it Lasts: Properly stored, it lasts up to three days. - Methods for Reheating: You can use the oven or a microwave. For the oven, heat to 350°F (175°C) and warm for 10-15 minutes. In the microwave, heat in short bursts, stirring in between. - Tips to Maintain Quality: Cover the dish with foil in the oven. This keeps it moist. For the microwave, use a microwave-safe cover. - How to Prep in Advance: Marinate the chicken the night before. Chop the veggies ahead too. Keep everything in separate containers in the fridge. - Freezing Instructions for Longer Storage: Freeze leftovers in an airtight container. It stays good for up to three months. Thaw in the fridge overnight before reheating. Yes, you can use chicken breasts instead of thighs. Chicken breasts cook faster, so you need to adjust the cooking time. Cook them for about 20-25 minutes instead of 25-30 minutes. Always check the internal temperature. It should reach 165°F (75°C) to be safe to eat. Using breasts will give you a leaner option but may lack some of the juiciness that thighs provide. You can serve many tasty sides with this dish. Here are a few great options: - Greek salad with cucumbers, tomatoes, and feta - Couscous or rice to soak up the juices - Roasted potatoes for a hearty touch - Pita bread for a fun, easy way to enjoy the meal - Tzatziki sauce for a refreshing dip These sides will complement the flavors of the chicken and veggies well. You can easily prepare this recipe ahead of time. Here are some tips: - Marinate the chicken: Marinate it up to a day in advance. Store it in the fridge for deeper flavor. - Chop the veggies: You can slice the peppers and onion a day ahead. Keep them in an airtight container in the fridge. - Cook and store: After cooking, let it cool completely before storing. Keep leftovers in the fridge for up to 3 days. Reheat in the oven or microwave when ready to serve. These steps make meal prep a breeze! This blog post covered a tasty Greek Chicken Sheet Pan Dinner. We explored main ingredients like chicken thighs, bell peppers, and olives. I shared tips for a great marinade and cooking advice to enhance flavor. You learned ways to adjust the recipe for diet restrictions too. Remember, this dish is easy to make and delicious. Enjoy your cooking journey and impress your friends with a wonderful meal!

Greek Chicken Sheet Pan Dinner Packed with Flavor

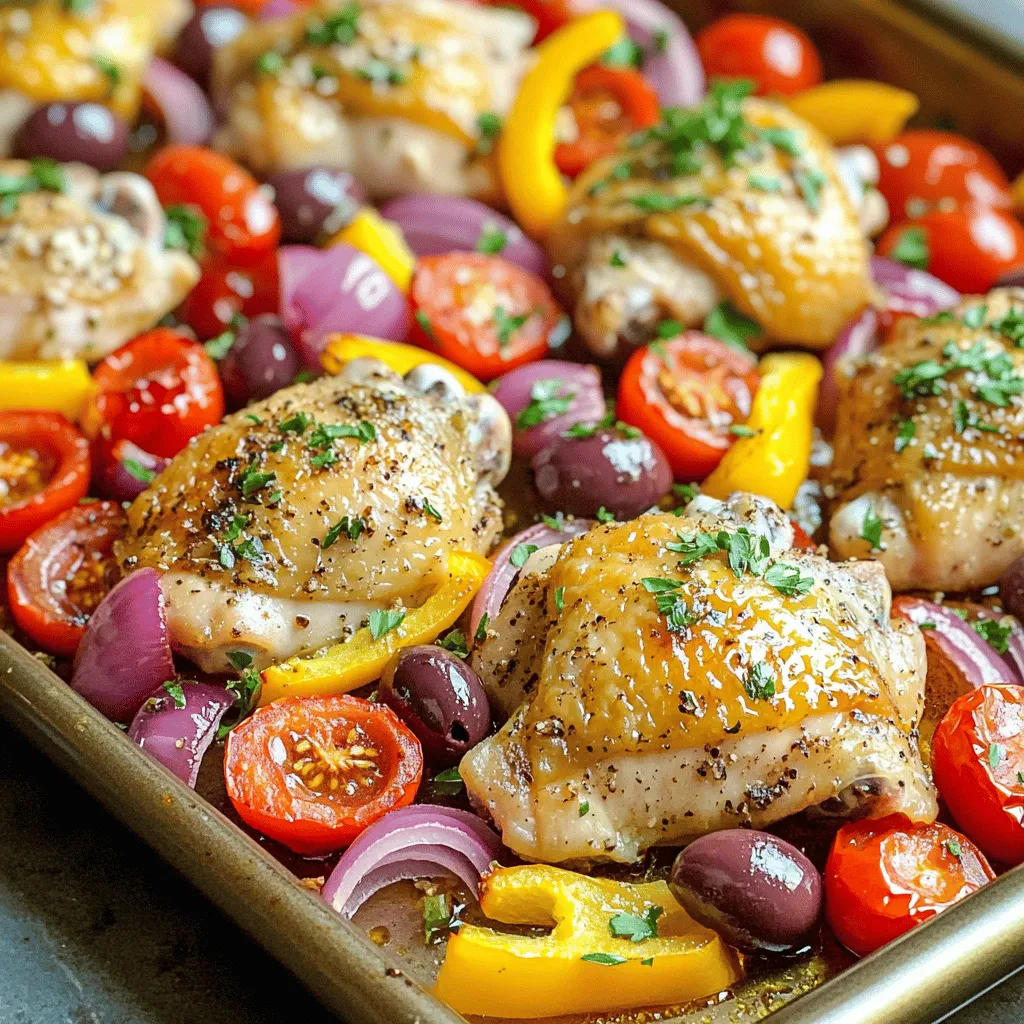
Ready to take your weeknight meals to the next level? This Greek Chicken Sheet Pan Dinner is bursting with bright

- 1 cup Greek yogurt - 1 cup granulated sugar - 2 large eggs - Zest of 2 fresh lemons - 1/2 cup freshly squeezed lemon juice (about 3 medium lemons) - 1/4 cup all-purpose flour - 1/2 teaspoon baking powder - Pinch of salt - Powdered sugar for dusting These ingredients come together to create a delightful treat. The Greek yogurt adds creaminess and tang. Granulated sugar gives sweetness to balance the tart lemon. Eggs help bind everything and add richness. Fresh lemon zest and juice provide bright, zesty flavor. All-purpose flour gives structure to the bars. Baking powder helps them rise and become light. A pinch of salt enhances the overall flavor. Finally, powdered sugar adds a lovely finish when dusted on top. When you gather these ingredients, you set the stage for a delicious baking adventure. Enjoy the process and the fresh, zesty taste of your Greek yogurt lemon bars! 1. Preheat oven and prepare baking pan First, set your oven to 350°F (175°C). Lightly grease an 8-inch square baking pan. You can also use parchment paper for easy removal. 2. Mix Greek yogurt and sugar In a large bowl, whisk together 1 cup of Greek yogurt and 1 cup of granulated sugar. Make sure the mixture is smooth and creamy without lumps. 3. Incorporate eggs, zest, and juice Add 2 large eggs, the zest of 2 lemons, and 1/2 cup of freshly squeezed lemon juice. Beat the mixture well until it is uniform. 4. Combine dry ingredients In another bowl, mix 1/4 cup of all-purpose flour, 1/2 teaspoon of baking powder, and a pinch of salt. Whisk these dry ingredients until well-blended. 1. Fold dry ingredients into wet mixture Gradually fold the dry ingredients into the yogurt mixture. Mix gently until the batter is smooth with no dry spots. Avoid overmixing to keep the bars light. 2. Pour batter and spread evenly Pour the batter into the prepared baking pan. Use a spatula to spread it evenly across the pan. 3. Bake and check for doneness Bake for 25-30 minutes. Look for lightly golden edges. Insert a toothpick in the center; it should come out clean. 4. Cool and dust with powdered sugar Let the bars cool in the pan for about 10 minutes. Transfer them to a wire rack to cool completely. Dust the top with powdered sugar before serving. To make the best Greek yogurt lemon bars, focus on a few simple steps. Start with the yogurt. You want a smooth mixture. Whisk the Greek yogurt and granulated sugar well. This helps avoid lumps. A creamy base makes your bars light and fluffy. Mix your ingredients carefully. Once you add the eggs, lemon zest, and juice, beat the mixture until smooth. But watch out! Overmixing can make your bars dense. Fold in the dry ingredients just until you see no dry spots. Cooling is key for easy slicing. After baking, let the bars cool in the pan for 10 minutes. This makes them easier to lift out. Then, move them to a wire rack to cool completely. A sharp knife will help you cut neat squares. Presentation makes a big difference. Serve your lemon bars chilled. Use a bright plate to show off their color. Garnish with thin lemon slices and fresh mint leaves. This adds a pop of color and a nice scent. Pair your lemon bars with a refreshing drink. Lemonade or iced tea works great. The tartness of the bars balances well with sweet beverages. Enjoy! {{image_4}} If you want to make these lemon bars gluten-free, simply swap the all-purpose flour with a gluten-free flour blend. Look for brands that work well in baking, like almond flour or coconut flour. This change will keep the bars just as tasty while being suitable for those with gluten sensitivities. To craft vegan lemon bars, you can replace the eggs with flaxseed meal or chia seeds. For each egg, mix 1 tablespoon of flaxseed meal with 3 tablespoons of water. Let it sit for a few minutes to thicken. For yogurt, choose a plant-based option like coconut or almond yogurt. These swaps keep the flavor bright and the texture creamy. You can add a twist to your lemon bars by mixing in fresh herbs or spices. Try adding a hint of fresh basil or thyme for an herbal kick. You can also swap out lemons for other citrus fruits like limes or oranges. This change will give your bars a fun and unique flavor. Experiment with what you love and enjoy the process! Store your Greek yogurt lemon bars in an airtight container. This keeps them fresh and moist. Always place the container in the fridge. The cool air helps maintain the bars' texture. If you leave them out, they can dry out quickly. You can also cover them in plastic wrap. This adds another layer of protection. Enjoy your lemon bars within five days for the best taste. After that, they may lose some freshness. If you want to keep them longer, consider freezing them. Wrap each bar in plastic wrap and then place them in a freezer bag. They can last up to three months in the freezer. When ready to eat, thaw them in the fridge overnight. This way, they stay tasty and ready to enjoy! Can I use flavored yogurt? Yes, you can use flavored yogurt. However, I suggest sticking with plain Greek yogurt for the best taste. Flavored yogurt can change the flavor of the bars. You want the bright lemon taste to shine. How long do these bars last? These bars can last up to five days when stored in the fridge. Keep them in an airtight container. They may get a bit firmer over time but will stay tasty. Can I freeze Greek yogurt lemon bars? Yes, you can freeze them! Wrap the bars tightly in plastic wrap. Then, place them in a freezer bag. They can last up to three months in the freezer. Just thaw in the fridge before serving. What can I substitute for granulated sugar? You can use honey or maple syrup instead of sugar. Keep in mind that it might change the texture a bit. If you prefer a sugar substitute, try erythritol or stevia. Adjust the amount to taste. This blog post showed you how to make Greek yogurt lemon bars. You learned the key ingredients, like Greek yogurt, eggs, and lemon juice. I shared each step for mixing and baking, along with helpful tips for the best texture. You also found variations for gluten-free and vegan options. In the end, these bars are tasty and easy to make. Enjoy them fresh or try your favorite twists!

Greek Yogurt Lemon Bars Tasty and Easy Recipe

Looking for a bright and tangy dessert? These Greek Yogurt Lemon Bars are easy to make and delicious! With just

Older posts
Newer posts
← Previous Page1 … Page32 Page33 Page34 … Page83 Next →

dsad

© 2026 eataroundit • Built with GeneratePress

Our Policies

  • Copyright Policy
  • Cookie Policy
  • GDPR Policy
  • Privacy Policy
  • Disclaimer
  • Terms Of Use

More Information

  • Home
  • About
  • Contact
  • Appetizers
  • Dessert
  • Dinner
  • Drinks
©2026, eataroundit About Back To Top