White Chocolate Trail Mix Clusters Tasty Snack Idea

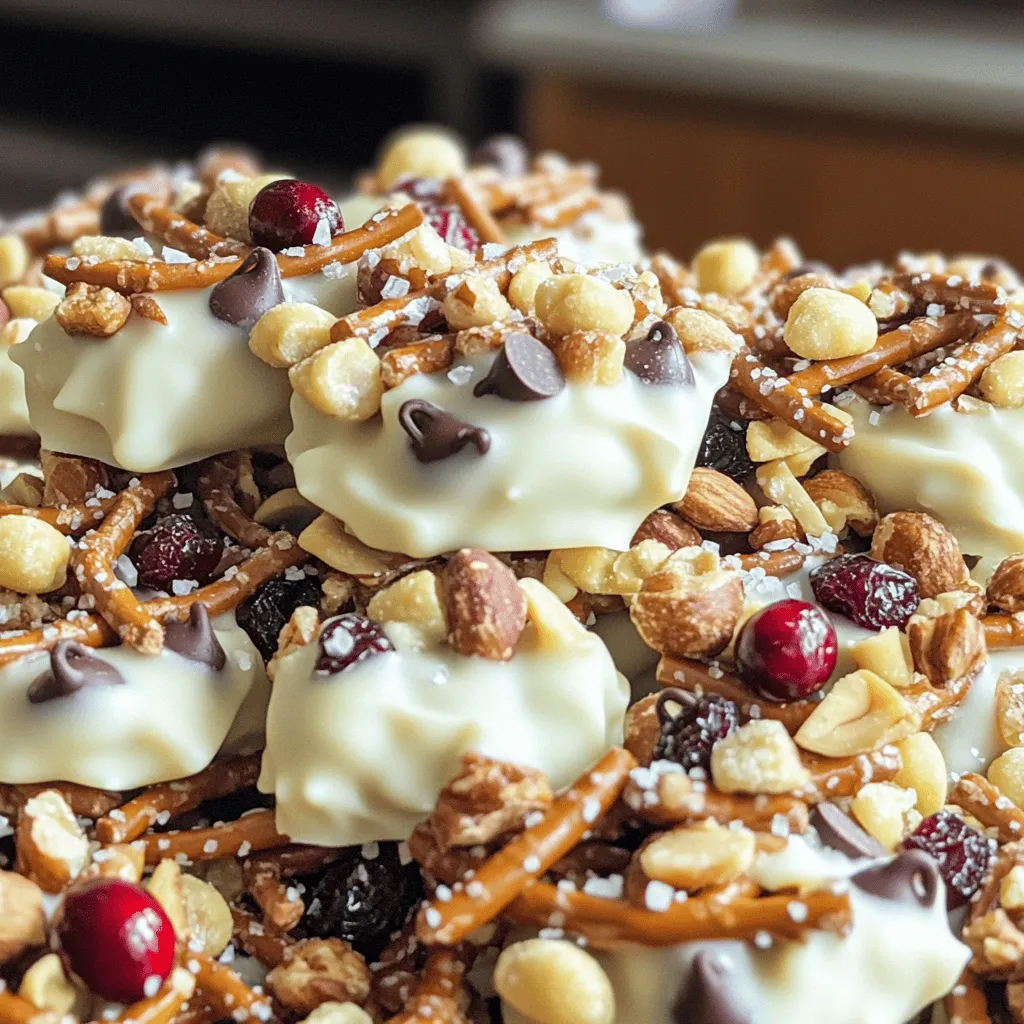
Looking for a tasty snack that’s easy to make? Let me introduce you to White Chocolate Trail Mix Clusters! These delicious bites mix sweet and salty flavors for the perfect treat. Whether you’re at home, on the go, or hosting friends, these clusters will impress everyone. Ready to learn how to whip up this snack? Let’s dive into the ingredients and steps to create your new favorite munchie!

Ingredients

List of Ingredients

– 2 cups mixed nuts (almonds, cashews, walnuts)

– 1 cup dried cranberries

– 1 cup mini pretzels, broken into smaller pieces

– 1 cup dark chocolate chips

– 2 cups white chocolate chips

– 1 teaspoon coarse sea salt

Ingredient Substitutions

You can switch mixed nuts for seeds like pumpkin or sunflower seeds. These seeds add a nice crunch too. For dried fruits, use raisins or apricots if you prefer. They will change the taste a bit but will still be great.

You can also swap dark chocolate for milk chocolate. Milk chocolate will make the clusters sweeter. Just keep in mind that dark chocolate has a richer flavor.

If you want to explore more, you can check the Full Recipe for other fun ideas!

Step-by-Step Instructions

Preparation Steps

Preparing the baking sheet: First, grab a large baking sheet. Line it with parchment paper. This makes cleanup easy and helps the clusters not stick. Set the baking sheet aside for now.

Mixing the dry ingredients: In a big bowl, combine 2 cups of mixed nuts, 1 cup of dried cranberries, and 1 cup of broken mini pretzels. Use your hands or a spatula to mix well. Make sure everything is spread out evenly.

Melting the white chocolate: Take a microwave-safe bowl and pour in 2 cups of white chocolate chips. Heat in the microwave for 30 seconds at a time. Stir between each heating. Keep going until the chocolate is smooth and lump-free.

Combining Ingredients

Incorporating dark chocolate: Once the white chocolate is melted, pour it over your trail mix. Use a spatula to fold it all together. Make sure everything gets coated. Then, add 1 cup of dark chocolate chips. Gently mix until they are just combined. This adds a rich flavor.

Shaping the clusters: Using a spoon, scoop out mounds of the mix. Drop them onto your prepared baking sheet. Shape them into clusters that are about 2 inches apart. This helps them separate easily later.

Setting and Storing

Refrigerating the clusters: Place the baking sheet in the fridge. Let the clusters chill for about 30 minutes. This helps the chocolate harden and the clusters firm up.

Storage tips for freshness: After they are set, take the clusters off the parchment paper. Store them in an airtight container. You can keep them at room temperature for a week. If you want them to last longer, place them in the fridge.

Tips & Tricks

Perfecting Your Clusters

To make the best white chocolate trail mix clusters, start with even chocolate coating. Melt your white chocolate slowly. Stir it every 30 seconds. This helps it melt evenly. Once smooth, pour it over your mix. Use a spatula to fold carefully. This ensures every piece gets coated without clumping.

Avoid clumping by mixing thoroughly. When you add the chocolate, fold gently. If you mix too hard, ingredients may stick together. Aim for clusters where each piece stands out. This makes the final snack look great.

Presentation Ideas

Serving your clusters can be fun and creative. Use mini cupcake liners for a cute touch. They make perfect party snacks. You can also arrange them on a colorful platter. Add extra sea salt on top for a pop of flavor and color. This small detail makes your clusters more appealing.

Think about using decorative bowls or jars. They can add charm to your table. If you are hosting, it becomes a great conversation starter too!

Common Mistakes to Avoid

One common mistake is overheating the chocolate. If you heat it too quickly, it can seize up. Always melt in small bursts and stir often. This keeps your chocolate smooth.

Another mistake is not allowing clusters to set properly. After shaping, place them in the fridge for 30 minutes. This helps them harden and keeps their shape. Skipping this step can lead to messy clusters. Follow these tips for tasty and beautiful snacks!

Variations

Flavor Variations

You can easily change the taste of your clusters. Try adding spices like cinnamon or nutmeg. A splash of vanilla or almond extract also works well. These small changes can bring a new twist. You can also swap in different dried fruits. Consider using apricots or raisins instead of cranberries. These fruits add unique flavors and colors.

Healthier Versions

If you want a healthier snack, reduce the sugar content. You can cut back on white chocolate chips. Using dark chocolate exclusively is another great option. Dark chocolate has less sugar and more antioxidants. It can make your clusters rich and tasty.

Festive Twists

Add fun mix-ins for special occasions. For the holidays, consider adding peppermint bits or crushed candy canes. In fall, try pumpkin spice or dried apple pieces. These festive touches can make your clusters even more exciting. Each season brings new flavors to explore.

Storage Info

Container Recommendations

To keep your clusters fresh, use airtight containers. Glass jars or plastic containers work well. Make sure the container seals tightly. This helps keep moisture out. When stacking clusters, place parchment paper between layers. This prevents sticking. If you want to save space, use a flat container. Just keep the clusters in a single layer.

Shelf Life

At room temperature, these clusters stay fresh for about a week. Make sure to store them away from heat and sunlight. If you put them in the fridge, they can last longer. Refrigerated clusters can stay fresh for up to two weeks. Just remember, the cold can make them a bit firmer.

Reusing Leftovers

If you have leftover nuts or dried fruits, try adding them to your breakfast. Toss them into oatmeal or yogurt. You can also mix them into cookies or muffins. If you have extra clusters, chop them up and use them as a topping. They make a great addition to ice cream or smoothies.

FAQs

How long do white chocolate trail mix clusters last?

White chocolate trail mix clusters can last up to a week at room temperature. If you store them in the fridge, they may last longer. Just keep them in an airtight container to maintain freshness.

Can I make these clusters vegan?

Yes, you can make vegan clusters! Use dairy-free white chocolate chips instead of regular ones. Ensure that the other ingredients, like nuts and dried fruit, are also vegan-friendly.

Where can I buy pre-made white chocolate trail mix clusters?

You can find pre-made clusters at many grocery stores or specialty shops. Look in the snack aisle or the section for gourmet treats. Health food stores may offer organic options too.

What can I add to enhance the flavor of the clusters?

You can add a pinch of cinnamon or nutmeg for warmth. Consider mixing in coconut flakes, mini marshmallows, or even a dash of chili powder for a unique kick. Get creative!

Can I use white chocolate chips in a different recipe?

Absolutely! White chocolate chips work well in cookies, brownies, or melted as a topping for desserts. They add a sweet touch when drizzled over cakes or fruit.

Full Recipe: White Chocolate Trail Mix Clusters

Making white chocolate trail mix clusters is easy and fun. You can whip them up in under an hour, and they are perfect for snacks or parties. Here’s how to make them.

Ingredients

– 2 cups mixed nuts (almonds, cashews, walnuts)

– 1 cup dried cranberries

– 1 cup mini pretzels, broken into smaller pieces

– 1 cup dark chocolate chips

– 2 cups white chocolate chips

– 1 teaspoon coarse sea salt

Step-by-Step Instructions

1. Prepare the Baking Sheet: Start by lining a large baking sheet with parchment paper. This will help the clusters not stick.

2. Mix the Dry Ingredients: In a big bowl, combine the mixed nuts, dried cranberries, and broken pretzels. Toss well to mix them evenly.

3. Melt the White Chocolate: Put the white chocolate chips in a microwave-safe bowl. Heat them in the microwave for 30 seconds. Stir well and repeat until they are smooth and lump-free.

4. Combine Ingredients: Pour the melted white chocolate over the nut mix. Use a spatula to fold everything together until all pieces are covered.

5. Incorporate Dark Chocolate: Gently add the dark chocolate chips. Fold them in without breaking the clusters.

6. Form the Clusters: Use a spoon or scoop to drop mounds of the mix onto the prepared sheet. Space them about 2 inches apart.

7. Garnish: Sprinkle coarse sea salt on top of each cluster. This adds a nice contrast of flavor.

8. Set the Clusters: Place the baking sheet in the fridge for 30 minutes. This helps the chocolate set and the clusters harden.

9. Store and Enjoy: Once set, take the clusters off the parchment. Store them in an airtight container at room temperature for about a week. You can also refrigerate them for longer freshness.

Presentation Tips

Serve the clusters in mini cupcake liners for a fun snack. Arrange them on a platter with a sprinkle of extra sea salt for a nice touch.

Enjoy making these tasty white chocolate trail mix clusters! They are sure to please everyone.

You learned how to make tasty white chocolate trail mix clusters. We covered the ingredients, fun tips, and how to store them. You can swap nuts or chocolates to fit your taste. Remember to let the clusters set to avoid a messy treat. Try festive flavors to make them special. These clusters are a fun snack for any occasion. Enjoy making your own unique version and sharing it with others!

- 2 cups mixed nuts (almonds, cashews, walnuts) - 1 cup dried cranberries - 1 cup mini pretzels, broken into smaller pieces - 1 cup dark chocolate chips - 2 cups white chocolate chips - 1 teaspoon coarse sea salt You can switch mixed nuts for seeds like pumpkin or sunflower seeds. These seeds add a nice crunch too. For dried fruits, use raisins or apricots if you prefer. They will change the taste a bit but will still be great. You can also swap dark chocolate for milk chocolate. Milk chocolate will make the clusters sweeter. Just keep in mind that dark chocolate has a richer flavor. If you want to explore more, you can check the Full Recipe for other fun ideas! - Preparing the baking sheet: First, grab a large baking sheet. Line it with parchment paper. This makes cleanup easy and helps the clusters not stick. Set the baking sheet aside for now. - Mixing the dry ingredients: In a big bowl, combine 2 cups of mixed nuts, 1 cup of dried cranberries, and 1 cup of broken mini pretzels. Use your hands or a spatula to mix well. Make sure everything is spread out evenly. - Melting the white chocolate: Take a microwave-safe bowl and pour in 2 cups of white chocolate chips. Heat in the microwave for 30 seconds at a time. Stir between each heating. Keep going until the chocolate is smooth and lump-free. - Incorporating dark chocolate: Once the white chocolate is melted, pour it over your trail mix. Use a spatula to fold it all together. Make sure everything gets coated. Then, add 1 cup of dark chocolate chips. Gently mix until they are just combined. This adds a rich flavor. - Shaping the clusters: Using a spoon, scoop out mounds of the mix. Drop them onto your prepared baking sheet. Shape them into clusters that are about 2 inches apart. This helps them separate easily later. - Refrigerating the clusters: Place the baking sheet in the fridge. Let the clusters chill for about 30 minutes. This helps the chocolate harden and the clusters firm up. - Storage tips for freshness: After they are set, take the clusters off the parchment paper. Store them in an airtight container. You can keep them at room temperature for a week. If you want them to last longer, place them in the fridge. To make the best white chocolate trail mix clusters, start with even chocolate coating. Melt your white chocolate slowly. Stir it every 30 seconds. This helps it melt evenly. Once smooth, pour it over your mix. Use a spatula to fold carefully. This ensures every piece gets coated without clumping. Avoid clumping by mixing thoroughly. When you add the chocolate, fold gently. If you mix too hard, ingredients may stick together. Aim for clusters where each piece stands out. This makes the final snack look great. Serving your clusters can be fun and creative. Use mini cupcake liners for a cute touch. They make perfect party snacks. You can also arrange them on a colorful platter. Add extra sea salt on top for a pop of flavor and color. This small detail makes your clusters more appealing. Think about using decorative bowls or jars. They can add charm to your table. If you are hosting, it becomes a great conversation starter too! One common mistake is overheating the chocolate. If you heat it too quickly, it can seize up. Always melt in small bursts and stir often. This keeps your chocolate smooth. Another mistake is not allowing clusters to set properly. After shaping, place them in the fridge for 30 minutes. This helps them harden and keeps their shape. Skipping this step can lead to messy clusters. Follow these tips for tasty and beautiful snacks! {{image_4}} You can easily change the taste of your clusters. Try adding spices like cinnamon or nutmeg. A splash of vanilla or almond extract also works well. These small changes can bring a new twist. You can also swap in different dried fruits. Consider using apricots or raisins instead of cranberries. These fruits add unique flavors and colors. If you want a healthier snack, reduce the sugar content. You can cut back on white chocolate chips. Using dark chocolate exclusively is another great option. Dark chocolate has less sugar and more antioxidants. It can make your clusters rich and tasty. Add fun mix-ins for special occasions. For the holidays, consider adding peppermint bits or crushed candy canes. In fall, try pumpkin spice or dried apple pieces. These festive touches can make your clusters even more exciting. Each season brings new flavors to explore. To keep your clusters fresh, use airtight containers. Glass jars or plastic containers work well. Make sure the container seals tightly. This helps keep moisture out. When stacking clusters, place parchment paper between layers. This prevents sticking. If you want to save space, use a flat container. Just keep the clusters in a single layer. At room temperature, these clusters stay fresh for about a week. Make sure to store them away from heat and sunlight. If you put them in the fridge, they can last longer. Refrigerated clusters can stay fresh for up to two weeks. Just remember, the cold can make them a bit firmer. If you have leftover nuts or dried fruits, try adding them to your breakfast. Toss them into oatmeal or yogurt. You can also mix them into cookies or muffins. If you have extra clusters, chop them up and use them as a topping. They make a great addition to ice cream or smoothies. White chocolate trail mix clusters can last up to a week at room temperature. If you store them in the fridge, they may last longer. Just keep them in an airtight container to maintain freshness. Yes, you can make vegan clusters! Use dairy-free white chocolate chips instead of regular ones. Ensure that the other ingredients, like nuts and dried fruit, are also vegan-friendly. You can find pre-made clusters at many grocery stores or specialty shops. Look in the snack aisle or the section for gourmet treats. Health food stores may offer organic options too. You can add a pinch of cinnamon or nutmeg for warmth. Consider mixing in coconut flakes, mini marshmallows, or even a dash of chili powder for a unique kick. Get creative! Absolutely! White chocolate chips work well in cookies, brownies, or melted as a topping for desserts. They add a sweet touch when drizzled over cakes or fruit. Making white chocolate trail mix clusters is easy and fun. You can whip them up in under an hour, and they are perfect for snacks or parties. Here’s how to make them. - 2 cups mixed nuts (almonds, cashews, walnuts) - 1 cup dried cranberries - 1 cup mini pretzels, broken into smaller pieces - 1 cup dark chocolate chips - 2 cups white chocolate chips - 1 teaspoon coarse sea salt 1. Prepare the Baking Sheet: Start by lining a large baking sheet with parchment paper. This will help the clusters not stick. 2. Mix the Dry Ingredients: In a big bowl, combine the mixed nuts, dried cranberries, and broken pretzels. Toss well to mix them evenly. 3. Melt the White Chocolate: Put the white chocolate chips in a microwave-safe bowl. Heat them in the microwave for 30 seconds. Stir well and repeat until they are smooth and lump-free. 4. Combine Ingredients: Pour the melted white chocolate over the nut mix. Use a spatula to fold everything together until all pieces are covered. 5. Incorporate Dark Chocolate: Gently add the dark chocolate chips. Fold them in without breaking the clusters. 6. Form the Clusters: Use a spoon or scoop to drop mounds of the mix onto the prepared sheet. Space them about 2 inches apart. 7. Garnish: Sprinkle coarse sea salt on top of each cluster. This adds a nice contrast of flavor. 8. Set the Clusters: Place the baking sheet in the fridge for 30 minutes. This helps the chocolate set and the clusters harden. 9. Store and Enjoy: Once set, take the clusters off the parchment. Store them in an airtight container at room temperature for about a week. You can also refrigerate them for longer freshness. Serve the clusters in mini cupcake liners for a fun snack. Arrange them on a platter with a sprinkle of extra sea salt for a nice touch. Enjoy making these tasty white chocolate trail mix clusters! They are sure to please everyone. You learned how to make tasty white chocolate trail mix clusters. We covered the ingredients, fun tips, and how to store them. You can swap nuts or chocolates to fit your taste. Remember to let the clusters set to avoid a messy treat. Try festive flavors to make them special. These clusters are a fun snack for any occasion. Enjoy making your own unique version and sharing it with others!

White Chocolate Trail Mix Clusters

Indulge in the deliciousness of White Chocolate Trail Mix Clusters! This easy-to-follow recipe combines mixed nuts, dried cranberries, and pretzel pieces, all coated in creamy white chocolate and rich dark chocolate. Perfect for snacks or parties, these clusters are as delightful to look at as they are to eat. Click through for the full recipe and enjoy making these bite-sized treats that everyone will love!

Ingredients
  

2 cups mixed nuts (almonds, cashews, walnuts)

1 cup dried cranberries

1 cup mini pretzels, broken into smaller pieces

1 cup dark chocolate chips (to enhance the flavor)

2 cups white chocolate chips

1 teaspoon coarse sea salt (for garnish)

Instructions
 

Prepare the Baking Sheet: Begin by lining a large baking sheet with parchment paper, making sure it's ready for the cluster mixture. Set this aside.

    Mix the Dry Ingredients: In a spacious mixing bowl, combine the mixed nuts, dried cranberries, and broken pretzel pieces. Gently toss the mixture with your hands or a spatula to ensure that all ingredients are evenly distributed.

      Melt the White Chocolate: In a microwave-safe bowl, place the white chocolate chips. Melt them in the microwave in 30-second increments, stirring well between each increment, until the white chocolate is completely smooth and free of lumps.

        Combine Ingredients: Once the white chocolate is melted, pour it over the trail mix. Using a spatula, carefully fold the mixture together until all the ingredients are thoroughly coated with the creamy white chocolate.

          Incorporate Dark Chocolate: Gently add the dark chocolate chips to the mix, folding them in just until combined to introduce a rich layer of flavor.

            Form the Clusters: Using a spoon or a scoop, drop generous mounds of the mixture onto the prepared baking sheet. Shape the clusters to be about 2 inches apart to allow for easy separation later.

              Garnish: After shaping all the clusters, lightly sprinkle coarse sea salt over the top of each one for a delightful contrast of flavors that enhances the sweetness.

                Set the Clusters: Place the baking sheet in the refrigerator for about 30 minutes, allowing the chocolate to set completely and the clusters to firm up.

                  Store and Enjoy: Once the clusters have hardened, carefully remove them from the parchment paper. Store the clusters in an airtight container at room temperature for up to a week, or refrigerate if you prefer longer-lasting freshness.

                    Prep Time: 15 minutes | Total Time: 45 minutes | Servings: Approximately 12 clusters

                      - Presentation Tips: For an elegant touch, serve the clusters in mini cupcake liners as a party snack, or arrange them on a decorative platter topped with a sprinkle of additional sea salt. Enjoy!

                        Leave a Comment

                        Recipe Rating