Go Back
When making No-Bake Nutella Cheesecake Cups, gather these simple ingredients. Each item plays a key role in creating that rich and creamy goodness. - 1 cup chocolate cookie crumbs - 4 tablespoons unsalted butter, melted - 1 cup cream cheese, softened at room temperature - 1 cup Nutella - 1/2 cup powdered sugar - 1 teaspoon pure vanilla extract - 1 cup heavy whipping cream - 1/4 cup chocolate shavings or colorful sprinkles for garnish These ingredients come together to form a delightful treat. Chocolate cookie crumbs create a tasty base. The melted butter helps bind the crumbs for a firm crust. Cream cheese gives the filling its smooth texture. Nutella adds a rich, chocolate-hazelnut flavor that is hard to resist. Powdered sugar sweetens the mix, while pure vanilla extract enhances the taste. Heavy whipping cream makes the filling light and fluffy. Finally, chocolate shavings or sprinkles make each cup look special. With just a few steps, you can create a dessert that impresses. First, get a medium-sized bowl. Add 1 cup of chocolate cookie crumbs and 4 tablespoons of melted butter. Mix them well until it looks like damp sand. This step is key for a tasty crust. Now, grab 6 to 8 serving cups. Evenly distribute the mixture into them. Press down firmly to make a solid base. Make sure it sticks well. In a large bowl, take 1 cup of softened cream cheese. Beat it using an electric mixer on medium speed until it is smooth. This should take about 2-3 minutes. Next, add 1 cup of Nutella, 1/2 cup of powdered sugar, and 1 teaspoon of vanilla extract. Mix on low speed until it is creamy and lump-free. Now, let’s make the whipped cream. In a separate bowl, whip 1 cup of heavy cream until soft peaks form. This will take about 3-5 minutes. Once it’s ready, gently fold the whipped cream into the Nutella mixture. Use a spatula for this. Be careful not to deflate the whipped cream. This keeps your filling light and fluffy. Take the Nutella mixture and spoon it into your cups. Smooth the tops with a spatula for a nice finish. Place the cups in the fridge. Let them chill for at least 4 hours. If you can, chill them overnight. This helps the cheesecake set properly. Enjoy the wait, as your tasty treat will be worth it! To get the best texture in your cheesecake cups, fold the whipped cream gently. This keeps the air in the cream. If you mix too hard, it gets dense. You also need to ensure the cream cheese is at room temperature. Cold cream cheese is hard to mix, and it may create lumps. For a beautiful dessert, think about how you plate it. Use clear cups to show off the layers. You can also add fresh fruit or mint on top for color. A raspberry or mint sprig looks nice and adds flavor. Use a hand mixer for the cream cheese and whipped cream. It’s fast and easy. A spatula is great for folding ingredients without losing air. For serving, choose small clear cups or jars. They let everyone see the yummy layers inside. {{image_4}} You can switch up the flavors of your cheesecake cups. A peanut butter variant uses creamy peanut butter instead of Nutella. Blend it with the cream cheese for a nutty twist. You can also add some crushed peanuts for extra crunch. For a white chocolate version, melt white chocolate and mix it with cream cheese. This gives your cups a sweet and creamy finish. If you need gluten-free options, swap chocolate cookie crumbs for gluten-free cookies. You can also use almond flour mixed with butter for the crust. For dairy-free substitutions, try using vegan cream cheese and coconut cream instead of heavy cream. Both options still give you that creamy texture without the dairy. Toppings can really make your cheesecake cups pop. Try adding fresh fruit like strawberries or raspberries on top. Nuts like chopped hazelnuts or almonds also add a nice crunch. If you want a fun look, use colorful sprinkles or chocolate shavings. You can even drizzle some chocolate sauce for that extra touch. To keep your No-Bake Nutella Cheesecake Cups fresh, store them in the fridge. Use airtight containers or cover each cup tightly with plastic wrap. This helps prevent any strange smells from mixing with your dessert. These cheesecake cups stay fresh for about 3 to 5 days in the fridge. Look for signs that they have gone bad, such as a sour smell or watery texture. If you see any mold, throw them away right away. Yes, you can freeze these cheesecake cups! Just make sure to use freezer-safe containers. When you want to enjoy them, take them out and let them thaw in the fridge overnight. Avoid thawing them at room temperature, as this can mess with the texture. Yes, you can use any cookie you like. Graham crackers or Oreos both work well. Just crush them finely and mix with melted butter. Different cookies can change the flavor. Experiment with what you enjoy! You should chill these cups for at least 4 hours. For the best taste and texture, leave them overnight. This helps the cheesecake set up perfectly and enhances the flavors. Absolutely! You can make these cups a day or two ahead. Just store them in the fridge until you’re ready to serve. This makes hosting easy and stress-free. Your guests will love them! If you want a different flavor, try using peanut butter or almond butter. You can also use any chocolate spread. Just make sure it has a similar texture. This will keep your cups creamy and delicious. Yes, you can make a vegan version! Use vegan cream cheese and a plant-based chocolate spread. For the whipped cream, try coconut cream instead. These swaps make it easy to enjoy this treat without dairy. In this blog post, I shared a simple recipe for No-Bake Nutella Cheesecake Cups. You learned about the key ingredients and step-by-step instructions, from preparing the crust to chilling the dessert. To make your cups perfect, folding whipped cream gently is essential. You can also explore tasty variations like peanut butter or gluten-free options. Lastly, proper storage ensures your cheesecake stays fresh. Enjoy making this easy and delicious treat that’s great for any occasion!

No-Bake Nutella Cheesecake Cups

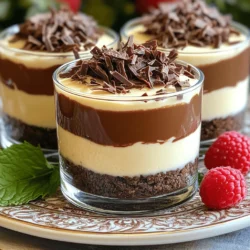
Indulge in the rich flavors of these irresistible no-bake Nutella cheesecake cups! This easy dessert combines a crunchy chocolate crust with a creamy Nutella filling that's perfect for any occasion. With just a few simple ingredients, you can create a stunning treat that your friends and family will love. Click through to explore the full recipe and discover tips to make your presentation truly shine! Enjoy your sweet creation!

Ingredients
  

1 cup chocolate cookie crumbs

4 tablespoons unsalted butter, melted

1 cup cream cheese, softened at room temperature

1 cup Nutella

1/2 cup powdered sugar

1 teaspoon pure vanilla extract

1 cup heavy whipping cream

1/4 cup chocolate shavings or colorful sprinkles for garnish

Instructions
 

In a medium-sized mixing bowl, combine the chocolate cookie crumbs and melted butter. Mix thoroughly until the consistency resembles damp sand.

    Evenly distribute this mixture into 6 to 8 serving cups, pressing down firmly to create a solid crust at the base of each cup.

      In a large mixing bowl, use an electric mixer to beat the softened cream cheese on medium speed until it becomes silky and smooth—this may take about 2-3 minutes.

        Introduce the Nutella, powdered sugar, and vanilla extract into the cream cheese. Mix on low speed until fully incorporated and creamy with no lumps remaining.

          In a separate bowl, whip the heavy cream using an electric mixer until soft peaks form—this should take about 3-5 minutes.

            Gently fold the whipped cream into the Nutella mixture using a spatula, ensuring you maintain the airiness of the whipped cream—this step is crucial for achieving a light texture.

              Carefully spoon or pipe the fluffy Nutella cheesecake filling over the prepared crusts in the cups, smoothing the tops with a spatula for an elegant finish.

                Place the filled cups into the refrigerator. Allow them to chill for at least 4 hours, or ideally overnight, to ensure they set properly.

                  Just before serving, adorn each cup with chocolate shavings or colorful sprinkles to elevate the presentation and add a delightful crunch.

                    Prep Time: 15 minutes | Total Time: 4 hours (plus chilling) | Servings: 6-8 cups

                      - Presentation Tips: Arrange the cheesecake cups on a decorative platter for an eye-catching display. Enhance the aesthetic by adding a fresh raspberry or a sprig of mint on top of each cup for a vibrant contrast against the rich chocolate. Enjoy your delightful creation!