Go Back
To make these salted caramel bars, you need a few basic ingredients. Each one plays a key role in building flavor and texture. Here’s the complete list of ingredients: - 1 ½ cups all-purpose flour - ½ cup unsweetened cocoa powder - 1 cup unsalted butter, softened to room temperature - ¾ cup granulated white sugar - ½ cup packed brown sugar - 1 teaspoon pure vanilla extract - 1 cup sweetened condensed milk - 1 cup caramel sauce (store-bought or homemade) - ½ teaspoon flaky sea salt - ½ teaspoon baking soda - 1 cup chocolate chips (your choice of milk or dark) Each ingredient adds something special to the bars. The flour gives structure. Cocoa powder adds a rich chocolate flavor. Butter keeps everything moist and tasty. The sugars blend to create sweetness. Vanilla adds warmth. Sweetened condensed milk brings creaminess, while caramel sauce gives that delightful touch of sweetness and gooeyness. Finally, chocolate chips and flaky salt enhance the overall taste. When you gather these ingredients, you set yourself up for a treat that’s hard to resist. Ready to dive into the full recipe? Let's get started! First, preheat your oven to 350°F (175°C). While the oven heats, prepare a 9x9 inch baking dish. You can grease it lightly or line it with parchment paper. This helps when you take the bars out later. In a medium mixing bowl, combine the following dry ingredients: - 1 ½ cups all-purpose flour - ½ cup unsweetened cocoa powder - ½ teaspoon baking soda Whisk these together until well mixed. This step adds a nice texture to your bars. In a large bowl, use an electric mixer to beat: - 1 cup unsalted butter, softened - ¾ cup granulated white sugar - ½ cup packed brown sugar Mix until light and fluffy. This should take about 2-3 minutes. Then, add 1 teaspoon of pure vanilla extract and blend it in well. Take half of the dough you just mixed and press it evenly into the bottom of your prepared baking dish. This forms the tasty crust for your bars. In another bowl, mix together: - 1 cup sweetened condensed milk - 1 cup caramel sauce Stir until smooth. This will create a rich, gooey layer in your bars. Pour the caramel mixture over the cookie base in the baking dish. Use a spatula to spread it evenly. Next, drop spoonfuls of the remaining cookie dough over the caramel. Let some caramel show for a rustic look. Finally, sprinkle 1 cup of chocolate chips and ½ teaspoon of flaky sea salt on top. Bake everything in the preheated oven for 25-30 minutes. Look for golden edges and a soft center. When done, remove the dish from the oven. Let it cool completely before cutting into squares. Enjoy these delicious salted caramel bars! For the full recipe, check out the complete guide. To achieve a chewy and soft center, focus on your baking time. Bake the bars just until the edges turn golden. The center may look a bit soft, but it will set as it cools. This balance is key. Be sure to press the cookie base evenly for best results. A smooth crust helps hold the caramel layer well. Mix the ingredients just enough to combine them. If you overmix, the bars can turn tough. This will ruin the soft texture you want. Use a gentle hand when folding in the dry ingredients. A few flour streaks are okay. The goal is a tender, melt-in-your-mouth treat. Let the bars cool completely in the pan. This can take about 30 minutes. If you cut them too soon, they might fall apart. Once cool, use a sharp knife for clean cuts. Wipe the knife between cuts for neat edges. This makes each piece look great and keeps the layers intact. For a fancy touch, you can sprinkle more flaky sea salt on top before serving. {{image_4}} You can switch things up with dark chocolate chips instead of milk chocolate. Dark chocolate adds a rich taste that balances the sweet caramel. If you want a healthier option, try using alternative sweeteners like coconut sugar or agave syrup. These swaps can change the flavor and texture slightly but keep your bars delicious. Feel free to play with add-ins! Chopped nuts, like walnuts or pecans, bring a nice crunch. You can also sprinkle in spices like cinnamon or sea salt for extra flavor. Want a fruity twist? Dried cranberries or cherries can add a lovely tartness. The choice is yours! If you need gluten-free bars, simply use gluten-free flour. Brands like almond flour or oat flour work well. These flours give a different texture but stay true to the flavor. Make sure to check the packaging for other gluten-free ingredients. You can still enjoy these sweet treats without worry! To keep your salted caramel bars fresh, store them in an airtight container. This helps prevent them from drying out. If you keep them at room temperature, make sure they are away from direct sunlight and heat. I often use parchment paper to layer between bars so they don’t stick together. This keeps them neat and easy to grab. If you want to save some for later, freezing is a great option. First, let the bars cool completely. Then, cut them into squares. Wrap each square tightly in plastic wrap. Place the wrapped bars in a freezer-safe bag or container. They will stay fresh for up to three months. When you’re ready to enjoy them, thaw the bars in the fridge overnight. You can also let them sit at room temperature for a few hours. When stored properly, these bars last about a week at room temperature. If you keep them in the fridge, they can last a bit longer. The cool air helps keep them fresh and tasty. You might notice the flavors get even better after a day! For the best taste, enjoy them within a week. For more details, check the Full Recipe. To make homemade caramel sauce, you need just a few simple ingredients. Here’s a quick recipe: - 1 cup granulated sugar - 6 tablespoons unsalted butter - ½ cup heavy cream - 1 teaspoon vanilla extract - A pinch of salt 1. In a medium saucepan, heat the sugar over medium heat. Stir it gently until it melts and turns golden brown. 2. Add the butter and mix until it melts completely. 3. Slowly pour in the heavy cream while stirring. It will bubble up, so be careful! 4. Remove from heat and stir in the vanilla and salt. 5. Let it cool before using it in your salted caramel bars. Yes, you can use store-bought caramel for your bars. Pros: - Saves time. - Consistent flavor and texture. Cons: - May have added preservatives. - Less control over sweetness. If you want a quick treat, store-bought works great. But homemade caramel adds a special touch to your bars. If you have allergies, there are good swaps you can make in this recipe. - Gluten: Use gluten-free flour instead of all-purpose flour. - Dairy: Replace butter with coconut oil and use almond milk for the condensed milk. - Nuts: Check labels on chocolate chips for nut-free options. These changes help everyone enjoy these salted caramel bars without worry. Explore these options to create a treat that fits your needs! In summary, we covered how to make delicious cookie bars using simple ingredients. From mixing the dry ingredients to assembling and baking, each step is crucial. I shared tips for perfecting texture and offered variations for different tastes. Store your bars well to enjoy them longer, and use the FAQ section for any questions. You have all the tools to create a sweet treat. Enjoy the process and the tasty results!

- Salted Caramel Bars

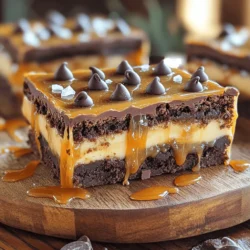
Dive into the sweet indulgence of Salted Caramel Dream Bars! These rich, chewy treats combine layers of chocolate cookie, silky caramel, and a sprinkle of flaky sea salt for the perfect dessert experience. With simple ingredients and easy steps, you'll create a mouthwatering delight that's perfect for sharing. Click through to explore the full recipe and learn how to make these irresistible bars that everyone will love!

Ingredients
  

1 ½ cups all-purpose flour

½ cup unsweetened cocoa powder

1 cup unsalted butter, softened to room temperature

¾ cup granulated white sugar

½ cup packed brown sugar

1 teaspoon pure vanilla extract

1 cup sweetened condensed milk

1 cup caramel sauce (store-bought or homemade)

½ teaspoon flaky sea salt

½ teaspoon baking soda

1 cup chocolate chips (your choice of milk or dark)

Instructions
 

Preheat your oven to 350°F (175°C). Prepare a 9x9 inch baking dish by greasing it lightly or lining it with parchment paper for effortless removal of the bars.

    In a medium mixing bowl, whisk together the all-purpose flour, unsweetened cocoa powder, and baking soda. Set the mixture aside for later use.

      In a large bowl, use an electric mixer to beat the softened butter with both the granulated white sugar and brown sugar until the mixture is light and fluffy, approximately 2-3 minutes.

        Add the pure vanilla extract to the butter mixture, blending well to incorporate.

          Gradually fold the dry ingredients into the wet mixture, stirring until just combined—do not overmix.

            Take half of the cookie dough mixture and press it evenly into the bottom of your prepared baking dish to form the crust layer.

              In a separate bowl, combine the sweetened condensed milk and caramel sauce, stirring until smooth and well-mixed.

                Carefully pour the caramel mixture over the pressed cookie layer in the baking dish, using a spatula to spread it out evenly.

                  Drop spoonfuls of the remaining cookie dough over the caramel layer, allowing some caramel to peek through for a rustic look.

                    Evenly sprinkle the chocolate chips and flaky sea salt on top of the cookie dough layer for an added flavor punch.

                      Bake in the preheated oven for 25-30 minutes, or until the edges are golden brown and the center has set but remains soft and chewy.

                        Once baked, remove from the oven and allow the bars to cool completely in the baking dish before cutting into squares for serving.

                          Prep Time: 15 minutes | Total Time: 1 hour | Servings: Approximately 16 bars

                            Presentation Tips: Arrange these delectable bars on a decorative platter. For an elegant finish, sprinkle additional flaky sea salt on top and drizzle a bit of extra caramel sauce over the finished bars before serving. Enjoy the visual appeal as much as the mouthwatering taste!