Are you ready to make the sweetest treat that you won't be able to resist? This Peanut Butter Chocolate Swirl Fudge is a simple yet delicious delight for anyone who loves the classic combo of chocolate and peanut butter. In this post, I'll walk you through every step, share helpful tips, and give you creative ideas for variations. Let’s dive into this yummy world of fudge-making together!
Why I Love This Recipe
- Decadent Flavor: This fudge combines rich chocolate and creamy peanut butter for an irresistible treat.
- Quick and Easy: With only 15 minutes of prep time, it’s a simple recipe that anyone can master.
- Customizable: Add your favorite nuts or even a sprinkle of sea salt to make it uniquely yours.
- Perfect for Sharing: Cut into squares, it’s an ideal dessert for parties, gatherings, or just to share with friends.
Ingredients
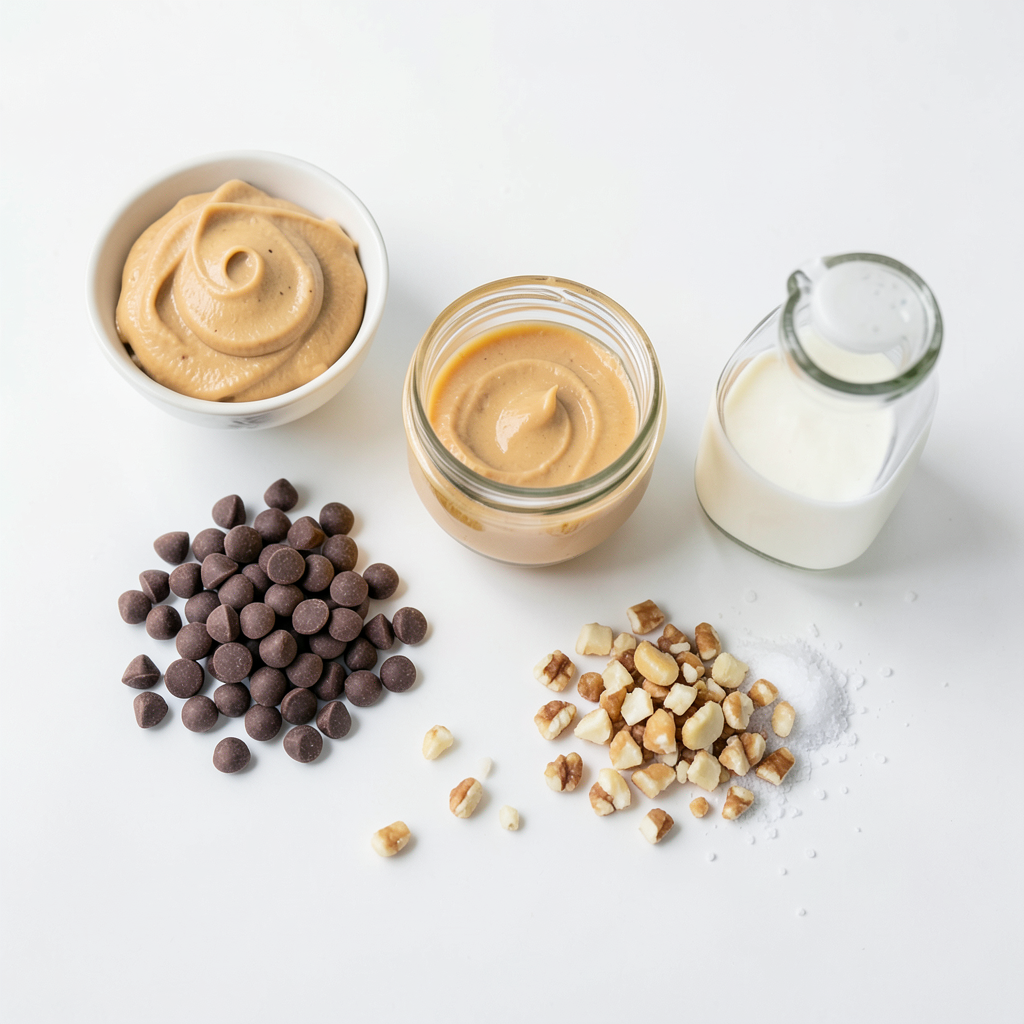
To make Peanut Butter Chocolate Swirl Fudge, you need a few simple ingredients. Each one plays a key role in creating that rich, creamy texture. Here’s what you'll need:
- 1 cup semi-sweet chocolate chips
- 1 cup creamy peanut butter
- 1 cup sweetened condensed milk
- 1 teaspoon vanilla extract
- 1/2 cup chopped nuts (optional)
- Pinch of salt
This fudge gets its sweetness from the sweetened condensed milk. The chocolate chips give it a rich chocolate flavor. Creamy peanut butter adds a smooth, nutty taste. The vanilla extract brings all the flavors together, while a pinch of salt balances the sweetness. If you want a bit of crunch, you can add chopped nuts.
Gather these items before you start. Having everything ready makes the process smooth and fun. Enjoy the delicious results!
Step-by-Step Instructions
Preparation of Baking Dish
To start, grab an 8x8-inch square baking pan. Line it with parchment paper. Make sure the paper hangs over the edges. This helps when you take the fudge out later. It will be easy to lift the fudge out when it's ready.
Melting Chocolate Mixture
Next, take a medium saucepan. Add 1 cup of semi-sweet chocolate chips. Pour in 1/2 cup of sweetened condensed milk. Set the pan over low heat. Stir this mix constantly. Keep stirring until the chocolate melts and looks smooth. Once melted, remove the saucepan from heat.
Preparing the Peanut Butter Mixture
In a separate saucepan, add 1 cup of creamy peanut butter. Add the remaining 1/2 cup of sweetened condensed milk. Pour in 1 teaspoon of vanilla extract and a pinch of salt. Heat this mix on low, stirring until it is smooth. This takes just a few minutes.
Swirling Technique
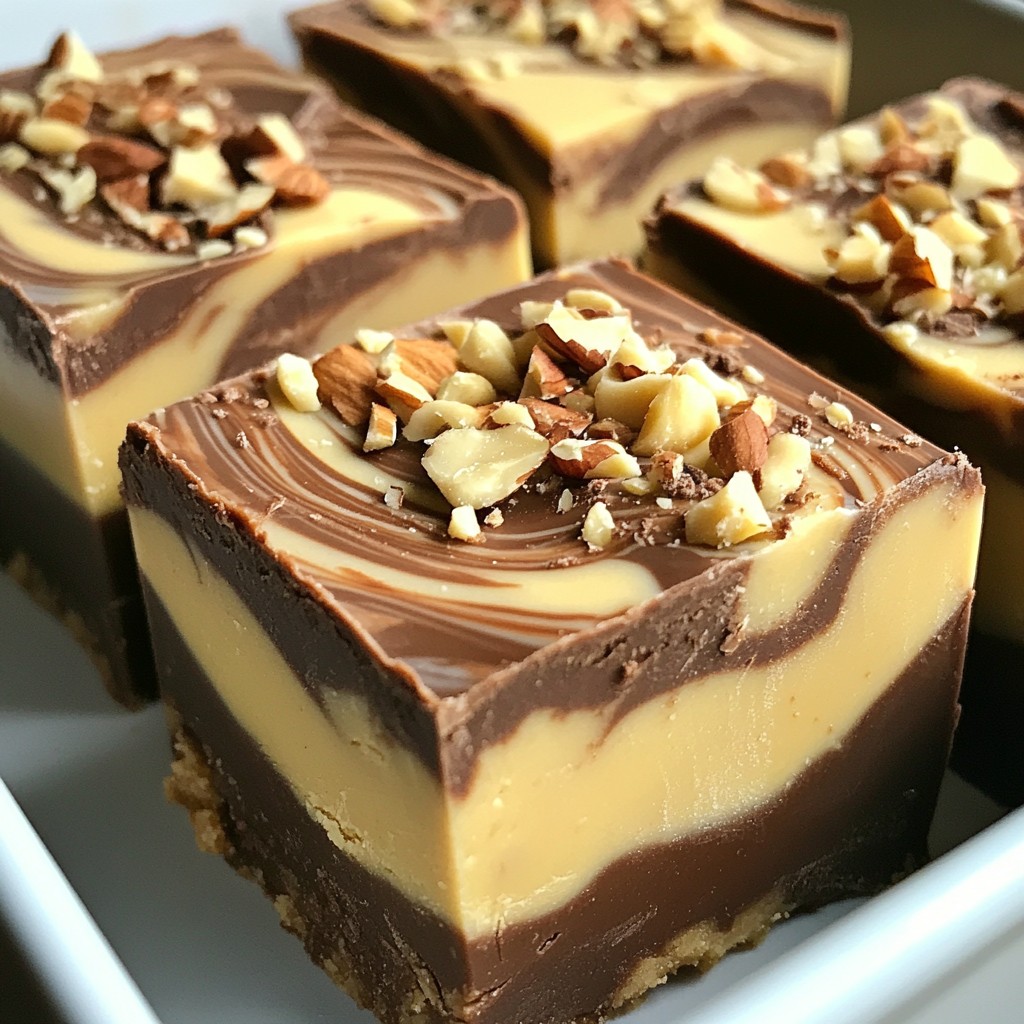
Carefully pour the peanut butter mixture into your lined baking dish. Spread it evenly across the bottom. Now, drop small dollops of the melted chocolate mixture on top. Take a toothpick or a knife. Gently swirl the chocolate into the peanut butter. This creates a lovely marbled look. Don’t over-mix; you want to see both layers.
Cooling and Cutting the Fudge
Now, it’s time to chill the fudge. Place the baking dish in the fridge for at least 2 hours. This makes the fudge firm. Once set, lift the fudge out using the parchment paper. Use a sharp knife to cut it into squares. This gives you clean edges.
Tips & Tricks
Key Tips for Success
Making fudge can be simple, but some mistakes can happen. Here are key tips to avoid them:
- Measure ingredients well. Accurate measurements make a big difference in texture.
- Use low heat. Too much heat can burn the chocolate. Keep it gentle.
- Stir often. Stirring helps mix the ingredients smoothly and evenly.
- Don’t over-mix. When swirling, stop before the layers blend too much.
- Cool properly. Ensure the fudge cools completely for the best texture.
Presentation Tips
Making your fudge look great adds to the fun! Here are neat ideas to serve it:
- Use a decorative plate. A nice plate can make simple fudge look fancy.
- Add a sprinkle. Top with extra chopped nuts for color and crunch.
- Cut neatly. Use a sharp knife to cut into squares for clean edges.
- Layer it up. Stack fudge squares on a wooden board for a fun display.
Ingredient Substitutions
Running low on an ingredient? Here are some easy swaps:
- Chocolate chips: Use dark or white chocolate for different flavors.
- Peanut butter: Almond or cashew butter works well too.
- Sweetened condensed milk: You can mix milk with sugar as a quick fix.
- Nuts: Omit them or try seeds for a nut-free version.
- Vanilla extract: Swap with almond extract for a new twist.
Pro Tips
- Use Room Temperature Ingredients: Make sure your peanut butter and condensed milk are at room temperature for easier mixing and a smoother fudge texture.
- Chill the Fudge Properly: Allow the fudge to chill for at least 2 hours to ensure it sets properly. This helps in achieving the right consistency for cutting.
- Experiment with Flavors: Feel free to add a pinch of cinnamon or sea salt on top for an extra flavor kick that complements the peanut butter and chocolate.
- Storage Tips: Store the fudge in an airtight container in the refrigerator for up to two weeks to maintain its freshness and texture.
Variations
Nutty Variations
You can add different nuts to the fudge for a fun crunch. Try chopped walnuts, pecans, or almonds. Each nut brings a unique taste. You can even mix nuts for more flavor. Just sprinkle them on top after swirling. They add texture and a nutty twist to the creamy fudge.
Flavor Variations
Want to change up the taste? You can add infused flavors like espresso or sea salt. A teaspoon of espresso powder enhances the chocolate flavor. If you like salt, sprinkle a pinch of sea salt on top. This contrast brings out the sweetness. You can experiment with other flavors too, like mint or orange zest.
Dietary Adjustments
Making this fudge vegan or gluten-free is easy. For a vegan option, swap the sweetened condensed milk for coconut cream. You can also use dairy-free chocolate chips. For gluten-free fudge, just ensure your chocolate chips are gluten-free. These swaps keep the fudge tasty while meeting dietary needs.
Storage Info
Best Storage Practices
To keep your peanut butter chocolate swirl fudge fresh, store it in an airtight container. Line the container with parchment paper for easy removal. This helps prevent the fudge from sticking and losing its shape.
- Layering: If you stack pieces, add parchment paper between layers. This keeps them from sticking together.
- Avoid heat: Store it in a cool, dry place away from sunlight.
Refrigeration vs. Freezing
You can refrigerate or freeze your fudge for longer storage.
- Refrigeration: Fudge lasts up to two weeks in the fridge. Just place it in an airtight container. The cool air helps keep it firm and fresh.
- Freezing: For longer storage, freeze the fudge. Wrap it tightly in plastic wrap and then in foil. It can last up to three months in the freezer. When ready to eat, thaw it in the fridge overnight.
Shelf Life
The shelf life of your fudge depends on how you store it.
- Room temperature: If stored properly, the fudge stays fresh for about a week.
- Refrigeration: It lasts up to two weeks in the fridge.
- Freezing: When frozen, it can remain good for three months.
By following these storage tips, you can enjoy your fudge for weeks to come!
FAQs
How long does it take for fudge to set?
Fudge usually takes about 2 hours to set in the fridge. This time can vary based on your fridge's temperature. Make sure the fudge feels firm to the touch before cutting. If you're in a rush, you can leave it for longer to ensure it sets well.
Can I use natural peanut butter?
Yes, you can use natural peanut butter. It may change the texture a bit. Natural peanut butter is often runnier than creamy peanut butter. If your fudge is too soft, try adding a little more chocolate or a bit of powdered sugar to help it firm up.
What to do if the fudge is too soft?
If your fudge ends up too soft, don't worry! You can melt it again and add more chocolate chips. Stir in a bit more peanut butter or powdered sugar too. Then, re-spread it in the baking dish and chill it again. This should help it firm up nicely!
Can I make this fudge in advance?
Absolutely! You can make this fudge a few days ahead of time. Just store it in an airtight container in the fridge. If you want to keep it longer, consider freezing it. Just wrap it well to protect it from freezer burn.
This blog post covered all aspects of making delicious fudge. We discussed ingredients, step-by-step instructions, and storage tips. You learned how to prevent common mistakes and try fun variations. Remember, your fudge can be simple or creative based on your choices. Enjoy making this treat for yourself or to share with friends! By following these tips, you can create the perfect fudge every time. Happy baking!


